

`
D
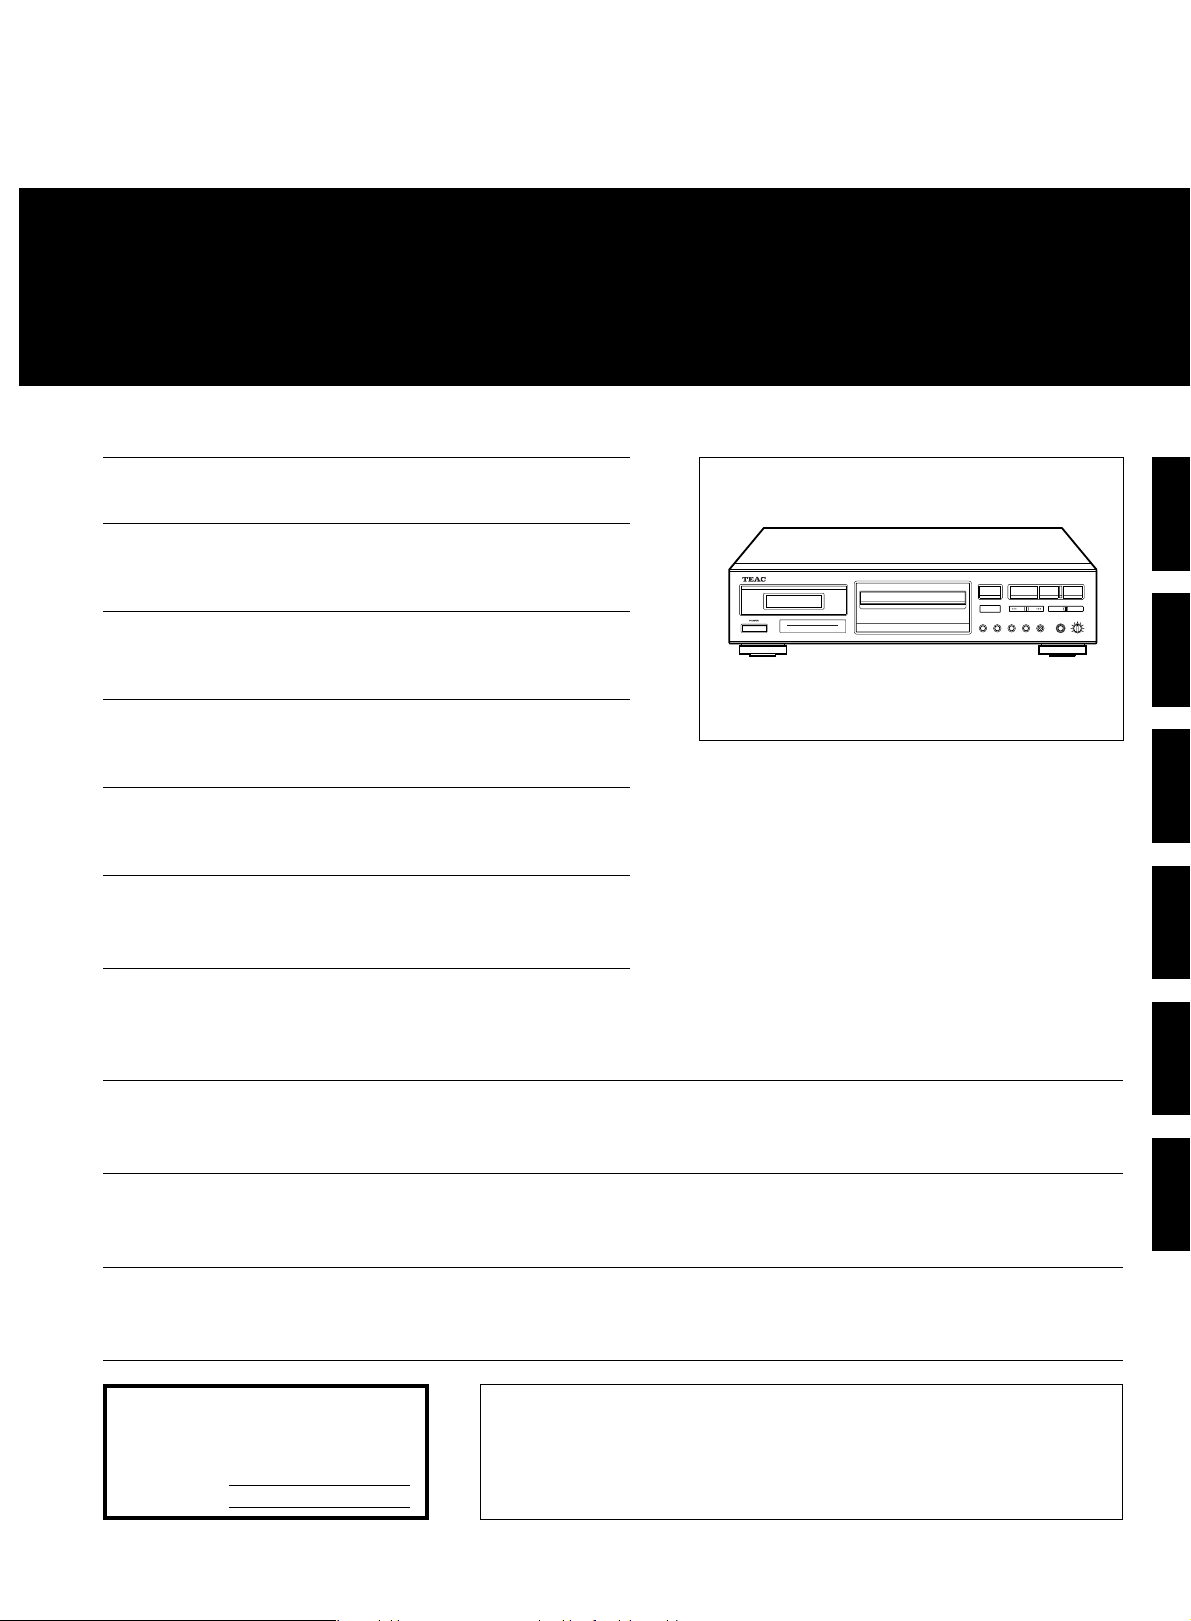
cd-p1120
Thanks for buying a TEAC. Read this manual carefully to get the best performance from this unit.
Nous vous remercions pour l’achat d’un appareil TEAC.
Lire ce manuel avec attention pour obtenir les meilleures performances
possibles de cet appareil.
Vielen Dank für den Kauf dieses TEAC-Geräts.
Bitte lesen Sie diese Anleitung sorgfältig durch, um die Leistungsfähigkeit dieses Geräts optimal nutzen zu können.
9A06831300
Compact Disc Player
Grazie per aver acquistato un prodotto TEAC.
Leggere attentamente questo manuale per ottenere le migliori prestazioni
da questo apparecchio.
Enhorabuena por la adquisición de un TEAC.
Lea detenidamente este manual a fin de obtener el mejor rendimiento de
esta unidad.
Dank u voor de aanschaf van een TEAC.
Lees deze gebruiksaanwijzing aandachtig door teneinde de beste prestaties van dit toestel te verkrijgen.
CAUTION: TO REDUCE THE RISK OF ELECTRIC SHOCK, DO NOT
REMOVE COVER (OR BACK). NO USER-SERVICEABLE PARTS INSIDE.
Ü
The lightning flash with arrowhead symbol, within an equilateral triangle, is intended to alert
the user to the presence of uninsulated “dangerous voltage” within the product’s enclosure
ÿ
Ÿ
that may be of sufficient magnitude to constitute a risk of electric shock to persons.
The exclamation point within an equilateral triangle is intended to alert the user to the presence of important operating and maintenance (servicing) instructions in the literature
accompanying the appliance.
REFER SERVICING TO QUALIFIED SERVICE PERSONNEL.
OWNER’S MANUAL......................... 4
MANUEL DU PROPRIETAIRE...........12
BEDIENUNGSANLEITUNG................20
MANUALE DI ISTRUZIONI ...............28
MANUAL DEL USUARIO ..................36
GEBRUIKSAANWIJZING ..................44
DEUTSCH FRANÇAIS ENGLISH
ITALIANO
NEDERLANDS ESPAÑOL
This appliance has a serial number located
on the rear panel. Please record the model
number and serial number and retain them
for your records.
Model number
Serial number
WARNING: TO PREVENT FIRE OR SHOCK
HAZARD, DO NOT EXPOSE THIS
APPLIANCE TO RAIN OR MOISTURE.
– 2 –
IMPORTANT SAFETY INSTRUCTIONS
CAUTION:
•
Read all of these Instructions.
•
Save these Instructions for later use.
•
Follow all Warnings and Instructions marked on the audio
equipment.
1) Read Instructions — All the safety and operating instructions
should be read before the product is operated.
2) Retain Instructions — The safety and operating instructions
should be retained for future reference.
3) Heed Warnings — All warnings on the product and in the operating instructions should be adhered to.
4) Follow Instructions — All operating and use instructions should
be followed.
5) Cleaning — Unplug this product from the wall outlet before
cleaning. Do not use liquid cleaners or aerosol cleaners. Use a damp
cloth for cleaning.
6) Attachments — Do not use attachments not recommended by
the product manufacturer as they may cause hazards.
7) Water and Moisture — Do not use this product near water _for
example, near a bath tub, wash bowl, kitchen sink, or laundry tub; in
a wet basement; or near a swimming pool; and the like.
8) Accessories — Do not place this product on an unstable cart,
stand, tripod, bracket, or table. The product may fall, causing serious
injury to a child or adult, and serious damage to the product. Use
only with a cart, stand, tripod, bracket, or table recommended by the
manufacturer, or sold with the product. Any mounting of the product
should follow the manufacturer’s instructions, and should use a
mounting accessory recommended by the manufacturer.
9) A product and cart combination should be moved with care. Quick
stops, excessive force, and uneven surfaces may cause the product
and cart combination to overturn.
"Note to CATV system installer:
This reminder is provided to call the CATV system installer’s attention to Section 820-40 of the NEC which provides guidelines for
proper grounding and, in particular, specifies that the cable ground
shall be connected to the grounding system of the building, as close
to the point of cable entry as practical."
15) Lightning — For added protection for this product during a lightning storm, or when it is left unattended and unused for long periods
of time, unplug it from the wall outlet and disconnect the antenna or
cable system. This will prevent damage to the product due to lightning and power-line surges.
16) Power Lines — An outside antenna system should not be located in the vicinity of overhead power lines or other electric light or
power circuits, or where it can fall into such power lines or circuits.
When installing an outside antenna system, extreme care should be
taken to keep from touching such power lines or circuits as contact
with them might be fatal.
17) Overloading — Do not overload wall outlets, extension cords, or
integral convenience receptacles as this can result in risk of fire or
electric shock.
18) Object and Liquid Entry — Never push objects of any kind into
this product through openings as they may touch dangerous voltage
points or short-out parts that could result in a fire or electric shock.
Never spill liquid of any kind on the product.
19) Servicing — Do not attempt to service this product yourself as
opening or removing covers may expose you to dangerous voltage
or other hazards. Refer all servicing to qualified service personnel.
20) Damage Requiring Service — Unplug this product from the
wall outlet and refer servicing to qualified service personnel under
the following conditions:
a) when the power-supply cord or plug is damaged.
b) if liquid has been spilled, or objects have fallen into the product.
c) if the product has been exposed to rain or water.
d) if the product does not operate normally by following the operat-
ing instructions. Adjust only those controls that are covered by the
operating instructions as an improper adjustment of other controls
may result in damage and will often require extensive work by a qualified technician to restore the product to its normal operation.
e) if the product has been dropped or damaged in any way.
f ) when the product exhibits a distinct change in performance _ this
indicates a need for service.
21) Replacement Parts — When replacement parts are required,
be sure the service technician has used replacement parts specified
by the manufacturer or have the same characteristics as the original
part. Unauthorized substitutions may result in fire, electric shock, or
other hazards.
22) Safety Check — Upon completion of any service or repairs to
this product, ask the service technician to perform safety checks to
determine that the product is in proper operating condition.
23) Wall or Ceiling Mounting — The product should be mounted to
a wall or ceiling only as recommended by the manufacturer.
24) Heat — The product should be situated away from heat sources
such as radiators, heat registers, stoves, or other products (including amplifiers) that produce heat.
10) Ventilation — Slots and openings in the cabinet are provided for
ventilation and to ensure reliable operation of the product and to protect it from overheating, and these openings must not be blocked or
covered. The openings should never be blocked by placing the product on a bed, sofa, rug, or other similar surface. This product should
not be placed in a built-in installation such as a bookcase or rack
unless proper ventilation is provided or the manufacturer’s instructions have been adhered to.
11) Power Sources — This product should be operated only from
the type of power source indicated on the marking label. If you are
not sure of the type of power supply to your home, consult your product dealer or local power company. For products intended to operate
from battery power, or other sources, refer to the operating instructions.
12) Grounding or Polarization — This product may be equipped
with a polarized alternating-current line plug (a plug having one
blade wider than the other). This plug will fit into the power outlet
only one way. This is a safety feature. If you are unable to insert the
plug fully into the outlet, try reversing the plug. If the plug should still
fail to fit, contact your electrician to replace your obsolete outlet. Do
not defeat the safety purpose of the polarized plug.
13) Power-Cord Protection — Power-supply cords should be routed so that they are not likely to be walked on or pinched by items
placed upon or against them, paying particular attention to cords at
plugs, convenience receptacles, and the point where they exit from
the product.
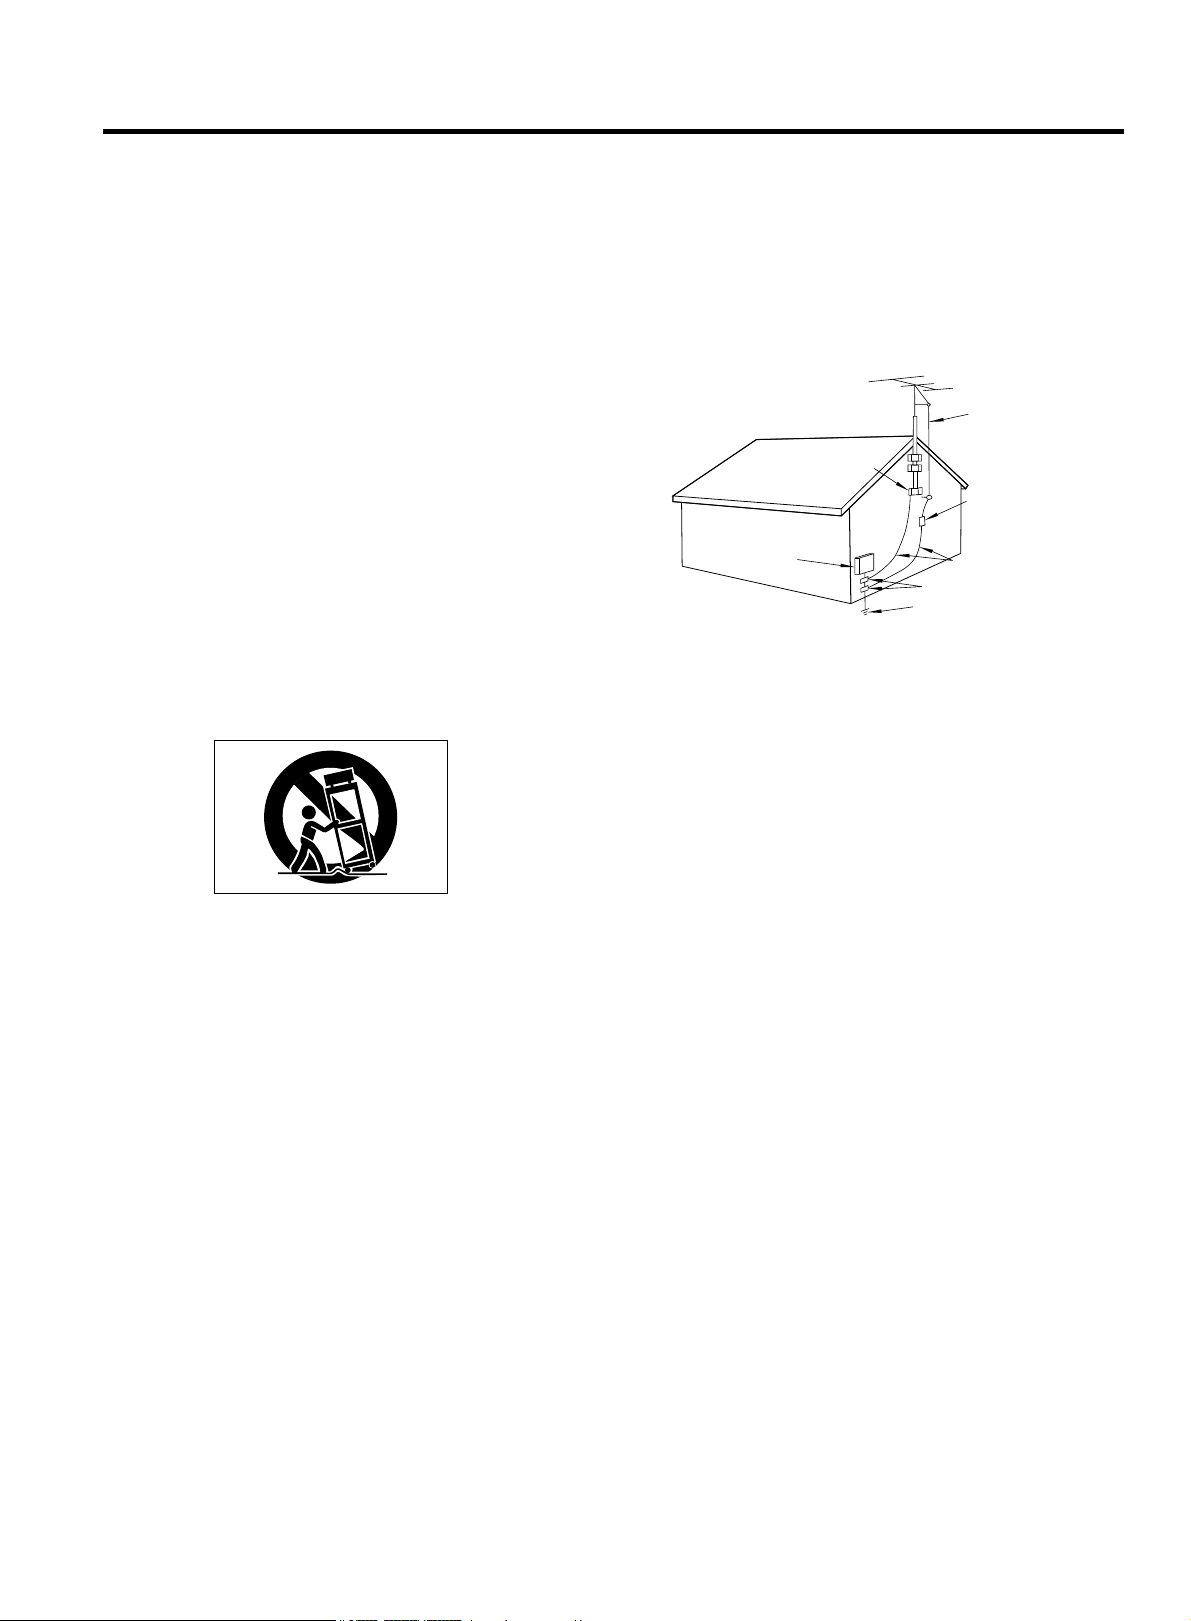
14) Outdoor Antenna Grounding — If an outside antenna or
cable system is connected to the product, be sure the antenna or
cable system is grounded so as to provide some protection against
voltage surges and built-up static charges. Article 810 of the
National Electrical Code, ANSI/NFPA 70, provides information with
regard to proper grounding of the mast and supporting structure,
grounding of the lead-in wire to an antenna discharge unit, size of
grounding conductors, location of antenna-discharge unit,
connection to grounding electrodes, and requirements for the
grounding electrode.
Example of Antenna Grounding as per
National Electrical Code, ANSI/NFPA 70
ANTENNA
LEAD IN
WIRE
GROUND
CLAMP
ANTENNA
DISCHARGE UNIT
(NEC SECTION 810-20)
ELECTRIC
SERVICE
EQUIPMENT
NEC - NATIONAL ELECTRICAL CODE
GROUNDING CONDUCTORS
(NEC SECTION 810-21)
GROUND CLAMPS
POWER SERVICE GROUNDING
ELECTRODE SYSTEM
(NEC ART 250. PART H)
SAFETY INFORMATION
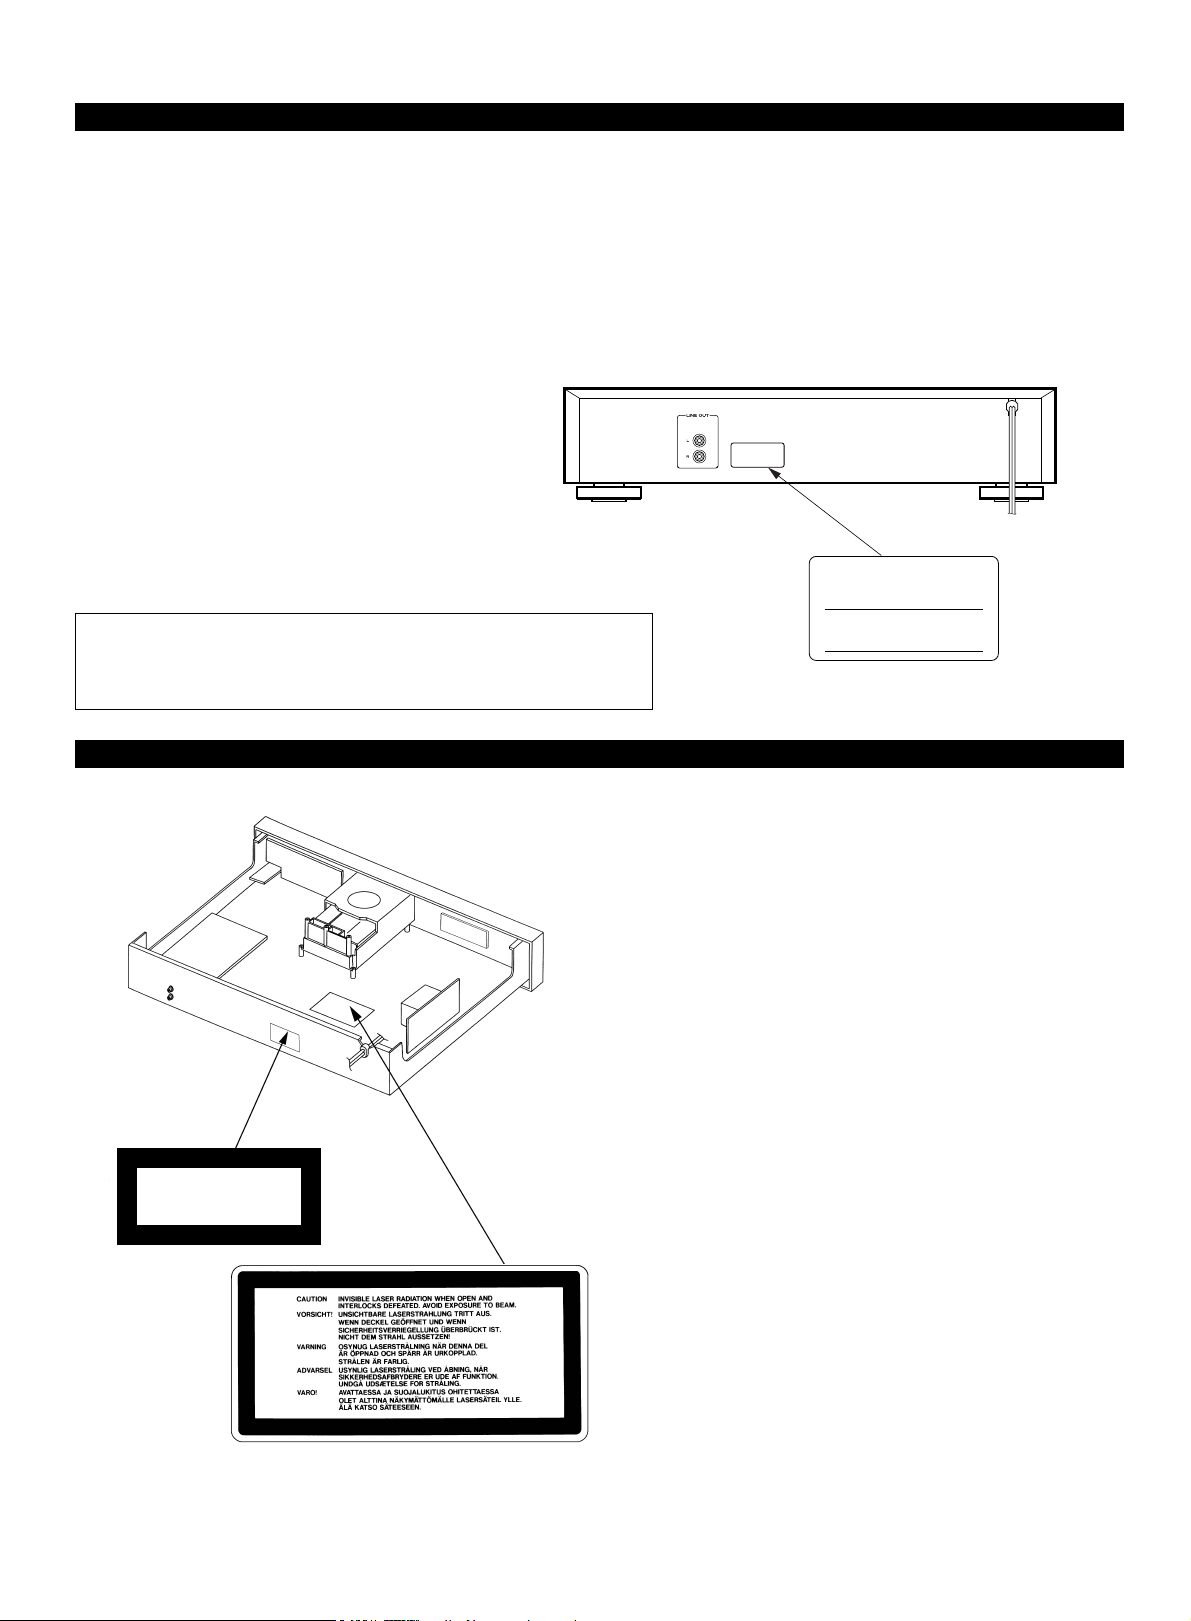
This product has been designed and manufactured according to FDA regulations "title 21, CFR, chapter 1, subchapter J, based on the Radiation
Control for Health and Safety Act of 1968", and is classified as a class 1 laser product. There is no hazardous invisible laser radiation during operation because invisible laser radiation emitted inside of this product is completely confined in the protective housings.
The label required in this regulation is shown 1.
OCAUTION
- DO NOT REMOVE THE PROTECTIVE HOUSING USING A SCREWDRIVER.
- USE OF CONTROLS OR ADJUSTMENTS OR PERFORMANCE OF PROCEDURES OTHER THAN THOSE SPECIFIED HEREIN MAY RESULT IN HAZARDOUS RADIATION EXPOSURE.
- IF THIS PRODUCT DEVELOPS TROUBLE, CONTACT YOUR NEAREST QUALIFIED SERVICE PERSONNEL, AND DO NOT USE THE PRODUCT IN ITS
DAMAGED STATE.
Optical pickup: Type : SF-P101
Manufacturer : SANYO Electric CO., Ltd.
Laser output : Less than 0.7 mW on the objective lens
Wavelength : 765_815nm
CLASS 1 LASER PRODUCT
LUOKAN 1 LASERLAITE
KLASS 1 LASERAPPARAT
1
THIS PRODUCT COMPLIES WITH DHHS
RULES 21 CFR SUBCHAPTER J APPLICABLE AT DATE OF MANUFACTURE
TEAC CORPORATION
3-7-3 NAKA-CHO, MUSASHINO-SHI, TOKYO, JAPAN
MANUFACTURED TIF
OCAUTION OACHTUNG OOBSERVERA OADVARSEL
1 THIS LABEL IS ATTACHED TO THE PLACE AS ILLUSTRATED TO
INFORM THAT THE APPARATUS CONTAINS A LASER COMPONENT.
1 DIESE AUFKLEBEMARKE IST AN DEM IN DER ABBILDUNG
GEZEIGTEN ORT ANGEBRACHTUM DARAUF HINZUWEISEN, DASS
IM INNERN DES GERÄTS EINE LASER-KOMPONENTE BEFINDET.
1 PÅSKRIFTEN SITTER PÅ APPARATEN SOM VISAS SOM UPPMAN-
ING OM ATT APPARATEN OMFATTAR EN INBYGGD LASERKOMPONENT.
1 DETTE MÆRKAT ER ANBRAGT SOM VIST I ILLUSTRATIONEN FOR
AT ADVARE BRUGEREN OM AT APPARATET INDEHOLDER EN
LASERKOMPONENT.
2 DETTE MÆRKAT ER SOM VIST PÅ ILLUSTRATIONEN ANBRAGT PÅ
INDERSIDEN AF TOPDÆKSLET FOR AT ADVARE BRUGEREN OM AT
YDERLIGERE FREMTRÆNGEN VIL VÆRE FORBUNDET MED FARE
FOR AT UDSÆTTE SIG FOR LASERSTRÅLING.
ADVARSEL — BETJENING AF ANDRE KONTROLLER OG REGULATORER ELLER BENYTTELES AF ANDRE FREMGANGSMÅDER END
BESKREVET HERI ER FORBUNDET MED FARE FOR UDSÆTTELSE
FOR LASERSTRÅLING.
CERTIFICATION
For U.S.A.
– 3 –
VARING: APPARATEN INNEHÅLLER LASER LOMPONENT MED
STRÅLNING ÖVERSTIGANDE KLASS 1.
"ADVARSEL: USYNLIG LASERSTRÅLING VED ÅBNING NAR
SIKKERHEDSAFBRYDERE ER UDE AF FUNKTION. UNDGÅ
UDSAETTELSE FOR STRÅLING"
"VAROITUS! SUOJAKOTELOA EI SAA AVATA. LAITE SISÄLTÄÄ
LASERDIODIN. JOKA LÄHETTÄ (NÄKYMÄTÖNTÄ) SILMILLE
VAARALLISTA LASERSÄTEILYÄ".
ADVARSEL: USYNLIG LASERBESTRÅLING NÅR DENNE
DELEN ER ÅPEN OG SIKKERHETSSPERREN ER UTKOBLET
UNNGÅ UTSETTELSE FOR STRÅLING.
– 4 –
O Choose the installation location of your
unit carefully. Avoid placing it in direct
sunlight or close to a source of heat.
Also avoid locations subject to vibrations and excessive dust, heat, cold or
moisture. Keep away from such sources
that hum, such as transformers or
motors.
O Do not open the cabinet as this might
result in damage to the circuitry or electrical shock. If a foreign object should
get into the set, contact your dealer.
O Be sure not to handle discs with dirty
fingers. Never insert a disc which has a
crack on the surface.
O When removing the power plug from the
wall outlet, always pull directly on the
plug, never yank the cord.
O To keep the laser-pickup clean, do not
touch it, and do not forget to close the
disc tray.
O Do not attempt to clean the unit with
chemical solvents as this might damage
the finish. Use a clean, dry cloth.
O Keep this manual in a safe place for
future reference.
This unit has been designed specifically for
reproduction of compact discs bearing the
"
D
" mark. No other discs can be repro-
duced.
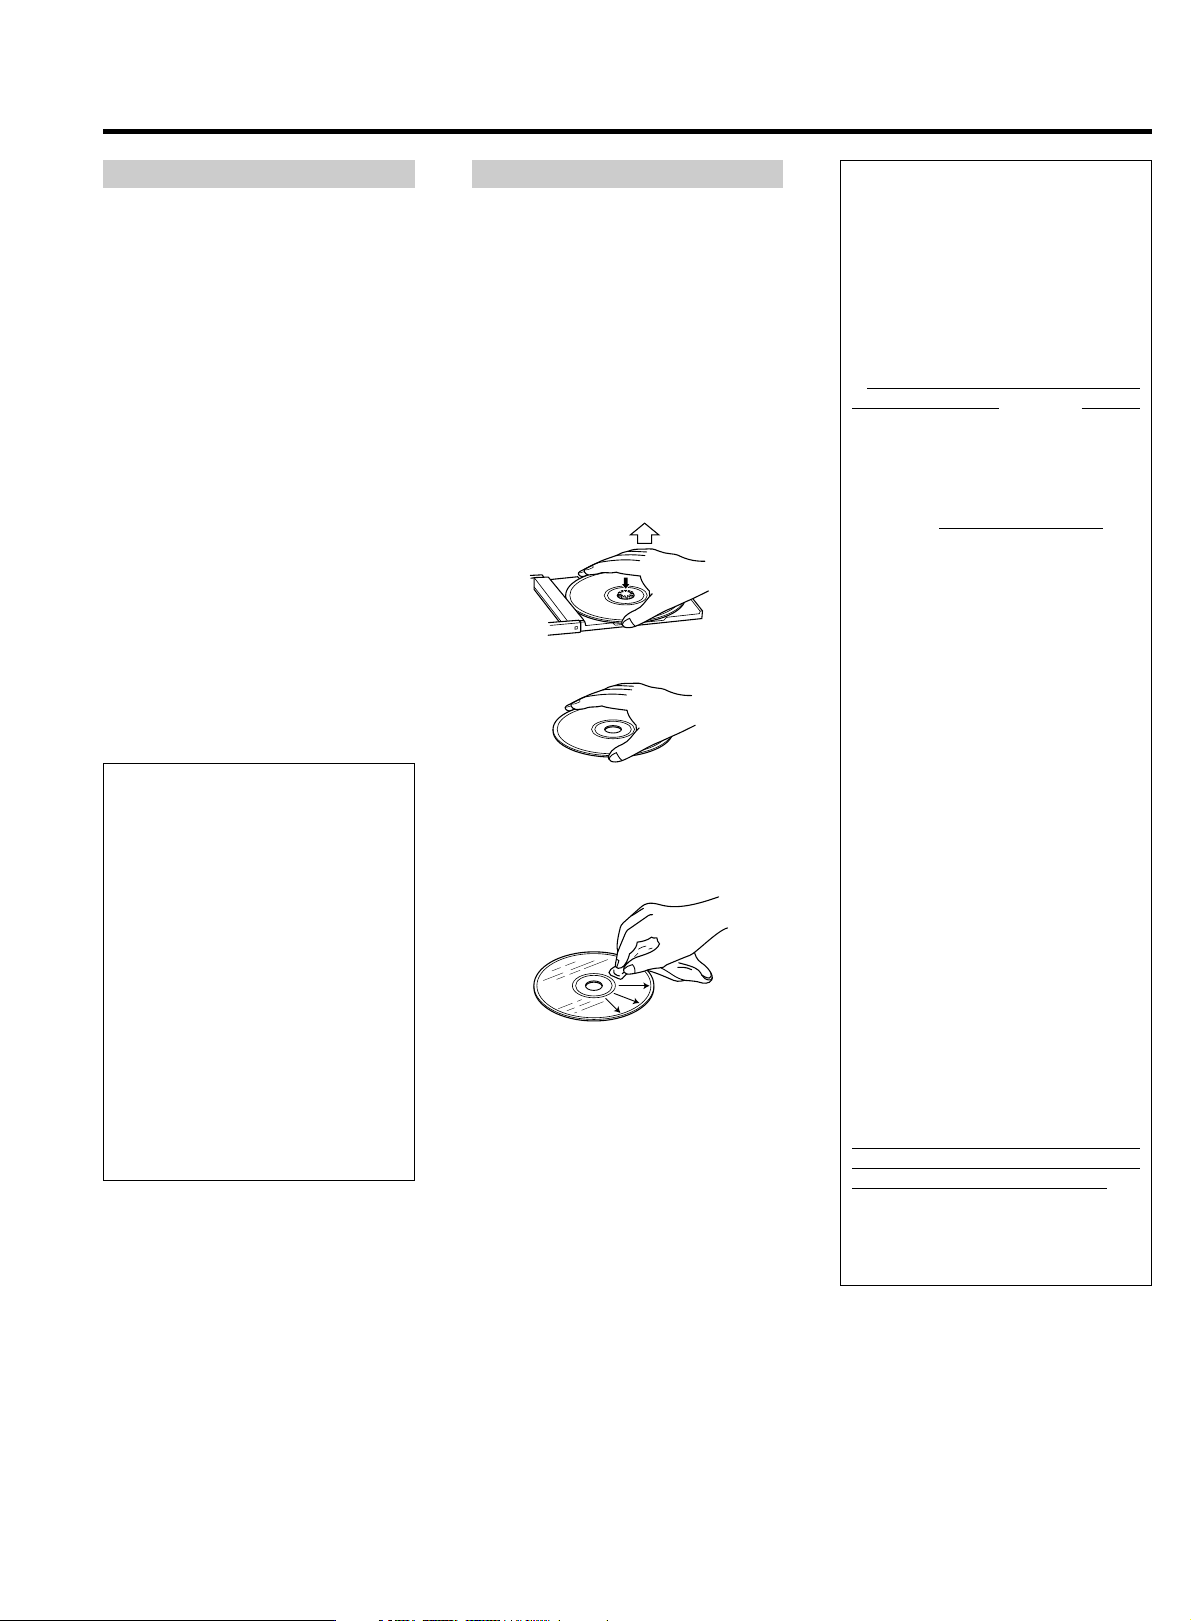
O Always place the compact disc in the
disc tray with the label facing upward.
(Compact discs can be played only on
one side.)
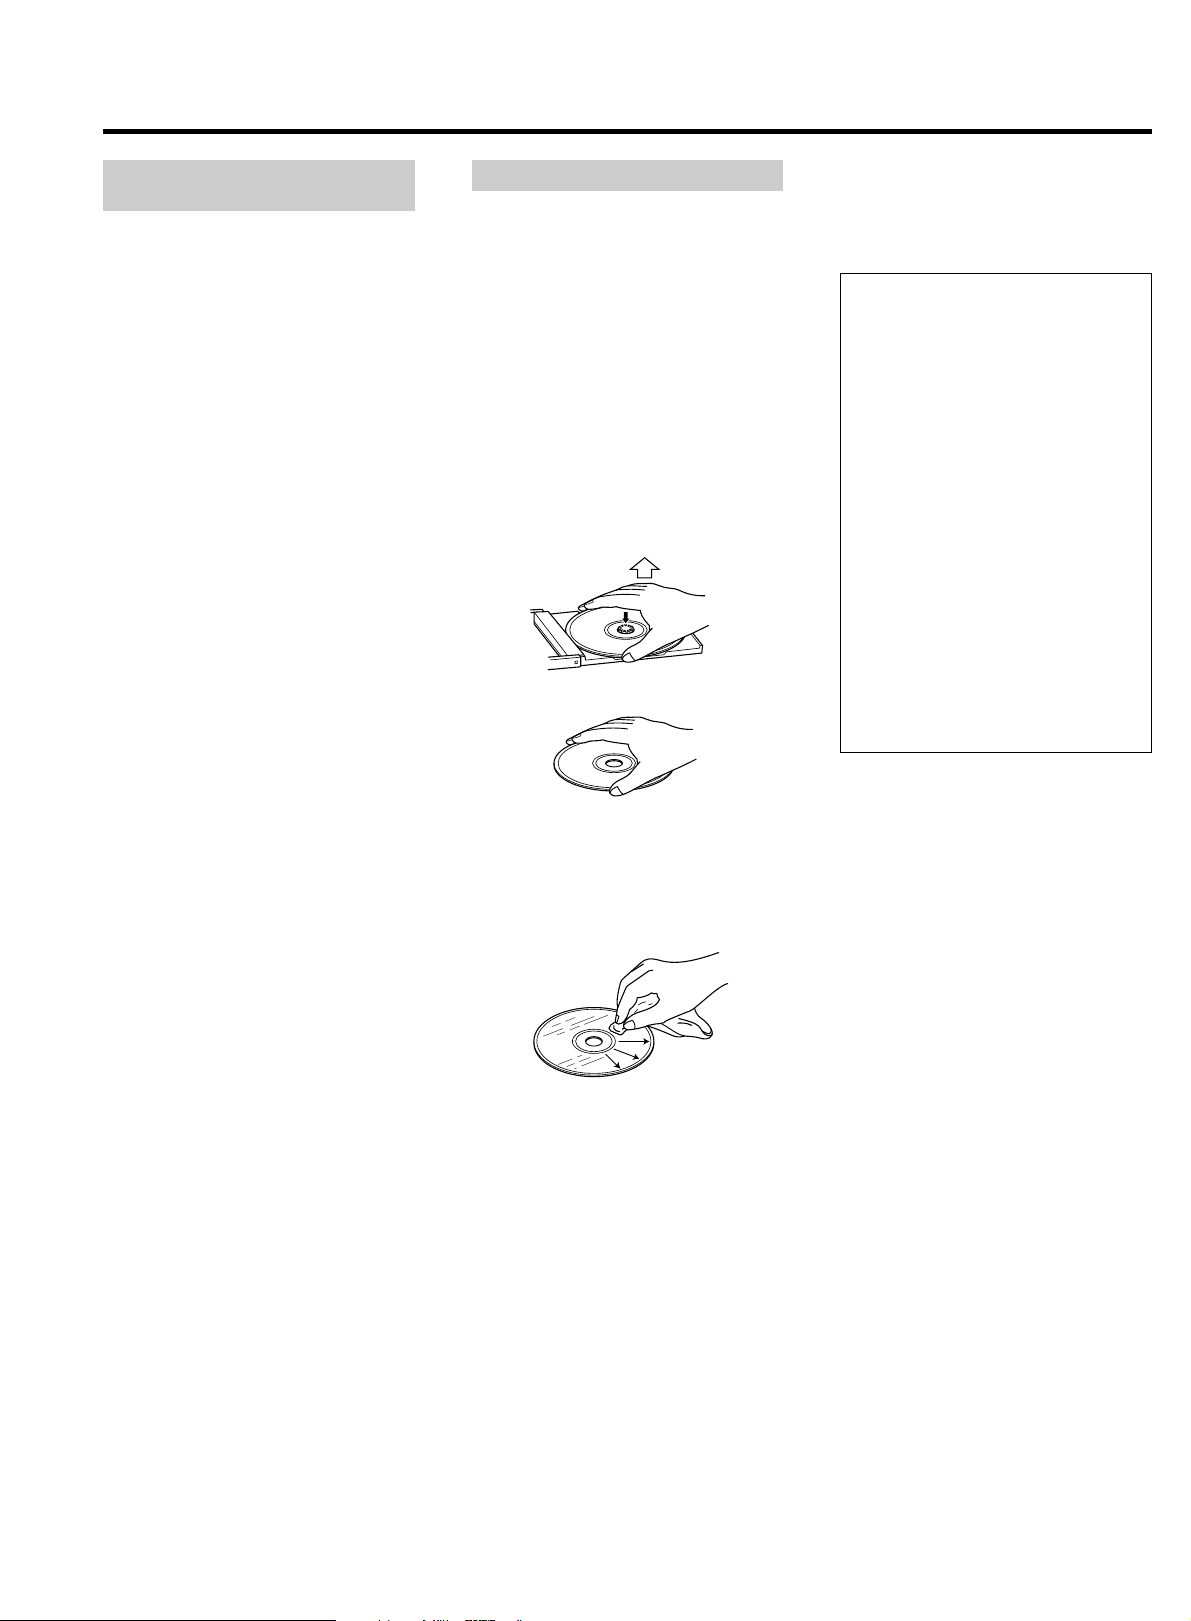
O To remove a disc from its storage case,
press down on the center of the case
and lift the disc out, holding it carefully
by the edges.
How to remove the disc
How to hold the disc
O Fingermarks and dust should be careful-
ly wiped off the disc's recorded surface
with a soft cloth.
Wipe radially
O Never use such chemicals as record
sprays, antistatic sprays or fluid, benzine or thinner to clean compact discs.
Such chemicals will do irreparable damage to the disc's plastic surface.
O Discs should be returned to their cases
after use to avoid serious scratches that
could cause the laser pickup to "skip."
O Do not expose discs to direct sunlight or
high humidity and temperature for
extended periods.
Long exposure to high temperatures can
warp the disc.
O Do not stick paper or write anything with
a ballpoint pen on the surface of the
label side.
Before Use
Read This Before Operating Handling the Discs
Beware of condensation
When the player (or a compact disc) is
moved from a cold to a warm place or
used after a sudden temperature
change, there is the danger of condensation. Water vapor in the air could
condense on the mechanism or the
laser pickup. If droplets of water form
on these parts, correct playback will be
impossible because the laser cannot
read the information from the disc correctly. To prevent this, if you are going
to use the player in a condition where
condensation could occur, you should
leave the player for 1 or 2 hours after
plugging it into an AC outlet depending
on the amount of condensation. If this
is done, the player will stabilize at the
temperature of its surroundings.
IMPORTANT (for U.K. Customers)
DO NOT cut off the mains plug from this
equipment. If the plug fitted is not suit-
able for the power points in your home
or the cable is too short to reach a
power point, then obtain an appropriate
safety approved extension lead or consult your dealer.
If nonetheless the mains plug is cut off,
remove the fuse and dispose of the plug
immediately, to avoid a possible shock
hazard by inadvertent connection to the
mains supply.
If this product is not provided with a
mains plug, or one has to be fitted,
then
follow the instructions given below:
IMPORTANT. DO NOT make any connection to the larger terminal which is
marked with the letter E or by the safety
earth symbol © or coloured GREEN or
GREEN-and-YELLOW.
The wires in the mains lead on this product are coloured in accordance with the
following code:
BLUE: NEUTRAL
BROWN: LIVE
As these colours may not correspond
with the coloured markings identifying
the terminals in your plug proceed as
follows:
The wire which is coloured BLUE must
be connected to the terminal which is
marked with the letter N or coloured
BLACK.
The wire which is coloured BROWN
must be connected to the terminal
which is marked with the letter L or
coloured RED.
When replacing the fuse only a correct
ly rated approved type should be used
and be sure to re-fit the fuse cover.
IF IN DOUBT — CONSULT A COMPETENT ELECTRICIAN.
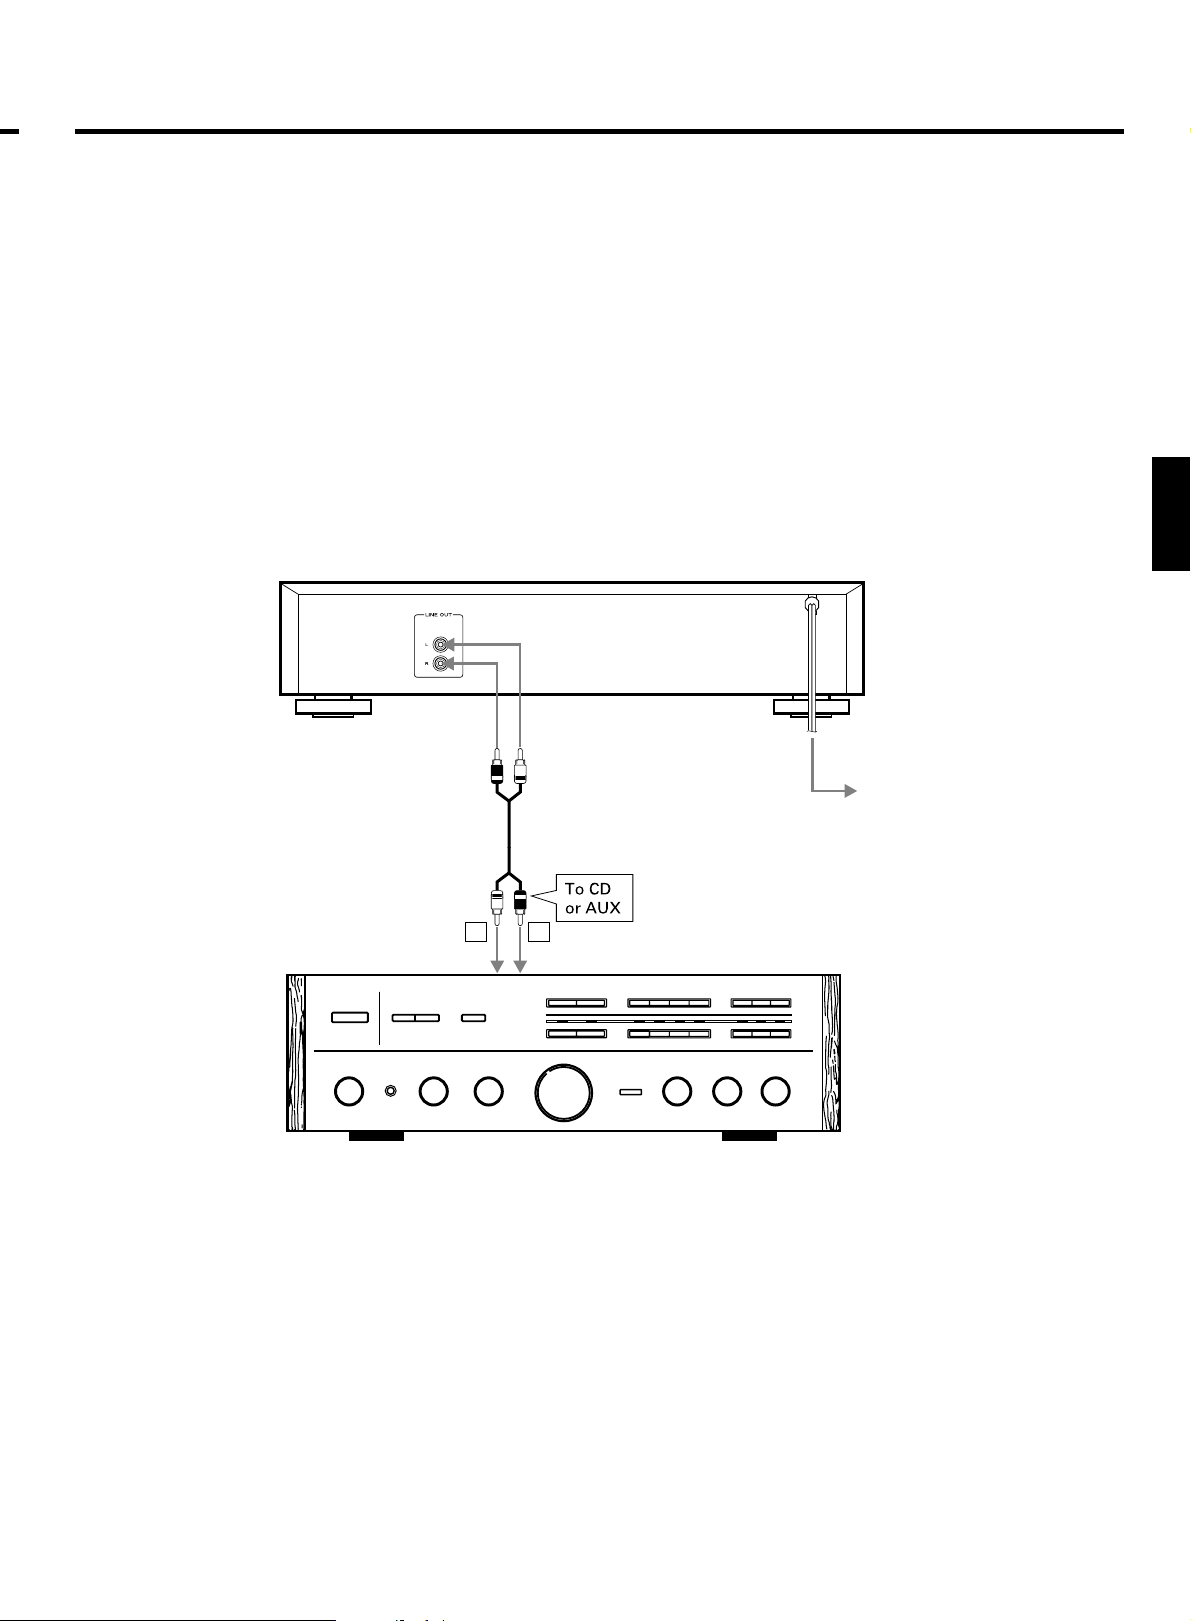
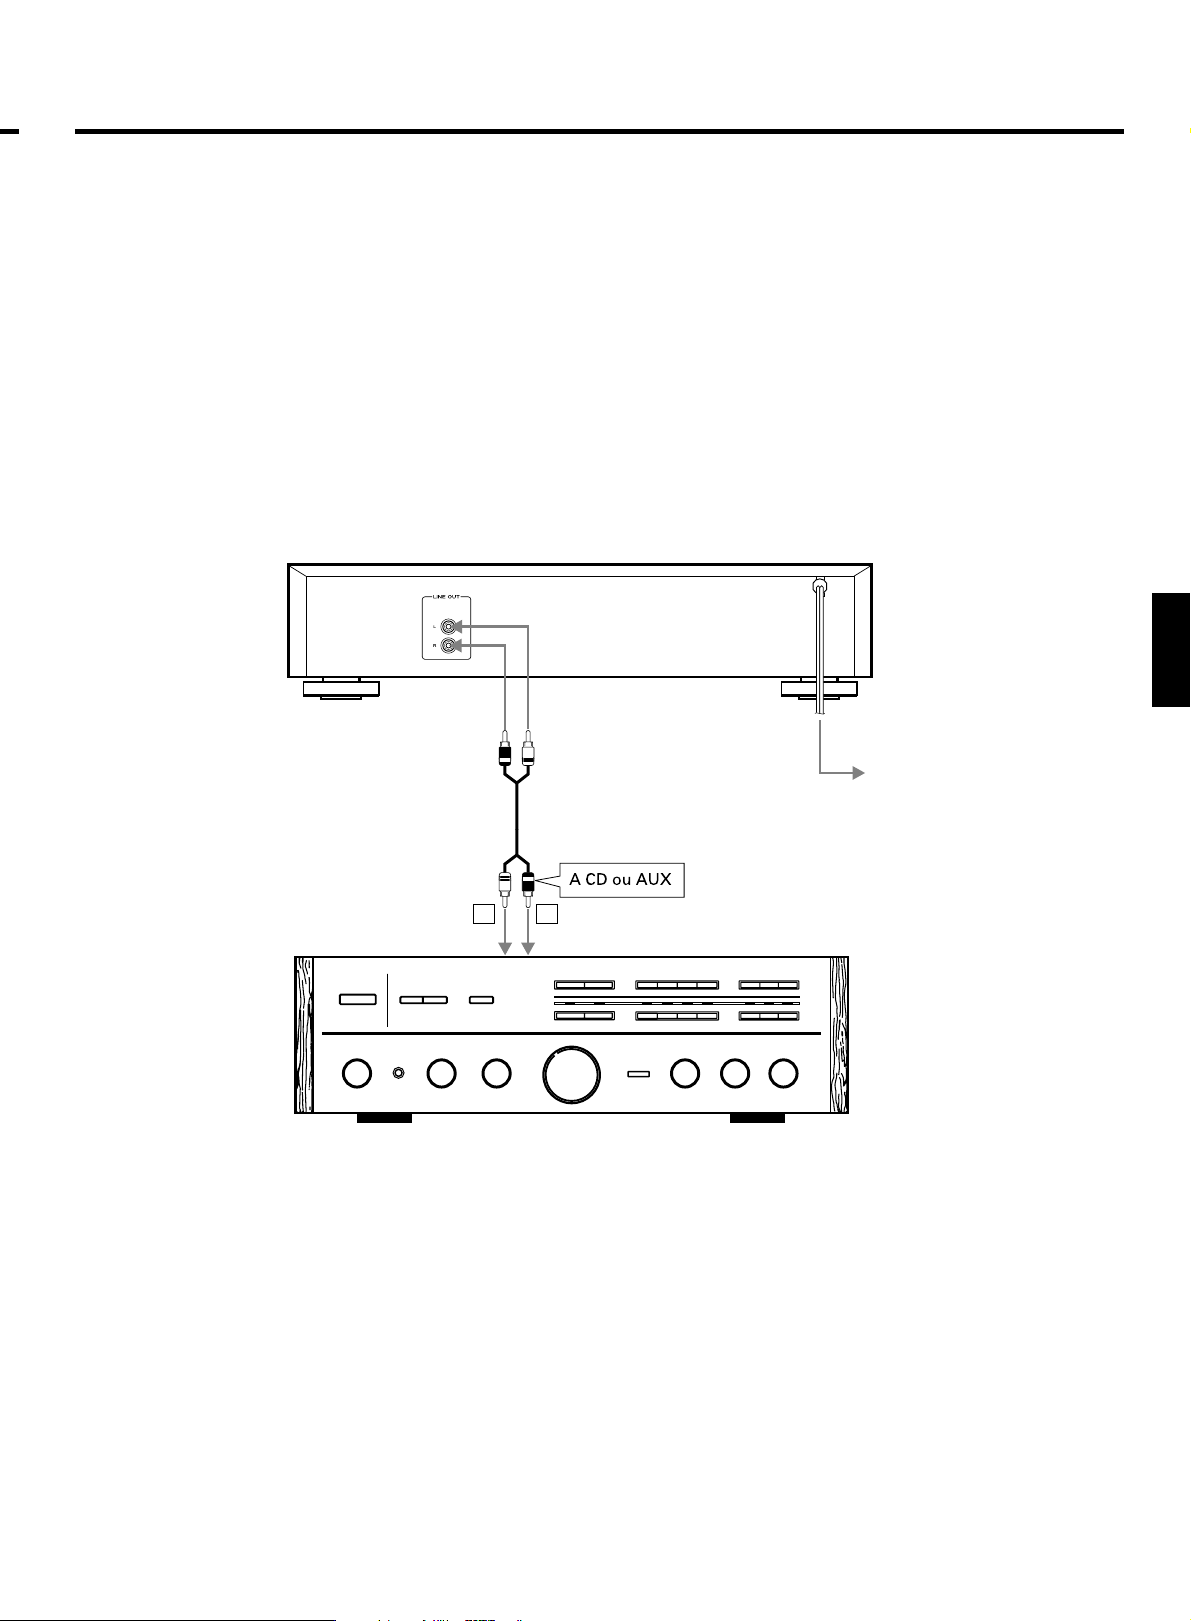
Connections
RCA pin cord
To AC Outlet
Stereo amplifier
CD-P1120
L
R
Before making connections, be sure to read
the instruction manual of the stereo amplifier carefully and turn the power of the
stereo amplifier and the player OFF.
Caution:
If the CD player interferes with the tuner, TV
reciever, etc., allow a reasonable distance
between them.
∑ Signal cords
Connect the LINE OUT terminals to the CD
terminals, etc. of the stereo amplifier using
RCA pin plug cords.
∑ Power cord
Be sure to connect the power cord to an AC
outlet which supplies the correct voltage.
∑ Headphones
When using headphones, connect the
headphone plug into the PHONES jack.
O Adjust the level of the signals output
from the phones jack.
ENGLISH
– 5 –
– 6 –
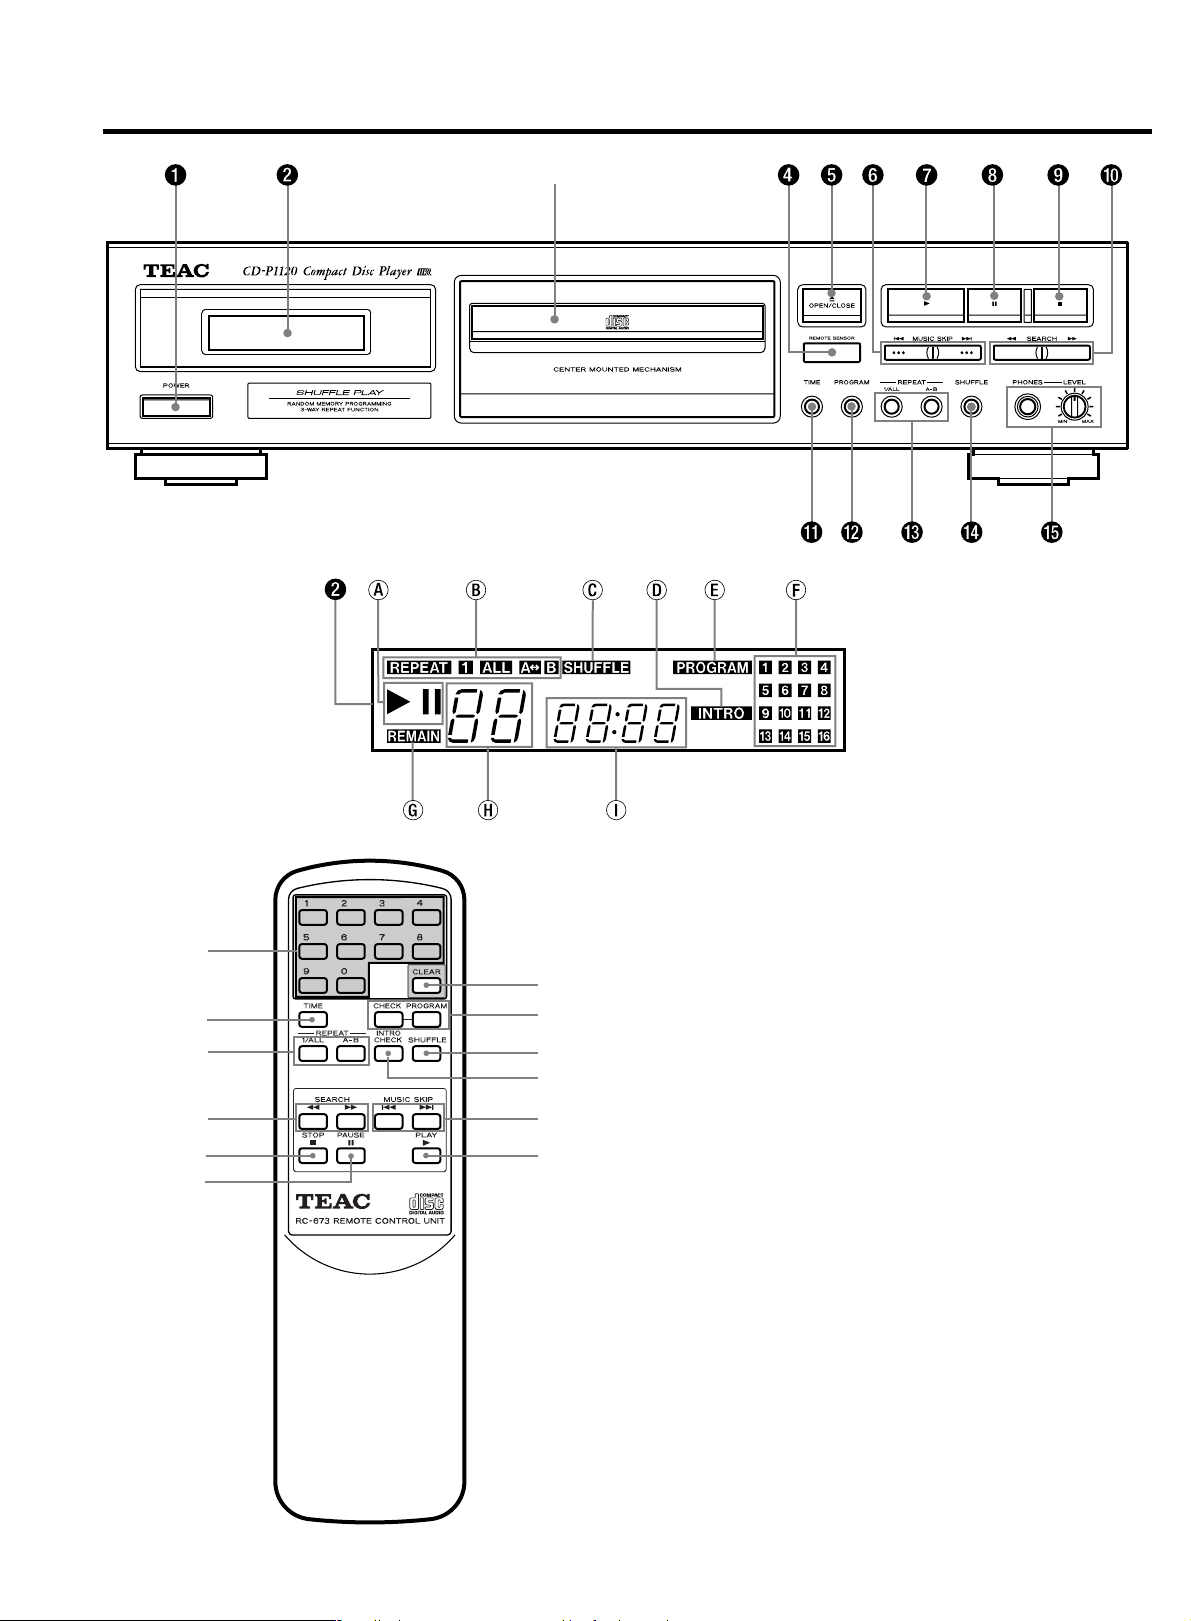
1 POWER switch (POWER)
2 Multi-function display window
a Á (play) / ƒ (pause) indicators
b REPEAT (1/ALL/A-B) indicators
c SHUFFLE indicator
d INTRO Check indicator
e PROGRAM indicator
f Music Calendar display
g REMAIN time indicator
h TRACK indicator
i Time counter
3 Disc tray
4 REMOTE SENSOR
5 OPEN/CLOSE button (ø)
6 MUSIC SKIP buttons (Â/¯)
7 PLAY button (Á)
8 PAUSE button (ƒ)
9 STOP button (∑)
0 SEARCH buttons (Ô / )
q TIME button
w PROGRAM button
e REPEAT (1/ALL, A-B) buttons
r SHUFFLE play button
t PHONES LEVEL control / PHONES jack
y Numeric buttons (1~9, 0)
u CLEAR button
i INTRO CHECK button
Name of Each Control
3
y
q
e
0
9
8
u
w
r
i
6
7
Operations
For 8 cm (3-inch)
CD singles
For 12 cm (5-inch)
Compact Discs
Total number of
tunes on the disc
Tune numbers on
disc up to 16
Total playback
time of disc
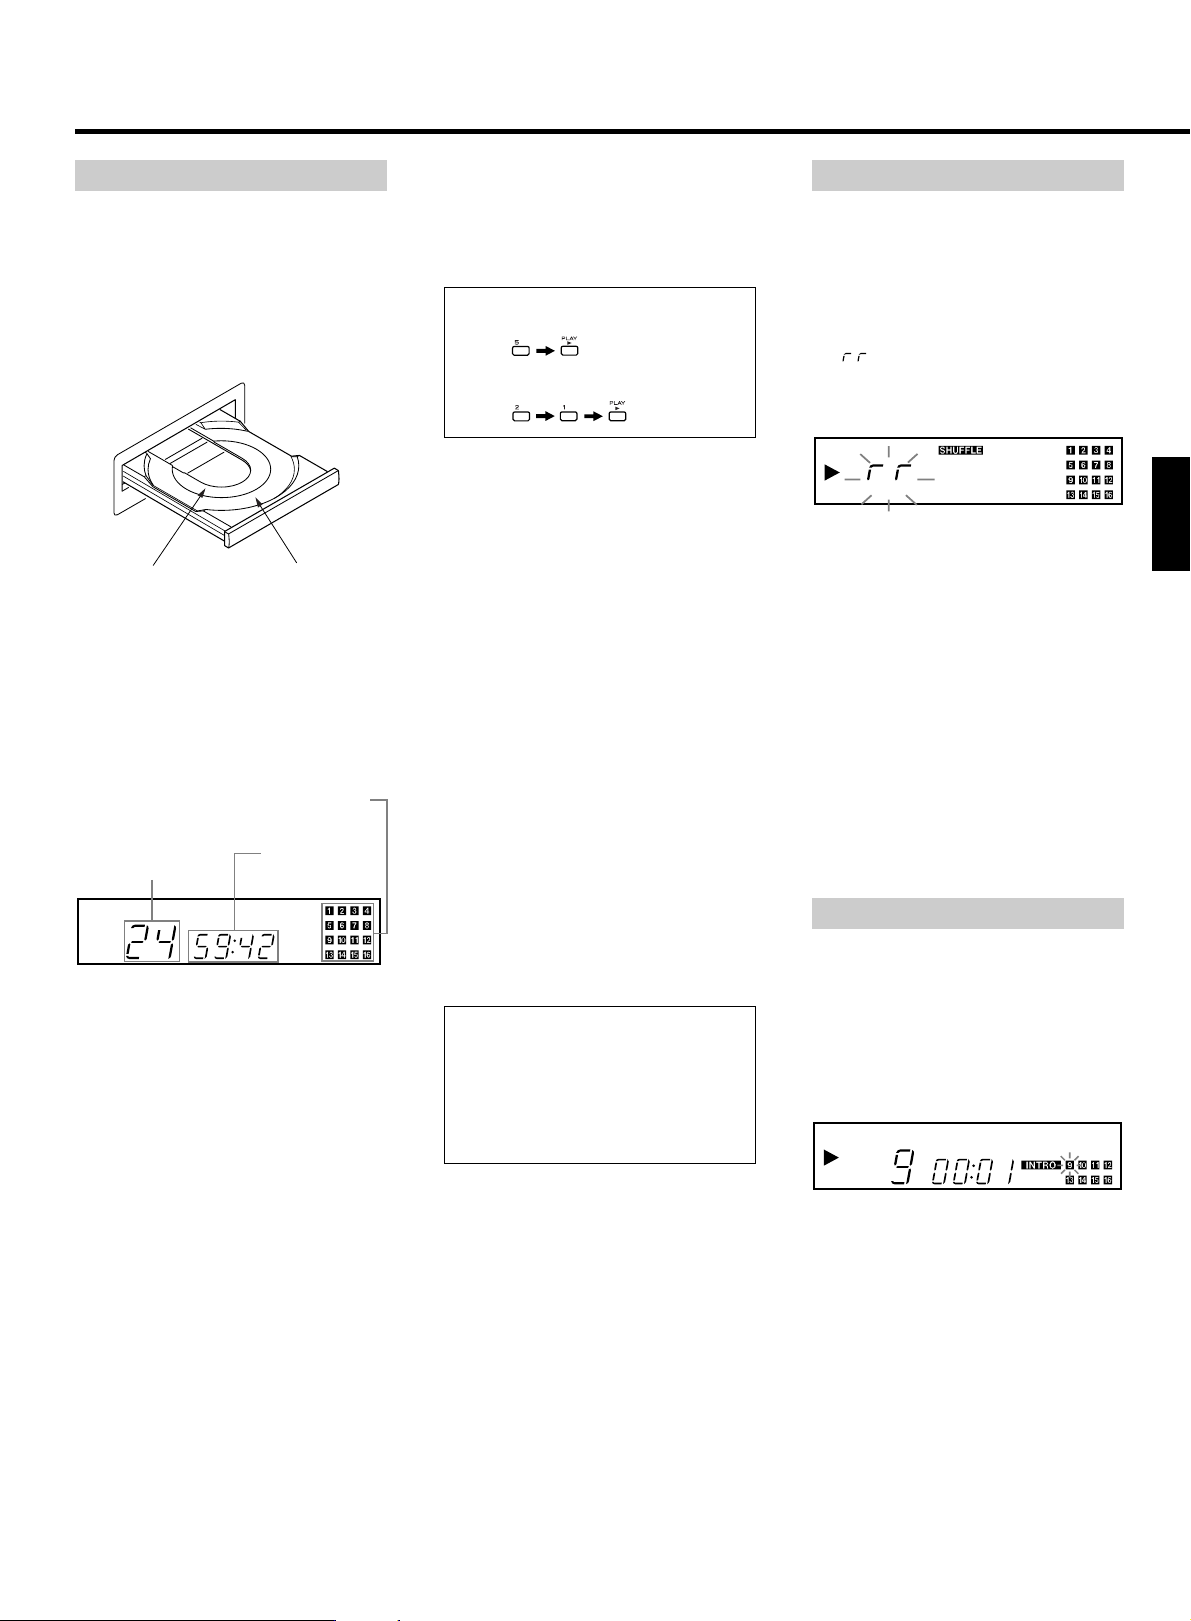
Basic Operation
1. Press the POWER switch
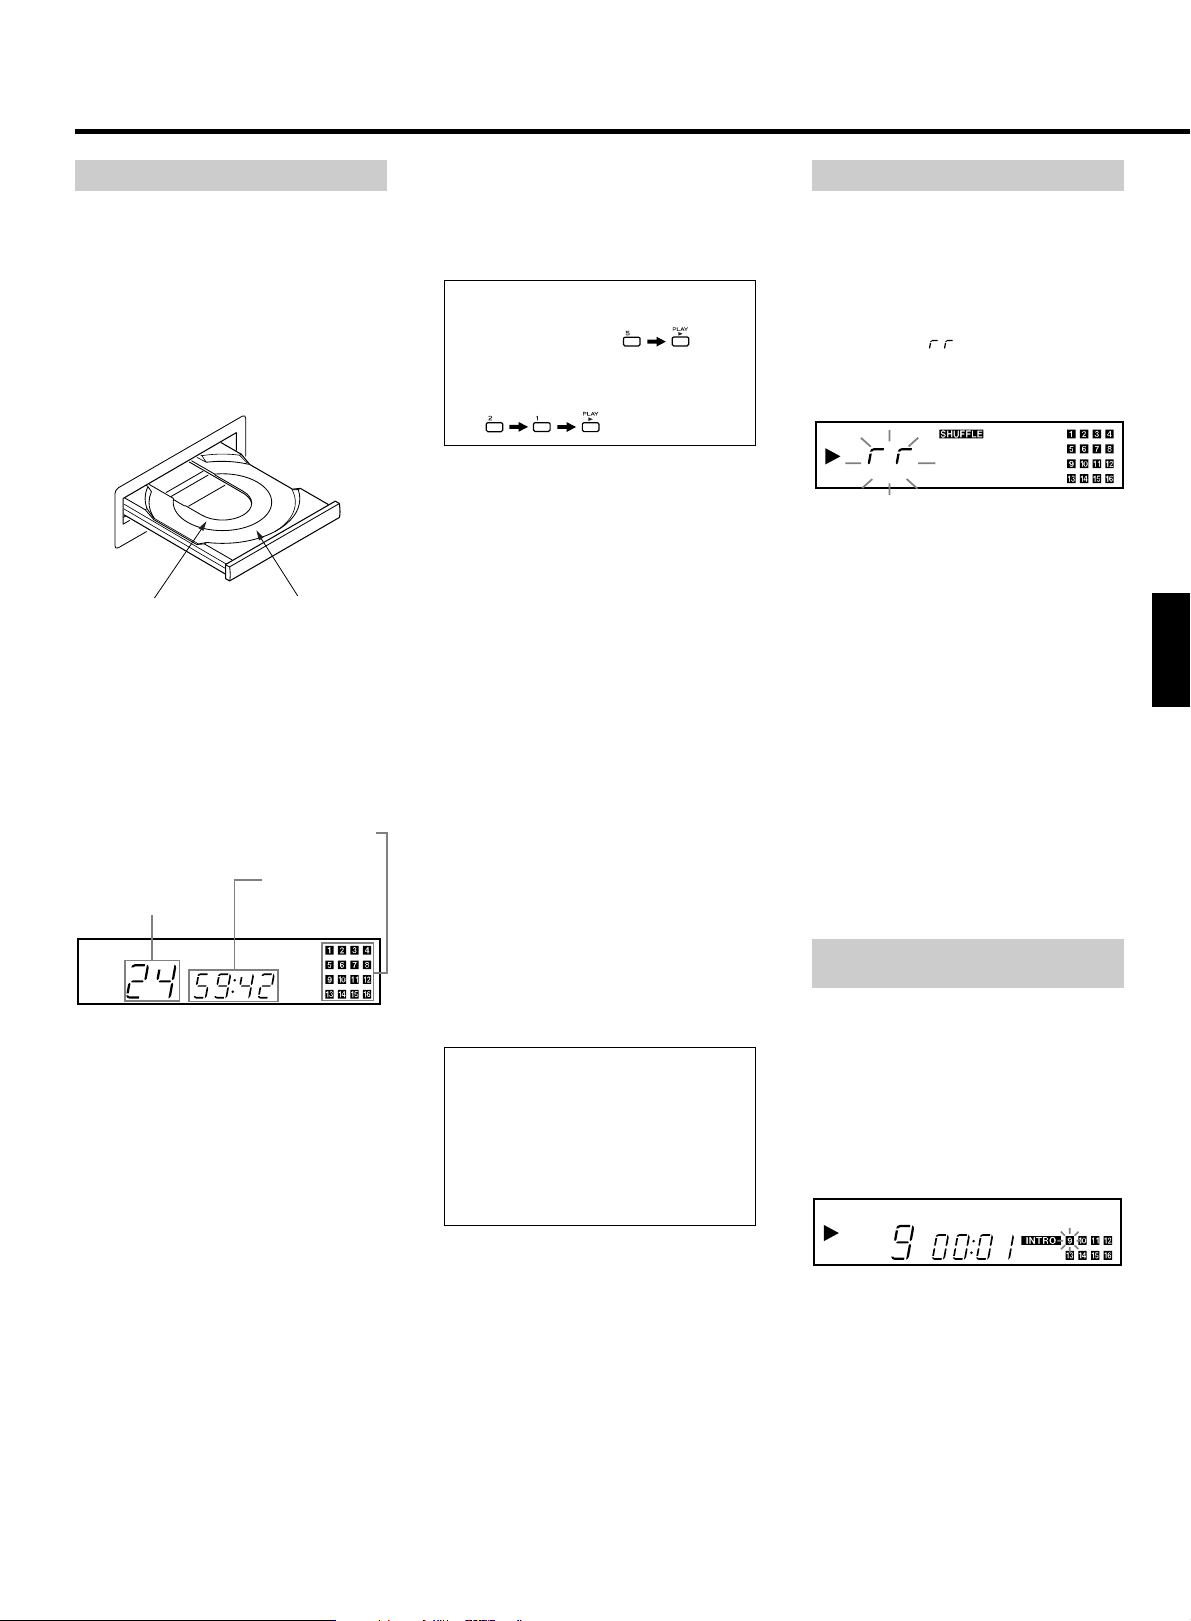
2. Press the OPEN/CLOSE (∫) button.
The disc tray will slide out. Place the
disc gently on the tray with its label side
facing upward. The disc is set within the
disc guides at the center of the tray.
3. Press the OPEN/CLOSE (∫) button
again.
The disc tray will close.
Several seconds later, the following
information is displayed and the player
enters the standby mode.
4. Press the PLAY (Á) button.
Disc playback starts from the first track,
and the Á(play) indicator will light.
● During playback, the number of the currently played tune blinks on the Music
Calendar.
● When tunes have been played, their
numbers will disappear from the Music
Calendar display.
Direct access play:
Press the numeric buttons corresponding
to the required tune, and press the PLAY
(Á) button. The player starts from the
specified tune directly.
Example 1:
To play the 5th tune:
Press
.
Example 2:
To play the 21st tune:
Press
.
Even if the disc tray is open....
When the Á button is pressed:
The disc tray will close and playback starts
from the first track.
To stop play
To stop playback:
Press the STOP (∑) button. The player
enters the stop mode.
To unload the disc:
Press the OPEN/CLOSE (∫) button; playback stops and the disc tray will slide out,
and all functions are reset to their initial
settings.
To temporarily suspend playback
(pause mode):
Press the ƒ button. Playback stops at the
current position and the ƒ indicator lights
steadily. To resume playback from the same
position, press the Á or ƒ button.
CAUTION:
● Do not force the tray by hand during
opening and closing operations.
● Do not leave the disc tray open
when the player is not in use to prevent dirt and dust from entering the
mechanism.
Shuffle Playback
This function is operational both at stop
and during normal playback.
1. Press the SHUFFLE button.
The SHUFFLE indicator lights up in the
display.
2. Press the PLAY (Á) button. The
indication rotates on the TRACK
display while the player is shuffling the
tunes.
3. Tracks will be randomly selected and
played back.
Notes:
● Press the / button with shuffle func-
tion engaged to select a tune at random.
Press the . button to replay currently played tune from its beginning.
● A tune cannot be replayed after it has
been played in this mode.
● To release the shuffle function while it is
engaged, press the SHUFFLE button
again. Tunes will play back in their normal designated order, starting from the
currently played tune.
Intro Check Function
The Intro Check function allows only the
beginning of each track to be played for 10
seconds.
1. Press the INTRO CHECK button.
2. Press the PLAY (Á) button.
The INTRO and Á indicators will be
indicated.
3. Press the INTRO CHECK button again to
clear the Intro Check function.
● The Intro Check function also works
together with SHUFFLE and REPEAT ALL
functions. This function will not stop
until the STOP (ª) button is pressed.
● The Intro Check function also works
together with the PROGRAM function.
ENGLISH
– 7 –

– 8 –
Adding to the Programmed
Sequence
Press the STOP (ª) button, then CHECK
button until “--” is shown on the TRACK display. Repeat from step 2.
To Clear the Program Memory
1. During programmed disc play, press the
STOP (ª) button once to return the CD
player to the standby mode.
2. Press the CLEAR button to clear the program memory.
● Press the OPEN/CLOSE (ø) button
once, and the program memory will be
cleared.
● The Program memory will also be
cleared if the CD player's power is
switched off.
To repeat an entire disc
(All repeat mode)
1. Press the 1/ALL button twice.
The REPEAT and ALL indicators light.
2. Press the PLAY (Á) button.
Playback starts and, when the end of
the disc is reached, the player will
return to the beginning of the first tune,
and then playback continues repeatedly.
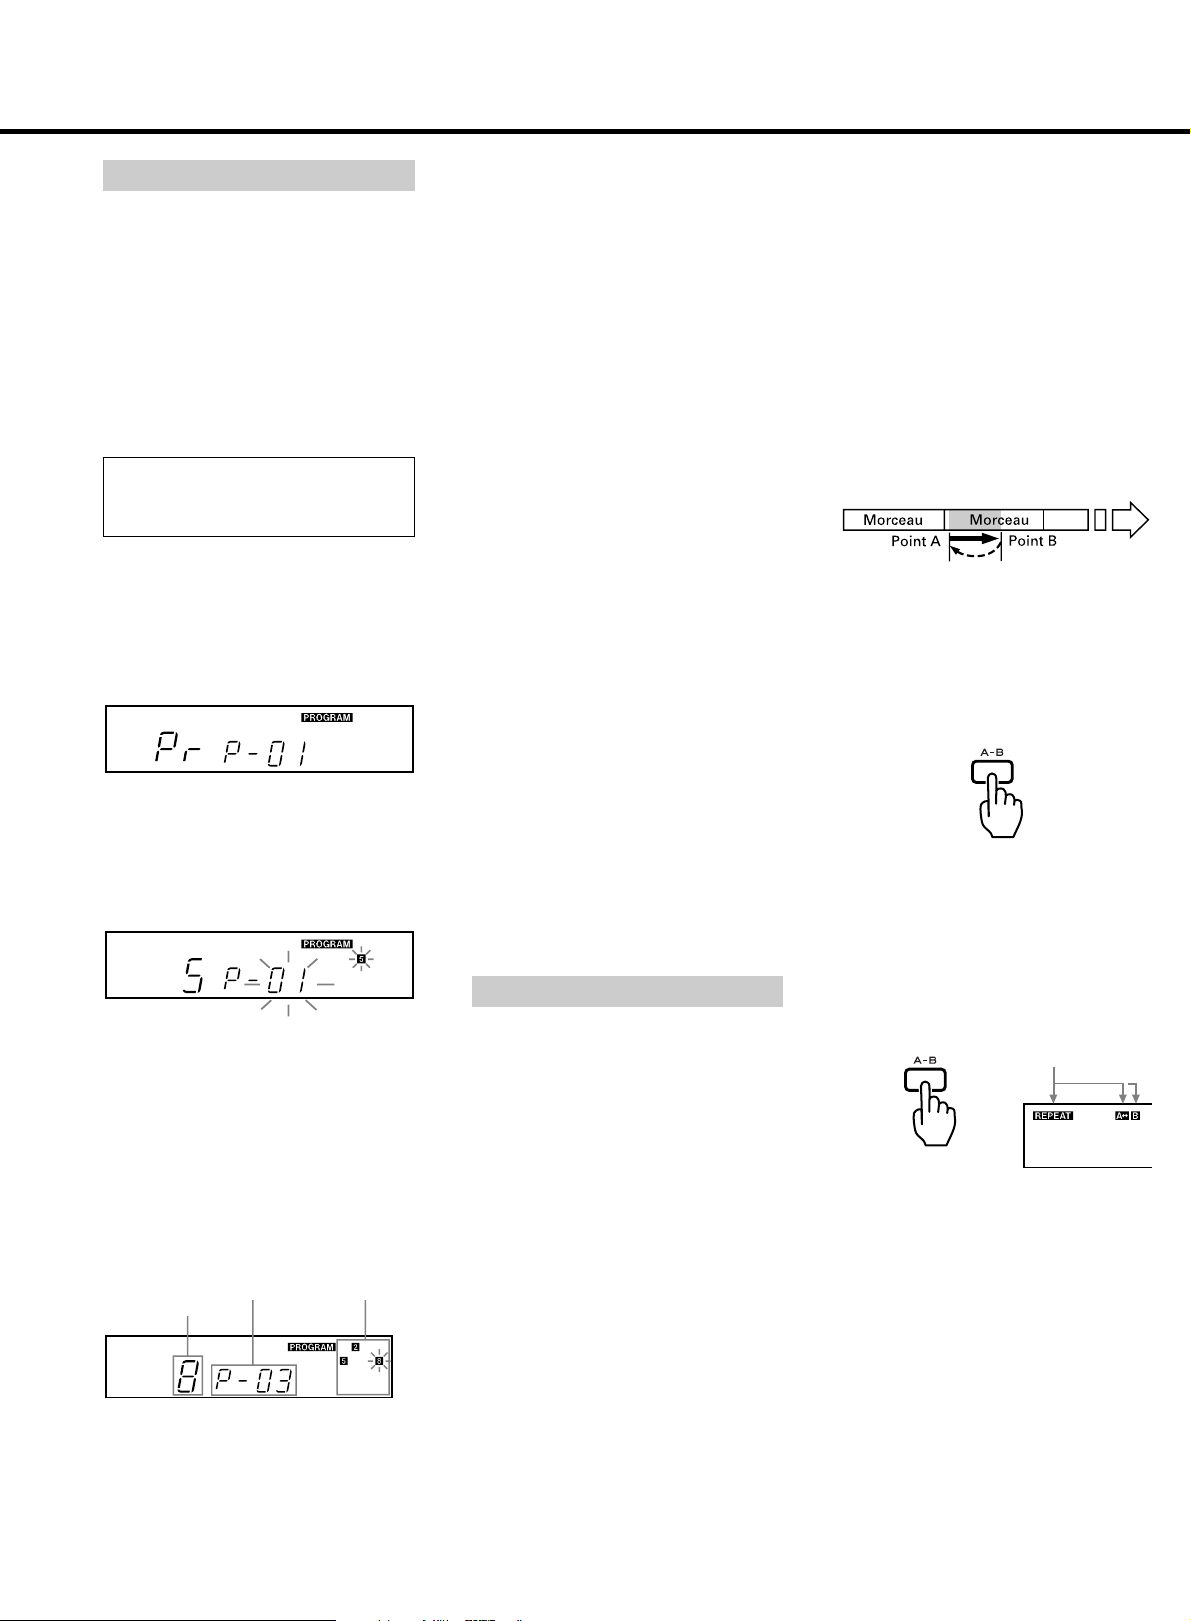
To repeat a designated section
(A-B repeat mode)
● The program playback function allows
you to program up to 20 tunes (tracks)
for playbak in any desired order.
● If more than 16 tunes are entered, the
rest will not be shown on the Music
Calendar display.
Programming required tunes
Program Playback
Example:
To program tunes in the order 5 ∑ 2 ∑
8 in the stop mode.
1. Press the STOP (ª) button.
2. Press the PROGRAM button.
The player enters the program mode.
The PROGRAM indicator lights in the
display.
3. Enter the first program (track 5), using
the ./¯ MUSIC SKIP buttons or
the numeric buttons. The indicators
blink in the display.
4. Press the PROGRAM button again.
Then, the 5th track has been programmed as program No. 1.
5. Alternately press the Â/¯
MUSIC SKIP buttons (or numeric buttons) and the PROGRAM button to program tracks in the order shown in the
example.
6. Press the PLAY button.
Programmed playback starts from the
first programmed tune.
Repeat Function
● Programming tunes is possible only
when the player is in the stop mode.
● The programmed contents will be held
in memory even after programmed playback has been completed or when programmed playback is stopped by pressing the STOP button.
● When the CLEAR button is pressed in
the stop mode, the contents of the program are erased.
The repeat function allows repeat playback
of any single tune (track), the entire disc, or
of any desired portion on the disc designated by two (start and end) points.
To repeat one tune
(Single repeat mode)
1. Press the 1/ALL button.
The REPEAT and 1 indicators light.
2. Press the numeric buttons corresponding to the required tune.
The selected tune is played, then when
the end of the tune is reached, the player will return to the beginning of the
tune and playback starts again. In this
way, the selected tune will be played
back repeatedly.
1. Press the PLAY (Á) button to start
playback.
2 Designate the point at which playback
should start (point A) by pressing the AB button.
The REPEAT and A - indicators light.
Press
3 When the portion at which repeat play-
back should end is reached, press the
A-B button again to designate point B.
The B indicator lights to show that the
A-B repeat function has been activated.
The player automatically returns to
point A and restarts playback. When
play reaches point B, the player returns
to point A and starts playback again,
repeatedly.
Tune No.
on disc
Program
No.
Programmed
tunes
Light
Again
Press
Programmed repeat playback
or
Repeat function can be activated even in
the programmed playback mode.
To repeat all the programmed tunes, press
the 1/ALL button twice. (At this time, check
that the REPEAT and ALL indicators light.)
● When the 1/ALL button is pressed ON
during programmed repeat playback,
the tune (track) currently playing will be
played back repeatedly.
● Any of the repeat functions can be
released by pressing the REPEAT button
again.
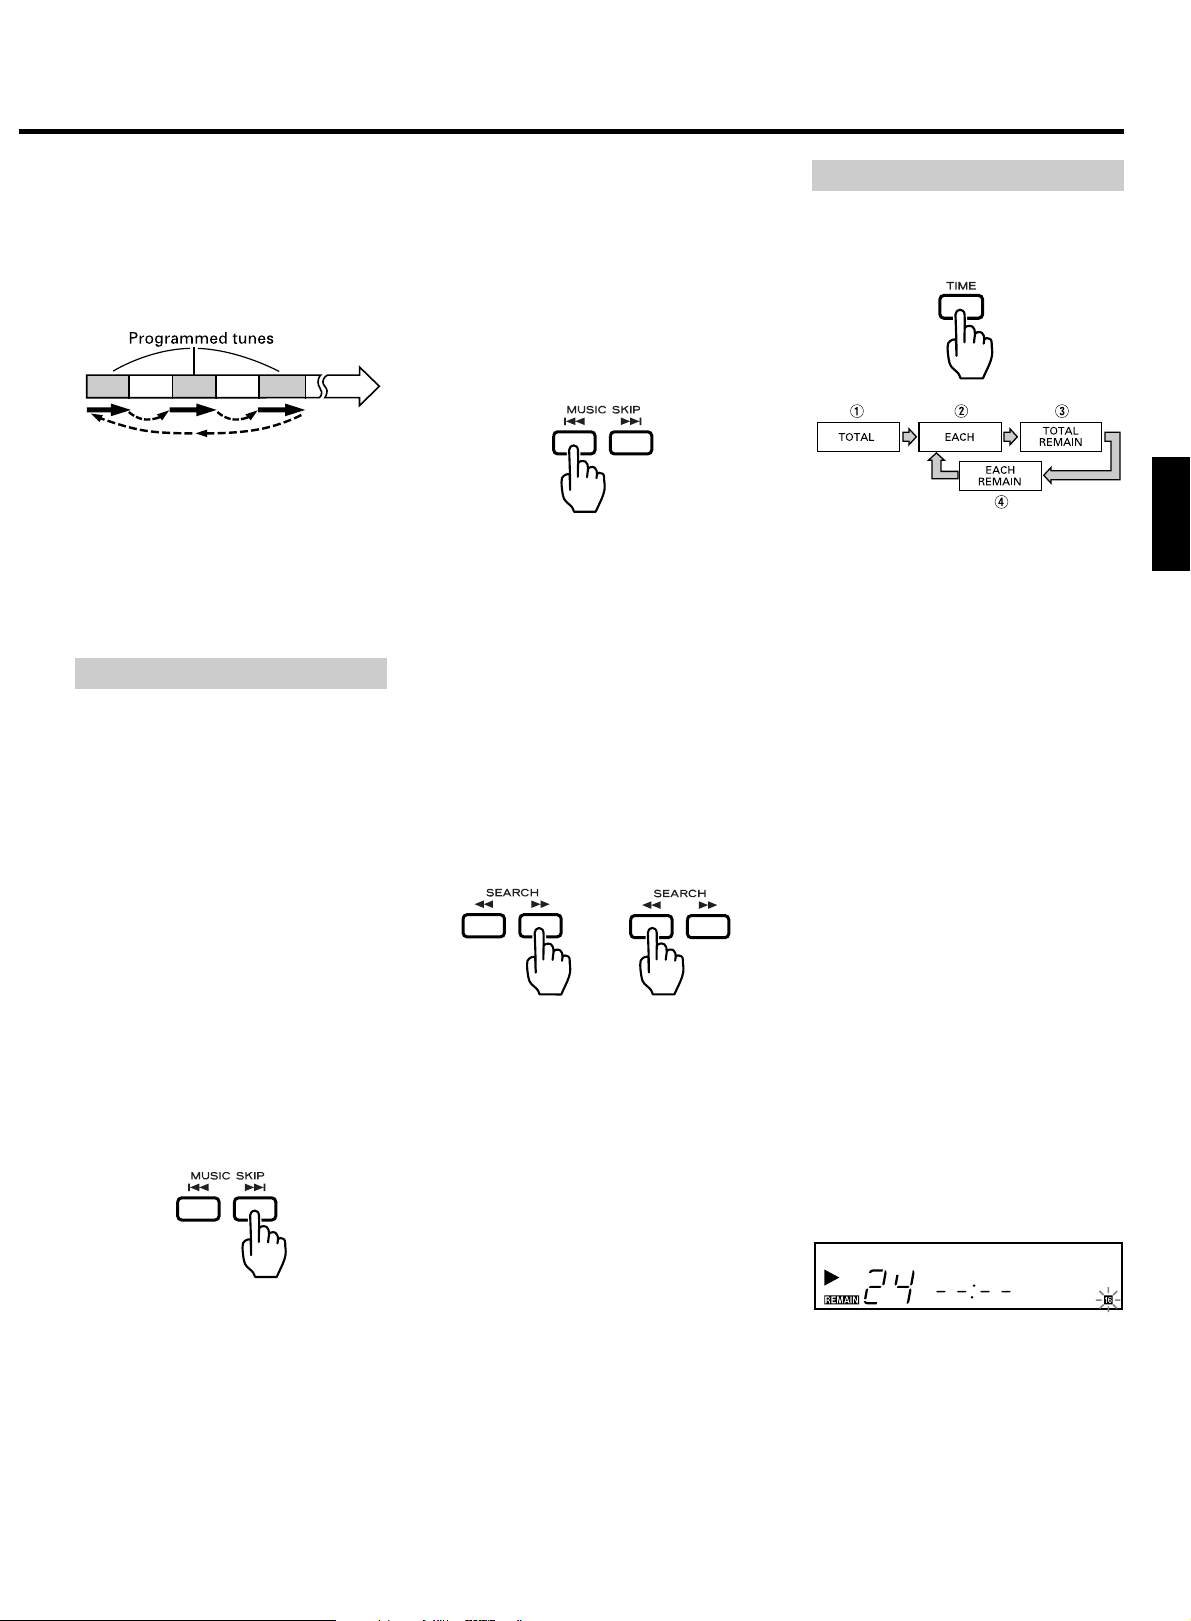
Music Search Operation
Music search using MUSIC
SKIP buttons (Â/¯)
The beginning of any tune can be easily
located using the  and ¯ MUSIC
SKIP buttons during playback or in the
pause mode. This operation is indicated
clearly in the TRACK display.
● This operation is possible even in the
program playback mode. However, only
programmed tunes will be detected.
∑ To skip to the next tune
Press the ¯ button.
The player will skip ahead to the next tune
each time the ¯ button is pressed. The
player can be advanced to the last tune in
this way, but once the beginning of the last
tune is reached, the player will not advance
even if the ¯ button is pressed.
∑ To skip back to the previous tune
Press the  button.
The player will skip back one tune each
time the  button is pressed. If this button is pressed in the middle of a tune, the
player will skip back to the beginning of the
current tune. To make it skip back to the
previous tune, the button must be pressed
twice.
In this way, the player can be returned to
the beginning of the first tune on the disc.
Music search using SEARCH
buttons (Ô/)
During playback or in the pause mode, hold
down the button to move the playing
position quickly in the forward direction,
and hold down the Ô button to move
quickly in the reverse direction.
During the manual search operation, sound
will be audible but the output level will be
lowered. This lets you search for any
required portion while checking the sound.
When the desired position is reached,
release the button to reenter the previous
mode.
or
Time Counter Display
The time counter shows various time readouts, as follows.
1 Total disc playback time
After the disc tray is closed with the
disc loaded, total disc playback time
and total number of tunes on the disc is
displayed.
2 Elapsed time display
When playback begins, the elapsed
time of the tune being played is displayed in minutes and seconds.
3 Total remaining time display
(TOTAL REMAIN)
Displayed when the TIME button is
pressed once. The time displayed is the
total remaining playback time from the
position being played, to the end of the
disc; the counter counts down to "00:00"
during playback.
4 Remaining time display (REMAIN)
Displayed when the TIME button is
pressed twice. This provides an easy
check of the remaining time of the tune
being played.
5 Elapsed time display
Displayed after the TIME button is
pressed three times. The time displayed
is the elapsed playback time.
● In normal playback mode, if a tune
whose track number is greater than 23
(but is not the last one) is being played,
the remaining time will not be displayed
in the time counter even when the TIME
button is pressed. Instead, "--:--" will be
indicated in the time counter.
ENGLISH
– 9 –
– 10 –
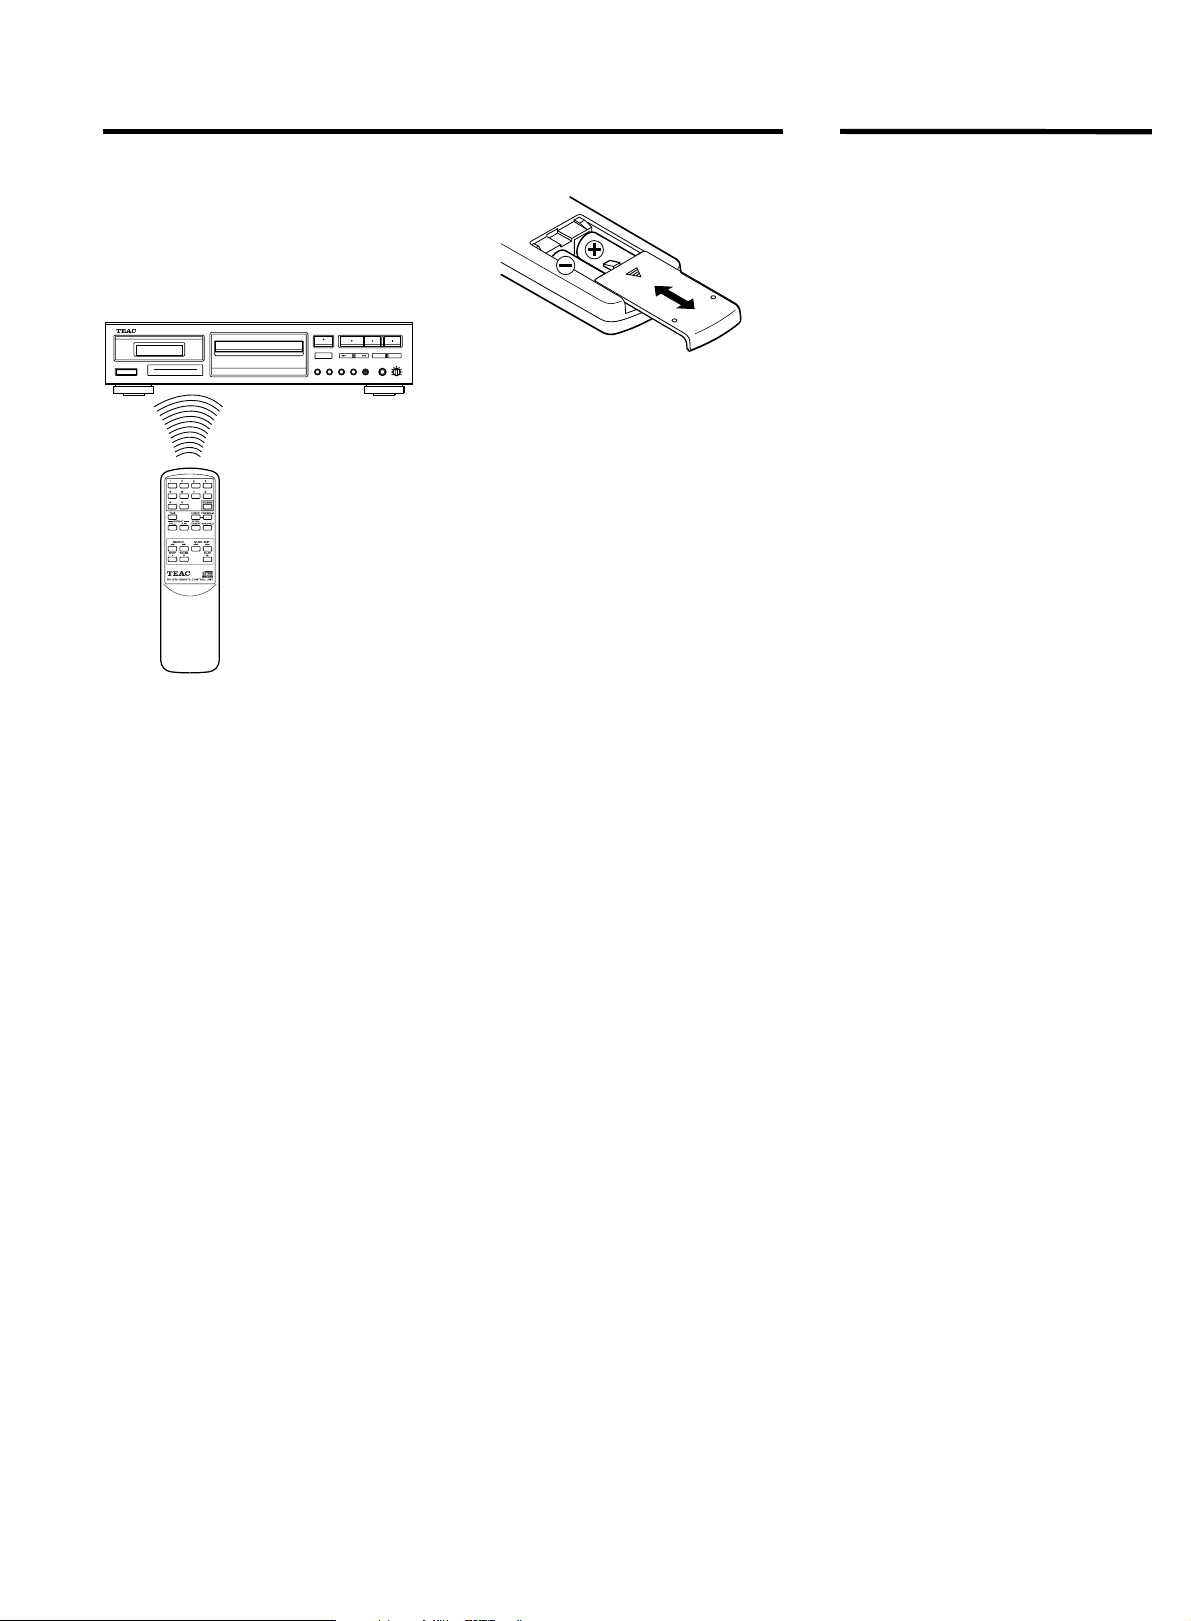
Remote Control Unit
The provided Remote Control Unit allows
the unit to be operated from a distance.
When operating the remote control unit,
point it towards the remote sensor on the
front panel of the unit.
● Even if the remote control unit is operated within the effective range, remote
control operation may be impossible if
there are any obstacles between the
player and the remote control.
● If the remote control unit is operated
near other appliances which generate
infrared rays, or if other remote control
devices using infrared rays are used
near the player, the player may operate
incorrectly. In the reverse way, the
other appliances may operate incorrectly.
Battery Installation
1. Remove the battery compartment cover.
2. Insert two "AA" (R6, SUM-3) dry batteries.
Make sure that the batteries are inserted with their positive ≠ and negative
– poles positioned correctly.
3. Close the cover until it clicks.
Battery Replacement
If you notice that the distance between the
remote control unit and the player for correct operation becomes shorter, it indicates
that the batteries are exhausted. In this
case replace the batteries with new ones.
Precautions concerning batteries
● Be sure to insert the batteries with correct positive ≠ and negative – polarities.
● Use batteries of the same type. Never
use different types of batteries together.
● Rechargeable and non-rechargeable
batteries can be used. Refer to the precautions on their labels.
● When the remote control unit is not to
be used for a long time (more than a
month), remove the batteries from the
remote control unit to prevent them
from leaking. If they leak, wipe away the
liquid inside the battery compartment
and replace the batteries with new
ones.
● Do not heat or disassemble batteries
and never dispose of old batteries by
throwing them in a fire.
CD PLAYER
Pickup: 3-beam, semiconductor laser
D/A Converter: 1 bit DAC
Digital filter: 4-times oversampling 16 -bit
Analog filter: 3rd order Butterworth
Frequency Response: 20 Hz – 18 kHz ± 3dB
Total Harmonic Distortion: < 0.09 % (1 kHz)
Signal-to-Noise Ratio (S/N): >96 dB
Channel Separation: >80 dB (1 kHz)
Output: Analog; 2.0 Vrms (RCA)
Headphones; 110 mW / 32 ohms
Wow and Flutter: Below measurable limit
GENERAL
Power Requirements:
120 VAC, 60 Hz (U.S.A./ Canada
Model)
230 VAC, 50Hz (UK/Europe Model)
240 VAC, 50Hz (Australia Model)
Power Consumption: 12 Watts (AC)
Dimensions (W x H x D): 435 x104x290 mm
(17-1/8" x 4-1/8" x 11-7/16")
Net Weight: 3.5 kg
Standard Accessories:
Wireless Remote Control Unit
(RC-673), RCA pin-plug cord, Battery
(SUM-3, "AA", "R6" type) x 2 (Except
for U.S.A./Canada Model)
● Improvements may result in specification or feature changes without notice.
● Illustrations may differ slightly from production models.
Remote-Controlled Operation Specifications
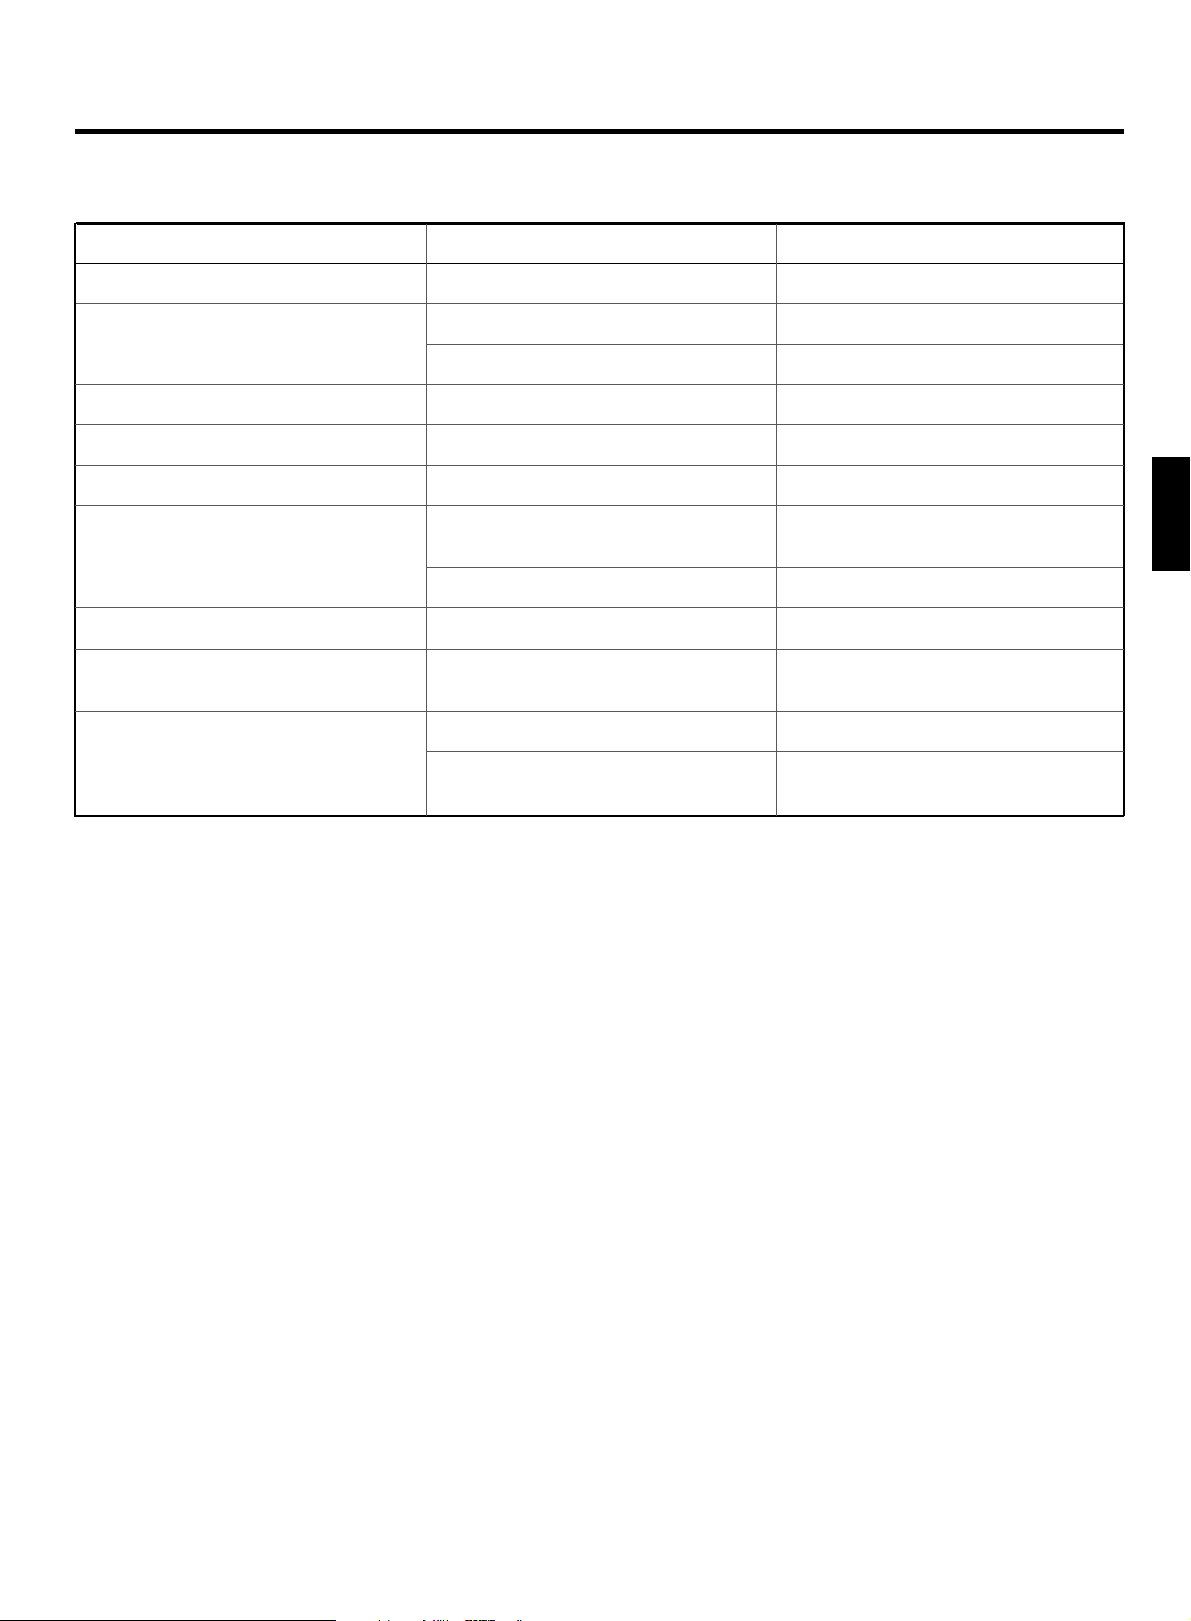
Troubleshooting
Basic troubleshooting of a CD player is similar to troubleshooting of any other electrical or electronic equipment. Always check the most obvious
possible causes first. To give you a few ideas of what to look for, check the following:
Problem Probable Cause Remedy
No power when POWER is pressed. Power plug not inserted securely. Plug in securely.
No playback when disc is loaded. Disc loaded with label side down. Load with label side up.
Disc dirty. Clean disc surface.
No audio output. Connection to stereo system is incorrect. Check connections.
A single tune can only be played. 1/ALL button engaged. Press button to disengage it.
No program playback.
Mistracing (sound jumping). Player receiving vibration or shock.
Hum.
Noise in tuner.
Remote control unit operation is impossible.
Caution:
Since the unit incorporates a microcomputer, it may not operate correctly because of external noise, etc. If this happens, turn the power switch
OFF, then turn it ON again and restart operations.
PROGRAM button not pressed. Press button to display “PROGRAM”.
Change the installation position of the player.
Disc dirty. Clean disc surface.
Pin-cord plug not connected securely. Re-connect plug securely.
Player too near tuner. Keep a reasonable distance between them
Player’s POWER switch set to OFF.
Batteries not inserted in remote control
unit.
or switch off player’s power.
Set switch to ON.
Insert batteries.
ENGLISH
– 11 –
– 12 –
● Choisir avec soin l'endroit où vous placerez votre appareil. Eviter de le placer
directement au soleil ou près d'une
source de chaleur. Eviter aussi les
endroits sujets à des vibrations, à de la
poussière excessive, à la chaleur, au
froid ou à l'humidité. Toujours le garder
éloigné de sources de bourdonnements
telles que des transformateurs ou
moteurs.
● Ne pas ouvrir le coffret car ceci risquerait de provoquer des dommages
aux circuits ou des chocs électriques.
Si un objet rentre dans l'appareil, contacter votre revendeur.
● Ne pas manipuler les disques avec des
mains sales. Ne jamais insérer un
disque dont la surface est craquelée.
● Lors du débranchement du cordon d'alimentation de la prise murale, toujours
tirer sur la fiche et non sur le cordon.
● Pour garder le capteur laser propre, ne
pas y toucher et ne pas oublier de fermer le tiroir du disque.
● Ne pas essayer de nettoyer l'appareil
avec des solvants chimiques car ceci
pourrait endommager le fini de l'appareil. Utiliser un chiffon propre et sec.
● Garder soigneusement ce manuel d'instructions pour une référence
ultérieure.
Cet appareil a été conçu spécialement pour
la reproduction des disques audionumériques portant la marque "˛".
Les autres disques ne peuvent pas être
reproduits.
● Toujours placer le disque audionumérique dans le tiroir, l'étiquette
dirigée vers le haut. (Les disques
audionumériques ne peuvent être lus
que sur une face.)
● Pour retirer un disque de son boîtier,
presser le centre du boîtier et sortir le
disque en le tenant soigneusement par
les bords.
● Ne pas coller de papier ni écrire quoi
que ce soit avec un crayon-bille sur la
surface de la face comportant
l'étiquette.
Avant utilisation
Lire ceci avant de faire fonctionner l'appareil
Attention à la condensation
Quand le lecteur (ou un disque audionumérique) est déplacé d'un endroit
froid à un endroit chaud ou utilisé après
un changement rapide de la
température, il y a danger de condensation. La vapeur d'eau que comporte
l'air risque de se condenser sur le
mécanisme ou sur le capteur laser. Si
des gouttelettes d'eau se forment sur
ces pièces, une lecture correcte sera
impossible car le laser ne pourra pas
lire correctement les informations du
disque. Pour éviter ceci, si vous devez
utiliser le lecteur sous des conditions
qui peuvent provoquer une condensation, vous devez le laisser tel quel pendant 1 ou 2 heures, selon le degré de
condensation, après l'avoir branché
sur une prise CA. Le lecteur se stabilisera alors à la température de l'environnement.
Manipulation des disques
Comment retirer le disque
● Les empreintes digitales et la poussière
sur la surface du disque doivent être
essuyées avec soin avec un chiffon
doux.
Essuyer du centre vers l'extérieur
● Ne jamais utiliser de produits chimiques
comme des aérosols pour disques,
aérosols ou liquide antistatiques, de la
benzine ni de diluants pour nettoyer les
disques audionumériques. De tels produits chimiques endommageront de
façon définitive la surface de plastique
du disque.
● Les disques doivent toujours être remis
dans leurs boîtiers après l'usage pour
éviter des rayures sérieuses qui pourraient provoquer des "sauts" du capteur
laser.
● Ne pas exposer les disques directement
au soleil ni à l'humidité ou à des
températures élevées pendant
longtemps. Une longue exposition à de
hautes températures peut voiler le
disque.
Comment tenir le disque
Raccordements
CD-P1120
L
R
Avant de faire des raccordements, bien lire
le manuel d'instructions de l'amplificateur
stéréo et couper l'alimentation de l'amplificateur stéréo et du lecteur.
Attention:
Si le lecteur CD produit des interférences
sur le syntoniseur, le téléviseur, etc., laisser
une distance raisonnable entre ces
appareils.
∑ Cordons de signal
Connecter les bornes de sortie ligne aux
entrées CD de l'amplificateur stéréo en
utilisant les cordons RCA.
∑ Cordon d'alimentation
Bien raccorder le cordon d'alimentation à
une prise secteur CA sous tension.
∑ Casque d'écoute
Pour utiliser un casque d'écoute, brancher
la fiche du casque à la prise PHONES.
O Régler le niveau de sortie de la prise
casque.
FRANÇAIS
Cordon à
broches
RCA
Amplificateur
Prise secteur CA
– 13 –

– 14 –
1 Interrupteur d'alimentation (POWER)
2 Affichage à fonctions multiples
a Indicateurs Á (lecture) / ƒ (pause)
b Indicateurs de répétition (1/ALL/A-B)
c Indicateur SHUFFLE
d Indicateur de contrôle d'introductions (INTRO)
e Indicateur de programmation (PROGRAM)
f Affichage du calendrier musical
g Indicateurs de mode de durée (REMAIN)
h Affichage TRACK (piste)
i Compteur temporel
3 Tiroir du disque
4 Récepteur du signal de la télécommande
(REMOTE SENSOR)
5 Touche d'ouverture/fermeture (OPEN/CLOSE)(∫)
6 Touches de passage de morceaux
(MUSIC SKIP Â/ ¯)
7 Touche de lecture (PLAY)(Á)
8 Touche de pause (PAUSE)(ƒ)
9 Touche d'arrêt (STOP)(∑)
0 Touches de recherche (SEARCH) (Ô / )
q Touche d'affichage du temps (TIME)
w Touche de programmation (PROGRAM)
e Touches de répétition (REPEAT 1/ALL, A-B)
r Touche SHUFFLE
t Commande de niveau de casque d'écoute
(PHONES LEVEL) / Prise de casque d'écoute (PHONES)
y Touches numériques (1~9, 0)
u Touche d'annulation de plages programmées (CLEAR)
i Touche de contrôle d'introductions (INTRO CHECK)
Nom de chaque commande
3
y
q
e
0
9
8
u
w
r
i
6
7
Fonctionnement
For 8 cm (3-inch)
CD singles
For 12 cm (5-inch)
Compact Discs
Numéros de morceau sur
le disque jusqu'à 16
Nombre total de
morceaux sur le
disque
Durée totale de
lecture du
disque
Fonctionnement de base
1. Appuyer sur l'interrupteur d'alimentation POWER.
2. Appuyer sur la touche OPEN/CLOSE(ø).
Le tiroir du disque s'ouvre. Placer
doucement le disque sur le tiroir avec
sa surface marquée dirigée vers le haut.
Le disque doit être positionné dans les
guides de disque au centre du tiroir.
Pour disques simples de
8 cm
3. Appuyer à nouveau sur la touche
OPEN/CLOSE(ø) .
Le tiroir du disque se referme.
Quelques secondes après, l'information
suivante est affichée et le lecteur passe
en mode d'attente.
4. Appuyer sur la touche PLAY (Á).
La lecture du disque commence à partir
du premier morceau, et l'indicateur Á
(lecture) sera allumé.
● Pendant la lecture, le numéro du
morceau en cours de lecture clignote
sur le calendrier musical.
● Après la lecture d'un morceau, son
numéro disparaît de l'affichage du calendrier musical.
Pour disques
audionumériques
de 12 cm
Lecture à accès direct:
Appuyer sur les touches numériques correspondant au morceau voulu, et appuyer sur
la touche PLAY (Á). Le lecteur commence
directement à partir du morceau spécifié.
Exemple 1:
Pour lire à partir du 5ème
morceau: Appuyer sur .
Exemple 2:
Pour lire à partir du 21ème
morceau: Appuyer
sur .
Même si le tiroir du disque est
ouvert …
Lorsque la touche Á est pressée:
Le tiroir se fermera et la lecture commencera à partir du premier morceau.
Pour arrêter la lecture
Pour arrêter la lecture:
Appuyer sur la touche STOP(ª). Le lecteur
entre en mode d'arrêt.
Pour retirer le disque:
Appuyer sur la touche OPEN/CLOSE(ø); la
lecture s'arrête et le tiroir sortira, et toutes
les fonctions sont remises à leur réglage
initial.
Pour arrêter momentanément la lecture
(mode de pause):
Appuyer sur la touche ƒ. La lecture
s'arrête à la position où se trouve le capteur. L'indicateur ƒ s'allumera. Pour
reprendre la lecture à partir de la même
position, appuyer sur la touche Á ou ƒ.
PRECAUTIONS:
● Ne pas forcer le tiroir à la main lors
de l'ouverture et de la fermeture.
● Ne pas laisser le tiroir du disque
ouvert quand vous n'utilisez pas
l'appareil pour éviter que de la
saleté et de la poussière ne
pénètrent dans le mécanisme.
Lecture aléatoire
Cette fonction est opérationnelle à l'arrêt et
pendant la lecture normale.
1. Appuyer sur la touche SHUFFLE.
L'indicateur SHUFFLE s'allume dans
l'affichage.
2. Appuyer sur la touche PLAY (Á).
L'indication tourne sur l'affichage
TRACK alors que le lecteur fait une lecture aléatoire des morceaux.
3. Les pistes seront sélectionnées et lues
de façon aléatoire .
Remarques:
● Appuyer sur la touche ¯ avec la
fonction aléatoire engagée pour choisir
un morceau au hasard. Appuyer sur la
touche  pour reprendre la lecture
depuis le début du morceau en cours de
lecture.
● Un morceau ne peut pas être relu après
qu'il a été lu dans ce mode.
● Pour relâcher la fonction aléatoire alors
qu'elle est engagée, appuyer à nouveau
sur la touche SHUFFLE. Les morceaux
seront lus dans l'ordre normal prévu, en
commençant à partir du morceau en
cours de lecture.
Fonction de contrôle d'introductions
La fonction de contrôle d'introductions permet de lire seulement le début de chaque
piste pendant 10 secondes.
1. Appuyer sur la touche INTRO CHECK.
2. Appuyer sur la touche PLAY (Á) .
Les indicateurs INTRO et Á
apparaîtront.
FRANÇAIS
3. Appuyer à nouveau sur la touche
INTRO CHECK pour annuler la fonction
de contrôle d'introductions.
● La fonction de contrôle d'introductions
marche également avec les fonctions
SHUFFLE et REPEAT ALL. Cette fonction
ne s'arrêtera pas avant que la touche
STOP(ª) soit pressée.
● La fonction de contrôle d'introductions
marche également avec la fonction
PROGRAM.
– 15 –
– 16 –
La fonction de répétition permet la lecture
répétée d'un seul morceau, du disque en
entier, ou toute partie voulue sur un disque
définie par deux points (début et fin).
Pour répéter un morceau
(répétition d'un seul morceau)
1. Appuyer sur la touche 1/ALL.
Les indicateurs REPEAT et 1 s'allument.
2. Appuyer sur les touches numériques
correspondant au morceau voulu.
Le morceau sélectionné est joué, puis
quand le morceau est fini, le lecteur
revient au début du morceau et reprend
sa lecture. Ainsi, le morceau
sélectionné sera rejoué de façon
répétée.
3. Quand le point de fin de la lecture
répétée est atteint, appuyer à nouveau
sur la touche A-B pour définir le point
B.
L'indicateur B s'allume pour montrer
que la fonction de répétition A-B a été
activée.
● La fonction de lecture programmée
vous permet de programmer jusqu'à 20
morceaux dans n'importe quel ordre
pour la lecture.
● Si plus de 16 morceaux sont entrés, le
reste ne sera pas montré sur l'affichage
du calendrier musical.
Programmation des morceaux
voulus
Lecture programmée
Exemple:
Pour programmer les morceaux dans
l'ordre 5 ∑ 2 ∑ 8 en mode arrêt.
Fonction de répétition
1. Appuyer sur la touche STOP(ª).
2. Appuyer sur la touche PROGRAM.
Le lecteur entre en mode de programmation.
L'indicateur PROGRAM s'allume sur
l'affichage.
3. Entrer le premier programme (plage 5),
en utilisant les touches Â/¯
MUSIC SKIP ou les touches
numériques. Les indicateurs clignotent
dans l'affichage.
4. Appuyez de nouveau sur la touche
PROGRAM.
La plage n° 5 a été programmée comme
1er morceau du programme.
5. Appuyer alternativement sur les touches Â/¯ MUSIC SKIP (ou sur les
touches numériques) et la touche PROGRAM pour programmer des plages
dans l'ordre montré dans l'exemple.
6. Appuyer sur la touche de lecture PLAY
(∏).
La lecture programmée commence à
partir de la première plage programmée.
4. Appuyez de nouveau sur la touche
● La programmation des morceaux n'est
possible que quand le lecteur est dans
le mode d'arrêt.
● Le contenu du programme sera conservé en mémoire, même une fois la
lecture programmée terminée ou même
si la lecture programmée est arrêtée en
appuyant sur la touche STOP (ª).
● Si la touche CLEAR est pressée dans le
mode d'arrêt, le contenu du programme
sera complètement effacé.
Ajout à la séquence pro-
grammée
Appuyer sur la touche STOP (ª), puis
appuyer sur la touche CHECK jusqu'à ce
que "--" soit montré sur l'affichage TRACK.
Répéter à partir de l'étape 2.
Pour effacer la mémoire de pro-
gramme
1. Pendant la lecture programmée du
disque, appuyer une fois sur la touche
STOP(ª) pour faire revenir le lecteur
CD en mode d'attente.
2. Appuyer sur la touche CLEAR pour
effacer la mémoire du programme.
● Appuyer une fois sur la touche
OPEN/CLOSE(ø), et la mémoire de programme sera effacée.
● La mémoire de programme sera également effacée si l'alimentation du
lecteur CD est coupée.
Pour la lecture répétée du
disque entier (mode de
répétition complète)
1. Appuyer deux fois sur la touche 1/ALL.
Les indicateurs REPEAT et ALL s'allument.
2. Appuyer sur la touche PLAY (Á).
La lecture commence et, quand le
disque est terminé, le lecteur revient au
début du premier morceau et continue
la lecture de façon répétée.
Pour la lecture répétée d'une
section définie (mode de
répétition A-B)
1. Appuyer sur PLAY (Á) pour commencer la lecture.
2. Spécifier le point où la lecture doit
commencer (point A) en pressant la
touche A-B.
Les indicateurs REPEAT et A -s'allument.
Presser
S'allument
Presser à nouveau.
Le lecteur retourne alors au point A et la
lecture commence automatiquement.
Quand la lecture atteint le point B, le
lecteur revient au point A et reprend la
lecture de façon répétée.
Numéro de
morceau
sur le disque
Numéro de
programmation
Morceaux
programmés
Titelnummer
auf der CD
Programm-
Nummer
Programm-
Wiederholung
Light
Again
Press

Lecture répétée programmée
or
La fonction de répétition peut être activée
même dans le mode de lecture programmée. Pour répéter tous les morceaux
programmés, appuyer deux fois sur la
touche 1/ALL. (Alors, contrôler que les indicateurs REPEAT et ALL s'allument.)
● Lorsque la touche 1/ALL est sollicitée
pour être activée pendant la lecture
répétée programmée, le morceau
(piste) en cours de lecture sera répété.
● Toute fonction de répétition peut être
libérée en appuyant à nouveau sur la
même touche de répétition.
Fonctionnement de la
recherche musicale
Recherche musicale en util-
isant les touches MUSIC SKIP
(Â/¯)
Le début de tout morceau peut facilement
être localisé en utilisant les touches Â
et ¯ pendant la lecture ou en mode de
pause. Ce fonctionnement est clairement
indiqué sur l'affichage TRACK.
● Cette opération est possible même en
mode de lecture programmé; dans ce
cas, cependant, seuls les morceaux
programmés seront détectés.
Pour passer au morceau suivant
Appuyer sur la touche ¯.
Le lecteur passera au début du morceau
suivant à chaque pression sur la touche
¯. Le lecteur peut ainsi être avancé
jusqu'au dernier morceau, mais une fois
que le début du dernier morceau est atteint,
le lecteur n'avancera plus même si la
touche ¯ est pressée.
Pour revenir au morceau précédent
Appuyer sur la touche Â.
Le lecteur reviendra en arrière d'un
morceau à chaque pression sur la touche
Â. Si cette touche est pressée au milieu
d'un morceau, le lecteur revient au début
du morceau courant. Pour revenir au
morceau précédent, la touche doit être
pressée deux fois.
Il est ainsi possible de revenir au début du
premier morceau du disque.
Recherche musicale en
utilisant les touches SEARCH
(Ô/)
En lecture ou dans le mode de pause, maintenir pressée la touche
déplacer rapidement la position de lecture
vers l'avant, et maintenir pressée la touche
pour
Ô pour un déplacement rapide dans le
sens inverse.
Pendant la recherche manuelle, le son sera
audible mais le niveau de sortie sera
atténué. Ceci vous permet de rechercher
n'importe quelle plage voulue tout en
contrôlant le son.
Quand la position voulue est atteinte,
libérer la touche pour revenir dans le mode
précédent.
ou
Affichage de l'indicateur de
durée
L'indicateur de durée indique différentes
lectures de durée, comme montré.
1 Durée totale de lecture du disque
Après la fermeture du tiroir avec un
disque en place, la durée totale de lecture du disque et le nombre total de
morceaux sur le disque sont affichés.
2 Affichage de la durée écoulée
Quand la lecture commence, la durée
écoulée du morceau en lecture est
affichée en minutes et en secondes.
3 Affichage de la durée restante totale
(TOTAL REMAIN)
Affichée si la touche TIME a été
pressée une fois. Cet affichage de
durée est la durée totale de lecture
restante à partir de la position de lecture jusqu'à la fin du disque; le compteur décompte jusqu'à "00:00" pendant
la lecture.
4 Affichage de la durée restante
(REMAIN)
Affichée si la touche TIME a été
pressée deux fois. Ceci permet une
vérification facile de la durée restante
du morceau en cours de lecture.
5 Affichage de la durée écoulée
Affichée si la touche TIME est pressée
trois fois.
La durée affichée est la durée de lecture écoulée.
● En mode de lecture normale, si un
morceau dont le numéro de piste est
supérieur à 23 (mais n'est pas le
dernier) est lu, la durée restante ne sera
pas affichée sur le compteur de durée
même si la touche TIME est pressée. A
la place, "--:--" sera indiqué dans le
compteur de durée.
FRANÇAIS
– 17 –

– 18 –
Boîtier de télécommande
Le boîtier de télécommande fourni permet
la commande à distance de l'appareil.
Pour l'utilisation du boîtier de télé-commande, le diriger vers le détecteur de
télécommande du panneau avant de l'ap-
pareil.
● Même si le boîtier de télécommande est
activé dans la zone de fonctionnement,
la commande à distance peut être
impossible s'il y a des obstacles entre le
lecteur et le boîtier de télécommande.
● Si le boîtier de télécommande fonctionne dans le voisinage d'autres
appareils générant des rayons
infrarouges, ou si d'autres télécommandes utilisant des rayons infrarouges
sont utilisées près du lecteur, le lecteur
peut de ne pas bien fonctionner. Dans la
situation inverse, les autres appareils
peuvent ne pas bien fonctionner.
Mise en place des piles
1. Retirer le couvercle du compartiment
des piles.
2. Introduire deux piles "AA" (R6, SUM-3).
S'assurer que les piles sont correctement mises en respectant les polarités
plus ≠ et moins – .
3. Fermer le couvercle jusqu'au déclic.
Remplacement des piles
Si vous remarquez que la distance entre le
boîtier de télécommande et le lecteur
devient plus courte pour un fonctionnement
correct, ceci indique que les piles sont
usées. Dans ce cas, remplacer les piles par
des nouvelles.
Précautions à observer concernant les
piles
● Bien placer les piles en respectant les
polarités plus ≠ et moins – .
● Utiliser des piles du même type. Ne
jamais essayer d'utiliser des types de
pile différents ensemble.
● Des piles ou des batteries peuvent être
utilisées. Se référer à leurs étiquettes
pour les précautions à respecter.
● Si le boîtier de télécommande n'est pas
utilisé pendant une longue période (plus
d'un mois), retirer les piles du boîtier de
télécommande pour éviter des fuites de
pile. Si elles coulent, essuyer le liquide
dans le compartiment des piles et remplacer les piles par des neuves.
● Ne pas chauffer, démonter les piles ni
les mettre au feu.
LECTEUR CD
Capteur: laser à semi-conducteur, 3 rayons
Convertisseur N/A: Convertisseur D/A à 1
bit
Filtre numérique: Suréchantillonnage 4
fois, 16 bit
Filtre analogique: Butterworth du 3ème
ordre
Réponse en fréquence:
20 Hz à 18 kHz ±3 dB
Distorsion harmonique totale:
Inférieure à 0,09% (1 kHz)
Rapport signal/bruit (S/B):
Supérieur à 96 dB
Séparation des canaux:
Supérieure à 80 dB (1 kHz)
Sortie:
Analogique; 2, 0 Vrms (RCA)
Casque d'écoute; 110 mW / 32 Ω
Pleurage et scintillement:
Inférieur à la limite mesurable
GÉNÉRALES
Alimentation:
120 V CA, 60 Hz (modèle EtatsUnis/Canada)
230 V CA, 50 Hz (modèle RoyaumeUni/Europe)
240 V CA, 50 Hz (modèle Australie)
Consommation: 12 W (CA)
Dimensions (L x H x P):
435 x 104 x 290 mm
Poids net: 3,5 kg
Accessoires standard:
Télécommande sans fil (RC-673), cordon à
fiches à broche RCA, pile (type SUM-3,
"AA", "R6") x 2 (sauf pour modèle EtatsUnis/Canada)
● Des améliorations peuvent apporter des
changements dans les caractéristiques
techniques et générales sans préavis.
● Les illustrations peuvent légèrement
différer des modèles de production.
Fonctionnement avec le boîtier de télécommande Spécifications

En cas de difficulté
La recherche de causes de mauvais fonctionnements d'un lecteur de disque audionumérique est fondamentalement identique à celle de tout autre
appareil électrique ou électronique. Toujours vérifier les causes les plus probables en premier. Pour vous donner une idée des points à vérifier,
consulter la liste suivante:
Problème Cause probable Remède
Pas d'alimentation quand l'interrupteur
d'alimentation est pressé.
Pas de lecture quand un disque est mis en
place.
Pas de sortie audio. Le raccordement à la chaîne stéréo est
Seul un morceau peut être lu. La touche 1/ALL est engagée. Presser la touche pour la désengager.
Pas de lecture programmée. La touche PROGRAM n'est pas pressée. Presser la touche pour afficher ˝PRO-
Mauvais alignement (son sautant). Le lecteur subit des vibrations ou chocs. Changer la position d'installation du
Bourdonnement. La fiche à broche n'est pas raccordée fer-
Bruit dans le syntoniseur. Le lecteur est trop près du syntoniseur. Laisser une distance raisonnable entre eux
Le fonctionnement du boîtier de télécommande est impossible.
La prise d'alimentation n'est pas bien
branchée.
Le disque est mis en place avec l'étiquette
tournée vers le bas.
Le disque est sale. Nettoyer la surface du disque.
incorrect.
Le disque est sale. Nettoyer la surface du disque.
mement.
L'interrupteur POWER du lecteur est sur
OFF.
Les piles ne sont pas en place dans le
boîtier de télécommande.
Bien la brancher.
Le mettre en place avec l'étiquette tournée
vers le haut.
Vérifier les raccordements.
La raccorder à nouveau fermement.
ou couper l'alimentation du lecteur.
Placer l'interrupteur sur ON.
Installer les piles.
FRANÇAIS
Attention:
Comme l'appareil utilise un micro-ordinateur, il peut ne pas fonctionner correctement à cause de bruits externes, etc. Dans ce cas, couper l'alimentation, puis la remettre et reprendre les opérations.
– 19 –

– 20 –
● Wählen Sie einen geeigneten Standort
für den Spieler. Nicht geeignet sind
Standorte, die direkter Sonneneinstrahlung, Heizquellen, Vibrationen,
Staubeinwirkung, starken Temperaturschwankungen oder Feuchtigkeit ausgesetzt sind. Von Brummstörungen
verursachenden Geräten wie Transformatoren etc. fernhalten.
● Niemals das Gehäuse öffnen, da hierdurch Schäden an der Elektronik
und/oder elektrische Schläge verursacht werden können. Falls ein
Fremdkörper in das Geräteinnere gelangen sollte, wenden Sie sich bitte an
Ihren Fachhändler.
● CDs niemals mit verschmutzten Fingern
handhaben. Niemals eine verkratzte CD
einlegen.
● Bei Abziehen des Netzkabels darauf
achten, das Kabel am Stecker zu halten.
Niemals am Kabel ziehen.
● Um den Laser-Tonabnehmer sauberzuhalten, diesen nicht berühren und den
CD-Halter stets einfahren.
● Zur Gehäusereinigung keine Lösungsmittel verwenden, da hierdurch die
Gehäuseoberfläche beschädigt werden
kann. Ein sauberes trockenes Tuch verwenden.
● Bewahren Sie diese Bedienungsanleitung auf, um bei eventuell später
auftauchenden Fragen darin nachschlagen zu können.
Dieses Gerät ist ausschließlich zum
Abspielen von Compact Discs vorgesehen,
die mit dem "˛" Symbol gekennzeichnet
sind.
● CDs stets mit nach oben weisendem
Etikett in den CD-Halter einlegen. (CDs
sind nur einseitig bespielt.)
● Zur Entnahme einer CD aus ihrer
Schutzhülle die Haltenabe in der Mitte
drücken. Die CD vorsichtig an ihrer
Kante halten und entnehmen.
Vor Inbetriebnahme
Bitte vor Inbetriebnahme lesen
Auf Kondensationsniederschlag achten!
Wenn das Gerät oder CDs von kalter in
eine warme Umgebung gebracht werden, bzw. einer starken Temperaturschwankung ausgesetzt sind, besteht die Gefahr von Kondensa-tionsniederschlag am Laser-Tonabnehmer.
Durch eine solche Beeinträchtigung
wird die Abtast-funktion des Lasers
schwerwiegend gestört, so daß keine
Toninformation von der CD erhältlich
ist. Sollte die Möglichkeit von
Kondensations- niederschlag gegeben
sein, emp-fehlen wir, nach
Netzanschluß ein bis zwei Stunden bis
zur Inbetriebnahme zu warten. Nach
Ablauf dieser Zeitspanne sollte ein
Temperatur-ausgleich des Geräts
gegeben sein.
Handhabung von Compact Discs
Die CD am Rand halten
● Fingerabdrücke und Staub auf der
bespielten Seite mit einem sauberen
trockenen Tuch entfernen.
Gerade nach außen wischen
● Unter keinen Umständen zur Reinigung
von CDs herkömmliche Plattenreinigungsmittel wie Plattenspray oder
-flüssigkeit, Benzin, Farbverdünner oder
ähnliche Chemikalien verwenden. Die
Kunststoffoberfläche der CD kann hierdurch irreparablen Schaden nehmen!
● CDs nach Gebrauch stets wieder in ihre
Schutzhülle einlegen. Hierdurch sind
diese vor Staub, Kratzern etc.
geschützt, die zu Abtastaussetzern des
Lasers führen können.
● CDs niemals über einen längeren
Zeitraum direkter Sonneneinstrahlung,
hoher Feuchtigkeit und Temperatur aussetzen.
Bei längerer Einwirkung von hohen
Temperaturen kann es zu Ver-werfungen der CD kommen.
● Keine Aufkleber an der Etikettseite
anbringen, und niemals mit einem
Kugelschreiber die Etikettseite
beschriften.
Entnehmen der CD

Anschlüsse
To AC Outlet
CD-P1120
L
R
Vor der Herstellung der Anschlüsse sicherstellen, daß bei allen Geräten die
Spannungsversorgung abgeschaltet ist.
Die diesbezüglichen Angaben in der
Bedienungsanleitung des StereoVerstärkers etc. unbedingt beachten.
Achtung:
Falls dieser CD-Spieler Interferenzen beim
UKW-Tuner, TV-Empfänger etc. verursacht,
auf ausreichenden Abstand achten.
∑ Signalkabel
Stellen Sie die Verbindung zwischen den
LINE OUT Ausgängen und dem
entsprechenden Eingang Ihres Verstärkers
mit RCA-Kabeln her.
Anschlußkabel
(Cinch-Stecker)
∑ Netzkabel
Bei Netzanschluß sichergehen, daß die
vorgeschriebene Netzspannung vorliegt.
∑ Kopfhörerbuchse
Für den Anschluß eines Stereo-Kopfhörers.
O Die Kopfhörerlautstärke einstellen.
Netzanschluß
DEUTSCH
Ver stärker
– 21 –

– 22 –
1 Netzschalter (POWER)
2 Multifunktions-Displayfeld
a Wiedergabe-/Pausenanzeigen (Á/ ƒ)
b REPEAT (1/ALL /A-B)-Anzeigen
c SHUFFLE-Anzeige
d INTRO-Anzeige
e PROGRAM-Anzeige
f MUSIKKALENDER-Anzeige
g Zeitanzeige (REMAIN)
h TRACK-Display
i Zeitzähleranzeige
3 CD-Halter
4 Fernbedienungs-Empfangssensor
(REMOTE SENSOR)
5 OPEN/CLOSE (∫)-Taste
6 Sprungtasten (MUSIC SKIP Â/¯)
7 Wiedergabetaste (Á)
8 Pausetaste (ƒ)
9 STOP (∑)-Taste
0 SEARCH (Ô/)-Tasten
q Zeittaste (TIME)
w PROGRAM-Taste
e REPEAT (1/ALL, A-B)-Tasten
r SHUFFLE-Taste
t Kopfhörerpegelregler/Kopfhörerbuchse
(PHONES)
y Numerische Tasten (1~9, 0)
u Löschtaste (CLEAR)
i INTRO CHECK-Taste
Bezeichnungen der Bedienungselemente
3
y
q
e
0
9
8
u
w
r
i
6
7

Betrieb
For 8 cm (3-inch)
CD singles
For 12 cm (5-inch)
Compact Discs
CD mit bis zu 16
Titeln
Gesamt-Titelzahl
der CD
Gesamtspielzeit
der CD
Grundsätzliche Bedienschritte
1. Den POWER-Schalter drücken.
2. Die OPEN/CLOSE (ø)-Taste betätigen.
Der CD-Halter wird ausgefahren. Eine
CD vorsichtig mit nach oben weisendem
Etikett einlegen. Die CD muß in der
Mitte des CD-Halters innerhalb der CDFührung eingesetzt werden.
Für CD-Singles
(8 cm)
3. Die OPEN/CLOSE (ø)-Taste erneut
betäti-gen.
Der CD-Halter wird eingefahren.
Nach wenigen Sekunden erscheint die
folgende Anzeige. Der CD-Spieler ist
wiedergabebereit.
Für normale CDs
(12 cm)
Direktwiedergabe:
Betätigen Sie die dem Titel entsprechenden
numerischen Tasten und dann die PLAY
(Á)-Taste. Die Wiedergabe erfolgt ab
diesem vorgewählten Titel.
Beispiel 1:
Start bei Titel-Nr. 5: drücken.
Beispiel 2:
Start bei Titel-Nr. 21: Zweimal
drücken.
Bei ausgefahrenem CD-Halter
Wenn die Á-Taste betätigt wird:
Der CD-Halter wird eingefahren und die
Wiedergabe startet mit dem ersten Titel.
Wiedergabestop
Wiedergabestop:
Die STOP (ª)-Taste betätigen. Das
Laufwerk wird gestoppt.
Entnehmen der CD:
Die OPEN/CLOSE (ø)-Taste betätigen. Die
Wiedergabe wird gestoppt, der CD-Halter
wird ausgefahren, und das Gerät schaltet
auf den Anfangs-Status.
Wiedergabepause:
Die ƒ-Taste betätigen. Die Wiedergabe
wird bei gegebener Laser-Tonabnehmerposition unterbrochen. Die Pausenanzeige
ƒ leuchtet. Zur Wiedergabefortsetzung die
Á oder ƒ-Taste betätigen.
Zufallswiedergabe
Bei Stop oder normaler Wiedergabe kann
auf diese Funktion geschaltet werden.
1. Die SHUFFLE-Taste drücken.
Die SHUFFLE-Anzeige leuchtet.
2. Drücken Sie die PLAY (Á)-Taste. Die
Anzeige dreht sich im TRACKAnzeigebereich, solange der Player die
Titel mischt.
3. Die Titel werden in zufällig gewählter
Reihenfolge abgespielt.
Hinweise:
● Zum zufälligen Titel-Aufruf die ¯-
Taste drücken. Mit der Â-Taste kann
die Wiedergabe am Anfang des vorliegenden Abspiel-Titels neu gestartet
werden.
● Ein bereits abgespielter Titel wird nicht
mehr aufgerufen.
● Zum Abbruch der Zufallswiedergabe
nochmals die SHUFFLE-Taste drücken.
DEUTSCH
Anspielsuchlauf
Für einen schnellen Inhaltsüberblick werden jeweils die ersten 10 Sekunden jedes
Titels angespielt.
4. Die PLAY/-Taste (Á) betätigen.
Die Wiedergabe startet beim ersten
Titel, die Wiedergabeanzeige Á leuchtet.
● Bei Wiedergabe blinkt im Musik-kalender jeweils die Nummer des AbspielTitels.
● Nach vollständiger Wiedergabe erlischt
die zugehörige Titelnummer des
Musikkalenders.
VORSICHTSMASSNAHMEN:
● Den Halter bei Öffnen oder Schliessen per Hand nicht mit Gewalt
bewegen.
● Bei Nichtgebrauch den Halter stets
geschlossen halten, um das
Eindringen von Staub und sonstige
Verschmutzungen zu verhindern.
1. Die INTRO CHECK-Taste drücken.
2. Die PLAY/-Taste (Á) betätigen.
Die INTRO- und Á-Anzeigen
erscheinen.
3. Zur Löschung der Anspielfunktion
nochmals die INTRO CHECK-Taste
drücken.
● Die Anspielfunktion ist auch in
Verbindung mit der SHUFFLE- und
REPEAT ALL-Funktion einsetzbar. Diese
Funktion muß mit der STOP (ª)-Taste
gelöscht werden.
● Die Anspielfunktion ist auch für programmierte Titel einsetzbar.
– 23 –

– 24 –
Die Wiederholfunktion ermöglicht die
Wiedergabe-Wiederholung für einen
Einzeltitel, einen beliebigen CD-Abschnitt
oder die gesamte CD.
Titelwiederholung
(Einzelwiederholung)
1. Die REPEAT-Taste 1/ALL betätigen.
Die REPEAT und 1-Anzeige leuchten.
2. Den gewünschten Titel mit den
numerischen Tasten anwählen.
Der vorbestimmte Titel wird abgespielt.
Bei Erreichen des Titelendes wird zum
Beginn dieses Titels und erneut auf
Wiedergabe geschaltet. Auf diese
Weise kann der vorbestimmte Titel
beliebig oft wiederholt werden.
Wiederholfunktion
1. Die STOP (ª)-Taste betätigen.
2. Die PROGRAM-Taste betätigen.
Das Gerät schaltet auf den Programmiermodus.
Die PROGRAM-Anzeige leuchtet.
3. Geben Sie den ersten programmierten
Titel (5) mit den ./¯ MUSIC
SKIP- oder den numerischen Tasten
ein. Die Displayfeld-Anzeigen blinken.
4. Betätigen Sie erneut die PROGRAMTaste.
Der 5. Titel der CD wurde als 1.
Programmnummer gespeichert.
5. Zur Titelprogrammierung in der
gezeigten Reihenfolge abwechselnd
die Ô/ MUSIC SKIP-Tasten
(oder numerischen Tasten) und die
PROGRAM-Taste drücken.
● Diese Funktion erlaubt die Wiedergabe
von in beliebiger Reihenfolge programmierten Titeln (max. 20).
● Wenn bereits 16 Titel eingegeben wurden, entfällt die MUSIKKALENDERAnzeige für alle zusätzlich eingegebenen Titel.
Programmierung gewünschter
Titel
Programm-Wiedergabe
Beispiel 1:
Bei Stopbetrieb die programmierte
Titelfolge 5 ∑ 2 ∑ 8 eingeben.
6. Die Taste ∏ drücken.
Die programmierte Wiedergabe startet
beim ersten Programmtitel.
Gesamtwiederholung
(Alle Titel)
1. Die REPEAT-Taste 1/ALL zweimal
betätigen.
Die REPEAT- und ALL-Anzeige leuchten.
2. Die PLAY (Á)-Taste betätigen.
Die Wiedergabe startet. Bei Erreichen
des CD-Endes wird zum Anfang der CD
geschaltet und die gesamte CD erneut
abgespielt.
Abschnittswiederholung
(A-B-Abschnitt)
1. Zum Wiedergabestart die PLAY (Á)Taste drücken.
2. Die Position, an der die Abschnittswiederholung starten soll, durch
Betätigen der A-B-Taste kennzeichnen
(Position A).
Die REPEAT- und A-Anzeigen leuchten.
● Programmeingabe ist nur bei Stopbetriebsart möglich.
● Die Programmspeicherung wird auch
nach komplettem Abspielen aller programmierten Titel oder nach
Abschaltung der programmierten
Wiedergabe mit der Stoptaste (ª)
beibehalten.
● Wird bei Stopbetrieb die CLEAR-Taste
betätigt, wird der gesamte Speicherinhalt gelöscht.
Anfügung von programmierten
Titeln
Die STOP (ª)-Taste und dann die CHECKTaste drücken, bis im TRACKAnzeigebereich "--" gezeigt wird. Die
Bedienschritte ab Schritt 2 wiederholen.
Löschung von programmierten
Titeln...
1. Während der programmierten
Wiedergabe einmal die STOP (ª)-Taste
drücken, um den CD-Spieler auf
Bereitschaft zu schalten.
2. Zur Löschung der Titelprogrammierung
die CLEAR-Taste drücken.
● Die OPEN/CLOSE (ø)-Taste einmal
drücken. Hiermit werden die gespeicherten
Programmtitel gelöscht.
● Die gespeicherten Programmtitel werden auch bei Abschaltung des CDSpielers gelöscht.
Betätigen
3. Bei Erreichen der End-Position der
Abschnittswiederholung (Position B)
nochmals die A-B Taste betätigen.
Die Anzeige B leuchtet zur Bestätigung,
daß die A-B-Abschnittswiederholung
aktiviert wurde.
Nochmals betätigen
Leuchten
Der Laserabtaster wird nun zu Position
A zurückgesetzt, und die Wiedergabe
startet automatisch.
Bei Erreichen von Position B erfolgt
Rückschaltung zu Position A und
erneute Wiedergabe.
Titelnummer
auf der CD
ProgrammNummer
ProgrammWiederholung
Light
Again
Press

Wiederholfunktion für program-
or
mierte Titel
Die Wiederholfunktion ist auch bei programmierter Wiedergabe verfügbar.
Zur Wiederholung aller programmierten
Titel die 1/ALL-Taste zweimal betätigen.
(Sichergehen, daß REPEAT- und ALLAnzeige leuchten.)
● Wird während der Programmwiedergabe die 1/ALL Taste gedrückt, wird der
vorliegende Titel wiederholt abgespielt.
● Zur Abschaltung der Wiederholungsfunktion erneut die REPEAT-Taste
betätigen.
Titelsuchlauf
Titelsuchlauf mit den
Â/¯- Tasten (MUSIC
SKIP)
Titelanfänge können mit Hilfe der
Â/¯- Tasten bei Wiedergabe oder
Pausebetrieb auf einfache Weise
angewählt werden. Diese Funktion wird im
TRACK-Display angezeigt.
● Diese Funktion arbeitet auch bei
Programmwiedergabe, allerdings nur
für die programmierten Titel.
Überspringen zum vorhergehenden
Titel
Taste  betätigen.
Bei jedem Betätigen der Taste  wird
der Laserabtaster zum Anfang des
vorhergehenden Titels gesetzt. (Wird die
Taste Âwährend einer Titelwiedergabe
betätigt, wird der Laserabtaster zum
Anfang dieses Titels zurückgesetzt. Daher
diese Taste zweimal drücken, um zum
vorhergehenden Titel zurückzuspringen.)
Auf diese Weise kann der Laserabtaster bis
zum Beginn des ersten Titels versetzt werden.
Titelsuchlauf mit den
Â/¯-Tasten (SEARCH)
Bei Wiedergabe oder Pause zur Auslösung
des schnellen Vorlaufs die Taste , zur
Auslösung des schnellen Rücklaufs die
Taste Ô betätigen.
Bei diesem Suchlauf erfolgt Tonwiedergabe bei reduzierter Lautstärke.
Sobald die gewünschte Position gefunden
wurde, die Taste loslassen.
oder
Zeitmessung
Die Zeitmessungsfunktionen liegen wie
folgt vor:
1 CD-Gesamtspielzeit
Nach Schließen des belegten CDHalters werden die Gesamtspielzeit und
die Titel-Gesamtzahl angezeigt.
2 Titel-Laufzeit
Nach Wiedergabestart wird die TitelLaufzeit in Minuten und Sekunden
angezeigt.
3 Gesamtrestzeit (TOTAL REMAIN)
Diese Anzeige erfolgt nach einmaligem
Betätigen der TIME-Taste. Die Messung
bezieht sich auf den Zeitabschnitt ab
Wiedergabeposition bis zum Ende der
CD. Die Messung erfolgt bei
Wiedergabe bis Anzeige "00:00".
4 Titel-Restzeit (REMAIN)
Diese Anzeige erfolgt nach zweimaligem Betätigen der TIME-Taste. Die
Restzeit ist so auf einen Tastendruck
verfügbar.
5 Laufzeit
Erscheint nach dreimaligem Antippen
der TIME-Taste.
Die Messung gibt die Laufzeit an.
DEUTSCH
Überspringen zum nächsten Titel
TasteI ¯ betätigen.
Bei jedem Betätigen der Taste ¯ wird
der Laserabtaster zum Anfang des nachfolgenden Titels gesetzt. Diese Funktion ist bis
zum Erreichen des letzten Titels verfügbar.
Wird die Taste ¯ nach Erreichen des
letzten Titels betätigt, erfolgt die
Weitersetzung des Laserab-tasters nicht.
● Wird im normalen Wiedergabemodus
ein Titel (der aber nicht der letzte Titel
ist) mit einer höheren Nummer als 23
abgespielt, unterbleibt die ZählwerkRestzeitanzeige, selbst wenn die TIMETaste betätigt wird. In disem Fall
erscheint die Zählwerk-Anzeige "--:--".
– 25 –

– 26 –
Fernbedienungseinheit
Die mitgelieferte Fernbedienungseinheit
ermöglicht die Bedienung des CD-Spielers
bequem vom Sitzplatz aus.
Die Fernbedienung auf den Fernbedienungs-Empfangssensor am CD-Spieler
richten.
● Innerhalb des zulässigen Entfernungsbereichs kann der Signal-empfang durch zwischen Fern-bedienung
und Empfangssensor befindliche
Gegenstände behindert werden.
● Bei Fernbedienbetrieb kann der CDSpieler Fehlfunktionen zeigen, wenn er
in der Nähe eines lnfrarotstrahlen
ausstrahlenden Geräts betrieben wird
oder wenn im gleichen Raum lnfrarotFernbedienungen anderer Geräte verwendet werden. Umgekehrt kann die
Fernbedienung dieses CD-Spielers
Fehlfunktionen bei anderen mit
lnfrarotsignalen zu bedienenden
Geräten verursachen.
Einlegen der Batterien
1. Die Batteriefach-Abdeckung entfernen.
2. Zwei Batterien "AA"(R6, SUM-3) unter
Beachtung der Polarität ( ≠ / – ) einlegen.
3. Die Abdeckung wieder anbringen.
Batteriewechsel
Sollte es erforderlich werden, den Abstand
zwischen Gerät und Fernbedienung zur
Funktionsauslösung zu verringern, wird ein
Batteriewechsel notwendig. Stets zwei
neue Batterien einlegen.
Batterie-Vorsichtsmaßnahmen
● Die Batterien unter Beachtung der korrekten Polarität ( ≠ und – ) ein-legen.
● Stets zwei Batterien des gleichen Typs
verwenden, niemals eine gebrauchte
und eine frische Batterie zusammen
verwenden.
● Sowohl Einweg- als auch wiederaufladbare Batterien können verwendet
werden. Die Sicherheitshinweise auf
den Batterien beachten.
● Bei längerem Nichtgebrauch (über
einen Monat) sollten die Batterien entnommen werden, um ein Auslaufen im
Batteriefach zu verhindern.
Ausgelaufene Batterien entnehmen und
nach Säubern des Batteriefachs gegen
frische auswechseln.
● Batterien nicht erhitzen, zerlegen oder
verbrennen.
CD-PLAYER
Abnehmer: 3-Strahl-Halbleiter-Laser
D/A-Wandler: 1 Bit-Wandler
Digitalfilter: 4-fach Oversampling, 16 Bit
Analogfilter: Butterworth-Filter 3. Ordnung
Frequenzgang: 20 Hz — 18 kHz ±3 dB
Klirrfaktor: < 0,09 % (1 kHz)
Signal/Rausch-Abstand: > 96 dB
Kanaltrennung: > 80 dB (1 kHz)
Ausgang: Analog; 2,0 Veff. (Cinch)
Kopfhörer: 110 mW / 32 Ohm
Gleichlaufschwankungen: Nicht meßbar
ALLGEMEIN
Spannungsversorgung:
120 V Wechselspannung, 60 Hz
(USA/Kanada-Modell)
230 V Wechselspannung, 50 Hz
(Großbritannien/Europa-Modell)
240 V Wechselspannung, 50 Hz
(Australien-Modell)
Leistungsaufnahme: 12 Watt (Netz)
Abmessungen (B x H x T):
435 x 104 x 290 mm
Netto-Gewicht: 3,5 kg
Mitgeliefertes Zubehör:
Drahtlose Fernbedienung (RC-673),
Cinch-Audiokabel, Batterie (SUM-3,
"AA", "R6") x 2, (außer für
USA/Kanada-Modell)
● Technische Änderungen vorbehalten.
● Die Abbildungen können leicht vom
hergestellten Modell abweichen.
Betrieb mit der Fernbedienung Technische Daten

Störungssuche
Die Störungssuche bei einem CD-Spieler entspricht der für andere elektrische und elektronische Geräte. Überprüfen Sie zunächst stets die naheliegensten Ursachen. Im folgenden sind einige Beispiele angeführt.
Störung Naheliegende Ursache Beseitigung
Nach Betätigen der POWER-Taste wird das
Gerät nicht eingeschaltet.
Keine Wiedergabe von der eingelegten CD. Die CD wurde mit der Etikettseite nach
Kein Tonausgang. Unkorrekter Anschluß am Stereosystem. Die Anschlüsse überprüfen.
Nur die Wiedergabe eines einzelnen Titels
ist möglich.
Keine Programm-Wiedergabe. Die PROGRAM-Taste wurde nicht betätigt. Die Taste betätigen, so daß die Anzeige
Spurfolgefehler Der Spieler war Vibrationen oder
Brummstörung. Die Verbindungskabel sind unkorrekt ange-
Störgeräusche bei einem nahe aufgestellten Tuner.
Kein Fernbedienbetrieb möglich. Der Spieler ist nicht eingeschaltet. Die POWER-Taste betätigen.
Netzkabel ist nicht korrekt angebracht. Korrekt anschließen.
unten weisend eingelegt.
Verschmutzte CD. Die Abspielseite der CD reinigen.
Die 1/ALL-Taste wurde betätigt. Die Taste nochmals betätigen.
Erschütterungen ausgesetzt.
Verschmutzte CD. Die Abspielseite der CD reinigen.
bracht.
Der Spieler ist in zu geringem Abstand zum
Tuner aufgestellt.
Korrekt einlegen.
“PROGRAM” erscheint.
Den Aufstellort des Spielers wechseln.
Den Anschluß korrigieren.
Für ausreichenden Abstand sorgen oder
den Spieler abschalten.
DEUTSCH
Keine Batterien im Batteriefach der
Fernbedienung.
Zur Beachtung:
Da dieses Gerät mit Mikrocomputer-Technologie arbeitet, kann es auf Grund von externen Interferenzstörungen zu Fehlfunktionen kommen. In
einem sochen Fall nochmals abschalten, wieder einschalten und erneut die erforderlichen Bedienschritte vornehmen.
Batterien einlegen.
– 27 –

– 28 –
● Scegliere con cura il luogo in cui installare l'apparecchio. Evitare di esporlo
alla diretta luce del sole o ad una sorgente di calore. Evitare inoltre luoghi
soggetti a vibrazioni o ad eccessive
accumulazioni di polvere, calore, freddo
od umidità. Tenere inoltre l'apparecchio
lontano da sorgenti di disturbi quali
trasformatori o motori.
● Non aprire la cassa dell'apparecchio.
Ciò potrebbe danneggiarne la circuitazione o causare scariche elettriche. Se
un qualche oggetto estraneo dovesse
essere entrato nell'apparecchio stesso, rivolgersi al rivenditore.
● Accertarsi di non maneggiare i CD con
le dita sporche. Non inserire mai un CD
con la superficie crepata.
● Per staccare la spina dalla presa di
rete, agire direttamente sulla spina
stessa, evitando di tirare il cavo.
● Per mantenere pulito il pickup laser
evitare di toccarlo, e non dimenticare di
chiudere sempre il piatto del CD.
● Evitare di pulire l'apparecchio con solventi chimici poichè ciò potrebbe danneggiare la rifinitura esterna. Fare semplicemente uso di un panno pulito ed
asciuto.
● Tenere questo manuale in un luogo di
facile accesso, per ogni eventuale
futuro riferimento.
Questo apparecchio è stato studiato particolarmente per la riproduzione di CD con il
marchio ˛ . Nessun altro tipo di CD può
essere riprodotto.
● Porre il CD sul piatto sempre con
l'etichetta rivolta verso l'alto (i CD sono
registrati solamente su di un lato).
● Per togliere il CD dal suo contenitore,
premere sul centro della scatola e sollevare il disco verso l'alto, tenendolo
con cura sui lati.
Modo corretto di togliere il CD
Modo corretto di tenere il CD
● Impronte digitali e polvere devono
essere accuratamente tolte dal lato
registrato del disco con un panno morbido.
Pulire in senso radiale
● Non fare mai uso di prodotti chimici
quali spray per dischi, spruzzatori o fluidi antistatici, benzina o altri solventi per
pulire i CD. Questi prodotti chimici possono danneggiare in modo irrepa-rabile
la superficie di plastica del CD.
● I CD, dopo l'uso, devono essere riposti
nella propria scatola, allo scopo di
evitare possibili scalfitture che potrebbero causare lo "scivolamento" del raggio laser di lettura.
● Evitare di esporre i CD alla diretta luce
del sole, all'umidità o ad alte temperature per periodi prolungati. Una lunga
esposizione ad alte temperature può far
ondulare i CD.
● Non incollare carta e non scrivere con
penne a sfera o simili oggetti appuntiti
sulla superficie del CD dal lato dell'etichetta.
Prima dell'uso
Come tenere i CD
Attenzione alla condensazione
Quando l'apparecchio (o i dischi compatti) viene trasferito da un luogo freddo in uno caldo, o viene usato dopo una
brusca varizione di temperatura, c'è il
pericolo di condensazione. Il vapore
acqueo in sospensione nell'aria può
condensarsi sul meccanismo o sul
pickup laser. Se delle gocce d'acqua si
formano su queste parti un ascolto corretto diventa impossibile perchè il pickup laser non può leggere perfettamente l'informazione dal disco. Per far
fronte a questo problema, se si usa
l'apparecchio in condizioni ove sia possibile il verificarsi della condensazione, sarà opportuno attendere,
prima di utilizzare l'apparecchio, per
una o due ore, dopo aver inserito nella
presa di corrente il cavo di alimentazione, per permettergli di stabi-lizzarsi alla temperatura dell'ambiente.
Leggere questo manuale prima
di procedere all'uso

Collegamenti
CD-P1120
L
R
Prima di eseguire i collegamenti, accertarsi di leggere con attenzione il manuale di
istruzioni dell'amplificatore stereo e disattivare l'alimentazione dell'amplificatore
stereo e del lettore.
Precauzioni:
Se il lettore per CD interferisce con la radio,
il televisore, o altri apparecchi elettrici,
porre i rispettivi apparecchi ad una distanza sufficiente ad evitare le interferenze.
∑ Cavi segnale
Collegate le uscite LINE OUT agli ingressi
CD ecc., del Vostro amplificatore stereo utilizzando cavetti dotati di jack tipo pin RCA
(opzionali).
∑ Cavo di alimentazione
Il cavo di alimentazione deve essere collegato ad una presa di corrente alternata di
rete la cui tensione sia del livello corretto
per questo apparecchio.
∑ Cuffie
Per l'uso della cuffia, collegare la spina alla
presa PHONES.
O Regolare il livello del segnale emesso
dalla presa della cuffia.
Cavo con
spinotti RCA
Amplificatore
Presa CA
ITALIANO
– 29 –

– 30 –
Nome dei comandi
1 Interruttore alimentazione (POWER)
2 Display di visualizzazione multifunzione
a Indicatori di Á (riproduzione) / ƒ (pausa)
b Indicatori REPEAT (1/ALL/A-B)
c Indicatore SHUFFLE
d Indicatore INTRO
e Indicatore PROGRAM
f Visualizzazione della tavola musicale
g Indicatore REMAIN
h Indicatore TRACK (pista)
i Indicazione del tempo
3 Piatto CD
4 Sensore telecomando (REMOTE SENSOR)
5 Tasto OPEN/CLOSE (∫)
6 Tasti MUSIC SKIP (Â/¯)
7 Tasto di riproduzione (Á)
8 Tasto di pausa (ƒ)
9 Tasto STOP (∑)
0 Tasti SEARCH (Ô / )
q Tasto di indicazione del tempo (TIME)
w Tasto PROGRAM
e Tasti REPEAT (1/ALL, A-B)
r Tasto SHUFFLE
t Comando PHONES LEVEL / Presa PHONES
y Tasti numerici (1~9, 0)
u Tasto di verifica (CHECK)
i Tasto INTRO CHECK
3
y
q
e
0
9
8
u
w
r
i
6
7

Operazioni
For 8 cm (3-inch)
CD singles
For 12 cm (5-inch)
Compact Discs
Sino a 16 numeri di
brano sul CD
Numero totale di
brani sul CD
Tempo di
riproduzione
totale del CD
Funzionamento di base
1. Portare l'interruttore POWER su ON.
2. Premere il tasto OPEN/CLOSE (ø).
Il piatto del CD fuoriesce. Appoggiare
gentilmente il CD sul piatto col lato
etichettato rivolto in alto. Il CD va inserito nelle guide al centro del piatto.
Per CD singoli
da 8 cm
3. Premere nuovamente il tasto
OPEN/CLOSE (∫).
Il piatto del CD si chiude.
Alcuni secondi più tardi, le informazioni
seguenti vengono visualizzate ed il lettore si porta nel modo di attesa.
Per CD da 12 cm
Riproduzione ad accesso diretto:
Agire sul tasto numerico corrispondente al
brano desiderato, e premere poi il tasto di
riproduzione PLAY (Á). Il lettore inizia la
riproduzione direttamente dal brano specificato.
Esempio 1:
Per iniziare la riproduzione dal brano
numero 5:
Premere
.
Esempio 2:
Per iniziare la riproduzione dal brano
numero 21:
Premere
.
Anche se il piatto del CD è
aperto...
Quando il tasto Á viene premuto:
Il piatto del CD si chiude e la riproduzione
inizia dal primo brano.
Per interrompere la ripro-
duzione
Per interrompere la riproduzione:
Premere il tasto STOP (∑). Il lettore entra
nel modo di arresto.
Per estrarre il CD:
Premere il tasto OPEN/CLOSE (∫) la riproduzione si interrompe ed il piatto del CD
fuoriesce e tutte le funzioni vengono inizializzate.
Riproduzione alternata
Questa funzione può venire usata sia ad
unità ferma che durante la riproduzione
normale.
1. Premere il tasto SHUFFLE.
L'indicatore SHUFFLE si illumina sul display.
2. Agire sul tasto di riproduzione PLAY
(Á). Mentre il lettore provvede alla
riproduzione in ordine casuale, sul
quadrante sotto la voce TRACK compare, in rotazione, l’indicazione “ ”.
3. I brani vengono scelti e riprodotti in
ordine casuale.
Note:
● Per scegliere un brano a caso, premere
il tasto / a funzione di riproduzione
alternata. Per riprodurre dall'inizio il
brano al momento in riproduzione, premere il tasto ..
● Un brano riprodotto in questo modo non
può venire riprodotto nuovamente.
● Per abbandonare la funzione di riproduzione alternata mentre è in corso,
premere di nuovo il tasto SHUFFLE. I
brani vengono riprodotti nel loro ordine
solito a partire da quello in corso.
4. Premere il tasto PLAY (Á).
La riproduzione del CD inizia dal primo
brano e l'indicatore Á(riproduzione) si
illumina.
● Durante la riproduzione, il numero del
brano al momento riprodotto lampeggia
sulla tavola musicale.
● Dopo che ciascun brano è stato
riprodotto, il numero di brano corrispondente scompare dalla tavola musicale.
Per interrompere temporaneamente la
riproduzione (modo di pausa):
Premere il tasto ƒ. La riproduzione si interrompe sulla posizione in cui il pickup si
trova in quel momento. L'indicatore ƒ
rimane illuminato continuamente. Per
riprendere la riproduzione dalla stessa
posizione premere il tasto Á o ƒ.
PRECAUZIONI:
● Non forzare il piatto con le mani
durante le operazioni di apertura e
chiusura.
● Non lasciare il piatto del CD aperto
quando il lettore non viene utilizzato
per prevenire l'ingresso di polvere e
sporco all'interno del meccanismo.
ITALIANO
Riproduzione del solo inizio dei
brani
La funzione di riproduzione del solo inizio
dei brani permette appunto la riproduzione
dei soli primi 10 secondi di ciascun brano.
1. Premere il tasto INTRO CHECK.
2. Premere il tasto PLAY (Á).
Vengono visualizzate le indicazioni
INTRO e Á.
3. Premere il tasto INTRO CHECK una seconda volta per far terminare la funzione.
● Questa funzione può venire usata anche
insieme a quellle di riproduzione alternata e ripetuta. Essa non cessa sino a
che non viene premuto il tasto STOP
(ª).
– 31 –

– 32 –
Aggiunte alla sequenza già pro-
grammata
Premere prima il tasto di arresto STOP (ª)
e agire poi sul tasto di verifica CHECK sino
a quando sul quadrante, sotto la voce
TRACK, compare l'indicazione “--”.
Ripetere poi le operazioni a partire dal
punto 2.
Per cancellare un programma...
1. Durante la riproduzione programmata,
premere il tasto STOP (ª) una volta per
portare il lettore nel modo di attesa.
2. Per cancellare il programma dalla
memoria agire sul tasto di cancellazione CLEAR.
● Premere una volta il tasto OPEN/CLOSE
(ø) ed il programma viene cancellato.
● Il programma può venire cancellato
anche spegnendo il lettore CD.
Per la ripetizione di un intero
CD (modo di ripetizione di tutti i
brani)
1. Premere due volte il tasto 1/ALL.
Gli indicatori REPEAT e ALL si illuminano
2. Premere il tasto PLAY (Á).
La riproduzione inizia e, quando la fine
del CD viene raggiunta, il lettore ritorna
all'inizio del primo brano e la riproduzione continua ripetutamente.
Per riprodurre una parte desig-
nata (modo di ripetizione A-B)
● La funzione di riproduzione programmata permette di programmare fino a 20
brani per la riproduzione nell'ordine
desiderato.
● Se si impostano più di 16 brani, il resto
non appare sulla tavola musicale.
Programmazione dei brani de-
siderati
Riproduzione programmata
1. Premere il tasto STOP (ª).
2. Premere il tasto PROGRAM.
Il lettore entra in modalità di programmazione.
L'indicatore PROGRAM si illumina sul
display.
3. Agendo opportunamente sui tasti
./¯ MUSIC SKIP o direttamente
per mezzo dei tasti numerici, inserire il
primo brano (numero 5) della serie che
si vuole programmare. La relativa indicazione del quadrante lampeggia.
4. Premere ancora il tasto PROGRAM.
Il brano No.5 risulta così inserito come
No.1 del programma.
5. Agire poi alternativamente sui tasti
Â/¯ MUSIC SKIP (o sui tasti
numerici) e sul tasto di programmazione PROGRAM per programmare
gli altri brani, nell'ordine indicato nell'esempio.
d
Funzione di ripetizione
● La programmazione di brani è possibile
solo quando il lettore si trova nel modo
di arresto.
● I contenuti programmati vengono mantenuti in memoria anche dopo che la
riproduzione programmata è terminata
oppure quando la riproduzione programmata viene interrotta premendo il
tasto di arresto (ª).
● Quando il tasto CLEAR viene premuto
nel modo di arresto, i contenuti programmati vengono cancellati completamente.
La funzione di ripetizione permette la riproduzione ripetuta di un qualsiasi singolo
brano, dell'intero CD oppure di una qualsiasi parte desiderata del CD delimitata da
due punti (avvio e fine).
Per la ripetizione di un brano
(modo di ripetizione di un brano
singolo)
1. Premere il tasto 1/ALL.
Gli indicatori REPEAT e 1 si illuminato.
2. Premere il tasto(i) numerico corrispondente al brano desiderato.
Il brano selezionato viene riprodotto e
quindi, quando la fine del brano viene
raggiunta, il letttore ritorna all'inizio del
brano e la riproduzione reinizia. In
questo modo il brano selezionato viene
riprodotto ripetutamente.
1. Per avviare la riproduzione agire sul
tasto PLAY (Á).
2 Designare il punto di avvio della ripro-
duzione (punto A) premendo il tasto AB.
Gli indicatori REPEAT ed A si illuminano.
Premere
3 Quando viene raggiunto il punto in cui
si desidera che la riproduzione termini,
premere nuovamente il tasto A-B per
designare il punto B.
La lettera B si illumina, ad indicare che
la funzione di ripetizione A-B è stata
attivata.
Il lettore ritorna automaticamente al
punto A e reinizia la riproduzione.
Quando la riproduzione raggiunge il
punto B, il lettore ritorna al punto A e
reinizia la riproduzione, ripetutamente.
● La funzione di riproduzione del solo
inizio dei brani funziona anche insieme
a quella di riproduzione programmata.
Premere nuovamente
Illuminati
6. Premere il tasto PLAY.
La riproduzione inizia dal primo brano
programmato.
Esempio:
Per programmare i brani nell'ordine
5 ∑ 2 ∑ 8 nel modo di arresto.
No. di brano
sul CD
No.
programma
Brani
programmati
Tune No.
on disc
Program
No.
Programme
tunes
Light
Press
Again

Riproduzione ripetuta progra-
or
mmata
La funzione di ripetizione può essere attivata anche nel modo di riproduzione programmata.
Per ripetere tutti i brani programmati premere due volte il tasto 1/ALL. (A questo
punto controllare che gli indicatori REPEAT
ed ALL siano illuminati).
∑ Per saltare al brano precedente
Premere il tasto Â.
Il lettore salta al brano precedente ogni
volta che il tasto  viene premuto. Se
questo tasto viene premuto nel mezzo di un
brano, il lettore salta all'inizio del brano
stesso. Per saltare al brano precedente è
necessario premere il tasto due volte. In
questo modo è possibile ritornare fino
all'inizio del primo brano del CD.
Display contatore tempo
Il contatore del tempo indica diversi tempi
nel modo seguente.
● Quando il tasto di 1/ALL viene premuto
durante la riproduzione ripetuta programmata, il brano in corso di riproduzione viene riprodotto ripetutamente.
● Qualsiasi funzione di ripetizione può
essere abbandonata premendo nuovamente il tasto di ripetizione.
Operazione di ricerca musicale
Ricerca musicale utilizzando i
tasti MUSIC SKIP (Â/¯)
L'inizio di un qualsiasi brano può essere
localizzato facilmente utilizzando i tasti
 e ¯ durante la riproduzione
oppure nel modo di pausa. Questa operazione viene indicata chiaramente nel indicatore TRACK.
● Questa operazione è possibile anche
nel modo di riproduzione programmata
però solo i brani programmati vengono
rilevati.
∑ Per saltare al brano successivo
Premere il tasto ¯.
Il lettore salta al brano successivo ogni
volta che il tasto ¯ viene premuto. Il lettore può arrivare fino all'ultimo brano in
questo modo ma, una volta che l'inizio dell'ultimo brano è stato raggiunto, esso non
avanza più anche se il tasto ¯ viene premuto.
Ricerca musicale utilizzando i
tasti SEARCH (Ô/)
Durante la riproduzione oppure nel modo di
pausa, tenere premuto il tasto per
spostare rapidamente in avanti la posizione della riproduzione e tenere premuto il
tasto Ô per spostarla all'indietro.
Durante l'operazione di ricerca manuale, il
suono è udibile ma il livello di uscita viene
abbassato. Ciò permette di ricercare una
qualsiasi parte desiderata controllando il
suono.
Quando la parte desiderata è stata raggiunta, rilasciare il tasto per rientrare nel
modo precedente.
o
1 Tempo di riproduzione totale del CD
Dopo che il piatto portadisco contenente un disco si è richiuso, la durata
totale del disco stesso ed il numero di
brani che contiene vengono visualizzati.
2 Visualizzazione del tempo trascorso
Quando la riproduzione inizia, il tempo
trascorso del brano in corso di riproduzione viene indicato in minuti e secondi.
3 Visualizzazione del tempo totale rima-
nente (TOTAL REMAIN)
Il tempo totale rimanente viene visualizzato quando il tasto TIME viene premuto una volte. La visualizzazione del
tempo è quella del tempo di riproduzione totale rimanente dalla
posizione corrente fino alla fine del CD;
durante la riproduzione il contatore
conta alla rovescia fino a "00:00".
4 Visualizzazione del tempo rimanente
(REMAIN)
Il tempo rimanente viene visualizzato
quando il tasto TIME viene premuto due
volta. Esso fornisce una comoda informazione sul tempo rimanente del brano
in corso di riproduzione.
5 Visualizzazione del tempo rimanente
Viene visualizzato premendo il tasto
TIME tre volte. Il tempo visualizzato è
quello trascorso di riproduzione.
● Se, nella normale modalità di riproduzione, viene riprodotto un brano il cui
numero d'ordine è superiore a 23 (ma
non si tratta dell'ultimo brano), pur premendo il tasto TIME il tempo rimanente
sino alla fine del brano non viene visualizzato sul contatempo, sul quale compare invece l'indicazione
"--:--".
ITALIANO
– 33 –

– 34 –
Unità di telecomando
L'unità di telecomando in dotazione pemette di comandare a distanza l'appa-recchio.
Quando si utilizza l'unità di telecomando,
puntarla verso il sensore sul pannello anteriore dell'apparecchio.
● Anche se l'unità di telecomando viene
utilizzata entro il campo efficace, il
comando a distanza potrebbe essere
impossibile se vi sono degli ostacoli tra
il telecomando ed il lettore.
● Se l'unità di telecomando viene utilizzata in prossimità di altri apparecchi
che generano raggi infrarossi oppure se
altri dispositivi di comando a distanza
utilizzanti raggi infrarossi vengono utilizzati in prossimità del lettore, esso
potrebbe funzionare in modo scorretto.
Dal punto di vista opposto anche gli altri
apparecchi potrebbero funzionare in
modo scorretto.
Installazione batterie I
1. Rimuovere il coperchio del vano batterie.
2. Inserire due batterie "AA" (R6, SUM-3).
Accertarsi che le batterie siano inserite
con i poli positivo ≠ e negativo –
nelle posizioni corrette.
3. Chiudere il coperchio fino a sentire uno
scatto.
Sostituzione batterie
Se si notasse che la distanza di funzionamento diminuisce, ciò indica che le batterie sono scariche. In tale caso sosti-tuire
le batterie con altre di nuove.
Precauzioni riguardanti le batterie
● Accertarsi di inserire le batterie con le
polarità ≠ e – nella posizione corretta.
● Usare batterie dello stesso tipo. Non
usare mai tipi diversi di batterie
assieme.
● Possono essere usate sia batterie ricaricabili che batterie non ricaricabili. Fare
riferimento alle indicazioni sull'etichetta.
● Quando si prevede di non utilizzare il
telecomando per un lungo periodo (più
di un mese), rimuovere le batterie per
prevenire perdite. Se si verificassero
delle perdite, pulire il vano batterie e
sostituire le batterie con altre di nuove.
● Non riscaldare o disassemblare le batterie e non gettarle nel fuoco.
LETTORE CD
Dispositivo di lettura: pickup a
semiconduttori, a 3 fasci laser
Convertitore D/A (da digitale a analogico):
convertitore ad 1 bit
Filtro digitale: a 16 -bit, con
sovracampionamento quadruplo
Filtro analogico: filtro Butterworth del
terzo ordine
Risposta in frequenza: da 20 Hz a 18 kHz,
±3 dB
Distorsione armonica totale: inferiore a
0,09% (ad 1 kHz)
Rapporto segnale/rumore: oltre 96 dB
Separazione dei canali: oltre 80 dB (ad a
kHz)
Uscite: analogica: 2,0 Vrms (tipo RCA)
cuffia: 110 mW, 32 ohm
Fluttuazioni e fruscii: inferiori ai limiti
misurabili
GENERALITÀ
Alimentazione:
corrente alternata a 120 V, 60 Hz
(modello per gli U.S.A. e il Canada)
corrente alternata a 230 V, 50 Hz
(modello per la Gran Bretagna e
l'Europa)
corrente alternata a 240 V, 50 Hz
(modello per l'Australia)
Consumo: 12 W (a corrente alternata)
Dimensioni: 435 (largh.) x 104 (alt.) x 290
(prof.) mm
Peso netto: 3,5 kg
Accessori forniti:
Telecomando (RC-673), cavo con
spina tipo RCA, 2 batterie (tipo SUM3, o "AA", o "R6", non fornite modello
per gli U.S.A. e il Canada)
● Eventuali miglioramenti possono comportare cambiamenti di dati tecnici e di
caratteristiche senza preavviso.
● Le illustrazioni possono differire leggermente dal modelli prodotti.
Funzionamento col telecomando Dati tecnici

Diagnostica
La diagnostica di base di un lettore CD è simile alla diagnostica di un qualsiasi altro apparecchio elettrico o elettronico. Controllare sempre le cause
più ovvie per prime. Per alcune idee su cosa controllare leggere quanto segue:
Problema Causa probabile Rimedio
L'apparecchio non si accende anche premendo il tasto POWER.
Nessuna riproduzione anche dopo aver
inserito il CD.
Nessuna uscita audio. Il collegamento con il sistema stereo non è
Si può ascoltare solamente un unico brano. Il tasto 1/ALL è attivato. Premere il tasto stesso per disattivarlo.
Nessun ascolto programmato. Il tasto PROGRAM non è stato premuto. Premere il tasto per ottenere la visuali-
Errori di allineamento (il suono salta).
Si verificano fruscii. La spina del cavo di collegamento non è
Rumori nel sintonizzatore. L'apparecchio è troppo vicino al sintoni-
Non si riesce ad utilizzare l'unità per il
comando a distanza.
Cavo di alimentazione non ben inserito
nella presa.
CD inserito con l'etichetta rivolta verso il
basso.
CD sporco. Pulire la superficie del CD.
stato effettuato in modo corretto.
L'apparecchio è soggetto a vibrazioni o a
scosse.
CD sporco. Pulire la superficie del CD.
ben fissata.
zzatore.
L'interruttore POWER del lettore è nella
posizione OFF.
Inserire saldamente il cavo.
Inserire il CD con l'etichetta rivolta verso
l'alto.
Verificare i collegamenti.
zzazione dell'indicazione “PROGRAM”.
Cambiare le posizione in cui è stato installato l'apparecchio.
Fissare bene la spina del cavo di collegamento.
Frapporre una distanza ragionevole fra i
due apparecchi, spegnere il lettore.
Porre l'interruttore nella posizione ON.
L'unità per il comando a distanza è senza
batterie.
Cautela:
Dato che l'apparecchio incorpora un microcomputer, esso potrebbe non funzionare correttamente a causa di disturbi esterni, ecc. Se ciò
accadesse, portare l'interruttore power su OFF e quindi riportarlo su ON per riattivare il funzionamento.
Inserire le batterie.
ITALIANO
– 35 –

– 36 –
Este aparato ha sido específicamente
diseñado para la reproducción de compact
disc con la marca ˛. No pueden repro-
ducirse otros discos.
● Coloque siempre el compact disc en la
bandeja con la etiqueta hacia arriba.
(Los compact disc pueden reproducirse
de un solo lado.)
● Para sacar el disco de su caja, presione
el centro de la caja y retire el disco
sujetándolo por los bordes con cuidado.
Modo correcto de sacar el disc
Modo correcto de sujetar el disc
O Debe limpiarse cuidadosamente la
superficie grabada con un paño suave
eliminando las huellas digitales y el
polvo.
Limpiar radialmente
● No utilice productos químicos tales
como pulverizadores para limpiar discos, pulverizadores o líquidos
antiestáticos, bencina o diluyente para
limpiar los compact disc. Tales productos dañarán irreparablemente la superficie plástica del disco.
● Guarde siempre los discos en sus cajas
luego de escucharlos para evitar rayas
de consideración que podrían hacer
"saltar" el fonocaptor laser.
● No deje los discos expuestos a la luz
directa del sol o en lugares con alta
humedad y temperatura por mucho
tiempo.
Una prolongada exposición a altas temperaturas puede alabear el disco.
● No fije papeles ni escriba con un
bolígrafo sobre la superficie de la etiqueta.
Previo al empleo
● Elija con cuidado el lugar de instalación
para su aparato. No lo coloque a la luz
solar directa o cerca de fuentes que
generen calor. Evite también lugares
expuestos a vibraciones y muy
polvorientos, calurosos, fríos o
húmedos. Manténgalo alejado de
fuentes de zumbidos tales como transformadores o motores.
● No abra el gabinete ya que esto podría
producir daños en los circuitos o electrochoques. Si entrara algún objeto en
el interior del aparato, póngase en contacto con su concesionario.
● No toque los discos con los dedos
sucios. Nunca coloque un disco que
tenga la superficie rayada.
● Al desenchufar el cordón del tomacorriente, tire siempre de la clavija, nunca
del cordón.
● Para mantener limpio el fonocaptor
laser, no lo toque y no olvide cerrar la
bandeja portadisco.
● No utilice solventes químicos para
limpiar el aparato ya que podría dañar
el acabado. Use un paño seco y limpio.
● Guarde este manual en un lugar seguro
para usarlo como referencia en el
futuro.
Lea lo siguiente antes de poner
en funcionamiento el aparato
Cuidado con la condensación
Cuando se cambia el reproductor (o un
compact disc) de un lugar frío a otro
cálido o cuando se utiliza luego de un
cambio brusco de temperatura, existe
el peligro de condensación. El vapor de
agua en el aire puede condensarse en
el mecanismo o en el fonocaptor laser.
Si se forman gotas de agua en estas
partes, será imposible lograr una
reproducción adecuada debido a que
el laser no leerá correctamente la
información del disco. Para prevenir
esto, si va a utilizar el reproductor en
un lugar donde pueda producirse condensación, déjelo durante 1 ó 2 horas
enchufado en un tomacorriente de
alterna según la cantidad de condensación. De este modo, el reproductor
se estabilizará según la temperatura de
la zona circundante.
Manipulación de discos

Conexiones
CD-P1120
L
R
Antes de efectuar las conexiones, lea
detenidamente el manual de instrucciones
del amplificador estereofónico y apague el
amplificador y el reproductor.
Atención
Si el reproductor de discos compactos
interfiere con el sintonizador, el televisor,
etc., deje una distancia razonable entre
ellos.
∑ Cordones de señales
Conecte los terminales de salida de línea
(LINE OUT) a los terminales CD etc. del
amplificador estéreo utilizando cables de
clavija monopolar RCA.
∑ Cordón de alimentación
Conecte el cordón en un tomacorriente de
corriente alterna que suministre la tension
correcta.
∑ Auriculares
Cuando emplee los auriculares, conecte el
enchufe de los mismos al jack PHONES.
O Ajuste el nivel de la salida de señales
del jack phones.
Cordón de clavija
monopolar RCA
Tomacorriente
de alterna
Amplificador
ESPAÑOL
– 37 –

– 38 –
1 Interruptor de energía (POWER)
2 Visor indicador de funciones múltiples
a Indicadores de reproducción (Á) / ƒ (pausa)
b Indicadores REPEAT (1/ALL/A-B)
c Indicador SHUFFLE
d Indicador INTRO
e Indicador PROGRAM
f Indicación de calendario musical
g Indicador REMAIN
h Indicador TRACK (pista)
i Contador de tiempo
3 Bandeja portadisco
4 Receptor de señales infrarrojas del control remoto
(REMOTE SENSOR)
5 Tecla OPEN/CLOSE (ø)
6 Teclas MUSIC SKIP (Â/¯)
7 Tecla de reproducción (Á)
8 Tecla de pausa (PAUSE π)
9 Tecla de parada (STOP ª)
0 Teclas de búsqueda (Ô/)
q Tecla TIME
w Tecla PROGRAM
e Teclas REPEAT (1/ALL, A-B)
r Tecla SHUFFLE
t Control de nivel de auriculares/Jack para
auriculares (PHONES)
y Teclas numéricas (1~9, 0)
u Tecla CLEAR
i Tecla INTRO CHECK
Nombre de controles
3
y
q
e
0
9
8
u
w
r
i
6
7

Operaciones
For 8 cm (3-inch)
CD singles
For 12 cm (5-inch)
Compact Discs
Número total de
canciones del
disco
Número de canciones
en el disco hasta 16
Tiempo total de
reproducción del
disco
Operación básica
1. Encienda el aparato con el interruptor
POWER.
2. Presione la tecla OPEN/CLOSE(ø);
saldrá la bandeja portadisco.
La bandeja portadisco se deslizará
hacia afuera. Coloque el disco gentilmente en la bandeja con la etiqueta
hacia arriba. El disco debe ser colocado
dentro de las guías para el mismo en el
centro de la bandeja.
Para compact disc
simple de 8 cm
(3 pulgadas)
3. Presione nuevamente la tecla
OPEN/CLOSE (ø).
La bandeja portadisco se cerrará.
Varios segundos más tarde aparece la
siguiente información y el reproductor
ingresa en el modo de espera.
4. Presione la tecla PLAY (Á).
La reproducción del disco se inicia
desde la primera pista y se enciende el
indicador Á (reproducción).
● Durante la reproducción, el número de
la música que está siendo reproducida
parpadea en el calendario musical.
● Después de la reproducción de cada
música, el número desaparece de la
indicación del calendario musical.
Para compact disc de
12 cm (5 pulgadas)
Reproducción por acceso directo:
Presione los botones numéricos correspondientes a la música deseada y presione el botón PLAY (Á). El reproductor
comienza la reproducción desde la música
especificada.
Ejemplo 1:
Para reproducir a partir de la
5°canción
Presione
.
Ejemplo 2:
Para reproducir a partir de la 21°
canción
Presione
.
Aunque la bandeja portadisco
esté abierta...
Cuando se presiona la tecla Á:
Se cierra la bandeja portadisco y se inicia
la reproducción desde la primera pista.
Para detener la reproducción
Para detener la reproducción:
Presione la tecla STOP (∑). El reproductor
se establece en el modo de parada.
Para sacar el disco:
Presione la tecla OPEN/CLOSE (∫);se
detiene la reproducción y sale la bandeja
portadisco, y se reponen todas las funciones a sus ajustes iniciales.
Para suspender provisoriamente la reproducción (modo de pausa):
Presione la tecla ƒ. Se detiene la reproducción en la posición actual del fonocaptor. Se enciende el indicador ƒ. Para
reanudar la reproducción desde la misma
posición, presione la tecla Á o ƒ.
ATENCION:
● No fuerce la bandeja con la mano
durante su apertura y cierre.
● No deje la bandeja abierta mientras
no utilice el reproductor a fin de prevenir la entrada de suciedad y polvo
en el mecanismo.
Reproducción aleatoria
Esta función opera tanto durante la parada
como durante la reproducción normal.
1. Presione la tecla SHUFFLE .
El indicador SHUFFLE se enciende en la
indicación.
2. Presione el botón PLAY (Á). La
indicación en la indicación
TRACK circula mientras el reproductor
está reorganizando las músicas.
3. Las pistas son seleccionadas y reproducidas aleatoriamente.
Notes:
● Presione la tecla / con la función de
reproducción aleatoria activada para
seleccionar una música aleatoriamente. Presione la tecla . para
reproducir la música actual desde el
principio.
● La música no puede ser reproducida
otra ves después que haya sido reproducida en este modo.
● Para desactivar la función SHUFFLE
mientras está cativada, presione otra
vez la tecla SHUFFLE. Las músicas
serán reproducidas en el orden normal
designado, comenzando desde la
música que está siendo reproducida.
Función de comprobación de
introducción
La función de comprobación de introducción permite que sólo el comienzo cada
pista sea reproducida durante 10 segundos.
1. Presione la tecla INTRO CHECK.
2. Presione la tecla PLAY (Á).
Aparecerán los indicadores INTRO y
Á.
ESPAÑOL
3. Presione otra vez la tecla INTRO
CHECK para cancelar la función de
comprobación de introducción.
● La función de comprobación de introducción también funciona conjuntamente con las funciones de SHUFFLE y
REPEAT ALL. Esta función no se cancelará hasta que se presione la tecla
STOP (ª).
– 39 –

– 40 –
Agregado a la secuencia pro-
gramada
Presione el botón STOP (ª) y presione el
botón CHECK hasta que parezca indicado
“--” en la indicación TRACK. Repita desde
el paso 2.
Borrado de la memoria de pro-
grama
1. Durante la reproducción programada
del disco presione una vez la tecla
STOP (ª) para devolver al reproductor
de CD al modo de espera.
2. Presione el botón CLEAR para borrar la
memoria del programa.
● Presione una vez la tecla OPEN/CLOSE
(ø) para borrar la memoria del programa.
● La memoria del programa también será
borrada si se desconecta la ali-
Para repetir un disco completo
(Modo de repetición completa)
1. Presione dos veces la tecla 1/ALL.
Se encenderán los indicadores REPEAT
y ALL.
2. Presione la tecla PLAY (Á).
Se iniciará la reproducción y al finalizar
el disco, el reproductor retornará al
comienzo de la primera canción y así la
reproducción continuará repetidamente.
Para repetir una sección desig-
nada
(Modo de repetición de A-B)
● Esta función le permite programar la
reproducción de hasta 20 canciones
(pistas) en el orden que desee.
● Si se ingresan más de 16 músicas, el
resto no será mostrado en la indicación
de calendario musical.
Programación de las canciones
deseadas
Reproducción programada
1. Presione la tecla STOP (ª).
2. Presione la tecla PROGRAM.
El reproductor ingresa en el modo de
programa.
Se enciende el indicador PROGRAM en
el display.
3. Ingrese el primer programa (pista 5),
empleando los botones ./¯
MUSIC SKIP o los botones numéricos.
Los indicadores destellan en la pantalla.
4. Pulse de nuevo el botón de PROGRAM.
La pista número 5 queda programada
con el número 1.
5. Presione alternadamente los botones
Â/¯ MUSIC SKIP (o los botones
numéricos) y el botón PROGRAM para
programar las pistas en el orden
mostrado en el ejemplo.
d
Función de repetición
● La programación de canciones es
únicamente posible cuando el reproductor se encuentra en el modo de
parada.
● Los contenidos programados serán
retenidos en la memoria aún después
de la finalización de la repetición programada o cuando la misma ha sido
detenida presionando la tecla de parada.
● Cuando se presiona la tecla CLEAR en
el modo de parada. Se borra completamente el contenido programado.
Esta función le permite repetir la reproducción de una sola canción (pista), de todo el
disco o de cualquier parte del disco designada por dos puntos (principio y fin).
Para repetir una canción
(Modo de repetición de una
sola canción)
1. Presione una vez la tecla 1/ALL.
Se encenderán los indicadores REPEAT
y 1.
2. Presione la(s) tecla(s) numérica(s) correspondiente(s) a la canción deseada
Se reproducirá la canción seleccionada, al terminar la misma el reproductor
retornará al comienzo y se iniciará nuevamente su reproducción. De este
modo, la canción deseada se repetirá
continuamente.
1. Presione el botón PLAY (Á) para iniciar la reproducción.
2 Designe el punto en el cual debe ini-
ciarse la reproducción (punto A) presionando la tecla A-B.
Los indicadores REPEAT y A se encienden.
Presionar
3 Al llegar a la parte en la cual ha de
finalizar la reproducción repetida, presione nuevamente la tecla A-B para
designar el punto B.
El indicador B se enciende mostrando
que la función de repetición A-B ha sido
activada.
El reproductor regresa automáticamente al punto A y se reinicia la reproducción. Cuando llega al punto B,
regresa al punto A y comienza nuevamente la reproducción repetidamente.
● La función de comprobación de introducción también funciona conjuntamente con la función PROGRAM.
Ejempio:
Para programar canciones en el orden
de 5 ∑ 2 ∑ 8 en la modalidad de para-
da.
6. Presione la tecla PLAY (Á).
Se inicia la reproducción de la primera
pista programada.
Presionar nuevamente
Se encienden
N° de canción
en el disco
N° de
programación
Canciones
programadas
Tune No.
on disc
Program
No.
Programme
tunes
Light
Press
Again

Reproducción programada
or
repetida
La función de repetición puede activarse
inclusive en el modo de reproducción programada.
Para repetir todas las canciones programadas, presione dos veces la tecla 1/ALL.
(En este momento, verifique que se enciendan los indicadores REPEAT y ALL).
● Para reproducir constantemente la
canción (pista), que está siendo reproducida durante la repetición programada, presione (ON) la tecla de 1/ALL.
● Cualquier función de repetición puede
cancelarse presionando nuevamente la
tecla REPEAT.
Búsqueda musical
Búsqueda musical utilizando
las teclas MUSIC SKIP
(Â/¯)
El comienzo de cualquier canción puede
localizarse fácilmente utilizando las teclas
 y ¯ durante la reproducción o en
el modo de pausa. Esta operación es claramente indicada en el indicador TRACK.
● Esta operación es posible aún cuando
la modalidad de repetición de programa
está activada, sin embargo, solo las
canciones programadas serán detectadas.
∑ Para saltar a la próxima canción
Presione la tecla ¯.
El reproductor avanzará a la próxima
canción cada vez que se presione la tecla
¯. De este modo, el reproductor puede
avanzar hasta la última canción pero una
vez que llegue al principio de la última
canción, no avanzará aunque se presione
la tecla ¯.
∑ Para retroceder a la canción previa
Presione la tecla Â.
El reproductor retrocederá una canción
cada vez que se presione la tecla Â. Si
se presiona esta tecla durante una
canción, el reproductor retrocederá al
comienzo de la misma. Para que retroceda
a la canción anterior, debe presionarse dos
veces la tecla.
De este modo, el reproductor puede
retornar hasta el comienzo de la primera
canción del disco.
Búsqueda musical utilizandon
las teclas SEARCH (Ô /)
Durante la reproducción o en el modo de
pausa, mantenga presionada la tecla
para avanzar rápidamente la posición de
reproducción y mantenga presionada la
tecla Ô para retroceder rápidamente la
posición de reproducción.
Durante la búsqueda manual, podrá
escucharse el sonido aunque disminuirá el
nivel de salida. Esto le permite buscar la
parte deseada escuchando el sonido.
Cuando escuche la parte requerida, suelte
la tecla para restablecer el modo previo.
o
Indicación del contador de
tiempo
Este contador muestra diversas lecturas de
tiempos como se explica a continuación.
1 Tiempo total de reproducción del disco
Después de cerrar el portadisco con un
disco colocado, se visualizará el tiempo
de reproducción total del disco y el
número de músicas del mismo.
2 Indicación de tiempo transcurrido
Cuando se inicia la reproducción, se
visualiza el tiempo transcurrido de la
canción escuchada en minutos y
segundos.
3 Indicación del tiempo restante total
(TOTAL REMAIN)
Se visualiza cuando se presiona una vez
la tecla TIME. La indicación corresponde al tiempo restante total de
reproducción desde la posición que se
está reproduciendo hasta el final del
disco; el contador ejecuta un conteo
descendente hasta "00:00" durante la
reproducción.
4 Indicación de tiempo restante
(REMAIN)
Se visualiza cuando se presiona dos
veces la tecla TIME. Esto facilita la verificación del tiempo restante de la
canción reproducida
5 Indicación del tiempo transcurrido
Indicada después de presionar la tecla
TIME tres veces. El tiempo indicado es
el tiempo de reproducción transcurrido.
● En el modo de reproducción normal, si
el número de una pista es mayor que 23
(per no es la última), está siendo reproducida, el tiempo no será indicado en el
contador de tiempo aunque presione el
botón TIME. En lugar de ello aparecerá
indicado "--:--" en el contador de tiempo.
ESPAÑOL
– 41 –

– 42 –
Control remoto
La unidad de control remoto suministrada
le permite controlar el aparato a distancia.
Cuando opere con el control remoto,
diríjalo hacia el sensor remoto en el panel
frontal del aparato.
● Aunque se utilice la unidad dentro del
margen de funcionamiento efectivo, es
imposible el control a distancia si hay
obstáculos entre el reproductor y el
control remoto.
● Si se utiliza la unidad cerca de otros
aparatos que generen rayos infrarrojos
o si se emplean otros aparatos de control remoto por rayos infrarrojos cerca
del reproductor, es posible que éste no
funcione correctamente. Del mismo
modo, es posible que los otros aparatos
tampoco funcionen correctamente.
Instalación de las pilas
1. Abra la tapa del compartimiento de las
pilas.
2. Coloque dos pilas "AA" (R6, SUM-3).
Asegúrese de que las pilas queden ubicadas con sus polos positivo ≠ y negativo – correctamente posi-cionados.
3. Cierre la tapa hasta que se trabe.
Cambio de pilas
Si nota que ha disminuido la distancia
necesaria para un control correcto entre el
control remoto y el reproductor, significa
que las pilas están gastadas. En este caso,
reemplácelas por nuevas.
Precauciones con las pilas
● Asegúrese de insertar las pilas con sus
polaridades positiva ≠ y negativa –
correctas.
● Utilice el mismo tipo de pilas. Nunca
utilice diferentes tipos de pilas juntas.
● Pueden utilizarse pilas recargables y no
recargables. Refiérase a las precauciones en sus rótulos.
● Si no va a utilizar el control remoto por
mucho tiempo (más de un mes), retire
las pilas para evitar pérdidas. Si se produce pérdidas, limpie el líquido en el
interior del compartimiento y cambie las
pilas por nuevas.
● No caliente ni desarme las pilas y
nunca arroje pilas gastadas al fuego.
REPRODUCTOR DE CD
Captor: Semiconductor láser de 3 haces
Convertidor D/A: DAC de 1 bit
Filtro digital: 4 sobremuestreos de 16 bit
Filtro analógico: Butterworth de 3er. orden
Respuestas de frecuencia:
20 Hz –18 kHz ±3dB
Distorsión armónica total: <0,09% (1kHz)
Relación de señal a ruido (S/R): >96 dB
Separación de canales: >80 dB (1 kHz)
Salida: Analógica; 2 Vrms (RCA)
Auriculares:110 mW / 32 ohmios
Lloro y trémolo:
Por debajo del límite medible
GENERALIDADES
Requisitos de alimentación:
120 V CA, 60 Hz
(Modelo para EE.UU/CANADA)
230 V CA, 50 Hz
(Modelo para G.B/Europa)
240 V CA, 50 Hz
(Modelo para Australia)
Consumo de energía: 12 Watts (CA)
Dimensiones (AxAlt.xP): 435 x 104 x290 mm
Peso neto: 3,5 kg
Accesorios estándar: Mando a distancia
inalámbrico (RC-673), Cable de
enchufe de clavija RCA , Pila (SUM-3,
"AA", tipo "R6") x 2 (excepto modelo
para EE.UU/CANADA)
● Posibles mejoras puede originar cambios en las especificaciones o características sin aviso.
● Las ilustraciones puede diferir ligeramente de los modelos de producción.
Operación de control remoto Especificaciones

Detección de problemas
La detección básica de problemas de un reproductor de compact disc es similar a la cualquier otro equipo eléctrico o electrónico. Siempre verifique primero las causas posibles más obvias. Para darle una idea de ello verifique lo siguiente.
Problema Causa probable Solución
No se enciende al presionar POWER. La clavija de alimentación no está bien
No se reproduce el disco colocado. El disco está colocado al revés. Colóquelo con la etiqueta hacia arriba.
No hay salida de audio. La conexión al sistema estereofónico es
Sólo puede reproducirse una sola canción.
No se reproduce lo programado.
Mal seguimiento (salto del sonido).
Zumbido. La clavija monopolar del cordón no está
Ruido en el sintonizador. El reproductor está muy cerca del sin-
Es imposible el uso de la unidad de control
remoto.
enchufada.
El disco está sucio. Limpia la superficie del disco.
incorrecta.
La tecla 1/ALL está activada.
No se ha presionado la tecla PROGRAM. Presiónela para que aparezca “PROGRAM”.
El reproductor recibe vibraciones o sacudidas.
El disco está sucio. Limpie la superficie del disco.
bien conectada.
tonizador.
El interruptor POWER del reproductor está
desactivado (OFF).
No hay pilas en la unidad de control remoto.
Enchúfela firmemente.
Verifique las conexiones.
Presiónela para desactivarla.
Cambie la posición de instalación del
reproductor.
Reconecte firmente la clavija.
Mantenga una distancia razonable entre
ellos o apague el reproductor.
Active el interruptor (ON).
Coloque pilas.
Atención:
Puesto que el aparato incorpora una microcomputadora, es posible que no funcione correctamente debido a ruidos externos, etc. Si esto
sucediera, apague el aparato, luego vuelva a encenderlo y reinicie las operaciones.
ESPAÑOL
– 43 –

– 44 –
● Kies de plaats zorgvuldig voor het
installeren van dit toestel. Vermijd plaatsen in het direkte zonlicht of dichtbij een
warmtebron. Vermijd ook plaatsen die
blootstaan aan trillingen en overmatig
stof, te veel hitte, koude of vocht. Houd
het toestel uit de buurt van bronnen met
brom zoals transformators en motoren.
● Open de behuizing niet daar dit kan
resulteren in schade aan de schakelingen of een elektrische schok. Neem
kontakt op met de dealer mochten er
vreemde voorwerpen in het toestel
komen.
● Vermijd vingerafdrukken op de disk.
Plaats nooit een gebarste of bekraste
disk.
● Bij het uitnemen van de stekker uit het
stopkontakt altijd de stekker zelf beetpakken en nooit aan het snoer trekken.
● Raak om de laser-aftastkop niet te
verontreinigen deze nooit aan en
vergeet niet de diskschuif te sluiten.
● Probeer het toestel niet te reinigen met
chemische oplosmiddelen daar deze de
afwerking kunnen aftasten. Gebruik een
schone, droge doek.
● Bewaar deze gebruiksaanwijzing op
een veilige plaats om deze later te kunnen naslaan.
Dit toestel is speciaal ontworpen voor
weergave van kompakt disks met het "˛"
teken. Andere disks kunnen niet worden
weergegeven.
● Plaats de kompakt disk altijd met het
label naar boven in de diskschuif.
(Slechts een kant van een kompakt disk
kan worden weergegeven.)
● Druk om een disk uit het doosje te halen
op het middengedeelte van het doosje
en tie de disk voorzichtig op door hem
aan de kanten vast te houden.
Alvorens in gebruik te nemen
Lees dit alvorens het toestel in
gebruik te nemen
Pas op met kondensatie
Wanneer de diskspeler (of een kompakt disk) van een koude naar een
warme plaats verplaatst wordt of
gebruikt wordt na een plotselinge
verandering in de temperatuur bestaat
er gevaar op kondensatie. Waterdamp
in de lucht kan nl. gaan kondenseren op
het mechanisme of op de aftastkop. Als
zich waterdruppeltjes op deze
onderdelen vormen, is juiste weergave
niet mogelijk omdat de laser de informatie op de disk niet goed kan lezen.
Om dit te voorkomen is het, wanneer u
de diskspeler gaat gebruiken in een
omgeving waar kondensatie zou kunnen optreden, verstandig het toestel
met de stekker in het stopkontakt voor 1
à 2 uur (afhankelijk van de hoeveelheid
kondensatie) niet te gebruiken. Als dit
gebeurd is, zal de diskspeler dezelfde
temperatuur gaan aannemen als zijn
omgeving.
Hanteren van disks
Juiste wijze om een disk te halen
● Vingerafdrukken en stof dienen
zorgvuldig van de opgenomen kant van
de disk te worden geveegd met een
zachte doek.
Afvegen van binnen naar buiten
● Gebruik nooit chemicaliën zoals sprays
voor grammofoonplaten, antistatische
sprays of vloeistof, benzine of verfverdunner om kompakt disks te reinigen.
Dergelijke chemicaliën zullen het
oppervlak van de disk onherstelbaar
beschadigen.
● Disk dienen na gebruik in hun doosjes te
worden opgeborgen om ernstige
beschadigingen zoals krassen te
voorkomen waardoor de aftastkop
stukken informatie gaat overslaan.
● Stel disks niet voor langere tijd bloot
aan zonlicht of een hoge vochtigheid of
temperatuur.
Lang blootstellen aan hoge tem-peraturen kan de disk doen kromtrekken.
● Plak geen papier en schrijf niet met een
ballpen op het oppervlak aan de kant
met het label.
Juiste wijze om een disk te houden

Aansluitingen
To AC Outlet
CD-P1120
L
R
Alvorens het maken van de aansluitingen,
lees de gebruiksaanwijzing van de stereoversterker door, en schakel de versterker
en de speler beiden uit.
Opmerking:
Mocht de kompakt diskspeler storing
veroorzaken bij de tuner of de televisie laat
dan een ruime afstand tussen deze
toestellen onderling.
∑ Verbindingssnoeren
Sluit de LINE OUT aansluitingen met behulp
van RCA tulpstekkersnoeren aan op de CD
ingangsaansluitingen, of een daaraan
gelijkwaardige aansluiting.
∑ Netsnoer
Steek de stekker van het netsnoer in een
stopkontakt dat het juiste voltage levert.
∑ Hoofdtelefoon
Voor gebruik van een hoofdtelefoon dient
de plug van de hoofdtelefoon in de PHONES
aansluiting te worden gestoken.
O Voor het regelen van de signaalsterkte
van de phones aansluiting.
RCA
penstekkersno-
Stopkontakt
Ver sterker
NEDERLANDS
– 45 –

– 46 –
Bedieningsorganen
1 Spanningsschakelaar (POWER)
2 Multifunktioneel displayvenster
a Á (weergave) / ƒ (pauze) indikators
b REPEAT (1/ALL/A-B) indikators
c SHUFFLE indikator
d INTRO indikator
e PROGRAM indikator
f Muziekkalenderdisplay
g REMAIN tijddisplay
h TRACK display
i Tijdteller
3 Diskschuif
4 Signaalontvanger voor de afstandsbediening
(REMOTE SENSOR)
5 OPEN/CLOSE (∫) toets
6 MUSIC SKIP (Â/¯) toetsen
7 Weergave (Á) toets
8 Pauze (ƒ) toets
9 STOP (∑) toets
0 SEARCH (Ô/) toetsen
q Tijdtoets (TIME)
w PROGRAM toets
e REPEAT (1/ALL, A-B) toetsen
r SHUFFLE toets
t Hoofdtelefoonvolumeregelaar /
Hoofdtelefoonaansluiting (PHONES)
y Numerieke toetsen (1~9, 0)
u Enkel-nummer wistoets (CLEAR)
i INTRO CHECK toets
3
y
q
e
0
9
8
u
w
r
i
6
7

Bediening
For 8 cm (3-inch)
CD singles
For 12 cm (5-inch)
Compact Discs
Basisbediening
1. Zet de POWER schakelaar op ON.
2. Druk op de OPEN/CLOSE (ø) toets.
De diskschuif komt naar buiten. Plaats
de disk met het label omhoog wijzend
voorzichtig op de schuif. De disk dient
binnen de uitsparingen te liggen.
gle" disks
3. Druk nogmaals op de OPEN/CLOSE (ø)
toets.
De diskschuif sluit.
Enkele sekonden later verschijnt de volgende informatie op het display en
schakelt de speler in de standby-funktie.
Totale aantal
fragmenten
op de disk
4. Druk op de PLAY (Á) toets.
Weergave start vanaf het begin van het
eerste fragment en de Á (weergave)
indikator licht op.
● Tijdens weergave knippert het nummer
van het spelende fragment op de
muziekkalender.
● Na weergave van het fragment dooft
het overeenkomende nummer op de
muziekkalender.
Voor 12 cm disksVoor 8 cm "sin-
Maximaal 16 fragmentnummers
op de disk
Totale weergavetijd
van de disk
Direkt spelen van een bepaald fragment:
Kies het gewenste muziekstuk met de nummertoetsen en druk dan op de (Á)weergavetoets. Dan begint de weergave direkt
vanaf het gekozen muziekstuk.
Voorbeeld 1:
Weergave vanaf het 5e fragment.
Druk op .
Voorbeeld 2:
Weergave vanaf het 21e fragment.
Druk op .
Zelfs als de diskschuif open
is....
Wanneer de Á toets ingedrukt wordt:
De diskschuif wordt gesloten en weergave
begint vanaf het eerste fragment.
Stoppen van de weergave
Stoppen van de weergave:
Druk op de STOP (ª) toets. De stopfunktie
wordt ingeschakeld.
Uitwerpen van een disk:
Druk op de OPEN/CLOSE (ø) toets; De
weergave stopt en de diskschuif komt naar
buiten en alle funkties worden op hun oorspronkelijke instelling teruggesteld.
Tijdelijk onderbreken van de weergave
(pauzefunktie):
Druk op de ƒ toets. Weergave stopt bij de
huidige positie. De ƒ indikator licht op.
Druk op de Á of ƒ toets om de weergave
vanaf dezelfde positie te hervatten.
WAARSCHUWINGEN:
● Forceer de diskschuif tijdens het
openen en sluiten niet met de hand.
● Laat de diskschuif niet open wanneer de kompakt diskspeler niet
gebruikt wordt om zo te voorkomen
dat vuil en stof het mechanisme binnendringen.
Willekeurige weergave
Deze funktie kan zowel tijdens de stopfunktie als de normale weergave-funktie worden geaktiveerd.
1. Druk op de SHUFFLE toets.
De SHUFFLE indikator licht op het display op.
2. Druk op de (Á) weergavetoets. De
aanduiding draait rond in de TRACK
display terwijl de CD-speler de nummers in willekeurige volgorde zet.
3. De fragmenten van de CD worden vervolgens in een kris-kras gekozen volgorde gespeeld.
Opmerkingen:
● Druk tijdens de willekeurige weergavefunktie op de ¯ toets om willekeurig
een ander fragment in te stellen. Druk
op de  toets om het spelende fragment weer vanaf het begin weer te
geven.
● Een fragment kan na weergave niet met
deze funktie worden herhaald.
● Druk tijdens willekeurige weergave
nogmaals op de SHUFFLE toets om de
willekeurige weergavefunktie te
annuleren. De fragmenten worden
vanaf het spelende fragment in hun normale volgorde weergegeven.
Intro-aftastfunktie
De intro-aftastfunktie speelt achtereen-volgens van ieder fragment de eerste 10
sekonden.
1. Druk op de INTRO CHECK toets.
2. Druk op de PLAY (Á) toets.
De INTRO en Á indikators verschijnen.
NEDERLANDS
3. Druk nogmaals op de INTRO CHECK
toets om de intro-aftastfunktie te
annuleren.
● De intro-aftastfunktie is tevens bruikbaar in kombinatie met de SHUFFLE en
REPEAT ALL funkties. Deze funktie stopt
niet tenzij de STOP (ª) toets wordt
ingedrukt.
● De intro-aftastfunktie is tevens bruikbaar in kombinatie met de PROGRAM
funktie.
– 47 –

– 48 –
Met de herhalingsfunktie is herhaalde
weergave van een enkel fragment (nummer) of van de gehele disk of van elk
gewenst gedeelte tussen twee punten A en
B mogelijk.
Herhalen van een enkel frag-
ment
(Enkel herhalingsfunktie)
1. Druk eenmal op de 1/ALL toets op.
De REPEAT en 1 indikators lichten op.
2. Druk bij de afstandsbediening de
cijfertoets(en) in die overeenkomen
met het gewenste fragment.
Het ingestelde fragment wordt
weergegeven en wanneer het einde
van het fragment bereikt is, keert de
aftastkop terug naar het begin van het
fragment waarna dit opnieuw
weergegeven wordt. Op deze manier
wordt het ingestelde fragment herhaaldelijk weergegeven.
3. Druk bij het bereiken van het punt waar
het te herhalen gedeelte eindigt nogmaals op de A-B toets om punt B vast te
leggen.
De B indikator licht op om aan te geven
dat de A-B herhaalfunktie is
ingeschakeld.
● Middels geprogrammeerde weergave
kunnen maximaal 20 fragmenten (nummers) voor weergave in elke gewenste
volgorde worden gepro-grammeerd.
● Als er meer dan 16 fragmenten worden
ingevoerd, zullen de overige fragmenten niet op de muziekkalenderdisplay worden getoond.
Programmeren van gewenste
fragmenten
Geprogrammeerde weergave
Voorbeeld:
Tijdens de stopfunktie fragmenten 5 ∑
2 ∑ 8 in deze volgorde programmeren.
Herhalingsfunktie
1. Druk op de STOP (ª) toets.
2. Druk op de de PROGRAM toets.
De CD-speler schakelt in de programmeerfunktie.
De PROGRAM indikator in de display
licht op.
3. Kies het eerste fragment (nummer 5)
met de Â/¯ toetsen of de nummertoetsen. De aanduidingen knipperen in de display.
6. Druk op de PLAY (∏) toets.
Het eerst geprogrammeerde muziekstuk
begint te spelen.
● Programmeren is enkel mogelijk wanneer de stopfunktie van het toestel
ingeschakeld is.
● De geprogrammeerde inhoud blijft in
het geheugen bewaard nadat het
programma is weergegeven of het
programma wordt gestopt door op de
STOP (ª) toets te drukken.
● Indien tijdens de stopfunktie op de
CLEAR toets wordt gedrukt, zal de
gehele inhoud van het programma
worden gewist.
Nummers toevoegen aan het
muziekprogramma
Druk op de STOP (ª) toets en dan op de
CHECK toets tot er "--" wordt aangegeven in
de TRACK display. Herhaal de handelingen
vanaf stap 2.
Wissen van een weergavepro-
gramma ...
1. Druk tijdens weergave van het programma eenmaal op de STOP (ª) toets
om de CD-speler in de standby-stand te
schakelen.
2. Druk op de CLEAR toets om het programmeergeheugen te wissen.
● Druk vervolgens eenmaal op de
OPEN/CLOSE (ø) toets om het programma uit het geheugen te wissen.
● Een weergaveprogramma wordt tevens
gewist als de CD-speler wordt uitgeschakeld.
Herhalen van de hele disk
(Allen herhalingsfunktie)
1. Druk tweemaal op de 1/ALL toets.
De REPEAT en ALL indikators lichten op.
2. Druk op de PLAY (Á) toets.
De weergave begint en bij het bereiken
van het einde van de disk keert de
aftastkop terug naar het begin van het
eerste fragment waarna de disk
opnieuw weergegeven wordt.
Herhalen van een gewenst
gedeelte
(A-B herhalingsfunktie)
1. Druk op de (Á) weergavetoets om het
afspelen te starten.
2. Stel het punt in vanwaar af de weergave dient te beginnen (punt A) door op
de A-B toets te drukken.
De REPEAT en A indikators lichten op.
Indrukken
De aftastkop keert automatisch terug
naar punt A en het gedeelte wordt herhaald.
Nadat het afspelen tot punt B gevorderd
is, keert de aftastkop terug naar punt A
waarna de weergave opnieuw begint,
enz.
4. Druk nogmaals op de PROGRAM toets.
Dan wordt het 5de muziekstuk vastgelegd als eerste programma-nummer.
5. Druk nu beurtelings op de Â/¯
toetsen (of de nummertoetsen) en de
PROGRAM toets, om de nummers te
programmeren in de volgorde getoond
in het voorbeeld.
Lichten op
Nogmaals indrukken
Programmanummer
Fragmentnummer
op de disk
Geprogrammeerde
nummers
Light
Press
Again

Geprogrammeerde herhaalde
or
weergave
De herhalingsfunktie kan zelfs tijdens de
geprogrammeerde weergavefunktie
ingeschakeld worden.
Druk tweemaal op de 1/ALL toets om alle
geprogrammeerde nummers te herhalen.
(Ga op dit moment na dat de REPEAT en ALL
indikators oplichten.)
● Indien u tijdens geprogrammeerde herhaalde weergave op de toets 1/ALL
drukt, wordt het spelende (huidige)
fragment herhaald.
● Druk om alle herhalingsfunkties uit te
schakelen nogmaals op de REPEAT
toets.
Muziekzoekfunktie
Muziekzoeken m.b.v. de
MUSIC SKIP toetsen
(Â/¯)
Tijdens weergave of tijdens de pauzefunktie kan het begin van elk nummer makkelijk
gelokaliseerd worden m.b.v. de  en
¯ toetsen. Deze bedieningswijze wordt
duidelijk in de TRACK display aangegeven.
● Verspringen is tevens mogelijk tijdens
geprogrammeerde weergave. Er wordt
in dit geval echter alleen naar de geprogrammeerde nummers ver-sprongen.
Om naar het volgende nummer over te
gaan
Druk op de ¯toets.
Telkens bij indrukken van de ¯ toets
gaat de aftastkop naar het volgende fragment.
De aftastkop kan op deze manier naar het
laatste fragment gestuurd worden, maar
als de ¯ daarna ingedrukt wordt,
gebeurt er niets.
Teruggaan naar het vorige fragment
Druk op de Âtoets.
Telkens bij indrukken van de  toets
gaat de aftastkop een fragment terug. Als
de toets in het midden van een fragment
ingedrukt wordt, gaat de aftastkop terug
naar het begin van het huidige fragment. De
toets dient tweemaal ingedrukt te worden
om de aftastkop terug te laten gaan naar
het vorige fragment.
Op deze manier kan de aftastkop terug naar
het begin van het eerste fragment op de
disk worden gestuurd.
Muziekzoeken m.b.v. de
SEARCH toetsen (Ô/)
Houd de toets tijdens weergave of de
pauzefunktie ingedrukt om de aftastkop
snel in voorwaartse richting te bewegen en
druk op deÔ toets om in achter-waartse
richting te gaan.
Tijdens handbediend zoeken is geluid hoorbaar maar met een laag volume. Hierdoor
kunt u door naar het geluid te luisteren een
gewenst gedeelte snel opzoeken.
Laat de toets bij het bereiken van het
gewenste gedeelte los om zo de eerder
ingestelde funktie opnieuw in te stellen.
of
Bandtellerdisplay
De tijdteller toont een aantal tijdaanduidingen. Hieronder volgen enkele voorbeelden
1 Totale diskweergavetijd
Nadat de CD-lade is gesloten en een
disk is geplaatst, wordt de totale weergavetijd van de disk en het totaal aantal
fragmenten van de disk op het display
getoond.
2 Verstreken tijddisplay
Vanaf het begin van de weergave wordt
de verstreken tijd van het huidige fragment in minuten en sekonden
aangegeven.
3 Totale resterende tijddisplay
(TOTAL REMAIN)
Wordt aangegeven bij éénmaal
indrukken van de TIME toets. De tijddisplay geeft de totale resterende weergavetijd weer vanaf de huidige weergavepositie tot het einde van de disk; de
teller telt tijdens het weergeven tot
"00:00" af.
4 Resterende tijddisplay (REMAIN)
Wordt aangegeven bij tweemaal
indrukken van de TIME toets. Hierdoor
kan de resterende tijd van het spelende
fragment makkelijk gekontroleerd worden.
5 Aanduiding van de verstreken tijd
Deze aanduiding verschijnt nadat de
TIME toets driemaal is ingedrukt. De
getoond tijd is de verstreken weergavetijd.
● Als er bij normale weergave een
muziekstuk wordt afgespeeld met een
nummer boven de 23 (maar niet het laatste), zal de resterende speelduur niet in
het tijdvenster worden aangegeven,
ook al drukt u op de TIME toets. Dan zal
het tijdvenster slechts
"--:--" aangeven.
NEDERLANDS
– 49 –

– 50 –
Afstandsbediening
Richt de bijgeleverde afstandsbediening tijdens het bedienen op de signaalontvanger
op het voorpaneel van het toestel. De afstandsbediening kan binnen het in de
afbeelding getoonde bereik worden
gebruikt.
● Zelfs bij bediening binnen het effektieve
bereik kan bediening van de afstandsbediening onmogelijk zijn als er zich een
obstakel tussen de diskspeler en de afstandsbediening bevindt.
● Als afstandsbedieningen bij andere
toestellen gebruikt worden die infrarood stralen gebruiken of als andere
afstandsbedieningen met infrarood
stralen gebruikt worden bij de diskspeler kan deze onjuist funktioneren.
Omgekeerd kan het ook voorkomen dat
een ander toestel verkeerd gaat
werken.
Inleggen van de batterijen
1. Verwijder het deksel van het batterijvak.
2. Plaats twee "AA" (R6, SUM-3) formaat
batterijen.
Zorg ervoor dat de batterijen ingelegd
zijn met hun positieve ≠ en negatieve
– polen in de juiste richting.
3. Sluit het deksel (het klikt vast).
Vervangen van de batterijen
Als de bedieningsafstand tussen de afstandsbediening en de diskspeler echter
korter wordt, geeft dit aan dat de batterijen
uitgeput zijn. Vervang de batterijen in dit
geval door nieuwe.
Voorzorgsmaatregelen aangaande batterijen
● Zorg ervoor dat de batterijen ingelegd
zijn met de juiste polariteit ≠ en –.
● Gebruik altijd batterijen van hetzelfde
type. Probeer nooit verschillende typen
batterijen door elkaar te gebruiken.
● Zowel oplaadbare als normale batterijen kunnen worden gebruikt. Zie de
voorzorgsmaatregelen op de respektievelijke labels.
● Haal de batterijen uit de afstandsbediening om lekken te voorkomen, als de
afstandsbediening voor langere tijd
(langer dan 1 maand) niet gebruikt
wordt. Veeg de vloeistof binnen het batterijvak weg en vervang de batterijen
door nieuwe als de batterijen toch
hebben gelekt.
● Verhit geen batterijen en haal ze niet uit
elkaar en gooi nooit oude batterijen in
het vuur.
CD-SPELER
Afleeskop: 3-stralen, halfgeleider laser
D/A omzetter: 1-bit DAC
Digitaalfilter: 4-voudige overbemonstering,
16 bits
Analoogfilter: 3de orde Butterworth
Frekwentiebereik: 20 Hz – 18 kHz ± 3 dB
Totale harmonische vervorming:
< 0,09% (1 kHz)
Signaal/ruisverhouding: > 96 dB
Kanaalscheiding: > 80 dB (1 kHz)
Uitgangsspanning:
Analoog; 2,0 V RMS (RCA)
Hoofdtelefoon; 110 mW / 32 ohm
Snelheidsfluctuaties: Onmeetbaar gering
ALGEMEEN
Spanningsvereisten:
120 V wisselstroom, 60 Hz (model
voor de V.S./Canada)
230 V wisselstroom, 50 Hz (model
voor Groot-Brittannië/Europa)
240 V wisselstroom, 50 Hz (model
voor Australië)
Stroomverbruik: 12 watt (wisselstroom)
Afmetingen (b/h/d): 435 x 104 x 290 mm
Netto gewicht: 3,5 kg
Standaard toebehoren:
Draadloze afstandsbediening (RC-
673), RCA tulpstekker-snoer, batterijen (SUM-3, R6, AA-formaat) x 2
(behalve model voor de V.S./Canada)
● Verbeteringen kunnen resulteren in
veranderingen in de technische
gegevens of kenmerken zonder voorafgaande kennisgeving.
● De afbeeldingen kunnen enigszins
afwijken van de produktiemodellen.
Bediening op afstand Technische gegevens

Oplossen van moeilijkheden
n principe is het oplossen van moeilijkheden bij een kompakt diskspeler hetzelfde als bij andere toestellen. Ga altijd eerst de meest waarschijnlijke
oorzaken na. Om u een idee te geven waar u naar dient te zoeken, ga het volgende lijstje na:
Probleem Waarschijnlijke oorzaak Oplossing
Geen spanning wanneer de POWER toets
ingedrukt wordt.
Geen weergave bij inleggen van een disk. De disk is met het label naar beneden
Geen weergave van geluid. Aansluiting op het stereosysteem is niet
Slechts een enkel nummer kan worden
gespeeld.
Geen geprogrammeerde weergave. De PROGRAM toets is niet ingedrukt. Toets indrukken zodat “PROGRAM”
Overspringen van het geluid. De diskspeler staat bloot aan trillingen of
Brom. De penstekkers zijn niet goed ingestoken. Steek de stekker stevig in.
Ruis in de tuner. De diskspeler staat te dicht bij de tuner.
Op afstand bedienen is niet mogelijk. De POWER schakelaar van de diskspeler
De stekker is niet goed ingestoken. Steek de stekker stevig in.
Inleggen met het label naar boven.
ingelegd.
De disk is vuil. Reinig het oppervlak van de disk.
Ga de aansluitingen na.
korrekt.
De 1/ALL toets is ingeschakeld. Toets indrukken om de herhalingsfunktie uit
te schakelen.
aangegeven wordt.
Verander de plaats van de diskspeler.
schokken.
De disk is vuil. Reinig het oppervlak van de disk.
Houd een redelijke afstand tussen de
toestellen en schakel de spanning van de
diskspeler uit.
Zet de schakelaar aan (ON).
staat uit (OFF).
Geen batterijen in de afstandsbediening. Plaats batterijen.
Opmerking:
Daar het toestel voorzien is van een mikrokomputer, kan deze mogelijk niet juist funktioneren door externe ruis, enz. Schakel in dit geval de spanning uit (OFF) en daarna weer aan (ON) en start opnieuw.
NEDERLANDS
– 51 –

0398U .MA-0141A
AC POWER CORD CONNECTION
CAUTION:
TO PREVENT ELECTRIC SHOCK, MATCH WIDE
BLADE OF PLUG TO WIDE SLOT, FULLY INSERT.
CORDE DE CONNEXION CA
ATTENTION:
POUR ÉVITER LES CHOCS ÉLECTRIQUES, INTRODUIRE LA LAME LA PLUS LARGE DE LA FICHE
DANS LA BORNE CORRESPONDANTE DE
LA PRISE ET POUSSER JUSQU’AU FOND.
For CANADA
TO THE USER
This equipment has been tested and found to comply with the limits for a Class B digital device, pursuant to Part 15
of the FCC Rules. These limits are designed to provide reasonable protection against interference in a residential
area. This device generates and uses radio frequency energy and if not installed and used in accordance with the
instructions, it may cause interference to radio or TV reception. If this unit does cause interference with TV or radio
reception you can try to correct the interference by one or more of the following measures:
a) Reorient or relocate the receiving antenna.
b) Increase the separation between the equipment and the receiver.
c) Plug the equipment into a different outlet so that it is not on the same circuit as the receiver.
If necessary, consult the dealer or an experienced radio/TV technician for additional suggestions.
CAUTION:
Changes or modifications to this equipment not expressly approved by TEAC CORPORATION for compliance could
void the user's authority to operate this equipment.
For U.S.A.
TEAC CORPORATION
3-7-3, Nakacho, Musashino-shi, Tokyo 180-8550, Japan Phone: (0422) 52-5082
TEAC AMERICA, INC. 7733 Telegraph Road, Montebello, California 90640 Phone: (213) 726-0303
TEAC CANADA LTD. 5939 Wallace Street, Mississauga, Ontario L4Z 1Z8, Canada Phone: 905-890-8008 Facsimile: 905-890-9888
TEAC MEXICO, S.A. De C.V Privada De Corina, No.18, Colonia Del Carmen Coyoacon, Mexico DF 04100 Phone: 5-658-1943
TEAC UK LIMITED 5 Marlin House, Marlins Meadow, The Croxley Centre, Watford, Herts. WD1 8YA, U.K. Phone: 01923-819699
TEAC DEUTSCHLAND GmbH Bahnstrasse 12, 65205 Wiesbaden-Erbenheim, Germany Phone: 0611-71580
TEAC FRANCE S. A. 17 Rue Alexis-de-Tocqueville, CE 005 92182 Antony Cedex, France Phone: 01.42.37.01.02
TEAC BELGIUM NV/SA P.A. TEAC Nederland BV, Perkinsbaan 11a, 3439 ND Nieuwegein, Netherlands Phone: 0031-30-6048115
TEAC NEDERLAND BV Perkinsbaan 11a, 3439 ND Nieuwegein, Netherlands Phone: 030-6030229
TEAC AUSTRALIA PTY., LTD.
106 Bay Street, Port Melbourne, Victoria 3207, Australia Phone: (03) 9644-2442
A.C.N. 005 408 462
TEAC ITALIANA S.p.A. Via C. Cantù 11, 20092 Cinisello Balsamo, Milano, Italy Phone: 02-66010500
 Loading...