

Page 1

What’s in this guide? Getting started Making calls Using the phone book In-call features
Advanced settings
1
D14582 03 USER GUIDE Pro file Series, Code c C Series, Quick Set C 20 / C20 P lus (TC3) —March 2010
www.tandberg.com
Profile Series, Codec C Series
Quick Set C20 / C20 Plus
User Guide
The next generation HD team
collaboration solution.
The TANDBERG Profile, the
Quick Set C20 and Quick Set
C20 Plus, as well as solutions
based on the Codec C Series,
bring colleagues face-to-face at
the touch of a button through a
user-friendly interface.
Easily share presentations and
multimedia to spark ideas and
generate better discussions.
TC 3.0
Profile 42”
Quick Set C20 / C20 Plus
Codec C90
Codec C6 0
Codec C 40
Codec C20
Profile 52”
Profile 52” Dual
Profile 65”
Profile 65” Dual
Page 2

What’s in this guide? Getting started Making calls Using the phone book In-call features
Advanced settings
What’s in this guide?
2
D14582 03 USER GUIDE Pro file Series, Code c C Series, Quick Set C 20 / C20 P lus (TC3) —March 2010
Getting started
Waking up the system..................................... 4
The TRC5 remote control ................................ 5
Navigating in the menus .................................. 7
Entering text in text fields
............................... 8
What happens when you press
a number key? .............................................. 8
Using the number keys in text fields ............ 8
Screen layout ................................................... 9
Camera presets ............................................. 10
Adding a camera preset ................................ 11
Camera settings ............................................ 12
Main source ................................................... 13
Call settings—an overview ........................... 13
Call settings—auto answer options .............. 14
Call settings—default call rate....................... 14
Language settings ........................................... 15
About the setting of date and time ............... 15
Setting date and time manually ...................... 16
Setting date and time automatically ............... 16
Selecting ring tone ........................................ 17
Setting ring tone volume ............................... 17
Setting key tone to on or off.......................... 18
Setting wallpaper on your screen .................. 18
Inserting your own wallpaper ........................ 19
System information ....................................... 19
Entering the Advanced configuration ............ 20
Restarting the system ................................... 20
Making calls
Making calls by dialing the number ............... 22
When someone is calling .............................. 22
Terminating an ongoing call ........................... 22
Making calls using phone book ..................... 23
Making calls using the recent calls list .......... 24
The icons used ........................................... 24
Management systems booking list ............... 25
Calling more than one (optional) .................... 26
Using MultiWay™ to call more than one ........ 27
Which codec does my system have? ............ 28
Phone book usage
Basic phone book features ............................ 30
Navigating in the phone book ..................... 30
Calling an entry in the phone book .............30
Searching in the phone book ......................... 31
Adding new contacts to the phone book ...... 32
Editing existing entries in the phone book .... 33
In-call features
Sharing a PC presentation ............................. 35
Dual video stream ......................................35
Sharing a presentation ................................ 35
If the presentation fails to show ................. 35
Other presentation sources ........................ 35
Controlling the cameras ................................36
Controlling your own camera (near side) .... 36
Controlling the far end camera ................... 36
Advanced settings
About the advanced settings ........................ 38
Advanced configuration & password............. 38
Defining softbutton functions ....................... 39
Softbutton— Main source selection ..............40
Softbutton— Camera Preset ......................... 41
Softbutton— Speed dials ............................... 42
Softbutton— Clear softbuttons ...................... 43
What’s in this user guide?
Page 3
What’s in this guide? Getting started Making calls Using the phone book In-call features
Advanced settings
Getting started
3
D14582 03 USER GUIDE Pro file Series, Code c C Series, Quick Set C 20 / C20 P lus (TC3) —March 2010
Chapter 1
Getting started
Page 4

What’s in this guide? Getting started Making calls Using the phone book In-call features
Advanced settings
Getting started
4
D14582 03 USER GUIDE Pro file Series, Code c C Series, Quick Set C 20 / C20 P lus (TC3) —March 2010
If the system fails to respond to the remote control or to incoming calls, make sure that:
• The system is connected to line voltage.
• The remote control has working batteries.
• The internal cables, such as the monitor cable and/or the camera cables are properly
connected, see the installation sheet for details, if needed.
Waking up the system
To make a call you need to wake up the system from standby.
However, if someone calls you, the system will wake up by itself.
• To wake up the system just pick up the TRCV remote control or
press any key. You may have to point the remote control towards
the system to make sure it discovers you.
• The system will now display the wallpaper.
• The dial-in address (H.323 Alias ID) or dial-in number (H.323 Alias
E164) of your system is displayed in the upper left corner. If you
have questions about the dial-in address or number, contact your
system administrator.
• The screen will also indicate if there are any calls you have missed.
The dial- in address (H .323 Alias ID) or dial -in
number (H.323 Alias E164) of your system is
displayed in the upper left corner.
Date and time of day.
After wake -up, the scr een will typically l ook like this :
alice.wonderland@mycompany.com
Softkeys (described on the following pages).
Page 5

What’s in this guide? Getting started Making calls Using the phone book In-call features
Advanced settings
Getting started
5
D14582 03 USER GUIDE Pro file Series, Code c C Series, Quick Set C 20 / C20 P lus (TC3) —March 2010
ARROW UP/DOWN: Use the and
arrow
keys to navigate in the menu and to move
the camera (pan, tilt) when the menu o n screen is not displayed.
OK/ SELECT: Press the
key to confirm your choice or selection.
ARROW LEF T: Press the
arrow
key to go one
step back in the menu or
to move to the left in a
text field.
ARROW RIGHT: Press
the
arrow
key to
expand the selected
menu item or to move
to the right in a text
field.
MICROPHONE: Press the key
to go between the
microphone(s) on and
microphone(s) of f.
VOLUME: Press
the + or – on the
key
to adjust the volume. Press
– to mute an incoming call.
PRESENTATION: Press the
key
to show or hide a presentation.
ZOOM: Press
the + or – on the
key to zoom the camera
in and out.
FUNCTI ON KEYS: Each
key corresponds to a sof t
key on the screen and
represents shortcuts and
advanced func tions.
The TRC5 remote control
The
function
keys in the upper par t of the remote control
reflects the sof tkeys on screen.
The middle part of the remote control is use d to handle
video, sound, p hone book, menus and navigation.
The lower part of the remote control is similar to the keypad
of a mobile phone.
Page 6
What’s in this guide? Getting started Making calls Using the phone book In-call features
Advanced settings
Getting started
6
D14582 03 USER GUIDE Pro file Series, Code c C Series, Quick Set C 20 / C20 P lus (TC3) —March 2010
CALL: Press the
key to display the
recent call s
menu.
Select one or more
contacts and press
the
key to initiate
the call.
Press this key to
accept an incoming
call.
CLEAR: Press the
key to
remove characters in a tex t field.
END CALL / STANDBY:
Press the key
to reject an incoming c all, to
end an ongoing call
or—when idle—to go
into standby mode.
When navigating in the
menus is used to exit the
menu system.
Press and hold this button
to have the system enter
standby mode.
Alphanumeric keypad: Use the keypad in the same way as you would use a mobile phone.
abc/123 #: Press and
hold the # key to toggle
between lower case
characters and numbers.
0-9, a-z, p eriod (.), @,
space, *: Press a key
repeatedly to toggle
between the options
displayed on each key.
HOME: Press the
key to go back to the
Home menu.
PHONE BOOK: Press the
key to display the
phone book.
LAYOUT: Press the
key to display the Layout
menu, then select a v iew
in the menu.
Page 7
What’s in this guide? Getting started Making calls Using the phone book In-call features
Advanced settings
Getting started
7
D14582 03 USER GUIDE Pro file Series, Code c C Series, Quick Set C 20 / C20 P lus (TC3) —March 2010
Navigating in the menus
Use the remote control to operate your TANDBERG video system. A few
basic navigation principles are all you need to know to get started.
• Press the
home
key ( ) to show the Home menu.
• The
arrow
keys in the center of the upper part of the remote control are
used to navigate in the menus.
• When the system shows the Home menu only (see the Fig. below),
pressing
home
key ( ) will hide the menu. To bring it back, press the
home
key ( ) again.
• In an input field, pressing will delete characters/numbers to the left of
the cursor position.
Example showing a submenu displayed by pressing the right arrow key.
Press the key to display the Home menu on the screen.
The element currently
selected is indic ated by
an orange rectangle.
Use the
and
arrow
keys to navigate up and
down in a menu.
The little
triangle
indicates that
a submenu is
available.
The little triangle ( ) indicates
that there are further submenus
available. Use the
arrow
key or
to show this submenu.
Context sensitive softkeys
corresponding to the
function keys of the remote
control.
Softkeys not used in a given
context are shown ghosted
(grey).
If there is no menu shown...
Wake up the system by lifting the remote control and press the key to display the
Home menu.
Use the
arrow
key key to collapse
the menu expansion (to go back one
level).
Use the
home
key ( ) to exit all menus
and return to showing the Home menu
only.
Page 8
What’s in this guide? Getting started Making calls Using the phone book In-call features
Advanced settings
Getting started
8
D14582 03 USER GUIDE Pro file Series, Code c C Series, Quick Set C 20 / C20 P lus (TC3) —March 2010
Entering text in text fields
Some menu fields expect text information to be entered. This is used to
enter the number or the identity of the person you want to call. It is also
used for such things as to search in the phone book and maintain your list
of contacts (My contacts).
What happens when you press a number key?
• If you press a number key when you are not in a call, the Call menu will
be shown.
• The system will automatically switch to text mode (abc) inside entry
fields expecting text entries. Entering letters is similar to as on a mobile
phone—see right.
• The system will automatically switch to number mode (123) inside entry
fields expecting number entries. Dial with the number keys as usual.
Using the number keys in text fields
Whenever text entries are expected by the system, a small abc appears in the right lower
corner of the entr y field.
For entry fields expecting numbers, 123 will appear instead.
In text mode (abc), entries from the number keys are automatically interpreted as text
entries in the same way as on a mobile phone.
Guidelines:
• Press the key that corresponds to the required let ter as many times as needed to
produce that let ter.
• Switch between tex t mode (abc) and number mode (123) by keeping the # abc/123
key depressed for more than a second.
• To insert space, press the 0 _ key.
• To insert the @ sign, press the 1- key twice, while the keyp ad is in text mode.
• To insert the . sign, press the
*
.-key once, while the keypad is in number mode.
• To write digits and numbers in a tex t input field, repeatedly press the cor responding
key until the digit appears.
• To erase incorrect inputs, use the c key.
Special characters
Sometimes you will need to use special characters, for example w hen entering names in
My contacts.
Sometimes it is likely th at special characters are needed. T he softkey
special ch aracters
will then be displayed. This will give you access to the
special characters menu, shown to the right.
If needed, press this
key repeatedly until
the input field is set as
required (123/abc).
Special characters
Page 9

What’s in this guide? Getting started Making calls Using the phone book In-call features
Advanced settings
Getting started
9
D14582 03 USER GUIDE Pro file Series, Code c C Series, Quick Set C 20 / C20 P lus (TC3) —March 2010
Layout control used during a call gives you the possibilit y to include self view...
Tip: Adding wallpaper to your screen
Screen layout
The layout of the screen can be changed as shown to the right.
To show the display options screen, press the
layout
( ) key.
Alternatively, you may get to it through Settings > Layout.
• Use the
arrow
keys to move between the alternatives and use to
select the alternative you want to use.
• You may—or may not—include selfview (to show the outgoing video
signal from your own system). This will show you what others will see
from your system.
In the
settin gs
submenu
navigate down to
Wallpaper. Press
again.
In the Home menu, navigate
down to Set tings and press
the key.
Select between the
options available and
press the key to leave
the menu putting your
choice into effect. See
also page 18 for more
on this.
However, if you already have activated
the selfview, the menu will give you
these options when you enter the menu
again.
However, if you already have activated
the selfview, you may select where the
selfview should appear in the image
when you enter the menu again.
Layout control ou tside a call is limited
to the choice between showing
selfview and showing a wallpaper...
Layout control when in a call provides
the choice of showing selfview or full
screen participant...
Page 10

What’s in this guide? Getting started Making calls Using the phone book In-call features
Advanced settings
Getting started
10
D14582 03 USER GUIDE Pro file Series, Code c C Series, Quick Set C 20 / C20 P lus (TC3) —March 2010
Camera presets
You may create predefined settings of where the camera points and the
zoom. This is referred to as camera presets. See the next page for more.
Do as follows:
1. Press the key on the remote control to display the Layout menu.
Select Selfview to be shown as required. In this way you will see what
other will see of you in a call.
2. Press the key on the remote control to display the Home menu and
select Camera control.
3. Softbuttons will now appear. Press the
function
key corresponding to
Camera presets (
function
key number 2 from the left).
4. To hide the Camera presets, use the same
function
key again.
Where to find it
Using the presets (I)
Using the presets (II)
Camera presets must have been defined b efore you do this.
Press the key on the remote control to display the Home menu and select
Camera control. Use the and
arrow
keys to navigate in the menu. Use
to select a preset. The c amera will now move accordingly. Note that this feature
may be used any time.
Camera presets must have been defined b efore you do this.
Press the
key on the remote control to display the Home menu and select
Camera control. Use the 0 ~9 keys to select a preset. T he camera will now
move accordingl y. Note that this feature may be used any time.
Page 11
What’s in this guide? Getting started Making calls Using the phone book In-call features
Advanced settings
Getting started
11
D14582 03 USER GUIDE Pro file Series, Code c C Series, Quick Set C 20 / C20 P lus (TC3) —March 2010
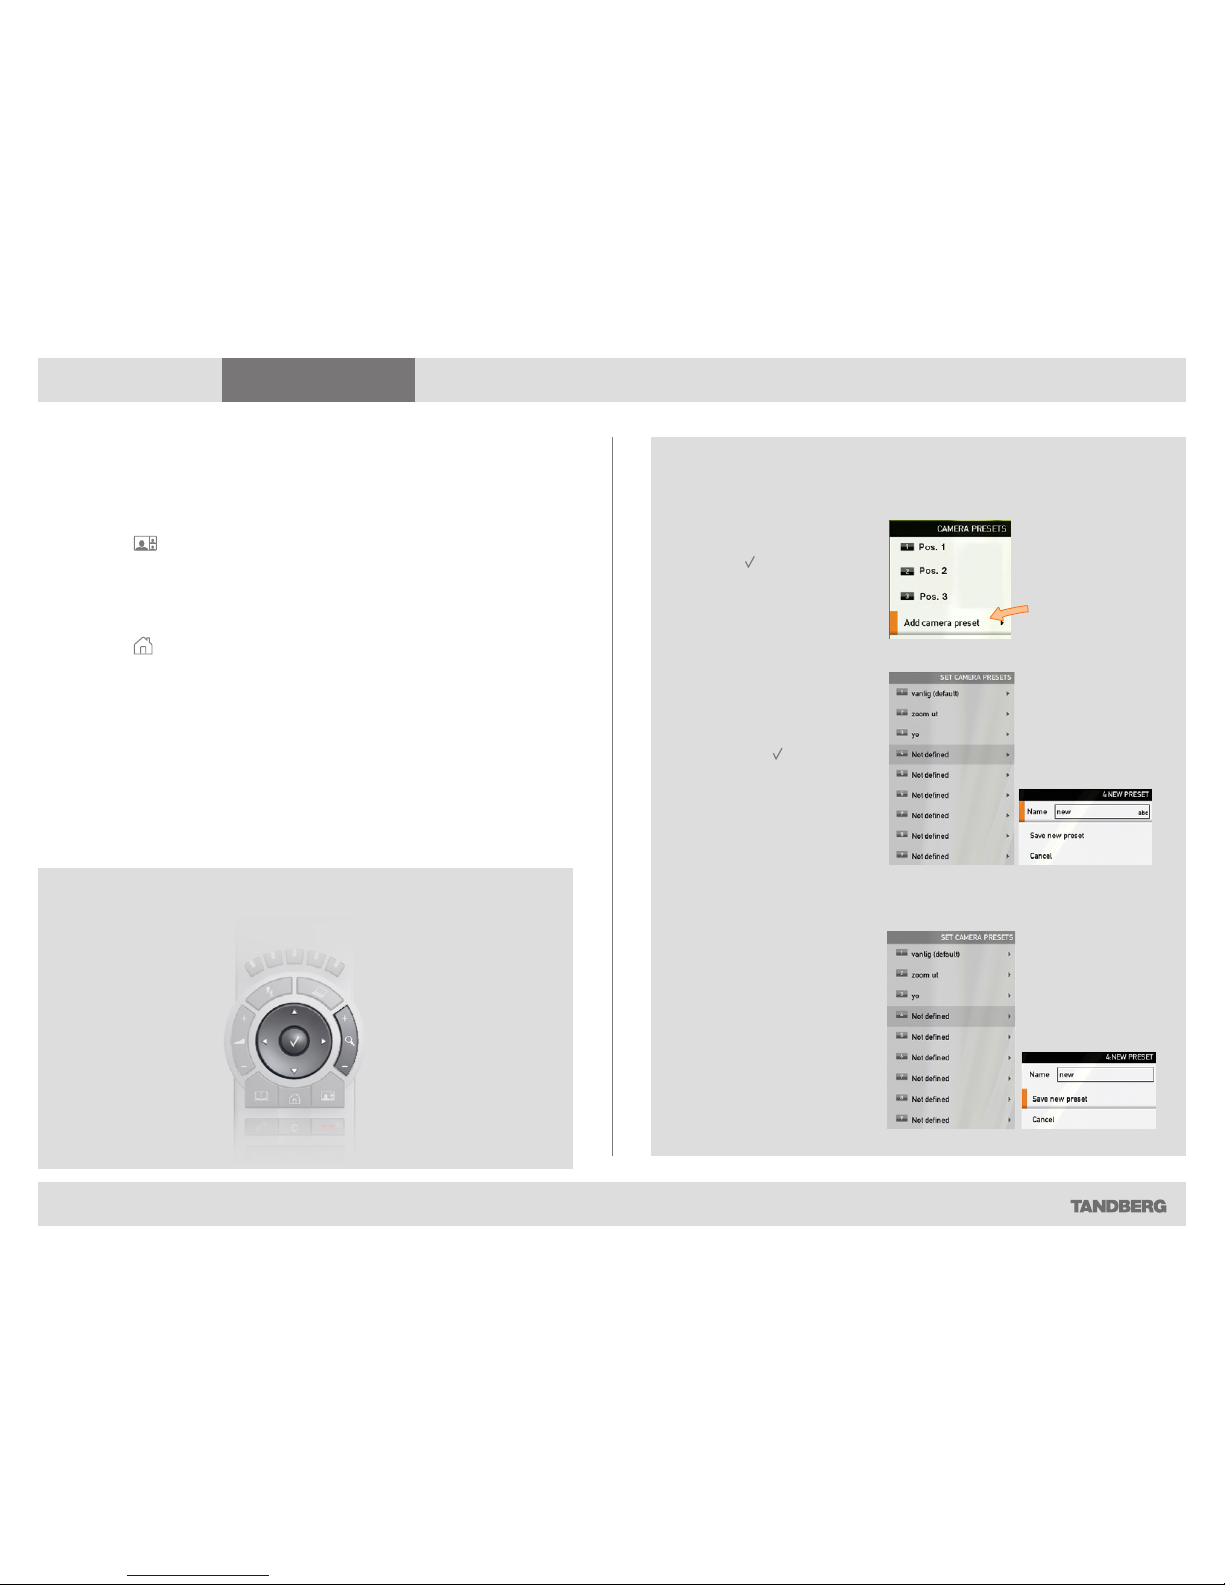
Adding a camera preset
For more on camera presets, as such, see the previous page.
To add a camera preset, do as follows:
1. Press the key on the remote control to display the Layout menu.
Select Selfview to be shown. In this way you will see what other will
see of you in a call.
2. Adjust where the camera points and the zoom using the four
arrow
keys
and the
zoom
key.
3. Press the key on the remote control to display the Home menu and
select Camera control.
4. This will cause softbuttons to appear. Press the
function
key
corresponding to Camera presets (
function
key number 2 from the left).
5. Follow the procedure shown to the right.
Adding a camera preset
Moving and zooming the camera
In the Camer a presets menu
navigate to Add camera pres et
and press .
Navigate to the preset to
define (or redefine, if it already
existed). Press to produce the
submenu.
Give it a descriptive name, use
special characters, if needed.
Save the new preset.
Use the
arrow
keys and the
zoom
keys.
Page 12

What’s in this guide? Getting started Making calls Using the phone book In-call features
Advanced settings
Getting started
12
D14582 03 USER GUIDE Pro file Series, Code c C Series, Quick Set C 20 / C20 P lus (TC3) —March 2010
Camera settings
Camera settings let you adjust the exposure and whitebalance.
Do as follows:
1. Press the key on the remote control to display the Layout menu.
Select Selfview to be shown as required.
2. Press the key on the remote control to display the Home menu and
select Camera control.
3. This will cause softbuttons to appear. Press the
function
key
corresponding to Camera settings (
function
key number 2 from the
left).
4. Follow the procedures outlined to the right.
Adjusting the exposure
Adjusting the whitebalance
If you change the
Brightn ess mode to
Manual, the B rightne ss
level will be possible to
set by you. Since Auto
has been chosen here,
the actual level is show n
ghosted.
Backlight compensates for any backlight shining on
the camera from behind you. Such light conditions
often make you appear darker than needed..
Since the whitebalance has been set to Ma nual in this case, you will have access
to setting the whiteb alance in the usual manner. Use Automatic if that is more
convenient.
Page 13

What’s in this guide? Getting started Making calls Using the phone book In-call features
Advanced settings
Getting started
13
D14582 03 USER GUIDE Pro file Series, Code c C Series, Quick Set C 20 / C20 P lus (TC3) —March 2010
Main source
You may choose what to use as the main input source. This will typically
be the camera, a secondary camera (if applicable), the PC input or other
sources such as a DVD player.
Do as follows:
1. In the menu select Settings > Main source and expand the submenu.
2. Use the
arrow
keys to move between the alternatives and use to
select the alternative you want to use.
3. Collapse the menu using the
arrow
key.
Call settings—an overview
Use the Call settings menu to set the default bit rate and how the system
shall answer incoming calls. Answering can be set to automatic or to
manual. More on this can be found on the next page.
Do as follows:
1. In the menu select Settings > Call settings and expand the submenu.
2. Use the
arrow
keys to move between the alternatives and use to
select the alternative you want to use.
3. Collapse the menu using the
arrow
key.
This example has been
taken from a Codec C 20
equipped Profile. Larger
systems may have
more options.
More on Profiles and
their codecs c an be
found on
page 28.
Page 14

What’s in this guide? Getting started Making calls Using the phone book In-call features
Advanced settings
Getting started
14
D14582 03 USER GUIDE Pro file Series, Code c C Series, Quick Set C 20 / C20 P lus (TC3) —March 2010
Call settings—auto answer options
You may set up your system to answer automatically whenever someone
calls you. If you choose to do so, you may also specify how long time it
shall take before your system connects you.
For privacy reasons you may want your microphone to be muted (turned
off) when the system answers automatically.
Call settings—default call rate
The Call settings menu lets you set the default call rate expressed as
default number of kilobits per second.
You may want to consult your system administrator to discuss the best
setting in your environment.
Options are 128, 256, 384, 512, 768 (initial default), 1152, 1472, 1920,
2560, 3072, 4000 and 6000 bits per second.
Use the and
arrow
keys to alter how long
time it shall take before
your system connect s you.
Interval is 0 –5 0 seconds.
For privacy you m ay set the
microphone to be muted upon
autoanswer. You will then have
to activate the microphone
yourself (press
).
Set to On to have your
system answer incoming
calls automatic ally and Off
to answer them manually.
Page 15

What’s in this guide? Getting started Making calls Using the phone book In-call features
Advanced settings
Getting started
15
D14582 03 USER GUIDE Pro file Series, Code c C Series, Quick Set C 20 / C20 P lus (TC3) —March 2010
Language settings
This will allow you to specify the language used in the menus and settings
shown. The following languages are supported: English, Norwegian,
Swedish, German, French, Italian, Japanese, Russian, Spanish, Korean,
Finnish, Chinese (Simplified), Turkish, Polish.
Do as follows:
1. Start from the Home menu and navigate down to Settings and press
the key.
2. Then navigate to Language and press the key again. Use the and
arrow
keys to select.
3. Press the key to exit the menu putting changes into effect or the
arrow
key to leave the menu going one step back.
About the setting of date and time
You may have the system pick date and time for you or you may specify
date and time zone settings along with date and time format and the date
and time of day itself.
Do as follows:
1. Start from the Home menu and navigate down to Settings and press
the key. Then navigate to Date and time and press the key. Select
between Auto and Manual.
2. Press the key to exit the menu putting changes into effect or the
arrow
key to leave the menu going one step back.
Further details are shown on the next page.
Page 16

What’s in this guide? Getting started Making calls Using the phone book In-call features
Advanced settings
Getting started
16
D14582 03 USER GUIDE Pro file Series, Code c C Series, Quick Set C 20 / C20 P lus (TC3) —March 2010
Setting date and time manually
You may specify date and time zone settings along with date and time
format and the date and time of day itself.
Do as follows:
1. Start from the Home menu and navigate down to Settings and press
the key. Then navigate to Date and time and press the key.
2. Use
arrow
keys and the key to set everything as required.
Setting date and time automatically
You may have the date and time of day set automatically. However, you
must still specify time and date formats as well as the time zone.
Do as follows:
1. Start from the Home menu and navigate down to Settings and press
the key. Then navigate to Date and time and press the key.
2. Use
arrow
keys and the key to set everything as required.
The options shown here are
available only when manual
settings have been chosen.
Page 17

What’s in this guide? Getting started Making calls Using the phone book In-call features
Advanced settings
Getting started
17
D14582 03 USER GUIDE Pro file Series, Code c C Series, Quick Set C 20 / C20 P lus (TC3) —March 2010
Selecting ring tone
The system lets you choose between many ring tones.
Do as follows:
1. Start from the Home menu and navigate down to Settings and press
the key.
2. Then navigate to Sounds and alerts and press the key. Navigate to
Ring tone and press the key. Use the and
arrow
keys to move
among the ring tones. Each ring tone will be played when you position
the cursor at it.
3. Press the key to exit the menu putting changes into effect or the
arrow
key to leave the menu going one step back.
Setting ring tone volume
The system lets you set the ring tone volume.
Do as follows:
1. Start from the Home menu and navigate down to Settings and press
the key.
2. Then navigate to Sounds and alerts and press the key. Navigate to
Ring tone volume and press the key. Use the and
arrow
keys to
set the volume.
3. Press the key to exit the menu putting changes into effect or the
arrow
key to leave the menu going one step back.
Page 18

What’s in this guide? Getting started Making calls Using the phone book In-call features
Advanced settings
Getting started
18
D14582 03 USER GUIDE Pro file Series, Code c C Series, Quick Set C 20 / C20 P lus (TC3) —March 2010
Setting key tone to on or off
The system may be set to emit a sound every time you click key on the
remote control.
Do as follows:
1. Start from the Home menu and navigate down to Settings and press the
key.
2. Then navigate to Sounds and alerts and press the key. Navigate to
Key tone and press the key. Use the and
arrow
keys to select.
3. Press the key to exit the menu putting changes into effect or the
arrow
key to leave the menu going one step back.
Setting wallpaper on your screen
The system lets you set a wall paper on your screen. This is shown in idle
condition only.
Do as follows:
1. Start from the Home menu and navigate down to Settings and press the
key.
2. Then navigate to Wallpaper and press the key. Use the and
arrow
keys to select wall paper. Uploading and inserting a custom wallpaper is
explained overleaf.
3. Press the key to exit the menu putting changes into effect or the
arrow
key to leave the menu going one step back.
Page 19

What’s in this guide? Getting started Making calls Using the phone book In-call features
Advanced settings
Getting started
19
D14582 03 USER GUIDE Pro file Series, Code c C Series, Quick Set C 20 / C20 P lus (TC3) —March 2010
Inserting your own wallpaper
The system lets you upload and use your own wallpaper (for example your
logo) on your screen. This custom wallpaper picture can be any size up to
1920×1200 pixels.
The custom wallpaper is uploaded from the web interface. See the
Appendices section of the Administrator Guide for your system for further
details about the web interface.
Do as follows:
1. Open a web browser and enter the IP address of the codec of your
system.
2. Select Wallpaper from the menu bar on the left side of the screen.
3. Browse for the file and click the Upload button.
4. Close the web browser.
5. Select Custom wallpaper (see the previous page) to put the change into
effect.
System information
System information can be listed.
Do as follows:
1. Start from the Home menu and navigate down to Settings and press the
key.
2. Then navigate to System information and press the key again.
3. To exit this screen, press the
home
key ( ).
A shor tcut to this function is available. Make sure the system displays the Hom e
menu (press the key on the remote control to display this menu). Then press the
rightmost soft button to display the System information.
Page 20

What’s in this guide? Getting started Making calls Using the phone book In-call features
Advanced settings
Getting started
20
D14582 03 USER GUIDE Pro file Series, Code c C Series, Quick Set C 20 / C20 P lus (TC3) —March 2010
Entering the Advanced configuration
Your video system has a separate set of Advanced configuration settings
intended to be used by system administrators only. These settings are
protected by a password.
Do as follows:
1. Start from the Home menu and navigate down to Settings and press
the key.
2. Then navigate to Administrator settings and press the key.
3. Key in the password and use
arrow
keys and the key to make your
selection.
Restarting the system
Some changes in the system settings, network settings and the
infrastructure configurations may call for a system restart.
Do as follows:
1. Start from the Home menu and navigate down to Settings and press
the key.
2. Then navigate to Restart and press the key.
3. Use
arrow
keys and the key to make your selection.
Page 21

What’s in this guide? Getting started Making calls Using the phone book In-call features
Advanced settings
Making calls
21
D14582 03 USER GUIDE Pro file Series, Code c C Series, Quick Set C 20 / C20 P lus (TC3) —March 2010
Chapter 2
Making calls
Page 22

What’s in this guide? Getting started Making calls Using the phone book In-call features
Advanced settings
Making calls
22
D14582 03 USER GUIDE Pro file Series, Code c C Series, Quick Set C 20 / C20 P lus (TC3) —March 2010
Making calls by dialing the number
The term “number” has a wide definition here—you may use the
procedure outlined on this page to call people by their alphanumeric
address as well, for example:
“helen.karr@company.com”
Do as follows:
1. Key in the “number” to call. If needed, switch to alphanumeric or
numeric setting by means of the abc/123 softkey.
2. Press the softkey Special characters to access non-standard
characters, if needed. See Special characters on page 8 for more on
this.
3. Press followed by or, press twice to start calling.
Note that the system will search for matches as you write along.
Terminating an ongoing call
Terminating an ongoing call is similar to terminating calls on a cell phone—
just press the key on the remote control.
When someone is calling
Respond to an incoming call by pressing the key on the remote control
to accept it, or press the key to reject it.
Press the key on the
remote control to terminate
an ongoing call.
Press the
key on
the remote
control to reject
an incoming
call.
Press the
key on the
remote control
to answer an
incoming call.
You may alter the call rate setting before you pla ce the call, if need ed. Look for
softke y
number two from the right ( ). Press the corresp onding
function
key to display the Call rate set ting menu. Select a new setting, if required.
Press the key to produce
the
call
menu, if needed.
Position the cursor at Cal l
and press to display the
submenu.
As soon as you start to key in, the
system will look for possible matches
in the Recent c alls list, My contacts,
and the Phone book.
Page 23

What’s in this guide? Getting started Making calls Using the phone book In-call features
Advanced settings
Making calls
23
D14582 03 USER GUIDE Pro file Series, Code c C Series, Quick Set C 20 / C20 P lus (TC3) —March 2010
Making calls using phone book
Using the phone book is time saving and prevents you from calling the
wrong number by accident.
The phone book entries are sorted alphabetically.
Phone book entries are also called contacts.
Press the key to produce the Call menu, if
needed.
Position the cursor at
Call and press to
produce the submenu…
If you know your way, navigate
down to the folder required and
press
to produce the contents
of that folder.
Use the
arrow
keys to locate
whom to call and press
to
place the call.
Alternatively, you may search
for an entry in the phone book.
This is described in the section
Using the phon e book.
If you know your way, then navigate down to the folder required and press
to
produce the contents of that folder. Use the
arrow
keys to locate whom to call.
Press to place the call.
As you key in someone’s “number”, the system will immediately search for
matches.
Alternatively, you may search for an entry in the phone book. This is described in
the section Using the phone boo k.
...then navigate down to
Phone bo ok.
Press
to display the phone
book.
Method 2:
Method 1:
… to show the Phone book.
Press the
Phone
book key…
Page 24

What’s in this guide? Getting started Making calls Using the phone book In-call features
Advanced settings
Making calls
24
D14582 03 USER GUIDE Pro file Series, Code c C Series, Quick Set C 20 / C20 P lus (TC3) —March 2010
The icons used
The icon is used for calls made by you.
The icon is used for calls received.
The icon is used for missed calls.
Making calls using the recent calls list
If you have called somebody, or somebody has called you, this will be
listed in the list of recent calls.
To gain access to the
recent calls
list, press the key on the remote
control.
You may also copy entries in the recent calls list to your phone book—see
Using the phone book for details.
When you have selected whom to call press the
key again to call the
selected entry.
Select what t ype of recent calls to show; All recent calls, just the missed calls, just
the placed calls or just the received calls, by means of the softkeys.
Page 25

What’s in this guide? Getting started Making calls Using the phone book In-call features
Advanced settings
Making calls
25
D14582 03 USER GUIDE Pro file Series, Code c C Series, Quick Set C 20 / C20 P lus (TC3) —March 2010
Management systems booking list
If your video network makes use of the TANDBERG Management
System (TMS), your video system may be set up for scheduled meetings
from remote.
Typically, the TMS works with tools like Microsoft Outlook, permitting
employees to book and schedule video calls and conferences.
Any bookings applying to your system will appear on the screen as
shown in the below example.
Page 26

What’s in this guide? Getting started Making calls Using the phone book In-call features
Advanced settings
Making calls
26
D14582 03 USER GUIDE Pro file Series, Code c C Series, Quick Set C 20 / C20 P lus (TC3) —March 2010
Calling more than one (optional)
Provided that your video endpoint is equipped with the optional built-in
MultiSite feature, any point-to–point video call (a call involving two parties
only) may be expanded into including additional participants. The call will
then become a video conference.
Any ongoing video call can then be expanded into a video conference by
adding more participants at all times (see the upper right example).
Alternatively, you may set up a list of whom to call before you actually call
them and then call them all in one go (see the below example).
Note that your video network may have an infrastructure permitting video
conferencing—even if your video system itself does not. This will require
the presence of an external Multipoint Control Unit (MCU).
The most advanced video systems (those using Codec C60 or C90)
can—when equipped with MultiSite— set up video meetings with
four participants (yourself included). External MCUs may let you set up
conferences with many more participants.
Systems equipped with Codec C20 have no MultiSite feature (see
page
28 to find out which type of codec your system has). However, they come
with MultiWay
™
installed (see the next page for more on this).
Contact your system administrator for details on how to use external MCUs.
Setting up a list of whom to call before calling them
Calling participants one by one
Terminating a video conference
This example shows t wo entries made
before any calls are placed. For units
equipped with MultiSite capabilities,
up to three participants can be called
simultaneously, if no external MCUs are
used.
After you have entered the participants ,
press the
key to place the calls. A ny
of these may, of course, be fetched from
the phone book in the usual manner.
During a call, open the Call menu
again…
Then call someone in the usual
manner—by dialing the “number”
(in this case “542”) or by means
of the phone book…
Finally, navigate down to
Call
and place the call…
If you want to add another
particip ant (you can call a
maximum of three par ticipants),
repeat the process.
The
particip ant
you already
are in call
with.
The next
particip ant
you are
going to
call.
Use
this to
place the
call.
The host of a video conference is the
endpoint to which all the others are
connected —the one who initiated
the conference.
The host has the right to terminate
the connection to any of the
particip ants. The par ticipants cannot
control any of the others, but may
disconnect themselves from the
meeting at all times.
Page 27

What’s in this guide? Getting started Making calls Using the phone book In-call features
Advanced settings
Making calls
27
D14582 03 USER GUIDE Pro file Series, Code c C Series, Quick Set C 20 / C20 P lus (TC3) —March 2010
Case 2: Someone calls you while you are in a call. You will need to decide
whether the calling party shall be invited to join the current call or not.
1. Someone calls you while you are in a call. A dialog box giving you three
options will be shown.
2. Select Accept (put current call on hold).
3. When you are ready to create the conference, select Join Calls.
4. All three of you will now be in the same meeting.
Case 2 options: If you do not want to set up a MultiWay
™
conference, you
have the following choices in 2. above:
• If you want to accept the incoming call instead of the current call, select
Accept (disconnect current call).
• If you do not want to respond to the incoming call, select Reject.
Using MultiWay™ to call more than one
Systems equipped with Codec C20 offer MultiWay™ as a means to call
more than one (see page 28 to find out which type of codec your system
has). Note that successful use of MultiWay™ requires the presence
of certain infrastructure products. If in doubt check with your system
administrator
Using MultiWay
™
Case 1: Assume that you already are in a call and that you would like to
expand the call to include someone else.
Do as follows:
1. Start calling someone else by pressing the key on the remote control.
2. Dial the new participant. This will put the current call on Hold. When the
new participant replies, select Join Calls.
3. All three of you will now be in the same meeting.
4. Repeat to include more participants if needed.
The maximum number of participants in a MultiWay™ call is limited by the
capabilities of the infrastructure of your network only. The two c ases described on
this page may be combined as much as you want.
Page 28

What’s in this guide? Getting started Making calls Using the phone book In-call features
Advanced settings
Making calls
28
D14582 03 USER GUIDE Pro file Series, Code c C Series, Quick Set C 20 / C20 P lus (TC3) —March 2010
Profile series codecs:
Which codec does my system have?
The optional ability to call more than one participant—the MultiSite
feature— does not apply to all video endpoints. This depends on the type
of codec your system is equipped with. The following applies:
• Endpoints using TANDBERG Codec C40, C60 and C90 support MultiSite.
• Endpoints using TANDBERG Codec C20 do not support MultiSite, but
MultiWay™.
• Quick Set C20 / C20 Plus both use the Codec C20. Consequently, they
do not support MultiSite, but MultiWay™.
At any rate, MultiSite is an optional feature that may—or may not—be
present in your endpoint.
If you need to see which type of codec your system is equipped with,
open the bottom module lid of the system.
Looking for codec type:
TANDBERG Co dec C90
TANDBERG Co dec C60
TANDBERG Co dec C40
TANDBERG Co dec C20
Open the bottom module lid as
shown, to see which t ype of
codec you have.
Page 29

What’s in this guide? Getting started Making calls Using the phone book In-call features
Advanced settings
Using the phone book
29
D14582 03 USER GUIDE Pro file Series, Code c C Series, Quick Set C 20 / C20 P lus (TC3) —March 2010
Chapter 3
Phone book usage
Page 30

What’s in this guide? Getting started Making calls Using the phone book In-call features
Advanced settings
Using the phone book
30
D14582 03 USER GUIDE Pro file Series, Code c C Series, Quick Set C 20 / C20 P lus (TC3) —March 2010
Opening the phone book:
Basic phone book features
Your TANDBERG video system contains a phone book. The phone book is
organized in a way very similar to what you find in a mobile phone.
It contains a section where you can add your own list of contacts, and
most corporate solutions will also include a corporate phone list.
This corporate phone list is normally installed and maintained from remote
by your system administrator through a management system like the
TANDBERG Management Suite (TMS), which is available separately.
You cannot edit the corporate list yourself, but you may add entries to My
Contacts. These may be edited as much as you want.
Navigating in the phone book
• Navigate in the phone book with the
arrow
and keys.
• A folder icon indicates that there is a folder here. Press the
arrow
key
to display the contents of this folder. Repeat, if needed, if there are more
levels.
• Whenever you are at a lower level, use the
arrow
key to move one
level back.
Calling an entry in the phone book
When an entry is located, just press the key to place the call.
The Phone book menu will now open…
The phone book typicall y contains your own My contacts and a corporate phone
book.
In My contac ts you may enter your own contacts.
Press the
phone book
key…
Nee d to search for an entry in the phone book? See Searching in the phone book
on the next page.
Folders
contain
phone book
entries
(and they
may even
contain
subfolders).
Page 31

What’s in this guide? Getting started Making calls Using the phone book In-call features
Advanced settings
Using the phone book
31
D14582 03 USER GUIDE Pro file Series, Code c C Series, Quick Set C 20 / C20 P lus (TC3) —March 2010
Searching in the phone book
The My contacts may contain up to 200 entries, but the entire phone
book can be virtually unlimited in size. Consequently, using the arrow keys
as the only navigation device can easily mean a lot of work. What to do?
You may then use Quick Search by Letters. Whenever you are inside
the phone book, navigating in the list of entries, the numerical keypad
automatically switches from
123 mode to abc mode. To locate a specific
entry, just type in the first letter as with a mobile phone. The system will
then display all matches. Add more letters to refine your search.
Entering text in the search field
Example: How do I write a lice 123 in the Search input field in the phone book?
Do as follows :
1. Press the 2- key once to get an a
2. Press the 5 -key three times to get an l
3. Press the 4 -key three times to get an
i
4. Press the 2- key three times to get a c
5. Press the 3 -key twice to get an e
6. Press the 0 -key once to get sp ace
7. Press the 1-key three times to get a 1
8. Press the 2- key four times to get a 2
9. Press the 3 -key four times to get a 3
Quick search by letters
Just type the letter (or switch to 123 mo de by pressing the # key to key in digits) and the
Searc h field will be acti vated immediately. The phone book will then lo ok something like
this:
The search will begin immediately. Add more letters to narrow and refine your search.
Example: Keying in da, will return entries like Dave Olson and David Jones, but also
John Dahl and V ittorio Dalmazzino. There is no case sensitivity.
How to open the phone book is describ ed Basic phone bo ok features, which can
be found on the previous p age.
Page 32

What’s in this guide? Getting started Making calls Using the phone book In-call features
Advanced settings
Using the phone book
32
D14582 03 USER GUIDE Pro file Series, Code c C Series, Quick Set C 20 / C20 P lus (TC3) —March 2010
Adding an entry manually to My contacts:
Open the phone b ook by pressing the key on the remote control.
Navigate to My co ntacts:
Press the key to show the contents of My contact s. A softkey named N ew conta ct
will now appear along the bottom line of the display:
Press the corresp onding
function
key on the remote control to enter the Edit dialog box.
Enter name and “number” of the new contact. After you have
entered this information, the Save field will no longer appear ghosted and you may
navigate down to this field and press the key to save your new entry.
Alternatively, navigate down to Canc el and press the key to exit the dialog b ox without
saving the new entr y.
Adding new contacts to the phone book
New contacts can be added to My contacts only. Other entries must be
entered by your system administrator.
How to open the phone book is describ ed Basic phone bo ok features, which can
be found two pages back.
Adding an entry from recent calls or the phone book
While you are inside the phone book or insid e the list of recent calls, navigate to the entry
you would like to copy to My co ntacts and press the
key or the
arrow
key to show
the Options menu:
Navigate down to Save to my conta cts and pres s the
key to open the Edit dialo g box.
This is similar to entering a new contact manually (see right for details), but in this case
the name and “number” of the copied contact has already been filled in for you by the
system. If you want to edit the information entered, you may do so. Remember to save
before leaving the menu.
Shown ghosted
because nothing
has been
entered yet.
Page 33

What’s in this guide? Getting started Making calls Using the phone book In-call features
Advanced settings
Using the phone book
33
D14582 03 USER GUIDE Pro file Series, Code c C Series, Quick Set C 20 / C20 P lus (TC3) —March 2010
Editing existing entries in the phone book
You may edit and delete entries in My contacts any time. Since updates
in the corporate phone book(s) made by your system administrator will not
affect My contacts, you may have to use this feature from time to time
when corporate phone book changes are made.
Editing entries in the phone book
Open the phone b ook. Since entries in My cont acts are the o nly ones that may be
subject to editing, navigate to My co ntacts and press the key to open it.
Navigate to the entr y to edit and press the key again. In the submenu that now
appears, navigate to Edit and press the key to open for editing of the entry.
You will now see a dialog box similar to this:
The name and “number” of the entry selected for editing has already b een inserted.
Edit as required and navigate down to Save and press the
key to put the changes into
effect.
Page 34

What’s in this guide? Getting started Making calls Using the phone book In-call features
Advanced settings
In-call features
34
D14582 03 USER GUIDE Pro file Series, Code c C Series, Quick Set C 20 / C20 P lus (TC3) —March 2010
Chapter 4
In-call features
Page 35

What’s in this guide? Getting started Making calls Using the phone book In-call features
Advanced settings
In-call features
35
D14582 03 USER GUIDE Pro file Series, Code c C Series, Quick Set C 20 / C20 P lus (TC3) —March 2010
Sharing a PC presentation
General recommendations tips for making your video meeting room as
good as possible are described in the Administrator guide for this product.
The Administrator guide may be downloaded from www.tandberg.com.
Dual video stream
With dual video stream you can view two different live video streams
simultaneously—the main video and one additional source. This could
for example be both a PC presentation and the person who gives the
presentation.
If one of the video systems does not support dual video stream, no second
video stream will be established and the PC presentation will be shown as
the main video.
Sharing a presentation
To share a presentation, do as follows:
1. Make sure the PC does not cover any of the microphones. This will
reduce the audio quality at the far end.
2. Locate the DVI cable and connect the PC to the video system.
Connect the audio mini-jack output from the PC, or any other source—
including Ipod—to the mini-jack socket of the cable to get sound.
Connect the RCA connectors to the corresponding sockets on the
codec/endpoint.
3. When pressing the
presentation
button on the remote control the
default presentation source is activated.
The DVI/ VGA input is compliant with VESA Extended Display Identification
Data (EDID) and will be able to notify the PC of the supported output
formats.
If the presentation fails to show
• Normally you must press a special key combination to switch the PC
image from the PC screen to the video screen.
• Check that the presentation source is correctly defined. Access to this
setting may be password protected by your system administrator. The
procedure is described in the Administrator guide for this product.
• Make sure your PC is set to activate your VGA output.
Other presentation sources
You can also connect other presentation sources like:
• DVD
• Document camera
To specify which source to serve for the presentation select it as shown here. Note
that the name of each source can be chang ed, consult your administrator for details on
this.
Page 36

What’s in this guide? Getting started Making calls Using the phone book In-call features
Advanced settings
In-call features
36
D14582 03 USER GUIDE Pro file Series, Code c C Series, Quick Set C 20 / C20 P lus (TC3) —March 2010
Controlling the cameras
During a call, you may control your where your own camera is pointing and
the zoom. However, far end systems with remotely controllable cameras
may also permit you to control their camera’s panning and zooming. This is
called Far end camera control.
For video conferences with more than two participants, far end is an
ambiguous term. Consequently, far end camera control is not accessible
unless you are in a point-to-point call.
Controlling your own camera (near side)
1. During a call, enter camera control mode by means of either of the and
arrow
keys.
The display will now typically look like below, note that selfview has
been activated by the system (even if it was not in advance).
Access to far
end camera (if
far end camera
is remotely
controllable).
Access to your
own camera
presets, if
defined.
Access to your
own camera’s
settings.
Access to your
own system’s
main source
setting.
Exit this
mode.
• Use the
arrow
keys to change where the camera points and use the
zoom
keys to adjust the zoom.
Camera Presets, Camera settings and Main source are all explained in
the section Getting started.
Controlling the far end camera
1. During a call, enter camera control mode by means of either of the and
arrow
keys.
2. Press the leftmost
function
key to access the far end camera.
Back to near end
camera control.
Exit this
mode.
3. Far end camera control is restricted to controlling where the camera
points and to zooming. Nothing else. Use the arrow keys to change
where the camera points and the zoom keys to set the far end camera
zoom.
Page 37

What’s in this guide? Getting started Making calls Using the phone book In-call features
Advanced settings
Advanced settings
37
D14582 03 USER GUIDE Pro file Series, Code c C Series, Quick Set C 20 / C20 P lus (TC3) —March 2010
Chapter 5
Advanced settings
Page 38

What’s in this guide? Getting started Making calls Using the phone book In-call features
Advanced settings
Advanced settings
38
D14582 03 USER GUIDE Pro file Series, Code c C Series, Quick Set C 20 / C20 P lus (TC3) —March 2010
About the advanced settings
The Advanced settings lets you define extra softbutton functions; change
the IP settings of the system; use the Advanced configuration options and
change the menu access password.
Your video system can be configured through its web interface, but it
may also be configured through the Advanced configuration. This is all
normally done by your system administrator, who may have password
protected the access to the Advanced configuration.
Do as follows:
1. Starting from the Home menu, navigate down to Settings and press the
key.
2. Then navigate to Advanced and press the key again to display the
options available (shown below).
Advanced configuration & password
The Advanced configuration is aimed at system administrators only and
may have been password protected by your system administrator. Unless
you are the system administrator you should leave these settings as they
are.
The IP settings (not shown) are also aimed at system administrators.
The Advanced configuration settings and the IP settings are described
in the Administrator Guide for your video system. This guide can be
downloaded from www.tandberg.com. Look for Support and then
Documentation.
The password may not have been set. If you decide to give your system a
password, take care. If you forget your password or otherwise forget it, contact
your TANDBERG representative for help.
The Audio input levels
menu is not available in
systems equippe d with
Codec C20.
Page 39

What’s in this guide? Getting started Making calls Using the phone book In-call features
Advanced settings
Advanced settings
39
D14582 03 USER GUIDE Pro file Series, Code c C Series, Quick Set C 20 / C20 P lus (TC3) —March 2010
Defining softbutton functions
The
function
keys of the system’s remote control are used to control the
softbuttons along the lower end of the screen. These softbuttons are
context sensitive. This means that they appear only when needed and not
else—typically when you adjust settings via the menus.
Note! The access to the settings described here, may have been
password protected by your system administrator.
You may enhance your system’s perceived performance by adding
softbutton functionality to idle situations as well as to in-call situations.
Do as follows:
1. Starting from the Home menu, navigate down to Settings and press the
key.
2. Then navigate to Advanced and press the key to display the options
available (shown below).
3. Expand the Programmable softbuttons and select whether the
definitions shall apply when in idle or when in call. You may define one
set for each situation, but only one at a time.
4. Expand your selection to display a list of all five softbuttons.
5. Navigate to the softbutton to be defined and expand this menu item.
6. You will now have three choices; Main source selection, Camera
preset and Speed dials. These are all treated on the following pages.
If you want a softbutton assignment to apply to both idle and in- call situations you
must assign a function twice —one set ting for idle and one for in -call situations.
Note that any softbutton can be assig ned to any function. Set ting one softbutton to
a specific function for idle situations does not require that the same function must
be assigned to the same softbutton for in-c all situations (although doing so may
appear more logical in many cases).
Page 40

What’s in this guide? Getting started Making calls Using the phone book In-call features
Advanced settings
Advanced settings
40
D14582 03 USER GUIDE Pro file Series, Code c C Series, Quick Set C 20 / C20 P lus (TC3) —March 2010
Softbutton—Main source selection
If you want direct access (via the softbuttons along the bottom line of the
screen) to the source used, you should assign the function Main source
selection to one of the softbuttons. In the following we will use
softbutto n
1 as an example, but the function may be assigned to any of the five
softbuttons.
Do as follows:
1. Navigate down to the softbuttons options as shown in “Defining
softbutton functions” on page 39. Make sure you have decided whether
your setting shall apply to idle or in call. If you want it to apply to both
situations you must do this twice, one setting for each case—see the
tip on page 39 for more on this.
2. Expand the Main source selection menu.
3. Use the and
arrow
keys to go between the options as main
source. The number of options available depends on the type of codec
in your system.
4. Press the key to exit the menu putting changes into effect or the
arrow
key to leave the menu going one step back.
Below is a screenshot showing how the softbuttons appear when
assignments have been made.
If you have set
softbut ton 1
to PC as main source, you may want to set
softbut ton
2 to Camera (or the other way around) in order to be able to conveniently switch
between the two.
This example has been
taken from a system
equipped with Codec
C20.
Systems equippe d
with Codec C 60 or
C90 will show more
options to choose
from—such as
secondar y camera, any
DVD connected etc.
Page 41

What’s in this guide? Getting started Making calls Using the phone book In-call features
Advanced settings
Advanced settings
41
D14582 03 USER GUIDE Pro file Series, Code c C Series, Quick Set C 20 / C20 P lus (TC3) —March 2010
Softbutton—Camera Preset
If you want direct access (via the softbuttons along the bottom line of
the screen) to predefined camera presets, you should assign the function
Camera preset to one or more of the softbuttons.
Note that camera presets must have been defined before you start
assigning presets to any of the softbuttons—see page 11 for more on
camera presets.
In the following we will use
softbutto n 1
as an example, but the function
may be assigned to any of the five softbuttons.
Do as follows:
1. Navigate down to the softbuttons options as shown on page 39. Make
sure you have decided whether your setting shall apply to idle or in
call. If you want it to apply to both situations you must do this twice,
one setting for each case—see the tip on page 39 for more on this.
2. Expand the Camera preset menu.
3. Use the and
arrow
keys to go between the presets existing.
4. Press the key to exit the menu putting changes into effect or the
arrow
key to leave the menu going one step back.
Below is an example showing how the softbuttons appear when
assignments have been made.
Page 42

What’s in this guide? Getting started Making calls Using the phone book In-call features
Advanced settings
Advanced settings
42
D14582 03 USER GUIDE Pro file Series, Code c C Series, Quick Set C 20 / C20 P lus (TC3) —March 2010
Softbutton—Speed dials
If you want direct access (via the softbuttons along the bottom line of the
screen) to contacts in the phone book, you should assign the function
Speed dials to one or more of the softbuttons.
Note that assignments can be made to existing contacts only. To add a
contact to your phone book, see page 32.
In the following we will use
softbut ton 1
as an example, but the function
may be assigned to any of the five softbuttons.
Do as follows:
1. Navigate down to the softbuttons options as shown on page 39. Make
sure you have decided whether your setting shall apply to idle or in
call. If you want it to apply to both situations you must do this twice,
one setting for each case—see the tip on page 39 for more on this.
2. Expand the Speed dials menu.
3. Use the and
arrow
keys to navigate in the phone book. For more
on phone book usage, see page 30.
4. Press the key to exit the menu putting changes into effect or the
arrow
key to leave the menu going one step back.
Below is an example showing how the softbuttons appear when
assignments have been made.
Page 43

What’s in this guide? Getting started Making calls Using the phone book In-call features
Advanced settings
Advanced settings
43
D14582 03 USER GUIDE Pro file Series, Code c C Series, Quick Set C 20 / C20 P lus (TC3) —March 2010
Softbutton—Clear softbuttons
You may clear softbuttons that you no longer want to appear. This is done
via the Clear softbutton at the bottom of the menu. You do not have to
clear a softbutton function before assign the same softbutton to another
function. That may be done right away.
For more on how to get to the below menu—see page 39 for details.
Make sure you select the right softbutton (idle mode or in- call mode).
Page 44

U.S. HEADQUARTERS
TANDBERG
1212 Avenue of the Americas
24th Floor
New York, NY 10036
Telephone: +1 212 692 6500
Fax: +1 212 692 6501
Video: +1 212 692 6535
E-mail: tandberg@tandberg.com
EUROPEAN HE ADQUARTERS
TANDBERG
Philip Pedersens vei 20
1366 Lysaker
Norway
Telephone: +47 67 125 125
Fax: +47 67 125 234
Video: +47 67 126 126
E-mail: tandberg@tandberg.com
Copyright © TANDBERG 2009. All rights reserved.
INTELLECTUAL PROPERT Y RIGHTS
The TANDBERG video endpoints and codecs covered by this User Guide
are protected under copyright, patent, and other intellectual property rights
of various jurisdictions. Any applicable software licenses and any limited
warranty are located in the License Information section of the corresponding
version of the TANDBERG Administrator Guide for this product.
 Loading...