


3-227-586-13 (1)
FM Stereo/SW/MW/LW
PLL Synthesized Receiver
Operating instructions |
GB |
Mode d’emploi |
|
FR |
|
Bedienungsanleitung |
|
DE |
|
Manual de instrucciones |
|
ES |
|
Gebruiksaanwijzing |
|
NL |
|
Manual de Instruções |
|
PT |
ICF-SW7600GR
Sony Corporation 2001 Printed in Japan

Owner’s record
The model and serial numbers are located at the rear of the unit. Record the serial number in the space provided below. Refer to them whenever you call your Sony dealer regarding this product.
Model No. ICF-SW7600GR
Serial No. _________________________
Warning
To prevent fire or shock hazard, do not expose the unit to rain or moisture.
To avoid electrical shock, do not open the cabinet.
Refer servicing to qualified personnel only.
For the customers in the U.S.A.
You are cautioned that any changes or modifications not expressly approved in this manual could void your authority to operate this equipment.
INFORMATION
This equipment has been tested and found to comply with the limits for a Class B digital device, pursuant to Part 15 of the FCC Rules. These limits are designed to provide reasonable protection against harmful interference in a residential installation. This equipment generates, uses, and can radiate radio frequency energy and, if not installed and used in accordance with the instructions, may cause harmful interference to radio communications. However, there is no guarantee that interference will not occur in a particular installation. If this equipment does cause harmful interference to radio or television reception, which can be determined by turning the equipment off and on, the user is encouraged to try to correct the interference by one or more of the following measures:
—Reorient or relocate the receiving antenna.
—Increase the separation between the equipment and receiver.
—Connect the equipment into an outlet on a circuit different from that to which the receiver is connected.
—Consult the dealer or an experienced radio/TV technician for help.
2GB Features
Features
•Worldwide coverage with FM stereo/SW/MW/LW reception
Simple and precise tuning with the quartz controlled PLL (Phase Locked Loop) synthesizer system. FM: 76–108 MHz
SW: 1 621–29 999 kHz MW: 530–1 620 kHz* LW: 150–529 kHz
Refer to the supplied “Wave Handbook” for more information.
*About channel steps for MW
(medium wave) broadcasts
The MW channel step differs depending on areas. The channel step of this unit is factory-set to 9 kHz or 10 kHz. Changing the settings to be able to listen to the radio (see page 15).
Area |
MW |
|
channel step |
|
|
North and South |
10 kHz |
American countries |
|
|
|
Other countries |
9 kHz |
•Five types tuning methods to suit your needs
–Direct tuning for tuning in to a station by directly specifying the frequency.
–Manual tuning for adjusting the frequency little by little manually.
–Auto scan tuning for searching stations automatically.
–Preset tuning for storing stations beforehand and selecting with a touch of a button.
–Memory scan tuning for automatically searching available stations from stations stored in a specified page.
•Built-in timer operation
With the 2 built-in timers, you can tune into the station of your choice at the time of your choice.
•Sleep timer
The sleep timer will automatically turn off the radio so that you can fall asleep listening to the radio without worry.
You can select the time for the sleep timer to activate from 60 min., 45 min., 30 min., and 15 min.
•Stereo FM reception
You can enjoy FM broadcasts in stereo using the optional stereo headphones.

Table of contents
Introduction |
|
|
|
Location of parts and controls .................................... |
4 |
|
|
|
|
|
|
Power sources |
|
|
|
Operating on batteries ................................................. |
8 |
|
|
Operating on external power sources ..................... |
10 |
|
|
Operating on AC power adaptor ................... |
10 |
|
|
|
|
|
|
Setting the clock |
|
|
|
Setting the Current Time ........................................... |
11 |
|
|
Finding out the time in other areas of the world... |
13 |
|
|
|
|
|
|
Listening to the radio |
|
|
|
|
|
GB |
|
Changing MW Channel Step |
15 |
|
|
|
|
||
..Directly entering the frequency — Direct tuning |
16 |
|
|
To improve reception ...................................... |
17 |
|
|
Manually selecting the frequency |
|
|
|
— Manual tuning ....................................................... |
18 |
|
|
Searching the station automatically |
|
|
|
— Auto scan tuning ................................................... |
20 |
|
|
Presetting stations — Preset tuning ........................ |
22 |
|
|
Searching available stations from presets |
|
|
|
— Memory scan tuning ............................................. |
24 |
|
|
Receiving SSB and CW transmissions ..................... |
26 |
|
|
Adjusting for optimum AM reception |
|
|
|
— Synchronous detection ......................................... |
27 |
|
|
|
|
|
|
Using the timer |
|
|
|
Waking up to the radio or alarm |
|
|
|
— Standby function ................................................... |
28 |
|
|
Falling asleep listening to the radio |
|
|
|
— Sleep timer function .............................................. |
31 |
|
|
|
|
|
|
Other convenient uses |
|
|
|
Preventing operation errors — Hold function ....... |
32 |
|
|
Recording broadcasts ................................................ |
33 |
|
|
Using the supplied SW external antenna ............... |
34 |
|
|
Using the optional external antenna ....................... |
35 |
|
|
|
|
|
|
Additional information |
|
|
|
Precautions and maintenance .................................. |
36 |
|
|
Troubleshooting ......................................................... |
38 |
|
|
Specifications .............................................................. |
40 |
|
|
Tips on radio waves ................................................... |
41 |
|
|
Table of Contents |
|
3GB |
|

B Introduction
Location of parts and controls
Refer to the pages in the parentheses for details.
Front
1AM EXT ANT (AM external antenna) jack (35)
2ATT (attenuator) control (21)
3ATT (attenuator) ON/ OFF switch (21)
4LINE OUT (recording output) jack (33)
52(headphones) jack (17,
33)
You can enjoy FM stereo broadcasting by connecting the optional stereo headphones to the unit . When using headphones, sound from the speaker will be muted.
6DC IN 6V ! (external power input) jack (10)
7LIGHT button When the display is
difficult to see, press this button to light up the display for approximately 10 seconds. Pressing the button again while the light is on will turn off the light. Performing button operations while the light is on will extend the lighting time.
8 Display (7)
9 Controls (6)
0 Speaker
4GB Introduction

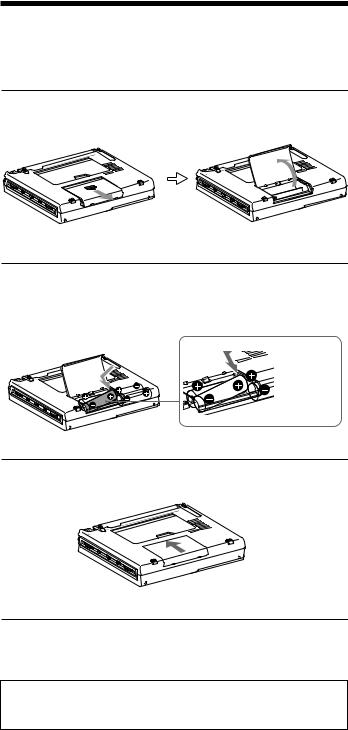
Rear
controls and parts of ocationL
qa SSB FINE TUNE control (26) qs LSB/USB selector (26, 27) qd AM MODE selector (26, 27) qf TONE selector (33)
qg VOLUME control
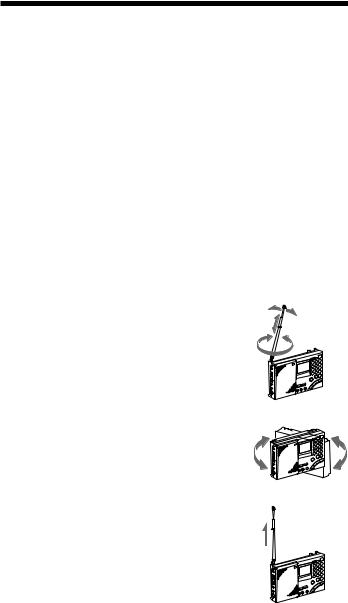
qh Telescopic antenna
Always pull out the base of the antenna before use. Furthermore, do not use unnecessary force when storing the antenna. At this time, be sure to push in the base as well.
 Base
Base
Pull out
qj Stand
qk Battery compartment
Introduction 5GB
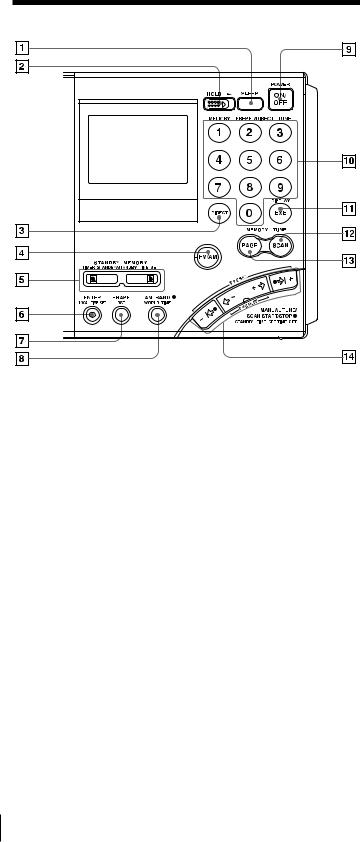
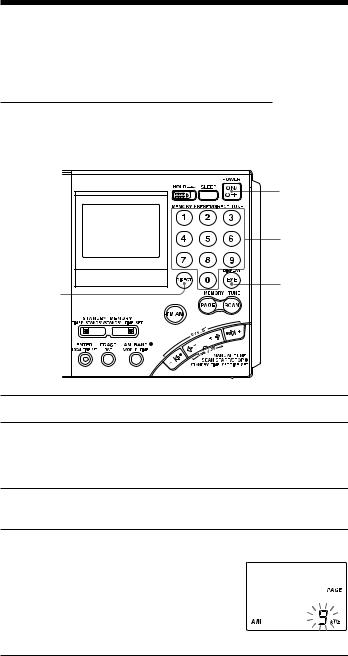
Controls
1 SLEEP button (31)
2 HOLD switch (32)
3 DIRECT button (15, 16)
4 FM/AM button (16, 18, 20)
5STANDBY MEMORY, TIMER STANDBY/ STANDBY TIME SET buttons (28, 30)
6ENTER, LOCAL TIME SET button (11, 22, 28)
7ERASE, DST (Daylight Saving Time) button (11, 13, 30)
8AM BAND, WORLD TIME button (13, 18, 20)
9 POWER ON/OFF button
0Number buttons (15, 16, 22, 23, 24)
qa DISPLAY, EXE button (13, 15, 16)
Press to switch to clock display while operating the radio. Press again to return to the previous display. If you do not press the button, the display will return to the previous condition in about 10 seconds.
qs SCAN button (24) qd PAGE button (22, 24)
qf MANUAL TUNE/SCAN START/STOP, STANDBY TIME SET/TIME SET buttons (11, 13, 18, 20, 28)
6GB Introduction

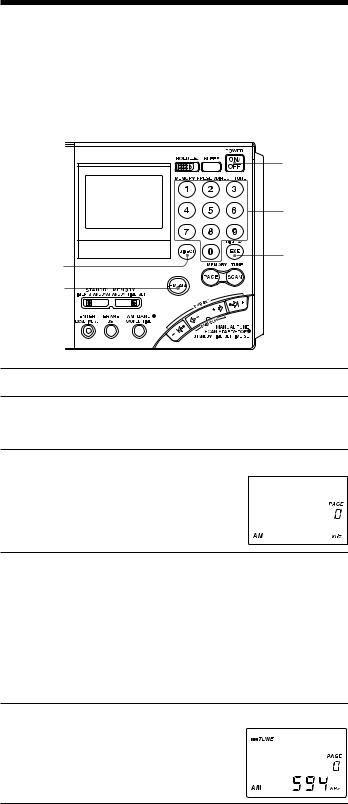
Display
1TUNE indicator (16, 18) Appears when a station is tuned in.
2 Battery indicator (9)
3HOLD indicator (32) Appears when HOLD is in effect. All buttons will be inoperative.
4

 (Daylight Saving Time) indicator (12) Appears when the time display is adjusted to the Daylight Saving Time.
5Preset number/time difference display (11, 22, 23)
6SYNCLOCK (synchronous detection lock) indicator (27) Appears when synchronous detection is in effect.
7SLEEP indicator (31) Appears when the sleep timer is in effect.
8STANDBY  , STANDBY
  indicators (28, 29, 30)
Light up when the standby timer is set.
9PAGE number display Appears constantly when the radio is on.
0 Time/frequency display
controls and parts of ocationL
Introduction 7GB
B Power sources
Operating on batteries
To operate the unit on external power sources, see “Operating on AC power adaptor” (page 10).
1 Slide and open the battery compartment lid.
2 Insert four R6 (size AA) batteries in the battery compartment.
Insert with correct polarity as shown.
Insert the
# side of the battery first.
3 Close the battery compartment lid.
When inserting batteries for the first time, “0:00” will flash in the display. The flashing can be stopped by setting the time.
Note
It takes about 3 seconds for characters to appear in the display after inserting batteries.
8GB |
|
Power sources |
|
Replacing the batteries
The sound will become small and distorted, and “E” will flash in the display when the batteries become weak.
When the batteries are completely exhausted, “E” will stop flashing (constant display), the power will turn off and all buttons will become inoperable. Replace all four batteries with new ones.
After replacing the batteries and turning on the power again, “E” will disappear and the unit will become operable.
Note on replacing the batteries
Replace the batteries within 60 seconds while the power is turned off. Otherwise, the clock setting will be cleared. In this case, set the time again. Preset stations, the time set by standby function and the time difference between your local time and the UTC are not erased.
on Operating batteries
Battery life |
|
(JEITA*) |
|
|
|
|
Sony LR6 alkaline (size AA) |
Sony R6 (size AA) |
|
|
|
FM |
approx. 47 hours |
approx. 15 hours |
|
|
|
SW |
approx. 34 hours |
approx. 10 hours |
|
|
|
MW/LW |
approx. 34 hours |
approx. 10 hours |
*Measured by JEITA (Japan Electronics and Information Technology Industries Association) standards. The actual battery life may vary depending on the circumstance of the unit.
Notes on dry batteries
Mishandling may result in leakage or damage. Be sure to follow the items below.
•Insert the batteries with correct polarity.
•Do not mix new and used batteries. Do not mix different types of batteries.
•Do not try to charge dry batteries, as they cannot be charged.
•Remove the batteries when the unit is not to be used for a long time.
•Do not carry the dry batteries with coins or other metallic objects. It can generate heat if the positive and negative terminals of the batteries are accidentally contacted by a metallic object.
Should any battery leakage occur, wipe the battery compartment thoroughly before installing new batteries.
Power sources |
|
9GB |
|

Operating on external power sources
The unit can also be operated by connecting the AC power adaptor to the DC IN 6V (external power input) jack.
Tip
When an external power source is connected, the unit automatically switches to the external power source, regardless of whether the batteries are installed.
Notes
•Keep the batteries installed even when operating on external power sources as backup for the unit’s microcomputer. Replace the batteries about once a year.
•Turn off the unit when connecting or disconnecting external power sources. Otherwise, the power may go off and “E” may appear. In this case, turn on the power again to clear the “E” display.
•When operating the unit on batteries, first disconnect the AC power adaptor from the wall outlet, then disconnect the AC power adaptor from the DC IN 6V jack of the unit. The unit will not operate on
batteries as long as the DC IN 6V jack is plugged in. |
|
• Use only the recommended AC power adaptor |
|
manufactured by Sony. Using AC power adaptors |
|
with different specifications (polarity of the plug, |
|
etc.) will result in malfunction and damage to the |
Polarity of the plug |
unit. |
|
Operating on AC power adaptor
Connect the optional AC power adaptor AC-E60HG to the DC IN 6V jack.
1
to DC IN 6V jack |
2 to a wall outlet |
1 Connect the AC power adaptor securely to the DC IN 6V jack.
2 Connect the AC power adaptor securely to a wall outlet.
Notes
•Do not bend or twist the power cord forcibly. Do not place heavy objects on the power cord.
•Always hold the plug when disconnecting the power cord. Do not pull the cord itself.
•Disconnect the AC power adaptor from the wall outlet and radio when the unit is not to be used for a long period of time.
10GB Power sources
B Setting the clock
Setting the Current Time
“0:00” flashes in the display when installing the batteries for the first time or when the unit has been reset. Set the clock to the current time.


 1
1
|
2 |
|
2, 4, 5 |
4 |
|
3 |
||
|
This unit can display local time, which is the time for your time zone, as well as world time, which is the time for any other area in the world. For the calculation of the time in other areas of the world, the time difference* between the local time and the UTC (Universal Time Coordinated) is used (see page 14, “Time difference with UTC for each area”). To find out the correct time, set the correct time and time difference of the area you are in.
* This unit uses time zones to pinpoint specific areas.
1 If the radio is turned on, press POWER ON/OFF to turn it off.
Note
You cannot set the clock when the radio is turned on.
2 Hold down LOCAL TIME SET and press K – or + k to choose the time difference between your local time and the UTC.
TIME ZONE indicator will appear. Each time you press K – or + k, the time difference (UTC + or –) and
the “hour” of the clock will increase or decrease accordingly. Two short beeps will be heard when adjusting the time difference to ±0. When you release LOCAL TIME SET, the
TIME ZONE indicator will disappear and the time difference with UTC will be determined.
sources power external on Operating
Time Current the Setting
Setting the clock |
|
11GB |
|
||
|
|
|

Setting the Current time (continued)
3 To set the daylight saving time, press DST to display the 

 indicator.
If daylight saving time is not used in your area, daylight saving time is not currently in effect, or 

 is already displayed, proceed to Step 4.
4 Hold down LOCAL TIME SET and press –?K or k?+ to set the local time.
Each time you press –?K or k? increase by a minute. To change or k?+.
+, the current time will decrease or the digits rapidly, hold down –?K
Two short beeps will be heard when adjusting the time to “0:00”.
5 Release LOCAL TIME SET.
“ : ” starts flashing and the clock starts running.
To switch to clock display while the radio is turned on
Press EXE. The display returns to the previous condition automatically after about 10 seconds or when EXE is pressed again. The time display period is extended when the WORLD TIME button is pressed during clock display, or when K – or
+ k is pressed during world time display. During clock display, radio operations such as changing frequencies are not possible. The clock will not be displayed during auto scan (page 20) or memory scan (page 24).
For areas adopting the daylight saving time (summer time)
Press DST to display the 

 indicator if you are now in the summer time period. When the summer time period has ended, press DST to clear the

 indicator. The time display will be adjusted automatically.
Tips
•The clock is displayed in the 24 hour system.
•Press LOCAL TIME SET to stop the flashing of “0:00”.
•To adjust the time to the second, release LOCAL TIME SET at the time of the tone.
12GB Setting the clock
Finding out the time in other areas of the world
You can display the time for any other area in the world (WORLD time).
EXE


 2 1
2 1


3
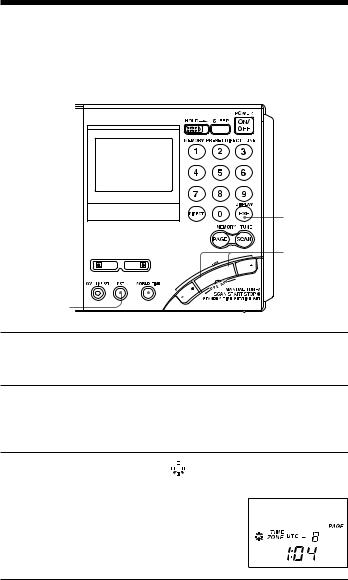
1 Press WORLD TIME.
If the radio is turned on, press EXE to display the clock before pressing WORLD TIME.
2 Press K – or + k to display the time difference with the UTC for the city (area) you want to see.
Two short beeps will be heard when adjusting the time difference to ±0.
3 Press DST to display the 

 indicator if the specified area is now under daylight saving time.
The current time of the area you want to see will be displayed.
To switch back to the LOCAL time display
Press WORLD TIME again.
world the of areas other in time the out Finding
Setting the clock |
|
13GB |
|
||
|
|
|

Finding out the time in other areas of the world (continued)
Time difference between local time and UTC
The table shows the time difference with the UTC for each area. “+1:00” indicates one hour ahead of UTC and “–1:00” indicates one hour behind UTC.
The relationship of the UTC, LOCAL time and the time difference is as follows:
Time difference = LOCAL time* – UTC
*Local time prior to DST (daylight saving time) adjustment. The DST setting does not affect the time difference display.
Time difference with UTC for each area
Time difference |
Major city or area |
|
|
±0 |
London |
+1 |
Central Europe, Amsterdam, Stockholm, Zurich, |
|
Paris, Vienna, Brussels, Berlin, Madrid, Lisbon, Rome |
|
|
+2 |
Cairo, Athens, Istanbul |
+3 |
Jeddah, Riyadh, Nairobi, Moscow |
+4 |
Dubai |
+5 |
Karachi |
+6 |
Dhaka (Dacca) |
+7 |
Bangkok, Jakarta |
+8 |
Singapore, Beijing, Hong Kong |
+9 |
Tokyo, Seoul |
+10 |
Sydney, Guam |
+11 |
Solomon, Noumea |
+12 |
Auckland, Fiji |
–11 |
Samoa |
–10 |
Hawaii, Honolulu, Tahiti |
–9 |
Anchorage |
–8 |
Los Angeles, San Francisco, Vancouver |
–7 |
Denver, Calgary |
–6 |
Chicago, Dallas, Mexico City |
–5 |
New York, Toronto, Panama, Lima |
–4 |
Caracas, Santiago |
–3 |
Rio de Janeiro, San Paulo, Buenos Aires |
–2 |
Fernando Island |
–1 |
Azores Island |
14GB Setting the clock
B Listening to the radio
Changing MW Channel Step
The MW channel step differs depending on the area as shown in the table below. Select the channel step according to your area.
Channel step according to area
Area |
Channel step |
North and South American countries |
10 kHz |
Other countries |
9 kHz |
|
3 |
MWChanging |
|
1 |
|
2 |
4 |
Channel |
|
||
|
Step |
|
|
|
1 Press POWER ON/OFF to turn off the radio.
2 Press DIRECT.
Perform Step 3 within 10 seconds. Otherwise, the unit will return to the condition prior to Step 2. In this case, repeat from Step 2. In addition, perform steps after Step 3 within 10 seconds as well.
3 Enter the channel step using the number buttons.
To enter 9 kHz, press 9 and to enter 10 kHz, press 1 and 0.
4 Press EXE to finish operation.
The entered channel step will flash for about 3 seconds and the unit will return to the clock display.
Two short beeps will be heard when entering numbers other than “9” and “10”. In this case, repeat from Step 2 after returning to the clock display.
Listening to the radio |
|
15GB |
|
Directly entering the frequency
— Direct tuning
If you know the frequency of the station you want to listen to, you can use the number buttons for quick and accurate tuning.
|
1 |
|
4 |
3 |
5 |
|
|
2 |
|
TVOLUME (adjust the volume)
1 Press POWER ON/OFF to turn on the radio.
2 Press FM/AM to select either band.
To listen to SW (short wave), MW (medium wave) or LW (long wave) broadcasts, select AM.
3 Press DIRECT.
The frequency disappears from the display. Perform Step 4 within 10 seconds. Otherwise, the unit will return to the condition prior to Step 3. In this case, repeat from Step 3. In addition, perform steps after Step 4 within 10 seconds as well.
4 Press the number buttons and input the frequency of the desired station.
FM band: You can ignore the decimal point. Example: To enter 89.5 MHz, press 8, 9 and 5.
AM band: You can ignore the last 3 digits if they are all zero. Examples: To enter 810 kHz, press 8, 1 and 0.
To enter 10 000 kHz, enter 1 and 0.
To enter 12 095 kHz, enter 1, 2, 0, 9 and 5.
The minimum frequency step for direct input is 0.05 MHz (50 kHz) for FM and 1 kHz for AM.
5 Press EXE.
The unit will tune in to the entered frequency. “ TUNE ” will appear in the display when the station is tuned in.
16GB |
|
Listening to the radio |
|
To correct input
Press DIRECT and repeat from Step 3.
If you enter an invalid frequency
You will hear two short beeps and the display will return to the frequency you are currently listening. Check the frequency and repeat from Step 3.
To turn off the radio
Press POWER ON/OFF.
Tips
•You can use the optional stereo headphones to enjoy FM stereo broadcasts.
•When listening to news broadcasts, set the TONE selector to NEWS for voice enhancement. When listening to music, set the selector to MUSIC.
•Reception of frequencies around 3.64 MHz may be difficult due to internal spurious signals generated by the built-in oscillators.
To improve reception
FM reception
Extend the telescopic antenna, and adjust the direction and angle.
(See “telescopic antenna”, page 5)
MW/LW reception
Retract the telescopic antenna and rotate the unit to reorient the built-in ferrite bar antenna.
SW reception
Fully extend the telescopic antenna vertically. For SW reception, you can enjoy even better reception by using the supplied external antenna (page 34)
tuning Direct — frequency the entering Directly
When there is interference
Turn the ATT switch on the side of the unit to ON, and adjust the ATT control (page 21).
Bad reception
Connect the optional external antenna (page 35).
Listening to the radio |
|
17GB |
|

Manually selecting the frequency
— Manual tuning
Use –?K, k?+ or K –, + k to change the frequency.
1
2
4
3 |
3, 4 |
1 Press POWER ON/OFF to turn on the radio.
2 Press FM/AM to select either band.
To listen to SW, MW or LW broadcasts, select AM.
3 For AM bands, hold down AM BAND and press –?K or k?+ to select MW (medium wave), LW (long wave) or meter band (short wave).
The lowest frequency of the band (meter band) will appear in the display each time the button is pressed.
For FM, skip this step.
4 Press –?K, k?+ or K –, + k repeatedly to tune in to the desired station.
The frequency changes in the channel steps shown below each time the button is pressed, and the “ TUNE ” appears when a station is tuned in.
|
Band |
When outer –?K or k?+ |
When inner K – or + k |
|
|
is pressed |
is pressed |
|
|
|
|
|
FM |
0.05 MHz |
0.05 MHz |
|
SW |
5 kHz |
1 kHz |
|
MW |
9 kHz or 10 kHz |
1 kHz |
|
LW |
9 kHz |
1 kHz |
|
|
|
|
18GB |
|
Listening to the radio |
|
||
|
|
|

Tips
•The unit will perform auto scan when –?K or k?+ is held down (see “Searching the station automatically – Auto scan tuning”, page 20).
•The frequency changes rapidly when K – or + k is held down and stops when the button is released. In the AM bands (MW, SW and LW), the unit scans continuously in the range of 150 to 29 999 kHz.
What is a meter band?
Meter bands refer to frequency bands which short wave broadcasts are divided into wavelengths. Normally, international broadcast frequencies are assigned. With this unit, there are 14 meter bands.
Frequency range of bands/meter bands
Unit: kHz for AM, MHz for FM
Band |
Frequency Range |
Scan Frequency Range |
Meter band |
||||
|
|
|
|
|
|
|
|
|
LW |
150–529 |
|
153–522 |
|
— |
|
|
MW |
530–1 620 |
|
530–1 |
620 |
* |
— |
|
|
|
|
|
|
||
|
|
531–1 |
620 |
** |
— |
||
|
|
|
|
||||
|
|
|
|
2 250–2 550 |
|
120 meter band |
|
|
|
|
|
|
|
|
|
|
|
|
|
3 150–3 450 |
|
90 meter band |
|
|
|
|
|
|
|
|
|
|
|
|
|
3 850–4 050 |
|
75 meter band |
|
|
|
|
|
4 700–5 100 |
|
60 meter band |
|
|
|
|
|
|
|
|
|
|
|
|
|
5 900–6 250 |
|
49 meter band |
|
|
|
|
|
7 100–7 400 |
|
41 meter band |
|
AM |
|
|
|
|
|
|
|
SW |
1 621–29 999 |
9 |
400–10 |
000 |
|
31 meter band |
|
|
|
|
|
|
|
|
|
|
|
|
11 |
500–12 150 |
|
25 meter band |
|
|
|
|
13 |
500–13 900 |
|
22 meter band |
|
|
|
|
|
|
|
|
|
|
|
|
15 |
000–15 900 |
|
19 meter band |
|
|
|
|
17 |
450–18 000 |
|
16 meter band |
|
|
|
|
18 |
850–19 100 |
|
15 meter band |
|
|
|
|
|
|
|
|
|
|
|
|
21 |
450–21 950 |
|
13 meter band |
|
|
|
|
25 |
600–26 100 |
|
11 meter band |
|
|
|
|
|
|
|
||
|
FM |
76.00–108.00 |
76.00–108.00 |
|
— |
||
*10 kHz channel step (see page 15).
**9 kHz channel step (see page 15).
Note
The actual frequency range of short wave broadcasts and the range of the meter bands for this unit may differ. Refer to the supplied “Wave Handbook” for more information.
tuning Manual — frequency the selecting Manually
Listening to the radio |
|
19GB |
|
||
|
|
|

Searching the station automatically
— Auto scan tuning
1
2
6
3 |
3, 4, 5 |
1 Press POWER ON/OFF to turn on the radio.
2 Press FM/AM to select either band.
To listen to SW, MW or LW broadcasts, select AM.
3 For AM bands, hold down AM BAND and press –?K or k?+ to select MW (medium wave), LW (long wave) or meter band (short wave).
The lowest frequency of the band (meter band) will appear in the display each time the button is pressed.
For FM, skip this step.
4 Hold down –?K or when the unit starts
k?+ for about 2 seconds. Release scanning.
Stations will be searched automatically. The unit will stop at each reception and will resume scanning after about 3 seconds (auto scan tuning).
The unit will scan within the frequency range of the chosen band or meter band (see “Frequency range of bands/meter bands”, page 19).
5 When the unit tunes in to the desired broadcast, press the outer –?K or k?+.
Auto scan will stop at that broadcast station.
6 Press the inner K – or + k to adjust to the optimum frequency.
20GB |
|
Listening to the radio |
|
||
|
|
|
Tips
•The unit scans the frequencies in descending order when holding down –?K, and in ascending order when holding down k?+.
•To change the scanning direction, hold down either –?K or k?+ opposite to the current direction for 3 seconds. This is convenient when you want to return to the previous reception after the unit has resumed scanning.
To adjust the reception sensitivity for scanning
— Using the ATT switch and ATT control
When scanning for MW broadcasts at night when reception is intense or when scanning under prevalent interference, the unit may stop scanning to null broadcasts frequently.
If the unit stops scanning frequently, adjust the reception sensitivity.
Under normal conditions, set the ATT switch to OFF (maximum reception sensitivity).
ATT control 
ATT switch 
1 Set the ATT switch to ON.
The ATT control is enabled.
2 Turn the ATT control and adjust the reception sensitivity.
Turn the ATT control toward MAX to reduce sensitivity. The unit will skip weaker signals and stop at only stronger ones.
Note
If the ATT control is turned too much toward MAX, the unit will not stop at any weaker signals at all. Set the ATT switch to OFF if you do not need to use the attenuator.
tuning scan Auto — automatically station the Searching
Listening to the radio |
|
21GB |
|
||
|
|
|

Presetting stations
— Preset tuning
There are a total of 10 pages available for presets (page 0 to page 9) and you can preset up to 10 stations per page for a maximum of 100 preset stations. By presetting, you can tune in to stations simply by using the number buttons (0 to 9).
Convenient way using preset tuning
For short wave (SW) broadcasts, frequencies available for reception differ depending on the time and period even for the same station. Presetting different frequencies for the same station on a page will allow you to tune in to that station easily by using the memory scan tuning (page 24).
(For frequencies of each station, see the supplied Wave Handbook.)
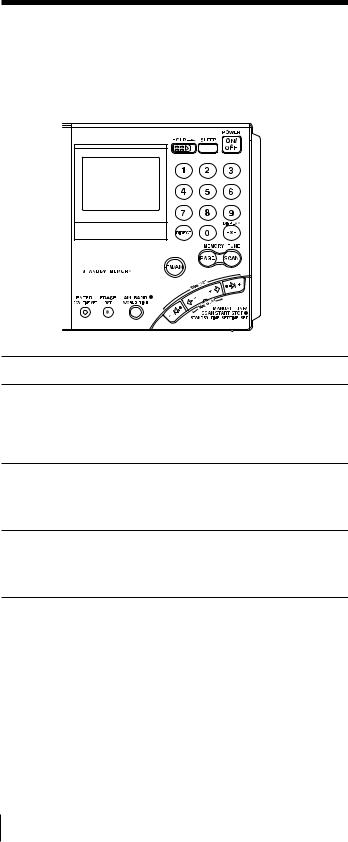
Presetting and changing the stations
Frequencies may already be preset in the memory at the time of purchase. In this case, erase or change the unnecessary stations.
1
3, 4
 3
3
4
1 Press POWER ON/OFF to turn on the radio.
2 Tune in to the station you want to preset.
For details concerning tuning, see Direct tuning (page 16), Manual tuning (page 18) or Auto scan tuning (page 20).
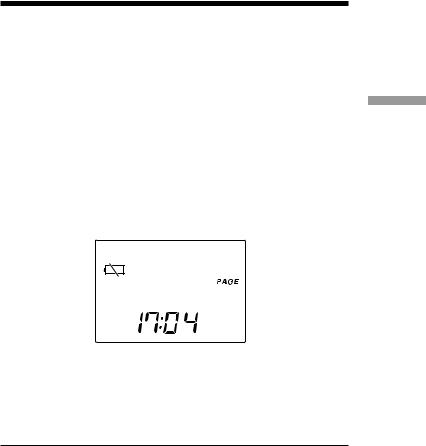
3 Press PAGE and press a number button between 0 and 9 to select a page number.
The number will change from a flashing display to a constant display and the page number will be determined.
4 Hold down ENTER and press a number button between 0 and 9 to select a preset number.
Two short beeps will be heard and the
PRESET indicator will change from a
flashing display to a constant display. The frequency will be stored in the selected preset number. The example shows AM 594 kHz is stored in preset number 1 of page number 1.
Note
If a station has already been stored to the button you chose, it will be overwritten by the new preset.
22GB |
|
Listening to the radio |
|
||
|
|
|

Tuning in to a preset station
1 |
2, 3 |
2 |
1 Press POWER ON/OFF to turn on the radio.
2 Press PAGE and press the page number (0 to 9) where the desired preset station is stored.
3 Press the number button (0 to 9) of the desired preset station.
The radio will tune in to the station assigned to the button.
If no station is preset
Two short beeps are sounded when the button is pressed (0 to 9) and after “- - - -“ is displayed momentarily, the unit will return to the previous display.
Erasing a preset station
1
2, 3
 2
2
4
1 Press POWER ON/OFF to turn on the radio.
2 Press PAGE and press the page number (0 to 9) where the desired station to erase is stored.
3 Press the number button (0 to 9) of the desired station to erase.
4 Hold down ERASE.
The preset number flashes while you hold down ERASE.
Two short beeps sound after about 3 seconds and the stored station is erased. The preset number display will disappear.
tuning Preset — stations Presetting
Listening to the radio |
|
23GB |
|
||
|
|
|

Searching available stations from presets
— Memory scan tuning
You can scan stations stored on a page.
Convenient way using memory scan tuning
When performing memory scan tuning, scanning will stop at the available stations. By storing frequencies of a short wave (SW) broadcast station that differ depending on the time and period on a page, the available frequency can be received by scanning that page.
1
2


 3
3  2
2
1 Press POWER ON/OFF to turn on the radio.
2 Press PAGE and press the number button (0 to 9) of the page to scan.
3 Press SCAN.
The unit will scan all stations preset to the selected page in ascending order and stop when there is reception. Press SCAN again to select the next station. After the highest preset number has been scanned, the unit will return to the smallest preset number and scan again.
24GB |
|
Listening to the radio |
|
||
|
|
|

To stop memory scan during operation
Press SCAN while memory scan is in operation.
When there are no stations available
If no stations are received after scanning, the unit will return to the preset number where the scan was started and two short beeps will be heard.
When you press SCAN for a page with no presets
Two short beeps sound, “- - - -“ is displayed and the unit will return to the previous state.
Tips
•Scanning works faster if you preset frequencies in descending or ascending order in preset number orders.
•When scanning at night when reception is intense or when scanning under prevalent interference, the unit may stop scanning to null broadcasts frequently. In this case, set the ATT switch to ON, and adjust the ATT control (see “To adjust the reception sensitivity for scanning”, page 21). Under normal conditions, set the ATT switch to OFF.
Note
Many international broadcasts for short wave have limited broadcast hours. Due to this, the unit may not be able to tune in to the station outside the broadcast hours, or the unit may tune in to another station such as the local station of your area, etc.
tuning scan Memory — presets from stations available Searching
Listening to the radio |
|
25GB |
|
||
|
|
|

Receiving SSB and CW transmissions
You can receive SSB (Single Side Band) and CW (Continuous Wave) transmissions with this unit.
1
6
4
3
 2
2
1 Press POWER ON/OFF to turn on the radio.
2 Press FM/AM to select AM.
3 Set the AM MODE selector to SSB.
4 Set the LSB/USB selector to either LSB or USB.
To receive CW transmission, select LSB.
5 Adjust the frequency.
For tuning, see Direct tuning (page 16), Manual tuning (page 18), or Auto scan tuning (page 20).
6 Use SSB FINE TUNE control to fine tune in to a frequency where you have the best reception.
You can fine tune the received frequency in a range of about ±1.5 kHz. During this time, the frequency display will not change.
Tip
For more information on SSB and CW, refer to “Tips on radio waves”, page 41.
26GB |
|
Listening to the radio |
|
||
|
|
|

Adjusting for optimum AM reception
— Synchronous detection
With synchronous detection, you can adjust AM reception (especially SW reception) to optimum conditions.
1
5
4
2
1 Press POWER ON/OFF to turn on the radio.
2 Press FM/AM to select AM.
3 Adjust the frequency.
For tuning, see Direct tuning (page 16), Manual tuning (page 18), Auto scan tuning (page 20), or Memory scan tuning (page 24).
4 Set the AM MODE selector to SYNC.
5 Set the LSB/USB selector to either LSB or USB, whichever has the best reception.
SYNCLOCK indicator will appear when the synchronous detection circuit is locked.
Tip
For more information on synchronous detection, see “Tips on radio waves”, page 41.
Note
SYNCLOCK indicator may not appear when the received signal is weak and synchronous detection does not take effect.
optimum for Adjusting |
CW and SSB Receiving |
reception AM |
transmissions |
detection Synchronous — |
|
Listening to the radio |
|
27GB |
|
||
|
|
|

B Using the timer
Waking up to the radio or
alarm — Standby function
Waking up to the radio
You can wake up to your favorite radio program using the standby function. You can preset different frequencies and standby times to STANDBY MEMORY  and
and  .
.
To wake up to the alarm, see “Waking up to the alarm”, page 30.
4 |
3, 5, 6 |
2 |
|
3 |
||
5 |
||
|
Make sure the clock is set correctly before using the standby function (page 11).
The standby timer takes effect when the set time and the displayed time match. You do not need to take into consideration the LOCAL time and WORLD time. If you want to wake up at 8:00, set 8:00. After setting the standby time, simply select the displayed time to LOCAL time or the time of the desired area you want to use (WORLD time), and the standby function will operate at 8:00 am for the specified area.
1 Tune in to the station you want to listen.
For tuning, see the various tuning methods (pages 16–27).
2 Adjust the volume using the VOLUME control.
3 Hold down ENTER and press STANDBY MEMORY  or
or  .
.
When ENTER is held down, the PRESET indicator will flash. Two short beeps sound when STANDBY MEMORY  or
or  is pressed and the selected station will be stored to the standby memory button. The standby memory number of “a” or “b” will appear in the display.
4 Press POWER ON/OFF to turn off the radio.
Note
Always turn off the power when setting the standby time. The time cannot be set when the radio is on.
28GB Using the timer

5 Hold down STANDBY MEMORY  or
or  selected in Step 3 and press –?K or k?+ repeatedly to set the standby time.
The time changes by a minute each time –?K or k?+ is pressed. Hold down the button to rapidly change the digits.
When  or
or  is held down, STANDBY
  or STANDBY
  will flash in the display.
6 Release STANDBY MEMORY  or
or  .
.
”STANDBY  ” or ”STANDBY
  ” lights up and the standby setting is complete. The clock indication returns to the current time.
7 Display the time of the area you want the standby function to take effect (LOCAL time or WORLD time).
When the time is reached and the standby function activates
The radio turns on, SLEEP indicator appears and the preset station is received. The power will automatically turn off after about 60 minutes.
To check the standby time
Hold down STANDBY MEMORY  or
or  with the radio turned off. The preset standby time is displayed while the button is pressed.
To change the standby time
Perform Step 4 and after and set the new time.
To cancel the standby function
Press STANDBY MEMORY  or
or  with the radio turned off so that STANDBY
  or STANDBY
  is cleared from the display. At this time, release button
  or
or  within a second. Otherwise, the unit goes to Step 5 for setting the standby time again.
Tips
•To temporarily cancel the standby function, turn off the radio and slide HOLD in the direction of the arrow so that “-” is displayed. The timer goes back to effect when “-” is cleared from the display (see “Preventing operation errors – Hold function”, page 32).
•Once the standby presets are set, the radio turns on at the preset time everyday unless the standby function is canceled by clearing
STANDBY  or STANDBY
  . Even when the standby function is canceled, the station and time stored in STANDBY MEMORY
  or
or  are not erased until new settings are overwritten.
•If the standby memory is in standby status, it takes effect even when you are listening to the radio. The radio switches to the preset standby frequency at the standby time.
•You can set both STANDBY  and
and  to the standby status at the same time. The radio turns on at the first standby time to receive the first standby frequency, then switches to the second standby frequency at the second standby time.
•If both STANDBY  and
and  are set to the same standby time, only STANDBY
  will operate.
function Standby — alarm or radio the to up Waking
Using the timer 29GB
Waking up to the radio or alarm — Standby function (continued)
Waking up to the alarm
If STANDBY MEMORY  or
or  without a frequency preset is activated, the alarm sounds at the standby time. Erase if a frequency is preset.


 1
1
2  3
3 
1 Press POWER ON/OFF to turn on the radio.
2 Press STANDBY MEMORY  or
or  .
.
The preset station is received.
If no frequency is stored, two short beeps sound, “- - - -“ appears in the display and the unit will return to the previous condition. Proceed to Step 4.
3 Hold down ERASE.
The preset number display flashes while ERASE is held down. Two short beeps sound after about 3 seconds and the stored station is erased. The “a” or “b” indicator will be cleared from the display.
4 Follow Step 4 and after of “Waking up to the radio”, page 28 to set the standby time.
The alarm sounds at the standby time and stops after about 3 minutes.
To stop the alarm
Press any button on the front.
Notes
•The alarm volume cannot be adjusted with the VOLUME control.
•If the standby time is reached when listening to the radio, the radio is turned off and switched to the clock display, and the alarm is sounded.
30GB Using the timer
 Loading...