

Sony HVR-Z5P, 4-114-858-12-1, HVR-Z5E User Manual

4-114-858-12(1)
Digital HD Video Camera Recorder
Digital HD Video
Camera Recorder
Operating Guide
Before operating the u nit, please read this m anual thoroughly,
and retain it for future reference
http://www.sony.net/
Printed on 70% or more recycled paper using VOC
(Volatile Organic Compound)
-free vegetable oil based ink.
Printed in Japan
GB
HVR-Z5E/Z5P
© 2008 Sony Corporation
Read this first
Before operating this unit, please read this
manual thoroughly, and retain it for future
reference.
Notes on use
Types of cassette you can use in your
camcorder
Your camcorder is capa ble of recording in
HDV, DVCAM and DV formats.
When recording in HDV/DV format, So ny
recommends that you use mini DV
cassettes.
When recording in DVCAM format, Sony
recommends that you use mini DVC A M
cassettes. Your camcorder does not support
the Cassette Memory function (p. 116).
The HDV format
• Digital high-definition (HD) video signals
are recorded and pla yed back on a DV
format cassette.
• HDV signals are compressed in MPEG2
format, which is adopted in BS (broadcast
satellite) digital and terrestria l di gital
HDTV broadcastings and in Blu-ray disc
recorders.
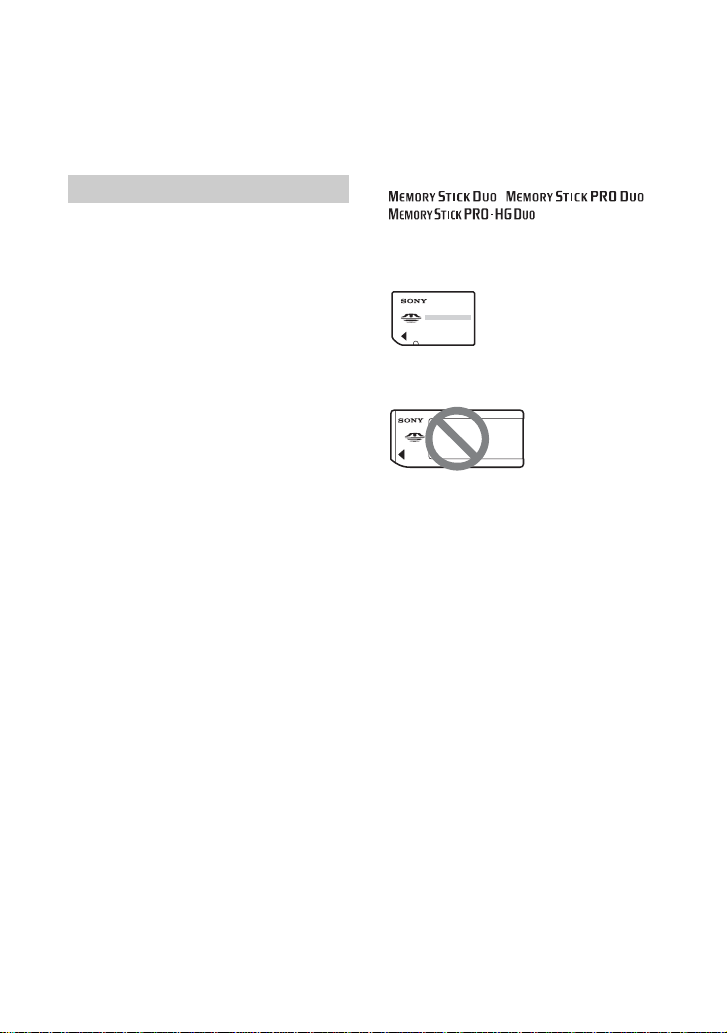
Types of “Memory Stick” you can use
in your camcorder
You can use any “Mem ory Stick” that has
the following markings.
“Memory Stick Duo”
(This size can be used with your
camcorder.)
“Memory Stick”
(You cannot use it in your camcorder.)
b Notes
• You cannot use an y type of memory card
except “Memory Stick Duo.”
• “Memory Stick PRO Duo” can be used
only with “Memory Stick PRO”
compatible equipmen t.
• Do not attach a label or th e li ke on a
“Memory Stick Duo” or a “Memory Stick
Duo” Adaptor.
• When using a “M em ory Stick Duo” with
“Memory Stick” compatible equipment,
insert the “Memory Stick Duo ” into the
“Memory Stick Duo” Adaptor.
2
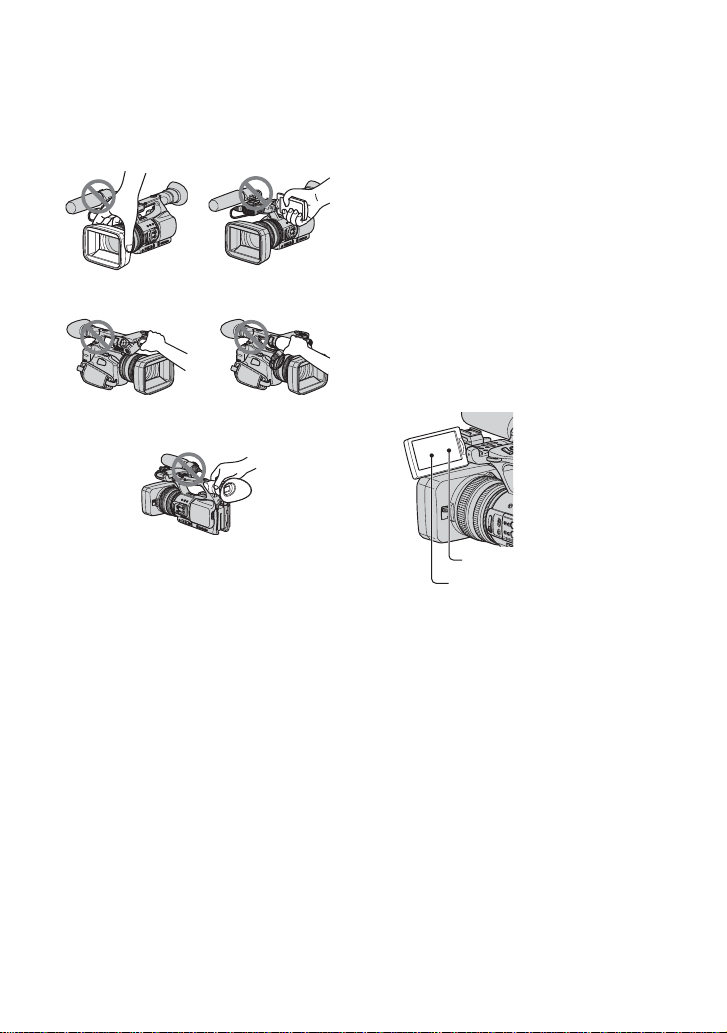
Using the camcorder
LCD panel
Viewfinder
Lens hood
Internal microphone Microphone or
Microphone holder
Black point
White, red, blue o r g reen point s
• Do not hold the camcorder by the
following part.
b Notes
• The camcorder is not dustproof, dripproof
or waterproof.
See “About handling of your camcorder”
(p. 122).
• Do not connect cables to your camcorder
with their terminals placed the wrong
way. Squeezing the terminals into your
camcorder's jacks may damage them or
results in a malfunction of your
camcorder.
About menu items, LCD panel,
viewfinder, and lens
• A menu item that is grayed out is not
available und er the current recording or
playback conditions.
• The LCD screen and the vi ewfinder are
manufactured using extre mely highprecision technology, so over 99.99% of
the pixels are operational for effective
use. However, there may be some tiny
black points and/or bright points (white,
red, blue, or green in color) that appear
constantly on the LCD screen a nd th e
viewfinder. These points are normal
results of the manufacturing process and
do not affect the record in g in any way.
Do not expose your camcorder’s
viewfinder, lens, or LCD screen to the
sun or strong light source for extended
periods.
• Intense ligh t sources, especially the sun
will converge o n the viewfinder or len s
and damage the internal part s of your
camcorder. Avoid sunlight or other strong
light sources when storing your
camcorder. Protect this device by always
closing the lens cover or by placing it in
its bag when not in use.
About temperature of your camcorder
and battery pack
• Your camcorde r ha s a p rot ective function
that disables recording or pla yba c k if th e
temperature of your cam c order or battery
Continued ,
3

Read this first (Continued)
pack is beyond the safely operable range.
In this case, a message appears on the
screen or in the viewfinder (p. 113).
On recording
• Before starti n g to record, test the
recording function to make sure the
picture and soun d ar e r ecorded without
any problems.
• Compensation for the contents of
recordings cannot be provided, even if
recording or playback i s not possible due
to a malfunction of the camcorder, storage
media, etc.
• TV color systems differ depending on the
countries/regions . T o view your
recordings on a TV, you need a PAL
system-based TV.
• Television programs, film s, video tapes,
and other materials may be copyrighted.
Unauthorized recording of such materials
may be contrary to the copyright laws.
• Because of the way that the image device
(CMOS sensor) reads out image signals,
the subjects passing by the frame ra pidly
might appear crooked d ep ending on the
recording conditions. This phenomenon
may be notable in displays havi ng hi gh
motion resolution.
On playing back HDV tapes on other
devices
A tape recorded in the HDV format can not
be played back on a device that is not
compatible with the HDV format.
Check the contents of tapes by playing
them back on this camcor de r pri o r to
playing them back on other devices.
Features available for the DV SP
format only.
The function that can be used when
i.LINK cable i s connected.
The function that can be assigned to
an ASSIGN button.
About this manual
• The images of the LCD screen and the
viewfinder used in this manual for
illustration purposes are capture d usin g a
digital still camera, and therefore may
appear different.
• The on-screen displ ays in each local
language are used for illu stra ti ng the
operating procedur es. Change the screen
language before using your camcorder if
necessary (p. 20).
• Design and specific a ti ons of re cording
media and other accessories are subject to
change without notice.
• Illustrations of battery packs in this
manual show the NP-F770 unless
otherwise specified.
Notes on the icons used in this
manual
Features available for the HDV
format only.
Features available for the DVCAM
format only.
4

Table of Contents
Read this first ...........................................................................................2
Getting Started
Step 1: Checking supplied items ..............................................................8
Step 2: Attaching the supplied microphone and the lens ho od w it h le ns
cover .............................................................................................9
Step 3: Charging the battery pack ..........................................................12
Step 4: Turning the power on an d hol ding your camcorder properly .....16
Step 5: Adjusting the LCD panel and viewfinder ....................................17
Step 6: Setting the date and time ...........................................................19
Step 7: Inserting a tape or a “Memory Stick Duo” ..................................21
Recording ...............................................................................................23
Changing the settings of your camcorder recordings .............................26
Assigning the functions to the ASSIGN buttons .....................................44
Playback .................................................................................................49
Changing/checking the settings in your camcorder ................................52
Changing the language setting .......................................................... 20
Recording/Playback
Adjusting the zoom ............................................................................. 26
Adjusting the focus manually.............................................................. 27
Adjusting the image brightness .......................................................... 28
Adjusting to natural color (White balance).......................................... 31
Customizing the picture quality (Picture profile) ................................. 33
Adjusting the volume .......................................................................... 42
Attaching a Memory Recording Unit ................................................... 42
Recording an index signal .................................................................. 45
Playing back the most recently recorded movies
(Last scene review)............................................................................. 46
Reviewing the most recently recorded scenes (Rec review).............. 46
Searching for the last scene of the most recent recording
(End search) ....................................................................................... 46
Using the Shot transition ..................................................................... 46
Changing the screen .......................................................................... 52
Displaying recording data (Data code) .............................................. 52
Displaying the settings in your camcorder (Status check) ................. 53
Checking the remaining battery (Battery Info) .................................... 53
Continued ,
5

Table of Contents (Continued)
Locating a scene on a tape ....................................................................54
Searching for a scene by date of recording (Date search) ................ 54
Searching for a recording start point (Index search) .......................... 54
Playing the picture on a TV ....................................................................56
Using the Menu
Using the menu items ...........................................................62
Menu items ............................................................................................64
(CAMERA SET) menu .................................................................... 6 7
Settings to adjust your camcorder to the recording conditions (GAIN SETUP/
BACK LIGHT/STEADYSHOT, etc.)
(AUDIO SET) menu .......................................................................75
Settings for the audio recording (DV AU.MODE (DV Audio mode)/XLR SET,
etc.)
(DISPLAY SET) menu ................................. ....................................78
Display settings of the display and the viewfinder (MARKER/VF B.LIGHT/DISP
OUTPUT, etc.)
(IN/OUT REC) menu .......................................................................83
Recording settings, input and output settings (REC FORMAT/HDV PROGRE./
VIDEO OUT/EXT REC CTRL, etc.)
(TC/UB SET) menu .................................................. .......................86
(TC PRESET/UB PRESET/TC LINK, etc.)
(MEMORY SET) menu ....................................................................88
Settings for the “Memory Stick Duo” (ALL ERASE/FORMAT, etc.)
(OTHERS) menu .............................................................................90
Settings while recording on a tape or other basic settings (QUICK REC/BEEP,
etc.)
Dubbing/Editing
Dubbing to VCR, DVD/HDD device, etc. .................. .............................93
Recording pictures from a VCR ............................................................97
Copying movies on a tape to a computer ..............................................99
Copying still images to a computer ........................... ...........................102
Troubleshooting
Troubleshooting ................................................................................... 103
Warning indicators and messages ....................................................... 113
6

Additional Information
Using your camcorder abroad ..............................................................115
Maintenance and precautions ..............................................................116
Specifications .......................................................................................126
HDV format and recording/playback ................................................ 116
Compatibility of the DVCAM/DV formats ........................................... 117
About the “Memory Stick” ................................................................. 119
About the “InfoLITHIUM” battery pack ............................................. 120
About i.LINK...................................................................................... 121
About x.v.Color ................................................................................. 122
About handling of your camcorder ................................................... 122
Quick Reference
Identifying parts and controls ............................................................. ..130
Indicators for the LCD screen and viewfinder ......................................136
Index .....................................................................................................139
7
Getting Started
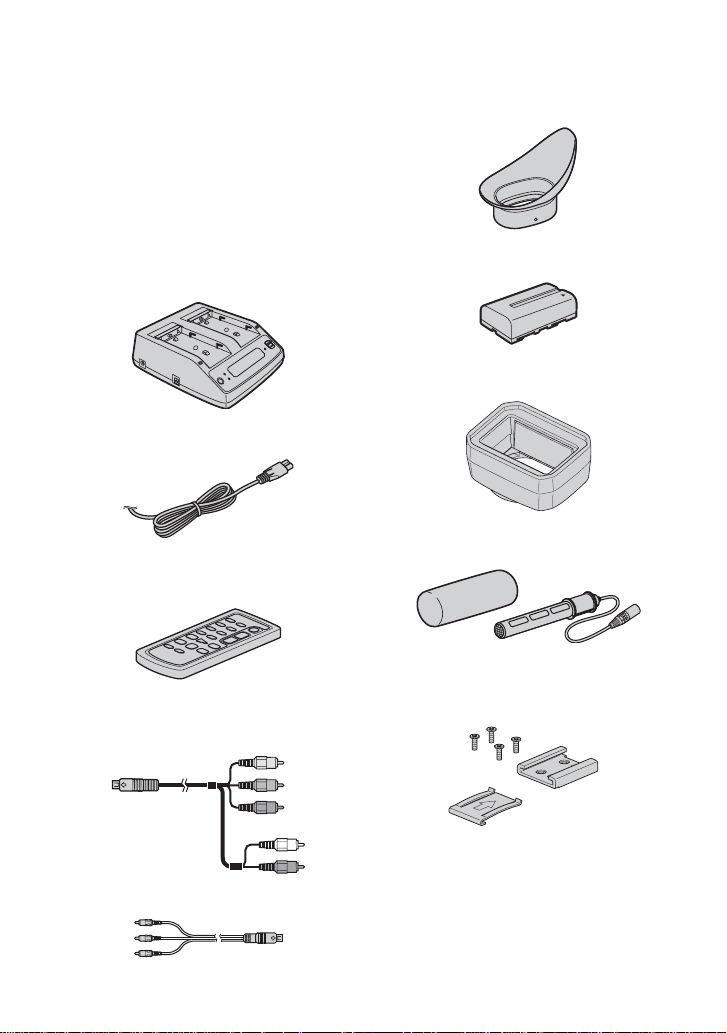
Step 1: Checking supplied items
Make sure that you have following items
supplied with your camcorder.
The number in the parentheses indicates the
number of that item sup p lied.
• The cassette tape and “Memory Stick Duo” are
not included. See pages 2, 116 and 119 for types
of cassette tapes and “Memory Stick Duo” that
you can use on your camcorder.
AC Adaptor/Charger (AC-VQ1050) (1)
(p. 12)
Power cord (mains lead) (1) (p. 12)
Wireless Remote Commander (RMT-831)
(1) (p. 135)
A button-type lithium battery is already instal led.
Component A/V cable (1) (p. 56)
Large eyecup (1) (p.18)
Rechargeable battery pack (NP-F570) (1)
(p. 12, 120)
Lens hood with lens cover (1) (p.11)
This lens hood is pre-mounted.
Wind Screen (1), Micropho ne (ECM-XM1)
(1) (p. 9)
Accessory shoe kit (Accessory shoe (1),
Accessory shoe plate (1), screws (4))
(p. 130)
A/V connecting cable (1) (p.56, 93)
8
Connecting cord (DK-415) (1) (p.14)
CD-ROM “Manuals for Digital HD Video
Camera Recorder” (1)
Operating Guide (2)
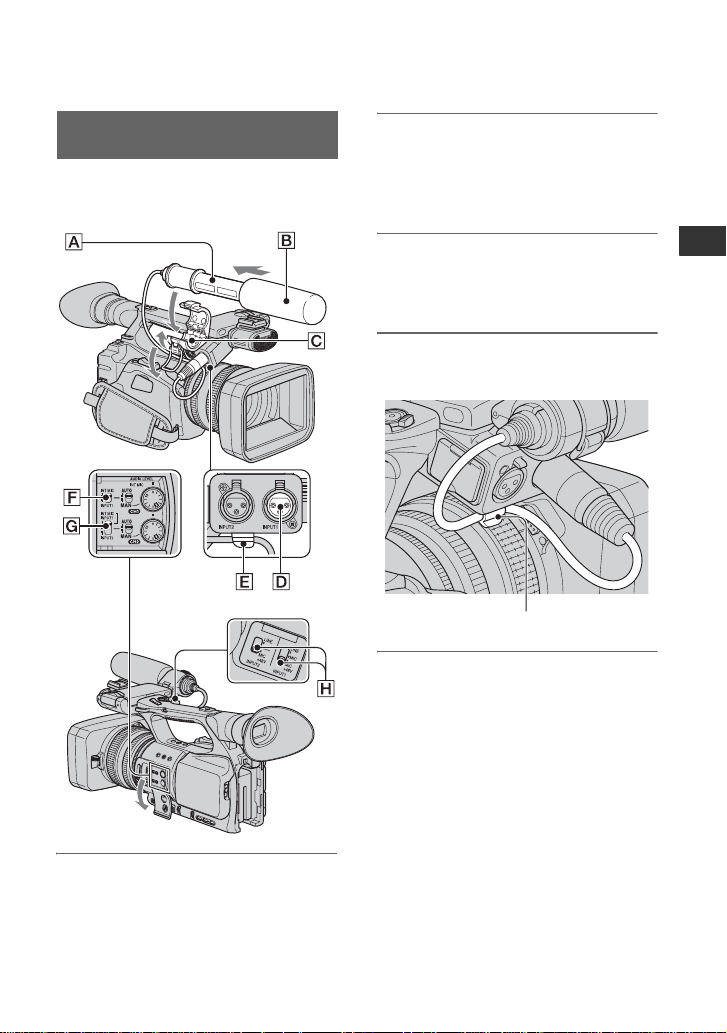
Step 2: Attaching the supplied microphone and
the lens hood with lens cover
Attaching the supplied
microphone
When you use the supplied microphone
(ECM-XM1) for record in g sound, do the
following steps.
2 Place the microphone A in the
microphone holder C with the
model name facing upward, c lose
the cover, and shut the clamp.
3 Connect the plug of the
microphone to the INPUT1 jack
D.
4 Put the micropho ne cab le i nto th e
cable holder E.
Put the cable in the outer cable holder.
5 Select channels with the CH1 (INT
MIC/INPUT1) switch F and the
CH2 (INT MIC/INPUT1/INPUT2)
switch G.
See the table below for the recording
channels.
Getting Started
1 Attach the wind screen B to the
supplied microphone A.
Continued ,
9

Step 2: Attaching the supplied microphone and the lens hood with lens
cover (Continued)
When the CH1 switch is set to
INT MIC
CH2 switch
position
INT MIC Internal
INPUT1 Internal
INPUT2 Internal
Input channel and source
microphone
(L)
Internal
microphone
(R)
microphone
(mono)
XLR INPUT1 CH2**
microphone
(mono)
XLR INPUT2 CH2**
CH1
CH2*
CH1
CH1
When the CH1 is set to INPUT1
CH2 switch
position
INT MIC XLR INPUT1 CH1
INPUT1 XLR INPUT1 CH1
INPUT2 XLR INPUT1 CH1
* The recording level of channel 2 is
synchronized with that of channel 1 when only
the internal microphone is used. The recording
level of channel 2 is controlled with the CH1
(AUDIO LEVEL) dial and the CH1 (AUTO/
MAN) switch.
**You can adjust the recording levels of channel 1
and channel 2 separately.
Input channel and source
Internal
microphone
(mono)
XLR INPUT2 CH2**
CH2**
CH2**
6 Set the INPUT1 switch H to an
appropriate positi on for the
microphone connected to the
INPUT1 jack D.
LINE: For inputting sound from an
audio device
MIC: For inputting sound from an
external microphone that does
not support the +48V power
source.
MIC+48V: For inputting sound from a
When you connec t a m icrophone to the
INPUT2 jack, set the INP UT2 sw itch to
an appropriate po s it ion for that
microphone.
b Notes
• When you connect a device that supports the
+48V power source to the INPUT1 or INPUT2
jack, set the INPUT1/INPUT2 switch to MIC
prior to connecting the device. When you
disconnect the device, set the INPUT1/INPUT2
switch to MIC first, then disconnect it.
• When you connect a microphone that does not
support the +48V power source to the INPUT1
or INPUT2 jack, set the INPUT1/INPUT2
switch to MIC. If you use it with the INPUT1/
INPUT2 switch set to MIC+48V, it may be
damaged or the recorded sound may be
distorted.
z Tips
• See page 42 for adjusting the volume.
device that supports th e
+48V power source
including the supplied
microphone.
10
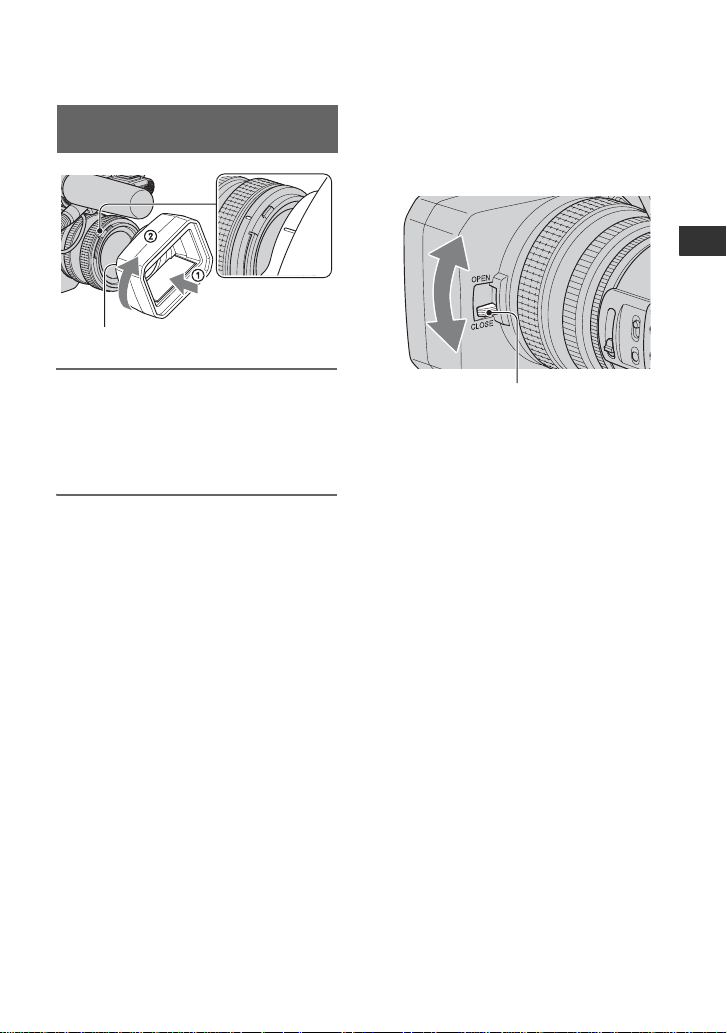
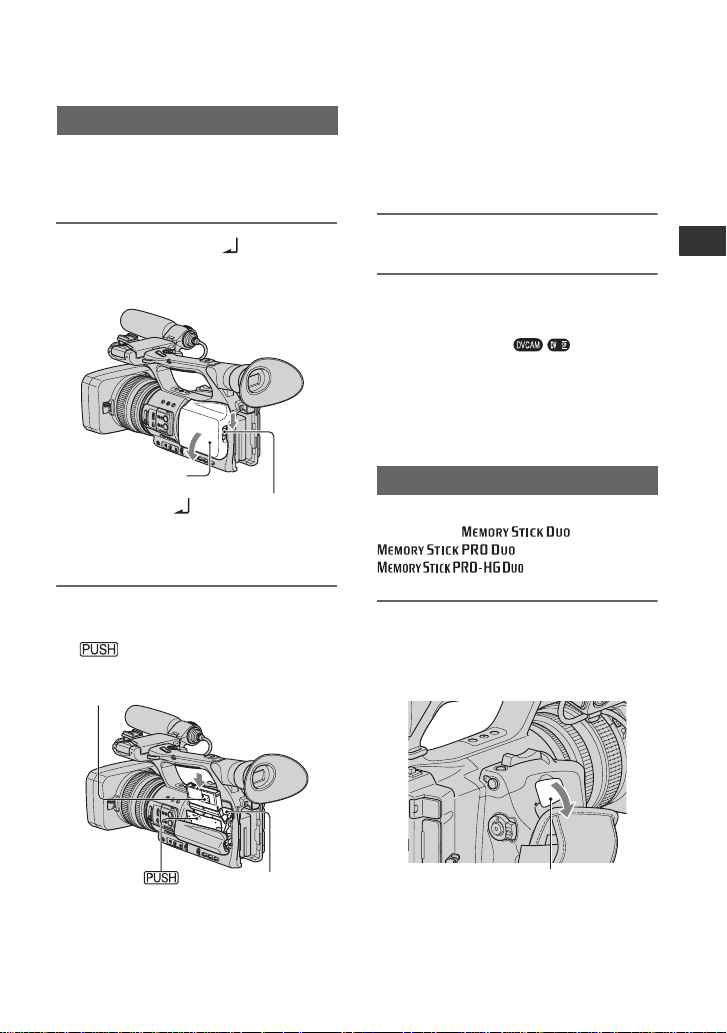
Attaching the lens hood with lens
cover
PUSH (lens hood release) button
To open or close the shutter of the
lens hood with lens cover
Move the lens cover lever up or dow n to
open or close the lens cover.
Getting Started
Align the marks on the lens hood to
those on the camcorder, and turn the
lens hood in the directi on of the
arrow
2.
To remove the lens hood with lens
cover
Turn the lens hood in the opposite direction
to the arrow 2 in the illustration whil e
pressing the PUSH (lens hood release)
button.
z Tips
• If you attach or remove a 72mm (2 7/8 in.) PL
filter or MC protector, remove the lens hood
with lens cover.
Move the lens cover lever to OPEN to
open the lens cover, and move the lever
to CLOSE to close the lens cover.
11
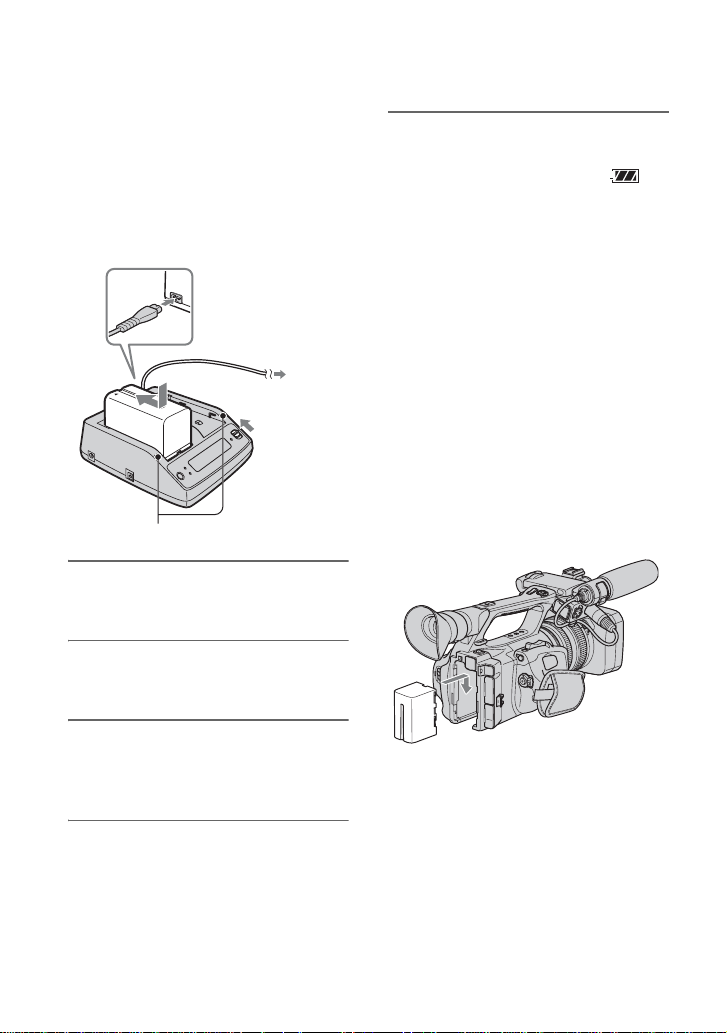
Step 3: Charging the battery pack
4
You can charge the “InfoLITHIUM”
battery pack (L series) with the
supplied AC Adaptor/Charger.
b Notes
• You cannot use batteries other than the
“InfoLITHIUM” battery pack (L series)
(p. 120).
2
3
4
1
Charge lamp
1 Set the mode change switch to
CHARGE.
After charging the battery
All segments of the batt ery mark ( )
appear in the display window when the
normal charge of the ba tt ery is completed.
You can fully charge the battery pack if you
continue char g ing the battery pack after the
charge lamp turns off until the battery mark
with “FULL” appears (full charge). The
battery life of the full y charged battery is
slightly longer than that of the norma lly
charged battery.
Remove the ba ttery pack from the AC
Adaptor/Charger w hen the charge is
completed.
z Tips
• You can che ck the remaining battery life with
the battery info function (p. 53).
To attach the battery pack
Press the batter y pack against the bac k of
your camcorder and slide it dow n.
2 Connect the power cord (mains
lead) to the AC Adaptor/Charger.
3 Connect the power cord (mains
lead) to the wall outlet (wall
socket).
4 Place the battery pack in the slot
of the AC Adaptor/Charger, press
it down, and s l ide it in the
direction of the arrow as
illustrated.
The charge lamp turns on and charging
starts.
12
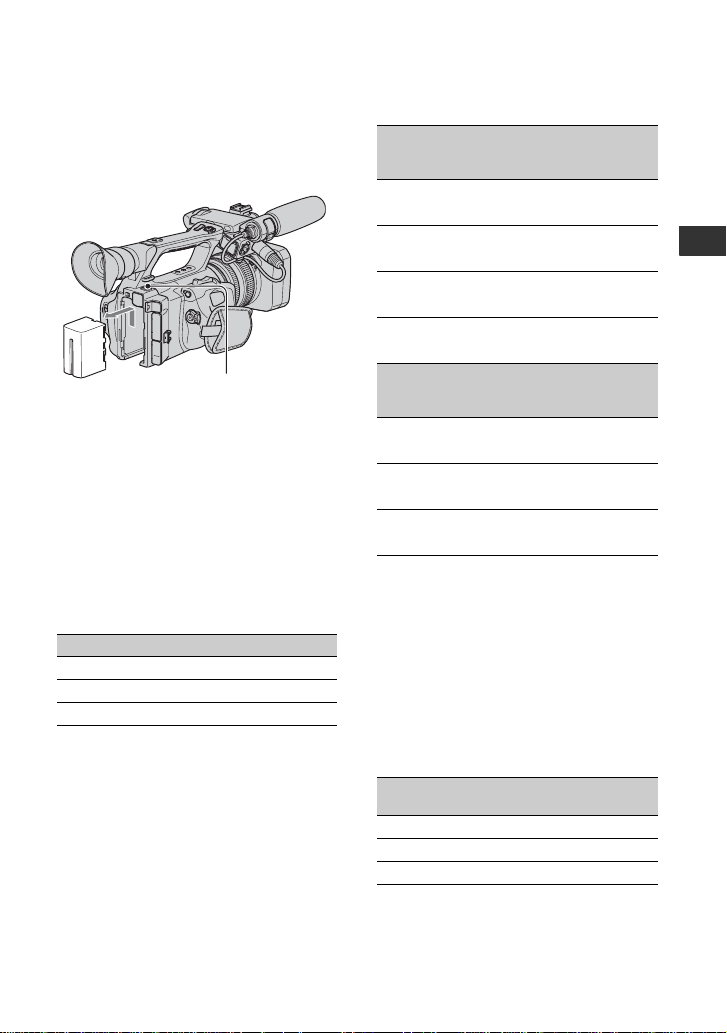
To remove the battery pack
Slide the POWER switch to OFF. Push the
BATT RELEASE (battery release) button
and remove the battery pack.
BATT RELEASE
(battery release) button
To store the battery pack
If the battery pack will not be use d for a
while, run down the battery and store it. See
page 121 for details on storage of the
battery pack.
Charging time
Approximate time (min.) requ ir ed when
you fully charge a fully discharged battery
pack.
Battery pack Charging time
NP-F570 145
NP-F770 230
NP-F970 310
b Notes
• The supplied battery pack is NP-F570.
• You cannot use the NP-F330 battery pack with
your camcorder.
Recording time
Approximate time (min.) available when
you use a fully charged bat te ry pack.
Recording in the HDV format
Continuous
Battery pack
NP-F570 130 65
NP-F770 265 130
NP-F970 395 195
Recording in the DVCAM (DV) format
Battery pack
NP-F570 130 65
NP-F770 275 135
NP-F970 410 205
Top: When the LCD backlight turns on.
Bottom: When recording with the viewfinder
while the LCD panel is closed.
* Typical recording time shows the time when
you repeat recording start/stop, turning the
power on/off and zooming.
recording
time
Continuous
recording
time
Typical
recording
time*
130 65
275 135
410 205
Typical
recording
time*
135 65
285 140
425 210
Playing time
Approximate time (min.) available when
you use a fully charged ba ttery pack.
HDV format pictures
Battery pack
NP-F570 175 180
NP-F770 360 375
NP-F970 545 570
LCD panel
opened*
LCD panel
closed
Getting Started
Continued ,
13
Step 3: Charging the battery pack (Continued)
DVCAM (DV) format pictures
Battery pack
LCD panel
opened*
LCD panel
closed
NP-F570 180 190
NP-F770 375 390
NP-F970 570 595
* When the LCD backlight turns on.
On the battery pack
• Before changing the battery pack, slide the
POWER switch to OFF.
• The Battery Info (p. 53) will not be correctly
displayed under the following conditions.
– The battery pack is not attached correctly.
– The battery pack is damaged.
– The battery pack is worn-out.
• Sony recommends that you use an NP-F970
battery pack when you use your camcorder with
the Memory Recording Unit (optional).
On the charging/recording/playback time
• Times measured with the camcorder at 25 °C
(77 °F). 10 to 30 °C (50 °F to 86 °F) is
recommended.
• The recording and playback time will be shorter
when you use your camcorder in low
temperatures.
• The recording and playback time will be shorter
depending on the conditions under which you
use your camcorder.
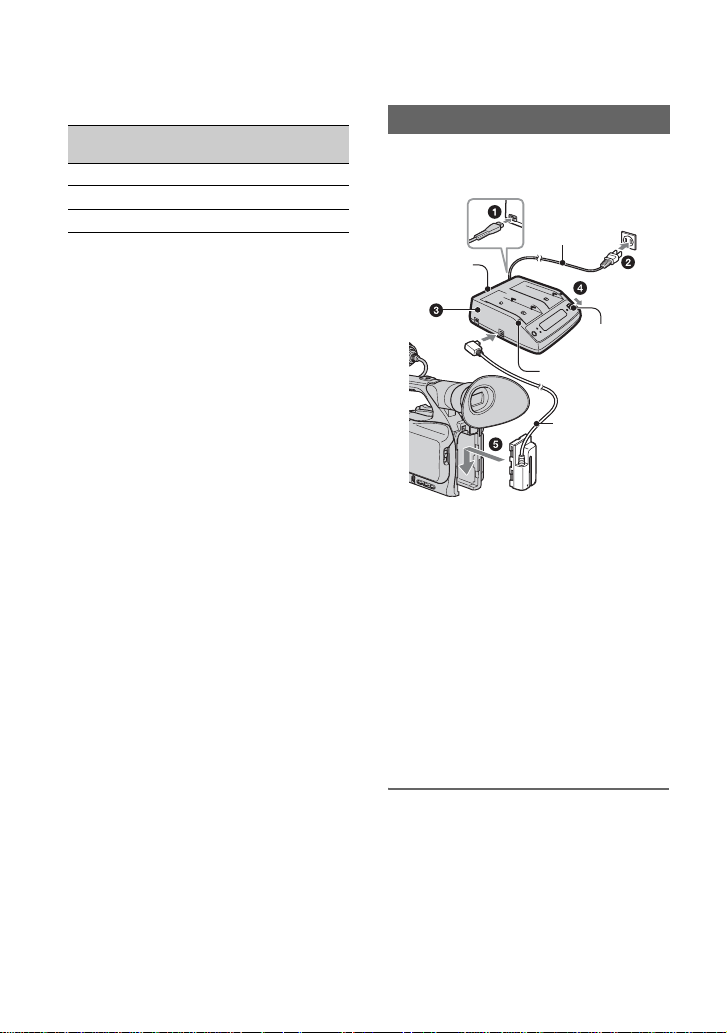
Using an outside power source
You can use the AC Adaptor/Charger to
obtain AC power.
To the wall outlet
(wall socket)
Power cord
AC Adaptor/
Charger
Mode change
switch
Charge lamp
Connecting cord
DK-415
1 Connect the power cord (mains lead) to
the AC Adaptor/Charger .
2 Connect the power cord (mains lead) to
the wall outlet (wall socket).
3 Connect the connecting cable (DK-415)
to the AC Adaptor/Charger.
4 Set the mode chan g e switch of the AC
Adaptor/Charger to VCR/CAMER A .
5 Press the connecting part of the
connecting cable (DK-415) against the
back of your camcorde r in the bat te ry
slot and slide it down.
14
On the AC Adaptor/Charger
• Use the nearby wall outlet when using the AC
Adaptor/Charger. Disconnect the AC Adaptor/
Charger from the wall outlet (wall socket)
immediately if any malfunction occurs while
using your camcorder.
• Do not use the AC Adaptor/Charger placed in a
narrow space, such as between a wall and
furniture.

• Do not short-circuit the DC plug of the AC
Adaptor/Charger or battery terminal with any
metallic objects. This may cause a malfunction.
• Even if your camcorder is turned off, AC power
(house current) is still supplied to it while
connected to the wall outlet (wall socket) via the
AC Adaptor/Charger.
Getting Started
15
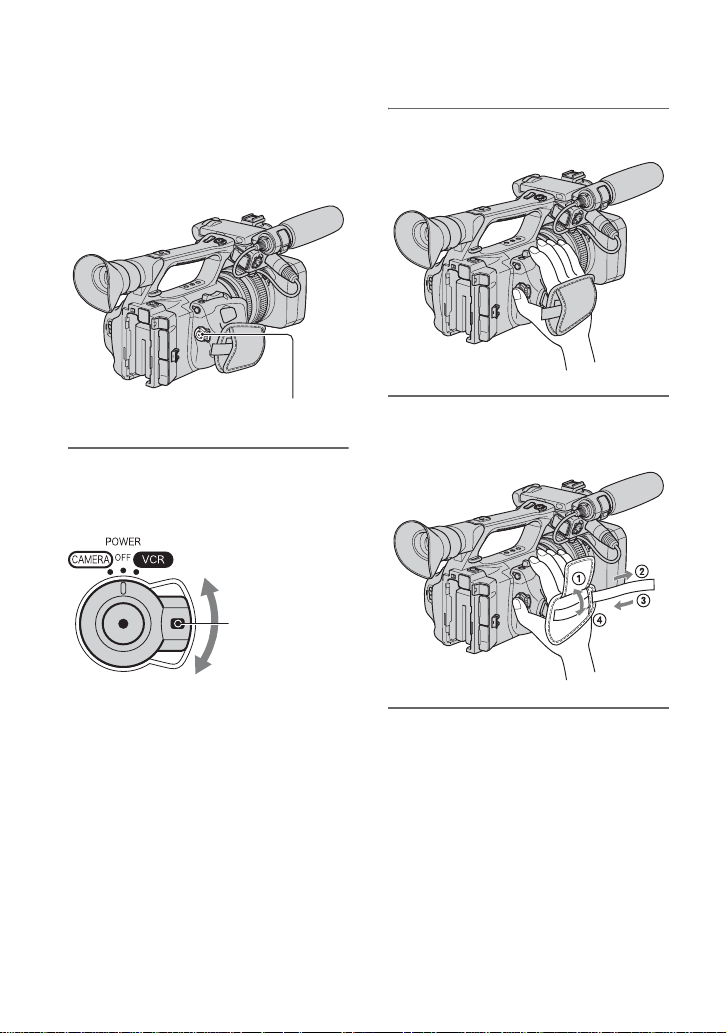
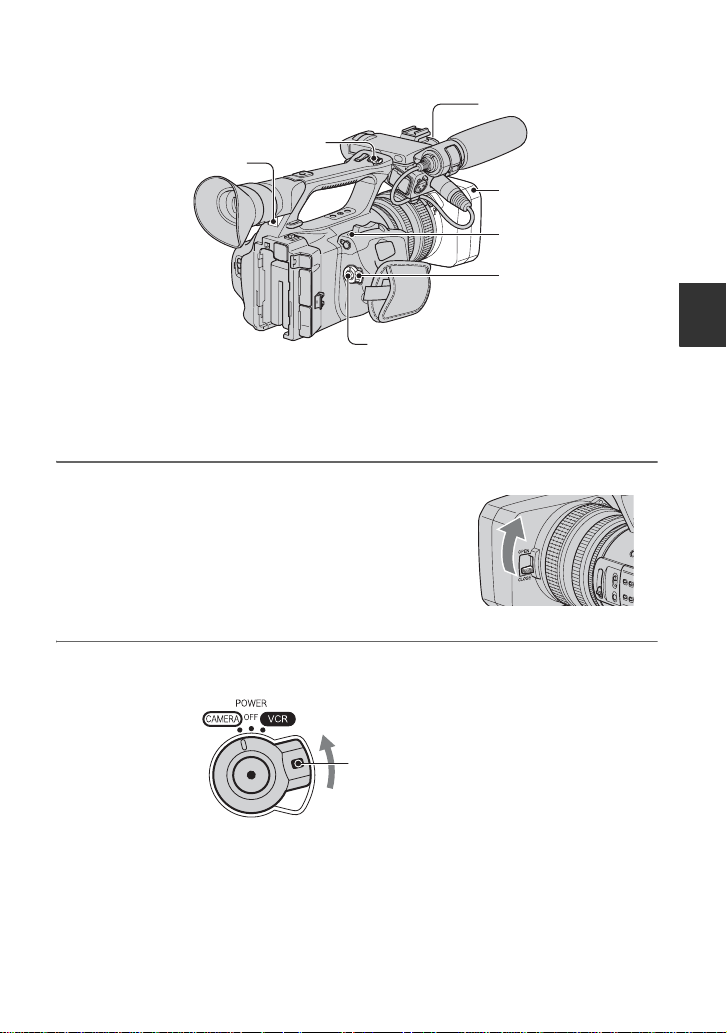
Step 4: Turning the power on and holding your
camcorder properly
To record or play back, set the POWER
switch to the respective positions .
When you use your camcorder for the first
time, the [CLOCK SET] screen appears
(p. 19).
2 Hold the camcorder properly.
POWER switch
1 Slide the POWER switch to
CAMERA or VCR while you press
the green button.
Slide the POWER
switch while
pressing the green
button.
CAMERA: To record pictures.
VCR: To play or edit pictures.
b Notes
• The current date and time appe ar on the LCD
screen for a few seconds when you turn on your
camcorder once you set the date and time
([CLOCK SET], p. 19).
3 Ensure a good grip, then fasten
the grip belt.
To turn off the power
Slide the POWER switch to OFF while
pressing the green button.
b Notes
• If warning messages appear on the screen,
follow the instructions.
16
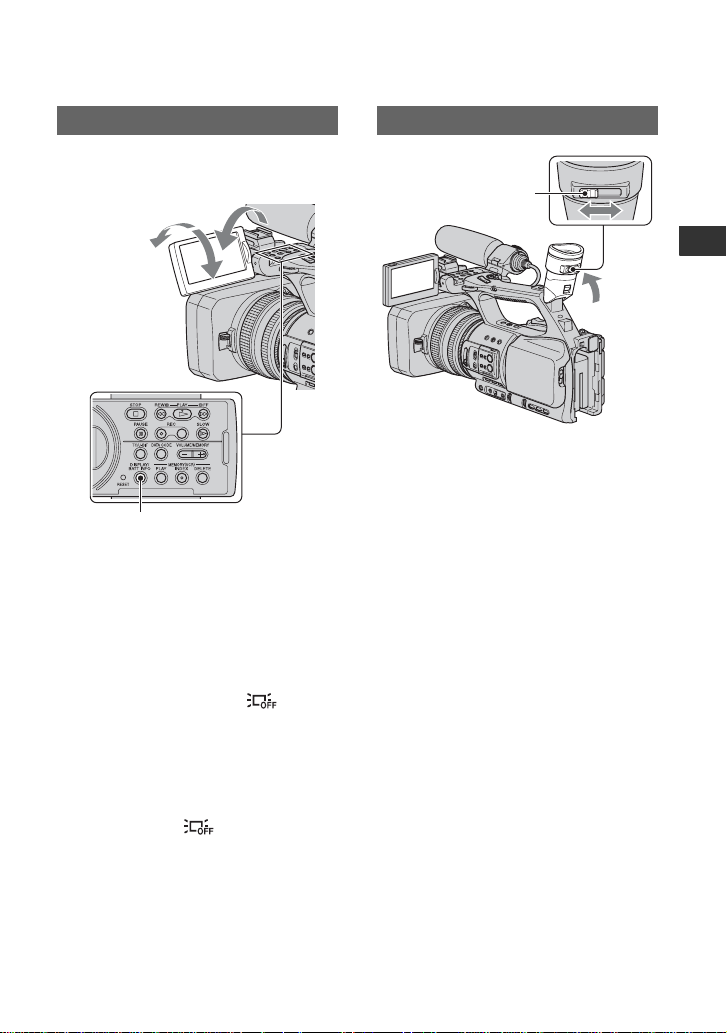
Step 5: Adjusting the LCD panel and viewfinder
The LCD panel
Open the LCD panel 180 degrees (1), then
rotate it to the best angle to re cord or play
back (2).
1Open 180 degrees.
290 degrees
(max.)
2180 degrees
(max.)
DISPLAY/BATT INFO button
z Tips
• You can see your mirror image on the LCD
screen by setting the LCD panel facing you. The
image will be recorded in a normal image.
To turn off the LCD backlight to make
the battery last longer
Press and hold the DISPLAY/BATT INFO
button for a few seconds until appears.
This setting is practical when you use you r
camcorder in bright conditions or when you
want to save battery power. The recorded
picture will not be affecte d by th e setting.
To turn on the LCD backlight, press and
hold the DISPLAY/BATT INFO button for
a few seconds until disappears.
z Tips
• You can adjust the brightness of the LCD screen
from [LCD BR IG H T ] (p. 81).
The viewfinder
Viewfinder lens
adjustment lever
Move it until the picture
becomes clear.
b Notes
• You may see primary colors shimmering in the
viewfinder when you move your eye line. This
is not a malfunction. The shimmering colors
will not be recorded on the recording media.
z Tips
• You can adjust the brightness of the viewfinder
backlight from [VF B.L IGH T] (p. 81).
• To display images both on the LCD display and
in the viewfinder, set [VF POWERMODE] to
[ON](p. 82).
• To display images in black and white in the
viewfinder, set [VF COLOR] to [OFF] (p. 82).
Getting Started
Continued ,
17
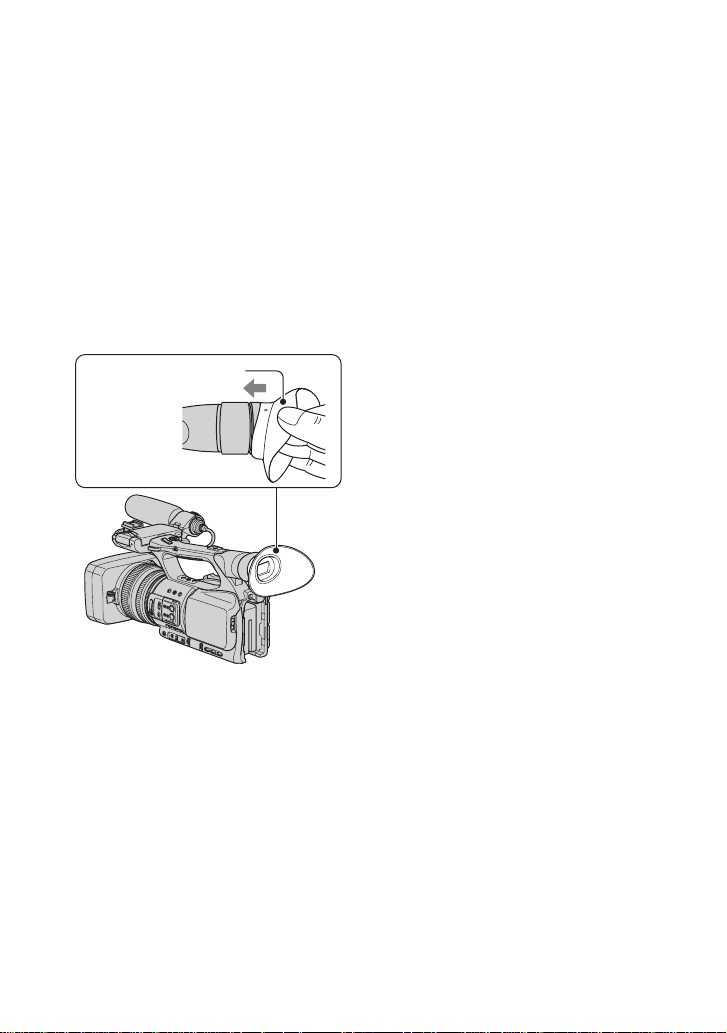
Step 5: Adjusting the LCD panel and viewfinder (Continued)
When the picture in the viewfinder is
hard to see
If you cannot see the pict ure in the
viewfinder clearl y unde r bright
circumstances, use the suppl ie d large
eyecup. To attach the large eyecup, stretch
it slightly and align it with the ey ecup
groove in the viewfinde r. Y ou ca n a tt ac h
the large eyecup facing either the right or
left side.
b Notes
• Do not remove the pre-attached eyecup.
Large eyecup (supplied)
Attach with th e
protruding part
at the top.
18
Step 6: Setting the date and time
Set the date and time when using your
camcorder for the first time. If you do no t
set the date and time , [CLOCK SET] scre en
appears every time you tur n on your
camcorder or change the POWER switch
positions.
z Tips
• If you do not use your camcorder for about 3
months, the built-in rechargea ble ba ttery gets
discharged and the date and time settings may
be cleared from the memory. In that case,
charge the rechargeable battery and then set the
date and time again (p. 125).
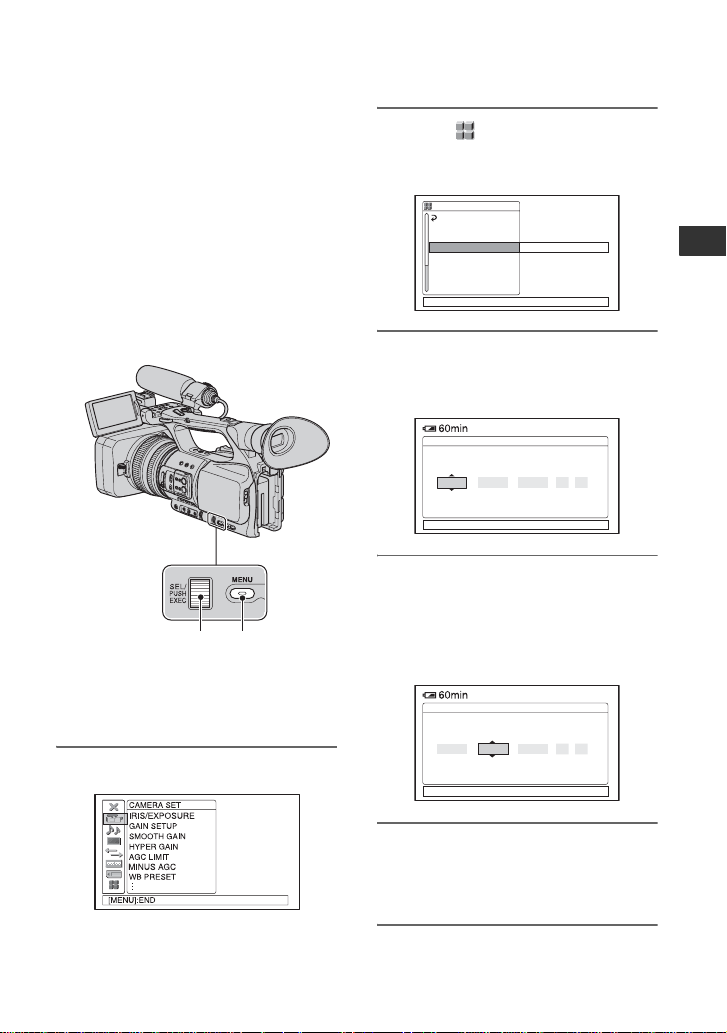
SEL/PUSH
EXEC dial
MENU
button
Skip to step 4 when you set the clock for
the first time.
1 Press the MENU button.
2 Select (OTHERS) by turning
the SEL/PUSH EXEC dial, then
press the dial.
OTHERS
RETURN
CAMERA PROF.
ASSIGN BTN
CLOCK SET
WORLD TIME
LANGUAGE
QUICK REC
DATE REC
[MENU]:END
3 Select [CLOCK SET] by turning
the SEL/PUSH EXEC dial, then
press the dial.
CLOCK SET
2008
[MENU]:CANCEL
4 Set [Y] (year) by turning the SEL/
PUSH EXEC dial, then press the
dial.
You can set any year up to the year
2079.
CLOCK SET
2008
[MENU]:CANCEL
MDY
--
MDY
--
--:--:--
1
Getting Started
--:--:--:--
0 : 0011
--:--:--:--
0 : 001
5 Set [M] (month), [D] (day), hour
and minute, then press the dial.
The clock starts .
Continued ,
19

Step 6: Setting the date and time (Continued)
z Tips
• The date and time are automatically recorded on
the tape, and can be displayed during playback
(DATA CODE button, p. 52).
.
Changing the language setting
You can change the on -sc reen displays to
show messages in a specified language.
Press the MENU button and select the
(OTHERS) with the SEL/PUSH
EXEC dial. Se lect the screen la nguage in
[LANGUAGE] (p. 91).
20
Step 7: Inserting a tape or a “Memory Stick Duo”
{DO NOT PUSH}
Cassette tape
See page 116 for details on tapes includi ng
which tapes can be used and how to protect
from overwriting tapes.
1 Slide and hold the OPEN/
EJECT lever in the direction of the
arrow and open the lid.
Lid
OPEN/EJECT lever
The cassette compar tment automati cally
comes out.
2 Insert a cassette with its window
facing outwards, then press
.
Window
Push the center of the b ack of
the cassette ligh tly.
b Notes
• Do not push the portion marked
compartment is sliding in. Doing so may
cause a malfunction.
while the cassette
3 Close the lid.
z Tips
• The recordab le time varie s dep ending on [DV
REC MODE] (p.84).
To eject the cassette
Open the lid fo llowing the same proced u r e
as described in step 1 and rem ove the
cassette.
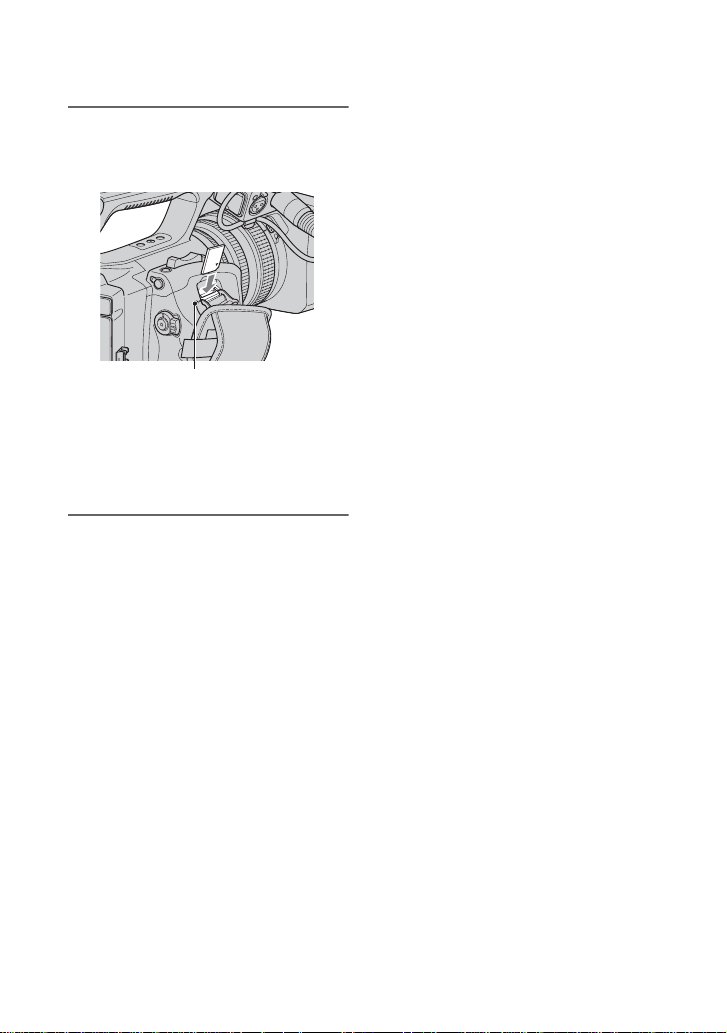
“Memory Stick Duo”
You can use only a “Memory Sti ck Duo”
marked with ,
or
(p. 119).
1 Open the “Memory Stick Duo”
slot cover in the direction of the
arrow.
Getting Started
Cassette
compartment
The cassette compar tment automati cally
slides back in.
“Memory Stick Duo” slot cover
Continued ,
21
Step 7: Inserting a tape or a “Memory Stick Duo” (Continued)
2 Insert the “Memory Stick Duo”
into the “Memory Stick Duo” slot
in the right direction until it clicks.
Access l amp
b Notes
• If you insert the “Memory Stick Duo” into
the slot in the wrong direction, the “Memory
Stick Duo,” the “Memory Stick Duo” slot,
or image data may be damaged.
To eject a “Memory Stick Duo”
Lightly push the “Mem ory Stick Duo”
once.
b Notes
• When the access lamp is lit or flashing, your
camcorder is reading/writing data. Do not shake
or knock your camcorder, turn the power off,
eject the “Memory Stick Duo,” or remove the
battery pack. Otherwise, image data may be
damaged.
• When inserting or ejecting the “Memory Stick
Duo,” be careful with the “Memory Stick Duo”
from popping out and dropping.
22
Recording/Playback
Recording
Recording lamp
Recording lamp
REC START/
STOP button B
Lens hood
ASSIGN 7/
PHOTO button
POWER switch
REC START/STOP button A
Your camcorder records movies on tape and still images on “Memory Stick Duo.” Do the
following steps to record movies.
• This camcorder can record movies in HDV or DVCAM (DV) format. The factory setting is HDV format
([REC FORMAT], p. 83).
1 Open the shutter of the lens hood.
2 Slide the POWER switch to CAMERA while pressing the green button.
Press and hold the green
button when you slide the
POWER switch from O FF.
Recording/Playback
Continued ,
23

Recording (Continued)
3 Press the REC START/STOP button A (or B).
00:04:50:04
REC
60min
[STBY] t [REC]
The recording lamp lights up during recording.
To stop the movie recording, press th e RE C START/STOP button again.
z Tips
• When recording in HDV format, the aspect ratio is fixed to 16:9. When recording in DVCAM (DV)
format, you can switch the aspect ratio to 4:3 ([DV WIDE REC], p. 84).
• You can change the screen display during recording (p. 52).
• Indicators displayed on the screen during recording are shown on page 136.
• The recording lamp can be set to st a y of f ([REC LAMP[F]] , [REC LAMP[R]], p.92).
• You cannot record movies on a “Memory Stick Duo.”
• For low angle recording, the REC START/STOP button on the handle is convenient. Release the
HOLD lever to enable the REC START/STOP button. It might be helpful if you set the LCD panel
face up or close it after turning it face down, or lift the viewfinder up during the low angle recording.
24

To capture still images
1 Assign [PHO TO] to the ASSIGN 7/
PHOTO button (p. 44).
2 Press the ASSIGN 7/PHOTO button or
the PHOTO button on the Remote
Commander.
A still image will be reco r ded on the
“Memory Stick Duo.” disappears
when the recording is completed.
You can capture still imag es du rin g
movie recording.
z Tips
• See page 138 for indicators that appear on the
screen during recording.
• You can assign [PHOTO] to another ASSIGN
button from (OTHERS)
BTN] and use that ASSIGN button as a PHOTO
button.
t
[ASSIGN
Capacity of the “Memory Stick Duo”
(MB) and the number of recordable
pictures
1.2M
0.9M
VGA
1440
×
1080 ×
810
810
1.2M
512MB 760 1000 2850 3600
1GB 1550 2100 5900 7300
2GB 3150 4300 12000 15000
4GB 6300 8500 23500 29500
8GB 12500 17000 48000 60000
16GB 25500 34500 97500 122000
b Notes
• Specifications are for Sony “Memory Stick
Duo.” The actual number of recordable pictures
can vary depending on the recording
environment and the type of “Memory Stick
Duo.”
• You cannot store a still image under the
following conditions:
– When the shutt er speed is slower tha n 1/50.
– While using the fader
– While using [SMTH SLW REC]
– While using shot transition
640 ×
480
0.2M
640 ×
360
• The unique pixel array of Sony's ClearVid
CMOS sensor and image processing system
(Enhanced Imaging Processor) allows for s till
image resolution equivalent to the sizes
described.
z Tips
• Image sizes of still images are as follows:
– Recording in HDV format/DVCAM (DV)
format (16:9): 1.2M
– Re c ord ing in DVCAM (DV) forma t (4 :3):
0.9M
– Playing back in HDV format: 1.2M
– Playing back in DVCAM (DV) format (16:9):
0.2M
– Playing back in DVCAM (DV) format (4:3):
VGA
To store still images captured from
movies on a tape on “Memory Stick
Duo”
You can capture an im age in a movie and
record it on a “Memory Stick Duo” as a still
image. Be su re to in se rt a r e cord ed t ap e a nd
a “Memory Stick Duo” in your camcorder.
1 Assign [PHOTO] to the ASSIGN 7/
PHOTO button (p. 44).
2 Set the POWER switch to VCR.
3 Press the
the scene you want to save as a still
image. Press the ASSIGN 7/PHOTO
button or the PHOTO button on your
Remote Commander at the scene.
b Notes
• The recorded date and time on the tape and the
stored date and time on the “Memory S tick
Duo” are both saved on the “Memory Stick
Duo.” When you view the still images, only the
recorded date and time on the tape will be
displayed on the screen (Data code, p. 52).
• Camera data stored on the tape will not be
copied to the “Memory Stick Duo.”
• You cannot store a still image during using your
camcorder with [PB ZOOM] set to [ON] (p. 91).
N
(play) button to search for
Recording/Playback
25
Changing the settings of your camcorder recordings
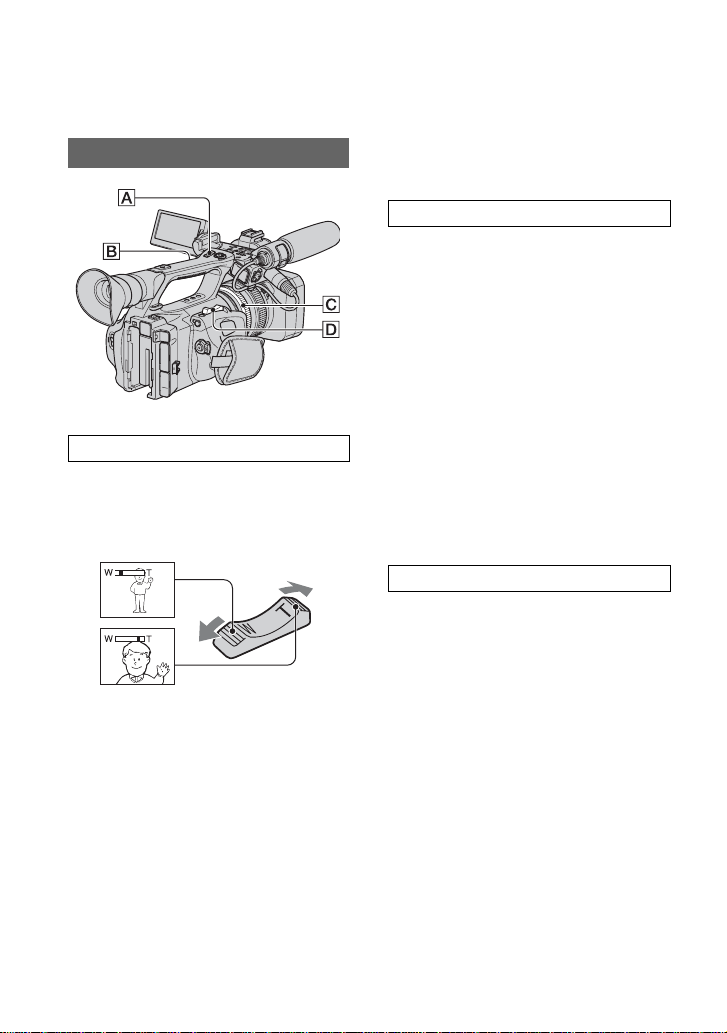
Adjusting the zoom
.
Using the zoom lever
Move the power zoom lever D slightly for
a slower zoom. Move it further for a faster
zoom.
Wide view: (Wide angle)
Close view: (Telephoto)
z Tips
• The minimum distance required between your
camcorder and the subject for focus is about 1
cm (about 13/32 in.) for wide angle and about
80 cm (about 2 5/8 feet) for telephoto.
• The focus may not be adjusted at certain zoom
positions if the subject is within 80 cm (about 2
5/8 feet) from your camcorder.
• When you set [FOCUS MACRO] to [OFF], you
cannot focus on a subject within 80 cm (about 2
5/8 feet) regardless of the zoom position (p. 71).
• Be sure to keep your finger on the power zoom
lever D. If you move your finger off the power
zoom lever D, the operation sound of the
power zoom lever D may also be recorded.
26
• You can increase the zoom speed of the zoom
lever D or the handle zoom A ([SPEED
ZOOM], p. 71).
Using the handle zoom
1 Set the handl e zoom switch B to VAR
or FIX.
z Tips
• When you set the handle zoom switch B to
VAR, you can zoom in or out at variable
speed.
• When you set the handle zoom switch B to
FIX, you can zoom in or out at fixed speed
set in [HANDLE ZOOM] (p. 71).
2 Press the handle zoom lever A to zoom
in or out.
b Notes
• You cannot use the handle zoom lever A when
the handle zoom switch B is set to OFF.
• You cannot change the zoom speed of the zoom
lever D with the handle zoom switch
B.
Using the zoom ring
You can zoom at the desired speed by
turning the zoom ring C. Fine adjustment
is also possible.
b Notes
• Turn the zoom ring C at a moderate speed. If
you turn it too fast, the zoom speed may lag
behind the zoom ring rotation speed, or the
operation sound of the zoom may also be
recorded.
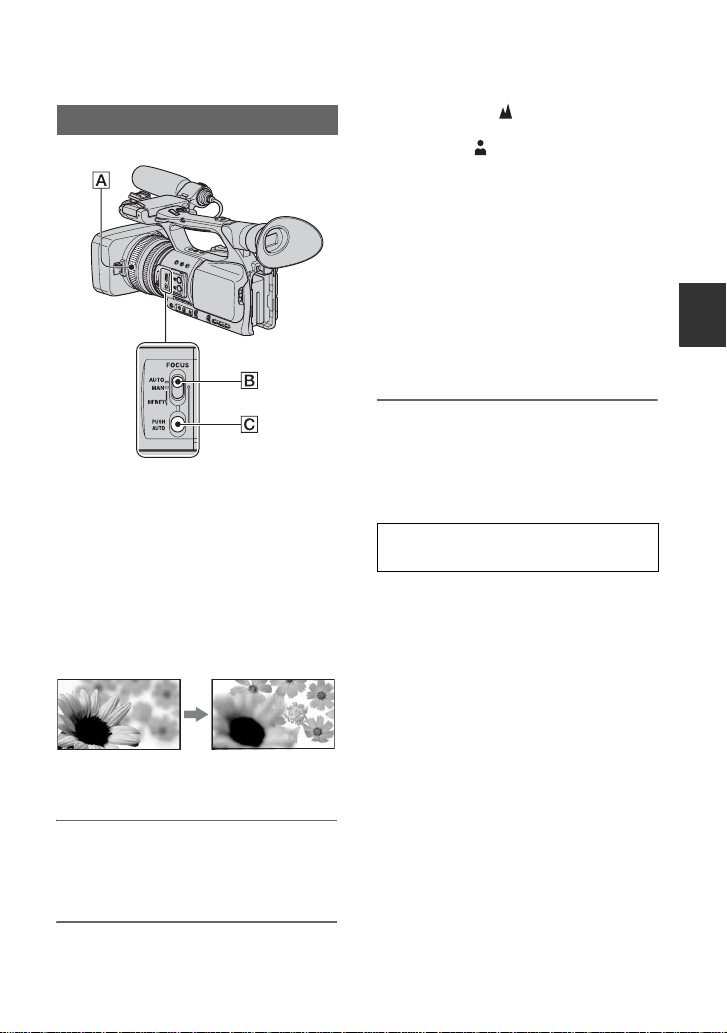
Adjusting the focus manually
You can adjust the focus manually for
different recording cond it ion s .
Use this function in the followin g ca ses.
– To record a subject behind a window covered
with raindrops.
– To record horizontal stripes.
– To record a subject with little contrast between
the subject and its background.
– When you want to focus on a subject in the
background.
– To record a stationary subject using a tripod.
1 During recording or standby, set
the FOCUS switch B to MAN.
9 appears.
9 changes to when the focus
cannot be adjusted any far the r.
9
changes to when the focus cannot be
adjusted any closer.
z Tips
For focusing manually
• It is easier to focus on the subject when you use
the zoom function. Move the power zoom lever
towards T (telephoto) to adjust the focus, and
then, towards W (wide angle) to adjust the zoom
for recording.
• When you want to record a close-up image of a
subject, move the power zoom lever towards W
(wide angle) to fully magnify the image, then
adjust the focus.
To restore automatic adjustment
Set the FOCUS switch B to AUTO.
9 disappears and the automatic focus
adjustmen t is r estored.
Using automatic focus temporarily
(Push auto focus)
Record the subject while pressing an d
holding the PUSH AUTO button C.
If you release the button, the setting returns
to manual focusing.
Use this function to shift the focus on one
subject to anoth er. The scenes will shift
smoothly.
z Tips
• The focal distance information (for when it is
dark and hard to adjust the focus) appears for
about 3 seconds in the following cases. (It will
not be displayed correctly if you are using a
conversion lens (optional)).
– When you set the FOCUS switch to MAN
and 9 appears on the screen
– When you rotate the focu s ring whil e 9 is
displayed on the screen.
Recording/Playback
2 Rotate the focus ring A and
adjust the focus.
Continued ,
27
Changing the settings of your camcorder recordings (Continued)
Using the expanded focus (Expanded
focus)
Assign [EXP.FOCUS] to an y one of the
ASSIGN buttons beforehand (p. 44).
During standby, press the ASSIGN button
to which [EXP.FOCUS] is assigned.
[EXPANDED FOCUS] appears and the
center of the screen is mag nif ie d by about
2.0 times. It will be easier to confirm the
focus setting during manual fo cusi ng. The
screen returns to the original size when you
press the butt on again.
b Notes
• The screen returns to the original size when you
start recording during the expanded focus
display.
z Tips
• You can select a type of an expanded image
displayed during the expanded focus
([EXP.FOCUS TYPE], p. 80).
Focusing on a distant subject (Focus
infinity)
Slide the FOCUS switch B to IN F I N I TY
and hold it there.
appears on the screen.
To return to manual fo cus mode, rel ease th e
FOCUS switch B. This function enables
you to set focus on a distant subject even
when the focus is automatically set on a
close subject.
b Notes
• This function is only available during the
manual focus. It is not available during the
automatic focus.
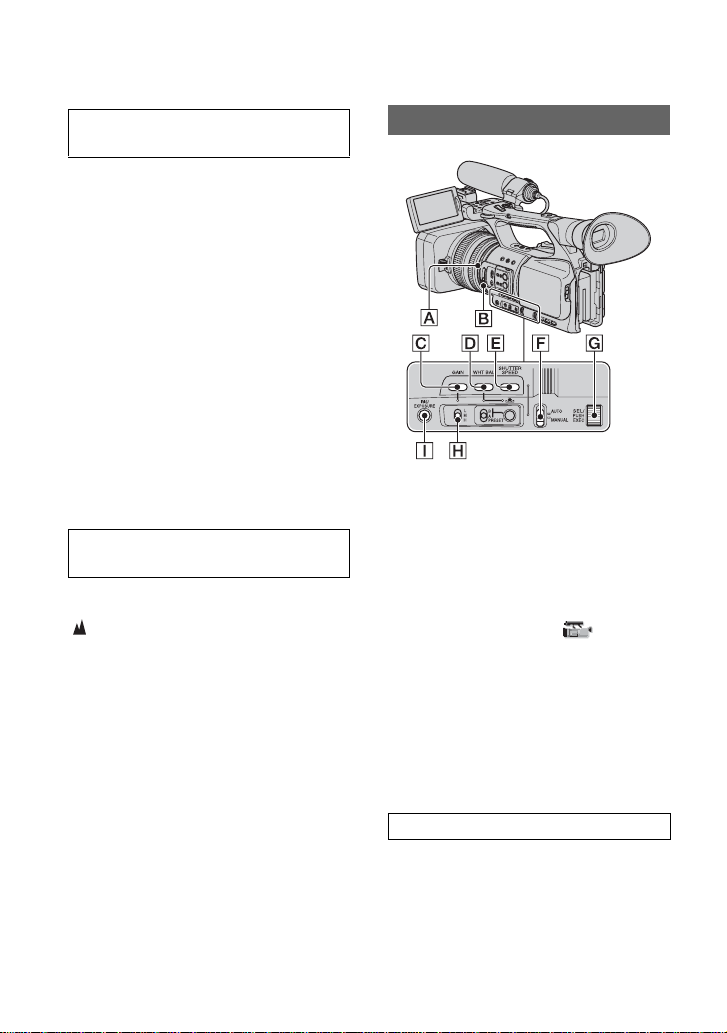
Adjusting the image brightness
You can adjust the image brightn ess by
adjusting the iris, gain or shutter speed, or
by reducing the light vo lum e w it h the N D
filter B. Also, when [EXPOSURE] is
assigned to the iris ring A, you can adjust
the iris, gain and shutter speed with the iris
ring A. You can assign [IRIS] or
[EXPOSURE] to the iris ring A from
[IRIS/EXPOSURE] of the
(CAMERA SET) menu (p.67). The def ault
setting is [IRIS].
b Notes
• You cannot use the back light function and the
spotlight function if at least two of iris, gain and
shutter speed are adjusted manually.
• [AE SHIFT] is not effective while you adjust
the iris, gain and shutter speed all manually.
Adjusting the iris
You can manually adjust the iris to control
the volume of the l ight en terin g the le ns. By
adjusting the iris, you can change or close
the aperture of the lens, which is expressed
as an F value between F1.6 and F11. The
volume of the light incre ases the more that
you open the aperture (decreasin g F v alue).
28

The volume o f the light decreases the mor e
that you close th e aperture (increa sing F
value). The current F value appears on the
screen.
1 Select (CAMERA SET) menu t
[IRIS/EXPOSURE] t [RING
ASSIGN] t [IRIS] (p. 67).
2 During recording or standby, set the
AUTO/MANUAL switch F to
MANUAL.
3 When the iris is auto matically adjusted,
press the IRIS/EXPOSURE button I.
next to the iris value disappears
(p. 80), or the iris value appears on the
screen.
4 Adjust the iris wit h the iris ring A.
When you assign [PUSH AT IRIS] to
one of the ASSIGN buttons, you can
automati cally adjust the iris while
pressing and holding that ASSIGN
button. See page 44 for details on t he
ASSIGN button.
z Tips
• The F value becomes close to F3.4 as the zoom
position changes from W to T even when you
open the aperture by setting the F value lower
than F3.4, such as F1.6.
• The range of focus, an important effect of the
aperture, is called the depth of field. The depth
of field gets shallower as the aperture is opened,
and deeper as the aperture is closed. Use the
aperture creatively to obtain the desired effect in
your photography.
• This is handy for making the background
blurred or sharp.
To adjust the iris automatically
Press the IRIS/EXPOSURE button I, or
set the AUTO/MANUAL switch F to
AUTO.
The iris value disappears, or appears
next to the ir is v alue.
b Notes
• When you set the AUTO/MANUAL switch F
to AUTO, other manually adjusted items (gain,
shutter speed, white balance) also become
automatic.
Adjusting the exposure
When [IRIS/EXPOSURE] is set to
[EXPOSURE], you can adjust the image
brightness by adjusting the iris, gain and
shutter speed with the iris ring.
You can also manual ly prese t on e or tw o of
these parameters and adjust the remaining
parameter(s) with the iris ring.
1 Select (CAMERA SET) menu t
[IRIS/EXPOSURE] t [RING
ASSIGN] t [EXPOSURE] (p. 67)
2 During recording or standby, set the
AUTO/MANUAL switch F to
MANUAL.
3 When [EXPOSURE] is automatically
adjusted, press the I RIS /EXPOSURE
button I.
The iris, gain and shutter speed values
and appear on the screen. You can
adjust the iris, gain and shutter speed
with the iris ring A.
When is not di sp la yed, do the
following operation. appears next to
the items, indicati ng th at you can adjust
them with the iris ring A.
–Gain
Press the GAIN button C.
– Shutter speed
Press the SHUTTER SPEED button E
twice. When the shutter speed is not locked,
press the button once.
4 Adjust the image brightness by turning
the iris ring A.
When you assign [PUSH AT IRIS] to
one of the ASSIGN buttons, you can
automatically adju st th e exposure while
pressing and holding that ASSIGN
button. See page 44 for details on the
ASSIGN button.
Recording/Playback
Continued ,
29
Changing the settings of your camcorder recordings (Continued)
To restore automatic adjustment
Press the IRIS/EXPOSURE button I, or
set the AUTO/MANUAL switch F to
AUTO.
The values next to which is displayed
disappear, or appears next to those
values.
b Notes
• When you set the AUTO/MANUAL switch F
to AUTO, other manually adjusted items (gain,
shutter speed, white balance) also become
automatic.
z Tips
• When you press the GAIN button C while
is displayed on the screen next to the gain value,
disappears and you can adjust the gain
manually. When you press the GAIN button C
again, appears and you can adjust the gain
with the iris ring A. See step 2 in “Adjusting
the gain” for details on how to adjust the gain.
• When you press the SHUTTER SPEED button
E while is displayed on the screen next to
the shutter speed value, disappears and you
can adjust the shutter speed manually. When
you press the SHUTTER SPEED button E
again, appears and you can adjust the shutter
speed with the iris ring A. See steps 3 and 4
in “Adjusting the shutter speed” on page 30 for
details on how to adjust the shutter speed.
Adjusting the gain
You can adjust the gain manually when you
do not want to use the AGC (automatic gain
control).
1 Set the AUTO/MANUAL switch F to
MANUAL during recording or standby.
2 When the gain is automatically
adjusted, pres s the GAIN butt on C.
next to the gain value disappears, or
the gain value app ear s on the screen.
3 S et the gain swi tch H to H, M or L.
The gain value set for the selected gain
switch position appears on the screen.
You can set the gain value for each gain
switch position from [GAIN SETUP] of
the (CAMERA SET) menu
(p. 67).
30
To adjust the gain automatically
Press the GAIN button C, or set the
AUTO/MANUAL switch F to AUTO.
The gain value disappears, or appears
next to the gain value.
b Notes
• When you set AUTO/MANUAL switch F to
AUTO, other manually adjusted items (iris,
shutter speed, white balance) also become
automatic.
z Tips
• When you record a movie with the gain set to
[-6dB] and play it back with the data code, the
gain value is displayed as [---].
Adjusting the shutter speed
You can manually adjust and fix the shutter
speed. You can make a moving subject look
still or emphasize the movement of a
moving subject by adjusting the shu tter
speed.
1 During recording or standby, set
AUTO/MANUAL switch F to
MANUAL.
2 Press the SHUTTER SPEED button E
until the shutter speed value is
highlighted.
3 Change the shutter speed displayed on
the screen by turning the SEL/PUSH
EXEC dial G.
You can adjust the shutter spe ed in a
range of 1/3 second throug h 1/ 10000
second or the extended cl ear scan
().
The denominator of the set shutter speed
appears on the screen. For exampl e,
[100] appears on the screen when you
set the shutter speed to 1/100 second.
The larger the value on the screen, the
faster the shutter speed.
4 Press the SEL/PUSH EXEC dial G to
lock the shutter speed.
To readjust the shutter speed, do steps
2 to 4.
 Loading...