


OmniBook 2000/5700
Installation and Setup Guide
For other Service and User Manuals, go to www.ManualDepot.com

Notice
This manual and any examples contained herein are provided “as is” and are subject to change without notice. Hewlett-Packard Company makes no warranty of any kind with regard to this manual, including, but not limited to, the implied warranties of merchantability and fitness for a particular purpose. Hewlett-Packard Co. shall not be liable for any errors or for incidental or consequential damages in connection with the furnishing, performance, or use of this manual or the examples herein.
Consumer transactions in Australia and the United Kingdom: The above disclaimers and limitations shall not apply to Consumer transactions in Australia and the United Kingdom and shall not affect the statutory rights of Consumers.
© Copyright Hewlett-Packard Company 1997. All rights reserved. Reproduction, adaptation, or translation of this manual is prohibited without prior written permission of Hewlett-Packard Company, except as allowed under the copyright laws.
The programs that control this product are copyrighted and all rights are reserved. Reproduction, adaptation, or translation of those programs without prior written permission of Hewlett-Packard Co. is also prohibited.
Portions of the programs that control this product may also be copyrighted by Microsoft Corporation, SystemSoft Corp., Advanced Micro Devices, Inc., Crystal Semiconductor Corporation, and Chips & Technologies, Inc. See the individual programs for additional copyright notices.
Microsoft, MS, MS-DOS, and Windows are registered trademarks of Microsoft Corporation (U.S. patent numbers 4955066 and 4974159). Pentium is a U.S. registered trademark of Intel Corporation. TrackPoint is a U.S. trademark of International Business Machines.
For warranty information, see the Support and Service booklet.
Hewlett -Packard Company
Mobile Computing Division
1000 N.E. Circle Blvd.
Corvallis, OR 97330, U.S.A.
ii

HP Software Product License Agreement
Your HP OmniBook PC contains factory-installed software programs. Please read the Software License Agreement before proceeding.
Carefully read this License Agreement before proceeding to operate this equipment. Rights in the software are offered only on the condition that the customer agrees to all terms and conditions of the License Agreement. Proceeding to operate the equipment indicates your acceptance of these terms and conditions. If you do not agree with the terms of the License Agreement, you must now either remove the software from your hard disk drive and destroy the master diskettes, or return the complete computer and software for a full refund.
Proceeding with configuration signifies your acceptance of the License Terms.
Unless otherwise stated below, this HP Software Product License Agreement shall govern the use of all software that is provided to you, the customer, as part of the HP computer product. It shall supersede any non -HP software license terms that may be found online, or in any documentation or other materials contained in the computer product packaging.
Note: Operating System Software by Microsoft is licensed to you under the Microsoft End User License Agreement (EULA) contained in the Microsoft documentation.
The following License Terms govern the use of the software:
Use. Customer may use the software on any one computer. Customer may not network the software or otherwise use it on more than one computer. Customer may not reverse assemble or decompile the software unless authorized by law.
Copies and Adaptations. Customer may make copies or adaptations of the software (a) for archival purposes or (b) when copying or adaptation is an essential step in the use of the software with a computer so long as the copies and adaptations are used in no other manner.
Ownership. Customer agrees that he/she does not have any title or ownership of the software, other than ownership of the physical media. Customer acknowledges and agrees that the software is copyrighted and protected under the copyright laws. Customer acknowledges and agrees that the software may have been developed by a third party software supplier named in the copyright notices included with the software, who shall be authorized to hold the Customer responsible for any copyright infringement or violation of this Agreement.
Product Recovery CD -ROM. If your computer was shipped with a product recovery CD-ROM: (i) The product recovery CD-ROM and/or support utility software may only be used for restoring the hard disk of the HP computer with which the
iii

product recovery CD-ROM was originally provided. (ii) The use of any operating system software by Microsoft contained in any such product recovery CD-ROM shall be governed by the Microsoft End User License Agreement (EULA).
Transfer of Rights in Software. Customer may transfer rights in the software to a third party only as part of the transfer of all rights and only if Customer obtains the prior agreement of the third party to be bound by the terms of this License Agreement. Upon such a transfer, Customer agrees that his/her rights in the software are terminated and that he/she will either destroy his/her copies and adaptations or deliver them to the third party.
Sublicensing and Distribution. Customer may not lease, sublicense the software or distribute copies or adaptations of the software to the public in physical media or by telecommunication without the prior written consent of Hewlett-Packard.
Termination. Hewlett-Packard may terminate this software license for failure to comply with any of these terms provided Hewlett-Packard has requested Customer to cure the failure and Customer has failed to do so within thirty (30) days of such notice.
Updates And Upgrades. Customer agrees that the software does not include updates and upgrades which may be available from Hewlett-Packard under a separate support agreement.
Export Clause. Customer agrees not to export or re-export the software or any copy or adaptation in violation of the U.S. Export Administration regulations or other applicable regulation.
U.S. Government Restricted Rights. Use, duplication, or disclosure by the U.S. Government is subject to restrictions as set forth in subparagraph (c)(1)(ii) of the Rights in Technical Data and Computer Software clause in DFARS 252.227-7013. Hewlett-Packard Company, 3000 Hanover Street, Palo Alto, CA 94304 U.S.A. Rights for non-DOD U.S. Government Departments and Agencies are as set forth in FAR 52.227-19(c)(1,2).
Edition History
Edition 1 |
............................................ April 1997 |
|
This manual is printed on recycled paper. |
iv

Contents
1. Starting Out with Your OmniBook ........................ |
1-1 |
Setting Up the OmniBook ................................ |
1-3 |
To set up the OmniBook ............................... |
1-3 |
To select one of the factory-installed operating systems.......... |
1-4 |
Getting Comfortable .................................... |
1-7 |
A tour of the OmniBook ................................. |
1-8 |
To adjust the display .................................. |
1-9 |
To use the pointing device.............................. |
1-9 |
To adjust the OmniBook keyboard ........................ |
1-10 |
To adjust the speaker volume............................ |
1-11 |
To connect a microphone, speakers, or headphones ........... |
1-11 |
To start the OmniBook ................................ |
1-12 |
To stop the OmniBook ................................ |
1-12 |
To reset and restart the OmniBook ........................ |
1-16 |
To understand the status panel........................... |
1-17 |
To attach a security cable .............................. |
1-18 |
Using OmniBook Accessories.............................. |
1-19 |
To remove accessories from the OmniBook.................. |
1-20 |
To install the floppy disk drive ........................... |
1-21 |
To insert and eject a floppy disk .......................... |
1-22 |
To install the CD-ROM drive ............................. |
1-23 |
To insert and remove a CD.............................. |
1-24 |
To use the CD-ROM drive safely .......................... |
1-25 |
To replace the battery ................................. |
1-26 |
To install a high-capacity battery ......................... |
1-27 |
To handle and store the battery safely ...................... |
1-28 |
To maintain and preserve battery life ...................... |
1-28 |
To insert a PC card ................................... |
1-29 |
To remove a PC card.................................. |
1-30 |
Where to Go from Here .................................. |
1-31 |
2. Installing an Operating System ........................... |
2-1 |
What the Recovery CD Contains............................ |
2-3 |
Reinstalling Windows 95 ................................. |
2-4 |
To reinstall Windows 95 ............................... |
2-4 |
Reinstalling Windows for Workgroups ....................... |
2-6 |
To reinstall Windows for Workgroups ...................... |
2-6 |
Contents-1

To make DOS 6.22 and Windows for Workgroups disks.......... |
2-7 |
To install Windows for Workgroups drivers .................. |
2-8 |
Installing Windows NT or OS/2 Warp ........................ |
2-9 |
To install Windows NT or OS/2 Warp ...................... |
2-9 |
Installing HP Applications ................................ |
2-10 |
To install HP software programs .......................... |
2-10 |
3. Expanding the OmniBook ............................... |
3-1 |
Replacing Hardware .................................... |
3-3 |
To remove the hard disk drive ........................... |
3-3 |
To install the hard disk drive ............................ |
3-4 |
To find the system software version and memory size ........... |
3-4 |
To add memory to the OmniBook ........................ |
3-5 |
Connecting Devices .................................... |
3-7 |
To connect an external monitor .......................... |
3-8 |
To adjust the display type .............................. |
3-8 |
To turn off the built-in display ........................... |
3-9 |
To connect a printer .................................. |
3-9 |
To install a printer.................................... |
3-9 |
To connect an external mouse or keyboard.................. |
3-10 |
To connect both a mouse and keyboard .................... |
3-10 |
To enable the Fn keys ................................. |
3-11 |
To connect a serial device .............................. |
3-11 |
To view or change serial port assignments ................... |
3-11 |
To specify serial port settings ............................ |
3-12 |
To connect a parallel device ............................ |
3-13 |
To view or change parallel port assignments ................. |
3-13 |
To make an infrared connection ......................... |
3-14 |
To print on an infrared printer ........................... |
3-14 |
To set up a PC card or parallel port CD-ROM drive ............. |
3-15 |
4. Changing the Configuration ............................. |
4-1 |
Changing the Configuration............................... |
4-3 |
Using HP User Tools .................................... |
4-4 |
To run HP User Tools ................................. |
4-4 |
Using OmniBook Tools .................................. |
4-6 |
To run OmniBook Tools ............................... |
4-6 |
Using the System Configuration Utility........................ |
4-8 |
To run the SCU (during reboot) .......................... |
4-8 |
To run the SCU without rebooting ........................ |
4-8 |
Contents-2

5. |
Troubleshooting ...................................... |
5-1 |
|
Solving Basic Problems .................................. |
5-3 |
6. |
Specifications and Regulatory Information .................. |
6-1 |
|
Hardware Specifications ................................. |
6-3 |
|
Software System Resources ............................... |
6-4 |
|
Safety Information ..................................... |
6-6 |
|
Working in Comfort .................................... |
6-9 |
|
Regulatory Information .................................. |
6-10 |
|
U.S.A. ............................................ |
6-10 |
|
Canada ........................................... |
6-11 |
|
Japan ............................................ |
6-11 |
|
Europe ........................................... |
6-12 |
Contents-3

1
Starting Out with Your
OmniBook

Starting Out with Your OmniBook
Congratulations! Your OmniBook sets a new standard in personal computing. Although it’s compact and easy to carry, the OmniBook is infused with the quality and attention to detail that are the hallmark of Hewlett-Packard.
The OmniBook Quick Start sheet shows how to get your OmniBook up and running quickly. This Getting Started manual shows how to start using your OmniBook and it also shows what to do if you run into trouble.
Your OmniBook provides these additional manuals:
·The online OmniBook User’s Guide : This introduces the OmniBook and shows you how to operate and maintain your OmniBook. It also contains troubleshooting information. Look in the OmniBook Library group.
· The Introducing Microsoft Windows 95 manual: This is shipped with your OmniBook and contains information about using the standard features of Windows 95.
·The online Windows Quick Start and MS-DOS Quick Start manuals: These are in the OmniBook Library group for Windowsâ for Workgroups.
·The OmniBook Website at http://www.hp.com/go/omnibook
The Corporate Evaluator’s Guide at our Website provides complete information about installing alternate operating systems, as well as how to configure the OmniBook in a corporate, networked environment.
1-2
C A U T I O N
Starting Out with Your OmniBook
Setting Up the OmniBook
Setting Up the OmniBook
This chapter describes the first-time setup of your HP OmniBook hardware, including the following:
♦Installing the battery.
♦Connecting the ac adapter and charging the battery.
♦Selecting a factory-installed operating system.
To set up the OmniBook
1. Insert the battery. Use only an HP F1193B battery (or super F1194B).
2. Plug the power cord into the ac adapter, then into a grounded outlet.
Use only an HP F1140A or HP F1044B ac adapter. Using an improper adapter could damage the OmniBook and will make your warranty invalid.
1-3
C A U T I O N
C A U T I O N
Starting Out with Your OmniBook
Setting Up the OmniBook
The first time you plug in the ac adapter, let the OmniBook charge continually for at least 24 hours. This ensures that the OmniBook’s clock battery is fully charged. Otherwise, your OmniBook will not keep the correct date and time. Subsequent charging of the primary battery, during normal use, will maintain the clock battery’s charge.
The HP F1044B ac adapter used with this product is disconnected from the power by unplugging the power cord from the power outlet or from the ac adapter. Therefore, the power outlet should be located close to the product and be easily accessible.
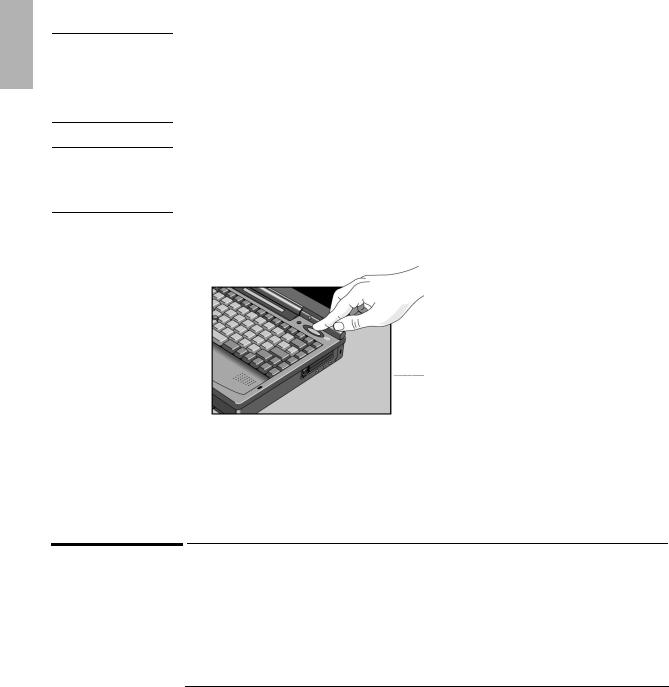
3. Press the blue On/Suspend button.
The OmniBook will take half a minute or more to start. If the OmniBook does not turn on, press the Off button on the left side of the OmniBook, then press the blue button again.
To select one of the factory-installed operating systems
This product offers a choice between two Microsoft operating systems:
∙Windows 95, or
∙Windows for Workgroups.
1-4

Recovery CD
Important
CAUTION
Starting Out with Your OmniBook
Setting Up the OmniBook
As part of the setup procedure, you must make a one-time, final selection of the operating system you want to use. Once made, this selection can be changed only by purchasing new copies of DOS 6.22 and Windows for Workgroups. (Windows 95 is included on the Recovery CD-ROM.)
Should you later need to reinstall the operating system, you can reinstall Windows 95 from the Recovery CD—or Windows for Workgroups from retail disks, which you purchase. Instructions for reinstalling an operating system are in chapter 2 of this manual.
When your OmniBook starts up the first time, it takes you through a series of setup screens, including installation of the operating system.
If you have a docking system, you should not have it connected during the installation of the operating system.
If you’re installing Windows for Workgroups
When prompted to do so, it is important that you make back-up installation disks for MS-DOS and Windows for Workgroups. This will require 12 floppy disks—eight disks for Windows and four for MS-DOS 6.22. (The back-up program will format the disks. You will need these installation disks to install certain drivers (such as printers and networks), as well as to recover your operating system in case of a failure. If you do not make these disks, you will need to purchase your own copies of MS-DOS 6.22 and Windows for Workgroups. (You can make these back-up disks at any time from the icon in the Windows OmniBook group.)
1.Plug in the ac adapter.
2.Press the blue On/Suspend button.
The Windows 95 Setup program starts automatically. The Setup screens are labeled Windows 95, but they are for Windows for Workgroups, too.
After you accept the License Agreement and enter the Product ID (printed on the Certificate of Authenticity on the Microsoft Introducing Windows 95 book), you will see the Windows Version screen. If you choose Windows for Workgroups, the product ID is not necessary.
1-5
Starting Out with Your OmniBook
Setting Up the OmniBook
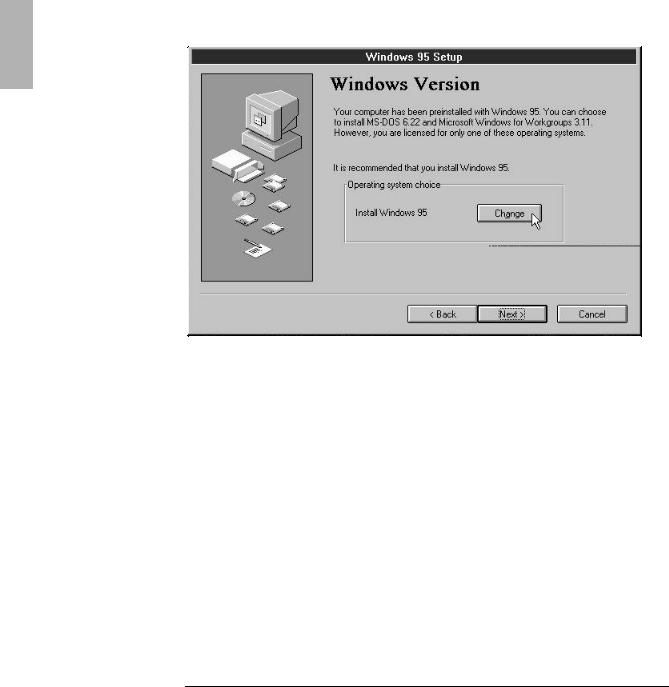
3. In the Windows Version screen, click the Change button.
4.Choose the following option:
No, I want to install MS-DOS 6.22 and Microsoft Windows for Workgroups 3.11
5.Click OK to continue the Setup program and install Windows for Workgroups.
1-6

Starting Out with Your OmniBook
Getting Comfortable
Getting Comfortable
This section introduces the OmniBook and shows you how perform some basic tasks. In this section you’ll learn how to
♦Identify parts of the OmniBook.
♦Adjust the display.
♦Use the TrackPoint III pointing device.
♦Adjust and use the OmniBook keyboard features.
♦Adjust the volume of the OmniBook.
♦Connect a microphone, speaker, or headphones.
♦Start and stop the OmniBook.
♦Reset the OmniBook.
♦Understand the status panel symbols.
♦Attach a security cable to the OmniBook.
♦Get more information about using the OmniBook.
1-7

Starting Out with Your OmniBook
A tour of the OmniBook
A tour of the OmniBook
The following illustrations point out key parts of the OmniBook.
Latch to open OmniBook
TrackPoint III
|
Latch to open OmniBook |
Internal speaker |
Display controls |
|
|
|
Internal microphone |
|
On/Suspend button |
Hard disk drive
CD-ROM drive, |
|
|
floppy disk drive, |
|
|
or high-capacity |
Main battery |
|
battery |
||
|
Kensington lock slot
Audio jacks
PC card slots
Internal speaker
Serial |
Mouse or |
AC adapter |
|
Infrared port port |
|||
keyboard |
|||
|
XGA out |
||
Midi/Joystick port |
|
|
|
|
Off button |
Docking port |
Tilt foot |
Parallel port |
Tilt foot |
Reset slot |
|
|
|
1-8
Starting Out with Your OmniBook
A tour of the OmniBook
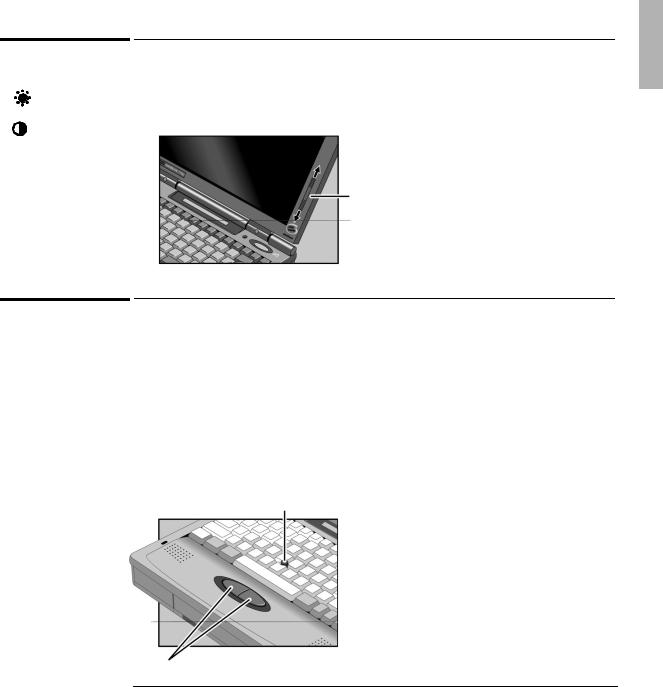
To adjust the display
Brightness All OmniBooks are equipped with a brightness control. Some models also
have a contrast control. The display controls are located to the right of the display.
Contrast
To increase brightness or
contrast, slide the controls up.
To decrease, slide down.
To use the pointing device
The pointing device controls the motion of the pointer on the screen by detecting pressure. The pointing device itself does not move. The click buttons work like those on a standard mouse—what they do depends on the software you’re using.
1.Place your hands in the typing position.
2.With your index finger, gently press the pointing device in the direction you want the pointer to move.
3.Click the buttons with your thumb to select and drag.
TrackPoint III
Click buttons
1-9
Starting Out with Your OmniBook
A tour of the OmniBook
To adjust the OmniBook keyboard
You can tilt the OmniBook keyboard to a more comfortable typing angle with the built-in tilt feet located on the bottom of the OmniBook.
Tilt foot
Special features of the OmniBook keyboard
In addition to the standard typing keys, the OmniBook keyboard contains the following special keys and features:
Fn combination keys
Use the gold Fn key in combination with other keys to execute special functions— for example, Fn+F8 decreases the speaker volume. You press and hold the Fn key, then you press the other key.
Embedded numeric keypad
Press the Num Lock (number lock) key to use the numeric keypad. With the keypad active, keys change to the designations shown on their slanted faces.
1-10

Starting Out with Your OmniBook
A tour of the OmniBook
Alt Gr key
If your keyboard has an Alt Gr key to the right of the spacebar, you hold that key to type the characters printed at the bottom-right corners of keys. For keys that have four characters, hold SHIFT and Alt GR to type the upper-right characters.
Shift |
|
Unshifted |
Alt Gr |
|
To adjust the speaker volume
All OmniBook 2000/5700 models support Sound Blaster compatible sound. The easiest way to adjust the speaker volume is to use the built in Fn key combinations.
∙Hold down Fn and press F8 or F9 as needed to gradually decrease or increase the maximum volume.
To connect a microphone, speakers, or headphones
Your OmniBook has a built-in microphone above the keyboard and two stereo speakers. You can also plug in an external microphone, external speakers or headphones, and a stereo input source—such as a CD player.
Headphones Microphone Stereo input
When you plug in an external microphone, the built-in microphone turns off. When you plug in stereo speakers or headphones, the built-in speakers turn off.
1-11

Starting Out with Your OmniBook
A tour of the OmniBook
To start the OmniBook
You can easily start and stop your OmniBook using the blue On/Suspend button. However, at certain times, you may want to use other methods for starting and stopping your OmniBook—depending on power considerations, types of active connections, and startup time.
∙Press the blue On/Suspend button. Either your previous session resumes or the computer reboots, depending on how you stopped the computer—see the next topic.
If you want to know more about what happens when you stop the OmniBook, you can check the table on page 1-14. It can help you decide what’s best for the way you work.
Suspend icon appears
in the status panel.
To stop the OmniBook
∙Press the blue On/Suspend button—this is the most convenient way if you’re using Windows 95 or Windows for Workgroups. This maintains the current session and “turns off” the computer. The session resumes when you turn on the computer.
–or–
1-12
C A U T I O N
C A U T I O N
Starting Out with Your OmniBook
A tour of the OmniBook
Press Fn+F12 simultaneously with the ac adapter unplugged. This stores the current session on the hard disk and completely shuts down the OmniBook. The computer reboots when you turn it on, then restores the session.
–or–
Shut down Windows, then press the square Off button on the left side of the case for 2 seconds. This deletes the current session and completely shuts down the OmniBook. The computer reboots when you turn it on and starts a new session.
Windows 95 can become unstable if you press the square Off button without properly shutting down Windows.
Off button
If you have active network connections, or if you have any SCSI devices connected, plug in the ac adapter and press the blue On/Suspend button to stop the OmniBook. These connections and devices are disconnected if you stop the OmniBook any other way.
Windows 95 can restore network connections and SCSI devices when you turn on the OmniBook. For a different operating system, you may have to reboot the OmniBook or restart the operating system to restore them.
1-13

Starting Out with Your OmniBook
A tour of the OmniBook
Effects of Stopping the OmniBook
When you press this |
The OmniBook does this |
Limitations of this method are |
On/Suspend button |
Turns off the display. |
Requires ac power. |
(with ac adapter) |
Continues the current session. |
Saves minimal power. |
|
Maintains network connections. |
|
|
Maintains SCSI devices. |
|
|
Charges the battery. |
|
|
Restarts quickly (“Instant-On”). |
|
On/Suspend button |
Turns off the display. |
Loses network connections. |
(no ac adapter) |
Maintains current session. |
Loses SCSI devices. |
|
Saves significant power. |
Requires some battery power. |
|
Restarts quickly (“Instant-On”). |
|
Fn+F12 button |
Saves maximum power. |
Reboots at startup. |
(no ac adapter) |
Saves current session. |
Loses network connections. |
|
|
Loses SCSI devices. |
Off button |
Saves maximum power. |
Reboots at startup. |
|
Resets everything at startup. |
Loses current session. |
|
Starts a new session. |
Loses network connections. |
|
Charges battery if ac adapter is connected. |
Loses SCSI devices. |
|
|
Potential loss of data if not properly shut down. |
|
|
|
Power States after Stopping the OmniBook
Method of Stopping |
Power State |
Condition |
On/Suspend button |
Display Off |
Powered/operating state. The computer looks off, but only the display, |
(with ac adapter) |
|
keyboard, and pointer are turned off. Network and SCSI devices are |
|
|
maintained. Everything continues at turn-on. |
On/Suspend button |
Suspend |
Low-power/stopped state. Everything is off or in a low-power state. Network |
(no ac adapter) |
|
and SCSI devices are off. Everything resumes operating at turn-on. |
Fn+F12 button |
Hibernate |
No-power/stopped state. Everything is shut down. Computer reboots and |
(no ac adapter) |
|
restores previous session at turn-on. |
Off button |
Off |
No-power/stopped state. Everything is shut down (battery charges if ac |
|
|
adapter is connected). Computer reboots at turn-on. |
Windows 95 can restore network connections and SCSI devices when you turn on the OmniBook.
1-14

Starting Out with Your OmniBook
A tour of the OmniBook
For Windows 95, the Start button provides two commands that stop the OmniBook.
∙Suspend changes the OmniBook to the Suspend state.
∙Shut Down (shut down the computer) changes the OmniBook to the Off state.
If you plug in the ac adapter while the OmniBook is stopped, battery-charging components are activated, but the OmniBook stays in the same power state. On the other hand, if you unplug the ac adapter while the OmniBook is in the Display Off state, it changes to the Suspend state—if you plug it in again, the OmniBook stays in the Suspend state.
In addition, Advanced Power Management (APM) provides several automatic power-saving features that affect the power state. You can adjust settings in the System Configuration Utility to control features such as the following. See page 4-8 for more information about the SCU.
If the OmniBook is running on battery power and there’s no activity for a short period of time, it automatically stops by changing to the Suspend state.
If you leave the OmniBook stopped in the Suspend state for a long time without plugging in the ac adapter, it automatically saves power by changing to the Hibernate state. Your session is saved.
1-15
Hint
Starting Out with Your OmniBook
A tour of the OmniBook
To reset and restart the OmniBook
If your OmniBook stops responding—and you can’t correct the problem in
Windows—you can reset the OmniBook and restart Windows.
1.If possible, shut down Windows.
2.Press Ctrl+Alt+Del to reboot the OmniBook. –or–
Press the square Off button on the left side of the case for 2 seconds, then press the blue On/Suspend button.
–or–
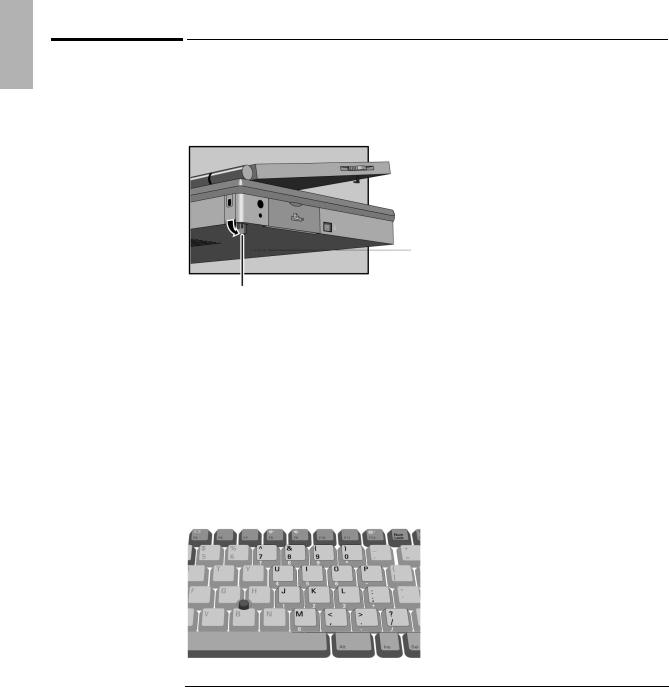
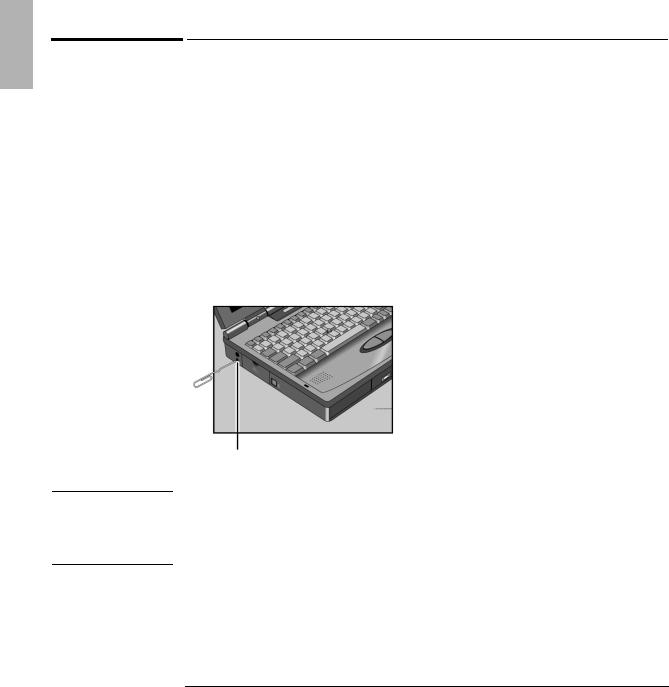
Insert a straightened paper clip into the small hole below the ac adapter socket and press the Reset button inside the hole.
Reset button
If you want to reboot from a boot disk in the floppy disk drive, put the disk in the floppy disk drive before you restart the OmniBook. For example, you can reboot from the Support Utility disk, then use the commands on this disk to check your hard disk.
1-16

Starting Out with Your OmniBook
A tour of the OmniBook
To understand the status panel
The OmniBook status panel, located above the keyboard, contains indicators that show the current status of the OmniBook. There are three groups of icons on the status panel that indicate
∙Keyboard status.
∙Data storage status.
∙Power status.
Keyboard status
The icons on the right indicate Caps Lock, Num Lock, and Scroll Lock.
This icon appears when Caps Lock is active.
This icon appears when Num Lock is active.
This icon appears when Scroll Lock is active.
Data storage status
The center icons indicate data storage areas—CD-ROM activity, floppy disk activity, hard disk activity, and PC card status.
This icon appears when the OmniBook is reading from the built-in CD-ROM drive.
This icon appears when the OmniBook is reading or writing to the floppy disk drive.
This icon appears when the OmniBook is reading or writing to drive C.
These icons appears when you insert PC cards into the card slots. Each icon identifies when a PCMCIA card slot is occupied.
1-17
Starting Out with Your OmniBook
A tour of the OmniBook
Power status
These icons indicate power conditions—ac adapter use, battery status, charging status.
This icon appears when the OmniBook is in the Suspend power state; the “bookmark” icon reminds you that the state of the computer has been saved.
This icon appears when the ac adapter is plugged in.
The shading of the battery symbol shows the approximate charge level of the battery relative to a full charge.
The lightning bolt symbol appears when the battery is charging. The battery symbol blinks when the battery is low.
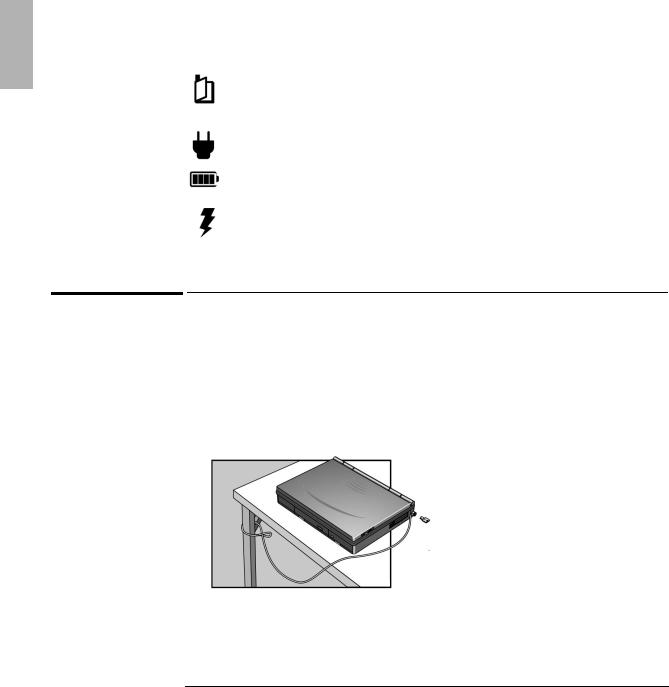
To attach a security cable
1.Wrap the cable around a stationary object, such as a table leg.
2.Loop the cable to create a slip knot around the stationary object—make sure it can’t slip off.
3.Insert the lock into the OmniBook’s Kensington lock slot and release the key.
Store the key in a safe place away from the OmniBook.
1-18

Starting Out with Your OmniBook
Using OmniBook Accessories
Using OmniBook Accessories
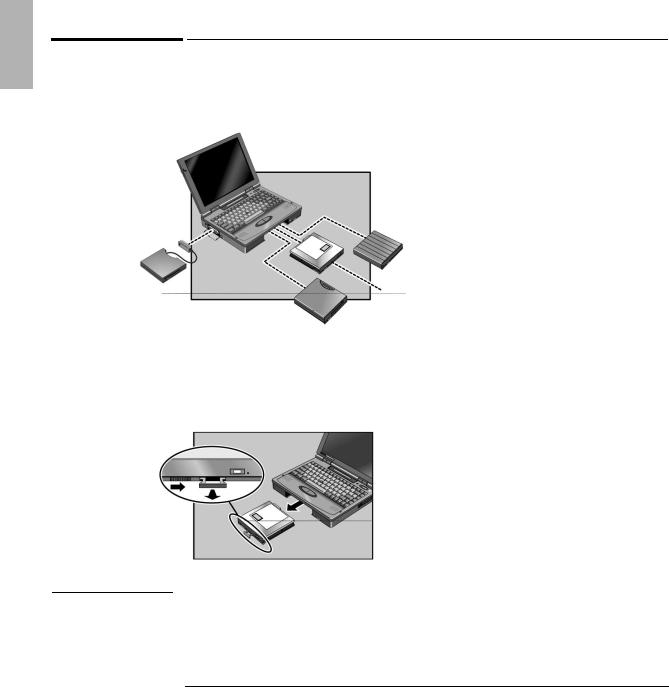
Depending on the accessories you purchased with your OmniBook, the center drive-bay can hold an internal CD-ROM drive, a floppy disk drive, or a high-capacity battery.
In this section you’ll learn how to
♦Remove accessory modules from the OmniBook.
♦Install and use the floppy disk drive.
♦Install and use the CD-ROM drive.
♦Replace the main battery.
♦Install a second, high-capacity battery.
♦Handle and store the battery safely.
♦Maintain and preserve battery life.
♦Insert and remove a PC card.
1-19
Starting Out with Your OmniBook
Using OmniBook Accessories
To remove accessories from the OmniBook
The OmniBook’s center drive bay can hold a CD-ROM drive, a floppy disk drive, or a high-capacity (2nd) battery for extra power.
High-capacity battery
Floppy disk drive |
CD-ROM drive |
Floppy disk drive
Use this procedure to remove any of these accessories.
1.Slide the switch to the right. A pull-tab pops out.
2.Pull the pull-tab firmly to remove the module from the OmniBook.
C A U T I O N |
To prevent damage to the pull -tab, gently push the tab back into the module |
|
after you remove it from the OmniBook. |
1-20
Important
Starting Out with Your OmniBook
Using OmniBook Accessories
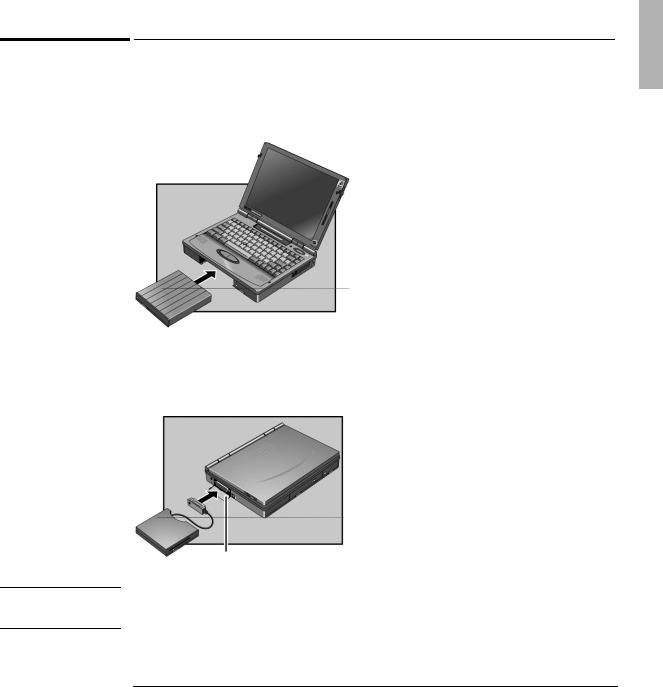
To install the floppy disk drive
1.If necessary, remove the current accessory module from the OmniBook.
2.Slide the floppy disk drive into the OmniBook until it clicks into place.
–or–
Connect the floppy disk drive to the OmniBook externally by pulling out the floppy disk drive cable and connecting it to the parallel port on the left side of the OmniBook.
Parallel port
The external floppy disk drive works only with the OmniBook’s parallel port. It does not work with the parallel port on the docking system or port replicator.
1-21

floppy disk indicator
C A U T I O N
Starting Out with Your OmniBook
Using OmniBook Accessories
To insert and eject a floppy disk
When the OmniBook is reading or writing data to the floppy disk drive, the floppy disk indicator appears on the Status Panel (above the function keys).
Do not insert or remove a floppy disk while the OmniBook is actively reading or writing data. Wait until the floppy disk drive stops reading or writing. Otherwise, you could lose data or the OmniBook could stop responding.
1.Hold the disk with its face up, then slide it into the floppy disk drive slot until it clicks into place.
2.To remove the floppy disk, press the eject button on the front of the floppy disk drive.
1-22
 Loading...