


 Loading...
4-564-359-42(1)
|
|
|
“Help Guide” (Web manual) |
|
|
||
|
|
|
Refer to “Help Guide” for in-depth |
|
|
||
|
|
|
instructions on the many functions of the |
|
|
||
|
|
|
camera. |
|
|
||
|
|
|
« Manuel d’aide » (Manuel en ligne) |
|
|||
|
|
|
|
||||
|
|
|
Consultez le « Manuel d’aide » pour obtenir |
|
|||
|
|
|
des instructions détaillées au sujet des |
|
|
||
|
|
|
nombreuses fonctions de l'appareil. |
|
|
||
E-mount |
|
|
|||||
http://rd1.sony.net/help/ilc/1450/h_zz/ |
|
|
|||||
|
|
|
|
||||
|
|
|
|
|
|
|
|
|
Interchangeable Lens Digital Camera/Instruction Manual |
GB |
|
||||
|
|
|
|
|
|
|
|
|
|
|
|
|
|
|
|
|
Appareil photo à objectif interchangeable/Mode d’emploi |
FR |
|
||||
|
|
|
|
|
|
|
|
|
|
|
|
|
|
|
|
|
Digitalkamera mit Wechselobjektiv/Gebrauchsanleitung |
DE |
|
||||
|
|
|
|
|
|
|
|
|
|
|
|
|
|
|
|
|
Cámara Digital de Lentes Intercambiables/Manual de instrucciones |
ES |
|
||||
|
|
|
|
|
|
|
|
|
|
|
|
|
|
|
|
|
Fotocamera digitale con obiettivo intercambiabile/Istruzioni per l’uso |
IT |
|
||||
|
|
|
|
|
|
|
|
|
|
|
|
|
|
|
|
|
Câmara Digital de Objetivas intercambiáveis/Manual de instruções |
PT |
|
||||
|
|
|
|
|
|
|
|
|
|
|
|
|
|
|
|
|
Digitale camera met verwisselbare lens/Gebruiksaanwijzing |
NL |
|
||||
|
|
|
|
|
|
|
|
|
|
|
|
|
|
|
|
|
|
|
|
|
|
PL |
|
|
|
|
|
|
|
|
|
|
|
|
|
|
|
|
|
|
|
|
|
|
|
|
|
|
Цифровой фотоаппарат со сменным объективом/Инструкция по эксплуатации |
RU |
|
||||
|
|
|
|
|
|
|
|
|
|
|
|
|
|
|
|
|
Цифровий фотоапарат мі ммінним об'єктивом/Посібник м експлуатації |
UA |
|
||||
|
|
|
|
|
|
|
|
|
|
|
|
|
|
|
|
|
Digitalkamera med utbytbart objektiv/Handledning |
SE |
|
||||
|
|
|
|
|
|
|
|
|
|
|
|
|
|
|
|
|
Digitaalinen kamera vaihdettavalla objektiivilla/Käyttöopas |
FI |
|
||||
|
|
|
|
|
|
|
|
|
|
|
|
|
|
|
|
|
Digitalkamera med utskiftbart objektiv/Bruksanvisning |
NO |
|
||||
|
|
|
|
|
|
|
|
|
|
|
|
|
|
|
|
|
Digitalkamera med udskifteligt objektiv/Betjeningsvejledning |
DK |
|
||||
|
|
|
|
|
|
|
|
© 2014 Sony Corporation Printed in Thailand |
ILCE-7M2 |
|

English
E-mount
Learning more about the camera (“Help Guide”)
“Help Guide” is an on-line manual. You can read the “Help Guide” on your computer or smartphone.
Refer to it for in-depth instructions on the many functions of the camera.
URL:
http://rd1.sony.net/help/ilc/1450/ h_zz/
Owner’s Record
The model and serial numbers are located on the bottom. Record the serial number in the space provided below. Refer to these numbers whenever you call your Sony dealer regarding this product.
Model No. WW328278 (ILCE-7M2) Serial No.
Model No. AC-UD10/AC-UUD11
Serial No.
WARNING
To reduce fire or shock hazard, do not expose the unit to rain or moisture.
IMPORTANT SAFETY INSTRUCTIONS -SAVE THESE INSTRUCTIONS DANGER
TO REDUCE THE RISK OF FIRE OR ELECTRIC SHOCK, CAREFULLY FOLLOW THESE INSTRUCTIONS
If the shape of the plug does not fit the power outlet, use an attachment plug adaptor of the proper configuration for the power outlet.
GB
2

CAUTION
Battery pack
If the battery pack is mishandled, the battery pack can burst, cause a fire or even chemical burns. Observe the following cautions.
•Do not disassemble.
•Do not crush and do not expose the battery pack to any shock or force such as hammering, dropping or stepping on it.
•Do not short circuit and do not allow metal objects to come into contact with the battery terminals.
•Do not expose to high temperature above 60°C (140°F) such as in direct sunlight or in a car parked in the sun.
•Do not incinerate or dispose of in fire.
•Do not handle damaged or leaking lithium ion batteries.
•Be sure to charge the battery pack using a genuine Sony battery charger or a device that can charge the battery pack.
•Keep the battery pack out of the reach of small children.
•Keep the battery pack dry.
•Replace only with the same or equivalent type recommended by Sony.
•Dispose of used battery packs promptly as described in the instructions.
AC Adaptor
Use the nearby wall outlet (wall socket) when using the AC Adaptor. Disconnect the AC Adaptor from the wall outlet (wall socket) immediately if any malfunction occurs while using the apparatus.
The power cord (mains lead), if supplied, is designed specifically for use with this camera only, and should not be used with other electrical equipment.
For Customers in the U.S.A.
and Canada
RECYCLING LITHIUM-ION BATTERIES
Lithium-Ion batteries are
recyclable. You can help preserve
our environment by returning your used rechargeable batteries to
the collection and recycling location nearest you.
For more information regarding recycling
of rechargeable batteries, call toll free GB 1-800-822-8837, or visit http://www.call2recycle.org/
Caution: Do not handle damaged or leaking Lithium-Ion batteries.
Battery pack and lens (if lens supplied)
This device complies with Part 15 of the FCC Rules. Operation is subject to the following two conditions:
(1) This device may not cause harmful interference, and (2) this device must accept any interference received, including interference that may cause undesired operation.
CAN ICES-3 B/NMB-3 B
This equipment complies with FCC/IC radiation exposure limits set forth for an uncontrolled environment and meets the FCC radio frequency (RF) Exposure Guidelines and RSS-102 of the IC radio frequency (RF) Exposure rules. This equipment has very low levels of RF energy that are deemed to comply without testing of specific absorption ratio (SAR).
GB
3

For Customers in the U.S.A.
If you have any questions about this product, you may call:
Sony Customer Information Center 1-800-222-SONY (7669).
The number below is for the FCC related matters only.
Regulatory Information
Declaration of Conformity
Trade Name: SONY
Model No.: WW328278
Responsible Party: Sony Electronics Inc.
Address: 16530 Via Esprillo,
San Diego, CA 92127 U.S.A.
Telephone No.: 858-942-2230
This device complies with Part15 of the FCC Rules. Operation is subject to the following two conditions: (1) This device may not cause harmful interference, and (2) this device must accept any interference received, including interference that may cause undesired operation.
This equipment must not be co-located or operated in conjunction with any other antenna or transmitter.
CAUTION
You are cautioned that any changes or modifications not expressly approved in this manual could void your authority to operate this equipment.
Note:
This equipment has been tested and found to comply with the limits for a Class B digital device, pursuant to Part 15 of the FCC Rules.
These limits are designed to provide reasonable protection against harmful interference in a residential installation. This equipment generates, uses, and can radiate radio frequency energy and, if not installed and used in accordance with the instructions, may cause harmful interference to radio communications. However, there is no guarantee that interference will not occur in a particular installation. If this equipment does cause harmful interference to radio or television reception, which can be determined by turning the equipment off and on, the user is encouraged to try to correct the interference by one or more of the following measures:
–Reorient or relocate the receiving antenna.
–Increase the separation between the equipment and receiver.
–Connect the equipment into an outlet on a circuit different from that to which the receiver is connected.
–Consult the dealer or an experienced radio/TV technician for help.
The supplied interface cable must be used with the equipment in order to comply with the limits for a digital device pursuant to Subpart B of Part 15 of FCC Rules.
For Customers in Canada
This device complies with Industry Canada licence-exempt RSS standard(s). Operation is subject to the following two conditions: (1) this device may not cause interference, and (2) this device must accept any interference, including interference that may cause undesired operation of the device.
GB
4

For Customers in Europe
Notice for the customers in the countries applying EU Directives
Manufacturer: Sony Corporation, 1-7-1 Konan Minato-ku Tokyo, 108-0075 Japan For EU product compliance: Sony Deutschland GmbH, Hedelfinger Strasse 61, 70327 Stuttgart, Germany
Hereby, Sony Corporation, declares that this equipment is in compliance with the essential requirements and other relevant provisions of Directive 1999/5/EC. For details, please access the following URL: http://www.compliance.sony.de/
Notice
If static electricity or electromagnetism causes data transfer to discontinue midway (fail), restart the application or disconnect and connect the communication cable (USB, etc.) again.
This product has been tested and found compliant with the limits set out in the EMC regulation for using connection cables shorter than 3 meters (9.8 feet).
The electromagnetic fields at the specific frequencies may influence the picture and sound of this unit.
Disposal of waste batteries and electrical and electronic equipment (applicable in the European Union and other European countries with separate collection systems)
This symbol on the product, the battery or on the packaging indicates that the product and the battery shall not be treated as household waste. On
certain batteries this symbol might be used in combination with a chemical symbol. The chemical symbols for mercury (Hg) or
lead (Pb) are added if the battery contains GB more than 0.0005% mercury or 0.004%
lead. By ensuring these products and batteries are disposed of correctly, you will help prevent potentially negative consequences for the environment and human health which could otherwise be caused by inappropriate waste handling. The recycling of the materials will help to conserve natural resources.
In case of products that for safety, performance or data integrity reasons require a permanent connection with an incorporated battery, this battery should be replaced by qualified service staff only. To ensure that the battery and the electrical and electronic equipment will be treated properly, hand over these products at end- of-life to the applicable collection point for the recycling of electrical and electronic equipment. For all other batteries, please view the section on how to remove the battery from the product safely. Hand the battery over to the applicable collection point for the recycling of waste batteries. For more detailed information about recycling of this product or battery, please contact your local Civic Office, your household waste disposal service or the shop where you purchased the product or battery.
GB
5
For Customers in Singapore
For customers who purchased their camera from a store in Japan that caters to tourists
Note
Some certification marks for standards supported by the camera can be confirmed on the screen of the camera.
Select MENU t (Setup) t [Certification Logo].
If display is not possible due to problems such as camera failure, contact your Sony dealer or local authorized Sony service facility.
For details on the Wi-Fi and NFC One-touch functions, refer to the attached document “Wi-Fi Connection/One-touch (NFC) Guide” or to the “Help Guide.”
This manual covers several models supplied with different lenses.
The model name varies depending on the supplied lens. The available model varies depending on the countries/regions.
Model name |
Lens |
ILCE-7M2 |
Not supplied |
|
|
ILCE-7M2K |
FE 28-70 mm F3.5-5.6 OSS |
|
|
GB
6

Introduction of functions
This section introduces some frequently used shooting functions and other unique functions.
See the pages in parentheses for details.
Shooting functions used frequently
Exposure Comp. (34)
You can adjust the exposure to change the brightness of the entire image. Even when the shooting mode is set to M, you can adjust the exposure if the ISO sensitivity is set to [ISO AUTO].
GB
ISO/Multi Frame NR (34)
You can adjust the luminous sensitivity.
The ISO sensitivity can be adjusted between ISO 50 and ISO 25600. When you select 
 (Multi Frame NR), you can select larger ISO numbers than the maximum ISO sensitivity.
White Balance (34)
You can adjust the color tones.
You can select an option to suit a light source, or perform fine adjustments using color temperature and color filters.
Drive Mode (33)
You can select an appropriate drive mode to suit your purposes, such as single shooting, continuous shooting, or bracket shooting.
Features of this camera
DRO/Auto HDR (69)
[D-Range Opt.]: By dividing the image into small areas, the camera analyses the contrast of light and shadow between the subject and the background, and produces an image with the optimal brightness and gradation.
[Auto HDR]: Shoots 3 images with different exposures, and then overlays these images to create an image with rich gradation.
GB
7

Introduction of functions
Creative Style (68)
You can select the desired style from among 13 styles.
You can also adjust certain image factors, such as exposure, using the selected style as the base.
Movie recording with manual adjustments (66)
You can adjust the exposure in P, A, S, or M mode even when shooting movies.
Picture Profile (71)
You can change settings such as color and tone when recording movies.
How to operate or customize the camera
Display information (36)
When you look into the viewfinder, the viewfinder mode is activated, and when you move your face away from the viewfinder, the viewing mode reverts to monitor mode (default settings). You can change the screen display mode by pressing DISP on the control wheel.
Quick Navi (26)
In [For viewfinder] screen, you can quickly switch from the monitor to the Quick Navi screen by pressing the Fn button. You can set the items with an intuitive operation by using the front/rear dial and the control wheel.
Customization (39)
The camera are equipped with the Custom buttons, where you can assign desired function on each button. You can also assign functions to other buttons, such as the AEL button.
GB
8

Notes on using your camera
Screen language
You can select the language displayed on the screen using the menu (page 42).
Shooting procedure
This camera has 2 modes for monitoring subjects: the monitor mode using the monitor, and the viewfinder mode using the viewfinder.
Functions built into this camera
•This manual describes 1080 60icompatible devices and 1080 50icompatible devices.
To check whether your camera is a 1080 60i-compatible device or 1080 50icompatible device, check for the following marks on the bottom of the camera.
1080 60i-compatible device: 60i
1080 50i-compatible device: 50i
•This camera is compatible with 1080 60p or 50p-format movies. Unlike standard recording modes up to now, which record in an interlacing method, this camera records using a progressive method. This increases the resolution, and provides a smoother, more realistic image.
Creating an image database file
If you insert a memory card that does not contain an image database file into the camera and turn on the power, the camera automatically creates an image database file using some of the memory card’s capacity.
The process may take a long time and you cannot operate the camera until the process is completed. If a database file error occurs, export all images to your computer using PlayMemories Home™, and then format the memory card using the camera.
Notes on recording/playback
•In order to stabilize the operation of the memory card, it is recommended that you format the memory card on the camera when you use it with that camera for the first time.
Once you format the memory card, all the data recorded on the memory card will be deleted and cannot be restored. Before formatting, copy the data to a computer or other device.
•If you repeatedly record and delete
images over a long period, the files on the GB memory card may become fragmented
and movie recording may be suspended partway through. If this occurs, copy the data to a computer or other device and then perform [Format].
•Before you start recording, make a trial recording to make sure that the camera is working correctly.
Back up recommendation for a memory card
If you turn the camera off or remove the battery pack or the memory card while the access lamp is flashing, the data on the memory card may become broken. To avoid data loss, always copy (back up) data to another device.
No compensation for damaged content or recording failure
Sony cannot compensate for failure to record or loss or damage of recorded content due to a malfunction of the camera or recording media, etc.
GB
9

Notes on using your camera
Shooting with an E-mount lens compatible APS-C size
This camera is equipped with a 35 mm, full-frame CMOS sensor. However, the image size is automatically set to that of the APS-C size setting and the image size is smaller when an E-mount lens compatible APS-C size is used (default settings).
Notes on the monitor, electronic viewfinder, lens, and image sensor
•The monitor and electronic viewfinder are manufactured using extremely highprecision technology, and over 99.99% of the pixels are operational for effective use. However, there may be some small black dots and/or bright dots (white, red, blue or green in color) that constantly appear on the monitor and electronic viewfinder. These dots are normal due to the manufacturing process and do not affect the images in any way.
•Do not hold the camera by the monitor.
•When using the power zoom lens, be careful not to get your fingers or any other objects caught in the lens.
•Do not expose the camera to a strong light source such as a sunlight. The internal components may become damaged.
•Do not look at sunlight or a strong light source through the lens when it is detached. This may result in unrecoverable damage to the eyes or cause a malfunction.
•Do not use the camera in areas where strong radio waves or radiation are being emitted. Recording and playback may not function correctly.
•Images may trail across on the screen in a cold location. This is not a malfunction. When turning on the camera in a cold location, the screen may become temporarily dark. When the camera warms up, the screen will function normally.
•The recorded image may be different from the image you monitored before recording.
Notes on using the lenses and accessories
It is recommended that you use Sony lenses/accessories designed to suit the characteristics of this camera. Using this camera with products from other manufacturers may affect its performance, leading to accidents or malfunction. Sony bears no responsibility for such accidents or malfunction.
Notes on the multi interface shoe
•When attaching or detaching accessories such as an external flash to the multi interface shoe, first turn the power to OFF. When attaching the accessories, tighten the screws all the way and confirm that it is firmly fastened to the camera.
•Do not use an external flash with a high voltage flash sync terminal or inverse polarity. This may result in malfunction.
Notes on shooting with the viewfinder
This camera is equipped with an Organic Electro-Luminescence viewfinder with high resolution and high contrast. This viewfinder achieves a wide viewing angle and a long eye relief. This camera is designed to provide an easily viewable viewfinder by appropriately balancing various elements.
GB
10
Notes on using your camera
•The image may be slightly distorted near the corners of the viewfinder. This is not a malfunction. When you want to see the full composition with all its details, you can also use the monitor.
•If you pan the camera while looking into the viewfinder or move your eyes around, the image in the viewfinder may be distorted or the color of the image may change. This is a characteristic of the lens or display device and is not a malfunction. When you shoot an image, we recommend that you look at the center area of the viewfinder.
•When shooting with the viewfinder, you may experience symptoms such as eyestrain, fatigue, travel sickness, or nausea. We recommend that you take a break at regular intervals when you are shooting with the viewfinder.
The required length or frequency of the break may differ depending on the individuals, so you are advised to decide at your own discretion. In case you may feel uncomfortable, refrain from using the viewfinder until your condition recovers, and consult your doctor as necessary.
Notes on recording for long periods of time
•Depending on the camera and battery temperature, you may be unable to record movies or the power may turn off automatically to protect the camera.
A message will be displayed on the screen before the power turns off or you can no longer record movies. In this case, leave the power off and wait until the camera and battery temperature goes down. If you turn on the power without letting the camera and battery cool enough, the power may turn off again or you may be unable to record movies.
•Under high ambient temperatures, the temperature of the camera rises quickly.
•When the temperature of the camera rises, the image quality may deteriorate. It is recommended that you wait until the temperature of the camera drops before continuing to shoot.
•The surface of the camera may get warm. This is not a malfunction.
Notes on importing XAVC S movies and AVCHD movies to a computer
When importing XAVC S movies or AVCHD movies to a computer, download and use the software PlayMemories Home
from the following website: GB http://www.sony.net/pm/
Notes when playing movies on other devices
•This camera uses MPEG-4 AVC/H.264 High Profile for AVCHD format recording. Movies recorded in AVCHD format with this camera cannot be played with the following devices.
–Other devices compatible with AVCHD format that do not support High Profile
–Devices incompatible with the AVCHD format
This camera also uses MPEG-4 AVC/ H.264 Main Profile for MP4 format recording. For this reason, movies recorded in MP4 format with this camera cannot be played on devices other than those that support MPEG-4 AVC/H.264.
•Discs recorded with HD (high definition) image quality can be played back only on AVCHD format-compatible devices.
DVD-based players or recorders cannot play back HD image quality discs, as they are incompatible with the AVCHD format. Also, DVD-based players or recorders may fail to eject HD image quality discs.
GB
11

Notes on using your camera
•Movies recorded in 1080 60p/1080 50p format can be played back only on 1080 60p/1080 50p-supported devices.
•Movies recorded in XAVC S format can be played back only on XAVC S- supported devices.
Warning on copyright
Television programs, films, videotapes, and other materials may be copyrighted. Unauthorized recording of such materials may be contrary to the provisions of the copyright laws.
The pictures used in this manual
The photographs used as examples of pictures in this manual are reproduced images, and are not actual images shot using this camera.
On the data specifications described in this manual
The data on performance and specifications are defined under the following conditions, except as described in this manual: at an ordinary ambient temperature of 25ºC (77°F), and using a battery pack that has been fully charged until the charge lamp has turned off.
How to turn off wireless network functions (Wi-Fi and NFC, etc.) temporarily
When you board an airplane, etc., you can turn off all wireless network functions temporarily.
Select MENU button t  (Wireless) t [Airplane Mode] t [On].
If you set [Airplane Mode] to [On], an  (airplane) mark will be displayed on the screen.
Notes on wireless LAN
If your camera is lost or stolen, Sony bears no responsibility for the loss or damage caused by illegal access or use of the registered access point on the camera.
Notes on security when using wireless LAN products
•Always make sure that you are using a secure wireless LAN to avoid hacking, access by malicious third parties, or other vulnerabilities.
•It is important that you set the security settings when using a wireless LAN.
•If a security problem arises because no security precautions are in place or due to any inevitable circumstances when using a wireless LAN, Sony bears no responsibility for the loss or damage.
GB
12

Checking the supplied items
The number in parentheses indicates the number of pieces.
Supplied with all models:
•Camera (1)
•AC Adaptor AC-UD10/AC- UUD11 (1)
The shape of the AC Adaptor may differ depending on the country/ region.
•Power cord (mains lead) (1)* (not supplied in the U.S.A. and Canada)
*Multiple power cords may be supplied with your camera. Use the appropriate one that matches your country/region.
•Rechargeable battery pack NPFW50 (1)
• Body cap (1) (Attached on the camera)
• Shoe cap (1) (Attached on the camera)
• Eyepiece Cup (1) (Attached on |
GB |
|
|
||
the camera) |
|
|
|
|
•Instruction Manual (1) (this manual)
•Wi-Fi Connection/One-touch (NFC) Guide (1)
This guide explains the functions that require a Wi-Fi connection.
ILCE-7M2K:
•Zoom lens FE 28-70 mm F3.5- 5.6 OSS (1)/Front lens cap (1)/ Rear lens cap (1)/Lens hood (1)
•Micro USB cable (1)
•Shoulder strap (1)
For how to attach the shoulder strap to the camera, refer to page 18.
GB
13
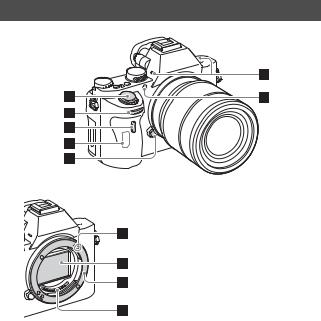
Identifying parts
See the pages in parentheses for details on operation for the parts.
Front side
When the lens is removed
APower switch/Shutter button
BFront dial
CRemote sensor
DWi-Fi antenna (built-in)
ELens release button
FBuilt-in microphone*1
GAF illuminator (34)/Self-timer lamp
HMount index
IImage sensor*2
JMount
KContacts*2
*1 Do not cover this part during movie recording.
Doing so may cause noise or lower the volume.
*2 Do not directly touch these parts.
GB
14
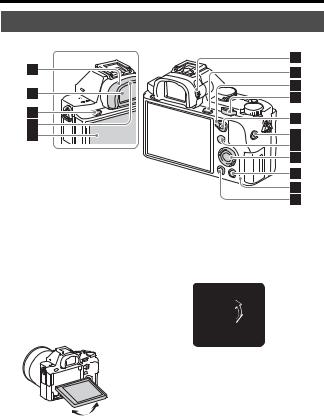
Identifying parts
Rear side
GB 
AEyepiece cup (59)
BViewfinder
CMENU button (32)
DEye sensor
EMonitor (21)
•You can adjust the monitor to an easily viewable angle and shoot from any position.
FDiopter-adjustment dial
•Adjust the diopter-adjustment dial according to your eyesight until the display appears clearly in the viewfinder.
GFor shooting: C3 (Custom 3) button (25)
For viewing:  (Enlarge) button (73)
HAF/MF/AEL switch lever
IRear dial
GB
15

Identifying parts
JFor shooting: AF/MF (Auto focus/manual focus) button/ AEL button (25)
For viewing: |
(Image |
index) button (73) |
|
KMOVIE button (62)
LFor shooting: Fn button (30)
For viewing:  (Send to Smartphone) button
•You can display the screen for [Send to Smartphone] by pressing this button.
MControl wheel (28)
NFor shooting: C4 (Custom 4) button (25)
For viewing:  (Delete) button (65)
OAccess lamp
P (Playback) button (63)
GB
16

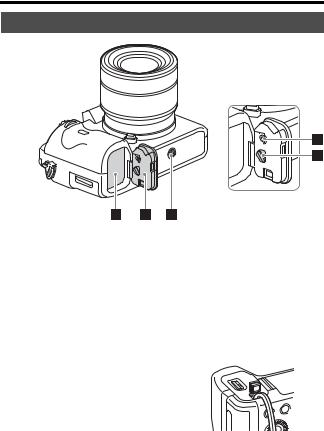
Identifying parts
Top side/Side view
GB 
A Image sensor position mark
BSpeaker
CM (Microphone) jack
•When an external microphone is connected, the microphone is turned on automatically. If the external microphone is a plug- in-power type, the power of the microphone is supplied by the camera.
DI (Headphones) jack
EMulti/Micro USB Terminal*
•Supports Micro USB compatible device.
FCharge lamp (46)
GHDMI micro jack
HMulti interface shoe*
•Some of the accessories may not be inserted fully and protrude backward from the Multi interface shoe. However, when the accessory reaches the front end of the shoe, the connection is completed.
IMode dial (66)
JC2 (Custom 2) button (25)
KC1 (Custom 1) button (25)
LExposure compensation dial (25)
GB
17

Identifying parts
MHooks for shoulder strap
•Attach both ends of the strap onto the camera.
N  (N mark)
•This mark indicates the touch point for connecting the camera and an NFC-enabled Smartphone.
For details on the location of the (N mark) on your
Smartphone, refer to the operating instructions of the Smartphone.
•NFC (Near Field Communication) is an international standard of shortrange wireless communication technology.
OMemory card cover
PMemory card slot
*For details on compatible accessories for the multi interface shoe and the Multi/Micro USB Terminal, visit the Sony website, or consult your Sony dealer or local authorized Sony service facility.
You can also use accessories that are compatible with the accessory shoe. Operations with other manufactures’ accessories are not guaranteed.
GB
18
Identifying parts
Bottom view
GB 
ABattery insertion slot (45)
BBattery cover (45)
CTripod socket hole
•Use a tripod with a screw less than 5.5 mm (7/32 inches) long. Otherwise, you cannot firmly secure the camera, and damage to the camera may occur.
DBattery cover locking button
EBattery cover release lever
•When you attach a vertical grip (sold separately), remove the battery cover.
Connection plate cover
Use this when using an AC-PW20 AC Adaptor (sold separately). Insert the connection plate into the battery compartment, and then pass the cord through the connection plate cover as shown below.
•Make sure that the cord is not pinched when you close the cover.
GB
19

Identifying parts
Lens FE 28-70 mm F3.5-5.6 OSS (Supplied with ILCE7M2K)
AFocusing ring
BZoom ring
CFocal-length scale
DFocal-length index
ELens contacts*
FMount index
* Do not touch this part directly.
GB
20
List of icons on the monitor
The status of the monitor is set to [Display All Info.] in the default settings. When you change the [DISP Button] setting, and press DISP on the control wheel, the screen status will change to the viewfinder mode. You can also display the histogram by pressing DISP. The displayed contents and their position shown below are just a guideline, and may differ from the actual display.
Monitor mode |
For playback |
|
Basic information display |
GB 
Viewfinder mode |
Histogram display |
||||||||||||||||||||
Auto Mode or Scene Selection mode |
|
|
|
|
|
|
|
|
|
|
|
||||||||||
|
|
|
|
|
|
|
|
|
|
|
|
|
|
|
|
|
|
|
|
|
|
|
|
|
|
|
|
|
|
|
|
|
|
|
|
|
|
|
|
|
|
|
|
|
|
|
|
|
|
|
|
|
|
|
|
|
|
|
|
|
|
|
|
|
|
|
|
|
|
|
|
|
|
|
|
|
|
|
|
|
|
|
|
|
|
|
|
|
|
|
|
|
|
|
|
|
|
|
|
|
|
|
|
|
|
|
|
|
|
|
|
|
|
|
|
|
|
|
|
|
|
|
|
|
|
|
|
|
|
|
|
|
|
|
|
|
|
|
|
|
|
|
|
|
|
|
|
|
|
|
|
|
|
|
|
|
|
|
|
|
|
|
|
|
|
|
|
|
|
|
|
|
|
|
|
|
|
|
|
|
|
|
|
|
|
|
|
|
|
|
|
|
|
|
|
|
|
|
|
|
|
|
|
|
|
|
|
|
|
|
|
|
|
|
|
|
|
|
|
|
|
|
|
|
|
|
|
|
|
|
|
|
|
|
|
|
|
|
|
|
|
|
|
|
|
|
|
|
|
|
|
|
|
|
|
|
|
|
|
|
|
|
|
P/A/S/M/Sweep Panorama mode
GB
21

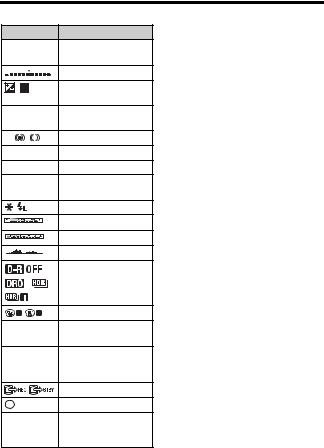
List of icons on the monitor
A
Display Indication
Shooting mode (66)
P P* A S
M 

Register number (66)
Scene Recognition icons
|
Memory card (50)/ |
NO CARD |
Upload (41) |
100Remaining number of recordable images
Aspect ratio of still images (33)
24M 20M Image size of still
10M 8.7M images (33)
6.0M 5.1M
2.6M 2.2M
Image quality of still images (33)
Frame rate of movies
Display Indication
Image size of movies (70)
Remaining battery (48)
Remaining battery warning
Flash charge in progress
APS-C Size Capture (38)
Setting Effect OFF (37)
AF Illuminator (34)
NFC is activated
Airplane Mode
No audio recording of movies (36)
Wind Noise Reduction (36)
SteadyShot/Camera shake warning (56)
SteadyShot Focal Length/Camera shake warning (56)
Overheating warning
Database file full/
Database file error
Smart Zoom/Clear
Image Zoom/Digital
Zoom
Digital level gauge
Audio level (72)
GB
22

|
|
|
|
|
|
|
|
List of icons on the monitor |
|
|||
|
|
|
|
|
|
|
|
|
|
|
|
|
|
|
|
|
|
|
|
|
|
|
|
|
|
|
Display |
Indication |
|
Display |
Indication |
|
|
|||||
|
|
|
|
|
|
View Mode (64) |
|
35mm |
Lens focal length |
|
|
|
|
|
|
|
|
|
|
|
|
|
|
|
|
|
|
|
|
|
|
|
|
AWB |
White balance (Auto, |
|
||
|
|
|
|
|
|
|
|
|
Preset, Underwater |
|
||
|
|
|
|
|
|
|
|
|
Auto, Custom, Color |
|
||
|
|
|
|
|
|
|
|
|
temperature, Color |
|
||
100-0003 |
Folder - file number |
|
|
|
||||||||
|
7500K A5 G5 |
filter) (34) |
|
|||||||||
- |
|
|
|
Protect (40) |
|
|
|
|
|
|
||
|
|
|
|
|
D-Range Optimizer/ |
|
||||||
|
|
|
|
|
|
|
|
|
|
|||
|
XAVC S |
Recording mode of |
|
|
Auto HDR (69) |
|
||||||
|
AVCHD MP4 |
movies |
|
|
|
|
|
|
||||
|
|
|
Creative Style (68)/ |
|
||||||||
|
|
|
|
|
|
|
|
|
|
|||
|
DPOF |
DPOF set |
|
|
Contrast, Saturation, |
|
||||||
|
|
|
|
|
|
|
|
|
Sharpness |
|
||
|
|
|
|
|
|
Auto Object Framing |
|
|
|
|||
|
|
|
|
|
|
|
|
|
|
|
|
|
|
|
|
|
|
|
|
|
|
|
|
GB |
|
|
|
|
|
|
|
Dual Video REC (33) |
+3 +3 +3 |
|
|
|
||
|
|
|
|
|
|
|
|
|
|
|||
|
|
|
|
|
|
|
|
|
|
|
||
|
|
|
|
|
|
|
|
|
|
|
|
|
|
|
|
|
|
|
|
|
|
Picture Effect (34) |
|
||
|
|
|
|
|
|
PC Remote |
|
|
|
|||
|
|
|
|
|
|
|
|
|
||||
|
|
|
|
|
|
|
|
|
|
|
|
|
B
Display Indication
Drive mode (33)
|
|
|
|
|
Smile detection |
|
|
|
|
|
sensitivity indicator |
|
|
|
|
|
|
|
|
|
|
|
|
|
Flash mode (33)/Red- |
|
|
|
|
|
eye reduction (33) |
|
|
|
|
|
|
|
|
|
|
±0.0 |
Flash compensation |
|
|
|
|
|
|
|
|
||
|
|
– |
Picture Profile (71) |
||
|
(33) |
|
|
||
|
|
|
|
|
|
|
Focus mode (33) |
|
|
|
|
|
|
|
|
|
|
|
AF area |
|
|
|
|
Face Detection/Smile
Shutter (35)
Metering mode (34)
GB
23
List of icons on the monitor
C
Display |
Indication |
Z Lock-on |
Lock-on AF guide |
AF |
|
|
EV scale |
|
Exposure compensation |
|
(34)/Metered Manual |
REC 0:12 |
Recording time of the |
|
movie (m:s) |
Z |
Focus |
1/250 |
Shutter speed |
F3.5 |
Aperture Value |
ISO400 |
ISO sensitivity (34) |
ISO AUTO |
|
|
AE lock/FEL lock |
|
Shutter speed indicator |
|
Aperture indicator |
|
Histogram |
|
D-Range Optimizer/ |
|
Auto HDR/Auto HDR |
|
image warning |
|
Picture Effect error |
2014-1-1 |
Date of recording |
10:37PM |
|
3/7 |
File number/Number of |
|
images in the view |
|
mode |
|
REC Control |
|
Spot metering area |
00:00:00:00 |
Time code |
|
(hour:minute:second: |
|
frame) (71) |
GB
24

Functions that can be operated using the buttons/dials
You can set up or operate various functions using these buttons/dials. For the location of the buttons/dials, see “Identifying parts” (page 14).
Mode dial (66) |
|
Switches the shooting mode. |
|
|
|
|
|
|
|
|
|
MENU button (32) |
|
Displays the menu screen for setting menu items. |
|
|
|
|
|
|
|
|
|
MOVIE button (62) |
|
Records movies. |
|
|
|
|
|
|
|
||
AF/MF button/AEL button/ |
Switches the autofocus and manual focus temporarily./ |
|
|
||
button |
|
Fixes the exposure of the entire screen./Displays |
|
|
|
|
|
multiple images on the screen simultaneously. |
|
|
|
|
|
|
|
|
|
button (73) |
|
Scales an image up when viewing images. |
|
GB |
|
|
|
|
|
|
|
Fn button (30)/ |
button |
Displays the setup screen for functions set using the Fn |
|
|
|
|
|
button. In [For viewfinder] screen, switches to the Quick |
|
|
|
|
|
Navi screen./In playback mode, pressing |
button |
|
|
|
|
switches to “Send to Smartphone” screen. |
|
|
|
|
|
|
|
|
|
Exposure compensation |
Sets the range for exposure adjustment. |
|
|
|
|
dial |
|
|
|
|
|
|
|
|
|
|
|
button (63) |
|
Plays back images. |
|
|
|
|
|
|
|
|
|
button (65) |
|
Deletes images. |
|
|
|
|
|
|
|
|
|
Custom button |
|
Assigns a frequently-used function to the button. |
|
|
|
|
|
The following function is assigned to each button in the |
|
|
|
|
|
default settings. |
|
|
|
|
|
C1 (Custom 1) button: White Balance |
|
|
|
|
|
C2 (Custom 2) button: Focus Settings |
|
|
|
|
|
C3 (Custom 3) button: Focus Mode |
|
|
|
|
|
C4 (Custom 4) button: Not set |
|
|
|
|
|
|
|
|
|
GB
25

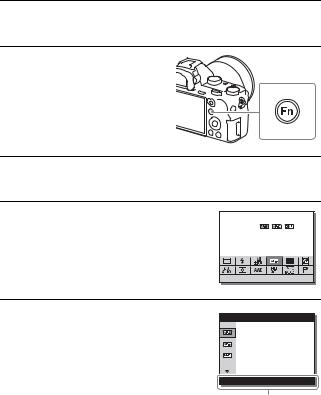
How to use the Quick Navi screen
Using the Quick Navi screen, you can change settings directly on the recording information display when the screen mode is set to [For viewfinder] (Quick Navi). The displayed contents and their position shown below are just a guideline, and may differ from the actual display.
1 MENU button t  (Custom Settings) t [DISP Button] t [Monitor] t [For viewfinder] t [Enter]
2 Press the DISP on the control wheel to set the screen mode to [For viewfinder].
3 Press the Fn button to switch to the Quick Navi screen.
In Auto Mode or Scene Selection mode
In P/A/S/M/Sweep Panorama mode
4 Select the desired item with V/V/B/B on the control wheel.
GB
26

How to use the Quick Navi screen
5 Set the item with the front dial.
•Some setting values can be finely adjusted by turning the rear dial.
•Pressing the center of the control wheel turns on the designated screen used to set up the selected item (page 28).
•Pressing the Fn button again turns off the Quick Navi screen and the screen goes back to the original one.
Functions available on the Quick Navi screen
Drive Mode |
Flash Mode |
Flash Comp. |
|
|
|
|
|
|
|
Focus Mode |
Focus Area |
Exposure Comp. |
|
|
ISO |
Metering Mode |
White Balance |
GB |
|
|
|
|||
|
|
|
|
|
DRO/Auto HDR |
Creative Style |
Picture Effect |
|
|
|
|
|
|
|
Picture Profile |
Smile/Face Detect. |
Image Size |
|
|
|
|
|
|
|
Aspect Ratio |
Quality |
SteadyShot |
|
|
|
|
|
|
|
Auto Mode |
Scene Selection |
Peaking Level |
|
|
|
|
|
|
|
Notes
•Gray items on the Quick Navi screen are not available.
•When using [Creative Style] (page 68) or [Picture Profile] (page 71), some of the setup tasks can be accomplished only on a designated screen.
GB
27

Operating the camera
How to use the control wheel
•You can turn the control wheel or press up/down/left/right on the control wheel to move the selection frame. Press Z in the center of the control wheel to set the selected item. In this manual, the action of pressing the up/down/left/right side of the control wheel is indicated by V/V/B/B.
•The following functions are assigned to V/B/B on the control wheel.
V |
DISP |
Changes the screen display. |
|
|
|
|
|
B |
ISO |
ISO sensitivity |
|
|
|
|
|
B |
/ |
Drive Mode |
|
|
|
• |
Cont. Shooting/Bracket |
|
|
• |
Self-timer |
|
|
|
|
• You can assign a desired function to the V/B/B/Z buttons and to the control wheel turning position in shooting mode.
• When you turn the control wheel or press B/B on the control wheel in playback mode, you can display the previous or next image.
GB
28

Operating the camera
How to use the front dial/rear dial
GB 
You can turn the front dial or rear dial to change the settings required for each shooting mode with immediate effect.
GB
29
Selecting a function using the Fn (Function) button
This button is used for setting up or executing functions used frequently in shooting, except for functions from the Quick Navi screen.
1 Press the DISP on the control wheel to set the screen mode to other than [For viewfinder].
2 Press the Fn button.
3 Select the desired item using V/V/B/B on the control wheel.
The setting screen appears.
4 Select the desired setting by turning the front dial, then press Z on the control wheel.
• Some setting values can be finely adjusted by turning the rear dial.
To set the individual settings in the dedicated screen
In step 3, select a setting item and press Z on the control wheel to switch to the dedicated screen for the setting item. Set the items according to the Operation guide.
Operation guide
GB
30
Loading...