


Contents
1Instructions
1.1General safety instructions
1.2Manufacturer liability
1.3Appliance purpose
1.4Disposal
1.5Identification plate
1.6This user manual
1.7How to read the user manual
2 Description
2.1General Description
2.2Symbols
3Use
3.1Instructions
3.2First use
3.3Using the hob
4Cleaning and maintenance
4.1Instructions
4.2Cleaning the appliance
5 Installation
5.1Safety instructions
5.2Section cut from the countertop
5.3Mounting
5.4Gas connection
5.5Adaptation to different types of gas
5.6Electrical connection
28
28
29
29
29
30
30
30
31
31
32
33
33
33
34
37
37
37
39
39
39
40
42
44
51
EN
These instructions apply only for the destination countries listed on the appliance’s data plate. This is a class 3 built in hob.
We advise you to read this manual carefully, which contains all the instructions for maintaining the appliance’s aesthetic and functional qualities.
For further information on the product: www.smeg.com
27

Instructions
1 Instructions
1.1 General safety instructions
Risk of personal injury
•During use the appliance and its accessible parts become very hot.
•Never touch the heating elements during use.
•Keep children under the age of eight at a safe distance unless they are constantly supervised.
•Children must not play with the appliance.
•Never rest metallic objects such as knives, forks, spoons and lids on the appliance during use.
•Switch off the appliance immediately after use.
•Never try to put out a fire or flames with water: Turn off the appliance and smother the flames with a fire blanket or other appropriate cover.
•Cleaning and maintenance must not be carried out by unsupervised children.
•Have qualified personnel carry out installation and assistance interventions according to the standards in force.
•Do not modify this appliance.
•Do not insert pointed metal objects (cutlery or utensils) into the slots in the appliance.
•Do not try to repair the appliance yourself or without the intervention of a qualified technician.
•If the power supply cable is damaged, contact technical support immediately and they will replace it.
Risk of damaging the appliance
•Do not use abrasive or corrosive detergents (e.g. scouring powders, stain removers and metallic sponges) on glass parts.
•Use wooden or plastic utensils.
•Do not seat on the appliance.
•Do not use steam jets to clean the appliance.
•Do not obstruct ventilation openings and heat dispersal slots.
•Never leave the appliance unattended during cooking operations where fats or oils could be released.
•Never leave objects on the cooking surface.
•Do not use the appliance to heat rooms for any reason.
28
Instructions
1.2 Manufacturer liability
The manufacturer declines all liability for damage to persons or property caused by:
•Use of the appliance other than the one envisaged,
•Non-observance of the user manual provisions,
•Tampering with any part of the appliance,
•The use of non-original spare parts.
1.3 Appliance purpose
This appliance is intended for cooking food in the home environment. Every other use is considered improper.
This appliance must not be used by people (including children) of reduced physical or mental capacity, or lacking in experience in the use of electrical appliances, unless they are supervised or instructed by adults who are responsible for their safety.
1.4 Disposal
This appliance must be disposed of separately from other waste
(Directives 2002/95/EC, 2002/ 96/EC, 2003/108/EC). The appliance does not contain substances in quantities sufficient to be considered hazardous to health and the environment, in accordance with current European directives.
To dispose of the appliance: |
|
||
|
|
||
Power voltage |
|
|
|
Danger of electrocution |
|
|
|
EN |
|||
• Disconnect the mains power supply. |
|
||
|
|
||
• Unplug the appliance. |
|
|
|
|
|||
|
|
|
|
• Cut the power supply cable and remove |
|
||
it along with the plug. |
|
||
• Deliver the appliance to the appropriate |
|
||
recycling centre for electrical and |
|
||
electronic equipment waste, or return it to |
|
||
the retailer when purchasing an |
|
||
equivalent product, on a one for one |
|
||
basis. |
|
||
Our appliances are packaged in non- |
|
||
polluting and recyclable materials. |
|
||
• Deliver the packing materials to the |
|
||
appropriate recycling centre. |
|
||
Plastic packaging |
|
||
Danger of suffocation |
|
||
•Do not leave the packaging or any part of it unattended.
•Do not let children play with the packaging plastic bags.
29
Instructions
1.5 Identification plate
The identification plate bears the technical data, serial number and brand name of the appliance. Do not remove the identification plate for any reason.
1.6 This user manual
This user manual is an integral part of the appliance and must therefore be kept in its entirety and within the user’s reach for the whole working life of the appliance. Read this user manual carefully before using the appliance.
1.7 How to read the user manual
This user manual uses the following reading conventions:
Instructions
General information on this user manual, on safety and final disposal.
Description
Description of the appliance and its accessories.
Use
Information on the use of the appliance and its accessories,
cooking advice.
Cleaning and maintenance
Information for proper cleaning and maintenance of the appliance.
Installation
Information for the qualified technician: Installation, operation and inspection.
Safety instructions
Information
Advice
1. Sequence of instructions for use.
• Standalone instruction.
30

Description
2 Description
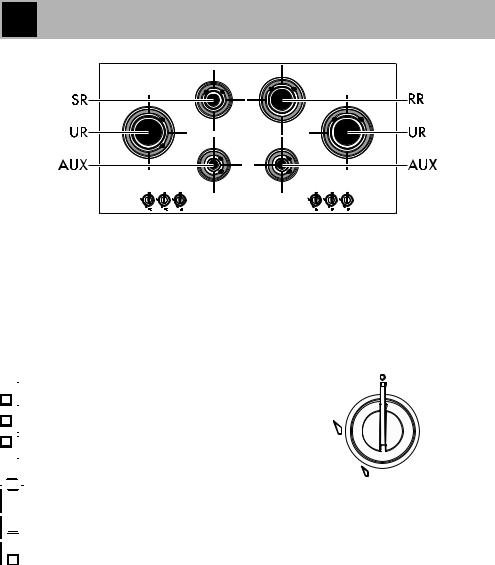
2.1 General Description
EN
60 cm
75 cm
31
Description
AUX = Auxiliary SR = Semi-rapid
RR = Reduced rapid
2.2 Symbols
Cooking zones

 Front left

 Centre left

 Rear left


 Central
 Rear right
 Central right
Front right
32
100 cm
R = Rapid
UR = Ultra rapid
Burner knobs
Useful for lighting and adjusting the hob burners. Press and turn the knobs anti-
clockwise to the value  to light the relative burners. Turn the knobs to the zone between the maximum
  and minimum
  setting to adjust the flame. Return the knobs to the position
  to turn off the burners.

Use
3 Use
3.1 Instructions
Improper use
Danger of burns
•Make sure that the flame-spreader crowns are correctly positioned in their seats with their respective burner caps.
•Oils and fats could catch fire if overheated. Be very careful.
•Do not leave the appliance unattended during cooking operations where fats or oils could be released.
•Do not spray any spray products near the appliance.
•Do not touch the appliance's heating elements when it is running. Leave them to cool before cleaning.
•Keep children under the age of eight away from the appliance when it is in use.
|
Improper use |
|
|
|
Risk of damage to surfaces |
|
|
|
EN |
||
• |
Do not use aluminium foil to cover the |
||
|
|||
|
burners or hob body. |
|
|
• |
Cooking vessels or griddle plates |
|
|
|
should be placed inside the perimeter of |
|
|
|
the hob. |
|
|
• |
All pans must have smooth, flat bottoms. |
|
|
• |
If any liquid does boil over or spill, |
|
|
|
remove the excess from the hob. |
|
• It is not recommended to use earthenware or steatite (soapstone) pans to cook or heat food.
3.2 First use
1.Remove any protective film from the outside or inside of the appliance, including accessories.
2.Remove any labels (apart from the technical data plate) from accessories.
3.Remove and wash all the appliance accessories (see 4 Cleaning and maintenance).
33
Use
3.3 Using the hob
All the appliance’s control and monitoring devices are located together on the front panel. The burner controlled by each knob is shown next to the knob. The appliance is equipped with an electronic ignition device. Simply press the knob and turn it anticlockwise to the maximum flame symbol, until the burner ignites. If the burner does not light in the first 15 seconds, turn the knob to  and wait 60 seconds before trying again. After lighting, keep the knob pressed in for a few seconds to allow the thermocouple to heat up. The burner may go out when the knob is released: In this case, the thermocouple has not heated up sufficiently. Wait a few moments and repeat the operation. Keep the knob pressed in longer.
In case of an accidental switching off, a safety device will be tripped, cutting off the gas supply, even if the gas cock is open. Return the knob to  and wait at least 60 seconds before lighting it again.
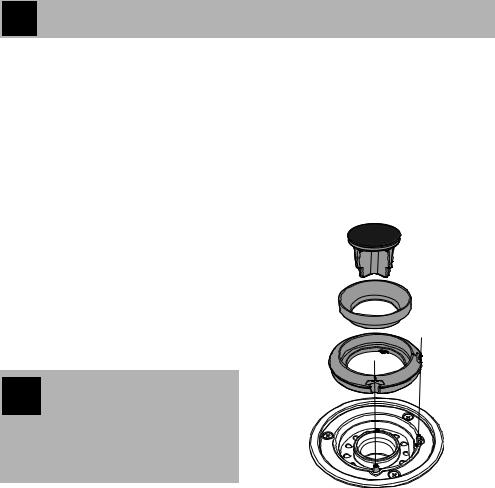
Correct positioning of the flamespreader crowns and burner caps
Before lighting the hob burners, make sure that the flame-spreader crowns are correctly positioned in their housings with their respective burner caps. Make sure that the holes in the burners are aligned with the igniters and thermocouples. Also ensure that the flame-spreader crowns are correctly engaged in the burner holes.
34
 Loading...