

Page 1
kÉï=~ë=çÑW==
MTKOMMV
pfabufp=ud
lйЙк~нзкЫл=j~ем~д
bеЦдблЬ
Page 2

Sirona Dental Systems GmbH
Operator’s Manual SIDEXIS XG
2 D 3407.208.01.10.02 07.2009
59 62 134 D 3407
Page 3

Sirona Dental Systems GmbH
Operator’s Manual SIDEXIS XG Contents
Contents
1 Introduction................................................................................................... 7
1.1 Components of the SIDEXIS XG system ......................................... 7
1.2 General notes on the use of SIDEXIS XG ........................................ 8
1.3 SIDEXIS XG/ What’s new? .............................................................. 8
1.4 Structure of the documents .............................................................. 11
2 General notes for operation.......................................................................... 12
2.1 Checking the system time before starting ........................................ 12
2.2 Installing other SIDEXIS software components ................................ 13
2.3 Completing work on the system ....................................................... 13
2.4 Creating backup copies .................................................................... 14
3 Operation...................................................................................................... 15
3.1 General ............................................................................................. 15
3.1.1 Start SIDEXIS XG. ............................................................... 15
3.1.2 Logging on (option) .............................................................. 15
3.1.3 Screen layout ....................................................................... 16
3.1.4 Functional description and workflows................................... 17
3.1.5 Working with exams ............................................................. 18
3.1.6 Workflow assistance............................................................. 18
3.1.7 Multi-workstation support for exams..................................... 19
3.1.8 Changing the program.......................................................... 23
3.1.9 Information regarding SIDEXIS, Internet connection ........... 24
3.1.10 Exiting SIDEXIS XG ............................................................. 25
3.2 Exam concept ................................................................................... 25
3.2.1 Generating a new exam ....................................................... 25
3.2.2 Opening a saved exam ........................................................ 27
3.2.3 Saving an exam.................................................................... 28
3.2.4 Printing an exam .................................................................. 29
3.2.5 Exporting an exam ............................................................... 30
3.2.6 Importing an exam................................................................ 32
3.2.7 Deleting an exam ................................................................. 33
3.2.8 Closing the exam.................................................................. 33
3.2.9 Changing the form and the size of objects........................... 33
3.2.10 Displaying and changing object properties........................... 34
3.2.11 Removing objects from the workspace ................................ 35
3.2.12 Copying the active image to the Windows clipboard............ 36
bеЦдблЬ
59 62 134 D 3407
D 3407.208.01.10.02 07.2009
3
Page 4

Sirona Dental Systems GmbH
Contents Operator’s Manual SIDEXIS XG
3.2.13 Pasting images from the Windows clipboard ....................... 36
3.2.14 Working with several open examinations............................. 37
3.2.15 Sending an examination via email ....................................... 37
3.3 Templates ........................................................................................ 37
3.3.1 Ready-to-use templates ....................................................... 37
3.3.2 Self-created templates ......................................................... 38
3.3.3 Managing templates............................................................. 38
3.4 Patient management ........................................................................ 39
3.4.1 Which dialog box is used to register a patient?.................... 40
3.4.2 How do I use the patient selection dialog box?.................... 40
3.4.3 How can I create new patient data?..................................... 43
3.4.4 How can I modify patient data?............................................ 44
3.4.5 How can I delete patient data?............................................. 45
3.4.6 How can I check out a patient? ............................................ 46
3.5 Image management ......................................................................... 47
3.5.1 Saving original images ......................................................... 47
3.5.2 Save image views ................................................................ 47
3.5.3 Opening images from the SIDEXIS database...................... 48
3.5.4 Image description and findings ............................................ 56
3.5.5 Removing objects from an exam.......................................... 59
3.5.6 Close image ......................................................................... 60
3.5.7 Deleting images from the image database........................... 60
3.5.8 Identification of images ........................................................ 61
3.5.9 Exporting image views ......................................................... 64
3.5.10 Importing an image .............................................................. 66
3.5.11 Printing images and diagnostic findings............................... 68
3.5.12 Print preview ........................................................................ 68
3.5.13 Scanning images.................................................................. 70
3.5.14 Sending images via Internet as e-mail ................................. 71
3.5.15 Send image .......................................................................... 72
3.5.16 Move image.......................................................................... 73
3.6 Image acquisition ............................................................................. 74
3.6.1 General ................................................................................ 74
3.6.2 Safety instructions................................................................ 74
3.6.3 Intraoral X-rays..................................................................... 75
3.6.4 Panoramic, Ceph and TSA X-ray exposures ....................... 79
3.6.5 3D X-ray exposure ............................................................... 81
3.6.6 Panoramic X-ray acquisition with GALILEOS ...................... 83
3.6.7 Video exposure .................................................................... 83
3.7 Analysis tools ................................................................................... 87
4 D 3407.208.01.10.02 07.2009
59 62 134 D 3407
Page 5

Sirona Dental Systems GmbH
Operator’s Manual SIDEXIS XG Contents
3.7.1 Selecting objects in the workspace ...................................... 87
3.7.2 Restore original image ......................................................... 88
3.7.3 Measurement tools............................................................... 89
3.7.4 Display tools ......................................................................... 97
3.7.5 Image filters.......................................................................... 105
3.7.6 Drawing tools........................................................................ 122
4 Special functions........................................................................................... 126
4.1 Explanation ....................................................................................... 126
4.2 Specialized function - Always on top ................................................ 126
4.3 Relocating the image stock .............................................................. 126
4.3.1 Procedure when using an additional hard drive ................... 128
4.3.2 Procedure when using exchangeable external media.......... 130
4.3.3 Opening relocated images ................................................... 132
4.4 Constancy test .................................................................................. 132
4.5 Reducing 3D data volumes .............................................................. 133
4.5.1 Deleting raw data manually .................................................. 133
4.5.2 Deleting raw data automatically ........................................... 133
4.5.3 Deletion process................................................................... 134
4.6 Internet connection to SIDEXIS XG ................................................. 135
5 System setup................................................................................................ 136
5.1 Exposure settings ............................................................................. 136
5.2 Editing an exposure template ........................................................... 140
5.2.1 The configuration workspace ............................................... 141
5.2.2 Creating a new exposure template....................................... 141
5.2.3 Editing an existing exposure template.................................. 143
5.2.4 Changing the exposure position in the exposure
template window................................................................... 143
5.2.5 Changing the tooth registration ............................................ 144
5.2.6 Defining the sequence of exposure positions....................... 144
5.3 Processing standard findings ........................................................... 145
5.4 Configuring a printout ....................................................................... 146
5.5 Configuring E-mail ............................................................................ 147
bеЦдблЬ
5.6 Configuring the export function ........................................................ 149
5.7 Configuring the reminder function .................................................... 150
5.8 Configuring the constancy test option .............................................. 151
5.9 Configuring the relocation function ................................................... 152
5.10 Configuring the permanent dentist data ........................................... 153
59 62 134 D 3407
D 3407.208.01.10.02 07.2009
5
Page 6

Sirona Dental Systems GmbH
Contents Operator’s Manual SIDEXIS XG
5.11 Displaying an error log ..................................................................... 154
5.12 Service ............................................................................................. 154
6 Buttons and hotkeys ..................................................................................... 155
6.1 “Exam” toolbar .................................................................................. 155
6.2 “Image” toolbar ................................................................................. 157
6.3 “Edit” toolbar ..................................................................................... 159
6.4 “Analysis” toolbar ............................................................................. 160
6.5 “View” toolbar ................................................................................... 163
6.6 “Utilities” toolbar ............................................................................... 165
6.7 “Help” toolbar ................................................................................... 165
7 Appendices................................................................................................... 166
7.1 DICOM Export Wrap&Go ................................................................. 166
7.2 Backup copies .................................................................................. 167
7.2.1 Database backup ................................................................. 168
7.2.2 File-based backup................................................................ 168
7.2.3 Database restoration............................................................ 169
7.3 Customizing the user interface and plug-in administration .............. 170
7.3.1 Commands........................................................................... 171
7.3.2 Toolbars ............................................................................... 172
7.3.3 Plugin Manager .................................................................... 174
7.3.4 Options................................................................................. 176
7.3.5 Access rights........................................................................ 178
7.3.6 Personalization..................................................................... 183
7.4 Error processing ............................................................................... 185
7.4.1 Error messages.................................................................... 185
7.4.2 List of error messages.......................................................... 186
7.4.3 Rescue program (SiRescue.exe) ......................................... 189
7.4.4 Service utility ........................................................................ 191
Index............................................................................................................. 192
6 D 3407.208.01.10.02 07.2009
59 62 134 D 3407
Page 7

Sirona Dental Systems GmbH 1 Introduction
Operator’s Manual SIDEXIS XG Components of the SIDEXIS XG system
1 Introduction
Explanation This manual provides instructions and information on the use of the SIDEXIS
digital radiography and video system. It contains comprehensive instructions
on how to use the software, as well as an introduction to the exposure
technique and the possibilities of visualization and analysis of digital X-ray
and video exposures.
Important note
NOTICE
Make sure that all national requirements are observed when using
SIDEXIS XG,
for example, the German X-Ray Ordinance (RöV) (see section “Constancy
test” [ 132]).
1.1 Components of the SIDEXIS XG system
NOTICE
Please refer to the pertinent manuals for a detailed description of the
individual hardware components as well as of the entire system.
General components ● PC with monitor, mouse, keyboard, connection cables, pre-installed
operating system software and manuals (when using a kit solution, this
type of PC is required)
● SIDEXIS XG software (already pre-installed on the PC or supplied on CDROM) with manual
● Warranty passport
bеЦдблЬ
Intraoral X-ray components ● Wall-mounted X-ray box for image acquisition
● PC slide-in module for image acquisition
● USB X-ray box
● Two X-ray sensors: Full Size and Universal, each with disk and hygiene
protection sleeves
● Holder set from RINN
Panoramic and Ceph X-ray components ● The following panoramic X-ray units:
- ORTHOPHOS Plus DS
- ORTHOPHOS Plus DS Ceph
- ORTHOPHOS 3 DS,
- ORTHOPHOS XG
- ORTHOPHOS XG
3D X-ray ● GALILEOS
● GALILEOS GAX 5
Video components ● SIROCAM video camera with foot switch and hygienic protective sleeves
● Optional video camera for extraoral exposures (full-face camera)
● Video acquisition / frame grabber card including software (installed in PC)
59 62 134 D 3407
D 3407.208.01.10.02 07.2009
Plus
DS
Plus
DS Ceph
7
Page 8

1 Introduction Sirona Dental Systems GmbH
General notes on the use of SIDEXIS XG Operator’s Manual SIDEXIS XG
Existing systems You can also continue using the following components with existing systems:
● X-ray sensor with holders, diskette and hygienic protective sleeves
● XIO intraoral X-ray image acquisition card XIO (installed in the PC)
● Optional front-end sensor connection
● Optional adapter box with cable for multiroom X-ray operation
● XOP panoramic X-ray image acquisition card (installed in the PC)
1.2 General notes on the use of SIDEXIS XG
Intended use SIDEXIS XG is a software package for the personal computer (PC) which
provides the working environment for generating, managing, archiving and
analyzing digital X-ray and video exposures and enables the transmission of
images via LAN/WAN and by e-mail.
CAUTION
SIDEXIS XG must not be used for implant planning!
Some special ergonomic features of
SIDEXIS XG.
The workspace displayed on the monitor makes use of the user-friendly MS
Windows graphical interface. The dialog boxes have been designed
according to ergonomic findings.
● Information
SIDEXIS XG always displays the current application status.
● Warning
Prior to important decisions, the user is advised about the consequences.
This applies particularly in case of possible data loss.
● Error stability
Incorrect user input can be easily corrected or undone.
● Appropriateness
SIDEXIS has been designed especially for the management,
visualization and analysis of digital X-ray and video exposures in the
dental field.
● Operation
The program has been designed so that all commands and actions can be
initiated both with the keyboard and the mouse. Thus it is possible to
develop an individual method of working corresponding to the personal
inclinations of the user and practical requirements.
These features enable even inexperienced users to gain easy access to this
innovative method of working in the field of dental X-ray and video techniques.
1.3 SIDEXIS XG/ What’s new?
New features of SIDEXIS XG Version 1.0 - Overview
● Innovative examination concept
● Individually adaptable user interface
● Modern and innovative image description tools
● Expandability through plugins
8 D 3407.208.01.10.02 07.2009
59 62 134 D 3407
Page 9

Sirona Dental Systems GmbH 1 Introduction
Operator’s Manual SIDEXIS XG SIDEXIS XG/ What’s new?
New features of SIDEXIS XG Version 1.2 - Overview
● Configurable display of patient data
● Optional home page
● Selectable large/small buttons for toolbars
● Display of chevrons for hidden buttons
● Optimized examination navigation
● Optimized handling for image positioning
● Convenient rotation of images
● Improved image zoom, display detail is retained
● Movable text boxes for length and angle measurements
● Performance optimizations
● Enhanced plugin integration
● Automated assignment of access authorizations via Setup
● SiAccess tool for manual setup of access authorizations
New features of SIDEXIS XG Version 1.3 - Overview
● The list of X-ray units supported has been extended to include the
ORTHOPHOS XG Plus.
● The background is black in the Full Frame mode.
● Images can be zoomed with a wheel mouse.
● A new, improved print preview for both single images and examinations
enables new possibilities for preparing printouts.
bеЦдблЬ
New features of SIDEXIS XG Version 1.4 - Overview
● Restriction of access rights;
The functionality can be restricted in SIDEXIS XG by using users and
roles. See the menu View / Customize... / Access rights.
● Support of video cards with WDM drivers:
The program NGVidCap for configuring and testing WDM and VfW videos
is featured in the application directory. Refer to the Online Help function in
NGVidCap for the further procedure.
New features of SIDEXIS XG Version 1.5 - Overview
● Implant visualization plugin
● Free-hand drawings
● The color, transparency and line width of all vector objects are individually
adjustable
● Generation and storage of X-ray images with an optional depth of 8 or 16
bits
● All functions of SIDEXIS XG are also available for grayscale images with
a depth of 16 bits
● Transfer function for selecting grayscales for display via windowing and
gamma value
● Examinations exportable as individual archives (*.nge)
● Examinations (*.nge, *.svg) easy to import via drag&drop, double-click on
file or menu/toolbar
● Online selection of user interface language (SIDEXIS XG)
● Subsequently selectable odontogram
● Practice name subsequently editable
59 62 134 D 3407
D 3407.208.01.10.02 07.2009
9
Page 10

1 Introduction Sirona Dental Systems GmbH
SIDEXIS XG/ What’s new? Operator’s Manual SIDEXIS XG
New features of SIDEXIS XG Version 1.6 - Overview
● A central installation speeds up the SIDEXIS update for the customer. A
"master installation" must be set up only one time. The clients then
retrieve the required information from the "master". For more information
please refer to the Installation Manual.
● An automated update via the internet is now possible.
● New standard database: SQL Server 2005 Express replaces the previous
Access DB. Data are imported from the previous database.
New features of SIDEXIS XG Version 2.0 - Overview
● Preparation for GALILEOS systems and GALILEOS/GALAXIS software
● SiDICOM Removable Media extends the import/export functions of
SIDEXIS XG
● SIDEXIS Manager for comfortable administration of the SIDEXIS
installation
● Central info on master station in the program info dialog box
● Station Manager for comfortable administration of the SIDEXIS stations.
It is thus also possible to change the master station.
● Service Pack 1 of SQL Server 2005 is used for new installations
● The administration of templates has been extended
● The positions of docked toolbars can be fixed
New features of SIDEXIS XG Version 2.2 - Overview
● Preparation for XIOS Intraoral System
● SIDEXIS plugin
of image data (2D and 3D image acquisition)
● SiDICOM Removable Media with enhanced comfort and automatic
installation
● Extended relocation to removable storage media and stationary drives
● Extended image selection dialog box for display of 3D data
● "3D Data Reduction" tool for clean-up of 3D raw data, invoked via
SIDEXIS Manager
● "NGSQLConnect" connects SIDEXIS to another SQL database. Invoked
via SIDEXIS Manager
"DICOM Export Wrap&Go"
for easy transfer and viewing
New features of SIDEXIS XG Version 2.3 - Overview
● Supports Windows Vista
● Extended options for relocating data
● More comfortable deletion of corrected 3D raw data
● Compression of 3D data in the database
● Tool for collecting support information (NGLogCollect)
● Easy-to-use tool for configuring SQL Server backups (NGSQLBackup)
New features of SIDEXIS XG Version 2.4 - Overview
● XGNetDeploy for automated distribution of software
● Support for XIOS Plus
● Revised demo image database
● Now SQL Server databases and examinations can also be repaired with
NGDBRepair
59 62 134 D 3407
10 D 3407.208.01.10.02 07.2009
Page 11
Sirona Dental Systems GmbH 1 Introduction
Operator’s Manual SIDEXIS XG Structure of the documents
● Revised configuration of X-ray components in the network
● Extension of NGLogCollect with customer feedback
New features of SIDEXIS XG Version 2.5 - Overview
● SIDEXIS XG can now administer and use address data for several
practices.
● Images can be transferred from one patient to another.
● Examinations are exportable as single files.
● Examinations can be e-mailed as compressed ZIP files.
● The configuration of the user interface of a station can now be transferred
to other stations.
● You have the option of displaying a ruler for X-ray images.
1.4 Structure of the documents
Structure of the documents
The symbols and character formats used in the present manual have the
following meaning:
WARNING
bеЦдблЬ
Identifies warnings where a medium risk of injury to persons exists if they
are not observed.
CAUTION
Identifies safety information where the following hazards exist if they are
not observed: Slight risk of injury to persons, risk of property damage or
damage to the product.
NOTICE
Assistance
Identifies additional information, hints and tips.
✔ Prerequisite
➢ Action
or
➢ 1., 2., …
ª Result
See chapter on "General
information".
•List
Requests you to do something.
Identifies a reference to another text
passage.
Identifies a list.
59 62 134 D 3407
D 3407.208.01.10.02 07.2009
“Text between quotation
marks“
Identifies commands, menu items or
quotations.
11
Page 12
2 General notes for operation Sirona Dental Systems GmbH
Checking the system time before starting Operator’s Manual SIDEXIS XG
2 General notes for operation
2.1 Checking the system time before starting
Why is it necessary to check the system
time?
SIDEXIS saves the creation time for each image. For this reason, the date
and time setting of the system clock integrated in the PC must occasionally
be checked and, if necessary, corrected.
Where do I find the system time? On the Windows desktop, the system time is displayed in the systray, which
is usually located at the bottom right corner of the screen. The date is
displayed when pointing with the mouse cursor to the time.
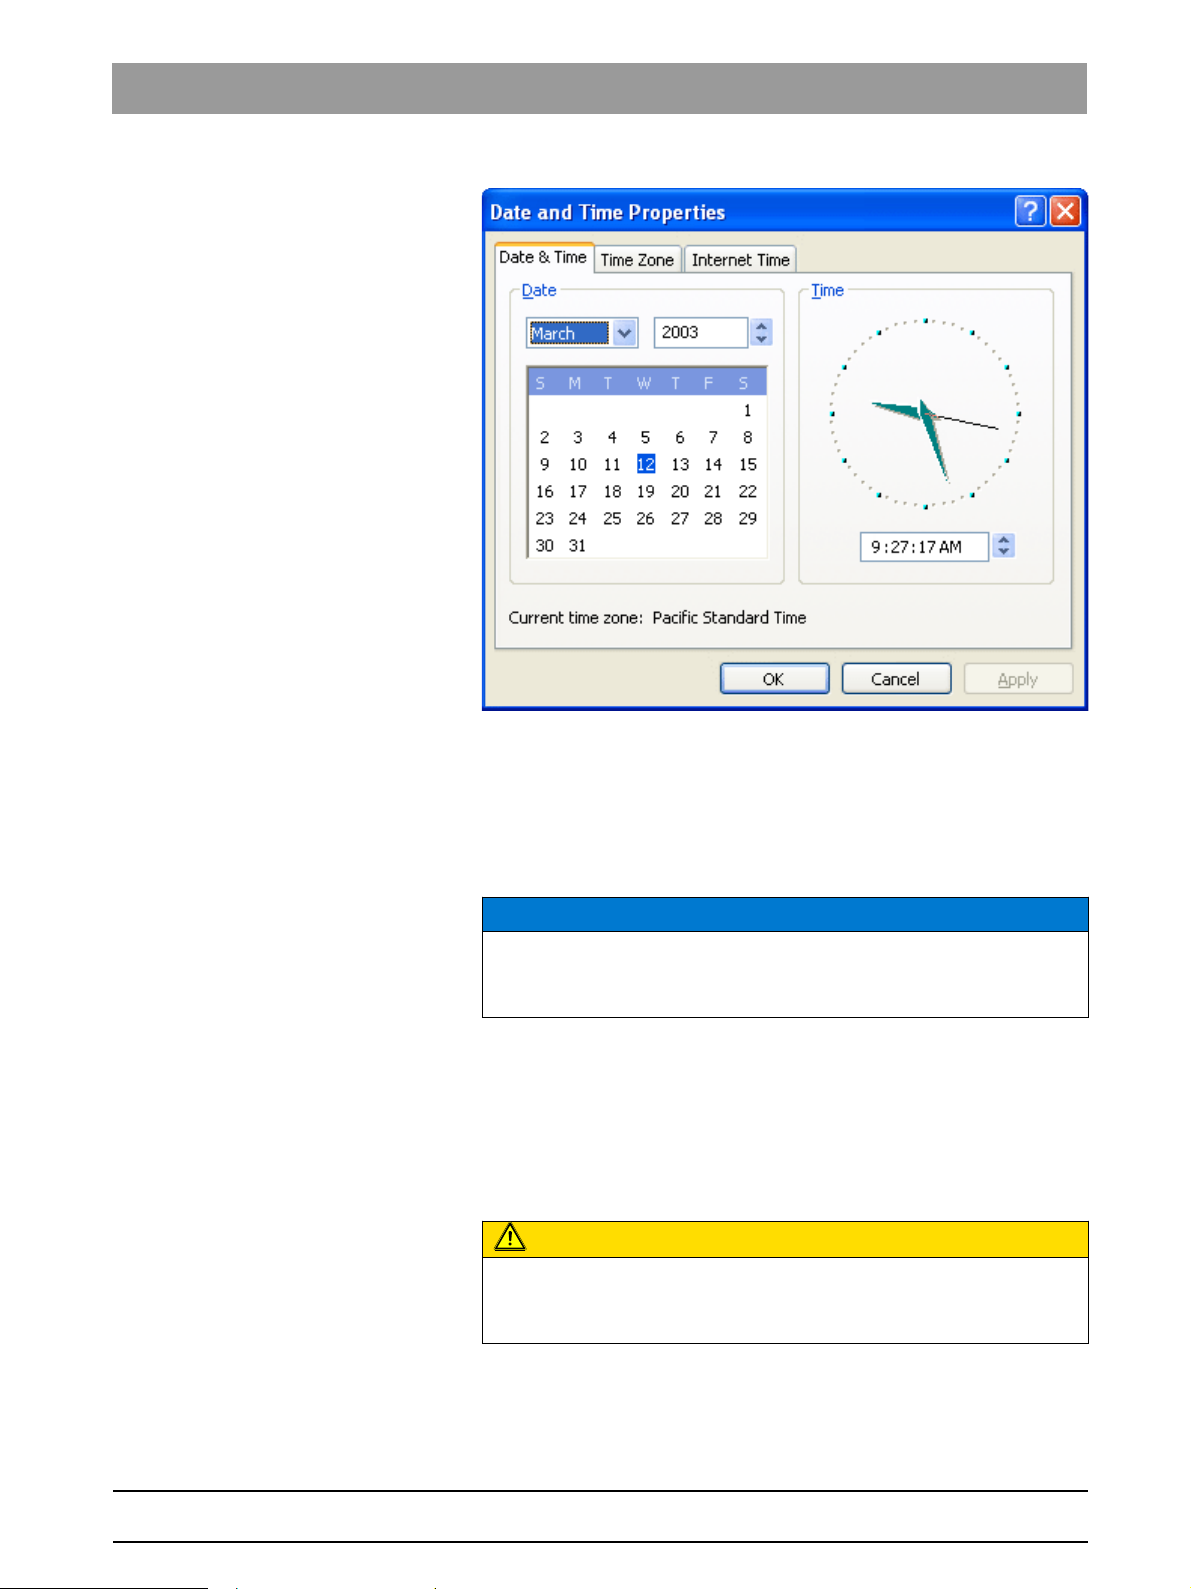
How can I change the system time? The current time setting can be changed in a dialog box which opens when
you double-click the time display. The date is set on the left half of the “Date
& Time” tab.
● The month and year settings are selected using drop-down lists, which
● The day of the month can be selected by clicking the corresponding day
● The time setting is changed by clicking the value to be set (hours, minutes
● The dialog box is then closed by clicking
CAUTION
If the system clock is improperly set, the time of creation saved for new
images will also be incorrect. This would then result in incorrect
documentation and make it difficult to retrieve these images.
unfold when you click the arrows next to them.
on the calendar sheet.
or seconds) and then using the corresponding spin buttons.
Alternatively, the desired value can also be entered directly using the
keyboard.
"OK"
.
12 D 3407.208.01.10.02 07.2009
59 62 134 D 3407
Page 13
Sirona Dental Systems GmbH 2 General notes for operation
Operator’s Manual SIDEXIS XG Installing other SIDEXIS software components
2.2 Installing other SIDEXIS software
components
Explanation It sometimes becomes necessary to install additional or extended software
components on the PC.
NOTICE
Later installation of the X-ray control book or SIMOCON etc. from the CDROM.
Example For instance, this is the case when installing a new X-ray sensor or a service
disk. In such cases, you must insert the disk included in delivery in the floppy
disk drive. Then start the installation of the software by clicking the “Start”
button on the task bar.
2.3 Completing work on the system
Explanation
CAUTION
bеЦдблЬ
59 62 134 D 3407
D 3407.208.01.10.02 07.2009
The operating system must always be shut down properly to prevent data
loss.
13
Page 14
2 General notes for operation Sirona Dental Systems GmbH
Creating backup copies Operator’s Manual SIDEXIS XG
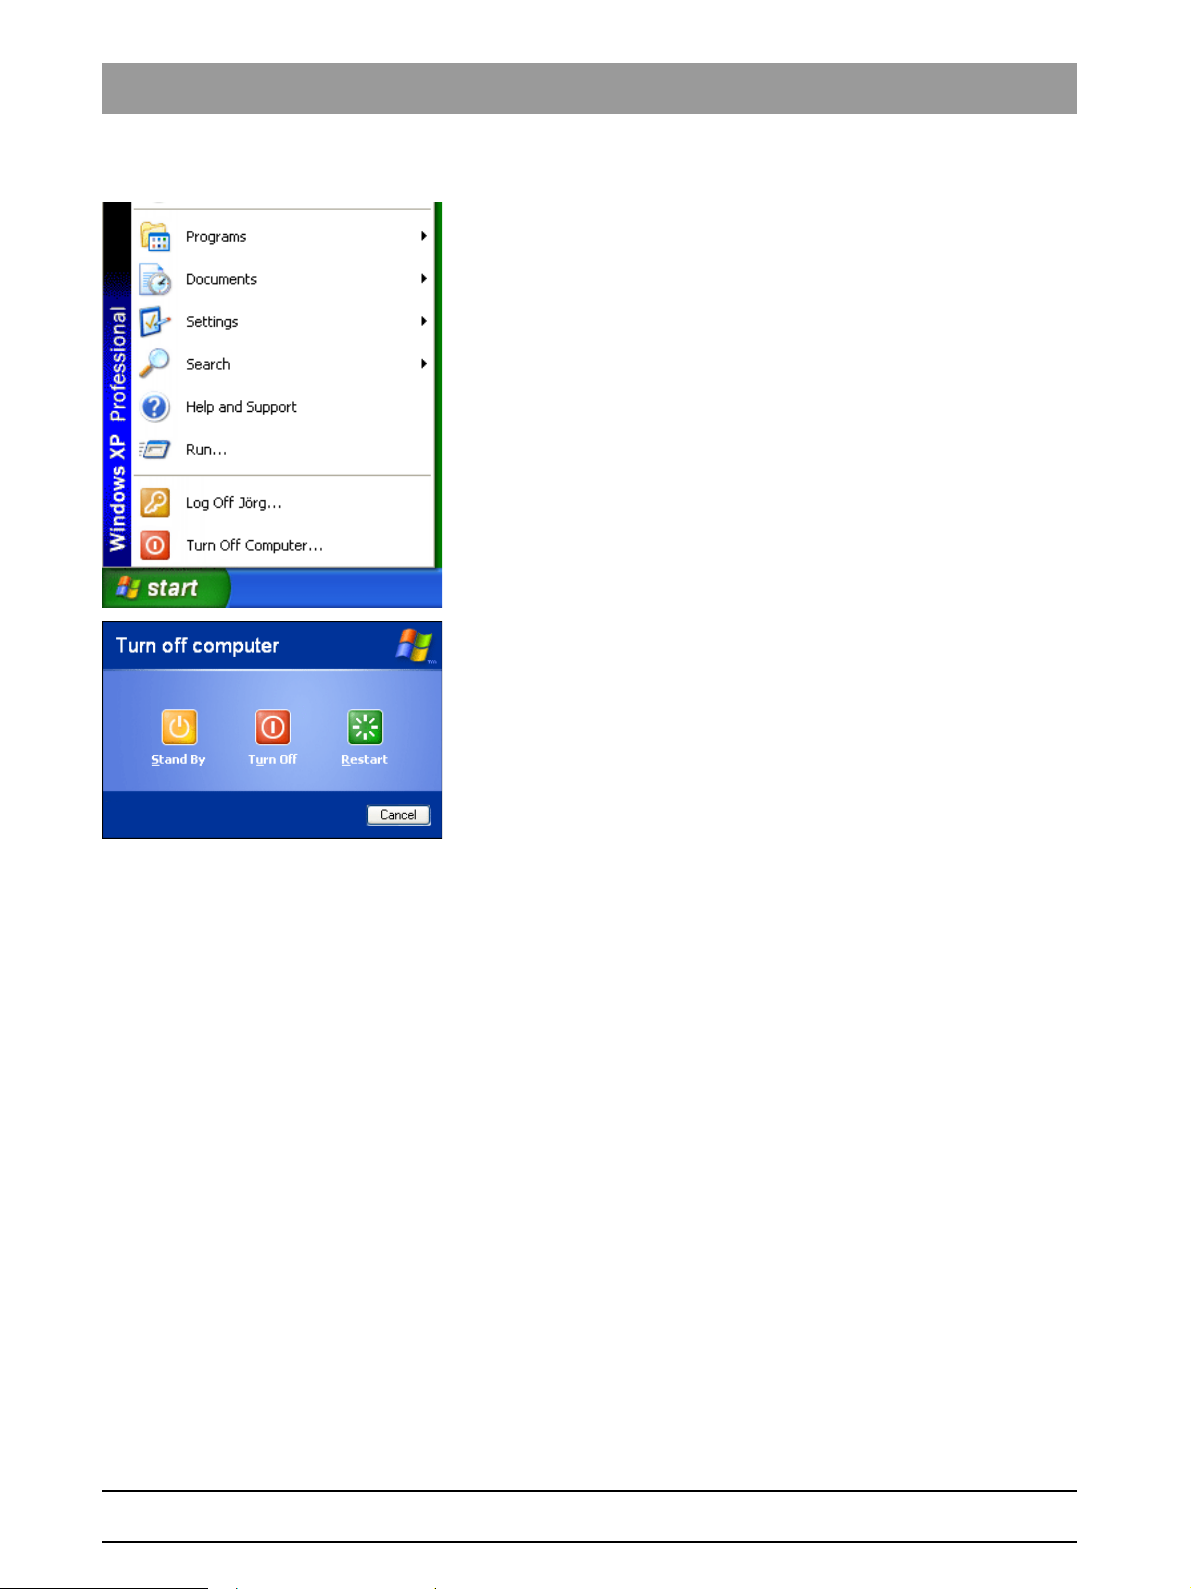
Example – Windows XP
1. Open the start menu using the
2. Select the function
"Turn Off Computer..."
"start"
button.
.
3. Select the option
ª Unsaved data is automatically saved.
ª Depending on the type of computer, either a message is displayed after
some time prompting you to turn off your PC (i.e., you can turn off the PC
then) or the computer shuts down automatically.
"Turn Off"
in the corresponding dialog box.
2.4 Creating backup copies
Why make backup copies? To prevent a possible loss of data following a system failure, image and
patient data should occasionally be backed up from the integrated PC hard
disk to removable storage media. This procedure thus provides users with a
backup copy that they can recur to in case the original data is lost.
What is a backup? Such a copy is generally referred to as backup copy.
Please refer to Section “Backup copies" [ 167]for further information on
making backups.
14 D 3407.208.01.10.02 07.2009
59 62 134 D 3407
Page 15
Sirona Dental Systems GmbH 3 Operation
Operator’s Manual SIDEXIS XG General
3 Operation
3.1 General
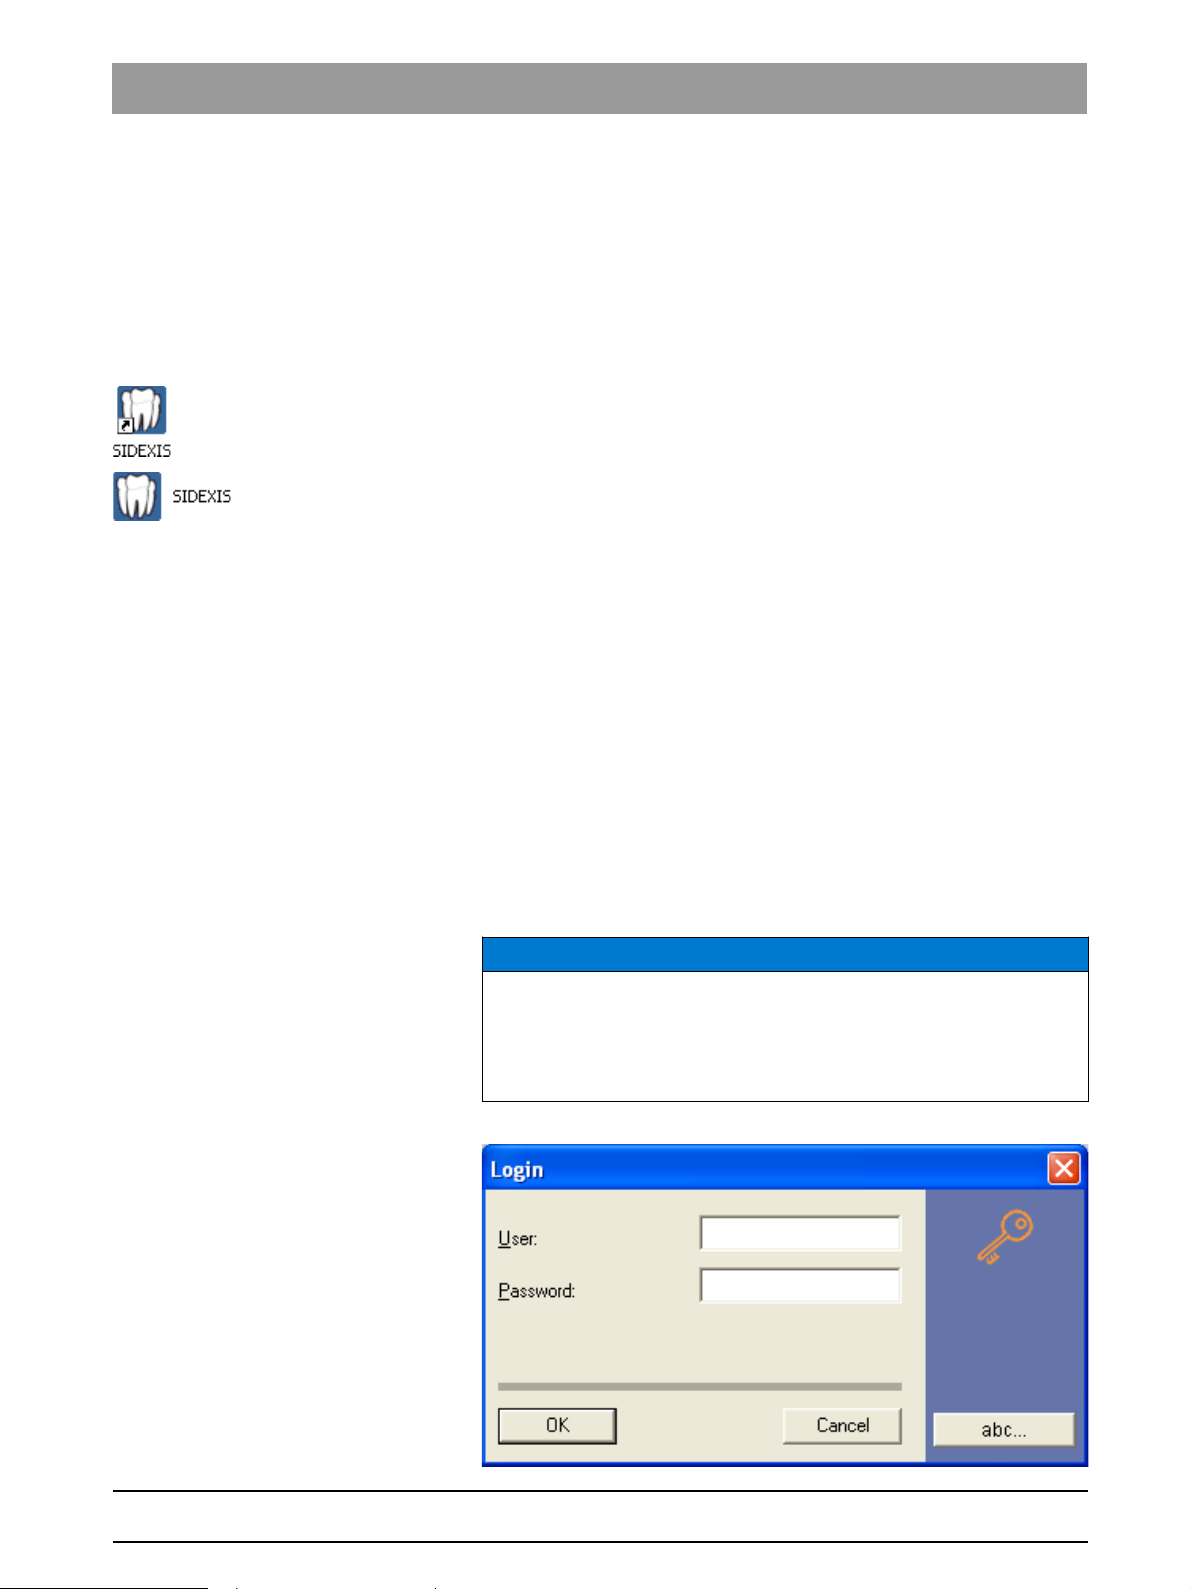
3.1.1 Start SIDEXIS XG.
Activating the function
➢ Double-click the program icon on the desktop.
or
➢ Activation via the “Start” button and the program icon. This icon is
typically located in the lower left corner of the screen. The display may
vary depending on the operating system and the settings.
After the start A splash screen appears after program start. This screen disappears
automatically after a couple of seconds.
3.1.2 Logging on (option)
Explanation If the access rights have been restricted, the
the welcome screen. The user must enter his or her user name and password
here.
"Login"
dialog box appears after
bеЦдблЬ
Configuration
The configuration is described in Section “Access rights” [ 178].
Password input 1. Enter your user name in the
2. Enter your password in the
3. Confirm your entry with the
NOTICE
When you create a new user and activate the password request function
for him or her, this user does not have a password yet. When the new user
logs on the next time and enters his or her user name and confirms with
"OK"
, another dialog box for assigning a new password appears once.
"User"
field.
"Password"
"OK"
button.
field.
59 62 134 D 3407
D 3407.208.01.10.02 07.2009
15
Page 16
3 Operation Sirona Dental Systems GmbH
General Operator’s Manual SIDEXIS XG
Switching users While SIDEXIS XG is running, you can switch between users by pressing the
[Ctrl] + [Shift] + [U] key combination.
"Login"
The
➢ Simultaneously all images and exams are closed and the registered
window opens.
patient is deregistered.
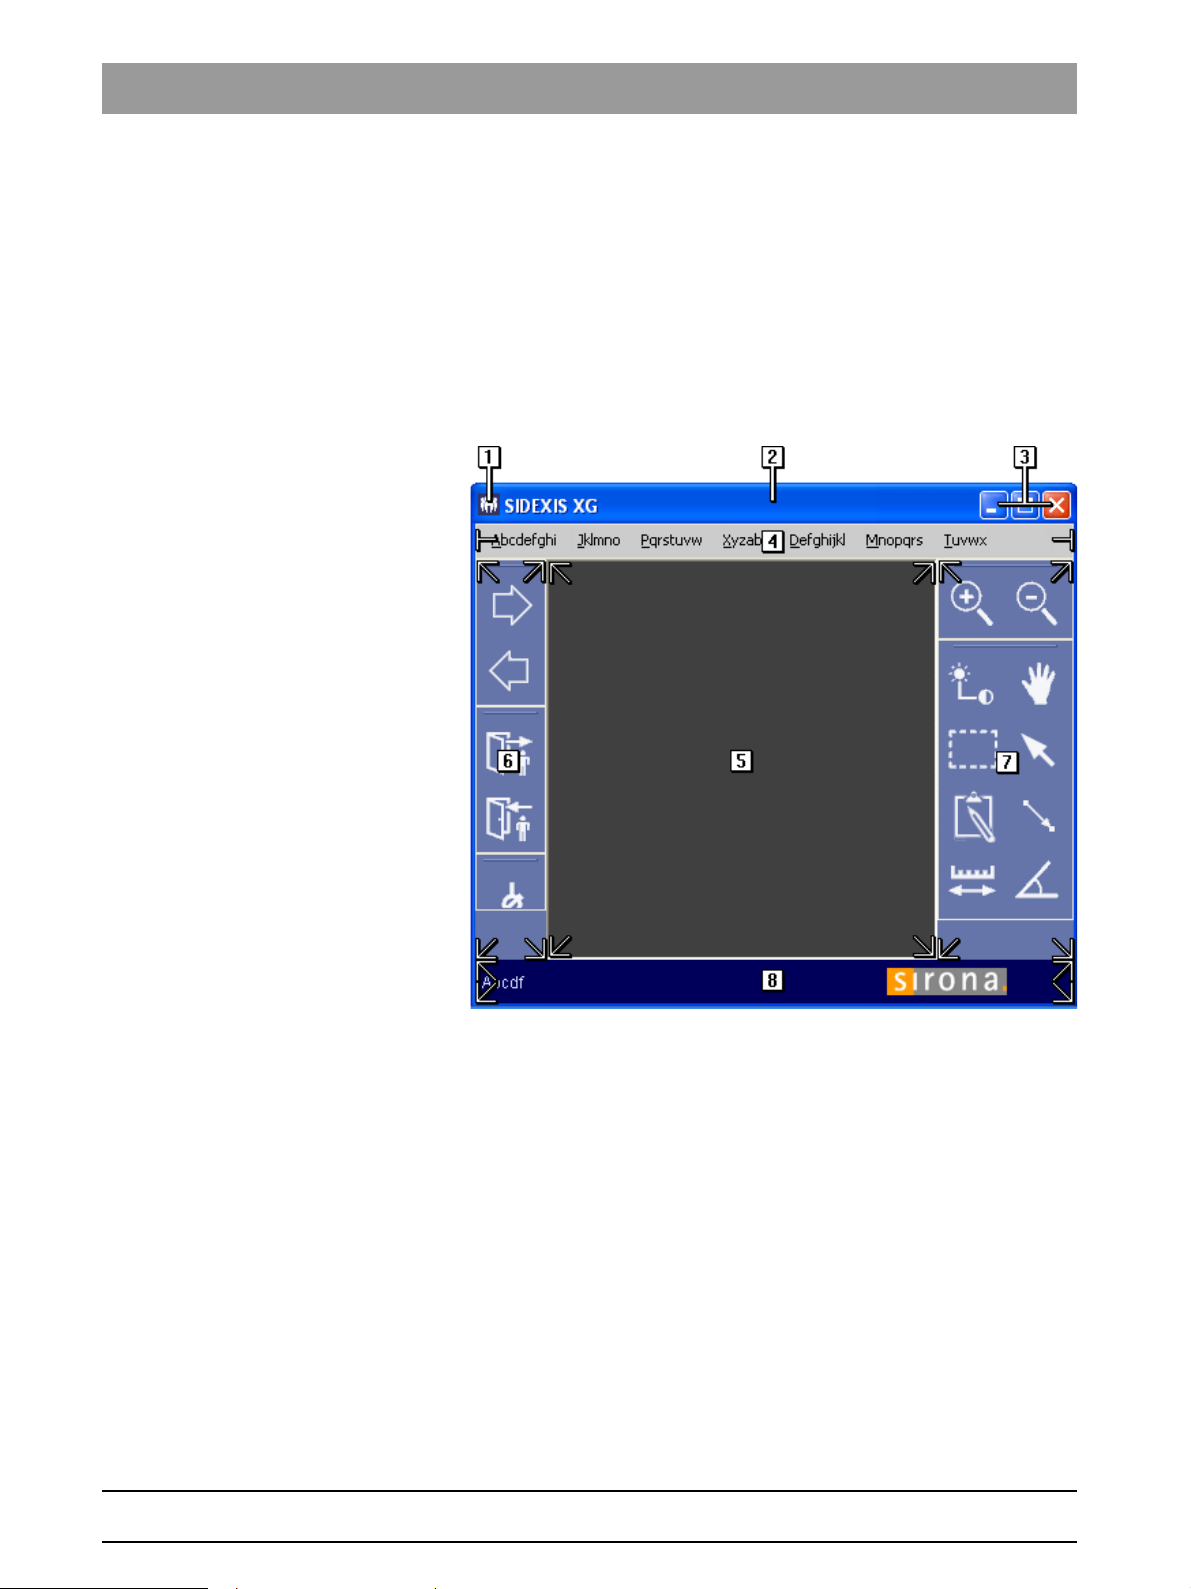
3.1.3 Screen layout
After SIDEXIS XG is started, the program window with the specific program
components appears:
1 System menu of the program window (see documentation of
the operating system)
2 Title bar with selected patient data (See section "Options" [
176].)
3 Buttons for controlling the window size (see documentation of
the operating system)
4 Menu bar
5 Workspace
6 Area for management toolbars
7 Area for image processing toolbars
8 Status bar
Workspace The working and diagnosing processes of all exams are displayed together in
the exam workspace.
59 62 134 D 3407
16 D 3407.208.01.10.02 07.2009
Page 17

Sirona Dental Systems GmbH 3 Operation
Operator’s Manual SIDEXIS XG General
It is called “
Area for management toolbars The area on the left margin of the program window shows various sorted
toolbars with management tools
Area for image processing toolbars The area on the right margin of the program window shows various sorted
toolbars with image processing tools
Toolbars The toolbars consist of buttons which contain graphical symbols (icons).
These icons are comparable to the keys on themultitimer control of the X-ray
system. A system function can be launched by clicking one of these buttons.
Logically related functions are always grouped in one toolbar.
Status bar The status bar displays information about the currently active function.
For example, the angle during an angle measurement.
"Exam"
” and can be opened, saved and managed in SIDEXIS XG.
3.1.4 Functional description and workflows
Explanation The functions and workflows of “SIDEXIS XG” are described in several
chapters of the manual.
Subdivision The functional description is divided into the following sections:
● Patient management
● Image management
● Measurement tools
- Measurement tools
- Display tools
- Image filters
● Special functions
- System setup
bеЦдблЬ
Workflows The following workflows are briefly explained here:
● Taking a new exposure
● Opening a saved exposure
● Opening a saved exam
Taking a new exposure 1. Register the desired patient.
2. Select the desired type of exposure.
3. Release an exposure.
4. Interpret the exposure.
Opening a saved exposure 1. Register the desired patient.
2. In the “
There are two ways to open exposures.
● New
Opening a saved exam 1. Register the desired patient.
2. In the “
59 62 134 D 3407
D 3407.208.01.10.02 07.2009
"Exam"
” window, select the option “
All images assigned to the patient can be opened via the image selection
dialog box.
"Exam"
” window, select the option “
"Existing"
"Existing"
”.
”.
17
Page 18

3 Operation Sirona Dental Systems GmbH
General Operator’s Manual SIDEXIS XG
All saved exams are displayed.
➢ Select the desired exam.
3.1.5 Working with exams
Explanation ● Users of conventional, film-based X-ray systems mostly use self-
adhesive labels or felt tip pens to highlight certain areas on X-ray images
or to take down notes.
● The images are manually positioned on the X-ray viewing box. Then, they
are compared with other images, measured, superimposed with photos
(orthodontics!) or put in an envelope and sent to a specialist.
● The working procedures applying to conventional film exposures were
transferred to the SIDEXIS XG user interface.
● The working and diagnosing processes of all exams are displayed
together in the exam workspace.
- It is called “Exam” and can be opened, saved and managed in SIDEXIS
XG.
● The SIDEXIS XG software is used in the context of an “Exam”.
● Each image processing session can be saved as an “
- “Processing” also describes the act of merely opening exposures which
are saved in the image database.
- Newly generated exposures are automatically included in the image
database.
● Diagnostic findings are linked to the exposures in the image database and
are also saved there.
● When an “
(exposures), which are displayed on the exam workspace, are saved in a
database of their own.
● Such an “Exam” can also be printed out and exported.
● The first step of starting an “
● The lower half of the patient selection window already provides a number
of selection options for opening an “
● If a patient is already registered, a specific dialog box for selecting an
“
"Exam"
"Exam"
” is saved, only the objects and/or their references
” is displayed.
"Exam"
” is to register a patient.
"Exam"
”.
"Exam"
”.
Function See also Section "Exam concept [ 25]".
3.1.6 Workflow assistance
Explanation Predefined linear workflows are provided as exam templates in the SIDEXIS
XG.
These workflows are divided into logical steps.
SIDEXIS XG provides navigating functions for this purpose within those
workflows.
One step forward
Activation
➢ Click the button.
or
➢ Hotkey: Press the [Enter] key.
59 62 134 D 3407
18 D 3407.208.01.10.02 07.2009
Page 19
Sirona Dental Systems GmbH 3 Operation
Operator’s Manual SIDEXIS XG General
or
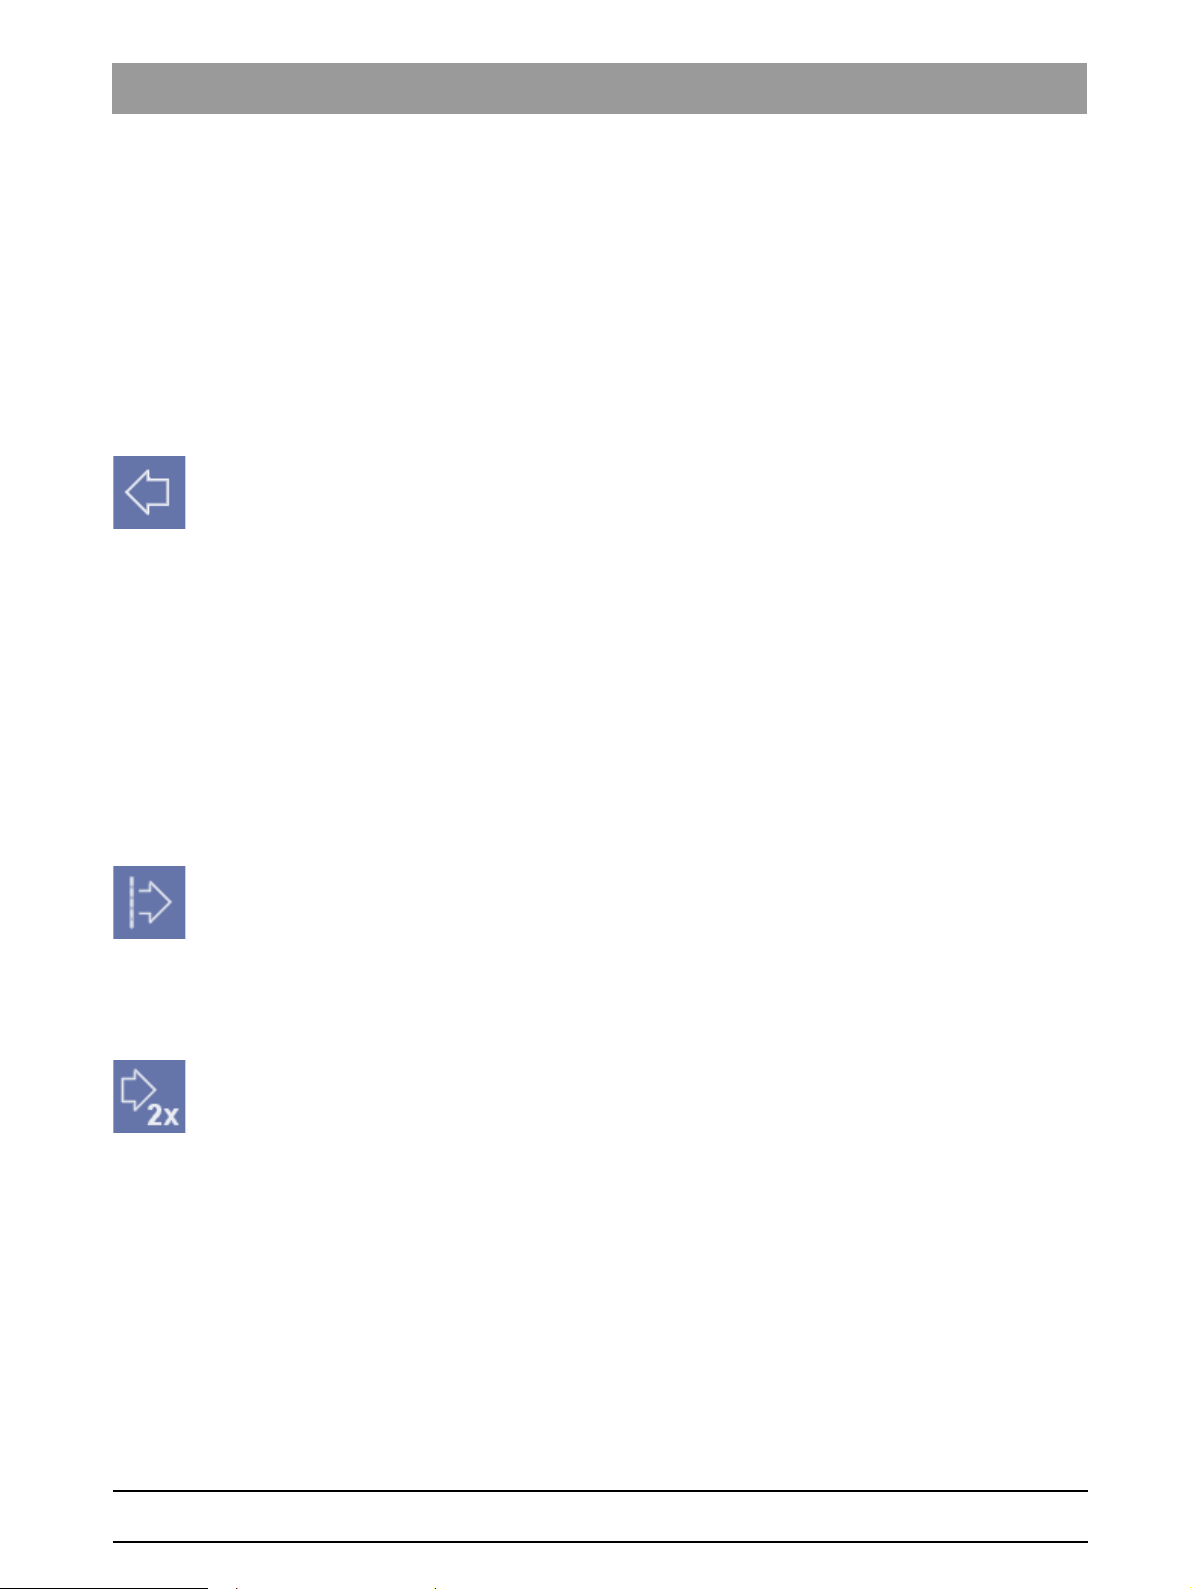
One step back
Continuing an interrupted workflow with the
next step
➢ From the menu bar
"E[x]am"/"[S]teps"
, select the menu item
"[N]ext"
.
Example
When SIDEXIS XG is started, the [Enter]Register patient
key. After selection of the patient and pressing the [Enter] key again, the
"Select image"
function is started.
"Register patient"
Activation
➢ Click the button.
or
➢ Hotkey: Press the [Esc] key
or
➢ From the menu bar
"E[x]am"/"[S]teps"
, select the menu item
"[B]ack"
.
Example
Pressing the [Esc] key repeatedly first closes any images available one after
the other and then finally checks out the registered patient. Another activation
of the key exits the SIDEXIS XG program altogether.
bеЦдблЬ
Activation
➢ Click the button.
or
Repeating a step
➢ From the menu bar
"E[x]am"/"[S]teps"
select the menu item
"[C]ontinue"
Activation
➢ Click the button.
or
➢ From the menu bar
"E[x]am"/"[S]teps"
, select the menu item
"[R]epeat"
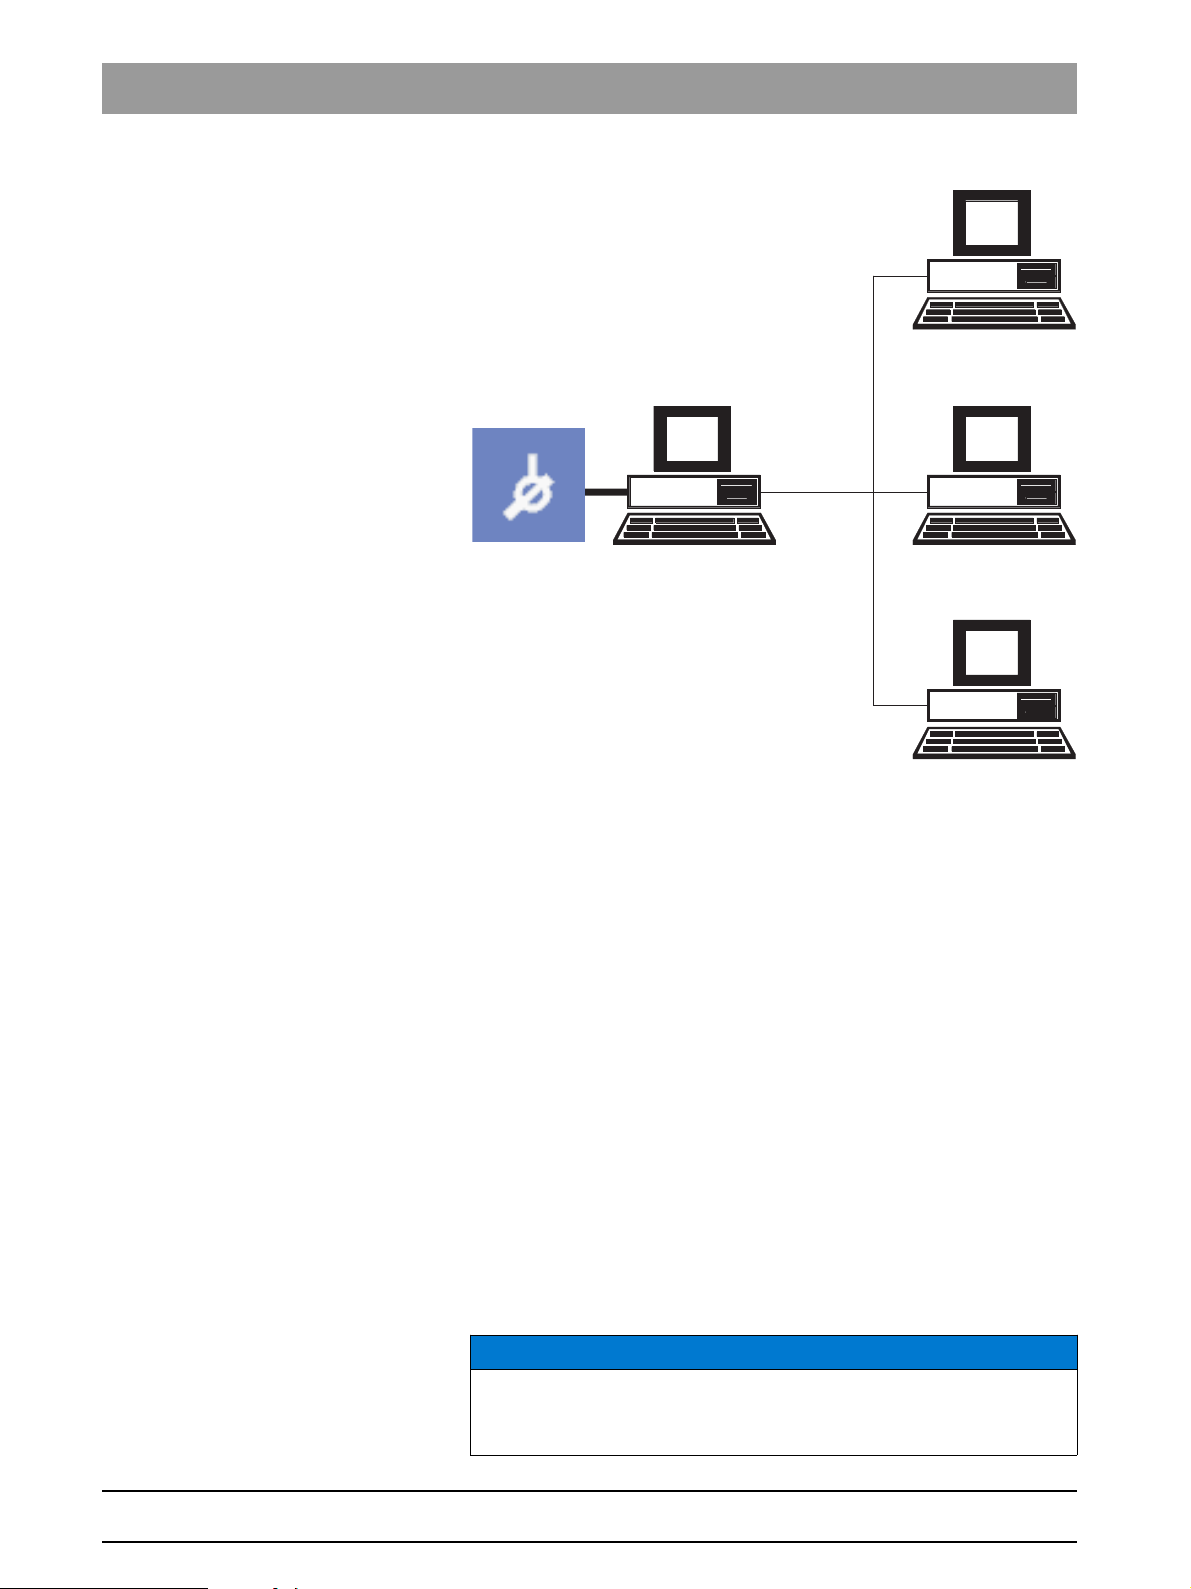
3.1.7 Multi-workstation support for exams
Explanation The following services are intended especially for use in a multi-workstation
installation. The SIDEXIS system can be operated in a multi-workstation
environment, but can also be used in astand-alone installation without
restrictions.
Amulti-workstation installation combines several units with a cable. Such a
combination of several workstations is also referred to asnet ornetwork. All
connected units can then access the same database (i.e., patient and image
data).
.
.
59 62 134 D 3407
D 3407.208.01.10.02 07.2009
19
Page 20
3 Operation Sirona Dental Systems GmbH
A
B3
B2
B1
General Operator’s Manual SIDEXIS XG
Example
A X-ray room
B Treatment room 1
C Treatment room 2
D Treatment room 3
An example of a SIDEXIS multi-workstation installation is a network of several
dental treatment rooms, each with a SIDEXIS workstation, and a central Xray room with an X-ray PC.
Each workstation can issue X-ray orders, which are accepted and executed
by the SIDEXIS station in the X-ray room. The exposures are available at
every X-ray PC as well as everyworkstation for subsequent diagnostics. The
SIDEXIS workstations in the treatment rooms do not support X-ray image
acquisition and are therefore also referred to asviewing stations.
3.1.7.1 Generating an order in a multi-workstation
environment
Explanation In a SIDEXIS multi-workstation installation, each workstation may produce X-
ray orders, which are then accepted and executed by the stations having the
required equipment (X-ray unit or SIROCAM).
NOTICE
To enable processing of the new order at another station, the respective
patient must be checked out at the station that has produced the order.
20 D 3407.208.01.10.02 07.2009
59 62 134 D 3407
Page 21

Sirona Dental Systems GmbH 3 Operation
Operator’s Manual SIDEXIS XG General
Scope This function can be used for X-ray and video images.
The relevant patient must be registered.
If several orders are to be generated for a single patient, this function can be
used repeatedly until all orders are generated.
After the orders have been accepted and the X-rays have been taken in the
X-ray room, these are then available at every SIDEXIS workstation.
Activating the function
➢ Activate the icon.
or
➢ In the menu bar
.
[o]rder"
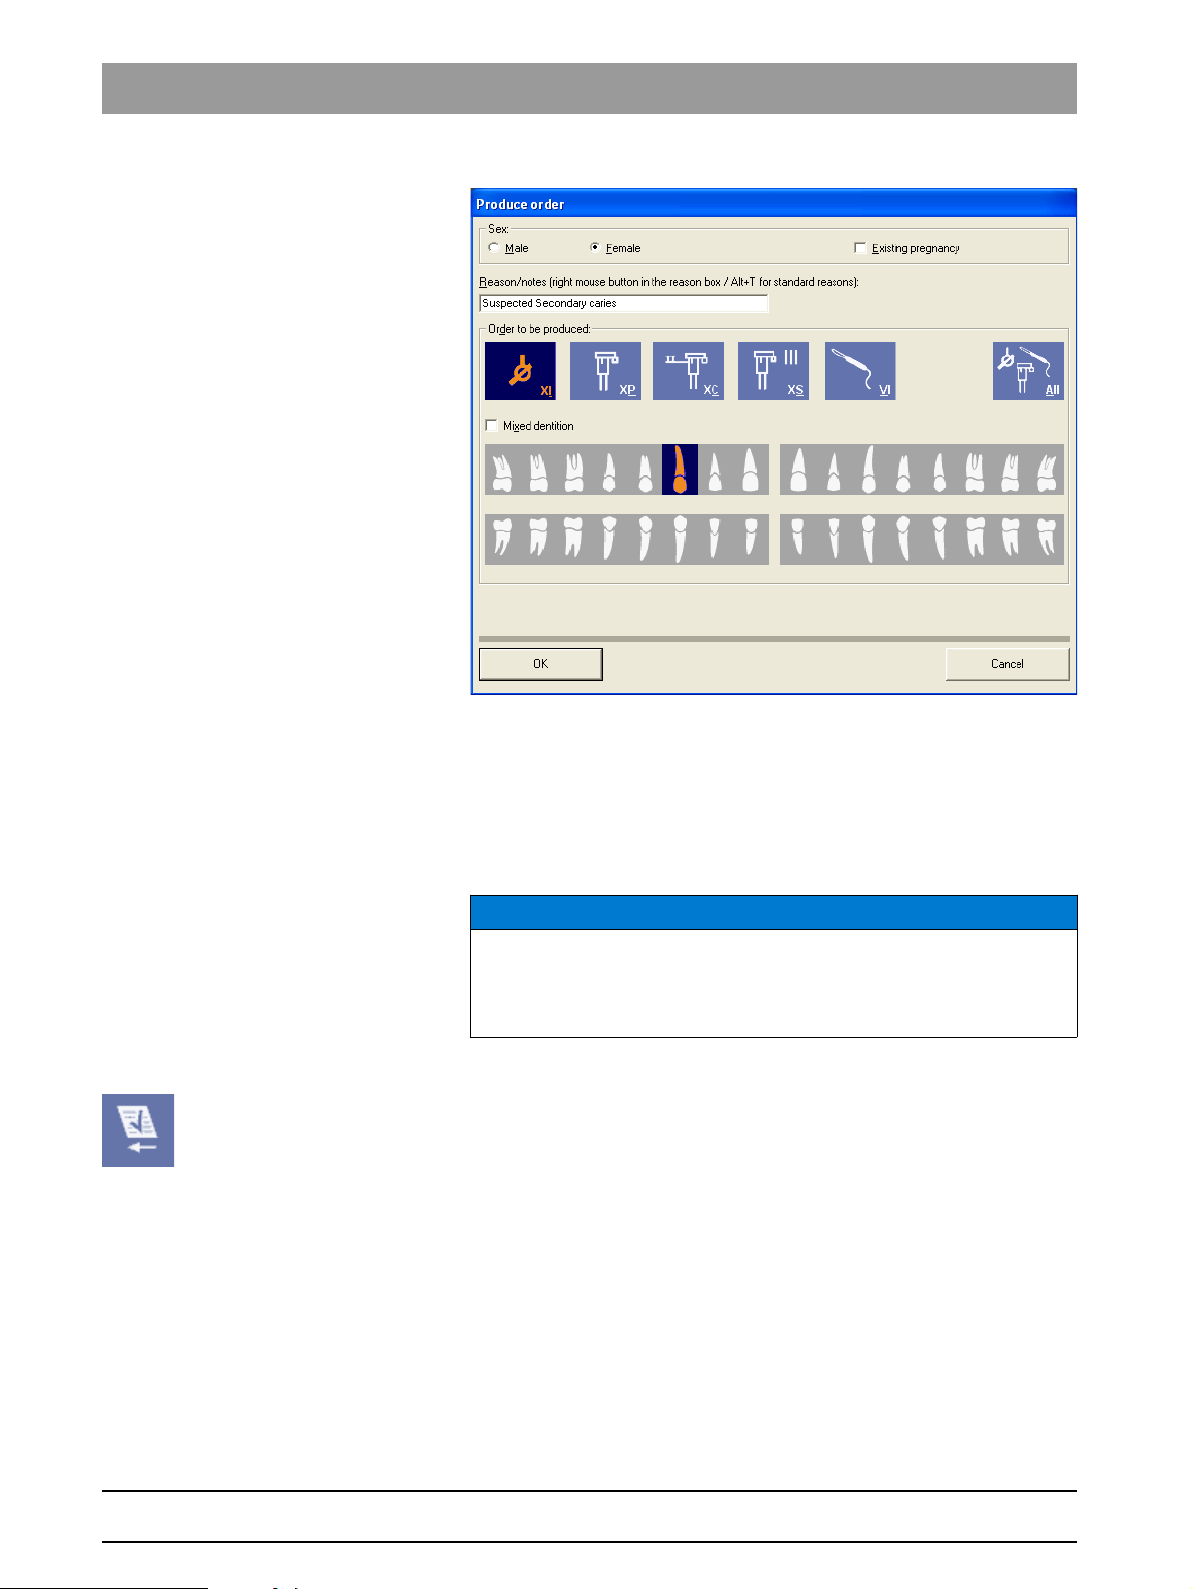
Order specifications After activating the function, you can enter the information required for the
order in a dialog box:
Specifying the patient’s gender The patient’s gender is specified in the “
Click the desired option button to do so.
"E[x]am"/"[S]teps"
, select the menu item
"Sex:"
” dialog box area
"Produce
● The option button
● The option button
Enter possible pregnancy (only relevant for X-ray) in the
pregnancy"
Reason for image acquisition and/or notes The reasons for image acquisition and/or further remarks are specified in the
"Reason/notes"
"Male"
"Female"
check box.
text box.
represents a male person.
represents a female person.
"Existing
NOTICE
When entering the reason for the exposure or additional remarks, you may
select prefabricated phrases via a context menu, which opens after rightclicking or pressing the [Alt] + [T] key combination, similar to the procedure
used in image description / findings. You can combine several of these
texts by repeating this step.
The [Esc] key closes the context menu without further actions. Section
"Processing standard findings [ 145]" describes how the texts can be
configured individually.
Specifying the image type The patient’s sex is specified in the dialog box
The following image types are available:
● Intraoral X-ray exposures
● Panoramic X-ray exposures
● Cephalometric X-ray exposures
● Transversal slices
● Video exposures
● 3D data
You specify the desired image type as usual by clicking the corresponding
buttons in the lower half of the dialog box.
"Order to be produced"
.
bеЦдблЬ
59 62 134 D 3407
D 3407.208.01.10.02 07.2009
21
Page 22
3 Operation Sirona Dental Systems GmbH
General Operator’s Manual SIDEXIS XG
Example screenshot
3.1.7.2 Accepting an order in a multi-workstation environment
Explanation The program automatically jumps to the
has not yet occurred during activation. If possible, the patient for whom orders
are pending is already pre-selected in the patient registration dialog box.
Scope This function can be used for X-ray and video images.
"Register patient"
dialog box if this
NOTICE
The SIDEXIS station with the required equipment cannot accept and
execute existing X-ray and video orders for a certain patient until the
patient concerned has been registered there, as usual.
Activating the function
➢ Click the button.
or
➢ In the menu bar
Operation A list of pending orders for the registered patient then appears in the following
dialog box:
"E[x]am"/"[S]teps"
, select the menu item
"[A]ccept order"
.
22 D 3407.208.01.10.02 07.2009
59 62 134 D 3407
Page 23

Sirona Dental Systems GmbH 3 Operation
Operator’s Manual SIDEXIS XG General
In addition to the image type, reason or notes, date and time of creation, the
name of the workstation that has produced the order is also displayed. This
simplifies possible queries. The buttons for selecting the image type and tooth
are unavailable here – they only indicate the desired image type.
After the dialog box is confirmed, the marked order is removed from the list of
orders. With intraoral X-rays, it is then possible to automatically switch to
readiness for exposure and to take the exposure.
Video exposures are started in the usual way by removing the camera from
its holder. To make the system ready for panoramic and Ceph X-rays,
proceed as usual.
CAUTION
An order is also removed from the list of orders if no exposure is taken after
the dialog box has been confirmed.
Orders which are not processed are considered obsolete after some time and
automatically removed from the list.
The data entered on producing the order are taken over as far as possible in
its execution and used as a basis for the image description of new exposures.
3.1.8 Changing the program
bеЦдблЬ
Explanation If desired, the service engineer who installs and configures the system can
configure an automatic program switchover. This can be used e.g. for quickly
switching from SIDEXIS to a practice management program or any other
software installed on the same PC.
59 62 134 D 3407
D 3407.208.01.10.02 07.2009
23
Page 24

3 Operation Sirona Dental Systems GmbH
General Operator’s Manual SIDEXIS XG
Activating the function
➢ Click the button.
or
➢ Use the
Function ● If only a single program change is configured, then the desired program
appears on the screen immediately after you launch the command.
● If several programs are interfaced to SIDEXIS in this way, then you make
the required choice in a dialog box.
"E[x]am"
menu bar to select the
"Change [p]rogram"
menu item.
NOTICE
If an error occurs when you try to start the selected program, a message
appears. You must then check that the target program is correctly installed
and access to it has been correctly configured.
3.1.9 Information regarding SIDEXIS, Internet
connection
Activating the function
➢ Click the button.
or
➢ Use the
Function The dialog box which opens displays information about the version number
and the disk space available for images.
"[H]elp"
menu bar to select the
"[A]bout..."
menu item.
NOTICE
You should check the available disk space occasionally and relocate older
images in due course. Detailed information on relocation is provided in
Section “Relocation of the image stock” [ 126].
You can make an email connection to the SIRONA hotline using the
button on the left side.
to:..."
The button on the right side starts the Internet browser installed on your
system and connects you to the Homepage of SIRONA.
"Info"
The
purposes.
This text file is displayed in the standard text editor.
This can be saved, printed or processed further.
button in the center creates a text file with system data for service
"Mail
"Info"
button
The text file contains the following information:
● Operating system used
● Name of the computer
● User who is currently logged on
● Name of the database
59 62 134 D 3407
24 D 3407.208.01.10.02 07.2009
Page 25
Sirona Dental Systems GmbH 3 Operation
Operator’s Manual SIDEXIS XG Exam concept
● Database path with information on the available disk space
● Information about the SLIDA interface
● Information about the connected digital X-ray components
3.1.10 Exiting SIDEXIS XG
Explanation When you quit SIDEXIS, all open image windows as well as the patient file
are automatically closed.
Activating the function
➢ Click the button.
or
➢ Click the button on the title bar.
or
➢ Hotkey: Activate the key combination [Alt]+[F4]
or
➢ Use the
"E[x]am"
menu bar to select the
"[E]xit"
menu item.
NOTICE
bеЦдблЬ
A confirmation prompt appears before the program is terminated.
3.2 Exam concept
3.2.1 Generating a new exam
Explanation This function is used to generate a new
If no patient is registered yet, the patient selection dialog box opens. See also
Section "How do I use the patient selection dialog box? [ 40]" .
Activating the function
➢ Click the button.
or
➢ Hotkey: Activate the key combination [Ctrl]+[N].
or
➢ Use the
ª A selection dialog box appears.
"E[x]am"
menu bar to select the
"Exam"
"[N]ew..."
.
menu item.
59 62 134 D 3407
D 3407.208.01.10.02 07.2009
25
Page 26
3 Operation Sirona Dental Systems GmbH
Exam concept Operator’s Manual SIDEXIS XG
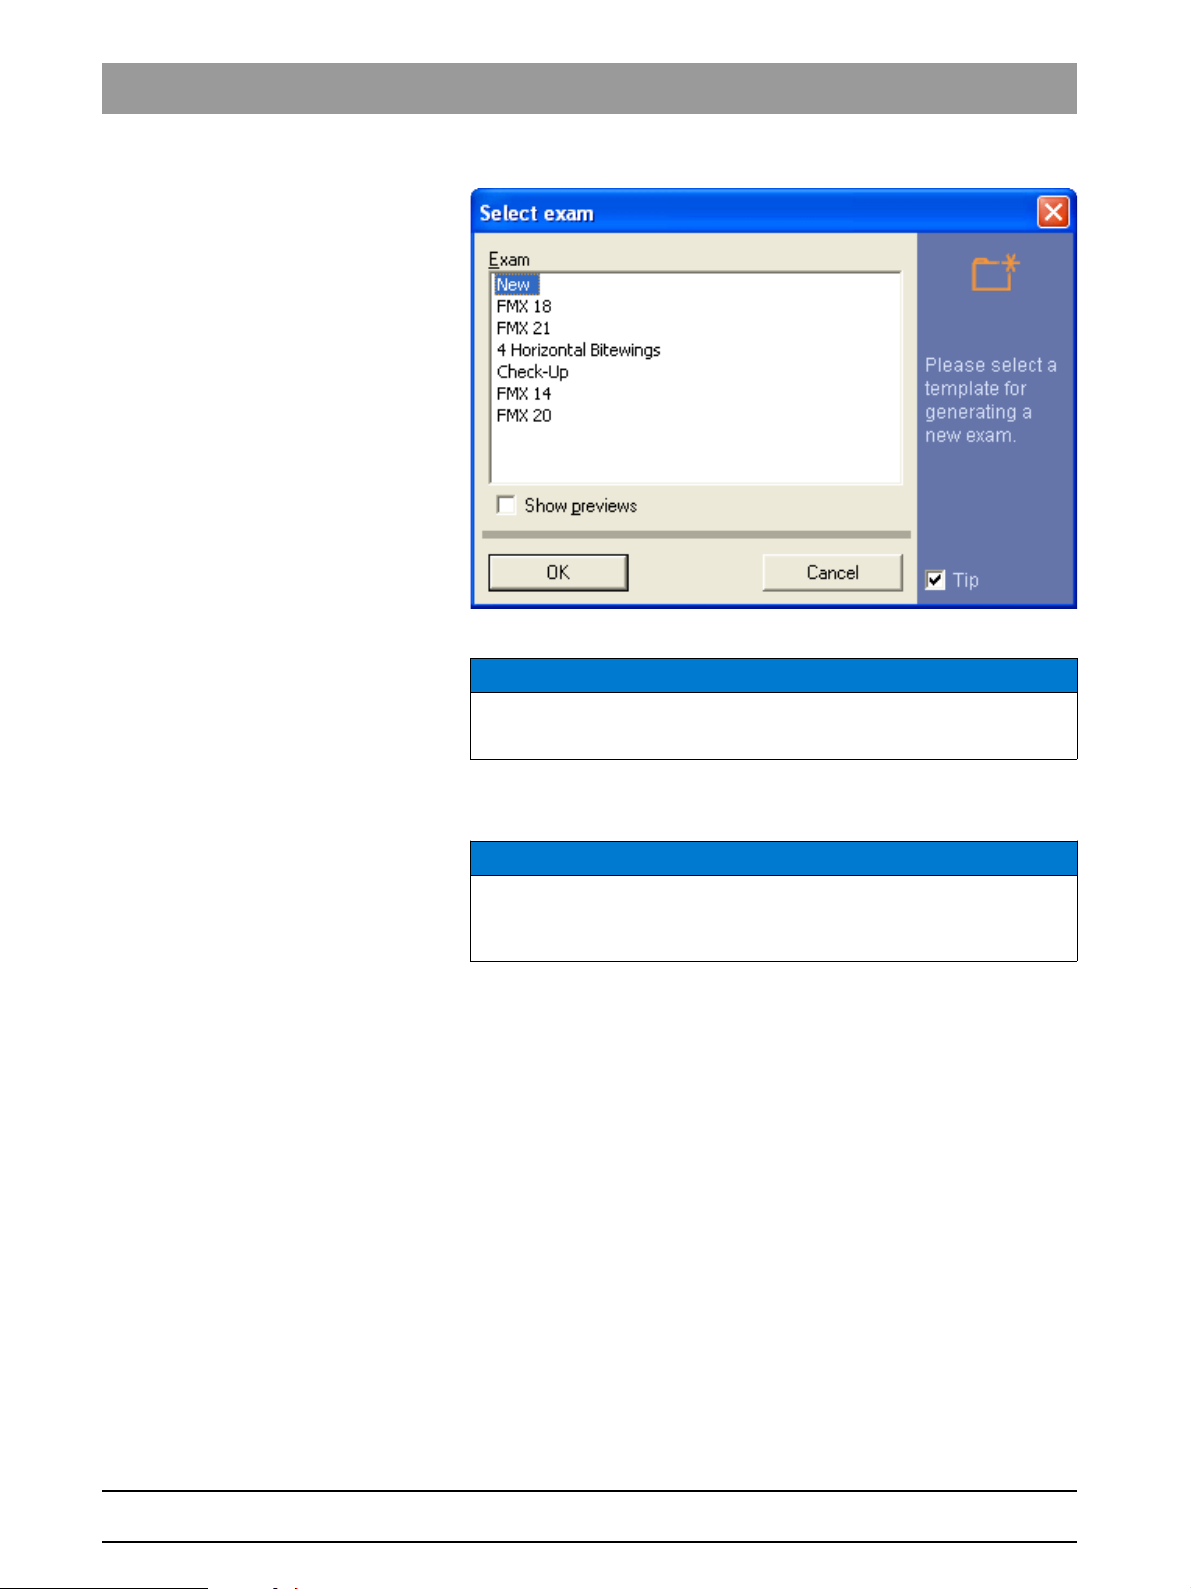
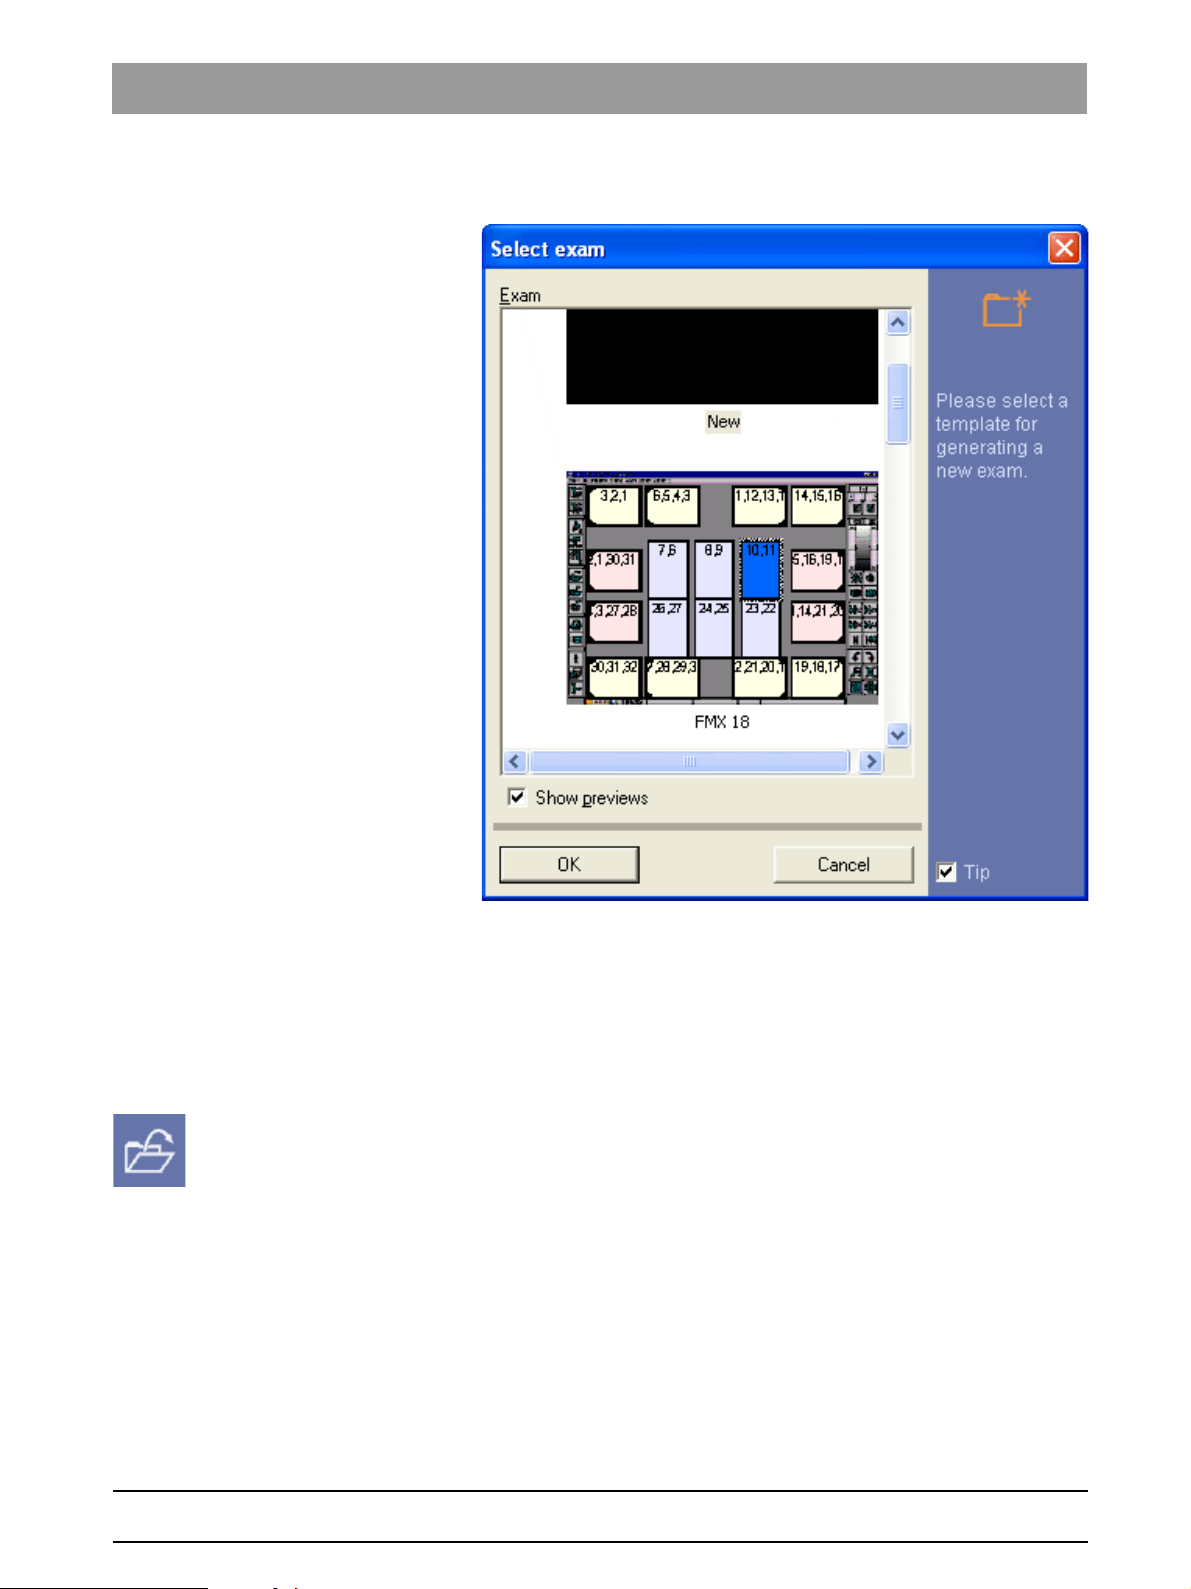
Selection dialog box
All templates saved for an
NOTICE
The use of this drawing function is explained in Section "Templates [ 37]".
Function The
empty workspace.
NOTICE
It is recommended to select this template for daily routine operation if you
do not want to use a saved template.
The
graphically.
"Exam"
are displayed in the selection dialog box.
"New"
template appears in the first line. This template consists of an
"Show previews"
check box can be used to display the templates
26 D 3407.208.01.10.02 07.2009
59 62 134 D 3407
Page 27
Sirona Dental Systems GmbH 3 Operation
Operator’s Manual SIDEXIS XG Exam concept
"Show previews"
check box
bеЦдблЬ
3.2.2 Opening a saved exam
Explanation This function is used to open a saved
If no patient is registered yet, the patient selection dialog box opens. See also
Section "How do I use the patient selection dialog box? [ 40]."
Activating the function
➢ Click the button.
or
➢ Hotkey: Activate the key combination [Ctrl]+[O].
or
59 62 134 D 3407
D 3407.208.01.10.02 07.2009
➢ Use the
ª A selection dialog box appears.
"E[x]am"
menu bar to select the
"Exam"
.
"Se[le]ct..."
menu item.
27
Page 28
3 Operation Sirona Dental Systems GmbH
Exam concept Operator’s Manual SIDEXIS XG
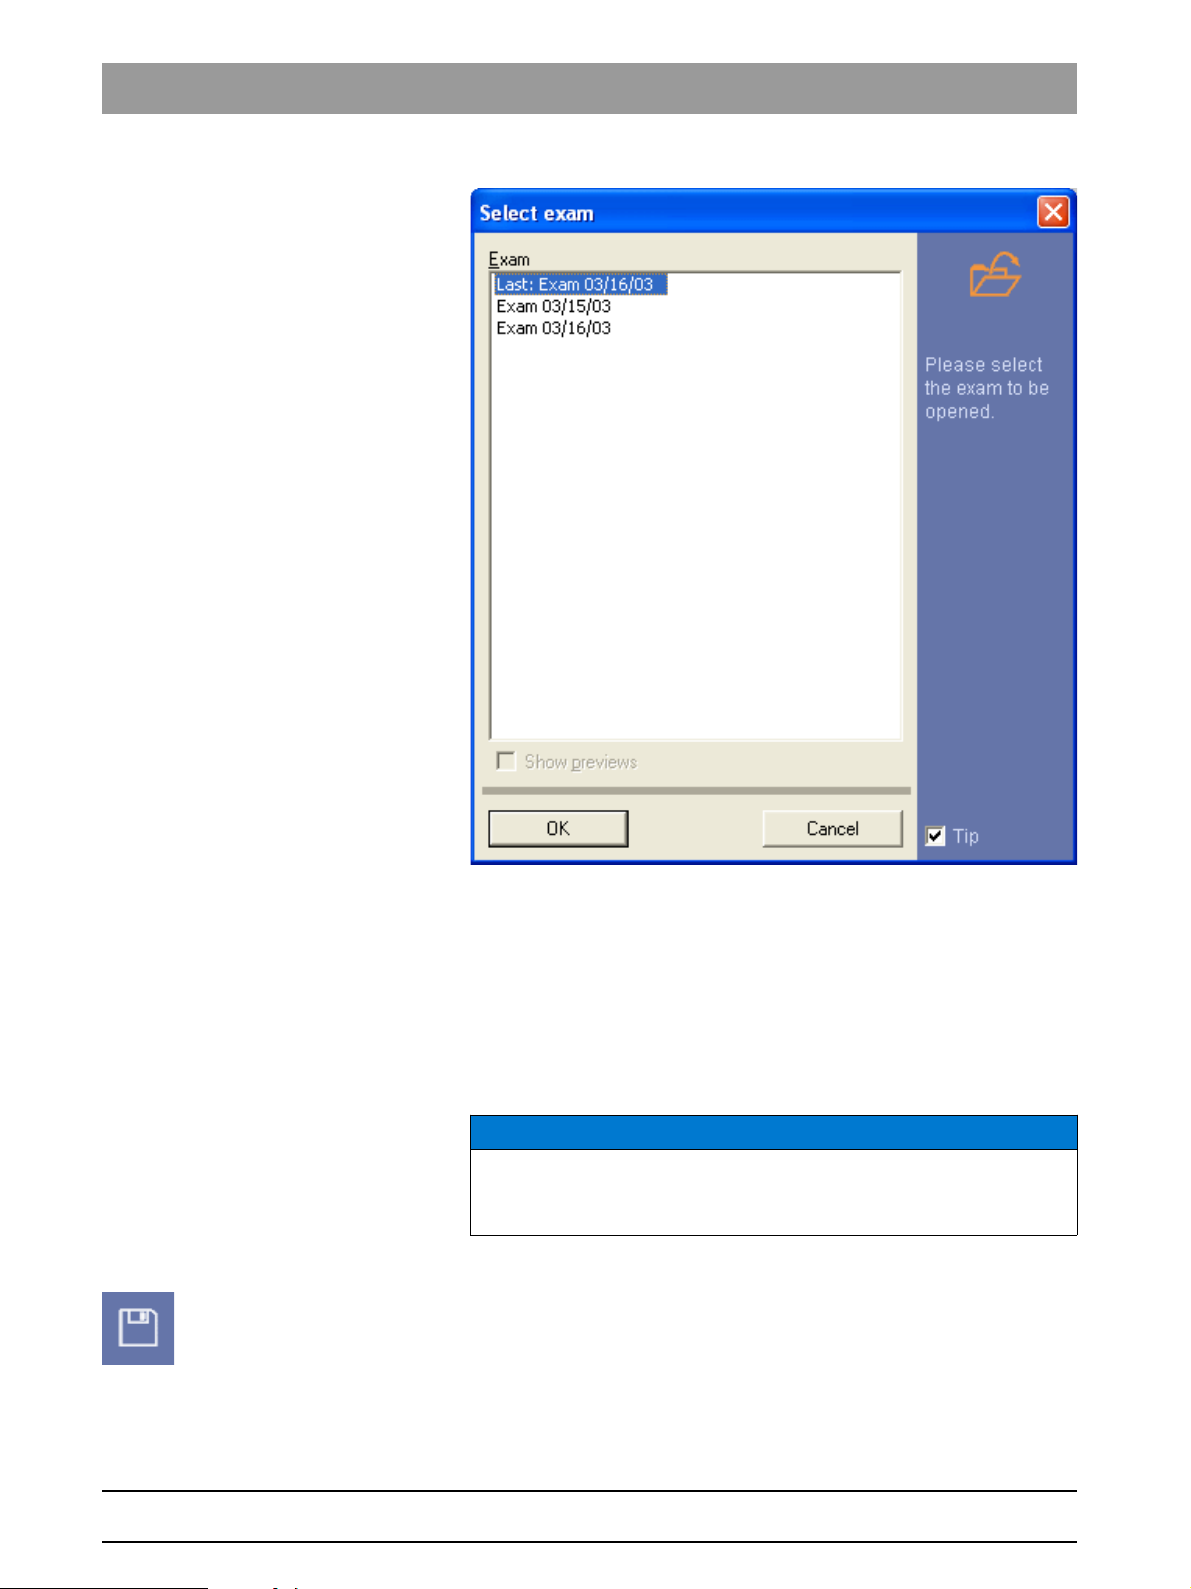
Selection dialog box
Function The selection dialog box contains all saved exams of the corresponding
patient.
The exams are sorted chronologically in the order in which they were created.
In addition, the last saved exam is displayed in the first line.
3.2.3 Saving an exam
Explanation All objects of the examination window can be saved as an
"Exam"
.
NOTICE
Use the
before from the exam database without overwriting the original data.
Activating the function
➢ Click the button.
or
➢ Hotkey: Activate the key combination [Shift]+[F12].
or
➢ Use the
"Save [a]s..."
"E[x]am"
function if you want to save a current
menu bar to select the
"[S]ave"
menu item.
"Exam"
loaded
28 D 3407.208.01.10.02 07.2009
59 62 134 D 3407
Page 29
Sirona Dental Systems GmbH 3 Operation
Operator’s Manual SIDEXIS XG Exam concept
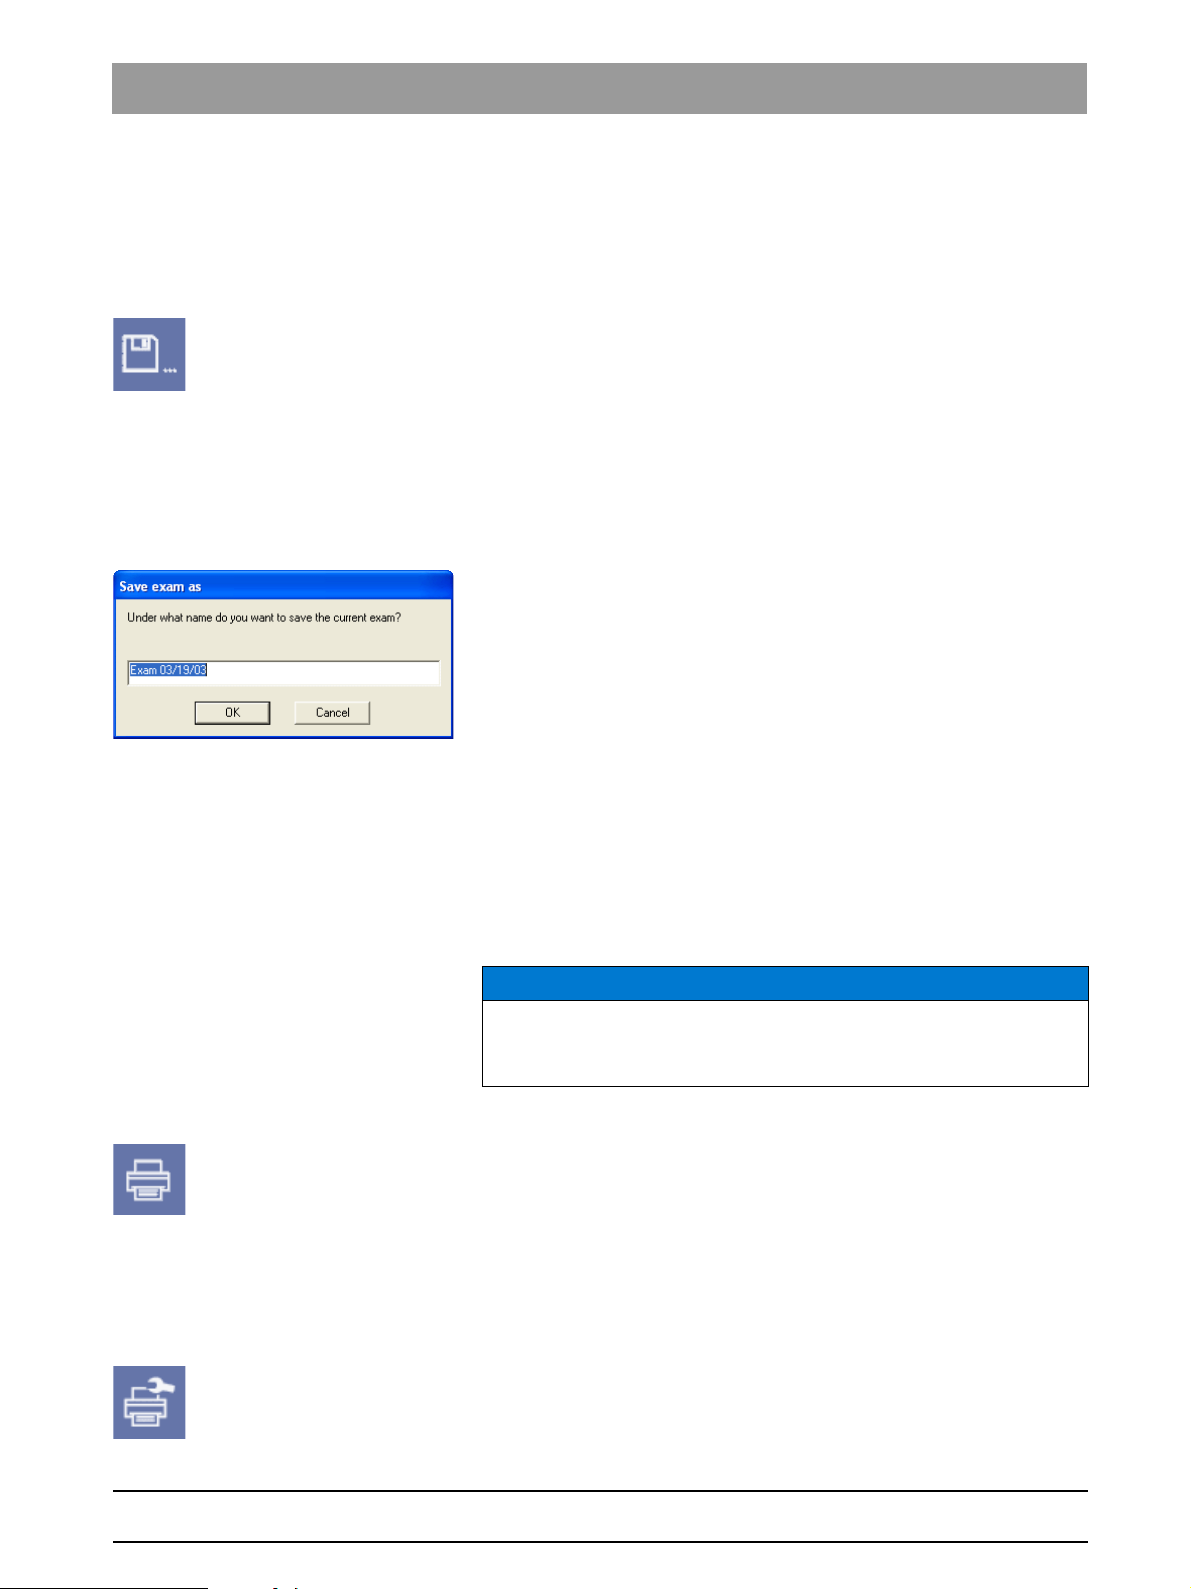
ª The Save dialog box appears.
Saving an exam under a new name Use the
before from the exam database without overwriting the original data.
Activating the function
➢ Click the button.
or
➢ Hotkey: Press the [F12] key
or
➢ Use the
ª The Save dialog box appears.
Save dialog box
SIDEXIS XG suggests a name for the
modified.
Use the
3.2.4 Printing an exam
"Save [a]s..."
"E[x]am"
"OK"
button to save the
function if you want to save a current
menu bar to select the
"Exam"
"Save [a]s..."
"Exam"
. This suggestion can be
.
"Exam"
loaded
menu item.
bеЦдблЬ
Explanation When the
one page.
There are two ways to print an exam.
● Printout via the function described below.
● Printout via the print preview (see section "Print Preview" [ 68]).
"Exam"
is printed, all of the objects in the workspace are printed on
NOTICE
Select the printer and the page view prior to the printout. (See "Setting up
the printer").
Activating the function
➢ Click the button.
or
➢ In the menu bar
ª The print dialog box of the operating system appears.
Function The print dialog box of the operating system is used to print out the
Setting up the printer
➢ Click the button.
or
➢ Use the
"E[x]am"
"E[x]am"/"Print"
menu bar to select the
, select the menu item
"Print Set[u]p..."
"Pr[i]nt..."
menu item.
.
"Exam"
.
59 62 134 D 3407
D 3407.208.01.10.02 07.2009
29
Page 30

3 Operation Sirona Dental Systems GmbH
Exam concept Operator’s Manual SIDEXIS XG
ª The print dialog box of the operating system appears.
NOTICE
It is advisable to set the page orientation to the landscape format when
printing an exam.
This ensures that the paper size will be optimally utilized.
3.2.5 Exporting an exam
Explanation
Activating the function
NOTICE
Please note that this function exports 2D information only. The "SiDICOM
Removable Media" plug-in can be used for importing and exporting
GALILEOS data sets.
You can export the current exam using the
Exporting an
exported.
➢ The patient's first name, last name and date of birth are also exported.
Exports can be performed in two different formats:
● NGE format
The NGE format [ 30] can be exported from and imported to SIDEXIS
XG in version 1.5 and higher.
● SVG format
The SVG format [ 31] can be displayed with an SVG viewer.
- Extended functionality
➢ Click the button.
or
➢ In the menu bar
"Exam"
means that all objects in the exam workspace are
Compressed SVG as ZIP for sending via email.
See section "Send examination via email" [ 37] for more information.
"E[x]am"/"Export"
"Export exam"
, select the menu item
function.
"E[x]port..."
.
3.2.5.1 NGE format
Explanation
The NGE format is an separate SIDEXIS XG format starting with version 1.5.
Exporting in NGE format
Exporting an
workspace are saved to a file.
"Exam"
in NGE format means that all objects in the exam
59 62 134 D 3407
30 D 3407.208.01.10.02 07.2009
Page 31

Sirona Dental Systems GmbH 3 Operation
Operator’s Manual SIDEXIS XG Exam concept
3.2.5.2 SVG format
Explanation SVG format (Scalable Vector Graphics) is a file format which enables the use
of vector graphics on the Internet. SVG is a language used for describing
graphics in XML (Extensible Markup Language).
"Exam"
Exporting in SVG format During an
exported to the specified folder.
In addition to the SVG file as such, the images from the
JPG files to the directory.
export in SVG format, all objects in the workspace are
"Exam"
are saved as
NOTICE
An
"Exam"
should always be exported to an empty folder. Reason: Any
existing JPG files are overwritten without reconfirmation prompt.
NOTICE
For viewing, you should use the newest version of the Adobe SVG Viewer.
This viewer is integrated as plug-in into the installed Internet browser.
Opening an SVG file starts the default Internet browser.
See also the section "Working with an exported exam in the Adobe® SVG
Viewer [ 31]“.
bеЦдблЬ
3.2.5.3 Working with an exported exam in the Adobe® SVG
Viewer
Operation More information on how to use the Adobe® SVG Viewer can be obtained in
the related context menu under the
Hints for use The Viewer is controlled by a context menu. (Activation by right-clicking).
"Help"
item.
NOTICE
The setting "
representation of geometric forms (smoothing of jagged edges, antialiasing). On texts and images, however, it may produce a somewhat
blurred impression. In this case you should deactivate the setting.
Higher Quality
" in the context menu results in enhanced
NOTICE
The browser print function should not be used because of distortions!
● The window title contains configurable patient data (See appendix
"Options" [ 176].
● When you click an image, it opens directly in the Internet browser window.
To return to the
browser.
● The file name of an image is displayed on the status bar when the mouse
pointer is above the corresponding image.
"Exam"
view, press the “Back” button of the Internet
59 62 134 D 3407
D 3407.208.01.10.02 07.2009
31
Page 32

3 Operation Sirona Dental Systems GmbH
Exam concept Operator’s Manual SIDEXIS XG
3.2.6 Importing an exam
Explanation Using versions 1.5 and higher of SIDEXIS XG, it is possible to import an exam
with the
"Import exam"
function.
NOTICE
The import function can be used only if the exam to be imported was
exported from version 1.5 or higher of SIDEXIS XG.
There are three different file formats which can be imported:
● NGE format
For further information, please refer to Section "NGEFormat [ 30]".
● SVG format
For further information, please refer to Section "SVGFormat [ 31]".
● Zip format
Examinations exported using the
compressed as a Zip file. These Zip files can be imported directly.
See section "Send examination via email" [ 37] for more information.
"Send exam by e-mail"
fun ctio n are se nt
Activating the function
➢ Click the button.
or
➢ In the menu bar
or
➢ via drag & drop.
or
➢ NGE format only:Via a double-click in the Explorer
Import ● For registered patients, SIDEXIS XG compares the patient data of the
registered patient with that of the imported exam.
If the patient data is not identical, a confirmation query then asks whether
the exam to be imported should be imported to the registered patient.
● If no patient is registered, the patient with the matching patient data (first
name, last name, date of birth) is automatically opened.
If the patient is not known to the database, a new patient will automatically
be generated when the exam is saved. In this case, it may be necessary
to enter additional new patient data. See also Section "How can I modify
patient data? [ 44]".
"E[x]am"/"Import"
, select the menu item
"Imp[o]rt..."
.
NOTICE
The exam is then displayed in SIDEXIS XG after the function is executed.
The exam is stored in the database along with all of the images it contains
only after the "Save exam" function is executed (see section "Saving an
exam [ 28]").
59 62 134 D 3407
32 D 3407.208.01.10.02 07.2009
Page 33

Sirona Dental Systems GmbH 3 Operation
Operator’s Manual SIDEXIS XG Exam concept
3.2.7 Deleting an exam
Explanation SIDEXIS XG offers the option to delete saved exams from the exam
database.
NOTICE
The images contained in the deleted exam will not be deleted from the
SIDEXIS database!
Scope The function refers to the exam which is currently open.
Activating the function
➢ Click the button.
or
➢ Use the
"E[x]am"
menu bar to select the
"[D]elete..."
menu item.
3.2.8 Closing the exam
Explanation The Close exam function is used to close the current exam.
Activating the function
➢ Click the button.
or
➢ Use the
ª The
Configuration possibility The following option can be configured:
● If there are any objects in the workspace, the software asks whether the
current view should be saved as
28]").
This option can also be configured so that this query appears only if at
least two images are located in the workspace.
Configuration ➢ In the menu bar
"E[x]am"
"Exam"
"Reminders..."
ª The
See Section "Configuring the reminder function [ 150]".
"Reminders..."
menu bar to select the
is closed.
1
"Exam"
(see Section "Saving an exam [
"[U]tilities"/"Configure [s]ystem..."
.
window appears.
"[C]lose"
menu item.
, select the menu item
3.2.9 Changing the form and the size of objects
bеЦдблЬ
Explanation Depending on the object type used, the form and also the size of the object
can be modified.
Objects can be classified according to their modifiability:
● Closed-area objects
● Line-shaped objects
● Objects with invariable size
1. If a processing plugin is still active in the examination, then a message appears
as to whether processing can now be closed. This is required to close the
examination.
59 62 134 D 3407
D 3407.208.01.10.02 07.2009
33
Page 34

3 Operation Sirona Dental Systems GmbH
Exam concept Operator’s Manual SIDEXIS XG
Closed-area objects This includes:
● Image objects
- X-ray images
- Video exposures
● Vector objects
- Rectangle (see section “Rectangle” [ 124]).
- Ellipse (see section “Ellipse” [ 124]).
Explanation
Vector objects can be resized and reshaped like a window object in Windows.
However, image objects can only be reduced in size. This means that they are
not really reduced in size, but only clipped.
The “Viewport” [ 99] function is designed for viewing them.
With image objects, you can only zoom in or out the image as a whole using
the zoom function.
Line-shaped objects This includes:
● Vector objects
- Connecting arrows (see section “Connecting arrows” [ 122]).
- Lines (see section “Lines [ 123]").
● Measurement tools
- Length measurement (see section “Length measurement” [ 89])
- Angle measurement (see section “Angle measurement” [ 93])
- Bone density measurement (see section “Bone density measurement”
[ 94])
Explanation
These objects consist of individual node points that are connected by lines.
In most cases these objects are located completely within an image object
and are adjusted when the zoom function is applied to an image object.
The node points can be moved when the object is selected.
● First place the mouse pointer above a node point.
A small navigation crosshair appears.
● With the left mouse button pressed, you can drag the selected node point
to a new position.
Objects with invariable size The nature of these objects does not allow resizing.
This includes:
● Vector objects
- Drawing tool “Cross” for orthodontics (see section “Special drawing tool
for orthodontics” [ 124]).
- Text fields (see Section "Text fields [ 123]").
● Findings (see Section "Image description and findings [ 56]").
3.2.10 Displaying and changing object properties
Explanation The properties or attributes of specific objects can be displayed and changed
via the "
"Attributes"
dialog box in the workspace.
34 D 3407.208.01.10.02 07.2009
59 62 134 D 3407
Page 35

Sirona Dental Systems GmbH 3 Operation
Operator’s Manual SIDEXIS XG Exam concept
Validity ● The individually selected object.
● This function is only applicable to vector and measurement objects.
Activating the function
➢ Click the button.
or
➢ Hotkey: Activate the key combination [Alt]+[Enter]
or
➢ Select
or
➢ From the menu bar
"Attributes"
from the pop-up menu.
"[A]nalysis"
, select the menu item
"[P]roperties…"
3.2.10.1 Changing object properties
Explanation The possibilities for change depend on the type of object involved. Not all
types are always possible!
Change possibilities ● Stroke width
● Stroke color
● Fill color
● Stroke width
.
bеЦдблЬ
Function 1. Select the desired object.
2. Activate the
3. Change the properties as required.
4. Confirm with
Applying settings as default values f the selected settings are to be used again, they first must be accepted in the
"Attributes"
default values"
"Attributes"
"OK"
.
dialog box with
.
function.
"OK"
, and by clicking the control box
"Apply as
3.2.11 Removing objects from the workspace
Explanation All selectable objects can be removed from the workspace with the help of the
Remove function.
NOTICE
This function should not be confused with the deletion of images.
The images are not deleted, but only removed from the workspace.
If images are removed from the workspace, all objects linked to the image are
removed as well.
Scope All selected objects in the workspace.
Activating the function
59 62 134 D 3407
D 3407.208.01.10.02 07.2009
➢ Click the button.
or
35
Page 36

3 Operation Sirona Dental Systems GmbH
Exam concept Operator’s Manual SIDEXIS XG
➢ Hotkey: Press the [Del] key
or
➢ Select Remove from the pop-up menu.
or
"[E]dit"
➢ Use the
menu bar to select the
"[R]emove"
menu item.
3.2.12 Copying the active image to the Windows
clipboard
Explanation SIDEXIS XG offers the option to copy the active image to the Windows
clipboard.
CAUTION
If the copied image is edited with another software (e.g. PaintBrush), it is
no longer suitable for diagnostics.
Scope The currently active image in the workspace.
Activating the function
➢ Click the button.
or
➢ Hotkey: Activate the key combination [Ctrl]+[C]
or
"Copy"
➢ Select
or
➢ Use the
from the pop-up menu.
"[E]dit"
menu bar to select the
"[C]opy"
menu item.
3.2.13 Pasting images from the Windows clipboard
Explanation SIDEXIS XG offers the option of copying images from the Windows clipboard
to the workspace.
NOTICE
The representation and resolution of images which have been imported
into the program via the Windows clipboard depends on the imported
images.
Scope All pixel images.
Activating the function
➢ Click the button.
or
➢ Hotkey: Activate the key combination [Ctrl]+[V]
or
➢ Use the
"[E]dit"
menu bar to select the [P]aste menu item.
59 62 134 D 3407
36 D 3407.208.01.10.02 07.2009
Page 37

Sirona Dental Systems GmbH 3 Operation
Operator’s Manual SIDEXIS XG Templates
3.2.14 Working with several open examinations
Explanation It is possible to set up SIDEXIS XG so that several examinations can be
opened at the same time.
Then you can switch between the examinations without having to reopen the
respective examination in each case.
Setting See the "Options [ 176]" section.
Display If more than one examination is open, then a tab will be displayed above the
status line for each open examination.
The name of the corresponding examination is displayed on each tab.
Operation You can switch by clicking on the tabs.
3.2.15 Sending an examination via email
Explanation It is possible to send an examination packaged as a Zip file.
The contents are generated in SVG format (see the "Exporting an
examination [ 30]" section).
Operation ➢ In the menu bar
.
e-mail"
ª The email standard application is opened with the compressed Zip file
in the attachment.
ª The examination is sent by entering the recipient and activating the send
function in the standard email application.
"E[x]am"/"Export"
, select the menu item
"Send exam by
bеЦдблЬ
3.3 Templates
3.3.1 Ready-to-use templates
The following ready-to-use templates are available:
●FMX xx Exams (Intraoral)
xx = number of exposures
● 4 Horizontal Bitewings (Intraoral)
● Check-Up (Intraoral)
● Ortho template
This template is used for combination exposures featuring one panoramic
view, one ceph view and one carpus view. This combination is intended
only for the ORTHOPHOS XG
in a predetermined order (P1-C3-C4) with reduced cool-down times in
between.
A description of the individual views can be obtained from the Operating
Instructions for the ORTHOPHOS XG
However, a longer cooling period is required after the entire exposure
combination has been taken.
Example screen
Plus
DS Ceph. These views are generated
Plus
DS Ceph.
59 62 134 D 3407
D 3407.208.01.10.02 07.2009
37
Page 38

3 Operation Sirona Dental Systems GmbH
Templates Operator’s Manual SIDEXIS XG
3.3.2 Self-created templates
Overview There are two types of self-created templates.
● Templates for intraoral radiography which can be edited with a special
editor (see Section "Editing an exposure template [ 140]").
● Templates which use the screen layout of the workspace and the order of
exposure as a template.
➢ All image types (Intraoral, Panoramic, Ceph, TSA, Video and 3D) can
thus be saved in the available templates.
3.3.2.1 Saving a template
Activating the function
➢ Click the button.
or
➢ Use the
"E[x]am"
menu bar to select the
3.3.3 Managing templates
Explanation The
Activating the function
"Manage templates"
➢ Click the button.
or
➢ Use the
item.
"E[x]am"
function is provided for managing templates.
menu bar to select the
"Save t[e]mplate"
menu item.
"[M]anage templates"
menu
Renaming a template 1. Press the
ª A dialog with a text box then opens.
"Rename"
button.
59 62 134 D 3407
38 D 3407.208.01.10.02 07.2009
Page 39

Sirona Dental Systems GmbH 3 Operation
Operator’s Manual SIDEXIS XG Patient management
2. Enter the desired name of the template in this text box.
3. Confirm your entry with the
"OK"
button.
Deleting a template 1. Press the
ª A confirmation dialog box appears.
2. Confirm the delete operation by clicking the
"Delete"
button.
"Yes"
button.
3.4 Patient management
Explanation Patients for whom a digital exposure is to be saved are managed in a powerful
patient database in SIDEXIS.
To avoid any confusion, all saved images are always clearly assigned to the
respective patient.
Overview ● Which dialog box is used to register a patient? [ 40]
● How do I use the patient selection dialog box? [ 40]
● How can I create new patient data? [ 43]
● How can I modify patient data? [ 44]
● How can I delete patient data? [ 45]
● How can I check out a patient? [ 46]
Getting started Patient registration must always be the first step taken to be able to assign the
image to the patient and then display a saved image on the screen.
Data security Since a newly taken X-ray is saved automatically to the patient database
immediately after the exposure for reasons of data security, the patient must
be registered before the exposure is taken in this case, too.
bеЦдблЬ
CAUTION
Whenever an X-ray is to be taken with SIDEXIS, a patient must be
registered previously.
Data security / exception "video images" When working with the video camera, it is not always necessary or desirable
to save the video images. For this reason, you can make video exposures in
SIDEXIS without having to register the patient first. If you later wish to save
your video exposure and the patient has not yet been registered, you can
register him or her afterwards.
NOTICE
A patient does not need to be registered prior to taking video exposures.
The patient can be registered later if you wish to save the video exposures.
If you attempt to take an X-ray without registering the patient first, the
"Register patient"
The commands for patient management are in the
"Patient"
submenu.
dialog box opens.
"Exam"
menu in the
59 62 134 D 3407
D 3407.208.01.10.02 07.2009
39
Page 40

3 Operation Sirona Dental Systems GmbH
Patient management Operator’s Manual SIDEXIS XG
3.4.1 Which dialog box is used to register a patient?
Answer Patients are registered in the
Activating the function
➢ Click the button.
or
➢ Hotkey: Press the [Pos1] key.
or
➢ In the menu bar
"E[x]am"/"[P]atient"
3.4.2 How do I use the patient selection dialog box?
Layout The
Example screen
"Register patient"
● "Patient" selection list box [ 40]
● "Exam" selection list box [ 42]
● Buttons [ 42]
dialog box is divided into the following areas:
"Register patient"
, select the menu item
dialog box.
"[R]egister..."
.
3.4.2.1 "Patient" selection list box
Explanation The
Configuration The patient list is displayed here.
Sorting The patient list can be sorted by the column headings.
"Patient"
The data of the individual patients is displayed line-by-line.
The patient data is displayed in columns corresponding to the column
headings.
● Click the desired column heading.
If the patient list should be sorted in reverse order, click the desired
column heading again.
selection list box is used to select the desired patient.
59 62 134 D 3407
40 D 3407.208.01.10.02 07.2009
Page 41

Sirona Dental Systems GmbH 3 Operation
Operator’s Manual SIDEXIS XG Patient management
Patient search There are two ways to search for patients.
● Searching with the scrollbar
● Searching with the search box
"Search criteria"
.
Searching with the scrollbar ● Scroll the section using the scrollbar in the
you can see the required patient.
Searching with the search box
NOTICE
This search method is only possible with the patient data
"Dentist"
The search is performed according to the selected sorting method in the
search box.
It is displayed in brackets behind the term
There are two different search methods here.
● Patient search without
● Patient search with
Patient search without
1. Deactivate the
2. Select the desired search criterion.
3. Type the personal data into the search box according to the search
4. Click on the
and
"Card-index no."
.
"Search criteria"
"Quick-search"
"Quick-search"
"Quick-search"
"Quick-search"
criteria.
"Search"
ª The desired patient selection then appears.
button.
check box.
"Patient"
selection list box until
"Name"
.
,
bеЦдблЬ
Select a patient
NOTICE
When you press the
or number(s) in the search box, all patients included in the database are
displayed.
Patient search with
1. Activate the
2. Select the desired search criterion.
3. Type the personal data into the search box according to the search
criteria.
ª Following each entry, the program searches the database for the data
entered and displays the appropriate section in the
window.
➢ Click on the required patient name in the
ª Selected items appear highlighted on the screen.
ª The patient is now selected.
"Search"
"Quick-search"
"Quick-search"
button without having entered any letter(s)
check box.
"Patient"
"Patient"
selection window.
selection
59 62 134 D 3407
D 3407.208.01.10.02 07.2009
41
Page 42

3 Operation Sirona Dental Systems GmbH
Patient management Operator’s Manual SIDEXIS XG
3.4.2.2 "Exam" selection window
Explanation In the
Navigation Navigating in the tree structure:
Configuration The
"Exam"
selection window, a new exam can be saved or saved exams
can be called up.
"Exam"
The
➢ The tree structure expands when you click the plus icon.
➢ The tree structure collapses when you click the minus icon.
● First, the
If it activated, an empty workspace for a new exam is opened for the
selected patient.
The
● In a second step, the name of the last saved exam is displayed.
If it is called up, the last exam saved for the selected patient will be
opened.
● Thirdly, the
It contains ready-to-use templates of special exam types and self-created
templates.
See Section "Templates [ 37]".
● Fourthly, the
All previously saved exams are displayed.
They can be opened for viewing or diagnosis and as a supplement to Xray and video exposures.
box includes a tree structure representing a selection.
"Exam"
window has the following structure (from top to bottom):
"New"
box is displayed.
"New"
field is preselected by default.
"Templates"
"Existing"
folder is displayed.
folder is displayed.
Selection 1. Exam types can be selected by mouse-click.
ª Selected items appear highlighted on the screen.
"OK"
2. The
button activates the selected exam type.
3.4.2.3 Buttons
Functional description of the button
functions
Command button Meaning
"OK"
"New..."
"Edit..."
This button activates the selected patient and
the selected exam.
This button opens the
which is used to include a new patient in the
SIDEXIS database.
See section "How can I create new patient data?
[ 43]"
This button opens the
box, which is used to modify the data of the
currently active patient.
See also Section "How can I modify patient
data? [ 44]".
"New patient"
"Edit patient data"
window,
dialog
42 D 3407.208.01.10.02 07.2009
59 62 134 D 3407
Page 43

Sirona Dental Systems GmbH 3 Operation
Operator’s Manual SIDEXIS XG Patient management
Command button Meaning
"Delete..."
"Cancel"
This button opens the
box, in which an existing patient can be deleted
from the SIDEXIS database.
See also Section "How can I delete patient
data? [ 45]".
This button closes the
box.
See Section "How can I check out a patient? [
46]"
"Delete patient"
"Register patient"
dialog
dialog
3.4.3 How can I create new patient data?
Background If the patient is not known to the system (i.e., he or she does not appear in the
list on the patient registration dialog box), then a new registration must be
made. For this purpose, the patient data are entered in the text boxes of the
relevant dialog box.
Activating the function
➢ Click the button.
or
➢ In the menu bar
ª The New patient window is displayed.
"E[x]am"/"[P]atient"
, select the menu item
"[N]ew..."
.
bеЦдблЬ
Example screen
Entering patient data ● Enter the patient data in the individual text boxes of the relevant dialog
box.
59 62 134 D 3407
D 3407.208.01.10.02 07.2009
43
Page 44

3 Operation Sirona Dental Systems GmbH
Patient management Operator’s Manual SIDEXIS XG
NOTICE
The system recognizes if last name, first name and date of birth are
identical to those of another patient and issues a corresponding warning.
On the other hand, card index numbers can be used several times. A date
of birth in the future is not accepted.
Text boxes ● The last name must be entered in the first field
● Enter the
● Enter the
When entering the date of birth, you do not need to separate day, month
and year as this is done automatically. For example, the numbers
"030395" are sufficient for March 3, 1995.
Optional text boxes ● It is recommended to enter the patient's card index number in the
index no."
● The name or the abbreviation of the responsible dentist should be entered
in the
Navigation ● To jump to the next text box, press the [Enter] or [[Tab] key.
● To return to the previous box, press [Shift] + [Tab].
● To directly select a box, position the mouse pointer in it and click.
Completion Once all boxes are filled in completely, confirmation with “OK” creates the
patient in the database and registers him or her in the system. An already
registered patient will be replaced by the new patient. The new patient is now
set up in the system.
"First name"
"Date of birth"
box.
in the second box.
in the corresponding box.
"Permanent dentist"
.
"Name"
.
"Card-
3.4.4 How can I modify patient data?
Explanation The data of the currently registered patient can be modified at any time. For
this purpose, enter the new data in the desired text boxes of the dialog box.
When you confirm the dialog box, the new patient data are automatically
saved to the database.
NOTICE
When the function for editing patient data is launched from the patient
selection dialog box, the changes refer to the patient selected in the list. In
this case the program returns to the activating dialog box after the data
have been changed. This enables users to conveniently change the data
of several patients without having to go via the menu and previous
registration of the patients.
Activating the function
➢ Click the button.
or
➢ In the menu bar
ª The
"Edit patient data"
"E[x]am"/"[P]atient"
window is displayed.
, select the menu item
59 62 134 D 3407
"[E]dit data..."
44 D 3407.208.01.10.02 07.2009
.
Page 45

Sirona Dental Systems GmbH 3 Operation
Operator’s Manual SIDEXIS XG Patient management
Example screen
3.4.5 How can I delete patient data?
Explanation This function deletes the currently registered patient from the patient
database. As is logical, the patient is first checked out by the system during
this operation.
NOTICE
To prevent inadvertent deletion, a message prompting you to reconfirm the
command is displayed.
NOTICE
When the function for deleting a patient is launched from the patient
selection dialog box, then the delete operation refers to the patient
selected in the list.
In this case the system returns to the activating dialog box after the delete
operation.
This enables users to conveniently delete several patients from the
database without having to go via the menu and previous registration of
the patients.
Activating the function
➢ Click the button.
or
➢ In the menu bar
ª The
"Delete patient"
"E[x]am"/"[P]atient"
window is displayed.
, select the menu item
"Dele[t]e"
bеЦдблЬ
.
59 62 134 D 3407
D 3407.208.01.10.02 07.2009
45
Page 46

3 Operation Sirona Dental Systems GmbH
Patient management Operator’s Manual SIDEXIS XG
Example screen
Legal retention periods To guarantee the legal retention periods for X-rays, it is not possible to delete
patients for whom X-rays have already been stored in the image database.
In this case the following message appears:
3.4.6 How can I check out a patient?
Activating the function
➢ Click the button.
or
➢ In the menu bar
ª The patient is checked out.
Control ● If you have processed existing images or taken new video exposures of
the patient you are about to check out, a message asking you whether
you want to save the changes is displayed.
● New X-ray exposures have already been saved automatically by the
system.
Further information Section "Patient management [ 39]" provides further information about
saving and closing images.
After the patient has been checked out successfully, the title bar of the
program window informs you that no patient is currently registered.
"E[x]am"/"[P]atient"
, select the menu item
"[C]heck out"
.
46 D 3407.208.01.10.02 07.2009
59 62 134 D 3407
Page 47

Sirona Dental Systems GmbH 3 Operation
Operator’s Manual SIDEXIS XG Image management
3.5 Image management
3.5.1 Saving original images
Explanation It is not necessary for the user to save the X-ray images as they are
automatically saved directly to thepatient database after image collection is
complete.
These automatically saved images are calledoriginal images ororiginal views.
The new video exposures saved for the first time by the user are also initially
saved in the database in the form of original images.
3.5.2 Save image views
Explanation In addition, the user may wish to store individual views after image processing
and optimization. These edited views can then be saved as well.
The original image will at no time be overwritten by a new view.
NOTICE
Views can therefore only ever be saved in addition to the original images
and are based on these original versions.
In this way it is possible to generate different views from one image which
then can also be displayed simultaneously. The name of each new view is
assigned in a dialog box.
What does a view contain? The following image processing and image optimizing procedures are saved
as a view:
● Measurements
See Section "Measurement tools [ 89]".
● Filter
See Section "Image filters [ 105]".
● Screen position
● Zoom
See Section "Zooming the image [ 97]".
● Image detail
See Section ""Moving the image segment [ 98]"
● Rotation
See Section "Rotating [ 103]"
Scope This function can be used for X-ray and video images (but not for live and still
images).
This function applies only to the active image.
bеЦдблЬ
Activating the function
59 62 134 D 3407
D 3407.208.01.10.02 07.2009
➢ Click the button.
or
➢ Hotkey: Activate the key combination [Ctrl]+[S].
or
47
Page 48

3 Operation Sirona Dental Systems GmbH
Image management Operator’s Manual SIDEXIS XG
Additional information
➢ Use the
ª The Save dialog box appears.
"[I]mage"
menu bar to select the
"Save [a]s..."
menu item.
Example screen
NOTICE
The system automatically generates unique view names, however, these
may be overwritten by the user with other, more meaningful names. This
makes it easy to retrieve the views later.
NOTICE
Loading saved views that have been subjected to complex image
processing procedures takes somewhat longer than loading original
images.
If you have opened several images and want to save all views, it is
recommended to save them as exam.
You can also save all the exposures in compressed form. This greatly
reduces the amount of storage space needed in the database. For further
details, please see Section "System settings [ 136]".
3.5.3 Opening images from the SIDEXIS database
Explanation Images in the SIDEXIS database can be opened using the dialog box
image"
.
All available images of registered patients are displayed here.
Scope This function can be used for X-ray and video images (but not for live and still
images).
This function applies only to the active image.
Activating the function
➢ Click the button.
or
➢ Hotkey: Press the [Enter] key.
or
➢ Use the
Function After the list of available X-rays has been narrowed down sufficiently, the
desired images can be selected using the mouse or the cursor key s. You can
make either a single or a multiple selection.
Overview More details can be found in the following sections:
● Structure of the dialog box [ 49]
● Single selection [ 53]
"[I]mage"
menu bar to select the
"Se[le]ct..."
menu item.
"Select
48 D 3407.208.01.10.02 07.2009
59 62 134 D 3407
Page 49

Sirona Dental Systems GmbH 3 Operation
Operator’s Manual SIDEXIS XG Image management
● Multiple selection [ 54]
● Patient data discrepancies [ 55]
● Procedure for relocated images [ 55]
3.5.3.1 Structure of the dialog box
Dialog box
View tabs You can switch between two different views by means of two tabs.
They show all existing images of the registered patient by default, sorted by
date and time.
● Tab
● Tab
"Preview"
The images are displayed as preview images, with the related image
type.
"List"
The images are displayed as a list.
The list includes the image type, date and a short description of each
image.
NOTICE
Images which have been marked in the image description as not
diagnosable are identified by “~~” in the list of acquired images.
They are displayed only when all image types are displayed by clicking the
"All"
button.
bеЦдблЬ
List field "View" By using the
available (i.e. from views that have been previously generated by the user).
The individual views are listed by name.
"Last view"
recently reviewed.
59 62 134 D 3407
D 3407.208.01.10.02 07.2009
"View"
list field, you can select from the various image views
means those previously listed images that have been most
49
Page 50

3 Operation Sirona Dental Systems GmbH
Image management Operator’s Manual SIDEXIS XG
The selected view is loaded and displayed as it was last saved in a window in
the workspace.
Saving image views is described in more detail in the "Saving image views"
[ 47] section.
NOTICE
The
"View"
list field can be configured in the
Image type selection tabs The images appearing in the list can be preselected according to their image
type using the tabs in the lower half of the dialog box. For X-rays taken with
SIDEXIS, the image type is assigned automatically by the system in the
findings.
This enables images to be retrieved more easily if there is a large number of
images. However, this preselection works only if the user has assigned the
image accordingly at an earlier point in time (usually immediately after the
exposure or during the findings). This allocation process is described in
Section "Image description and findings".
"Options"
tab.
Tab Image type selected
"All"
IO Shows only type XI intraoral X-rays (see
PAN Shows only type XP panoramic X-rays (see
CEPH Shows only type XC ceph X-rays (see "Ceph
TS Shows only type XS transversal slice images
VI Shows only video exposures (see
3D Shows only 3D images
The number of images available for each tab is indicated, provided there are
any images of this type available. The code of the selected image type is then
displayed above the list box (XI, XP, XC, VI, XS, or ?? for exposures of an
unknown or arbitrary type)
Shows all types jointly
Note: Image filters are not displayed in the
preview
"Odontogram")
"Panoramic image types (XP)")
image types (XC)")
(see "Odontogram")
"Odontogram")
50 D 3407.208.01.10.02 07.2009
59 62 134 D 3407
Page 51

Sirona Dental Systems GmbH 3 Operation
Operator’s Manual SIDEXIS XG Image management
Odontogram
An odontogram is displayed in addition to the tab for the intraoral X-ray (XI),
transversal slice (XS) and intraoral video (VI) image types. This odontogram
allows you to specify further search criteria for retrieving acquired images.
When you click a tooth symbol, only images that correspond to the selected
tooth are shown in the list of available X-ray images.
The image type code above the list box is then detailed further according to
the international odontogram (e.g. 16XI).
The number of available images is shown below or above each tooth button.
Each of the symbols located next to the tooth symbols can be clicked to
display one quarter of the teeth in the odontogram.
The odontogram can be changed to mixed dentition by means of a check box.
bеЦдблЬ
ORTHOPHOS XG layout
59 62 134 D 3407
D 3407.208.01.10.02 07.2009
Panoramic image type (XP)
For the panoramic image type (XP), an overview of the OP programs appears
instead of the odontogram. The procedure is identical to that for intraoral
images. The image type code above the list box is then detailed further
according to the selected program number (e.g. 03XP).
During the launch of ORTHOPHOS XG, the overview layout was adapted to
match the design of ORTHOPHOS XG. This new layout can be replaced by
the SIDEXIS Classic layout (See section "Options [ 176]").
51
Page 52

3 Operation Sirona Dental Systems GmbH
Image management Operator’s Manual SIDEXIS XG
SIDEXIS Classic layout
Ceph image type (XC)
For the Ceph image type (XC), a breakdown into PA, AP, lateral and carpus
exposures is offered. The procedure is identical to that for intraoral images.
The image type code above the list box is then detailed further according to
the selected type (e.g. 01XC).
During the launch of ORTHOPHOS XG, the overview layout was adapted to
match the design of ORTHOPHOS XG. This new layout can be replaced by
the SIDEXIS Classic layout (See section "Options [ 176]").
ORTHOPHOS XG layout
SIDEXIS Classic layout
52 D 3407.208.01.10.02 07.2009
59 62 134 D 3407
Page 53

Sirona Dental Systems GmbH 3 Operation
Operator’s Manual SIDEXIS XG Image management
GALILEOS layout
To provide a clearer overview, the list of displayed images can be limited
using the structural tree (Pan, Ceph, TSA etc).
This limits you to the selected view in 2D image selection. Upon opening the
3D processing software (GALAXIS), this has no effect on the selected
GALILEOS scan.
3.5.3.2 Single selection
Explanation Single selection means that only one image is selected. The selected list item
is highlighted by a border.
"List"
Example screens Example image of the
Example image of the
tab
"Preview"
tab
bеЦдблЬ
59 62 134 D 3407
D 3407.208.01.10.02 07.2009
53
Page 54

3 Operation Sirona Dental Systems GmbH
Image management Operator’s Manual SIDEXIS XG
Open The last active view of the image is opened as follows:
Selection
➢ Select the desired image by left-clicking it with the mouse.
"List"
ª For
window on the right.
tab only: A preview of the selected image is displayed in a
Loading the image
You can load the image in three different ways:
➢ By double-clicking the selected image with the left mouse button
or
"OK"
➢ By pressing the
or
"List"
➢ For
preview window
ª The image is loaded to the workspace.
tab only: By double-clicking with the left mouse button on the
button.
3.5.3.3 Multiple selection
Explanation With multiple selection, several images are selected from the list.
● This method allows, for example, to easily make and retrieve image
comparisons using images generated over an extended period of time.
With multiple selection either just the
selected.
● Selected items appear highlighted in the
● The configuration is explained in Section "Options [ 176]".
"Last view"
or the
"View"
"Original view"
list box.
NOTICE
can be
Selection of the list field
(grey).
Selection
"View"
is not possible using multiple selection
Area selection
1. Select the first desired image by left-clicking it with the mouse.
2. Press and hold the
"[Shift]"
key.
59 62 134 D 3407
54 D 3407.208.01.10.02 07.2009
Page 55

Sirona Dental Systems GmbH 3 Operation
Operator’s Manual SIDEXIS XG Image management
3. Select the last required image by left-clicking it with the mouse.
ª All images between the first and the last selected image are selected.
Individual selection
1. Select the first desired image by left-clicking it with the mouse.
2. Press and hold the
3. Select further desired images by left-clicking with the mouse on each
one.
ª Only the explicitly selected images are selected.
"[Ctrl]"
key.
NOTICE
To deselect images that you have selected inadvertently, press the
key and then click the unwanted image.
Once you have deselected the last selection, you return to the single
selection mode and select other views.
Loading the image You can load the selected images in one of three ways:
➢ By double-clicking the selected image with the left mouse button
or
"OK"
➢ By pressing the
or
"List"
➢ For
preview window
ª The images are loaded to the workspace.
tab only: By double-clicking with the left mouse button on the
button.
"[Ctrl]"
3.5.3.4 Patient data discrepancies
Explanation If the patient data saved for the image you have selected are not identical to
the current patient data, a warning appears to prevent incorrect assignment
of data. You should always check the reason for this discrepancy (e.g. name
change due to marriage, etc.).
Example screen
bеЦдблЬ
3.5.3.5 Procedure for relocated images
Explanation If the images you require have already been relocated, you may be prompted
to insert a storage medium when you try to select them.
Function Once you have inserted the storage medium and acknowledged the
message, the image can be displayed in the usual way.
Relocated images are identified by "»" in the list for enhanced clarity.
59 62 134 D 3407
D 3407.208.01.10.02 07.2009
55
Page 56

3 Operation Sirona Dental Systems GmbH
Image management Operator’s Manual SIDEXIS XG
For further information on this topic, please refer to Section "Configuring
relocation [ 152]"
Example screen
3.5.4 Image description and findings
Explanation When an image is open and active, its description can be displayed or edited
at any time.
This image description helps you to easily retrieve a specific image of a
patient. Furthermore, a finding can be entered to the image description.
Scope This function can be used for X-ray and video images (but not for live and still
images).
This function applies only to the active image.
Activating the function
Activating the function
Display in the workspace
➢ Click the button.
or
➢ Use the
➢ Click the button.
or
➢ Hotkey: Activate the key combination [Alt]+[Enter]
or
➢ Select
or
➢ Use the
A symbol for an existing diagnostic finding is displayed in the image.
This symbol can be freely moved within the image or in the workspace.
If the exam symbol is placed outside the image, it is always linked to the
relevant image by a dotted line.
➢ The dialog box opens after a double-click.
"[A]nalysis"
"Attributes"
"[A]nalysis"
menu bar to select the
from the pop-up menu.
menu bar to select the
"Findin[g]s"
menu item.
"[P]roperties…"
menu item.
56 D 3407.208.01.10.02 07.2009
59 62 134 D 3407
Page 57

Sirona Dental Systems GmbH 3 Operation
Operator’s Manual SIDEXIS XG Image management
Example screen
Dialog box
Image information The displayed dialog box shows the available image information for the
currently active X-ray.
●
"Image type"
The image type is displayed here.
For intraoral, TSA and video images, the image type is determined by the
tooth selected in the displayed odontogram.
For panoramic and ceph exposures, the image type is determined by the
program selected in the OR program survey. The program number of the
ORTHOPHOS is also displayed in the image type.
This image information appears later on in the list box of the dialog box for
selecting available images.
bеЦдблЬ
59 62 134 D 3407
D 3407.208.01.10.02 07.2009
57
Page 58

3 Operation Sirona Dental Systems GmbH
Image management Operator’s Manual SIDEXIS XG
●
"Image date"
This image information appears later on in the list box of the dialog box for
selecting available images.
The image creation date is read-only and cannot be edited.
●
"Short description"
This image information appears later on in the list box of the dialog box for
selecting available images.
You can enter any text in this field.
A maximum of 128 characters is permitted.
●
"Person responsible"
Here, the name of the patient's permanent dentist is entered
automatically by the system. If another dentist was responsible for the
image, the data can be edited.
●
"Findings"
You can enter any text in this field.
A maximum of 5000 characters is permitted.
●
"Not diagnosable"
If an X-ray cannot be diagnosed, then this can be noted by activating the
associated check box. Images marked as not diagnosable are identified
by “~~” in the image type.
They are displayed only when all image types are displayed by clicking
the
"All"
button.
●
"Quick View"
If this check box is activated, the findings text is displayed in a text window
in the workspace.
Example screen:
NOTICE
The accurate specification of image type and short description is helpful for
later retrieval of the X-ray and should therefore always be made.
NOTICE
When entering the findings text, you can open a context menu with
precompiled standard findings by pressing the right mouse button or the
[Alt] + [B] key combination. Several of these findings can be combined by
repeating this action. The [Esc] key closes the context menu without
further actions. Section "Processing standard findings [ 145]" describes
how these standard findings can be configured individually.
By confirming the dialog box, all entries are saved automatically. By canceling
the dialog box, all changes made are discarded.
59 62 134 D 3407
58 D 3407.208.01.10.02 07.2009
Page 59

Sirona Dental Systems GmbH 3 Operation
Operator’s Manual SIDEXIS XG Image management
Automatic activation
Additional information For this reason, for all exposures taken with SIDEXIS, an information window
NOTICE
SIDEXIS can be configured in such a way that determination of the image
type to be acquired or diagnostics is launched automatically before or after
taking the X-ray. For further details, please refer to Section "Exposure
settings [ 136]".
It is not possible to determine whether an X-ray image is an original or a copy.
Neither is it possible to recognize whether an image is compressed (for further
details, see chapter “System configuration [ 136]”) nor to determine the
compression level. This information is mostly required for expert appraisals.
It may also be important in a service and complaint case to have accurate
information about the exposure.
with further information on the displayed image can be opened by pressing
"More info..."
the
displayed behind the
can be found in Section "Identification of images [ 61]".
For panoramic, Ceph and transversal slice images made with SIDEXIS XG,
additional information is displayed for radiation time, tube current, tube
voltage, stand height, temple support width and forehead support. For all
other exposures, this information is grayed out.
button. The origin of an exposure and further information are
"Software"
label. An explanation of the abbreviations
bеЦдблЬ
3.5.5 Removing objects from an exam
Scope This function can be used for X-ray and video images (but not for live and still
images).
This function applies to selected objects.
Activating the function
➢ Click the button.
or
➢ Hotkey: Press the [Del] key
or
➢ Select Remove from the pop-up menu.
or
"[E]dit"
➢ Use the
Function If any properties (image processing, window position, etc.) of one or of the
several images have been changed, then several messages prompting you
to save are issued before the images are removed from the workspace.
menu bar to select the
"[R]emove"
menu item.
NOTICE
Configuration of the behavior for positioning the window is described in
Section "Configuring the reminder function [ 150]".
59 62 134 D 3407
D 3407.208.01.10.02 07.2009
With live video images, or if no changes have been made to an image that
was already saved in the past, the associated image window is closed without
this message dialog box.
59
Page 60

3 Operation Sirona Dental Systems GmbH
Image management Operator’s Manual SIDEXIS XG
NOTICE
When a patient is checked out or SIDEXIS is terminated, all views are
closed automatically.
3.5.6 Close image
Scope This function can be used for X-ray and video images (but not for live and still
images).
This function applies only to the active image.
Activating the function
➢ Click the button.
or
➢ Hotkey: Press the [Esc] key.
or
➢ If the
"Extended image title"
the image title (see the "Options [ 176]" section).
function is activated: Click on the button in
or
➢ Use the
Function If any property (image processing, window position, etc.) of an image has
been changed, then several messages prompting you to save are issued
before the image is removed from the workspace.
With live video images, or if no changes have been made to an image that
was already saved in the past, the associated image window is closed without
this message dialog box.
"[I]mage"
menu bar to select the
"[C]lose"
menu item.
NOTICE
When a patient is checked out or SIDEXIS is terminated, all views are
closed automatically.
3.5.7 Deleting images from the image database
Explanation This function can be used to delete previously stored images from the image
database.
A distinction is made regarding the image type:
● X-ray images
For X-ray images, only the stored image views can be deleted.
It is not possible to delete the original views.
CAUTION
To guarantee the legal retention period for X-rays, it is not possible to
delete original images of this type.
59 62 134 D 3407
60 D 3407.208.01.10.02 07.2009
Page 61

Sirona Dental Systems GmbH 3 Operation
Operator’s Manual SIDEXIS XG Image management
● Video images
For video images, both the stored image views and the original views can
be deleted.
The original views of video images can be deleted only after reconfirming
the command.
Please note that in addition to the original view, all associated views of the
image are deleted as well.
Scope This function can be used for X-ray and video images (but not for live and still
images).
This function applies only to the active image view.
Activating the function
➢ Click the button.
or
➢ Use the
Function After activating the function, you must close the associated image window
first for this purpose.
For safety reasons, a message prompting you to reconfirm the command is
displayed before permanent deletion.
"[I]mage"
menu bar to select the
"[D]elete"
menu item.
bеЦдблЬ
3.5.8 Identification of images
Explanation X-ray images are provided with a code to enable clear identification of copies
and originals.
The images used in SIDEXIS are labeled with a code during printing,
exporting, copying to the clipboard ([Ctrl] + [C]) and sending by image
messaging or by e-mail. This code (black lettering on a white background)
appears in the bottom left corner of the image when it is exported, e-mailed
or copied to the clipboard.
When an image previously exported by SIDEXIS XG is imported again, the
identification becomes visible.
Re-importing images When an image is re-imported, all filter, contrast and brightness adjustments
become visible again. An image compressed on export is not compressed
again on importing.
Coding
The individual elements are separated by blanks. They are always of the
maximum length and for this reason, blanks are added at the end.
Empty fields are marked by a period.
Position 1
59 62 134 D 3407
D 3407.208.01.10.02 07.2009
3.5.8.1 Structure
SIDEXIS image
61
Page 62

3 Operation Sirona Dental Systems GmbH
Image management Operator’s Manual SIDEXIS XG
Position 2
Version number with which the image has been acquired or imported.
SIDEXIS XG version numbers are displayed as 6.x.
Position 3
Original image
Copy
Modified image
Position 4
Image created with the present SIDEXIS system
Imported file
Scanner (TWAIN)
Position 5
Position 6
Imported from clipboard
Imported via SLIDA
No compression
Compression type - JPEG
JPEG compression parameter:
Quality factor
Files with multiple compression (compressed export of an already
compressed image) are preceded by ‘<’. The smallest compression factor
used is displayed.
No compression
NOTICE
The encoding described above is also displayed in the window
See Section "Image description and findings [ 56]".
"More info"
.
62 D 3407.208.01.10.02 07.2009
59 62 134 D 3407
Page 63

Sirona Dental Systems GmbH 3 Operation
Operator’s Manual SIDEXIS XG Image management
3.5.8.2 Examples
Example 1
● A new image, saved without compression and modified (brightness,
contrast), then exported:
Coding: “SIDEXIS 5.35 M . . . "
Example 2
● A new image was saved with compression in dental practice A and a
modified version of it was exported as a compressed file. This exported
image was then imported in dental practice B (and saved without
compression):
Coding: “SIDEXIS 5.45 M I JPG 100”
bеЦдблЬ
Example 3 (printing) Printout of a re-imported copy, compression level JPEG 100.
59 62 134 D 3407
D 3407.208.01.10.02 07.2009
63
Page 64

3 Operation Sirona Dental Systems GmbH
Image management Operator’s Manual SIDEXIS XG
The code is printed as text outside the image, but only for single image
printouts.
Position: Right-aligned in brackets in the same line as the image title
3.5.9 Exporting image views
Explanation Exchanging image data produced with SIDEXIS XG with other systems (for
example, in the case of a referral) is facilitated with the
An image is copied to another storage medium (e.g. USB stick, CDR, DVDR, conventional diskette or network drive) and can then be imported via the
"Import"
function at another location.
"Export..."
function.
CAUTION
If the exported image is edited with another software (e.g. PaintBrush), it
is no longer suitable for diagnostics.
Scope This function can be used for X-ray and video images (but not for live and still
images).
This function applies only to the active image.
Activating the function
➢ Click the button.
or
➢ In the menu bar
"[I]mage"/"Export"
, select the menu item
"Exp[o]rt..."
.
64 D 3407.208.01.10.02 07.2009
59 62 134 D 3407
Page 65

Sirona Dental Systems GmbH 3 Operation
Operator’s Manual SIDEXIS XG Image management
Function The WYSIWYG principle applies here.
The images are always exported in the state in which they are at the time the
command is selected. This means that all processing steps (rotating, filtering,
brightness and contrast adjustment) are also exported.
Exceptions:
● Magnified image details are not exported. Only entire images are
exported.
● The filters
exported.
● Changes in the region of interest must be applied prior to export (See
section "Brightness/contrast adjustment in the region of interest [ 108]").
The target of the export, i.e. path and file name, is defined in the dialog box.
Long file names can be used.
When using TIFF compression, always ensure that the system which has to
import the data is capable of reading this compression format. This is always
the case if the same or a newer SIDEXIS version than the exporting SIDEXIS
version is being used.
The version is shown in the window
description and findings [ 56]").
"Invert"
and
"Color"
are not included in the image to be
"More info"
(see Section "Image
bеЦдблЬ
NOTICE
Compression, which significantly reduces the amount of storage space
required on the disk, can also be selected for X-rays to be exported in the
"Save as type"
parameter 100 can be exported to a normal 3.5" disk.
Further details on compression can be found in Section System settings
[ 136]".
If you wish to export an image in TIFF format in uncompressed form, select
file type
"TIFF komprimiert"
select
Example Exporting the active image to a disk in drive A: under the image name
"Exchange.tif"
1. Insert formatted disk into the (A:) drive
2. In the
3. Select the file format if necessary
4. Confirm by selecting
Remove disk from drive after the save operation is completed.
field. For example, a panoramic X-ray compressed with
"TIFF (*.tif)"
"File name:"
. If the image is to be exported in compressed form,
(*.tif)".
text box, enter
"Exchange.tif"
"Save"
59 62 134 D 3407
D 3407.208.01.10.02 07.2009
65
Page 66

3 Operation Sirona Dental Systems GmbH
Image management Operator’s Manual SIDEXIS XG
Example dialog box
3.5.10 Importing an image
Explanation The
systems, i.e., it is possible to load images that have been produced by a
system other than SIDEXIS as well as images that have been produced and
exported by another SIDEXIS system before.
For images that have already been exported using SIDEXIS, all available
image information such as exposure date and findings are also exported with
the image.
The images integrated into the system in this way can be processed like
normal exposures. Clear assignment of the image to one patient is also
required here.
Before importing an image, the user should be absolutely sure that the
correct patient is registered.
NOTICE
The representation and resolution of imported images depends on the
imported images.
"Import"
CAUTION
function enables image data exchange between different
Scope This function can be used for X-ray and video images.
59 62 134 D 3407
66 D 3407.208.01.10.02 07.2009
Page 67

Sirona Dental Systems GmbH 3 Operation
Operator’s Manual SIDEXIS XG Image management
The system automatically detects whether a compressed format was used for
export.
NOTICE
Exports from non-SIDEXIS programs may not be imported.
Activating the function
➢ Click the button.
or
➢ In the menu bar
Function The path and name of the file to be loaded must be specified in the dialog box.
Long file names can be used.
"[I]mage"/"Import"
, select the menu item
"Imp[o]rt..."
.
Example Importing the previously exported image named
the (A:) drive
Insert disk containing the image to be imported into the (A:) drive.
Example dialog box
"File name:"
In the
Confirm by selecting
The disk may be removed from the drive once the image is displayed.
text box, enter
"Open"
"Exchange.tif"
"Exchange.tif"
from a disk in
bеЦдблЬ
59 62 134 D 3407
D 3407.208.01.10.02 07.2009
67
Page 68

3 Operation Sirona Dental Systems GmbH
Image management Operator’s Manual SIDEXIS XG
3.5.11 Printing images and diagnostic findings
Scope
This function can be used for X-ray and video images (but not for live and still
images).
This function applies only to the active image.
Activating the function
➢ Click the button.
or
➢ Hotkey: Activate the key combination [Ctrl]+[P].
or
➢ In the menu bar
System dialog box Here you can select and configure one of the Windows printers installed in the
system.
In most cases, it offers sufficient space for the image and the associated
description, so that, when the active image is printed, both are printed on one
page.
CAUTION
Printed images are not suitable for diagnostics.
Exception: Special printers that furnish outputs that are explicitly suitable
for diagnostics, e.g. DICOM film imagers.
ª The image is printed on the installed default printer
ª The image is printed on the installed default printer
ª The
"[I]mage"/"Print"
"Print"
system dialog is displayed immediately.
, select the menu item
"Pr[i]nt..."
.
➢ The printout can be checked using the
Section "Print preview [ 68]"). A printout can also be started from this
function.
The portrait or landscape format must be selected manually.
"Print preview"
function (See
3.5.12 Print preview
Explanation SIDEXIS XG features a print preview option.
● This function can be used to obtain a preview of how the printout will look.
● The position and size of the contents of the printout are displayed on the
screen.
● The printout can be started and the printer setup can be invoked directly
from the print preview.
● It is also possible to adjust the position and the size of the page to be
printed in print preview (not during an
"Exam"
!).
59 62 134 D 3407
68 D 3407.208.01.10.02 07.2009
Page 69

Sirona Dental Systems GmbH 3 Operation
Operator’s Manual SIDEXIS XG Image management
Activating the function
Print preview of an
➢ Click the button.
or
➢ Use the
"E[x]am"
"Exam"
menu bar to select the
"Print pre[v]iew..."
menu item.
Print preview of an image
➢ Click the button.
or
➢ Use the
Configuration With only one exception, the print preview uses the symbols from the
SIDEXIS XG buttons.
The page is output to the default printer.
The print setup dialog box of the operating system appears.
The window
● The size and position of an image can be changed there.
● See Section "Page setup for printing [ 69]"
"[I]mage"
menu bar to select the
"Set up page"
is displayed.
"Print pre[v]iew..."
menu item.
bеЦдблЬ
NOTICE
Not active during print preview of an
Print preview, zoom in.
Print preview, zoom out.
Closes print preview.
3.5.12.1 Page setup for printing
Explanation The page to be printed can be configured in the
Configuration ● Pane
● Pane
"Size"
The size of the image to be printed is preset in the
The width-to-height ratio is not and cannot be changed.
"Position"
The position of the image to be printed is preset in the
"Exam"
"Set up page"
"Size"
"Position"
dialog box.
pane.
pane.
59 62 134 D 3407
D 3407.208.01.10.02 07.2009
69
Page 70

3 Operation Sirona Dental Systems GmbH
Image management Operator’s Manual SIDEXIS XG
● Check box
The entered size and position of further print-outs are saved when the
control box
If the check box is deactivated, only a single printout in the print preview
will be printed.
Field "Size" ● "100%" option field
The image is printed out in the original size of the exposure.
● The size depends on the size information contained in the image.
● If the size information is missing in the image, the image will be printed
with a width of 60 mm.
● X-ray images which have been obtained directly from a SIDEXIS
exposure or imported to the SIDEXIS database via "TIF" export are
printed in the size of the sensor area.
● Option buttons
The size of the printout is adjusted so that the maximum printable area is
fully utilized.
● Option buttons
The size can be adjusted.
● Check box
When the check box
print out is limited to the maximum printable area.
Contents of the "Position" field ● Check box
When the check box
margin for punching holes.
The image size is reduced accordingly.
● Positioning box
The image position can be determined via the option buttons in the
positioning box.
"Apply as default values"
"Apply as default values"
"Page-filling"
"Variable"
"Limit to printable size"
"Edge of hole"
is activated.
"Limit to printable size"
"Edge of hole"
is activated, a space is left in left page
is activated, the size of the
3.5.13 Scanning images
Explanation The SIDEXIS XG system can read image data from any TWAIN-compatible
device (scanner, digital camera, etc.) into the database.
If several TWAIN devices are installed on the system, the appropriate device
can be selected using the
"Select scanner"
function.
NOTICE
The representation and resolution of scanned images depends on the
performance and the settings of the scanner as well as the quality of the
original.
Scope All TWAIN-compatible devices are permitted.
The main purpose of this function is to allow you to include conventional Xrays in the SIDEXIS database.
59 62 134 D 3407
70 D 3407.208.01.10.02 07.2009
Page 71

Sirona Dental Systems GmbH 3 Operation
Operator’s Manual SIDEXIS XG Image management
Activating the function
➢ Click the button.
or
➢ Use the
Tips for X-ray exposures When scanning X-ray images, the following must be observed:
● In order to make full use of the SIDEXIS software functions, images must
be scanned in grayscale mode (with 256 levels of gray).
● The scanner must be equipped with a transparency unit in order to ensure
maximum contrast of the scanned images.
● We recommend scanning intraoral X-ray images at a resolution of 600
dpi.
● Panoramic, Ceph or TSA X-ray images should be scanned at a resolution
of 300 dpi.
● If length measurements must be performed, the length must be calibrated
by means of a reference measure on the X-ray image.
"Select scanner" function
➢ Click the button.
or
➢ Use the
"[I]mage"
"[I]mage"
menu bar to select the
menu bar to select the
"[S]can..."
menu item.
"S[e]lect scanner..."
menu item.
bеЦдблЬ
3.5.14 Sending images via Internet as e-mail
Explanation If an Internet email connection has been configured on your SIDEXIS
workstation, you can send images via email.
A description of the configuration can be found in chapter in Section "System
setup [ 136]"
CAUTION
The procedure described here presumes that
activated in the SIDEXIS software.
"MAPI + dialog"
If
starts. Operation of the e-mail program that comes with Windows,
however, is similar.
Scope This function can be used for X-ray and video images (but not for live and still
images).
This function applies only to the active image.
Activating the function
➢ Click the button.
or
➢ Use the
is activated, the preinstalled Windows email program
"[I]mage"
menu bar to select the
"SMTP"
"E-[m]ail"
or
"MAPI"
menu item.
are
59 62 134 D 3407
D 3407.208.01.10.02 07.2009
71
Page 72

3 Operation Sirona Dental Systems GmbH
Image management Operator’s Manual SIDEXIS XG
Dialog box
Structure of the dialog box ● Text field
Enter the email address of the recipient in this field.
● Text field
As an option you can enter the subject of the E-Mail here.
● Text field
The header data of the active image and the name of the practice
automatically appear in this text box.
You may enter further explanations and information regarding the image
to be sent.
● Check box
You can continue to work with SIDEXIS XG while the image is
transmitted.
● Check box
After the e-mail has been successfully sent, a confirmation message
appears on screen.
● Command button
Is used to send the e-mail to the addressee.
While the e-mail is being sent, a progress indicator informs you about the
status of the operation.
"To:"
"Subject:"
"Text:"
"Send in the background"
"Report after sending"
"Send"
3.5.15 Send image
Explanation During installation and configuration of the system, the service engineer may
interface further programs so that these can receive images from SIDEXIS.
For example, you can use this option to forward images for further processing
to measuring programs for implants or for remote X-ray analysis.
The desired image is transmitted with this command and remains available
for when the target application is next opened.
72 D 3407.208.01.10.02 07.2009
59 62 134 D 3407
Page 73

Sirona Dental Systems GmbH 3 Operation
Operator’s Manual SIDEXIS XG Image management
Validity This function can be used for X-ray and video images (but not for live and still
images).
This function applies only to the active image.
The WYSIWYG principle applies here. The images are always exported in the
condition at the time the command is selected. That is, all processing steps
(rotating, filtering, brightness and contrast adjustment) are also exported.
However, this applies only to entire images. Magnified image details are not
exported.
Activating the function
➢ Click the button.
or
➢ From the menu bar
Function If only a single addressee has been configured, then the image is sent without
further queries immediately after giving the command, and the corresponding
program opens simultaneously.
If several programs are interfaced to SIDEXIS in this way, then you select the
desired target application in a dialog box.
"[I]mage"
, select the menu item
"Send ima[g]e"
.
3.5.16 Move image
bеЦдблЬ
Explanation This command makes it possible to move images that were created for the
wrong patient to another patient.
● Image movements are recorded and can be undone by moving the
images once again.
● Saved views are also moved in this process.
● If an image is moved that is part of one or more examinations, then the link
to the moved image remains intact in the examinations.
- However, the image will no longer be displayed in the affected
examinations.
- If the image is moved back to the original location, then it will be
displayed once again in the affected examinations.
● If the image of a 3D volume exposure is moved, then the entire 3D volume
will be moved with all of the 2D images generated for it.
NOTICE
Entries in the optional X-ray control book are not moved!
These are to be corrected subsequently using comments.
NOTICE
If an image is moved, then the procedure is logged in the PDATA/sibdel.log file.
Scope This function can be applied to all saved images.
This function applies only to the active image.
59 62 134 D 3407
D 3407.208.01.10.02 07.2009
73
Page 74

3 Operation Sirona Dental Systems GmbH
Image acquisition Operator’s Manual SIDEXIS XG
Activating the function
➢ Click the button.
or
➢ Use the
"[I]mage"
menu bar to select the
"Move"
menu item.
ª The
Selecting the (target) patients 1. Select the (target) patient.
2. Press the
3. Press the
ª The active image has been moved.
"Register patient"
"OK"
ª A security dialog box is displayed.
"OK"
window opens.
button.
button.
3.6 Image acquisition
3.6.1 General
Explanation When a digital X-ray image is acquired with SIDEXIS, the PC and the
SIDEXIS software must be prepared for the exposure in addition to the usual
operation of the X-ray tube assembly or panoramic unit. The PC must
therefore be made ready for exposure.
As soon as the PC is ready for exposure and SIDEXIS is ready to take an Xray, a dialog box appears on the monitor as control.
In an X-ray exposure, the dose area product can be entered immediately
following image creation. This value is then saved with the image.
3.6.2 Safety instructions
CAUTION
Before releasing radiation, the user should always ensure that the PC and
software are ready for exposure and that the correct patient is registered
in the system.
CAUTION
Since programs running simultaneously under Windows can interfere with
each other, it is recommended not to switch to another program as long as
exposures are being taken. Otherwise the consistency and reliability of
such exposures cannot be fully guaranteed.
CAUTION
Immediately after the X-ray is taken, the acquired image is automatically
saved to the patient database. This ensures a high level of data security.
Once the new X-ray has been saved, it is displayed in a window on the
screen.
74 D 3407.208.01.10.02 07.2009
59 62 134 D 3407
Page 75

Sirona Dental Systems GmbH 3 Operation
Operator’s Manual SIDEXIS XG Image acquisition
In contrast to X-rays, exposures with the video camera are possible even
when the patient is not registered. The information
appears in the title bar. If you later wish to save your video exposure and the
patient has not yet been registered, you can register him or her afterwards.
However, in order to avoid errors when saving video exposures and to ensure
a uniform workflow, we recommend registering the patient in advance even
when working with the video camera.
"Unknown patient"
CAUTION
Before saving the video exposures, the user should make sure that the
correct patient is registered in the system!
SIDEXIS creates a description of every X-ray or video exposure taken. This
description is automatically filled with certain information following an
exposure. The data can be changed or updated (diagnostic findings) either
immediately after the exposure has been taken or at a later moment. For
details please refer to section Image description and findings [ 56]".
NOTICE
Please note that the number of images which can be opened
simultaneously is limited and a large number of open images reduces the
overall system performance. Images which are no longer required should
therefore always be closed.
3.6.3 Intraoral X-rays
3.6.3.1 Single intraoral X-ray exposures
Explanation The first alternative serves for producing a single intraoral image. In this case
readiness for exposure for one single image is activated. After the ready
dialog box is displayed and radiation is subsequently released, the new image
appears on the screen. The process is completed. With this option, it is
possible to jump to image description or diagnostics automatically before or
after each exposure if the system has been configured correspondingly. For
further details, please refer to Section "Exposure settings [ 136]".
Activating the function
➢ Click the button.
or
➢ Hotkey: Activate the key combination [Ctrl]+[Shift] +[I].
or
➢ In the menu bar
"S[i]ngle exposure"
"[I]mage"/"[I]ntraoral X-ray"
.
, select the menu item
bеЦдблЬ
59 62 134 D 3407
D 3407.208.01.10.02 07.2009
75
Page 76

3 Operation Sirona Dental Systems GmbH
Image acquisition Operator’s Manual SIDEXIS XG
3.6.3.2 Multiple exposure
Explanation The
Activating the function
"Multiple exposure"
exposures of the same patient, without having to again make the system
ready and select the X-ray acquisition unit on the PC. After an intraoral X-ray
is taken, readiness for exposure is restored automatically without any user
interaction. This is of great advantage especially if the PC and X-ray sensor
are located at different places. Once all X-rays are taken, the process is
completed by canceling the ready dialog box.
➢ Click the button.
or
➢ Hotkey: Activate the key combination [Ctrl]+[Shift] +[M].
or
➢ In the menu bar
"[M]ultiple exposure"
command can be used to take several intraoral X-ray
"[I]mage"/"[I]ntraoral X-ray"
.
, select the menu item
3.6.3.3 Templates for intraoral exposures
Explanation You can select a template for intraoral exposure series from a template list.
This feature is part of the exam concept of SIDEXIS XG.
You can create your own X-ray image series within the
More information can be found in Section System setup [ 136]".
"Templates"
function.
Activating the function
➢ Click the button.
or
➢ Hotkey: Activate the key combination [Ctrl]+[N].
or
➢ Use the
or
➢ In the menu bar
"[N]ew..."
"E[x]am"
.
menu bar to select the
"[N]ew..."
"[I]mage"/"[I]ntraoral X-ray"
, select the menu item
menu item.
76 D 3407.208.01.10.02 07.2009
59 62 134 D 3407
Page 77

Sirona Dental Systems GmbH 3 Operation
Operator’s Manual SIDEXIS XG Image acquisition
Selection dialog box
3.6.3.4 Tooth selection
Explanation To enable the user to enter the number of the affected tooth, the findings
dialog box explained in detail in the chapter on image description is displayed.
Click the desired tooth in the lower part of the dialog box and confirm with
"OK"
. The rest of the box is not yet relevant at this moment and is therefore
unavailable for selection.
bеЦдблЬ
Selection dialog box
Here as well the process is terminated by canceling the ready dialog box or
specifying the tooth.
A corresponding message appears on the status bar during multiple
exposures.
59 62 134 D 3407
D 3407.208.01.10.02 07.2009
77
Page 78

3 Operation Sirona Dental Systems GmbH
Image acquisition Operator’s Manual SIDEXIS XG
3.6.3.5 Operation with several intraoral X-ray units
If several X-ray units are installed and networked in a practice, then an X-ray
acquisition unit must be selected before taking an intraoral X-ray exposure.
The selection is made by clicking the desired unit in the
column and it is highlighted by a blue bar.
Selection dialog box
"Status / Name"
Acquisition units marked with a question mark are possibly not switched on.
Acquisition units which are crossed out are possibly busy.
After the X-ray acquisition unit has been selected, further dialog boxes show
how the connection between the acquisition unit and the calling computer is
established. These dialog boxes can provide important information in case of
connection errors.
3.6.3.6 Image acquisition
Explanation As soon as the message
by the computer. You can now release the exposure at the unit.
After further messages the following dialog box which informs you about the
progress of the data transfer operation finally appears. Note that the
button is now unavailable for safety reasons.
"Waiting for X-ray"
appears, the X-ray unit is enabled
"Quit"
78 D 3407.208.01.10.02 07.2009
59 62 134 D 3407
Page 79

Sirona Dental Systems GmbH 3 Operation
Operator’s Manual SIDEXIS XG Image acquisition
Acquisition dialog box
Function As long as SIDEXIS is busy with taking an intraoral X-ray exposure, a green
indicator flashes as a warning below the intraoral acquisition unit symbol in
the dialog box.
If the system is equipped with an X-ray box, readiness for exposure is also
signaled by a permanently lit green LED on this X-ray box.
As long as this message is displayed on the screen and the indicator in the
dialog box flashes or the green LED on the X-ray box lights up, the exposure
can be taken as in conventional radiography. The X-ray sensor is then put into
a ready status. Signal transmission starts as soon as the X-rays hit the
sensor.
bеЦдблЬ
Activating the function
CAUTION
If no such ready dialog box appears, or the indicator in the dialog box does
not flash, or the X-ray box LED does not light up, do not take any X-rays of
the patient until the problem has been rectified.
Readiness for exposure ends before detection of radiation when you press
"Quit"
the
or the [Esc] key.
NOTICE
Information on the USB box
More information can be found in the documentation: SIDEXIS - Intraoral
USB Box - Operating and Installation Instructions REF 59 15 702
3.6.4 Panoramic, Ceph and TSA X-ray exposures
➢ Click the button.
or
➢ Hotkey: Activate the key combination [Ctrl]+[Shift] +[P].
or
59 62 134 D 3407
D 3407.208.01.10.02 07.2009
79
Page 80

3 Operation Sirona Dental Systems GmbH
Image acquisition Operator’s Manual SIDEXIS XG
Operation with several panoramic X-ray
units
Selection dialog box
➢ Use the
If several X-ray units are installed and networked in a practice, then an X-ray
acquisition unit must be selected before taking a panoramic, Ceph or TSA Xray exposure. The selection is made by clicking the desired unit in the
/ Name"
"[I]mage"
column and it is highlighted by a blue bar.
menu bar to select the
"[P]anoramic X-ray"
menu item.
"Status
Acquisition units marked with a question mark are possibly not switched on.
Acquisition units which are crossed out are possibly busy.
After the X-ray acquisition unit has been selected, further dialog boxes show
how the connection between the acquisition unit and the calling computer is
established. These dialog boxes can provide important information in case of
connection errors.
Image acquisition As soon as the message
by the computer. You can now release the exposure at the unit.
After further messages the following dialog box which informs you about the
progress of the data transfer operation finally appears. Note that the
button is now unavailable for safety reasons.
Different X-ray exposures are automatically recognized and differentiated by
the system.
As long as SIDEXIS is busy taking an X-ray exposure, a green indicator
flashes as a warning in the exposure dialog box.
CAUTION
If no such ready dialog box appears, or the indicator in the dialog box does
not flash, it is not possible to release radiation on the ORTHOPHOS until
the problem has been rectified.
"Waiting for X-ray"
appears, the X-ray unit is enabled
"Quit"
80 D 3407.208.01.10.02 07.2009
59 62 134 D 3407
Page 81

Sirona Dental Systems GmbH 3 Operation
Operator’s Manual SIDEXIS XG Image acquisition
Acquisition dialog box for ORTHOPHOS
DS units
Acquisition dialog box for ORTHOPHOS
XG DS units
Readiness for exposure ends when you press the
Once the exposure has been started, it can only be stopped via the
ORTHOPHOS.
"Quit"
or the [Esc] key.
bеЦдблЬ
Activating the function
59 62 134 D 3407
D 3407.208.01.10.02 07.2009
While the X-ray data is being transferred for ORTHOPHOS XG DS units, a
preview image of the X-ray exposure is formed in the acquisition dialog box.
3.6.5 3D X-ray exposure
➢ Click the button.
or
➢ Hotkey: Activate the key combination [Ctrl]+[Shift] +[3].
81
Page 82

3 Operation Sirona Dental Systems GmbH
Image acquisition Operator’s Manual SIDEXIS XG
or
➢ Use the
Operation with several 3D X-ray units If several X-ray units are installed and networked in a practice, then an X-ray
acquisition unit must be selected before taking a 3D X-ray exposure. The
selection is made by clicking the desired unit in the
and it is highlighted by a blue bar.
Selection dialog box
"[I]mage"
menu bar to select the
"[3]D-Scan"
"Status / Name"
menu item.
column
Acquisition units marked with a question mark are possibly not switched on.
Acquisition units which are crossed out are possibly busy.
After the X-ray acquisition unit has been selected, further dialog boxes show
how the connection between the acquisition unit and the calling computer is
established. These dialog boxes can provide important information in case of
connection errors.
Image acquisition As soon as the message
by the computer. You can now release the exposure at the unit.
After further messages the following dialog box which informs you about the
progress of the data transfer operation finally appears. Note that the
button is now unavailable for safety reasons.
Different X-ray exposures are automatically recognized and differentiated by
the system.
As long as SIDEXIS is busy with taking an X-ray exposure, a green indicator
flashes as a warning in the acquisition dialog box.
CAUTION
If no such ready dialog box appears, or the indicator in the dialog box does
not flash, it is not possible to release radiation on the GALILEOS until the
problem has been rectified.
"Waiting for X-ray"
appears, the X-ray unit is enabled
"Quit"
Readiness for exposure ends when you press the
Once the exposure has been started, it can only be stopped via the
GALILEOS.
"Quit"
or the [Esc] key.
59 62 134 D 3407
82 D 3407.208.01.10.02 07.2009
Page 83

Sirona Dental Systems GmbH 3 Operation
Operator’s Manual SIDEXIS XG Image acquisition
3.6.6 Panoramic X-ray acquisition with GALILEOS
Explanation With a GALILEOS system, panoramic views can be generated without
GALAXIS visualization software.
Command Please refer to the GALILEOS documentation.
3.6.7 Video exposure
Explanation The integration of video exposures in a SIDEXIS XG
this section.
Function As a rule, the live video image of the SIROCAM is activated by removing the
camera from its holder. Then you can freeze (still image) the displayed live
image or take the actual video exposure with the help of the foot switch. If an
extraoral full-face video camera is connected in addition, then actuating the
foot switch while the SIROCAM is in its holder activates an extraoral live
image.
In systems equipped with both a SIROCAM and an extraoral video camera,
all relevant commands refer to the SIROCAM as long as it is removed from
its holder. When the SIROCAM is in its holder, then the extraoral camera has
priority. However, you can also switch between the two cameras in the
context menu of an active video image.
In addition to this method of taking exposures by foot switch control, there is
also a number of control options available in the software user interface which
are described below:
"Exam"
is described in
3.6.7.1 Live video image (SIROCAM)
Direct activation of the function ➢ Remove the SIROCAM from its holder.
ª The live video image starts
NOTICE
bеЦдблЬ
If necessary, switch to the SIROCAM in the pop-up menu of the video
image.
Indirect activation of the function It is also possible to start open an empty video window first.
➢ Click the button.
or
➢ Hotkey: Activate the key combination [Ctrl]+[Shift] +[V].
or
➢ Use the
ª An empty white window appears.
➢ Now remove the SIROCAM from its holder.
ª The live video image starts
"[I]mage"
menu bar to select the
"[V]ideo"
menu item.
3.6.7.2 Starting a live video image (extraoral full-face camera)
Activating the function ➢ When the SIROCAM is in the holder, use the menu bar
59 62 134 D 3407
D 3407.208.01.10.02 07.2009
"[I]mage"
to select
83
Page 84

3 Operation Sirona Dental Systems GmbH
Image acquisition Operator’s Manual SIDEXIS XG
the menu item
ª The live video image starts
"[V]ideo"
.
NOTICE
If necessary switch to the full-face camera in the context menu of the video
image.
3.6.7.3 Video start/stop
Video Stop (live image > still image) ➢ In the context menu for the image, select the menu item
.
Stop"
or
➢ Hotkey: Press the
or
➢ Briefly press the foot switch (freezing takes place when you release the
switch).
Video start (still image >live image) ➢ In the context menu for the image, select the menu item
Stop"
.
or
➢ Hotkey: Press the
"[Enter]"
"[Enter]"
key.
key.
"Video Start/
"Video Start/
or
➢ Briefly actuate the foot switch of the hardware.
3.6.7.4 Taking an exposure (Video still image > Save)
Explanation There are several possibilities depending on the type of system or the
treatment center in which the SIROCAM is integrated.
Activating the function ➢ Hotkey: Activate the key combination [Ctrl]+[S].
ª The current still image is digitized and a new live image is produced.
NOTICE
The digitized video image is not saved automatically.
Addendum 1 Only for:
●SIROCAM 2
● SIVISION 1
●SIROCAM Box
● IVISION 3 Compact
● SIVISION 3 on C6, C8 or ProFeel
● SIVISION 3 with camera in the assistant element
➢ Press the foot switch for a longer time (approx. 2 seconds).
ª In this case the current still image is saved automatically after digitization.
ª A new live image is produced after saving.
59 62 134 D 3407
84 D 3407.208.01.10.02 07.2009
Page 85

Sirona Dental Systems GmbH 3 Operation
Operator’s Manual SIDEXIS XG Image acquisition
Addendum 2 Only for:
● SIVISION 2
● SIVISION 3 with SIROCAM in the dentist element
➢ Actuate the corresponding function at the treatment system. (Usually, this
is the S key with the “C+” foot switch, or the “C” foot switch to the left).
NOTICE
More details can be found in the operating instructions of your treatment
center.
3.6.7.5 Canceling the exposure and closing the video image
Activating the function ✔ In the live image mode only with SIROCAM
➢ Hang up the SIROCAM.
or
✔ Video live and still image
➢ Hotkey: Press the [Del] key.
NOTICE
Unlike X-rays and video exposures, live video images cannot be scaled.
Please note that on low resolution monitors (800x600 pixels and below)
the live video image will be clipped at the screen margins.
3.6.7.6 Overview
The following illustrations provide a further overview of the relationships:
SIROCAM After the SIROCAM has been removed from its holder, it has priority over an
additionally connected extraoral full-face camera.
However, you can switch to the extraoral camera in the pop-up menu of the
active live video image (right-click to open context menu).
bеЦдблЬ
59 62 134 D 3407
D 3407.208.01.10.02 07.2009
85
Page 86

3 Operation Sirona Dental Systems GmbH
Image acquisition Operator’s Manual SIDEXIS XG
Full-face camera After the SIROCAM has been removed from its holder, it has priority over an
additionally connected extraoral full-face camera. However, you can s wit ch t o
the extraoral camera in the pop-up menu of the active live video image (rightclick to open context menu).
86 D 3407.208.01.10.02 07.2009
59 62 134 D 3407
Page 87

Sirona Dental Systems GmbH 3 Operation
Operator’s Manual SIDEXIS XG Analysis tools
3.7 Analysis tools
Explanation Analysis tools help to make the interpretation of X-ray and video exposures
easier.
3.7.1 Selecting objects in the workspace
bеЦдблЬ
Explanation The standard mouse pointer is used for selecting objects in the workspace.
It has the shape of an arrow.
Scope All objects in the workspace
59 62 134 D 3407
D 3407.208.01.10.02 07.2009
87
Page 88

3 Operation Sirona Dental Systems GmbH
Analysis tools Operator’s Manual SIDEXIS XG
Activating the function
➢ Click the button.
or
➢ Use the
Function There are several ways to select objects in the workspace.
"[A]nalysis"
menu bar to select the
"[S]elect"
menu item.
Single selection:
1. Place the standard mouse pointer above the desired object.
2. Select the object with the left mouse button.
Multiple selection:
1. Press and hold the [Shift] and [Ctrl] key.
2. Place the standard mouse pointer above the desired objects and select
them by left-clicking.
3. Let go of the control elements [Shift] and [Ctrl].
Area selection:
1. While pressing and holding down the left mouse button, draw a selection
frame around the desired objects.
2. Release the left mouse button.
3.7.2 Restore original image
Explanation The
"Starting image"
changes and to return to the original view in any stage of editing. This
command refers to all image manipulations including the image filters as well
as to the position of the images within the workspace.
function allows you to discard all previously made
NOTICE
Any objects placed in the image will be discarded.
Scope This function can be used for X-ray and video images (but not for live and still
images).
As this function recurs to saved original images, it cannot be used for images
that have not been saved yet.
Activating the function
➢ Click the button.
or
➢ Hotkey: Activate the key combination [Ctrl]+[Y].
or
➢ Select
"Starting image"
from the pop-up menu.
or
➢ Use the
"[A]nalysis"
menu bar to select the
"[S]tarting image"
59 62 134 D 3407
menu item.
88 D 3407.208.01.10.02 07.2009
Page 89

Sirona Dental Systems GmbH 3 Operation
Operator’s Manual SIDEXIS XG Analysis tools
NOTICE
For safety reasons, a message prompting you to reconfirm the command
is displayed before the changes are undone.
3.7.3 Measurement tools
3.7.3.1 Measuring lengths
Explanation The purpose of this function is to determine dimensions, distances or size
ratios of the objects in the X-ray image. It is also possible to measure curved
lines by setting interpolation points.
CAUTION
Always use a reference object as a reference for length measurements,
intraoral exposures and ORTHOPHOS exposures! See Section
"Correcting the results of a length measurement [ 91]"
NOTICE
The indicated lengths are relative values.
They depend on the dimensions of the sensors used for acquiring the
images.
This also applies to imported images.
NOTICE
Measurement results on imported images may, and on video exposures
will, only appear as pixel values if the imported data does not contain the
necessary information for the exact determination of the length.
This may be the case, for instance, with exposures which were not taken
with SIDEXIS.
The display can, however, be switched to millimeters via the
measurement"
measurement [ 91]").
function (see section "Correcting the results of a length
3.7.3.1.1 Validity
Explanation This function can be used for X-ray and video images (but not for live and still
images).
"Adapt
bеЦдблЬ
Special case for TSA exposures with an
ORTHOPHOS XG Plus:
59 62 134 D 3407
D 3407.208.01.10.02 07.2009
CAUTION
There are different magnification factors for TSA exposures with an
ORTHOPHOS XG Plus!
Please note that the magnifications of the partial images vary according to
the technique concerned.
89
Page 90

3 Operation Sirona Dental Systems GmbH
Analysis tools Operator’s Manual SIDEXIS XG
Configuration
● On the left are three transverse partial images (TSA) with slightly different
magnifications depending on the linear position (magnification as with
normal TSA thin layer).
● On the right is the lateral partial image with a magnification of
approximately 1:1.24 (magnification similar to that with panoramic
exposures).
Nominal magnifications for TSA exposures with an ORTHOPHOS
XG Plus:
Exposure Area Magnification factor
TSA Exposures (3x)
Anterior tooth 1:1,38 1:1,24 0-5
Canine tooth 1:1,38 1:1,24 6-14
Pre-molar 1:1.34 1:1,24 15-35
Molar 1:1.40 1:1,24 36-65
Magnification Factor
Linear positions
Lateral (1x)
Note: All magnifications are approximate values in terms of the positioning
precision in relation to objects in the center of the layer
3.7.3.1.2 Measurement
Activating the measurement tool
➢ Click the button.
or
➢ In the menu bar
Simple linear measurement 1. Determine the starting point with the mouse pointer.
2. Confirm the starting point by clicking the left mouse button.
3. Drag the mouse pointer to the desired end point.
ª Both points are connected by a line.
4. Confirm the measured length by double-clicking the left mouse button.
"[A]nalysis"
, select the
"Measure [l]ength"
function.
Measuring the length across several
interpolation points
Indication of the measured value ● The length between starting point and end point is displayed next to the
1. Determine the starting point with the mouse pointer.
2. Confirm the starting point by clicking the left mouse button.
3. Drag the mouse pointer to the desired first interpolation point.
4. Confirm this interpolation point by clicking the left mouse button.
5. Repeat steps 3 and 4 until you have reached the desired end point.
ª The length that has just been measured is then extended segment by
segment.
6. Confirm the measured length by double-clicking the left mouse button.
connection line as well as on the status bar at the bottom of the program
window.
● The total length is displayed on the status bar and next to the last line
segment.
59 62 134 D 3407
90 D 3407.208.01.10.02 07.2009
Page 91

Sirona Dental Systems GmbH 3 Operation
Operator’s Manual SIDEXIS XG Analysis tools
● The display next to the line segment is highlighted with a colored bar and
can be moved freely within the workspace.
- At the same time, the measuring section remains connected to the
measured value by a broken line.
NOTICE
If several length measurements are displayed simultaneously, the status
bar always shows the result of the individually selected length
measurement.
➢ By switching between the active length measurements, you can
compare the values.
Example screen
Saving a measurement Length measurements can be saved either within a view or within an exam.
3.7.3.2 Correcting the results of a length measurement
Explanation If the image sensor is not aligned exactly orthogonal to the tube assembly
during an intraoral exposure, but is slightly inclined, then the measured
distances are too large. A projection correction is provided for this case.
NOTICE
A correction entered by the user remains active as long as the respective
image is open.
Correction values are not saved; they are therefore lost as soon as the
image is closed.
NOTICE
bеЦдблЬ
If several images are displayed, then the correction refers only to the active
image in which the correction was made.
Scope This function can only be selected if at least one length measurement is
already available.
59 62 134 D 3407
D 3407.208.01.10.02 07.2009
91
Page 92

3 Operation Sirona Dental Systems GmbH
Analysis tools Operator’s Manual SIDEXIS XG
NOTICE
The correction values are sufficiently accurate only in the vicinity of the
reference value, because the angle of the sensor in relation to the tooth
may be different in other image areas.
Activating the measurement tool
➢ Click the button.
or
➢ In the menu bar
Adapting the length measurement 1. First measure a known reference length (e.g. a root canal file with defined
length) on the image.
2. Open the
ª The previously measured value appears as
box.
3. Enter the actual value as correction value in the
box. You can adjust this value in 0.1 mm steps using the two arrow keys.
ª SIDEXIS XG displays the calculated correction factor.
"[A]nalysis"
"Adapt measurement"
, select the
dialog box.
"Adapt [m]easurement"
"Length"
in the dialog
"Calculated length"
function.
input
4. Close the dialog box by clicking the
ª For all subsequent length measurements in this image the calculated
correction factor is used.
ª To make the user aware of the activated correction factor, all measured
values receive the label
Deactivating the correction 1. If further measurements are to be made without length correction, open
"Adapt measurement"
the
adapt"
option button.
2. Then close the dialog box by clicking the
Example ●
Example screen
"Length"
●
"Calculated length"
●
"New factor"
All subsequent measurements in the same image are multiplied by 0.897.
= 11.26 mm
= 0,897
"ref."
dialog box once again and activate the
= 10,10 mm
"OK"
button.
on the status bar and in the image.
"OK"
button.
"Don't
92 D 3407.208.01.10.02 07.2009
59 62 134 D 3407
Page 93

Sirona Dental Systems GmbH 3 Operation
Operator’s Manual SIDEXIS XG Analysis tools
3.7.3.3 Measuring angles
Explanation SIDEXIS XG also provides a function for easily determining angles.
NOTICE
The indicated angles are relative values.
They depend on the dimensions of the sensors used for acquiring the
images.
This also applies to imported images.
Scope This function can be used for X-ray and video images (but not for live and still
images).
For imported images square pixels are assumed for determining angles if the
corresponding information could not be detected during import.
Activating the measurement tool
➢ Click the button.
or
➢ In the menu bar
Handling Angle measurements are handled similarly to length measurements.
1. Position the mouse pointer on the spot where you want to place the apex
of the angle.
2. Confirm this position by clicking the left mouse button.
3. Draw the first leg of the angle to be measured using the mouse pointer.
4. Confirm this position by clicking the left mouse button.
5. Draw the second leg of the angle by dragging the mouse pointer. Here it
is possible to measure to the left or to the right.
6. Confirm this position by clicking the left mouse button.
● Angles of up to 180° can be measured. The angle is displayed between
the two legs as well as on the status bar at the bottom of the window.
● The angle measurement in the image is highlighted with a colored bar and
can be moved freely within the workspace.
- At the same time, the angle measurement remains connected to the
legs of the angle by a broken line.
"[A]nalysis"
, select the
"Measure [a]ngle"
function.
bеЦдблЬ
59 62 134 D 3407
D 3407.208.01.10.02 07.2009
93
Page 94

3 Operation Sirona Dental Systems GmbH
Analysis tools Operator’s Manual SIDEXIS XG
Example screen
3.7.3.4 Measuring bone density
Explanation This function enables a relative measurement of the bone density. An
absolute measurement is not possible because of the lack of calibration.
However, bone density measurements can be used to confirm or reject
findings more easily by quantitative statements.
NOTICE
The indicated angles are relative values. They depend on the dimensions
of the sensors used for acquiring the images.
This also applies to imported images.
Application examples ● Decision on the existence of caries/periodontosis on the side of the teeth
● Decision on the progress of caries/periodontosis
● Apex detection in root treatment
● Localization of inflammations
● Decision whether the inflammation is clearing up or getting worse
● Decision on bone mass build-up/reduction on implants
Scope This measurement tool works only with X-ray exposures.
Activating the measurement tool
➢ Click the button.
or
➢ In the menu bar
function.
Operation 1. Determine the starting point with the mouse pointer.
2. Confirm the starting point by clicking the left mouse button.
3. Drag the mouse pointer to the desired end point.
ª The current density is displayed as a percentage value next to the
cursor.
"[A]nalysis"
, select the
"Measure de[n]sity profile"
4. Confirm the end point by double-clicking the left mouse button.
ª The
"Display density profile"
window is displayed.
59 62 134 D 3407
94 D 3407.208.01.10.02 07.2009
Page 95

Sirona Dental Systems GmbH 3 Operation
Operator’s Manual SIDEXIS XG Analysis tools
3.7.3.5 Displaying the density profile
Explanation After determining a measuring section with the help of the
function in the active image, this function can be used to display the
profile"
density along this measuring section.
"Measure density
CAUTION
No filters such as
Scope This display works only for density profile measuring sections.
Opening the display dialog box The dialog box opens via the
"Relief"
may be used before the measurement.
"Attributes"
function.
CAUTION
The measuring section to be displayed must be selected.
The smoothing filter may be used, provided that it acts on the entire
measuring section.
➢ Hotkey: Simultaneously press the [Alt] and [Enter] keys.
or
➢ Click the button.
or
➢ In the menu bar
"[A]nalysis"
, select the
"[P]roperties…"
function.
bеЦдблЬ
Elements of the display dialog box
59 62 134 D 3407
D 3407.208.01.10.02 07.2009
● The length of the green bars represents the relative density.
95
Page 96

3 Operation Sirona Dental Systems GmbH
Analysis tools Operator’s Manual SIDEXIS XG
- Bright image areas generate correspondingly long bars, whereas dark
image areas generate short bars.
● The chart is spread out when it is produced by assigning the value 0 to the
lowest density and the maximum bar length to the highest density.
- This spreading can be deactivated by clicking the
checkbox.
Copy The values displayed in the profile can be copied as uncorrected numerical
values (0 to 255) to the Windows clipboard with the
This feature enables the user to perform an evaluation in other programs.
"Uncorrected"
"Copy"
button.
Allocation between measuring location and
diagram
The viewfinder in the
of establishing a clear relationship between the measuring position and the
diagram.
"Display density profile"
dialog box offers the possibility
1. Move the mouse pointer over the viewfinder.
2. Drag the viewfinder icon – while pressing and holding down the right
mouse button – from the profile display to the measuring section.
ª The current position within the measuring section is indicated by a white
line in the profile chart and a small slider below the profile chart.
ª The relative value of the bone density at this position appears in the field
"OK"
next to the
button.
59 62 134 D 3407
96 D 3407.208.01.10.02 07.2009
Page 97

Sirona Dental Systems GmbH 3 Operation
Operator’s Manual SIDEXIS XG Analysis tools
3.7.4 Display tools
3.7.4.1 Zooming the image
Explanation The zoom function can be used to change the display scale of the active
image.
A distinction must be made here between two different types of zoom.
● Basic zooming where the entire image is magnified or reduced in size.
In this case, the display size of the image changes.
● Zooming in which only the detail view changes.
The display size of the image remains intact here.
Scope This function can be used for X-ray and video images (but not for live and still
images).
Activating the function
Enlarging
➢ Click the button.
or
➢ Hotkey: Press the [+] key.
or
➢ Select
"Enlarge"
from the pop-up menu.
bеЦдблЬ
or
➢ In the menu bar
"[E]nlarge"
"[V]iew"/"[I]mage"/"[Z]oom"
.
, select the menu item
Reducing
➢ Click the button.
or
➢ Hotkey: Press the [-] key.
or
➢ Select
or
➢ In the menu bar
"Reduce"
"Re[d]uce"
from the pop-up menu.
"[V]iew"/"[I]mage"/"[Z]oom"
.
, select the menu item
More details
➢ Click the button.
or
➢ Hotkey: Activate the key combination [Ctrl]+[+].
or
59 62 134 D 3407
D 3407.208.01.10.02 07.2009
➢ Roll the mouse scroll wheel forward (up).
or
97
Page 98

3 Operation Sirona Dental Systems GmbH
Analysis tools Operator’s Manual SIDEXIS XG
➢ In the menu bar
.
details"
"[V]iew"/"[I]mage"/"[Z]oom"
, select the menu item
"More
Less details
➢ Click the button.
or
➢ Hotkey: Activate the key combination [Ctrl]+[-].
or
➢ Roll the mouse scroll wheel back.
or
➢ In the menu bar
.
details"
Function Each time you activate a zoom function, the display scale is increased or
decreased by one step.
When combined with the
indicated (see section "Viewport [ 99]").
"[V]iew"/"[I]mage"/"[Z]oom"
"Viewport"
function, the selected zoom factor is
, select the menu item
"Less
3.7.4.2 Panning
Explanation If the image to be displayed is larger than the available window (e.g. at a zoom
factor larger than 1:1), then you can pan around the image (thus displaying
another image detail) either in horizontal or vertical direction using the scroll
bars.
"Hand"
The so-called
around the image simultaneously in horizontal and vertical direction.
mode is a simple and intuitive method for panning
Scope
Activating the function
Indication of the active status
Operation After left-clicking into the image window, you can pan around the image by
NOTICE
If the image to be displayed is larger than the available window in the Full
Frame mode, the Hand mode is automatically activated.
This function can be used for X-ray and video images (but not for live and still
images) if only a partial image is visible.
➢ Click the button.
or
➢ Hotkey: Activate the [Ctrl] key + double-click with the left mouse key
or
➢ Use the
As long as this function is active, the mouse pointer has another shape.
dragging the mouse in the desired direction.
"[A]nalysis"
menu bar to select the
"[H]and"
menu item.
98 D 3407.208.01.10.02 07.2009
59 62 134 D 3407
Page 99

Sirona Dental Systems GmbH 3 Operation
Operator’s Manual SIDEXIS XG Analysis tools
3.7.4.3 Viewport
Explanation A further tool is available for viewing images which cannot be displayed on the
workspace in their entirety due to their size or the selected zoom factor.
● This tool is referred to as
● With the help of the
positioned and displayed easily and quickly.
● The
● The zoom factor of the image detail is indicated.
It thus represents an alternative to positioning using scroll bars, keyboard and
the Shift visible image portion [ 98] function.
Scope This function can be used for X-ray and video images (but not for live and still
images).
Activating the function
➢ Click the button.
or
➢ Use the
"Viewport"
is currently on display and on the other hand, permits intuitive twodimensional movement of this section.
tool clarifies, on the one hand, which section of the image
"[V]iew"
menu bar to select the
"Viewport"
"Viewport"
.
tool, different image areas can be
"[E]nlarge"
menu item.
bеЦдблЬ
Display
An additional window is displayed in the workspace for this function. This socalled
"Viewport"
If you switch to another image or change the image dimensions (e.g. by
rotation), the
Within the
window.
The zoom factor of the image detail is indicated in the lower right corner of the
"Viewport"
displays a smaller copy of the complete active image.
"Viewport"
"Viewport"
window.
also changes accordingly.
, a red frame indicates the area displayed in the image
Operation via the Viewport window 1. Place the mouse pointer within the red frame.
2. Press the left mouse button.
3. Move the mouse.
59 62 134 D 3407
D 3407.208.01.10.02 07.2009
99
Page 100

3 Operation Sirona Dental Systems GmbH
Analysis tools Operator’s Manual SIDEXIS XG
ª The red frame follows the mouse pointer movement.
4. Release the left mouse button when you have reached the desired area.
The new image detail is now displayed in the related image window.
Operation via the Hand mode The image detail can be moved in the Hand mode (See section "Shift visible
image portion" [ 98]).
Additional context menu A context menu is available as an additional aid in the
used to position the displayed image area in the four image quadrants or in
the center of the image.
Depending on the zoom factor and size of the image window, this creates
partial images which overlap to varying degrees. Furthermore, you can use
the pop-up menu to jump back and forth between the current and last position
(e.g. to compare sides).
"Viewport"
. It can be
3.7.4.4 Tiling
Explanation If several image windows are open simultaneously in the SIDEXIS
workspace, some image information may be hidden due to mutual
overlapping.
The
"Tile"
function arranges all open windows in the available workspace so
that there is no overlap. Under certain circumstances this may lead to a
reduction of the window sizes.
Scope This function can be used for X-ray and video images (but not for live and still
images).
Activating the function
➢ Click the button.
or
➢ In the menu bar
"[T]ile"
.
"[V]iew"/"[I]mage"/"[A]rrange"
, select the menu item
3.7.4.5 Overview
Explanation Function like
Additionally, the zoom is adapted in such a way that no scroll bars are
displayed, if possible. The scroll bars are displayed only if the minimum zoom
factor has been reached. This will fully show all loaded images in the form of
an overview.
Scope This function can be used for X-ray and video images (but not for live and still
images).
Activating the function
➢ Click the button.
or
➢ In the menu bar
"[O]verview"
"Tile"
.
"[V]iew"/"[I]mage"/"[A]rrange"
.
, select the menu item
59 62 134 D 3407
100 D 3407.208.01.10.02 07.2009
 Loading...