


43-1

431
Convertible

Instructions for using
SINGER
Form 30-064 G / 1264 engl. Printed in Western Germany
* A Trademark of THE SINGER COMPANY
SLANT-O-MATIC
Convertible
.. the most versatile sewing machine ever built!

THE CONVERTIBLE 431
. . . represents the ultimate in sewing machine performance. With the
purchase of the new SLANT-O-MATIC, you can take pride in owning
the finest sewing machine ever built. You'll marvel at its almost unbe
lievable ease of operation . . . the remarkable services it performs.
You'll delight in its perfect, beautiful stitching.
• World's first convertible with double-easy threading. Has built-in
threading chart, handy "drop-in" bobbin in front of needle!
• World's first convertible with slant needle and gear drive. Seeing
is easier, sewing smoothest ever. No slipping or stalling.
• World's first convertible with built-in eye-level stitch chart . . .
lets you "tune" the knob for whatever fancy stitch you want.
Add to these major developments in sewing machine design the
following ADVANCED features, and you have a machine far ahead
in design, unequalled in performance.
Copyright 1964 by The Singer Manufacturing Company

OTHER OUTSTANDING FEATURES ARE:
• CYLINDER BED simplifies sewing of articles of
a curved or cylindrical nature — converts to
flat bed with the push of a button.
• PERFECT STITCHING . . . straight and zigzag.
• NEEDLE CLAMP holds one or two regular
needles — same or different sizes for exciting
two needle stitching.
• AUTOMATIC THREAD CONTROL ensures a
smooth flow of thread from spool to needle for
uniform stitch setting.
• CLIP-ON TYPE calibrated throat plate . . . easy
to remove and replace.
• HINGED FACE PLATE, houses threading chart
and swings open for easy access to oiling points.
• BUILT-IN MOTOR with worm wheel drive, no
belts required, excellent penetrating power
when sewing heaviest materials without manual
assistance. ,
• BUILT-IN LIGHT focused on sewing area.
• ALL MECHANISM completely enclosed.
• SPECIAL PURPOSE FOOT.
• FLEXIBLE SEAM GUIDE.
• HINGED BED EXTENSION for increased work
area.
SUPERFINE CONTROL of stitch length ensures # COMPARTMENT for attachments and accesso-
perfect satin stitching. ries built into detachable cloth plate.
SINGER SERVICE
Wherever you go you will find expert, dependable SINGER* Service
close at hand. SINGER is interested in helping you keep your SINGER
Sewing Machine in top running condition. That is why you should
always call your SINGER SEWING CENTRE if your machine ever
requires adjustment or repair. Only from your SINGER SEWING
CENTRE can you obtain the services of a trained SINGER repair man
and warranted SINGER* parts.
EVERYTHING FOR THE WOMAN WHO SEWS
The answer to your sewipg needs is at your SINGER SEWING
CENTRE. There you will find a wide choice of sewing aids, notions,
sewing information and services. Look for the famous red "S" and
SINGER trademarks on your SINGER SEWING CENTRE and the ever
ready SINGER van. See phone book under SINGER SEWING
MACHINE CO. for address nearest you.
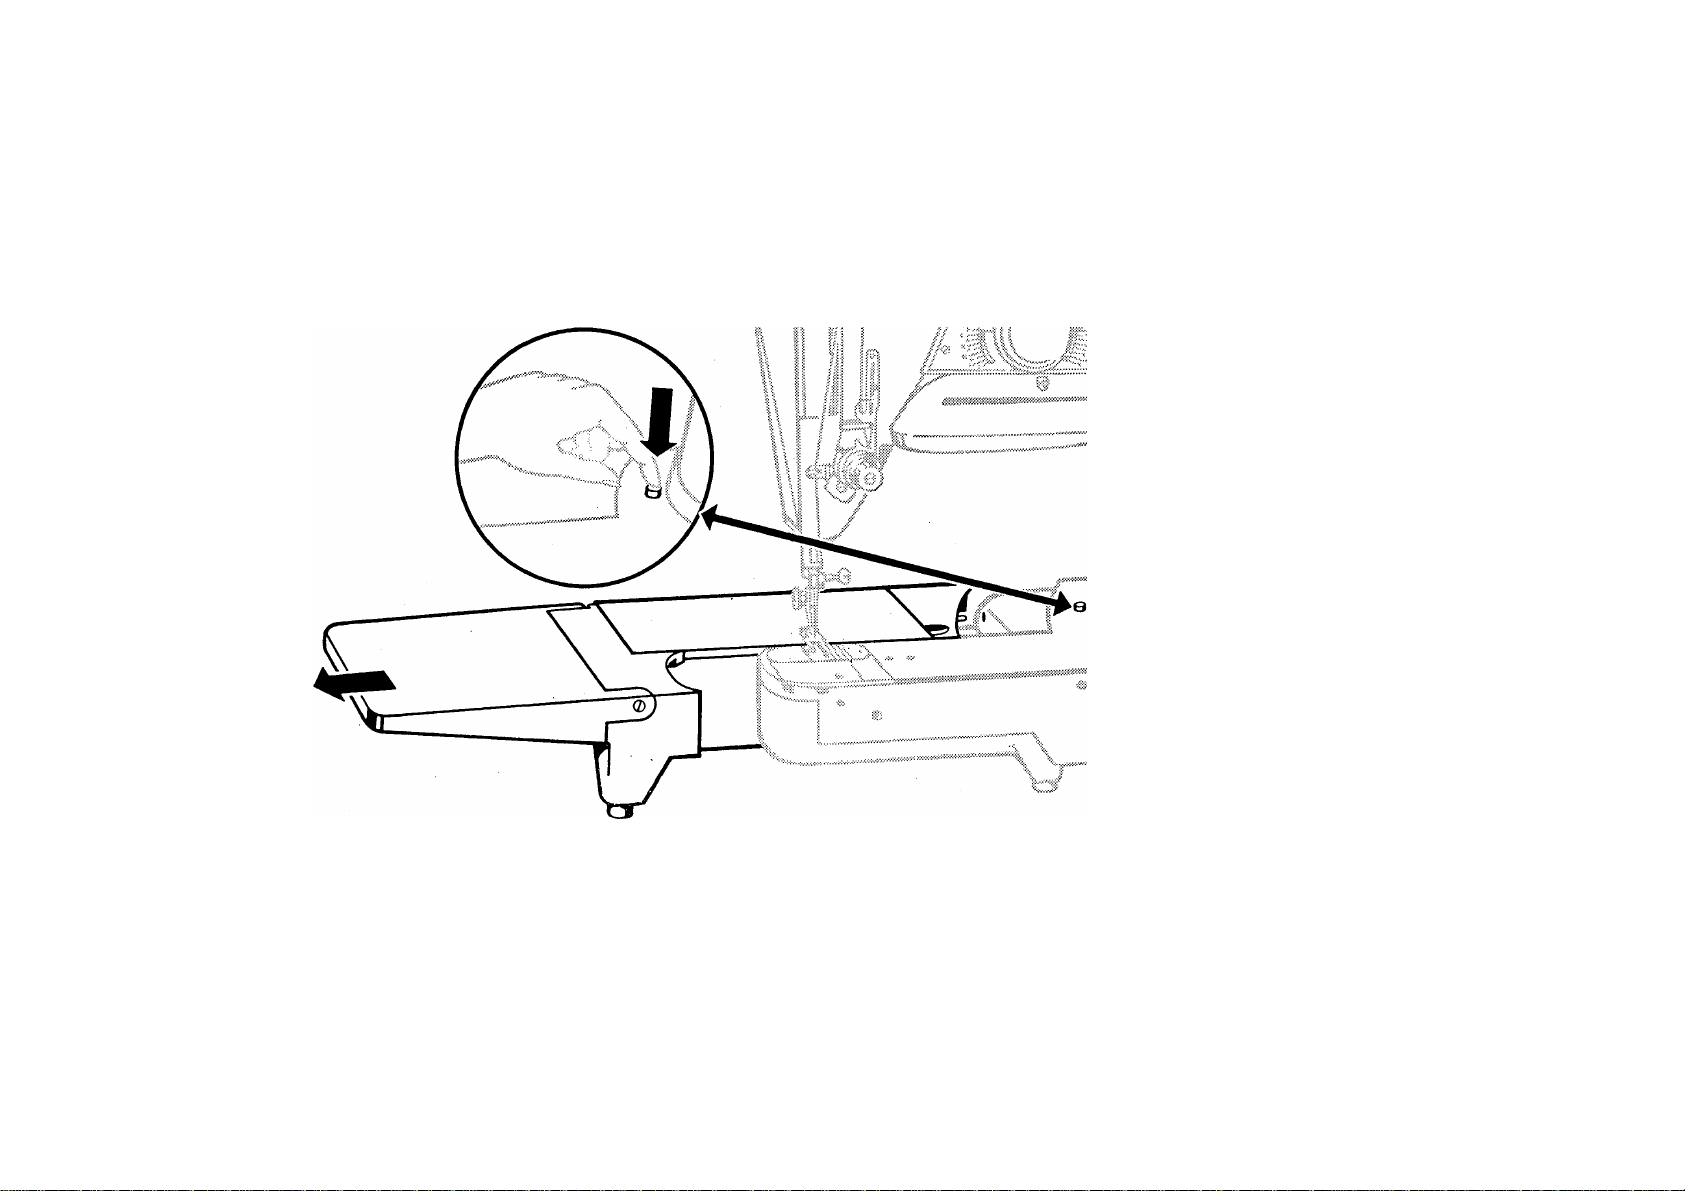
TO REMOVE AND REPLACE DETACHABLE CLOTH PLATE
. \
I I
To detach cloth plate from machine, press button on machine bed and withdraw plate.
Replace cloth plate in same manner, locating two pins in plate with corresponding holes in machine
bed. Push cloth plate to right until it snaps in locked position.
See pages 81 to 86 for applications of cylinder bed feature.

NEEDLE AND THREAD SELECTION
The selection of thread should be based on the fabric to be stitched. The thread should blend with
the fabric in colour, fibre and size.
Silk and wool fabrics should be stitched with silk thread; cotton fabrics should be stitched with cotton
or cotton mercerised thread, etc. The thread must be of a size that will imbed itself into the texture of the
fabric. Thread that is too heavy for the fabric will remain on the surface and become weakened by
friction and abrasion.
The selection of the needle should be based on both the fabric and thread being used. The eye of the
needle must be large enough for the thread to pass freely through it. The blade of the needle must be fine
enough not to mar the fabric with too large a puncture, yet heavy enough to pierce the fabric without
binding or deflecting.
You will obtain best stitching results from your Sewing Machine if it is fitted with a SINGERS' Needle.
NEEDLES AND THREAD
This machine uses needles
Catalogue 2020 (15X1).
Sizes 9, 11, 14, 16 and 18.
For perfect stitching, select correct needle
and thread to correspond with fabric (see
page 6).
Be sure to use similar threads for both
needle and bobbin.
"1m
mi
^1*
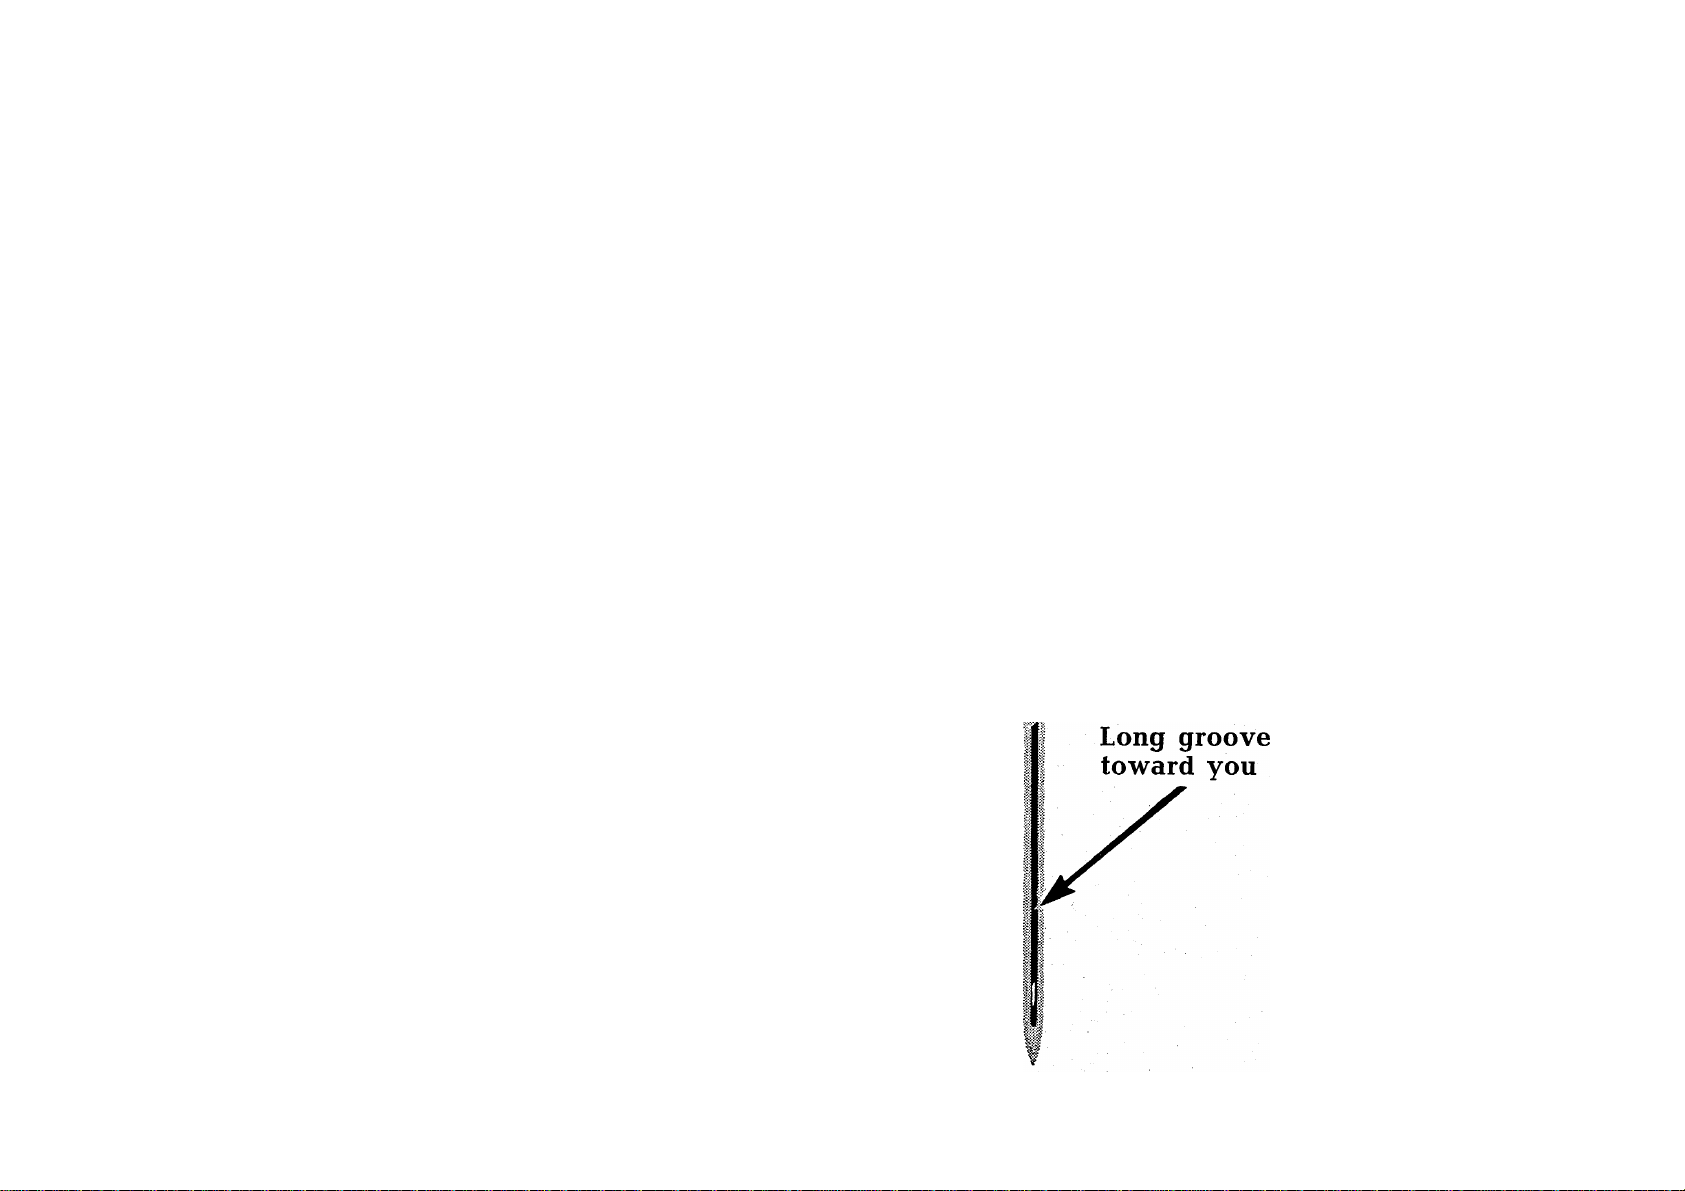
NEEDLE INSERTION
Raise the needle bar to highest point by
turning the hand wheel toward you. Loosen
the needle clamp screw. Insert needle
upward into clamp as far as it will go, with
the flat side of the needle to the back and
the long groove toward you. Tighten needle
clamp screw.
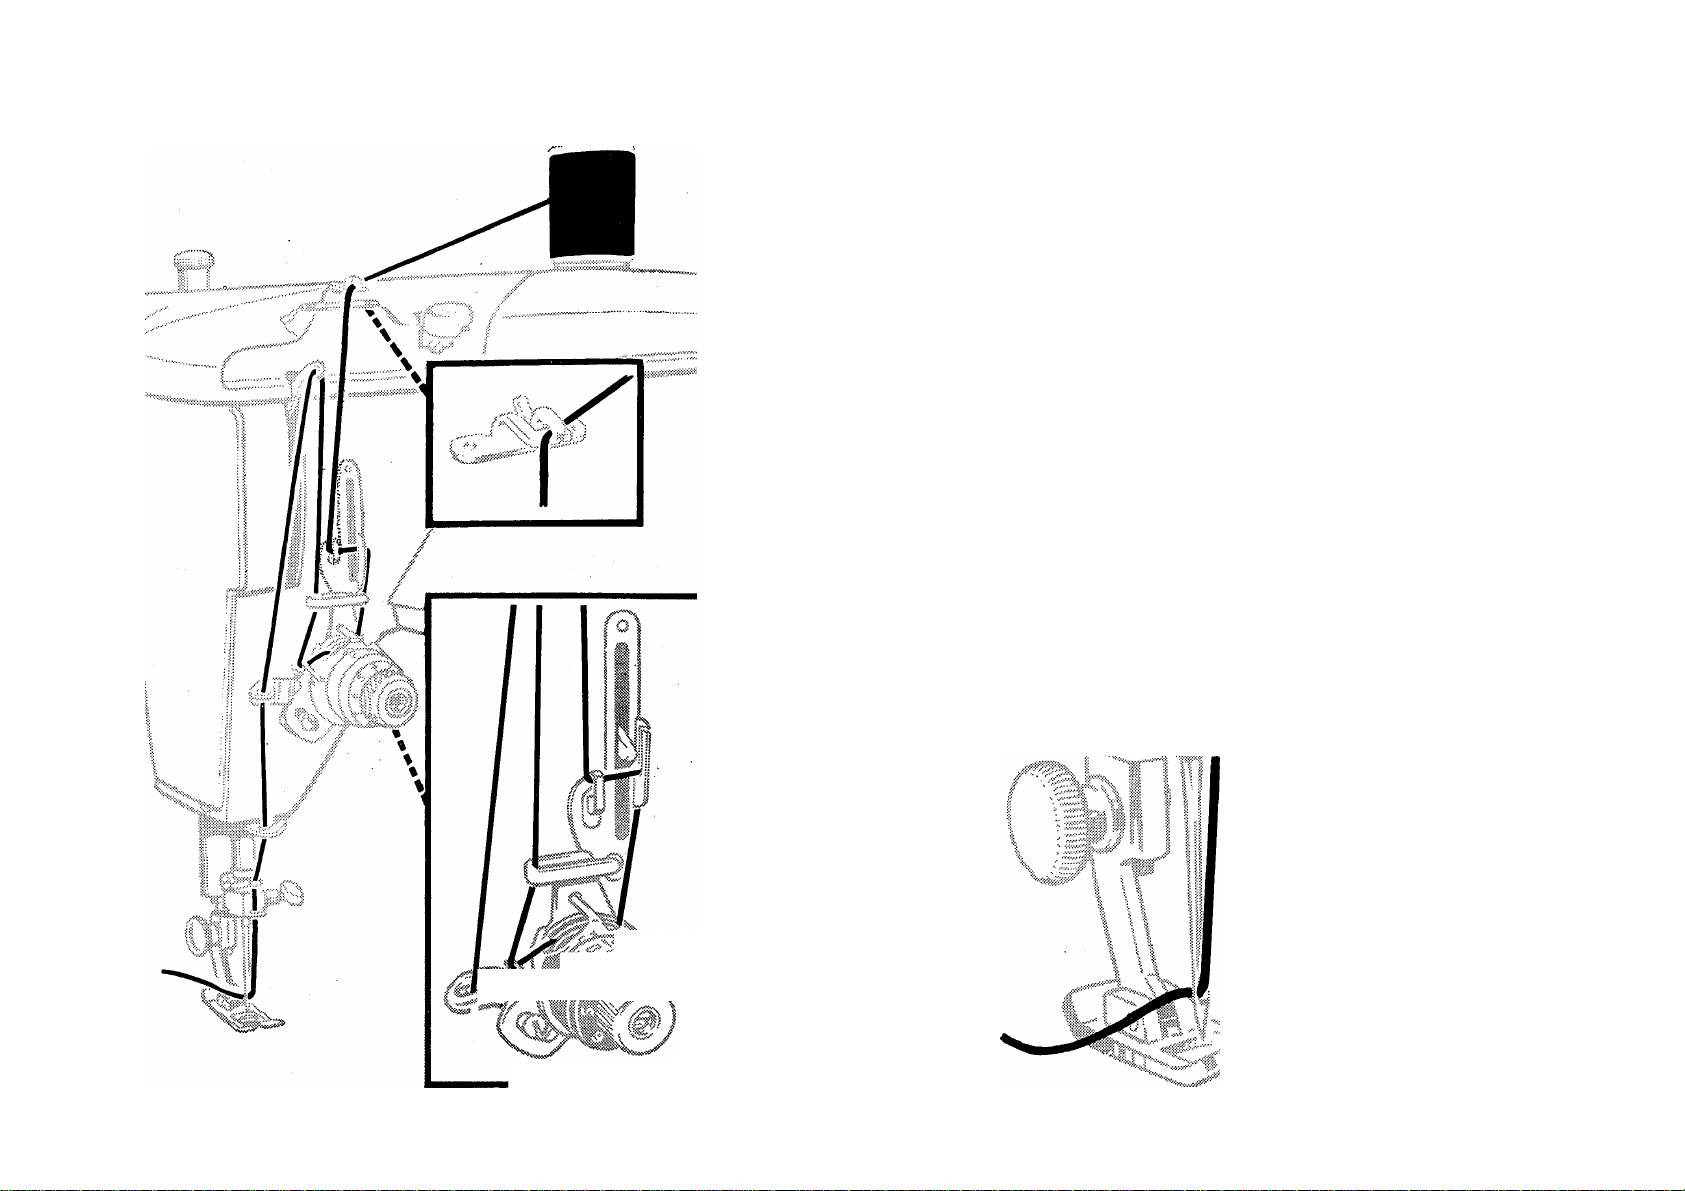
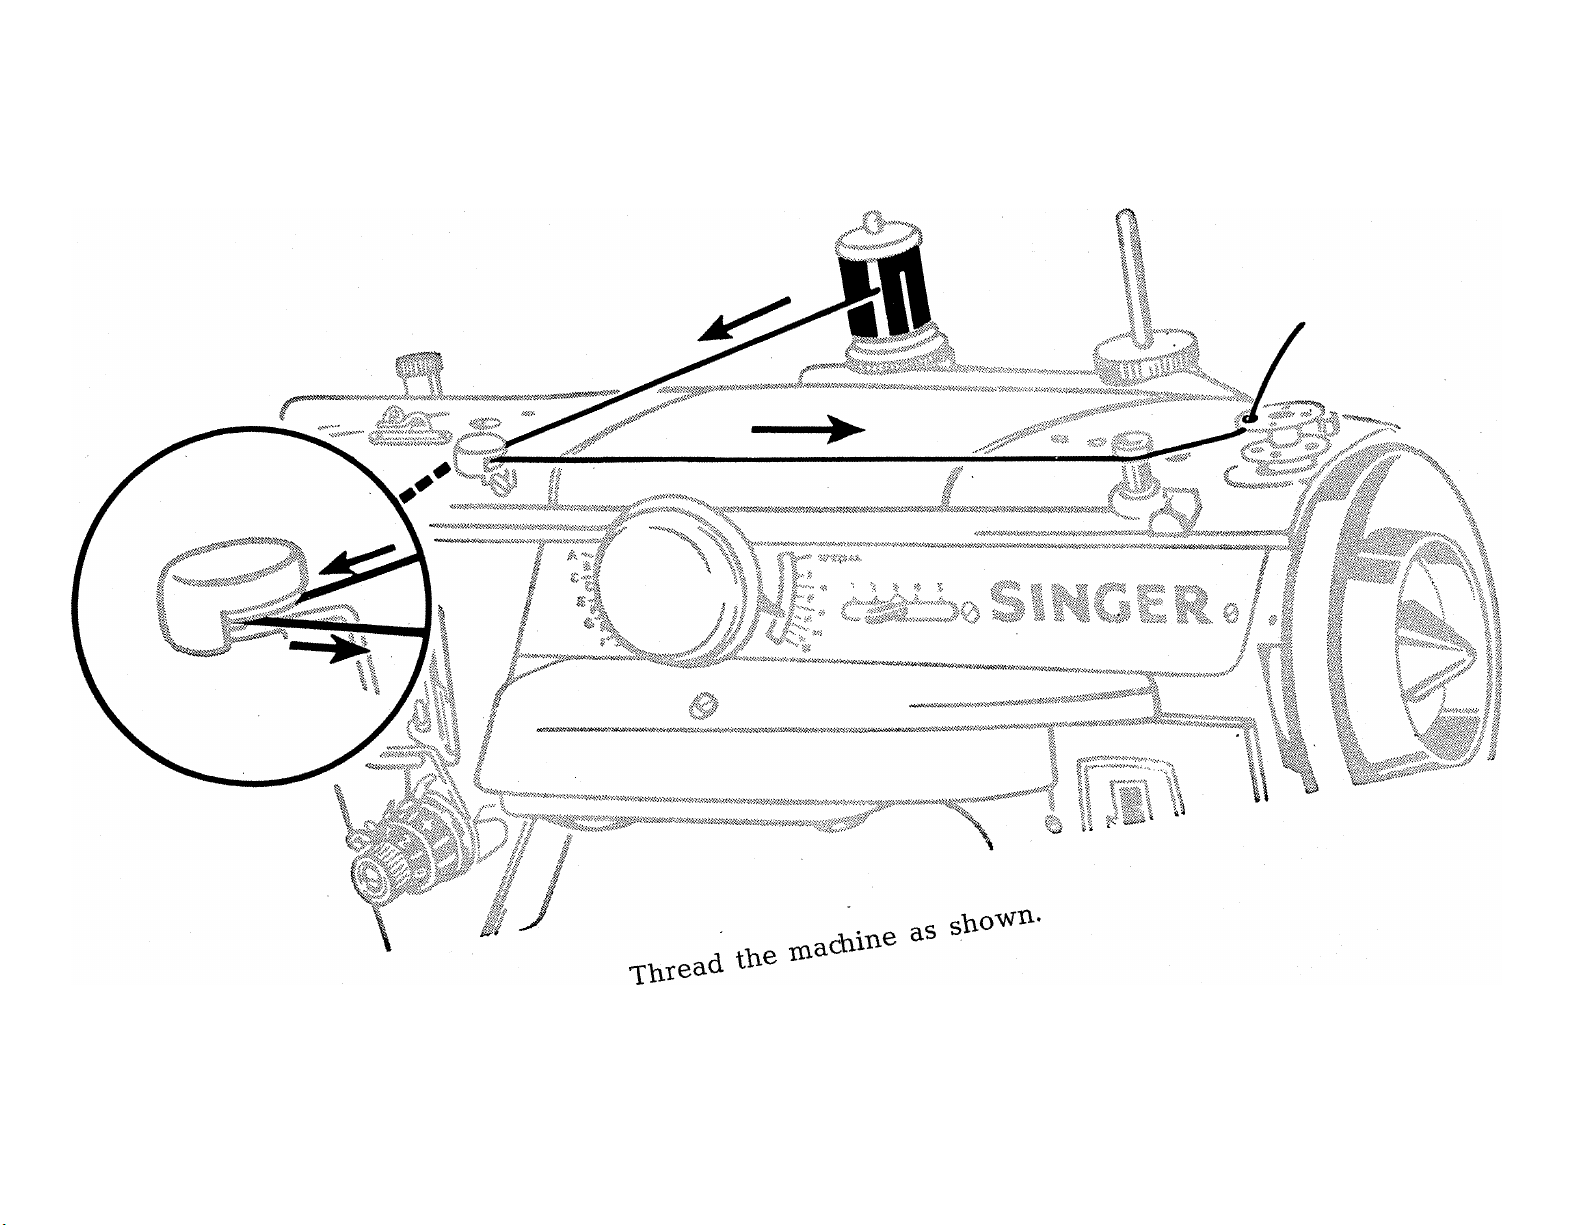
UPPER THREADING-SINGLE NEEDLE
Raise take-up lever to highest point. Place thread
on spool pin and lead through threading points
shown. Thread needle from front to back. Draw
sufficient thread through eye of needle with which
to start sewing.
8
WIND THE BOBBIN
Loosen stop motion wheel with right hand. Place bobbin on spindle. Pull out bobbin winder engaging
slide.
9
.OB..N
IO
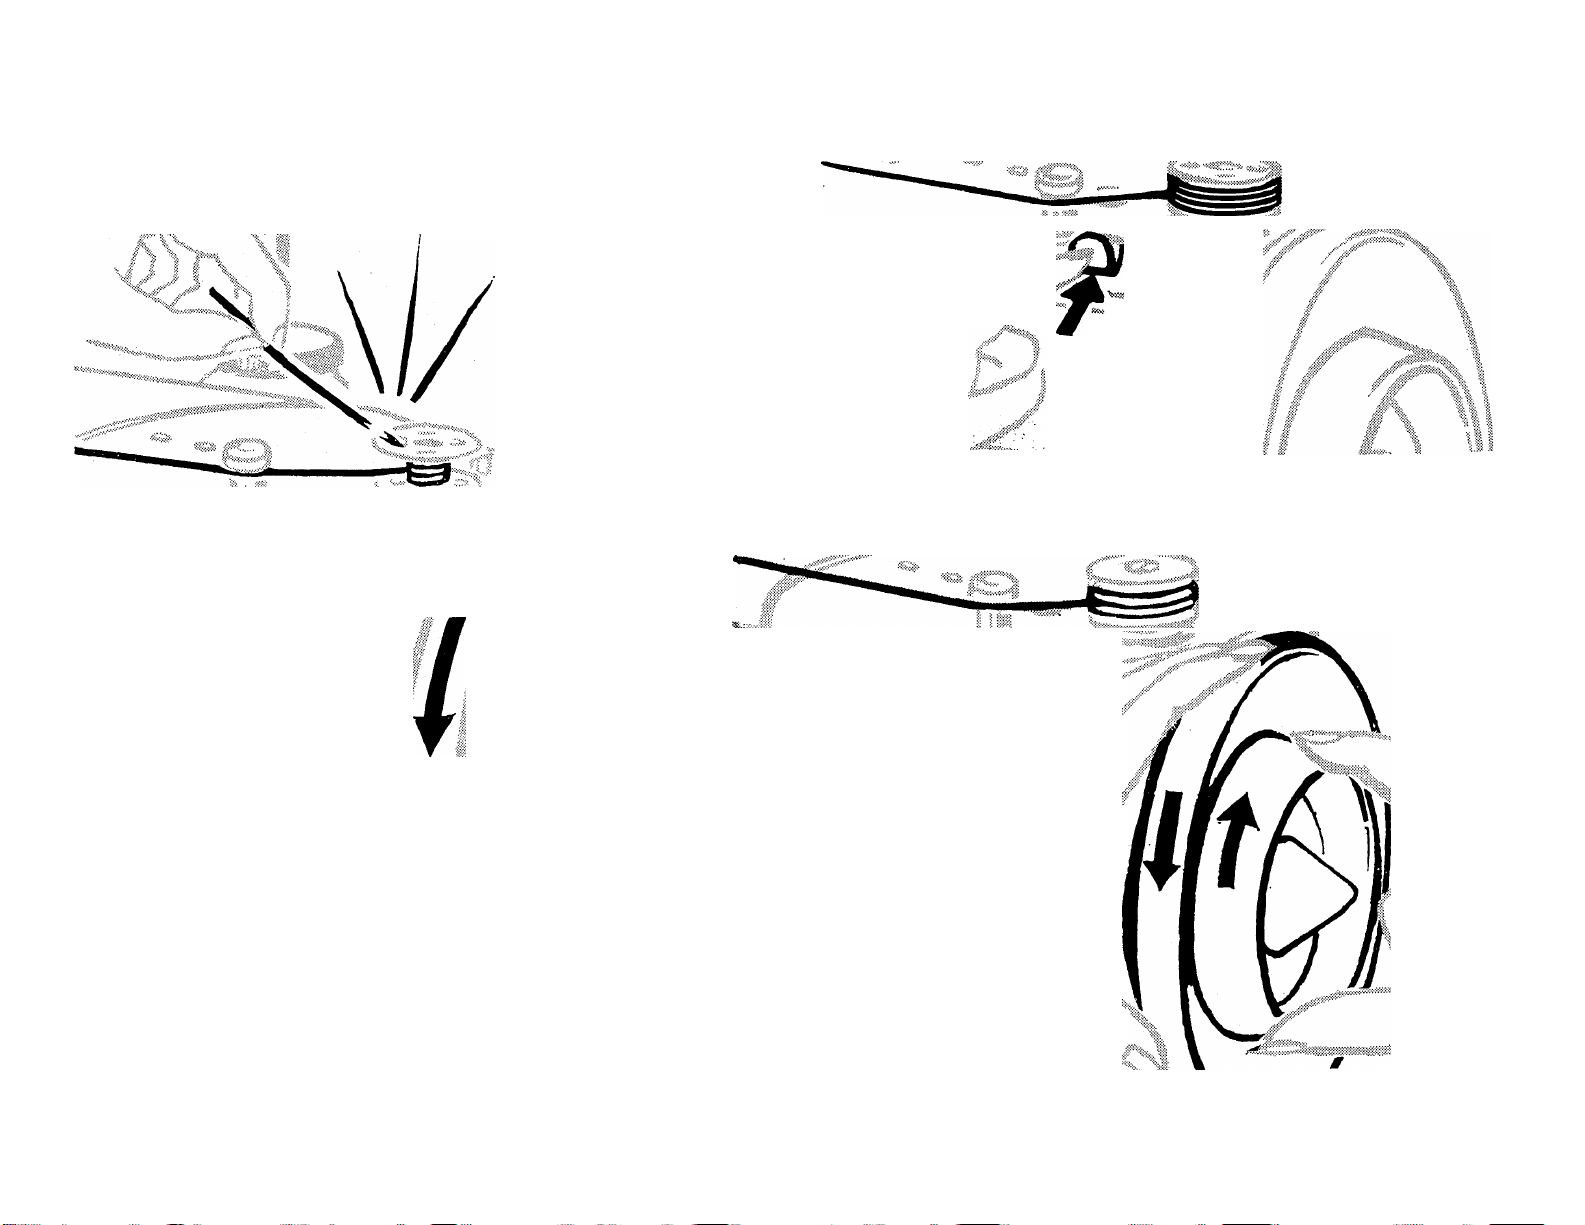
WIND THE BOBBIN (Cont'd.)
A full bobbin will automatically release. Stop
machine and push in disengaging slide.
Hold end of thread and start machine.
Tighten stop motion wheel.
X
X
11
tu®
\г

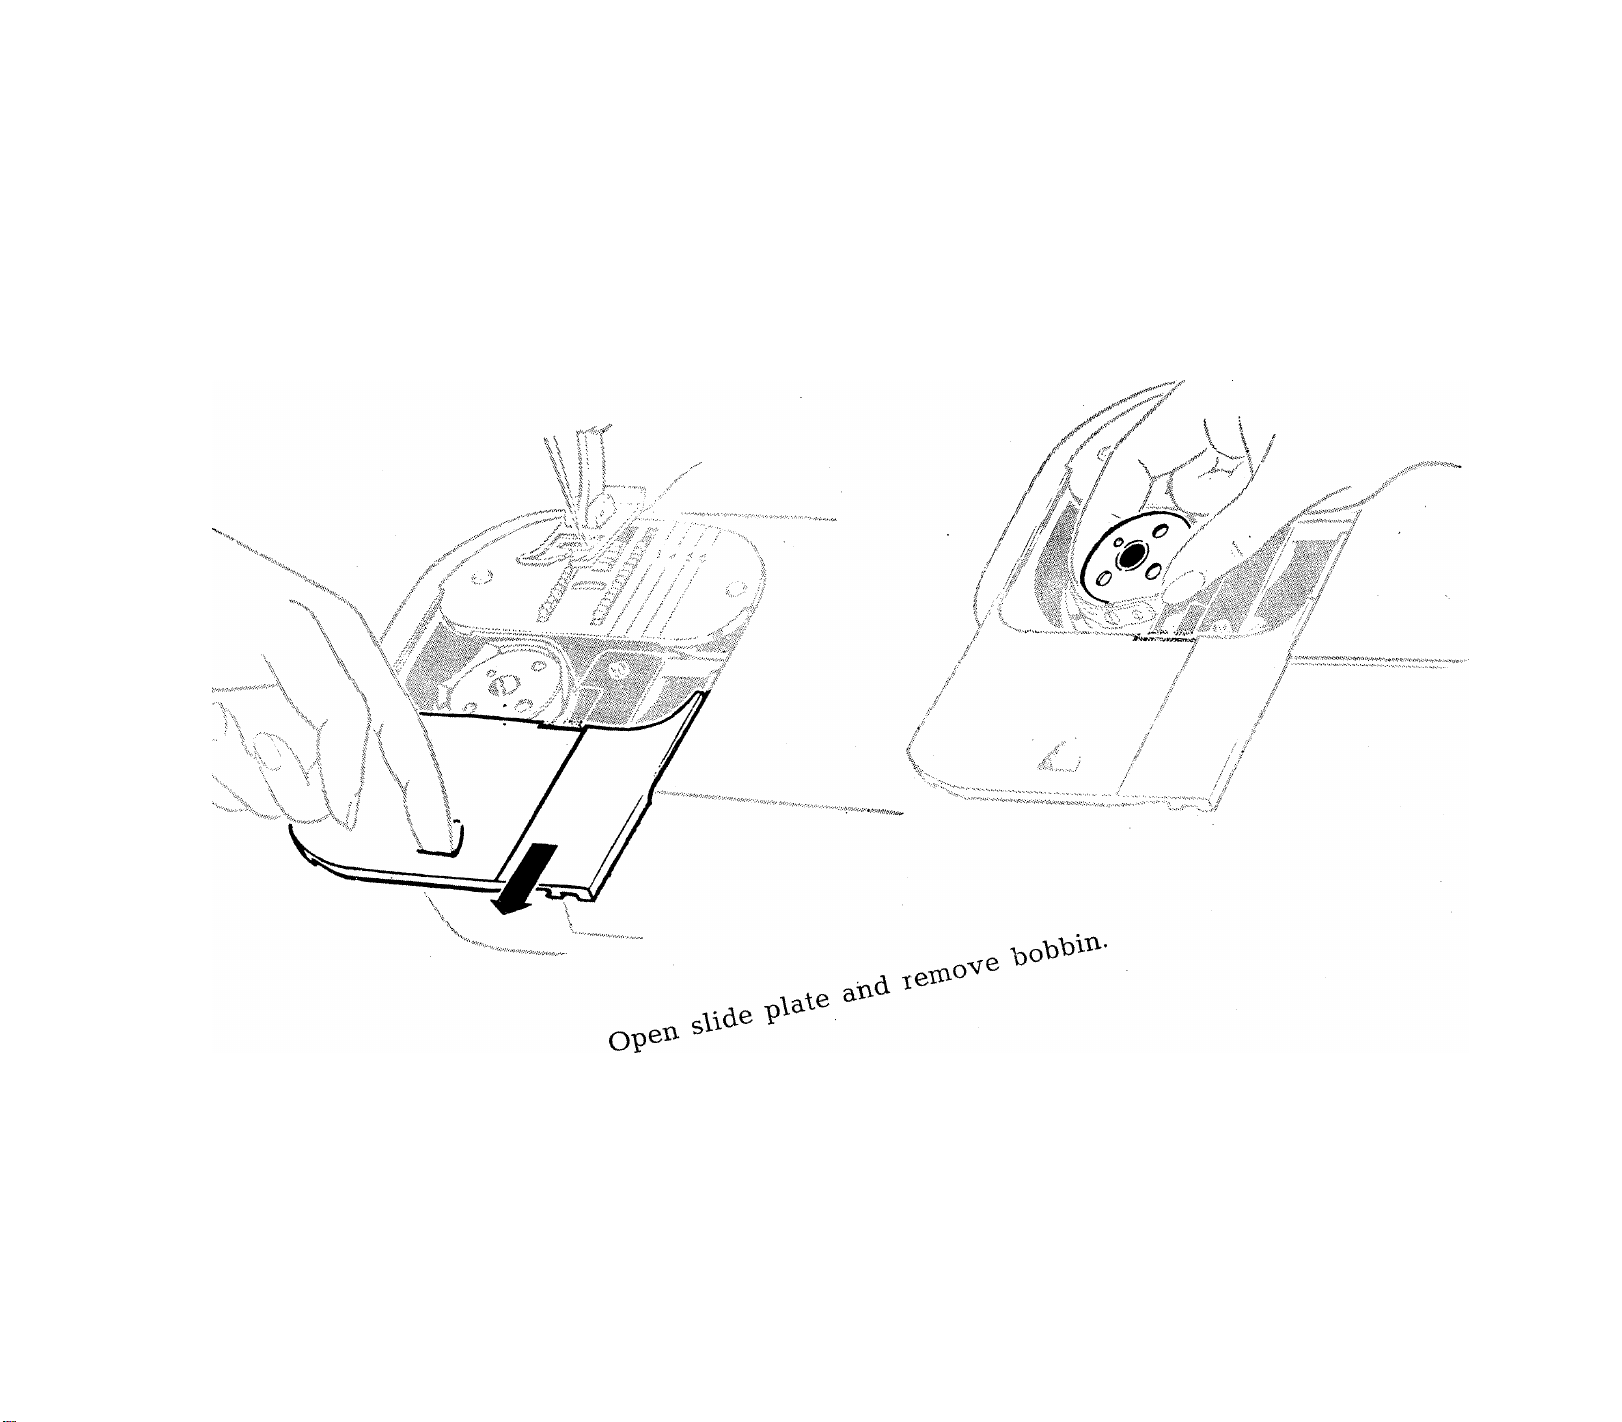
THREADING THE BOBBIN CASE
Hold bobbin so that thread leads off in direction shown. Place bobbin in case. Guide thread into slot
and under spring.
Draw thread into notch at end of spring, pulling off about 3 inches of thread across the bobbin.
Close slide plate allowing thread to enter notch.
13
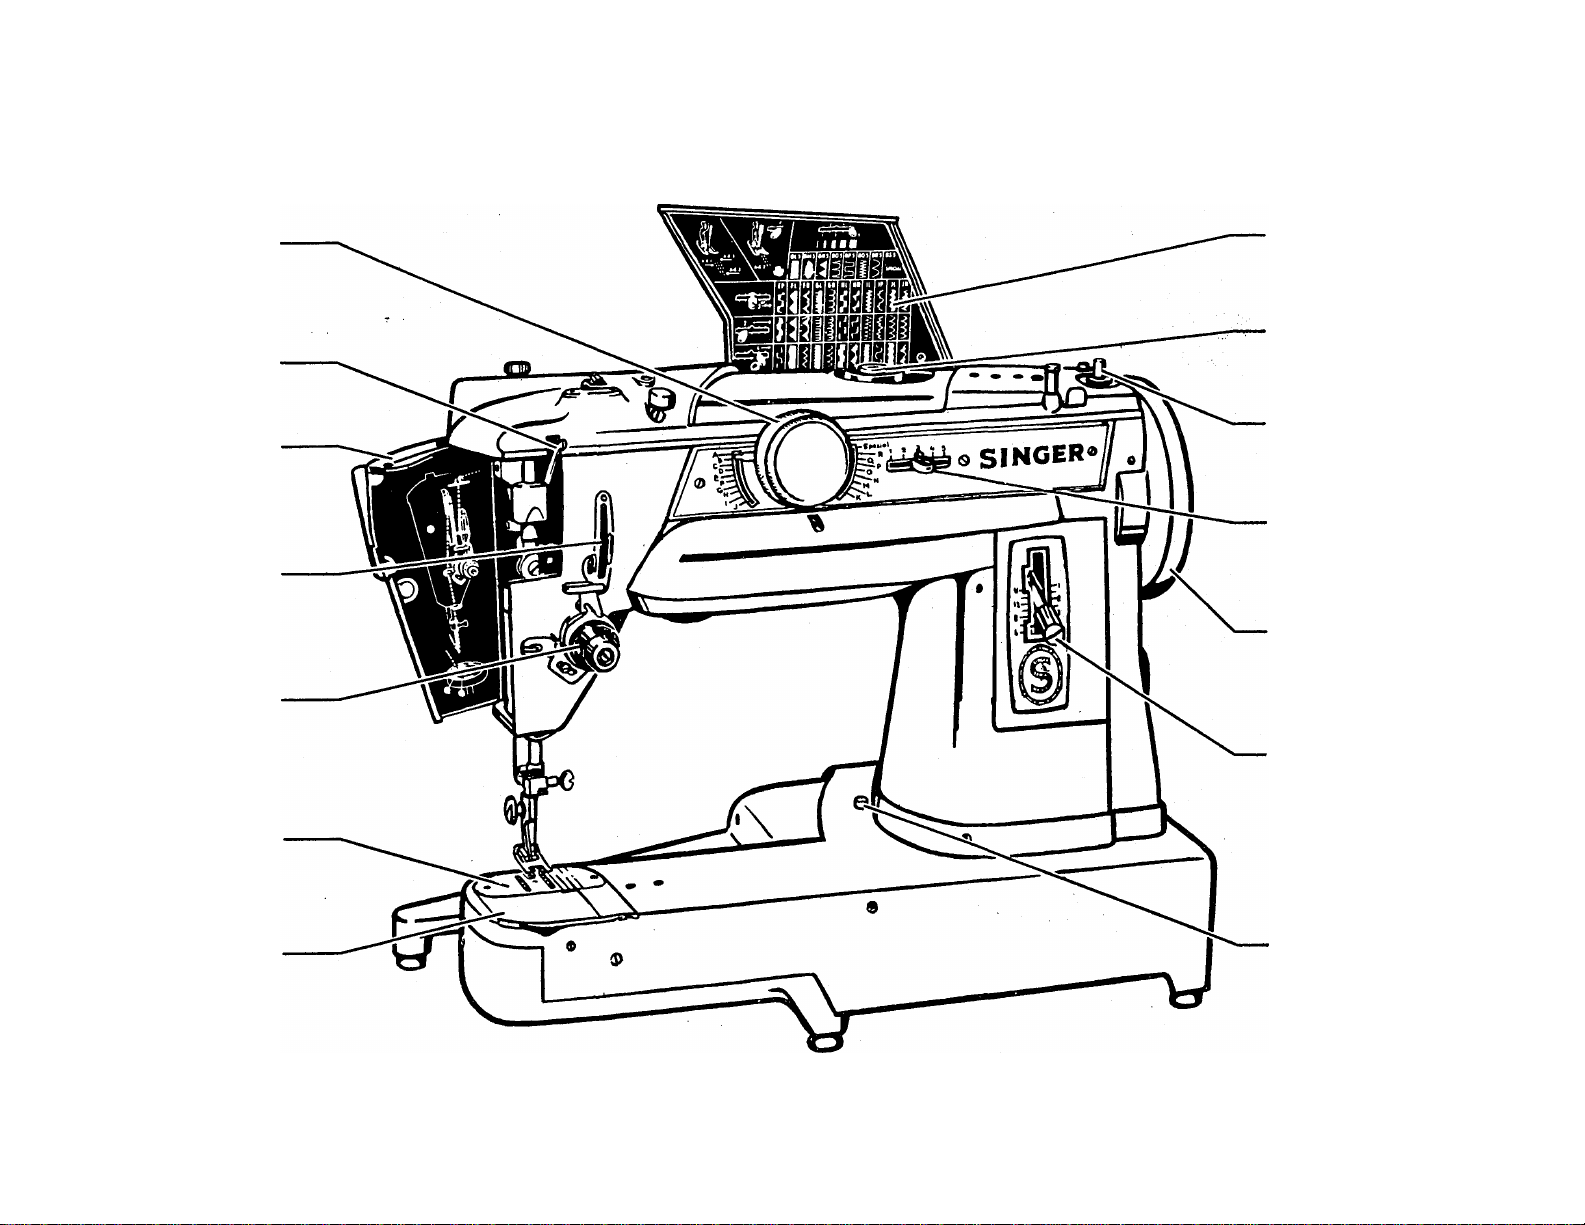
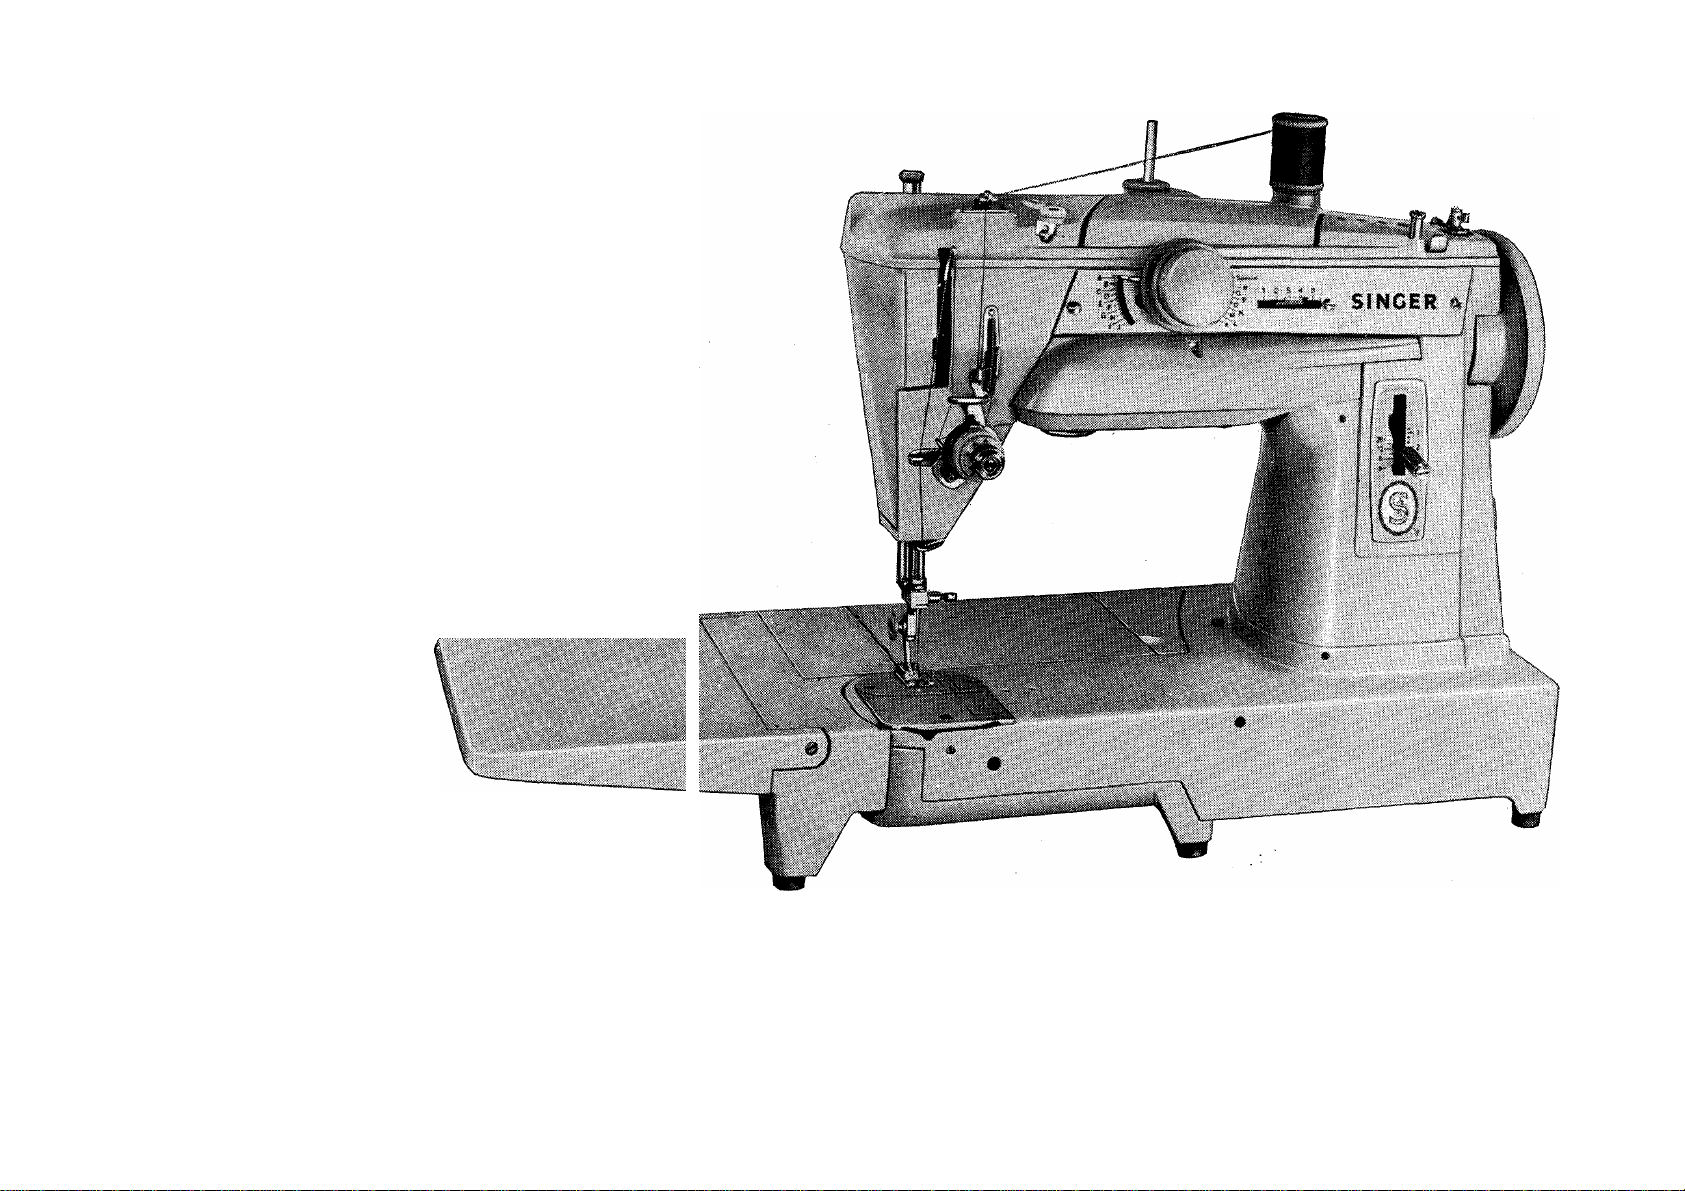
PRINCIPAL PARTS OF MACHINE 431
Stitch pattern
selector
Take-up lever
Face plate
Automatic
thread control
Needle thread
tension
Throat plate
Slide plate
Stitch chart
Special disc
Bobbin winder
stitch width
léver
Hand wheel
Stitch length
regulator
Cloth plate
disengaging
button
14
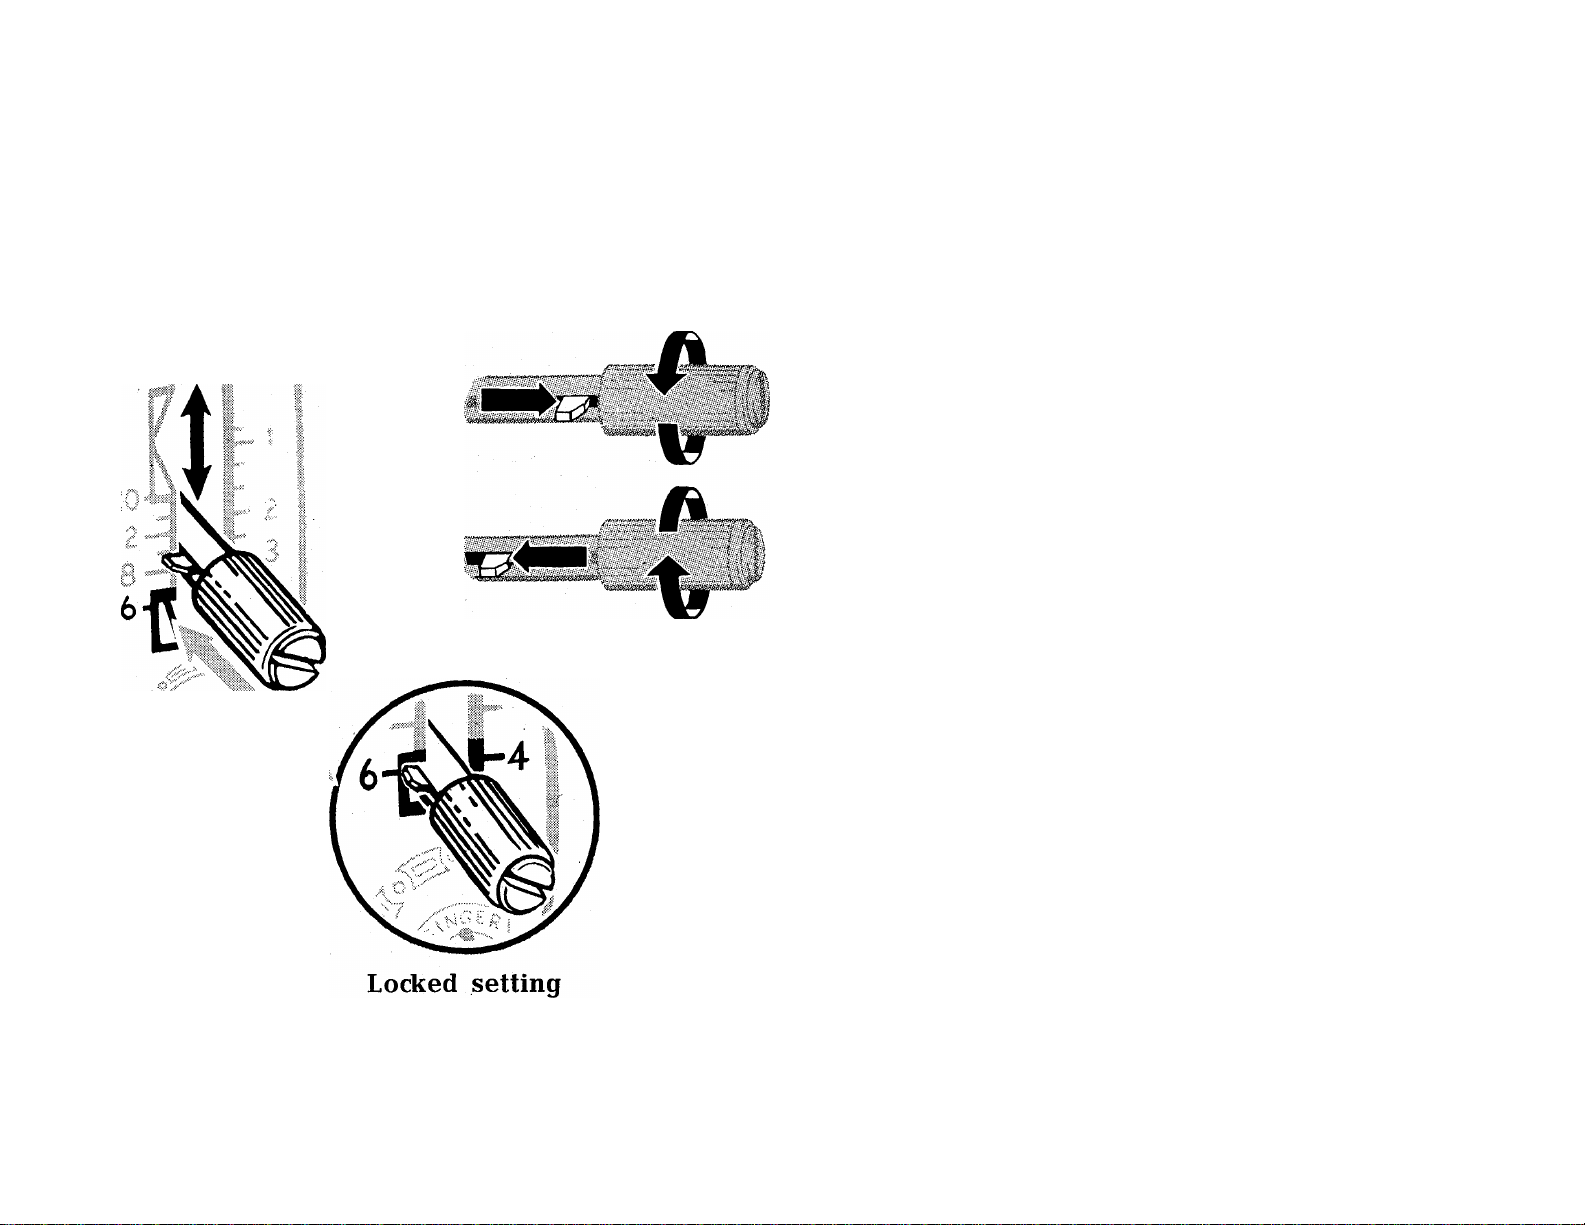
STITCH LENGTH REGULATOR
Reverse
To release
Forward
To tighten
Numerals on left side of indicator represent
number of stitches per inch.
Numerals on right side represent stitch length in
millimeters.
The upper indented area of the indicator repre
sents stitch lengths above 20.
The lower indented area of the indicator allows
the No. 6 stitch length setting to be "locked" in
place when stitching folds, pleats or multiple layers
of heavy fabric.
To set stitch length
• Release pointer by turning thumb nut to the
left.
• Position lever for desired stitch length.
/
• Tighten pointer against plate by turning thumb
nut to the right.
Once the pointer has been positioned, reverse
stitching is accomplished by raising the lever to its
highest position. The No. 6 "locked" position must
be unlocked for reverse stitching.
15

STITCH WIDTH AND NEEDLE POSITION SELECTOR
A Stitch width or needle position setting is necessary for both straight and zigzag stitching.
When used with a straight stitch setting, the lever places stitching in left, centre or right needle position
(see pages 19 and 20).
When used with a decorative stitch setting, the lever controls width of primary patterns and produces
variations of combination patterns (see pages 34 and 36).
To position, depress lever and slide il left or right to desired setting. Numerals indicate five positions
but intermediate settings may also be used.
16
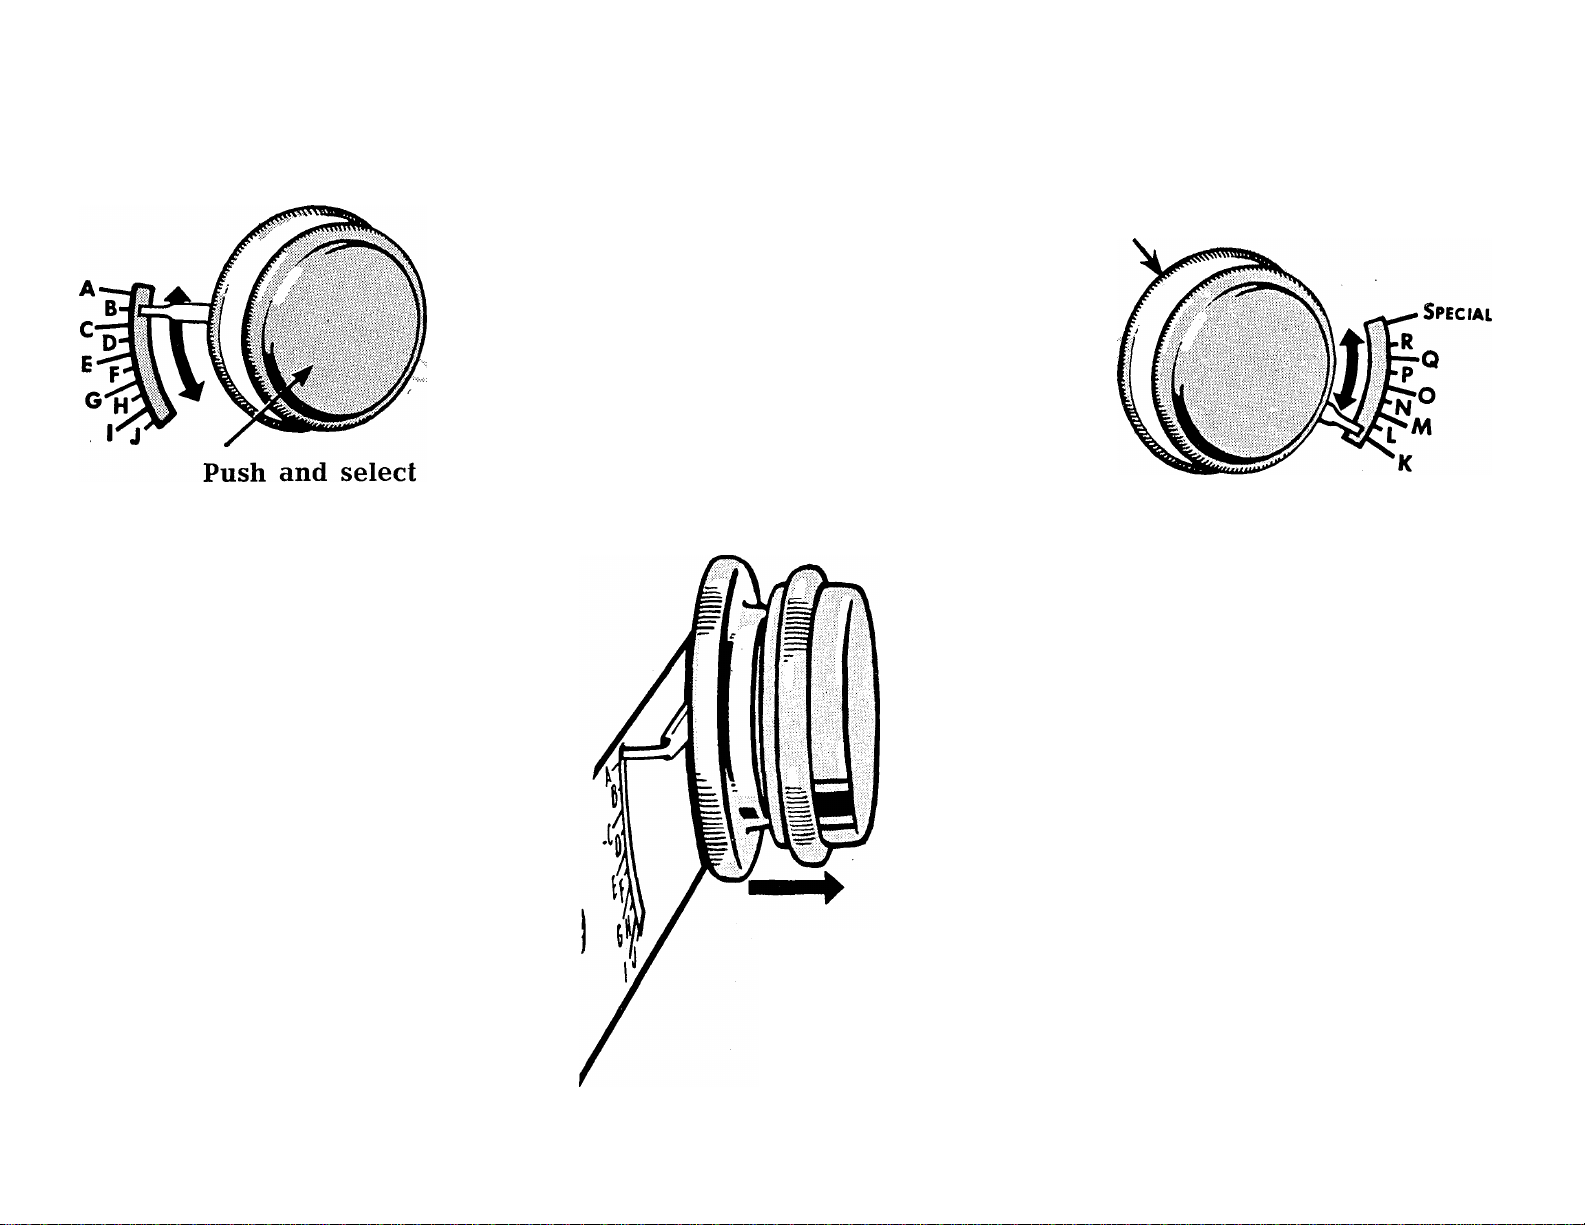
STITCH PATTERN SELECTOR
(Set Stitch Width Lever at 3.)
i
Pull and select
All settings on the left of the plate
are controlled by the outer knob.
Push (using right hand) —
select desired setting and release.
All settings on the right of the plate
are controlled by the inner knob.
Pull (using left hand) —
select desired setting and release.
1. Push
2. Select (A to J)
3. Release
1. Pull
2. Select (K to S)
3. Release
Do not make selector adjustments while the needle is in the fabric.
17

THROAT PLATE
REMOVAL AND REPLACEMENT
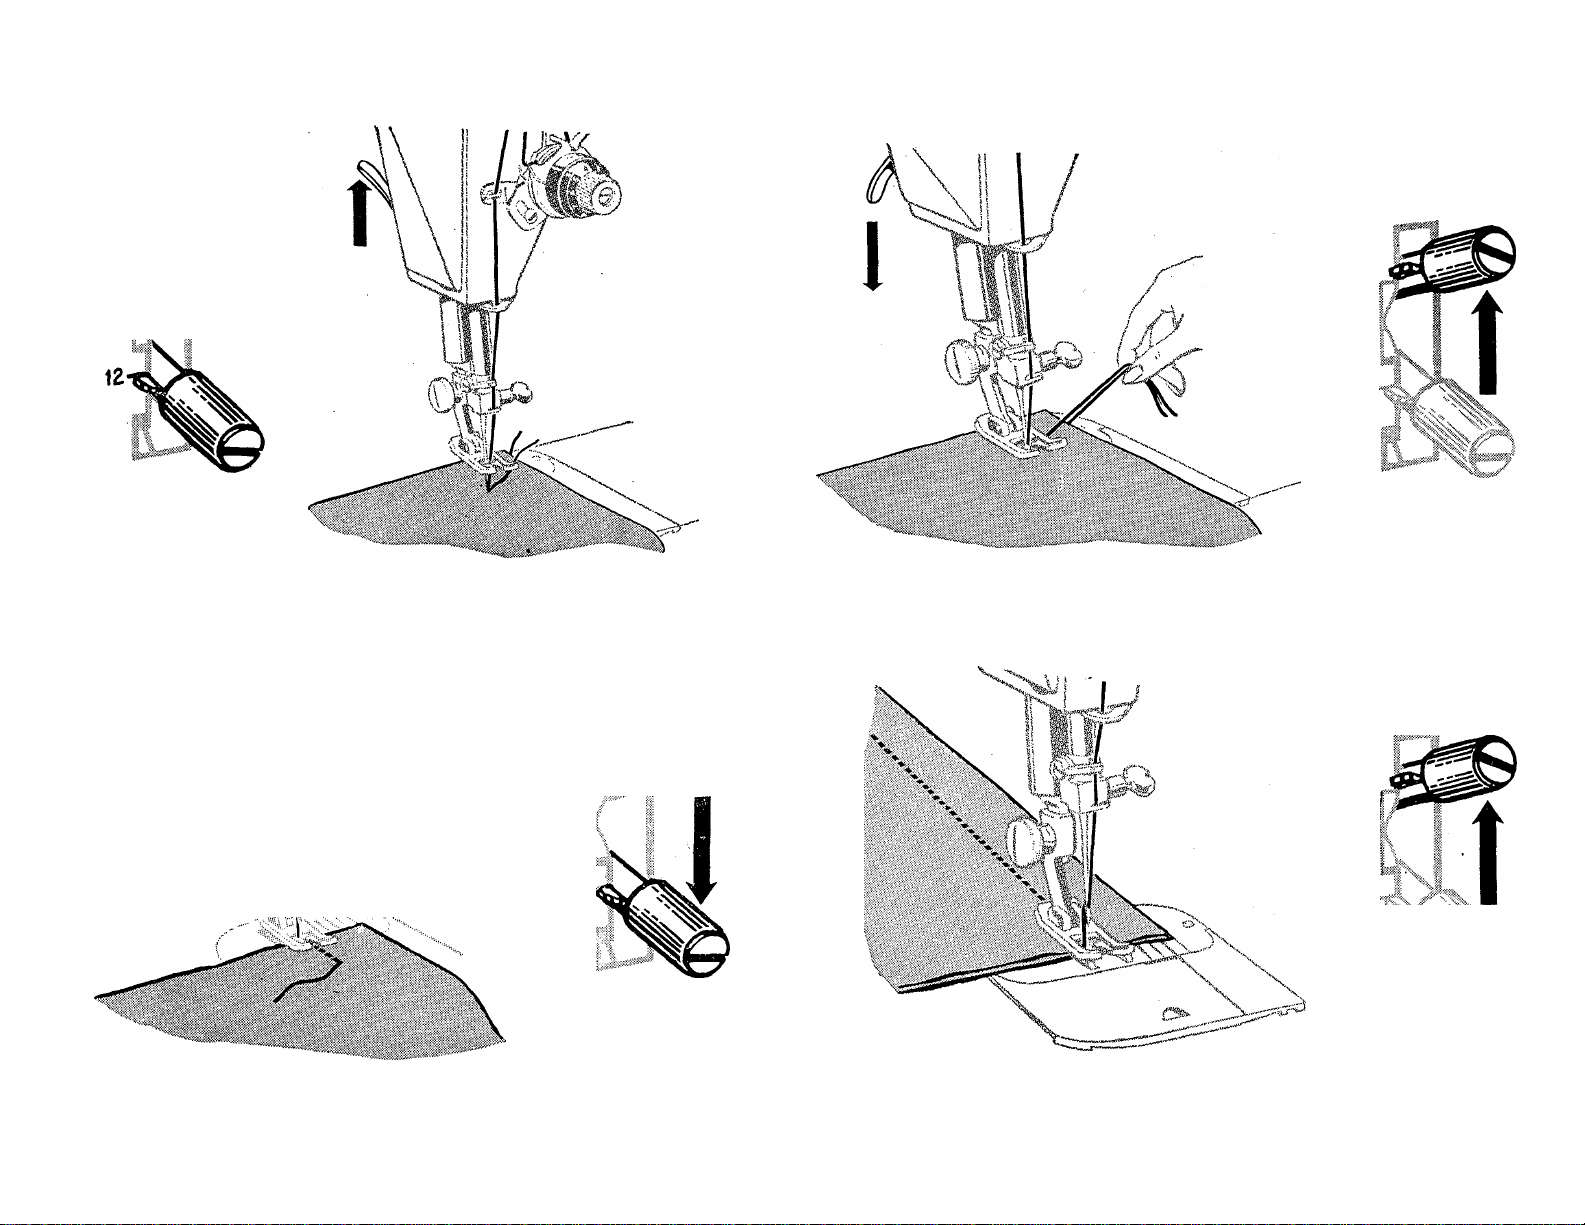
To remove the throat plate
To replace the throat plate
Raise presser bar. Turn hand wheel until needle
bar is at its highest point. Open slide plate. Place
thumb under front end of throat plate and lift plate
from machine.
18
Place throat plate in position over two clamping
pins and press plate down until it snaps in locked
position. Then close slide plate.

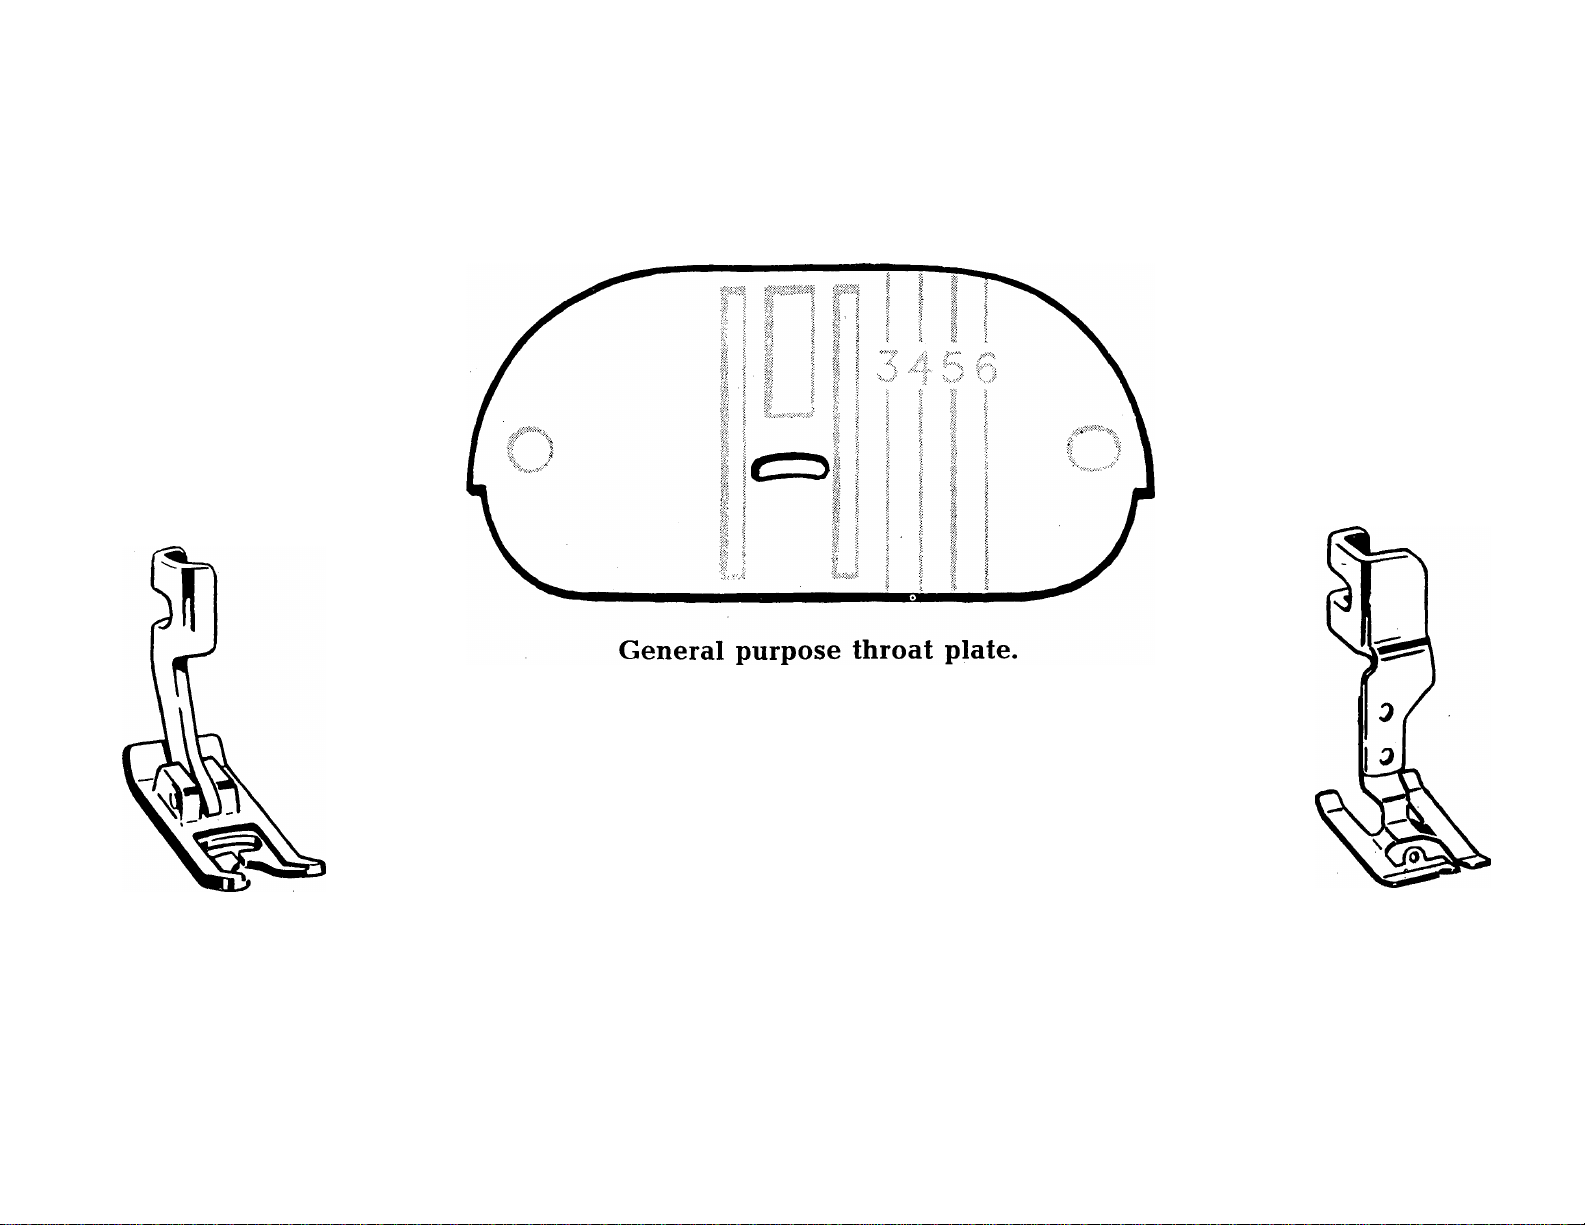
STRAIGHT STITCHING
CENTRE NEEDLE POSITION AK 3
Needle Position Lever at 3 (Centre Position).
General Purpose Throat Plate and Presser Foot.
Use general purpose throat plate and presser foot for all utility sewing, long straight seams, etc., and
where there is occasion to alternate between straight and zigzag stitching.
STRAIGHT STITCH THROAT PLATE AND
PRESSER FOOT
Use the straight stitch throat plate and presser
foot where fabric and sewing procedure require
close control . . . for precision stitching of curved
and scalloped edges, top stitching, edge stitching,
etc.
For best results, this equipment should be used
when stitching sheer and filmy fabrics, knits and
tricots (particularly synthetics) and all soft spongy
materials.

STRAIGHT STITCHING
SECONDARY POSITIONS
f 111
Set Selector at AK.
Needle Position Lever at 1, 2, 4 or 5.
General Purpose Throat Plate and Presser Foot.
To meet special requirements a line of stitching may be placed to the left or to the right of centre.
Lever setting 1 locates stitching to the extreme left; lever setting 5 locates it to the extreme right. Inter
mediate left and right positions result when settings 2 and 4 are used.
The general purpose throat plate and presser foot must be used with left and right needle positions.
Do not make any lever adjustments while the needle is in the fabric.
20

PREPARE TO SEW
Hold needle thread lightly with left hand. Turn hand wheel so that needle enters plate and brings
up bobbin thread.
i I » ■f"'! K- jJ«“”"'«»,..
'
Pull end of bobbin thread through plate and place both needle and bobbin threads diagonally under
presser foot.
21
SEWING A SEAM
Set stitch regulator for stitch length desired. Position needle into fabric about V2 inch from edge and
lower presser foot. Raise stitch regulator to reverse.
Back stitch to edge of fabric for reinforcement. Lower regulator for forward stitching of seam. Raise
stitch regulator,
22

SEWING A SEAM (Cont'd.)
Back stitch to reinforce end of seam, and lower regulator to forward stitching position.
With take-up lever at highest point, raise presser foot and remove fabric.
23

GUIDING AND SUPPORTING FABRIC
\
Most fabrics need only to be guided in front of the presser foot.
Fabrics of unusual texture and weave, filmy sheers, crepes, tricots, etc., require support while being
stitched.
For such fabrics, use the straight stitch throat plate and presser foot, and apply gentle tension to the
seam by holding the fabric in front and at the back of the presser foot as illustrated.
24

PRESSURE ADJUSTMENTS
To decrease pressure, turn thumb screw upward.
To increase pressure, turn screw downward.
Decrease
Increase
Pressure is the force the presser foot exerts on fabric while it is
being stitched.
. Smooth, even handling of several thicknesses of fabric results when
pressure is correctly regulated.
Too light a pressure will result in irregular feeding which affects
both quality of stitch and evenness of seams.
Too heavy a pressure not only affects stitch and seam quality but
will mar smooth surfaces and pile fabrics.
Surface finish, as well as the weight and texture of the fabric, must
be considered in determining the amount of pressure needed.
25
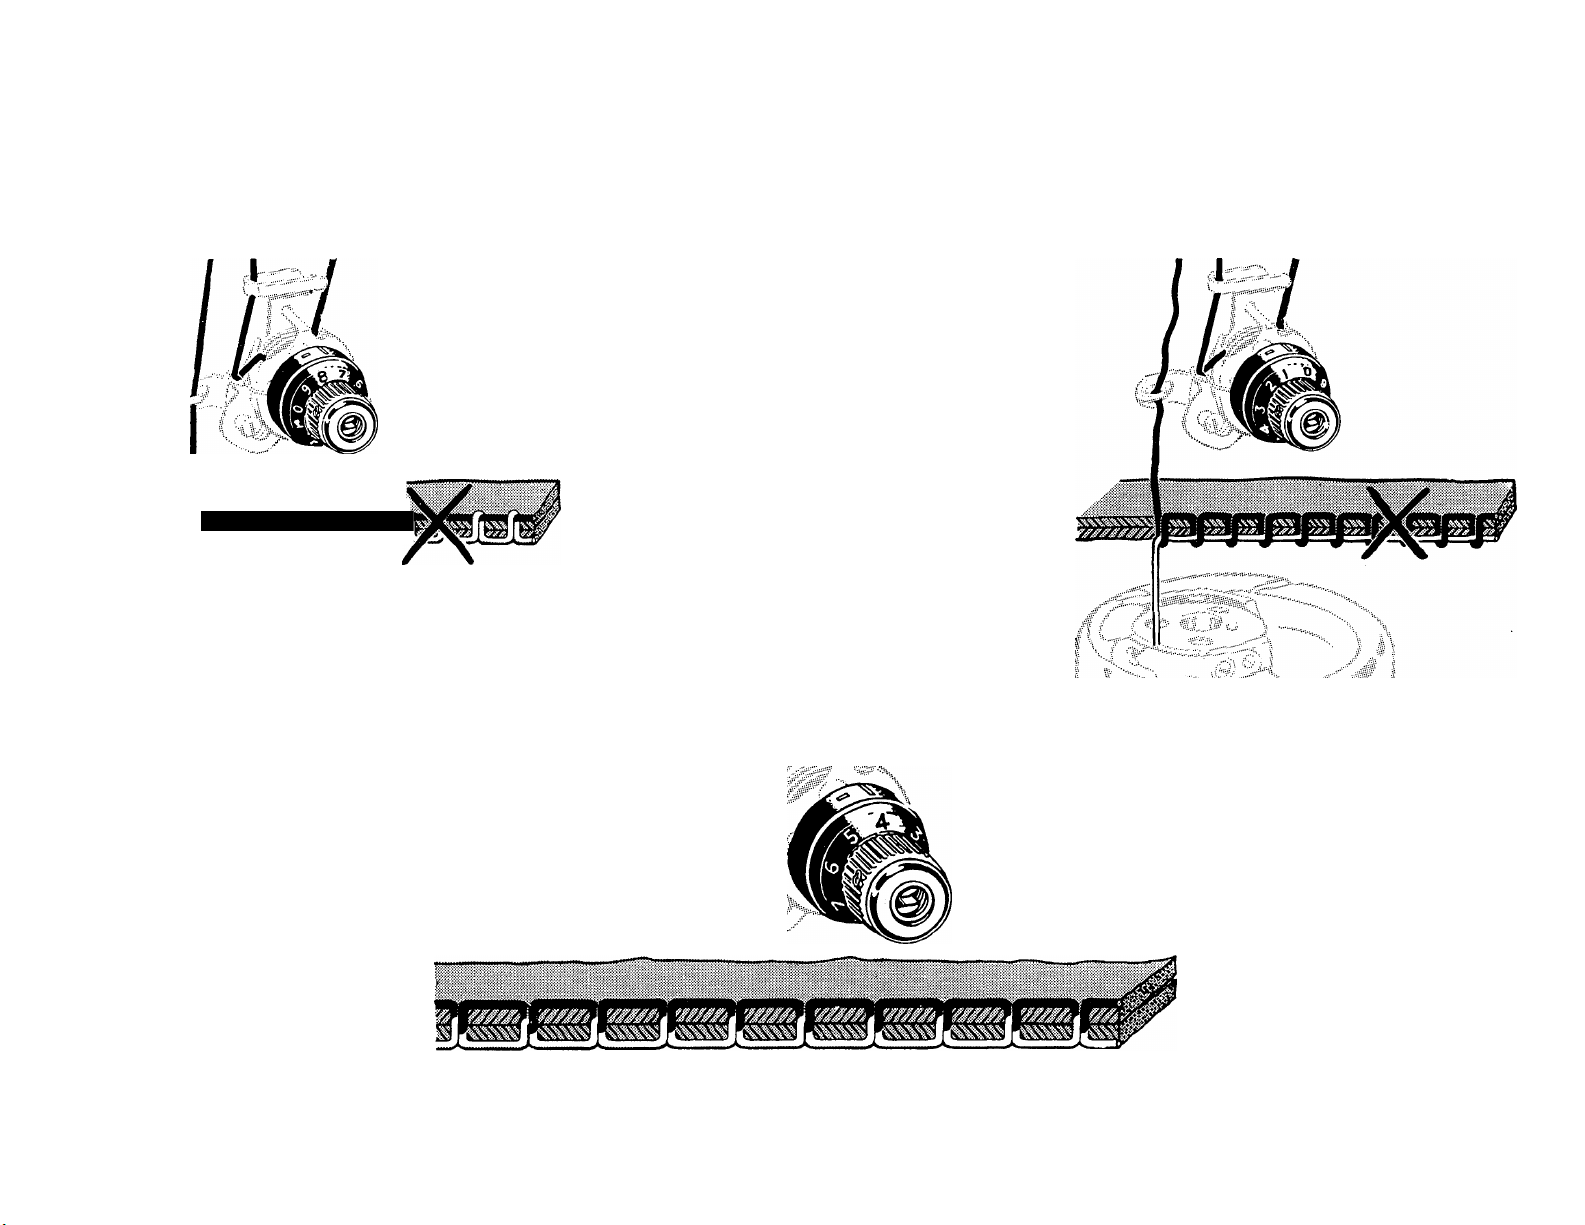
NEEDLE THREAD TENSION
STRAIGHT STITCHING
Needle thread tension too tight —
correct by setting dial to lower
number.
Needle thread tension too loose —
correct by setting dial to higher
number.
A perfectly locked stitch results with the upper and lower tensions balanced so that needle and bobbin
threads are drawn equally into fabric.
26
:r—-Hv, \ X
ex .„.-Jy/I
\
..
m
...
.
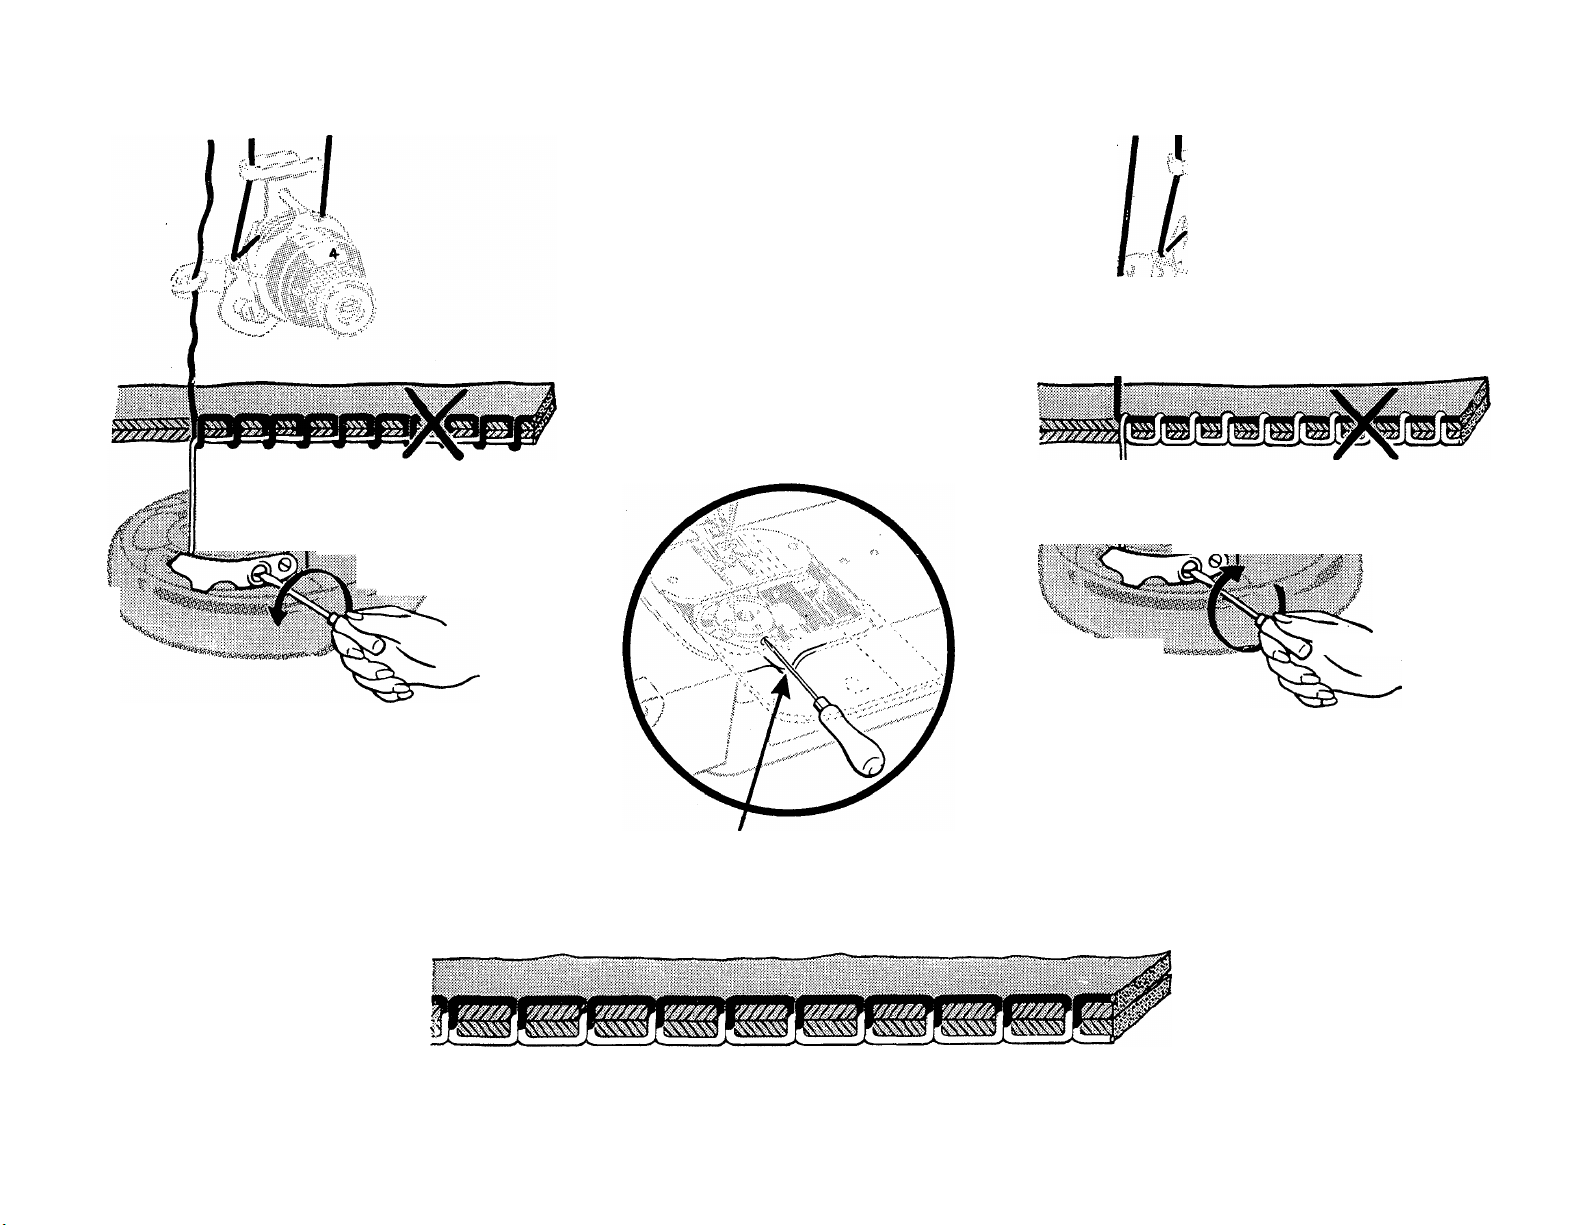
Bobbin thread tension too tight
— correct by turning screw in
direction indicated.
BOBBIN THREAD TENSION
STRAIGHT STITCHING
/
y,iiS§i
'•'xA ''•> < •<
Bobbin thread tension too loose
— correct by turning screw in
direction indicated.
Insert for tension screwdriver
A perfectly locked stitch results with the upper and lower tensions balanced so that needle and bobbin
threads are drawn equally into fabric.
27
ZIGZAG STITCHING EQUIPMENT
General purpose presser foot.
Special purpose presser foot.
28
 Loading...