


Arc Welder

www.silverlinetools.com
3 Year Guarantee
*Register online within 30
days. Terms & Conditions apply
Garantie de 3 ans
*Enregistrez votre produit en ligne
dans les 30 jours. Sous réserve des
Conditions Générales d’utilisation
3 Jahre Garantie
*Registrieren Sie sich innerhalb von 30
Tagen online. Es gelten die allgemeinen
Geschäftsbedingungen
3 años de garantía
*Regístrese online dentro de 30 días.
Se aplican los términos y condiciones
3 anni di garanzia
*Registrarsi on-line entro 30 giorni.
Termini e Condizioni si applicano
3 Jaar Garantie
*Registreer online binnen 30 dagen.
Algemene voorwaarden van toepassing
www.silverlinetools.com
677293
Arc Welder
POWER
S
I
L
V
E
R
L
I
N
E
R
A
N
G
E
40-100A
Arc Welder
Poste à souder à l'arc
Lichtbogenschweißgerät
Soldadora por arco
Saldatrice ad arco
Lasmachine
2
2
4
1
3
5
www.silverlinetools.com
3
English .................. 4
Français ................ 8
Deutsch ................. 12
Español ................. 16
Italiano .................. 20
Nederlands ............ 24
®
Arc Welder
40-100A
4
GB
4
GB
General Power Tool Safety
Warnings
WARNING Read all safety warnings and all instructions. Failure to follow the
warnings and instructions may result in electric shock, fire and/or serious injury.
Save all warnings and instructions for future reference.
The term "power tool" in the warnings refers to your mains-operated (corded)
power tool or battery-operated (cordless) power tool.
Work Area Safety
a) Keep work area clean and well lit. Cluttered or dark areas invite accidents
b) Do not operate power tools in explosive atmospheres, such as in the
presence of flammable liquids, gases or dust. Power tools create sparks
which may ignite the dust or fumes
c) Keep children and bystanders away while operating a power tool.
Distractions can cause you to lose control
Electrical Safety
a) Power tool plugs must match the outlet. Never modify the plug in any
way. Do not use any adapter plugs with earthed (grounded) power
tools. Unmodified plugs and matching outlets will reduce risk of electric
shock
b) Avoid body contact with earthed or grounded surfaces, such as pipes,
radiators, ranges and refrigerators. There is an increased risk of electric
shock if your body is earthed or grounded
c) Do not expose power tools to rain or wet conditions. Water entering a
power tool will increase the risk of electric shock
d) Do not abuse the cord. Never use the cord for carrying, pulling or
unplugging the power tool. Keep cord away from heat, oil, sharp edges
or moving parts. Damaged or entangled cords increase the risk of electric
shock
e) When operating a power tool outdoors, use an extension cord suitable
for outdoor use. Use of a cord suitable for outdoor use reduces the risk of
electric shock
f) If operating a power tool in a damp location is unavoidable, use a
residual current device (RCD) protected supply. Use of an RCD reduces
the risk of electric shock
NOTE: The term “residual current device (RCD)” may be replaced by the
term “ground fault circuit interrupter (GFCI)” or “earth leakage circuit breaker
(ELCB)”.
Personal Safety
a) Stay alert, watch what you are doing and use common sense when
operating a power tool. Do not use a power tool while you are tired
or under the influence of drugs, alcohol or medication. A moment of
inattention while operating power tools may result in serious personal injury
b) Use personal protective equipment. Always wear eye protection.
Protective equipment such as dust mask, non-skid safety shoes, hard hat,
or hearing protection used for appropriate conditions will reduce personal
injuries
c) Prevent unintentional starting. Ensure the switch is in the off-position
before connecting to power source and/or battery pack, picking up or
carrying the tool. Carrying power tools with your finger on the switch or
energising power tools that have the switch on invites accidents
d) Remove any adjusting key or wrench before turning the power tool on.
A wrench or a key left attached to a rotating part of the power tool may result
in personal injury
e) Do not overreach. Keep proper footing and balance at all times. This
enables better control of the power tool in unexpected situations
f) Dress properly. Do not wear loose clothing or jewellery. Keep your hair,
clothing and gloves away from moving parts. Loose clothes, jewellery or long
hair can be caught in moving parts
g) If devices are provided for the connection of dust extraction and
collection facilities, ensure these are connected and properly used. Use
of dust collection can reduce dust-related hazards
Power Tool Use & Care
a) Do not force the power tool. Use the correct power tool for your
application. The correct power tool will do the job better and safer at the
rate for which it was designed
Carefully read and understand this manual and any label attached to the tool
before use. Keep these instructions with the product for future reference. Ensure
all persons who use this product are fully acquainted with this manual.
Even when used as prescribed it is not possible to eliminate all residual risk
factors. Use with caution. If you are at all unsure of the correct and safe manner in
which to use this tool, do not attempt to use it.
Specification
Input voltage: ............................................. 230V
Frequency: .................................................50Hz
Rated duty cycle: ........................................ 10%
Amps @ 60% duty cycle: ........................... 28A
Current range: ............................................ 40-100A
No load voltage: ......................................... 48V
Insulation class: .......................................... H
Electrode size: ............................................ 1.6-2.5mm
Max welding thickness: .............................. 5mm
Fuse rating: ................................................ 13A
Case Protection Rating: .............................. IP21S
Protection Class: ........................................
Weight: ....................................................... 13kg
The sound intensity level for the operator may exceed 85dB(A) and
sound protection measures are necessary.
As part of our ongoing product development, specifications of
Silverline products may alter without notice.
Description of Symbols
The rating plate on your tool may show symbols. These represent important
information about the product or instructions on its use.
Wear hearing protection
Wear eye protection
Wear breathing protection
Wear head protection
Wear hand protection
Read instruction manual
Class I construction (Protective earth)
Risk of electrocution
Conforms to relevant legislation and safety standards
Environmental Protection
Waste electrical products should not be disposed of with household
waste. Please recycle where facilities exist. Check with your local
authority or retailer for recycling advice

www.silverlinetools.com
5
Arc Welder677293
www.silverlinetools.com
5
b) Do not use the power tool if the switch does not turn it on and off. Any
power tool that cannot be controlled with the switch is dangerous and must
be repaired
c) Disconnect the plug from the power source and/or the battery pack
from the power tool before making any adjustments, changing
accessories, or storing power tools. Such preventive safety measures
reduce the risk of starting the power tool accidentally
d) Store idle power tools out of the reach of children and do not allow
persons unfamiliar with the power tool or these instructions to operate
the power tool. Power tools are dangerous in the hands of untrained users
e) Maintain power tools. Check for misalignment or binding of moving
parts, breakage of parts and any other condition that may affect the
power tool’s operation. If damaged, have the power tool repaired before
use. Many accidents are caused by poorly maintained power tools
f) Keep cutting tools sharp and clean. Properly maintained cutting tools with
sharp cutting edges are less likely to bind and are easier to control
g) Use the power tool, accessories and tool bits etc. in accordance with
these instructions, taking into account the working conditions and the
work to be performed. Use of the power tool for operations different from
those intended could result in a hazardous situation
Service
a) Have your power tool serviced by a qualified repair person using only
identical replacement parts. This will ensure that the safety of the power
tool is maintained
Welding Safety
• Welding produces toxic fumes and can reduce oxygen levels in the work area.
Always work in a well ventilated area. Avoid inhaling welding fumes and use a
suitable respirator where appropriate.
• Some metal parts may have galvanised, lead, cadmium, or other coatings.
Attempting to weld through these coatings can produce highly toxic fumes.
Always remove all coatings before welding.
• If you experience irritation to the lungs, throat, or eyes whilst welding, STOP
IMMEDIATELY and seek fresh air.
• Welding produces extremely high levels of UV light. To prevent eye damage,
ALWAYS wear an approved welding face mask. Under no circumstances look
directly at the arc
• If there is a possibility of other people approaching the work area, erect suitable
screening to protect them from the light / glare.
• To prevent skin damage, ALWAYS wear a suitable fire-proof long sleeve jacket,
heat proof gloves, and cap. Keep covered up.
• Always remove any flammable materials (e.g. cigarette lighter, matches) from
your clothing before welding.
• Always keep a fire extinguisher nearby when welding. Sparks and accidental
contacts can cause fires.
• Only weld when all workpieces and work area are dry.
• Do not weld sealed containers (e.g. fuel tanks, air tanks, oil drums).
• The heat generated from welding can cause sealed containers to burst without
warning.
• Be aware of transferred heat. Metal parts can conduct heat away from the work
area, and cause ignition of flammable materials.
• Be aware that welded parts will remain hot for some time after joining.
• Allow to cool fully before handling or leaving unattended.
• Never weld in the presence of flammable gasses, liquids, or dust
• Always ensure that you have a responsible person nearby to alert you to any
fire, or to call help in an emergency.
• Use of welding machines will create powerful magnetic fields. This may disturb
the operation of sensitive electronic equipment. Pacemaker wearers should
consult a doctor before using a welding machine.
• Do not overload power supply. Check your mains wiring is capable of delivering
the required currents (see specification) safely.
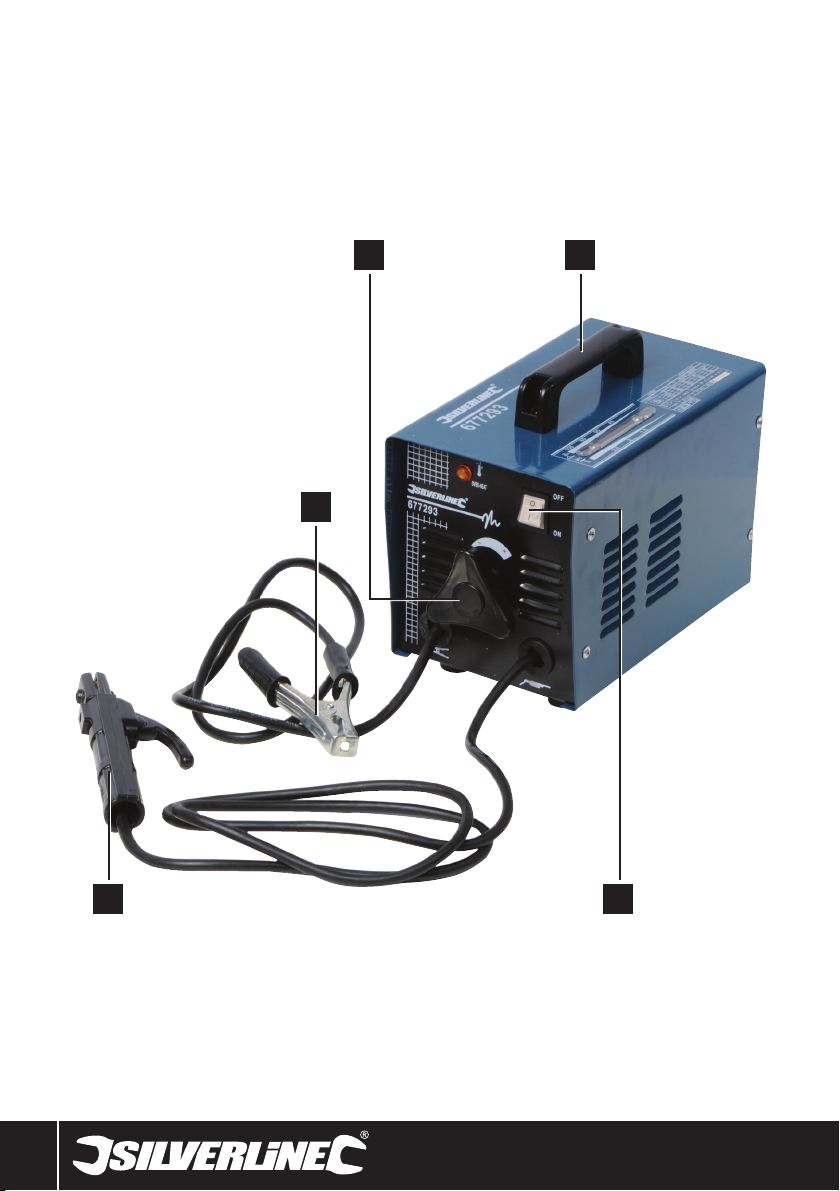
1 Current Control Knob
2 Carry Handle
3 Power Switch
4 Electrode Clamp
5 Earth Clamp
Product Familiarisation
Accessories
Welding Mask (inc. handle and visor)
Hammer & Brush
Unpacking Your Tool
• Carefully unpack and inspect your tool. Fully familiarise yourself with all its
features and functions
• Ensure that all parts of the tool are present and in good condition. If any parts
are missing or damaged, have such parts replaced before attempting to use
this tool
Assembly
Assembling the mask
1. Carefully slot the handle into the fixing slots on the mask. Ensure both
nibs engage for a secure fit
2. Remove protective wrapping from the visor and slot the visor into
place. Take care not to scratch the visor, and ensure the visor engages
fully with the clips so that it fully covers the viewing panel and cannot
be dislodged
Connecting to a Power Supply
• ONLY connect this welder to a power supply capable of providing the specified
voltage
• If connecting to a generator, check the specification of the generator first
Before Use
• Always wear appropriate personal protective equipment for the job that you
are to do. Use of this machine requires a welding mask, gloves, heat resistant
clothing and, if appropriate, a respirator
• Always ensure that you have an appropriate fire extinguisher near to the work
area
• Always inspect your machine for damage or wear. Pay particular attention to
leads and cables. If any damage is found DO NOT USE
• Check that all casings or covers are properly closed and secured
• Position the welder to ensure that it will not move, or tip, in use. Ensure that
there is at least 500mm of clear space around the welder, to allow proper
ventilation
Operating Instructions
Warning: Always unplug the welding machine from the mains supply and allow to
cool fully before attempting to fit or replace any part
Setting the machine
• To achieve a good quality weld the Current Control Knob (1) must be set
correctly
• Turning the control knob clockwise will increase the welding current, turning the
knob anti-clockwise will reduce the welding current
Welding rod selection
• In order to produce a good quality weld, the correct type of welding rod must be
used. Welding rods are available in a variety of thicknesses and materials, and
with a range of coatings
• Refer to rod manufacturers guidelines to select the correct rod for your
requirements
Duty Cycle
• This machine is not designed to weld constantly. Excessive continuous welding
will cause overheating and damage to internal components

6
GB
6
GB
• The duty cycle (see specifications) defines the number of minutes, in every ten
minutes, that the machine can weld
• For a duty cycle of 30%, the machine may be used for 3 minutes, then must be
allowed 7 minutes to cool
• If the duty cycle is exceeded, the machine will automatically cut out
• Using the machine at reduced current settings and maintaining good ventilation
will maximise the duty cycle
Thermal cut-out
• This machine is equipped with a thermal cut-out. If the machine is overloaded,
or used beyond its duty cycle, it will automatically shut down
• Allow the machine to cool. The cut-out will automatically reset once the
machine is ready for use
Preparing to weld
• Ensure that parts to be joined are clean, and free from rust, paint, or other
finishes
• All parts should be well supported, with a gap of approximately 1mm where
you intend to form the welded joint
• Check that there are no flammable materials in the vicinity of the work area
• Attach the Earth Clamp (5) to a cleaned area of one of the parts, as near as
practical to where the joint will be
• Squeeze the Electrode Clamp (4), to open the jaws. Place an electrode into
the jaws, and release. The electrode should be firmly gripped, with the clamp
contacting the clean metal part (not the coated part)
• Ensure that there is a responsible person, and an operable fire extinguisher
at hand
• Connect the machine to the mains power supply
Welding
WARNING: Using a welder correctly is a technical skill. A welder used incorrectly
can be highly dangerous. The information presented below is general guidance
only. If you are not entirely
• Move the Power Switch (3) to the 'ON' position
• Hold the Electrode Clamp (4) in one hand, and the face mask in the other
• Position the rod at an angle of approx 80˚ to the surface, with the tip is approx
30mm away from the metal
• Hold the mask over your face, and tap the rod against the metal
• An arc should strike between the metal, and the tip. Try to hold the tip of the rod
a distance away from the metal equal to the rod thickness. Maintain the arc for
1-2 seconds, then move the rod away
• Allow the weld to cool slightly, and move the mask away from your face. If the
settings were correct, a round 'spot' weld should have formed
• If the weld has not fully penetrated the metal, increase the current setting. If a
hole has been made in the metal, reduce the current setting
• Practice making 'spot' welds until you are confident using the machine, and
selecting settings
• To form a 'seam' weld, maintain the arc for longer, and slowly move the rod
forward at the same time. The speed at which the rod is moved is crucial to
achieving a good weld
• If the machine settings are correct, the arc should be steady, and produce a
crackling sound. Be aware that you will have to gradually move the electrode
clamp closer to the metal as the rod is used up
• Once the weld bead is complete, remove excess and splatters using a chipping
hammer or wire brush. Do not attempt to weld over beads unless properly
cleaned
• Creating neat, high quality welds is a skill that takes time to master. Practice
and good preparation will help to make satisfactory welds
Troubleshooting
Should you experience any problem with the welder please make the
following checks:-
• That the welding current is correct for the diameter and type of electrode in use
• That if the power supply is on, the power indicator light in the ON/OFF switch
is on. If the power indicator light is not on there is a power supply problem (for
example a circuit breaker may have blown)
• That the correct voltage is being used as indicated on the rating plate
• That you have not exceeded the duty cycle and the thermal cut-out is in
operation
• That the cables are undamaged and that there is nothing causing a short circuit
• That all circuit connections are correct. You should pay particular attention
to the work clamp, making sure that it is correctly attached to the workpiece
and that there is no grease, paint or other contaminate that could cause a bad
connection
Maintenance
WARNING: Always remove the plug from the mains power supply before carrying
out any maintenance/cleaning.
Cleaning
• Keep your machine clean at all times. Dirt and dust will cause internal parts
to wear quickly, shortening the machine’s service life. Clean the body of your
machine with a soft brush, or dry cloth. If available, use clean, dry, compressed
air to blow through the ventilation holes
Disposal
• Do not dispose of power tools, or other waste electrical and electronic
equipment, with household waste
• Contact your local waste disposal authority for information on the proper way
to dispose of tools

www.silverlinetools.com
7
Arc Welder677293
www.silverlinetools.com
7
Terms & Conditions
Silverline Tools Guarantee
This Silverline product comes with a 3 year
guarantee
Register this product at www.silverlinetools.com within 30 days of
purchase in order to qualify for the 3 year guarantee. Guarantee period
begins according to the date of purchase on your sales receipt.
Registering your purchase
Registration is made at silverlinetools.com by selecting the Guarantee
Registration button. You will need to enter:-
• Your personal details
• Details of the product and purchase information
Once this information is entered your guarantee certificate will be created
in PDF format for you to print out and keep with your purchase.
Guarantee period becomes effective from the date of retail purchase as
detailed on your sales receipt.
PLEASE KEEP YOUR SALES RECEIPT
If this product develops a fault within 30 days of purchase, return it to the
stockist where it was purchased, with your receipt, stating details of the
fault. You will receive a replacement or refund.
If this product develops a fault after the 30 day period, return it to:
Silverline Tools Service Centre
PO Box 2988
Yeovil
BA21 1WU, UK
The guarantee claim must be submitted during the guarantee period.
You must provide the original sales receipt indicating the purchase date,
your name, address and place of purchase before any work can be
carried out.
You must provide precise details of the fault requiring correction.
Claims made within the guarantee period will be verified by Silverline Tools
to establish if the deficiencies are related to material or manufacturing of
the product.
Carriage will not be refunded. Items for return must be in a suitably clean
and safe state for repair, and should be packaged carefully to prevent
damage or injury during transportation. We may reject unsuitable or
unsafe deliveries.
All work will be carried out by Silverline Tools or its authorized
repair agents.
The repair or replacement of the product will not extend the period
of guarantee
Defects recognised by us as being covered by the guarantee shall be
corrected by means of repair of the tool, free of charge (excluding carriage
charges) or by replacement with a tool in perfect working order.
Retained tools, or parts, for which a replacement has been issued, will
become the property of Silverline Tools.
The repair or replacement of your product under guarantee provides
benefits which are additional to and do not affect your statutory rights as
a consumer.
What is covered:
The repair of the product, if it can be verified to the satisfaction of Silverline
Tools that the deficiencies were due to faulty materials or workmanship
within the guarantee period.
If any part is no longer available or out of manufacture, Silverline Tools will
replace it with a functional replacement part.
Use of this product in the EU.
What is not covered:
Silverline Tools does not guarantee repairs required as a result of:
Normal wear and tear caused by use in accordance with the operating
instructions eg blades, brushes, belts, bulbs, batteries etc.
The replacement of any provided accessories drill bits, blades, sanding
sheets, cutting discs and other related items.
Accidental damage, faults caused by negligent use or care, misuse,
neglect, careless operation or handling of the product.
Use of the product for anything other than normal domestic purposes.
Change or modification of the product in any way.
Use of parts and accessories which are not genuine Silverline Tools
components.
Faulty installation (except installed by Silverline Tools).
Repairs or alterations carried out by parties other than Silverline Tools or its
authorized repair agents.
Claims other than the right to correction of faults on the tool named in
these guarantee conditions are not covered by the guarantee.
EC Declaration of Conformity
The undersigned: Mr Darrell Morris
as authorised by: Silverline Tools
Declares that the
Name/ model: Arc Welder
Type/ serial no: 677293
Net installed power: 40 - 100A
Conforms to the following Directives:
• Low voltage directive 2006/95/EC
• EMC Directive 2004/108/EC
• ROHS Directive 2002/95/EC
• EN60974-1:2005
• EN60974-6:2003
• EN60974-10:2007
• EN61000-3-11:2000, EN61000-3-12:2005
The technical documentation is kept by: Silverline Tools
Notified body: TUV Rheinland
Place of declaration: Shanghai, China
Date: 11/11/11
Signed by:
Director
Name and address of Manufacturer or Authorised representative:
Silverline Tools, Boundary Way, Lufton Trading Estate, Yeovil, Somerset,
BA22 8HZ United Kingdom

8
F
8
F
Consignes générales de
sécurité relatives aux appareils
électriques
AVERTISSEMENT Veuillez lire l’intégralité des consignes de sécurité et des
instructions. Le non-respect de ces consignes et instructions peut entraîner un
risque de choc électrique, d’incendie et/ou se traduire par des blessures graves
Veuillez conserver ces instructions et consignes de sécurité pour référence
ultérieure.
L’expression « appareil électrique » employée dans les présentes consignes
recouvre aussi bien les appareils filaires à brancher sur le secteur que les
appareils sans fils fonctionnant sous batterie.
Sécurité sur la zone de travail
a) Maintenir une zone de travail propre et bien éclairée. Des zones
encombrées et mal éclairées sont sources d’accidents.
b) Ne pas utiliser d’outils électriques dans des environnements explosifs,
tels qu’à proximité de liquides, de gaz ou de poussières inflammables.
Les appareils électriques produisent des étincelles susceptibles d’enflammer
la poussière ou les vapeurs présentes.
c) Eloigner les enfants et les passants pendant l’utilisation d’un appareil
électrique. Ceux-ci peuvent provoquer une perte d’attention et faire perdre
la maîtrise de l’appareil.
Sécurité électrique
a) Voir ‘Branchement sur le secteur’ pour s’informer des conditions de
sécurité lorsque que vous branchez votre appareil sur le secteur. Ne pas
suivre les consignes peut engendrer un accident fatal.
b) Eviter le contact corporel avec les surfaces mises à la terre telles que
tuyaux, radiateurs, cuisinières et réfrigérateurs. Le risque de décharge
électrique est plus important si le corps est mis à la terre.
c) Ne pas exposer l’appareil électrique à la pluie ou à l’humidité.
L’infiltration d’eau dans un appareil électrique accroît le risque de décharge
électrique.
d) Ne pas maltraiter le cordon électrique. Ne jamais utiliser le cordon
électrique pour porter, tirer ou débrancher l’appareil. Protéger le
cordon électrique de la chaleur, du contact avec l’essence, des bords
tranchants et pièces rotatives. Un cordon électrique endommagé ou
entortillé accroît le risque de décharge électrique.
Sécurité des personnes
a) Rester vigilent et faire preuve de bon sens lors de la manipulation de
l’appareil. Ne pas utiliser un appareil électrique lorsque l’on se trouve
dans un état de fatigue, ou sous l’influence de drogues, d’alcool ou
de médicaments. Un moment d’inattention pendant l’utilisation d’un outil
électrique peut se traduire par des blessures graves.
b) Porter un équipement de protection approprié. Toujours porter une
protection oculaire. Le port de masque à poussières, chaussures de
sécurité antidérapantes, casque de sécurité et protections antibruit adaptés
aux différentes conditions de travail réduit le risque de blessures corporelles.
c) Eviter tout démarrage accidentel. S’assurer que l’interrupteur
marche-arrêt soit en position d’arrêt avant de brancher l’appareil sur
l’alimentation secteur ou d’installer la batterie, de prendre l’appareil ou
de le transporter. Porter un appareil électrique tout en maintenant le doigt
posé sur l’interrupteur ou brancher un appareil électrique dont l’interrupteur
est sur la position de marche est source d’accidents.
d) Enlever toute clé et tout instrument de réglage avant de mettre
l’appareil électrique en marche. Une clé ou un instrument de réglage
laissé fixé à un élément en rotation de l’appareil électrique peut entraîner des
blessures physiques.
e) Ne pas essayer d’atteindre une zone hors de portée. Se tenir toujours
en position stable permettant de conserver l’équilibre. Cela permet de
mieux contrôler l’appareil électrique dans des situations inattendues.
f) Porter des vêtements appropriés. Ne pas porter de vêtements amples
ou des bijoux pendants. Eloigner cheveux, vêtements et gants des
pièces en mouvement. Les vêtements amples, les bijoux pendants et
cheveux longs peuvent être happés par les pièces en rotation.
Description des symboles
La plaque signalétique figurant sur votre outil peut présenter des symboles. Ces
symboles constituent des informations importantes relatives au produit ou des
instructions concernant son utilisation.
Port de protection auditive
Port de lunettes de sécurité
Port de masques respiratoires
Port du casque
Port de gants
Lire le manuel d’instructions
Construction de classe I (Mise à la terre)
Risque d’électrocution
Conforme à la réglementation et aux normes de sécurité pertinentes
Protection de l’environnement
Les produits électriques usagés ne doivent pas être jetés avec les
ordures ménagères. Veuillez les recycler dans les centres prévus à
cet effet. Pour de plus amples informations, veuillez contacter votre
municipalité ou point de vente
Caractéristiques techniques
Tension : ..................................................... 230 V~
Fréquence : ................................................ 50 Hz
Cycle opératoire nominal : .......................... 10%
Ampérage à 60% du cycle opératoire : .......28 A
Variations de courant nominal : .................. 40-100 A
Tension à vide : .......................................... 48 V
Classe d’isolation : ..................................... H
Diamètre de l’électrode : ............................ 1,6-2,5 mm
Epaisseur max. de soudure : ...................... 5 mm
Valeur nominale du fusible : ....................... 13 A
Degré de protection : .................................. IP21S
Classe de protection : .................................
Poids : ....................................................................13 kg
L’intensité sonore peut dépasser 85 dB(A) et il est recommandé que
l’opérateur prenne des mesures de protection sonore.
Du fait de l’évolution constante de notre développement produits,
les spécifications des produits Silverline peuvent changer sans
notification préalable.
Lisez attentivement ce manuel ainsi que toute étiquette apposée sur l’outil et
assurez-vous d’en comprendre le sens avant utilisation. Rangez ces consignes
avec l’outil, pour référence ultérieure. Assurez-vous que toute personne venant à
utiliser cet outil ait attentivement pris connaissance de ce manuel.
Sachez qu’utiliser un outil conformément aux prescriptions ne garantit pas
l’élimination de tous les facteurs de risque. Procédez avec prudence. N’utilisez pas
cet outil si vous avez des doutes quant à la manière sûre et correcte de procéder.
 Loading...