


3 Year Guarantee
*Register online within 30
days. Terms & Conditions apply
Garantie de 3 ans
*Enregistrez votre produit en ligne
dans les 30 jours. Sous réserve des
Conditions Générales d’utilisation
3 Jahre Garantie
*Registrieren Sie sich innerhalb von 30
Tagen online. Es gelten die allgemeinen
Geschäftsbedingungen
3 años de garantía
*Regístrese online dentro de 30 días.
Se aplican los términos y condiciones
3 anni di garanzia
*Registrarsi on-line entro 30 giorni.
Termini e Condizioni si applicano
3 Jaar Garantie
*Registreer online binnen 30 dagen.
Algemene voorwaarden van toepassing
www.silverlinetools.com

R
E
L
V
I
N
L
I
E
S
POWER
R
E
A
G
N
633770
25cc Multi-Head Garden System
25cc Multi Head Garden System
Coupe-bordure multifonction thermique 25 cm³
Multifunktions-Gartengerät, 25 cm
Desbrozadora multifunción térmico 25 cm³
Sistema di giardinaggio a più
testine 25 cm³
Multi-kop bezinetrimmer
3
www.silverlinetools.com
2 7641 3 5
8 9
FIG A
FIG B
31 32
30
29
28
FIG C
23242527 26
2
11 12
FIG D FIG E
33
13
14
FIG F
FIG G
1819202122
www.silverlinetools.com
15
16
17
3

4

25cc Multi-Head Garden System
English ...................6
Français .................14
Deutsch .................. 22
®
Español ..................30
Italiano ................... 38
Nederlands .............46
www.silverlinetools.com
5

GB
Description of Symbols
The rating plate on your tool may show symbols. These represent important
information about the product or instructions on its use.
Wear hearing protection
Wear eye protection
Wear breathing protection
Wear head protection
Wear hand protection
Read instruction manual
Do not use petrol tools where there is a risk of explosion or
fire from combustible material, flammable liquids, flammable
gases, or dust of an explosive nature
If the engine has been running it will be very hot. DO NOT
TOUCH
Exhaust gases contain carbon monoxide, a toxic gas. Exposure
to it can provoke loss of consciousness and even death
Conforms to relevant legislation and safety standards
Specification
Engine displacement: .................. 25.4cc
Max engine power: ..................... 0.85kW/8,500min
Fuel: ............................................ Unleaded petrol /
2 stroke oil mix (40 : 1)
Fuel tank capacity: ...................... 0.6L
Spark plug type: ......................... TORCH BM6A
Engine speed at idle: ................... 3,000min
No load speed: ............................ 11,000min
Cutting width: .............................. 254mm for blade and
410mm for spool
Vibration
- Idling: .................................... 2.32/2.78m/s
- Racing: .................................. 3.64/3.89m/s
Sound pressure: .......................... 91dB (A)
Sound power: .............................. 106dB (A)
Weight: ........................................ 11.8kg
The sound intensity level for the operator may exceed
85dB(A) and sound protection measures are necessary.
As part of our ongoing product development, specifications
of Silverline products may alter without notice.
-1
-1
-1
2
2
Carefully read and understand this manual and any label attached to
the tool before use. Keep these instructions with the product for future
reference. Ensure all persons who use this product are fully acquainted
with this manual.
Even when used as prescribed it is not possible to eliminate all residual risk
factors. Use with caution. If you are at all unsure of the correct and safe
manner in which to use this tool, do not attempt to use it.
General Power Tool Safety
Warnings
WARNING Read all safety warnings and all instructions. Failure to
follow the warnings and instructions may result in electric shock, fire and/
or serious injury.
Save all warnings and instructions for future reference.
The term "power tool" in the warnings refers to your mains-operated
(corded) power tool or battery-operated (cordless) power tool.
Work Area Safety
a) Keep work area clean and well lit. Cluttered or dark areas invite
accidents
b) Do not operate power tools in explosive atmospheres, such as
in the presence of flammable liquids, gases or dust. Power tools
create sparks which may ignite the dust or fumes
c) Keep children and bystanders away while operating a power tool.
Distractions can cause you to lose control
Personal Safety
a) Stay alert, watch what you are doing and use common sense
when operating a power tool. Do not use a power tool while you
are tired or under the influence of drugs, alcohol or medication.
A moment of inattention while operating power tools may result in
serious personal injury
b) Use personal protective equipment. Always wear eye protection.
Protective equipment such as dust mask, non-skid safety shoes, hard
hat, or hearing protection used for appropriate conditions will reduce
personal injuries
c) Prevent unintentional starting. Ensure the switch is in the
off-position before connecting to power source and/or battery
pack, picking up or carrying the tool. Carrying power tools with your
finger on the switch or energising power tools that have the switch on
invites accidents
d) Remove any adjusting key or wrench before turning the power
tool on. A wrench or a key left attached to a rotating part of the power
tool may result in personal injury
e) Do not overreach. Keep proper footing and balance at all times.
This enables better control of the power tool in unexpected situations
f) Dress properly. Do not wear loose clothing or jewellery. Keep your
hair, clothing and gloves away from moving parts. Loose clothes,
jewellery or long hair can be caught in moving parts
g) If devices are provided for the connection of dust extraction and
collection facilities, ensure these are connected and properly
used. Use of dust collection can reduce dust-related hazards
Power Tool Use & Care
a) Do not force the power tool. Use the correct power tool for your
application. The correct power tool will do the job better and safer at
the rate for which it was designed
b) Do not use the power tool if the switch does not turn it on and off.
Any power tool that cannot be controlled with the switch is dangerous
and must be repaired
c) Disconnect the plug from the power source and/or the battery
pack from the power tool before making any adjustments,
changing accessories, or storing power tools. Such preventive
safety measures reduce the risk of starting the power tool accidentally
6

633770
25cc Multi-Head Garden System
d) Store idle power tools out of the reach of children and do
not allow persons unfamiliar with the power tool or these
instructions to operate the power tool. Power tools are dangerous
in the hands of untrained users
e) Maintain power tools. Check for misalignment or binding of
moving parts, breakage of parts and any other condition that may
affect the power tool’s operation. If damaged, have the power
tool repaired before use. Many accidents are caused by poorly
maintained power tools
f) Keep cutting tools sharp and clean. Properly maintained cutting
tools with sharp cutting edges are less likely to bind and are easier
to control
g) Use the power tool, accessories and tool bits etc. in accordance
with these instructions, taking into account the working
conditions and the work to be performed. Use of the power tool for
operations different from those intended could result in a hazardous
situation
Service
a) Have your power tool serviced by a qualified repair person using
only identical replacement parts. This will ensure that the safety of
the power tool is maintained
Internal Combustion Safety
Dangerous environment
• Do not use petrol tools in damp or wet conditions, or expose them to
rain. Provide adequate surrounding work space and keep area well lit.
Do not use petrol tools where there is a risk of explosion or fire from
combustible material, flammable liquids, flammable gases, or dust of an
explosive nature
Protect your hearing
• Always wear suitable hearing protection when tool noise exceeds 80dB.
It is the responsibility of the user to ensure that other people exposed to
the noise are also suitably protected
Protect your eyes
• Always wear suitable eye protection
Protect yourself from vibration
• Hand held tools may produce vibration. Vibration can cause disease.
Gloves to keep the operator warm may help to maintain good blood
circulation in the fingers. Hand held tools should not be used for long
periods without a break
Switch off
• Ensure that the engine has stopped before attaching any accessories
to the tool.
• If the tool stops unexpectedly ensure that the power is switched off and
the engine is not running before attempting to check the tool
Running in the engine
• New tools should be used at moderate speed
• Do not maintain high engine speed until the engine is fully run in
• The engine will not be capable of developing maximum power until the
end of the running in period
• When first using the tool, periodically stop and check that all nuts and
screws are securely fastened and tighten them as necessary
• Do not use fuels containing methanol or ethanol, as these may cause
internal damage to the fuel tank and fuel lines
Warning
• Never leave the tool running unattended
• Never leave the machine unattended when parts are still hot
Servicing
• We recommended that your tool is serviced shortly after its first use
• In normal use, have the tool serviced regularly
• Do not modify any of the components of this tool. To do so would
invalidate your guarantee, and could result in injury to yourself or others
around you
• Always have your tool serviced at an authorised service centre
Storage
• When you have finished using the tool, clean it completely
• Be careful not to damage the fuel tank, or fuel lines, when it is placed
on the ground
• Ensure that the tool will not be subject to impact damage; any damage
could cause the tool to become unsafe
• Store the tool away from direct sunlight
• Ensure that fuel and oil is stored in a safe place, away from heat, direct
sunlight or any source of ignition
Whenever the machine is likely to be out of use for an extended period of
time, proceed as follows:
• Empty the fuel tank completely
• Protect all metal engine parts from corrosion by coating them with oil
• Remove the spark plug, put a few drops of oil into the cylinder and then
pull the recoil starter 2 to 3 times in order to distribute the oil evenly
• Replace the spark plug
• Never store the machine where children may gain access to it
THIS PRODUCT PRODUCES POISONOUS EXHAUST FUMES AS SOON AS
THE ENGINE IS RUNNING. THESE GASES MAY BE COLOURLESS AND
ODOURLESS. TO REDUCE THE RISK OF SERIOUS OR FATAL INJURY, NEVER
RUN THE MACHINE INDOORS, OR IN POORLY VENTILATED AREAS. ENSURE
PROPER VENTILATION WHEN WORKING IN TRENCHES OR OTHER CONFINED
SPACES.
www.silverlinetools.com
7

GB
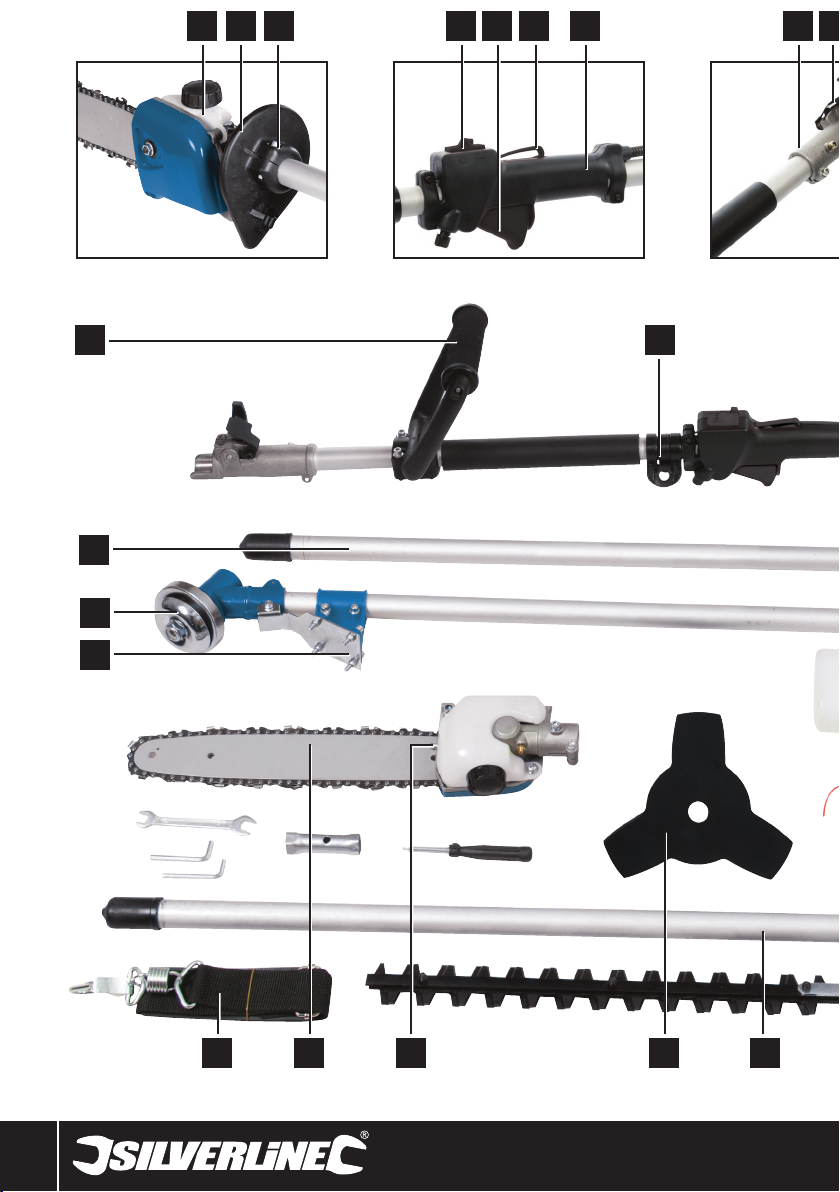
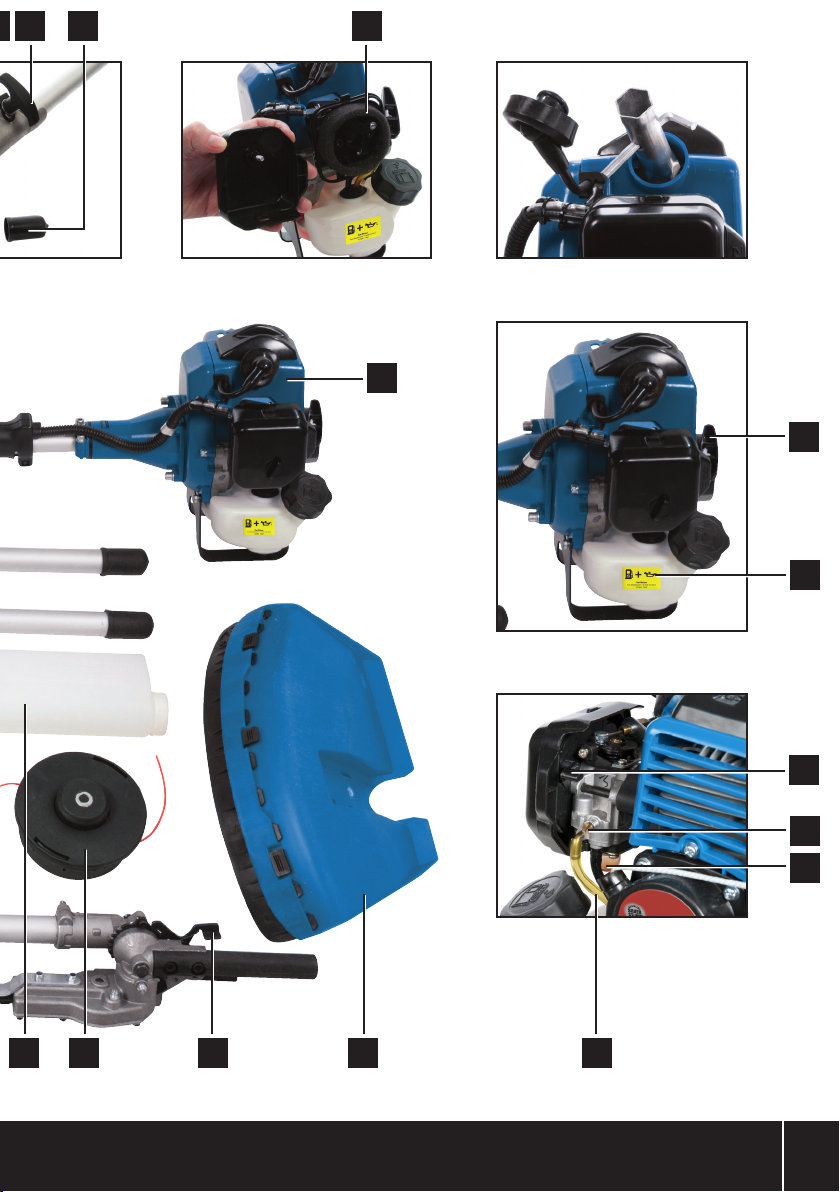
Product Familiarisation
1 Chain Oil Reservoir
2 Chainsaw Lubrication Guard
3 Guard Retaining Bolt
4 Ignition Switch
5 Throttle
6 Safety Switch
7 Handle
8 Drive Unit Coupling
9 Locking Pin Cover
10 Locking Clamp
11 End Cover
12 Air Filter
13 Starter Handle
14 Fuel Tank
15 Choke Lever
16 Idling Adjustment Screw
17 Primer
18 Fuel Lines
19 Trimmer Guard
20 Adjustment Levers (Hedge Trimmer)
21 Trimmer Spool
22 Fuel Mixing Bottle
23 Hedge Trimmer
24 Brush Cutter Blade
25 Chain Tension Screw
26 Chainsaw
27 Shoulder Strap
28 Trimmer Guard Brackets
29 Brush Cutter/Trimmer Head
30 Chainsaw Shaft
31 Auxiliary Handle
32 Strap Anchor Point
33 Drive Unit
Accessories
Open-Ended Spanner
Hex Key
Box Spanner
Screwdriver
Unpacking Your Tool
• Carefully unpack and inspect your tool. Fully familiarise yourself with all
its features and functions
• Ensure that all parts of the tool are present and in good condition. If
any parts are missing or damaged, have such parts replaced before
attempting to use this tool
Preparing your cutting tools
Fitting the Trimmer Guard
1. Slide the Trimmer Guard (19) between the Trimmer Guard Brackets
(28) on the shaft
2. Use the four hex nuts and bolts supplied to secure the guard to the
bracket on the side of the shaft
Fitting the blade
1. Put a hex key through the locking hole located on the spindle housing
to lock the spindle
2. Use socket and screwdriver (or wrench) to undo the locking nut at
the base of the cutter assembly NOTE: this is reverse thread so turn
clockwise to unscrew
3. Remove the outer cap and blade bush
4. Insert blade, replace blade bush and outer cap, and re-fit locking nut
Fitting the trimmer spool
NOTE: The trimmer spool (21) is a left-handed screw-fit onto the spindle
1. Put a hex key through the locking hole located on the spindle housing
to lock the spindle
2. Use the box spanner and screwdriver (or wrench) to unscrew the
locking nut at the base of the cutter assembly NOTE: this is reverse
thread so turn clockwise to unscrew
3. Remove the outer cap, blade bush and blade (if fitted). Leave the cover
to the spindle housing in place
4. Lock the spindle by putting hex key through the locking hole
5. Thread the trimmer spool on to the spindle and tighten by hand – do
not over-tighten
NOTE: The spool does not need to be tightened by a tool
Assembling the Chainsaw
1. Unscrew the locking pin in the chainsaw coupling
2. Remove the End Cover (11) from one end of the Chainsaw Shaft (30)
and insert into the chainsaw coupling fully so that the drive shaft is
engaged
3. Align pin hole in shaft with locking pin, and tighten pin to secure shaft
in position
4. Remove the end cover from the opposite end of the chainsaw shaft,
fit the Chainsaw Lubrication Guard (2) onto the chainsaw shaft, then
replace the end cover
5. Thread the guard along the shaft up to the coupling with the chainsaw
and secure in position (Fig A) by tightening the Guard Retaining Bolt (3)
8

25cc Multi-Head Garden System
633770
Preparing the Drive Unit
Fuelling
• The Drive Unit (33) uses a mixture of unleaded fuel and 2 stroke oil at a
ratio of 40:1
• Use only good quality, petroleum-based 2 stroke oil and unleaded petrol
• Mix the fuel in the Fuel Mixing Bottle (22) supplied
• Do not mix fuel in the Fuel Tank (14)
• Only mix as much fuel as you intend to use (Note: The tank has a
capacity of 0.6Ltr)
• Place the drive unit on a firm level surface
• Remove the fuel tank cap to fill the tank
• Pour the fuel carefully through a funnel with a filter. Do not fill the tank
beyond the level of the base of the filler neck
• Replace the fuel cap and screw tightly closed
• Make sure that any fuel spillage is completely cleaned up
• Store any excess fuel in a safe container well away from the work area
and from other combustible materials
IMPORTANT NOTES
• Always refuel in a safe place, well away from the work area, and any
source of heat or ignition. Avoid any contact with the fuel. DO NOT
SMOKE
• Only add fuel when the engine has stopped and cooled fully
• 2 stroke fuels may separate. If you are using fuel that you have mixed
earlier, shake the fuel container thoroughly before filling the tank
• Move the drive unit well away from the fuelling area before starting the
engine
Starting the engine
Running in
• When using the drive unit for the first time, it is important to run in the
engine. This will improve engine efficiency, performance and maximise
life span.
• To run in the engine, leave the engine idling, with minimum use of
the throttle, for a period of approx. 15 minutes on first use. DO NOT
INCREASE ENGINE SPEED FOR THIS PERIOD IF POSSIBLE.
NOTE: It is normal to experience distinctive smells during running in, as
components heat up for the first time.
Starting from cold
• We recommend that you start the engine from cold without the cutting
tools attached, especially on first use. Once it is warmed up, turn off
the engine. Now attach the required cutting tool. See, 'Attaching the
Cutting Tools'
WARNING: The engine will produce toxic fumes as soon as it is running.
Never attempt to start the engine indoors, or in any kind of enclosed space.
Always wear proper safety protection. Use of this tool requires goggles,
gloves, ear defenders, face mask, and sturdy clothing. Wearing a hard hat,
and safety boots, is also advisable.
1. Place the Drive Unit (33) on a firm, level surface
2. Pump the Primer (17) until you can see the Fuel Lines (18) filled with
fuel (usually takes 6-12 ‘pumps’)
3. Set the Choke Lever (15) up to the COLD START position (If the engine
is already warm, or air temperature is warm, set the choke lever down
to the WARM START position
4. Move the Ignition Switch (4) to the 'ON' position (nearest the handle)
5. Place one hand on the Handle (7) to steady the unit. Make sure you
can operate the Safety Switch (6) and Throttle (5) if necessary
WARNING: Do not wrap the starter cord around your hand.
1. Grip the Starter Handle (13) and pull sharply to start the engine. Always
guide the cord back into the casing, DO NOT LET IT SNAP BACK
2. The engine will start after a few pulls
3. If necessary, press the Safety Switch (6) and gently squeeze the
Throttle (5) to encourage starting
4. As the engine warms, move the choke lever up to the 'OPEN' position
5. Keep engine speed to a minimum and allow the engine to warm up
slowly for a few minutes
NOTE: If the engine sounds like it is going to stall, move the choke into the
WARM START position and squeeze the throttle to increase engine speed
Stopping the engine
1. Release the Throttle (5), and allow the engine to idle for a few minutes
to cool down
2. Move the Ignition Switch (4) forward to the STOP position
3. The engine will stop
NOTE: When a cutting tool is attached, be aware that the spool or blade
may continue to spin for a few moments after the engine has stopped. Do
not attempt to stop the blade; allow it to slow gradually.
Attaching the shoulder strap
• Clip Shoulder Strap (27) to the Strap Anchor Point (32)
Attaching the cutting tools (Fig C)
WARNING: Do not attempt to change the cutting tools when the engine is
running, this could cause serious injury.
1. Lay the drive unit on a firm level surface
2. Ensure Locking Clamp (10) is loose
3. Remove End Cover (11) from the shaft of the required tool
4. Position shaft with the locking hole uppermost
5. Depress the Locking Pin Cover (9) and slide shaft fully into
Drive Unit Coupling (8)
6. Release the locking pin cover and firmly try to pull shaft out of the
coupling to check pin is engaged
7. Now tighten the locking clamp
Disconnecting a cutting tool
1. Turn the Locking Clamp (10) anti-clockwise to loosen the coupling
2. Depress the Locking Pin Cover (9) and pull the shaft out of the
coupling
Using the hedge trimmer
• First attach the hedge trimmer as described in ‘Attaching the cutting
tools’
Adjusting the hedge trimmer head
The pivot hinge allows 180° adjustment of the blade angle:
• Press the two Adjustment Levers (20) together and rotate trimmer head
to required angle
• Release the adjustment levers and check the lever is engaged with the
teeth of the pivot hinge
Before starting the engine
Check the connections:
• Ensure the hedge trimmer is securely attached to the drive unit
• Ensure the head of the hedge trimmer is securely fixed at the required
angle
Check the blade:
1. Remove the protective sleeves from the blade
2. Check the blade is suitably lubricated. If the blade appears dry, apply a
light spray or bead of multi-purpose oil along the base of the teeth
www.silverlinetools.com
9

GB
Starting the engine
• Be sure the hedge trimmer blade is clear of the ground and any
obstruction - when the engine is running and you squeeze the throttle,
the blade will operate
• Start the engine in accordance with instructions in 'Starting the engine'
(page 9)
Cutting
WARNING: Using a hedge trimmer correctly is a technical skill. A hedge
trimmer used incorrectly can be highly dangerous. The information
presented below is general guidance only. If you are not entirely confident in
your ability to use this tool safely, DO NOT USE.
• Always maintain a secure footing. If it is not possible to reach the cutting
area from a secure position, do not cut
• Do not overreach or attempt to cut through more vegetation than the tool
is capable of in one stroke
• Wear the correct personal protective equipment for the job. Safety
goggles, safety gloves, ear defenders and protective clothing are all
essential and must be worn at all times when trimming
• Always grip the tool in both hands. Use the Auxiliary Handle (31) to
maintain control of the power tool
DANGER: Never grip the hedge trimmer by the blade or protective sleeve
Using the grass trimmer and
brush cutter
• To attach the grass trimmer or brush cutter, see 'Attaching the cutting
tools' (page 9)
Safety in use
WARNING: Do not use without the blade guard in place
• Find an angle at which you can operate the machine that suits your body
• Always grip the tool in both hands. Use the Auxiliary Handle (31) to
maintain control of the power tool
• Do not use before you have inspected the work area for loose stones and
other obstacles that may cause a footing hazard
• Be aware that the nylon line and brush cutter blade rotate in a clockwise
direction. Keep this in mind when cutting or trimming
• For scalping and edging, tilt the cutting head at a steep angle and in a
position so that debris, dislodged dirt and stones will be thrown away
from you
Before starting the engine
• Ensure the shaft is securely attached to the drive unit
• Be sure the cutting head is clear of the ground and any obstruction -
when the engine is running and you squeeze the throttle, the cutter will
operate
Starting the engine
Start the engine in accordance with instructions in 'Starting the engine'
(page 9)
Cutting
• When moving the brush cutter over barren areas, be aware of the
potential for stones and other debris to be thrown up at high speed
Grass trimming
• When trimming grass, keep head of the trimmer at a slight angle. This
will help to reduce the amount of debris being shifted backwards
• Trim grass in stages. Never attempt to trim grass straight down to a
workable length in one sweep. This will reduce the work load being
placed on the line spool and the motor of the power tool
• If trimming through a weed stem, keep the nylon line as low to the root of
the stem as possible. The stem of the weed is thinner at the root and will
thus cause less wear on the nylon line
• The line spool has a bump-feed mechanism. To feed more line, gently
bump the base of the trimmer head against the ground and the spool will
release trimmer line
• To replace the cutting line, see Page 12
Using the chainsaw
• To attach the chainsaw, see 'Attaching the cutting tools' (page 9)
Check the chain tension
• Rotate the Chain Tension Screw (25) clockwise, until there is only approx
5mm of slack when the chain is pulled vertically from the centre of the
cutting bar
NOTE: Chain tension should be checked regularly. The chain will stretch as
it is used. An excessively loose chain may derail, an excessively tight chain
will wear quickly and could break.
Fill the chain oil reservoir
• This machine is equipped with a Chain Oil Reservoir (1)
• Oil is automatically fed onto the chain as the saw is used. Using the saw
without oil, or with the incorrect oil, will cause rapid wear and could lead
to chain breakage
• Always check that the chain oil reservoir is properly filled before use
• Use only good quality chain oil (30 weight). Do not attempt to use motor
oil, 2 stroke oil, or any other type of alternative lubricant
• To add oil, stop the engine and remove the cap to the chain oil reservoir.
Fill the reservoir with oil. Replace the cap
• Do not allow the reservoir to run dry during use
Clothing and protective equipment
All of the following must be worn at all times when using the chainsaw:
• Protective jacket conforming to EN381 – 11 Class 0. To provide extra
protection across the shoulders, arms and front yoke area
• Protective trousers conforming to EN381-5 Class 1
• Chainsaw gloves conforming to EN381-7 Class 0. These gloves help
prevent slippage and incorporate a special anti-cut material on the back
of the hand
• Hard hat with full face shield and ear defenders
• Protective chainsaw boots with steel midsole and toecap
Before starting the engine
• Ensure the chainsaw is securely attached to the drive unit
• Be sure the chainsaw head is clear of the ground and any obstruction -
when the engine is running and you squeeze the throttle, the chainsaw
will operate
Starting the engine
• Start the engine in accordance with instructions in Starting the engine
(above)
Cutting
WARNING: Using a chainsaw correctly is a technical skill. A chainsaw used
incorrectly can be highly dangerous. The information presented below is
general guidance only. If you are not entirely confident in your ability to use
this tool safely DO NOT USE.
• Always maintain a secure footing, if it is not possible to reach the cutting
area from a secure position, do not cut
• Carefully asses the safest way to cut, see 'Avoiding kickback below'.
Every cut made using a chainsaw is unique, every cut presents its own
safety considerations. Always consider how the wood may move or fall
when it has been cut. Make sure that the wood will not fall or roll towards
you, and that the blade will not become trapped
• Always hold the saw securely, keeping your left arm as straight as is
practical. Do not raise the saw above chest height
• Always grip the tool in both hands. Use the Auxiliary Handle (31) to
maintain control of the power tool
• With the saw running at full speed, lower the blade into the wood. Always
use the part of the cutting bar nearest to the body of the machine
10

25cc Multi-Head Garden System
633770
• Allow the blade to work steadily through the wood. It should not be
necessary to use force to make the saw cut. Slow cutting indicates a
blunt blade
• Do not allow the blade to touch the ground, or any object other than that
which you intend to cut
• Release the Throttle (5) as soon as the cut is complete
• Running the engine at full throttle without a load will cause rapid wear to
the engine, saw chain, and guide bar
Avoiding kickback
• Kickback is usually caused when the chain teeth near the tip of the
cutting bar 'bite' into a solid object. The resulting reactionary force may
make the saw violently accelerate up and back, towards the user
• The chain supplied with the chainsaw has been designed with kickback
reducing features. However, this does not mean that kickback will not
occur and you should be aware of kickback at all times. Careful use is
the best guarantee of safety
Maintenance
NOTE: Regular maintenance is essential to prolong the life of this power
tool. Without regular maintenance and proper storage the tool’s working life
will diminish considerably.
• Always stop the engine, and allow to cool, before performing any
cleaning / maintenance
• Ensure that all screws and bolts are tightly fastened so that the unit can
be used safely
• Never use the power tool if any of the parts appear worn or broken. In
such case, consult your retailer
• Do not attempt to alter any of the components of this tool. To do so
would not only INVALIDATE YOUR WARRANTY, BUT MAY ALSO RESULT IN
DAMAGE TO THE UNIT, YOURSELF OR OTHERS IN THE VICINITY
Engine adjustment
When adjusted properly, the engine should idle smoothly and accelerate
without hesitation. The blade or spool should not move when the engine
is idling.
• To make the engine idle at a higher speed, rotate the Idling Adjustment
Screw (16) clockwise
• To make the engine idle at a lower speed, rotate the idle adjustment
screw anticlockwise
Cleaning the air filter (Fig D)
The Air Filter (12) should be cleaned regularly. To access the filter:
1. Unscrew and unclip the filter cover
2. Remove filter element from the housing and wash carefully using
household detergent and water
3. Dry the filter element, and liberally oil using a multi-purpose oil
4. Reassemble before using the tool
Checking the spark plug
• Remove the spark plug cap
• Clean any dirt and debris from around the plug
• Box spanner is supplied to remove plug for inspection
• If problem persists, contact your retailer or suitably qualified technician
Chainsaw – chain maintenance
• To extend the life of the saw chain and the efficiency of the saw, sharpen
the teeth regularly. This should only be carried out by a qualified and
experienced person
• If the teeth become worn through use, the chain should be replaced.
Consult your retailer or a suitably qualified and experienced technician
Drive shaft
• Apply grease periodically to the grease nipples on the chainsaw and
hedge trimmer, according to use – for example, at the beginning and end
of each season
Storage
• Allow the motor to cool fully before putting this tool in storage
• Store all parts of the tool in a clean, dry place away from heat and direct
sunlight. Ensure that all items are stored where children cannot get
access to them
• Never store the unit where the fuel tank can be exposed to extreme heat,
or where petrol fumes could come into contact with flames or sparks
• Keep the storage area clear of debris and possible tripping hazards
• Make sure all heads are clean and that the protective sleeves are in
place
Extended Storage
If you are putting the tool into extended storage, in addition to the items
listed in Storage above:
• Dilute a little household detergent in warm water and, using a damp
cloth, clean the plastic housings on the main body.
• Drain all fuel from the Fuel Tank (14) safely and make sure the fuel cap is
properly fastened in place
• Remove the spark plug and pour one teaspoon of clean oil into the spark
plug cylinder. Replace and reconnect the spark plug
• With the ignition off, pull the starter handle slowly to coat the engine
with oil
Drainage and Disposal
• If you need to drain fuel from the tank, do this outdoors and only when
the motor is cool
• To respect the environment, do not dispose of any fuel or oil drained
from the machine into the drainage system or ground. Local service
stations and recycling sites have proper facilities for the disposal of such
materials and only these locations should be used to dispose of such
products. If you do not know the location of your nearest depot, contact
your local authority for information
www.silverlinetools.com
11

GB
Trimmer Line Installation
Instructions
1) Eyelet (x2)
2) Housing
3) Arbor Bolt
4) Spring
NOTE: Operating with trimmer line of uneven length will increase vibration.
Always ensure the line is wound evenly and trimmed to equal lengths from
the Eyelets (1).
1. Depress the tabs in the housing and twist the cover to release.
Remove the cover and bump button
2. Remove the spool and spring
3. Clean all components and inspect for damage. Replace any
damaged items
4. Check eyelets are in their correct position
WARNING: Never operate the trimmer without the Eyelets (1).
5. Thread the new line through the anchor in the spool until the line
lengths are equal. Do not exceed maximum capacity of spool
6. Holding the Spool (5) with the line clamp slots uppermost, wind
the line clockwise in the spool using a finger to keep the two lines
separate
7. Lock the two ends of the line in the line clamp slots
8. Place the Spring (4) over the Arbor Bolt (3)
9. With the line clamp slots facing downwards into the housing, thread
the ends of the line through the Eyelets (1) in the housing. Do not
allow the line to become caught under the spool
10. Place the Bump Button (6) in the centre of the spool
11. Replace the Cover (7) by aligning the tabs and then twisting so that
the tabs engage with the slots in the cover
12. Pull the line free from the line clamp slots
13. Check that a maximum 100 – 125mm of line extends equally from
each eyelet. Trim line as necessary
5) Spool
6) Bump Button
7) Cover
1
2
3
4
5
6
12
7

633770
Silverline Tools Guarantee
This Silverline product comes with a 3 year
guarantee
Register this product at www.silverlinetools.com within 30 days of
purchase in order to qualify for the 3 year guarantee. Guarantee period
begins according to the date of purchase on your sales receipt.
Terms & Conditions
Guarantee period becomes effective from the date of retail purchase as
detailed on your sales receipt.
PLEASE KEEP YOUR SALES RECEIPT
If this product develops a fault within 30 days of purchase, return it to the
stockist where it was purchased, with your receipt, stating details of the
fault. You will receive a replacement or refund.
If this product develops a fault after the 30 day period, return it to:
Silverline Tools Service Centre
PO Box 2988
Yeovil
BA21 1WU, UK
The guarantee claim must be submitted during the guarantee period.
You must provide the original sales receipt indicating the purchase date,
your name, address and place of purchase before any work can be
carried out.
You must provide precise details of the fault requiring correction.
Claims made within the guarantee period will be verified by Silverline Tools
to establish if the deficiencies are related to material or manufacturing of
the product.
Carriage will not be refunded. Items for return must be in a suitably clean
and safe state for repair, and should be packaged carefully to prevent
damage or injury during transportation. We may reject unsuitable or
unsafe deliveries.
All work will be carried out by Silverline Tools or its authorized
repair agents.
The repair or replacement of the product will not extend the period
of guarantee
Defects recognised by us as being covered by the guarantee shall be
corrected by means of repair of the tool, free of charge (excluding carriage
charges) or by replacement with a tool in perfect working order.
Retained tools, or parts, for which a replacement has been issued, will
become the property of Silverline Tools.
EC Declaration of Conformity
The undersigned: Mr Darrell Morris
as authorised by: Silverline Tools
Declares that the
Name/ model: 25cc Multi-Head Garden System
Type/ serial no: 633770
Conforms to the following Directives:
• Machinery Directive 2006/42/EC
• Electromagnetic Compatibility Directive 2004/108/EC
• Non Road Mobile Machinery Directive 97/68/EC
• EN ISO11806:2008
• EN ISO11680-1:2008
• EN ISO10517:2009
• EN ISO14982:1998
25cc Multi-Head Garden System
Registering your purchase
Registration is made at silverlinetools.com by selecting the Guarantee
Registration button. You will need to enter:-
• Your personal details
• Details of the product and purchase information
Once this information is entered your guarantee certificate will be created
in PDF format for you to print out and keep with your purchase.
The repair or replacement of your product under guarantee provides
benefits which are additional to and do not affect your statutory rights as
a consumer.
What is covered:
The repair of the product, if it can be verified to the satisfaction of Silverline
Tools that the deficiencies were due to faulty materials or workmanship
within the guarantee period.
If any part is no longer available or out of manufacture, Silverline Tools will
replace it with a functional replacement part.
Use of this product in the EU.
What is not covered:
Silverline Tools does not guarantee repairs required as a result of:
Normal wear and tear caused by use in accordance with the operating
instructions eg blades, brushes, belts, bulbs, batteries etc.
The replacement of any provided accessories drill bits, blades, sanding
sheets, cutting discs and other related items.
Accidental damage, faults caused by negligent use or care, misuse,
neglect, careless operation or handling of the product.
Use of the product for anything other than normal domestic purposes.
Change or modification of the product in any way.
Use of parts and accessories which are not genuine Silverline Tools
components.
Faulty installation (except installed by Silverline Tools).
Repairs or alterations carried out by parties other than Silverline Tools or its
authorized repair agents.
Claims other than the right to correction of faults on the tool named in
these guarantee conditions are not covered by the guarantee.
The technical documentation is kept by: Silverline Tools
Notified body: Intertek Testing Services
Place of declaration: Shanghai, China
Date: 09/05/11
Signed by:
Director
Name and address of Manufacturer or Authorised representative:
Silverline Tools, Boundary Way, Lufton Trading Estate, Yeovil, Somerset,
BA22 8HZ United Kingdom
www.silverlinetools.com
13
F
Description des symboles
La plaque signalétique figurant sur votre outil peut présenter des symboles.
Ces symboles constituent des informations importantes relatives au produit
ou des instructions concernant son utilisation.
Port de protection auditive
Port de lunettes de sécurité
Port de masques respiratoires
Port du casque
Port de gants
Lire le manuel d’instructions
N'utilisez pas d’appareil à essence lorsqu'il y a un risque
d'explosion ou d'incendie provenant de matières combustibles,
de liquides ou de gaz inflammables, ou de poussière de nature
explosive.
Si le moteur vient de fonctionner, il sera très chaud. NE LE
TOUCHEZ PAS.
Les gaz d'échappement contiennent du monoxyde de carbone,
un gaz toxique. L'inhalation de ce gaz peut provoquer la perte
de conscience, voire la mort.
Conforme à la réglementation et aux normes de sécurité
pertinentes.
Caractéristiques techniques
Cylindrée: .................................... 25,4 cm³
Puissance maximale du moteur: . 0.85 kW/8,500 min
Carburant: ................................... Mélange essence sans
plomb / huile 2 temps
(40 : 1)
Capacité réservoir: ...................... 0,6 L
Type de bougie d’allumage: ....... TORCH BM6A
Régime du moteur au ralenti: ...... 3,000 min
Vitesse à vide: ............................. 11,000 min
Largeur de coupe: ....................... 254 mm (lame) et
410 mm (bobine)
Vibrations
- Au ralenti: .............................. 2,32/2,78 m/s
- Vitesse maximale: .................. 3,64/3,89 m/s
Pression acoustique: ................... 91dB (A)
Puissance acoustique: ................. 106 dB (A)
Poids: .......................................... 11,8 kg
L’intensité sonore peut dépasser 85 dB(A) et il est
recommandé que l’opérateur prenne des mesures de
Du fait de l’évolution constante de notre développement
produits, les caractéristiques techniques des produits
Silverline peuvent changer sans notification préalable.
protection sonore.
-1
-1
-1
2
2
Lisez attentivement ce manuel ainsi que toute étiquette apposée sur l’outil
et assurez-vous d’en comprendre le sens avant utilisation. Rangez ces
consignes avec l’outil, pour référence ultérieure. Assurez-vous que toute
personne venant à utiliser cet outil ait attentivement pris connaissance de
ce manuel.
Sachez qu’utiliser un outil conformément aux prescriptions ne garantit
pas l’élimination de tous les facteurs de risque. Procédez avec prudence.
N’utilisez pas cet outil si vous avez des doutes quant à la manière sûre et
correcte de procéder.
Consignes générales de
sécurité relatives aux appareils
électriques
AVERTISSEMENT Veuillez lire l’intégralité des consignes de sécurité
et des instructions. Le non-respect de ces consignes et instructions peut
entraîner un risque de choc électrique, d’incendie et/ou se traduire par des
blessures graves
Veuillez conserver ces instructions et consignes de sécurité pour
référence ultérieure.
L’expression « appareil électrique » employée dans les présentes consignes
recouvre aussi bien les appareils filaires à brancher sur le secteur que les
appareils sans fils fonctionnant sous batterie.
Sécurité sur la zone de travail
a) Maintenir une zone de travail propre et bien éclairée. Des zones
encombrées et mal éclairées sont sources d’accidents.
b) Ne pas utiliser d’outils électriques dans des environnements
explosifs, tels qu’à proximité de liquides, de gaz ou de poussières
inflammables. Les appareils électriques produisent des étincelles
susceptibles d’enflammer la poussière ou les vapeurs présentes.
c) Eloigner les enfants et les passants pendant l’utilisation d’un
appareil électrique. Ceux-ci peuvent provoquer une perte d’attention
et faire perdre la maîtrise de l’appareil.
Sécurité des personnes
a) Rester vigilent et faire preuve de bon sens lors de la manipulation
de l’appareil. Ne pas utiliser un appareil électrique lorsque l’on
se trouve dans un état de fatigue, ou sous l’influence de drogues,
d’alcool ou de médicaments. Un moment d’inattention pendant
l’utilisation d’un outil électrique peut se traduire par des blessures
graves.
b) Porter un équipement de protection approprié. Toujours porter
une protection oculaire. Le port de masque à poussières, chaussures
de sécurité antidérapantes, casque de sécurité et protections antibruit
adaptés aux différentes conditions de travail réduit le risque de
blessures corporelles.
c) Eviter tout démarrage accidentel. S’assurer que l’interrupteur
marche-arrêt soit en position d’arrêt avant de brancher l’appareil
sur l’alimentation secteur ou d’installer la batterie, de prendre
l’appareil ou de le transporter. Porter un appareil électrique tout en
maintenant le doigt posé sur l’interrupteur ou brancher un appareil
électrique dont l’interrupteur est sur la position de marche est source
d’accidents.
d) Enlever toute clé et tout instrument de réglage avant de mettre
l’appareil électrique en marche. Une clé ou un instrument de
réglage laissé fixé à un élément en rotation de l’appareil électrique
peut entraîner des blessures physiques.
e) Ne pas essayer d’atteindre une zone hors de portée. Se tenir
toujours en position stable permettant de conserver l’équilibre.
Cela permet de mieux contrôler l’appareil électrique dans des
situations inattendues.
f) Porter des vêtements appropriés. Ne pas porter de vêtements
amples ou des bijoux pendants. Eloigner cheveux, vêtements et
gants des pièces en mouvement. Les vêtements amples, les bijoux
pendants et cheveux longs peuvent être happés par les pièces en
rotation.
14

633770
Coupe-bordure multifonction thermique 25 cm³
g) Si l’appareil est pourvu de dispositifs destinés au raccord
d’équipements d’extraction et de récupération de la poussière/
sciure, s’assurer qu’ils soient bien fixés et utilisés correctement
L’utilisation de ces dispositifs peut réduire les risques dus à la
poussière.
Utilisation et entretien des appareils électrique
a) Ne pas forcer sur l’appareil électrique. Utiliser l’appareil
électrique approprié au travail à effectuer. Un appareil électrique
adapté et employé au rythme pour lequel il a été conçu permettra de
réaliser un travail de meilleure qualité et dans de meilleures conditions
de sécurité.
b) Ne pas utiliser un appareil électrique dont l’interrupteur marche-
arrêt est hors service. Tout appareil électrique dont la commande
ne s’effectue plus par l’interrupteur marche-arrêt est dangereux et
doit être réparé.
c) Débrancher l’appareil électrique ou démonter sa batterie avant
d’effectuer tout réglage ou changement d’accessoire et avant
de le ranger. De telles mesures préventives réduiront les risques de
démarrage accidentel.
d) Ranger les appareils électriques inutilisés hors de portée des
enfants et ne pas permettre l’utilisation de cet appareil aux
personnes non habituées à son maniement ou n’ayant pas lu les
présentes instructions. Les appareils électriques sont dangereux
dans les mains d’utilisateurs inexpérimentés.
e) Veiller à l’entretien des appareils électriques. Vérifier que les
éléments rotatifs soient bien alignés et non grippés. S’assurer
de l’absence de pièces cassées ou endommagées susceptibles
de nuire au bon fonctionnement de l'appareil. Si l’appareil
électrique est endommagé, le faire réparer avant toute utilisation.
De nombreux accidents sont dus à l’utilisation d’appareils électriques
mal entretenus.
f) Veiller à ce que les outils de coupe soient tenus affûtés et
propres. Des outils de coupe bien entretenus, aux tranchants bien
affûtés, sont moins susceptibles de se gripper et sont plus faciles à
contrôler.
g) Utiliser l’appareil électrique, les accessoires et outils à monter
conformément à ces instructions, en tenant compte des
conditions de travail et de la tâche à réaliser. Toute utilisation d’un
appareil électrique autre que celle pour laquelle il a été conçu peut
entraîner des situations à risque.
Révision
a) Ne faire réparer votre appareil électrique que par un réparateur
qualifié utilisant uniquement des pièces de rechange identiques.
Cela permet de maintenir la sécurité d’utilisation de l’appareil
électrique.
Consignes de sécurité relatives aux
appareils à combustion interne
Environnements dangereux
• N’utilisez pas un outil à moteur à essence dans un environnement
humide et ne l’exposez pas à la pluie. Prévoyez un espace de travail
adéquat et assurez un éclairage correct de la zone. N’utilisez pas l’outil à
moteur à essence s’il existe un risque d’explosion ou d’incendie dû à des
matières combustibles, des liquides ou des gaz inflammables, ou à de la
poussière de nature explosive.
Protégez votre ouïe
• Portez une protection auditive adéquate lorsque le bruit de l’outil dépasse
80 dB. Il vous appartient de veiller à ce que les personnes se trouvant à
proximité d’un outil en fonctionnement soient également protégées.
Protégez vos yeux
• Portez toujours une protection oculaire adaptée.
Protégez-vous des vibrations
• Les outils portatifs produisent des vibrations, qui peuvent provoquer des
maladies. En conservant la chaleur, les gants contribuent à maintenir
une bonne circulation sanguine au niveau des doigts. Les outils portatifs
ne doivent pas être utilisés pendant de longues périodes sans marquer
de pause.
Eteignez l’outil avant d’installer un accessoire
• Assurez-vous que le moteur de l’outil soit arrêté avant la pose d’un
accessoire.
• Si l’outil cesse de fonctionner de manière inattendue, assurez-vous que
le moteur soit bien arrêté avant de procéder à son inspection.
Rodage du moteur
• Lorsque l’outil est neuf, prenez soin de faire tourner le moteur à régimes
modérés.
• Ne conservez pas un régime élevé tant que le moteur n’est pas rodé.
• Le moteur ne développe sa pleine puissance qu’à la fin de la période de
rodage.
• Avant d’utiliser l’outil pour la première fois et après vous être assuré que le
moteur est arrêté, vérifiez le serrage des vis et des écrous.
• N’utilisez aucun carburant contenant du méthanol ou de l’éthanol car ils
peuvent endommager le réservoir et les conduites de carburant.
Avertissement
• Attendez que l’outil se soit complètement arrêté avant de vous en
éloigner.
• Ne vous éloignez pas de l’outil tant que certaines de ses pièces sont
encore chauds.
Révisions
• Nous vous conseillons de faire réviser l’outil peu après la première
utilisation.
• Par la suite, faites réviser l’outil de manière régulière.
• Ne modifiez pas les composants de l’outil. Ceci invaliderait non seulement
votre garantie mais pourrait également vous faire courir le risque de vous
blesser ou de blesser d’autres personnes autour de vous.
• Ne faites réviser l’outil que par un centre agréé.
Rangement
• Lorsque vous n’avez plus besoin de l’outil, nettoyez-le soigneusement.
• Lorsque vous posez l’outil sur le sol, veillez à ne pas endommager le
réservoir et les conduites de carburant.
• Veillez à ne pas faire tomber l’outil, ce qui pourrait l’endommager et
rendre son utilisation dangereuse.
• Rangez l’outil à l’abri de la lumière directe du soleil.
• Assurez-vous que le carburant et l’huile soient conservés dans un endroit
sûr, éloigné de toute source de chaleur, à l’abri de la lumière directe du
soleil et de toute source d’étincelle.
Avant de ranger l’outil pour une période prolongée, procédez comme suit :
• Videz complètement le réservoir de carburant.
• Protégez de la corrosion toutes les pièces métalliques du moteur en y
appliquant une couche d’huile.
• Retirez la bougie, introduisez quelques gouttes d’huile dans le cylindre
puis tirez 2 ou 3 fois sur le lanceur à rappel pour répartir l’huile
uniformément.
• Remettez la bougie en place.
• Rangez toujours la machine hors de portée des enfants.
CET OUTIL PRODUIT DES GAZ D’ÉCHAPPEMENT TOXIQUES DÈS QUE LE
MOTEUR TOURNE. CES GAZ PEUVENT ÊTRE INCOLORES ET INODORES.
POUR RÉDUIRE LE RISQUE D’ACCIDENT GRAVE, VOIRE MORTEL, NE
L’UTILISEZ PAS À L’INTÉRIEUR NI DANS UN ENDROIT MAL AÉRÉ. VEILLEZ
À CE QUE LA VENTILATION SOIT SUFFISANTE LORSQUE VOUS TRAVAILLEZ
DANS UNE TRANCHÉE, OU TOUT AUTRE LIEU EXIGU.
www.silverlinetools.com
15

F
Familiarisation avec le produit
1 Réservoir d’huile pour la chaîne
Protection contre les projections de lubrifiant de la
2
tronçonneuse
3 Boulon de fixation de la protection
4 Bouton de marche-arrêt
5 Gâchette d’accélération
6 Interrupteur de sécurité
7 Poignée
8 Accouplement entre élément moteur et accessoires
9 Cache de la goupille d’arrêt
10 Dispositif de blocage
11 Embout
12 Filtre à air
13 Poignée du lanceur
14 Réservoir de carburant
15 Manette du starter
16 Molette de réglage du ralenti
17 Pompe d’amorçage
18 Durites de carburant
19 Carter de protection du coupe-bordure
20 Manettes de réglage (taille-haie)
21 Bobine de fil du coupe-bordure
22 Bouteille pour mélanger le carburant
23 Taille-haie
24 Lame de débroussailleuse
25 Vis de tension de la chaîne
26 Tronçonneuse
27 Bandoulière
28 Monture du carter de protection du coupe-bordure
29 Tête de montage pour coupe-bordure/débrousailleuse
30 Manche pour la tronçonneuse
31 Poignée auxiliaire
32 Point de fixation de la bandoulière
33 Élément moteur
Accessoires
Clé à fourche
Clé mâle
Clé tubulaire
Tournevis
Déballage
• Déballez le produit avec soin. Veillez à retirer tout le matériau
d’emballage et familiarisez-vous avec toutes les caractéristiques du
produit
• Si des pièces sont endommagées ou manquantes, faites-les réparer ou
remplacer avant d’utiliser l’appareil
Fixation des accessoires
Fixation du carter de protection du coupe-bordure
1. Introduire le carter de protection du coupe-bordure (19) sur la monture
du carter de protection (28) se trouvant sur le manche.
2. Fixer solidement le carter de protection sur la monture sur le côté du
manche en serrant les quatre écrous hexagonaux et boulons fournis.
Installation de la lame
1. Placer une clé mâle dans le trou de blocage situé sur le carter de
l’arbre afin d’immobiliser l’arbre.
2. À l’aide de la clé tubulaire et du tournevis (ou d’une clé anglaise),
desserrer le contre-écrou situé à la base de la tête de montage (29).
REMARQUE : le dévissage s’effectue dans le sens des aiguilles d’une
montre car le pas de filetage est inversé.
3. Retirer le cache extérieur et la bague de la lame.
4. Introduire la lame, remettre en place la bague de la lame et le cache
extérieur, et resserrer le contre-écrou.
Installation de la bobine de coupe
REMARQUE : la bobine de fil du coupe-bordure (21) se fixe sur l’arbre par
vissage dans le sens contraire des aiguilles d’une montre.
1. Placer une clé mâle dans le trou de blocage situé sur le boîtier de
l’arbre afin d’immobiliser l’arbre.
2. À l’aide de la clé tubulaire et du tournevis (ou d’une clé anglaise),
desserrer le contre-écrou situé à la base de la tête de montage (29).
REMARQUE : le dévissage s’effectue dans le sens des aiguilles d’une
montre car le pas de filetage est inversé.
3. Retirer le cache extérieur, la bague de la lame et la lame (si installée).
Laisser le cache du carter de l’arbre en place.
4. Immobiliser l’arbre en plaçant la clé mâle dans le trou de blocage.
5. Visser la bobine sur l’arbre et serrer à la main (sans trop serrer).
REMARQUE : il n’est pas nécessaire de serrer la bobine à l’aide d’un outil.
Montage de la tronçonneuse
1. Dévisser la goupille d’arrêt se trouvant dans l’accouplement de la
tronçonneuse.
2. Retirer l’embout (11) d’une extrémité du manche de la tronçonneuse
(30) et introduire complètement cette extrémité dénudée
dans l’accouplement de la tronçonneuse de sorte que l’arbre
d’entraînement soit enclenché.
3. Faire correspondre le trou prévu pour la goupille situé dans l’arbre
avec la goupille d’arrêt et fixer solidement le manche en place en
serrant la goupille.
4. Retirer l’embout de l’autre extrémité du manche de la tronçonneuse,
installer la protection contre les projections de lubrifiant de la
tronçonneuse (2) sur le manche de la tronçonneuse, puis remettre
l’embout en place.
5. Faire coulisser la protection sur le manche jusqu’à l’accouplement
avec la tronçonneuse et la fixer solidement en place (Fig. A) en serrant
le boulon de fixation de la protection (3).
Préparation de l’élément moteur
Remplissage de carburant
• L’élément moteur (33) utilise un mélange d’essence sans plomb et
d’huile 2 temps à un rapport de 40:1.
• Utiliser uniquement de l’huile 2 temps (dérivée du pétrole) de bonne
qualité et de l’essence sans plomb.
16

633770
Coupe-bordure multifonction thermique 25 cm³
• Mélanger le carburant dans la bouteille de mélange de carburant (22)
fournie.
• Ne pas mélanger le carburant directement dans le réservoir de carburant
(14).
• Mélanger uniquement la quantité requise de carburant devant être
utilisée (Remarque : le réservoir a une capacité de 0,6 litre).
• Poser l’élément moteur sur une surface stable et nivelée.
• Enlever le bouchon du réservoir de carburant pour remplir le réservoir.
• Verser le carburant dans le réservoir avec précaution et en utilisant un
entonnoir équipé d’un filtre. Ne pas remplir le réservoir au-delà du niveau
de la base du goulot de remplissage.
• Remettre le bouchon du réservoir en place et bien le fermer en le serrant.
• S’assurer de bien nettoyer tout déversement accidentel de carburant.
• Stocker le restant de carburant dans un conteneur conçu à cet effet
et le conserver bien à l’écart de la zone de travail et d’autres matières
combustibles.
IMPORTANT NOTES
• Toujours effectuer le remplissage de carburant dans un lieu sûr, et à
l’écart de la zone de travail et de toute source de chaleur ou d’étincelles.
Éviter tout contact avec le carburant. NE PAS FUMER.
• Ne pas remplir le réservoir de carburant tant que le moteur n’est pas
complètement arrêté et refroidi.
• Le mélange essence/huile 2 temps peut se séparer. En cas d’utilisation
de mélange préparé antérieurement, bien remuer la bouteille de mélange
de carburant avant d’effectuer le remplissage du réservoir.
• Bien éloigner l’élément moteur de la zone de remplissage de carburant
avant de mettre le moteur en marche.
Démarrage du moteur
Rodage
• À la première utilisation de l’élément moteur, il est important de roder
le moteur. Cela améliorera l’efficacité et la performance du moteur, et
maximisera sa durée de vie.
• Pour roder le moteur, au cours de sa première utilisation, laisser tourner
le moteur au ralenti pendant environ 15 minutes en accélérant le moins
possible. SI POSSIBLE, NE PAS AUGMENTER LA VITESSE DU MOTEUR
PENDANT TOUTE CETTE PERIODE.
REMARQUE : il est normal que le moteur dégage des odeurs particulières
pendant la période de rodage car les composants sont chauffés pour la
première fois.
Démarrage à froid
• Pour le démarrage du moteur à froid, nous recommandons de ne pas
installer d’outil de coupe, surtout pour sa première utilisation. Une fois
que le moteur est chaud, l’arrêter. Il est alors possible de fixer l’outil de
coupe requis. Voir le chapitre « Equipement de la tête de coupe ».
AVERTISSEMENT : le moteur émettra des émanations toxiques dès
qu’il sera mis en marche. Ne jamais essayer de démarrer le moteur à
l’intérieur ou dans tout type d’espace clos. Toujours porter un équipement
de protection adapté. Pour l’utilisation de cet outil, il est indispensable de
porter des lunettes de sécurité, des gants, un casque antibruit, un masque à
poussières et des vêtements résistants. Il est également conseillé de porter
un casque et des chaussures de sécurité.
1. Poser l’élément moteur (33) sur une surface stable et nivelée.
2. Appuyer sur la pompe d’amorçage (17) jusqu’à ce qu’il y ait du
carburant dans les durites de carburant (18) (il faut normalement
appuyer 6 à 12 fois sur la pompe d’amorçage).
3. Faire passer la manette du starter (15) sur la position DÉMARRAGE
À FROID (COLD START) en la poussant vers le haut ; si le moteur est
déjà chaud ou si la température ambiante est chaude, faire passer
la manette du starter sur la position DÉMARRAGE À CHAUD (WARM
START) en la poussant vers le bas.
4. Faire passer le bouton de marche-arrêt (4) sur la position de marche
'ON' (la plus proche de la poignée).
5. Poser une main sur la poignée (7) pour stabiliser l’appareil. S’assurer
de pouvoir se servir de l’interrupteur de sécurité (6) et de la gâchette
d’accélération (5) en cas de besoin.
AVERTISSEMENT : ne pas enrouler le lanceur autour de la main.
1. Saisir la poignée du lanceur (13) et mettre le moteur en marche en
tirant vivement sur la poignée. Toujours guider le lanceur pour qu’il
revienne délicatement à son emplacement. NE PAS LE LAISSER
REVENIR BRUSQUEMENT AVEC UN CLAQUEMENT.
2. Le moteur devrait démarrer après avoir tiré quelques fois sur la
poignée du lanceur.
3. Si nécessaire, appuyer sur l’interrupteur de sécurité (6) et appuyer
légèrement sur la gâchette d’accélération (5) pour faciliter le
démarrage.
4. Une fois que le moteur est chaud, placer la manette du starter sur la
position ouverte 'OPEN' en la déplaçant vers le haut.
5. Faire tourner le moteur à la vitesse minimale et laisser le moteur se
chauffer doucement pendant quelques minutes.
REMARQUE : s’il semble que le moteur va caler, positionner le starter sur la
position DÉMARRAGE À CHAUD (WARM START) et augmenter la vitesse du
moteur en appuyant sur la gâchette d’accélération.
Arrêt du moteur
1. Relâcher la gâchette d’accélération (5) et laisser le moteur refroidir en
le faisant tourner au ralenti pendant quelques minutes.
1. Placer le bouton de marche-arrêt (4) sur la position ‘STOP’ en le
poussant vers l’avant.
2. Le moteur s’arrêtera.
REMARQUE : lorsqu’un outil de coupe est fixé sur l’appareil, savoir que la
bobine de fil ou la lame peut continuer de tourner pendant quelques instants
après l’arrêt du moteur. Ne pas essayer d’arrêter l’outil de coupe ; le laisser
ralentir progressivement.
Fixation de la bandoulière
• Fixer la bandoulière (27) au point de fixation de la bandoulière (32).
Raccord des outils de coupe à
l’élément moteur (Fig. C)
AVERTISSEMENT : ne pas changer d’outil de coupe lorsque le moteur est
en marche ; cela pourrait provoquer des blessures graves.
1. Poser l’élément moteur sur une surface stable et nivelée.
2. S’assurer que le dispositif de blocage (10) est desserré.
3. Retirer l’embout (11) du manche de l’outil requis.
4. Orienter le manche en plaçant le trou de blocage tourné vers
le haut.
5. Enfoncer le cache de la goupille d’arrêt (9) et introduire
complètement le manche dans l’accouplement de l’élément
moteur (8) en le faisant coulisser.
6. Relâcher le cache de la goupille d’arrêt et essayer de faire sortir
le manche de l’accouplement en tirant fermement dessus pour
vérifier que la goupille soit bien enclenchée.
7. Serrer à présent le dispositif de blocage.
Dépose d’un outil de coupe
1. Tourner le dispositif de blocage (10) dans le sens inverse des aiguilles
d’une montre pour desserrer l’accouplement.
2. Enfoncer le cache de la goupille d’arrêt (9) et tirer sur le manche de
l’accouplement pour le faire sortir.
Utilisation du taille-haie
• Tout d’abord, raccorder le taille-haie à l’élément moteur ainsi qu’il est
décrit dans le chapitre « Raccord des outils de coupe à l’élément
moteur ».
www.silverlinetools.com
17

F
Réglage de la tête du taille-haie
Le pivot permet un réglage à 180° de l’angle d’inclinaison de la lame :
• Appuyer en même temps sur les deux manettes de réglage (20) et faire
tourner la tête du taille-haie jusqu’à l’obtention de l’angle d’inclinaison
requis.
• Relâcher les manettes de réglage et vérifier que la manette est
enclenchée avec les dents du pivot avant de mettre le moteur en marche.
Avant la mise en marche du moteur
Vérification des raccords :
• S’assurer que le taille-haie soit solidement rattaché à l’élément moteur.
• S’assurer que la tête du taille-haie soit solidement fixée à l’angle requis.
Vérification de la lame :
1. Retirer les manchons protecteurs de la lame.
2. Vérifier que la lame est lubrifiée de façon adéquate. Si la lame
ne semble pas avoir été lubrifiée, graisser la base des dents
sur toute leur largeur avec une huile polyvalente soit en en
appliquant une goutte soit par légère vaporisation.
Mise en marche du moteur
• S’assurer que la lame du taille-haie ne touche pas le sol et qu’elle soit
dégagée de tout obstacle éventuel : lorsque le moteur est en marche et
que l’accélérateur est enclenché, la lame fonctionnera elle-aussi.
• Mettre en marche le moteur conformément aux consignes données dans
le chapitre « Démarrage du moteur »., (p.17)
Coupe
AVERTISSEMENT : l’utilisation correcte d’un taille-haie est une technique
qui s’acquiert. Les informations présentées ci-dessous sont uniquement
des conseils généraux. Si vous n’êtes pas entièrement certain(e) de votre
capacité à utiliser cet outil en toute sécurité, NE L’UTILISEZ PAS.
• Toujours conserver une position stable ; s’il n’est pas possible de
conserver une position stable pour pouvoir atteindre la surface à couper,
ne pas procéder.
• Ne pas chercher à atteindre une zone de coupe en étant en déséquilibre
et ne pas essayer de couper plus de végétation que l’outil n’est capable
de couper en une seule passe.
• Porter un équipement de protection individuelle adapté au travail à
entreprendre. Lunettes de sécurité, gants de sécurité, casque antibruit
et vêtements de protection sont tous essentiels et doivent être portés
pendant toute la durée d’utilisation de l’appareil.
• Toujours tenir l’appareil à deux mains. Se servir de la poignée auxiliaire
(31) pour contrôler l’appareil.
DANGER : ne jamais tenir le taille-haie par la lame ou le manchon
protecteur.
Utilisation des fonctions coupebordure et débroussailleuse
• Pour fixer le coupe-bordure ou la débroussailleuse, voir le chapitre «
Raccord des outils de coupe à l’élément moteur ». (p. 17)
Sécurité pendant l’utilisation
AVERTISSEMENT : ne pas utiliser cet appareil si le carter de protection de
la lame n’est pas en place.
• Trouver un angle de travail adapté à sa morphologie personnelle pour
une meilleure utilisation de l’appareil.
• Toujours tenir l’appareil à deux mains. Se servir de la poignée auxiliaire
(31) pour contrôler l’appareil.
• Avant de commencer un travail de coupe, toujours inspecter la zone
de travail et vérifier qu’elle ne présente aucun danger de trébuchage
(pierres ou autres obstacles).
• Savoir que le fil en nylon et la lame de la débroussailleuse tournent dans
le sens des aiguilles d’une montre. Garder cette information à l’esprit
pendant l’utilisation du coupe-bordure ou de la débrousailleuse.
• Pour la coupe à ras de l’herbe et le dressage de bordures, incliner la tête
de coupe avec un fort angle d’inclinaison et une orientation permettant
d’éviter toute projection de débris, de terre et de pierres vers l’utilisateur.
Avant la mise en marche du moteur
• S’assurer que le manche est solidement fixé à l’élément moteur.
• S’assurer que la tête de coupe ne touche pas le sol et qu’elle soit écartée
de tout obstacle éventuel : lorsque le moteur est en marche et que
l’accélérateur est enclenché, l’outil de coupe fonctionnera lui-aussi.
Mise en marche du moteur
Mettre en marche le moteur conformément aux consignes données dans le
chapitre « Démarrage du moteur ». (p.17)
Coupe
• Lors du déplacement de la débroussailleuse sur des zones présentant
peu de végétation, faire attention au risque de projection de pierres et
d’autres débris à grande vitesse.
Coupe de l’herbe
• Pendant la coupe de l’herbe, conserver la tête de coupe à un léger angle
d’inclinaison. Cela permettra de réduire la quantité de débris projetés
vers l’arrière.
• Couper l’herbe par paliers. Ne jamais essayer de couper l’herbe à la
hauteur désirée en une seule fois. Cela réduira la charge de travail
exercée sur la bobine de fil et le moteur de l’appareil.
• Pour la coupe de mauvaises herbes drues, maintenir le fil en nylon le
plus près possible de la base de la tige : la tige des mauvaises herbes est
plus fine à la base et entraîne une moindre usure du fil de nylon.
• La bobine de fil est équipée d’un mécanisme d’avancement du fil par
petits coups. Pour faire avancer le fil, taper délicatement la base de la
tête de coupe contre le sol et la bobine libèrera du fil.
• Pour remplacer le fil de coupe, voir le chapitre « Instructions d’installation
du fil de coupe ». Voir page 19
Utilisation de la tronçonneuse
• Pour fixer la tronçonneuse, voir le chapitre « Raccord des outils de coupe
à l’élément moteur ». (p. 17)
Vérification de la tension de la chaîne de la
tronçonneuse
• Faire tourner la vis de tension de la chaîne(25) dans le sens des aiguilles
d’une montre, jusqu’à ce que la chaîne puisse s’écarter d’environ 5 mm
du guide de chaîne lorsque l’on tire verticalement sur celle-ci à partir du
centre du guide de chaîne.
REMARQUE : il est nécessaire de vérifier régulièrement la tension de la
chaîne car elle se détendra au fur et à mesure des utilisations. Une chaîne
excessivement détendue pourra dérailler et une chaîne excessivement
tendue s’usera rapidement et pourrait se rompre.
Remplissage du réservoir d’huile de la chaîne
• Cet appareil est équipé d’un réservoir d’huile pour la chaîne (1).
• La chaîne est automatiquement graissée par ce réservoir pendant
l’utilisation de la tronçonneuse. L’utilisation de la tronçonneuse sans huile
ou avec une huile inappropriée, entraînera une usure rapide de la chaîne,
voire sa rupture.
• Toujours vérifier que le réservoir d’huile pour la chaîne est correctement
rempli avant d’utiliser la tronçonneuse.
• Toujours utiliser de l’huile pour chaîne de bonne qualité (W 30). Ne pas
utiliser de l’huile pour moteur, de l’huile 2 temps ou tout autre type de
lubrifiant.
• Pour ajouter de l’huile, arrêter le moteur et enlever le bouchon du
réservoir d’huile pour la chaîne. Remplir le réservoir d’huile. Remettre en
place le bouchon du réservoir.
• Ne jamais utiliser la tronçonneuse avec le réservoir d’huile vide.
Vêtements et équipements de protection
Il est impératif de porter tous les équipements suivants lors de l’utilisation
de la tronçonneuse :
• Veste de protection conforme à la norme EN381–11 Classe 0. Fournit une
protection supplémentaire des bras et des épaules.
18

633770
Coupe-bordure multifonction thermique 25 cm³
• Pantalon de protection conforme à la norme EN381-5 Classe 1.
• Gants spéciaux pour tronçonneuses conformes à la norme EN381-7
Classe 0. Ces gants permettent d’éviter le dérapage des mains, et le
revers du gant est conçu en tissu anti-coupure.
• Casque de sécurité avec visière intégrale et protection antibruit.
• Bottes de sécurité spéciales tronçonneuse avec intercalaire et embout
protecteur en acier.
Avant la mise en marche du moteur
• S’assurer que la tronçonneuse est solidement fixée à l’élément moteur.
• S’assurer que l’outil de coupe de la tronçonneuse ne touche pas le sol
et qu’il est dégagé de tout obstacle éventuel : lorsque le moteur est
en marche et que l’accélérateur est enclenché, l’outil de coupe de la
tronçonneuse fonctionnera lui-aussi.
Mise en marche du moteur
• Mettre en marche le moteur conformément aux consignes données dans
le chapitre « Démarrage du moteur ».
Coupe
AVERTISSEMENT : l’utilisation correcte d’une tronçonneuse est une
technique qui s’acquiert. L’utilisation incorrecte d’une tronçonneuse peut
être extrêmement dangereuse. Les informations présentées ci-dessous
sont uniquement des conseils généraux. Si vous n’êtes pas entièrement
certain(e) de votre capacité à utiliser cet outil en toute sécurité, NE
L’UTILISEZ PAS.
• Toujours conserver une position stable ; s’il n’est pas possible de
conserver une position stable pour pouvoir atteindre la surface à couper,
ne pas procéder.
• Soigneusement évaluer la façon la plus sûre de couper ; consulter le
chapitre « Éviter le recul » ci-dessous.
• Chaque coupe effectuée à l’aide d’une tronçonneuse est particulière et
chaque coupe présente ses propres observations de sécurité. Toujours
étudier comment le bois en cours de coupe risque de s’orienter ou de
tomber. S’assurer que le bois ne tombera pas ou ne roulera pas vers
l’utilisateur et que la lame ne se retrouvera pas bloquée.
• Toujours tenir fermement la tronçonneuse, en gardant le bras gauche
aussi droit que possible. Ne pas soulever la tronçonneuse plus haut que
la poitrine.
• Toujours tenir cet appareil à deux mains. Se servir de la poignée auxiliaire
(31) pour contrôler l’appareil.
• En faisant tourner la tronçonneuse à pleine vitesse, abaisser le guide et
faire pénétrer la lame dans le bois. Toujours utiliser la partie du guide de
chaîne la plus proche du carter principal de la tronçonneuse.
• Laisser la chaîne couper le bois de façon régulière. L’utilisation de la
force ne devrait pas être nécessaire pour couper. Une coupe lente indique
que la chaîne est émoussée.
• Ne pas laisser la chaîne entrer en contact avec le sol ou tout objet autre
que celui à couper.
• Relâcher la gâchette d’accélération (5) dès que la coupe est terminée.
• La marche du moteur à pleine vitesse et à vide entraînera une usure
rapide du moteur, de la chaîne et du guide.
Éviter le recul
• Le recul provient généralement du fait que les dents de la chaîne situées
près de l’extrémité du guide « mordent » dans un objet solide. La force
réactive résultante peut faire violemment accélérer la tronçonneuse et la
repousser en haut et en arrière, vers l’utilisateur.
• La chaîne livrée avec cette tronçonneuse est équipée de dispositifs
conçus pour réduire le recul. Cependant, cela ne signifie pas qu’il n’y
aura aucun recul ; par conséquent, il faut faire attention au recul en
permanence. La meilleure garantie de sécurité consiste à utiliser une
tronçonneuse avec précaution.
Entretien
REMARQUE : il est essentiel de régulièrement entretenir la tronçonneuse
pour prolonger sa durée de vie. Sans un entretien régulier et un rangement
approprié, la durée de vie de cet appareil réduira considérablement.
• Avant de nettoyer / d’entretenir cet appareil, toujours arrêter le moteur
et le laisser refroidir.
• Contrôler que toutes les vis et tous les boulons soient solidement serrés
pour assurer une utilisation en toute sécurité de l’appareil.
• Ne jamais utiliser l’appareil si des pièces semblent usées ou cassées. Si
c’est le cas, consulter le revendeur.
• Ne pas modifier les composants de l’appareil. La modification de toute
pièce non seulement ANNULERA LA GARANTIE, MAIS ENCORE POURRA
ENDOMMAGER L’APPAREIL ET BLESSER L’UTILISATEUR ET LES AUTRES
PERSONNES SE TROUVANT À PROXIMITÉ.
Réglage du moteur
Lorsque le moteur est réglé correctement, il devrait tourner rond au ralenti
et il devrait accélérer sans hésitation. La lame ou la bobine ne devrait pas
tourner lorsque le moteur marche au ralenti.
• Pour faire tourner le moteur au ralenti à une vitesse supérieure, tourner
la molette de réglage du ralenti (16) dans le sens des aiguilles d’une
montre.
• Pour faire tourner le moteur au ralenti à une vitesse inférieure, tourner
la molette de réglage du ralenti dans le sens inverse des aiguilles d’une
montre.
Nettoyage du filtre à air (Fig. D)
Le filtre à air (12) doit être régulièrement nettoyé. Pour accéder au filtre :
1. Dévisser et retirer le couvercle du filtre.
2. Retirer l’élément filtrant du logement et le laver soigneusement avec
un produit détergent ménager et de l’eau.
3. Sécher l’élément filtrant et le graisser généreusement avec une huile
polyvalente.
4. Remettre toutes les pièces en place avant d’utiliser l’outil.
Contrôle de la bougie
• Retirer le protecteur de bougie.
• Nettoyer toute saleté et enlever tout débris se trouvant autour de la
bougie.
• Une clé tubulaire est fournie pour enlever la bougie afin de pouvoir
l’examiner.
• Si des problèmes persistent, contacter le revendeur ou un réparateur
qualifié.
Tronçonneuse – entretien de la chaîne
• Pour prolonger la durée de vie de la chaîne et l’efficacité de la
tronçonneuse, faire affûter régulièrement les dents. Seule une personne
qualifiée et expérimentée devrait affûter la chaîne de la tronçonneuse.
• Si les dents sont usées après l’utilisation de l’appareil, remplacer la
chaîne. Consulter le revendeur ou un réparateur qualifié et expérimenté.
Arbre d’entraînement
• Appliquer périodiquement de la graisse aux graisseurs de la
tronçonneuse et du taille-haie, selon l’utilisation – par exemple, au début
t à la fin de chaque saison.
Rangement
• Laisser le moteur refroidir complètement avant de ranger l’appareil.
• Ranger toutes les pièces de l’appareil dans un lieu propre, sec et à l’abri
de la chaleur et de la lumière directe du soleil. S’assurer de bien ranger
tous les éléments hors de portée des enfants.
• Ne jamais ranger l’appareil dans un endroit exposant le réservoir de
carburant à des chaleurs extrêmes, ou dans un endroit où des étincelles
ou flammes pourraient entrer au contact des émanations de carburant.
• Dégager la zone de rangement de tout débris et de tout danger de
trébuchage possible.
www.silverlinetools.com
19
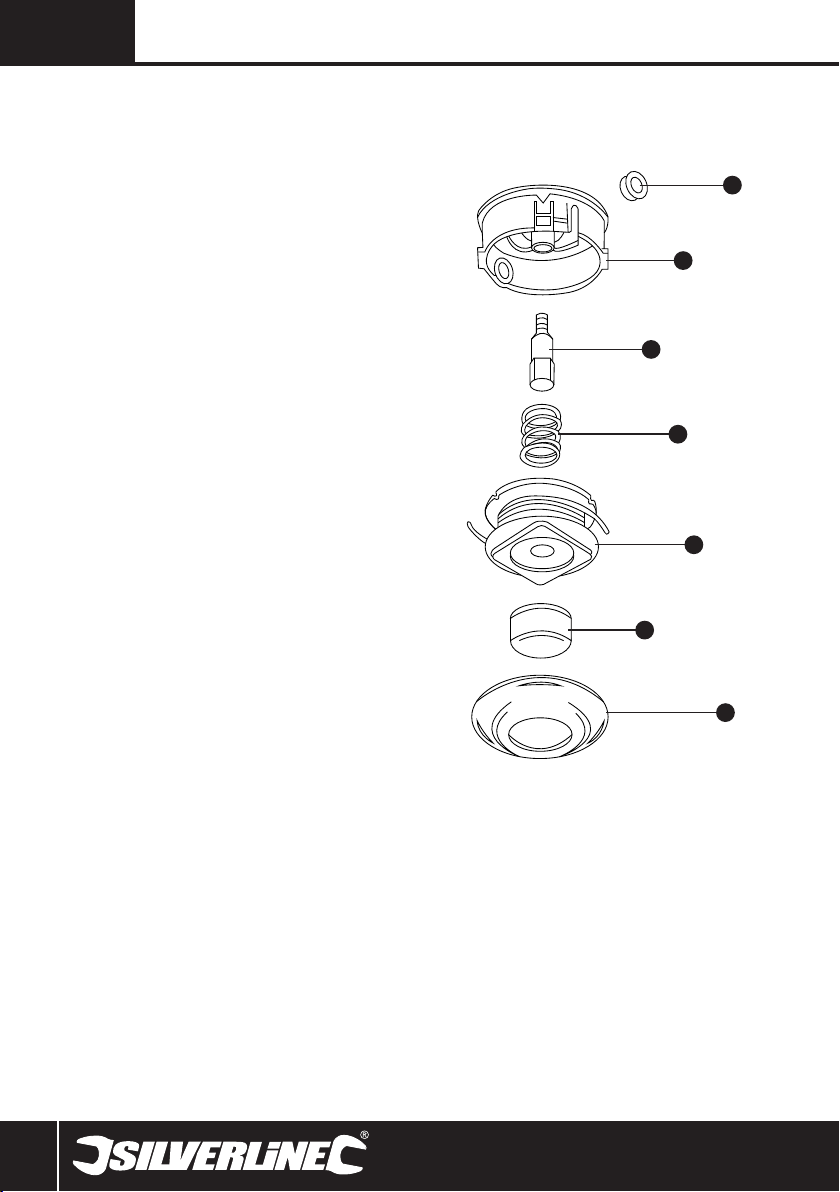
F
• S’assurer de bien nettoyer toutes les têtes de coupe et de remettre en
place tous les manchons protecteurs.
Périodes de rangement prolongées
Si l’appareil doit être entreposé pendant une période prolongée, en plus des
points indiqués dans le chapitre « Rangement » ci-dessus :
• Diluer un peu de produit détergent ménager dans de l’eau tiède et, à
l’aide d’un chiffon humide, nettoyer les carters en plastique du corps
principal de l’outil.
• Evacuer complètement le carburant demeurant dans le réservoir de
carburant (14) en respectant les consignes de sécurité et veiller à ce que
le bouchon du réservoir de carburant soit correctement fermé.
• Enlever la bougie et verser une cuillérée à café d’huile propre dans le
cylindre de la bougie. Remettre la bougie en place et la reconnecter.
• Le moteur étant arrêté, tirer doucement sur la poignée du lanceur pour
couvrir le moteur d’huile.
Vidange et élimination
• S’il faut vider le carburant du réservoir, le faire à l’extérieur et
uniquement lorsque le moteur est froid.
• Pour respecter l’environnement, ne pas jeter le restant de carburant ni
l’huile usagée de l’appareil à l’égout ni sur le sol. Les déchetteries et
centres d’entretien spécialisés disposent d’infrastructures conçues pour
l’élimination de ce type de produit et seules ces installations devraient
être utilisées pour se débarrasser de ces produits. Contactez votre mairie
ou service municipal pour plus d’informations relatives à la déchetterie la
plus proche de chez vous.
Instructions d’installation du fil
de coupe
1) Œillet (x2)
2) Boîtier
3) Boulon d’axe
4) Ressort
NOTA : l’utilisation de fils de coupe de longueurs différentes d’un côté et de
l’autre favorisera les vibrations. Assurez-vous que le fil soit uniformément
enroulé et sorte des œillets (1) à des longueurs égales.
1. Enfoncez les ergots du boîtier et faites tourner le couvercle pour le
retirer. Retirez également le butoir
2. Retirez la bobine et le ressort
3. Nettoyez tous les composants et contrôlez qu’ils ne soient pas
abîmés. Remplacez tout élément endommagé
4. Vérifiez que les œillets soient bien placés
AVERTISSEMENT: N’utilisez jamais l’appareil sans les œillets (1).
5. Passez le fil neuf dans l’œilleton du centre de la bobine, en faisant
ressortir autant de fil d’un côté que de l’autre de l’œilleton, puis
regroupez les deux longueurs d’un même côté. Ne dépassez pas la
capacité maximale de la bobine indiquée ci-dessus
6. En tenant la bobine (5) de manière à ce que les évidements coince-
fils soient orientés vers le haut, enroulez le fil dans le sens des
aiguilles d’une montre en plaçant votre index entre les deux fils pour
bien les séparer
7. Faites passer chaque extrémité dans- son évidement coince-fil
respectif
8. Placez le ressort (4) sur le boulon d’axe (3) monté dans le boîtier
9. Les évidements coince-fil étant orientés vers le bas, enfilez
l’extrémité de chaque fil dans son œillet (1) respectif. Attention à ne
pas coincer de fil sous la bobine
10. Placez le butoir (6) au centre de la bobine
11. Remettez le couvercle (7) en place et encliquetez les rainures du
couvercle dans les ergots du boîtier
5) Bobine
6) Butoir
7) Couvercle
12. Tirez brièvement sur chaque fil pour le décoincer de son évidement
13. Vérifiez que 10 à 12,5 cm de fil ressorte bien de chaque œillet.
Coupez à la longueur voulue si nécessaire
1
2
3
4
5
6
7
20

633770
Coupe-bordure multifonction thermique 25 cm³
Garantie Silverline Tools
Ce produit Silverline bénéficie d’une garantie
de 3 ans
Enregistrez ce produit à www.silverlinetools.com dans les 30 jours suivant
l’achat afin de bénéficier de la garantie de 3 ans. La période de garantie
commence à partir de la date d’achat figurant sur votre facture d’achat.
Conditions de Garantie des Outils Silverline
La période de garantie prend effet à compter de la date de l’achat en
magasin, comme indiqué sur votre facture d’achat.
VEUILLEZ CONSERVER VOTRE FACTURE D’ACHAT.
Si ce produit est défectueux pendant les 30 jours qui suivent l’achat,
retournez-le au magasin où vous l’avez acheté, avec votre facture, en
expliquant en détail le problème. Le produit sera remplacé ou vous serez
remboursé(e).
Si ce produit est défectueux après cette période de 30 jours,
retournez-le à :
Silverline Tools Service Centre
PO Box 2988
Yeovil
BA21 1WU, Royaume Uni
Toute demande de service sous garantie doit être soumise pendant la
période de garantie.
Avant toute intervention sous garantie, vous devez présenter la facture
d’achat originale sur laquelle doivent figurer la date d’achat, votre nom,
votre adresse et le lieu d’achat.
Vous devez expliquer en détail la défaillance nécessitant réparation.
Les demandes de service sous garantie faites pendant la période de
garantie seront vérifiées par Silverline Tools pour établir si la défaillance du
produit est liée à un vice de matériau ou de fabrication.
Les frais de port ne seront pas remboursés. Les articles retournés doivent
être convenablement propres et sûrs pour être réparés et devraient être
emballés soigneusement pour éviter tout dommage ou toute blessure
pendant le transport. Nous pouvons refuser les livraisons qui ne sont pas
convenables ou sûres.
Toute intervention sera effectuée par Silverline Tools ou ses agents de
réparation agréés.
La réparation ou le remplacement du produit ne dépassera pas la période
de garantie.
Les anomalies que nous reconnaissons être couvertes par la garantie
seront rectifiées par la réparation de l’outil, sans frais (hormis les
frais de port) ou par son remplacement par un outil en parfait état de
fonctionnement.
Les pièces ou les outils remplacés deviendront la propriété de
Déclaration de conformité CE
Le soussigné : Mr Darrell Morris
Autorisé par : Silverline Tools
Déclare que le produit :
Nom/modèle : Coupe-bordure multifonction thermique 25 cm³
Nº de série/Type : 633770
Est conforme aux directives suivantes :
• Directive sur les machines 2006/42/EC
• Compatibilité électromagnétique 2004/108/CE
• Émissions des engins mobiles non routiers 97/68/EC
• EN ISO11806:2008
• EN ISO11680-1:2008
• EN ISO10517:2009
• EN ISO14982:1998
Enregistrement de votre achat
Visitez silverlinetools.com, sélectionnez le bouton d’enregistrement
et saisissez :
• Vosinformationspersonnelles
• Lesinformationsconcernantleproduitetl’achat
Vous recevrez le Certificat de garantie en format PDF. Veuillez l’imprimer et
le conserver avec votre achat.
Silverline Tools.
La réparation ou le remplacement de votre produit sous garantie vous
apporte des avantages ; ces avantages s’ajoutent à vos droits statutaires
en tant que consommateur sans les affecter aucunement.
La présente garantie couvre:
La réparation du produit, s’il peut être vérifié, à la satisfaction de Silverline
Tools, que les défaillances du produit ont été provoquées par un vice de
matériau ou de fabrication au cours de la période de garantie.
Si une pièce n’est plus disponible ou n’est plus fabriquée, Silverline Tools la
remplacera par une pièce de rechange opérationnelle.
Utilisation de ce produit dans l’UE.
La présente garantie ne couvre pas:
Silverline Tools ne garantit pas les réparations nécessaires du produit
engendrées par :
L’usure normale provoquée par l’utilisation conforme aux instructions
d’utilisation, par exemple les lames, les charbons, les courroies, les
ampoules, les batteries, etc.
Le remplacement de tout accessoire fourni tel que les forêts, les lames, les
feuilles abrasives, les outils de coupes et les autres articles associés.
Les dommages et les défaillances accidentels causés par une utilisation ou
un entretien négligent, une mauvaise utilisation, un manque d’entretien ou
une utilisation ou une manipulation imprudente du produit.
L’utilisation du produit à des fins autres que son utilisation domestique
normale.
Le moindre changement ou la moindre modification du produit.
L’utilisation de pièces et d’accessoires qui ne sont pas des composants
véritables de Silverline Tools.
Une installation défectueuse (sauf si l’installation a été réalisée par
Silverline Tools).
Les réparations ou les modifications réalisées par des tiers autres que
Silverline Tools ou ses agents de réparation agréés.
Les demandes de service autres que le droit de rectifier les défaillances
de l’outil indiquées dans ces conditions de garantie ne sont pas couvertes
par cette garantie.
La documentation technique est conservée par : Silverline Tools
Organisme notifié : Intertek Testing Services
Lieu de la déclaration : Shanghai, Chine
Date : 09/05/11
Signature :
Directeur
Nom et adresse du fabricant ou de son représentant agréé :
Silverline Tools, Boundary Way, Lufton Trading Estate, Yeovil, Somerset,
BA22 8HZ Royaume-Uni
www.silverlinetools.com
21

D
Beschreibung der Symbole
Auf dem Leistungsschild des Werkzeugs sind möglicherweise Symbole
abgebildet. Sie vermitteln wichtige Informationen über das Produkt oder
dienen als Gebrauchsanweisung.
Gehörschutz benutzen
Augenschutz benutzen
Atemschutz benutzen
Kopfschutz benutzen
Schutzhandschuhe benutzen
Bedienungsanleitung sorgfältig lesen
Verwenden Sie benzinbetriebene Geräte nicht in Bereichen,
in denen Brand- oder Explosionsgefahr durch brennbare
Stoffe, brennbare Flüssigkeiten, brennbare Gase oder
explosionsfähigen Staub besteht.
Der Motor ist nach dem Betrieb sehr heiß. NICHT BERÜHREN!
Abgase enthalten das Giftgas Kohlenmonoxid, das zu
Bewusstlosigkeit und zum Tod führen kann.
Erfüllt die entsprechenden rechtlichen Vorschriften und
Sicherheitsnormen.
Technische Daten
Hubraum: .................................... 25,4 cm
Max. Motorleistung: .................... 0,85 kW/8.500 min
Kraftstoff: .................................... Bleifreies Benzin/
Zweitaktöl
(Mischverhältnis: 40:1)
Kraftstofftankinhalt: ..................... 0,6 L
Zündkerze: ................................. TORCH BM6A
Mindestbetriebsgeschwindigkeit: 3,000 min
Leerlaufdrehzahl:......................... 11,000 min
Schnittbreite: ............................... Messer: 254 mm;
Faden: 410 mm
Vibration
- Bei Mindestgeschwindigkeit: . 2,32 / 2,78 m/s
- Bei Höchstgeschwindigkeit: ... 3,64/3,89 m/s
Schalldruckpegel: ........................ 91 dB (A)
Schallleistungspegel:................... 106 dB (A)
Gewicht: ...................................... 11,8 kg
Der Schallintensitätspegel kann für den Bediener 85 dB(A)
übersteigen und Lärmschutzmaßnahmen sind notwendig.
Aufgrund der fortlaufenden Weiterentwicklung unserer
Produkte können sich die technischen Daten von Silverline-
Produkten ohne vorherige Ankündigung ändern.
3
-1
-1
2
2
Betreiben Sie das Gerät erst, wenn Sie diese Bedienungsanleitungen und
alle am Werkzeug angebrachten Etiketten sorgfältig gelesen und verstanden
haben. Bewahren Sie alle Anleitungen mit dem Gerät zum späteren
Nachschlagen auf. Vergewissern Sie sich, dass alle Benutzer dieses
Produkts diese Bedienungsanleitung vollständig verstanden haben.
Auch wenn dieses Gerät wie vorgeschrieben verwendet wird, ist es nicht
möglich, sämtliche Restrisiken auszuschließen. Mit Vorsicht verwenden.
Sollten Sie sich in irgendeiner Weise unsicher bezüglich der sachgemäßen
und sicheren Benutzung dieses Werkzeugs sein, verwenden Sie es nicht.
Allgemeine Sicherheitshinweise
für Elektrowerkzeuge
WARNUNG! Lesen Sie alle Sicherheitshinweise und Anweisungen.
Versäumnisse bei der Einhaltung der Sicherheitshinweise und Anweisungen
können elektrischen Schlag, Brand und/oder schwere Verletzungen
verursachen.
Bewahren Sie alle Sicherheitshinweise und Anweisungen für die
Zukunft auf.
Der in den Sicherheitshinweisen verwendete Begriff „Elektrowerkzeug“
bezieht sich auf netzbetriebene Elektrowerkzeuge (mit Netzkabel) und auf
akkubetriebene Elektrowerkzeuge (ohne Netzkabel).
Arbeitsplatzsicherheit
a) Halten Sie Ihren Arbeitsbereich sauber und gut beleuchtet.
Unordnung oder unbeleuchtete Arbeitsbereiche können zu Unfällen
führen.
b) Arbeiten Sie mit dem Elektrowerkzeug nicht in
explosionsgefährdeter Umgebung, in der sich brennbare
Flüssigkeiten, Gase oder Stäube befinden. Elektrowerkzeuge
erzeugen Funken, die den Staub oder die Dämpfe entzünden können.
c) Halten Sie Kinder und andere Personen während der Benutzung
des Elektrowerkzeugs fern. Bei Ablenkung können Sie die Kontrolle
-1
über das Gerät verlieren.
Sicherheit von Personen
a) Seien Sie aufmerksam, achten Sie darauf, was Sie tun, und
gehen Sie mit Vernunft an die Arbeit mit einem Elektrowerkzeug.
Benutzen Sie kein Elektrowerkzeug, wenn Sie müde sind oder
unter dem Einfluss von Drogen, Alkohol oder Medikamenten
stehen. Ein Moment der Unachtsamkeit beim Gebrauch des
Elektrowerkzeuges kann zu ernsthaften Verletzungen führen.
b) Tragen Sie persönliche Schutzausrüstung und immer eine
Schutzbrille. Das Tragen persönlicher Schutzausrüstung, wie
Staubmaske, rutschfeste Sicherheitsschuhe, Schutzhelm oder
Gehörschutz, je nach Art und Einsatz des Elektrowerkzeuges,
verringert das Risiko von Verletzungen.
c) Vermeiden Sie eine unbeabsichtigte Inbetriebnahme.
Vergewissern Sie sich, dass das Elektrowerkzeug ausgeschaltet
ist, bevor Sie es an die Stromversorgung und/oder den Akku
anschließen, es aufnehmen oder tragen. Wenn Sie beim Tragen
des Elektrowerkzeuges den Finger am Schalter haben oder das Gerät
eingeschaltet an die Stromversorgung anschließen, kann dies zu
Unfällen führen.
d) Entfernen Sie Einstellwerkzeuge oder Schraubenschlüssel, bevor
Sie das Elektrowerkzeug einschalte. Ein Werkzeug oder Schlüssel,
der sich in einem drehenden Geräteteil befindet, kann zu Verletzungen
führen.
e) Vermeiden Sie eine unnatürliche Körperhaltung. Sorgen Sie für
einen sicheren Stand und halten Sie stets das Gleichgewicht.
Auf diese Weise lässt sich das Elektrowerkzeug in unerwarteten
Situationen besser kontrollieren.
f) Tragen Sie geeignete Kleidung. Tragen Sie keine weite Kleidung
oder Schmuck. Halten Sie Haare, Kleidung und Handschuhe fern
von sich bewegenden Teilen. Lockere Kleidung, Schmuck oder lange
Haare können von sich bewegenden Teilen erfasst werden.
g) Wenn Staubabsaug- und -auffangeinrichtungen montiert werden
können, vergewissern Sie sich, dass diese angeschlossen sind
22

633770
Multifunktions-Gartengerät, 25 cm
3
und richtig verwendet werden. Verwendung einer Staubabsaugung
kann Gefährdungen durch Staub verringern.
Verwendung und Behandlung des
Elektrowerkzeuges
a) Überlasten Sie das Gerät nicht. Verwenden Sie für Ihre Arbeit
das dafür bestimmte Elektrowerkzeug. Mit dem passenden
Elektrowerkzeug arbeiten Sie besser und sicherer im angegebenen
Leistungsbereich.
b) Benutzen Sie kein Elektrowerkzeug, dessen Schalter defekt ist.
Ein Elektrowerkzeug, das sich nicht mehr ein- oder ausschalten lässt,
ist gefährlich und muss repariert werden.
c) Ziehen Sie den Stecker aus der Steckdose und/oder entfernen Sie
den Akku, bevor Sie Geräteeinstellungen vornehmen, Zubehörteile
wechseln oder das Gerät weglegen. Diese Vorsichtsmaßnahme
verhindert den unbeabsichtigten Start des Elektrowerkzeuges.
d) Bewahren Sie unbenutzte Elektrowerkzeuge außerhalb der
Reichweite von Kindern auf. Lassen Sie Personen das Gerät
nicht benutzen, die mit diesem nicht vertraut sind oder diese
Anweisungen nicht gelesen haben. Elektrowerkzeuge sind
gefährlich, wenn sie von unerfahrenen Personen benutzt werden.
e) Pflegen Sie Elektrowerkzeuge mit Sorgfalt. Kontrollieren Sie, ob
bewegliche Teile einwandfrei funktionieren und nicht klemmen,
ob Teile gebrochen oder so beschädigt sind, dass die Funktion
des Elektrowerkzeuges beeinträchtigt ist. Lassen Sie beschädigte
Teile vor dem Einsatz des Gerätes reparieren. Viele Unfälle haben
ihre Ursache in schlecht gewarteten Elektrowerkzeugen.
f) Halten Sie Schneidwerkzeuge scharf und sauber. Sorgfältig
gepflegte Schneidwerkzeuge mit scharfen Schneidkanten verklemmen
sich weniger und sind leichter zu führen.
g) Verwenden Sie Elektrowerkzeug, Zubehör, Einsatzwerkzeuge
usw. entsprechend diesen Anweisungen. Berücksichtigen Sie
dabei die Arbeitsbedingungen und die auszuführende Tätigkeit.
Der Gebrauch von Elektrowerkzeugen für andere als die vorgesehenen
Anwendungen kann zu gefährlichen Situationen führen.
Service
a) Lassen Sie Ihr Elektrowerkzeug nur von qualifiziertem
Fachpersonal und nur mit Original-Ersatzteilen reparieren.
Damit wird sichergestellt, dass die Sicherheit des Elektrowerkzeuges
erhalten bleibt.
Sicherheitshinweise für Geräte
mit Verbrennungsmotoren
Gefährliche Umgebung
• Verwenden Sie Benzinmotorgeräte nie in feuchter oder nasser Umgebung
und setzen Sie sie nie dem Regen aus. Sorgen Sie für einen geeigneten
und gut ausgeleuchteten Arbeitsbereich. Benutzen Sie Benzinmotorgeräte
nicht an Orten, wo ein Explosions- oder Brandrisiko aufgrund brennbarer
Materialien, entflammbarer Flüssigkeiten, entflammbarer Gase oder
entzündbaren Staubs besteht.
Schützen Sie Ihr Gehör
• Tragen Sie immer einen geeigneten Gehörschutz, wenn der
Lautstärkepegel des Werkzeugs 80 dB überschreitet. Es liegt in der
Verantwortung des Benutzers, sicherzustellen, dass in der Nähe des
Arbeitsbereichs befindliche Dritte ebenfalls ausreichend geschützt sind.
Schützen Sie Ihre Augen
• Benutzen Sie stets einen geeigneten Augenschutz.
Schützen Sie sich vor Vibrationen
• Tragbare Elektrowerkzeuge können starke Schwingungskräfte erzeugen.
Diese Vibrationen können gesundheitsschädigend sein. Wärmende
Handschuhe können zu einer guten Durchblutung der Finger beitragen.
Tragbare Werkzeuge sollten nie über längere Zeiträume ohne Pausen
verwendet werden.
Vor dem Anschließen von Zubehör ausschalten
• Vergewissern Sie sich, dass der Motor ausgeschaltet ist, bevor Sie
Zubehör am Werkzeug anbringen. Wenn das Werkzeug unerwartet
anhält, vergewissern Sie sich, dass der Motor nicht läuft, bevor Sie das
Werkzeug untersuchen.
Betrieb des Motors
• Lassen Sie den Motor bei neuen Werkzeugen nur mit mäßiger Drehzahl
laufen.
• Benutzen Sie erst dann höhere Motordrehzahlen, wenn der Motor
vollständig eingelaufen ist.
• Der Motor kann seine maximale Leistung erst nach Beendigung der
Einlaufzeit erreichen.
• Prüfen Sie vor dem ersten Gebrauch des Werkzeugs, dass alle Muttern
und Schrauben sicher befestigt sind und ziehen Sie sie gegebenenfalls
an.
• Verwenden Sie keine methanol- oder ethanolhaltigen Kraftstoffe, da diese
interne Schäden an Kraftstofftank und Kraftstoffleitungen verursachen
können.
Warnhinweis
• Lassen Sie das Gerät niemals unbeaufsichtigt, wenn der Motor noch
läuft.
• Lassen Sie das Gerät niemals unbeaufsichtigt, wenn Teile der Maschine
noch heiß sind.
Wartung
• Es wird empfohlen, dass Sie Ihr Werkzeug kurz nach dem ersten
Gebrauch warten lassen.
• Bei normalem Gebrauch muss das Werkzeug regelmäßig gewartet
werden.
• Versuchen Sie nicht, Komponenten des Werkzeugs zu modifizieren.
Der Versuch, das Werkzeug zu verändern, führt zum Verlust des
Garantieanspruchs und kann außerdem zu ernsthaften Verletzungen der
eigenen oder in der Nähe befindlicher Personen führen.
• Lassen Sie Ihr Werkzeug immer bei einer autorisierten
Reparaturwerkstatt warten.
Lagerung
• Reinigen Sie das Gerät nach dem Gebrauch gründlich.
• Achten Sie darauf, dass der Kraftstofftank oder die Kraftstoffleitungen
nicht beschädigt werden, wenn das Werkzeug auf den Boden gestellt
wird.
• Sorgen Sie dafür, dass das Gerät nicht durch Schläge oder Stöße
beschädigt wird, da das Gerät sonst möglicherweise nicht länger den
Sicherheitsansprüchen genügt.
• Gerät vor direkter Sonneneinstrahlung geschützt lagern.
• Sorgen Sie dafür, dass Kraftstoff und Öl an einem sicheren Ort und
geschützt vor Hitze, direkter Sonneneinstrahlung, allen Zündquellen
sowie außer Reichweite von Kindern aufbewahrt werden.
Wenn das Gerät längere Zeit nicht benutzt werden wird, gehen Sie wie
folgt vor:
• Entleeren Sie vollständig den Kraftstofftank.
• Wischen Sie alle Metalloberflächen und Metallkomponenten des Motors
zum Schutz vor Korrosion mit einem geölten Lappen ab.
• Entfernen Sie die Zündkerze und geben Sie einige Tropfen Öl in den
Zylinder.
• Ziehen Sie den Starthebel zwei bis drei Mal, um das Öl gleichmäßig zu
verteilen.
• Setzen Sie die Zündkerze wieder ein.
DIESES PRODUKT ERZEUGT GIFTIGE ABGASE, SOBALD DER MOTOR LÄUFT.
DIESE GASE KÖNNEN FARB- UND GERUCHLOS SEIN. LASSEN SIE DIE
MASCHINE NIEMALS IN GESCHLOSSENEN RÄUMEN ODER IN SCHLECHT
BELÜFTETEN BEREICHEN LAUFEN, UM DAS RISIKO SCHWERER ODER
LEBENSGEFÄHRLICHER
VERLETZUNGEN ZU REDUZIEREN. SORGEN SIE FÜR AUSREICHENDE
BELÜFTUNG, WENN IN GRÄBEN ODER IN ANDEREN BEENGTEN RÄUMEN
GEARBEITET WIRD.
www.silverlinetools.com
23

D
Geräteübersicht
1 Kettenöltank
2 Kettensägen-Spritzschutz
3 Schutzbefestigungsschraube
4 Zündschalter
5 Gashebel
6 Schutzschalter
7 Griff
8 Antriebskupplung
9 Sperrstiftabdeckung
10 Sperrbügel
11 Abdeckkappe
12 Luftfilter
13 Startergriff
14 Kraftstofftank
15 Chokehebel
16 Leerlaufstellschraube
17 Kraftstoffpumpe
18 Kraftstoffschläuche
19 Messerschutz
20 Stellhebel (Heckenschere)
21 Fadenspule
22 Kraftstoffmischflasche
23 Heckenschere
24 Freischneiderblatt
25 Kettenspannschraube
26 Kettensäge
27 Schultergurt
28 Messerschutzplatten
29 Schneidkopf
30 Kettensägewelle
31 Zusatzgriff
32 Gurtbefestigungspunkt
33 Antriebseinheit
Zubehör
Gabelschlüssel
Innensechskantschlüssel
Steckschlüssel
Schraubendreher
Vor Inbetriebnahme
• Packen Sie Ihr Werkzeug vorsichtig aus und überprüfen Sie es. Machen
Sie sich vollständig mit all seinen Eigenschaften und Funktionen vertraut
• Vergewissern Sie sich, dass sämtliche Teile des Werkzeugs vorhanden
und in einem guten Zustand sind. Sollten Teile fehlen oder beschädigt
sein, lassen Sie diese ersetzen, bevor Sie das Werkzeug verwenden
Aufsätze am Schaft anbringen
Messerschutz anbringen
1. Stecken Sie den Messerschutz (19) zwischen den Messerschutzplatten
(28) auf den Schaft auf.
2. Schrauben Sie den Schutz mit den vier mitgelieferten
Sechskantmuttern und -schrauben an den Platten auf der Seite des
Schaftes fest.
Schneidblatt anbringen
1. Stecken Sie einen Innensechskantschlüssel durch das
Verriegelungsloch am Spindelgehäuse, um die Spindel zu fixieren.
2. Lösen Sie mit dem Steckschlüssel und dem Schraubendreher
(oder einem Schraubenschlüssel) die Sicherungsmutter unten am
Schneidkopf (29). HINWEIS: Es handelt sich um ein Umkehrgewinde,
schrauben Sie sie daher im Uhrzeigersinn ab.
3. Entfernen Sie Abdeckkappe und Blatthalter.
4. Setzen Sie das Blatt ein, den Blatthalter und die Abdeckkappe wieder
auf und drehen Sie die Sicherungsmutter wieder fest.
Fadenspule anbringen
HINWEIS: Die Fadenspule (21) hat ein Linksgewinde, mit dem er sich auf
die Spindel schrauben lässt.
1. Stecken Sie einen Innensechskantschlüssel durch das
Verriegelungsloch am Spindelgehäuse, um die Spindel festzustellen.
2. Lösen Sie mit dem Steckschlüssel und dem Schraubendreher
(oder einem Schraubenschlüssel) die Sicherungsmutter unten am
Schneidkopf (29). HINWEIS: Es handelt sich um ein Umkehrgewinde,
schrauben Sie sie daher im Uhrzeigersinn ab.
3. Entfernen Sie Abdeckkappe, Blatthalter und (falls angebracht) das
Schneidblatt. Nehmen Sie die Abdeckung des Spindelgehäuses nicht
ab.
4. Fixieren Sie die Spindel, indem Sie einen Innensechskantschlüssel
durch das Verriegelungsloch stecken.
5. Schrauben Sie die Fadenspule auf die Spindel und ziehen Sie ihn von
Hand an, allerdings nicht zu fest.
HINWEIS: Die Spule braucht nicht mit einem Werkzeug angezogen zu
werden.
Kettensäge anbringen
1. Lösen Sie den Sperrstift der Kettensägekupplung.
2. Entfernen Sie die Abdeckkappe (11) an einem der Enden der
Kettensägewelle (30) und stecken Sie diese vollständig in die
Kettensägekupplung, bis die Antriebswelle greift.
3. Richten Sie das Stiftloch am Schaft auf den Sperrstift aus und ziehen
Sie den Stift fest, um den Schaft zu fixieren.
4. Entfernen Sie die Abdeckkappe am anderen Ende der Kettensägewelle,
stecken Sie den Kettensägen-Spritzschutz (2) auf die Kettensägewelle
auf und stecken Sie dann die Abdeckkappe wieder auf.
5. Schrauben Sie den Schutz am Schaft bis zur Kupplung mit der
Kettensäge hoch und an dieser Position (Abb. A) fest, indem Sie die
Schutzbefestigungsschraube (3) anziehen.
24

633770
Multifunktions-Gartengerät, 25 cm
3
Vorbereitung der Antriebseinheit
Betankung
• Die Antriebseinheit (33) benötigt eine Mischung aus bleifreiem Kraftstoff
und Zweitaktöl in einem Verhältnis von 40:1.
• Verwenden Sie nur aus Erdöl gewonnenes, hochwertiges Zweitaktöl und
bleifreies Benzin.
• Mischen Sie den Kraftstoff in der mitgelieferten Kraftstoffmischflasche
(22).
• Mischen Sie den Kraftstoff nicht im Kraftstofftank (14).
• Mischen Sie nur so viel Kraftstoff, wie Sie benötigen (Hinweis: der Tank
hat ein Fassungsvermögen von 0,6 l).
• Stellen Sie die Antriebseinheit auf einer stabilen, ebenen Fläche auf.
• Ziehen Sie zum Befüllen des Tanks die Kraftstofftankkappe ab.
• Gießen Sie den Kraftstoff vorsichtig durch einen Einfülltrichter mit
einem Filter. Füllen Sie den Tank höchstens bis zur Unterkante des
Einfüllstutzens.
• Setzen Sie die Kraftstoffkappe wieder auf und schrauben Sie sie gut fest.
• Entfernen Sie eventuell vorhandene Kraftstoffspritzer sorgfältig.
• Lagern Sie nicht verwendeten Kraftstoff in einem sicheren Behälter weit
vom Arbeitsbereich und sonstigen brennbaren Materialien entfernt.
WICHTIGE HINWEISE
• Füllen Sie den Kraftstoff stets an einem sicheren Ort fernab vom
Arbeitsbereich und von Wärme- oder Zündquellen auf. Vermeiden Sie
jeglichen Kontakt mit dem Kraftstoff. Nicht rauchen!
• Füllen Sie nur Kraftstoff nach, wenn der Motor zum Stillstand gekommen
und vollständig abgekühlt ist.
• Bei Kraftstoffgemischen kann eine Abscheidung stattfinden. Falls Sie
schon länger gemischten Kraftstoff verwenden, schütteln Sie den
Kraftstoffbehälter kräftig, bevor Sie den Tank auffüllen.
• Entfernen Sie die Antriebseinheit weit vom Auffüllbereich, bevor Sie den
Motor anlassen.
Anlassen des Motors
Einlaufen
• Bei der ersten Inbetriebnahme ist es wichtig, dass sich der
Motor zunächst einläuft. Dadurch werden die Leistung und die
Funktionstüchtigkeit des Motors erhöht und seine Lebensdauer
verlängert.
• Lassen Sie den Motor bei der ersten Inbetriebnahme unter möglichst
geringer Verwendung des Gashebels (5) ca. 15 Minuten lang im Leerlauf
laufen. Beschleunigen Sie den Motor währenddessen möglichst nicht.
HINWEIS: Es ist normal, dass während des Einlaufens charakteristische
Gerüche auftreten, da sich die Komponenten hierbei zum ersten Mal
erhitzen.
Kaltstart
• Wir empfehlen – insbesondere bei der ersten Inbetriebnahme – den
Motor im Kaltstart anzulassen, ohne die Schneidwerkzeuge einzusetzen.
Ist er warmgelaufen, schalten Sie den Motor aus. Bringen Sie nun das
erforderliche Schneidwerkzeug an (siehe „Anbringen des Schafts am
Motor“ unten).
WARNHINWEIS: Der Motor stößt hochgiftige Dämpfe aus, sobald er anläuft.
Lassen Sie den Motor daher nie in Innen- oder sonstigen geschlossenen
Räumen an.
Tragen Sie stets geeignete Schutzkleidung. Zur Verwendung dieses Gerätes
sind Schutzbrille, Arbeitshandschuhe, Gehörschutz, Atemschutzmaske
und robuste Kleidung zu tragen. Es sollten außerdem ein Schutzhelm und
Sicherheitsschuhe getragen werden.
1. Stellen Sie die Antriebseinheit (33) auf einer stabilen, ebenen Fläche
auf.
2. Betätigen Sie die Kraftstoffpumpe (17), bis sich die Kraftstoffschläuche
(18) mit Kraftstoff gefüllt haben (gewöhnlich 6–12 Pumpvorgänge).
3. Stellen Sie den Chokehebel (15) auf „COLD START“ (falls der Motor
bereits warm ist oder die Lufttemperatur hoch ist, stellen Sie den
Chokehebel auf „WARM START“).
4. Stellen Sie den Zündschalter (4) auf „ON“ (d.h. zum Griff hin).
5. Halten Sie den Griff mit einer Hand (7), damit das Gerät sicher in
der Hand liegt. Vergewissern Sie sich, dass Sie bei Bedarf den
Schutzschalter (6) und den Gashebel (5) betätigen können.
WARNHINWEIS: Wickeln Sie den Seilzugstarter nicht um die Hand.
1. Halten Sie den Startergriff (13) fest und ziehen Sie kurz und kräftig,
um den Motor anzulassen. Halten Sie den Seilzugstarter stets
fest, wenn er ins Gehäuse zurückgleitet, und lassen Sie ihn nicht
zurückschnappen.
2. Der Motor springt nach wenigen Zügen an.
3. Drücken Sie zum Anlassen bei Bedarf den Schutzschalter (6) und
drücken Sie behutsam auf den Gashebel (5).
4. Wenn der Motor warm ist, stellen Sie den Chokehebel auf „OPEN“.
5. Lassen Sie den Motor ein paar Minuten auf Mindestleistung laufen,
damit er warmläuft.
HINWEIS: Falls es sich anhört, als ob der Motor abzusaufen droht, stellen
Sie den Choke auf „WARM START“ und betätigen Sie den Gashebel, um den
Motor zu beschleunigen.
Anhalten des Motors
1. Geben Sie den Gashebel (5) frei und lassen Sie den Motor einige
Minuten im Leerlauf abkühlen.
2. Stellen Sie den Zündschalter (4) nach vorn auf „STOP“.
3. Der Motor hält nun an.
HINWEIS: Wenn ein Schneidwerkzeug angebracht ist, können sich die
Fadenspule oder das Schneidblatt eine kurze Zeit weiterdrehen, nachdem
der Motor zum Stillstand gekommen ist. Versuchen Sie nicht, das Blatt
anzuhalten, sondern lassen Sie es von selbst verlangsamen.
Anbringen des Schultergurtes
• Klinken Sie den Schultergurt (27) am Gurtbefestigungspunkt (32) ein.
Anbringen des Schafts am Motor
(Abb. C)
WARNHINWEIS: Wechseln Sie die Schneidwerkzeuge niemals, während
der Motor läuft, da dies zu schweren Verletzungen führen kann.
1. Stellen Sie die Antriebseinheit auf einer stabilen, ebenen Fläche auf.
2. Sorgen Sie dafür, dass der Sperrbügel (10) gelöst ist.
3. Ziehen Sie die Abdeckkappe (11) vom Schaft des benötigten
Schneidwerkzeugs ab.
4. Legen Sie den Schaft mit nach oben zeigendem Verriegelungsloch
bereit.
5. Drücken Sie die Sperrstiftabdeckung (9) herunter und stecken Sie den
Schaft vollständig in die Antriebskupplung (8).
6. Lösen Sie die Sperrstiftabdeckung und versuchen Sie, den Schaft aus
der Kupplung zu ziehen, um den Stift auf festen Sitz zu überprüfen.
7. Ziehen Sie nun den Sperrbügel fest.
Schneidwerkzeug abnehmen
1. 1. Drehen Sie den Sperrbügel (10) gegen den Uhrzeigersinn, um die
Kupplung zu lösen.
2. 2. Drücken Sie die Sperrstiftabdeckung (9) herunter und ziehen Sie
den Schaft aus der Kupplung.
www.silverlinetools.com
25

D
Verwendung der Heckenschere
• Setzen Sie zunächst die Heckenschere wie unter „Anbringen des Schafts
am Motor“ beschrieben ein.
Heckenscherenaufsatz einstellen
• Das Drehgelenk ermöglicht ein Einstellen des Blattwinkels von 180°:
• Drücken Sie die beiden Stellhebel (20) zusammen und drehen Sie den
Heckenscherenaufsatz in den gewünschten Winkel.
• Lösen Sie die Stellhebel und vergewissern Sie sich, dass der Hebel in den
Zähnen des Drehgelenks eingerastet ist.
Vor dem Anlassen des Motors
Überprüfen der Anschlüsse:
• Vergewissern Sie sich, dass die Heckenschere sicher an der
Antriebseinheit befestigt ist.
• Achten Sie darauf, dass der Heckenscherenaufsatz fest im gewünschten
Winkel sitzt.
Überprüfen des Blattes:
1. Entfernen Sie die Schutzhüllen vom Blatt.
2. Vergewissern Sie sich, dass das Blatt ausreichend geschmiert ist.
Falls das Blatt trocken wirkt, sprühen oder tröpfeln Sie ein wenig
Mehrzwecköl entlang der Schneidzahnansätze.
Motor anlassen
• Achten Sie darauf, dass das Heckenscherenblatt weder den Boden
berührt, noch in irgendeiner Weise blockiert wird – sobald der Motor läuft
und Sie den Gashebel betätigen, dreht sich das Blatt.
• Lassen Sie den Motor gemäß den Anweisungen unter „Anlassen des
Motors“ (oben) an. (S. 25)
Schneidevorgang
WARNHINWEIS: Die korrekte Verwendung einer Heckenschere
erfordert technische Fertigkeiten. Von einer nicht sachgemäß bedienten
Heckenschere können große Gefahren ausgehen. Die folgenden
Informationen dienen nur als allgemeine Anleitung. Falls Sie sich Ihrer
Fähigkeit, dieses Werkzeug sicher zu bedienen, nicht vollkommen sicher
sind, VERWENDEN SIE ES NICHT.
• Achten Sie stets auf einen sicheren Stand. Falls Sie nicht von einer
sicheren Position auf den Schnittbereich zugreifen können, schneiden
Sie dort nicht.
• Strecken Sie sich nicht zu weit und versuchen Sie nicht, in einem
Schneidedurchgang mehr Wuchs zu schneiden, als das Gerät zu
schneiden vermag.
• Tragen Sie der Arbeit angemessene Schutzausrüstung. Schutzbrille,
Arbeitshandschuhe, Gehörschutz und Schutzkleidung sind allesamt
unerlässlich und müssen beim Schneiden stets getragen werden.
• Halten Sie das Gerät stets mit beiden Händen fest. Verwenden Sie den
Zusatzgriff (31), um das Gerät unter Kontrolle zu behalten.
GEFAHR: Halten Sie die Heckenschere nie am Blatt oder der Schutzhülle
fest.
Verwendung des
Rasenschneiders und des
Freischneiders
• Zum Einsetzen des Rasenschneiders oder des Freischneiders siehe
„Anbringen des Schafts am Motor“ (oben). (S. 25)
Nutzungssicherheit
WARNHINWEIS: Das Gerät nicht ohne angebrachten Blattschutz
verwenden.
• Nehmen Sie eine Haltung ein, in der Sie das Gerät bequem bedienen
können.
• Halten Sie das Gerät stets mit beiden Händen fest. Verwenden Sie den
Zusatzgriff (31), um das Gerät unter Kontrolle zu behalten.
• Suchen Sie den Arbeitsbereich auf lose Steine und sonstige Hindernisse
ab, die eine Gefahr darstellen können, bevor Sie mit der Arbeit beginnen.
• Beachten Sie, dass sich der Trimmerfaden und das Freischneiderblatt
im Uhrzeigersinn drehen. Berücksichtigen Sie dies beim Schneiden oder
Stutzen.
• Drehen Sie den Schneidkopf zum Fein- und Kantenschneiden in einem
steilen Winkel auf eine Position, in der die Mähreste sowie Schmutz und
Steine von Ihnen weg geschleudert werden.
Vor dem Anlassen des Motors
• Vergewissern Sie sich, dass der Schaft sicher an der Antriebseinheit
befestigt ist.
• Achten Sie darauf, dass der Schnittkopf weder den Boden berührt, noch
in irgendeiner Weise blockiert wird – sobald der Motor läuft und Sie den
Gashebel betätigen, dreht sich das Schnittwerk.
Motor anlassen
Lassen Sie den Motor gemäß den Anweisungen unter „Anlassen des
Motors“ (oben) an. (S. 25)
Schneidevorgang
• Wenn der Freischneider auf unwirtlichem Gelände betrieben wird,
beachten Sie, dass möglicherweise Steine und sonstige Mähreste in
hoher Geschwindigkeit durch die Luft geschleudert werden können.
Schneiden von Gras
• Halten Sie den Schneidkopf beim Grasschneiden leicht schräg. Dadurch
wird die Menge der rückwärts geschleuderten Abfälle verringert.
• Schneiden Sie das Gras in mehreren Durchgängen. Versuchen Sie
nie, das Gras in einem Durchgang auf eine bearbeitbare Länge zu
schneiden. Hierdurch wird die Arbeitsbelastung der Fadenspule und des
Gerätemotors reduziert.
• Halten Sie beim Schneiden von Unkrautstängeln den Trimmerfaden so
nah an der Wurzel des Stängels wie möglich. Die Stängel des Unkrauts
sind an der Wurzel dünner, wodurch sich der Trimmerfaden weniger
abnutzt.
• Die Fadenspule verfügt über eine Auftipp-Automatik. Um mehr
Trimmerfaden auszugeben, schlagen Sie mit der Unterseite des
Schneidkopfes leicht auf den Boden, damit die Spule den Trimmerfaden
abrollt.
• Zum Auswechseln des Trimmerfadens siehe „Anleitung zur
Fadenkopfmontage“ (unten). S. 28
Verwendung der Kettensäge
• Zum Einsetzen der Kettensäge siehe „Anbringen des Schafts am Motor“
(oben). (S. 25)
Kettenspannung überprüfen
• Drehen Sie die Kettenspannschraube (25) im Uhrzeigersinn, bis die Kette
nur noch ca. 5 mm Durchhang hat, wenn sie senkrecht von der Mitte der
Schneideschiene heruntergedrückt wird.
HINWEIS: Die Kettenspannung muss regelmäßig überprüft werden.
Die Kette dehnt sich durch den Gebrauch. Eine zu lockere Kette kann
abspringen und eine zu stark gespannte Kette nutzt sich schnell ab und
kann reißen.
Kettenöltank füllen
• Dieses Gerät ist mit einem Kettenöltank (1) ausgestattet.
• Die Kette wird beim Betrieb der Säge automatisch geölt. Durch den
Betrieb der Säge ohne Öl oder mit dem falschen Öl nutzt die Kette sich
schnell ab und kann dann reißen.
• Vergewissern Sie sich vor dem Betrieb stets, dass der Kettenöltank
ordnungsgemäß gefüllt ist.
• Verwenden Sie nur hochwertiges Kettenöl (Ölgewicht 30). Verwenden Sie
kein Motoröl, Zweitaktöl oder sonstige alternative Schmiermittel.
• Halten Sie zum Nachfüllen von Öl den Motor an und ziehen Sie die Kappe
des Kettenöltanks ab. Befüllen Sie nun den Tank mit Öl. Setzen Sie dann
die Kappe wieder auf.
• Lassen Sie den Tank beim Betrieb nicht leer werden.
26

633770
Multifunktions-Gartengerät, 25 cm
3
Kleidung und Schutzausrüstung
Die folgende Schutzkleidung ist bei jeder Verwendung der Kettensäge stets
zu tragen:
• Schnittschutzjacke gemäß EN 381-11, Klasse 0. Zum besonderen Schutz
des Schulter-, Arm- und Brustbereichs.
• Schnittschutzhose gemäß EN 381-5, Klasse 1.
• Schnittschutzhandschuhe für die Arbeit mit Kettensägen gemäß EN381-
7, Klasse 0. Diese Handschuhe verhindern das Abrutschen, wobei die
Handschuhrücken mit einem speziellen Schnittschutzmaterial versehen
sind.
• Schutzhelm mit vollständigem Gesichtsschutz und Gehörschutz.
• Sicherheitsschuhe für die Arbeit mit Kettensägen, mit Stahlzwischensohle
und Zehenschutzkappe.
Vor dem Anlassen des Motors
• Vergewissern Sie sich, dass die Kettensäge sicher an der Antriebseinheit
befestigt ist.
• Achten Sie darauf, dass der Schnittkopf weder den Boden berührt, noch
in irgendeiner Weise blockiert wird – sobald der Motor läuft und Sie den
Gashebel betätigen, läuft die Kettensäge.
Motor anlassen
• Lassen Sie den Motor gemäß den Anweisungen unter „Anlassen des
Motors“ (oben) an.
Schneidevorgang
WARNHINWEIS: Die korrekte Verwendung einer Heckenschere
erfordert technische Fertigkeiten. Von einer nicht sachgemäß bedienten
Heckenschere können große Gefahren ausgehen. Die folgenden
Informationen dienen nur als allgemeine Anleitung. Falls Sie sich Ihrer
Fähigkeit, dieses Gerät sicher zu bedienen, nicht vollkommen sicher sind,
verwenden SIE ES NICHT.
• Achten Sie stets auf einen sicheren Stand. Falls Sie nicht von einer
sicheren Position auf den Schnittbereich zugreifen können, schneiden
Sie dort nicht.
• Überlegen Sie sich sorgfältig, wie Sie am sichersten schneiden (siehe
„Rückschlag vermeiden“ unten). Jeder Schneidevorgang mit einer
Kettensäge ist anders, daher sind bei jedem Schnittvorgang die
jeweiligen Sicherheitsaspekte zu erwägen. Überlegen Sie sich stets,
wie sich das Holz nach dem Schnitt bewegen oder fallen könnte.
Vergewissern Sie sich, dass das Holz nicht auf Sie fallen oder zurollen
und das Blatt nicht verklemmen kann.
• Halten Sie die Säge stets gut fest und Ihren linken Arm möglichst gerade.
Heben Sie die Säge nicht über Brusthöhe an.
• Halten Sie das Gerät stets mit beiden Händen fest. Verwenden Sie den
Zusatzgriff (31), um das Gerät unter Kontrolle zu behalten.
• Führen Sie das Blatt bei mit voller Geschwindigkeit laufender Säge
ins Holz hinein. Verwenden Sie stets den dem Gehäuse der Säge am
nächsten liegenden Teil der Schneideschiene.
• Lassen Sie das Blatt sich kontinuierlich durch das Holz arbeiten. Zum
Schneiden der Säge sollte keine Anwendung von Kraft notwendig sein.
Ein langsames Schneiden deutet auf ein stumpfes Blatt hin.
• Lassen Sie das Blatt nicht den Boden oder andere Gegenstände berühren
als denjenigen, den Sie schneiden möchten.
• Geben Sie den Gashebel (5) frei, sobald der Schnitt beendet ist.
• Läuft der Motor ohne Belastung auf Vollgas, nutzen sich der Motor, die
Kette der Säge und die Führungsschiene schnell ab.
Rückschlag vermeiden
• Rückschlag tritt normalerweise auf, wenn die Kettenzähne an der Spitze
der Schneideschiene auf einen festen Gegenstand treffen. Die daraus
resultierende Kraft kann bewirken, dass die Säge plötzlich heftig nach
oben schlägt und auf den Benutzer zugeht.
• Die mit der Kettensäge mitgelieferte Kette ist mit Rückschlag
verringernden Merkmalen ausgestattet. Dies bedeutet jedoch nicht, dass
kein Rückschlag auftreten kann. Seien Sie sich daher der Gefahr von
Rückschlag stets bewusst. Durch einen umsichtigen Gebrauch wird die
Sicherheit am ehesten gewährleistet.
Wartung
HINWEIS: Zur Verlängerung der Lebenszeit dieses Gerätes ist eine
regelmäßige Wartung unerlässlich. Ohne regelmäßige Wartung und
ordnungsgemäße Lagerung verkürzt sich die Lebenszeit des Gerätes
erheblich.
• Halten Sie den Motor stets an und lassen Sie ihn abkühlen, bevor Sie
Reinigungs- oder Wartungsarbeiten durchführen.
• Achten Sie darauf, dass alle Schrauben fest angezogen sind, so dass das
Gerät sicher betrieben werden kann.
• Betreiben Sie das Gerät nie mit abgenutzten oder schadhaften Teilen.
Wenden Sie sich in einem solchen Fall an Ihren Händler.
• Versuchen Sie nicht, Komponenten dieses Gerätes zu modifizieren.
Dadurch würde nicht nur die Garantie erlöschen, sondern Sie könnten
damit auch dem Gerät, sich selbst und anderen, in der Nähe befindlichen
Personen Schaden zufügen.
Motor einstellen
Ist der Motor ordnungsgemäß eingestellt, sollte er im Leerlauf gleichmäßig
laufen und ohne zu stottern beschleunigen. Das Blatt oder die Spule sollten
sich nicht bewegen, wenn der Motor im Leerlauf ist.
• Drehen Sie zum Heraufsetzen der Motorgeschwindigkeit im Leerlauf die
Leerlaufstellschraube (16) im Uhrzeigersinn.
• Drehen Sie zum Herabsetzen der Motorgeschwindigkeit im Leerlauf die
Leerlaufstellschraube gegen den Uhrzeigersinn.
Luftfilter reinigen (Abb. D)
Der Luftfilter (12) ist regelmäßig zu reinigen. Verschaffen Sie sich wie folgt
Zugriff auf den Filter:
1. Schrauben Sie den Filterdeckel ab und nehmen Sie ihn ab.
2. Ziehen Sie den Filtereinsatz aus dem Gehäuse und waschen Sie ihn
sorgsam mit einem Haushaltsreiniger und Wasser.
3. Lassen Sie den Filtereinsatz trocknen und ölen Sie ihn reichlich mit
einem Mehrzwecköl.
4. Setzen Sie die Teile vor der Verwendung des Gerätes wieder
zusammen.
Zündkerze überprüfen
• Nehmen Sie die Zündkerzenkappe ab.
• Entfernen Sie sämtlichen Schmutz und Rückstände an der Zündkerze.
• Ein Steckschlüssel zum Abziehen der Zündkerze zwecks Überprüfung ist
im Lieferumfang enthalten.
• Kann das Problem nicht behoben werden, wenden Sie sich an Ihren
Händler oder einen qualifizierten Techniker.
Kettensäge: Kettenwartung
• Schärfen Sie zur Verlängerung der Lebensdauer der Kettensäge und zur
Erhöhung ihrer Leistungsfähigkeit regelmäßig die Zähne. Dies sollte nur
von einem qualifizierten und erfahrenen Techniker ausgeführt werden.
• Wenn sich die Zähne durch den Betrieb abgenutzt haben, muss die Kette
ausgewechselt werden. Wenden Sie sich an Ihren Händler oder einen
qualifizierten und erfahrenen Techniker.
Antriebswelle
• Fetten Sie je nach Gebrauch in regelmäßigen Abständen die
Schmiernippel der Kettensäge und Heckenschere, beispielsweise jeweils
zu Anfang und Ende der Saison.
Lagerung
• Lassen Sie den Motor vollständig abkühlen, bevor Sie das Gerät lagern.
• Lagern Sie alle Teile des Gerätes an einem sauberen, trockenen Ort
fernab von Hitzequellen und direktem Sonnenlicht. Achten Sie darauf, alle
Teile an einem für Kinder unzugänglichen Ort zu lagern.
• Lagern Sie das Gerät nie an einem Ort, an dem der Kraftstofftank
extremer Hitze ausgesetzt ist oder an dem Benzindämpfe in Kontakt mit
offenen Flammen oder Funken kommen können.
• Halten Sie den Lagerbereich frei von Schmutz, Kleinteilen und möglichen
Stolperfallen.
www.silverlinetools.com
27

D
• Vergewissern Sie sich, dass alle Köpfe sauber und mit den Schutzhüllen
versehen sind.
Langzeitlagerung
Falls Sie das Gerät längere Zeit lagern werden, muss neben den oben
aufgeführten Punkten Folgendes berücksichtigt werden:
• Verdünnen Sie etwas Haushaltsreiniger mit warmem Wasser und reinigen
Sie das Kunststoffgehäuse des Gerätekörpers mit einem feuchten Tuch.
• Lassen Sie sämtlichen Kraftstoff vorsichtig aus dem Kraftstofftank (14)
ab und vergewissern Sie sich, dass die Kraftstoffkappe wieder fest
aufgeschraubt ist.
• Entfernen Sie die Zündkerze und gießen Sie einen Teelöffel sauberes
Öl in den Zündkerzenzylinder. Setzen Sie die Zündkerze wieder ein und
schließen Sie sie wieder an.
• Ziehen Sie bei ausgeschalteter Zündung langsam am Startergriff, um den
Motor mit Öl zu schmieren.
Entleeren und Entsorgung
• Wenn Sie Kraftstoff aus dem Tank ablassen, tun Sie dies im Freien und
nur bei abgekühltem Motor.
• Lassen Sie aus Gründen des Umweltschutzes keinen Kraftstoff und kein
Öl, das aus dem Gerät abgelassen wurde, in ein Entwässerungssystem
oder in den Boden laufen. Tankstellen und Wertstoffhöfe vor Ort verfügen
über geeignete Anlagen zur Entsorgung derartiger Stoffe und nur diese
Stellen sind zur Entsorgung solcher Produkte befugt. Falls Sie nicht
wissen, wo sich der Ihnen am nächsten liegende Wertstoffhof befindet,
wenden Sie sich an die örtlichen Behörden.
Anleitung zur Fadenkopfmontage
1) Fadenöse (2x)
2) Gehäuse
3) Haltestift
4) Druckfeder
HINWEIS: Der Betrieb mit Mähfäden ungleicher Länge verstärkt die
Vibrationen. Achten Sie stets darauf, dass die Fäden gleichmäßig und
stramm aufgewickelt und auf gleiche Länge zu den Fadenösen (1)
zugeschnitten sind.
1. Drücken Sie auf die Laschen im Gehäuse (2) und drehen Sie die
Abdeckung (7), um sie zu lösen. Nehmen Sie die Abdeckung (7) und
das Druckstück (6) ab
2. Entfernen Sie die Fadenspule (5) und die Druckfeder (4)
3. Reinigen Sie sämtliche Komponenten und untersuchen Sie sie auf
Schäden. Ersetzen Sie alle beschädigten Teile
4. Vergewissern Sie sich, dass sich die Fadenösen (1) an der richtigen
Stelle befinden, d.h. bis zum Anschlag in die dafür vorgesehenen
Nuten eingeschoben sind
WARNHINWEIS: Betreiben Sie das Gerät niemals, wenn die Fadenösen (1)
nicht montiert sind.
5. Führen Sie den neuen Faden durch das Loch im Flügel an der
Rolle der Fadenspule (5), bis beide Fadenenden gleich lang sind.
Achten Sie darauf, die maximale Fadenaufnahme (siehe „Maximale
Fadenaufnahme der Fadenspule” oben) nicht zu überschreiten
6. Halten Sie die Fadenspule (5) mit den Klemmnuten nach oben und
wickeln Sie beide Fadenenden im Uhrzeigersinn auf die Fadenspule.
Halten Sie die beiden Fäden dabei mit einem Finger voneinander
getrennt, so dass sie nicht übereinander gewickelt werden
7. Legen Sie die beiden Fadenenden in die Klemmnuten ein
8. Setzen Sie die Druckfeder (4) auf den Haltestift (3)
9. Führen Sie die Fadenenden durch die Fadenösen (1) im Gehäuse,
wobei die Klemmnuten nach unten zum Gehäuse zeigen müssen.
Achten Sie darauf, dass sich der Faden nicht unter der Fadenspule
verfängt
10. Setzen Sie das Druckstück (6) mittig auf die Fadenspule (5)
5) Fadenspule
6) Druckstück
7) Abdeckung
11. Legen Sie die Abdeckung (7) wieder auf, indem Sie die Laschen
korrekt ausrichten und die Abdeckung anschließend drehen, so dass
die Laschen in den Schlitzen in der Abdeckung einrasten
12. Ziehen Sie den Faden aus den Klemmnuten
13. Vergewissern Sie sich, dass die Fäden in gleicher Länge und jeweils
höchstens 100–125 mm aus den Ösen herausreichen. Kürzen Sie
die Fadenenden gegebenenfalls entsprechend
1
2
3
4
5
6
7
28

633770
Silverline Tools Garantie
Dieses Silverline Produkt beinhaltet eine
3-Jahre-Garantie
Registrieren Sie dieses Produkt unter www.silverlinetools.com innerhalb
von 30 Tagen nach dem Kauf, um die 3-Jahre-Garantie zu nutzen. Die
Garantiezeit beginnt mit dem Kaufdatum auf Ihrem Kaufbeleg.
Garantiebedingungen für Silverline Tools
Die Garantiezeit beginnt mit dem Datum des auf dem Kaufbeleg
angegebenen Einzelhandelskaufs.
BITTE BEWAHREN SIE IHREN KAUFBELEG AUF
Falls dieses Produkt innerhalb von 30 Tagen nach dem Kauf einen Defekt
aufweisen sollte, bringen Sie es bitte mit Ihrem Kaufbeleg und unter
Angabe des Fehlers zu dem Fachhändler, bei dem es gekauft wurde,
zurück. Sie erhalten einen Ersatz oder eine Erstattung.
Falls dieses Produkt nach den 30 Tagen nach dem Kauf einen Defekt
aufweist, schicken Sie es zurück an:
Silverline Tools Service Centre
PO Box 2988
Yeovil
BA21 1WU, U.K.
Der Garantieanspruch muss während der Garantiezeit gestellt werden.
Sie müssen den Originalkaufbeleg mit Angabe des Kaufdatums einreichen,
Ihren Namen und Ihre Adresse sowie den Ort des Kaufs angeben, bevor
Schritte eingeleitet werden können.
Sie müssen genaue Einzelheiten des zu behebenden Defekts angeben.
Ansprüche, die während der Garantiezeit gestellt werden, werden von
Silverline Tools überprüft, um nachzuweisen, dass der Defekt durch
fehlerhaftes Material oder Herstellung des Produkts bedingt ist.
Transportkosten werden nicht erstattet. Eingereichte Produkte sollten
sich in einem zur Reparatur geeigneten sauberen und sicheren Zustand
befinden und sorgfältig verpackt werden, damit es beim Transport nicht
zu Schäden oder Verletzungen kommen kann. Wir können die Annahme
ungeeigneter oder unsicherer Lieferungen verweigern.
Alle Arbeiten werden von Silverline Tools oder den von Silverline Tools
ernannten Reparaturbeauftragten durchgeführt.
Die Reparatur oder der Ersatz des Produkts wird die Garantiezeit nicht
erweitern.
Defekte, die von uns als unter die Garantie fallend erachtet werden,
werden entweder durch kostenlose Reparatur des Werkzeugs (exklusive
Transportkosten) oder durch Ersatz durch ein Werkzeug in einwandfreiem
Zustand behoben.
Multifunktions-Gartengerät, 25 cm
Registrieren Sie Ihren Kauf
Gehen Sie zu: silverlinetools.com, wählen Sie den Link Registrierung und
geben Sie Folgendes ein:
• IhrepersönlichenAngaben
• ProduktdetailsundKaunformationen
Das Garantiezertifikat wird Ihnen im PDF-Format zugeschickt. Bitte
drucken Sie es aus und bewahren Sie es zusammen mit Ihrem Produkt auf.
Einbehaltene Werkzeuge oder Teile, für die ein Ersatz ausgegeben wurde,
werden zu Eigentum von Silverline Tools.
Die Reparatur bzw. der Ersatz Ihres Produkts unter dieser Garantie erfolgt
zusätzlich zu Ihren gesetzlichen Rechten als Verbraucher und hat keine
nachteiligen Folgen auf diese.
Was abgedeckt ist:
Die Reparatur des Produkts, nachdem zur Zufriedenheit von Silverline Tools
nachgewiesen wurde, dass der Defekt durch fehlerhaftes Material oder
mangelhafte Arbeitsausführung während der Garantiezeit bedingt ist.
Wenn ein Ersatzteil nicht mehr erhältlich ist oder nicht mehr hergestellt
wird, kann Silverline Tools es gegen einen funktionellen Ersatz
austauschen.
Gebrauch des Produkts in der EU.
Was nicht abgedeckt ist:
Silverline Tools garantiert keine Reparaturen, die erforderlich sind
aufgrund von:
Normale Verschleißerscheinungen, die durch einen der
Bedienungsanleitung entsprechenden Gebrauch entstehen, z.B. an
Messern, Bürsten, Riemen, Glühbirnen, Batterien usw.
Der Ersatz von mitgeliefertem Zubehör wie etwa Bohrspitzen, Messer,
Sandpapier, Schneidscheiben und anderen zugehörigen Artikeln.
Unfallschäden, Defekte verursacht durch: unsachgemäßen Gebrauch,
unzureichende Wartung oder nachlässige Bedienung bzw. Handhabung
des Produkts.
Verwendung des Produkts für andere als normale häusliche Zwecke.
Produktänderungen oder -modifikationen jeglicher Art.
Durch den Gebrauch von Zubehörteilen, die keine echten Silverline Tools-
Teile sind, entstandene Defekte.
Fehlerhafte Installation (außer, wenn von Silverline Tools installiert).
Reparaturen oder Änderungen, die von anderen als Silverline Tools oder
seinen autorisieren Reparaturbeauftragten durchgeführt wurden.
Forderungen anderer Art als dem Recht auf Behebung von Defekten des
Produkts im Rahmen dieser Bedingungen fallen nicht unter die Garantie.
3
Konformitätserklärung
Name des Unterzeichners: Mr Darrell Morris
Bevollmächtigter: Silverline Tools
Erklärt, dass das Produkt:
Name/Gerätetyp: Multifunktions-Gartengerät, 25 cm
Bauart/Seriennummer: 633770
Mit den folgenden Richtlinien übereinstimmt:
• Maschinenrichtlinie 2006/42/EC
• Elektromagnetische Verträglichkeit 2004/108/EG
• Richtlinie 97/68/EG über Emissionen mobiler Maschinen und Geräte
• EN ISO11806:2008
• EN ISO11680-1:2008
• EN ISO10517:2009
• EN ISO14982:1998
Techn. Unterlagen bei: Silverline Tools
Benannte Stelle: Intertek Testing Services
Ort: Shanghai, China
3
Datum: 09/05/11
Unterschrift:
Direktor
Name und Anschrift des Herstellers oder seines niedergelassenen
Bevollmächtigten:
Silverline Tools, Boundary Way, Lufton Trading Estate, Yeovil, Somerset,
BA22 8HZ Großbritannien
www.silverlinetools.com
29

ESP
Descripción de los Símbolos
Los símbolos siguientes pueden aparecer en la placa de características
de su herramienta. Éstos representan información importante sobre el
producto o instrucciones relativas a su uso.
Lleve protección auditiva.
Lleve protección ocular.
Lleve protección respiratoria.
Lleve un casco de seguridad.
Lleve guantes de seguridad.
Lea el manual de instrucciones.
No utilice herramientas de gasolina donde exista un riesgo
de explosión o incendio de materiales combustibles, líquidos
inflamables, gases inflamables o polvos de carácter explosivo
Si el motor ha estado funcionando, estará muy caliente. NO
LO TOQUE.
Los gases de escape contienen monóxido de carbono, un gas
tóxico. La exposición a ellos puede provocar la pérdida de
conciencia e incluso la muerte.
Conforme a las normas de seguridad y a la legislación
correspondientes
Características técnicas
lindrada: ...................................... 25,4 cm³
Potencia máx. motor: .................. 0,85 kW/8500 min
Combustible: ............................... Mezcla de gasolina sin
plomo y aceite para
motores de 2 tiempos
(40 : 1)
Capacidad del depósito
de combustible: ........................... 0,6 litros
Tipo de bujía: .............................. TORCH BM6A
Velocidad del motor en ralentí: .... 3,000 min
Velocidad en vacío: ...................... 11,000 min
Anchura de corte: ........................ 254 mm para el disco
de corte y 410 mm
para la bobina
Vibraciones
- En ralentí: .............................. 2,32/2,78 m/s
- En velocidad máxima: ............ 3,64/3,89 m/s
Presión sonora: ........................... 91 dB (A)
Potencia sonora: .......................... 106 dB (A)
Peso: ........................................... 11,8 kg
El nivel de intensidad sonora para el operador puede
exceder 85 dB(A) y se recomiendan medidas de
En el marco de nuestro continuo programa de desarrollo
de productos, los datos técnicos de los productos
Silverline pueden cambiar sin previo aviso.
protección sonora.
-1
-1
-1
2
2
ILea cuidadosamente y asegúrese de entender este manual y cualquier
etiqueta antes de usar. Guarde estas instrucciones con el producto para
poderlas consultar en el futuro. Asegúrese de que todas las personas que
utilizan este producto están completamente familiarizadas con este manual.
Incluso cuando se esté utilizando según lo prescrito, no es posible eliminar
todos los factores de riesgo residuales. Utilice con precaución. Si está
inseguro de la manera correcta y segura en la cual utilizar este producto,
no intente utilizarlo.
Reglas generales de seguridad
relativas a las herramientas
eléctricas
ADVERTENCIA Lea todas las advertencias de seguridad e
instrucciones. El no respetar estas advertencias e instrucciones puede
causar descargas eléctricas, incendios y/o lesiones graves.
Conserve estas advertencias e instrucciones para referencia futura.
La expresión “herramienta eléctrica” en todas la advertencias se refiera
a su herramienta eléctrica alimentada por la red eléctrica (herramienta
alámbrica) o su herramienta eléctrica alimentada por baterías (herramienta
inalámbrica).
Seguridad en el área de trabajo
a) Mantenga el área de trabajo limpia y bien iluminada. Las áreas
desordenadas y oscuras invitan a que se produzcan accidentes.
b) No maneje herramientas eléctricas en atmósferas explosivas,
como por ejemplo en presencia de líquidos, gases o polvos
inflamables. Las herramientas eléctricas producen chispas que
pueden incendiar el polvo o los vapores.
c) Mantenga alejados a los niños y a las personas que estén
presentes mientras esté trabajando con una herramienta
eléctrica. Las distracciones pueden hacerle perder el control de la
herramienta.
Seguridad personal
a) Manténgase alerta, fíjese en lo que está haciendo y use el sentido
común cuando esté utilizando una herramienta eléctrica. No
use una herramienta eléctrica si se encuentra cansado o bajo la
influencia de drogas, alcohol o medicamentos. Un momento de
distracción mientras esté utilizando una herramienta eléctrica puede
provocar lesiones corporales graves.
b) Use equipo de protección individual. Use siempre protección
ocular. El uso de equipamientos de seguridad tales como máscara
antipolvo, calzado de seguridad antideslizante, casco duro y
protecciones auditivas adecuadas reducirá el riesgo de lesiones
corporales.
c) Evite el arranque accidental. Asegúrese de que el interruptor está
en la posición de apagado antes de enchufar la herramienta. Si
se transportan las herramientas con el dedo en el interruptor o se
enchufan con el interruptor en la posición de encendido, se invita a
que se produzcan accidentes.
d) Quite toda llave de ajuste o de tuercas antes de encender la
herramienta eléctrica. Una llave de tuercas o de ajuste que se ha
dejado colocada en una parte móvil de la herramienta eléctrica puede
causar lesiones corporales.
e) No adopte posturas forzadas. Manténgase en posición firme y en
equilibrio en todo momento. De este modo, podrá controlar mejor la
herramienta eléctrica en situaciones inesperadas.
f) Vístase adecuadamente. No lleve ropa holgada ni joyas. Mantenga
el pelo, la ropa y los guantes alejados de las piezas móviles.La
ropa holgada, las joyas o el pelo largo pueden quedar atrapados en
las piezas móviles.
g) Si se proporcionan dispositivos para la conexión de sistemas
de extracción y recolección de polvo, asegúrese de que estén
conectados y se usen correctamente. El uso de estos dispositivos
puede reducir los peligros relacionados con el polvo.
30

633770
Desbrozadora multifunción térmico 25 cm
³
Uso y cuidado de las herramientas eléctricas
a) No fuerce la herramienta eléctrica. Use la herramienta eléctrica
correcta para el trabajo a realizar. La herramienta correcta
funcionará mejor y con más seguridad a la velocidad para la que se
ha diseñado.
b) No use la herramienta eléctrica si el interruptor no la enciende ni
la apaga. Toda herramienta eléctrica que no se pueda controlar con el
interruptor es peligrosa y debe ser reparada.
c) Desconecte el enchufe de la fuente de alimentación y/o
el paquete de batería de la herramienta antes de realizar
cualquier ajuste, cambio de accesorios o almacenamiento de
la herramienta eléctrica. Estas medidas de seguridad preventivas
reducen el riesgo de arranque accidental de la herramienta eléctrica.
d) Guarde las herramientas eléctricas que no esté usando fuera
del alcance de los niños y no deje que personas que no estén
familiarizadas con ellas o estas instrucciones las utilicen. Las
herramientas eléctricas son peligrosas en manos de usuarios que no
hayan recibido capacitación.
e) Mantenga sus herramientas eléctricas. Revise que no haya
piezas en movimiento mal alineadas o trabadas, piezas rotas o
cualquier otra condición que pueda afectar el funcionamiento
de la herramienta eléctrica. Si encuentra daños, haga reparar
la herramienta eléctrica antes de utilizarla. Muchos accidentes
son causados por herramientas eléctricas que carecen de un
mantenimiento adecuado.
f) Mantenga las herramientas de corte afiladas y limpias. Las
herramientas de corte con bordes de corte afilados son menos
propensas a trabarse y son más fáciles de controlar.
g) Utilice la herramienta eléctrica, los accesorios y las brocas etc.
de acuerdo con estas instrucciones y de la forma prevista para
el tipo específico de herramienta eléctrica, teniendo en cuenta
las condiciones de trabajo y el trabajo a realizar. El uso de la
herramienta eléctrica para operaciones distintas de aquellas para las
que fue diseñada podría causar une situación peligrosa.
Servicio y reparaciones
a) Haga que su herramienta eléctrica reciba servicio de un técnico
de reparaciones calificado, utilizando únicamente piezas de
recambio idénticas. Esto asegurará que se mantenga la seguridad de
la herramienta eléctrica.
Aspectos de seguridad relativos
a la combustión interna
Entorno peligroso
• No utilice herramientas de gasolina en condiciones húmedas o mojadas,
ni las exponga a la lluvia. Proporcione el espacio de trabajo adecuado
y mantenga el área bien iluminada. No utilice herramientas de gasolina
donde exista un riesgo de explosión o de incendio por materiales
combustibles, líquidos inflamables, gases inflamables o polvo de
naturaleza explosiva.
Protéjase los oídos
• Póngase siempre protección adecuada para los oídos cuando el nivel de
ruido de la herramienta supere los 80 dB. Es responsabilidad del usuario
asegurarse de que las personas que haya cerca de la herramienta en uso
estén también adecuadamente protegidas.
Protéjase los ojos
• Póngase siempre protección ocular adecuada.
Protéjase de la vibración
• Las herramientas de uso manual pueden producir vibración. La vibración
puede causar enfermedades. Los guantes para mantener al operador
caliente pueden ayudar a mantener la buena circulación sanguínea en
los dedos. Las herramientas de uso manual no deben ser utilizadas
durante largos periodos sin descanso.
Apague la herramienta antes de instalar accesorios
• Asegúrese de que el motor esté parado antes de conectar accesorios a
la herramienta.
• Si la herramienta se detiene de forma imprevista, asegúrese de que el
motor no esté funcionando antes de proceder a verificar la herramienta.
Rodaje del motor
• Si la herramienta es nueva, deje que el motor funcione sólo a velocidad
moderada.
• No haga funcionar el motor a alta velocidad hasta que haya finalizado su
periodo de rodaje completo.
• El motor no será capaz de desarrollar su máxima velocidad antes de que
se haya finalizado el periodo de rodaje.
• Cuando use por primera vez la herramienta, tómese el tiempo de
verificar que todas las tuercas y tornillos estén apretados con seguridad
y proceda a apretarlos si es preciso.
• No use combustibles que contengan metanol o etanol, ya que éstos
pueden causar daños en el interior del depósito y las tuberías del
combustible.
Advertencia
• Espere siempre a que la máquina se detenga por completo antes de
dejarla.
• No deje nunca la máquina desatendida mientras las piezas están todavía
calientes.
Servicio
• Se recomienda que se realice una revisión de la herramienta poco
después de su primer uso.
• En caso de uso normal, haga que se realice el mantenimiento de la
herramienta con regularidad.
• No intente modificar ninguno de los componentes de la herramienta. Si
lo hace, no sólo invalidaría la garantía, sino que además puede causarse
lesiones a sí mismo o a otras personas próximas al lugar de uso.
• Haga siempre que se realice la revisión de la herramienta en un centro
de servicio autorizado.
Almacenamiento
• Cuando haya acabado de utilizar la herramienta, límpiela a fondo.
• Tenga cuidado de no golpear ni cortar el depósito o los tubos de
combustible cuando esté en el suelo.
• No deje que la herramienta se caiga: puede dañarse y su uso podría ser
peligroso.
• Guarde la herramienta fuera de la luz directa del sol.
• Asegúrese de guardar el combustible y el aceite en un lugar seguro,
alejado de las fuentes de calor, de la luz directa del sol, de las fuentes de
inflamación, y fuera del alcance de los niños.
Siempre que no use la herramienta durante un periodo prolongado, siga las
siguientes instrucciones:
• Vacíe el depósito de combustible completamente.
• Proteja contra la corrosión todas las piezas de metal del motor
recubriéndolas de aceite.
• Retire la bujía de encendido, aplique unas gotas de aceite al cilindro y
luego accione el arrancador de retroceso 2 ó 3 veces para distribuir de
modo uniforme el aceite.
• Vuelva a poner la bujía.
• No almacene nunca la herramienta en lugares donde los niños puedan
tener acceso.
ESTE PRODUCTO PRODUCE GASES DE ESCAPE TÓXICOS TAN PRONTO COMO
EL MOTOR SE PONE EN MARCHA. ESTOS GASES PUEDEN SER INCOLOROS E
INODOROS. PARA REDUCIR EL RIESGO DE LESIONES GRAVES O MORTALES,
NO PONGA NUNCA EN MARCHA EL MOTOR EN ESPACIOS INTERIORES O MAL
VENTILADOS. ASEGÚRESE DE QUE HAYA UNA VENTILACIÓN ADECUADA AL
TRABAJAR EN ZANJAS U OTROS ESPACIOS CERRADOS.
www.silverlinetools.com
31

ESP
Presentación del producto
1 Depósito de aceite de cadena
Protección contra las proyecciones de aceite de
2
motosierra
3 Tornillo de retención de la protección
4 Interruptor de encendido
5 Acelerador
6 Interruptor de seguridad
7 Empuñadura
8 Acoplamiento de unidad motora
9 Tapa del pasador de sujeción
10 Dispositivo de sujeción
11 Capuchón
12 Filtro de aire
13 Manija de arranque
14 Depósito de combustible
15 Palanca de estrangulador
16 Tornillo de ajuste de ralentí
17 Cebador
18 Tubos de combustible
19 Protector del cortabordes
20 Palancas de ajuste (cortasetos)
21 Bobina de hilo para cortabordes
22 Botella de mezcla de combustible
23 Cortasetos
24 Disco cortante de desbrozadora
25 Tornillo de tensión de cadena
26 Motosierra
27 Bandolera
28 Soportes de guarda de recortadora
29 Cabezal de montaje para cortabordes y desbrozadora
30 Eje de motosierra
31 Empuñadura auxiliar
32 Punto de amarre de bandolera
33 Unidad motora
Accesorios
Llave fija
Llave allen
Llave de tubo
Destornillador
Desembalaje
• Desembale e inspeccione la herramienta con cuidado. Familiarícese con
todas sus características y funciones.
• Asegúrese de que el embalaje contiene todas las partes y que están
en buenas condiciones. Si faltan piezas o están dañadas, solicite su
sustitución antes de utilizar esta herramienta.
Montaje de los accesorios de
corte
Instalación del protector del cortabordes
1. Deslice el protector del cortabordes (19) entre los soportes del
protector del cortabordes (28) del eje.
2. Utilice los cuatro tornillos y tuercas hexagonales suministrados para
sujetar el protector al soporte situado en el lateral del eje.
Instalación del disco
3. Introduzca una llave allen a través del agujero de sujeción situado en
el alojamiento del husillo para sujetar el husillo.
4. Utilice la llave de tubo y el destornillador (o una llave de tuercas) para
aflojar la contratuerca de la base del cabezal de montaje (29).
NOTA: la rosca es invertida por tanto para desenroscar la contratuerca debe
girarla hacia la derecha.
5. Retire la tapa externa y el buje del disco.
6. Inserte el disco, vuelva a colocar el buje y la tapa externa y vuelva a
colocar la contratuerca.
Instalación de la bobina de hilo
NOTA: La bobina de hilo se enrosca a izquierdas en el husillo.
1. Introduzca una llave allen a través del agujero de sujeción situado en
el alojamiento del husillo para sujetar el husillo
2. Utilice la llave de tubo y el destornillador (o una llave de tuercas) para
aflojar la contratuerca de la base del cabezal de montaje (29).
NOTA: La rosca es invertida por tanto para desenroscar la contratuerca
debe girarla hacia la derecha.
3. Retire la tapa externa, el buje del disco y el disco (si está instalado). No
retire la tapa del alojamiento del husillo.
4. Sujete el husillo introduciendo la llave allen en el agujero de sujeción.
5. Introduzca la bobina de hilo en el husillo y apriétela manualmente –
no la apriete excesivamente
NOTA: La bobina no necesita apretarse con una herramienta.
Montaje de la motosierra
1. Desenrosque el pasador de sujeción situado en el acoplamiento de
la motosierra.
2. Retire el capuchón (11) de un extremo del eje de la motosierra (30) e
introduzca el eje completamente en el acoplamiento de la motosierra
de forma que el eje de mando se enganche.
3. Alinee el agujero del pasador con el pasador de sujeción y apriete el
pasador para sujetar el eje en posición.
4. Retire el capuchón del extremo opuesto del eje de la motosierra,
coloque la protección contra las proyecciones de aceite de la
motosierra (2) en el eje de la motosierra, y vuelva a colocar el
capuchón.
5. Desplace la protección a lo largo del eje hasta el acoplamiento con
la motosierra y sujétela en posición (Fig. A) apretando el tornillo de
retención de la protección (3).
32

633770
Desbrozadora multifunción térmico 25 cm
³
Preparación de la unidad motora
Llenado de combustible
• La unidad motora (33) utiliza una mezcla de combustible sin plomo y
aceite de 2 tiempos a una proporción de 40:1.
• Utilice solamente aceite de 2 tiempos con base de petróleo de buena
calidad y gasolina sin plomo.
• Mezcle el combustible en la botella de mezcla de combustible (22)
suministrada.
• No mezcle combustible en el depósito de combustible (14).
• Mezcle solamente la cantidad de combustible que se propone utilizar.
(Nota: El depósito tiene una capacidad de 0,6 litro).
• Coloque la unidad motora sobre una superficie nivelada y firme.
• Retire el tapón del depósito de combustible para llenarlo.
• Vierta el combustible con cuidado a través de un embudo con un filtro.
No llene el depósito más allá del nivel mostrado en la base del cuello
de llenado.
• Vuelva a colocar el tapón del combustible y apriételo bien.
• Asegúrese de que se limpie completamente cualquier derrame de
combustible.
• Guarde el combustible sobrante en un recipiente seguro apartado del
área de trabajo y de otros materiales combustibles.
NOTAS IMPORTANTES
• Llene siempre el depósito de combustible en un lugar seguro apartado
del área de trabajo y cualquier fuente de calor o ignición. Evite cualquier
contacto con el combustible. NO FUME.
• Solamente llene el depósito de combustible cuando el motor haya parado
y se haya enfriado completamente.
• Las mezclas de combustible y aceite de 2 tiempos pueden separarse. Si
utiliza combustible que ha mezclado previamente, agite bien el recipiente
de combustible antes de llenar el depósito.
• Aparte la unidad motora del área de llenado de combustible antes de
poner en marcha el motor.
Arrancar el motor
Rodaje
• Cuando se utiliza la unidad motora por primera vez, es importante que
el motor pase por una fase de rodaje. Esto mejora la eficiencia y el
rendimiento del motor y maximiza su vida útil.
• Para el rodaje del motor, déjelo en ralentí, con un uso mínimo del
acelerador, durante un período de aproximadamente 15 minutos, la
primera vez que se utilice. NO AUMENTE LA VELOCIDAD DEL MOTOR
DURANTE ESTE PERÍODO, SI ES POSIBLE.
NOTA: Es normal notar olores peculiares durante el rodaje debido a que los
componentes se calientan por primera vez.
Arranque en frío
• Recomendamos arrancar el motor en frío sin las herramientas cortadoras
instaladas, especialmente la primera vez que se utilice la máquina. Una
vez que se haya calentado, pare el motor. Ahora instale la herramienta
cortadora requerida. Consulte la sección “Instalación de las herramientas
cortadoras”.
ADVERTENCIA: El motor producirá gases tóxicos tan pronto como empiece
a funcionar. No intente nunca arrancar el motor en el interior de un local
o en un espacio cerrado de cualquier tipo. Lleve puesto siempre equipo
protector de seguridad. Para utilizar esta herramienta se requieren gafas
y guantes de seguridad, protectores para los oídos, mascarilla y ropa
resistente. También se aconseja llevar casco y botas de seguridad.
1. Coloque la unidad motora (33) sobre una superficie firme y nivelada.
2. Accione el cebador (17) hasta que vea que los tubos de combustible
(18) están llenos de combustible (normalmente se requieren 6-12
“accionamientos”).
3. Ponga la palanca del estrangulador (15) en la posición de COLD START
(ARRANQUE FRÍO) (si el motor ya está caliente, o la temperatura del
aire es cálida, ponga la palanca del estrangulador en la posición de
WARM START (ARRANQUE CALIENTE).
4. Ponga el interruptor de encendido (4) a la posición 'ON' (ACTIVACIÓN)
(la más cerca de la empuñadura).
5. Coloque una mano en la empuñadura (7) para estabilizar la unidad.
Asegúrese de que puede accionar el interruptor de seguridad (6) y el
acelerador (5) si es necesario.
ADVERTENCIA: No enrolle el cordón de arranque en su mano.
1. Sujete la manija de arranque (13) y dé un tirón seco para arrancar
el motor. Guíe siempre el cordón para volver a entrar en la caja, NO
PERMITA QUE ENTRE DE GOLPE.
2. El motor arranca después de unos cuantos tirones.
3. Si es necesario, pulse el interruptor de seguridad (6) y apriete con
cuidado el acelerador (5) para ayudar a arrancar.
4. Cuando el motor empiece a calentarse, desplace la palanca del
estrangulador a la posición 'OPEN' (ABIERTO).
5. Mantenga la velocidad del motor a un mínimo y permita que el motor
se caliente poco a poco durante unos minutos.
NOTA: Si el motor suena de forma que parece que va a calarse, ponga el
estrangulador en la posición WARM START (ARRANQUE CALIENTE) y apriete
el acelerador para aumentar la velocidad del motor.
Parada del motor
1. Suelte el acelerador (5) y permita que el motor funcione en ralentí
durante unos minutos para que se enfríe.
2. Mueva el interruptor de encendido (4) hacia delante a la posición
de STOP.
3. El motor se para.
NOTA: Cuando hay instalada una herramienta cortadora, debe ser
consciente de que la bobina o el disco puede continuar girando unos
momentos después de que el motor pare. No intente parar el disco sino
permite que se pare gradualmente.
Instalación de la bandolera
• Enganche la bandolera (27) al punto de amarre (32).
Instalación de las herramientas
cortadoras (Fig. C)
ADVERTENCIA: No intente cambiar las herramientas cortadoras cuando el
motor está en marcha, esto podría causar lesiones graves.
1. Coloque la unidad motora sobre una superficie nivelada y firme.
2. Asegúrese de que el dispositivo de sujeción (10) está abierto.
3. Retire el capuchón (11) del eje de la herramienta requerida.
4. Posicione el eje con su agujero de sujeción en la parte superior.
5. Pulse la tapa del pasador de sujeción (9) y deslice el eje
completamente al interior del alojamiento de la unidad motora (8).
6. Suelte la tapa del pasador de sujeción e intente con firmeza sacar el
eje del alojamiento para comprobar que el pasador de sujeción está
enganchado.
7. Ahora apriete el dispositivo de sujeción.
Desconexión de una herramienta cortadora
1. Gire el dispositivo de sujeción (10) hacia la izquierda para soltar el
acoplamiento.
2. Pulse la tapa del pasador de sujeción (9) y retire el eje del
acoplamiento.
Uso del cortasetos
• En primer lugar, instale el cortasetos de la forma descrita en ‘Instalación
de las herramientas cortadoras’.
Ajuste del cabezal del cortasetos
• La bisagra pivote permite un ajuste de 180° del ángulo de la cuchilla:
• Apriete las dos palancas de ajuste (20) una contra la otra y gire el
www.silverlinetools.com
33

ESP
cabezal del cortasetos al ángulo requerido.
• Suelte las palancas de ajuste y compruebe que la palanca está
engranada con los dientes de la bisagra pivote.
Antes de arrancar el motor
Compruebe las conexiones:
• Asegúrese de que el cortasetos está conectado de forma segura a la
unidad motora.
• Asegúrese de que el cabezal del cortasetos está bloqueado de forma
segura en el ángulo requerido.
Compruebe la cuchilla:
1. Retire los manguitos protectores de la cuchilla.
2. Compruebe que la cuchilla está lubricada adecuadamente. Si parece
que la cuchilla está seca, aplique una pequeña vaporización o una
gota de aceite para usos múltiples a lo largo de la base de los dientes.
Arranque del motor
• Asegúrese de que la cuchilla del cortasetos no toque el suelo y no tenga
ninguna obstrucción - cuando el motor está en marcha y se aprieta el
acelerador, la cuchilla funciona.
• Arranque el motor de acuerdo con las instrucciones de la sección
“Arrancar el motor”. (p. 33)
Corte
ADVERTENCIA: Utilizar un cortasetos correctamente requiere una habilidad
técnica. Las instrucciones siguientes se dan solamente a título de guía
general. Si no tiene una confianza completa en su capacidad de utilizar esta
herramienta de forma segura, NO LA UTILICE.
• Mantenga siempre el equilibrio, con los pies firmemente en el suelo. Si
no es posible alcanzar el área a cortar desde un lugar seguro, no la corte.
• No alargue los brazos excesivamente ni intente cortar más vegetación de
la que la herramienta puede cortar de una sola vez.
• Lleve puesto el equipo protector personal correcto para el trabajo en
cuestión. Gafas y guantes de seguridad, protectores para los oídos y ropa
protectora son esenciales y deben llevarse siempre puestos cuando se
utilice el cortabordes.
• Agarre siempre la herramienta con ambas manos. Utilice la empuñadura
auxiliar (31) para mantener el control de la herramienta.
PELIGRO: No agarre nunca el cortasetos por la cuchilla o el manguito
protector.
Uso de las funciones cortabordes
y desbrozadora
• Para instalar el cortabordes o la desbrozadora, consulte la sección
“Instalación de las herramientas cortadoras” (p. 33)
Uso seguro
ADVERTENCIA: No utilice el cortabordes o la desbrozadora sin el protector
(19) colocado.
• Sujete la máquina según un ángulo en que puede utilizarla con
comodidad.
• Agarre siempre la herramienta con ambas manos. Utilice la empuñadura
auxiliar (31) para mantener el control de la herramienta.
• No utilice la herramienta antes de inspeccionar el área de trabajo para
asegurarse de que no haya piedras sueltas y otros obstáculos que
puedan hacerle perder el equilibrio.
• Sea consciente de que el hilo de nylon y el disco de la desbrozadora
giran en sentido de las agujas del reloj. Tenga esto presente cuando
corte o recorte.
• Para cortar al ras y rebordear, incline el cabezal a un ángulo pronunciado
en una posición en la que los residuos, la tierra desprendida y las piedras
sean arrojados en sentido contrario de usted.
Antes de arrancar el motor
• Asegúrese de que el eje está bien sujeto a la unidad motora.
• Asegúrese de que el cabezal no toque el suelo y no tenga ninguna
obstrucción - cuando el motor está en marcha y se aprieta el acelerador,
el cabezal también gire.
Arranque del motor
Arranque el motor de acuerdo con las instrucciones de la sección “Arrancar
el motor”. (p. 33)
Corte
• Cuando desplace la desbrozadora sobre áreas sin vegetación, sea
consciente de la posibilidad de que piedras y otros residuos sean
lanzados a alta velocidad.
Recorte de césped
• Cuando recorte césped, mantenga el cabezal de la máquina a un
pequeño ángulo. Esto ayuda a reducir la cantidad de residuos tirados
hacia atrás.
• Recorte el césped en fases. No trate nunca de recortar una larga tira de
césped en una sola pasada. Esto reduce la carga de trabajo aplicada a la
bobina y al motor de la herramienta.
• Si quiere cortar tallos de hierbajos, mantenga el hilo de nylon lo más
cerca posible de la raíz del tallo del hierbajo. La parte más delgada del
hierbajo es la raíz y esto causa menos desgaste en el hilo de nylon.
• La bobina de hilo tiene un mecanismo de avance por golpeo. Para
obtener más hilo, golpee con cuidado la base del cortabordes contra el
suelo y la bobina soltará más hilo cortador.
• Para renovar el hilo cortador, consulte la sección “Instrucciones para
reemplazar el hilo del cortabordes”. Ver la página 36
Uso de la motosierra
• Para instalar la motosierra, consulte la sección “Instalación de las
herramientas cortadoras”. (p. 33)
Comprobar la tensión de la cadena
• Gire el tornillo de tensión de la cadena (25) hacia la derecha, hasta que
sólo haya aproximadamente 5 mm de cadena sobrante cuando se tira
verticalmente de la cadena desde el centro de la barra de guía.
NOTA: La tensión de la cadena debe comprobarse con regularidad. La
cadena se estira a medida que se usa. Una cadena excesivamente floja
puede salirse del carril, mientras que una cadena demasiado tensa se
desgasta rápidamente y puede romperse.
Llenado del depósito de aceite de cadena
• Esta máquina está equipada con un depósito de aceite de cadena (1).
• Se alimenta automáticamente aceite a la cadena cuando la cadena se
utiliza. El uso de la sierra sin aceite o con un aceite incorrecto causa que
la cadena se desgaste rápidamente y pueda romperse.
• Compruebe siempre que el depósito de aceite de cadena esté
correctamente lleno antes del uso.
• Utilice tan sólo aceite de cadena de buena calidad (W 30). No intente
utilizar aceite de motor, aceite de 2 tiempos o cualquier otro tipo de
lubricante.
• Para añadir aceite, pare el motor y retire el tapón del depósito de aceite
de cadena. Llene el depósito con aceite. Vuelva a colocar el tapón.
• No permite que el depósito se vacíe y seque durante el uso.
Ropa y equipo de protección
Cuando se utilice la motosierra debe llevarse puesto en todo momento todo
el equipo siguiente:
• Chaqueta protectora que cumpla con la norma EN381 – 11 Clase 0. Para
proporcionar protección para los hombros, el cuello y los brazos.
• Pantalones protectores que cumplan con la norma EN381-5 Clase 1.
• Guantes de motosierra que cumplan con la norma EN381-7 Clase 0.
Estos guantes ayudan a evitar que el equipo resbale e incorporan en la
parte del dorso de la mano un material especial resistente al corte.
• Casco con escudo facial completo y protectores para los oídos.
• Botas protectoras de motosierra con entresuela y puntera de acero.
34

633770
Desbrozadora multifunción térmico 25 cm
³
Antes de arrancar el motor
• Asegúrese de que la motosierra está instalada de forma segura en la
unidad motora.
• Asegúrese de que la cabeza de la motosierra no toque el suelo y no
tenga ninguna obstrucción -cuando el motor está en marcha y se aprieta
el acelerador, la motosierra funciona.
Arranque del motor
• Arranque el motor de acuerdo con las instrucciones de la sección
“Arrancar el motor”.
Corte
ADVERTENCIA: Utilizar una motosierra correctamente requiere una
habilidad técnica. Las instrucciones siguientes se dan solamente a título de
guía general. Si no tiene una confianza completa en su capacidad de utilizar
esta herramienta de forma segura, NO LA UTILICE.
• Mantenga siempre el equilibrio, con los pies firmemente en el suelo. Si
no es posible alcanzar el área a cortar desde un lugar seguro, no la corte.
• Evalúe cuidadosamente la forma más segura de cortar, consulte
la sección “Cómo evitar reculadas” a continuación. Cada corte
hecho con una motosierra es único, cada corte requiere sus propias
consideraciones de seguridad. Considere siempre la forma en que la
madera puede moverse o caer después de cortarse. Asegúrese de que
la madera no caída o ruede hacia usted y que la sierra no pueda quedar
atrapada.
• Sujete siempre la motosierra de forma segura, manteniendo su brazo
izquierdo lo más recto posible. No levante la sierra más arriba de su
pecho.
• Agarre siempre la herramienta con ambas manos. Utilice la empuñadura
auxiliar (31) para mantener el control de la herramienta.
• Con la sierra funcionando a velocidad máxima, aplique la hoja a la
madera. Utilice siempre la parte de la guía de corte más cercana al
cuerpo de la máquina.
• Permita que la sierra corte la madera a un ritmo constante. No debería
ser necesario utilizar fuerza para realizar el corte. Un corte lento indica
una hoja desafilada.
• No permita que la hoja toque el suelo ni ningún objeto aparte del que
quiere cortar.
• Suelte el acelerador (5) tan pronto como el corte ha finalizado.
• El funcionamiento del motor a toda velocidad sin una carga causará el
desgaste rápido del motor, la cadena y la guía de corte de la sierra.
Cómo evitar reculadas
• Normalmente la reculada es causada cuando los dientes de la cadena
cercanos a la punta de la guía de corte 'muerden' un objeto sólido. La
fuerza de reacción que se produce puede causar que la sierra haga
un movimiento acelerado violento hacia arriba y hacia atrás, hacia el
usuario.
• La cadena suministrada con la motosierra ha sido diseñada con
funciones de reducción de reculada. Sin embargo, esto no significa
que una reculada no ocurra nunca por tanto debe ser consciente de la
posibilidad de una reculada en todo momento. El uso cuidadoso es la
mejor garantía de seguridad.
Mantenimiento
NOTA: El mantenimiento regular es esencial para prolongar la vida útil de
esta herramienta. Sin un mantenimiento regular y un almacenamiento
correcto la vida útil de la herramienta se reducirá considerablemente..
• Pare el motor y deje siempre que se enfríe antes de realizar cualquier
tarea de limpieza o mantenimiento
• Asegúrese de que todos los tornillos y tuercas estén bien apretados para
que la unidad puede utilizarse de forma segura.
• No utilice nunca la herramienta si alguna de las piezas parece estar
desgastada o rota. En ese caso consulte a su proveedor.
• No intente alterar ninguno de los componentes de esta herramienta. Si lo
hiciera, no sólo ANULARÍA SU GARANTÍA SINO QUE PODRÍAN CAUSARSE
DAÑOS A LA UNIDAD, A USTED O A OTRAS PERSONAS DEL ALREDEDOR.
Ajuste del motor
Cuando está ajustado correctamente, el motor debe funcionar suavemente
en ralentí y acelerar sin vacilar. El disco o la bobina no deben moverse
cuando el motor está en ralentí.
• Para que el motor funcione en ralentí a una velocidad más alta, gire el
tornillo de ajuste de ralentí (16) hacia la derecha.
• Para que el motor funcione en ralentí a una velocidad más baja, gire el
tornillo de ajuste de ralentí (16) hacia la izquierda.
Limpieza del filtro de aire (Fig. D)
El filtro de aire (12) debe limpiarse con regularidad. Para acceder al filtro:
1. Destornille y desenganche la tapa del filtro.
2. Retire el elemento del filtro del alojamiento y lávelo con cuidado
utilizando detergente doméstico y agua.
3. Seque el elemento del filtro y engráselo generosamente utilizando un
aceite multiuso.
4. Vuelva a montarlo antes de utilizar la herramienta.
Comprobación de la bujía de encendido
• Retire la tapa de la bujía de encendido.
• Limpie la suciedad y los residuos de alrededor de la bujía.
• Se suministra una llave de tubo para retirar la bujía para su inspección.
• Si el problema continúa, contacte con su proveedor o un técnico
cualificado.
Motosierra – mantenimiento de la cadena
• Para prolongar la vida útil de la cadena de la sierra y la eficiencia de la
sierra, afile los dientes de la cadena con regularidad. Esto sólo debe ser
realizado por una persona cualificada y experimentada.
• Cuando los dientes se desgasten con el uso, la cadena debe cambiarse.
Consulte a su proveedor o a un técnico cualificado y experimentado.
Eje de mando
• Aplique grasa periódicamente a las boquillas de engrase de la motosierra
y del cortasetos, de acuerdo con el uso –por ejemplo, al principio y al
final de cada temporada.
Almacenamiento
• Deje que el motor se enfríe completamente antes de almacenar esta
herramienta.
• Guarde todas las piezas de la herramienta en un lugar limpio y seco
apartado del calor y los rayos directos del sol. Asegúrese de que todas
las piezas se guarden en un lugar al que los niños no puedan obtener
acceso.
• No guarde nunca la unidad en un lugar en que el depósito de
combustible pueda estar expuesto a calor extremo o donde vapores de
gasolina puedan entrar en contacto con llamas o chispas.
• Mantenga el área de almacenamiento libre de residuos y posibles
riesgos de tropezar.
• Asegúrese de que todas las cabezas de corte estén limpias y los
manguitos protectores estén colocados.
Almacenamiento prolongado
• Si va a almacenar la herramienta por un período prolongado, además de
los puntos detallados en “Almacenamiento” , más arriba:
• Diluya un poco de detergente doméstico con agua tibia y, utilizando un
paño húmedo, limpie los alojamientos de plástico del cuerpo principal.
• Vacíe completamente el depósito de combustible (14) de una forma
segura y asegúrese de que el tapón de combustible se coloque de forma
segura.
• Retire la bujía de encendido y ponga una cucharadita de aceite limpio
en el cilindro de la bujía de encendido. Vuelva a colocar y reconectar la
bujía de encendido.
• Con el encendido desactivado, tire de la palanca del arrancador
lentamente para revestir el motor con aceite.
www.silverlinetools.com
35

ESP
Vaciado y eliminación del aceite
• Si necesita vaciar el depósito de aceite, hágalo en el exterior y solamente
cuando el motor esté frío.
• Para respetar el entorno, no deseche combustible o aceite vaciado de
la máquina tirándolo al sistema de alcantarillado o enterrándolo. Las
estaciones de servicio y lugares de reciclaje locales tienen medios
apropiados para la el desecho de estos materiales y deben utilizarse
para eliminar estos productos. Si no conoce la ubicación de su centro de
eliminación de desechos más cercano, contacte con su autoridad local
para informarse.
Instrucciones para reemplazar el
hilo del cortabordes
1) Ojal (x2)
2) Cubierta
3) Perno eje
4) Muelle
NOTA : Utilizar un hilo de longitud desigual aumentará las vibraciones.
Asegúrese siempre de que el hilo se enrolle de manera uniforme y se
recorte en longitudes iguales desde los ojales (1).
1. Presione las pestañas de la cubierta y gire la tapa para soltarla.
Retire la tapa y el botón de retención
2. Retire la bobina y el muelle
3. Limpie todos los componentes e inspeccione para ver si existen
daños. Sustituya cualquier elemento dañado
4. Compruebe que los ojales están en su posición correcta
ADVERTENCIA: Nunca opere el cortabordes sin los ojales (1).
5. Introduzca el hilo nuevo a través del anclaje al centro de la bobina
hasta que las longitudes del hilo por cada lado del anclaje sean
iguales. No exceda la capacidad máxima de la bobina, consulte las
indicaciones dadas más arriba
6. Sujetando la bobina (5), asegurándose de que las ranuras de fijación
estén apuntando hacia arriba, rebobine el hilo en sentido de las
agujas del reloj utilizando un dedo para mantener los dos hilos
separados
7. Bloquee cada extremo del hilo en su respectiva ranura de fijación
8. Coloque el muelle (4) sobre el perno eje (3)
9. Con las ranuras de fijación mirando hacia abajo hacia la cubierta,
introduzca los extremos del hilo a través de los ojales (1) instalados
en la cubierta. No permita que el hilo se enganche debajo de la
bobina
10. Coloque el botón de retención (6) en el centro de la bobina
11. Vuelva a colocar la tapa (7) alineando las pestañas y a continuación
girando la tapa para que las pestañas se enganchen con las ranuras
de la tapa
12. Tire de los hilos para desbloquearlos de las ranuras de fijación
13. Compruebe que un máximo de 10 – 12,5 cm de hilo se extiende por
igual desde cada ojal. Recorte los hilos según sea necesario
5) Bobina
6) Botón de retención
7) Tapa
1
2
3
4
5
6
7
36

633770
Desbrozadora multifunción térmico 25 cm
Garantía de Silverline Tools
Garantía Silverline Tools
Este producto Silverline viene con una garantía de
3 años
Registre el producto en www.silverlinetools.com antes de que transcurran
30 días a partir de la fecha de compra para poder acogerse a la garantía
de 3 años. El periodo de garantía comienza en la fecha de compra que
consta en el comprobante.
Condiciones
El periodo de garantía entra en vigor en la fecha de compra que consta en
el recibo de ventas.
GUARDE EL RECIBO DE VENTAS
En caso de que el producto se averíe antes de que transcurran 30 días
desde la fecha de compra, devuélvalo al distribuidor donde lo compró,
junto con el recibo y los detalles de la avería. Recibirá una sustitución o
un reembolso.
Si el producto se avería después de que transcurran 30 días desde la fecha
de compra, devuélvalo a:
Centro de Servicio de Silverline Tools
PO Box 2988
Yeovil
BA21 1WU, Reino Unido
La reclamación bajo garantía debe presentarse durante el periodo de
garantía.
Antes de poder realizar cualquier trabajo de reparación, deberá entregar
el recibo de compra original en el que se indica la fecha de compra, su
nombre, dirección y el lugar donde lo adquirió.
También deberá indicar claramente los detalles del fallo a reparar.
Las reclamaciones presentadas dentro del periodo de garantía deberán ser
verificadas por Silverline Tools con el fin de establecer si las deficiencias
son consecuencia de los materiales o de la mano de obra del producto.
Los gastos de transporte no son reembolsables. Todo producto a devolver
deberá estar en un estado limpio y seguro para su reparación, debiendo
empaquetarse cuidadosamente con el fin de prevenir daños o lesiones
durante el transporte. Nos reservamos el derecho a rechazar envíos
incorrectos o inseguros.
Todas las reparaciones serán realizadas por Silverline Tools o sus agentes
de reparación autorizados.
La reparación o sustitución del producto no prolongará el periodo de
garantía.
Los defectos reconocidos por nosotros como cubiertos por la garantía
serán corregidos reparando la herramienta, sin cargo alguno (salvo los
gastos de envío), o bien sustituyéndola por una herramienta en perfecto
estado de funcionamiento.
Registro de la compra
Visite: silverlinetools.com y seleccione el botón de registro, introduciendo:
• Susdatospersonales
• Detallesdelproductoeinformacióndecompra
El Certificado de Garantía le será enviado en formato PDF. Imprímalo y
guárdelo con el producto.
Las herramientas o piezas retenidas que hayan sido sustituidas serán
propiedad de Silverline Tools.
La reparación o sustitución del producto bajo garantía aporta beneficios
adicionales a sus derechos legales como consumidor, sin afectarlos.
Qué está cubierto:
La reparación del producto, si se puede comprobar a satisfacción de
Silverline Tools que las deficiencias se deben a materiales o mano de obra
defectuosos dentro del periodo de garantía.
En caso de que cualquier pieza no estuviera disponible o estuviera fuera de
fabricación, Silverline Tools la sustituirá por una pieza funcional.
Uso del producto en la Unión Europea.
Qué no está cubierto:
Silverline Tools no garantiza las reparaciones necesarias como
consecuencia de:
Desgaste normal por uso en cumplimiento de las instrucciones de por
ejemplo hojas, escobillas, correas, bombillas, baterías, etc...
La sustitución de cualquier accesorio suministrado: brocas, hojas, papel de
lija, discos de corte y otras piezas relacionadas.
Daño accidental, averías debidas a uso o cuidado negligente, uso
incorrecto, negligencia, funcionamiento o manejo indebido del producto.
El uso del producto para un fin distinto al normal doméstico.
Cualquier cambio o modificación del producto.
El uso de piezas y accesorios que no sean recambios originales de
Silverline Tools.
Instalación incorrecta (excepto si fue realizada por Silverline Tools).
Reparaciones o alteraciones realizadas por agentes distintos a Silverline
Tools o sus agentes de reparación autorizados.
Las reclamaciones distintas al derecho a corrección de fallos en la
herramienta indicados en las presentes condiciones de garantía no están
cubiertas por ella.
³
Declaración de conformidad CE
El abajo firmante: Mr Darrell Morris
Autorizado por: Silverline Tools
Declara que el producto:
Modelo/Nombre: Desbrozadora multifunción térmico 25 cm³
Tipo y N° de serie: 633770
Está en conformidad con las directivas:
• Directiva de máquinas 2006/42/EC
• Compatibilidad electromagnética 2004/108/EC
• Emisiones de maquinaria móvil no destinada al tráfico viario 97/68/EC
• EN ISO11806:2008
• EN ISO11680-1:2008
• EN ISO10517:2009
• EN ISO14982:1998
La documentación técnica se conserva en: Silverline Tools
Organismo notificado: Intertek Testing Services
Lugar de declaración: Shanghai, China
Fecha: 09/05/11
Firma:
Director
Nombre y dirección del fabricante o representante autorizado:
Silverline Tools, Boundary Way, Lufton Trading Estate, Yeovil, Somerset, BA22
8HZ Reino Unido
www.silverlinetools.com
37

I
Descrizione dei Simboli
La targhetta identificativa del vostro elettroutensile potrebbe riportare
dei simboli. Tali simboli sono una rappresentazione grafica che mira a
evidenziare importanti informazioni sul prodotto o istruzioni per il suo
utilizzo corretto e sicuro.
Indossare protezioni per l’udito.
Indossare protezioni per gli occhi.
Indossare una protezione per le vie respiratorie.
Indossare una protezione per la testa.
Indossare protezioni per le mani
Leggere il manuale d’uso
Non usare gli utensili a benzina dove esiste il rischio di
esplosioni o incendio da materiali combustibili, liquidi o gas
infiammabili o polveri di natura esplosiva
Dopo l'uso il motore sarà molto caldo. NON TOCCARLO.
I gas di scarico contengono monossido di carbonio, un gas
tossico. L'esposizione al monossido di carbonio può provocare
la perdita della conoscenza e anche lesioni mortali.
Il prodotto è conforme alle vigenti normative e norme di
sicurezza applicabili
Caratteristiche tecniche
Cilindrata: .................................... 25,4 cm³
Potenza motore max: .................. 0,85 kW/8500 min
Carburante: ................................. Miscela di benzina
senza piombo e olio
per motori a due tempi
(40 : 1)
Capacità del serbatoio: ................ 0,6 litri
Tipo della candela: ..................... TORCH BM6A
Velocità minima: .......................... 3,000 min
Velocità a vuoto: .......................... 11,000 min
Larghezza di taglio: ..................... 254 mm per la lama e
410 mm per la bobina
Vibrazione
- A velocità minima: ................. 2,32/2,78 m/s
- A velocità maxima: .................3,64/3,89 m/s
Pressione sonora: ........................ 91 dB (A)
Potenza sonora: ........................... 106 dB (A)
Peso: ........................................... 11,8 kg
Il livello di intensità del suono per l’operatore può
superare 85dB (A) e le misure di protezione contro il
Nell'ambito del nostro sviluppo continuo del prodotto,
le specifiche dei prodotti Silverline possono subire
rumore sono necessarie.
variazioni senza preavviso.
-1
-1
2
2
Prima dell’utilizzo si raccomanda di leggere attentamente e familiarizzare con le
istruzioni contenute nel presente manuale e sulle etichette riportate sul prodotto.
Il presente manuale delle istruzioni deve essere tenuto sempre assieme al
prodotto, per consentire una rapida consultazione in futuro. Prima di utilizzare il
prodotto, assicurarsi che tutto il personale addetto al suo impiego abbia letto e
familiarizzato con le informazioni contenute nel presente manuale.
Anche quando utilizzato secondo le raccomandazioni prescritte, l’impiego
del prodotto comporta comunque dei rischi residui non eliminabili. Si
raccomanda pertanto di adottare la massima cautela durante l’utilizzo del
prodotto. Evitare di utilizzare il prodotto in caso di dubbi o incertezze sulle
corrette modalità di utilizzo.
Norme generali di sicurezza
AVVERTENZA: Leggere ed assimilare tutte le istruzioni. La non
osservanza delle seguenti istruzioni può causare scosse elettriche, incendi
e/o lesioni gravi.
Conservare tutte le avvertenze di pericolo e le istruzioni operative per
ogni esigenza futura.
Il termine “elettroutensile” si riferisce all’utensile a rete fissa (con filo) o un
utensile a batteria (senza filo).
Area di lavoro
a) Mantenere l’area di lavoro pulita e adeguatamente illuminata. Il
disordine e le zone di lavoro non illuminate possono essere fonte di
incidenti.
b) Non usare gli elettroutensili in presenza di atmosfere esplosive,
come liquidi, gas e polveri infiammabili. Gli elettroutensili
producono scintille che potrebbero accendere le polveri o i fumi.
c) Tenere altre persone e i bambini a distanza di sicurezza durante
l’impiego dell’utensile elettrico. Eventuali distrazioni potrebbero far
perdere il controllo dell’utensile all’operatore.
Sicurezza personale
-1
a) Quando si usa un elettroutensile lavorare sempre con la massima
attenzione e concentrazione, lasciandosi guidare dal buon senso.
Non usare mai un elettroutensile quando si è stanchi o sotto
l’effetto di medicinali e/o sostanze alcoliche o stupefacenti.
Quando si usa un elettroutensile un attimo di distrazione è sufficiente
a causare gravi lesioni alle persone.
b) Usare dispositivi per la protezione personale. Indossare sempre
protezioni per gli occhi. I dispositivi per la sicurezza personale, come
le mascherine antipolvere, le calzature di sicurezza antiscivolo, il casco
e la cuffia, se usati in maniera appropriata, riducono i rischi di lesioni
alle persone.
c) Evitare l’avviamento accidentale. Garantire che l’interruttore è in
posizione arresto (OFF) prima di attaccare la presa. Trasportare
gli elettroutensili con il dito al di sopra dell’interruttore o attaccando
l’elettroutensile con l’interruttore acceso, aumenta il rischio di
accidenti.
d) Rimuovere tutte le chiavi di regolazione e le chiavi inglesi prima
di accendere l’elettroutensile. Una chiave inglese o una chiave di
regolazione collegata a una parte in movimento dell’elettroutensile
potrebbe causare lesioni alle persone.
e) Non andare oltre l’altezza consentita. In qualsiasi momento
mantenere i piedi poggiati su superfici solide e un punto di
appoggio sicuro. Un buon equilibrio consente di avere il massimo
controllo sull’elettroutensile nelle situazioni inaspettate.
f) Vestirsi con abbigliamento adeguato. Non indossare abiti larghi o
gioielli.Tenere i capelli, vestiti e guanti lontano da parti in movimento.
g) Se il dispositivo utilizzato è dotato di bocchetta per l’aspirazione
della polvere accertarsi che sia collegato e utilizzato
correttamente. L’uso di tali dispositivi riduce i rischi correlati alle
polveri.
Maneggio ed impiego accurato di utensili elettrici
a) Non forzare l’elettroutensile. Usare sempre l’elettroutensile
corretto per il lavoro da eseguire. L’elettroutensile corretto sarà in
grado di svolgere il lavoro in modo più efficiente e sicuro nell’ambito
della gamma di potenza indicata.
38

633770
Sistema di giardinaggio a più testine 25 cm³
b) Non usare l’elettroutensile se l’interruttore di accensione non
si accende e si spegne. Gli elettroutensili con un interruttore
di accensione difettoso sono pericolosi e devono essere riparati
immediatamente.
c) Staccare la spina dalla presa di corrente prima di effettuare
qualsiasi regolazione, sostituire gli accessori o riporre gli attrezzi
a motore. Queste misure di sicurezza preventive riducono il rischio di
avvio involontario.
d) Conservare l’elettroutensile fuori dalla portata dei bambini e non
lasciare che venga utilizzato da persone non adeguatamente
addestrate e competenti nell’uso degli elettroutensili o che non
abbiano letto questo manuale di istruzioni. Gli elettroutensili
diventano estremamente pericolosi nelle mani di persone non
addestrate.
e) Mantenere gli elettroutensili. Controllare per disallineamento
o la legatura delle parti in movimento, la rottura di parti
e altre condizioni che possono influire il funzionamento
dell’apparecchio. In caso di danneggiamento, fare riparare prima
dell’uso. Molti incidenti sono causati da una scarsa manutenzione
dell’utensile.
f) Mantenere le lame pulite e affilate. Gli utensili da taglio tenuti in
buone condizioni operative e con i bordi taglienti affilati sono meno
soggetti a bloccarsi e più facili da controllare.
g) Utilizzare l’elettroutensile e tutti i componenti e gli accessori in
conformità con le istruzioni di questo manuale e nella maniera
prevista per ciascun tipo di utensile, tenendo conto delle
condizioni lavorative e del compito da eseguire. L’utilizzo degli
elettroutensili per fini diversi da quelli previsti rappresenta un rischio
per le persone.
Assistenza
a) Qualsiasi intervento sull’elettroutensile deve essere eseguito da
personale qualificato utilizzando unicamente pezzi di ricambio
compatibili e approvati. Ciò garantisce la sicurezza dell’utensile
elettrico.
Sicurezza combustione interna
Ambiente pericoloso
• Non usare utensili a benzina in ambienti umidi o bagnati, e non esporli alla
pioggia. Accertarsi che lo spazio di lavoro attorno all'utensile sia ben illuminato.
Non usare gli utensili a benzina in ambienti dove esiste un rischio di esplosione
o incendio da materiali combustibili, liquidi o gas infiammabili o polveri di
natura esplosiva.
Proteggere l'udito
• Indossare sempre adeguate protezioni per le orecchie quando il rumore
dell'utensile supera gli 80 dB. È responsabilità dell'utente accertarsi che altre
persone vicine all'area di lavoro siano adeguatamente protette.
Proteggere gli occhi
• Indossare sempre una protezione adeguata per gli occhi.
Proteggere se stessi dalle vibrazioni
• Gli utensili manuali producono vibrazioni. Le vibrazioni possono causare lesioni.
Dei guanti per tenere le mani calde potrebbero aiutare l'operatore ad assorbire
le vibrazioni e a mantenere una buona circolazione sanguigna nelle mani. Gli
utensili manuali non devono essere usati ininterrottamente per lunghi periodi.
Spegnere l'utensile prima di collegare gli accessori
• Accertarsi che il motore sia fermo prima di collegare all'utensile gli
accessori.
• Se l'utensile si arresta inaspettatamente, prima di effettuare qualsiasi
controllo accertarsi che il motore non sia ancora in funzione
Rodaggio del motore
• Quando l'utensile è ancora nuovo utilizzare il motore solo a regime ridotto.
• Non utilizzare il motore a regimi elevati fino a quando il motore sarà stato rodato
completamente.
• Il motore non sarà in grado di sviluppare la massima potenza fino al termine del
periodo di rodaggio.
• Al primo utilizzo dell'utensile spegnere il motore e controllare che tutti i dadi e le viti
siano saldamente fissate e adeguatamente strette.
• Non usare combustibili contenenti metanolo o etanolo perché potrebbero provocare
danni al serbatoio e alle linee di alimentazione.
Avvertenza
• Attendere sempre che l'utensile si arresti completamente prima di
allontanarsi.
• Non lasciare mai l'utensile non presidiato quando i suoi componenti sono
ancora caldi.
Manutenzione
• Si raccomanda di far eseguire la manutenzione dell'utensile subito dopo
il primo utilizzo.
• In condizioni di utilizzo normale far eseguire gli interventi di
manutenzione regolarmente.
• Non modificare i componenti di questo utensile. La modifica non solo
renderà nulla la garanzia, ma potrebbe provocare infortuni e lesioni
all'operatore o alle persone che si trovano nei pressi dell'area di lavoro.
• Eseguire gli interventi di manutenzione solo in un centro di assistenza
autorizzato.
Conservazione
• Dopo aver usato l'utensile, pulirlo a fondo.
• Fare attenzione a non colpire, tagliare o danneggiare in alcun modo il
serbatoio o le linee di alimentazione del carburante quando si appoggia
l'utensile al suolo.
• Non far cadere l'utensile per evitare che resti danneggiato e che diventi
poco sicuro.
• Conservare l'utensile lontano dalla luce diretta del sole.
• Accertarsi che il combustibile e l'olio siano conservati in luogo sicuro,
lontano da fonti di calore, dalla luce diretta del sole e da fonti di scintille o
ignizione, e fuori dalla portata dei bambini.
Quando l'utensile è a riposo per un lungo periodo di tempo, procedere
come segue.
• Svuotare completamente il serbatoio del carburante.
• Proteggere tutte le parti metalliche del motore dalla corrosione con uno
strato di olio.
• Rimuovere la candela, versare alcune gocce d'olio nel cilindro e tirare la
manopola del motorino di avviamento 2 o 3 volte per distribuire l'olio in
modo uniforme nel cilindro.
• Riavviare la candela.
• Non lasciare mai l'utensile in funzione non presidiato.
QUESTO UTENSILE PRODUCE FUMI DI SCARICO VELENOSI SUBITO DOPO
CHE IL MOTORE È ACCESO. TALI FUMI POTREBBERO ESSERE PRIVI DI
COLORE E ODORE. PER RIDURRE IL RISCHIO DI LESIONI GRAVI O FATALI,
NON AVVIARE MAI LA MACCHINA IN AMBIENTI CHIUSI O SCARSAMENTE
VENTILATI. ACCERTARSI CHE LA VENTILAZIONE SIA ADEGUATA QUANDO SI
OPERA IN CANALI O SPAZI CONFINATI.
www.silverlinetools.com
39

I
Conoscenza del prodotto
1 Serbatoio dell’olio
2 Protezione contro gli spruzzi d’olio
3 Bullone di blindaggio della protezione
4 Interruttore d’accensione
5 Valvola a farfalla
6 Interrutore di sicurezza
7 Maniglia
8 Unitá di azionamento per l’accoppiamento
9 Perno di bloccaggio della copertura
10 Morsetto di bloccaggio
11 Copertura di fondo
12 Filtro dell’aria
13 Maniglia di avviamento
14 Serbatoio del carburante
15 Leva dello starter
16 Vite di regolazione del minimo
17 Innesco
18 Linee del carburante
19 Dispositivo del tosaerba
20 Levette di aggiustamento (tosasiepe)
21 Bobina del tosaerba
22 Bottiglia di miscelazione del carburante
23 Tagliasiepi
24 Lama con punta per taglio a spazzola
25 Vite a tensione della catena
26 Motosega
27 Tracolla
28 Dispositivo delle staffe del tosaerba
29 Decespugliatore/Testa del tosaerba
30 Albero della motosega
31 Maniglia ausiliaria
32 Punto della tracolla di ancoraggio
33 Unitá motrice
Accessori
Chiave a forchetta
Chiave esagonale
Chiave a tubo
Cacciavite
Prima dell'uso
• Togliere con cura l’utensile dallo scatolo. Verificare di averlo disimballato
completamente. Acquisire la necessaria familiarità con tutte le parti/
funzionalità dell’utensile
• In caso di parti mancanti o danneggiate, sarà necessario far riparare o
sostituire tali parti prima di utilizzare il prodotto
Preparazione degli utensili da
taglio
Assemblaggio del dispositivo del tosaerba
1. Fate scorrere il dispositivo del tosaerba (19) tra le staffe del tosaerba
(28) sull’albero
2. Usate i quattro dadi e bulloni esagonali forniti per assicurare il
dispositivo alle staffe sul lato dell’albero
Assemblare la lama
1. Inserite la chiave esagonale attraverso il buco di bloccaggio che si
trova sulla custodia del mandrino per bloccare il mandrino
2. Usate la chiave a tubo ed il cacciavite (o chiave inglese) per svitare
il dado di bloccaggio alla base dell’assemblaggio di taglio. NOTARE:
questo è un filetto inverso quindi girate in senso orario per svitare
3. Rimuovete il cappuccio esterno e la lama per i cespugli
4. Inserite la lama, sostituite il cappuccio esterno e la lama per cespugli,
e riposizionate il dado di bloccaggio.
Assemblaggio della bobina
NOTARE: la bobina (21) si avvita sul mandrino
1. Inserite la chiave esagonale attraverso il buco di bloccaggio che si
trova sulla custodia del mandrino per bloccare il mandrino
2. Usate il manicotto ed il cacciavite (o chiave) per svitare il dado di
bloccaggio alla base dell’assemblaggio di taglio. NOTARE: questo è un
filetto inverso quindi girate in senso orario per svitare
3. Rimuovete il cappuccio esterno e la lama per i cespugli (se
assemblata). Lasciate il coperchio del mandrino in posizione
4. Bloccate il mandrino inserendo la chiave esagonale attraverso il foro
di bloccaggio
5. Fate passare la bobina sul madrino e stringetela a mano-non
stringetela troppo
NOTARE: la bobina non ha bisogno di essere stretta con un utensile
Assemblaggio della motosega
1. Svitate il perno di bloccaggio nell’accoppiamento della motosega
2. Rimuovete la copertura di fondo (11) da uno degli alberi della
motosega (30) ed inseritelo completamente nell’accoppiamento della
motosega in modo che l’albero motore sia impegnato
3. Allineate il foro stenopeico nel mandrino con il perno di sicurezza, e
stringete il perno in modo da assicurare la posizione del mandrino
4. Rimuovete la copertura di fondo dalla parte opposta dell’albero della
motosega, assemblate la protezione contro gli spruzzi d’olio della
motosega (2) sull’albero della motosega, quindi sostitute la copertura
di fondo
5. Fate passare la protezione lungo l’albero fino all’accoppiamento con
la motosega e assicuratela in posizione (Fig A) stringendo il bullone di
blindaggio della protezione (3)
40

633770
Sistema di giardinaggio a più testine 25 cm³
Preparazione dell’unitá motrice
Rifornimento
• L’unitá motrice (33) usa una miscela di benzina senza piombo e olio per
motori a due tempi con un rapporto di 40:1
• Usate solo olio per motori a due tempi a base di benzina di buona qualitá
e benzina senza piombo
• Mescolate il carburante nella bottiglia di miscelazione del carburante in
dotazione (22).
• Non mischiate il carburante nel serbatoio del carburante (14).
• Miscelate solamente la quantitá di carburante che intendete usare
(Notare: il serbatoio ha una capacitá di 0,6 l).
• Posizionate l’unità motrice su una superfice piatta.
• Rimuovete il tappo del serbatoio per riempire il serbatoio.
• Versate il carburante con attenzione attraverso un imbuto con il filtro.
Non riempite il serbatoio oltre il livello della base del collo di riempimento.
• Rimettete il tappo e stringetelo bene.
• Assicuratevi che ogni fuoriuscita sia pulita completamente.
• Conservate il carburante in eccesso in un contenitore sicuro lontano
dall’area di lavoro ed altri materiali di combustione.
NOTE IMPORTANTI
• Fate sempre rifornimento in un posto sicuro, ben lontano da un area di
lavoro, ed ogni fonte di calore od avviamento. Evitate qualsiasi contatto
con il carburante. NON FUMARE.
• Aggiungete carburante solo quando il motore è fermo e completamente
raffreddato.
• Miscele di carburante e olio per motori a due tempi possono separarsi.
Se usate carburante che avete miscelato prima, scuotete il contenitore
del carburante completamente prima di riempire il serbatoio.
• Spostate l’unità motrice ben lontano dall’area di rifornimento prima di
avviare il motore.
Avviamento del motore
Rodaggio
• Quando usate l’unitá motrice per la prima volta, è importante rodare
il motore. Questo migliorerá l’efficienza del motore, la performance e
massimizzerá la durata della vita.
• Per rodare il motore, lasciate il motore al minimo, con un uso minimo
della valvola a farfalla, per un periodo approssimativo di 15 minuti al
primo utilizzo. SE POSSIBILE NON INCREMENTATE LA VELOCITA DEL
MOTORE DURANTE QUESTO PERIODO.
NOTARE: è normale durante il rodaggio sentire degli odori distinti, in quanto
i componenti si scaldano per la prima volta.
Partenza a freddo
• Raccomandiamo di accendere il motore da freddo senza montare gli
utensili da taglio, specialmente la prima volta. Una volta riscaldato,
spegnere il motore. Ora montate gli utensili da taglio necessari. Fate
riferimento a “Montaggio degli utensili da taglio”
ATTENZIONE: il motore emetterà fumi tossici non appena si accende.
Non cercate mai di accendere il motore all’interno, o in uno spazio chiuso.
Indossare sempre la protezione giusta. L’uso di questo utensile richiede
occhiali di protezione, guanti, protezione per le orecchie, maschera, ed
abbigliamento robusto. E’ anche raccomandabile indossare un elmetto e
stivali di sicurezza.
1. Posizionate l’unitá motrice (33) su una superfice piana e dura
2. Pompate l’innesto fino a che potete vedere le linee del carburante (18)
riempite con il carburante (di solito ci voglion 6-12 “pompate”)
3. Posizionate la leva dello starter (15) sulla posizione COLD START
(avviamento a freddo), se il motore è giá caldo o la temperatura
dell’aria è calda, posizionate la leva dello starter sulla posizione WARM
START (avviamento a caldo)
4. Spostate l’interruttore di accensione (4) sulla posizione ON (più vicino
alla maniglia)
5. Mettete una mano sulla maniglia (7) per stabilizzare l’unitá.
Assicuratevi di operare l’interruttore di sicurezza (6) e la valvola a
farfalla (5) se necessario
ATTENZIONE: non arrotolate la corda dello starter intorno alla vostra mano
1. Afferrate la maniglia di avviamento (13) e tirate bruscamente per
far partire il motore . Fate sempre in modo di rimettere la corda
nell’involucro, NON FATELA SCATTARE ALL’INDIETRO
2. Il motore si avvierá dopo pochi tiri
3. Se necessario, premete l’interruttore di sicurezza (6) e spremete
gentilmente la valvola a farfalla (5) per incoraggiare l’avviamento
4. Man mano che il motore si riscalda, spostate la leva dello starter sulla
posizione “OPEN”
5. Mantenete la velocitá del motore al minimo e permettete al motore di
riscaldarsi lentamente per qualche minuto
NOTARE: Se il motore sembra che si stia spegnendo, spostate la leva nella
posizione “WARM START” (avviamento a caldo) e stringete gentilmente la
valvola a farfalla per incrementare la velocitá del motore
Spegnimento del motore
1. Rilasciate la valvola a farfalla (5), e permettete al motore di girare al
minimo per qualche minuto in modo da raffreddarsi
2. Spostate l’interruttore d’accensione (4) verso la posizione di STOP
3. Il motore si fermerá
NOTARE: Quando un utensile da taglio è montato, fate attenzione che la
bobina o la lama possono continuare a girare per alcuni momenti dopo che
il motore viene spento. Non cercate di fermare la lama; lasciatela rallentare
gradualmente
Montate la tracolla
• Agganciate la tracolla (27) al punto della tracolla d’ancoraggio (32)
Montaggio degli utensili da taglio
(Fig C)
ATTENZIONE: Non cercate di cambiare gli utensili di taglio quando il motore
è in moto, in quanto questo potrebbe causare lesioni gravi.
1. Posate l’unitá motrice su di una superfice piana
2. Assicuratevi che il morsetto di bloccaggio (10) sia allentato
3. Rimuovete la copertura di fondo (11) dall’albero dell’utensile
necessario
4. Posizionate l’albero con il foro di bloccaggio più in alto
5. Premete il perno di bloccaggio della copertura (9) e fate scivolare
completamente l’albero dentro l’unitá di azionamento per
l’accoppiamento (8)
6. Rilasciate il coperchio del perno di bloccaggio e cercate di tirare
in modo fermo il perno dall’accoppiamenton per controllare se il
perno di controllo è impegnato
7. Ora stringete il morsetto di bloccaggio
Disinserite un utensile da taglio
1. Girare il morsetto di bloccaggio (10) in senso anti orario per allentare
l’accoppiamento
2. Premete il perno di bloccaggio della copertura (9) e fate scivolare
completamente l’albero fuori dall’accoppiamento (8)
www.silverlinetools.com
41

I
Uso del tagliasiepi
• Prima di tutto inserite il tagliasiepi come descritto nella sezione
“Montaggio degli utensili da taglio”.
Aggiustamento della testa del tagliasiepi
• Il perno di cerniera permette un’aggiustamento di 180° dell’angolo
della lama.
• Premete insieme le due levette di aggiustamento (20) e ruotate la testa
del tosaerba all’angolo desiderato.
• Rilasciate le levette di aggiustamento e controllate che la levetta sia
impegnata con il dente del perno di cerniera.
Prima di avviare il motore
Controllate le connessioni:
• Assicuratevi che il tagliasiepi sia attaccato in modo sicuro all’unitá
motrice.
• Assicuratevi che la testa del tagliasiepi sia fissata in modo sicuro
all’angolo desiderato.
Controllate la lama:
1. Rimuovete i manicotti di protezione dalla lama.
2. Controllate che la lama sia lubrificata adeguatamente. Se la lama
appare asiutta, applicare uno spray leggero o gocce di olio multiuso
alla base del dente.
Avviare il motore
• Assicuratevi che la lama del tagliasiepi sia sollevata e libera da ogni
ostruzione- quando il motore è acceso e voi spremete la valvola a farfalla,
la lama si attiverà.
• Accendete il motore seguendo le istruzioni nella sezione “Avviamento del
motore”. (p. 41)
Taglio
ATTENZIONE: usare il tagliasiepi correttamente è un’abilitá tecnica. Una
siepe rappresentata qui sotto è per carattere generale. Se non siete sicuri
della vostra capacitá di usare questo strumento correttamente, NON
USATELO.
• Mantenere sempre un appoggio sicuro. Se non è possibile raggiungere
l’area di taglio in maniera sicura, non tagliate.
• Non sbilanciatevi o cercate di tagliare attraverso più vegetazione che lo
strumento sia in grado di fare in un colpo unico.
• Indossate l’equipaggiamento protettivo corretto per il lavoro. Occhiali di
sicurezza, guanti di sicurezza, protezione per le orecchie e abbigliamento
protettivo sono essenziali e devono essere sempre indossati durante
il taglio.
• Tenete sempre lo strumento con due mani
PERICOLO: Non impugnate mai il tagliasiepi dalla lama o dai manicotti
protettivi.
Uso del tagliaerba e del
decespugliatore
• Per installare il tagliaerba o il decespugliatore, fate riferimento alla
sezione “Montaggio degli utensili da taglio”.(p. 41)
Sicurezza d’uso
ATTENZIONE: non usarlo senza il dispositivo della lama in posizione.
• Cercate un angolo dove potete operare la macchina in modo che si adatti
al vostro corpo.
• Tenete sempre lo strumento con due mani. Usate la maniglia ausiliaria
(31) per avere controllo dello strumento.
• Non usatela prima che abbiate ispezionato l’area di lavoro per sassi ed
altri ostacoli che possono causare rischi.
• Attenzione che il filo di nylon e la lama con punta per taglio a spazzola
ruotino in una direzione oraria. Ricordatevelo quando tagliate o tosate.
• Per scalpare e bordare, inclinate il taglio ad angolo ripido ed in una
posizione in modo che detriti, sporco e pietre verranno gettati lontano
da voi.
Prima di avviare il motore
• Assicuratevi che l’albero sia attaccato all’unitá motrice.
• Assicuratevi che la testa del taglio sia sollevato da terra e senza
ostruzioni- quando il motore è in moto e voi stringete la valvola a farfalla,
la taglierina funzionerà.
Accendere il motore
Accendete il motore seguendo le istruzioni nella sezione “Avviamento del
motore”. (p. 41)
Taglio
• Quando muovete il decespugliatore su aree sterili, fate attenzione a pietre
ed altri detriti che possono venire gettati in aria ad alta velocità.
Taglio dell’erba
• Quando tagliate l’erba, mantenete l’angolo del tosaerba leggermente
angolato. Questo ridurrá l’ammontare di detriti che vengono spostati
all’indietro.
• Tagliate l’erba in più fasi. Non cercate mai di tagliare l’erba fino ad un
altezza lavorabile in un colpo solo. Questo ridurrá il carico di lavoro sulla
bobina e sul motore.
• Se si taglia attraverso delle erbacce, mantenete il filo di nylon il più
possibile all’altezza delle radici delle erbacce. Le erbacce sono più sottili
alla radice e causeranno meno usura al filo di nylon.
• Il filo della bobina ha un sistema di alimentazione ad urto. Per avere più
filo, urtate gentilmente la base del tosaerba contro il terreno e la bobina
rilascerá il filo del tosaerba.
• Per sostituire il filo da taglio, fate riferimento alla sezione “Istruzioni sulla
bobina”, (P. 44)
Uso della motosega
• Per inserire la motosega, fate riferimento alla sezione “Montaggio degli
utensili da taglio”. (p. 41)
Controllo della tensione della catena
• Ruotate la vite a tensione della catena (25) in senso orario, fino a che vi
sono solamente circa 5 mm di allentamento quando la catena viene tirata
verticalmente dal centro della barra di taglio.
NOTARE: la tensione della catena dovrebbe essere controllata
regolarmente. La catena si estenderá quando in uso. Una catena troopo
allentata può deragliare, una catena troppo tirata si logorerá presto e si
potrebbe rompere.
Riempimento del serbatoio dell’olio
• Questa macchina è equipaggiata con un serbatoio dell’olio (1).
• L’olio viene alimentato automaticamente nella catena mentre si usa la
sega. Se si usa la sega senza olio, o con un olio sbagliato, si logorerá
presto e potrebbe portare alla rottura della catena.
• Controllate che il serbatoio dell’olio sia sempre riempito in modo
appropriato prima dell’uso.
• Usate solo olio di buona qualitá (W 30). Non cercate di usare olio per
motore, olio per motori a due tempi, o ogni altro tipo di lubrificante
alternativo.
• Per aggiungere olio, spegnete il motore e rimuovete il cappuccio del
serbatoio dell’olio. Riempite il sebatoio con l’olio. Rimettete il cappuccio.
• Non lasciate che il serbatoio funzioni a secco durante l’uso.
Abbigliamento ed equipaggiamento protettivo
I seguenti devono essere indossati sempre quando si usa la motosega:
• Giacca di protezione conforme a EN381-11 Classe 0. Per fornire
protezione attraverso le spalle, braccia e la zona frontale.
• Pantaloni protettivi conformi a EN381-5 Classe 1.
• Guanti per motosega conformi a EN381-7 Classe 0. Tali guanti aiutano a
prevenire slittamenti e incorporano un materiale anti-taglio speciale sul
dorso della mano.
• Elmetto con visiera completa e protezione per le orecchie.
• Stivali protettivi per lotoseghe con suola in acciaio e puntale.
42

633770
Sistema di giardinaggio a più testine 25 cm³
Prima di avviare il motore
• Assicuratevi che l’albero sia attaccato all’unitá motrice.
• Assicuratevi che la testa della motosega sia sollevata da terra e senza
ostruzioni- quando il motore è in moto e voi stringete la valvola a farfalla,
la motosega funzionerà.
Avviare il motore
• Accendete il motore seguendo le istruzioni nella sezione “Avviamento
del motore”.
Taglio
ATTENZIONE: usare la motosega correttamente è un’abilitá tecnica. Una
motosega usata in modo errato può essere estremamente pericolosa. Le
informazioni qui sotto sono solo a carattere generale. Se non siete sicuri
della vostra capacitá di usare questo strumento correttamente, NON
USATELO.
• Mantenere sempre un appoggio sicuro. Se non è possibile raggiungere
l’area di taglio in maniera sicura, non tagliate.
• Valutate attentamente il modo più sicuro per tagliare, fate riferimento a
“Evitare il contraccolpo”. Ogni taglio fatto con la motosega è unico, ogni
taglio presenta le proprie considerazioni di sicurezza. Considerate sempre
come si può muovere il legno o cadere una volta tagliato. Accertatevi che
il legno non cada o rotoli verso di voi, e la lama non resti intrappolata.
• Tenete sempre la motosega in modo sicuro, tenendo dritto il vostro
braccio sinistro in quanto è pratico. Non sollevate la sega oltre l’altezza
del petto.
• Tenete sempre lo strumento con due mani. Usate la maniglia ausiliaria
(31) per avere controllo dello strumento.
• Con la sega a piena velocitá abbassate la lama nel legno. Usate sempre
la parte della barra di taglio più vicina al corpo della macchina.
• Permettete alla lama di lavorare constantemente attraverso il legno. Non
dovrebbe essere necessario usare la forza per far tagliare la sega. Un
taglio lento denota una lama smussata.
• Non permettete alla lama di toccare il terreno, o altri oggetti oltre che
quello che intendete tagliare.
• Rilasciate la valvola a farfalla (5) appena il taglio è completato.
• Fare andare il motore a tutto gas senza un peso, causerá una logorazione
rapida del motore, la catena della sega, e la barra di guida.
Evitare il contraccolpo
• Il contraccolpo viene generalmente causato quando il dente della catena
vicino alla barra di taglio “morde” un oggetto solido. La forza di reazione
risultante potrebbe fare accellerare la sega violentemente avanti ed
indietro, verso l’utente.
• La catena fornita con la motosega è stata ideata con delle caratteristiche
che riducono il contraccolpo. Tuttavia, questo non voul dire che il
contraccolpo non avverrà e dovete stare attenti al contraccolpo in ogni
momento. L’uso con attenzione è la migliore garanzia di sicurezza.
Manutenzione
NOTA: Una manutenzione regolare è essenziale per prolungare la vita
dell’utensile. Senza manutenzione regolare e corretta conservazione la vita
dello strumento si ridurrá considerevolmente. Spegnete sempre il motore,
e permettetegli di raffreddarsi, prima di fare qualsiasi pulizia/ manutenzione.
• Assicuratevi che tutte le viti ed i bulloni siano stretti in modo fermo in
modo che l’unitá possa essere usata in modo sicuro.
• Non usare mai l’utensile se qualsiasi parte appare logorata o rotta. In
questo caso, consultate il vostro rivenditore.
• Non cercate di alterare qualsiasi componente di questo utensile. Se fate
questo INVALIDATE LA VOSTRA GARANZIA, MA PUO’ ANCHE CAUSARE
DANNI ALL’UNITA’, A VOI STESSI O ALTRI NELLE VICINANZE.
Regolazione del motore
Quando regolato in modo appropriato, il motore dovrebbe andare al minimo
senza problemi ed accellerare senza esitazioni. La lama o la bobina non
dovrebbero muoversi quando il motore è al minimo.
• Per rendere il motore al minimo ad una velocitá superiore, ruotate la vite
di regolazione del minimo (16) in senso orario.
• Per rendere il motore al minimo ad una velocitá inferiore, ruotate la vite di
regolazione del minimo (16) in senso anti orario.
Pulizia del filtro dell’aria (Fig D)
Il filtro dell’aria (12) dovrebbe essere pulito regolarmente. Per accedere
al filtro:
1. Svitare e sganciare il coperchio del filtro.
2. Rimuovere il filtro dal contenitore e lavarlo con attenzione con sapone
detergente ed acqua.
3. Asciugate il filtro, ed usate liberamente olio multiuso.
4. Rimontate prima di usare lo strumento.
Controllo della candela di accensione
• Rimuovete il coperchio della candela di accensione.
• Pulite dallo sporco e residui intorno alla candela.
• La chiave a tubo è in dotazione per rimuovere la candela da ispezionare.
• Se il problema persiste, contattate il vostro rivenditore o un tecnico
qualificato.
Motosega - manutenzione della catena
• Per allungare la vita della catena della sega e l’efficienza della sega,
affilate i denti regolarmente. Questo dovrebbe essere fatto solamente da
una persona qualificata e d’esperienza.
• Se i denti si logorano dopo l’uso, la catena dovrebbe essere sostituita.
Consultate il vostro rivenditore o un tecnico qualificato e con esperienza.
Albero
• Applicate grasso regolarmente agli ingrassatori della motosega ed il
tagliasiepi, secondo l’uso- per esempio, all’inizio ed alla fine di ogni
stagione.
Immagazzinaggio
• Permette al motore di raffreddarsi prima di riporre l’utensile.
• Tenete tutte le parti in un posto pulito ed asciutto lontano da calore e luce
diretta del sole. Assicuratevi che tutti gli articoli siano tenuti lontano dalla
portata dei bambini.
• Non conservate mai l’unitá dove il serbatoio può essere esposto a fonti
di calore estreme, o dove fumi di benzina possono venire in contatto con
fiamme o scintille.
• Mantenete l’area libera da detriti e possibili rischi di inciampo.
• Assicuratevi che tutte le teste siano pulite e che i manicotti di protezione
siano in posizione.
Stoccaggio prolungato
Se mettete lo strumento in stoccaggio prolungato, oltre alle cose elencate
sopra dovete:
• Diluire del detergente in acqua calda ed usando un panno umido, pulire il
contenitore in plastica del corpo principale.
• Scolare tutto il carbuarnte dal serbatoio del carburante (14) in modo
sicuro ed assicurarsi che il tappo del carburante sia posizionato in modo
fermo.
• Rimuovete la candela di avviamento e versate un cucchiaino di olio pulito
nel cilindro della spina. Sostituite e ricollegate la candela di avviamento.
• A motore spento, tirate lentamente la maniglia della starter per rivestire
di olio il motore.
Drenaggio e smaltimento
• Se dovete drenare del carburante dal serbatoio, fatelo all’aperto e solo
quando il motore è freddo.
• Per rispettare l’ambiente, non smaltite alcun carburante o olio drenato
dalla macchina nel sistema di drenaggio o terreno. Siti per il riciclaggio
e stazioni di servizio locali hanno le giuste strutture per disporre di tali
materiali e solo in tali posti bisognerebbe disporre tali prodotti. Se non
sapete l’ubicazione del vostro deposito più vicino, contattate la vostra
autoritá locale per informazioni.
www.silverlinetools.com
43
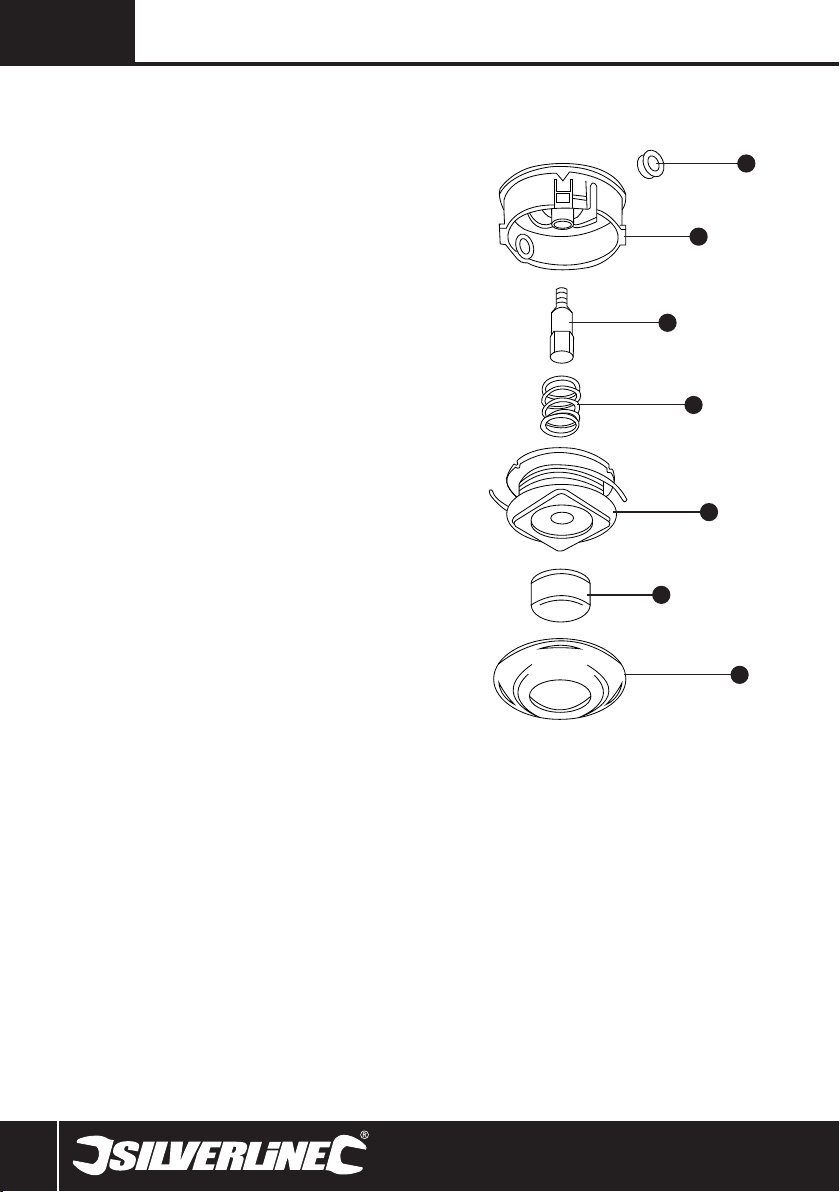
I
Istruzioni sulla bobina
1) Occhiello (x2)
2) Custodia
3) Bullone pergolato
4) Molla
NOTA : Il funzionamento con la fienaia di irregolare lunghezza aumenterà
le vibrazioni. assicurarsi sempre che la bobina sia ben arrotolata in modo
uniforme e tagliata per pari lunghezze dalla Occhielli (1).
1. Premere le linguette della custodia e torsione la copertura di rilascio.
Togliere il coperchio e pulsante
2. Rimuovere la bobina e la molla
3. Pulire tutti i componenti e controllare per danni. Sostituire tutti gli
elementi danneggiati
4. Controllare che gli occhielli sono nella loro posizione corretta
ATTENZIONE: Non usare mai la falce senza gli occhielli (1).
5. Far passare la nuova linea attraverso l’ancoraggio a la bobina finché
la lunghezza delle righe sono uguali. Non superare la capacità
massima della bobina vedi tabella sotto
6. Tenendo la bobina (5) con il morsetto del foro linea più in alto,
spostare la linea in senso orario nella bobina con un dito per
mantenere le due linee separate
7. Bloccare le due estremità della linea nel primo foro del morsetto
blocca linea
8. Posizionare la molla (4) al di sopra il bullone pergolato(3)
9. Con i fori del morsetto blocca linea rivolti verso il basso nella
scatola, infilare le estremità della linea attraverso l’occhiello (1) nella
custodia. non permettendo alla linea di impigliarsi nella bobina
10. Posizionare il pulsante a sbatto (6) nel centro della bobina
11. Sostituire il coperchio (7), allineare le linguette e poi farla girare in
modo che le linguette si inseriscono con le fessure del coperchio
12. Tirare libera la linea dai fori di serraggio
13. Verificare che un massimo di 100 - 125mm di linea si estende
ugualmente da ogni occhiello. Tagliare linea, se necessario
5) Bobina
6) Pulsante di sbatto
7) Copertura
1
2
3
4
5
6
7
44

633770
Sistema di giardinaggio a più testine 25 cm³
Garanzia Silverline Tools
Questo prodotto Silverline è protetto da una
garanzia di 3 anni
Per attivare la garanzia di 3 anni è necessario registrate il prodotto sul
sito www.silverlinetools.com entro 30 giorni dalla data d'acquisto. La data
d'inizio del periodo di garanzia corrisponde alla data d'acquisto riportata
sullo scontrino di vendita.
Condizioni Della Garanzia
Il periodo di garanzia decorre dalla data dell’acquisto presso il rivenditore
indicata sulla ricevuta d’acquisto.
SI PREGA DI CONSERVARE LA RICEVUTA D'ACQUISTO
Nel caso in cui il prodotto risultasse difettoso entro 30 giorni dalla data
d’acquisto, sarà necessario restituirlo al punto vendita presso cui è stato
acquistato, presentando la ricevuta e spiegando chiaramente la natura del
difetto riscontrato. Il prodotto difettoso sarà sostituito o sarà rimborsato
l'importo d'acquisto.
Nel caso in cui il prodotto risultasse difettoso dopo 30 giorni dalla data
d’acquisto, sarà necessario inviare una richiesta di indennizzo in garanzia
a:
Silverline Tools Service Centre
PO Box 2988
Yeovil
BA21 1WU, GB
Le richieste di indennizzo devono essere presentate durante il periodo
della garanzia.
Affinché la richiesta sia approvata, è necessario presentare anche la
ricevuta d’acquisto originale, indicante il luogo e la data dell’acquisto del
prodotto e il proprio nome e indirizzo.
Sarà necessario inoltre fornire una descrizione dettagliata del guasto
riscontrato.
Le richieste effettuate durante il periodo di garanzia saranno verificate da
Silverline Tools per stabilire se il difetto del prodotto è dovuto a problemi di
materiali o di lavorazione.
Le spese di spedizione non saranno rimborsate. Tutti i prodotti devono
essere spediti puliti e in condizioni tali da garantire l'esecuzione della
riparazione in modo sicuro. I prodotti devono essere imballati con cura
per evitare danni o lesioni durante il trasporto. Silverline Tools si riserva
il diritto di non accettare prodotti spediti in condizioni non idonee o non
sicure.
Le riparazioni saranno eseguite da Silverline Tools o da un centro di
riparazione autorizzato.
La riparazione o la sostituzione del prodotto non estende o rinnova il
periodo di garanzia.
Nel caso in cui determini che il prodotto e il difetto riscontrato sono coperti
dalla garanzia, Silverline Tools provvederà a riparare l'utensile
Dichiarazione di Conformità CE
Il sottoscritto: Mr Darrell Morris
come autorizzato di: Silverline Tools
Dichiara che il prodotto:
Nome/Modello: Sistema di giardinaggio a più testine 25 cm³
Tipo/Numero di serie: 633770
Si conforma ai seguenti direttivi:
• Direttiva macchina 2006/42/EC
• Direttiva sulla compatibilità elettromagnetica 2004/108/CE
• Direttiva sulle emissione dei motori delle macchine mobili non
stradali 97/68/EC
• EN ISO11806:2008
• EN ISO11680-1:2008
• EN ISO10517:2009
• EN ISO14982:1998
Registrazione dell'acquisto
Accedere al sito: silverlinetools.com e selezionare il tasto Registrazione
per inserire:
• Informazionipersonali
• Dettaglidelprodottoeinformazionisull'acquisto
Il Certificato di Garanzia sarà inviato per posta elettronica nel formato
PDF. Si prega di stampare e conservare il Certificato insieme alla ricevuta
d'acquisto.
gratuitamente (esclusi i costi di spedizione) o, a propria discrezione, a
sostituirlo con un nuovo utensile.
Gli utensili o le parti trattenuti da Silverline Tools in cambio di un prodotto o
componente sostitutivo diventano proprietà di Silverline Tools.
La riparazione o la sostituzione di un prodotto in garanzia estende i diritti
del consumatore previsti per legge, senza modificarli.
Cosa copre la garanzia:
La riparazione del prodotto, nel caso in cui Silverline Tools determini che il
problema sia dovuto a difetti dei materiali o difetti di lavorazione riscontrati
durante il periodo della garanzia.
Nel caso in cui un componente non sia più disponibile o fuori produzione,
Silverline Tools si riserva il diritto di sostituirlo con un componente
adeguato.
Prodotti acquistati e utilizzati all’interno dell’Unione Europea.
Cosa non copre la garanzia:
La Garanzia Silverline Tools non copre le riparazioni se il difetto è stato
causato da:
La normale usura dei componenti per via dell’utilizzo del prodotto come
indicato nelle istruzioni d’uso (ad esempio, lame, spazzole, cinghie,
lampadine, batterie, ecc.).
La sostituzione di accessori forniti a corredo, come ad esempio punte,
lame, fogli abrasivi, dischi di taglio e altri componenti correlati.
I danni accidentali, causati dall'uso improprio, dall'abuso e dalla
manipolazione, conservazione e cura inadeguata dell'utensile da parte del
proprietario.
L’uso del prodotto per fini non domestici.
La modifica o alterazione del prodotto.
Difetti causati dall’uso di parti e accessori che non siano componenti
originali Silverline Tools.
Installazione difettosa (fatto salvo quando l'installazione viene eseguita da
Silverline Tools).
Riparazioni o alterazioni eseguite da terze parti che non siano la Silverline
Tools o i centri di riparazione autorizzati da quest'ultima.
Silverline Tools non fornisce alcuna garanzia per le richieste formulate per
la correzione dei difetti dell'utensile oggetto della garanzia fatto salvo per
quanto previsto nelle condizioni di cui sopra.
La documentazione tecnica è mantenuta da: Silverline Tools
Organismo informato: Intertek Testing Services
Posto di dichiarazione: Shanghai, Cina
Data: 09/05/11
Firma:
Direttore
Nome e indirizzo del fabbricante oppure persona autorizzata:
Silverline Tools, Boundary Way, Lufton Trading Estate, Yeovil, Somerset, BA22
8HZ, Regno Unito
www.silverlinetools.com
45
NL
Beschrijving symbolen
Op het gegevensplaatje van uw gereedschap kunnen zich symbolen
bevinden. Deze symbolen belangrijke informatie over het product of
instructies voor het gebruik.
Draag gehoorbescherming
Draag een veiliggheidsbril
Draag een stofmasker
Draag een veiligheidshelm
Draag handschoenen
Lees de handleiding
Gebruik geen benzinegereedschap bij risico op ontploffing of
brand van brandbare materialen, vloeistoffen, gassen of stof
van explosieve aard.
Als de motor heeft gedraaid zal hij heet zijn. NIET AANRAKEN.
Uitlaatgassen bevatten koolmonoxide, een giftig gas.
Blootstelling daar aan kan tot bewustzijnsverlies en zelfs de
dood leiden
Voldoet aan de relevante wetgeving en veiligheidsnormen
Specificaties
Motor: ......................................... 25,4 cm³
Vermogen: .................................. 0.85 kW/8,500 min
Brandstof: ................................... Ongelood/2 takt mix
(40:1)
Brandstoftank capaciteit: ............ 0,6 L
Bougie type: ................................ TORCH BM6A
Laagste motorsnelheid: ............... 3.000 min
Onbelaste snelheid: ......................11.000 min
Trim wijdte: ................................. 254 mm voor
maaiblad 410 mm
voor trimmerspoel
Vibratie
- Laagste snelheid: .................. 2,32/2,78 m/s²
- Hoogste snelheid: .................. 3,64/3,89 m/s²
Geluidsdruk: ................................ 91 dB (A)
Geluidsvermogen: ....................... 106 dB (A)
Gewicht: ...................................... 11,8 kg
De geluidsintensiteit voor de bediener kan 85 db(A)
overscheijden en de gehoorbescherming is noodzakelijk.
Met het oog op onze aanhoudende productontwikkeling
kunnen de specificaties van Silverline producten zonder
voorafgaande kennisgeving worden gewijzigd.
-1
-1
Lees voor gebruik deze handleiding en alle etiketten op het gereedschap
zorgvuldig na. Bewaar deze handleiding bij het product voor toekomstig
gebruik. Zorg ervoor dat iedereen die dit product gebruikt, de handleiding
heeft doorgenomen.
Zelfs indien het gereedschap wordt gebruikt volgens de aanwijzingen, is
het onmogelijk om alle risicofactoren te elimineren. Wees dus voorzichtig.
Gebruik dit gereedschap niet als u twijfelt aan de juiste en veilige
gebruikswijze.
Algemene veiligheid voor
elektrisch gereedschap
WAARSCHUWING Lees alle bediening- en veiligheidsvoorschriften.
Het niet opvolgen van alle voorschriften die hieronder vermeld staan, kan
resulteren in een elektrische schok, brand en/of ernstig letsel.
Bewaar deze voorschriften voor toekomstig gebruik.
De term “elektrisch gereedschap” in alle hieronder vermelde
waarschuwingen heeft betrekking op uw elektrische gereedschap dat op
de stroom is aangesloten (met een snoer) of met een accu wordt gevoed
(snoerloos).
Veiligheid in de werkruimte
a) Houd de werkruimte schoon en zorg voor een goede verlichting.
Rommelige en donkere ruimtes leiden vaak tot ongelukken.
b) Werk niet met elektrisch gereedschap in explosieve omgevingen,
bijvoorbeeld in de aanwezigheid van ontvlambare vloeistoffen,
gassen of stof. Elektrisch gereedschap brengt vonken teweeg die stof
of dampen kunnen doen ontbranden.
c) Houd kinderen en omstanders uit de buurt wanneer u elektrisch
gereedschap bedient. Door afleiding kunt u de controle over het
gereedschap verliezen.
-1
Persoonlijke veiligheid
a) Blijf alert en gebruik uw gezonde verstand wanneer u elektrisch
gereedschap bedient. Gebruik het elektrisch gereedschap niet
wanneer u vermoeid bent of onder invloed bent van drugs,
alcohol of medicijnen. Onoplettendheid tijdens het bedienen van
elektrisch gereedschap kan leiden tot ernstig letsel.
b) Maak gebruik van persoonlijke bescherming. Draag altijd een
veiligheidsbril. Passende bescherming voor de omstandigheden,
zoals een stofmasker, niet-slippende veiligheidsschoenen een helm of
gehoorbescherming, vermindert het risico op persoonlijk letsel.
c) Zorg ervoor dat het apparaat niet per ongeluk wordt gestart.
Controleer of de schakelaar in de ‘uit’ stand staat voordat u
de stekker in het stopcontact steekt. Het dragen van elektrisch
gereedschap met uw vinger op de schakelaar of het aansluiten op de
stroom van elektrisch gereedschap met de schakelaar ingeschakeld
kan tot ongelukken leiden.
d) Verwijder alle stel- of moersleutels voordat u het elektrische
gereedschap inschakelt. Een moer- of stelsleutel die zich op een
draaiend onderdeel van het elektrische gereedschap bevindt, kan
leiden tot letsel.
e) Reik niet te ver. Blijf altijd stevig en in balans staan. Zo houdt
u meer controle over het elektrische gereedschap in onverwachte
situaties.
f) Draag geschikte kleding. Draag geen loshangende kleding of
sieraden. Houd haren, kleding en handschoenen uit de buurt van
bewegende delen. Loshangende kleding, sieraden en los hangende
haren kunnen vast komen te zitten in bewegende delen.
g) Als er onderdelen voor stofafvoer- en stofverzameling worden
meegeleverd, sluit deze dan aan en gebruik deze op de
juiste wijze. Het gebruik van deze onderdelen kan het risico op
stofgerelateerde ongelukken verminderen.
Gebruik en verzorging van elektrisch gereedschap
a) Forceer elektrisch gereedschap niet. Gebruik elektrisch
gereedschap dat geschikt is voor het werk dat u wilt uitvoeren.
Geschikt elektrisch gereedschap werkt beter en veiliger op een
passende snelheid.
46

633770
Multi-kop bezinetrimmer
b) Gebruik het elektrische gereedschap niet als de schakelaar van
het apparaat niet in- en uitschakelt. Elektrisch gereedschap dat
niet bediend kan worden met de schakelaar is gevaarlijk en moet
gerepareerd worden.
c) Haal de stekker uit het stopcontact voordat u instellingen
aanpast, toebehoren verwisselt of het elektrische gereedschap
opbergt. Dergelijke voorzorgsmaatregelen verminderen het risico op
het per ongeluk starten van het elektrische gereedschap.
d) Berg elektrisch gereedschap dat niet in gebruik is op buiten
bereik van kinderen en laat mensen die niet bekend zijn met het
elektrische gereedschap of met deze instructies het elektrische
gereedschap niet bedienen. Elektrisch gereedschap is gevaarlijk in
de handen van onervaren gebruikers.
e) Onderhoud uw elektrisch gereedschap. Controleer op foutieve
uitlijning of het vastslaan van bewegende delen, gebroken
onderdelen en elke andere afwijking die de werking van het
elektrische gereedschap zou kunnen beïnvloeden. Indien
het elektrische gereedschap beschadigd is, moet u het laten
repareren voordat u het weer gebruikt. Veel ongelukken worden
veroorzaakt door slecht onderhouden elektrisch gereedschap.
f) Houd snijwerktuigen scherp en schoon. Goed onderhouden
snijwerktuigen met scherpe messen slaan minder snel vast en zijn
gemakkelijker te bedienen.
g) Gebruik het elektrische gereedschap, de accessoires en
onderdelen, etc. volgens deze instructies en volgens bestemming
voor het specifieke type elektrisch gereedschap, en houd daarbij
rekening met de werkomstandigheden en het uit te voeren
werk. Gebruik van elektrisch gereedschap voor werkzaamheden die
verschillen van die waarvoor het apparaat bestemd is, kan leiden tot
gevaarlijke situaties.
Onderhoud
a) Laat uw elektrische gereedschap onderhouden door een
gekwalificeerde vakman en gebruik alleen identieke
vervangstukken. Zo bent u er zeker van dat de veiligheid van het
elektrische gereedschap gewaarborgd blijft.
Veiligheid interne verbranding
Gevaarlijke omgeving
• Gebruik geen benzinegereedschap in vochtige of natte omstandigheden,
en stel het niet bloot aan regen. Zorg voor voldoende werkruimte
en verlichting. Gebruik gereedschap op benzine niet op platsen
met ontproffings- of brandgevaar omwille van brandbaar materiaal,
vloeistoffen, gassen of stof van explosieve aard.
Bescherm uw gehoor
• Draag altijd geschikte gehoorbescherming bij gereedschap dat
een geluidsniveau van meer dan 80 dB produceert. Het is de
verantwoordelijkheid van de gebruiker om ervoor te zorgen dat andere
mensen in de buurt waar het gereedschap wordt gebruikt ook goed zijn
beschermd.
Bescherm uw ogen
• Draag geschikte bescherming voor uw ogen
Bescherm uzelf tegen trillingen
• Elektrisch handgereedschap kan trillingen veroorzaken. Trillingen
kunnen ziektes veroorzaken. Handschoenen die de handen van de
bediener warmhouden kunnen een goede circulatie van het bloed in de
vingers bevorderen. Gebruik handgereedschap niet langdurig zonder
onderbreking.
Uitzetten alvorens iets aan te sluiten
• Zorg ervoor dat de motor is gestopt voordat u toebehoren aan het
gereedschap wordt aangelsoten. Als het gereedschap onverwacht stopt,
wacht dan tot de motor niet langer draait voordat u het gereedschap
inspecteert.
Inlopen van de motor
• Laat de motor wanneer het gereedschap nieuw is op een matig toerental
draaien.
• Laat de motor pas op volle toeren draaien als hij volledig is ingelopen.
• De motor zal pas aan het eind van de inloopperiode op maximaal
vermogen lopen.
• Wanneer u het gereedschap voor het eerst gebruikt, controleer dn eerst
of alle bouten en moeren goed zijn aangedraaid en draai ze zo nodig
alsnog aan.
• Gebruik geen brandstof die methanol of ethanol bevat aangezien dit de
brandstoftank en de brandstofleidingen intern kan beschadigen.
Waarschuwing
• Laat het gereedschap nooit achter wanneer deze ingeschakeld is
• Laat het gereedschap nooit achter wanneer onderdelen heet zijn
Onderhoud
• Wij raden aan om het gereedschap kort na het eerste gebruik een
onderhoudsbeurt te laten geven.
• Zorg bij normaal gebruik regelmatig voor een onderhoudsbeurt.
• Modificeer de onderdelen van dit gereedschap niet. Daarmee vervalt
niet alleen de garantie maar het kan tevens leiden tot letsel aan uzelf of
mensen om u heen.
• Onderhoud moet altijd worden uitgevoerd door een bevoegd
servicecentrum.
Opbergen
• Maak het gereedschap na gebruik helemaal schoon.
• Zorg ervoor dat u de brandstoftank en de brandstofleidingen niet raakt of
beschadigt als u het toestel op de grond is geplaatst.
• Laat het gereedschap niet vallen, het kan beschadigd raken en onveilig
kan worden.
• Sla het gereedschap buiten bereik van direct zonlicht op.
• Zorg ervoor dat brandstof en olie op een veilige plaats worden
opgeslagen, buiten bereik van hitte, direct zonlicht, ontstekingsbronnen
en kinderen.
Doe het volgende als de machine gedurende langere tijd niet in gebruik is:
• Maak de brandstoftank volledig leeg.
• Bescherm alle metalen motoronderdelen tegen roestvorming door ze in
te smeren met olie.
• Verwijder de bougie, doe een paar druppels olie in de cilinder en trek 2 of
3 maal aan het startkoord om de olie gelijkmatig te distribueren.
• Breng de bougie weer aan.
• Laat de machine nooit onbeheerd achter als er kinderen bij kunnen.
ZODRA DE MOTOR DRAAIT PRODUCEERT DIT PRODUCT GIFTIGE
UITLAATGASSEN. DEZE GASSEN KUNNEN KLEUR- EN GEURLOOS ZIJN. OM
HET RISICO OP ERNSTIG OF DODELIJK LETSEL TE VERMINDEREN MAG
DE MACHINE NOOIT BINNEN OF IN SLECHT GEVENTILEERDE RUIMTEN
WORDEN GEBRUIKT. ZORG VOOR GOEDE VENTILATIE BIJ HET WERKEN IN
GREPPELS OF ANDERE BESLOTEN RUIMTEN.
www.silverlinetools.com
47

NL
Productbeschrijving
1 Reservoir kettingolie
2 Beschermkap voor kettingolie
3 Borgbout beschermkap
4 Contactschakelaar
5 Gashendel
6 Veiligheidsschakelaar
7 Handvat
8 Koppeling aandrijfeenheid
9 Afdekking grendelpen
10 Vergrendelingsklem
11 Eindkap
12 Luchtfilter
13 Startkoord
14 Brandstoftank
15 Chokehendel
16 Stationaire stelschroef
17 Primer
18 Brandstofleidingen
19 Trimmerkap
20 Stelhendels (heggenschaar)
21 Trimmerspoel
22 Brandstofmengfles
23 Heggenschaar
24 Bosmaaiblad
25 Kettingspanning schroef
26 Kettingzaag
27 Schouderriem
28 Beugels trimmerkap
29 Bosmaaier / trimmerkop
30 Kettingzaag steel
31 Extra handvat
32 Aanhechtpunt voor riem
33 Aandrijfeenheid
Accessoires
Steeksleutel
Inbussleutel
Dopsleutel
Schroevendraaier
Het uitpakken van uw
gereedschap
• Pak uw toestel / gereedschap uit. Inspecteer het en zorg dat u met alle
kenmerken en functies vertrouwd raakt.
• Controleer of alle onderdelen aanwezig zijn en in goede staat verkeren.
Als er onderdelen ontbreken of beschadigd zijn, zorg dan dat deze
vervangen worden voor u dit toestel / gereedschap gebruikt.
Klaarmaken van uw
snoeigereedschap
De trimmerkap bevestigen
1. Schuif de trimmerkap (19) tussen de beugels van de trimmerkap (28)
op de steel.
2. Gebruik de vier meegeleverde zeskantmoeren en bouten om de kap
op de beugel aan de kant van de steel te bevestigen.
Het blad bevestigen
1. Steek een inbussleutel door het vergrendelinggat op de
spindelbehuizing om de spindel te vergrendelen.
2. Gebruik de dopsleutel en de schroevendraaier om de
vergrendelingmoer onderaan de snoeier los te draaien. LET OP: dit is
omgekeerd draad, draai dus linksom om los te draaien.
3. Verwijder de buitenkap en bus van het maaiblad.
4. Steek het blad erin, plaats de bus van het maaiblad en buitenkap
terug en plaats de grendelmoer terug.
De trimmerspoel bevestigen
LET OP: De trimmerspoel wordt via een linkshandige schroefbevestiging op
de spindel bevestigd.
1. Steek een inbussleutel door het vergrendelinggat op de
spindelbehuizing om de spindel te vergrendelen.
2. Gebruik een inbusschroevendraaier (of dopsleutel) om de
vergrendelingsmoer onderaan de snoeier los te draaien. LET OP: dit is
omgekeerd draad, draai dus linksom om los te draaien.
3. Verwijder de buitenkap, bus van het maaiblad en blad (indien
gemonteerd). Laat de kap op de spindelbehuizing zitten.
4. Vergrendel de spindel door de inbussleutel door het vergrendelinggat
te steken.
5. Draai de trimmerspoel op de spindel en draai hem met de hand vast
- niet te vast draaien.
LET OP: De spoel hoeft niet met gereedschap aangedraaid te worden.
De kettingzaag monteren
1. Schroef de grendelpen in de koppeling van de kettingzaag los.
2. Verwijder de eindkap (11) van het ene einde van de steel van de
kettingzaag (30) en steek hem volledig in de koppeling van de
kettingzaag zodat de aandrijfas ineengrijpt.
3. Zet het pengat in de steel in lijn met de vergrendelingspen en draai de
pen aan om de steel op zijn plaats te vergrendelen.
4. Verwijder de eindkap van het andere einde van de steel van de
kettingzaag, bevestig de bescherming voor kettingolie (2) op de steel
van de kettingzaag en plaats dan de eindkap weer terug.
5. Plaats de kap over de steel tot aan de koppeling met de kettingzaag
en zet hem vast (fig. A) door de borgbout van de beschermkap (3)
aan te draaien.
48

633770
Multi-kop bezinetrimmer
De aandrijfeenheid klaarmaken
Vullen met brandstof
• De aandrijfeenheid (33) gebruikt een mengsel van ongelode brandstof en
tweetaktolie in een ratio van 40:1.
• Gebruik alleen tweetaktolie op petroleumbasis en ongelode benzine van
goede kwaliteit.
• Meng de brandstof in de meegeleverde brandstofmengfles (22).
• Meng de brandstof niet in de brandstoftank (14).
• Meng alleen zoveel brandstof als u denkt nodig te hebben (LET OP: de
tank heeft een capaciteit van 0,6 liter.
• Plaats de aandrijfinrichting op een stevige, vlakke ondergrond.
• Verwijder de tankdop om de tank te vullen.
• Giet de brandstof er voorzichtig in met behulp van een trechter met een
filter. Vul de tank niet boven het niveau van de basis van de vulnek.
• Doe de tankdop er weer op en schroef hem stevig vast.
• Zorg ervoor dat eventueel gemorste brandstof compleet opgedaan wordt.
• Overtollige brandstof bewaart u in een jerrycan uit de buurt van het
werkgebied en ander brandbaar materiaal.
BELANGRIJKE OPMERKINGEN
• Vul de brandstof altijd op een veilige plek bij, uit de buurt van de
werkplek en hitte- of ontstekingsbronnen. Vermijd contact met de
brandstof. NIET ROKEN
• Vul alleen brandstof bij als de motor gestopt en volledig afgekoeld is.
• Tweetaktbrandstoffen kunnen scheiden. Als u brandstof gebruikt dat u
eerder gemengd heeft, schud de brandstofcontainer dan goed voordat
u de tank vult.
• Verplaats de aandrijfeenheid totdat hij een eind uit de buurt is van de
plek waar u de brandstof erin gedaan heeft, voordat u de motor start.
De motor starten
Inlopen
• Als u de aandrijfeenheid voor het eerst gebruikt is het belangrijk dat u de
motor eerst in laat lopen. Hierdoor verbetert de efficiëntie van de motor,
de prestatie en gaat hij langer mee.
• Om de motor in te lopen, laat u de motor de eerste keer ongeveer 15
minuten stationair draaien, met minimaal gebruik van de gashendel.
VERHOOG DE SNELHEID IN DIT TIJDSBESTEK INDIEN MOGELIJK NIET
LET OP: Het is normaal dat u tijdens het inlopen een bepaalde geur
waarneemt. Dit komt omdat de componenten voor het eerst warm worden.
Koud starten
• Wij bevelen aan dat u de motor koud start, zonder het maaigereedschap.
Vooral als u hem voor het eerst gebruikt. Als hij eenmaal opgewarmd is,
zet u de motor uit. Bevestig dan het gewenste snoeigereedschap. Zie 'De
snoeihulpstukken bevestigen'
WAARSCHUWING: Zodra de motor loopt, zal hij giftige dampen produceren.
Probeer nooit de motor binnenshuis of in een besloten ruimte te starten.
Draag altijd de juiste veiligheidsbescherming. Voor dit gereedschap dient
u een veiligheidsbril, handschoenen, oorbeschermers, gelaatsmasker
en stevige kleding te dragen. Het dragen van een veiligheidshelm en
-schoenen wordt ook aanbevolen.
1. Plaats de aandrijfeenheid (33) op een stevige, vlakke ondergrond.
2. Druk op de primer (17) totdat u de brandstofleidingen (18) vol ziet
lopen met brandstof (meestal ongeveer 6-12x drukken).
3. Zet de choke (15) in de COLD START-positie (als de motor al warm is,
of als de buitentemperatuur warm is, zet de choke dan in de WARM
START-positie).
4. Zet de contactschakelaar (4) in de 'ON'-positie (dichtste bij het
handvat).
5. Leg één hand op het handvat (7) om de eenheid te stabiliseren.
Controleer of u zonodig de veiligheidsschakelaar (6) en gashendel (5)
kunt u bedienen.
WAARSCHUWING: Wikkel het startkoord niet om uw hand.
1. Grijp de startkoord (13) en trek er hard aan om de motor te starten.
Leid het koord altijd terug en LAAT HET NIET TERUG SCHIETEN.
2. Na een paar keer trekken zal de motor starten.
3. Eventueel kunt u op de veiligheidsschakelaar (6) drukken en de
gashendel (5) licht indrukken om het starten te vergemakkelijken.
4. Als de motor warm wordt, verplaatst u de choke naar de 'OPEN'positie.
5. Houd de motorsnelheid minimaal en laat de motor een paar minuten
langzaam warm worden.
LET OP: Als het erop lijkt dat de motor gaat afslaan, zet u de choke weer in
de 'WARM START'-positie en knijpt u de gashendel in om de motorsnelheid
te verhogen.
De motor stoppen
1. Laat de gashendel (5) los en laat de motor een paar minuten stationair
draaien om af te koelen.
2. Zet de contactschakelaar (4) naar voren naar de STOP-positie.
3. De motor stopt.
LET OP: Als er een snoeihulpstuk bevestigd is, let er dan op dat de spoel
of het blad nog even door kan blijven draaien nadat de motor gestopt is.
Probeer de hulpstukken niet te stoppen; laat ze langzaam tot stilstand
komen.
De schouderbandbevestigen
• Klem de schouderband(27) aan het aanhechtpunt voor de riem (32)
De snoeihulpstukken bevestigen
(fig. C)
WAARSCHUWING: Probeer de snoeihulpstukken niet te vervangen als de
motor nog draait; u kunt ernstige verwondingen oplopen.
1. Leg de aandrijfeenheid op een stevige, vlakke ondergrond.
2. Controleer of de vergrendelingsklem (10) los is.
3. Verwijder de eindkap (11) van de steel van het gewenste hulpstuk.
4. Plaats de steel met het vergrendelingsgat naar boven.
5. Druk op de afdekking van de grendelpen (9) en schuif de steel volledig
in de koppeling van de aandrijfeenheid (8).
6. Laat de afdekking van de grendelpen los en probeer de steel krachtig
uit de koppeling trekken om te controleren of de pen aangrijpt.
7. Draai nu de vergrendelingsklem aan.
Een snoeihulpstuk loskoppelen
1. Draai de vergrendelingsklem (10) linksom om de koppeling los te
draaien.
2. Druk op de afdekking van de grendelpen (9) en trek de steel uit de
koppeling.
De heggenschaar gebruiken
• Bevestig eerst de heggenschaar zoals beschreven bij ‘De
snoeihulpstukken bevestigen'.
De trimmerkop afstellen (fig. F)
• Door het draaischarnier kan de hoek 180° afgesteld worden:
• Druk tegelijk op de twee stelhendels (20) en draai de trimmerkop in de
gewenste hoek.
• Laat de stelhendels los en controleer of de hendel ingrijpt met de tanden
van het draaischarnier.
Voordat u de motor start
Controleer de aansluitingen:
• Controleer of de heggenschaar goed aan de aandrijfeenheid bevestigd is.
• Controleer of de kop van de heggenschaar goed vast zit in de gewenste
hoek.
www.silverlinetools.com
49

NL
De messen controleren:
1. Verwijder de beschermhoes van de messen.
2. Controleer of de messen goed gesmeerd zijn. Als de messen droog
lijken, spuit deze in of breng lichtjes een dunne laag universele olie op
de onderkant van de tanden aan.
De motor starten
• Zorg ervoor dat de messen niet op de grond of andere obstructie liggen;
als de motor loopt en u de gashendel indrukt zullen de messen gaan
bewegen.
• Start de motor volgens de instructies in 'De motor starten' (pagina 49)
Snoeien
WAARSCHUWING: Het is een hele kunst om een heggenschaar goed te
kunnen gebruiken. De onderstaande informatie is slechts een algemene
richtljin. Als u er niet zeker van bent dat u dit gereedschap veilig kunt
gebruiken, GEBRUIK HET DAN NIET.
• Zorg er altijd voor dat u stevig staat. Als u het snoeigebied niet vanuit een
stevige positie kunt bereiken, snoei het dan niet.
• Reik niet boven uw macht of probeer niet door meer begroeiing heen te
snoeien dan het gereedschap in één slag aankan.
• Draag de juiste persoonlijke beschermingsmiddelen voor de klus.
Een veiligheidsbril, veiligheidshandschoenen, oorbeschermers en
beschermende kleding zijn allemaal essentieel en dienen altijd bij het
snoeien te worden gedragen.
• Houd het gereedschap altijd met beide handen vast. Gebruik het extra
handvat (31) om de controle over het elektrische gereedschap te houden.
LET OP: Pak de heggenschaar nooit bij de messen of beschermhoes vast.
De grastrimmer en bosmaaier
gebruiken
• Om de grastrimmer of bosmaaier te bevestigen, zie 'de snoeihulpstukken
bevestigen' (pagina 49)
Veilig gebruik
WAARSCHUWING: Niet gebruiker zonder de mesbescherming.
• Zoek een hoek waarin u de machine makkelijk kunt bedienen.
• Houd het gereedschap altijd met beide handen vast. Gebruik het extra
handvat (31) om de controle over het elektrische gereedschap te houden.
• Ga pas beginnen als u het werkgebied hebt geïnspecteerd op losse
stenen en andere obstakels waarover u kunt struikelen.
• Let er op dat de nylon draad en het mes van de bosmaaier rechtsom
draaien. Houd dit in uw achterhoofd bij het maaien of trimmen.
• Voor aftoppen en randen kantelt u de snoeikop in een scherpe hoek en
in een dusdanige positie dat rommel, losgekomen vuil en stenen van u
af worden geworpen.
Voordat u de motor start
• Controleer of de steel goed aan de aandrijfeenheid bevestigd is.
• Zorg ervoor dat de snoeikop niet op de grond of andere obstructie ligt;
als de motor loopt en u de gashendel indrukt zal het snoeigereedschap
gaan bewegen.
De motor starten
Start de motor volgens de instructies in 'De motor starten'. (pagina 49)
Snoeien
• Als u de bosmaaier over kale grond beweegt, let er dan op dat stenen
en andere voorwerpen met hoge snelheid de lucht in geslingerd kunnen
worden.
Gras trimmen
• Als u trimt houd de trimmerkop dan in een lichte schuine hoek. Zo zal er
minder rommel naar achteren geslingerd worden.
• Trim het gras in delen. Probeer nooit het gras in één keer tot een
werkbare lengte te trimmen. Dit reduceert de werkbelasting op de
lijnspoel en de motor van het gereedschap.
• Als u door een onkruidstengel trimt, houd de nylon lijn dan zo dicht
mogelijk bij de wortel van de stengel. De stengel van het onkruid is
dunner bij de wortel en hierdoor zal de nylon lijn dan ook minder snel
slijten.
• De lijnspoel heeft een aanvoermechanisme dat via schokken werkt. Voor
meer lijn geeft u een lichte tik met de onderkant van de trimmerkop
tegen de grond. De spoel zal dan meer trimmerlijn geven.
• Om het snijdraad te vervangen, zie spoellijn instructies, zie pagina 52
De kettingzaag gebruiken
• Om de kettingzaag te bevestigen, zie 'de snoeihulpstukken bevestigen'.
(p. 49)
Controleer de kettingspanning
• Draai de kettingspanning schroef (25) rechtsom tot er ongeveer 5mm
speling is als de ketting verticaal van het midden van de zaagbalk
getrokken wordt.
LET OP: De kettingspanning dient regelmatig gecontroleerd te worden. Bij
gebruik zal de ketting wat uitrekken. Een te losse ketting kan eruit lopen en
een te strakke ketting zal snel slijten en kan breken.
Het reservoir van de kettingolie bijvullen
• Deze machine heeft een reservoir voor kettingolie (1).
• Als de zaag gebruikt wordt, komt er automatisch olie op de ketting. De
zaag gebruiken
• zonder olie of met de verkeerde olie, zal de zaag snel slijten en kan de
ketting breken.
• Controleer voor gebruik altijd of het kettingolie reservoir goed gevuld is.
• Gebruik alleen kettingolie van een goede kwaliteit .Gebruik geen
motorolie, tweetaktolie of een ander soort alternatief smeermiddel.
• Om olie toe te voegen, stopt u de motor en verwijdert u de dop van het
oliereservoir.
• Vul het reservoir met olie. Doe de dop er weer op.
• Laat het reservoir tijdens gebruik niet leeg worden.
Kleding en persoonlijke beschermingsmiddelen
Het volgende moet altijd gedragen worden bij gebruik van de kettingzaag:
• Beschermingsjas volgens EN381 – 11 klasse 0. Voor extra bescherming
bij de schouders, armen en borstgebied.
• Beschermende broek volgens EN381-5 klasse 1.
• Ketingzaaghandschoenen volgens EN381-7 klasse 0. Deze
handschoenen voorkomen wegglijden en hebben op de rug van de hand
speciaal verdikt materiaal.
• Veiligheidshelm met volledig gelaatsscherm en oorbeschermers.
• Werklaarzen met een stalen middenzool en stalen neus.
Voordat u de motor start
• Controleer of de kettingzaag goed aan de aandrijfeenheid bevestigd is.
• Zorg ervoor dat de kettingzaagkop niet op de grond of andere obstructie
ligt; als de motor loopt en u de gashendel indrukt zal de kettingzaag
gaan bewegen.
De motor starten
• Start de motor volgens de instructies in 'De motor starten' (hierboven).
Snoeien
WAARSCHUWING: Het is een hele kunst om een heggenschaar goed te
kunnen gebruiken. Onjuist gebruik van de kettingzaag kan levensgevaarlijk
zijn. De onderstaande informatie is slechts bedoeld als algemene richtlijn.
Als u er niet zeker van bent dat u dit gereedschap veilig kunt gebruiken,
GEBRUIK HET DAN NIET.
• Zorg ervoor dat u stevig staat. Als u het snoeigebied niet vanuit een
stevige positie kunt bereiken, snoei het dan niet.
• Bekijk wat de veiligste manier is om te zagen, zie ook 'terugslag
vermijden'. Elke zaagsnede is uniek, en brengt zijn eigen
veiligheidsoverwegingen met zich mee. Bedenk altijd hoe het hout kan
bewegen of vallen als het afgezaagd is. Zorg ervoor dat het hout niet op
50

633770
Multi-kop bezinetrimmer
u kan vallen of naar u toe kan rollen en dat het zaagblad niet vast kan
komen te zitten.
• Houd de zaag altijd stevig vast, en houd uw linkerarm daarbij zo recht
mogelijk. Houd de zaag niet hoger dan borsthoogte.
• Houd het gereedschap altijd met beide handen vast. Gebruik het extra
handvat (31) om de controle over het elektrische gereedschap te houden.
• Als de zaag op volle snelheid draait geleid u het door het hout. Gebruik
altijd het deel van de zaagblad dat het dichtste bij het huis van de
machine is.
• Laat het zaagblad gestaag door het hout gaan. Het hoort niet nodig te
zijn om kracht te gebruiken bij het zagen. Als hij langzaam zaagt duidt
dit op een bot blad.
• Laat het blad de grond niet raken.
• Laat de gashendel (5) los zodra u de zaagsnede gemaakt hebt.
• Als u de motor zonder belasting op volle toeren laat draaien zullen de
motor, zaagketting en geleidingsbalk snel slijten.
Terugslag vermijden
• Terugslag wordt veroorzaakt als de kettingtanden vlakbij de punt
van het zaagblad met een solide object in aanraking komen. Door de
resulterende reactiekracht kan de zaag heftig omhoog naar de gebruiker
toe bewegen.
• De met de kettingzaag geleverde zaagketting heeft
terugslagverminderende eigenschappen. Dit betekent echter niet dat er
zich nooit terugslag zal voordoen en u dient zich hiervan altijd bewust te
zijn. Zorgvuldig gebruik is de beste garantie voor uw veiligheid.
Onderhoud
LET OP: Regelmatig onderhoud is essentieel om dit elektrische
gereedschap zo lang mogelijk mee te laten gaan. Zonder regelmatig
onderhoud en een juiste opslag zal het gereedschap een stuk korter
meegaan.
• Stop altijd de motor en laat hem afkoelen voordat u gaat beginnen met
onderhoud / reiniging ervan.
• Zorg ervoor dat alle schroeven en bouten goed vastgedraaid zijn, zodat
de eenheid veilig gebruikt kan worden.
• Gebruik het elektrische gereedschap nooit als een van de onderdelen
versleten of gebroken is of lijkt te zijn. Ga in dat geval terug naar uw
winkelier.
• Probeer geen componenten van dit gereedschap te wijzigen. Als u dit
doet ZAL DIT NIET ALLEEN DE GARANTIE ONGELDIG MAKEN, MAAR U OF
ANDEREN KUNNEN HIERDOOR ERNSTIG GEWOND RAKEN.
Motor afstellen
Als de motor goed afgesteld is, moet hij soepel stationair draaien en zonder
aarzeling accelereren. Het blad en de spoel mogen niet bewegen als de
motor stationair draait.
• Om de motor op een hoger toerental stationair te laten draaien, draait u
de stationaire stelschroef (16) rechtsom.
• Om de motor op een lager toerental stationair te laten draaien, draait u
de stationaire stelschroef linksom.
Het luchtfilter schoonmaken (fig. D)
Het luchtfilter (12) moet regelmatig schoongemaakt worden. Om bij het
filter te komen:
1. Schroef het filterdeksel los en haal de klem eraf.
2. Verwijder het filterelement uit de behuizing en was het zorgvuldig met
gewoon afwasmiddel en water.
3. Droog het filterelement en doe er ruim olie op met een universele olie.
4. Zeg het geheel weer in elkaar voordat u het gereedschap gaat
gebruiken.
De bougie controleren
• Verwijder de bougiedop.
• Haal vuil en rommel rondom de bougie weg.
• Er is een dopsleutel meegeleverd om de bougie voor inspectie mee te
verwijderen.
• Als het probleem blijft bestaan, raadpleeg dan uw winkelier of een
bevoegde technicus.
Kettingzaag - kettingonderhoud
• Om de zaagketting zo lang mogelijk mee te laten gaan en zo optimaal
mogelijk te laten werken moeten de tanden regelmatig geslepen worden.
Dit mag alleen door een bevoegd en ervaren persoon gedaan worden.
• Als de tanden door het gebruik versleten raken, moet de ketting
vervangen worden. Raadpleeg uw winkelier of een bevoegde en ervaren
technicus.
Aandrijfas
• Breng periodiek vet aan op de vetnippels op de kettingzaag en
hegtrimmer, afhankelijk van het gebruik. U kunt dit bijvoorbeeld aan het
begin en eind van elk seizoen doen.
Opbergen
• Laat de motor volledig afkoelen voordat u dit gereedschap gaat
opbergen.
• Berg alle onderdelen van het gereedschap in een schone, droge
plaats op uit de buurt van hitte en direct zonlicht. Zorg ervoor dat alle
onderdelen bewaard worden op een plaats waar kinderen er niet bij
kunnen.
• Bewaar het gereedschap nooit op een plaats waar de brandstoftank
blootgesteld kan worden aan extreme hitte of waar benzinedampen in
contact kunnen komen met vlammen of vonken.
• Houd de opslagplaats vrij van rommel en mogelijke struikelgevaren.
• Zorg ervoor dat alle koppen schoon zijn en de beschermhoezen er op
zitten.
Langdurig opbergen
• Als u het gereedschap gedurende lange tijd niet gaat gebruiken, doe dan
naast het bovenstaande het volgende:
• Verdun een beetje gewoon afwasmiddel in warm water en reinig de
kunststof behuizingen op het hoofdgedeelte met een vochtige doek.
• Laat alle brandstof veilig uit de brandstoftank (14) lopen en zorg ervoor
dat de tankdop goed vast zit.
• Verwijder de bougie en giet één theelepel schone olie in de
bougiecilinder.
• De bougie vervangen en weer aansluiten
• Als de ontsteking uit is, trekt u langzaam aan de startkoord om een
laagje olie over de motor te laten komen.
Afvoeren en weggooien
• Als u brandstof uit de tank moet halen, doe dit dan buiten en alleen als
de motor koud is.
• Om het milieu te sparen dient u brandstof of olie uit de machine niet
in het riool of de aarde te laten lopen. Plaatselijke servicestations en
recyclingcentra hebben de juiste faciliteiten voor het verwerken van
dergelijke materialen en uitsluitend deze locaties dienen gebruikt te
worden om dergelijke producten weg te gooien. Als u niet weet waar het
dichtstbijzijnde depot is, neem dan contact op met uw gemeente voor
meer informatie.
www.silverlinetools.com
51

NL
Handleiding voor de spoel
montage
1) Oogring (x 2)
2) Behuizing
3) Opsteek bout
4) Veer
LET OP: Wanneer de 2 draden van de spoel een ongelijke lengte hebben zal
het vibreren van de bosmaaier sterk toenemen. Zorg ervoor dat de draad
even gewikkeld is, en dat de uiteinden op gelijke lengte van de oogringen
(1) zijn afgeknipt.
1. Ontkoppel de tabs op de behuizing van de sleuven in de afdekplaat.
Verwijder zowel de afdekplaat als de stootkop
2. Verwijder de spoel en veer
3. Maak alle onderdelen schoon en controleer op schade. Vervang de
beschadigde onderdelen
4. Controleer of de oogringen in de juiste positie zitten
WAARSCHUWING: Gebruik de maaier nooit zonder de oogringen (1).
1. Haal de nieuwe draad door het anker in de spoel tot de lengtes
van beide zijden van de draad gelijk zijn. Overschrijd de maximale
capaciteit van de spoel niet (zie nr. 13)
2. Houd de spoel (5) met de lijnklemmen naar boven wijzend vast, wind
de lijn in de richting van de wijzers van de klok op de spoel en gebruik
daarbij één vinger voor het scheiden van de 2 lijnen
3. Klem de twee uiteinden van de lijnen in de lijnklemmen
4. Plaats de veer (4) over de opsteek bout (3)
5. Met de lijnklemmen naar beneden, in de behuizing wijzend, haalt u de
uiteinden van de lijnen door de oogringen (1) in de behuizing. Laat de
lijn niet onder de spoel klemmen
6. Plaats de stootkop (6) in het midden van de spoel
7. Nu plaats u de afdekplaat (7) terug op de behuizing door de tabs uit te
lijnen en de afdekplaat zo te draaien dat de tabs in de gleuven vallen
8. Trek de lijn vrij uit de lijnklemmen
9. Controleer of de lijnen de maximale extensie van 100-125 mm niet
overschrijden. Knip de lijnen wanneer nodig bij
5) Spoel
6) Stootkop
7) Afdekplaat
1
2
3
4
5
6
7
52

633770
Silverline Tools Garantie
Dit Silverline product komt met 3 jaar garantie.
Registreer dit product binnen 30 dagen van aankoop op
www.silverlinetools.com om in aanmerking te komen voor 3 jaar
garantie. De garantieperiode begint op de datum van aankoop op het
ontvangstbewijs.
Voorwaarden
De garantieperiode gaat in vanaf de datum van aankoop op het
ontvangstbewijs.
BEWAAR HET ONTVANGSTBEWIJS OP EEN VEILIGE PLAATS
Als dit product binnen 30 dagen van de aankoopdatum een fout heeft,
breng het dan naar de winkelier waar u het heeft gekocht, met uw
ontvangstbewijs, en met vermelding van de details van de storing. U kunt
om een nieuwe vragen of om uw geld terug.
Als dit product na de periode van 30 dagen een fout heeft, stuur het dan
naar:
Silverline Tools Service Centre
PO Box 2988
Yeovil
BA21 1WU, GB
Alle claims moeten binnen de garantieperiode worden ingediend.
U moet het originele ontvangstbewijs geven met de datum van aankoop,
uw naam, adres en plaats van aankoop voordat er aan kan worden
gewerkt.
U moet nauwkeurige gegevens verschaffen van de fout die verholpen
moet worden.
Claims die binnen de garantieperiode worden ingediend, worden door
Silverline Tools nagelopen om te kijken of het probleem een kwestie is van
de materialen of de fabricage van het product.
De verzendkosten worden niet vergoed. De geretourneerde items moeten
voor de reparatie in een redelijk schone en veilige staat verkeren en
moeten zorgvuldig worden verpakt om schade en letsel tijdens het vervoer
te voorkomen. Ongeschikte en onveilige leveringen kunnen worden
afgewezen.
Al het werk wordt uitgevoerd door Silverline Tools of een officiële
reparatiedienst.
De garantieperiode wordt niet door de reparatie of vervanging van het
product verlengd.
Defecten waarvan wij beschouwen dat ze onder de garantie vallen, worden
verholpen door middel van gratis reparatie van het gereedschap (exclusief
verzendingskosten) of door vervanging door een gereedschap in perfecte
staat van werking.
EG-Verklaring van overeenstemming
De ondergetekende: Mr Darrell Morris
Gemachtigd door: Silverline Tools
Verklaart dat
Naam/model: Multi-kop bezinetrimmer
Type/ serie nr: 633770
Voldoet aan de volgende richtlijnen:
• Machinerichtlijn 2006/42/EC
• Elektromagnetische verenigbaarheid 2004/108/EG
• Emissies van niet voor de weg bestemde mobiele machines Richtlijn
2004/26/EG
• EN ISO11806:2008
• EN ISO11680-1:2008
• EN ISO10517:2009
• EN ISO14982:1998
Multi-kop bezinetrimmer
Het gekochte product registreren
Ga naar: silverlinetools.com, kies Registration (registratie) en voer het
volgende in:
• Uwpersoonlijkegegevens
• Degegevensvanhetproductendeaankoop
U ontvangt het garantiebewijs in PDF-vorm. Druk het af en bewaar het bij
het product.
De ingehouden gereedschappen of onderdelen die zijn vervangen, worden
het eigendom van Silverline Tools.
De reparatie of vervanging van het product onder garantie zijn voordelen
die bijkomstig zijn aan uw wettelijke rechten als consument, en hebben
daar geen invloed op.
Wat is gedekt:
De reparatie van het product, mits naar tevredenheid van Silverline Tools
kan worden vastgesteld dat de gebreken het gevolg zijn van defecte
materialen of fabrieksfouten binnen de garantieperiode.
Onderdelen die niet meer verkrijgbaar zijn en die niet meer worden
vervaardigd worden door Silverline Tools vervangen door een functionele
vervanging.
Gebruik van dit product in de EU.
Wat niet is gedekt:
Silverline Tools geeft geen garantie op reparaties als gevolg van:
Normale slijtage veroorzaakt door gebruik in overeenstemming met de
bedieningsinstructies zoals zaagbladen, borstels, riemen, gloeilampen,
batterijen enz.
De vervanging van geleverde accessoires zoals boortjes, zaagbladen,
schuurvellen, snijschrijven en aanverwante producten.
Accidentele schade, storingen veroorzaakt door nalatigheid in gebruik of
verzorging, misbruik, verwaarlozing, onvoorzichtige bediening en hantering
van het product.
Gebruik van het product voor andere doeleinden dan normaal huishoudelijk
gebruik.
Alle soorten wijzigingen en modificaties van het product.
Gebruik van andere onderdelen en accessoires dan de originele onderdelen
van Silverline Tools.
Defecte installatie (behalve wanneer geïnstalleerd door Silverline Tools).
Reparaties of wijzigingen die zijn uitgevoerd door anderen dan Silverline
Tools of diens officiële reparatiediensten.
Behalve claims voor het recht op correctie van fouten van het gereedschap
volgens de bepalingen van deze garantie zijn geen andere claims gedekt.
De technische documentatie wordt bijgehouden door: Silverline Tools
Keuringsinstantie: Intertek Testing Services
Plaats van afgifte: Shanghai, China
Datum: 09/05/11
Handtekening:
Directeur
Naam en adres van fabrikant of gemachtigde:
Silverline Tools, Boundary Way, Lufton Trading Estate, Yeovil, Somerset,
BA22 8HZ Verenigd Koninkrijk
www.silverlinetools.com
53
 Loading...