

Page 1
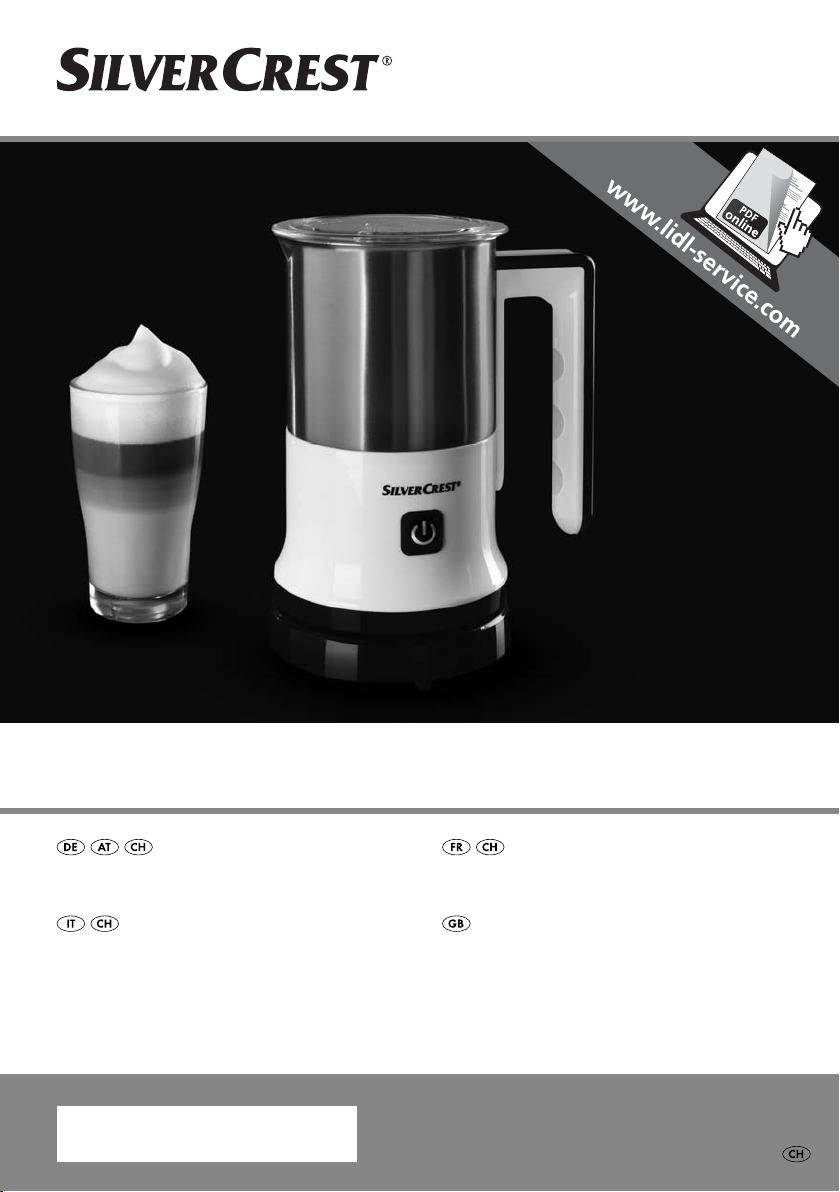
MILCHAUFSCHÄUMER SMA 550 A1
MILCHAUFSCHÄUMER
Bedienungsanleitung
MONTALATTE
Istruzioni per l'uso
IAN 100076
MOUSSEUR À LAIT
Mode d'emploi
MILK FROTHER
Operating instructions
Page 2
Klappen Sie vor dem Lesen die Seite mit den Abbildungen aus und machen Sie sich anschließend mit allen
Funktionen des Gerätes vertraut.
Avant de lire le mode d'emploi, ouvrez la page contenant les illustrations et familiarisez-vous ensuite avec
toutes les fonctions de l'appareil.
Prima di leggere aprire la pagina con le immagini e prendere confi denza con le diverse funzioni
dell'apparecchio.
Before reading, unfold the page containing the illustrations and familiarise yourself with all functions of
the device.
DE / AT / CH Bedienungsanleitung Seite 1
FR / CH Mode d'emploi Page 15
IT / CH Istruzioni per l'uso Pagina 29
GB Operating instructions Page 43
Page 3
Page 4
Inhaltsverzeichnis
Einführung . . . . . . . . . . . . . . . . . . . . . . . . . . . . . . . . . . . . . . . . . . . . . . . . . . . . 2
Urheberrecht . . . . . . . . . . . . . . . . . . . . . . . . . . . . . . . . . . . . . . . . . . . . . . . . . . . . . . . . . . . . 2
Bestimmungsgemäße Verwendung . . . . . . . . . . . . . . . . . . . . . . . . . . . . . . . . . . . . . . . . . . . 2
Lieferumfang . . . . . . . . . . . . . . . . . . . . . . . . . . . . . . . . . . . . . . . . . . . . . . . . . . 3
Gerätebeschreibung . . . . . . . . . . . . . . . . . . . . . . . . . . . . . . . . . . . . . . . . . . . . 3
Technische Daten . . . . . . . . . . . . . . . . . . . . . . . . . . . . . . . . . . . . . . . . . . . . . . . 3
Sicherheitshinweise . . . . . . . . . . . . . . . . . . . . . . . . . . . . . . . . . . . . . . . . . . . . 4
Vorbereitungen . . . . . . . . . . . . . . . . . . . . . . . . . . . . . . . . . . . . . . . . . . . . . . . . 6
Auspacken . . . . . . . . . . . . . . . . . . . . . . . . . . . . . . . . . . . . . . . . . . . . . . . . . . . . . . . . . . . . . . 6
Entsorgung der Verpackung . . . . . . . . . . . . . . . . . . . . . . . . . . . . . . . . . . . . . . . . . . . . . . . . 6
Bedienen . . . . . . . . . . . . . . . . . . . . . . . . . . . . . . . . . . . . . . . . . . . . . . . . . . . . . 6
Milch erhitzen . . . . . . . . . . . . . . . . . . . . . . . . . . . . . . . . . . . . . . . . . . . . . . . . . . . . . . . . . . . 7
Milch aufschäumen . . . . . . . . . . . . . . . . . . . . . . . . . . . . . . . . . . . . . . . . . . . . . . . . . . . . . . . 8
Milchschaum verwenden . . . . . . . . . . . . . . . . . . . . . . . . . . . . . . . . . . . . . . . . 9
Cappuccino nach italienischer Art . . . . . . . . . . . . . . . . . . . . . . . . . . . . . . . . . . . . . . . . . . . . 9
Marocchino . . . . . . . . . . . . . . . . . . . . . . . . . . . . . . . . . . . . . . . . . . . . . . . . . . . . . . . . . . . . . 9
Wiener Melange . . . . . . . . . . . . . . . . . . . . . . . . . . . . . . . . . . . . . . . . . . . . . . . . . . . . . . . . . 9
DE
AT
CH
Reinigung und Pfl ege . . . . . . . . . . . . . . . . . . . . . . . . . . . . . . . . . . . . . . . . . . 10
Aufbewahren . . . . . . . . . . . . . . . . . . . . . . . . . . . . . . . . . . . . . . . . . . . . . . . .11
Fehlerbehebung . . . . . . . . . . . . . . . . . . . . . . . . . . . . . . . . . . . . . . . . . . . . . . 11
Gerät entsorgen . . . . . . . . . . . . . . . . . . . . . . . . . . . . . . . . . . . . . . . . . . . . . . 12
Hinweise zur EG-Konformitätserklärung . . . . . . . . . . . . . . . . . . . . . . . . . . . . . . . . . . . . . . 12
Importeur . . . . . . . . . . . . . . . . . . . . . . . . . . . . . . . . . . . . . . . . . . . . . . . . . . . 12
Garantie. . . . . . . . . . . . . . . . . . . . . . . . . . . . . . . . . . . . . . . . . . . . . . . . . . . . . 13
Service . . . . . . . . . . . . . . . . . . . . . . . . . . . . . . . . . . . . . . . . . . . . . . . . . . . . . . 13
SMA 550 A1
1
Page 5
DE
AT
CH
Einführung
Herzlichen Glückwunsch zum Kauf Ihres neuen Gerätes.
Sie haben sich damit für ein hochwertiges Produkt entschieden. Die Bedie-
nungsanleitung ist Bestandteil dieses Produkts. Sie enthält wichtige Hinweise für
Sicherheit, Gebrauch und Entsorgung. Machen Sie sich vor der Benutzung des
Produkts mit allen Bedien- und Sicherheitshinweisen vertraut. Benutzen Sie das
Produkt nur wie beschrieben und für die angegebenen Einsatzbereiche. Händigen Sie alle Unterlagen bei Weitergabe des Produkts an Dritte mit aus.
Urheberrecht
Diese Dokumentation ist urheberrechtlich geschützt.
Jede Vervielfältigung bzw. jeder Nachdruck, auch auszugsweise, sowie die Wie-
dergabe der Abbildungen, auch im veränderten Zustand, ist nur mit schriftlicher
Zustimmung des Herstellers gestattet.
Bestimmungsgemäße Verwendung
Dieses Gerät dient ausschließlich dem Erhitzen von Milch und dessen Aufschlagen zu Milchschaum für den häuslichen Gebrauch. Es ist nicht vorgesehen für die
Verwendung mit anderen Flüssigkeiten oder für gewerbliche Bereiche.
Dieses Gerät ist ausschließlich für die Benutzung in privaten Haushalten bestimmt. Benutzen Sie das Gerät nicht gewerblich!
WARNUNG
Gefahr durch nicht bestimmungsgemäße Verwendung!
Von dem Gerät können bei nicht bestimmungsgemäßer Verwendung und /
oder andersartiger Nutzung Gefahren ausgehen.
► Das Gerät ausschließlich bestimmungsgemäß verwenden.
► Die in dieser Bedienungsanleitung beschriebenen Vorgehensweisen einhalten.
Ansprüche jeglicher Art aufgrund Schäden aus nicht bestimmungsgemäßer Verwendung, unsachgemäßen Reparaturen, unerlaubt vorgenommenen Veränderungen
oder Verwendung nicht zugelassener Ersatzteile, sind ausgeschlossen.
Das Risiko trägt allein der Benutzer.
2
SMA 550 A1
Page 6

Lieferumfang
Das Gerät wird standardmäßig mit folgenden Komponenten geliefert:
▯ Milchaufschäumer (Kanne)
▯ Sockel
▯ 3 Quirle (2 x Quirl zum Erhitzen und Aufschäumen,
1 x Quirl zum Erhitzen)
▯ Bedienungsanleitung
HINWEIS
Prüfen Sie die Lieferung auf Vollständigkeit und auf sichtbare Schäden.
►
► Bei einer unvollständigen Lieferung oder Schäden infolge mangelhafter
Verpackung oder durch Transport wenden Sie sich an die Service-Hotline
(siehe Kapitel Service).
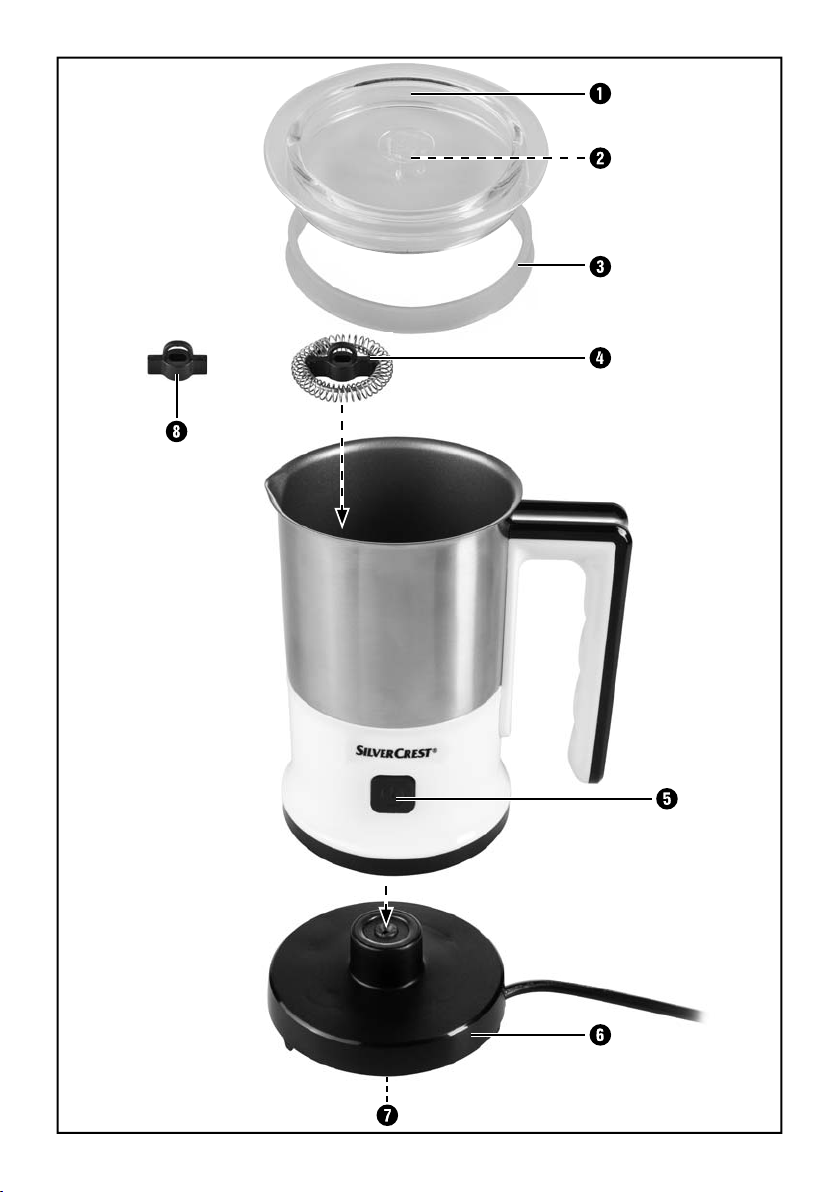
Gerätebeschreibung
1 Deckel
2 Quirl-Halter
3 Dichtungsring
4 Quirl zum Erhitzen und Aufschäumen
5 Start/Stop-Taste mit integrierter Kontrollleuchte
6 Sockel
7 Kabelaufwicklung
8 Quirl zum Erhitzen
DE
AT
CH
Technische Daten
Spannungsversorgung 220 - 240 V ~, 50 Hz
Nennleistung 450 - 550 W
SMA 550 A1
3
Page 7
DE
AT
CH
Sicherheitshinweise
GEFAHR - ELEKTRISCHER SCHLAG!
► Stellen Sie sicher, dass der Sockel mit den elektrischen Anschlüssen
niemals mit Wasser in Berührung kommt! Lassen Sie den Sockel erst
vollständig trocknen, wenn er versehentlich feucht geworden ist.
► Verwenden Sie das Gerät nur mit dem mitgelieferten Sockel.
► Achten Sie darauf, dass im Betrieb das Netzkabel niemals nass
oder feucht wird. Führen Sie es so, dass es nicht eingeklemmt oder
anderweitig beschädigt werden kann.
► Lassen Sie beschädigte Netzstecker oder Netzkabel sofort von
autorisiertem Fachpersonal oder dem Kundenservice austauschen,
um Gefährdungen zu vermeiden.
► Kontrollieren Sie das Gerät vor der Verwendung auf äußere sichtba-
re Schäden. Nehmen Sie ein beschädigtes oder heruntergefallenes
Gerät nicht in Betrieb.
► Lassen Sie Reparaturen am Gerät nur von autorisierten Fachbe-
trieben oder dem Kundenservice durchführen. Durch unsachgemäße Reparaturen können Gefahren für den Benutzer entstehen.
Zudem erlischt der Garantieanspruch.
WARNUNG - VERLETZUNGSGEFAHR!
► Ziehen Sie immer den Netzstecker aus der Netzsteckdose, wenn
Sie Zubehörteile auswechseln. Das verhindert ein unbeabsichtigtes
Starten des Gerätes.
► Das Gerät ist im Betrieb heiß. Fassen Sie es daher nur am Griff an.
► Stellen Sie sicher, dass das Gerät stabil und senkrecht steht, bevor
Sie dieses einschalten. Ansonsten kann das Gerät umstürzen und
die heiße Milch herausspritzen.
► Fassen Sie nicht in die rotierenden Teile während des Betriebes!
4
SMA 550 A1
Page 8

WARNUNG - VERLETZUNGSGEFAHR!
► Dieses Gerät kann von Kindern ab 8 Jahren und darüber benutzt
werden, wenn sie beaufsichtigt werden oder bezüglich des sicheren Gebrauchs des Gerätes unterwiesen wurden und die daraus
resultierenden Gefahren verstanden haben.
► Reinigung und die Wartung durch den Benutzer dürfen nicht durch
Kinder vorgenommen werden, es sei denn, sie sind 8 Jahre oder
älter und werden beaufsichtigt.
► Das Gerät und seine Anschlussleitung sind von Kindern jünger als 8
Jahre fernzuhalten.
► Dieses Gerät kann von Personen mit reduzierten physischen, senso-
rischen oder mentalen Fähigkeiten oder Mangel an Erfahrung und/
oder Wissen benutzt werden, wenn sie beaufsichtigt oder bezüglich des sicheren Gebrauchs des Gerätes unterwiesen wurden und
die daraus resultierenden Gefahren verstanden haben.
► Kinder dürfen nicht mit dem Gerät spielen.
► Kinder sollten beaufsichtigt werden, um sicherzustellen, dass sie
nicht mit dem Gerät spielen.
DE
AT
CH
ACHTUNG - SACHSCHADEN!
► Benutzen Sie keine externe Zeitschaltuhr oder ein separates Fern-
wirksystem um das Gerät zu betreiben.
► Lassen Sie das Gerät während des Betriebes niemals unbeaufsichtigt.
► Stellen Sie sicher, dass das Gerät, das Netzkabel oder der Netz-
stecker nicht mit heißen Quellen wie Kochplatten oder off enen
Flammen in Berührung kommt.
► Betreiben Sie das Gerät niemals im Leerzustand. Das Gerät kann
irreparabel beschädigt werden.
SMA 550 A1
5
Page 9
DE
AT
CH
Vorbereitungen
Auspacken
♦ Entnehmen Sie alle Teile des Gerätes und die Bedienungsanleitung aus dem
Karton.
♦ Entfernen Sie sämtliches Verpackungsmaterial.
♦ Reinigen Sie das Gerät wie im Kapitel „Reinigung und Pfl ege“ beschrieben.
Entsorgung der Verpackung
Die Verpackung schützt das Gerät vor Transportschäden. Die Verpackungsmaterialien sind nach umweltverträglichen und entsorgungstechnischen Gesichtspunkten ausgewählt und deshalb recyclebar.
Die Rückführung der Verpackung in den Materialkreislauf spart Rohstoff e und
verringert das Abfallaufkommen. Entsorgen Sie nicht mehr benötigte Verpackungsmaterialien gemäß den örtlich geltenden Vorschriften.
HINWEIS
Heben Sie wenn möglich die Originalverpackung während der Garan-
►
tiezeit des Gerätes auf, um das Gerät im Garantiefall ordnungsgemäß
verpacken zu können.
Bedienen
GEFAHR - ELEKTRISCHER SCHLAG!
Bringen Sie niemals den elektrischen Sockel 6 in die Nähe von Wasser –
►
Lebensgefahr durch elektrischen Schlag!
WARNUNG - VERLETZUNGSGEFAHR!
► Aus Sicherheitsgründen sollten Sie den Deckel 1 nicht öff nen, während
das Gerät in Betrieb ist. Es besteht die Gefahr von Verbrühungen.
► Verwenden Sie immer frische Milch. Verzehren Sie keine Milch, die schon
länger in der Kanne gestanden hat.
HINWEIS
Wenn Sie während des Zubereitungsvorganges die Kanne vom Sockel 6
►
heben, stoppt das Gerät. Sie müssen den Zubereitungsvorgang durch
drücken der Start/Stop-Taste 5 wieder starten.
6
SMA 550 A1
Page 10

Milch erhitzen
1) Setzen Sie den Quirl zum Erhitzen 8 auf die Antriebswelle im Inneren der
Kanne. Einen der nicht benötigten Quirle 4 können Sie zum Aufbewahren
in den Quirl-Halter 2 klemmen. Den anderen nicht benötigten Quirl 4
bewahren Sie an einem trockenen und sauberen Ort auf, zum Beispiel in
einer Besteckschublade.
2) Nehmen Sie die Kanne vom Sockel 6, und füllen Sie die Milch ein. Füllen
Sie dabei mindestens soviel Milch ein, dass die MIN-Markierung im Inneren
der Kanne erreicht wird. Füllen Sie jedoch niemals mehr Milch ein, als bis zur
oberen MAX - Markierung (
3) Stellen Sie die Kanne auf den Sockel 6.
4) Setzen Sie den Deckel 1 auf.
5) Drücken Sie die Start/Stop-Taste 5. Die integrierte Kontrollleuchte leuchtet.
Der Quirl zum Erhitzen 8 beginnt sich zu drehen und erhitzt die Milch
dadurch gleichmäßig.
6) Das Gerät schaltet sich aus und die integrierte Kontrollleuchte erlischt,
sobald die Milch auf ca. 60 - 65°C erhitzt ist.
HINWEIS
Wenn Sie den Zubereitungsvorgang vorzeitig stoppen wollen, drücken Sie
►
die Start/Stop-Taste 5. Wenn Sie die Start/Stop-Taste 5 noch einmal
drücken, läuft der Zubereitungsvorgang weiter.
7) Nehmen Sie den Deckel 1 ab und füllen Sie die heiße Milch in das gewünschte Gefäß.
Warten Sie ca. 2 Minuten ab, bevor Sie eine weitere Portion Milch erhitzen.
DE
AT
CH
). Ansonsten läuft das Gerät über.
SMA 550 A1
7
Page 11

DE
AT
CH
Milch aufschäumen
Tipps für den Milchschaum
■ Schäumen Sie nur Kuhmilch mit diesem Gerät auf. Andere Milchsorten
lassen sich nur mit Einschränkungen aufschäumen oder können das Gerät
zum Überlaufen bringen.
■ Entrahmte oder Magermilch brennt nicht so leicht an wie Vollmilch, bei zu
geringem Fettgehalt besteht allerdings das Risiko, dass sich die Milch nicht
gut aufschäumen lässt. Benutzen Sie daher möglichst eine Milch mit 3,5%
oder 1,5% Fettanteil.
■ Gut gekühlte Milch lässt sich besser aufschäumen als weniger kalte.
■ Schäumen Sie die Milch kein zweites Mal auf, da sie sonst anbrennt.
■ Lassen Sie aufgeschäumte Milch ca. 30 Sekunden lang stehen, bevor Sie
den Schaum auf den Cappuccino, Espresso, etc. geben. So platzen größere
Blasen und noch fl üssige Milch sinkt nach unten. Sie können dann den feinen
Schaum verwenden.
Milchschaum herstellen
1) Setzen Sie den Quirl zum Erhitzen und Aufschäumen 4 auf die Antriebswel-
le im Inneren der Kanne. Den nicht benötigten Quirl 8 können Sie zum Aufbewahren in den Quirl-Halter 2 klemmen. Den anderen Quirl zum Erhitzen
und Aufschäumen 4 bewahren Sie an einem trockenen und sauberen Ort
auf, zum Beispiel in einer Besteckschublade.
2) Nehmen Sie die Kanne vom Sockel 6 und füllen Sie die Milch ein. Füllen
Sie dabei mindestens soviel Milch ein, dass die MIN-Markierung im Inneren
der Kanne erreicht wird. Füllen Sie jedoch niemals mehr Milch ein, als bis
zur unteren MAX - Markierung (
Aufschäumen vervielfacht sich das Volumen der Milch!
3) Stellen Sie die Kanne auf den Sockel 6.
4) Setzen Sie den Deckel 1 auf.
5) Drücken Sie die Start/Stop-Taste 5. Die integrierte Kontrollleuchte leuchtet.
Der Quirl zum Erhitzen und Aufschäumen 4 beginnt sich zu drehen, erhitzt
die Milch und schäumt diese auf.
6) Das Gerät schaltet sich aus und die integrierte Kontrollleuchte erlischt,
sobald die Milch aufgeschäumt ist.
). Ansonsten läuft das Gerät über. Beim
8
SMA 550 A1
Page 12

HINWEIS
Wenn Sie den Zubereitungsvorgang vorzeitig stoppen wollen, drücken Sie
►
die Start/Stop-Taste 5. Wenn Sie die Start/Stop-Taste 5 noch einmal
drücken, läuft der Zubereitungsvorgang weiter.
7) Warten Sie ca. 30 Sekunden. In dieser Zeit setzt sich die noch fl üssige Milch
unten ab.
8) Nehmen Sie den Deckel 1 ab und füllen Sie den Milchschaum in das
gewünschte Gefäß, zum Beispiel um einen Cappuccino zu machen.
Warten Sie ca. 2 Minuten ab, bevor Sie eine weitere Portion Milch aufschäumen.
Milchschaum verwenden
Sie können den Milchschaum für verschiedene Getränkevariationen verwenden:
Cappuccino nach italienischer Art
■ Geben Sie einen Espresso (ca. 25 - 30 ml) in eine etwa 120 - 180 ml
fassende Tasse.
■ Gießen Sie dann Milchschaum hinzu, bis die Tasse bis zum Rand gefüllt ist.
Marocchino
■ Schmelzen Sie ca. einen Teelöff el Vollmilchschokolade.
■ Verteilen Sie die geschmolzene Schokolade an der Innenwand eines Glases
und gießen Sie einen Espresso hinein.
■ Geben Sie ca. 3 - 4 Teelöff el Milchschaum hinzu und bestäuben Sie diesen
mit Kakaopulver.
DE
AT
CH
Wiener Melange
■ Geben Sie ca. 125 ml schwarzen, starken Kaff e in eine Mokka-Tasse.
■ Schäumen Sie 110 ml Milch auf und geben Sie soviel Milchschaum hinzu,
so dass die Tasse bis kurz unter den Rand gefüllt ist.
■ Je nach persönlichem Geschmack können Sie noch etwas Zucker hinzu
geben.
SMA 550 A1
9
Page 13
DE
AT
CH
Reinigung und Pfl ege
GEFAHR - ELEKTRISCHER SCHLAG!
Ziehen Sie vor jeder Reinigung den Netzstecker aus der Netzsteckdose!
►
Ansonsten besteht Gefahr eines elektrischen Schlages!
► Öff nen Sie niemals irgendwelche Gehäuseteile. Es befi nden sich keinerlei
Bedienelemente darin. Bei geöff netem Gehäuse kann Lebensgefahr bestehen durch elektrischen Schlag.
Tauchen Sie das Gerät niemals in Wasser oder andere Flüssigkeiten!
Hier kann Lebensgefahr durch elektrischen Schlag entstehen, wenn im
Betrieb Flüssigkeitsreste auf spannungsführende Teile gelangen.
WARNUNG - VERLETZUNGSGEFAHR!
► Lassen Sie das Gerät vor der Reinigung abkühlen. Verbrennungsgefahr!
ACHTUNG - SACHSCHADEN!
Reinigen Sie das Gerät oder Teile davon nicht in der
Spülmaschine! Ansonsten wird das Gerät irreparabel beschädigt.
► Benutzen Sie keine scheuernden oder ätzenden Reinigungsmittel. Diese
können die Oberfl äche angreifen und das Gerät irreparabel beschädigen.
HINWEIS
Reinigen Sie das Gerät am Besten direkt nach dem Abkühlen, so dass
►
Milchreste nicht antrocknen können.
Für die erste, grobe Reinigung geben Sie Wasser mit etwas Spülmittel in
die Kanne (der benutzte Quirl 4/8 ist eingesetzt). Beachten Sie dabei
die MIN- und MAXStarten Sie das Gerät, so dass der Quirl 4/8 durch das Wasser pfl ügt.
Spülen Sie das Gerät danach mit viel klarem Wasser aus.
Für eine gründliche Reinigung gehen Sie wie folgt vor:
■ Nehmen Sie zum Reinigen den Quirl 4/8 aus dem Gerät und reinigen Sie
das Innere des Gerätes mit warmem Wasser. Geben Sie ein wenig Spülmittel
hinzu. Wischen Sie das Innere mit einem weichen Tuch oder Schwamm ab.
Achten Sie dabei besonders auf den Bereich um die Antriebswelle. Spülen
Sie das Gerät sorgfältig mit klarem Wasser aus.
■ Ziehen Sie den Dichtungsring 3 vom Deckel 1 ab und reinigen Sie beide
Teile in mildem Spülwasser. Entfernen Sie Spülmittelreste mit klarem Wasser
und trocknen Sie beides gut ab. Schieben Sie den Dichtungsring 3 wieder
auf den Deckel 1, so dass die nach außen weisende Dichtlippe unten am
Deckel 1 liegt und die nach innen weisende Dichtlippe in die Kerbe am
Deckel 1 greift.
-Markierungen.
10
SMA 550 A1
Page 14
■ Reinigen Sie die Quirle 4/8 in mildem Spülwasser und spülen Sie alles mit
klarem Wasser ab.
■ Reinigen Sie alle Außenfl ächen, den Sockel 6 und das Netzkabel mit einem
leicht angefeuchteten Spültuch. Trocknen Sie das Gerät auf jeden Fall gut
ab, bevor Sie es erneut verwenden. Bei hartnäckigeren Verschmutzungen
geben Sie ein mildes Spülmittel auf das Tuch. Achten Sie darauf, dass sich
keine Spülmittelreste am und im Gerät befi nden, bevor Sie es wieder in
Betrieb nehmen.
Aufbewahren
■ Lassen Sie das Gerät erst vollständig auskühlen, bevor Sie es wegstellen.
■ Wickeln Sie das Netzkabel um die Kabelaufwicklung 7 unter dem Sockel 6.
■ Lagern Sie das Gerät an einem trockenen Ort.
Fehlerbehebung
Störung Ursache Abhilfe
DE
AT
CH
Das Gerät funktioniert nicht.
Die Milch wird
nicht aufgeschäumt.
Der Netzstecker steckt nicht
in der Netzsteckdose.
Das Gerät ist nicht eingeschaltet.
Das Gerät ist defekt.
Das Gerät ist noch zu heiß.
Der falsche Quirl 8 ist im
Gerät installiert.
Verbinden Sie den Netzstecker mit dem Stromnetz.
Schalten Sie das Gerät ein.
Wenden Sie sich an den
Kundendienst.
Lassen Sie das Gerät
abkühlen.
Setzen Sie den Quirl zum
Erhitzen und Aufschäumen
4 ein.
SMA 550 A1
11
Page 15
DE
AT
CH
Gerät entsorgen
Werfen Sie das Gerät keinesfalls in den normalen Hausmüll.
Dieses Produkt unterliegt der europäischen Richtlinie
2012/19/EU.
Entsorgen Sie das Gerät über einen zugelassenen Entsorgungsbetrieb oder
über Ihre kommunale Entsorgungseinrichtung. Beachten Sie die aktuell geltenden Vorschriften. Setzen Sie sich im Zweifelsfall mit Ihrer Entsorgungseinrichtung
in Verbindung.
Hinweise zur EG-Konformitätserklärung
Dieses Gerät entspricht hinsichtlich Übereinstimmung mit den
grundlegenden Anforderungen und den anderen relevanten
Vorschriften der europäischen Richtlinie für elektromagnetische Verträglichkeit 2004/108/EC sowie der Niederspannungsrichtlinie 2006/95/EC.
Die vollständige Original-Konformitätserklärung ist beim
Importeur erhältlich.
Importeur
KOMPERNASS HANDELS GMBH
BURGSTRASSE 21
44867 BOCHUM, GERMANY
www.kompernass.com
12
SMA 550 A1
Page 16
Garantie
Sie erhalten auf dieses Gerät 3 Jahre Garantie ab Kaufdatum. Das Gerät wurde
sorgfältig produziert und vor Anlieferung gewissenhaft geprüft.
Bitte bewahren Sie den Kassenbon als Nachweis für den Kauf auf. Bitte setzen
Sie sich im Garantiefall mit Ihrer Servicestelle telefonisch in Verbindung. Nur so
kann eine kostenlose Einsendung Ihrer Ware gewährleistet werden.
HINWEIS
Das Produkt ist lediglich für den privaten und nicht für den gewerblichen
Gebrauch bestimmt. Bei missbräuchlicher und unsachgemäßer Behandlung,
Gewaltanwendung und bei Eingriff en, die nicht von unserer autorisierten ServiceNiederlassung vorgenommen wurden, erlischt die Garantie.
Ihre gesetzlichen Rechte werden durch diese Garantie nicht eingeschränkt.
Die Garantiezeit wird durch die Gewährleistung nicht verlängert. Dies gilt auch
für ersetzte und reparierte Teile.
Eventuell schon beim Kauf vorhandene Schäden und Mängel müssen sofort nach
dem Auspacken gemeldet werden, spätestens aber zwei Tage nach Kaufdatum.
Nach Ablauf der Garantiezeit anfallende Reparaturen sind kostenpfl ichtig.
Service
Service Deutschland
Tel.: 0800 5435 111 (Kostenfrei aus dem dt. Festnetz/Mobilfunknetz)
E-Mail: kompernass@lidl.de
IAN 100076
Die Garantieleistung gilt nur für Material- oder Fabrikationsfehler, nicht
►
aber für Transportschäden, Verschleißteile oder für Beschädigungen an
zerbrechlichen Teilen, z. B. Schalter.
DE
AT
CH
SMA 550 A1
Service Österreich
Tel.: 0820 201 222 (0,15 EUR/Min.)
E-Mail: kompernass@lidl.at
IAN 100076
Service Schweiz
Tel.: 0842 665566 (0,08 CHF/Min., Mobilfunk max. 0,40 CHF/Min.)
E-Mail: kompernass@lidl.ch
IAN 100076
Erreichbarkeit Hotline: Montag bis Freitag von 8:00 Uhr – 20:00 Uhr (MEZ)
13
Page 17

14
SMA 550 A1
Page 18
Sommaire
Introduction . . . . . . . . . . . . . . . . . . . . . . . . . . . . . . . . . . . . . . . . . . . . . . . . . . 16
Droits d'auteur . . . . . . . . . . . . . . . . . . . . . . . . . . . . . . . . . . . . . . . . . . . . . . . . . . . . . . . . . . 16
Utilisation conforme . . . . . . . . . . . . . . . . . . . . . . . . . . . . . . . . . . . . . . . . . . . . . . . . . . . . . . 16
Accessoires fournis . . . . . . . . . . . . . . . . . . . . . . . . . . . . . . . . . . . . . . . . . . . . 17
Description de l'appareil . . . . . . . . . . . . . . . . . . . . . . . . . . . . . . . . . . . . . . . 17
Caractéristiques techniques . . . . . . . . . . . . . . . . . . . . . . . . . . . . . . . . . . . . . 17
Consignes de sécurité . . . . . . . . . . . . . . . . . . . . . . . . . . . . . . . . . . . . . . . . . . 18
Préparatifs . . . . . . . . . . . . . . . . . . . . . . . . . . . . . . . . . . . . . . . . . . . . . . . . . . . 20
Déballage . . . . . . . . . . . . . . . . . . . . . . . . . . . . . . . . . . . . . . . . . . . . . . . . . . . . . . . . . . . . . 20
Recyclage de l'emballage . . . . . . . . . . . . . . . . . . . . . . . . . . . . . . . . . . . . . . . . . . . . . . . . . 20
Opération . . . . . . . . . . . . . . . . . . . . . . . . . . . . . . . . . . . . . . . . . . . . . . . . . . . 20
Chauff er le lait . . . . . . . . . . . . . . . . . . . . . . . . . . . . . . . . . . . . . . . . . . . . . . . . . . . . . . . . . . 21
Faire mousser le lait . . . . . . . . . . . . . . . . . . . . . . . . . . . . . . . . . . . . . . . . . . . . . . . . . . . . . . 22
Utiliser la mousse de lait . . . . . . . . . . . . . . . . . . . . . . . . . . . . . . . . . . . . . . . 23
Cappuccino à la mode italienne . . . . . . . . . . . . . . . . . . . . . . . . . . . . . . . . . . . . . . . . . . . . 23
Marocchino . . . . . . . . . . . . . . . . . . . . . . . . . . . . . . . . . . . . . . . . . . . . . . . . . . . . . . . . . . . . 23
Mélange viennois . . . . . . . . . . . . . . . . . . . . . . . . . . . . . . . . . . . . . . . . . . . . . . . . . . . . . . . 23
Nettoyage et entretien . . . . . . . . . . . . . . . . . . . . . . . . . . . . . . . . . . . . . . . . . 24
FR
CH
Rangement . . . . . . . . . . . . . . . . . . . . . . . . . . . . . . . . . . . . . . . . . . . . . . . . . . 25
Elimination de pannes . . . . . . . . . . . . . . . . . . . . . . . . . . . . . . . . . . . . . . . . . 25
Mise au rebut . . . . . . . . . . . . . . . . . . . . . . . . . . . . . . . . . . . . . . . . . . . . . . . . 26
Remarques relatives à la déclaration de conformité CE . . . . . . . . . . . . . . . . . . . . . . . . . . 26
Importateur . . . . . . . . . . . . . . . . . . . . . . . . . . . . . . . . . . . . . . . . . . . . . . . . . . 26
Garantie. . . . . . . . . . . . . . . . . . . . . . . . . . . . . . . . . . . . . . . . . . . . . . . . . . . . . 27
Service après-vente . . . . . . . . . . . . . . . . . . . . . . . . . . . . . . . . . . . . . . . . . . . 27
SMA 550 A1
15
Page 19

FR
CH
Introduction
Toutes nos félicitations pour l'achat de votre nouvel appareil.
Vous avez choisi un produit de grande qualité. Le mode d'emploi fait partie de ce
produit. Il contient des remarques importantes concernant la sécurité, l'utilisation
et la mise au rebut. Veuillez vous familiariser avec l'ensemble des consignes
d'opération et de sécurité avant l'usage du produit. N'utilisez le produit que
conformément aux consignes et pour les domaines d'utilisation prévus. En cas
de transfert du produit à un tiers, remettez-lui également tous les documents.
Droits d'auteur
Cette documentation est protégée par les droits d'auteur.
Toute reproduction de ce document, même partielle, ainsi que la réutilisation des
illustrations, même sous une forme modifi ée, suppose l'accord écrit du fabricant.
Utilisation conforme
Cet appareil sert exclusivement à chauff er du lait et à le faire mousser dans le
cadre d'un usage domestique. Il n'est pas prévu pour l'usage en combinaison
avec d'autres liquides ou pour un usage commercial.
Cet appareil est exclusivement réservé à l'utilisation dans le cadre domestique.
N'utilisez pas l'appareil à des fi ns commerciales !
AVERTISSEMENT
Danger par l'usage non conforme !
L'appareil peut présenter un danger en cas d'usage non conforme et/ou
d'usage divergent.
► Utiliser l'appareil exclusivement de manière conforme à sa destination.
► Respecter les procédures décrites dans la présente notice d'utilisation.
Aucune réclamation ne pourra être recevable concernant des dommages résultant
d'une utilisation non conforme, de réparations mal eff ectuées, de modifi cations
non permises eff ectuées sur le matériel ou d'utilisation de pièces de rechange non
agréées.
La personne opérant l'appareil est seule à assumer le risque.
16
SMA 550 A1
Page 20

Accessoires fournis
L'appareil est équipé par défaut des composants suivants :
▯ Mousseur à lait (pichet)
▯ Socle
▯ 3 batteurs (2 x batteur pour chauff er et faire mousser,
1 x batteur pour chauff er)
▯ Mode d'emploi
REMARQUE
Vérifi ez que la livraison est bien complète et qu'elle ne présente pas de
►
dommages apparents.
► En cas de livraison incomplète ou de dommages résultant d'un emballage
défi cient ou du transport, veuillez vous adresser à la hotline du service
après-vente (cf. le chapitre Service après-vente).
Description de l'appareil
1 couvercle
2 porte-batteur
3 anneau d'étanchéité
4 batteur pour chauff er et faire mousser
5 bouton marche/arrêt avec témoin lumineux incorporé
6 socle
7 enroulement du câble
8 batteur pour chauff er
FR
CH
Caractéristiques techniques
Alimentation en tension 220 - 240 V ~, 50 Hz
Puissance nominale 450 - 550 W
SMA 550 A1
17
Page 21

FR
CH
Consignes de sécurité
DANGER - CHOC ÉLECTRIQUE !
► Assurez-vous que le socle avec ses raccords électriques n'entre
jamais en contact avec l'eau ! Laissez entièrement sécher le socle
s'il a été mouillé par inadvertance.
► Utilisez l'appareil uniquement avec le socle fourni.
► Veillez à ce qu'en cours l'opération, le câble d'alimentation ne
soit jamais humide ou mouillé. Menez le câble de telle façon qu'il
ne soit pas coincé ou endommagé d'une autre manière.
► Faites immédiatement remplacer une fi che secteur ou un cordon
d'alimentation endommagés par des techniciens agréés ou le
service après-vente, pour éviter des dommages.
► Vérifi er l'absence de dommages manifestes avant utilisation de
l'appareil. Ne mettez pas en service un appareil endommagé ou
ayant subi une chute.
► Confi ez les réparations sur l'appareil exclusivement à des entre-
prises agréées ou au service après-vente. Toutes réparations non
conformes peuvent faire courir de graves risques à l'utilisateur. A
cela s'ajoute l'expiration de la garantie.
AVERTISSEMENT - RISQUE DE BLESSURES !
► Retirez toujours la fi che secteur de la prise secteur lorsque
vous remplacez les accessoires. Vous évitez ainsi de démarrer
l'appareil par inadvertance.
► L'appareil s'échauff e en cours d'opération. C'est pourquoi,
saisissez-le uniquement au niveau de la poignée.
► Assurez-vous que l'appareil est stable et à la verticale, avant de
le mettre en marche. Sinon, l'appareil peut se renverser et le lait
chaud peut s'en échapper.
► Ne touchez pas les pièces en mouvement en cours d'opération !
18
SMA 550 A1
Page 22

AVERTISSEMENT - RISQUE DE BLESSURES !
► Les enfants à partir de 8 ans et plus pourront utiliser cet appareil
à condition de le faire sous surveillance, ou s’ils ont été instruits
quant à l’utilisation sécurisée de l’appareil et qu’ils aient compris les
dangers en résultant.
► Le nettoyage et la maintenance ne doivent pas être confi és à des
enfants, sauf s’ils sont âgés de 8 ans ou plus et s’ils eff ectuent ces
opérations sous surveillance.
► Éloignez l’appareil et son cordon de raccordement des enfants
âgés de moins de 8 ans.
► Cet appareil peut être utilisé par des personnes ayant des capa-
cités physiques, sensorielles ou mentales réduites ou disposant de
peu d’expérience et/ou de connaissances, à condition qu’elles
soient surveillées ou qu’elles aient été initiées à l’utilisation sécurisée
de l’appareil et qu’elles aient compris les dangers en résultant.
► Ne pas laisser les enfants jouer avec l’appareil.
► Les enfants doivent être surveillés afi n d’éviter qu’ils ne jouent avec
l’appareil.
FR
CH
ATTENTION - DOMMAGES MATÉRIELS !
► N'utilisez pas de temporisateur externe ou un système de télécom-
mande séparé pour opérer l'appareil.
► Ne laissez jamais l'appareil sans surveillance en cours d'opération.
► Assurez-vous que l'appareil, le cordon d'alimentation ou la fi che
secteur n'entre pas en contact avec des sources chaudes telles
que des plaques de cuisson ou des fl ammes ouvertes.
► N'opérez jamais l'appareil à vide. L'appareil risque d'être endom-
magé de manière irréparable.
SMA 550 A1
19
Page 23

FR
CH
Préparatifs
Déballage
♦ Sortez du carton toutes les pièces de l'appareil et la notice d'utilisation.
♦ Retirez tous les matériaux d'emballage.
♦ Nettoyez l'appareil comme décrit dans le chapitre "Nettoyage et entretien".
Recyclage de l'emballage
L'emballage protège l'appareil de tous dommages éventuels au cours du
transport. Les matériaux d'emballage ont été sélectionnés selon des critères de
respect de l'environnement et de recyclage, de sorte qu'ils peuvent être recyclés.
Le retour de l'emballage dans le cycle des matériaux permet d'économiser les
matières premières et réduit la formation de déchets. Recyclez les matériaux
d'emballage qui ne sont plus utilisés en conformité avec les règles locales en
vigueur.
REMARQUE
Dans la mesure du possible, conservez l'emballage d'origine pendant la
►
période sous garantie, afi n de pouvoir emballer l'appareil en bonne et due
forme pour l'expédition si vous étiez amené à faire valoir la garantie.
Opération
DANGER - CHOC ÉLECTRIQUE !
N'amenez jamais le socle électrique 6 à proximité de l'eau – danger de
►
mort par choc électrique !
20
AVERTISSEMENT - RISQUE DE BLESSURES !
► Pour des raisons de sécurité, vous ne devriez pas ouvrir le couvercle 1,
pendant que l'appareil est en service. Il présente alors des risques d'ébouillantage.
► Utilisez toujours du lait frais. Ne consommez pas de lait qui se trouve dans
le pichet depuis un certain temps.
REMARQUE
►
Si, pendant le processus de préparation, vous soulevez le pichet du socle 6,
l’appareil s’arrête. Vous devez remettre le processus de préparation en
marche en appuyant sur le bouton marche/arrêt 5.
SMA 550 A1
Page 24

Chauff er le lait
1) Placez le batteur pour chauff er 8 sur l'arbre d'entraînement à l'intérieur du
pichet. Vous pouvez ranger l'un des batteurs 4 dont vous n'avez pas besoin
dans le porte-batteur 2. Le batteur 4 non utilisé peut être rangé dans un
endroit sec et propre par exemple dans un tiroir à couverts.
2) Retirez le pichet du socle 6, et mettez du lait. Versez au moins autant de lait
jusqu'à atteindre le repère MIN à l'intérieur du pichet. Ne versez toutefois
pas plus de lait que le repère supérieur MAX (
déborder de l'appareil.
3) Posez le pichet sur le socle 6.
4) Placez le couvercle 1.
5) Appuyez sur le bouton marche/arrêt 5. Le témoin de contrôle intégré s'allume.
Le batteur pour chauff er 8 commence à tourner et chauff e le lait de
manière régulière.
6) L’appareil passe hors service et le témoin de contrôle s’éteint dès que le lait
est chauff é à env. 60 - 65 °C.
REMARQUE
Si vous souhaitez interrompre prématurément le processus de préparation,
►
appuyez sur le bouton marche/arrêt 5. Si vous appuyez de nouveau sur
le bouton marche/arrêt 5, le processus de préparation continue.
7) Retirez le couvercle 1 et versez le lait chaud dans le pichet souhaité.
Attendez env. 2 minutes avant de réchauff er une autre portion de lait.
FR
CH
). Sinon, le lait risque de
SMA 550 A1
21
Page 25

FR
CH
Faire mousser le lait
Conseils pour la mousse de lait
■ Cet appareil devrait uniquement servir à faire mousser du lait de vache. Les
autres types de lait se laissent diffi cilement mousser ou peuvent déborder de
l'appareil.
■ Le lait écrémé ou demi-écrémé ne brûle pas aussi facilement que le lait
entier, en cas de teneur trop faible en matières grasses, il existe toutefois
le risque que le lait ne se laisse pas bien mousser. Voilà pourquoi, dans la
mesure du possible utilisez un lait présentant une teneur en matières grasses
de 3,5% ou 1,5%.
■ Un lait bien réfrigéré est plus facile à faire mousser qu'un lait plus tiède.
■ Ne faites pas mousser le lait une deuxième fois, car il risque de brûler.
■ Laissez le lait moussé reposer pendant env. 30 secondes avant d'ajouter la
mousse sur un cappuccino, un espresso, etc.. C'est ainsi que les bulles plus
grandes éclatent et le lait encore liquide se dépose au fond. Vous pouvez
alors utiliser la mousse fi ne.
Elaborer de la mousse de lait
1) Placez le batteur pour chauff er et faire mousser le lait 4 sur l'arbre d'entraînement à l'intérieur du pichet. Vous pouvez ranger le batteur 8 dont vous
n'avez pas besoin dans le porte-batteur 2. Rangez l'autre batteur pour
chauff er et faire mousser 4 dans un endroit propre et sec.
2) Retirez le pichet du socle 6, et mettez du lait. Versez au moins autant de lait
jusqu'à atteindre le repère MIN à l'intérieur du récipient. Ne versez toutefois
pas plus de lait que le repère inférieur MAX (
déborder de l'appareil. Lors de la montée en mousse, le volume du lait en est
décuplé !
3) Posez le pichet sur le socle 6.
4) Placez le couvercle 1.
5) Appuyez sur le bouton marche/arrêt 5. Le témoin de contrôle intégré
s'allume. Le batteur pour chauff er et monter en mousse 4 commence à
tourner, chauff e le lait et le fait monter en mousse.
6) L’appareil passe hors service et le témoin de contrôle s’éteint dès que le lait
a moussé.
). Sinon, le lait risque de
22
SMA 550 A1
Page 26

REMARQUE
Si vous souhaitez interrompre prématurément le processus de préparation,
►
appuyez sur le bouton marche/arrêt 5. Si vous appuyez de nouveau sur
le bouton marche/arrêt 5, le processus de préparation continue.
7) Attendez pendant env. 30 secondes. Pendant ce temps, il se dépose encore
un peu de lait liquide en bas.
8) Retirez le couvercle 1 et versez la mousse de lait dans le pichet souhaité,
par exemple pour confectionner un cappuccino.
Attendez env. 2 minutes, avant de réchauff er une autre portion de lait.
Utiliser la mousse de lait
Vous pouvez utiliser la mousse de lait pour diff érentes variations de boissons :
Cappuccino à la mode italienne
■ Mettez un espresso (env. 25 - 30 ml) dans une tasse d'un contenu d'env.
120 - 180 ml.
■ Ajoutez ensuite la mousse de lait jusqu'à ce que la tasse soit remplie jusqu'au
bord.
Marocchino
■ Faites-y fondre l'équivalent d'une cuillère à café de chocolat au lait.
■ Répartissez le chocolat fondu dans la paroi intérieure d'un verre et versez-y
un espresso.
■ Ajoutez env. 3 - 4 de cuillère à café de mousse de lait et saupoudrez de
poudre de cacao.
FR
CH
Mélange viennois
■ Versez env. 125 ml de café noir et puissant dans une tasse à mocca.
■ Faites mousser env. 110 ml de lait et ajoutez autant de mousse de lait pour
que la tasse soit remplie tout juste en dessous du bord.
■ Selon vos préférences personnelles, vous pouvez ajouter un peu de sucre.
SMA 550 A1
23
Page 27

FR
CH
Nettoyage et entretien
DANGER - CHOC ÉLECTRIQUE !
Avant chaque nettoyage, retirez la fi che secteur de la prise secteur !
►
Sinon, il y a un risque de choc électrique !
► N'ouvrez jamais les éléments du boîtier. La machine ne contient aucun
élément de commande dans ces pièces. Danger de mort par électrocution
lorsque le corps de l'appareil est ouvert.
Ne plongez jamais l'appareil dans de l'eau ou dans d'autres liquides
! Danger de mort par électrocution si des restes d'humidité entrent en
contact avec des pièces sous tension.
AVERTISSEMENT - RISQUE DE BLESSURES !
► Laissez refroidir l'appareil avant le nettoyage. Risque de brûlure !
ATTENTION - DOMMAGES MATÉRIELS !
Ne nettoyez pas l'appareil ou certaines pièces dans le lave-vaisselle !
Sinon, l'appareil sera endommagé de manière irréparable.
► N'utilisez pas de produits nettoyants abrasifs ou corrosifs. Ils peuvent en
eff et agresser la surface et endommager l'appareil de manière irréparable.
REMARQUE
Nettoyez de préférence l'appareil directement après le refroidissement, de
►
manière à éviter que les restes de lait sèchent.
Pour le premier nettoyage grossier, il suffi t de mettre de l'eau avec un peu
de produit vaisselle dans le pichet (le batteur 4/8 est employé). Pour ce
faire, veuillez tenir compte des repères MIN et MAX
Démarrez l'appareil afi n que le batteur 4/8 brasse l'eau.
Rincez l'appareil avec beaucoup d'eau claire.
Pour un nettoyage soigneux, veuillez procéder comme suit :
■ Pour nettoyer, retirez le batteur 4/8 de l'appareil et nettoyez l'intérieur
de l'appareil à l'eau chaude. Ajoutez un peu de produit vaisselle. Essuyez
l'intérieur avec un chiff on doux ou une éponge. A cet égard, veuillez particulièrement faire attention à la zone autour de l'arbre d'entraînement. Rincez
soigneusement l'appareil avec beaucoup d'eau claire.
■ Retirez l'anneau d'étanchéité 3 du couvercle 1 et nettoyez les deux pièces
à l'eau rinçage additionnée d'un peu de produit vaisselle doux. Retirez les
restes de produit vaisselle à l'eau claire et séchez bien les deux pièces.
Insérez à nouveau l'anneau d'étanchéité 3 sur le couvercle 1, afi n que la
lèvre d'étanchéité orientée vers l'extérieur repose en bas du couvercle 1 et
que la lèvre d'étanchéité orientée vers l'intérieur s'enclenche dans la rainure
du couvercle 1.
.
24
SMA 550 A1
Page 28

■ Nettoyez le batteur 4/8 dans de l'eau avec un peu de détergent doux et
rincez le tout à l'eau claire.
■ Nettoyez l'ensemble des surfaces extérieures, le socle 6 et le câble d'ali-
mentation à l'aide d'un chiff on légèrement humidifi é. Séchez bien l'appareil,
avant de l'utiliser à nouveau. En cas de taches tenaces, appliquez un peu
de produit vaisselle doux. Veillez à ce qu'il n'y ait pas résidus de produits
détergents sur l'appareil avant de le remettre en service.
Rangement
■ Laissez d'abord entièrement refroidir l'appareil avant de le ranger.
■ Enroulez le câble d'alimentation autour du dispositif d'enroulement du
câble 7 sous le socle 6.
■ Entreposez l'appareil à un endroit sec.
Elimination de pannes
Défaillance Cause Remède
FR
CH
L'appareil ne
fonctionne pas.
Le lait ne mousse
pas.
La fi che secteur n'est pas
insérée dans la prise
secteur.
L'appareil n'est pas allumé. Allumez l'appareil.
L'appareil est défectueux.
L'appareil est encore trop
chaud.
Le mauvais batteur 8 est
installé dans l'appareil.
Raccordez la fi che secteur
au réseau électrique.
Veuillez vous adresser au
service après-vente.
Laissez refroidir l'appareil.
Insérez le batteur pour
chauff er et monter en
mousse 4.
SMA 550 A1
25
Page 29

FR
CH
Mise au rebut
L'appareil ne doit jamais être jeté dans la poubelle domestique
normale.
Cet appareil est soumis aux impératifs de la directive européenne 2012/19/EU.
Remettez l'appareil destiné au recyclage à une entreprise spécialisée ou
au centre de recyclage de votre commune. Respectez la réglementation en
vigueur. En cas de doutes, contactez votre organisme de recyclage.
Remarques relatives à la déclaration de conformité CE
Cet appareil est conforme aux exigences de base et les
autres prescriptions pertinentes de la directive européenne en
matière de compatibilité électromagnétique 2004/108/EC
ainsi que de la directive "basse tension" 2006/95/EC.
La déclaration de conformité originale est disponible chez
l'importateur.
Importateur
KOMPERNASS HANDELS GMBH
BURGSTRASSE 21
44867 BOCHUM
GERMANY
www.kompernass.com
26
SMA 550 A1
Page 30

Garantie
Cet appareil bénéfi cie de 3 ans de garantie à compter de la date d’achat. L’appareil
a été fabriqué avec soin et consciencieusement contrôlé avant sa distribution.
Veuillez conserver le ticket de caisse en guise de preuve d’achat. Dans le cas où la
garantie s’applique, veuillez appeler le service après-vente compétent. Cette condition doit être respectée pour assurer l’expédition gratuite de votre marchandise.
REMARQUE
Cette garantie concerne uniquement les vices de fabrication et ne couvre
►
pas les dommages de transport, les pièces d'usure ou les dommages subis
par des éléments fragiles, par ex. le commutateur ou les accus.
Ce matériel est exclusivement destiné à un usage privé et non commercial. La
garantie est annulée en cas d’utilisation incorrecte et inappropriée, d’utilisation
brutale et en cas d’intervention qui n’aurait pas été réalisée par un centre de
service après-vente agréé.
Cette garantie ne constitue pas une restriction de vos droits légaux. La période sous
garantie n’est pas prolongée par la garantie du fabricant. Ceci vaut également pour
les pièces remplacées et réparées.
Tous dommages et défauts éventuellement déjà présents à l’achat doivent être notifi és
immédiatement après le déballage, au plus tard deux jours après la date d’achat.
Toutes réparations eff ectuées après la période sous garantie sont payantes.
Service après-vente
Service France
Tel.: 0800 919270
E-Mail: kompernass@lidl.fr
IAN 100076
FR
CH
SMA 550 A1
Service Suisse
Tel.: 0842 665566 (0,08 CHF/Min., mobile max. 0,40 CHF/Min.)
E-Mail: kompernass@lidl.ch
IAN 100076
Heures de service de notre hotline : du lundi au vendredi de 8 h à 20 h (HEC)
27
Page 31

28
SMA 550 A1
Page 32

Indice
Introduzione . . . . . . . . . . . . . . . . . . . . . . . . . . . . . . . . . . . . . . . . . . . . . . . . . 30
Diritto d'autore . . . . . . . . . . . . . . . . . . . . . . . . . . . . . . . . . . . . . . . . . . . . . . . . . . . . . . . . . . 30
Uso conforme . . . . . . . . . . . . . . . . . . . . . . . . . . . . . . . . . . . . . . . . . . . . . . . . . . . . . . . . . . 30
Volume della fornitura . . . . . . . . . . . . . . . . . . . . . . . . . . . . . . . . . . . . . . . . . 31
Descrizione dell'apparecchio . . . . . . . . . . . . . . . . . . . . . . . . . . . . . . . . . . . .31
Dati tecnici . . . . . . . . . . . . . . . . . . . . . . . . . . . . . . . . . . . . . . . . . . . . . . . . . . . 31
Indicazioni di sicurezza . . . . . . . . . . . . . . . . . . . . . . . . . . . . . . . . . . . . . . . . 32
Preparativi . . . . . . . . . . . . . . . . . . . . . . . . . . . . . . . . . . . . . . . . . . . . . . . . . . 34
Estrazione dalla confezione . . . . . . . . . . . . . . . . . . . . . . . . . . . . . . . . . . . . . . . . . . . . . . . 34
Smaltimento della confezione . . . . . . . . . . . . . . . . . . . . . . . . . . . . . . . . . . . . . . . . . . . . . . 34
Uso . . . . . . . . . . . . . . . . . . . . . . . . . . . . . . . . . . . . . . . . . . . . . . . . . . . . . . . . .34
Riscaldamento del latte . . . . . . . . . . . . . . . . . . . . . . . . . . . . . . . . . . . . . . . . . . . . . . . . . . . 35
Schiumatura del latte . . . . . . . . . . . . . . . . . . . . . . . . . . . . . . . . . . . . . . . . . . . . . . . . . . . . . 36
Uso della schiuma di latte . . . . . . . . . . . . . . . . . . . . . . . . . . . . . . . . . . . . . . 37
Cappuccino all'italiana . . . . . . . . . . . . . . . . . . . . . . . . . . . . . . . . . . . . . . . . . . . . . . . . . . . 37
Marocchino . . . . . . . . . . . . . . . . . . . . . . . . . . . . . . . . . . . . . . . . . . . . . . . . . . . . . . . . . . . . 37
Melange viennese . . . . . . . . . . . . . . . . . . . . . . . . . . . . . . . . . . . . . . . . . . . . . . . . . . . . . . . 37
Pulizia e manutenzione . . . . . . . . . . . . . . . . . . . . . . . . . . . . . . . . . . . . . . . .38
Conservazione . . . . . . . . . . . . . . . . . . . . . . . . . . . . . . . . . . . . . . . . . . . . . . . 39
Guasti e possibili rimedi . . . . . . . . . . . . . . . . . . . . . . . . . . . . . . . . . . . . . . . . 39
Smaltimento dell'apparecchio . . . . . . . . . . . . . . . . . . . . . . . . . . . . . . . . . . . 40
Indicazioni sulla dichiarazione di conformità CE . . . . . . . . . . . . . . . . . . . . . . . . . . . . . . . 40
IT
CH
Importatore . . . . . . . . . . . . . . . . . . . . . . . . . . . . . . . . . . . . . . . . . . . . . . . . . . 40
Garanzia . . . . . . . . . . . . . . . . . . . . . . . . . . . . . . . . . . . . . . . . . . . . . . . . . . . . 41
Assistenza . . . . . . . . . . . . . . . . . . . . . . . . . . . . . . . . . . . . . . . . . . . . . . . . . . . 41
SMA 550 A1
29
Page 33

IT
CH
Introduzione
Congratulazioni per l'acquisto del nuovo apparecchio.
Lei ha scelto un prodotto di alta qualità. Il manuale di istruzioni è parte integrante
del presente prodotto. Esso contiene importanti indicazioni per la sicurezza,
l'uso e lo smaltimento. Prima di utilizzare il prodotto, si familiarizzi con tutte le
indicazioni relative ai comandi e alla sicurezza. Utilizzi il prodotto solo come
descritto e per i campi di impiego indicati. In caso di cessione del prodotto a
terzi, consegni anche tutta la documentazione relativa.
Diritto d'autore
La presente documentazione è tutelata dal diritto d'autore.
Qualsiasi riproduzione o ristampa, anche parziale, nonché la riproduzione delle
illustrazioni, anche se modifi cate, è consentita solo previa autorizzazione scritta
del produttore.
Uso conforme
Questo apparecchio serve esclusivamente al riscaldamento del latte e alla produzione di schiuma di latte per ambiente domestico. Esso non è previsto per l'uso
con altri liquidi o per ambienti commerciali.
Questo apparecchio è destinato esclusivamente all'uso in ambienti domestici
privati. Non utilizzare l'apparecchio a scopi commerciali!
AVVISO
Pericolo derivante da uso non conforme!
In caso di uso non conforme o diverso da quello previsto, possono verifi carsi
situazioni di pericolo.
► Utilizzare l'apparecchio esclusivamente in conformità alla sua destinazione.
► Attenersi alle procedure descritte nel presente manuale di istruzioni.
Si esclude qualsiasi rivendicazione per i danni derivanti da uso non conforme,
riparazioni non professionali, modifi che non autorizzate o impiego di parti di
ricambio non omologate.
Il rischio è esclusivamente a carico dell'utente.
30
SMA 550 A1
Page 34

Volume della fornitura
La fornitura standard dell'apparecchio comprende i seguenti componenti:
▯ Montalatte (bricco)
▯ Base
▯ 3 fruste (2 x fruste per riscaldamento e schiumatura,
1 x frusta per riscaldamento)
▯ Istruzioni per l'uso
AVVERTENZA
Controllare la completezza e integrità della fornitura in relazione ai danni
►
visibili.
► In caso di fornitura incompleta o in presenza di danni derivanti da imballag-
gio insuffi ciente o causati dal trasporto, rivolgersi alla Hotline di assistenza
(v. capitolo Assistenza)
Descrizione dell'apparecchio
1 Coperchio
2 Supporto fruste
3 Anello di guarnizione
4 Frusta per riscaldamento e schiumatura
5 Tasto Start/Stop con spia di controllo integrata
6 Base
7 Avvolgimento cavo
8 Frusta per il riscaldamento
IT
CH
Dati tecnici
SMA 550 A1
Tensione di alimentazione 220 - 240 V ~, 50 Hz
Tensione nominale 450 - 550 W
31
Page 35

IT
CH
Indicazioni di sicurezza
PERICOLO DI SCOSSA ELETTRICA!
► Assicurarsi che la base con i collegamenti elettrici non venga mai
a contatto con l'acqua! Se la base si bagnasse accidentalmente,
attenderne la completa asciugatura prima di rimetterla in funzione.
► Utilizzare l'apparecchio solo con l'acclusa base.
► Assicurarsi che il cavo di rete non si bagni o inumidisca mai du-
rante l'uso. Collocarlo in modo tale che non venga schiacciato o
danneggiato in altro modo.
► Fare sostituire immediatamente la spina o il cavo di rete dan-
neggiato da personale specializzato autorizzato o dal centro di
assistenza ai clienti, per evitare rischi.
► Controllare l'apparecchio prima dell'uso per rilevare eventuali
danni visibili. Non mettere in funzione l'apparecchio se è danneggiato o è caduto.
► Fare eseguire le riparazioni solo da aziende specializzate o
dall'assistenza ai clienti. Le riparazioni eff ettuate in modo inadeguato possono causare gravi pericoli per l'utente. In caso contrario,
la garanzia decade.
AVVISO - PERICOLO DI LESIONI!
► Prima di sostituire gli accessori staccare sempre la spina dalla
presa di rete. In tal modo si impedisce l'avviamento accidentale
dell'apparecchio.
► Durante il funzionamento l'apparecchio si surriscalda. Aff errarlo
pertanto esclusivamente dalla maniglia.
► Assicurarsi che l'apparecchio si è posizionato in modo stabile e
in verticale prima di accenderlo. In caso contrario l'apparecchio
potrebbe cadere e spruzzare latte bollente.
► Non toccare le parti rotanti durante il funzionamento!
32
SMA 550 A1
Page 36

AVVISO - PERICOLO DI LESIONI!
► Questo apparecchio può essere utilizzato dai bambini di almeno 8
anni di età solo se sorvegliati o istruiti sull’uso sicuro dell’apparecchio e qualora ne abbiano compreso i pericoli associati.
► La pulizia e la manutenzione a cura dell’utente non devono essere
eseguite da bambini, a meno che non abbiano almeno 8 anni di
età e siano sorvegliati.
► Tenere lontani dall’apparecchio e dal cavo di allacciamento i bam-
bini di età inferiore agli 8 anni.
► Questo apparecchio può essere utilizzato da persone con capa-
cità fi siche, sensoriali o mentali ridotte o insuffi ciente esperienza o
conoscenza, solo se sorvegliate o istruite sull’uso sicuro dell’apparecchio e qualora ne abbiano compreso i pericoli associati.
► I bambini non devono giocare con l’apparecchio.
► Sorvegliare i bambini per assicurarsi che non giochino con l'ap-
parecchio.
ATTENZIONE - DANNI MATERIALI!
► Per il funzionamento dell'apparecchio non utilizzare un timer
esterno o un sistema separato di telecomando.
► Non lasciare mai l'apparecchio incustodito durante l'uso.
► Assicurarsi che l'apparecchio, il cavo di rete o la spina non
vengano mai a contatto con sorgenti di calore come piastre di
cottura o fi amme libere.
IT
CH
► Non azionare mai l'apparecchio a vuoto. In caso contrario,
l'apparecchio potrebbe danneggiarsi irreparabilmente.
SMA 550 A1
33
Page 37

IT
CH
Preparativi
Estrazione dalla confezione
♦ Prelevare tutte le componenti dell'apparecchio e il manuale di istruzioni
dalla confezione.
♦ Rimuovere completamente il materiale di imballaggio.
♦ Pulire l'apparecchio come descritto al capitolo „Pulizia e manutenzione“.
Smaltimento della confezione
L'imballaggio protegge l'apparecchio dai danni da trasporto. I materiali di
imballaggio sono stati selezionati in relazione alla loro ecocompatibilità e alle
caratteristiche di smaltimento, e pertanto sono riciclabili.
Il riciclo dell'imballaggio consente di risparmiare materie prime e riduce la generazione di rifi uti. Smaltire il materiale di imballaggio inutilizzato in conformità
alle norme vigenti localmente.
AVVERTENZA
Durante il periodo di validità della garanzia, se possibile, conservare
►
l'imballaggio originale, per poter imballare adeguatamente l'apparecchio
in caso di intervento in garanzia.
Uso
PERICOLO DI SCOSSA ELETTRICA!
Non collocare mai la base elettrica 6 nelle vicinanze dell'acqua. Pericolo
►
di morte a causa di scossa elettrica!
34
AVVISO - PERICOLO DI LESIONI!
► Per motivi di sicurezza, non aprire il coperchio 1 mentre l'apparecchio è
in funzione. Sussiste il pericolo di ustioni.
► Utilizzare sempre latte fresco. Non consumare latte lasciato a lungo nel
bricco.
AVVERTENZA
Se durante il procedimento di preparazione si solleva il bricco dalla base 6,
►
l’apparecchio si ferma. Per riavviare il procedimento di preparazione è
necessario premere il tasto Start/Stop 5.
SMA 550 A1
Page 38

Riscaldamento del latte
1) Inserire la frusta per il riscaldamento 8 sull'albero motore all'interno del
bricco. Una delle fruste non necessarie 4 può essere inserita nell'apposito
supporto 2. Conservare la frusta 4 non utilizzata in un luogo pulito e
asciutto, ad esempio in un cassetto per le posate.
2) Rimuovere il bricco dalla base 6 e versarvi il latte. Versare una quantità
minima di latte così come indicato dalla marcatura MIN riportata all'interno
del bricco. Non versare tuttavia mai una quantità di latte superiore a quanto
indicato dalla marcatura superiore MAX (
traboccherà.
3) Collocare il bricco sulla base 6.
4) Inserire il coperchio 1.
5) Premere il tasto Start/Stop 5. La spia di controllo integrata si accende. La
frusta per il riscaldamento 8 comincia a ruotare e nel contempo riscalda
uniformemente il latte.
6) L’apparecchio si disattiva e la spia di controllo si spegne non appena il latte
ha raggiunto una temperatura di ca. 60 - 65 °C.
AVVERTENZA
Per interrompere prematuramente il procedimento di preparazione, preme-
►
re il tasto Start/Stop 5. Premendo ancora una volta il tasto Start/Stop 5
il procedimento di preparazione continua.
7) Rimuovere il coperchio 1 e versare il latte nel contenitore desiderato.
Attendere circa 2 minuti prima di riscaldare un'ulteriore porzione di latte.
). In caso contrario, il latte
IT
CH
SMA 550 A1
35
Page 39

IT
CH
Schiumatura del latte
Consigli per la schiuma di latte
■ Con questo apparecchio si deve schiumare solo il latte di mucca. Altri tipi di
latte si possono schiumare solo limitatamente oppure possono traboccare
dall'apparecchio.
■ Il latte scremato o magro non brucia facilmente come il latte intero ma a
causa dello scarso contenuto di grasso c'è il rischio che non si riesca a
schiumare bene. Pertanto utilizzare latte con una percentuale di grasso di
3,5% o 1,5%.
■ Il latte ben raff reddato può essere schiumato meglio del latte non molto
freddo.
■ Non schiumare il latte per la seconda volta altrimenti esso brucerà.
■ Fare riposare il latte schiumato per circa 30 secondi, prima di versare la
schiuma sul cappuccino, espresso, ecc. In tal modo, le bolle d'aria più grosse scoppiano e il latte ancora liquido scende sul fondo. Così si può utilizzare
la schiuma fi ne.
Produzione della schiuma di latte
1) Inserire la frusta per il riscaldamento e la schiumatura 4 sull'albero motore
all'interno del bricco. Una delle fruste non necessarie 8 può essere inserita
nell'apposito supporto 2. L'altra frusta per riscaldamento e schiumatura 4
può essere riposta in un luogo asciutto e pulito.
2) Rimuovere il bricco dalla base 6 e versarvi il latte. Versare una quantità
minima di latte così come indicato dalla marcatura MIN riportata all'interno
del bricco. Non versare tuttavia mai una quantità di latte superiore a quanto
indicato dalla marcatura inferiore MAX (
traboccherà. La schiumatura aumenta il volume del latte!
3) Collocare il bricco sulla base 6.
4) Inserire il coperchio 1.
5) Premere il tasto Start/Stop 5. La spia di controllo integrata si accende. La
frusta per riscaldamento e schiumatura 4 comincia a girare, riscalda il latte
e lo schiuma.
6) L’apparecchio si disattiva e la spia di controllo si spegne non appena il latte
ha schiumato.
). In caso contrario, il latte
36
SMA 550 A1
Page 40

AVVERTENZA
Per interrompere prematuramente il procedimento di preparazione, preme-
►
re il tasto Start/Stop 5. Premendo ancora una volta il tasto Start/Stop 5
il procedimento di preparazione continua.
7) Attendere circa 30 secondi. In questo lasso di tempo il latte ancora liquido
scende sul fondo.
8) Rimuovere il coperchio 1 e versare la schiuma di latte nel contenitore prefe-
rito, ad es. per fare un cappuccino.
Attendere circa 2 minuti prima di schiumare un'ulteriore porzione di latte.
Uso della schiuma di latte
La schiuma di latte può essere utilizzata per varie bevande:
Cappuccino all'italiana
■ Versare un espresso (ca. 25 - 30 ml) in una tazza di capacità compresa fra
120 e 180 ml.
■ Versare la schiuma di latte fi no a riempire la tazza fi no all'orlo.
Marocchino
■ Sciogliere circa un cucchiaino di cioccolata al latte.
■ Distribuire la cioccolata sciolta sulla parete interna di un bicchiere e versarvi
dentro l'espresso.
■ Versare circa 3 - 4 cucchiaini di schiuma di latte e cospargere con polvere
di cacao.
IT
CH
Melange viennese
■ Versare circa 125 ml di caff è nero e forte in una tazza per moca.
■ Schiumare 110 ml di latte e versare schiuma di latte fi no a riempire la tazza
poco sotto l'orlo.
■ A seconda dei gusti personali si può aggiungere ancora altro zucchero.
SMA 550 A1
37
Page 41

IT
CH
Pulizia e manutenzione
PERICOLO DI SCOSSA ELETTRICA!
Prima della pulizia staccare sempre la spina dalla presa di rete! In caso
►
contrario sussiste il rischio di scossa elettrica!
► Non aprire mai alcuna parte dell'alloggiamento dell'apparecchio. In esso
non è presente alcun elemento di comando. L'apertura dell'alloggiamento
comporta il pericolo di morte per scossa elettrica.
Non immergere mai l'apparecchio in acqua o altri liquidi! Può sussistere il pericolo di morte a causa di folgorazione in caso di contatto
di liquidi con parti sotto tensione all'accensione dell'apparecchio.
AVVISO - PERICOLO DI LESIONI!
► Fare raff reddare l'apparecchio prima della pulizia. Pericolo di ustioni!
ATTENZIONE - DANNI MATERIALI!
Non lavare l'apparecchio o sue parti in lavastoviglie! In caso contrario, l'apparecchio potrebbe danneggiarsi irreparabilmente.
► Non utilizzare detergenti abrasivi o corrosivi. Essi possono attaccare la
superfi cie e danneggiare irreparabilmente l'apparecchio.
AVVERTENZA
Si consiglia di pulire l'apparecchio subito dopo l'uso per impedire che i
►
resti di latte si asciughino.
Per una prima pulizia approssimativa, versare acqua con un po' di detersivo nel bricco (la frusta 4/8 è inserita). Rispettare in tal caso le marcature
MIN e MAX
Avviare l'apparecchio in modo che la frusta 4/8 giri nell'acqua.
Lavare quindi l'apparecchio con abbondante acqua pulita.
Per una pulizia accurata procedere come segue:
■ Per la pulizia rimuovere la frusta 4/8 dall'apparecchio e pulire l'interno
dell'apparecchio con acqua calda. Aggiungere un po' di detersivo. Pulire
l'interno con un panno morbido o una spugna. Fare attenzione in particolare
all'area dell'albero motore. Lavare quindi l'apparecchio accuratamente con
abbondante acqua pulita.
■ Rimuovere l'anello di guarnizione 3 dal coperchio 1 e pulire entrambe le
parti con acqua e aggiunta di detergente delicato. Rimuovere i resti di detergente con acqua pulita e asciugare tutto accuratamente. Ricollocare l'anello
di guarnizione 3 sul coperchio 1 in modo che il bordo di guarnizione che
sporge all'esterno si trovi sotto al coperchio 1 e il bordo che sporge all'interno
rientri nella scanalatura sul coperchio 1.
.
38
SMA 550 A1
Page 42

■ Pulire le fruste 4/8 in acqua con detergente delicato e risciacquare tutto
con acqua corrente.
■ Pulire le superfi ci esterne, la base 6 e il cavo di rete con una spugnetta
leggermente inumidita. Asciugare bene l'apparecchio comunque, prima di riutilizzarlo. In caso di sporco resistente, versare un po' di detergente delicato
sul panno. Assicurarsi che non si trovino residui di detergente sull'apparecchio e al suo interno prima di riutilizzarlo.
Conservazione
■ Fare raff reddare completamente l'apparecchio prima di riporlo.
■ Avvolgere il cavo di rete sull'apposito avvolgimento cavo 7 situato sotto la
base 6.
■ Collocare l'apparecchio in un luogo asciutto.
Guasti e possibili rimedi
Guasto Causa Rimedio
IT
CH
L'apparecchio
non funziona.
Il latte non
schiuma.
La spina di rete non si
inserisce nella presa.
L'apparecchio non è
acceso.
L'apparecchio è guasto.
L'apparecchio è ancora
surriscaldato.
Nell'apparecchio è stata
inserita la frusta errata 8.
Connettere la spina di rete
alla rete elettrica.
Accendere l'apparecchio.
Rivolgersi al servizio
clienti.
Fare raff reddare l'apparecchio.
Inserire la frusta per riscaldamento e schiumatura 4.
SMA 550 A1
39
Page 43

IT
CH
Smaltimento dell'apparecchio
Non gettare per alcun motivo l'apparecchio insieme ai normali
rifi uti domestici.
Questo prodotto è conforme alla Direttiva Europea 2012/19/EU.
Smaltire l'apparecchio presso un'azienda autorizzata o presso l'ente comunale
di smaltimento. Rispettare le norme attualmente in vigore. In caso di dubbi
mettersi in contatto con l'ente di smaltimento competente.
Indicazioni sulla dichiarazione di conformità CE
Il presente apparecchio corrisponde ai requisiti fondamentali in
relazione alla conformità e alle relative prescrizioni della Direttiva europea di compatibilità elettromagnetica 2004/108/EC e
della Direttiva basse tensioni 2006/95/EC.
La dichiarazione di conformità originale e completa è a
disposizione presso l'importatore.
Importatore
KOMPERNASS HANDELS GMBH
BURGSTRASSE 21
44867 BOCHUM
GERMANY
www.kompernass.com
40
SMA 550 A1
Page 44

Garanzia
Questo apparecchio è garantito per tre anni a partire dalla data di acquisto.
L'apparecchio è stato prodotto con cura e debitamente collaudato prima della
consegna.
Conservare lo scontrino come prova d'acquisto. Nei casi contemplati dalla
garanzia, mettersi in comunicazione telefonicamente con il centro di assistenza più
vicino. Solo in tal modo è possibile garantire una spedizione gratuita della merce.
AVVERTENZA
La garanzia vale solo per i difetti relativi ai materiali o difetti di fabbricazione,
►
ma non per i danni derivanti dal trasporto, danni alle parti soggette a
usura o fragili, come ad es. interruttori.
Il prodotto è destinato esclusivamente all'uso domestico e non a quello commerciale. La garanzia decade in caso di impiego improprio o manomissione, uso
della forza e interventi non eseguiti dalla nostra fi liale di assistenza autorizzata.
Questa garanzia non costituisce alcun limite ai diritti legali del consumatore.
Il periodo di garanzia non viene prolungato da interventi in garanzia. Ciò vale
anche per le parti sostituite e riparate.
I danni e difetti eventualmente presenti già all'atto dell'acquisto devono essere
segnalati immediatamente dopo il disimballaggio, e comunque entro due giorni
dalla data di acquisto.
Le riparazioni eseguite dopo la scadenza della garanzia sono a pagamento.
Assistenza
Assistenza Italia
Tel.: 02 36003201
E-Mail: kompernass@lidl.it
IAN 100076
IT
CH
Raggiungibilità della hotline: dal lunedì al venerdì, dalle 8.00 alle 20.00 (CET)
SMA 550 A1
Assistenza Svizzera
Tel.: 0842 665566 (0,08 CHF/Min., telefonia mobile max. 0,40 CHF/Min.)
E-Mail: kompernass@lidl.ch
IAN 100076
41
Page 45

42
SMA 550 A1
Page 46

Index
Introduction . . . . . . . . . . . . . . . . . . . . . . . . . . . . . . . . . . . . . . . . . . . . . . . . . . 44
Copyright . . . . . . . . . . . . . . . . . . . . . . . . . . . . . . . . . . . . . . . . . . . . . . . . . . . . . . . . . . . . . . 44
Intended use . . . . . . . . . . . . . . . . . . . . . . . . . . . . . . . . . . . . . . . . . . . . . . . . . . . . . . . . . . . 44
Items supplied . . . . . . . . . . . . . . . . . . . . . . . . . . . . . . . . . . . . . . . . . . . . . . . . 45
Description of the appliance . . . . . . . . . . . . . . . . . . . . . . . . . . . . . . . . . . . . 45
Technical data . . . . . . . . . . . . . . . . . . . . . . . . . . . . . . . . . . . . . . . . . . . . . . . . 45
Safety instructions . . . . . . . . . . . . . . . . . . . . . . . . . . . . . . . . . . . . . . . . . . . . 46
Preparation . . . . . . . . . . . . . . . . . . . . . . . . . . . . . . . . . . . . . . . . . . . . . . . . . .48
Unpacking . . . . . . . . . . . . . . . . . . . . . . . . . . . . . . . . . . . . . . . . . . . . . . . . . . . . . . . . . . . . . 48
Disposal of the packaging . . . . . . . . . . . . . . . . . . . . . . . . . . . . . . . . . . . . . . . . . . . . . . . . . 48
Operation . . . . . . . . . . . . . . . . . . . . . . . . . . . . . . . . . . . . . . . . . . . . . . . . . . . 48
Heating milk . . . . . . . . . . . . . . . . . . . . . . . . . . . . . . . . . . . . . . . . . . . . . . . . . . . . . . . . . . . . 49
Frothing milk . . . . . . . . . . . . . . . . . . . . . . . . . . . . . . . . . . . . . . . . . . . . . . . . . . . . . . . . . . . . 50
Using milk froth . . . . . . . . . . . . . . . . . . . . . . . . . . . . . . . . . . . . . . . . . . . . . . 51
Italian-style cappuccino . . . . . . . . . . . . . . . . . . . . . . . . . . . . . . . . . . . . . . . . . . . . . . . . . . . 51
Marocchino . . . . . . . . . . . . . . . . . . . . . . . . . . . . . . . . . . . . . . . . . . . . . . . . . . . . . . . . . . . . 51
Vienna Melange . . . . . . . . . . . . . . . . . . . . . . . . . . . . . . . . . . . . . . . . . . . . . . . . . . . . . . . . 51
Cleaning and Care . . . . . . . . . . . . . . . . . . . . . . . . . . . . . . . . . . . . . . . . . . . . 52
Storage . . . . . . . . . . . . . . . . . . . . . . . . . . . . . . . . . . . . . . . . . . . . . . . . . . . . . 53
Troubleshooting . . . . . . . . . . . . . . . . . . . . . . . . . . . . . . . . . . . . . . . . . . . . . .53
Disposal of the appliance . . . . . . . . . . . . . . . . . . . . . . . . . . . . . . . . . . . . . . . 54
Notes on the EC Declaration of Conformity . . . . . . . . . . . . . . . . . . . . . . . . . . . . . . . . . . . 54
Importer . . . . . . . . . . . . . . . . . . . . . . . . . . . . . . . . . . . . . . . . . . . . . . . . . . . . . 54
GB
Warranty . . . . . . . . . . . . . . . . . . . . . . . . . . . . . . . . . . . . . . . . . . . . . . . . . . . . 55
Service . . . . . . . . . . . . . . . . . . . . . . . . . . . . . . . . . . . . . . . . . . . . . . . . . . . . . . 55
SMA 550 A1
43
Page 47

Introduction
Congratulations on the purchase of your new appliance.
You have clearly decided in favour of a quality product. These operating instruc-
tions are a part of this product. They contain important information in regard to
safety, use and disposal. Before using the product, familiarise yourself with all of
these operating and safety instructions. Use the product only as described and
only for the specifi ed areas of application. In addition, pass these documents on,
together with the product, to any future owner.
GB
Copyright
This documentation is copyright protected.
Any copying or reproduction, including as extracts, as well as the reproduction of
images, also in an altered state, is only permitted with the written authorisation of
the manufacturer.
Intended use
This appliance is intended solely for the heating of milk and its processing to milk
froth for family domestic use. It is not intended for use with any other liquids or
for commercial applications.
This appliance is intended exclusively for use in domestic households. Do not use
the appliance commercially!
WARNING
Risks from unintended use!
Risks can be engendered if the appliance is used for unintended purposes
and/or other types of use.
► Use the appliance exclusively for its intended purposes.
► Pay heed to the procedures described in these operating instructions.
Claims of any kind resulting from damage caused by improper use, incompetent
repairs, unauthorised modifi cations or the use of non-approved spare parts will
not be acknowledged.
The operator alone bears liability.
44
SMA 550 A1
Page 48

Items supplied
The appliance is delivered with the following components as standard:
▯ Milk Frother (Carafe)
▯ Plinth
▯ 3 Whisks (2 x whisks for heating and frothing,
1 x whisk for heating)
▯ Operating instructions
NOTICE
Check the contents to ensure that everything is present and for signs of
►
visible damage.
► If the contents are incomplete, or have been damaged due to defective
packaging or transportation, contact the Service Hotline (see chapter
Service).
Description of the appliance
1 Lid
2 Whisk holder
3 Sealing ring
4 Whisk for heating and frothing
5 Start/Stop button with integrated indicator lamp
6 Plinth
7 Cable winder
8 Whisk for heating
GB
Technical data
Voltage supply 220 - 240 V ~, 50 Hz
Nominal power rating 450 - 550 W
SMA 550 A1
45
Page 49

GB
Safety instructions
DANGER - RISK OF ELECTRICAL SHOCK!
► Ensure that the plinth with the electrical connections NEVER
comes into contact with water! Allow the plinth to dry completely
should it ever get wet accidentally.
► Use the appliance only with the supplied plinth.
► Ensure that during operation the power cable will never get wet
or damp. Lay it so that it cannot be trapped or damaged in any
manner.
► Arrange for defective plugs and/or power cables to be replaced
at once by qualifi ed technicians or by our Customer Service
Department.
► Before use check the appliance for visible external damage. Do not put
into operation an appliance that is damaged or has been dropped.
► Repairs should only be carried out by authorised specialist
companies or by the Customer Service Department. Incompetent
repairs can result in signifi cant risks for the user. In addition, warranty claims become void.
WARNING - RISK OF PHYSICAL INJURY!
► Before you change accessories, disconnect the appliance from
the mains power socket.. This prevents an unintentional starting of
the appliance.
► The appliance becomes hot during operation. Therefore, only
grasp it by the handle.
► Ensure that the appliance is stable and vertical before switching it on.
Otherwise, the appliance may tip over and spill the hot milk out.
► Do not touch the rotating parts during operation!
46
SMA 550 A1
Page 50

WARNING - RISK OF PHYSICAL INJURY!
► This appliance may be used by children aged 8 years or over if
they are supervised or have been told how to use the appliance
safely and are aware of the potential risks.
► Cleaning and user maintenance tasks must not be carried out by
children unless they are aged 8 years or more and are supervised.
► The appliance and its connecting cable must be kept away from
children younger than 8 years old.
► This appliance can be used by persons with reduced physical, sen-
sory or mental capabilities or lack of experience and knowledge if
they have been given supervision or instruction concerning safe use
of the appliance, and if they are aware of the potential risks.
► Children shall not play with the appliance.
► Children should be supervised to ensure that they do not play
with the appliance.
WARNING - PROPERTY DAMAGE!
► Do not use an external time switch or separate remote control
system to operate the appliance.
GB
► Never leave the appliance unattended during operation.
► Ensure that the appliance, the power cable or the plug do not come
into contact with sources of heat, such as hot plates or open fl ames.
► NEVER operate the appliance when it is empty. The appliance
could be irreparably damaged!
SMA 550 A1
47
Page 51

GB
Preparation
Unpacking
♦ Remove all parts of the appliance and these operating instructions from the
carton.
♦ Remove all packing material.
♦ Clean the appliance as described in the section „Cleaning and Care“.
Disposal of the packaging
The packaging protects the appliance from transport damage. The packaging
materials are selected from the point of view of their environmental friendliness
and disposal technology and are therefore recyclable.
The recirculation of packaging into the material circuit saves on raw material and
reduces the amount of waste generated. Dispose of packaging material that is
no longer needed as per the regionally established regulations.
NOTICE
If possible preserve the appliance's original packaging during the warranty
►
period so that, in the event of a warranty claim, you can package the appliance
ideally for its return.
Operation
DANGER - RISK OF ELECTRICAL SHOCK!
NEVER place the electrical plinth 6 in the vicinity of water - potentially
►
fatal from electric shock!
48
WARNING - RISK OF PHYSICAL INJURY!
► For safety reasons you should not open the lid 1 while the appliance is in
operation. There is a risk of being scalded.
► Always use fresh milk. Do not consume milk that has been standing in the
carafe for some time.
NOTICE
If you lift the carafe off the plinth 6 during the preparation process, the
►
appliance will stop. You will have to start the preparation process again by
pressing the Start/Stop button 5.
SMA 550 A1
Page 52

Heating milk
1) Place the whisk for heating 8 onto the drive shaft inside the carafe. One of
the whisks 4 not required can be clamped and stored in the whisk holder 2.
Keep the other unused whisk 4 in a clean, dry place, for example in a cutlery
drawer.
2) Take the carafe from the plinth 6 and pour the milk in. Thereby, fi ll it with as
much milk as is needed so that at least the minimum mark inside the carafe
is reached. However, never fi ll it with milk beyond the upper MAX-marking
(
3) Place the carafe on the plinth 6.
4) Put the lid 1 on.
5) Press the Start/Stop button 5. The integrated indicator lamp glows. The
whisk for heating 8 starts to rotate and thereby heats the milk uniformly.
6) The appliance switches itself off and the integrated control lamp goes out as
soon as the milk reaches a temperature of 60–65°C.
NOTICE
If you want to stop the preparation process before completion, press the
►
Start/Stop button 5. If you press the Start/Stop button 5 again, the
preparation process will continue.
7) Take the lid off 1 and pour the hot milk into the desired container.
Wait about 2 minutes before you heat up another portion of milk.
). If you do, the appliance may overfl ow.
GB
SMA 550 A1
49
Page 53

GB
Frothing milk
Tips for the milk froth
■ Froth only cow‘s milk with this appliance. Other types of milk can be frothed
only subject to limitations, or can cause the appliance to overfl ow.
■ Low fat or skimmed milk does not burn on as easily as whole milk, however,
a too low fat content contributes to the risk that the milk will not be well
frothed. Therefore, when possible use a milk with 3.5% or 1.5% fat content.
■ Well-cooled milk can be better frothed than less cold.
■ Do not froth the milk a second time, otherwise it may burn on.
■ Leave frothed milk to stand for about 30 seconds before you put the foam
onto cappuccino, espresso, etc. Then the larger bubbles burst and the more
liquid milk sinks to the bottom. You can then use the fi ne foam.
Producing frothed milk
1) Place the whisk for heating and frothing 4 onto the drive shaft inside the
carafe. The whisk 8 not required can be clamped and stored in the whisk
holder 2. The other whisk for heating and frothing 4 you can store in a dry
and clean place.
2) Take the carafe from the plinth 6 and pour the milk in. Thereby, fi ll it with as
much milk as is needed so that at least the minimum mark inside the carafe is
reached. However, never fi ll it with milk beyond the upper MAX-marking (
If you do, the appliance may overfl ow. When frothing, the milk volume multiplies itself manyfold!
3) Place the carafe on the plinth 6.
4) Put the lid 1 on.
5) Press the Start/Stop button 5. The integrated indicator lamp glows. The whisk
for heating and frothing 4 begins to rotate, it heats the milk and froths it.
6) The appliance switches itself off and the integrated control lamp goes out as
soon as the milk is frothed.
).
50
SMA 550 A1
Page 54

NOTICE
If you want to stop the preparation process before completion, press the
►
Start/Stop button 5. If you press the Start/Stop button 5 again, the
preparation process will continue.
7) Wait about 30 seconds. In this time the still liquid milk fl ows to the bottom.
8) Remove the lid 1 and pour the milk froth into the desired container to make,
for example, a cappuccino.
Wait about 2 minutes before you heat up another portion of milk.
Using milk froth
You can use the milk froth for various drink variations:
Italian-style cappuccino
■ Pour an espresso (about 25 - 30 ml) into an approx. 120 - 180 ml cup.
■ Then pour milk froth onto it until the cup is fi lled to the brim.
Marocchino
■ Melt about a teaspoon of milk chocolate.
■ Spread the melted chocolate onto the inside wall of a glass and pour an
espresso in.
■ Add 3 - 4 teaspoons of frothed milk and then sprinkle it with cocoa powder.
Vienna Melange
■ Pour about 125 ml of strong black coff ee into a mocha coff ee cup.
■ Froth up about 110 ml of milk and add as much milk froth as is needed to fi ll
the cup to just below the rim.
■ Depending on personal taste, you can add a little sugar.
GB
SMA 550 A1
51
Page 55

GB
Cleaning and Care
DANGER - RISK OF ELECTRICAL SHOCK!
Before cleaning it, disconnect the plug from the mains power socket!
►
Otherwise there is the risk of receiving an electric shock!
► NEVER open any housing parts. There are no user-serviceable elements
inside. When the housing is open, there is the risk of receiving a potentially
fatal electrical shock.
NEVER immerse the appliance in water or other liquids! This would
bring about the risk of a potentially fatal electric shock upon the
next use of the appliance should moisture be present in the voltage
conducting elements.
WARNING - RISK OF PHYSICAL INJURY!
► Let the appliance cool down before cleaning it. Risk of burns!
WARNING - PROPERTY DAMAGE!
Do not clean the appliance or parts of it in the dishwasher!
If you do so, the appliance will be damaged beyond repair.
► Do not use abrasive or caustic cleaning agents. These can attack the
surface and damage it beyond repair.
NOTICE
Ideally, clean the appliance directly after cooling, so that milk residues can
►
not dry onto it.
For the fi rst coarse cleaning put some water and a little mild detergent into
the carafe (the whisk used 4/8 is still fi tted). Thereby, pay heed to the
MIN and MAX
Start the appliance so that the whisk ploughs 4/8 through the water.
Afterwards, rinse the appliance out with copious clean water.
For a thorough cleaning, proceed as follows:
■ Remove the whisk 4/8 from the appliance to clean it and clean the inside
of the appliance with warm water. Add a little detergent. Wipe the interior
with a soft cloth or sponge. Pay special attention to the area around the
drive shaft. Afterwards, rinse the appliance out with copious clean water.
■ Pull the sealing ring 3 off of the lid 1 and clean both parts in mild soapy
water. Remove detergent residues with clean water and dry both parts well.
Push the sealing ring 3 back onto the lid 1, so that the outwardly facing
sealing lip is located at the bottom of the lid 1 and the inwardly facing sealing lip engages in the groove of the lid 1.
- markings.
52
SMA 550 A1
Page 56

■ Clean the whisks 4/8 in mild soapy water and then rinse them well with
clean water.
■ Clean all exterior surfaces, the plinth 6 and the power cable with a damp
cloth. In all cases, dry the appliance well before using it again. For stubborn
soiling use a mild detergent on the cloth. Ensure that there are no detergent
residues located on and in the appliance before taking it back into service.
Storage
■ Let the appliance cool down completely before putting it into storage.
■ Wrap the power cable around the cable winder 7 under the plinth 6.
■ Store the appliance at a dry location.
Troubleshooting
Malfunction Cause Remedy
GB
The appliance
does not work.
The milk is not being frothed.
The plug is not connected
into the mains power
socket.
The appliance is not
switched on.
The appliance is defective.
The appliance is still too
hot.
The false whisk 8 is fi tted
in the appliance.
Connect the plug into a
mains power socket.
Switch the appliance on.
Contact Customer
Services.
Let the appliance cool
down.
Fit the whisk for heating
and frothing 4.
SMA 550 A1
53
Page 57

Disposal of the appliance
Do not dispose of this appliance in your normal domestic waste.
This product is subject to the provisions of European Directive
2012/19/EU.
Dispose of the appliance through an approved disposal centre or at your com-
munity waste facility. Observe the currently applicable regulations. In case of
doubt, please contact your waste disposal centre.
Notes on the EC Declaration of Conformity
GB
With regard to conformity with essential requirements
and other relevant provisions, this appliance complies
with the guidelines of the Electromagnetic Compatibility
Directive 2004/108/EC and the Low Voltage Directive
2006/95/EC.
The complete original Declaration of Conformity can be
obtained from the importer.
Importer
KOMPERNASS HANDELS GMBH
BURGSTRASSE 21
44867 BOCHUM, GERMANY
www.kompernass.com
54
SMA 550 A1
Page 58

Warranty
You receive a 3-year warranty for this appliance as of the purchase date. The
appliance has been manufactured with care and meticulously examined before
delivery.
Please retain your receipt as proof of purchase. In the case of a warranty claim,
please make contact by telephone with our service department. Only in this way
can a post-free despatch for your goods be assured.
NOTICE
►
This product is for domestic use only and is not intended for commercial use.
The warranty becomes void in cases of abusive and improper handling, use of
force and internal modifi cations not carried out by our authorised Service Centre.
Your statutory rights are not restricted in any way by this warranty.
The warranty period is not extended by repairs made under the warranty.
This applies also to replaced and repaired parts.
Damages and defects extant at the time of purchase must be reported immediately after unpacking, resp. no later than two days after the date of purchase.
Repairs made after the lapse of the warranty period are subject to charge.
Service
Service Great Britain
Tel.: 0871 5000 720 (£ 0.10/Min.)
E-Mail: kompernass@lidl.co.uk
IAN 100076
The warranty covers only claims for material and manufacturing defects,
not for transport damages, wearing parts or for damage to fragile components, e.g. switches.
GB
SMA 550 A1
Hotline availability: Monday to Friday 08:00 - 20:00 (CET)
55
Page 59

KOMPERNASS HANDELS GMBH
BURGSTRASSE 21
44867 BOCHUM
DEUTSCHLAND / GERMANY
www.kompernass.com
Stand der Informationen · Version des informations
Versione delle informazioni · Last Information Update:
04 / 2014 · Ident.-No.: SMA550A1-032014-1
IAN 100076
 Loading...