


DEHUMIDIFIER SLE 265 B3
DEHUMIDIFIER
Operating instructions
IAN 298611
LUFTENTFEUCHTER
Bedienungsanleitung

Before reading, unfold the page containing the illustrations and familiarise yourself with all functions of
the device.
Klappen Sie vor dem Lesen die Seite mit den Abbildungen aus und machen Sie sich anschließend mit allen
Funktionen des Gerätes vertraut.
GB / IE / NI Operating instructions Page 1
DE / AT / CH Bedienungsanleitung Seite 27


Contents
Introduction ...................................................2
Copyright ............................................................... 2
Limitation of Liability ....................................................... 2
Intended use ............................................................ 2
Warning notices .......................................................... 3
Safety. . . . . . . . . . . . . . . . . . . . . . . . . . . . . . . . . . . . . . . . . . . . . . . . . . . . . . . . 4
Risk of electrocution ....................................................... 4
Risk of electrocution due to moisture .......................................... 4
Risk of explosion ......................................................... 5
Risk of disease ........................................................... 5
Basic safety instructions .................................................... 6
Operation ....................................................8
Package contents and transport inspection ..................................... 8
Disposal of the packaging .................................................. 8
Appliance description ...........................................9
Before initial use ........................................................10
Electrical connection .....................................................10
Guidelines for operation .................................................. 10
Automatic defrosting ..................................................... 10
Handling and use .............................................11
Switching the appliance on/off ............................................. 11
Air outlet valve .......................................................... 11
Operating status displays ................................................. 12
Selecting programmes .................................................... 13
Timer function ........................................................... 14
Child lock .............................................................. 14
Water tank ............................................................. 15
Hose drainage ..........................................................16
Cleaning .....................................................18
Cleaning and changing the filter ............................................ 19
Protection against overheating ..............................................20
Storage .....................................................20
Troubleshooting ..............................................20
Causes of malfunction and fault rectification ................................... 20
Disposal .....................................................22
Disposal of the refrigerant .................................................22
Attachment ..................................................23
Technical data .......................................................... 23
Notes on the Declaration of Conformity ...................................... 23
Kompernass Handels GmbH warranty .......................................24
Service ................................................................ 25
Importer ............................................................... 25
SLE 265 B3
GB│IE│NI │ 1 ■

Introduction
Congratulations on the purchase of your new appliance.
You have selected a high-quality product. The operating instructions are part of this
product. They contain important information about safety, usage and disposal.
Before using the product, please familiarise yourself with all operating and safety
instructions. Use the product only as described and for the range of applications
specified. Retain these instructions for future reference. Please also pass on these
operating instructions to any future owner.
Copyright
This documentation is protected by copyright.
Any copying or reproduction, including in the form of extracts, or any reproduc-
tion of images (even in a modified state), is permitted only with the written
authorisation of the manufacturer.
Limitation of Liability
All technical information, data and instructions for the connection and operation
contained in these operating instructions correspond to the latest available at the
time of printing and, to the best of our knowledge, take into account our previous
experience and know-how.
No claims may be derived from the specifications, figures and descriptions in
these operating instructions.
The manufacturer assumes no liability for damages sustained in consequence of
non-adherence to the operating instructions, inappropriate use, improper repairs,
modifications undertaken without permission or the use of unauthorised spare
parts.
Intended use
The appliance is exclusively intended to dehumidify living spaces, basements or
storage areas with an ambient temperature of 5°C to 35°C. The appliance may
only be used indoors. The appliance is intended solely for personal and not
commercial use. Usage other than as described above is impermissible and may
result in injury and/or damage to the appliance. The manufacturer accepts no
liability for damage caused by improper application or usage. The risk shall be
borne solely by the user.
■ 2 │ GB│IE│NI
SLE 265 B3

Warning notices
The following types of warning are used in these operating instructions:
DANGER
A warning notice at this hazard level indicates an imminently
hazardous situation.
Failure to avoid this hazardous situation could result in serious injuries or even
death.
► Follow the instructions in this warning notice to avoid the risk of death or
serious injury.
WARNING
A warning at this hazard level indicates a potentially
hazardous situation.
Failure to avoid this hazardous situation could result in injury.
► Follow the instructions in this warning notice to prevent injury.
CAUTION
A warning notice at this hazard level indicates a risk of
property damage.
Failure to avoid this situation could result in property damage.
► Follow the instructions in this warning notice to prevent property damage.
NOTE
► A note provides additional information that makes handling the appliance
easier for you.
SLE 265 B3
GB│IE│NI │ 3 ■

Safety
This section contains important safety instructions for using the appliance.
Improper use may result in personal injury and property damage.
Risk of electrocution
DANGER
Risk of fatal injury from electrocution!
Contact with live cables or components can result in
a fatal injury!
Please observe the following safety guidelines to prevent
electrical hazards.
► Do not use the appliance if the power cable or the plug
is damaged.
► There is a risk of electrocution if live connections are
touched and the electrical and mechanical structure is
changed.
Risk of electrocution due to moisture
DANGER
► Do not place the appliance in water, in water pooling
areas or puddles.
► Never operate the appliance near a bath tub, a shower,
a filled wash basin or similar structures.
► Do not immerse appliance, the cabling or the mains
plug in water or other fluids.
► Protect the appliance from water droplets or spray.
► In the event that fluid enters the appliance (apart from in
the water tank), disconnect the mains plug immediately.
Arrange to have the appliance checked before using it
again.
► Do not handle the appliance with damp hands.
► If the appliance falls into water, disconnect the mains plug
immediately. Only then should you remove the appliance.
■ 4 │ GB│IE│NI
SLE 265 B3

Risk of explosion
DANGER
► Do not use the appliance in a potentially explosive en-
vironment containing combustible liquids, gases or dusts.
Electrical appliances generate sparks that can ignite the
dust or fumes.
Risk of disease
DANGER
► The stored water is not suitable for drinking or watering.
There are potential health hazards.
WARNING: MATERIAL DAMAGE
► Do not use the appliance in swimming pools, wash
rooms or similar facilities.
► The appliance is not suitable for drying lagging. If in-
sulation or lagging materials are damp after a pipe has
burst, consult an expert under all circumstances.
► Never expose the appliance to temperatures of 0°C
or lower. Residual water in the pipes could freeze and
damage the system.
SLE 265 B3
► Do not use the appliance in a dusty or chlorinated en-
vironment.
GB│IE│NI │ 5 ■

Basic safety instructions
To ensure safe operation of the appliance, follow the safety
guidelines set out below:
■ Check the appliance for visible external damage before
use. Do not use an appliance that has been damaged or
dropped.
■ To avoid possible risks, arrange for damaged cables or
connections to be replaced by an authorised specialist or
the Customer Service Department.
■ Do not operate the appliance outdoors.
■ During operation, always keep windows and doors closed
so that the appliance can work effectively.
■ Do not operate the appliance in the proximity of highly
inflammable gases or materials, near naked flames or in
areas prone to oil and water splashing.
■ This appliance may be used by children aged 8 years and
above and by persons with limited physical, sensory or
mental capabilities or lack of experience and knowledge,
provided that they are under supervision or have been told
how to use the appliance safely and are aware of the potential risks. Do not allow children to use the appliance as a toy.
Cleaning and user maintenance tasks may not be carried
out by children unless under supervision.
■ All repairs must be carried out by authorised specialist
companies or by the Customer Service department.
Improper repairs can pose significant risks to the user.
It will also invalidate any warranty claims.
■ Do not expose the appliance to rain. Protect the appliance
against moisture and the ingress of fluids and objects into
the casing. Never immerse the appliance in water and do
not place objects containing fluids (e.g. vases) on the appliance. The appliance could be irreparably damaged!
■ Do not place heavy objects on the appliance.
■ 6 │ GB│IE│NI
SLE 265 B3

■ Do not cover the appliance (e.g. with newspapers, cushions
or blankets).
■ Do not insert any objects into the ventilation slits.
■ Avoid direct sunlight.
■ Do not place any naked flames, e.g. burning candles, on or
directly next to the appliance.
■ In the event of malfunctions, and in bad weather, disconnect
the plug from the mains power socket.
■ Ensure that the air inlet and air outlet apertures remain free
of soiling during operation. Never cover the appliance!
■ Always place the appliance on a solid, flat surface so that it
cannot tip over.
■ Do not install the appliance. Position the side panels of the
appliance so there is a clearance of at least 20 cm from
walls or other objects. Also ensure a clearance of at least
50 cm from the front, rear and top panels of the appliance
in order to ensure good air circulation.
■ The appliance may only be operated in rooms with an ambi-
ent temperature of 5°C to 35°C.
■ Use the appliance only in rooms up a total of 20 m².
■ Clean the air filters before they become heavily soiled.
■ While draining via a hose, ensure that it does not become
■ Operate the appliance only together with the water tank or
■ Connect the safety plug only to a properly installed, easily
SLE 265 B3
blocked and that the open end of the hose is positioned at
a lower level than the outlet aperture. The end of the hose
must be positioned above a drain.
with the hose installed.
accessible plug socket with protected contacts, the voltage
of which corresponds to the specifications on the rating
plate. The plug socket must remain easily accessible even
after connection.
GB│IE│NI │ 7 ■

■ Before cleaning, always disconnect the mains plug from the
mains power socket.
■ Always transport the appliance in an upright position! Use
the carrying handle for transport. The water tank must be
emptied before transport.
Operation
Package contents and transport inspection
The appliance is supplied with the following components as standard:
▯ Dehumidifier
▯ Hose
▯ EU garden hose adapter
▯ These operating instructions
NOTE
► Check the package for completeness and signs of visible damage.
► If the delivery is incomplete or damage has occurred as a result of defec-
tive packaging or during transport, contact the Service hotline (see section
Service).
♦ Remove all packaging materials and all transport restraints from the
appliance.
♦ Remove the film from the control panel.
Disposal of the packaging
Dispose of the packaging in an environmentally friendly manner. Note the
labelling on the packaging and separate the packaging material components for
disposal if necessary. The packaging material is labelled with abbreviations (a)
and numbers (b) with the following meanings:
1–7: plastics, 20–22: paper and cardboard, 80–98: composites
■ 8 │ GB│IE│NI
SLE 265 B3

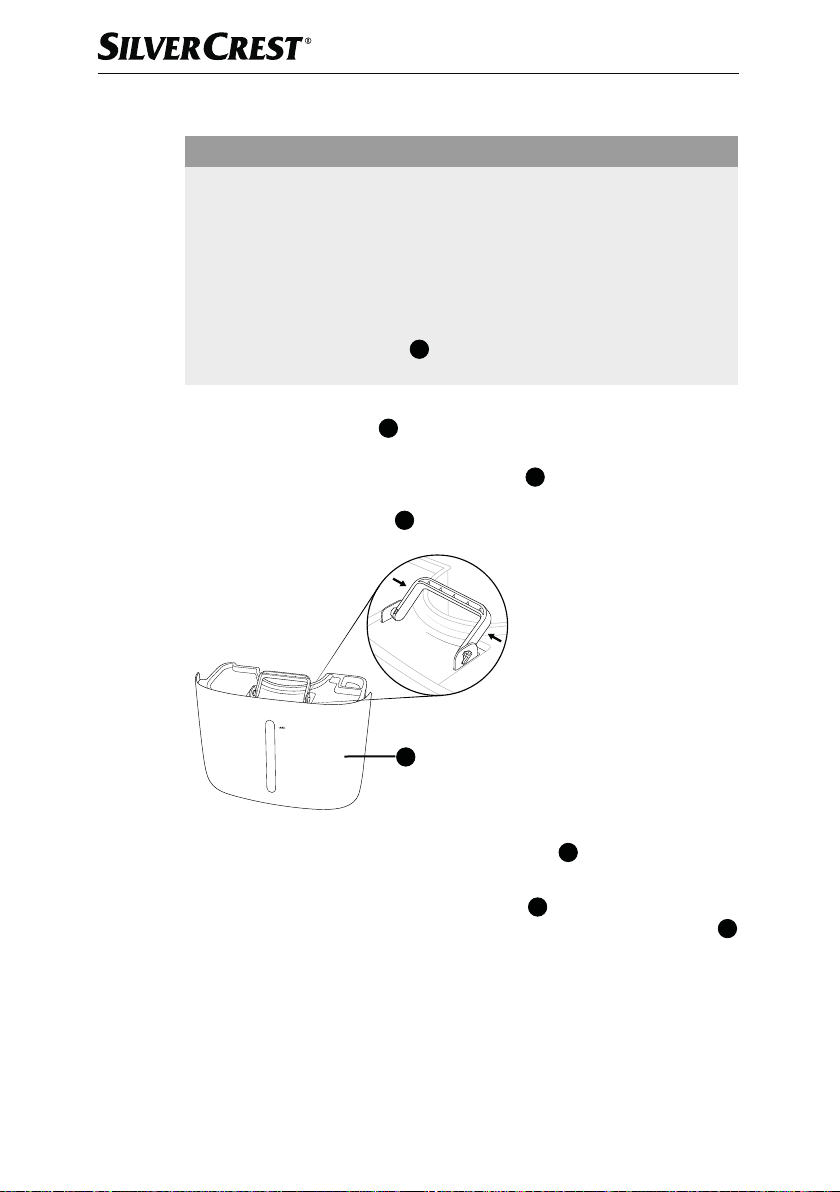
Appliance description
Control panel
2
Air outlet valve
3
LED panel
4
Water tank
5
Carrying handle
6
Air inlet
7
Plastic frame
8
Carbon filter
9
Cable retainer
10
Mains cable
11
Safety clip
12
Outlet
13
Drainage cap
14
Programme LEDs
15
Display
16
TANK FULL LED
17
TIMER LED
18
AUTO DEFROST LED
19
OPERATION LED
20
STAND-BY button
21
TIMER button
22
DOWN arrow button
23
UP arrow button
24
MODE button
25
Hose
26
EU garden hose adapter
SLE 265 B3
GB│IE│NI │ 9 ■

Before initial use
♦ Place the appliance on a flat, dry and solid surface.
♦ Allow the appliance to remain in the usage position for approx. 30 minutes
so that the coolant can settle.
♦ Check whether the water tank
♦ Insert the plug into a mains power socket.
4
has been correctly inserted.
Electrical connection
CAUTION
► Before connecting the appliance, compare the specifications for the
required input voltage on the rating plate with the intended voltage source
for operation. This data must agree so that the appliance is not damaged.
► The power cable must always be easily accessible, so that the appliance
can be quickly removed from the mains in the event of an emergency.
► Check whether the power cable is undamaged and that it is not routed
over hot surfaces and/or sharp edges, otherwise it will become damaged.
► Ensure that the power cable is not taut or kinked.
Guidelines for operation
■ If the air in your living spaces is constantly excessively humid, the cause should
be identified and addressed. (Running the dehumidifier continuously for years is
not reasonable.)
■ The optimal ambient temperature for dehumidifying the air is 5°C to 35°C.
Using a dehumidifier at temperatures below 5°C is redundant, as there is little
humidity in the air.
■ During operation, room temperature can increase by between 1°C and 4°C,
depending on the size of the room. This is normal.
Automatic defrosting
To ensure that the appliance does not ice up during sustained operation, it defrosts
automatically. The defrosting function is activated automatically and cannot be
switched on manually. The appliance cannot be switched off during defrosting.
During defrosting, the AUTO DEFROST LED 18 lights up. The lower the ambient
temperature at which the appliance is operated, the earlier or more often the
automatic defrosting is activated. Once the defrosting process is complete, the
appliance resumes operation in the previous selected settings.
■ 10 │ GB│IE│NI
SLE 265 B3

Handling and use
This section provides you with important information on handling and using the
appliance.
Switching the appliance on/off
♦ Press the STAND-BY button 20 to switch on the appliance.
You will hear a beep and the OPERATION LED
♦ Press the STAND-BY button
You will hear a beep and the OPERATION LED
NOTE
► The appliance starts in the mode last selected.
► After a power failure, if the appliance is disconnected from the mains, or
after switching off owing to the overheating protection, the appliance
restarts in the mode last selected.
♦ If a timer has been programmed, the appliance switches off definitively
upon lapse of the time specified (1–24 hours).
♦ If the relative humidity value has been defined in the TARGET HUMIDITY
programme, the appliance switches off once the value has been attained.
If the value is exceeded, the appliance switches on again.
♦ The appliance switches off if the water tank
If wrongly positioned, or if the water tank
16
FULL LED
NOTE
► The water tank
condensate cannot be collected properly.
flashes and you will hear a beep if the appliance is switched on.
4
must be fully inserted in the appliance; otherwise, the
19
lights up.
20 to switch off the appliance.
19
goes out.
4
is full or has been removed.
4
has been removed, the TANK
Air outlet valve
to dry washing, for example. In this way, you can direct the air flow towards the
wet laundry.
SLE 265 B3
There is an adjustable valve 2 on the air outlet on the
upper side of the appliance that you can open. You can
set the valve 2 at various angles to determine the air
flow. This can be helpful if you are using the appliance
GB│IE│NI │ 11 ■

Operating status displays
The various operating statuses are indicated by means of LEDs (14 ,16, 17, 18, 19)
and the display 15. In addition, there is an LED panel 3 on the front of the appliance that shows the relative humidity level (colour-coded).
LED indicators
LED lit Meaning
TANK FULL
TIMER
AIR CLEAN
DRY CLOTHES
TARGET HUMIDITY
AUTOMATIC
OPERATION
AUTO DEFROST
16
17
19
18
Display indicator
Display Meaning
During operation the current relative humidity is permanently
displayed.
The water tank is full or is not inserted.
A switch-off time has been activated.
Show the selected programme.
14
The appliance is switched on.
Automatic defrosting is activated.
LED panel
Colour Meaning
Red Relative humidity HIGH (> 70%)
Green Relative humidity MID (≥ 50 to ≤ 70%)
Yellow Relative humidity LOW (< 50%)
NOTE
► Note that the values for the relative humidity have a tolerance of approx.
± 3 %, and switching on the appliance or dehumidification may be slightly
delayed.
■ 12 │ GB│IE│NI
SLE 265 B3

Selecting programmes
The appliance has 4 distinct programmes.
♦ Press the MODE BUTTON
The programme LED
TARGET HUMIDITY
This programme offers you the option of setting the desired air humidity level.
♦ Press the arrow button
steps between 30% and 80%. The set value flashes for approx. 5 seconds
on the display 15 and then the current relative humidity is shown again.
Additionally, you also have the option to select the setting if you want to
make a setting below 30% relative humidity. This setting allows you to achieve
a very low humidity as the dehumidification runs permanently.
NOTE
► The minimum humidity that can be achieved in the
on many factors, such as the room size or the ambient temperature, etc.
Therefore it is not possible to define a generally applicable minimum value.
AUTOMATIC
The relative humidity that should be achieved is set permanently to 55%. The
appliance dehumidifies until this value is achieved and then switches off. If relative humidity increases again, the appliance switches on again. Changes in the
desired humidity are not possible in this programme.
Select this programme for sustained dehumidification at a comfortable relative
humidity of 55%.
24
repeatedly to set the desired programme.
14
of the set programme lights up.
22 or 23 to set the desired humidity in 5%
mode is dependent
SLE 265 B3
GB│IE│NI │ 13 ■

DRY CLOTHES
You can use this programme to dry damp laundry faster. Move the air outlet
valve 2 so that the air current is directed towards the articles of clothing to be
dried. Changes in the desired humidity are not possible in this programme.
AIR CLEAN
No dehumidification takes place in this programme. The air in the room is drawn
in via the filter in front of the air inlet aperture where it is purified.
Select this programme if you want to purify but not dehumidify the air in the
room.
Timer function
The appliance is equipped with a timer function that can be used with any one of
the 4 programmes. One of 24 switch-off times, ranging from 1 to 24 hours, can
be selected. Once the set time has elapsed, the appliance switches off permanently.
♦ Press the TIMER button
and
♦ Press the arrow button
24 hours. The selected switch-off time flashes for approx. 5 seconds on the
display 15 and afterwards the current relative humidity is displayed.
♦ To end the timer prematurely, press the TIMER button
The TIMER LED 17 goes out and the current relative humidity value is shown
on the display 15.
21 during operation. The TIMER LED 17 lights up
flashes on the display 15.
22 or 23 to set a switch-off time from 1 to
21 twice.
Child lock
The appliance is equipped with a child lock to prevent children from accidentally
switching the appliance on or off or making settings. When the child lock is activated, all of the appliance keys are deactivated.
♦ Press both arrow buttons
3 seconds. You will hear a beep and will appear on the display 15.
The child safety lock is activated.
♦ Press both arrow buttons
approx. 3 seconds to deactivate the child lock. You will hear a beep
and the display
■ 14 │ GB│IE│NI
goes out.
+
+
22
+ 23 at the same time for approx.
22
+ 23 at the same time again for
SLE 265 B3

Water tank
The water tank 4 has a capacity of approx. 6.5 litres. The water level is indicated
on the front of the water tank 4. The appliance may only be operated once the
water tank 4 is inserted. If the water tank 4 is full, the TANK FULL LED 16 will
flash and the appliance will beep for about 20 seconds. The appliance switches
off after a few seconds. The TANK FULL LED
emptied and replaced in the appliance.
♦ Pull the water tank
Use the grips to carry the water tank 4 (see figure 1).
Fig. 1
♦ Tip out the water and replace the water tank 4 into the appliance. The
appliance continues in the previously set programme for about 3 minutes.
16
flashes until the water tank 4 is
4
out of the appliance using the grips on the side.
SLE 265 B3
GB│IE│NI │ 15 ■

Hose drainage
In very damp rooms, it is often more appropriate for the water not to collect in
the water tank 4, but for it to be drained directly through a hose. You can use
the supplied hose 25 or the EU garden hose adapter 26 to set up a permanent
drainage.
CAUTION
► When draining via the hose, the appliance runs continuously. During hose
drainage, ensure that the hose is not kinked and that it runs downwards
over its entire length as the appliance does not have a pump for drainage.
► Check all connections in the system regularly for watertightness.
♦ Unscrew the cap
♦ Either connect the supplied hose
hose adapter 26 to the outlet 12 (see figs. 3 + 4).
♦ If you are using the EU garden hose adapter
the EU garden hose adapter 26 (see fig. 4).
13
on the rear of the appliance (see fig. 2).
25
to the outlet 12 or screw the EU garden
26
, screw a garden hose onto
13
12
25
12
Fig. 2 Fig. 3 Fig. 4
CAUTION
► Screw the EU garden hose adapter
hand-tight only. Do not use a
26
wrench as this could damage the EU garden hose adapter 26.
■ 16 │ GB│IE│NI
26
SLE 265 B3

NOTE
26
► Ensure that the seal of the EU garden hose adapter
is always inserted (the
seal is already fitted on delivery).
► Depending on the garden hose system you use, you may need an additional
adapter. These are available from specialist stores.
♦ Set up the appliance so that the end of the hose is positioned over a drain.
The open end of the hose must be positioned lower than the appliance's
outlet (i.e. the hose must run downwards).
♦ Switch on the appliance as usual and select a programme.
♦ If you wish to drain into the water tank
4
again, switch off the appliance,
pull off the hose 25 or unscrew the EU garden hose adapter 26 together
with the garden hose.
♦ Screw the cap
13
back onto the outlet 12.
SLE 265 B3
GB│IE│NI │ 17 ■
Cleaning
CAUTION
Possible damage to the appliance.
► Do not allow any liquids or moisture to get into the appliance.
► To avoid irreparable damage to the appliance, never immerse it in water.
► Always remove the mains plug from the mains power socket before cleaning
the appliance.
► Do not use aggressive or abrasive cleaning agents, as these may corrode
the surface of the casing.
► Do not clean the water tank
damaged.
♦ If required, wipe the casing with a slightly damp cloth.
♦ Remove the water tank
inside and out, before replacing it.
♦ In order to clean the inside of the water tank 4, you must remove the lid.
To do this, tip the grip backwards until the pins on the grip line up with the
groove on the water tank 4. You can now remove the grip by pushing it
on both sides out of the groove (see figure 5).
4
in a dishwasher. Otherwise, it will be
4
and pour out the water. Dry it thoroughly, both
Fig. 5
♦ Now remove the lid upwards from the water tank
♦ Assembly is carried out in the reverse order.
♦ We recommend that you clean the water tank 4 regularly every two weeks
to prevent the build-up of mould and bacteria. To do this, fill the water tank 4
with lukewarm water, adding a standard detergent. Rinse repeatedly with
lukewarm water. In addition, disinfection is recommended following cleaning. To do this, use a standard, alcohol-based disinfecting agent or highproof alcohol. Both substances are completely harmless if rinsed repeatedly
with lukewarm water afterwards.
■ 18 │ GB│IE│NI
4
4
.
SLE 265 B3

Cleaning and changing the filter
The performance of the appliance also depends upon how clean the filter is. The
carbon filter 8 should be cleaned every 2 weeks and changed every 6 months.
NOTE
► You can purchase new carbon filters in almost all shops selling household
goods. The carbon filter mats just need to be cut to size.
♦ Switch the appliance off and pull out the mains plug .
6
♦ To remove the air inlet grille
inlet grille 6 off backwards.
♦ Vacuum the air inlet grille
♦ To remove the plastic frame
the frame from the mounts on the appliance.
♦ Now, remove the carbon filter 8.
♦ Wash the carbon filter 8 in lukewarm water.
♦ Allow the carbon filter
appliance.
♦ Assembly is carried out in the reverse order (see fig. 6).
6
7
, there are grips above the grille. Pull the air
6
or clean it with a soft brush.
7
, carefully remove the retaining tabs around
8
to dry completely before re-inserting it in the
8
SLE 265 B3
Fig. 6
GB│IE│NI │ 19 ■

Protection against overheating
The appliance has an overheating protection. It switches off automatically if
there is a risk of overheating and switches back on once the appliance has fully
cooled down. The appliance cannot be used during the cool-down phase.
♦ Check whether external factors may have triggered the overheating protec-
tion (e.g. temperatures over 35°C or a closed valve
Storage
♦ Remove the plug from the mains power socket.
♦ Wrap the mains cable
mains plug to the power cable using the safety clip 11 provided with the
cable 10.
♦ Empty the water tank
period.
♦ Always store the appliance in an upright position and in a dry and dust-free
environment.
10
around the cable retainer 9 and secure the
4
if you are not using the appliance for a prolonged
Troubleshooting
This section contains important information on fault identification and rectification.
Causes of malfunction and fault rectification
The following table will help you to identify and rectify minor malfunctions:
2
on the air outlet).
Fault Possible cause
The plug is not plugged in.
The appliance
will not switch
on.
The appliance
stops occasionally (the fan
switches off).
The mains power socket is not
supplying power.
Safety stop due to missing or incorrectly inserted water tank 4.
The water tank
The automatic defrosting function is activated.
The humidity of the room has
reached the desired level.
■ 20 │ GB│IE│NI
4
is full.
Remedy
Insert the plug into the mains power
socket.
Check the house fuses.
Insert the water tank 4 correctly.
Empty the water tank 4 and re-insert
it.
This is a normal feature of the appliance.
This is a normal feature of the appliance.
SLE 265 B3

Fault Possible cause
The air inlet or air outlet
aperture is contaminated or
The appliance
is producing
no or too little
condensate.
obstructed.
The room's windows and doors
are open.
Is the appliance running in the
AIR CLEAN programme? Dehumidification is not taking place.
The air ejected
is warm.
Heat exchange process
The error code
E 1 is flashing on
the display
Temperature sensor error
15
.
The error code
E 2 is flashing on
the display
Humidity sensor error
15
.
NOTE
► If the solutions presented above do not resolve the problem, please contact
Customer Service (see section Service).
Remedy
Ensure that the air inlet and air outlet
apertures are clean and free of
obstructions.
Close the windows and doors.
Select a different programme, e.g.
AUTOMATIC.
This is a normal feature of the appliance.
Contact the Customer Service department.
Contact the Customer Service department.
SLE 265 B3
GB│IE│NI │ 21 ■

Disposal
Never dispose of the appliance in your normal domestic waste.
This product is subject to the provisions of the European WEEE
(Waste Electrical and Electronic Equipment) Directive 2012/19/EU.
Dispose of the appliance via an approved disposal company or your municipal
waste facility. Please observe the currently applicable regulations. Please contact
your waste disposal facility if you are in any doubt.
Your local community or municipal authorities can provide information on how to
dispose of the product.
Disposal of the refrigerant
This appliance contains fluorinated greenhouse gases that are listed in the Kyoto
Protocol.
The system is hermetically sealed.
Refrigerant: R134a
Fill quantity: 0.105 kg
CO
equivalent: 0.15 t
2
GWP value: 1430
The refrigerant R134a must be disposed of by professionals. Please contact your
waste disposal facility if you are in any doubt.
■ 22 │ GB│IE│NI
SLE 265 B3

Attachment
Technical data
Input voltage 220–240 V ∼ (alternating current), 50 Hz
Input power 265 W
Nominal current 1.3 A
Max. output power 370 W
Max. nominal current 1.6 A
Air flow rate 160m³/h
Water tank 6.5 l
Intake pressure 1.0MPa
Discharge pressure 2.5MPa
Dehumidification
performance / 24h*
Recommended room size
Refrigerant R134a
Operating temperature 5°C to +35°C
Dimensions approx. 56 x 36.5 x 29 cm
Weight approx. 13.5 kg
* The lower the ambient temperature and the colder the temperature outside
becomes, the less moisture accumulates in the air and flows from outside into
the room to be dehumidified. For this reason, dehumidification performance
steadily decreases when temperatures drop and can come to a standstill. This
does not mean that the appliance is defective.
20l (at 30°C/80% rh)
12l (at 27°C/60% rh)
2
approx. 20m
(at a ceiling height of 2.3m)
or approx. 46m3
Notes on the Declaration of Conformity
In terms of compliance with fundamental specifications and other relevant regulations, this appliance complies with the Low Voltage Directive 2014/35/EU, the
Electromagnetic Compatibility Directive 2014/30/EU and the Ecodesign Directive 2009/125/EC.
The complete original Declaration of Conformity is available from the importer.
SLE 265 B3
GB│IE│NI │ 23 ■

Kompernass Handels GmbH warranty
Dear Customer,
This appliance has a 3-year warranty valid from the date of purchase. If this product
has any faults, you, the buyer, have certain statutory rights. Your statutory rights
are not restricted in any way by the warranty described below.
Warranty conditions
The validity period of the warranty starts from the date of purchase. Please keep
your original receipt in a safe place. This document will be required as proof of
purchase.
If any material or production fault occurs within three years of the date of purchase
of the product, we will either repair or replace the product for you at our discretion.
This warranty service is dependent on you presenting the defective appliance
and the proof of purchase (receipt) and a short written description of the fault
and its time of occurrence.
If the defect is covered by the warranty, your product will either be repaired or
replaced by us. The repair or replacement of a product does not signify the beginning of a new warranty period.
Warranty period and statutory claims for defects
The warranty period is not prolonged by repairs effected under the warranty.
This also applies to replaced and repaired components. Any damage and defects
present at the time of purchase must be reported immediately after unpacking.
Repairs carried out after expiry of the warranty period shall be subject to a fee.
Scope of the warranty
This appliance has been manufactured in accordance with strict quality guidelines
and inspected meticulously prior to delivery.
The warranty covers material faults or production faults. The warranty does not
extend to product parts subject to normal wear and tear or fragile parts such as
switches, batteries, baking moulds or parts made of glass.
The warranty does not apply if the product has been damaged, improperly used
or improperly maintained. The directions in the operating instructions for the product
regarding proper use of the product are to be strictly followed. Uses and actions
that are discouraged in the operating instructions or which are warned against
must be avoided.
This product is intended solely for private use and not for commercial purposes.
The warranty shall be deemed void in cases of misuse or improper handling, use
of force and modifications / repairs which have not been carried out by one of
our authorised Service centres.
■ 24 │ GB│IE│NI
SLE 265 B3

Warranty claim procedure
To ensure quick processing of your case, please observe the following instructions:
■ Please have the till receipt and the item number (e.g. IAN 12345) available as
proof of purchase.
■ You will find the item number on the type plate, an engraving on the front page
of the instructions (bottom left), or as a sticker on the rear or bottom of the appliance.
■ If functional or other defects occur, please contact the service department listed
either by telephone or by e-mail.
■ You can return a defective product to us free of charge to the service address
that will be provided to you. Ensure that you enclose the proof of purchase (till
receipt) and information about what the defect is and when it occurred.
You can download these instructions along with many other manuals,
product videos and software on www.lidl-service.com.
Service
Service Great Britain
Tel.: 0871 5000 720 (£ 0.10/Min.)
E-Mail: kompernass@lidl.co.uk
Service Ireland
Tel.: 1890 930 034
(0,08 EUR/Min., (peak))
(0,06 EUR/Min., (off peak))
E-Mail: kompernass@lidl.ie
IAN 298611
Importer
SLE 265 B3
Please note that the following address is not the service address. Please use the
service address provided in the operating instructions.
KOMPERNASS HANDELS GMBH
BURGSTRASSE 21
DE - 44867 BOCHUM
GERMANY
www.kompernass.com
GB│IE│NI │ 25 ■

■ 26 │ GB│IE│NI
SLE 265 B3

Inhaltsverzeichnis
Einführung ...................................................28
Urheberrecht ........................................................... 28
Haftungsbeschränkung ................................................... 28
Bestimmungsgemäße Verwendung .......................................... 28
Verwendete Warnhinweise ................................................29
Sicherheit ....................................................30
Gefahr durch elektrischen Strom ............................................30
Gefahr von Stromschlag durch Feuchtigkeit ...................................30
Gefahr von Explosion .................................................... 31
Gefahr von Krankheiten ................................................... 31
Grundlegende Sicherheitshinweise ..........................................32
Inbetriebnahme ..............................................34
Lieferumfang und Transportinspektion ........................................34
Entsorgung der Verpackung ............................................... 34
Gerätebeschreibung ...........................................35
Vor dem Erstgebrauch .................................................... 36
Elektrischer Anschluss ....................................................36
Hinweise zum Betrieb .................................................... 36
Automatische Enteisung ...................................................36
Bedienung und Betrieb .........................................37
Gerät ein- / ausschalten .................................................. 37
Klappe für den Luftauslass ................................................. 37
Betriebszustandsanzeigen ................................................. 38
Programme auswählen ................................................... 39
Timerfunktion ........................................................... 40
Kindersicherung ......................................................... 40
Wassertank ............................................................ 41
Schlauchentwässerung ................................................... 42
Reinigung ....................................................44
Filter reinigen und tauschen ................................................45
Schutz vor Überhitzung ...................................................46
Lagerung ....................................................46
Fehlerbehebung ..............................................46
Fehlerursachen und Behebung .............................................46
Entsorgung. . . . . . . . . . . . . . . . . . . . . . . . . . . . . . . . . . . . . . . . . . . . . . . . . . . 48
Kältemittel entsorgen .....................................................48
Anhang .....................................................49
Technische Daten ........................................................ 49
Hinweise zur Konformitätserklärung ......................................... 49
Garantie der Kompernaß Handels GmbH ....................................50
Service ................................................................ 51
Importeur ..............................................................51
SLE 265 B3
DE│AT│CH
│
27 ■

Einführung
Herzlichen Glückwunsch zum Kauf Ihres neuen Gerätes.
Sie haben sich damit für ein hochwertiges Produkt entschieden. Die Bedienungsan-
leitung ist Bestandteil dieses Produkts. Sie enthält wichtige Hinweise für Sicherheit,
Gebrauch und Entsorgung. Machen Sie sich vor der Benutzung des Produkts mit
allen Bedien- und Sicherheitshinweisen vertraut. Benutzen Sie das Produkt nur
wie beschrieben und für die angegebenen Einsatzbereiche. Bewahren Sie diese
Bedienungsanleitung gut auf. Händigen Sie alle Unterlagen bei Weitergabe des
Produkts an Dritte mit aus.
Urheberrecht
Diese Dokumentation ist urheberrechtlich geschützt.
Jede Vervielfältigung bzw. jeder Nachdruck, auch auszugsweise, sowie die
Wiedergabe der Abbildungen, auch im veränderten Zustand, ist nur mit
schriftlicher Zustimmung des Herstellers gestattet.
Haftungsbeschränkung
Alle in dieser Bedienungsanleitung enthaltenen technischen Informationen, Daten
und Hinweise für den Anschluss und die Bedienung entsprechen dem letzten
Stand bei Drucklegung und erfolgen unter Berücksichtigung unserer bisherigen
Erfahrungen und Erkenntnissen nach bestem Wissen.
Aus den Angaben, Abbildungen und Beschreibungen in dieser Bedienungsanleitung können keine Ansprüche hergeleitet werden.
Der Hersteller übernimmt keine Haftung für Schäden aufgrund von Nichtbeachtung
der Bedienungsanleitung, nicht bestimmungsgemäßer Verwendung, unsachgemäßen
Reparaturen, unerlaubt vorgenommener Veränderungen oder Verwendung nicht
zugelassener Ersatzteile.
Bestimmungsgemäße Verwendung
Das Gerät ist ausschließlich zum Entfeuchten von Wohn-, Keller- oder Lagerräumen mit einer Temperatur von 5°C bis 35°C vorgesehen. Das Gerät darf nur in
Innenräumen benutzt werden. Das Gerät ist nur für den privaten Gebrauch und
nicht für den gewerblichen Einsatz bestimmt. Eine andere Verwendung als zuvor
beschrieben ist nicht zulässig und kann zu Verletzungen und / oder Beschädigungen des Gerätes führen. Für Schäden, deren Ursache in bestimmungswidrigen
Anwendungen liegen, übernimmt der Hersteller keine Haftung. Das Risiko trägt
allein der Benutzer.
■ 28 │ DE
│AT│
CH
SLE 265 B3

Verwendete Warnhinweise
In der vorliegenden Bedienungsanleitung werden folgende Warnhinweise
verwendet:
GEFAHR
Ein Warnhinweis dieser Gefahrenstufe kennzeichnet eine
drohende gefährliche Situation.
Falls die gefährliche Situation nicht vermieden wird, kann dies zu schweren
Verletzungen oder zum Tod führen.
► Die Anweisungen in diesem Warnhinweis befolgen, um die Gefahr von
schweren Verletzungen oder des Todes zu vermeiden.
WARNUNG
Ein Warnhinweis dieser Gefahrenstufe kennzeichnet eine
mögliche gefährliche Situation.
Falls die gefährliche Situation nicht vermieden wird, kann dies zu Verletzungen
führen.
► Die Anweisungen in diesem Warnhinweis befolgen, um Verletzungen von
Personen zu vermeiden.
ACHTUNG
Ein Warnhinweis dieser Gefahrenstufe kennzeichnet einen
möglichen Sachschaden.
Falls die Situation nicht vermieden wird, kann dies zu Sachschäden führen.
► Die Anweisungen in diesem Warnhinweis befolgen, um Sachschäden zu
vermeiden.
SLE 265 B3
HINWEIS
► Ein Hinweis kennzeichnet zusätzliche Informationen, die den Umgang mit
dem Gerät erleichtern.
DE│AT│CH
│
29 ■

Sicherheit
In diesem Kapitel erhalten Sie wichtige Sicherheitshinweise im Umgang mit dem
Gerät. Ein unsachgemäßer Gebrauch kann zu Personen- und Sachschäden führen.
Gefahr durch elektrischen Strom
GEFAHR
Lebensgefahr durch elektrischen Strom!
Beim Kontakt mit unter Spannung stehenden
Leitungen oder Bauteilen besteht Lebensgefahr!
Beachten Sie die folgenden Sicherheitshinweise, um eine
Gefährdung durch elektrischen Strom zu vermeiden:
► Benutzen Sie das Gerät nicht, wenn das Anschlusskabel
oder der Anschlussstecker beschädigt ist.
► Werden spannungsführende Anschlüsse berührt und der
elektrische und mechanische Aufbau verändert, besteht
Stromschlaggefahr.
Gefahr von Stromschlag durch Feuchtigkeit
GEFAHR
► Stellen Sie das Gerät nicht in Wasser / auch nicht in
Wasserlachen oder Pfützen.
■ 30 │ DE
► Das Gerät darf niemals in der Nähe einer Badewan-
ne, einer Dusche, eines gefüllten Waschbeckens o. Ä.
betrieben werden.
► Das Gerät, die Anschlussleitung und der Netzstecker dürfen
nicht in Wasser oder andere Flüssigkeiten getaucht werden.
► Schützen Sie das Gerät vor Tropf- und Spritzwasser.
► Sollte Flüssigkeit in das Gerät (außer in den Wasserbe-
hälter) gelangen, sofort den Netzstecker ziehen. Vor
einer erneuten Inbetriebnahme das Gerät prüfen lassen.
► Bedienen Sie das Gerät nicht mit feuchten Händen.
► Sollte das Gerät ins Wasser gefallen sein, sofort den Netz-
stecker ziehen. Erst danach das Gerät herausnehmen.
│AT│
CH
SLE 265 B3
Gefahr von Explosion
GEFAHR
► Benutzen Sie das Gerät nicht in explosionsgefährdeter
Umgebung, in der sich brennbare Flüssigkeiten, Gase
oder Stäube befinden. Elektrogeräte erzeugen Funken,
die den Staub oder die Dämpfe entzünden können.
Gefahr von Krankheiten
GEFAHR
► Das gesammelte Wasser ist nicht zum Trinken oder Wäs-
sern geeignet. Es besteht Gesundheitsgefahr.
WARNUNG VOR SACHSCHÄDEN!
► Benutzen Sie das Gerät nicht in Schwimmbädern,
Wasch- oder ähnlichen Räumen.
► Das Gerät ist nicht für die Trocknung von Dämmung
geeignet. Falls nach einem Rohrbruch Isolierung oder
Dämmmaterial feucht geworden sind, fragen Sie auf
jeden Fall einen Fachmann.
SLE 265 B3
► Setzen Sie das Gerät niemals Temperaturen von 0°C
oder weniger aus. Restwasser in den Leitungen könnte
gefrieren und das System beschädigen.
► Verwenden Sie das Gerät nicht in staubiger oder chlor-
haltiger Umgebung.
DE│AT│CH
│
31 ■

Grundlegende Sicherheitshinweise
Beachten Sie für einen sicheren Umgang mit dem Gerät die
folgenden Sicherheitshinweise:
■ Kontrollieren Sie das Gerät vor der Verwendung auf äuße-
re sichtbare Schäden. Nehmen Sie ein beschädigtes oder
heruntergefallenes Gerät nicht in Betrieb.
■ Bei Beschädigung des Anschlusskabels oder der Anschlüsse
lassen Sie diese von autorisiertem Fachpersonal oder dem
Kundenservice austauschen, um Gefährdungen zu vermeiden.
■ Betreiben Sie das Gerät nicht im Freien.
■ Halten Sie während des Betriebes die Fenster und Türen ge-
schlossen, damit das Gerät effektiv arbeiten kann.
■ Betreiben Sie das Gerät nicht in der Nähe von leicht ent-
flammbaren Gasen oder Stoffen, in der Nähe von offenen
Feuern oder an Stellen, wo Öl oder Wasser spritzen können.
■ Dieses Gerät kann von Kindern ab 8 Jahren und darüber sowie
von Personen mit verringerten physischen, sensorischen oder
mentalen Fähigkeiten oder Mangel an Erfahrung und Wissen
benutzt werden, wenn sie beaufsichtigt oder bezüglich des
sicheren Gebrauchs des Gerätes unterwiesen wurden und die
daraus resultierenden Gefahren verstehen. Kinder dürfen nicht
mit dem Gerät spielen. Reinigung und Benutzer-Wartung dürfen
nicht von Kindern ohne Beaufsichtigung durchgeführt werden.
■ Lassen Sie Reparaturen am Gerät nur von autorisierten
■ Dieses Gerät darf nicht dem Regen ausgesetzt werden. Schüt-
■ 32 │ DE
Fachbetrieben oder dem Kundenservice durchführen. Durch
unsachgemäße Reparaturen können erhebliche Gefahren für
den Benutzer entstehen. Zudem erlischt der Garantieanspruch.
zen Sie das Gerät vor Feuchtigkeit und dem Eindringen von
Flüssigkeiten und Gegenständen in das Gehäuse. Tauchen
Sie das Gerät niemals unter Wasser und stellen Sie keine mit
Flüssigkeit gefüllten Gegenstände (z. B. Vasen) auf das Gerät.
Das Gerät kann irreparabel beschädigt werden.
│AT│
CH
SLE 265 B3

■ Schwere Gegenstände dürfen nicht auf das Gerät gestellt
werden.
■ Das Gerät darf nicht (z. B. mit Zeitungen, Kissen oder
Decken) bedeckt werden.
■ Es dürfen keine Gegenstände in die Lüftungsschlitze einge-
fügt werden.
■ Vermeiden Sie direkte Sonneneinstrahlung.
■ Offene Feuerquellen wie z. B. brennende Kerzen dürfen
nicht auf oder direkt neben das Gerät gestellt werden.
■ Ziehen Sie bei auftretenden Störungen und bei Gewitter den
Netzstecker aus der Netzsteckdose.
■ Achten Sie darauf, dass die Luftein- und die Luftaustrittsöff-
nung während des Betriebs immer frei von Verschmutzungen
sind. Decken Sie das Gerät niemals ab!
■ Stellen Sie das Gerät auf eine feste, ebene Fläche, damit ein
Umkippen ausgeschlossen ist.
■ Bauen Sie das Gerät nicht ein. Stellen Sie die seitlichen Flä-
chen des Gerätes mit einem Mindestabstand von 20 cm zu
Wänden oder anderen Gegenständen entfernt auf, sowie zur
Vorder-/Rückseite und oberhalb des Gerätes einen Mindestabstand von 50 cm, um eine gute Luftzirkulation zu gewährleisten.
■ Das Gerät darf nur in Räumen mit einer Temperatur von 5°C
■ Verwenden Sie das Gerät nur in Räumen bis max 20 m².
■ Reinigen Sie die Luftfilter, bevor sie stark verschmutzt sind.
■ Achten Sie bei der Schlauchentwässerung darauf, dass
■ Betreiben Sie das Gerät nur mit eingesetztem Wassertank
SLE 265 B3
bis 35°C betrieben werden.
der Schlauch nicht blockiert wird und das offene Ende des
Schlauches tiefer als die Austrittsöffnung liegt. Das Schlauchende muss über einem Abfluss liegen.
oder installiertem Schlauch.
DE│AT│CH
│
33 ■

■ Schließen Sie den Schutzkontaktstecker nur an eine ord-
nungsgemäß installierte, leicht zugängliche Steckdose mit
Schutzkontakten an, deren Spannung der Angabe auf dem
Typenschild entspricht. Die Steckdose muss auch nach dem
Anschließen weiterhin leicht zugänglich sein.
■ Ziehen Sie vor jeder Reinigung den Netzstecker aus der
Netzsteckdose.
■ Transportieren Sie das Gerät nur aufrecht! Benutzen Sie für
den Transport den Tragegriff. Der Wassertank muss vor dem
Transport entleert werden.
Inbetriebnahme
Lieferumfang und Transportinspektion
Das Gerät wird standardmäßig mit folgenden Komponenten geliefert:
▯ Luftentfeuchter
▯ Schlauch
▯ EU-Gartenschlauch-Adapter
▯ Diese Bedienungsanleitung
HINWEIS
► Prüfen Sie die Lieferung auf Vollständigkeit und auf sichtbare Schäden.
► Bei einer unvollständigen Lieferung oder Schäden infolge mangelhafter
Verpackung oder durch Transport wenden Sie sich an die Service-Hotline
(siehe Kapitel Service).
♦ Entfernen Sie sämtliches Verpackungsmaterial und alle Transportsicherun-
gen vom Gerät.
♦ Ziehen Sie die Folie vom Bedienfeld ab.
Entsorgung der Verpackung
Entsorgen Sie die Verpackung umweltgerecht. Beachten Sie die Kennzeichnung
auf den verschiedenen Verpackungsmaterialien und trennen Sie diese gegebenenfalls gesondert. Die Verpackungsmaterialien sind gekennzeichnet mit
Abkürzungen (a) und Ziffern (b) mit folgender Bedeutung:
1–7: Kunststoffe, 20–22: Papier und Pappe, 80–98: Verbundstoffe
■ 34 │ DE
│AT│
CH
SLE 265 B3

Gerätebeschreibung
Bedienfeld
2
Klappe für Luftauslass
3
LED-Paneel
4
Wassertank
5
Tragegriff
6
Lufteinlassgitter
7
Kunststoffrahmen
8
Kohlefilter
9
Kabelaufwicklung
10
Netzkabel
11
Sicherungsklemme
12
Austrittsöffnung
13
Verschluss für Drainage
14
Programm-LEDs
15
Display
16
LED TANK FULL
17
LED TIMER
18
LED AUTO DEFROST
19
LED OPERATION
20
Taste STAND-BY
21
Taste TIMER
22
Pfeiltaste DOWN
23
Pfeiltaste UP
24
Taste MODE
25
Schlauch
26
EU-Gartenschlauch-Adapter
SLE 265 B3
DE│AT│CH
│
35 ■

Vor dem Erstgebrauch
♦ Stellen Sie das Gerät auf einen ebenen, trockenen und festen Untergrund.
♦ Lassen Sie das Gerät in der Einsatzposition ca. 30 Minuten ruhig stehen,
damit sich die Kühlflüssigkeit setzen kann.
♦ Prüfen Sie, ob der Wassertank
♦ Verbinden Sie den Netzstecker mit einer Netzsteckdose.
4
korrekt eingesetzt ist.
Elektrischer Anschluss
ACHTUNG
► Vergleichen Sie vor dem Anschließen des Gerätes die Angaben zur
benötigten Eingangsspannung auf dem Typenschild mit der für den Betrieb
vorgesehenen Spannungsquelle. Diese Daten müssen übereinstimmen,
damit keine Schäden am Gerät auftreten.
► Das Netzkabel muss immer leicht zugänglich sein, so dass im Notfall das
Gerät schnell vom Stromnetz getrennt werden kann.
► Vergewissern Sie sich, dass das Netzkabel unbeschädigt ist und nicht
über heiße Flächen und/oder scharfe Kanten verlegt wird, sonst wird es
beschädigt.
► Achten Sie darauf, dass das Netzkabel nicht straff gespannt oder geknickt
wird.
Hinweise zum Betrieb
■ Sollten Sie in Wohnräumen dauerhaft eine zu hohe relative Luftfeuchtigkeit haben,
sollte die Ursache gefunden und beseitigt werden. (Dauerhaftes - jahrelanges Entfeuchten ist in der Regel nicht sinnvoll.)
■ Die optimale Umgebungstemperatur, um der Luft Feuchtigkeit zu entziehen, be-
trägt 5 bis 35°C. Unter 5°C hat der Einsatz eines Luftentfeuchters keinen Sinn,
da nur wenig Feuchtigkeit in der Luft ist.
■ Während des Betriebs kann die Raumtemperatur je nach Raumgröße zwischen
1- 4°C steigen. Dies ist normal.
Automatische Enteisung
Damit das Gerät im Dauerbetrieb nicht vereist, enteist es sich automatisch.
Die Enteisung wird automatisch aktiviert und kann nicht manuell abgeschaltet
werden. Das Gerät lässt sich während der Enteisung nicht abschalten. Während
der Enteisung leuchtet die AUTO DEFROST LED 18. Je niedriger die Umgebungstemperatur ist, bei der das Gerät betrieben wird, desto früher bzw. öfter wird die
automatische Enteisung aktiviert. Ist der Enteisungsvorgang abgeschlossen, fährt
das Gerät mit dem Betrieb in der zuvor gewählten Einstellung fort.
■ 36 │ DE
│AT│
CH
SLE 265 B3

Bedienung und Betrieb
In diesem Kapitel erhalten Sie wichtige Hinweise zur Bedienung und Betrieb des
Gerätes.
Gerät ein- / ausschalten
♦ Drücken Sie die Taste STAND-BY
Es ertönt ein Signalton und die LED OPERATION 19 leuchtet auf.
♦ Drücken Sie die Taste STAND-BY
Es ertönt ein Signalton und die LED OPERATION 19 erlischt.
HINWEIS
► Das Gerät startet mit der zuletzt gewählten Einstellung.
► Nach einem Stromausfall, wenn das Gerät vom Netz getrennt wurde oder
nach dem Ausschalten durch den Überhitzungsschutz, startet das Gerät im
zuletzt gewählten Programm.
♦ Wurde ein Timer gesetzt, schaltet sich das Gerät nach Ablauf der Zeit
(1-24 Stunden) dauerhaft aus.
♦ Wurde im Programm TARGET-HUMIDITY der Wert für die relative Luftfeuch-
tigkeit eingestellt, schaltet sich das Gerät aus, sobald der Wert erreicht ist.
Wird der Wert überschritten, schaltet sich das Gerät wieder ein.
♦ Das Gerät schaltet aus, wenn der Wassertank
Bei falschem Sitz oder wenn der Wassertank 4 entfernt wurde, blinkt bei
eingeschalteten Gerät die LED TANK FULL 16 und ein akustisches Signal
ertönt.
20
, um das Gerät einzuschalten.
20
, um das Gerät auszuschalten.
4
voll ist oder entfernt wird.
HINWEIS
4
► Der Wassertank
ansonsten kann das Kondenswasser nicht richtig aufgefangen werden.
muss vollständig in das Gerät eingeschoben werden,
Klappe für den Luftauslass
An der Oberseite des Gerätes befindet sich eine
verstellbare Klappe
des Betriebs öffnen müssen. Sie können die Klappe
in verschiedene Winkel einstellen und so die Richtung
des Luftstroms bestimmen. Dies kann Ihnen helfen, wenn Sie das Gerät z. B. zur
Wäschetrocknung verwenden. Der Luftstrom kann so in Richtung der zu
trocknenden Wäsche geleitet werden.
SLE 265 B3
2
am Luftauslass, die Sie während
DE│AT│CH
│
37 ■
2

Betriebszustandsanzeigen
Die verschiedenen Betriebszustände werden über LED‘s (
und dem Display 15 dargestellt. Zusätzlich befindet sich an der Vorderseite des
Gerätes ein LED-Paneel 3, das Ihnen anhand von verschiedenen Farben den
jeweiligen Bereich der relativen Luftfeuchtigkeit im Raum anzeigt
LED Anzeigen
LED leuchtet Bedeutung
TANK FULL
TIMER
AIR CLEAN
DRY CLOTHES
TARGET-HUMIDITY
AUTOMATIC
OPERATION
AUTO DEFROST
16
17
19
18
Display Anzeige
Anzeige Bedeutung
Während des Betriebs wird dauerhaft der gegenwärtige
relative Luftfeuchtigkeitswert angezeigt.
Der Wassertank ist voll oder nicht eingesetzt.
Es ist eine Ausschaltzeit aktiviert.
Zeigt das gewählte Programm an.
14
Das Gerät ist eingeschaltet.
Die automatische Enteisung ist aktiviert.
14 ,16, 17, 18, 19
)
LED-Paneel
Farbe Bedeutung
Rot Relative Luftfeuchtigkeit HIGH (> 70 %)
Grün Relative Luftfeuchtigkeit MID (≥ 50 - ≤ 70 %)
Gelb Relative Luftfeuchtigkeit LOW (< 50 %)
HINWEIS
► Beachten Sie, dass bei den Werten zur relativen Luftfeuchtigkeit eine
Toleranz von ca. ± 3 % zu berücksichtigen ist und dass das Aus- oder
Einschalten des Gerätes bzw. der Entfeuchtung etwas verzögert erfolgt.
■ 38 │ DE
│AT│
CH
SLE 265 B3

Programme auswählen
Das Gerät verfügt über 4 verschiedene Programme.
♦ Drücken Sie wiederholt die Taste MODE
Programm einzustellen. Die Programm-LED
leuchtet.
TARGET-HUMIDITY
Dieses Programm bietet Ihnen die Möglichkeit, die gewünschte Luftfeuchtigkeit,
die erreicht werden soll, selbst einzustellen.
♦ Drücken Sie die Pfeiltaste 22 oder 23, um die gewünschte Luftfeuch-
tigkeit in 5 %-Schritten zwischen 30 % und 80 % einzustellen. Der eingestellte Wert blinkt für ca. 5 Sekunden im Display 15 und anschließend wird
wieder der gegenwärtige relative Luftfeuchtigkeitswert angezeigt.
Zusätzlich haben Sie die Möglichkeit die Einstellung
eine Einstellung unterhalb von 30 % relative Luftfeuchtigkeit vornehmen möchten.
Diese Einstellung ermöglicht Ihnen das Erreichen einer sehr geringen Luftfeuchtigkeit, da eine dauerhafte Entfeuchtung stattfindet.
HINWEIS
► Die minimale Luftfeuchtigkeit, die in der Betriebsart
kann ist von vielen Faktoren, wie z. B. der Raumgröße oder der Umgebungstemperatur etc. abhängig. Daher ist es nicht möglich einen allgemein
gültigen Minimalwert zu nennen.
AUTOMATIC
Die relative Luftfeuchtigkeit, die erreicht werden soll, ist fest auf 55 % eingestellt.
Das Gerät entfeuchtet, bis dieser Wert erreicht ist und schaltet sich dann aus.
Steigt die relative Luftfeuchtigkeit wieder an, schaltet sich das Gerät wieder
ein. Änderungen hinsichtlich der gewünschten Luftfeuchtigkeit sind in diesem
Programm nicht möglich.
Wählen Sie dieses Programm für die dauerhafte Entfeuchtung auf eine relative
Luftfeuchtigkeit von angenehmen 55 %.
24
, um das gewünschte
14
des eingestellten Programms
zu wählen, wenn Sie
erreicht werden
SLE 265 B3
DE│AT│CH
│
39 ■

DRY CLOTHES
Dieses Programm können Sie nutzen, um feuchte Wäsche schneller zu trocknen. Bewegen Sie die Klappe 2 am Luftauslass so, dass der Luftstrom auf die
zu trocknenden Kleidungsstücke gerichtet wird. Änderungen hinsichtlich der
gewünschten Luftfeuchtigkeit sind in diesem Programm nicht möglich.
AIR CLEAN
Bei diesem Programm findet keine Entfeuchtung statt. Die Raumluft wird durch die
Filter vor der Lufteinlassöffnung angesogen und dort gereinigt.
Wählen Sie dieses Programm, wenn Sie möchten, dass die Raumluft gereinigt
aber nicht entfeuchtet wird.
Timerfunktion
Das Gerät ist mit einer Timerfunktion ausgestattet, die bei jedem der 4 Programme aktiviert werden kann. Es können 24 Ausschaltzeiten von 1 bis 24 Stunden
gewählt werden. Nach Ablauf der eingestellten Zeit wird das Gerät dauerhaft
ausgeschaltet.
♦ Drücken Sie während des Betriebs die Taste TIMER
LED TIMER 17 leuchtet und im Display 15 blinkt die Anzeige .
♦ Drücken Sie die Pfeiltaste
1 bis 24 Stunden einzustellen. Die gewählte Ausschaltzeit blinkt für ca. 5
Sekunden im Display 15 und anschließend wird wieder der gegenwärtige
relative Luftfeuchtigkeitswert angezeigt.
♦ Um den Timer vorzeitig zu beenden, drücken Sie zweimal die Taste
TIMER
wärtige relative Luftfeuchtigkeitswert angezeigt.
21
. Die
22 oder 23, um eine Ausschaltzeit von
21
. Die LED TIMER 17 erlischt und im Display 15 wird der gegen-
Kindersicherung
Das Gerät ist mit einer Kindersicherung ausgestattet, um zu verhindern, dass
Kinder das Gerät versehentlich ein- bzw. ausschalten oder Einstellungen verändern können. Bei aktivierter Kindersicherung sind alle Tasten des Gerätes ohne
Funktion.
♦ Drücken Sie für ca. 3 Sekunden gleichzeitig die beiden Pfeiltasten
22
+ 23. Es ertönt ein Signalton und im Display 15 erscheint die Anzeige
. Die Kindersicherung ist nun aktiviert.
♦ Drücken Sie erneut für ca. 3 Sekunden gleichzeitig die beiden Pfeiltaste
+
Signalton und die Anzeige erlischt.
■ 40 │ DE
│AT│
22
+ 23, um die Kindersicherung zu deaktivieren. Es ertönt ein
CH
+
SLE 265 B3

Wassertank
Der Wassertank 4 hat ein Fassungsvermögen von ca. 6,5 Litern. Der Wasserstand kann vorne am Wassertank 4 überprüft werden. Das Gerät kann nur mit
eingesetztem Wassertank 4 betrieben werden. Wenn der Wassertank 4 voll
ist, blinkt die LED TANK FULL
ton. Das Gerät schaltet sich nach einigen Sekunden aus. Die LED TANK FULL 16
blinkt solange, bis der Wassertank 4 geleert und wieder in das Gerät eingesetzt ist.
♦ Ziehen Sie den Wassertank 4 an den seitlichen Griffmulden aus dem
Gerät. Verwenden Sie den Griff, um den Wassertank
(siehe Abbildung 1).
16
und es ertönt für ca. 20 Sekunden ein Signal-
4
zu transportieren.
SLE 265 B3
Abb. 1
♦ Gießen Sie das Wasser aus und setzen Sie den Wassertank
das Gerät ein. Das Gerät fährt nach ca. 3 Minuten mit dem Betrieb des
zuvor gewählten Programms fort.
DE│AT│CH
4
wieder in
│
41 ■

Schlauchentwässerung
Bei sehr feuchten Räumen ist es oft sinnvoller, dass das Wasser nicht im
Wassertank 4 gesammelt wird, sondern direkt über einen Schlauch abgeführt
wird. Mit dem mitgelieferten Schlauch 25 oder dem EU-Gartenschlauch-Adapter 26
ist es möglich eine Dauerdrainage herzustellen.
ACHTUNG
► Bei der Schlauchentwässerung läuft das Gerät im Dauerbetrieb durch.
Achten Sie bei der Schlauchentwässerung darauf, dass der Schlauch nicht
geknickt wird und über die gesamte Länge abschüssig verläuft, da das Gerät
nicht über eine Pumpe für die Entwässerung verfügt.
► Prüfen Sie regelmäßig das gesamte Anschluss-System auf Dichtigkeit.
♦ Schrauben Sie den Verschluss
(siehe Abbildung 2).
♦ Stecken Sie entweder den mitgelieferten Schlauch
nung 12 oder schrauben Sie den EU-Gartenschlauch-Adapter 26 auf die
Austrittsöffnung 12 (siehe Abbildung 3 + 4).
♦ Schrauben Sie, bei Verwendung des EU-Gartenschlauch-Adapters
nun einen Gartenschlauch auf den EU-Gartenschlauch-Adapter 26 (siehe
Abbildung 4).
13
auf der Rückseite des Gerätes heraus
25
auf die Austrittsöff-
26
,
13
12
25
12
Abb. 2 Abb. 3 Abb. 4
ACHTUNG
► Ziehen Sie den EU-Gartenschlauch-Adapter
nur handfest an. Ver-
26
wenden Sie keine Schraubenschlüssel, dies könnte zu Beschädigung des
EU-Gartenschlauch-Adapters 26 führen.
■ 42 │ DE
│AT│
CH
26
SLE 265 B3

HINWEIS
► Achten Sie darauf, dass immer die Dichtung im EU-Gartenschlauch-
26
Adapter
eingelegt ist (Dichtung bei Auslieferung bereits eingelegt).
► Je nach verwendetem Gartenschlauch-System wird ggf. ein weiterer
Adapter benötigt. Diesen erhalten Sie im Fachhandel.
♦ Stellen Sie das Gerät so auf, dass das Schlauchende über einem Abfluss en-
det. Dabei muss das offene Schlauchende unter dem Auslass am Gerät liegen
(Der Schlauch muss also ein Gefälle haben).
♦ Schalten Sie das Gerät wie gewohnt ein und wählen Sie ein Programm.
♦ Wenn Sie wieder in den Wassertank
4
entwässern wollen, schalten Sie
das Gerät aus, ziehen Sie den Schlauch 25 ab bzw. schrauben Sie den
EU-Gartenschlauch-Adapter 26 samt Gartenschlauch ab.
♦ Schrauben Sie den Verschluss
13
wieder auf die Austrittsöffnung 12.
SLE 265 B3
DE│AT│CH
│
43 ■

Reinigung
ACHTUNG
Mögliche Beschädigung des Gerätes!
► Schützen Sie das Gerät vor Feuchtigkeit und dem Eindringen von Flüssigkeiten.
► Tauchen Sie das Gerät niemals unter Wasser, um eine irreparable Beschädi-
► Ziehen Sie unbedingt den Netzstecker aus der Netzsteckdose, bevor Sie
► Verwenden Sie keine aggressiven oder scheuernden Reinigungsmittel, da
► Reinigen Sie den Wassertank
♦ Wischen Sie das Gehäuse bei Bedarf mit einem leicht angefeuchteten Tuch ab.
♦ Entnehmen Sie den Wassertank
♦ Um den Wassertank
gung des Gerätes zu vermeiden.
das Gerät reinigen.
diese die Gehäuseoberfläche angreifen können.
4
nicht in der Spülmaschine. Dieser wird
dadurch sonst beschädigt.
4
, gießen das Wasser weg und trocknen
ihn vor dem Einsetzen innen und außen gut ab.
4
von innen zu reinigen, müssen Sie den Deckel
entfernen. Neigen Sie hierzu den Griff so weit nach hinten, bis die Zapfen
am Griff mit den Nuten am Wassertank 4 übereinstimmen. Sie können nun
den Griff lösen, indem Sie ihn an beiden Seiten aus den Nuten drücken (siehe
Abbildung 5).
■ 44 │ DE
4
Abb. 5
♦ Nehmen Sie jetzt den Deckel nach oben vom Wassertank
♦ Der Einbau erfolgt in umgekehrter Reihenfolge.
4
♦ Es empfiehlt sich den Wassertank
reinigen, um Schimmelpilz und Bakterien zu vermeiden. Füllen Sie dazu den
Wassertank 4 mit lauwarmen Wasser und geben Sie ein handelsübliches
Spülmittel hinzu. Spülen Sie mehrmals mit lauwarmen Wasser nach. Zusätzlich empfiehlt es sich nach der Reinigung eine Desinfektion durchzuführen.
Benutzen Sie dazu handelsübliches Desinfektionsmittel auf Alkoholbasis
oder hochprozentigen Alkohol. Beide Substanzen sind völlig unbedenklich,
wenn anschließend mehrmals mit lauwarmen Wasser nachgespült wird.
│AT│
CH
regelmäßig alle zwei Wochen zu
4
ab.
SLE 265 B3

Filter reinigen und tauschen
Die Leistungsfähigkeit des Gerätes hängt auch von der Sauberkeit des Filters ab.
Der Kohlefilter 8 sollte alle 2 Wochen gereinigt und alle 6 Monate getauscht
werden.
HINWEIS
► Neue Kohlefilter erhalten Sie in fast allen Geschäften für Haushaltswaren.
Die Kohlefiltermatten müssen nur zugeschnitten werden.
♦ Schalten Sie das Gerät aus und ziehen Sie den Netzstecker aus der Netz-
steckdose.
6
♦ Um das Lufteinlassgitter
eine Griffmulde. Ziehen Sie das Lufteinlassgitter 6 nach hinten ab.
♦ Saugen Sie das Lufteinlassgitter
weichen Bürste.
♦ Um den Kunststoffrahmen 7 zu entnehmen, befinden sich ringsherum
Haltelaschen, die Sie vorsichtig aus den Halterungen des Gerätes hervorholen müssen.
♦ Entnehmen Sie jetzt den Kohlefilter 8.
♦ Waschen Sie den Kohlefilter 8 mit lauwarmen Wasser ab.
♦ Lassen Sie den Kohlefilter
Gerät einsetzen.
♦ Der Einbau erfolgt in umgekehrter Reihenfolge (siehe Abb. 6).
6
7
abzuziehen, befindet sich oberhalb des Gitters
8
6
ab oder reinigen Sie es mit einer
komplett trocknen, bevor Sie ihn wieder in das
SLE 265 B3
Abb. 6
8
DE│AT│CH
│
45 ■

Schutz vor Überhitzung
Das Gerät verfügt über einen Überhitzungsschutz. Es schaltet sich bei Gefahr
einer Überhitzung automatisch aus und nach Abkühlung selbstständig wieder
ein. Das Gerät kann während der Abkühlphase nicht bedient werden.
♦ Prüfen Sie, ob äußere Bedingungen den Hitzeschutz ausgelöst haben
können. (z. B. Temperaturen über 35°C oder eine geschlossene Klappe 2
am Luftauslass).
Lagerung
♦ Ziehen Sie den Netzstecker aus der Netzsteckdose.
♦ Wickeln Sie das Netzkabel
Sie den Netzstecker mit der am Kabel befindlichen Sicherungsklemme 11
am Netzkabel 10.
♦ Entleeren Sie den Wassertank
verwenden.
♦ Lagern Sie das Gerät nur in einer aufrechten Position und in einer trockenen
und staubfreien Umgebung.
10
auf die Kabelaufwicklung 9 und befestigen
4
, wenn Sie das Gerät längere Zeit nicht
Fehlerbehebung
In diesem Kapitel erhalten Sie wichtige Hinweise zur Störungslokalisierung und
Störungsbehebung.
Fehlerursachen und Behebung
Die nachfolgende Tabelle hilft bei der Lokalisierung und Behebung kleinerer
Störungen:
Fehler Mögliche Ursache Behebung
Das Gerät
lässt sich nicht
einschalten.
Das Gerät
stoppt gelegentlich (der
Lüfter schaltet
sich ab).
Der Netzstecker ist nicht eingesteckt.
Netzstecker liefert keine Spannung.
Sicherheitsstopp wegen fehlendem oder falsch eingesetztem
4
Wassertank
Der Wassertank
Die automatische Enteisung ist
aktiv.
Die Luftfeuchtigkeit des Raumes
hat den gewünschten Wert
erreicht.
.
4
ist voll.
Stecken Sie den Netzstecker in die
Netzsteckdose.
Überprüfen Sie die Haussicherungen.
Setzen Sie den Wassertank
ein.
Entleeren Sie den Wassertank 4 und
setzen Sie ihn erneut ein.
Dies ist ein normaler Vorgang des
Gerätes.
Dies ist ein normaler Vorgang des
Gerätes.
4
korrekt
■ 46 │ DE
│AT│
CH
SLE 265 B3

Fehler Mögliche Ursache Behebung
Das Gerät
produziert
kein oder
wenig Kondenswasser.
Die Austrittluft
ist warm
Im Display
blinkt der
Fehlercode E 1
Im Display 15
blinkt der
Fehlercode E 2
15
HINWEIS
Die Lufteintrittsöffnung oder die
Luftaustrittsöffnung ist verdreckt
oder zugedeckt.
Fenster und Türen des Raumes
sind geöffnet.
Läuft das Gerät im Programm
AIR CLEAN? Es findet keine
Entfeuchtung statt.
Wärmeaustauschprozess
Fehler Temperaturfühler
Fehler Luftfeuchtigkeitssensor
► Wenn Sie mit den vorstehend genannten Schritten das Problem nicht lösen
können, wenden Sie sich bitte an den Kundendienst (siehe Kapitel Service).
Stellen Sie sicher, dass die Luftein- und
die Luftaustrittsöffnung sauber und frei
von Verstopfungen sind.
Schließen Sie die Fenster und Türen.
Wählen Sie ein anderes Programm,
wie z. B. AUTOMATIC.
Dies ist ein normaler Vorgang des
Gerätes.
Wenden Sie sich an den
Kundenservice.
Wenden Sie sich an den
Kundenservice.
SLE 265 B3
DE│AT│CH
│
47 ■

Entsorgung
Werfen Sie das Gerät keinesfalls in den normalen Hausmüll.
Dieses Produkt unterliegt der europäischen Richtlinie 2012/19/EU
WEEE (Waste Electrical and Electronic Equipment).
Entsorgen Sie das Gerät über einen zugelassenen Entsorgungsbetrieb oder über
Ihre kommunale Entsorgungseinrichtung. Beachten Sie die aktuell geltenden
Vorschriften. Setzen Sie sich im Zweifelsfall mit Ihrer Entsorgungseinrichtung in
Verbindung.
Möglichkeiten zur Entsorgung des ausgedienten Produkts erfahren Sie bei Ihrer
Gemeinde- oder Stadtverwaltung.
Kältemittel entsorgen
Dieses Gerät enthält fluorierte Treibhausgase, die im Kyoto-Protokoll aufgeführt sind.
Das System ist hermetisch geschlossen.
Kältemittel: R134a
Füllmenge: 0,105 kg
CO
- Äquivalent: 0,15 t
2
GWP - Wert: 1430
Das Kältemittel R134a und muss unbeschädigt der fachgerechten Entsorgung
zugeführt werden. Setzen Sie sich im Zweifelsfall mit Ihrer Entsorgungseinrichtung
in Verbindung.
■ 48 │ DE
│AT│
CH
SLE 265 B3

Anhang
Technische Daten
Eingangsspannung 220 ‒ 240 V ∼ (Wechselstrom) 50 Hz
Eingangsleistung 265 W
Nennstrom 1,3 A
Max. Leistung 370 W
Max. Nennstrom 1,6 A
Luftdurchsatz 160 m³/h
Wassertank 6,5 l
Ansaugdruck 1,0 MPa
Ausblasdruck 2,5 MPa
Entfeuchtungsleistung / 24 h*
Empfohlene Raumgröße
Kältemittel R134a
Betriebstemperatur 5 bis 35 °C
Abmessungen ca. 56 x 36,5 x 29 cm
Gewicht ca. 13,5 kg
* Je niedriger die Raumtemperatur ist und je kälter die Außentemperatur wird,
desto weniger Feuchtigkeit wird in der Luft gespeichert und strömt von außen in
den zu entfeuchtenden Raum nach. Aus diesem Grund nimmt die Entfeuchtungsleistung mit sinkenden Temperaturen stetig ab und kann zum Stillstand kommen.
Es handelt sich hierbei nicht um einen Defekt des Gerätes.
20 l (bei 30°C / 80 % r. Feuchte)
12 l (bei 27°C / 60 % r. Feuchte)
2
ca. 20 m
(bei einer Deckenhöhe von 2,3 m)
bzw. ca. 46 m3
Hinweise zur Konformitätserklärung
Dieses Gerät entspricht hinsichtlich Übereinstimmung mit den grundlegenden
Anforderungen und den anderen relevanten Vorschriften der Niederspannungsrichtlinie 2014/35/EU, der Richtlinie zur elektromagnetischen Verträglichkeit
2014/30/EU sowie der Ökodesign-Richtlinie 2009/125/EC.
Die vollständige Original-Konformitätserklärung ist beim Importeur erhältlich.
SLE 265 B3
DE│AT│CH
│
49 ■

Garantie der Kompernaß Handels GmbH
Sehr geehrte Kundin, sehr geehrter Kunde,
Sie erhalten auf dieses Gerät 3 Jahre Garantie ab Kaufdatum. Im Falle von
Mängeln dieses Produkts stehen Ihnen gegen den Verkäufer des Produkts gesetzliche Rechte zu. Diese gesetzlichen Rechte werden durch unsere im Folgenden
dargestellte Garantie nicht eingeschränkt.
Garantiebedingungen
Die Garantiefrist beginnt mit dem Kaufdatum. Bitte bewahren Sie den Original–
Kassenbon gut auf. Diese Unterlage wird als Nachweis für den Kauf benötigt.
Tritt innerhalb von drei Jahren ab dem Kaufdatum dieses Produkts ein Materialoder Fabrikationsfehler auf, wird das Produkt von uns – nach unserer Wahl – für
Sie kostenlos repariert oder ersetzt. Diese Garantieleistung setzt voraus, dass
innerhalb der Drei-Jahres-Frist das defekte Gerät und der Kaufbeleg (Kassenbon)
vorgelegt und schriftlich kurz beschrieben wird, worin der Mangel besteht und
wann er aufgetreten ist.
Wenn der Defekt von unserer Garantie gedeckt ist, erhalten Sie das reparierte
oder ein neues Produkt zurück. Mit Reparatur oder Austausch des Produkts
beginnt kein neuer Garantiezeitraum.
Garantiezeit und gesetzliche Mängelansprüche
Die Garantiezeit wird durch die Gewährleistung nicht verlängert. Dies gilt auch
für ersetzte und reparierte Teile. Eventuell schon beim Kauf vorhandene Schäden
und Mängel müssen sofort nach dem Auspacken gemeldet werden. Nach Ablauf
der Garantiezeit anfallende Reparaturen sind kostenpflichtig.
Garantieumfang
Das Gerät wurde nach strengen Qualitätsrichtlinien sorgfältig produziert und vor
Auslieferung gewissenhaft geprüft.
Die Garantieleistung gilt für Material- oder Fabrikationsfehler. Diese Garantie
erstreckt sich nicht auf Produktteile, die normaler Abnutzung ausgesetzt sind und
daher als Verschleißteile angesehen werden können oder für Beschädigungen
an zerbrechlichen Teilen, z. B. Schalter, Akkus, Backformen oder Teile, die aus
Glas gefertigt sind.
Diese Garantie verfällt, wenn das Produkt beschädigt, nicht sachgemäß benutzt
oder gewartet wurde. Für eine sachgemäße Benutzung des Produkts sind alle
in der Bedienungsanleitung aufgeführten Anweisungen genau einzuhalten.
Verwendungszwecke und Handlungen, von denen in der Bedienungsanleitung
abgeraten oder vor denen gewarnt wird, sind unbedingt zu vermeiden.
Das Produkt ist nur für den privaten und nicht für den gewerblichen Gebrauch
bestimmt. Bei missbräuchlicher und unsachgemäßer Behandlung, Gewaltanwendung und bei Eingriffen, die nicht von unserer autorisierten Service-Niederlassung vorgenommen wurden, erlischt die Garantie.
■ 50 │ DE
│AT│
CH
SLE 265 B3

Abwicklung im Garantiefall
Um eine schnelle Bearbeitung Ihres Anliegens zu gewährleisten, folgen Sie bitte
den folgenden Hinweisen:
■ Bitte halten Sie für alle Anfragen den Kassenbon und die Artikelnummer (z. B. IAN
12345) als Nachweis für den Kauf bereit.
■ Die Artikelnummer entnehmen Sie bitte dem Typenschild, einer Gravur, auf dem
Titelblatt Ihrer Anleitung (unten links) oder als Aufkleber auf der Rück- oder
Unterseite.
■ Sollten Funktionsfehler oder sonstige Mängel auftreten, kontaktieren Sie zunächst die
nachfolgend benannte Serviceabteilung telefonisch oder per E-Mail.
■ Ein als defekt erfasstes Produkt können Sie dann unter Beifügung des Kaufbelegs
(Kassenbon) und der Angabe, worin der Mangel besteht und wann er aufgetreten ist, für Sie portofrei an die Ihnen mitgeteilte Serviceanschrift übersenden.
Auf www.lidl-service.com können Sie diese und viele weitere Handbücher,
Produktvideos und Software herunterladen.
Service
Service Deutschland
Tel.: 0800 5435 111 (Kostenfrei aus dem dt. Festnetz/Mobilfunknetz)
E-Mail: kompernass@lidl.de
Service Österreich
Tel.: 0820 201 222 (0,15 EUR/Min.)
E-Mail: kompernass@lidl.at
Service Schweiz
Tel.: 0842 665566 (0,08 CHF/Min., Mobilfunk max. 0,40 CHF/Min.)
E-Mail: kompernass@lidl.ch
IAN 298611
Importeur
SLE 265 B3
Bitte beachten Sie, dass die folgende Anschrift keine Serviceanschrift ist. Kontaktieren Sie zunächst die benannte Servicestelle.
KOMPERNASS HANDELS GMBH
BURGSTRASSE 21
DE - 44867 BOCHUM
DEUTSCHLAND
www.kompernass.com
DE│AT│CH
│
51 ■

■ 52 │ DE
│AT│
CH
SLE 265 B3

KOMPERNASS HANDELS GMBH
BURGSTRASSE 21
DE - 44867 BOCHUM
GERMANY
www.kompernass.com
Last Information Update · Stand der Informationen:
03 / 2018 · Ident.-No.: SLE265B3-022018-2
IAN 298611
 Loading...