

Page 1
KONVEKTOR SKT 2000 B1
KONVEKTOR
Bedienungsanleitung
CONVETTORE
Istruzioni per l’uso
IAN 100157
RP1001057_Konvektor Timer_Cover_LB1.indd 2 11.04.14 12:10
CONVECTEUR
Mode d’emploi
CONVECTION HEATER
Operating instructions
Page 2
RP100157 Konvektor Timer LB1 Seite 1 Mittwoch, 11. Juni 2014 12:30 12
Deutsch . . . . . . . . . . . . . . . . . . . . . . . . . . . . . . . . . . . . . . . . . 3
Bitte beachten Sie die Ausklappseite
Français . . . . . . . . . . . . . . . . . . . . . . . . . . . . . . . . . . . . . . . 15
Veuillez tenir compte des informations fournies sur le rabat
Italiano . . . . . . . . . . . . . . . . . . . . . . . . . . . . . . . . . . . . . . . . 27
Osservare la pagina pieghevole
English . . . . . . . . . . . . . . . . . . . . . . . . . . . . . . . . . . . . . . . . . 39
Be sure to note the fold-out page.
SKT2000B1_14_V1.2_DE_FR_IT_GB
Page 3
RP100157 Konvektor Timer LB1 Seite 1 Mittwoch, 11. Juni 2014 12:30 12
1
2
3
4
14 13 1112
5
6
7
8
9
10
Page 4
RP100157 Konvektor Timer LB1 Seite 2 Mittwoch, 11. Juni 2014 12:30 12
Page 5
RP100157 Konvektor Timer LB1 Seite 3 Mittwoch, 11. Juni 2014 12:30 12
Inhalt
1. Gerätebeschreibung . . . . . . . . . . . . . . . . . . . . . . . . . . . . . . . . . . . . . . . . . . . . . . . . . . . . . 3
2. Benennung der Teile (siehe Ausklappseite) . . . . . . . . . . . . . . . . . . . . . . . . . . . . . . . . . . . . . 4
3. Technische Daten. . . . . . . . . . . . . . . . . . . . . . . . . . . . . . . . . . . . . . . . . . . . . . . . . . . . . . . . 4
4. Sicherheitshinweise. . . . . . . . . . . . . . . . . . . . . . . . . . . . . . . . . . . . . . . . . . . . . . . . . . . . . . 4
5. Auspacken und aufstellen. . . . . . . . . . . . . . . . . . . . . . . . . . . . . . . . . . . . . . . . . . . . . . . . . . 8
6. Bedienen . . . . . . . . . . . . . . . . . . . . . . . . . . . . . . . . . . . . . . . . . . . . . . . . . . . . . . . . . . . . . 9
7. Reinigen. . . . . . . . . . . . . . . . . . . . . . . . . . . . . . . . . . . . . . . . . . . . . . . . . . . . . . . . . . . . . 11
8. Störungen beheben . . . . . . . . . . . . . . . . . . . . . . . . . . . . . . . . . . . . . . . . . . . . . . . . . . . . . 12
9. Entsorgung . . . . . . . . . . . . . . . . . . . . . . . . . . . . . . . . . . . . . . . . . . . . . . . . . . . . . . . . . . . 12
10. Garantie der HOYER Handel GmbH . . . . . . . . . . . . . . . . . . . . . . . . . . . . . . . . . . . . . . . . . 13
Herzlichen Glückwunsch zum Kauf
Ihres neuen Gerätes.
Sie haben sich damit für ein hochwertiges
Gerät entschieden. Die Bedienungsanleitung ist Bestandteil dieses Gerätes. Sie
enthält wichtige Hinweise für Sicherheit,
Gebrauch und Entsorgung.
1. Gerätebeschreibung
1.1 Verwendungszweck
Mit diesem Konvektor SilverCrest
SKT2000B1 können Sie trockene Wohnräume beheizen.
Dieses Gerät ist für den Einsatz in Privathaushalten und nicht für den gewerblichen
Einsatz geeignet.
Das Gerät ist ebenfalls geeignet für:
• den Einsatz in Küchen für Mitarbeiter in
Läden, Büros und anderen gewerblichen
Bereichen,
• den Einsatz in landwirtschaftlichen
Anwesen,
• Kunden in Hotels, Motels und anderen
Wohneinrichtungen,
• Frühstückspensionen.
Machen Sie sich vor der Benutzung des
Gerätes mit allen Bedien- und Sicherheitshinweisen vertraut. Benutzen Sie das Gerät nur
wie beschrieben und für die angegebenen
Einsatzbereiche.
Händigen Sie alle Unterlagen bei Weitergabe des Gerätes an Dritte mit aus.
Das Gerät ist geeignet als Zusatzheizung.
Als Alleinheizung für große Räume ist es
nicht geeignet.
Das Gerät darf ausschließlich auf dem
Boden aufgestellt werden oder mit der mitgelieferten Wandhalterung an einer Wand
befestigt werden.
1.2 Lieferumfang
•1 Konvektor
•2 Füße
• 4 Schrauben für Füße
• 4 Wandhaken
• 4 Dübel mit Schrauben für Wandhaken
• 1 Bedienungsanleitung
SKT2000B1 3
Page 6

RP100157 Konvektor Timer LB1 Seite 4 Mittwoch, 11. Juni 2014 12:30 12
1.3 Kennzeichnungen am Gerät
Nebenstehendes Symbol 3
warnt davor, das Gerät
abzudecken, da der dabei entstehende Hitzestau zu Schäden
und Brandgefahr führen könnte.
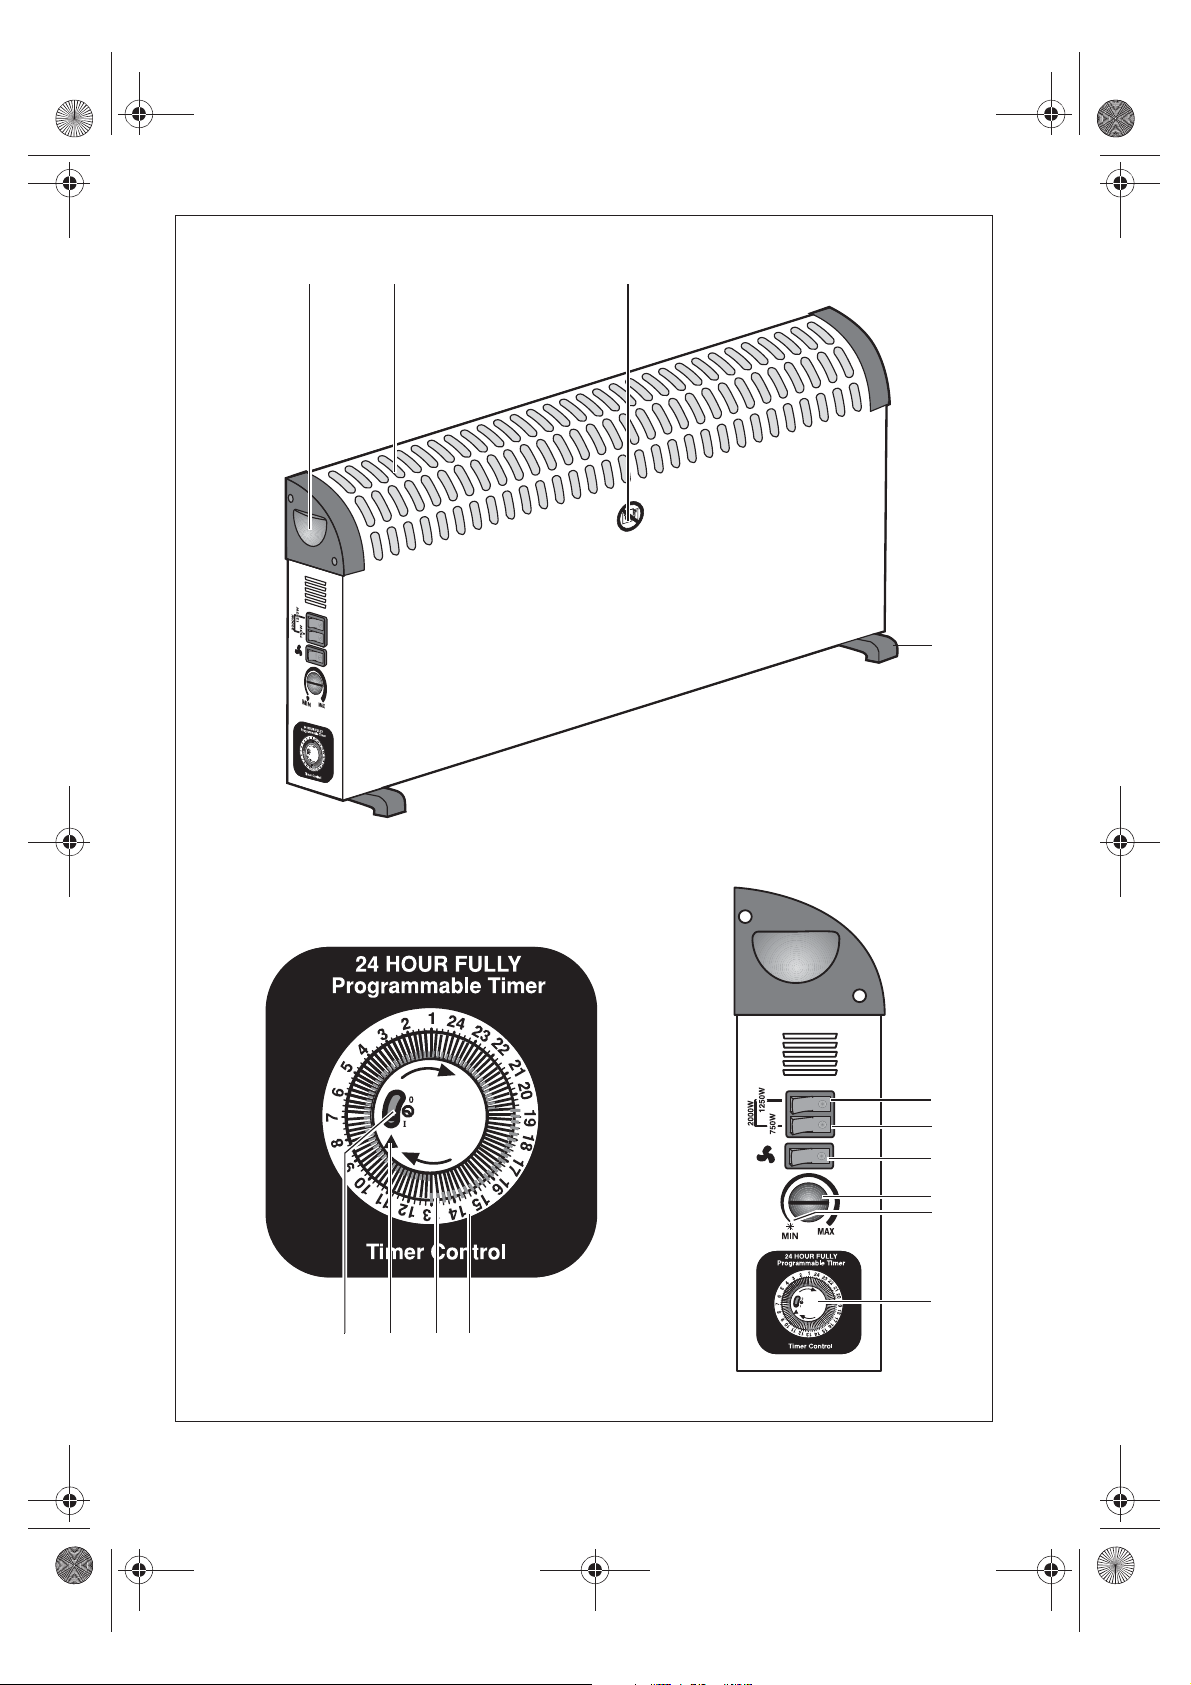
2. Benennung der Teile (siehe Ausklappseite)
1 Tragegriffe
2 Luftaustritt
3 Warnsymbol „Nicht abdecken“
4 Füße
5 Schalter 1250W
6 Schalter 750W
7 Ventilatorschalter
8 Temperaturwähler
9 Frostsymbol
10 Timer
11 Skala für die Uhrzeit
12 Steuerungssegmente
13 Uhrzeitmarkierung
14 Hauptschalter
3. Technische Daten
Spannungsversorgung: 220 - 240 V~/50 Hz
Maximalleistung: 2.000 Watt
Schutzklasse: I
4. Sicherheitshinweise
4.1 Begriffserklärung
Folgende Signalbegriffe finden Sie in dieser
Bedienungsanleitung:
Warnung!
Hohes Risiko: Missachtung der
Warnung kann Schaden für Leib
und Leben verursachen.
Vorsicht!
Mittleres Risiko: Missachtung der Warnung
kann einen Sachschaden verursachen.
Hinweis:
Geringes Risiko: Sachverhalte, die im Umgang
mit dem Gerät beachtet werden sollten.
4.2 Besondere Hinweise für dieses
Gerät
Warnung! Beachten Sie folgende Hinweise, um Verletzungen
zu vermeiden.
• Kinder jünger als 3 Jahre sind fernzuhalten, es sei
denn, sie werden ständig überwacht.
• Kinder ab 3 Jahren und jünger als 8 Jahre dürfen
das Gerät nur ein- und ausschalten, wenn sie
beaufsichtigt werden oder bezüglich des sicheren
Gebrauchs des Gerätes unterwiesen wurden und
die daraus resultierenden Gefahren verstanden
4
Page 7

RP100157 Konvektor Timer LB1 Seite 5 Mittwoch, 11. Juni 2014 12:30 12
haben, vorausgesetzt, dass das Gerät in seiner
normalen Gebrauchslage platziert oder installiert
ist.
• Kinder ab 3 Jahren und jünger als 8 Jahre dürfen
nicht den Stecker in die Steckdose stecken, das
Gerät nicht regulieren, das Gerät nicht reinigen
und/oder nicht die Wartung durch den Benutzer
durchführen.
• Dieses Gerät kann von Kindern ab 8 Jahren und
von Personen mit reduzierten physischen, sensorischen oder mentalen Fähigkeiten oder Mangel an
Erfahrung und/oder Wissen benutzt werden,
wenn sie beaufsichtigt oder bezüglich des sicheren Gebrauches des Gerätes unterwiesen wurden
und die daraus resultierenden Gefahren verstanden haben. Kinder dürfen nicht mit dem Gerät
spielen.
• Reinigung und Benutzer-Wartung dürfen nicht
durch Kinder durchgeführt werden, es sei denn,
sie sind älter als 8 Jahre und beaufsichtigt.
• Kinder jünger als 8 Jahre sind vom Gerät und der
Netzanschlussleitung fernzuhalten.
• Vorsicht - Einige Teile des Gerätes können sehr
heiß werden und Verbrennungen verursachen.
Besondere Vorsicht ist geboten, wenn Kinder und
schutzbedürftige Personen anwesend sind.
• Die metallischen Oberflächen des Gerätes können heiß werden. Fassen Sie daher das Gerät ausschließlich an den Tragegriffen
1
an.
• Ziehen Sie vor jeder Reinigung den Netzstecker
aus der Netzsteckdose.
• Tauchen Sie das Gerät nie in Wasser ein und
schützen Sie es vor Spritz- und Tropfwasser.
• Lassen Sie das Gerät vor dem Reinigen soweit
abkühlen, dass keine Verbrennungsgefahr mehr
besteht.
• Um eine Überhitzung des Heizgerätes zu vermeiden, darf das Heizgerät nicht abgedeckt wrden.
• Das Gerät darf niemals direkt unter einer Wandsteckdose aufgestellt werden, da die entstehende
Hitze zu Schäden an der elektrischen Installation
führen könnte.
• Dieses Heizgerät nicht mit einem Programmschalter, einem Zeitschalter, einem separaten Fernwirksystem oder irgendeiner anderen Einrichtung
verwenden, die das Heizgerät automatisch einschaltet, da Brandgefahr besteht, wenn das Heizgerät abgedeckt oder falsch aufgestellt wird.
Vorsicht! Um Sachschäden zu vermeiden,
beachten Sie folgende Bestimmungen:
• Verwenden Sie keinesfalls scheuernde, ätzende
oder kratzende Reinigungsmittel.
• Benutzen Sie das Gerät niemals in unmittelbarer
Nähe eines Spülbeckens, einer Badewanne, einer
Dusche oder eines Schwimmbeckens, da Spritzwasser in das Gerät gelangen könnte.
4.3 Allgemeine Hinweise
• Lesen Sie vor dem Gebrauch bitte sorg-
fältig diese Bedienungsanleitung. Sie ist
Bestandteil des Gerätes und muss jederzeit verfügbar sein.
• Verwenden Sie das Gerät nur für den
beschriebenen Verwendungszweck (siehe
„1.1 Verwendungszweck“ auf Seite 3).
• Überprüfen Sie, ob die erforderliche Netz-
spannung (siehe Typenschild am Gerät)
mit Ihrer Netzspannung übereinstimmt.
• Bei eventuellen Funktionsstörungen darf
die Instandsetzung des Gerätes nur
durch unser Service-Center erfolgen. Die
Kontaktdaten finden Sie in „Service-Center” auf Seite 14.
• Das Gerät darf ausschließlich auf einem
festen, ebenen, trockenen und nicht brennbaren Untergrund aufgestellt werden.
• Achten Sie darauf, dass die Netzsteck-
dose gut zugänglich ist, damit Sie eventuell
den Netzstecker schnell ziehen können.
SKT2000B1 5
Page 8
RP100157 Konvektor Timer LB1 Seite 6 Mittwoch, 11. Juni 2014 12:30 12
4.4 Schutz vor elektrischem Schlag
Warnung! Die folgenden Sicherheitshinweise sollen Sie vor einem
elektrischen Schlag schützen.
• Schließen Sie das Gerät nur an eine vorschriftsmäßig installierte Schutzkontaktsteckdose an.
• Sollte das Gerät zu Boden gefallen sein
oder einen harten Schlag abbekommen
haben, oder sollte es ins Wasser gefallen sein, dürfen Sie es nicht weiterbenutzen. Wenden Sie sich in diesem Fall an
unser Service-Center. Die Kontaktdaten
finden Sie in „Service-Center” auf
Seite 14.
• Wenn das Gerät beschädigt ist, darf das
Gerät keinesfalls benutzt werden. Lassen
Sie das Gerät in diesem Falle von qualifiziertem Fachpersonal reparieren. Die
Kontaktdaten finden Sie in „Service-Center” auf Seite 14.
• Wenn die Netzanschlussleitung dieses
Gerätes beschädigt wird, muss sie durch
den Hersteller oder eine ähnlich qualifizierte Person ersetzt werden, um
Gefährdungen zu vermeiden.
• In das Gerät dürfen keinesfalls Wasser
oder andere Flüssigkeiten gelangen.
Daher:
– niemals im Freien einsetzen,
– niemals mit Flüssigkeit gefüllte
Gefäße, wie Trinkgläser, Vasen etc.
auf das Gerät stellen.
Falls doch einmal Flüssigkeit in das
Gerät gelangt, ziehen Sie sofort den
Netzstecker und lassen das Gerät von
qualifiziertem Fachpersonal reparieren.
Die Kontaktdaten finden Sie in „ServiceCenter” auf Seite 14.
• Versuchen Sie niemals mit Fingern oder
Gegenständen durch die Öffnungen in
das Innere des Gerätes zu fassen.
• Fassen Sie das Gerät, die Netzanschlussleitung oder den Netzstecker niemals mit feuchten Händen an.
• Ziehen Sie die Netzanschlussleitung
stets am Netzstecker heraus. Ziehen Sie
niemals an der Leitung selber.
• Achten Sie darauf, dass die Netzanschlussleitung nie geknickt oder
gequetscht wird.
• Achten Sie darauf, dass die Netzanschlussleitung nicht durch scharfe Kanten
beschädigt wird.
• Halten Sie die Netzanschlussleitung von
heißen Flächen (z.B. Herdplatte) fern.
• Wenn Sie das Gerät längere Zeit nicht
benutzen, ziehen Sie den Netzstecker
aus der Netzsteckdose. Nur dann ist das
Gerät völlig stromfrei.
• Die Benutzung von Verlängerungskabeln
sollten Sie vermeiden. Sie ist nur unter
ganz bestimmten Voraussetzungen
gestattet:
– Das Verlängerungskabel muss für die
Stromstärke des Gerätes geeignet
sein.
– Das Verlängerungskabel darf nicht
„fliegend“ verlegt sein: es darf nicht
zur Stolperfalle werden oder von
Kindern erreichbar sein.
– Das Verlängerungskabel darf keines-
falls beschädigt sein.
– Es dürfen keine weiteren Geräte als
dieses Gerät an der Netzsteckdose
angeschlossen werden, da es sonst zu
einer Überlastung des Stromnetzes
kommen kann (Verbot von Mehrfachsteckdosen!).
6
Page 9

RP100157 Konvektor Timer LB1 Seite 7 Mittwoch, 11. Juni 2014 12:30 12
4.5 Schutz vor Brandgefahr
Warnung! Da das Gerät mit
hohen Temperaturen arbeitet,
beachten Sie die folgenden Sicherheitshinweise, damit kein Brand entstehen kann.
• Während des Betriebes dürfen sich
keine brennbaren Gegenstände (z.B.
Vorhänge, Papier usw.) in unmittelbarer
Umgebung des Gerätes befinden.
• Benutzen Sie das Gerät niemals dazu,
Textilien oder andere Dinge auf, über
oder vor dem Gerät zu trocknen.
• Halten Sie beim Aufstellen des Gerätes
auf dem Boden einen Mindestabstand
von 0,5 m zu anderen Geräten oder der
Wand ein.
• Wenn Sie das Gerät an einer Wand
befestigen, dürfen nur die mitgelieferten
Wandhaken benutzt werden. Es muss
dann darauf geachtet werden, dass die
Luft frei um den Konvektor strömen kann.
Der Mindestabstand zwischen Boden
und Unterkante des Gerätes beträgt
10 cm.
• Wenn Sie das Gerät an einer Wand
befestigen, darf diese nicht brennbar
sein und muss genügend Festigeit aufweisen.
• Betreiben Sie das Gerät nie in explosionsgefährdeten Räumen oder in der
Nähe von brennbaren Gasen oder
Flüssigkeiten.
• Achten Sie immer darauf, dass die Luft
frei ein- und austreten kann. Ansonsten
kann es zu einem Hitzestau in dem
Gerät kommen.
• Achten Sie darauf, dass die Netzanschlussleitung nie zur Stolperfalle wird
oder sich jemand darin verfangen oder
darauftreten kann.
• Wenn Sie das heiße Gerät transportieren wollen, schalten Sie es aus, ziehen
den Netzstecker und warten ab, bis sich
das Gerät abgekühlt hat. Ansonsten
könnten Sie sich an der heißen Oberfläche verbrennen.
4.7 Zur Sicherheit Ihres Kindes
Warnung! Kinder können Gefahren oft nicht richtig einschätzen und
sich dadurch Verletzungen
zuziehen. Beachten Sie daher:
• Achten Sie darauf, dass die Verpackungsfolie nicht zur tödlichen Falle
für Kinder wird. Verpackungsfolien sind
kein Spielzeug.
4.8 Sachschäden
Vorsicht! Um Sachschäden zu vermeiden,
beachten Sie folgende Bestimmungen.
• Achten Sie bei der Aufstellung auf dem
Boden darauf, dass die Füße korrekt
angebracht sind (siehe „5.1 Gerät für
Bodenaufstellung montieren“ auf
Seite 8), sonst könnte der Fußboden verkratzen oder Brandflecken bekommen.
4.6 Schutz vor Verletzungen
Warnung! Beachten Sie folgende Hinweise, um Verletzungen
zu vermeiden.
SKT2000B1 7
Page 10
RP100157 Konvektor Timer LB1 Seite 8 Mittwoch, 11. Juni 2014 12:30 12
5. Auspacken und aufstellen
1. Nehmen Sie das Gerät aus der Verpackung.
2. Entfernen Sie die Transportverpackung.
3. Überprüfen Sie, dass das Gerät keine
Beschädigungen aufweist.
5.1 Gerät für Bodenaufstellung
montieren
1. Schrauben Sie die Füße 4 mit den mitgelieferten kurzen Schrauben an der
Unterseite des Konvektors fest. Pro Fuß
werden jeweils 2 Schrauben diagonal
eingeschraubt.
Warnung! Achten Sie auf genügend Abstand zur Wand, Einrichtungsgegenständen oder anderen
Geräten. Der Abstand sollte bei
der Aufstellung auf dem Boden
mindestens 0,5 m betragen, um
eine Brandgefahr auszuschließen.
Nur unter Verwendung der mitgelieferten Wandhaken darf der
Abstand zur Wand unterschritten
werden, sofern diese nicht brennbar ist.
2. Wählen Sie einen Standort, der den
Sicherheitshinweisen entspricht (siehe
„4. Sicherheitshinweise“ auf Seite 4).
5.2 Gerät an einer Wand montieren
Hinweis: Wenn Sie das Gerät an einer
Wand montieren, dürfen die Füße nicht
angeschraubt werden.
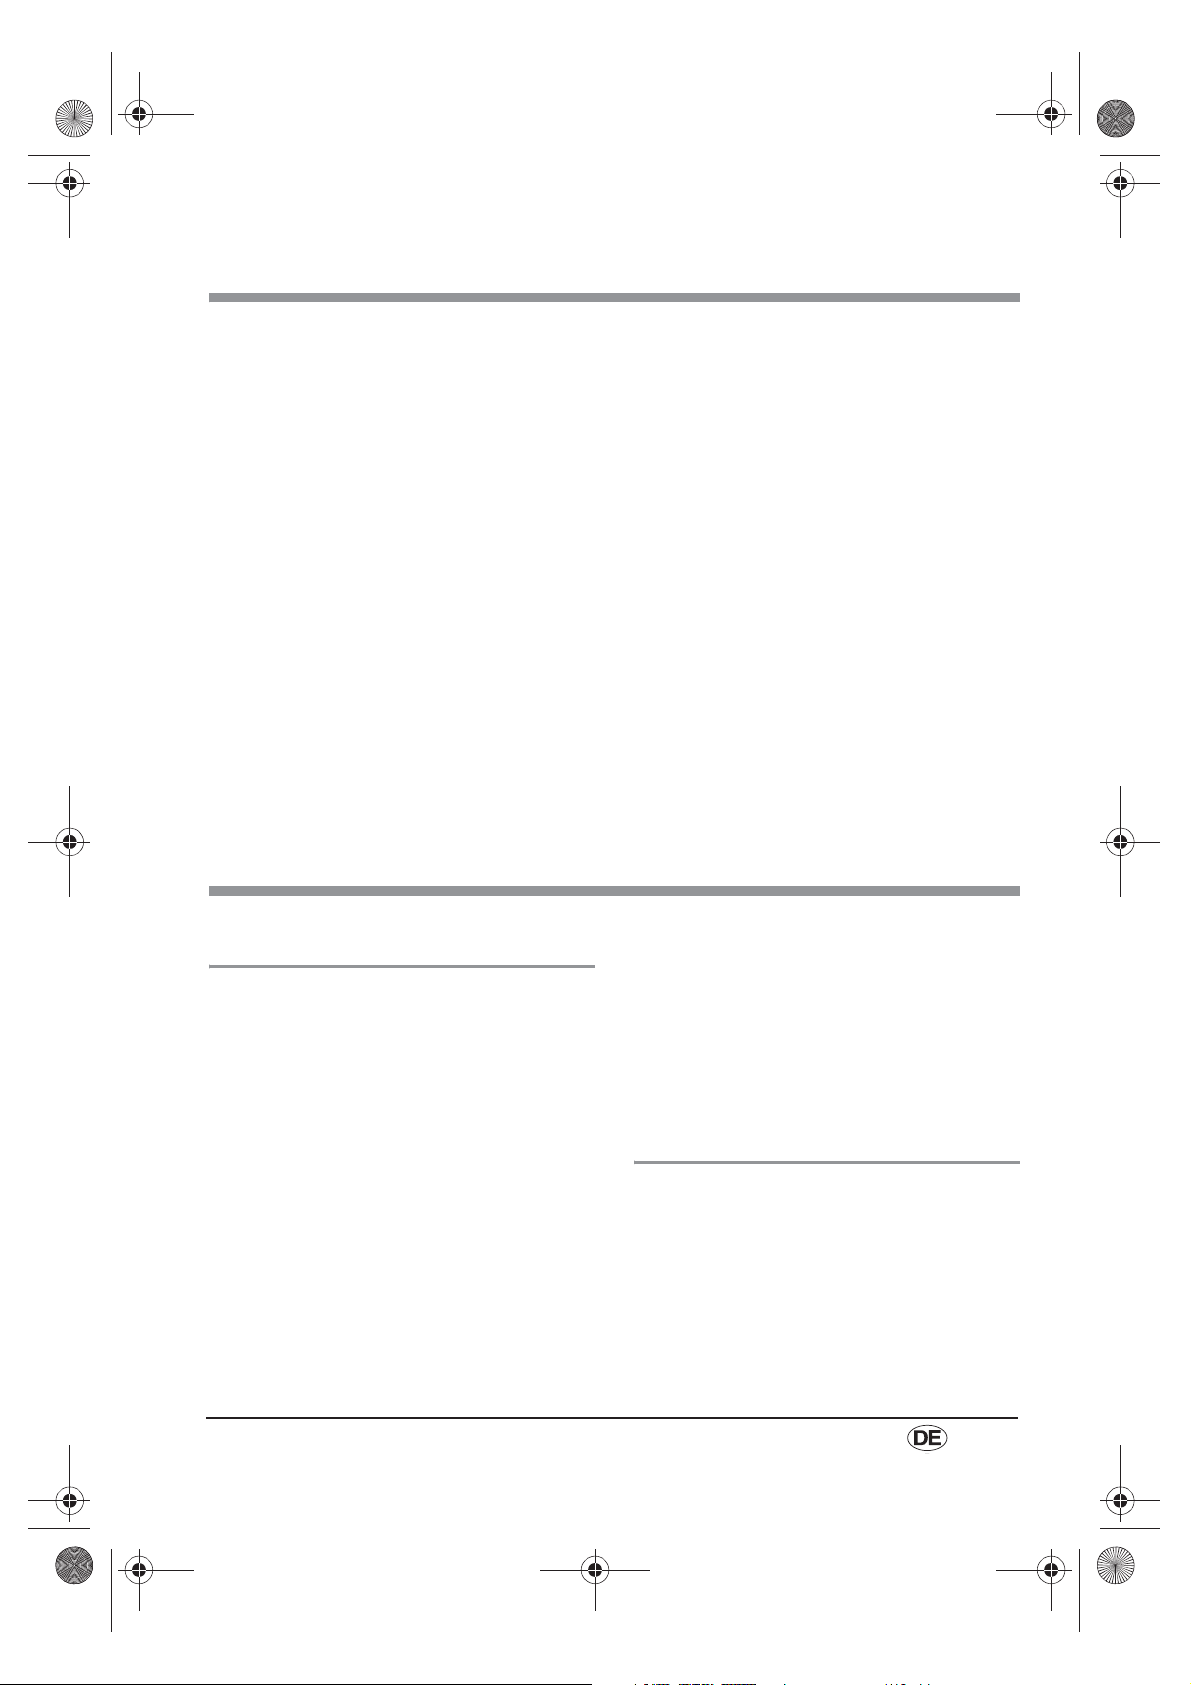
1. Schrauben Sie die mitgelieferten Wandhaken an einer geeigneten Wand fest:
– Markieren Sie die beiden Bohrlöcher
so, dass der Abstand der Wandhaken
exakt dem Abstand der beiden
Schlitze auf der Rückseite des Gerätes
entspricht.
– Achten Sie darauf, dass beide Bohr-
löcher exakt waagerecht sind.
– Bohren Sie mit einem Bohrer 8 mm ein
ca. 40 mm tiefes Loch.
– Setzen Sie jeweils einen Dübel ein.
– Schrauben Sie die beiden Wandha-
ken mit den langen Schrauben fest.
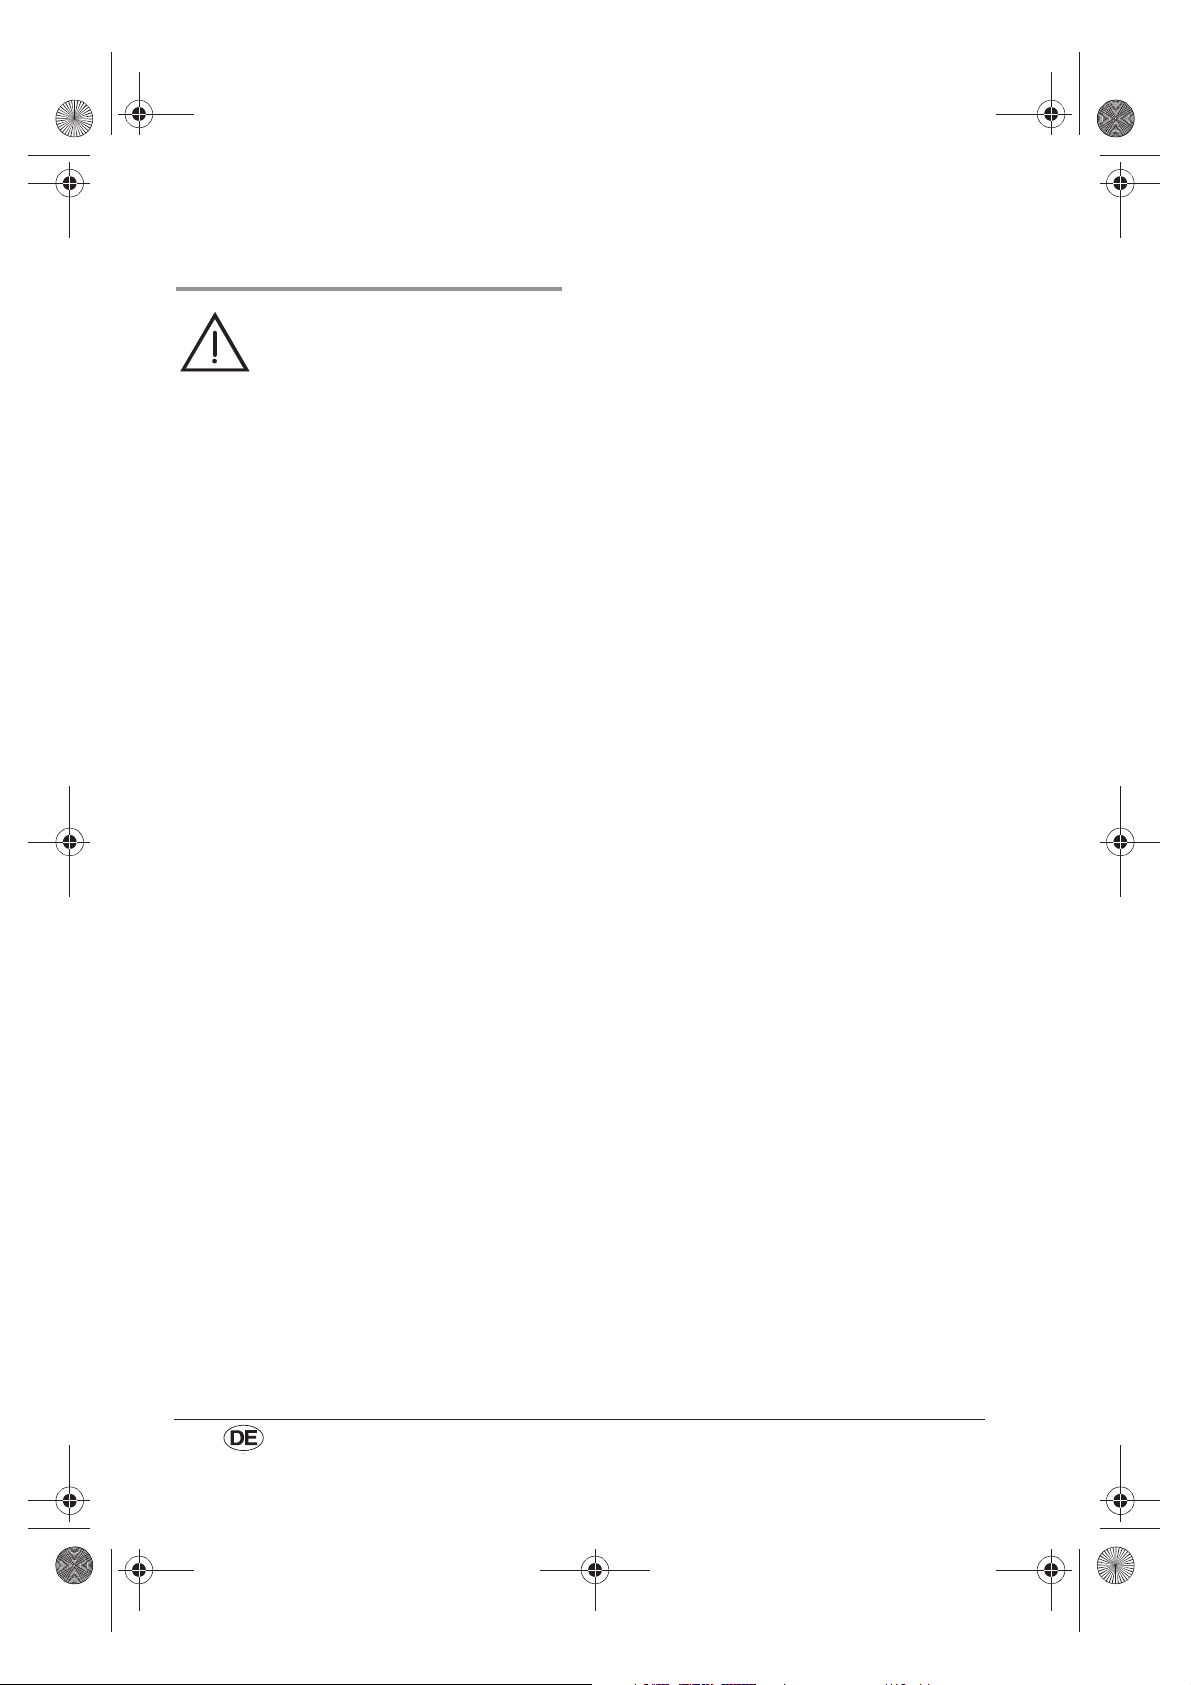
2. Damit das Gerät senkrecht an der Wand
hängt, werden die beiden anderen
Wandhaken als Abstandshalter benutzt:
Vorsicht!
• Die Wand darf nicht brennbar sein und
muss genügend Festigkeit besitzen.
• Das Gerät muss sich mindestens 10 cm
über dem Boden befinden, damit die Luft
frei einströmen kann.
8
Page 11
RP100157 Konvektor Timer LB1 Seite 9 Mittwoch, 11. Juni 2014 12:30 12
– Schrauben Sie die beiden verbliebe-
nen Wandhaken an der Unterseite
des Gerätes fest.
– Verwenden Sie hierzu die kurzen
Schrauben.
6. Bedienen
Hinweise:
• Da das Gerät bzw. die Heizelemente
leicht eingefettet geliefert werden, kann
es bei der ersten Benutzung zu leichter
Rauch- und Geruchsbildung kommen.
Dies ist unschädlich und hört nach kurzer
Zeit auf. Bitte achten Sie währenddessen
auf ausreichende Lüftung.
• Sollten Sie noch weitere Verbraucher am
gleichen Stromkreis angeschlossen
haben, achten Sie darauf, dass die maximale Belastbarkeit der installierten
Sicherung nicht überschritten wird, da
sonst die Sicherung auslöst.
6.1 Gerät in Betrieb nehmen und
ausschalten
1. Stecken Sie den Netzstecker in eine
Netzsteckdose, die den technischen
Daten entspricht (siehe „3. Technische
Daten“ auf Seite 4).
2. Schalten Sie die Stromversorgung ein,
indem Sie den Hauptschalter 14 auf
„I“ stellen.
3. Hängen Sie das Gerät in die Wandhaken ein.
4. Sie können die beiden Abstandshalter
ebenfalls an der Wand festschrauben,
um die Aufhängung noch stabiler zu
machen.
3. Schalten Sie die Stromversorgung aus,
indem Sie den Hauptschalter 14 auf „0“
stellen.
6.2 Heizstufe einstellen
Mit den Heizstufen wählen Sie, wie schnell
das Gerät aufheizt.
Das Gerät besitzt drei Heizstufen:
– Stufe 1: 750 Watt: Schalter 6 ein-
schalten;
– Stufe 2: 1.250 Watt: Schalter 5 ein-
schalten;
– Stufe 3: 2.000 Watt: Schalter 5 und
Schalter 6 einschalten.
Wenn besonders schnell aufgeheizt werden
soll, wählen Sie die Stufe 3, wenn nur langsam aufgeheizt werden soll, wählen Sie die
Stufe 1.
In den eingeschalteten Schaltern leuchtet
eine rote Kontroll-Lampe, sobald das Gerät
heizt.
Wenn keine Schalter eingeschaltet ist,
erzeugt das Gerät keine Wärme.
Das Gerät ist nun betriebsbereit.
SKT2000B1 9
Page 12
RP100157 Konvektor Timer LB1 Seite 10 Mittwoch, 11. Juni 2014 12:30 12
6.3 Temperatur wählen
Mit dem Temperaturwähler 8 stellen Sie die
gewünschte Temperatur ein.
• Wenn die gewünschte Raumtemperatur
erreicht ist, drehen Sie den Temperaturwähler 8 langsam zurück, bis Sie ein leises „klick” hören.
Die roten Kontroll-Lampen in den
Schaltern 5 bzw. 6 gehen aus.
Die momentane Raumtemperatur wird
gehalten.
Sobald das Gerät nachheizen muss, um
die Temperatur zu halten, leuchten die
roten Kontroll-Lampen in den Schaltern 5
bzw. 6 zwischendurch wieder auf.
6.4 Ventilatorfunktion
Um die erhitze Luft schneller im Raum zu verteilen, besitzt das Gerät einen Ventilator.
Um den Ventilator einzuschalten, betätigen
Sie den Ventilatorschalter 7. Im Ventilatorschalter 7 leuchtet dann eine rote KontrollLampe.
Hinweis: Das Gerät kann auch ohne eingeschalteten Ventilator betrieben werden.
Dann konzentriert sich die Wärme mehr um
den Konvektor herum und wird nicht so
schnell im Raum verteilt.
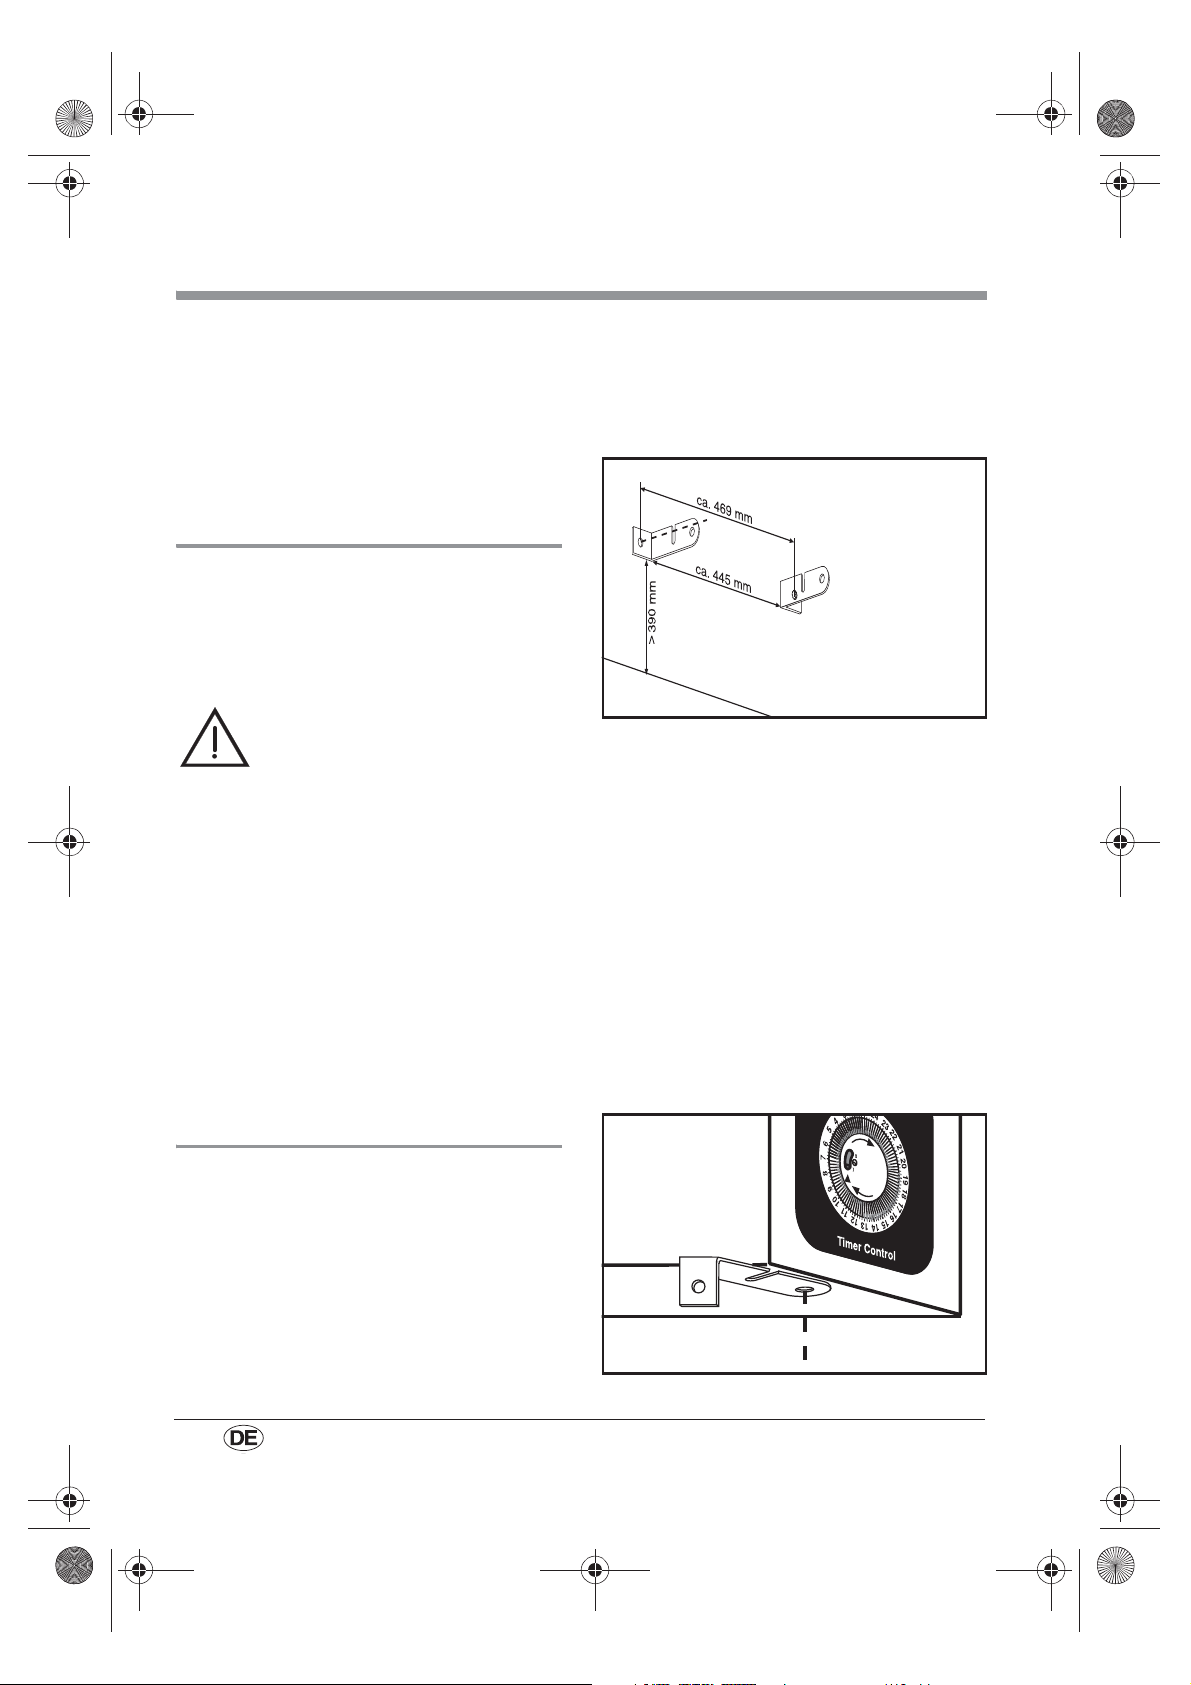
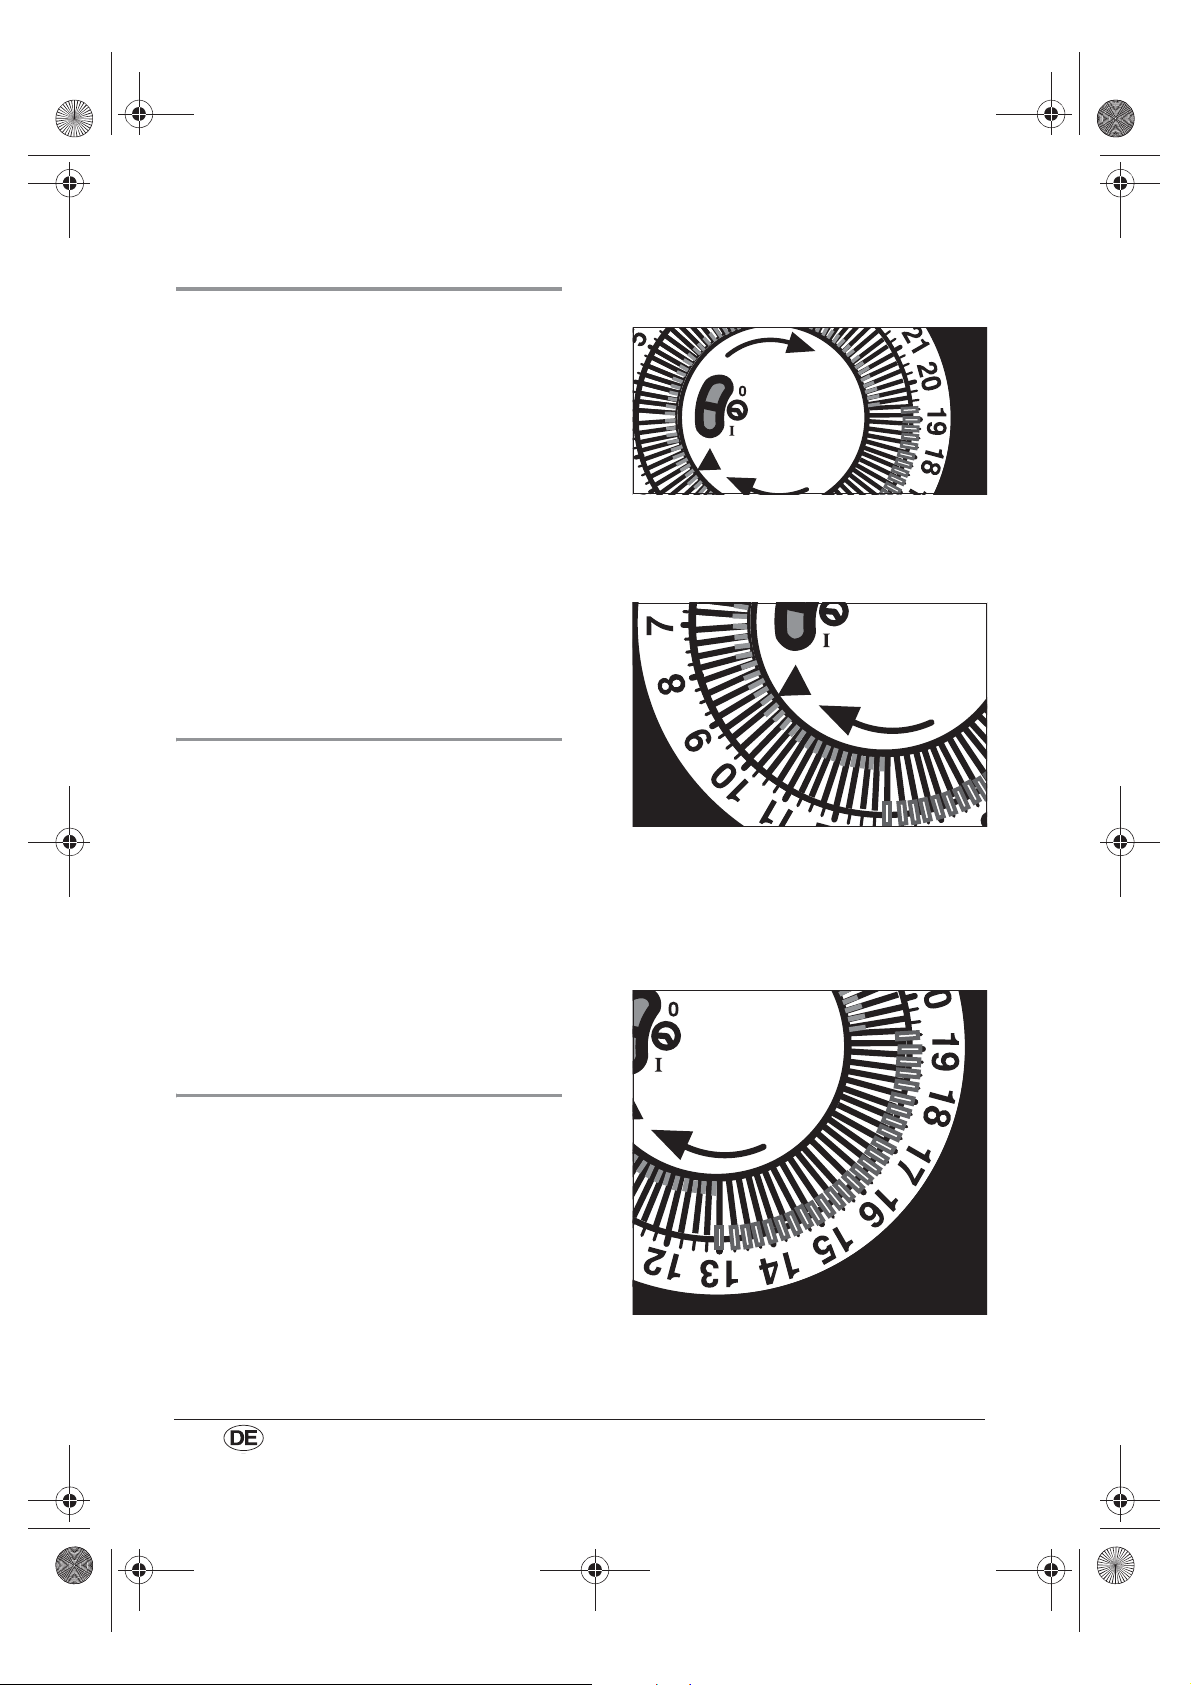
1. Schalten Sie den Timer ein, indem Sie
den Hauptschalter 14 auf das Uhrsymbol stellen.
2. Drehen Sie die Skala für die Uhrzeit 11
mit den Steuerungssegmenten 12, bis
die aktuelle Uhrzeit auf die Uhrzeitmarkierung 13 zeigt.
In diesem Beispiel ist dies 09.15 Uhr.
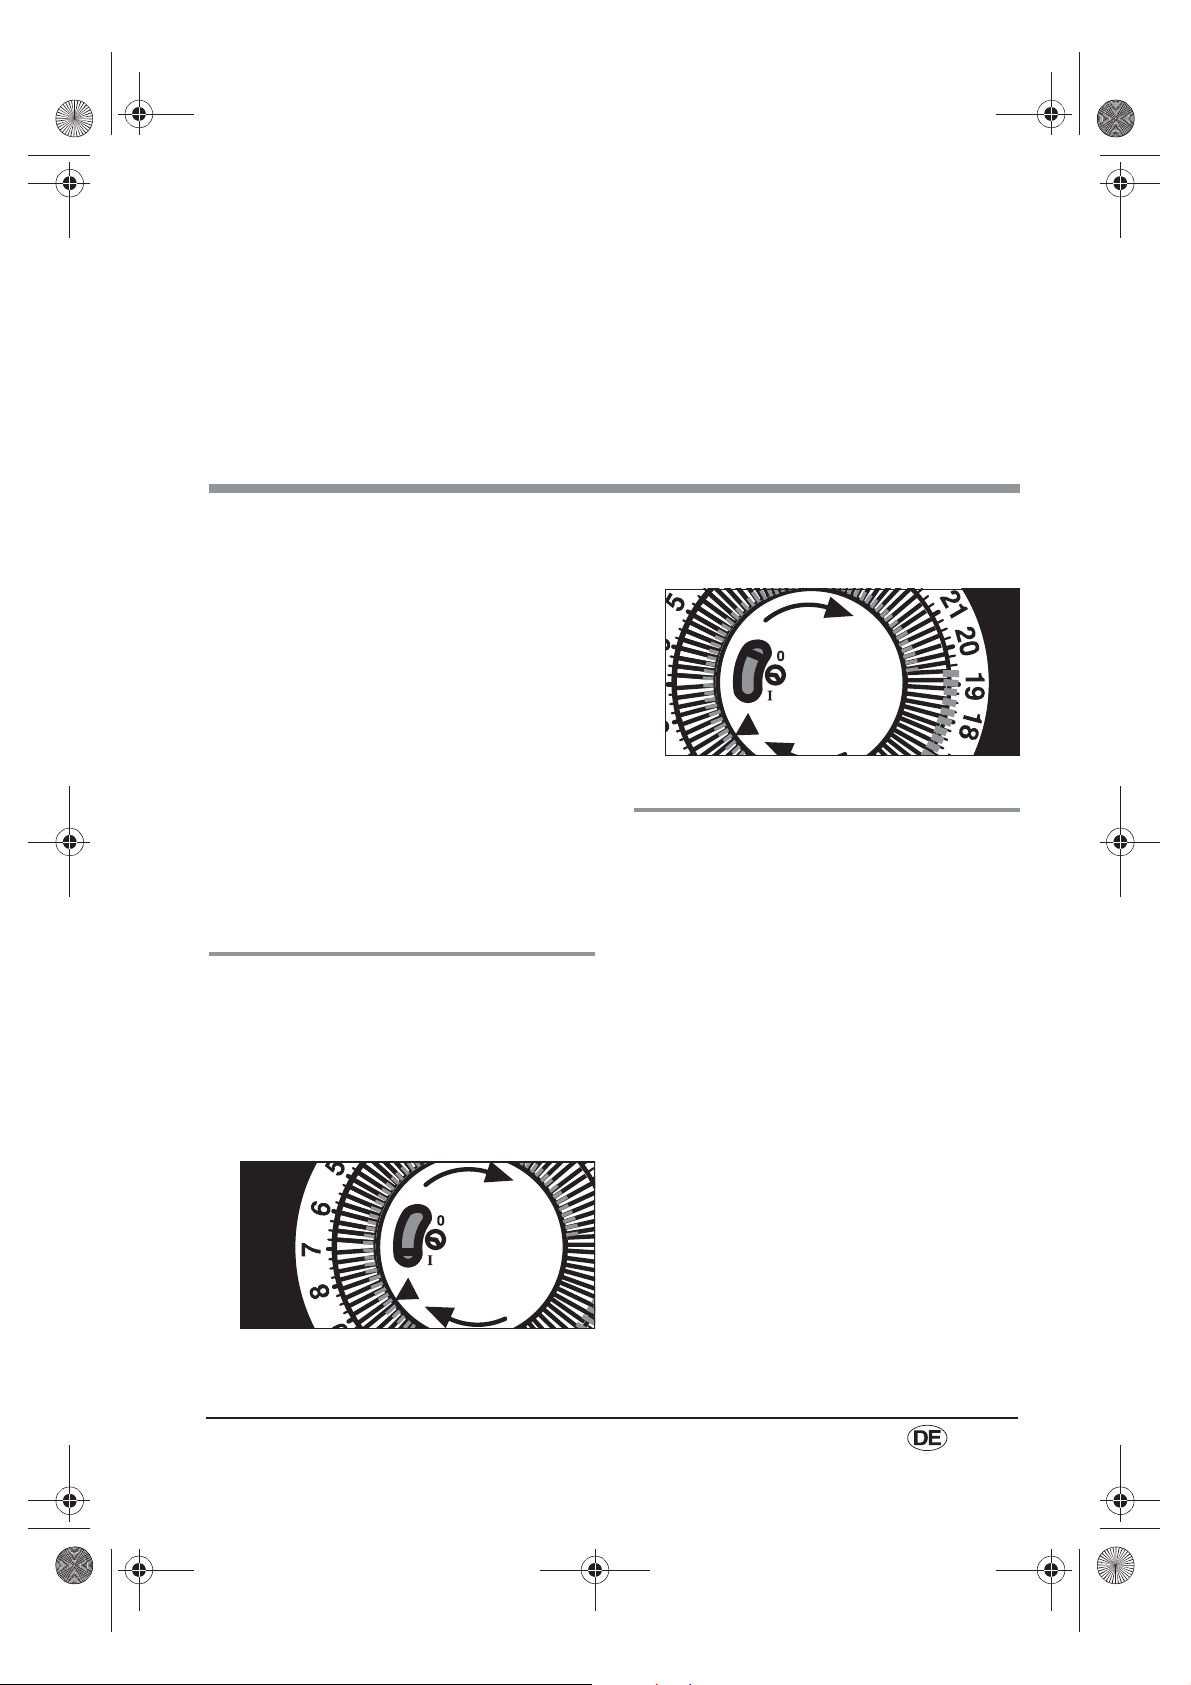
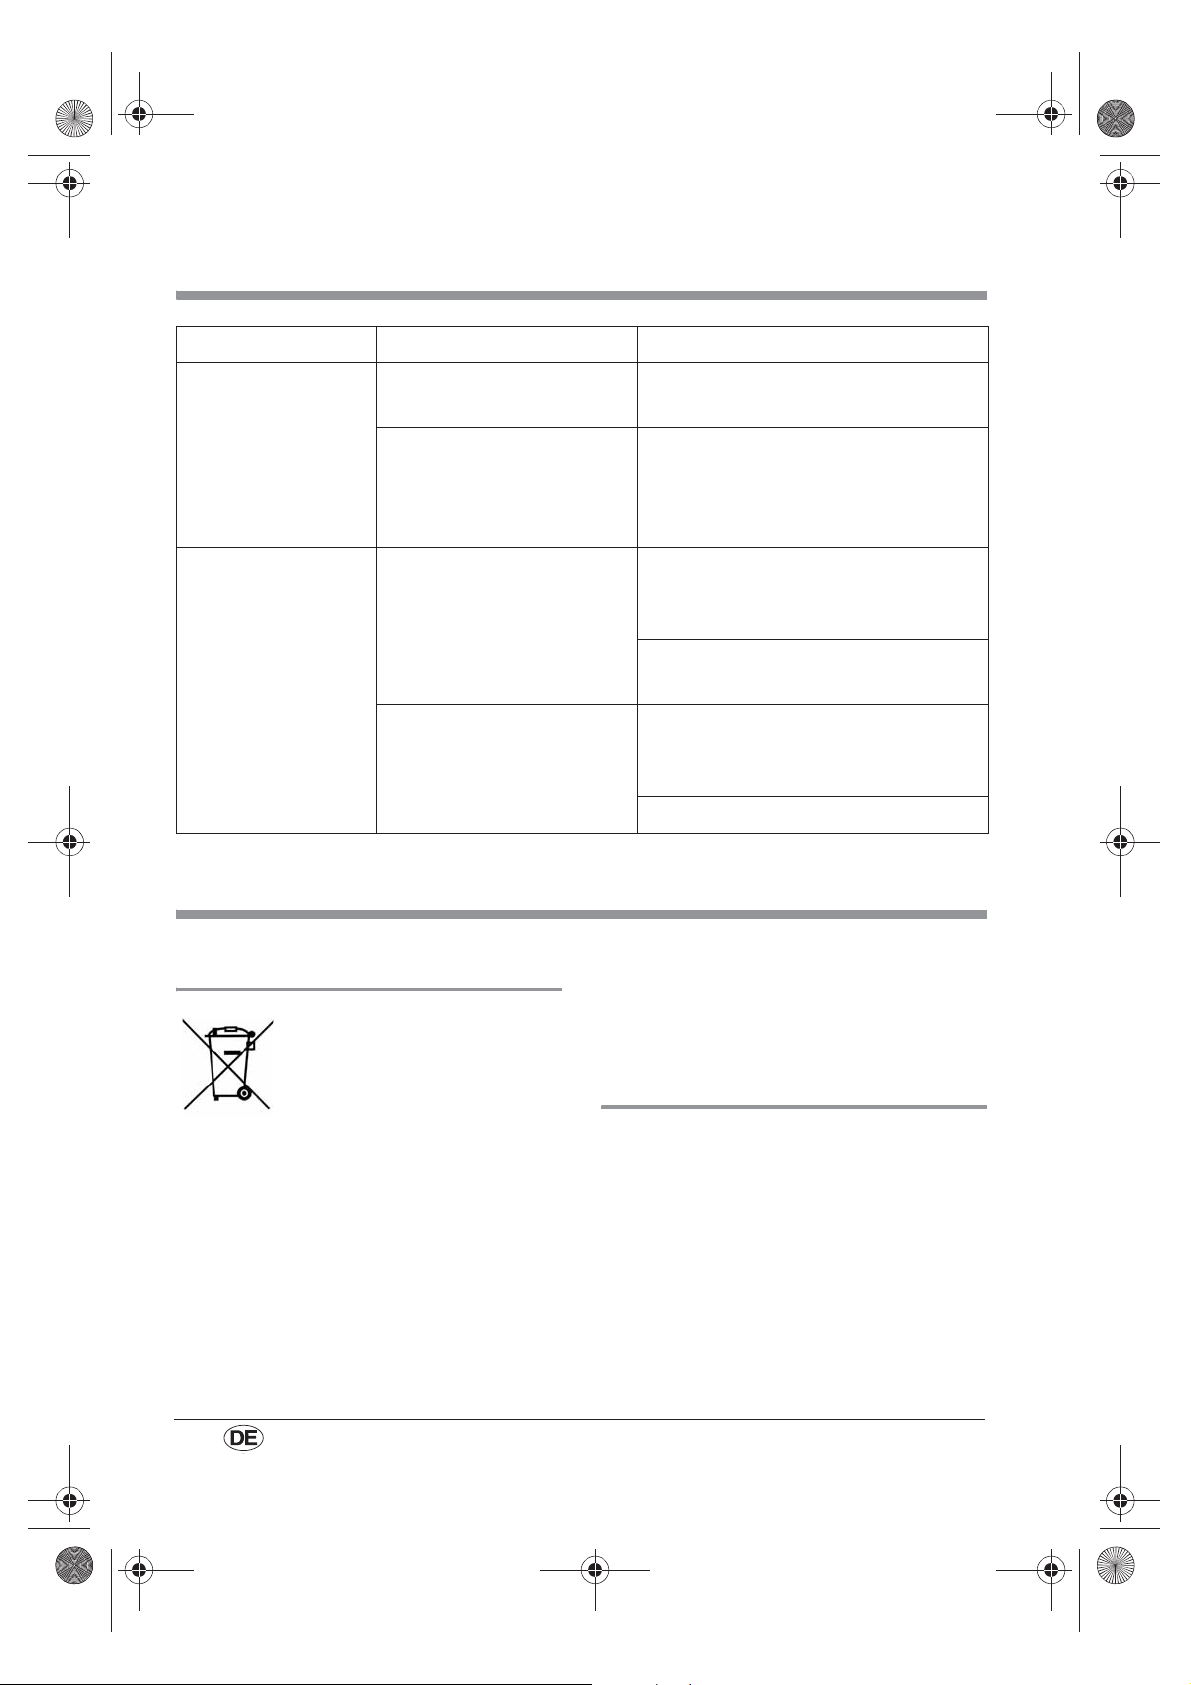
3. Wählen Sie die Zeiten, zu denen das
Gerät arbeiten soll, indem Sie alle Steuerungssegmente 12 vom Beginn bis
zum Ende entsprechend der Skala für
die Uhrzeit 11 nach außen ziehen.
6.5 Heizdauer einstellen
Das Gerät besitzt einen Timer, mit dem Sie
die gewünschte Heizdauer einstellen
können.
10
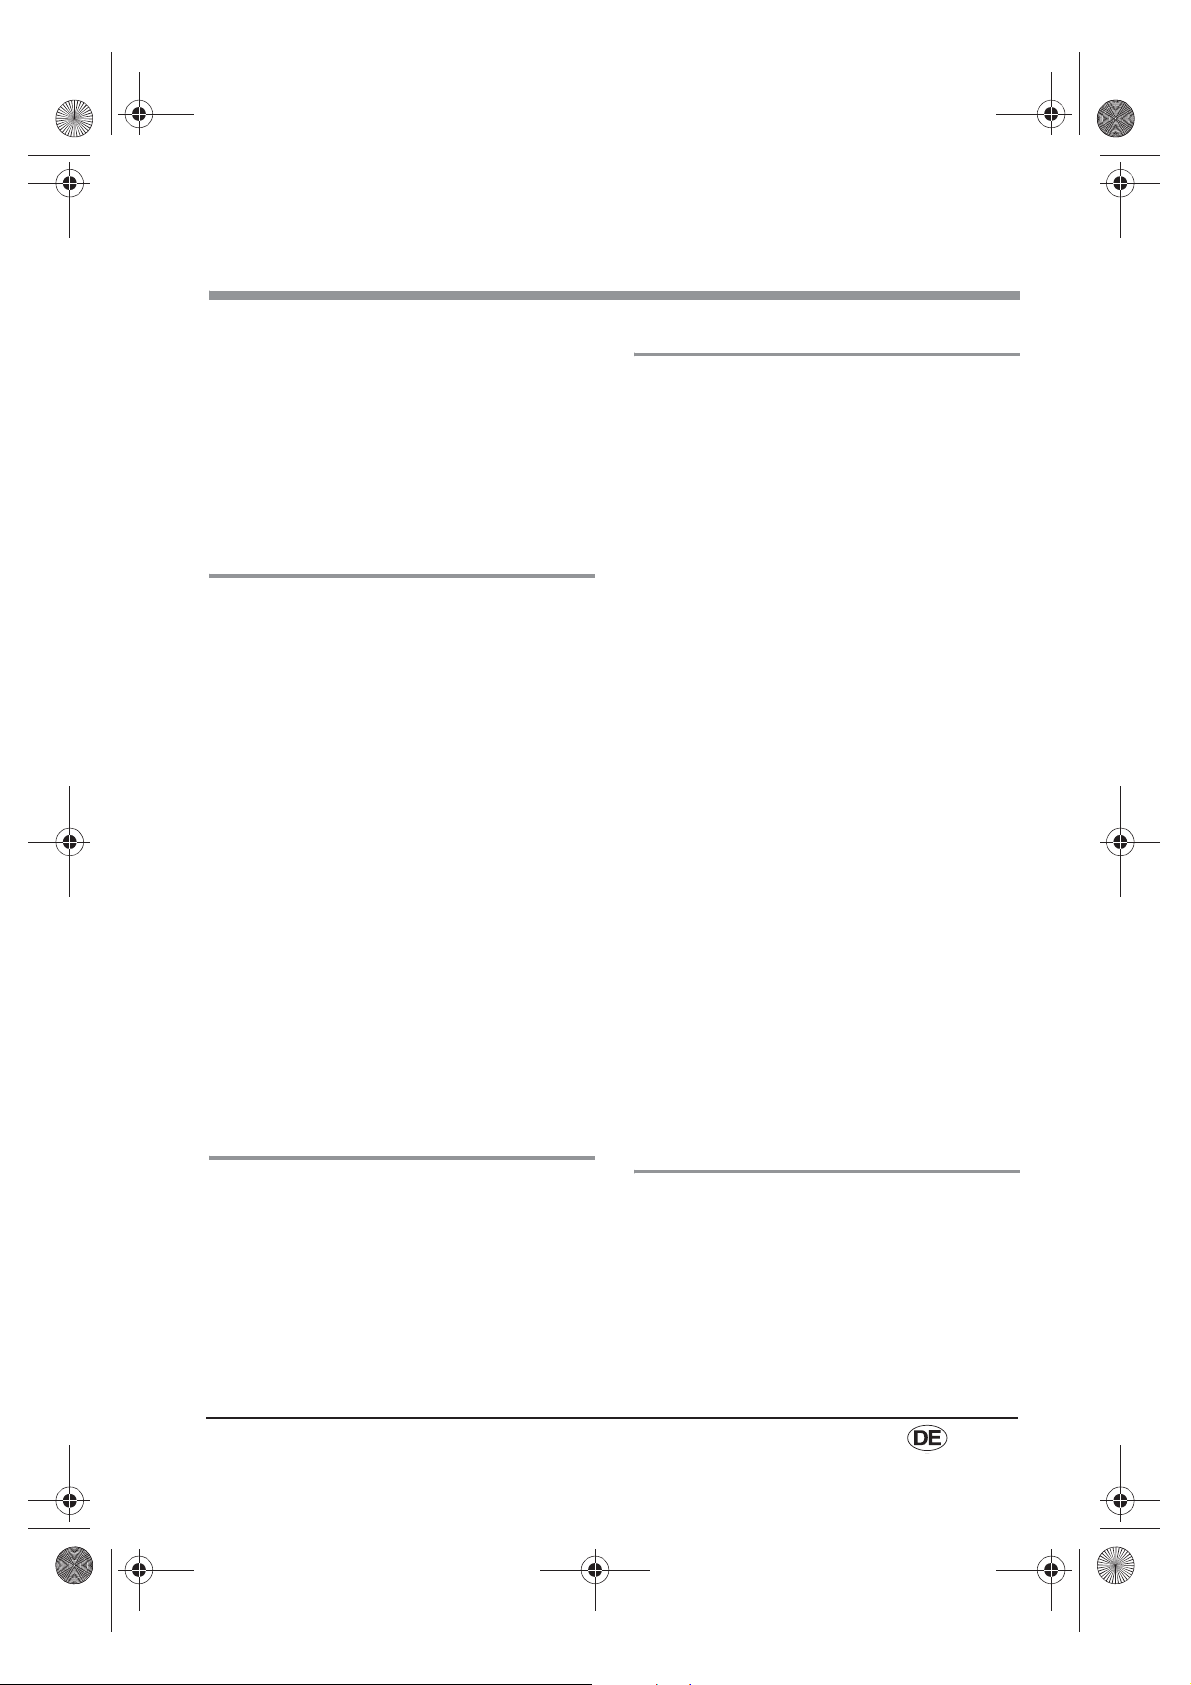
In diesem Beispiel läuft die Heizzeit von
13.00 Uhr bis 19.15 Uhr.
Page 13

RP100157 Konvektor Timer LB1 Seite 11 Mittwoch, 11. Juni 2014 12:30 12
4. Um den Timer auszuschalten, schieben
Sie den Hauptschalter 14 auf „I“
(Dauerbetrieb) oder „0“ (Gerät ausgeschaltet).
6.6 Überhitzungsschutz
Zu Ihrer Sicherheit besitzt dieses Gerät
einen Überhitzungsschutz.
Falls die Temperatur im Inneren des Gerätes zu
hoch wird, schaltet es sich automatisch aus:
1. Schalten Sie die Stromversorgung aus,
indem Sie den Hauptschalter 14 auf „0“
stellen.
2. Überprüfen Sie, ob die Luft frei ein- und
ausströmen kann.
Sollte keine Ursache feststellbar sein und
der Fehler wiederholt auftreten, lassen
Sie das Gerät reparieren oder nehmen
es außer Betrieb.
3. Warten Sie ab, bis sich das Gerät abgekühlt hat.
4. Danach können Sie es normal weiterbetreiben.
6.7 Frostschutzeinstellung
Mit dieser Funktion verhindert das Gerät,
dass die Raumtemperatur unter die Frostgrenze fällt.
1. Drehen Sie den Temperaturwähler 8 auf
das Frostsymbol 9.
2. Schalten Sie die Stromversorgung ein,
indem Sie den Hauptschalter 14 auf
„I“ stellen.
3. Wählen Sie mit den Schaltern 5 und 6
eine Heizstufe (siehe „6.2 Heizstufe einstellen“ auf Seite 9).
4. Schalten Sie den Ventilator ein, indem
Sie den Ventilatorschalter 7 betätigen
(siehe „6.4 Ventilatorfunktion“ auf
Seite 10).
6.8 Gerät transportieren
Wenn Sie das Gerät transportieren wollen,
tragen Sie es stets an den Tragegriffen 1.
7. Reinigen
Damit Sie lange Freude an Ihrem Gerät
haben, sollten Sie es regelmäßig reinigen.
Warnung! Um die Gefahr eines
elektrischen Schlages oder einer
Verbrennung zu vermeiden:
– Ziehen Sie vor jeder Reinigung
den Netzstecker.
– Lassen Sie das Gerät abkühlen.
– Tauchen Sie das Gerät nie in
Wasser.
– Lassen Sie kein Wasser oder
Reinigungsmittel in das Gerät
laufen.
1. Entfernen Sie grobe Staubablagerungen
vorsichtig mit einem Staubsauger.
SKT2000B1 11
2. Reinigen Sie das Gerät außen mit einem
feuchten Lappen. Sie können auch
etwas Spülmittel nehmen.
Vorsicht! Verwenden Sie niemals
scharfe oder scheuernde
Reinigungsmittel, da Ihr Gerät dadurch
beschädigt werden könnte.
3. Wischen Sie mit einem Lappen, der mit
klarem Wasser angefeuchtet ist, nach.
4. Benutzen Sie das Gerät erst wieder,
wenn es vollständig getrocknet ist.
Page 14
RP100157 Konvektor Timer LB1 Seite 12 Mittwoch, 11. Juni 2014 12:30 12
8. Störungen beheben
Störung Ursache Beseitigung
Gerät lässt sich nicht
einschalten
Gerät schaltet
automatisch ab
Sicherung oder Netzsteckdose defekt
Gerät defekt Durch Fachwerkstatt instand setzen
Überhitzungsschutz hat
ausgelöst
Gewählte Temperatur ist
erreicht
Andere Netzsteckdose wählen
lassen oder Gerät entsorgen. Die Service-Adresse finden Sie in „ServiceCenter” auf Seite 14.
Gerät abkühlen lassen (siehe
„6.6 Überhitzungsschutz“ auf
Seite 11)
Gerät reinigen (siehe „7. Reinigen“ auf
Seite 11)
Heizung schaltet sich automatisch
wieder ein, sobald Raumtemperatur
sinkt
Höhere Soll-Temperatur wählen
9. Entsorgung
9.1 Gerät
Das Symbol der durchgestrichenen Abfalltonne auf Rädern
bedeutet, dass das Gerät in der
Europäischen Union einer
getrennten Müllsammlung zugeführt werden muss. Dies gilt für das Gerät und
alle mit diesem Symbol gekennzeichneten
Zubehörteile. Gekennzeichnete Geräte dürfen nicht über den normalen Hausmüll entsorgt
werden, sondern müssen an einer Annahmestelle für das Recycling von elektrischen und
elektronischen Geräten abgegeben werden.
Recycling hilft, den Verbrauch von Rohstoffen
zu reduzieren und die Umwelt zu entlasten.
12
Informationen zur Entsorgung und zur Lage
des nächsten Recyclinghofes erhalten Sie z.B.
bei Ihrer Stadtreinigung oder in den Gelben
Seiten.
9.2 Verpackung
Wenn Sie die Verpackung entsorgen möchten, achten Sie auf die entsprechenden
Umweltvorschriften in Ihrem Land.
Page 15
RP100157 Konvektor Timer LB1 Seite 13 Mittwoch, 11. Juni 2014 12:30 12
10. Garantie der HOYER Handel GmbH
Sehr geehrte Kundin, sehr geehrter Kunde,
Sie erhalten auf dieses Gerät 3 Jahre
Garantie ab Kaufdatum. Im Falle von Mängeln dieses Gerätes stehen Ihnen gegen den
Verkäufer des Gerätes gesetzliche Rechte
zu. Diese gesetzlichen Rechte werden durch
unsere im Folgenden dargestellte Garantie
nicht eingeschränkt.
Garantiebedingungen
Die Garantiefrist beginnt mit dem Kaufdatum. Bitte bewahren Sie den Original
Kassenbon gut auf. Diese Unterlage wird als
Nachweis für den Kauf benötigt.
Tritt innerhalb von drei Jahren ab dem Kaufdatum dieses Gerätes ein Material- oder
Fabrikationsfehler auf, wird das Gerät von
uns – nach unserer Wahl – für Sie kostenlos
repariert oder ersetzt. Diese Garantieleistung setzt voraus, dass innerhalb der Dreijahresfrist das defekte Gerät und der
Kaufbeleg (Kassenbon) vorgelegt und
schriftlich kurz beschrieben wird, worin der
Mangel besteht und wann er aufgetreten ist.
Wenn der Defekt von unserer Garantie
gedeckt ist, erhalten Sie das reparierte oder
ein neues Gerät zurück. Mit Reparatur oder
Austausch des Gerätes beginnt kein neuer
Garantiezeitraum.
Garantiezeit und gesetzliche
Mängelansprüche
Garantieumfang
Das Gerät wurde nach strengen Qualitätsrichtlinien sorgfältig produziert und vor
Anlieferung gewissenhaft geprüft.
Die Garantieleistung gilt für Material- oder
Fabrikationsfehler. Diese Garantie erstreckt
sich nicht auf Geräteteile, die normaler
Abnutzung ausgesetzt sind und daher als
Verschleißteile angesehen werden können
oder für Beschädigungen an zerbrechlichen
Teilen, z. B. Schaltern, Akkus oder Teilen, die
aus Glas gefertigt sind.
Diese Garantie verfällt, wenn das Gerät
beschädigt, nicht sachgemäß benutzt oder
gewartet wurde. Für eine sachgemäße
Benutzung des Gerätes sind alle in der
Bedienungsanleitung aufgeführten Anweisungen genau einzuhalten.
Verwendungszwecke und Handlungen, von
denen in der Bedienungsanleitung abgeraten oder vor denen gewarnt wird, sind unbedingt zu vermeiden.
Das Gerät ist lediglich für den privaten und
nicht für den gewerblichen Gebrauch
bestimmt.
Bei missbräuchlicher und unsachgemäßer
Behandlung, Gewaltanwendung und bei
Eingriffen, die nicht von unserem autorisierten Service-Center vorgenommen wurden,
erlischt die Garantie.
Abwicklung im Garantiefall
Die Garantiezeit wird durch die Gewährleistung nicht verlängert. Dies gilt auch für ersetzte
und reparierte Teile. Eventuell schon beim Kauf
vorhandene Schäden und Mängel müssen
sofort nach dem Auspacken gemeldet werden.
Nach Ablauf der Garantiezeit anfallende
Reparaturen sind kostenpflichtig.
SKT2000B1 13
Um eine schnelle Bearbeitung Ihres
Anliegens zu gewährleisten, folgen Sie bitte
den folgenden Hinweisen:
• Bitte halten Sie für alle Anfragen die
Artikelnummer (für dieses Gerät:
IAN 100157) und den Kassenbon als
Nachweis für den Kauf bereit.
Page 16
RP100157 Konvektor Timer LB1 Seite 14 Mittwoch, 11. Juni 2014 12:30 12
• Die Artikelnummer entnehmen Sie dem
Typenschild, einer Gravur, dem Titelblatt
ihrer Anleitung (unten links) oder einem
Aufkleber am Gerät.
• Sollten Funktionsfehler oder sonstige
Mängel auftreten, kontaktieren Sie
zunächst das nachfolgend benannte
Service-Center telefonisch oder per
E-Mail.
• Ein als defekt erfasstes Gerät können Sie
dann unter Beifügung des Kaufbelegs
(Kassenbon) und der Angabe, worin der
Mangel besteht und wann er aufgetreten ist, für Sie portofrei an die Ihnen mitgeteilte Service-Anschrift übersenden.
Auf www.lidl-service.com können Sie diese und viele weitere
Handbücher, Produktvideos
und Software herunterladen.
Lieferant
Bitte beachten Sie, dass die folgende
Anschrift keine Serviceanschrift ist.
Kontaktieren Sie zunächst das oben
benannte Service-Center.
HOYER Handel GmbH
Kühnehöfe 5
22761 Hamburg
Deutschland
Service-Center
Service Deutschland
Tel.: 0800-5435111
(kostenlos)
E-Mail: hoyer@lidl.de
Service Österreich
Tel.: 0820 201 222
(0,15 EUR/Min.)
E-Mail: hoyer@lidl.at
Service Schweiz
Tel.: 0842 665566
(0,08 CHF/Min.,
Mobilfunk max. 0,40 CHF/Min.)
E-Mail: hoyer@lidl.ch
IAN: 100157
14
Page 17

RP100157 Konvektor Timer LB1 Seite 15 Mittwoch, 11. Juni 2014 12:30 12
Sommaire
1. Description de l'appareil . . . . . . . . . . . . . . . . . . . . . . . . . . . . . . . . . . . . . . . . . . . . . . . . . 15
2. Désignation des pièces (voir rabat) . . . . . . . . . . . . . . . . . . . . . . . . . . . . . . . . . . . . . . . . . 16
3. Caractéristiques techniques . . . . . . . . . . . . . . . . . . . . . . . . . . . . . . . . . . . . . . . . . . . . . . . 16
4. Consignes de sécurité . . . . . . . . . . . . . . . . . . . . . . . . . . . . . . . . . . . . . . . . . . . . . . . . . . . 16
5. Déballage et mise en place. . . . . . . . . . . . . . . . . . . . . . . . . . . . . . . . . . . . . . . . . . . . . . . . 20
6. Utilisation. . . . . . . . . . . . . . . . . . . . . . . . . . . . . . . . . . . . . . . . . . . . . . . . . . . . . . . . . . . . 21
7. Nettoyage. . . . . . . . . . . . . . . . . . . . . . . . . . . . . . . . . . . . . . . . . . . . . . . . . . . . . . . . . . . . 23
8. Dépannage. . . . . . . . . . . . . . . . . . . . . . . . . . . . . . . . . . . . . . . . . . . . . . . . . . . . . . . . . . . 24
9. Mise au rebut . . . . . . . . . . . . . . . . . . . . . . . . . . . . . . . . . . . . . . . . . . . . . . . . . . . . . . . . . 24
10. Garantie de la société HOYER Handel GmbH . . . . . . . . . . . . . . . . . . . . . . . . . . . . . . . . . . . 25
Merci d'avoir acheté ce nouvel
produit.
Vous avez porté votre choix sur un produit
haut de gamme. La notice d’utilisation fait
partie intégrante de l’appareil. Elle contient
des remarques importantes relatives à la
sécurité, l'utilisation et la mise au rebut.
1. Description de l'appareil
1.1 Destination
Ce convecteur SilverCrest SKT2000B1
vous permet de chauffer des pièces
d'habitation sèches.
Cet appareil est conçu pour un usage
domestique privé et n’est pas adapté à un
usage commercial.
L'appareil est également conçu pour être
utilisé :
• dans les cuisines par les employés des
magasins, bureaux et autres secteurs
commerciaux,
• dans les exploitations agricoles,
Avant tout usage du produit, prenez
connaissance de toutes les consignes
d'utilisation et de sécurité. Utilisez le produit
uniquement comme décrit et pour les
domaines d'application indiqués.
En cas de transfert du produit à un tiers, tous
les documents qui accompagnent ce produit
doivent être remis simultanément.
• par les clients dans des hôtels, motels ou
autres établissements,
• dans des pensions avec petit-déjeuner.
L'appareil est adapté comme chauffage
d'appoint. Il n'est pas adapté comme
unique source de chauffage dans de grands
volumes.
L’appareil doit être placé exclusivement au
sol ou bien installé sur le mur à l’aide du
dispositif de fixation murale fournis.
SKT2000B1 15
Page 18

RP100157 Konvektor Timer LB1 Seite 16 Mittwoch, 11. Juni 2014 12:30 12
1.2 Volume de livraison
•1 convecteur
•2 pieds
•4 vis pour les pieds
•4 crochets
• 4 chevilles avec vis pour les crochets
• 1 notice d’utilisation
2. Désignation des pièces (voir rabat)
1 Poignées de transport
2 Sortie d’air
3 Symbole d'avertissement «Ne pas
couvrir»
4 Pieds
5 Interrupteur 1250 W
6 Interrupteur 750 W
7 Interrupteur du ventilateur
3. Caractéristiques techniques
1.3 Marquages sur l'appareil
Le symbole ci-contre 3 vous
avertit de ne jamais couvrir
l'appareil, car l'accumulation de
chaleur pourrait causer des
dommages et un risque
d'incendie.
8 Sélecteur de températures
9 Symbole du gel
10 Minuterie
11 Graduation pour l'heure
12 Segments de commande
13 Marque de l'heure
14 Interrupteur principal
Alimentation en tension : 220 - 240 V~ / 50 Hz
Puissance maximale : 2 000 watts
Classe de protection : I
4. Consignes de sécurité
4.1 Signification des termes
La présente notice d’utilisation contient les
termes de mise en garde suivants :
Attention !
Haut risque. Toute non-observation
de cette mise en garde peut
occasionner des dommages
corporels et représente un risque
vital.
16
Prudence !
Risque moyen. Toute non-observation de
cette mise en garde peut engendrer des
dommages matériels.
Remarque :
Faible risque. Comportements à observer
dans le cadre de l’utilisation et de la
manipulation de l’appareil.
Page 19

RP100157 Konvektor Timer LB1 Seite 17 Mittwoch, 11. Juni 2014 12:30 12
4.2 Consignes spéciales pour cet
appareil
Avertissement ! Respectez les
consignes suivantes pour éviter
toute blessure.
• Empêcher l'accès à l'appareil aux enfants de
moins de 3ans, sauf s'ils sont constamment
surveillés.
• Les enfants de plus de 3ans et de moins de 8ans
peuvent allumer et éteindre l'appareil uniquement
à condition qu'ils soient surveillés ou aient reçu les
instructions nécessaires à une utilisation sûre de
l'appareil, qu'ils aient compris les dangers en
résultant et que l'appareil soit placé ou installé
dans sa position de fonctionnement normale.
• Les enfants de plus de 3ans et de moins de 8ans
ne doivent pas brancher l'appareil, le réguler, le
nettoyer et/ou en effectuer la maintenance
utilisateur.
• Cet appareil peut être utilisé par des enfants à
partir de 8 ans et des personnes aux capacités
physiques, sensorielles ou mentales réduites, ou
manquant d'expérience et/ou de connaissances,
condition qu'ils soient surveillés ou aient reçu les
instructions nécessaires à une utilisation sûre de
l'appareil, et qu'ils aient compris les dangers en
résultant. Les enfants ne doivent pas jouer avec
l’appareil.
• Le nettoyage et la maintenance utilisateur ne
doivent pas être effectués par des enfants s'ils sont
âgés de moins de 8 ans et sont sans surveillance.
• Tenir l’appareil et le câble de raccordement au
réseau hors de portée des enfants de moins de
8ans.
• Attention – plusieurs pièces de l'appareil peuvent
devenir très chaudes et provoquer des brûlures.
Faire preuve d'une prudence particulière en
présence d'enfants et de personnes nécessitant
une protection.
• Les surfaces métalliques de l’appareil peuvent
devenir brûlantes. Ne tenez l’appareil que par ses
1
poignées de transport
.
• Avant chaque nettoyage, débranchez la fiche
secteur de la prise secteur.
• Ne plongez jamais l’appareil dans l'eau et
protégez-le des éclaboussures et des gouttes
d'eau.
• Avant le nettoyage, laissez refroidir l’appareil
jusqu'à ce qu'il n'y ait plus aucun risque de
brûlure.
• Afin d’éviter une surchauffe, ne couvrez jamais le
chauffage.
• L’appareil ne doit jamais être placé directement
sous un socle de prise de courant étant donné que
la chaleur pourrait causer des dommages à
l'installation électrique.
• Ne pas utiliser ce chauffage en liaison avec un
minuteur, un système de commande à distance
autonome ou tout autre dispositif de mise en
marche automatique, car il y a un risque
d'incendie si le chauffage est couvert ou mal
réglé.
Prudence! Respectez les consignes suivantes pour éviter les dommages matériels:
• N'utilisez jamais des produits de nettoyage à
récurer, corrosifs ou pour gratter.
• N'utilisez jamais l'appareil à proximité immédiate
d'un lavabo, d'une baignoire, d'une douche ou
d'une piscine, car de l'eau pourrait être projetée
sur l'appareil.
4.3 Consignes générales
• Veuillez lire avec attention la présente
notice d’utilisation avant utilisation. Elle
fait partie intégrante de l’appareil et doit
être à tout moment disponible.
• Affectez l'appareil uniquement de
l'usage prévu (voir « 1.1 Destination » à
la page 15).
SKT2000B1 17
Page 20

RP100157 Konvektor Timer LB1 Seite 18 Mittwoch, 11. Juni 2014 12:30 12
• Assurez-vous que la tension secteur
nécessaire (voir plaque signalétique sur
l’appareil) concorde avec la tension
secteur de l’installation.
• Seul notre centre de service après-vente
est habilité à remettre en état l'appareil
dans le cas de dysfonctionnements
éventuels. Vous trouverez les données de
contact dans « Service après-vente » à
la page 26.
• L’appareil peut être installé uniquement
sur une surface stable, plane, sèche et
non inflammable.
• Veillez à ce que la prise reste bien
accessible pour pouvoir éventuellement
la débrancher rapidement.
4.4 Protection contre la décharge
électrique
Attention ! Les consignes de
sécurité suivantes sont destinées à
vous protéger contre une décharge
électrique.
• Ne branchez l'appareil qu’à une prise
de courant de sécurité installée en toute
conformité.
• Vous ne devez pas continuer à utiliser
l’appareil s'il est tombé par terre, s'il a
reçu un choc violent ou s'il est tombé
dans l'eau. Veuillez dans ce cas vous
adresser au centre de service aprèsvente. Vous trouverez les données de
contact dans « Service après-vente » à
la page 26.
• Si l’appareil est endommagé, ne l’utiliser
en aucun cas. Faites dans ce cas réparer
l’appareil par une main d’oeuvre
qualifiée. Vous trouverez les données de
contact dans « Service après-vente » à
la page 26.
• Si le câble d‘alimenation est
endommagé, il doit être remplacé par le
fabricant, son service après-ventes ou
des personne de qualification similaire
afin d‘éviter un danger.
• L’eau ou d’autres liquides ne peuvent en
aucun cas pénétrer dans l’appareil. Par
conséquent :
– Ne jamais l’utiliser à l’air libre ;
– Ne jamais poser sur l’appareil des
récipients remplis de liquide tels que
des verres, des vases, etc ;
Si du liquide pénètre dans l’appareil,
débranchez immédiatement la fiche
secteur et confiez la réparation de
l’appareil au personnel spécialisé et
qualifié. Vous trouverez les données de
contact dans « Service après-vente » à
la page 26.
• N'essayez jamais d'accéder à l'intérieur
de l'appareil à travers la grille de
protection avec les doigts ou avec des
objets.
• Ne saisissez jamais l’appareil, le câble
secteur ou la prise secteur, les mains
humides.
• Débranchez toujours le câble secteur en
tirant sur la prise mâle. Ne tirez jamais
sur le câble lui-même.
• Veillez à ne jamais couder ou coincer le
câble d’alimentation.
• Veillez à ce que le câble secteur ne soit
pas endommagé par des arêtes vives.
• Maintenez le câble secteur éloigné des
surfaces à haute température (comme
de la table de cuisson par ex.).
• Si vous n’utilisez pas l’appareil pendant
une période prolongée, retirez la fiche
secteur de la prise de courant. Dès lors,
l’appareil ne sera plus du tout alimenté
en courant.
• Evitez l’utilisation de rallonges. Elle est
autorisée dans certaines conditions
uniquement :
– la rallonge doit convenir à l’ampérage
de l'appareil ;
18
Page 21

RP100157 Konvektor Timer LB1 Seite 19 Mittwoch, 11. Juni 2014 12:30 12
– la rallonge ne doit pas être posée
« volante » : elle ne doit ni pouvoir
provoquer de chute, ni pouvoir être
atteinte par des enfants ;
– la rallonge ne doit en aucun cas être
endommagée ;
– aucun autre appareil que celui-ci ne
doit être raccordé à la prise femelle
secteur, une surcharge du secteur
pouvant sinon survenir (multiprises
interdites !).
4.5 Protection contre le risque
d’incendie
Attention ! L’appareil fonctionne
à des températures élevées,
respectez les consignes de sécurité
suivantes pour éviter de déclencher
un incendie..
• Durant le fonctionnement, aucun objet
inflammable (par ex. rideaux, papier,
etc.) ne peut se trouver à proximité de
l’appareil.
• N’utilisez jamais l’appareil pour sécher
des textiles ou autres objets, notamment
en les mettant sur ou devant l’appareil.
• En installant l’appareil sur le sol, gardez
une distance minimale de 0,5 m aux
autres appareils ou au mur.
• Si vous fixez l’appareil sur un mur, seuls les
crochets fournis doivent être utilisés. Il est
impératif de veiller à ce que l’air puisse
circuler librement autour du convecteur. La
distance minimale entre le sol et le bord
inférieur de l’appareil est de 10 cm.
• Si vous fixez l’appareil sur un mur, celui-
ci ne doit pas être inflammable et doit
être suffisamment solide.
• N'utilisez jamais l'appareil dans des
zones explosives ou à proximité de gaz
ou de liquides inflammables.
• Veillez toujours à ce que l’air puisse
entrer et sortir librement. Sinon, cela
risque de provoquer une accumulation
de chaleur.
4.6 Protection contre les blessures
Attention ! Respectez les
consignes suivantes pour éviter
toute blessure.
• Veillez à ce que le cordon
d’alimentation ne représente pas un
obstacle sur lequel une personne
pourrait trébucher ou marcher ou dans
lequel elle pourrait se prendre les pieds.
• Si vous voulez transporter l’appareil
mais qu'il est encore chaud, éteignez-le,
débranchez la prise et attendez que
l'appareil ait refroidi. Autrement, vous
risquez de vous brûler sur les surfaces
chaudes.
4.7 Pour la sécurité de votre enfant
Attention ! Les enfants ne sont
fréquemment pas à même
d’évaluer correctement les
dangers, risquant ainsi de se
blesser. Prenez note par
conséquent :
• Ne laissez jamais les enfants jouer avec
l’emballage plastique (risque
d’étouffement). Les films d’emballage ne
sont pas des jouets.
4.8 Dommages matériels
Prudence ! Respectez les consignes
suivantes pour éviter les dommages
matériels.
• Lors de l’installation sur le sol, veillez à
ce que les pieds soient mis en place
correctement (voir « 5.1 Montage de
l’appareil pour l’installation sur le sol » à
la page 20), sinon le sol risque d’être
rayé ou de subir des taches de brûlure.
SKT2000B1 19
Page 22

RP100157 Konvektor Timer LB1 Seite 20 Mittwoch, 11. Juni 2014 12:30 12
5. Déballage et mise en place
1. Retirez l’appareil de son emballage.
2. Enlevez l'emballage de transport.
3. Vérifiez que l’appareil n’est pas
endommagé.
5.1 Montage de l’appareil pour
l’installation sur le sol
1. Fixer les pieds 4 sur la face inférieure du
convecteur à l'aide des vis courtes
fournies. 2 vis sont vissées en diagonale
par pied.
Attention ! Conservez une
distance suffisante avec le mur, le
mobilier ou les autres appareils.
Lors de l’installation sur le sol,
respectez une distance de 0,5 m
minimum pour éviter les risques
d’incendie.
La distance par rapport au mur
peut être réduite uniquement si
vous utilisez les crochets fournis, à
condition que le mur ne soit pas
inflammable.
2. Choisissez un emplacement qui
correspond aux consignes de sécurité
(voir « 4. Consignes de sécurité » à la
page 16).
1. À l’aide des vis, fixez les crochets fournis
sur un mur adapté :
– Marquez les trous à percer de façon à
ce que l’écart des crochets
corresponde exactement à l’écart des
deux fentes sur la face arrière de
l’appareil.
– Veillez à ce que les deux trous à
percer se trouvent exactement à
l’horizontale.
– À l’aide d’un foret de 8 mm, percez un
trou d’env. 40 mm de profondeur.
– Insérez une cheville dans chaque trou.
– Fixez les deux crochets à l’aide des vis
longues.
2. Pour que l’appareil soit suspendu à la
verticale sur le mur, les deux autres
crochets servent d’entretoise :
5.2 Montage de l’appareil sur un mur
Attention !
• Le mur ne doit pas être inflammable et
doit être suffisamment solide.
• L’appareil doit se trouver au moins à 10
cm au-dessus du sol pour que l’air puisse
circuler librement.
Remarque : Si vous montez l’appareil sur
un mur, les pieds ne doivent pas être vissés.
20
Page 23

RP100157 Konvektor Timer LB1 Seite 21 Mittwoch, 11. Juni 2014 12:30 12
– À l’aide des vis, fixez les deux
crochets restants sur la face inférieure
de l’appareil.
– Pour cela, utilisez les vis courtes.
6. Utilisation
Remarque :
• Comme l’appareil ou les éléments
chauffants ont été légèrement graissés
avant la livraison, il est possible qu’une
légère formation de fumée ou d’odeur
se produise lors de la première
utilisation. Ceci ne présente aucun
danger et cesse peu après. Veillez à
assurer une aération suffisante pendant
ce temps.
• Si d’autres équipements consommateurs
de courant sont branchés sur le même
circuit, veillez à ce que la charge
maximale admissible du disjoncteur
général ne soit pas dépassée, car cela
déclencherait le disjoncteur.
6.1 Mise en service et arrêt de l'appareil
1. Insérez la fiche secteur dans une prise
secteur en conformité avec les données
techniques (voir « 3. Caractéristiques
techniques » à la page 16).
2. Mettez l'appareil sous tension en plaçant
l'interrupteur principal 14 sur "I".
3. Accrochez l’appareil aux crochets.
4. Vous pouvez également visser les deux
entretoises au mur pour rendre
l’accrochage encore plus stable.
3. Mettez l'appareil hors tension en plaçant
l'interrupteur principal 14 sur "0".
6.2 Réglage du niveau de chauffage
Les niveaux de chauffage permettent de
déterminer la rapidité avec laquelle
l'appareil chauffe.
L'appareil offre trois niveaux de chauffage:
– Niveau 1 : 750 watts : enclenchez
l'interrupteur 6 ;
– Niveau 2 : 1 250 watts : enclenchez
l'interrupteur 5 ;
– Niveau 3 : 2 000 watts : enclenchez
l'interrupteur 5 et l'interrupteur 6.
Si le chauffage doit être réalisé
particulièrement vite, sélectionnez le niveau
3, si vous souhaitez juste un chauffage lent,
sélectionnez le niveau 1.
Un témoin lumineux rouge s'allume dans les
interrupteurs enclenchés dès que l'appareil
chauffe.
Si aucun interrupteur n'est enclenché,
l'appareil ne génère pas de chaleur.
L’appareil est à présent opérationnel.
SKT2000B1 21
Page 24

RP100157 Konvektor Timer LB1 Seite 22 Mittwoch, 11. Juni 2014 12:30 12
6.3 Sélection de la température
Avec le sélecteur de températures 8, vous
réglez la température souhaitée.
• Lorsque la température ambiante
souhaitée est atteinte, tournez le
sélecteur de températures 8 lentement
dans le sens contraire jusqu'à ce que
vous entendiez un léger "clic".
Les témoins lumineux rouges dans les
interrupteurs 5 ou 6 s'éteignent.
La température ambiante actuelle est
conservée.
Dès que l'appareil doit chauffer de
nouveau afin de maintenir la
température, les témoins lumineux
rouges dans les interrupteurs 5 ou 6
s'allument de nouveau de temps en
temps.
6.4 Fonction du ventilateur
Afin de répartir l'air réchauffé plus
rapidement dans la pièce, l'appareil
possède un ventilateur.
Afin de mettre le ventilateur en service,
enclenchez l'interrupteur du ventilateur 7.
Un témoin lumineux rouge s'allume alors
dans l'interrupteur du ventilateur 7.
Remarque : l'appareil peut également
fonctionner sans ventilateur enclenché. La
chaleur se concentre alors davantage
autour du convecteur et n'est pas répartie
aussi rapidement dans la pièce.
1. Enclenchez la minuterie en positionnant
l'interrupteur principal 14 sur le symbole
de l'heure.
2. Tournez la graduation pour l'heure 11
avec les segments de commande 12
jusqu'à ce que l'heure actuelle soit en
face de la marque de l'heure 13.
09 h 15 est indiqué dans cet exemple.
3. Sélectionnez les périodes pendant
lesquelles l'appareil doit fonctionner en
tirant tous les segments de commande 12
vers l'extérieur du début à la fin de
chaque période conformément à la
graduation de l'heure 11.
6.5 Réglage de la durée de chauffage
L’appareil est doté d’une minuterie vous
permettant de régler la durée de chauffage
de votre choix.
22
La période de chauffage a lieu dans cet
exemple entre 13 h 00 et 19 h 15.
Page 25

RP100157 Konvektor Timer LB1 Seite 23 Mittwoch, 11. Juni 2014 12:30 12
4. Afin d'éteindre la minuterie, commutez
l'interrupteur principal 14 sur "I"
(fonctionnement en continu) ou sur "0"
(appareil arrêté).
6.6 Protection contre la surchauffe
Pour votre sécurité, cet appareil est muni
d'une protection contre la surchauffe.
Si la température à l'intérieur de l'appareil
est trop élevée, celui-ci s'éteint
automatiquement:
1. Mettez l'appareil hors tension en plaçant
l'interrupteur principal 14 sur "0".
2. Vérifiez que l'air peut entrer et sortir
librement.
Si aucune cause n'est constatée et que le
problème se reproduit, faites réparer
l'appareil ou mettez-le hors service.
3. Attendez que l'appareil ait refroidi.
4. Vous pourrez alors le remettre en service
normalement.
6.7 Réglage de protection antigel
Avec cette fonction, l’appareil empêche la
température de la pièce de tomber en
dessous de la limite de gel.
1. Tournez le sélecteur de températures 8
sur le symbole du gel 9.
2. Mettez l'appareil sous tension en plaçant
l'interrupteur principal 14 sur "I".
3. Sélectionnez avec les interrupteurs 5 et 6
un niveau de chauffage (voir
« 6.2 Réglage du niveau de chauffage »
à la page 21).
4. Mettez le ventilateur en service en
enclenchant l'interrupteur du
ventilateur 7 (voir « 6.4 Fonction du
ventilateur » à la page 22).
6.8 Transport de l’appareil
Si vous transportez l’appareil, saisissez-le
toujours par les poignées de transport 1.
7. Nettoyage
Afin que puissiez profiter à long terme de
votre appareil, vous devez le nettoyer
régulièrement.
Attention ! Pour éviter le risque
de décharge électrique ou de
brûlure :
–Avant chaque nettoyage,
débranchez la fiche secteur ;
– Laissez refroidir l’appareil ;
– N’immergez jamais l’appareil
dans l’eau ;
– Ne laissez pas pénétrer l’eau ou
du produit de nettoyage dans
l’appareil.
1. Retirez avec précaution les dépôts de
poussière importants à l’aide d’un
aspirateur.
SKT2000B1 23
2. Nettoyez l’appareil à l’extérieur avec un
chiffon humide. Vous pouvez également
utiliser un peu de produit de vaisselle.
Prudence ! N’utilisez jamais des
produits de nettoyage corrosifs ou
abrasifs car cela risquerait
d’endommager votre appareil.
3. Nettoyez l'appareil avec un chiffon
humidifié à l'eau claire.
4. Ne réutilisez l’appareil qu’une fois ce
dernier totalement sec.
Page 26

RP100157 Konvektor Timer LB1 Seite 24 Mittwoch, 11. Juni 2014 12:30 12
8. Dépannage
Problème Cause Elimination
L'appareil ne veut
pas s'allumer
L'appareil s'éteint
automatiquement
Fusible ou prise
défectueux
Appareil
défectueux
La protection
contre la
surchauffe s'est
déclenchée
La température
définie est atteinte
Choisir une autre prise
Faire réparer l'appareil par un atelier spécialisé ou le
mettre au rebut. L’adresse de notre service aprèsvente vous est fournie au paragraphe « Service aprèsvente » à la page 26.
Laisser refroidir l'appareil (voir « 6.6 Protection contre
la surchauffe » à la page 23)
Nettoyer l'appareil (voir « 7. Nettoyage » à la
page 23)
Le chauffage se rallume automatiquement dès que la
température ambiante descend
Sélectionner une température de consigne plus élevée
9. Mise au rebut
9.1 Appareil
Le pictogramme avec le
tonneau sur roues barré signifie
que le produit doit être affecté
à une collecte des déchets
séparées dans les Etats
membres de l'Union européenne. Cette
disposition s'applique au produit et à tous
les accessoires portant ce pictogramme. Il
est interdit de jeter les produits marqués en
conséquence dans les ordures ménagères
normales et imposé de les remettre à un
poste de collecte pour le recyclage des
appareils électriques et électroniques. Le
recyclage aide à réduire la consommation
de matières premières et soulage notre
environnement. Par conséquent, veuillez
absolument respecter les prescriptions en
matière d’élimination en vigueur dans votre
pays.
9.2 Emballage
Si vous souhaitez mettre l'emballage au
rebut, respectez les règlements en vigueur
dans votre pays.
24
Page 27

RP100157 Konvektor Timer LB1 Seite 25 Mittwoch, 11. Juni 2014 12:30 12
10. Garantie de la société HOYER Handel GmbH
Chers clients,
Ce produit est garanti pendant 3 ans à
compter de la date d’achat. Si vous
constatez des défauts, vous disposez d'un
recours légal à l'encontre du vendeur. Ces
droits légaux ne sont pas limités par notre
garantie, exposée comme suit.
Indépendamment de la garantie
commerciale souscrite, le vendeur reste tenu
des défauts de conformité du bien et des
vices rédhibitoires dans les conditions
prévues aux articles L211-4 et suivants du
Code de la consommation et aux articles
1641 et suivants du Code Civil.
Conditions de la garantie
Le délai de garantie courre à partir de la
date d'achat. Conservez soigneusement le
ticket de caisse. Ce document sert de preuve
d'achat.
Si un défaut de matériel ou de fabrication
survient au cours des trois années suivant la
date d'achat du produit, celui-ci est réparé
gratuitement ou remplacé, à notre
discrétion. Cette garantie s'applique à
condition que le produit défectueux soit
retourné accompagné du justificatif d'achat
(ticket de caisse) durant cet intervalle de
trois ans, avec une explication écrite
succincte de l'origine et de la date du défaut
constaté.
Si le défaut est couvert par la garantie, nous
vous retournons l'appareil réparé ou un
produit neuf. La réparation ou le
remplacement n'entraîne pas le
renouvellement de la garantie pour une
nouvelle période.
Durée de la garantie et dommages-intérêts
légaux
La durée de garantie n'est pas prolongée du
fait de son application. Il en va de même
pour les pièces réparées. Les défauts et
dommages existants précédemment à
l'achat doivent être signalés immédiatement
au déballage du produit. Les réparations
effectuées en dehors de la durée de
garantie sont payantes.
Etendue de la garantie
La production de ce produit a suivi des
normes de qualité strictes et le produit a été
soigneusement contrôlé avant livraison.
La garantie s'applique pour les défauts de
matériel ou de fabrication. Cette garantie ne
s'applique pas aux pièces soumises à une
usure normale et considérées comme telles
ou aux dommages causés à des pièces
fragiles comme les interrupteurs, les
accumulateurs ou les éléments en verre.
Cette garantie s'annule en cas de
détérioration du produit, d'utilisation ou
d'entretien inappropriés. Afin de s'assurer
d'un usage approprié du produit, il convient
de respecter toutes les consignes
mentionnées dans la notice d'utilisation.
Les modes d'utilisation et les traitements qui
sont déconseillés dans la notice d'utilisation
doivent être évités absolument.
Cet produit est destiné exclusivement à un
usage privé et non à un usage commercial.
En cas de traitement ou d'utilisation abusive
ou inappropriée et en cas d'intervention non
autorisée par notre SAV, la garantie ne
s'applique pas.
SKT2000B1 25
Page 28

RP100157 Konvektor Timer LB1 Seite 26 Mittwoch, 11. Juni 2014 12:30 12
Procédure d'application de la garantie
Pour traiter rapidement votre demande
d'application de la garantie, merci de suivre
les consignes suivantes :
• Préparez le justificatif d'achat et le
numéro de série (pour ce produit: IAN
100157) et le ticket de caisse faisant
office de preuve d'achat.
• Le numéro de référence se trouve sur la
plaque signalétique, sur la page de
couverture de la notice d'utilisation
(gravure en bas à gauche) ou sur un
auto-collant situé sur la face avant ou
arrière de l'appareil.
• En cas de défaut de fonctionnement ou
autre défaillance, veuillez contacter en
premier lieu le service après-vente
mentionné ci-après, soit par téléphone,
soit pas courriel.
• Si le produit est considéré comme
défectueux, vous pouvez le retourner,
accompagné de la preuve d'achat
(ticket de caisse), franco de port à
l'adresse qui vous aura été indiquée, en
indiquant la cause et la date
d'apparition du défaut.
• Vous pouvez télécharger cette notice,
ainsi que d'autres manuels, des vidéos
du produit et des logiciels sous www.lidlservice.com.
Vous pouvez télécharger cette
notice, ainsi que d'autres
manuels, des vidéos du produit
et des logiciels sous
www.lidl-service.com.
Service après-vente
Service France
Tel.: 0800 919270
E-Mail: hoyer@lidl.fr
Service Belgique
Tel.: 070 270 171
(0,15 EUR/Min.)
E-Mail: hoyer@lidl.be
Service Suisse
Tel.: 0842 665566
(0,08 CHF/Min.,
mobile max. 0,40 CHF/Min.)
E-Mail: hoyer@lidl.ch
IAN: 100157
Fournisseur
Attention, il ne s'agit pas de l'adresse
du service après-vente. Contactez en
premier lieu le service après-vente indiqué
ci-dessus.
HOYER Handel GmbH
Kühnehöfe 5
22761 Hamburg
Allemagne
26
Page 29

RP100157 Konvektor Timer LB1 Seite 27 Mittwoch, 11. Juni 2014 12:30 12
Indice
1. Descrizione dell’apparecchio . . . . . . . . . . . . . . . . . . . . . . . . . . . . . . . . . . . . . . . . . . . . . . 27
2. Denominazione dei componenti (vedere pagina ripiegata) . . . . . . . . . . . . . . . . . . . . . . . . . 28
3. Dati tecnici . . . . . . . . . . . . . . . . . . . . . . . . . . . . . . . . . . . . . . . . . . . . . . . . . . . . . . . . . . . 28
4. Indicazioni di sicurezza . . . . . . . . . . . . . . . . . . . . . . . . . . . . . . . . . . . . . . . . . . . . . . . . . . 28
5. Disimballaggio e montaggio. . . . . . . . . . . . . . . . . . . . . . . . . . . . . . . . . . . . . . . . . . . . . . . 32
6. Funzionamento . . . . . . . . . . . . . . . . . . . . . . . . . . . . . . . . . . . . . . . . . . . . . . . . . . . . . . . . 33
7. Pulizia . . . . . . . . . . . . . . . . . . . . . . . . . . . . . . . . . . . . . . . . . . . . . . . . . . . . . . . . . . . . . . 36
8. Risoluzione dei problem. . . . . . . . . . . . . . . . . . . . . . . . . . . . . . . . . . . . . . . . . . . . . . . . . . 36
9. Smaltimento . . . . . . . . . . . . . . . . . . . . . . . . . . . . . . . . . . . . . . . . . . . . . . . . . . . . . . . . . . 37
10. Garanzia di HOYER Handel GmbH . . . . . . . . . . . . . . . . . . . . . . . . . . . . . . . . . . . . . . . . . . 37
Congratulazioni per l'acquisto del
vostro nuovo apparecchio.
Avete acquistato un prodotto di qualità. Le
istruzioni per l'uso sono parte integrante del
prodotto. Esse contengono avvertenze
importanti sulla sicurezza, l'utilizzo e lo
smaltimento.
1. Descrizione dell’apparecchio
1.1 Impiego previsto
Il termoconvettore SilverCrest SKT2000B1
serve per riscaldare ambienti asciutti.
Questo apparecchio è destinato all’uso in
abitazioni private e non può essere
utilizzato per scopi commerciali.
L'apparecchio è anche adatto per:
• l'utilizzo in cucine per dipendenti in
negozi, uffici e altri luoghi di lavoro,
• l'utilizzo in contesto agricolo,
• clienti di hotel, motel e altri tipi di
alloggi,
• Bed & Breakfast
Prima di utilizzare il prodotto leggere con
attenzione tutte le avvertenze relative all'uso
e alla sicurezza. Utilizzare il prodotto solo
come descritto e per i campi di impiego
indicati.
In caso di cessione del prodotto a terzi
consegnare tutta la documentazione.
L’apparecchio è indicato per il
riscaldamento aggiuntivo. Non è indicato
per l’utilizzo come unica fonte di
riscaldamento in ambienti grandi.
L'apparecchio deve essere collocato
esclusivamente a pavimento oppure fissato
alla parete mediante i supporti a parete
forniti in dotazione.
SKT2000B1 27
Page 30

RP100157 Konvektor Timer LB1 Seite 28 Mittwoch, 11. Juni 2014 12:30 12
1.2 Entità della fornitura
•1 Convettore
•2 Piedi
• 4 Viti per piedi
• 4 ganci di fissaggio a parete
• 4 tasselli con viti per i ganci di fissaggio
a parete
•1 Istruzioni per l’uso
2. Denominazione dei componenti (vedere pagina ripiegata)
1 Maniglie per trasporto
2 Uscita aria
3 Simbolo di avvertenza “Non coprire”
4 Piedi
5 Interruttore 1250W
6 Interruttore 750W
7 Interruttore ventilatore
3. Dati tecnici
1.3 Contrassegni sull’apparecchio
Il simbolo riportato a fianco 3
indica di non coprire
l’apparecchio, poiché il ristagno
di calore così prodotto potrebbe
provocare danni e costituire
pericolo di incendio.
8 Selettore temperatura
9 Simbolo gelo
10 Timer
11 Scala dell'ora
12 Segmenti di comando
13 Indicatore ora
14 Interruttore principale
Tensione di alimentazione:220 - 240 V~/50 Hz
Potenza massima: 2.000 watt
Classe di protezione: I
4. Indicazioni di sicurezza
4.1 Spiegazione dei termini
Nelle istruzioni per l’uso trovate questi
simboli e termini:
Pericolo!
Rischio elevato. L’inosservanza
dell’avvertimento può provocare
danni gravissimi e lesioni mortali.
28
Attenzione!
Rischio contenuto. L’inosservanza
dell’avvertimento può causare danni
materiali.
Nota:
Scarso rischio. Dati di fatto che si devono
rispettare durante l’uso dell’apparecchio.
Page 31

RP100157 Konvektor Timer LB1 Seite 29 Mittwoch, 11. Juni 2014 12:30 12
4.2 Indicazioni particolari per questo
prodotto
Avvertenza! Osservare le
seguenti indicazioni per evitare di
provocare lesioni.
• L’apparecchio deve essere tenuto fuori dalla
portata dei bambini di età inferiore a 3 anni, se
non costantemente sorvegliati.
• I bambini di età compresa fra 3 e 8 anni possono
accendere e spegnere l’apparecchio purché siano
sorvegliati o abbiano ricevuto istruzioni
sull’utilizzo sicuro dell’apparecchio e sui pericoli
che ne derivano, a condizione che l’apparecchio
sia stato collocato o installato nella sua posizione
di utilizzo normale.
• I bambini di età compresa fra 3 e 8 anni non
possono inserire la spina nella presa, impostare o
pulire l’apparecchio e/o effettuare gli interventi di
manutenzione eseguibili dall’utente.
• Questo prodotto può essere utilizzato da bambini
a partire dall’età di 8 anni e da persone che
presentino limitazioni delle capacità fisiche,
sensoriali o mentali o scarsa esperienza e/o
scarsa conoscenza, purché siano sorvegliati o
abbiano ricevuto istruzioni sull’utilizzo sicuro del
prodotto e abbiano compreso i pericoli che ne
derivano. I bambini non devono giocare con il
prodotto.
• La pulizia e la manutenzione eseguibile
dall’utente non devono essere effettuate da
bambini, tranne nel caso in cui abbiano più di 8
anni e siano sorvegliati.
• Il prodotto e il cavo di collegamento alla rete
devono essere tenuti fuori dalla portata dei
bambini di età inferiore a 8 anni.
• Attenzione - Alcune parti dell’apparecchio
possono diventare roventi e causare ustioni.
Prestare particolare attenzione in presenza di
bambini e persone con limitazioni delle capacità
fisico-psichiche.
• Le superfici metalliche dell’apparecchio possono
diventare roventi. Afferrare quindi l’apparecchio
esclusivamente in corrispondenza delle
1
maniglie
.
• Estrarre la spina dalla presa di rete prima di ogni
operazione di pulizia.
• Non immergere mai il prodotto in acqua e
proteggerlo da eventuali gocce o spruzzi.
• Prima di pulirlo, lasciare raffreddare il prodotto
finché non sussiste più alcun pericolo di ustioni.
• Per evitare il surriscaldamento, l’apparecchio di
riscaldamento non deve essere coperto.
• Non posizionare mai l’apparecchio sotto una
presa a parete, poiché il calore prodotto potrebbe
danneggiare l’impianto elettrico.
• Non utilizzare questo apparecchio di
riscaldamento con selettori di programma, timer,
sistemi di telecontrollo separati o qualunque altro
dispositivo in grado di produrre l’accensione
automatica dell’apparecchio di riscaldamento
poiché, se l’apparecchio viene coperto o
posizionato in modo errato, sussiste il pericolo
d’incendio.
Attenzione! Per evitare danni alle cose,
attenersi alle seguenti disposizioni:
• Non utilizzare in nessun caso detergenti
aggressivi, corrosivi o abrasivi. Questi potrebbero
danneggiare sia il prodotto che il rivestimento
antiaderente.
• Non utilizzare mai l’apparecchio nelle immediate
vicinanze di lavelli, vasche da bagno, docce o
piscine, poiché gli schizzi d’acqua potrebbero
penetrare nell’apparecchio.
4.3 Indicazioni generali
• Prima dell’utilizzo leggere attentamente
queste istruzioni per l’uso. Sono parte
integrante dell’apparecchio e devono
essere disponibili in qualsiasi momento.
SKT2000B1 29
Page 32

RP100157 Konvektor Timer LB1 Seite 30 Mittwoch, 11. Juni 2014 12:30 12
• Utilizzare l’unità solo per gli scopi
applicativi descritti (vedi "1.1 Impiego
previsto" a pagina 27).
• Controllate se la tensione di rete
necessaria (vedi targhetta
sull’apparecchio) corrisponde alla
vostra.
• In caso di eventuali anomalie di
funzionamento, la riparazione
dell’apparecchio deve essere eseguita
solo dal nostro centro assistenza. Per i
dati di contatto si rimanda al "Centro
d’assistenza" a pagina 38.
• Il dispositivo deve essere utilizzato
esclusivamente su base fissa, piatta,
asciutta e ignifuga.
• Accertarsi che la presa sia ben
accessibile, in modo da poter estrarre
rapidamente la spina di rete in caso di
necessità.
4.4 Protezione dalle folgorazioni
Pericolo! Le seguenti istruzioni di
sicurezza servono per proteggere
l’utente da folgorazioni elettriche.
• Collegare l’apparecchio esclusivamente
ad una presa con contatto a terra
installata conformemente alle norme.
• Se l’apparecchio cade a terra o riceve
un forte colpo oppure cade nell’acqua,
non deve più essere utilizzato. In tal
caso rivolgersi al nostro Service-Center.
Per i dati di contatto si rimanda al
"Centro d’assistenza" a pagina 38.
• Mai utilizzare l’apparecchio se
danneggiato. In tal caso la riparazione
dell’apparecchio deve essere eseguita
da personale specializzato. Per i dati di
contatto si rimanda al "Centro
d’assistenza" a pagina 38.
• Se il cavo di rete di questo apparecchio
è danneggiato, deve essere sostituito dal
produttore o da una persona
ugualmente qualificata, per evitare
pericoli.
• Evitare il contatto di acqua o di altri
liquidi con l’apparecchio. Quindi:
– non utilizzare all’aperto;
– non posizionare contenitori con liquidi
quali vasi, bicchieri, ecc.
sull’apparecchio;
In caso di contatto dell’apparecchio con
liquidi, rimuovere immediatamente la
spina di rete e far riparare il dispositivo
da personale qualificato. Per i dati di
contatto si rimanda al "Centro
d’assistenza" a pagina 38.
• Non tentare mai di raggiungere con dita
od oggetti l’interno dell’unità passando
attraverso la griglia protettiva.
• Non toccate mai l’apparecchio, il cavo
di allacciamento alla rete o la spina con
mani bagnate.
• Staccate il cavo di allacciamento alla
rete solo afferrandone la spina. Non
tirare mai il cavo stesso.
• Fare attenzione a non piegare o
schiacciare mai il cavo di rete.
• Accertarsi che il cavo di rete non venga
danneggiato da spigoli appuntiti.
• Tenete il cavo di allacciamento alla rete
lontano da superfici calde (p. es. piastra
del piano cottura).
• Se l’unità non viene utilizzata per lungo
tempo, estrarre la spina dalla presa.
Soltanto in questo modo l’apparecchio è
completamente privo di alimentazione.
• Dovreste evitare l’uso di prolunghe.
Questo è consentito solo in condizioni
del tutto particolari:
– la prolunga deve essere adatta per
l’amperaggio dell’apparecchio;
– la prolunga non deve essere posata in
modo "volante”: non si deve potervi
inciampare o essere raggiungibile dai
bambini;
30
Page 33

RP100157 Konvektor Timer LB1 Seite 31 Mittwoch, 11. Juni 2014 12:30 12
– la prolunga non deve in nessun caso
essere danneggiata;
– alla presa elettrica non devono essere
allacciati altri apparecchi oltre a
questo, poiché altrimenti può
verificarsi un sovraccarico della rete
elettrica (divieto di prese multiple!).
4.5 Protezione dagli incendi
Pericolo! L’apparecchio funziona
a temperature elevate per cui si
consiglia di rispettare le seguenti
istruzioni per l’uso, per evitare la
formazione di incendi.
• Durante il funzionamento non avvicinarsi
con oggetti infiammabili (per es. tende,
giornali ecc.) nelle dirette vicinanze
dell’unità.
• Non utilizzare mai l’unità per asciugare
tessuti o altri oggetti.
• In caso di posizionamento
dell'apparecchio a pavimento,
mantenere una distanza minima di
0,5 m da altri apparecchi o dalla
parete.
• In caso di fissaggio dell'apparecchio
alla parete, utilizzare esclusivamente i
ganci di fissaggio a parete forniti in
dotazione. Accertarsi inoltre che l'aria
possa fluire liberamente attorno al
convettore. Fra il pavimento e il bordo
inferiore dell'apparecchio deve essere
rispettata una distanza minima di
10 cm.
• Se l'apparecchio viene fissato alla
parete, quest'ultima deve essere ignifuga
e sufficientemente stabile.
• Non utilizzare mai l’apparecchio in
ambienti a rischio di esplosione o nelle
immediate vicinanze di gas o liquidi
infiammabili.
• Controllare sempre che l’ingresso e
l’uscita dell’aria siano privi di ostacoli.
Altrimenti nel ventilatore si può formare
ristagno di calore.
4.6 Protezione da lesioni
Pericolo! Osservare le seguenti
indicazioni, per evitare di
provocare lesioni.
• Assicurarsi che non sussista mai il
pericolo di inciampare nel cavo di rete
oppure che nessuno vi si possa
impigliare o lo possa calpestare.
• Per trasportare il dispositivo caldo,
occorre spegnerlo, sfilare la spina di rete
e attendere che si sia raffreddato.
Altrimenti la superficie calda potrebbe
provocare ustioni.
4.7 Per la sicurezza dei bambini
Pericolo! Spesso i bambini non
sono in grado di valutare bene i
pericoli e possono così provocarsi
lesioni. Per questo motivo
osservare quanto segue:
• Prestare attenzione che la pellicola da
imballaggio non metta a repentaglio la
vita dei bambini. Le pellicole da
imballaggio non sono giocattoli.
4.8 Danni materiali
Attenzione! Per evitare danni alle cose,
attenersi alle seguenti disposizioni.
• In caso di installazione a pavimento,
accertarsi che i piedi dell'apparecchio
siano posizionati correttamente (vedi
"5.1 Montaggio dell'apparecchio per il
posizionamento a pavimento" a
pagina 32) per evitare graffi o
bruciature sul pavimento.
SKT2000B1 31
Page 34

RP100157 Konvektor Timer LB1 Seite 32 Mittwoch, 11. Juni 2014 12:30 12
5. Disimballaggio e montaggio
1. Estrarre l’apparecchio dalla confezione.
2. Rimuovere l’imballaggio di trasporto.
3. Verificare che l’apparecchio non
presenti danni.
5.1 Montaggio dell'apparecchio per il
posizionamento a pavimento
1. Avvitare i piedi 4 al lato inferiore del
termoconvettore con le viti corte fornite
in dotazione. Avvitare 2 viti in diagonale
per ciascun piede.
Pericolo! Mantenere una
distanza sufficiente dalla parete,
dal mobilio o da altri oggetti. Per il
posizionamento a pavimento,
osservare una distanza minima di
0,5 m per scongiurare il rischio di
incendio.
La distanza dalla parete può
essere inferiore a 0,5 m solo se
vengono utilizzati i ganci di
fissaggio a parete in dotazione e
solo se la parete è ignifuga.
2. Scegliere un luogo di posizionamento
conforme alle istruzioni di sicurezza
(vedi "4. Indicazioni di sicurezza" a
pagina 28).
5.2 Montaggio dell'apparecchio a
parete
Nota: in caso di fissaggio
dell'apparecchio a parete, i piedi non
devono essere montati.
1. Avvitare i ganci forniti in dotazione a
una parete idonea:
– Tracciare sulla parete un segno in
corrispondenza dei due fori, in modo
tale che la distanza fra i ganci
corrisponda esattamente alla distanza
delle due fessure presenti sul retro
dell'apparecchio.
– Accertarsi che i fori siano
perfettamente allineati.
– Trapanare i fori con una punta da
8 mm fino a una profondità di circa
40 mm.
– Inserire un tassello in ciascun foro.
– Fissare i due ganci con le viti lunghe.
2. Affinché l'apparecchio risulti
perfettamente perpendicolare alla
Attenzione!
• La parete deve essere ignifuga e
sufficientemente stabile.
• L'apparecchio deve essere collocato a
un'altezza minima di 10 cm sopra il
pavimento per consentire all'aria di
circolare liberamente.
32
Page 35

RP100157 Konvektor Timer LB1 Seite 33 Mittwoch, 11. Juni 2014 12:30 12
parete, gli altri due ganci di fissaggio
vengono utilizzati come distanziatori:
6. Funzionamento
Nota:
• L’apparecchio o i serpentini di
riscaldamento sono forniti con un
leggero ingrassaggio, pertanto in
occasione del primo utilizzo potrebbe
verificarsi una debole produzione di
fumo e di cattivo odore. Si tratta di un
fenomeno del tutto innocuo, che termina
dopo breve tempo. Al verificarsi del
fenomeno, provvedere a un’aerazione
sufficiente.
• Qualora siano state collegate altre
utenze allo stesso circuito elettrico,
prestare attenzione a non superare il
carico massimo ammissibile per il
dispositivo di protezione installato, al
fine di non farlo scattare.
– Fissare i due ganci rimanenti sul lato
inferiore dell'apparecchio
– Utilizzando le viti corte.
3. Appendere l'apparecchio ai ganci fissati
a parete.
4. Per rendere la sospensione a parete
ancora più stabile, è possibile avvitare
alla parete anche i due distanziatori.
2. Attivare l’alimentazione di rete,
posizionando l’interruttore principale 14
su "I".
L’apparecchio è ora pronto per l’uso.
3. Disattivare l’alimentazione di rete,
posizionando l’interruttore principale 14
su "0".
6.1 Messa in funzione e spegnimento
dell'apparecchio
1. Inserire la spina di rete in una presa di
rete che corrisponda ai dati tecnici (vedi
"3. Dati tecnici" a pagina 28).
SKT2000B1 33
6.2 Impostazione del livello di calore
Con i livelli di riscaldamento è possibile
selezionare la rapidità di riscaldamento
dell'apparecchio.
Page 36

RP100157 Konvektor Timer LB1 Seite 34 Mittwoch, 11. Juni 2014 12:30 12
L'apparecchio ha tre livelli di calore:
– Livello 1: 750 watt: accendere
l'interruttore 6;
– Livello 2: 1.250 watt: accendere
l'interruttore 5;
– Livello 3: 2.000 watt: accendere gli
interruttori 5 e 6.
Per riscaldare l'apparecchio in modo
particolarmente rapido, selezionare il livello
3, per riscaldarlo lentamente selezionare il
livello 1.
In corrispondenza degli interruttori accesi,
quando l'apparecchio si riscalda, si
accende una spia di controllo rossa.
Se gli interruttori sono tutti spenti
l'apparecchio non genera calore.
6.3 Selezione della temperatura
Impostare la temperatura desiderata con il
selettore della temperatura 8.
• Non appena raggiunta la temperatura
ambiente desiderata, ruotare il selettore
di temperatura 8 gradualmente
all’indietro fino a udire un leggero "clic".
Le spie di controllo rosse in
corrispondenza degli interruttori 5 e 6 si
spengono.
Viene mantenuta la temperatura
ambiente attuale.
Quando l'apparecchio deve riscaldarsi
nuovamente per mantenere la
temperatura, le spie di controllo rosse si
riaccendono in corrispondenza degli
interruttori 5 e 6.
Per accendere il ventilatore, azionare
l'interruttore del ventilatore 7. In
corrispondenza dell'interruttore del
ventilatore 7 si illumina quindi una spia di
controllo rossa.
Nota: l'apparecchio può funzionare anche
senza ventilatore. In tal caso il calore si
concentra maggiormente attorno al
termoconvettore e non viene distribuito
rapidamente nell'ambiente.
6.5 Impostazione della durata del
riscaldamento
L’apparecchio dispone di un timer con il
quale è possibile impostare la durata di
riscaldamento desiderata.
1. Accendere il timer spostando
l'interruttore principale 14 sul simbolo
dell'ora.
2. Ruotare la scala dell'ora 11 con segmenti
di controllo 12 fino a che l'indicatore
dell'ora 13 mostra l'ora attuale.
Nell'esempio corrisponde alle 09:15.
6.4 Funzione ventilatore
Per distribuire rapidamente l'aria calda
nell'ambiente, l'apparecchio è dotato di un
ventilatore.
34
3. Selezionare gli orari di funzionamento
dell'apparecchio spingendo verso
l'esterno tutti i segmenti di controllo 12
dall'inizio alla fine in base alla scala
Page 37

RP100157 Konvektor Timer LB1 Seite 35 Mittwoch, 11. Juni 2014 12:30 12
dell'ora 11.
Nell'esempio la durata di riscaldamento
va dalle ore 13:00 alle ore 19:15.
4. Per disattivare il timer, portare
l'interruttore principale 14 su "I"
(funzionamento continuo) oppure "0"
(apparecchio spento).
6.6 Protezione da surriscaldamento
Per ragioni di sicurezza, questo apparecchio
è dotato di una protezione da
surriscaldamento.
Se la temperatura interna diventa troppo
alta, l’apparecchio si spegne:
1. Disattivare l’alimentazione di rete,
posizionando l’interruttore principale 14
su "0".
2. Verificare che l'aria posso fluire e
defluire liberamente.
Qualora non sia possibile stabilire la
causa e l’errore si ripeta, far riparare
l’apparecchio o cessarne l’utilizzo.
3. Attendere che l’apparecchio si sia
raffreddato,
4. Quindi il funzionamento può continuare
normalmente.
6.7 Impostazione della protezione
antigelo
Grazie a questa funzione l’apparecchio
evita che la temperatura ambiente scenda al
di sotto dei limiti di gelo.
1. Ruotare il selettore di temperatura 8 sul
simbolo gelo9.
2. Attivare l’alimentazione di rete,
posizionando l’interruttore principale 14
su "I".
3. Con gli interruttori 5 e 6 selezionare un
livello di calore (vedi "6.2 Impostazione
del livello di calore" a pagina 33).
4. Accendere il ventilatore azionando
l'interruttore del ventilatore 7 (vedi
"6.4 Funzione ventilatore" a pagina 34).
6.8 Trasporto dell’apparecchio
Se si desidera trasportare l’apparecchio,
impugnarlo sempre per la maniglia per il
trasporto 1.
SKT2000B1 35
Page 38

RP100157 Konvektor Timer LB1 Seite 36 Mittwoch, 11. Juni 2014 12:30 12
7. Pulizia
Per poter prolungare la durata dell’unità si
consiglia di effettuare una pulizia regolare.
Pericolo! Per evitare il pericolo di
folgorazioni o di ustioni:
– estrarre la spina dalla presa
prima di ogni operazione di
pulizia;
– far raffreddare il dispositivo;
– non immergere l’unità in acqua;
– evitare la penetrazione di acqua
o detergenti nell’apparecchio.
1. Rimuovere con cautela i depositi di
polvere grossolani utilizzando un
aspirapolvere.
2. Pulire l’unità esterna con un panno
umido. Eventualmente con l’aggiunta di
detergente.
Attenzione! Evitare l’uso di detergenti
aggressivi che possono danneggiare
l’unità.
3. Strofinare con un panno inumidito con
acqua pulita.
4. Riutilizzare l’apparecchio solo quando è
completamente asciutto.
8. Risoluzione dei problem
Problema Causa Soluzione
Non è possibile
accendere l’unità
Fusibile o presa difettosa Scegliere un'altra presa
Unità difettosa Rivolgersi ad un’officina specializzata
oppure rottamare l’unità. L’indirizzo
dell’assistenza si trova nel capitolo
"Centro d’assistenza" a pagina 38.
L’unità si spegne
automaticamente
36
La protezione da surriscaldamento è scattata
È stata raggiunta la temperatura scelta
Lasciar raffreddare l’unità (vedi
"6.6 Protezione da surriscaldamento" a
pagina 35)
Pulire l’unità (vedi "7. Pulizia" a
pagina 36)
L’unità si accende di nuovo
automaticamente, quando la temperatura ambiente cala.
Selezionare una temperatura nominale più alta
Page 39

RP100157 Konvektor Timer LB1 Seite 37 Mittwoch, 11. Juni 2014 12:30 12
9. Smaltimento
9.1 Apparecchio
Il simbolo con il bidone della
spazzatura su ruote depennato
significa che nell'Unione
Europea il prodotto deve
essere smaltito nella
spazzatura differenziata. Ciò vale sia per il
prodotto che per tutti gli accessori
contrassegnati con lo stesso simbolo. I
prodotti contrassegnati non possono essere
smaltiti nei rifiuti normali, ma devono essere
consegnati ad un ufficio accettazione di
10. Garanzia di HOYER Handel GmbH
Gentile cliente,
questo apparecchio è accompagnato da
una garanzia di 3 anni a partire dalla data
di acquisto. In caso di difetti del prodotto
può far valere i Suoi diritti nei confronti del
venditore come previsto dalla legge. Tali
diritti di legge non sono limitati dalla nostra
garanzia, descritta di seguito in dettaglio.
Condizioni di garanzia
Il periodo di garanzia ha inizio dalla data
di acquisto. Conservare pertanto lo
scontrino di cassa originale, in quanto
documento comprovante l'acquisto.
Se entro tre anni dalla data di acquisto di
questo prodotto insorge un difetto di
materiale o di fabbricazione, ci impegniamo
a riparare o a sostituire a nostra scelta il
prodotto. La prestazioni di garanzia
presuppone, entro il termine di tre anni, la
riciclaggio di apparecchiature elettriche ed
elettroniche. Il riciclaggio aiuta a ridurre
notevolmente il consumo di materie grezze e
soprattutto l'inquinamento ambientale.
Rispettare scrupolosamente le disposizioni
in materia di smaltimento in vigore nel
proprio paese.
9.2 Imballaggio
Se volete smaltire la confezione, fate
attenzione alle relative disposizioni
ambientali del vostro paese.
presentazione dell'apparecchio difettoso e
della prova di acquisto (scontrino di cassa)
e una breve descrizione scritta del difetto e
del momento in cui è insorto.
Se il difetto è coperto dalla nostra garanzia,
ci impegniamo a rispedire il prodotto
riparato o un nuovo prodotto. Con la
riparazione o la sostituzione del prodotto
non decorre un nuovo periodo di garanzia.
Periodo di garanzia e rivendicazioni per
difetti
Il periodo di garanzia non viene prolungato
dalla prestazione di garanzia. Questo vale
anche per le parti sostituite e riparate.
Eventuali danni o difetti riscontrati già al
momento dell'acquisto devono essere
comunicati subito dopo l'apertura della
confezione. Dopo lo scadere del periodo di
garanzia le riparazioni vengono effettuate a
pagamento.
SKT2000B1 37
Page 40

RP100157 Konvektor Timer LB1 Seite 38 Mittwoch, 11. Juni 2014 12:30 12
Ambito della garanzia
L’apparecchio è stato prodotto rispettando i
più severi standard di qualità ed è stato
scrupolosamente testato prima della
spedizione.
La garanzia copre i difetti di materiale o di
fabbricazione. Non si estende alle parti del
prodotto soggette a normale usura e
considerate pertanto parti usurabili, né ai
danni ai componenti più fragili, ad es.
interruttori, batterie o parti in vetro.
La garanzia decade se il prodotto viene
danneggiato, utilizzato o sottoposto a
manutenzione in modo non conforme. Per
un utilizzo conforme del prodotto è
necessario attenersi a tutte le avvertenze
contenute nelle istruzioni per l'uso.
Sono assolutamente da evitare gli utilizzi e le
azioni che le istruzioni per l'uso sconsigliano.
Il prodotto è concepito esclusivamente per
l’uso privato, non per quello commerciale.
La garanzia decade in caso di utilizzo
indebito e non conforme, uso della forza e
interventi non effettuati dal nostro centro
d'assistenza autorizzato.
Svolgimento della garanzia
Per garantire una rapida evasione della
richiesta del cliente, si consiglia di attenersi
alla procedura seguente:
• Per tutte le richieste tenere a
disposizione il numero di articolo (per
questo apparecchio: IAN 100157) e lo
scontrino di cassa comprovante
l'acquisto.
• Il numero di articolo si trova sulla
targhetta dati, inciso, sul frontespizio
delle istruzioni (in basso a sinistra)
oppure sull'adesivo sul retro o sulla
parte inferiore dell'apparecchio.
• In caso di errori di funzionamento o altri
difetti, contattare dapprima
telefonicamente o per e-mail il centro
d'assistenza riportato di seguito.
• Il prodotto difettoso può essere spedito
gratuitamente all'indirizzo di assistenza
fornito, allegando la prova di acquisto
(scontrino di cassa) e indicando in cosa
consiste il difetto e quando è stato
riscontrato.
Su www.lidl-service.com è
possibile scaricare questo e
tanti altri manuali, video dei
prodotti e software.
Centro d’assistenza
Assistenza Italia
Tel.: 02 36003201
E-Mail: hoyer@lidl.it
Assistenza Malta
MT
Tel.: 80062230
E-Mail: hoyer@lidl.com.mt
Assistenza Svizzera
Tel.: 0842 665566 (0,08 CHF/Min.,
telefonia mobile max. 0,40 CHF/Min.)
E-Mail: hoyer@lidl.ch
IAN: 100157
Fornitore
Nota bene: l'indirizzo seguente non è
l'indirizzo d'assistenza. Contattare
dapprima il centro d'assistenza indicato
sopra.
HOYER Handel GmbH
Kühnehöfe 5
22761 Hamburg
Germania
38
Page 41

RP100157 Konvektor Timer LB1 Seite 39 Mittwoch, 11. Juni 2014 12:30 12
Contents
1. Description . . . . . . . . . . . . . . . . . . . . . . . . . . . . . . . . . . . . . . . . . . . . . . . . . . . . . . . . . . . 39
2. Names of parts (see fold-out page). . . . . . . . . . . . . . . . . . . . . . . . . . . . . . . . . . . . . . . . . . 40
3. Technical data. . . . . . . . . . . . . . . . . . . . . . . . . . . . . . . . . . . . . . . . . . . . . . . . . . . . . . . . . 40
4. Safety instructions. . . . . . . . . . . . . . . . . . . . . . . . . . . . . . . . . . . . . . . . . . . . . . . . . . . . . . 40
5. Unpacking and setting up. . . . . . . . . . . . . . . . . . . . . . . . . . . . . . . . . . . . . . . . . . . . . . . . . 43
6. Operation. . . . . . . . . . . . . . . . . . . . . . . . . . . . . . . . . . . . . . . . . . . . . . . . . . . . . . . . . . . . 45
7. Cleaning. . . . . . . . . . . . . . . . . . . . . . . . . . . . . . . . . . . . . . . . . . . . . . . . . . . . . . . . . . . . . 47
8. Troubleshooting . . . . . . . . . . . . . . . . . . . . . . . . . . . . . . . . . . . . . . . . . . . . . . . . . . . . . . . 48
9. Disposal . . . . . . . . . . . . . . . . . . . . . . . . . . . . . . . . . . . . . . . . . . . . . . . . . . . . . . . . . . . . . 48
10. HOYER Handel GmbH Warranty . . . . . . . . . . . . . . . . . . . . . . . . . . . . . . . . . . . . . . . . . . . . 49
Congratulations on the purchase of
your new product.
You have selected a high-quality product.
The operating instructions are a constituent
part of this product. They contain important
information about safety, use and disposal.
1. Description
1.1 Intended purpose
This SilverCrest SKT2000B1 convector
heater may be used to heat dry rooms.
This appliance is intended for private use
and is not suitable for commercial purposes.
The appliance is likewise suitable for:
• use in staff kitchens in shops, offices and
other commercial areas,
• use in agricultural settings,
• customers in hotels, motels and other
accommodations,
• bed-and-breakfast establishments.
The appliance is suitable for providing
auxiliary heating. It is not suitable for use on
its own to heat large spaces.
Familiarize yourself with all the operating
and safety instructions before using the
product. Use the product only as described
and for the stated spheres of application.
If you pass the product on to a third party,
always pass on all the documentation as
well.
The appliance is floor-standing only or can
be wall-mounted using the wall brackets
also supplied.
1.2 Scope of supply
• 1 convector heater
• 2 feet
• 4 screws for feet
•4 wall hooks
• 4 wall plugs with screws for wall hooks
• 1 set of operating instructions
SKT2000B1 39
Page 42

RP100157 Konvektor Timer LB1 Seite 40 Mittwoch, 11. Juni 2014 12:30 12
1.3 Symbols on the appliance
The adjacent symbol 3 warns
against covering the appliance
as this could cause a build up of
heat leading to damage and the
risk of fire.
2. Names of parts (see fold-out page)
1 Carry handles
2 Air outlet
3 Warning symbol - "Do not cover”
4 Feet
5 Switch 1250W
6 Switch 750W
7 Fan switch
3. Technical data
Power supply: 220 - 240 V~/50 Hz
Maximum power: 2,000 watts
Protection class: I
4. Safety instructions
4.1 Terms used
The following signalling terms are found in
these Operating Instructions:
Warning!
High risk. Disregarding the
warning may cause injury to life
and limb.
Caution!
Medium risk. Disregarding the warning may
cause damage to property.
8 Temperature selector
9 Frost symbol
10 Timer
11 Scale for time
12 Control segments
13 Hourly markings
14 Main switch
Note:
Low risk. Circumstances that should be taken
into account when dealing with this
appliance.
40
Page 43

RP100157 Konvektor Timer LB1 Seite 41 Mittwoch, 11. Juni 2014 12:30 12
4.2 Special informations for this
appliance
Warning! To avoid injury, please
observe the following information.
• Children under the age of 3 should be kept away
from the appliance unless they are under constant
supervision.
• Children between the ages of 3 and 8 may only
switch the appliance on or off provided they are
supervised or instructed in the safe use of the
appliance and have understood its associated
hazards and only when the appliance is placed or
installed in its normal working position.
• Children between the ages of 3 and 8 may not
insert the plug into the plug socket, control the
appliance, clean or maintain it.
• This appliance can be used by children aged 8 or
more, and by persons who have reduced physical,
sensory or mental ability or who lack experience
and/or knowledge, provided they are supervised
or instructed in the safe use of the appliance and
have understood its associated hazards. Do not
allow children to play with the appliance.
• Children may not be permitted to carry out
cleaning or maintenance of the appliance unless
they are older than 8 and are supervised.
• Children under the age of 8 should be kept away
from the appliance and its power cable.
• Caution – some parts of the appliance may
become very hot and lead to burns. Please be
especially careful when children or vulnerable
persons are nearby.
• The metal surfaces of the appliance may get hot,
so only hold the appliance by the carry
handles
• Always take the mains plug out of its socket before
cleaning.
• Never immerse the appliance in water, and
protect it from splashes and drips.
1
.
• Before cleaning, allow the appliance to cool
down to avoid the danger of burns.
• To prevent the heater overheating, do not cover it.
• The appliance should never be placed directly
below a wall power socket, because the radiated
heat could damage the electrical installation.
• Do not use this heater with a programming switch,
a timer switch, a separate remote control system or
any other device which switches the heater on
automatically, as there is a risk of fire if the heater
is covered or incorrectly set up.
Caution! To prevent material damage,
please comply with the conditions below.
• Never use scouring, corrosive or abrasive
cleaning materials.
• Never use the appliance in the immediate vicinity
of a sink, bath tub, shower or swimming pool as
splashes might get into the appliance.
4.3 General information
• Before using the appliance, be sure to
read these Operating Instructions
carefully. They are a component part of
the appliance and must be available at
all times.
• Use the appliance only for the purpose
described (see “1.1 Intended purpose”
on page 39).
• Check whether the mains voltage (see
type plate on the appliance) agrees with
your mains voltage.
• If there should be any malfunctions, the
appliance may only be repaired by our
Service Centre. The contact data can be
found in “Service Centre” on page 50.
• The appliance must only be set up on a
firm, level, dry and non-flammable
surface.
• Check that the power socket is easily
accessible so that you can pull out the
mains plug quickly if necessary.
SKT2000B1 41
Page 44

RP100157 Konvektor Timer LB1 Seite 42 Mittwoch, 11. Juni 2014 12:30 12
4.4 Protection against electric shock
Warning! The following safety
information is intended to protect
you against electric shock.
• Only plug the appliance into a correctly
installed, earthed wall socket.
• Do not use the appliance if it has fallen
on the floor, received a hard blow or
fallen into water. In this case, please
contact our Service Centre. The contact
data can be found in “Service Centre”
on page 50.
• The appliance must not under any
circumstances be used if it is damaged.
Have the device repaired in such cases
by a qualified specialist. The contact
data can be found in “Service Centre”
on page 50.
• If the mains cable for this appliance is
damaged, it must be replaced by the
manufacturer or a person with similar
qualifications in order to avoid a
hazard.
• Water or other liquids must never be
allowed to enter the appliance. For this
reason:
– never use outdoors;
– never place containers filled with
liquid, such as drinking glasses, vases
etc. on the appliance;
If nonetheless liquid does enter the
appliance, unplug the mains plug
immediately and have the appliance
repaired by a qualified specialist. The
contact data can be found in “Service
Centre” on page 50.
• Never insert fingers or any objects
through the protective guards into the
inside of the appliance.
• Never touch the appliance, the mains
cord or the mains plug with moist hands.
• Always pull the mains cord out by the
plug. Never pull it by the cord itself.
• Ensure that the mains cable is not kinked,
twisted or crushed.
• Ensure that the mains cable is not
damaged on sharp edges.
• Keep the mains cord away from hot
surfaces (such as stove eyes).
• If you are not using the appliance for a
prolonged period of time, remove the
plug from the wall socket. Only then is
the appliance completely free of current.
• You should avoid using extension cords.
This is only allowed under very
particular conditions:
– The extension cord has to be suited for
the appliance's amperage.
– The extension cord must not be
installed "loose": it must not be
possible to trip over it or within the
reach of children.
– The extension cord must not by any
means be damaged.
– No other devices other than this
appliance must be connected to the
mains socket, as otherwise
overloading of the power supply
network could occur (multiple sockets
are not allowed!).
4.5 Protection against the danger of fire
Warning! As the appliance
works at high temperatures, please
observe the following safety
information to prevent fire.
• While the appliance is operating, there
must be no flammable objects (e.g.
curtains, paper) in the immediate vicinity
of the appliance.
• Never use the appliance to dry textiles
or other items on, over or in front of the
appliance.
42
Page 45

RP100157 Konvektor Timer LB1 Seite 43 Mittwoch, 11. Juni 2014 12:30 12
• When deciding where to place the
appliance on the floor, maintain a
minimum distance of 0.5 m from other
appliances or the wall.
• If you are mounting the appliance on the
wall, only the wall hooks supplied
should be used. It must then be ensured
that air can circulate freely around the
convector. The minimum distance
between the floor and the lower edge of
the appliance is 10 cm.
• If you are mounting the appliance on the
wall, it must not be flammable and
should be strong enough for this
purpose.
• Never operate the appliance in rooms
where there is a risk of explosion or in
the vicinity of flammable gases or
liquids.
• Always check that air can freely enter
and escape. Heat might otherwise build
up inside the appliance.
4.6 Protection against injury
Warning! To avoid injury, please
observe the following information.
• Once hot, if you wish to transport the
appliance, switch it off, pull out the
mains plug, and wait until the appliance
has cooled down. Otherwise you could
burn yourself on the hot surface.
4.7 For the safety of your child
Warning! Children often cannot
assess dangers correctly and are
injured as a result. Please therefore
observe the following:
• Ensure that the packing foil does not
become a deadly trap for a child.
Packing foils are not toys.
4.8 Material damage
Caution! To avoid material damage,
please observe the following conditions.
• When setting up on the floor, check that
the feet are fitted correctly (see
“5.1 Assembling the appliance for setup on the floor” on page 43) - otherwise
the floor might be scratched or
scorched.
• Ensure that it is not possible for anyone
to trip over or to get caught up in or step
on the mainscable.
5. Unpacking and setting up
1. Unpack the appliance from the
packaging.
2. Remove the transport packaging.
3. Check that the appliance shows no signs
of damage.
SKT2000B1 43
5.1 Assembling the appliance for set-up
on the floor
1. Screw the feet 4 to the underside of the
convector using the short screws
provided. 2 screws are inserted
diagonally per foot.
Page 46

RP100157 Konvektor Timer LB1 Seite 44 Mittwoch, 11. Juni 2014 12:30 12
Warning! Check that there is
sufficient distance from the wall,
fixtures and other appliances.
When setting up on the floor, the
distance must be at least 0.5 m to
exclude the risk of fire.
The distance to the wall must
always be observed unless you are
using the wall hooks supplied. The
wall should not be flammable.
2. Select a location in compliance with the
safety information (see “4. Safety
instructions” on page 40).
5.2 Mounting the appliance on a wall
Caution!
• The wall must not be flammable and
should also be strong enough.
• The appliance must be at least 10 cm
above the floor so air can circulate
freely.
Note: If you are mounting the appliance
on a wall, the feet must not be screwed on.
1. Screw the wall hooks supplied securely
to a wall suitable for this purpose:
– Drill a hole around 40 mm deep using
an 8 mm bit.
– Insert a wall plug in each hole.
– Screw the two wall hooks in place
using the long screws.
2. To ensure the appliance hangs vertically
on the wall, the two other wall hooks are
used here as spacers:
– Screw the two remaining wall hooks
to the underside of the appliance.
–Use the short screws for this purpose.
3. Hang the appliance from the wall hooks.
4. You can also screw the two spacers to
the wall to make the appliance even
more stable.
– Mark the position of the two drill holes
so that the space between the wall
hooks matches the space between the
two slots on the rear of the appliance.
– Make sure that the two drill holes are
absolutely horizontal.
44
Page 47

RP100157 Konvektor Timer LB1 Seite 45 Mittwoch, 11. Juni 2014 12:30 12
6. Operation
Notes:
• As the appliance and heating coils are
supplied with a thin film of grease, there
might be a small amount of smoke and
odour the first time the appliance is
used. This is not harmful and will stop
after a short time. Ensure adequate
ventilation during this process.
• If you have plugged other power
consumers into the same circuit, check
that the maximum load for the installed
fuse is not exceeded, as otherwise the
fuse will trip.
6.1 Using the appliance for the first time
and switching off
1. Insert the mains plug into a mains socket
that complies with the technical data
(see “3. Technical data” on page 40).
2. Set the main switch 14 to "I" to switch
on the power supply.
The appliance is now ready to use.
3. Set the main switch 14 to "0" to switch
off the power supply.
6.2 Setting the heating setting
The heating settings are used to select how
quickly the appliance heats up.
The appliance has three heating settings:
– Level 1: 750 watts: Press switch 6;
– Level 2: 1250 watts: Press switch 5;
– Level 3: 2000 watts: Press switches 5
and 6.
If you want the appliance to heat up
particularly quickly, select level 3. If you only
want it to heat up slowly, select level 1.
A red indicator lights up in the activated
switches as soon as the appliance starts to
heat up.
If no switch is pressed, the appliance will not
produce any heat.
6.3 Selecting the temperature
Set the required temperature with the
temperature selector 8.
• When the required room temperature is
reached, slowly turn down the
temperature selector 8 until you hear a
quiet "click".
The red indicators in the switches 5
and 6 will be extinguished.
The current room temperature will be
maintained.
As soon as the appliance needs to heat
up again to maintain the temperature,
the red indicators in the switches 5
and 6 will light up once again in the
meantime.
SKT2000B1 45
Page 48

RP100157 Konvektor Timer LB1 Seite 46 Mittwoch, 11. Juni 2014 12:30 12
6.4 Fan function
The appliance is equipped with a fan to
distribute the air more quickly in the room.
To switch on the fan, press the fan switch 7.
A red indicator in the fan switch 7 will then
light up.
Note: The appliance can also be operated
without the fan being switched on. The heat
will then be concentrated more around the
convector and will not be distributed so
quickly in the room.
6.5 Setting the heating time
The appliance has a timer with which you
can set the required heating time.
1. Switch the timer on by setting the main
switch 14 to the Clocksymbol.
2. Turn the scale for the time 11 with the
control segments 12 until the current time
points to the hourly marking 13.
In this example the time is 09.15 am.
3. Select the times when the appliance is to
function by pulling all control
segments 12 to the outside from the
beginning to the end according to the
scale for the time 11.
In this example the heating time runs
from 01.00 pm to 07.15 pm.
4. To switch off the timer, move the main
switch 14 to "I " (continuous) or "0"
(appliance switched off).
6.6 Thermal cut-out
For your safety the appliance has a thermal
cut-out.
If the temperature inside the appliance
becomes too high, the appliance switches
off automatically:
1. Set the main switch 14 to "0" to switch
off the power supply.
2. Make sure that the air can enter and
escape freely.
If you cannot establish a cause and the
fault occurs repeatedly, have the
appliance repaired or else take it out of
use.
3. Wait for the appliance to cool down.
4. You can then continue to operate it
normally.
46
Page 49

RP100157 Konvektor Timer LB1 Seite 47 Mittwoch, 11. Juni 2014 12:30 12
6.7 Frost protection setting
With this function, the appliance prevents the
room temperature falling below the frost line.
1. Turn the temperature selector 8 to the
Frost symbol 9.
2. Set the main switch 14 to "I" to switch
on the power supply.
7. Cleaning
To ensure your appliance gives you lasting
service, you should clean it regularly.
Warning! To avoid the danger of
an electric shock or burning:
– remove the mains plug before
each clean;
– allow the appliance to cool
down;
– never immerse the appliance in
water;
– never allow water or cleaning
agent to run into the appliance.
1. Carefully remove major dust deposits
with a vacuum cleaner.
2. Clean the outside of the appliance with
a damp cloth. You could also use a little
washing-up liquid.
Caution! Never use caustic or abrasive
cleaning agents, as this could damage
your appliance.
3. Wipe the appliance with a cloth
moistened with clear water.
4. Do not use the appliance again until it
has dried completely.
3. Use the switches 5 and 6 to select a
heating level (see “6.2 Setting the
heating setting” on page 45).
4. Switch on the fan by pressing the fan
switch 7 (see “6.4 Fan function” on
page 46).
6.8 Transporting the appliance
If you wish to transport the appliance,
always carry it by the carry handles 1.
SKT2000B1 47
Page 50

RP100157 Konvektor Timer LB1 Seite 48 Mittwoch, 11. Juni 2014 12:30 12
8. Troubleshooting
Fault Cause Remedy
Appliance cannot be
switched on
Appliance switches
off automatically
9.1 Appliance
Faulty fuse or wall socket Select another wall socket
Faulty appliance Have repairs carried out at a specialist
workshop or dispose of the appliance.
You will find the service address in
“Service Centre” on page 50.
Thermal cut-out has
triggered
Selected temperature has
been reached
Allow the appliance to cool down (see
“6.6 Thermal cut-out” on page 46)
Clean the appliance (see
“7. Cleaning” on page 47)
Heating switches on again automatically as soon as the room temperature
falls
Select a higher required temperature
9. Disposal
9.2 Packaging
The symbol with the crossedout rubbish bin on wheels
means that within the European
Union, the product must be
disposed of to a sorted rubbish
collection. This applies to the product and all
accessories which are marked with this
symbol. Marked products must not be
disposed of via the regular domestic waste
but must be handed in to a recycling centre
for electrical or electronic devices. Recycling
helps to reduce the use of raw materials and
to relieve the environment. It is therefore
imperative that you follow the disposal
regulations applicable in your country.
48
If you would like to dispose of the
packaging, please observe the
corresponding environmental regulations in
your country.
Page 51

RP100157 Konvektor Timer LB1 Seite 49 Mittwoch, 11. Juni 2014 12:30 12
10. HOYER Handel GmbH Warranty
Dear Customer,
You have a warranty on this product which
is valid for 3 years from the date of
purchase. In the event of this product being
defective, you have statutory rights against
the seller of the product. These statutory
rights are not limited by our warranty as set
out below.
Warranty conditions
The warranty period begins with the date of
purchase. Please keep the original till receipt
in a safe place. This is required as your
proof of purchase.
If a defect in materials or workmanship
occurs within three years of the date your
product was purchased, we will repair or
replace the product at our discretion at no
charge to you. This service under warranty
assumes that the defective product and the
proof of purchase (till receipt) are submitted
within the three-year period and that a brief
description in writing is provided of what the
defect is and when it occurred.
If the defect is covered by our warranty, the
repaired product or a new one will be sent
back to you. There is no new warranty
period following repair or replacement of
the product.
Warranty period and statutory claims
relating to defects
The warranty period is not extended when a
service is provided under warranty. This also
applies to replaced and repaired parts. Any
damage or defects present at purchase must
be reported immediately the product is
unpacked. Repairs incurred once the
warranty period has expired are
chargeable.
Scope of warranty
The product has been carefully
manufactured in accordance with strict
quality guidelines and was thoroughly
checked before being delivered.
The warranty applies to defective materials
or workmanship. This warranty does not
extend to product parts exposed to normal
wear and tear (and which can therefore be
considered wear parts) or to damage to
fragile parts such as switches, batteries or
parts made of glass.
This warranty is void if the product is
damaged or if it is not used or maintained
properly. All the information in the operating
instructions should be observed precisely to
ensure that the product is used properly.
It is essential to avoid intended uses and
actions which are discouraged or warned
against in the operating instructions.
The product is intended for only private use
and not for commercial purposes.
The warranty is void in the event of misuse,
incorrect treatment, use of force or
interference by anyone other than our
authorized service centre.
Warranty process
Please follow the instructions below to
ensure that your claim is processed quickly.
• In case of any enquiry, please keep the
article number (for this product: IAN
100157) and the till receipt as proof of
purchase.
• The article number can be found on the
rating plate, as an engraving, on the
cover sheet of your instructions (bottom
left) or as a label on the back or
underside of your appliance.
SKT2000B1 49
Page 52

RP100157 Konvektor Timer LB1 Seite 50 Mittwoch, 11. Juni 2014 12:30 12
• If malfunctions or any other defects
should occur, in the first instance contact
the Service Centre mentioned below by
telephone or e-mail.
• Once a product has been recorded as
defective, you can then send it Freepost
to the service address you are given,
enclosing the proof of purchase (till
receipt) and quoting what the defect is
and when it occurred.
You can download these
instructions and many other
manuals, product videos and
software from
www.lidl-service.com.
Service Centre
Service Great Britain
Tel.: 0871 5000 720 (£ 0.10/Min.)
E-Mail: hoyer@lidl.co.uk
Supplier
Please note that the address below is not a
service address. In the first instance,
contact the service centre mentioned above.
HOYER Handel GmbH
Kühnehöfe 5
22761 Hamburg
Germany
Service Ireland
IR
Tel.: 1890 930 034
(0,08 EUR/Min., (peak))
(0,06 EUR/Min., (off peak))
E-Mail: hoyer@lidl.ie
Service Cyprus
CY
Tel.: 8009 4409
E-Mail: hoyer@lidl.com.cy
Service Malta
MT
Tel.: 80062230
E-Mail: hoyer@lidl.com.mt
IAN: 100157
50
Page 53

RP100157 Konvektor Timer LB1 Seite 51 Mittwoch, 11. Juni 2014 12:30 12
Page 54

HOYER HANDEL GMBH
Kühnehöfe 5
22761 Hamburg
Germany
Stand der Informationen · Version des informations ·
Stato attuale delle conoscenze · Status of information:
04/2014 · Ident.-Nr.: SKT 2000 B1
IAN 100157
RP1001057_Konvektor Timer_Cover_LB1.indd 1 11.04.14 12:10
1
 Loading...