

KITCHEN TOOLS
3
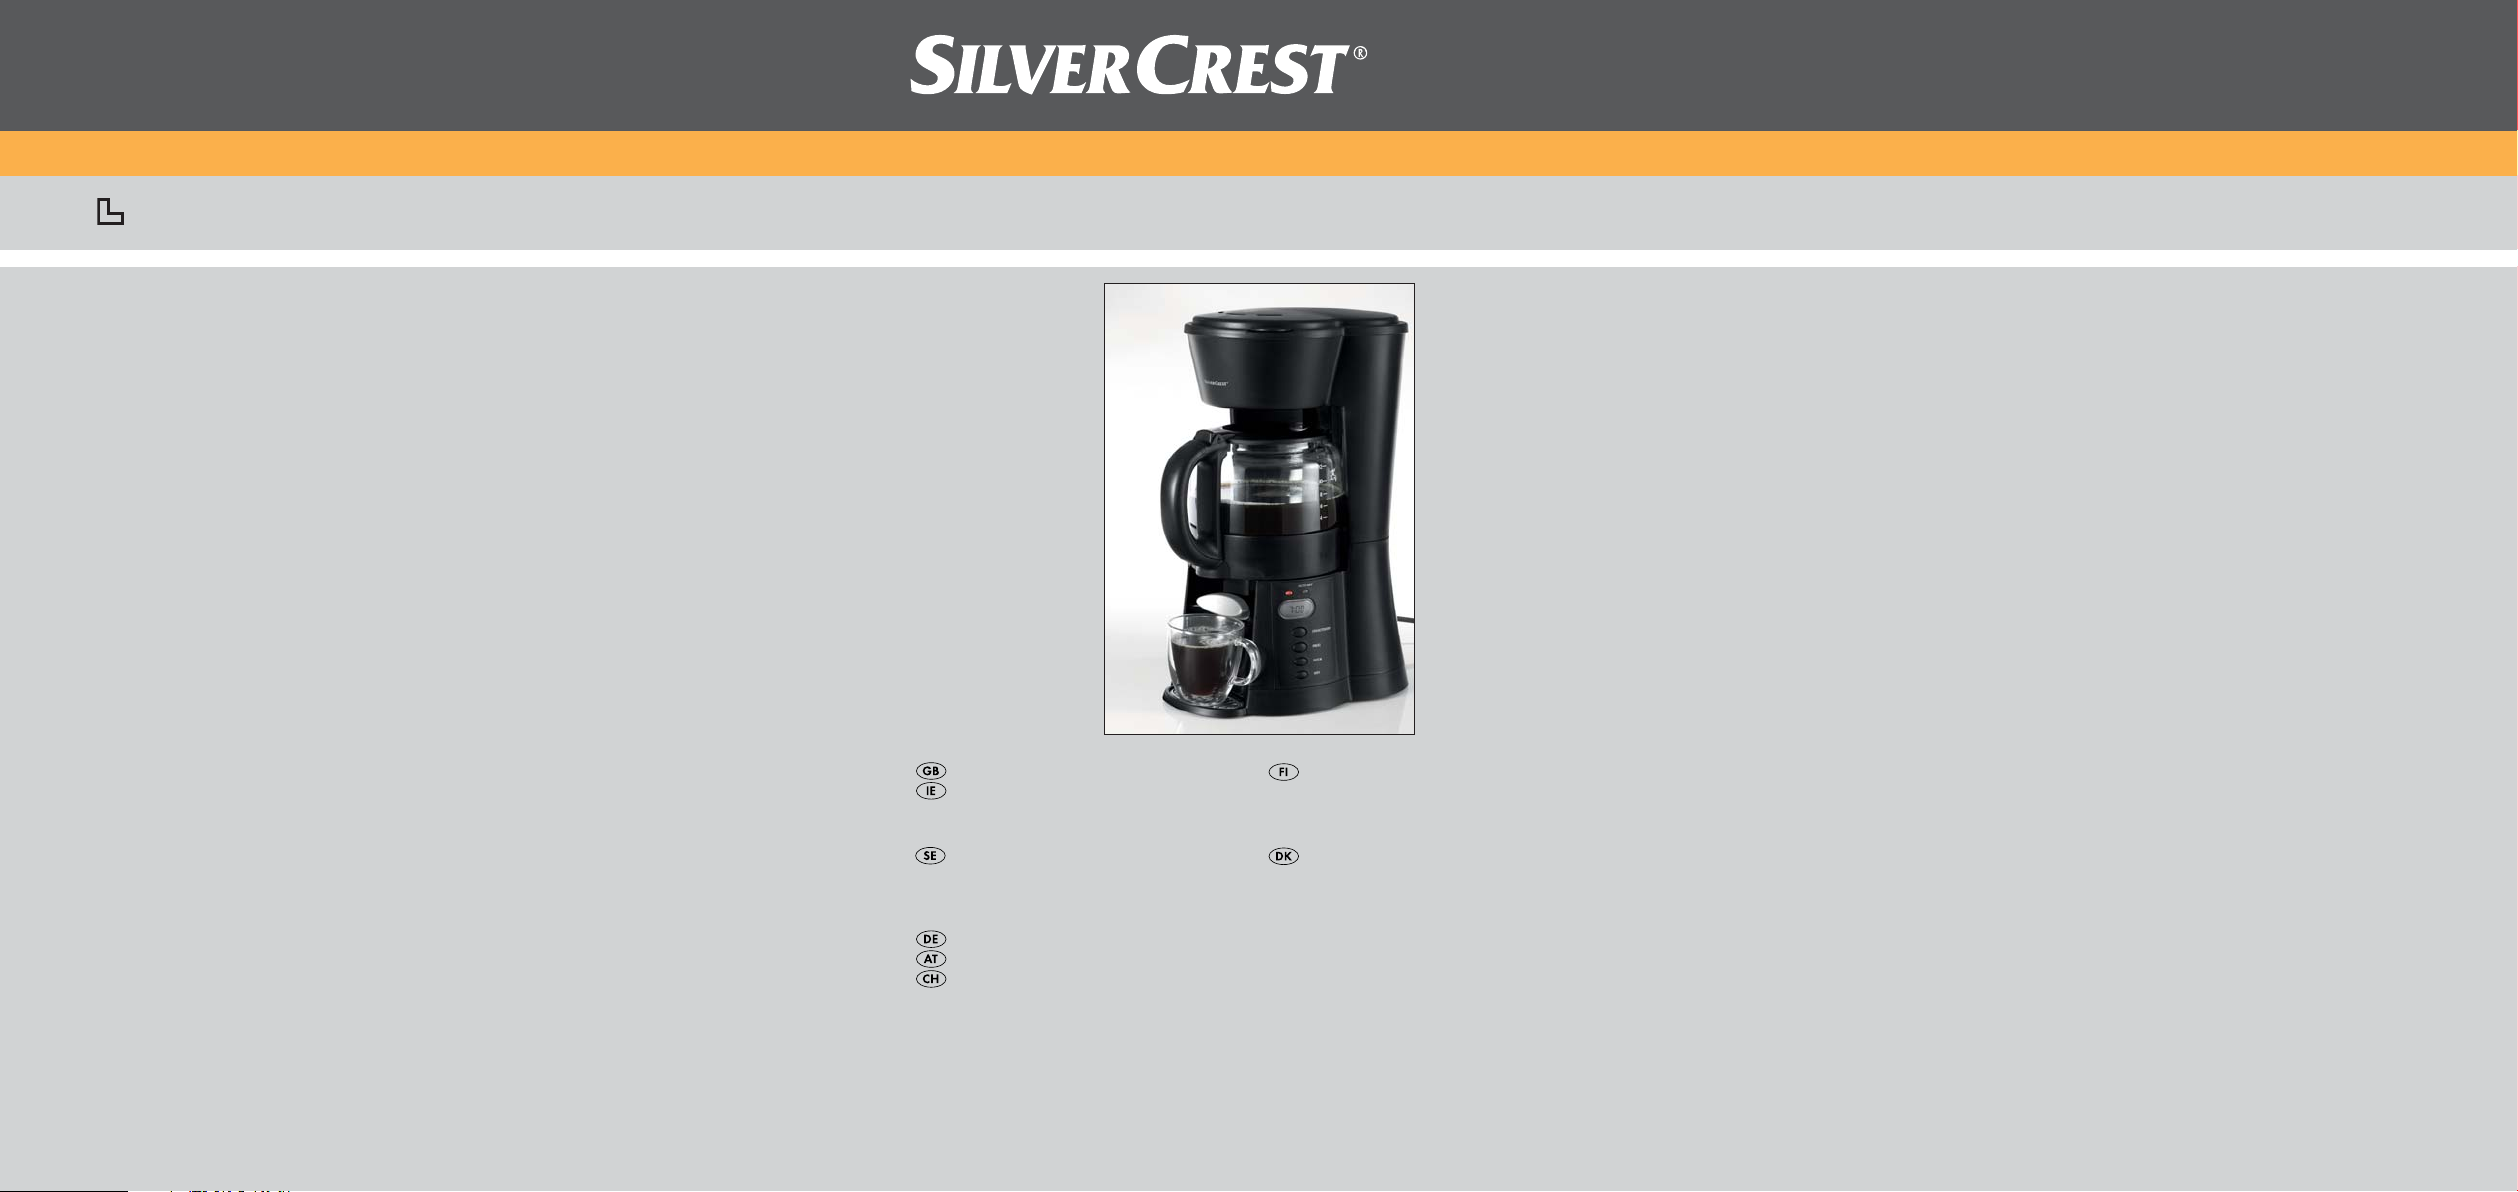
Coffee Machine SKATG 1050 A1
Coffee Machine
Operating instructions
Kahvinkeitin
Käyttöohje
KOMPERNASS GMBH
BURGSTRASSE 21 · D-44867 BOCHUM
www.kompernass.com
ID-Nr.: SKATG1050A1/10-V1
IAN: 61863
Kaffebryggare
Bruksanvisning
Kaffeemaschine
Bedienungsanleitung
Kaffemaskine
Betjeningsvejledning
SKATG 1050 A1
1(
q
w
e
l
k
j
h
g
f
d
s
a
r
t
u
y
io
CONTENT PAGE
Safety information 2
Technical data 2
Items supplied 3
Correct Usage 3
Appliance description 3
Preparation 3
Before the First Use 3
Setting the Time 4
Making coffee 4
Coffee servings 4
Timer-Function 5
Cleaning 5
Removing scale 6
Storage 6
Troubleshooting 7
Disposal 7
Warranty and Service 8
Importer 8
Read the operating instructions carefully before using the device for the first time and preserve this booklet
for later reference. Pass this manual on to whoever might acquire the device at a future date.
- 1 -
COFFEE MACHINE
Safety information
Danger of electric shock!
• Connect the appliance only to correctly installed
and properly earthed power sockets.
• Remove the plug from the wall socket when you
move the appliance, fill it with water, if it malfunctions,
before cleaning it and when it is not in use.
NEVER submerse the appliance in liquids.
Should liquids nonetheless permate into the
appliance housing, immediately remove the
plug from the wall socket. Arrange for it to be
repaired by a qualified specialist.
• NEVER grasp the appliance, power cable or power
plug with wet hands.
• To disconnect, always pull out the plug itself out
of the power socket, do not pull the power cable.
• Do not fold or crush the power cable.
• Arrange for defective power plugs and/or cables
to be replaced at once by qualified technicians
or our Customer Service Department.
Risk of fire!
• Do not leave the appliance unattended when in use.
• Never operate the appliance without mains tapwater.
• Never place the appliance near sources of heat.
• Do not use an extension cable. In the event of
danger, the plug must be quickly and easily
accessible.
• Do not use an external timing switch or a separate remote control system to operate the appliance.
Risk of personal injury!
• NEVER use the glass jug in a microwave oven.
• Lay the power cable in such a way that no one
can tread on or trip over it.
• This appliance is not intended for use by individuals
(including children) with restricted physical,
physiological or intellectual abilities or deficiences
in experience and/or knowledge unless they are
supervised by a person responsible for their safety
or receive from this person instruction in how the
appliance is to be used.
• Children should be supervised to ensure that
they do not play with the appliance..
Caution! Hot surface.
Risk of scalding!
• Never open the lid during the brewing process.
• Do not touch the hot filter. Remove the filter bag
when all of the coffee has drained away and the
bag has cooled down somewhat.
• Do not hold your hands in the rising steam.
• Never move/transport the appliance during the
brewing process.
This symbol warns you about hot steam clouds.
Risk of scalding!
To avoid damage to the appliance!
• Fill the water tank of the appliance exclusively
with freshly drawn mains water.
• Never subject the glass jug to large temperature
fluctuations. The glass may be damaged.
• No liabilty will be accepted for damage caused
by glass breakage!
Technical data
Mains voltage: 220-240V ~50Hz
Power consumption: 1050 W
- 2 -

Items supplied
Preparation
• Coffee Machine
• Glass jug
• Measuring spoon
• Operating Instructions
Before taking the appliance into use check to ensure
that all of the items listed have been supplied and
that there are no visible signs of damage.
Note:
On delivery, the measuring spoon is to be
found in either the water tank or the glass jug.
Correct Usage
The coffee maker is intended exclusively for brewing
coffee. This coffee maker is intended exclusively for
use in private households. Do not use it commercially. This appliance in intended only for indoor use.
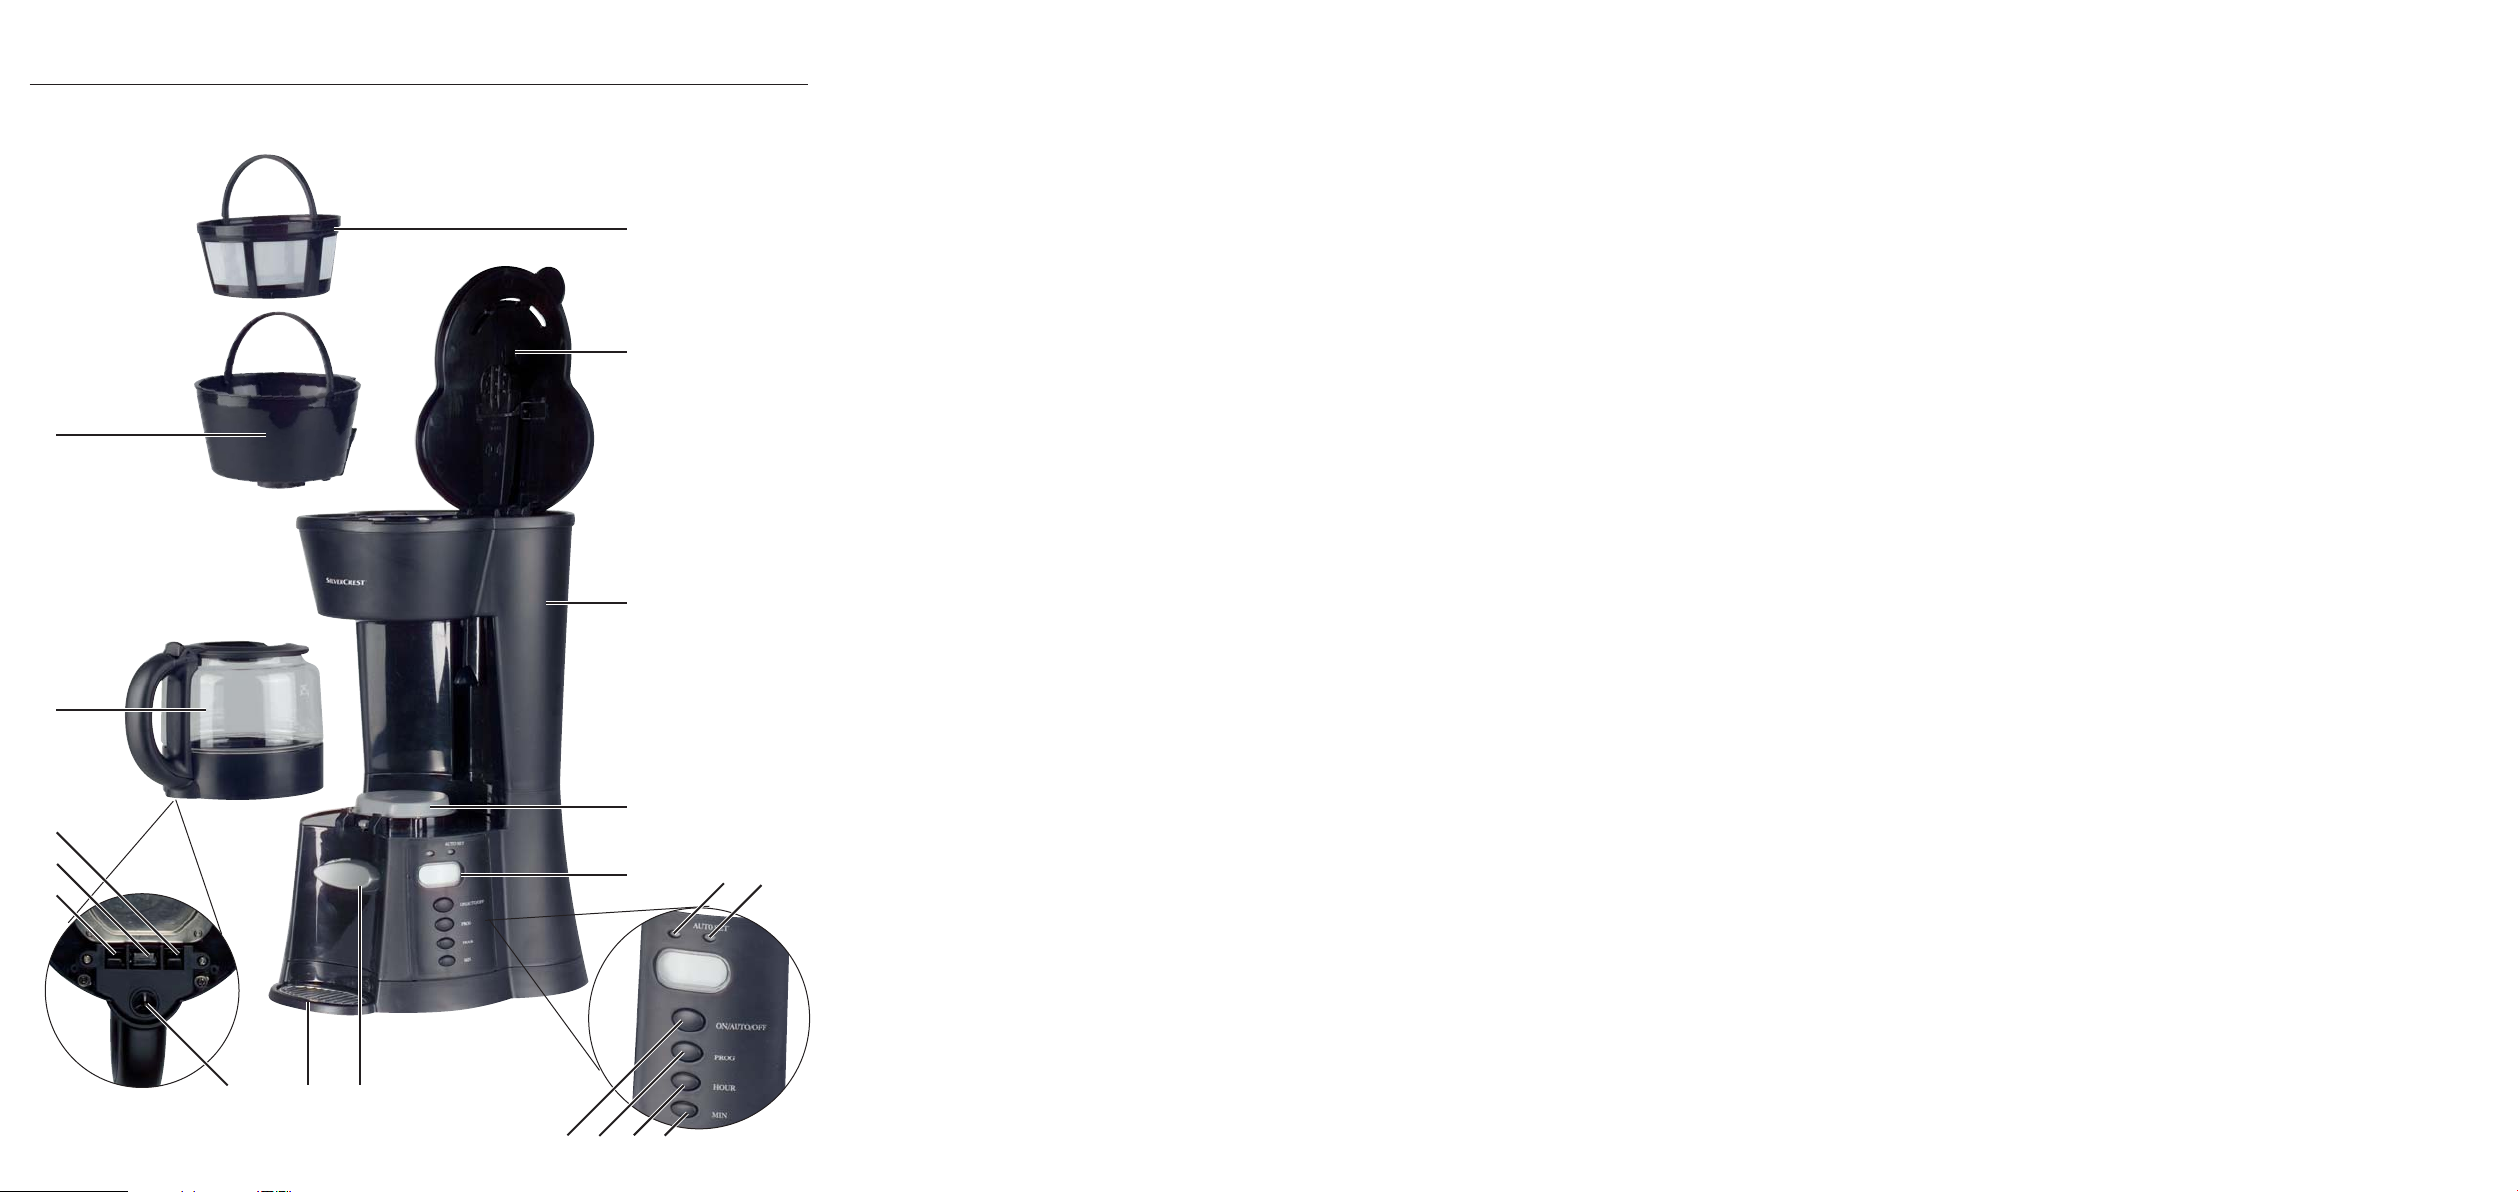
Appliance description
Filter
q
Lid
w
Water tank
e
Keep-warm plate
r
Display
t
red indicator lamp
y
green indicator lamp AUTO SET
u
Button MIN
i
Button HOUR
o
Button PROG
a
Button ON/AUTO/OFF
s
Coffee button
d
Driptray grill
f
Coffee passage
g
Outer lock
h
Coffee passage lock
j
Outer lock
k
Glass jug
l
Filter basket
1(
• Remove all packaging material from the appliance
and the accessories.
• Clean the appliance and all accessories (see
chapter "Cleaning").
• Place the coffee maker on a level and slip-free
surface.
• Open the lid
• Install the filter basket
into the recess on the coffee maker.
• Place the filter
• Lay the driptray grill
coffee maker.
• Insert the power plug into a power socket.
.
w
so that the lever settles
1(
in the filter basket 1(.
q
in the driptray on the
f
Before the First Use
Note:
When filling the appliance with water, never
exceed the MAX marking in the water tank
The appliance could overflow! Never fill the
water tank
for 4 cups. The appliance could be damaged.
• To remove possible production residues, before
the first use brew up 10 cups of plain water,
without coffee, and allow it to flow through the
appliance.
with less water than is needed
e
e
.
- 3 -
Setting the Time
• Press the button PROG aonce, so that CLOCK
appears in the display
• Repeatedly press the button HOUR
resp. the button MIN
time is programmed in. If you hold the buttons
down, the numbers run through faster.
• Press the button PROG
display is now programmed,
or
• if you do not press any other button for ca. 10
seconds, the indicator CLOCK extinguishes in
the display
and the time is programmed.
t
.
t
for hours,
o
for minutes, until the correct
i
twice. The time
a
Making coffee
• Open the lid w.
• Using the measuring spoon, place coffee powder
(coarse to medium ground) into the filter
A level measuring spoon of coffee approximates
to ca. 6 gr of coffee powder.
Note:
Should you use finely ground coffee powder it
could block the filter
through it and the coffee maker could overflow!
• Fill the water tank
of water. For this, use the glass jug
scale. When filling the appliance with water, never
exceed the MAX marking in the water tank
• Close the lid
, water can no longer flow
q
with the required amount
e
.
w
l
.
q
with the
e
The red indicator lamp yglows. The coffee maker
begins the brewing process.
• When the brewing process is complete, the coffee
is kept warm by the keep-warm plate
hours. On the expiry of this period the coffee
maker switches itself.
• Should you wish to switch the coffee maker off
earlier, repeatedly press the button
ON/AUTO/OFF
are extinguished.
u
until the indicator lamps y/
s
Risk of scalding!
After the brewing process the coffee machine must
first cool down, for at least 10 minutes, before you
start another brew. If you do not, there is a risk of
being scalded by escaping steam!
Coffee servings
With this coffee maker you can fill a cup with coffee
using only one hand:
• When there is coffee in the glass jug
and hold your cup against the coffee button
Coffee flows into the cup.
• When the cup is full, remove the cup from the
coffee button
• Any drips that might fall will be caught by the
driptray grill
Note:
.
Regularly empty and clean the driptray under the driptray grill
. Otherwise, it could overflow.
f
f
d
.
.
r
l
for two
, press
d
.
Note:
After brewing, there is always somewhat less coffee
in the glass jug
you filled the water tank
absorbs some of the water.
• Place the glass jug
• Press the button ON/AUTO/OFF
than the amount of water that
l
with. The coffee powder
e
in the coffee maker.
l
once.
s
Note:
If you pour coffee using the coffee button d, a
small amount of coffee will always be left in the
glass jug
You can also pour coffee from the glass jug
the usual manner:
• Lift the glass jug
- 4 -
l
.
and then pull it to the front.
l
l
in
Note:
If, before you lift the glass jug
activated the coffee button
few drops of coffee will drip from the glass jug
out, you have
l
, it can happen that a
d
l
Timer-Function
By use of the button PROG a, you can programme
the coffee maker so that it starts the brewing process at
a pre-determined time (Timer function). First, always
fill the filter
and the water tank
jug
l
is empty and the water tank eis not filled beyond
l
the Max marking.
• Press the button PROG atwice, so that TIMER
appears in the display
desired start time with the button HOUR
the button MIN
• When the desired start time has been entered in,
press the button PROG
time is now programmed. The display
the normal time.
• To activate the timer, press twice on the button
ON/AUTO/OFF
AUTO SET
start the brewing process at the programmed
time.
• If you want to deactivate the timer, press the button
ON/AUTO/OFF
AUTO SET
in the filter basket 1(with coffee powder
q
with water. Place the glass
e
in the coffee maker. Ensure that the glass jug
. Programme in the
t
and
o
(see chapter "Setting the Time").
i
once more. The start
a
shows
t
. The green indicator lamp
s
glows. The coffee maker will now
u
. The green indicator lamp
s
extinguishes.
u
Cleaning
Before cleaning, ALWAYS remove the plug from the
wall power socket.
.
Risk of electric shock!
Before you clean the Coffee Maker you MUST
remove the plug from the power socket.
Attention!
NEVER submerge the Coffee Maker in water.
This would irreparably damage the appliance.
Risk of burns!
Always wait until the coffee maker has cooled
down before cleaning it.
• Wipe the housing with a damp cloth. For stubborn
soiling use a mild detergent on the cloth.
Caution! Appliance Damage!
NEVER clean the glass carafe lin a dishwasher.
This would cause irreparable damage to the glass
jug
.
l
• Clean the glass jug
in mild sudsy water and rinse them with lots
1(
of clean and clear water.
Note:
Clean the filter
cooled. At a later time it will be more difficult to clean.
q
, filter qand filter basket
l
as soon as possible after it has
If coffee powder or something similar has deposited
itself in the coffee sieve of the glass jug
as follows:
- 5 -
, proceed
l
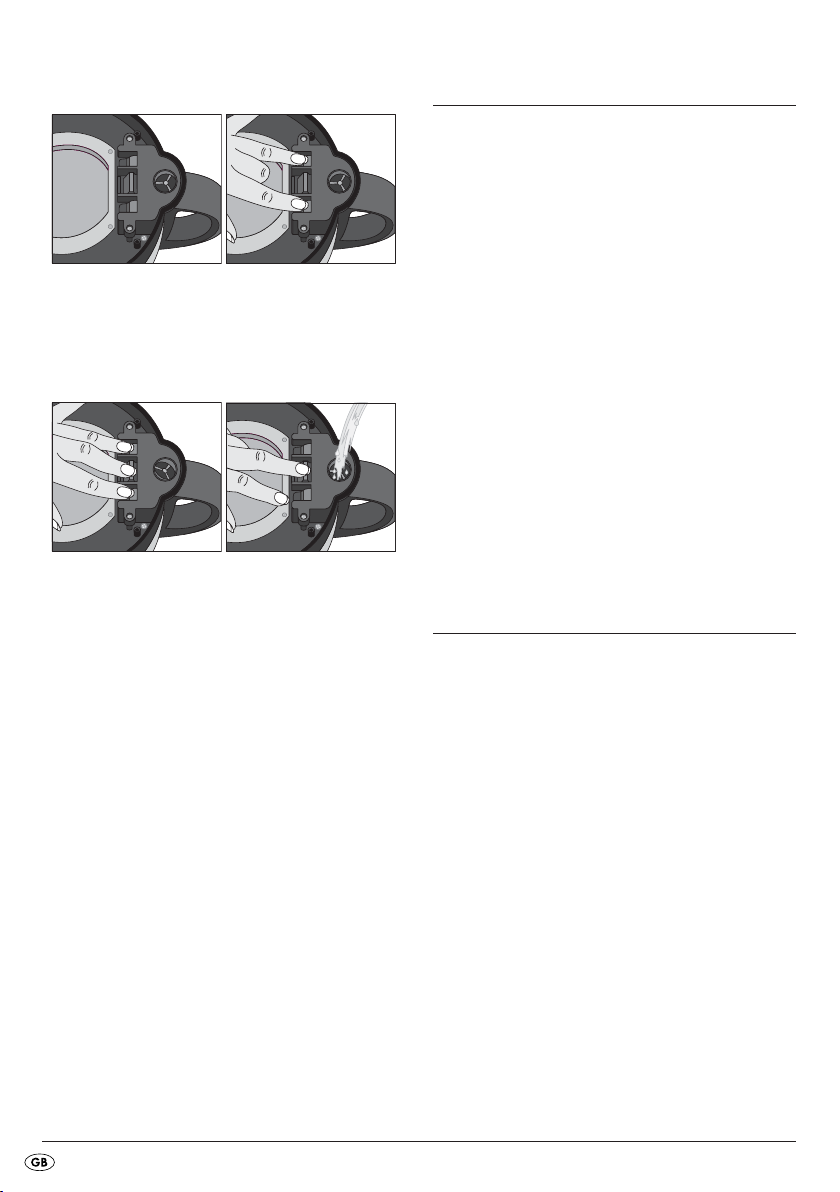
• Upturn the glass jug l.
• Press the two outer locks
hold them firmly.
• You can now slide the coffee passage lock
inwards. The coffee passage gopens itself.
Hold it open.
• You can release the outer locks h/k.
• Allow water to flow through the opened coffee
passage
washed out with the water. Should they still not
dissolve/detach themselves, gently scrub the sieve
with a soft brush.
• When the sieve is free of residues, release the
coffee passage lock
is now closed.
. The residues in the sieve should be
g
. The coffee passage
j
h/k
inwards and
j
Removing scale
Scale removal is already necessary after ca.
30 brewing processes with hard water, after
ca. 60 brewing processes with soft water.
Use only scale removal products that are suitable
for coffee makers and pay heed to the instructions
for use.
The procedure for scale removal is:
• Place the scale removal product in the water
tank
.
e
• Pour in the volume of water detailed in the usage
instructions for the descaler (max. 12 Cups).
• Press the button ON/AUTO/OFF
The brewing process starts, the red indicator
lamp
• Wait until the solution has completely run through
the Coffee Maker.
• After descaling, rinse the Coffee Maker through
twice with 12 cups of clean water each time.
y
glows.
Storage
• If you do not intend to use the Coffee Maker for
an extended period, remove the plug from the
power socket.
• Store the power cable in the cable shaft on the
g
rear of the Coffee Maker.
s
once.
- 6 -
Troubleshooting
The Coffee Maker does not function:
• The plug is not inserted into a power socket.
Connect the appliance with the mains.
Push the power plug into the wall socket.
• The power socket is defective. Try another wall
socket.
• The Coffee Maker is still hot from the previous
brewing process. Wait until the Coffee Maker
has cooled down.
The brewing process does not start at the
desired time:
• The timer is not activated. To activate the timer,
press twice on the button ON/AUTO/OFF
• The time is not correctly programmed. Check the
time entered and, if necessary, re-programme it.
The coffee is too strong/too weak:
• There is too little/too much water in the water
tank
. Fill it with the correct amount of water.
e
• It is filled with too much/too little coffee powder.
Fill it with less/more coffee powder.
• The coffee powder is too finely/too coarsely
ground. Select a different grade of grinding for
your coffee powder.
s
.
Disposal
Do not dispose of the appliance in your
normal domestic waste. This product is
subject to the European guideline
2002/96/EC.
Dispose of the appliance through an approved disposal centre or at your community waste facility.
Observe the currently applicable regulations.
In case of doubt, please contact your waste disposal
centre.
Dispose of all packaging materials in an
environmentally friendly manner.
Water collects in the filter
over:
• The coffee powder is too finely ground, causing
a blockage of the filter
ground coffee powder.
The brewing process takes unusually long.
The appliance switches itself off during the
brewing process.
The appliance is becoming louder when brewing.
There is excessive steam.
• The brewing system of the appliance is calcified.
Descale the appliance as described under
"Removing scale".
and it then flows
q
. Use a more coarsely
q
- 7 -

Warranty and Service
Importer
The warranty for this appliance is for 3 years from
the date of purchase. The appliance has been manufactured with care and meticulously examined before delivery. Please retain your receipt as proof of
purchase. In the event of a warranty claim, please
make contact by telephone with our Service Department. Only in this way can a post-free despatch for
your goods be assured.
The warranty covers only claims for material and
maufacturing defects, but not for transport damage,
for wearing parts or for damage to fragile components, e.g. buttons or batteries. This product is for
private use only and is not intended for commercial
use. The warranty is void in the case of abusive and
improper handling, use of force and internal tampering not carried out by our authorized service
branch. Your statutory rights are not restricted in
any way by this warranty.
The warranty period will not be extended by repairs
made under warranty. This applies also to replaced
and repaired parts. Any damage and defects extant
on purchase must be reported immediately after unpacking the appliance, at the latest, two days after
the purchase date. Repairs made after the expiration of the warranty period are subject to payment.
KOMPERNASS GMBH
BURGSTRASSE 21
44867 BOCHUM, GERMANY
www.kompernass.com
DES UK LTD
Tel.: 0871 5000 700
e-mail: support.uk@kompernass.com
Kompernass Service Ireland
Tel.: 1850 930 412 (0,082 EUR/Min.)
Standard call rates apply. Mobile operators may vary.
e-mail: support.ie@kompernass.com
CY
Kompernass Service Cyprus
Tel.: 800 9 44 01
e-mail: support.cy@kompernass.com
(£ 0.10 / minute)
- 8 -
SISÄLLYSLUETTELO SIVU
Turvaohjeet 10
Tekniset tiedot 10
Toimituslaajuus 11
Määräystenmukainen käyttö 11
Laitteen kuvaus 11
Esivalmistelut 11
Ennen ensimmäistä käyttöä 11
Kellonajan asettaminen 11
Kahvin valmistaminen 12
Kahvin ottaminen 12
Ajastintoiminto 12
Puhdistus 13
Kalkinpoisto 14
Säilytys 14
Vianetsintä 14
Hävittäminen 15
Takuu ja huolto 15
Maahantuoja 16
Lue käyttöohje ennen ensimmäistä käyttökertaa huolellisesti läpi ja pidä sitä lähettyvillä myös myöhemmissä
käytöissä. Jos myyt laitteen, anna ohje myös seuraavalle omistajalle.
- 9 -
KAHVINKEITIN
Turvaohjeet
Sähköiskun aiheuttama vaara!
• Liitä laite ainoastaan määräysten mukaisesti
asennettuun ja maadoitettuun pistorasiaan.
• Irrota pistoke pistorasiasta, kun siirrät tai täytät
laitetta, kun laitteessa ilmenee häiriö, ennen kuin
ryhdyt puhdistamaan laitetta tai kun et tarvitse
laitetta!
Älä koskaan upota laitetta nesteisiin. Jos nestettä
kuitenkin pääsee laitteen koteloon, irrota laitteen verkkopistoke välittömästi pistorasiasta.
Anna pätevien ammattihenkilöiden korjata laite.
• Älä koskaan koske laitteeseen, virtajohtoon tai
verkkopistokkeeseen märin käsin.
• Irrota laite verkkovirrasta ainoastaan pistokkeesta
vetämällä. Älä vedä johdosta.
• Älä taivuta tai purista sähköjohtoa.
• Anna vaurioitunut verkkopistoke tai virtajohto
heti valtuutetun ammattihenkilöstön tai huoltopalvelun vaihdettavaksi vaarojen välttämiseksi.
Loukkaantumisvaara!
• Älä koskaan käytä laitteen lasikannua mikroaaltouunissa.
• Sijoita verkkojohto siten, että sen päälle ei voi
astua tai ettei siihen voi kompastua.
• Tätä laitetta ei ole tarkoitettu sellaisten henkilöiden
(mukaan lukien lapset) käyttöön, joiden rajoitetut,
fyysiset, aistilliset tai henkiset kyvyt tai kokemuksen
ja/tai tiedon puute estävät käytön, lukuun ottamatta tilanteita, joissa heitä valvoo turvallisuudesta
vastaava henkilö tai joissa he ovat saaneet tältä
ohjeita laitteen käytöstä.
• Lapsia on valvottava ja on varmistettava, etteivät
he leiki laitteella.
Huomio! Kuuma pinta.
Varoitus palovammoista!
• Älä koskaan avaa kantta keittotapahtuman
aikana.
• Älä koske kuumaan suodattimeen. Irrota suodatin
vasta, kun neste on valunut ja suodatin on jäähtynyt.
• Älä pidä käsiäsi laitteesta nousevassa vesihöyryssä.
• Älä koskaan liikuta laitetta keittotapahtuman aikana.
Tämä symboli varoittaa kuumista höyryistä. Palovammavaara!
Tulipalon vaara!
• Älä jätä laitetta käytön aikana ilman valvontaa.
• Älä koskaan käytä laitetta ilman vesijohtovettä.
• Älä koskaan aseta laitetta lämmönlähteiden lähelle.
• Älä käytä jatkojohtoa. Vaaratilanteessa on
verkkopistokkeen oltava nopeasti käsillä.
• Älä käytä laitetta ulkoisen ajastimen tai erillisen
kauko-ohjatun järjestelmän avulla.
Näin vältät laitteen vaurioitumisen!
• Täytä laitteen vesisäiliöön ainoastaan puhdasta
vesijohtovettä.
• Älä koskaan altista lasikannua voimakkaille
lämpötilanmuutoksille. Lasi saattaa vaurioitua.
• Emme vastaa lasin särkymisen aiheuttamista
vaurioista!
Tekniset tiedot
Verkkojännite: 220 - 240 V ~50 Hz
Nimellisteho: 1050 W
- 10 -
Toimituslaajuus
Esivalmistelut
• Kahvinkeitin
• Lasikannu
• Mittalusikka
• Käyttöohje
Tarkasta ennen käyttöönottoa toimituksen täydellisyys
ja tarkasta laite mahdollisten vaurioiden varalta.
Ohje:
Mittalusikka voi toimitettaessa olla vesisäiliössä
tai lasikannussa.
Määräystenmukainen käyttö
Kahvinkeittimen pääasiallinen tarkoitus on valmistaa
kahvia. Tämä kahvinkeitin on tarkoitettu ainoastaan
kotitalouksissa käytettäväksi. Älä käytä sitä ammattitarkoituksiin.
Laite on tarkoitettu ainoastaan sisäkäyttöön.
Laitteen kuvaus
Suodatin
q
Kansi
w
Vesisäiliö
e
Lämpölevy
r
Näyttö
t
Punainen merkkivalo
y
Vihreä merkkivalo AUTO SET
u
Painike MIN
i
Painike HOUR
o
Painike PROG
a
Painike ON/AUTO/OFF
s
Kahvipainike
d
Tipparitilä
f
Kahvin valutusaukko
g
Ulompi lukitus
h
Kahvin valutusaukon lukitus
j
Ulompi lukitus
k
Lasikannu
l
Suodatinkori
1(
• Poista kaikki pakkausmateriaalit laitteesta ja
lisäosista.
• Puhdista laite ja kaikki lisäosat (katso luku Puhdistus).
• Aseta kahvinkeitin tasaiselle ja liukumattomalle
pinnalle.
• Avaa kansi
• Aseta suodatinkori
osuu kahvinkeittimen syvennykseen.
• Aseta suodatin
• Aseta tipparitilä
• Työnnä verkkopistoke pistorasiaan.
.
w
laitteeseen niin, että kahva
1(
suodatinkoriin 1(.
q
kahvinkeittimen keräysastialle.
f
Ennen ensimmäistä käyttöä
Ohje:
Älä koskaan täytä vettä enempää kuin vesisäiliön
MAX-merkintään saakka. Vesi voi vuotaa
e
laitteesta yli! Älä koskaan täytä vesisäiliöön
vähempää kuin 4 kupillista vettä. Laite saattaa
vaurioitua.
• Keitä ennen ensimmäistä käyttöä 10 kupillista
vettä ilman kahvijauhetta mahdollisten valmistusjäänteiden poistamiseksi.
Kellonajan asettaminen
• Paina painiketta PROG akerran niin, että näyttöön
ilmestyy CLOCK.
t
• Paina painiketta HOUR
MIN
haluttu kellonaika on asetettu. Kun pidät painiketta
painettuna, numerot vaihtuvat nopeammin.
• Paina painiketta PROG
asetettu.
tai
• Jos et paina mitään muuta painiketta n. 10 sekuntiin,
CLOCK häviää näytöstä
asetettu.
minuuteille niin monta kertaa, kunnes
i
tunneille ja painiketta
o
kahdesti. Kellonaika on
a
ja kellonaika on
t
e
- 11 -

Kahvin valmistaminen
Kahvin ottaminen
• Avaa kansi w.
• Täytä mittalusikalla kahvijauhetta (karkeasta keskikarkeaan jauhettua) suodattimeen
tasainen mittalusikallinen vastaa n. 6 g kahvijauhetta.
Ohje:
Jos käytät liian hienoksi jauhettua kahvijauhetta,
suodatin
sen läpi ja valuu yli kahvinkeittimestä!
• Täytä haluttu vesimäärä vesisäiliöön
tähän asteikolla varustettua vesikannua
koskaan täytä vettä enempää kuin vesisäiliön
MAX-merkintään saakka.
• Sulje kansi
Lasikannussa
vähemmän kahvia kuin mitä vesisäiliöön
vettä. Kahvijauhe imee itseensä hieman vettä.
• Aseta lasikannu
• Paina kerran painiketta ON/AUTO/OFF
Punainen merkkivalo
keittämisen.
• Kun keittotapahtuma on päättynyt, kahvi pidetään
kahden tunnin ajan lämpimänä lämpölevyllä
Sen jälkeen kahvinkeitin sammuttaa itse itsensä
automaattisesti.
• Jos haluat sammuttaa kahvinkeittimen sitä ennen,
paina painiketta ON/AUTO/OFF
että merkkivalot
tukkiutuu, vesi ei pääse enää valumaan
q
.
w
Ohje:
on keittämisen jälkeen aina hieman
l
kahvinkeittimeen.
l
palaa. Kahvinkeitin aloittaa
y
ovat sammuneet.
y/ u
. Tällöin
q
. Käytä
e
on täytetty
e
niin usein,
s
l
. Älä
s
e
.
r
Varoitus palovammoista!
Kahvinkeittimen on jäähdyttävä keittotapahtuman
jälkeen vähintään 10 minuuttia, ennen kuin seuraava
keittotapahtuma aloitetaan. Muutoin ulos työntyvä
höyry aiheuttaa palovamman vaaran!
Voit täyttää kahvin tällä kahvinkeittimellä mukiin
yhdellä kädellä:
• Jos lasikannussa on kahvia
kahvimukiasi kahvipainiketta
valuu mukiin.
• Heti, kun muki on täynnä, vedä muki pois kahvipainikkeelta
• Mahdollisesti vielä sen jälkeen alas putoavat
tipat kerätään tipparitilän
Ohje:
Puhdista tipankeruuristikon
säännöllisesti. Muuten se voi valua yli.
Ohje:
Jos otat kahvia kahvipainikkeen
lasikannuun
Voit myös kaataa kahvia lasikannusta
tapaan:
• Nosta lasikannua
eteenpäin vetämällä.
Ohje:
Jos olet painanut kahvipainiketta
nostat lasikannun
lasikannusta
.
.
d
aina jäämäkahvia.
l
l
paikoiltaan, voi olla, että
l
putoaa muutama tippa kahvia.
l
, paina ja pidä
l
vasten. Kahvi
d
avulla.
f
alla oleva keruuastia
f
avulla, jää
d
l
ja ota se sitten laitteesta
, ennen kuin
d
Ajastintoiminto
Painikkeella PROG avoidaan kahvinkeitin säätää
niin, että se aloittaa keittotapahtuman tiettynä ajankohtana (Timer-toiminto). Täytä aina ensin kahvijauhetta suodatinkorissa
ja vettä vesisäiliöön e. Aseta lasikannu lkahvinkeittimeen. Varmista, että lasikannu
vesisäiliöön
enempää.
ole täytetty vettä Max-merkintää
e
olevaan suodattimeen
1(
l
tavalliseen
q
on tyhjä eikä
- 12 -

• Paina painiketta PROG akahdesti niin, että
näyttöön
tusaika painikkeella HOUR
MIN
• Kun haluttu aloitusaika on asetettu, paina painiketta PROG
ohjelmoitu. Näyttö
• Aktivoi ajastin painamalla kahdesti painiketta
ON/AUTO/OFF
SET
pahtuman asetettuna ajankohtana.
• Kun haluat ottaa ajastimen jälleen pois käytöstä,
paina painiketta ON/AUTO/OFF
merkkivalo AUTO SET
ilmestyy TIMER. Aseta haluttu aloi-
t
ja painikkeella
o
(katso luku "Kellonajan asettaminen").
i
vielä kerran. Aloitusaika on nyt
a
näyttää tavallista kellonaikaa.
t
. Vihreä merkkivalo AUTO
s
palaa. Kahvinkeitin aloittaa nyt keittota-
u
. Vihreä
s
sammuu.
u
Puhdistus
Irrota verkkopistoke pistorasiasta ennen jokaista
puhdistuskertaa.
Sähköiskun vaara!
Ennen kuin puhdistat kahvinkeittimen, sinun tulee
aina irrottaa verkkopistoke pistorasiasta.
• Puhdista lasikannu l, suodatin qja suodatinkori
miedossa saippuavedessä ja huuhtele
1(
ne runsaalla puhtaalla vedellä.
Ohje:
Puhdista suodatin
on jäähtynyt. Myöhemmin sen puhdistaminen on erittäin vaikeaa.
Jos lasikannun
jauhetta tai vastaavaa, toimi seuraavasti:
• Käännä lasikannu lympäri.
• Paina molemmat uloimmat lukitukset
sisäänpäin ja pidä niitä painettuina.
• Nyt voit työntää kahvin valutusaukon lukituksen
sisään. Kahvin valutusaukko gavautuu.
j
Pidä sitä auki.
mahdollisimman pian, kun se
q
kahvisiivilään on kertynyt kahvi-
l
h/k
Huomio!
Älä koskaan upota kahvinkeitintä veteen. Se vaurioittaa laitteen korjauskelvottomaksi.
Palovammojen vaara!
Odota aina, että kahvinkeitin on jäähtynyt, ennen
kuin puhdistat sen.
• Pyyhi kotelo kostealla liinalla. Jos lika on kovapintaista, lisää liinaan laimeaa astianpesuainetta.
Huomio! Laitevaurio!
Älä koskaan puhdista lasikannua lastianpesukoneessa. Se vaurioittaa lasikannun
kuntoon.
korjauskelvottomaan
l
• Voit päästää jälleen uloimmat lukitukset h/
vapaaksi.
• Anna veden valua avatun kahvin valutusaukon
läpi. Siivilässä olevat jäämät huuhtoutuvat
g
pois veden mukana. Jos ne eivät vieläkään irtoa,
käytä lisäksi pehmeää harjaa, jolla sivelet siivilän
pintaa.
• Kun siivilässä ei ole enää jäämiä, päästä kahvin
valutusaukon lukitus
aukko
- 13 -
on jälleen lukittu.
g
vapaaksi. Kahvin valutus-
j
k

Kalkinpoisto
Vianetsintä
Veden ollessa erittäin kovaa on kalkinpoisto välttämätöntä jo n. 30 käyttökerran jälkeen, pehmeämmällä
vedellä noin 60 käyttökerran jälkeen.
Käytä ainoastaan kahvinkeittimille soveltuvaa
kalkinpoistoainetta ja noudata käyttöohjetta.
Näin kalkinpoisto tapahtuu:
• Lisää kalkinpoistoainetta vesisäiliöön
• Täytä kalkinpoistoaineen käyttöohjeessa ilmoitettu määrä vettä (kork. 12 kupillista).
• Paina kerran painiketta ON/AUTO/OFF
Keittotapahtuma käynnistyy, punainen merkkivalo
palaa.
y
• Odota, kunnes vesi on valunut kokonaan laitteen
läpi.
• Valuta kalkinpoiston jälkeen kahdesti 12 kupillista
vettä keittimen läpi.
e
.
.
s
Säilytys
• Jos et käytä kahvinkeitintä vähään aikaan, irrota
pistoke aina pistorasiasta.
• Varastoi johto kahvinkeittimen taustapuolella olevaan kaapelikanavaan.
Kahvinkeitin ei toimi:
• Verkkopistoke ei ole pistorasiassa. Liitä laite
sähköverkkoon.
Työnnä verkkopistoke verkkopistorasiaan.
• Pistorasia on rikki. Kokeile toista pistorasiaa.
• Kahvinkeitin on vielä liian kuuma edellisen käytön
jälkeen. Odota, kunnes kahvinkeitin on jäähtynyt.
Keittotapahtuma ei käynnisty haluttuun aikaan:
• Ajastinta ei ole aktivoitu. Aktivoi ajastin painamalla kahdesti painiketta ON/AUTO/OFF
• Kellonaikaa ei ole asetettu oikein. Tarkasta kellonaika ja aseta se tarvittaessa uudelleen.
Kahvi on liian vahvaa / mietoa:
• Vesisäiliössä
Täytä säiliöön oikea määrä vettä.
• Kahvijauhetta on käytetty liikaa / liian vähän.
Käytä vähemmän/enemmän kahvijauhetta.
• Kahvijauhe on jauhettu liian hienoksi / liian
karkeaksi. Valitse kahvijauheellesi toinen jauhatusaste.
Vesi seisoo suodattimessa
• Kahvijauhe on jauhettu liian hienoksi ja tukkii
suodattimen
kahvijauhetta.
on liian vähän / liikaa vettä.
e
ja valuu sitten yli.
q
. Käytä karkeammaksi jauhettua
q
s
.
Keittotapahtuma kestää epätavallisen kauan.
Laite sammuu keittotapahtuman aikana.
Laite muuttuu keittotapahtuman aikana äänekkäämmäksi.
Syntyy liiallista höyryä.
• Laitteen keittojärjestelmä on kalkkiutunut. Poista
laitteesta kalkki kohdan "Kalkinpoisto" mukaisesti.
- 14 -

Hävittäminen
Älä missään tapauksessa heitä laitetta
tavallisen talousjätteen sekaan. Tämä
tuote on yhdenmukainen EU-direktiivin
2002/96/EC kanssa.
Anna laite hyväksytyn jätehuoltoyrityksen tai
kunnallisen jätelaitoksen hävitettäväksi.
Noudata voimassa olevia määräyksiä.
Epäselvissä tilanteissa ota yhteyttä paikalliseen
jätehuoltoviranomaiseen.
Hävitä kaikki pakkausmateriaalit ympäristöystävällisellä tavalla.
Takuu ja huolto
Laitteen takuu on 3 vuotta ostopäivästä. Laite on
valmistettu huolellisesti ja tarkistettu tarkasti ennen
toimitusta. Säilytä ostokuitti todisteeksi takuun voimassaolosta.
Ota takuutapauksessa puhelimitse yhteyttä huoltopisteeseesi. Vain näin voidaan taata tuotteesi maksuton lähettäminen huoltoon.
Takuu koskee ainoastaan materiaali- ja valmistusvirheitä, ei kuitenkaan kuljetusvaurioita, kuluvia osia tai
herkästi vaurioituvien osien, esim. kytkinten tai akkujen vaurioita.
Tuote on tarkoitettu ainoastaan yksityiseen, ei kaupalliseen käyttöön.
Väärä tai asiaton käyttö, väkivallan käyttö ja muiden kuin valtuutetun huoltopisteen suorittamat korjaukset aiheuttavat takuun raukeamisen. Tämä takuu
ei rajoita kuluttajan lakisääteisiä oikeuksia.
Takuukorjaus ei pidennä takuuaikaa. Tämä koskee
myös vaihdettuja ja korjattuja osia. Mahdollisista jo
ostettaessa olemassa olevista vahingoista ja puutteista on ilmoitettava välittömästi pakkauksesta purkamisen jälkeen, kuitenkin viimeistään kaksi päivää
ostopäiväyksen jälkeen. Takuuajan jälkeen suoritetut
korjaukset ovat maksullisia.
Kompernass Service Suomi
Tel.: 010 30 935 80
(Soittamisen hinta lankaliittymästä: 8,21 snt/puh + 5,9 snt/min /
Matkapuhelimesta: 8,21 snt/puh + 16,90 snt/min)
e-mail: support.fi@kompernass.com
- 15 -

Maahantuoja
KOMPERNASS GMBH
BURGSTRASSE 21
44867 BOCHUM, SAKSA
www.kompernass.com
- 16 -

Innehållsförteckning Sidan
Säkerhetsanvisningar 18
Tekniska data 18
Leveransens omfattning 19
Föreskriven användning 19
Beskrivning 19
Förberedelser 19
Före första användningen 19
Ställa klockan 20
Brygga kaffe 20
Hälla upp kaffe 20
Timerfunktion 21
Rengöring 21
Avkalkning 22
Förvaring 22
Åtgärda fel 22
Kassering 23
Garanti och service 24
Importör 24
Läs igenom bruksanvisningen noga innan du börjar använda apparaten och spara den för senare bruk.
Lämna över bruksanvisningen tillsammans med apparaten om du överlåter den till någon annan person.
- 17 -

KAFFEBRYGGARE
Säkerhetsanvisningar
Risk för elektrisk chock!
• Apparaten får endast anslutas till ett godkänt
och jordat eluttag.
• Dra ut kontakten ur uttaget när du flyttar eller fyller
vatten i apparaten, vid störningar, innan den
rengörs och när den inte används.
Doppa aldrig ner apparaten i vatten eller andra
vätskor. Skulle det någon gång komma in vätska
innanför höljet ska du genast dra ut kontakten
ur uttaget. Lämna sedan in apparaten till en
kvalificerad yrkesman för reparation.
• Ta aldrig i apparaten, kabeln eller kontakten
med våta händer.
• Håll alltid i kontakten när du drar ut den ur uttaget,
dra inte i själva kabeln.
• Kabeln får inte veckas eller klämmas.
• Låt omedelbart en auktoriserad yrkesman eller
vår kundtjänst byta ut skadade kontakter och
strömkablar för att undvika risken för skador.
Brandrisk!
• Lämna aldrig apparaten helt utan uppsikt när
den används.
• Sätt aldrig på apparaten utan att först fylla på
vatten.
• Ställ aldrig apparaten i närheten av värmekällor.
• Använd inga förlängningskablar. Vid nödsituationer
måste det gå snabbt att dra ut kontakten.
• Använd ingen extern timer eller separat fjärrkontroll för att styra ugnen.
Risk för personskador!
• Sätt aldrig glaskannan i mikrovågsugnen.
• Lägg kabeln så att ingen kan trampa på eller
snubbla över den.
• Den här apparaten ska inte användas av personer
(inklusive barn) med begränsad fysisk, sensorisk
eller mental förmåga eller bristande erfarenhet
och kunskap om de inte först övervakats eller
instruerats av någon ansvarig person.
• Se noga till så att barnen inte leker med apparaten.
Akta! Het yta.
Varning för brännskador!
• Öppna aldrig locket när kaffet bryggs.
• Ta inte i det varma filtret. Ta inte ut filtret förrän
all vätska runnit igenom och filtret har svalnat.
• Håll inte händerna där den heta ångan tränger ut.
• Flytta aldrig apparaten när du brygger kaffe.
Den här symbolen ska varna för heta ångdunster. Risk för brännskador!
Så här undviker du att skada apparaten
• Fyll aldrig vattentanken med något annat än rent
kranvatten.
• Utsätt inte glaskannan för stora temperaturvariationer. Då kan den spricka.
• Vi ansvarar inte för skador som uppstår av
sprucket glas!
:
Tekniska data
Nätspänning: 220 - 240 V ~50 Hz
Nominell effekt: 1050 W
- 18 -

Leveransens omfattning
Förberedelser
• Kaffebryggare
• Glaskanna
• Kaffemått
• Bruksanvisning
Kontrollera att leveransen är komplett och inte har
några skador innan du börjar använda apparaten.
Observera:
Vid leveransen ligger måttet antingen
i vattentanken eller i glaskannan.
Föreskriven användning
Kaffebryggaren får endast användas till att brygga
kaffe. Den här kaffebryggaren får endast användas
i privata hem. Använd den inte i yrkesmässigt syfte.
Apparaten ska bara användas inomhus.
Beskrivning
Filter
q
Lock
w
Vattentank
e
Värmeplatta
r
Display
t
Röd indikatorlampa
y
Grön indikatorlampa AUTO SET
u
Knapp MIN
i
Knapp HOUR
o
Knapp PROG
a
Knapp ON/AUTO/OFF
s
Kaffeknapp
d
Droppstopp
f
Kaffeutlopp
g
Yttre spärr
h
Spärr för kaffeutlopp
j
Yttre spärr
k
Glaskanna
l
Filterkorg
1(
• Ta bort allt förpackningsmaterial från apparaten
och tillbehören.
• Rengör apparaten och alla tillbehör (se kapitel
Rengöring).
• Ställ kaffebryggaren på en jämn, halkfri yta.
• Öppna locket
• Sätt in filterkorgen
i utskärningen på kaffebryggaren.
• Sätt in filtret
• Lägg droppstoppet
kaffebryggaren.
• Sätt kontakten i ett eluttag.
.
w
så att spaken griper fast
1(
i filterkorgen 1(.
q
f
i uppsamlingsskålen på
Före första användningen
Observera:
Fyll aldrig på mera vatten än upp till MAXmarkeringen på vattentanken
rinna över! Fyll aldrig mindre än 4 koppar i
vattentanken
das.
• Låt tio koppar vatten rinna igenom kaffebryggaren
utan att lägga i något kaffe för att få bort eventuella rester från tillverkningsprocessen.
. Annars kan apparaten ska-
e
. Det kan
e
- 19 -

Ställa klockan
• Tryck på knappen PROG aen gång så kommer
CLOCK upp på displayen
• Tryck upprepade gånger på knappen HOUR
för timmen och knappen MIN iför minuterna
tills klockan är rätt inställd. Om knapparna hålls
inne går det snabbare.
• Tryck två gånger på knappen PROG
är nu inställd.
eller
• Om du inte trycker på någon knapp alls under
10 sekunder försvinner CLOCK från displayen
och klockan är inställd.
t
t
.
o
. Klockan
a
• När kaffet är färdigbryggt hålls det varmt i två
timmar på värmeplattan
kaffebryggaren av automatiskt.
• Om du vill stänga av kaffebryggaren tidigare
trycker du upprepade gånger på knappen
ON/AUTO/OFF
slocknar.
y/u
s
. Därefter stängs
r
tills indikatorlamporna
Varning för brännskador!
Kaffebryggaren måste stå och svalna i 10 minuter
innan man brygger en ny omgång kaffe. Annars
kan man bränna sig när het ånga tränger ut!
Hälla upp kaffe
Brygga kaffe
• Öppna locket w.
• Använd kaffemåttet för att fylla på kaffe (grovmalet
eller mellangrovt) i filtret
motsvarar ca 6 g kaffepulver.
Observera:
Om du använder för finmalet kaffe blir det stopp
i filtret qså att vattnet inte kan rinna igenom och
istället svämmar över!
• Fyll på så många koppar vatten du vill ha i vattentanken
att mäta upp vattnet. Fyll aldrig på mera vatten
än upp till MAX-markeringen i vattentanken
• Stäng locket
Observera:
Det blir alltid lite mindre kaffe i glaskannan
med hur mycket vatten man hällt på i tanken
Kaffet suger upp en del vatten.
• Sätt glaskannan
• Tryck en gång på knappen ON/AUTO/OFF
Den röda indikatorlampan
bryggas i kaffebryggaren.
. Använd glaskannans lskala för
e
.
w
på värmeplattan.
l
. Ett struket mått
q
l
tänds. Kaffet börjar
y
e
jämfört
.
e
Du kan hälla upp kaffet i en kopp med bara ena
handen:
• När det finns kaffe i glaskannan
kaffekoppen mot kaffeknappen
nu ner i koppen.
• Så snart koppen är full tar du bort den från
kaffeknappen
• Droppar som kan finnas kvar fångas upp av
droppstoppet
Observera:
Rengör uppsamlingsskålen under droppstoppets
galler
.
Om du häller upp kaffe med kaffeknappen dfinns
det alltid lite kvar i glaskannan
Du kan även hälla upp kaffe på vanligt sätt ur glaskannan
• Lyft upp och dra ut glaskannan
Om du trycker på kaffeknappen dinnan du lyfter
av glaskannan
.
s
några droppar kaffe ur kannan
regelbundet. Annars kan det rinna över.
f
Observera:
:
l
Observera:
.
d
.
f
l
kan det hända att det kommer ut
l
l
trycker du
l
. Kaffet rinner
d
sedan.
.
l
.
- 20 -

Timerfunktion
Rengöring
Med knappen PROG akan du ställa in kaffebryggaren så att den börjar brygga kaffe vid en viss tid
(timerfunktion). Fyll alltid först på kaffe i filtret
i filterkorgen 1(och vatten i vattentanken e.
Ställ glaskannan
om att kannan
inte fyllts över MAX-markeringen.
• Tryck på knappen PROG
TIMER upp på displayen
starttid med knapparna HOUR
(se kapitel "Ställa klockan").
• När du ställt in önskad starttid trycker du på
knappen PROG
grammerats in. På displayen
vanligt sätt.
• Tryck två gånger på knappen ON/AUTO/OFF
för att aktivera timern. Den gröna indikator-
s
lampan AUTO SET
kommer nu att börja brygga kaffet vid den
inställda tiden.
• Om du vill avaktivera timern trycker du på knappen
ON/AUTO/OFF
AUTO SET
i kaffebryggaren. Försäkra dig
l
är tom och att vattentanken
l
två gånger så kommer
a
. Ställ in önskad
t
o
igen. Starttiden har nu pro-
a
visas klockan på
t
tänds. Kaffebryggaren
u
. Den gröna indikatorlampan
s
slocknar.
u
och MIN
q
e
i
Dra alltid ut kontakten ur uttaget innan du rengör
apparaten.
Risk för elchock!
Innan du börjar rengöra kaffebryggaren måste du
dra ut kontakten ur uttaget.
OBS!
Doppa aldrig ner kaffebryggaren i vatten. Då kan
den totalförstöras.
Risk för brännskador!
Vänta alltid tills kaffebryggaren kallnat innan du
rengör den.
• Torka av apparaten utvändigt med en fuktig trasa.
Envisa fläckar tar du bort med några droppar
milt diskmedel på trasan.
Akta! Risk för skador på
apparaten!
Diska aldrig glaskannan li diskmaskinen. Då blir
kannan
totalförstörd.
l
• Rengör glaskannan
i vatten och milt diskmedel och skölj dem i rikligt
1(
med rent vatten.
Observera:
Rengör filtret
svalnat. Det blir mycket svårare att rengöra om du
väntar till senare.
Om det fastnat kaffepulver eller andra avlagringar
i glaskannans
- 21 -
så snart som möjligt när det har
q
l
, filtret qoch filterkorgen
l
kaffefilter gör du så här:

• Vänd på glaskannan l.
• Tryck in de två yttre spärrarna
fast dem i det läget.
• Du kan nu skjuta spärren till kaffeutloppet
inåt. Då öppnas kaffeutloppet g. Håll kvar det
i det läget.
• De yttre spärrarna h/kkan du släppa igen.
• Låt vatten strömma genom det öppna kaffeutloppet
. Resterna inuti filtret ska pressas ut av vattnet.
g
Om de inte vill lossna ändå använder du en
mjuk borste för att försöka rengöra filtret.
• När filtret är rent släpper du spärren
utloppet
stängs igen.
g
h/k
och håll
j
. Kaffe-
j
Avkalkning
Om vattnet är mycket hårt måste kaffebryggaren
avkalkas redan efter ca 30 användningar, om vattnet
är mjukare räcker det efter ca 60 användningstillfällen.
Använd bara avkalkningsmedel som är speciellt
anpassat för kaffebryggare och följ anvisningarna.
Gör så här för att kalka av apparaten:
• Häll avkalkningsmedlet i vattentanken
• Fyll på den mängd vatten som anges i avkalkningsmedlets bruksanvisning (max 12 koppar).
• Tryck en gång på knappen ON/AUTO/OFF
Bryggningsprocessen startar och den röda indikatorlampan
• Vänta tills allt vatten runnit igenom.
• Låt sedan 12 koppar rent vatten rinna igenom
apparaten två gånger.
y
tänds.
e
.
Förvaring
• Dra ut kontakten om du inte ska använda kaffebryggaren under en längre tid.
• Stoppa in kabeln i facket på kaffebryggarens
baksida.
Åtgärda fel
s
.
Kaffebryggaren fungerar inte alls:
• Kontakten sitter inte i ett uttag. Koppla ström till
apparaten.
Sätt kontakten i ett eluttag.
• Eluttaget är defekt. Prova i ett annat uttag.
• Kaffebryggaren är fortfarande för het efter tidigare bryggning. Vänta tills kaffebryggaren svalnat.
- 22 -

Kaffet börjar inte bryggas vid den inställda tiden:
• Timern har inte aktiverats. Tryck två gånger på
knappen ON/AUTO/OFF
timern.
• Tiden är inte rätt inställd. Kontrollera inställningen och ställ in rätt tid.
för att aktivera
s
Kassering
Apparaten får absolut inte kastas
bland de vanliga hushållssoporna.
Denna produkt uppfyller kraven i
EU-direktiv 2002/96/EC.
Kaffet är för starkt eller för svagt:
• Du har fyllt på för lite eller för mycket vatten
i tanken
• Du har fyllt på för lite eller för mycket kaffepulver.
Ta mindre resp. mer kaffepulver.
• Kaffet är för finmalet eller för grovmalet.
Välj ett kaffe med en annan malningsgrad.
Vattnet rinner inte igenom filtret
svämmar över:
• Kaffet är för finmalet så att det blir stopp i filtret
q
Det tar ovanligt lång tid att brygga kaffe.
Apparaten stängs av under bryggningen.
Apparaten låter mycket när den brygger.
Det ångar för mycket av apparaten när den
brygger.
• Apparaten är igenkalkad. Kalka av den så som
beskrivs i kapitel "Avkalkning".
. Fyll på rätt vattenmängd.
e
. Använd grovmalet kaffe.
q
och det
Lämna in den till ett företag som har tillstånd att ta
hand om kasserade apparater av den här typen
eller till rätt återvinningsstation på din kommuns
avfallsanläggning.
Följ gällande föreskrifter. Om du är tveksam ska du
fråga den lokala avfallshanteringsmyndigheten.
Lämna in allt förpackningsmaterial till miljövänlig återvinning.
- 23 -
Garanti och service
Importör
För den här apparaten lämnar vi tre års garanti från
och med inköpsdatum. Den här apparaten har tillverkats med omsorg och genomgått en noggrann
kontroll innan leveransen. Var god bevara kassakvittot som köpbevis. Vi ber dig att kontakta ditt serviceställe per telefon vid garantifall. Endast då kan produkten skickas in fraktfritt.
Garantin gäller bara för bara för material- eller fabrikationsfel, den täcker inte transportskador, förslitningsdelar eller skador på ömtåliga delar som t ex
brytare och batterier. Produkten är endast avsedd
för privat bruk och får inte användas yrkesmässigt.
Vid missbruk och felaktig behandling, användande
av våld och vid ingrepp som inte gjorts av vår auktoriserade servicefilial upphör garantin att gälla.
Den lagstadgade garantin begränsas inte av denna
garanti.
Garantitiden förlängs inte för att man utnyttjar garantiförmånerna. Det gäller även för utbytta eller reparerade delar. Eventuella skador och brister som
upptäcks redan vid köpet måste anmälas omedelbart efter uppackningen, dock senast två dagar efter inköpsdatum. När garantitiden är slut måste man
betala för eventuella reparationer.
KOMPERNASS GMBH
BURGSTRASSE 21
44867 BOCHUM, GERMANY
www.kompernass.com
Kompernass Service Sverige
Tel.: 0770 93 00 35
e-mail: support.sv@kompernass.com
Kompernass Service Suomi
Tel.: 010 30 935 80
(Soittamisen hinta lankaliittymästä: 8,21 snt/puh + 5,9 snt/min /
Matkapuhelimesta: 8,21 snt/puh + 16,90 snt/min)
e-mail: support.fi@kompernass.com
- 24 -

INDHOLDSFORTEGNELSE SIDE
Sikkerhedsanvisninger 26
Tekniske data 27
Medfølger ved køb 27
Bestemmelsesmæssig anvendelse 27
Beskrivelse af apparatet 27
Forberedelse 27
Før anvendelse første gang 27
Indstilling af klokkeslæt 28
Brygning af kaffe 28
Kaffeaftapning 28
Timerfunktion 29
Rengøring 29
Afkalkning 30
Opbevaring 30
Afhjælpning af fejl 30
Bortskaffelse 31
Garanti og service 32
Importør 32
Læs betjeningsvejledningen igennem før første brug, og opbevar den til senere brug. Lad vejledningen følge
med, hvis apparatet gives videre til andre.
- 25 -

KAFFEMASKINE
Sikkerhedsanvisninger
Fare på grund af elektrisk stød !
• Tilslut kun kaffemaskinen til en forskriftsmæssigt
installeret og jordet stikkontakt.
• Træk altid stikket ud af stikkontakten, når du flytter
eller fylder maskinen, før du rengør maskinen,
og når du ikke bruger den, eller hvis maskinen
har fejl.
Læg aldrig kaffemaskinen ned i væske. Hvis
der alligevel kommer væske ind i maskinens
kabinet, skal du straks trække kaffemaskinens
stik ud af stikkontakten. Lad kaffemaskinen
reparere af en kvalificeret reparatør.
• Rør aldrig ved kaffemaskinen, ledningen og stikket
med våde hænder.
• Træk altid ledningen ud af stikkontakten ved at
tage fat i stikket; træk aldrig i selve ledningen.
• Bøj eller klem ikke ledningen.
• Lad omgående defekte stik eller ledninger udskifte
af en autoriseret reparatør, så farlige situationer
undgås.
Brandfare!
• Hold altid kaffemaskinen under opsyn under
brug.
• Brug aldrig maskinen uden vand.
• Stil aldrig maskinen i nærheden af varmekilder.
• Brug ikke forlængerledning. Hvis der opstår fare,
skal det være nemt at få adgang til stikket.
• Brug aldrig en ekstern timer eller et separat
fjernbetjeningssystem til at betjene automaten.
Fare for personskade!
• Brug aldrig kaffemaskinens glaskande i en
mikrobølgeovn.
• Læg ledningen, så man ikke kan træde på den
eller falde over den.
• Denne kaffemaskine må ikke benyttes af personer
(inklusive børn) med begrænsede fysiske, sensoriske eller psykiske evner eller med manglende
erfaringer og/eller manglende viden, medmindre
en ansvarlig person holder opsyn med dem og
giver dem anvisninger til, hvordan kaffemaskinen
anvendes.
• Børn skal være under opsyn, så det sikres, at de
ikke leger med maskinen.
Obs! Varm overflade.
Advarsel om forbrændinger!
• Åbn aldrig låget, mens kaffen brygges.
• Rør ikke ved det varme filter. Tag først filteret ud,
når væsken er løbet ud, og filteret er afkølet.
• Hold ikke hænderne ind i vanddampen.
• Flyt aldrig kaffemaskinen under brygningen.
Dette symbol advarer mod varme damptåger.
Fare for forbrænding!
Sådan undgår du, at kaffemaskinen
beskadiges!
• Fyld udelukkende rent vand fra hanen i kaffemaskinens vandbeholder.
• Udsæt aldrig glaskanden for voldsomme temperatursvingninger. Glasset kan gå i stykker.
- 26 -

• Der gives ingen garanti for glas, der er gået i
stykker!
Tekniske data
Netspænding : 220 - 240 V~50 Hz
Nominel effekt: 1050 W
Medfølger ved køb
Knap PROG
a
Knap ON/AUTO/OFF
s
Kaffeknap
d
Dråberist
f
Kaffegennemløb
g
Udvendig låsemekanisme
h
Låsemekanisme til kaffegennemløb
j
Udvendig låsemekanisme
k
Glaskande
l
Filterkurv
1(
• Kaffemaskine
• Glaskande
• Måleske
• Betjeningsvejledning
Kontroller inden ibrugtagningen, at alle dele er leveret
med, og at kaffemaskinen ikke er beskadiget.
Bemærk:
Måleskeen kan ligge i vandbeholderen eller
glaskanden ved køb.
Bestemmelsesmæssig anvendelse
Kaffemaskinen er udelukkende beregnet til tilberedning af kaffe. Denne kaffemaskine er udelukkende
beregnet til anvendelse i private husholdninger.
Den må ikke bruges i erhvervsøjemed.
Kaffemaskinen er kun beregnet til anvendelse indendørs.
Beskrivelse af apparatet
Filter
q
Låg
w
Vandbaholder
e
Varmholdningsplade
r
Display
t
Rød indikatorlampe
y
Grøn indikatorlampe AUTO SET
u
Knap MIN
i
Knap HOUR
o
Forberedelse
• Tag alle emballagematerialerne ud af maskinen
og tilbehørsdelene.
• Rengør maskinen og alle tilbehørsdele
(se kapitlet Rengøring).
• Stil kaffemaskinen på en ensartet, skridsikker
overflade.
• Åbn låget
• Sæt filterkurven
i udskæringen på kaffemaskinen.
• Sæt filteret
• Læg dråberisten
kaffemaskinen.
• Sæt stikket i stikkontakten.
.
w
ind, så håndtaget går ind
1(
ind i filterkurven 1(.
q
i opsamlingsskålen på
f
Før anvendelse første gang
Bemærk:
Fyld kun vand på til MAKS-markeringen i
vandbeholderen
Fyld aldrig mindre end 4 kopper vand i vandbeholderen
• Kog 10 kopper vand uden kaffepulver, før maskinen
bruges første gang, så eventuelle produktionsrester
fjernes.
e
. Maskinen kan løbe over!
e
. Maskinen kan ødelægges.
- 27 -

Indstilling af klokkeslæt
• Tryk på knappen PROG aén gang, så CLOCK
vises i displayet
• Tryk på knappen HOUR
MIN
i for minutter, indtil det ønskede klokkeslæt
er indstillet. Hvis du holder knappen nede, løber
tallene hurtigere igennem.
• Tryk på knappen PROG
klokkeslættet indstillet.
eller
• Hvis du i ca. 10 sekunder ikke trykker på flere
knapper, slukkes visningen CLOCK i displayet
, og klokkeslættet er indstillet.
t
.
t
o for timer eller knappen
to gange. Nu er
a
• Når kaffebrygningen er afsluttet, holdes kaffen
varm i to timer på varmholdningspladen
Derefter slukkes kaffemaskinen automatisk.
• Hvis du vil slukke for kaffemaskinen tidligere,
skal du trykke på knappen ON/AUTO/OFF
indtil indikatorlamperne
y/ u
slukkes.
r
s
Advarsel mod forbrændinger!
Kaffemaskinen skal afkøles mindst 10 minutter efter
brygningen, før du må starte på en ny kaffebrygning.
Ellers kan du skolde dig på grund af udslippende
damp!
Kaffeaftapning
.
,
Brygning af kaffe
• Åbn låget w.
• Fyld kaffepulver (groft til fintmalet) i filteret
med måleskeen. En strøget måleskefuld svarer
q
til ca. 6 g kaffepulver.
Bemærk:
Hvis du bruger for fintmalet kaffepulver, stopper
filteret qtil, og vandet kan ikke løbe igennem, og
kaffemaskinen løber over!
• Fyld den ønskede vandmængde i vandbeholderen
. Brug glaskanden lmed skalaen hertil. Fyld
e
kun vand på til MAKS-markeringen i vandbeholderen
• Luk låget
Der vil altid være lidt mindre kaffe i glaskanden
efter brygning end det vand, du har fyldt i vandbeholderen
• Stil glaskanden
• Tryk én gang på knappen ON/AUTO/OFF
Den røde indikatorlampe
begynder at brygge.
.
e
.
w
Bemærk:
. Kaffepulveret suger noget af vandet op.
e
ind i kaffemaskinen.
l
lyser. Kaffemaskinen
y
l
s
Med denne kaffemaskine kan du fylde kaffe i kruset
med den ene hånd:
• Når kaffen er i glaskanden
og holde kaffekruset mod kaffeknappen
Så løber kaffen ned i kruset.
• Så snart kruset er fuldt, skal du tage det væk fra
kaffeknappen
• Dråber, der eventuelt falder ned, opfanges af
dråberisten
Bemærk:
Rengør regelmæssigt skålen under dråberisten
Ellers kan den løbe over.
Bemærk:
Hvis du tapper kaffe med kaffeknappen
der som regel altid en rest kaffe tilbage i kaffekanden
.
l
Du kan også hælde kaffen ud af kaffekanden
på den normale måde:
• Løft glaskanden
Bemærk:
.
Hvis du trykker på kaffeknappen d, før du løfter
glaskanden
kaffe ud af glaskanden
.
d
.
f
, og tag den ud forfra.
l
ud, kan der dryppe nogle dråber
l
l
l
.
, skal du trykke
d
d
f
, bliver
l
.
.
- 28 -

Timerfunktion
Rengøring
Med knappen PROG akan du indstille kaffemaskinen,
så den begynder at brygge kaffe på et bestemt tidspunkt (timer-funktion). Fyld altid først kaffepulver i filteret
i filterkurven 1(og vand i vandbeholderen e.
q
Stil glaskanden
at glaskanden
ikke er fyldt mere end til maks-makeringen.
• Tryk på knappen PROG
vises i displayet
med knappen HOUR
(se kapitlet "Indstilling af klokkeslæt“).
• Når den ønskede starttid er indstillet, skal du
trykke på knappen PROG
programmeret. Displayet
klokkeslæt.
• For at aktivere timeren skal du trykke to gange
på knappen ON/AUTO/OFF
indikatorlampe AUTO SET
begynder nu at brygge på det programmerede
tidspunkt.
• Hvis du vil deaktivere timeren, skal du trykke på
knappen ON/AUTO/OFF
katorlampe AUTO SET
ind i kaffemaskinen. Kontrollér,
l
er tom, og at vandbeholderen
l
to gange, så TIMER
a
. Indstil den ønskede starttid
t
o og knappen MIN i
igen. Nu er starttiden
a
viser det normale
t
. Den grønne
s
lyser. Kaffemaskinen
u
. Den grønne indi-
s
slukkes.
u
e
Tag stikket ud af stikkontakten inden rengøringen.
Fare for elektrisk stød!
Før du rengør kaffemaskinen, skal du altid trække
stikket ud af stikkontakten.
Obs!
Læg aldrig kaffemaskinen ned i vand. Det medfører
skader på maskinen, som ikke kan repareres længere.
Forbrændingsfare!
Vent, indtil kaffemaskinen er afkølet, før du rengør den.
• Tør kabinettet af med en fugtig klud. Brug et
mildt opvaskemiddel på kluden, hvis snavset
sidder meget fast.
Obs! Skader på maskinen!
Rengør aldrig glaskanden li opvaskemaskinen.
Det fører til skader på glaskanden
repareres igen.
• Rengør glaskanden l, filteret qog filterkurven
i mildt sæbevand, og skyl efter med rigeligt
1(
rent vand.
, som ikke kan
l
Bemærk:
Rengør filteret
afkølet. Senere er det sværere at gøre det rent.
Hvis der er aflejret kaffepulver eller lignende i glaskandens kaffesi
- 29 -
så hurtigt som muligt, når det er
q
, skal du gøre følgende:
l

• Drej glaskanden l.
• Tryk de to udvendige låsemekanismer
ind, og hold dem fast.
• Nu kan kaffegennemløbs-låsemekanismen
skubbes ind. Kaffegennemløbet gåbner sig.
Hold det åbent.
h/k
j
Afkalkning
Ved høje hårdhedsgrader er afkalkning allerede
nødvendig, når maskinen har været i brug ca. 30
gange, ved lave hårdhedsgrader efter ca. 60 gange.
Brug kun et afkalkningsmiddel, som er beregnet til
kaffemaskiner, og overhold betjeningsvejledningen.
Fremgangsmåde ved afkalkning:
• Fyld afkalkningsmidlet i vandbeholderen
• Fyld vandmængden på, som er angivet i betjeningsvejledningen til afkalkningsmidlet (maks. 12
kopper).
• Tryk én gang på knappen ON/AUTO/OFF
Kaffebrygningen starter, den røde indikatorlampe
lyser.
y
• Vent, til alt vandet er løbet igennem.
• Lad to gange 12 kopper vand løbe igennem
efter afkalkningen.
e.
s
.
• De yderste låsemekanismer h/kkan du slippe
igen.
• Lad vandet løbe gennem det åbne kaffegennemløb
. Resterne i sien skal løbe ud sammen med
g
vandet. Hvis resterne stadig ikke løsnes, skal du
bruge en blød børste til at rense sien med.
• Når sien er ren, slippes låsemekanismen til kaffegennemløbet
igen.
. Kaffegennemløbet ger lukket
j
Opbevaring
• Hvis kaffemaskinen ikke bruges i længere tid,
skal stikket trækkes ud af stikkontakten.
• Opbevar ledningen i skakten på bagsiden af
kaffemaskinen.
Afhjælpning af fejl
Kaffemaskinen fungerer ikke:
• Stikket sidder ikke i en stikkontakt. Slut kaffemaskinen
til strømforsyningen.
Sæt stikket i en stikkontakt.
• Stikkontakten er defekt. Prøv en anden stikkontakt.
• Kaffemaskinen er stadig for varm efter den foregående kaffebrygning. Vent, til kaffemaskinen er
kølet ned.
- 30 -

Brygningen starter ikke på det ønskede
tidspunkt:
• Timeren er ikke aktiveret. For at aktivere timeren
skal du trykke to gange på knappen
ON/AUTO/OFF
• Klokkeslættet er ikke indstillet rigtigt. Kontrollér
klokkeslættet, og indstil det rigtigt ved behov.
Kaffen er for stærk/for tynd:
• Der er for lidt/for meget vand i vandbeholderen
Fyld den korrekte mængde vand på.
• Der er fyldt for meget/for lidt kaffepulver i.
Fyld mindre/mere kaffepulver i.
• Kaffepulveret er malet for fint/for grovt. Vælg en
anden malegrad for dit kaffepulver.
Vandet står i filteret
• Kaffepulveret er malet for fint og stopper filteret
Brug kaffepulver, der er malet govere.
Brygningen varer usædvanligt længe.
Kaffemaskinen slukker under brygningen.
Kaffemaskinen bliver mere støjende under
brygningen.
Der opstår for meget damp.
• Kaffemaskinens bryggesystem er forkalket. Afkalk
kaffemaskinen som beskrevet under “Afkalkning”.
.
s
og løber så over:
q
e
q
Bortskaffelse
Kom under ingen omstændigheder
instrument i det normale husholdningsaffald. Dette produkt overholder
Europa-Parlamentets og Rådets
direktiv 2002/96/EC.
Bortskaf afspilleren hos et godkendt affaldsfirma el-
.
ler på dit kommunale affaldsanlæg. Følg de aktuelt
gældende regler. Kontakt affaldsordningen, hvis du
er i tvivl.
Aflever alle emballagematerialer på et
affaldsdepot, så miljøet skånes.
.
- 31 -

Garanti og service
På denne donkraft får du 3 års garanti fra købsdatoen. Apparatet er produceret omhyggeligt og inden levering afprøvet samvittighedsfuldt. Opbevar
kassebonen som bevis for købet.
I garantitilfælde bedes du kontakte service-afdelingen telefonisk. På denne måde kan gratis indsendelse af varen garanteres.
Garantiydelsen gælder kun for materiale- eller fabrikationsfejl, men ikke for transportskader, sliddele eller skader på skrøbelige dele som f.eks. kontakter
eller batterier. Produktet er kun beregnet til privat og
ikke til erhvervsmæssigt brug.
Ved misbrug og uhensigtsmæssig behandling, anvendelse af vold og ved indgreb, som ikke er foretaget af vores autoriserede service-afdeling, ophører
garantien. Dine juridiske rettigheder indskrænkes
ikke ved denne garanti.
Garantiperioden forlænges ikke på grund af produktansvaret. Det gælder også for udskiftede og reparerede dele. Eventuelle skader og mangler, som
allerede findes ved køb, skal straks anmeldes efter
udpakning og senest to dage efter købsdatoen.
Når garantiperioden er udløbet, skal udgifterne til
reparationer betales normalt.
Kompernass Service Danmark
Tel.: 80-889 980
(
Der kan kun ringes til servicenummeret fra fastnet)
e-mail: support.dk@kompernass.com
Importør
KOMPERNASS GMBH
BURGSTRASSE 21
44867 BOCHUM, GERMANY
www.kompernass.com
- 32 -

INHALTSVERZEICHNIS SEITE
Sicherheitshinweise 34
Technische Daten 35
Lieferumfang 35
Bestimmungsgemäßer Gebrauch 35
Gerätebeschreibung 35
Vorbereitungen 35
Vor dem ersten Gebrauch 36
Einstellung der Uhrzeit 36
Kaffeezubereitung 36
Kaffeeentnahme 37
Timer-Funktion 37
Reinigung 37
Entkalkung 38
Aufbewahrung 39
Fehlerbehebung 39
Entsorgung 39
Garantie und Service 40
Importeur 40
Lesen Sie die Bedienungsanleitung vor der ersten Verwendung aufmerksam durch und heben Sie diese für
den späteren Gebrauch auf. Händigen Sie bei Weitergabe des Gerätes an Dritte auch die Anleitung aus.
- 33 -
KAFFEEMASCHINE
Sicherheitshinweise
Gefahr durch Stromschlag!
• Schließen Sie das Gerät nur an eine vorschriftsmäßig installierte und geerdete Netzsteckdose
an.
• Ziehen Sie, wenn Sie das Gerät bewegen, befüllen, bei Störungen, bevor Sie das Gerät reinigen
oder wenn Sie es nicht gebrauchen, den Netzstecker aus der Netzsteckdose.
Tauchen Sie das Gerät nie in Flüssigkeiten.
Falls doch einmal Flüssigkeit in das Gerätegehäuse gelangt, ziehen Sie sofort den Netzstecker des Geräts aus der Netzsteckdose.
Lassen Sie es von qualifiziertem Fachpersonal
reparieren.
• Fassen Sie das Gerät, Netzkabel und -stecker
nie mit nassen Händen an.
• Ziehen Sie das Netzkabel stets am Stecker aus
der Steckdose, ziehen Sie nicht am Kabel selbst.
• Knicken oder quetschen Sie das Netzkabel
nicht.
• Lassen Sie beschädigte Netzstecker oder Netzkabel sofort von autorisiertem Fachpersonal
oder dem Kundenservice austauschen, um
Gefährdungen zu vermeiden.
Brandgefahr!
• Lassen Sie das Gerät während des Betriebs niemals unbeaufsichtigt.
• Betreiben Sie das Gerät niemals ohne Leitungswasser.
• Stellen Sie das Gerät niemals in der Nähe von
Wärmequellen auf.
• Benutzen Sie kein Verlängerungskabel. Bei Gefahr muss der Netzstecker schnell erreichbar
sein.
• Benutzen Sie keine externe Zeitschaltuhr oder
ein separates Fernwirksystem um das Gerät zu
betreiben.
Verletzungsgefahr!
• Benutzen Sie die Glaskanne des Geräts niemals
in der Mikrowelle.
• Verlegen Sie das Netzkabel so, dass niemand
darauf treten oder darüber stolpern kann.
• Dieses Gerät ist nicht dafür bestimmt, durch
Personen (einschließlich Kinder) mit eingeschränkten physischen, sensorischen oder
geistigen Fähigkeiten oder mangels Erfahrung
und/oder mangels Wissen benutzt zu werden,
es sei denn, sie werden durch eine für ihre
Sicherheit zuständige Person beaufsichtigt oder
erhielten von ihr Anweisungen, wie das Gerät
zu benutzen ist.
• Kinder sollten beaufsichtigt werden, um sicherzustellen, dass sie nicht mit dem Gerät spielen.
Achtung! Heiße Oberfläche.
Warnung vor Verbrühungen!
• Öffnen Sie niemals während des Brühvorgangs
den Deckel.
• Berühren Sie nicht den heißen Filter. Entnehmen
Sie den Filter erst, wenn die Flüssigkeit abgelaufen und der Filter abgekühlt ist.
• Halten Sie Ihre Hände nicht in den aufsteigenden Wasserdampf.
• Bewegen Sie niemals das Gerät während des
Brühvorgangs.
Dieses Symbol warnt Sie vor heißen Dampfschwaden. Verbrühungsgefahr!
So vermeiden Sie Geräteschäden!
• Füllen Sie ausschließlich sauberes Leitungswasser in den Wassertank des Geräts.
• Setzen Sie die Glaskanne nie starken Temperaturschwankungen aus. Das Glas kann beschädigt werden.
- 34 -

• Für Schäden durch Glasbruch wird
keine Haftung übernommen!
Technische Daten
Netzspannung: 220 - 240 V ~50 Hz
Nennleistung: 1050 W
Lieferumfang
• Kaffeemaschine
• Glaskanne
• Messlöffel
• Bedienungsanleitung
Bitte überprüfen Sie vor der Inbetriebnahme den Lieferumfang auf Vollständigkeit und eventuelle Beschädigungen.
::
Hinweis
Der Messlöffel kann sich bei Lieferung im Wassertank oder der Glaskanne befinden.
Gerätebeschreibung
Filter
q
Deckel
w
Wassertank
e
Warmhalteplatte
r
Display
t
rote Anzeigelampe
y
grüne Anzeigelampe AUTO SET
u
Taste MIN
i
Taste HOUR
o
Taste PROG
a
Taste ON/AUTO/OFF
s
Kaffeetaste
d
Tropfen-Auffanggitter
f
Kaffeedurchlass
g
äußere Verriegelung
h
Kaffeedurchlass-Verriegelung
j
äußere Verriegelung
k
Glaskanne
l
Filterkorb
1(
Vorbereitungen
Bestimmungsgemäßer
Gebrauch
Die Kaffeemaschine dient ausschließlich dem Zubereiten von Kaffee. Diese Kaffeemaschine ist ausschließlich für die Benutzung in privaten Haushalten
bestimmt. Benutzen Sie sie nicht gewerblich.
Das Gerät ist nur für den Innengebrauch bestimmt.
• Entfernen Sie alle Verpackungsmaterialien vom
Gerät und den Zubehörteilen.
• Reinigen Sie das Gerät und alle Zubehörteile
(siehe Kapitel Reinigung).
• Stellen Sie die Kaffeemaschine auf eine ebene
und rutschfeste Fläche.
• Öffnen Sie den Deckel
• Setzen Sie den Filterkorb
bel in die Aussparung an der Kaffeemaschine
greift.
• Setzen Sie den Filter
• Legen Sie das Tropfen-Auffanggitter
Auffangschale an der Kaffeemaschine.
• Stecken Sie den Netzstecker in eine Netzsteckdose.
- 35 -
.
w
so ein, dass der He-
1(
in den Filterkorb 1(.
q
f
in die

Vor dem ersten Gebrauch
Hinweis:
Füllen Sie nie mehr Wasser, als bis zur MAXMarkierung in den Wassertank
kann überlaufen! Füllen Sie nie weniger Wasser als für 4 Tassen in den Wassertank
Gerät kann beschädigt werden.
• Lassen Sie vor dem ersten Gebrauch 10 Tassen
Wasser ohne Kaffeepulver brühen, um eventuelle Fertigungsrückstände zu entfernen.
. Das Gerät
e
e
. Das
• Füllen Sie die gewünschte Wassermenge in den
Wassertank
kanne
l
Wasser, als bis zur Max-Markierung in Wassertank
e
• Schließen Sie den Deckel
Hinweis:
Es wird immer nach dem Brühen etwas weniger
Kaffee in der Glaskanne
den Wassertank
saugt etwas Wasser auf.
ein. Nutzen Sie dafür die Glas-
e
mit der Skala. Füllen Sie nie mehr
ein.
.
w
sein, als Sie Wasser in
l
gefüllt haben. Das Kaffeepulver
e
Einstellung der Uhrzeit
• Drücken Sie die Taste PROG aeinmal, so dass
CLOCK im Display
• Drücken Sie die Taste HOUR
bzw. die Taste MIN
bis die gewünschte Uhrzeit eingestellt ist. Wenn
Sie die Taste gedrückt halten, laufen die Zahlen
schneller durch.
• Drücken Sie die Taste PROG
Uhrzeit ist eingestellt.
oder
• Wenn Sie ca. 10 Sekunden keine weitere Taste
drücken, erlischt die Anzeige CLOCK im Display
und die Uhrzeit ist eingestellt.
t
erscheint.
t
für die Stunden
o
für die Minuten so oft,
i
zweimal. Die
a
Kaffeezubereitung
• Öffnen Sie den Deckel w.
• Füllen Sie mit dem Messlöffel Kaffeepulver
(grob bis mittel gemahlen) in den Filter
Dabei entspricht ein gestrichener Messlöffel ca.
6 g Kaffepulver.
q
ein.
• Stellen Sie die Glaskanne
maschine.
• Drücken Sie einmal die Taste ON/AUTO/OFF
.
s
Die rote Anzeigelampe
Kaffeemaschine beginnt den Brühvorgang.
• Ist der Brühvorgang beendet, wird der Kaffee
auf der Warmhalteplatte
warmgehalten. Danach schaltet sich die Kaffeemaschine automatisch aus.
• Möchten Sie die Kaffeemaschine vorher ausschalten, drücken Sie die Taste ON/AUTO/OFF
so oft, bis die Anzeigelampen y/ uerlo-
s
schen sind.
y
in die Kaffee-
l
leuchtet. Die
für zwei Stunden
r
Warnung vor Verbrühungen!
Die Kaffeemaschine muss nach dem Brühvorgang
mindestens 10 Minuten abkühlen, bevor Sie einen
weiteren Brühvorgang starten. Ansonsten besteht
Verbrühungsgefahr durch austretenden Dampf!
Hinweis:
Wenn Sie zu fein gemahlenes Kaffeepulver verwenden verstopft der Filter
mehr hindurchlaufen und die Kaffeemaschine läuft
über!
, das Wasser kann nicht
q
- 36 -

Kaffeeentnahme
Timer-Funktion
Sie können mit dieser Kaffeemaschine den Kaffee
mit einer Hand in den Becher füllen:
• Wenn sich Kaffee in der Glaskanne
drücken und halten Sie Ihren Kaffeebecher gegen die Kaffeetaste
Becher.
• Sobald der Becher voll ist, ziehen Sie den Becher von der Kaffeetaste
• Tropfen, die eventuell danach noch herunterfallen werden vom Tropfen-Auffanggitter
fangen.
Hinweis:
Reinigen Sie die Auffangschale unter dem TropfenAuffanggitter fregelmäßig. Ansonsten kann sie
überlaufen.
Hinweis:
Wenn Sie den Kaffee mit Hilfe der Kaffeetaste
entnehmen, bleibt immer ein Rest Kaffee in der
Glaskanne
Sie können auch auf herkömmlichem Weg den Kaffee aus der Glaskanne
• Heben Sie die Glaskanne
sie dann nach vorne heraus.
Hinweis:
Wenn Sie, bevor Sie die Glaskanne
ben, die Kaffeetaste
sein, dass einige Tropfen Kaffee aus der Glaskanne
tropfen.
l
l
zurück.
. Der Kaffee läuft in den
d
weg.
d
schütten:
l
an und ziehen Sie
l
betätigt haben, kann es
d
l
heraushe-
l
befindet,
aufge-
f
d
Mit der Taste PROG akönnen Sie die Kaffeemaschine so einstellen, dass sie zu einem festgelegten
Zeitpunkt mit dem Brühvorgang beginnt (TimerFunktion). Füllen Sie immer zuerst Kaffeepulver in
den Filter
Wassertank
Kaffeemaschine. Stellen Sie sicher, dass die
Glaskanne
über die Max-Markierung hinaus gefüllt ist.
• Drücken Sie die Taste PROG azweimal, so
dass TIMER im Display
die gewünschte Startzeit mit der Taste HOUR
und der Taste MIN iein (siehe Kapitel „Einstellung der Uhrzeit“).
• Wenn die gewünschte Startzeit eingestellt ist,
drücken Sie die Taste PROG
Die Startzeit ist nun programmiert. Das Display
t
• Um den Timer zu aktivieren, drücken Sie zweimal die Taste ON/AUTO/OFF
Anzeigelampe AUTO SET
feemaschine beginnt nun zur programmierten
Zeit mit dem Brühvorgang.
• Wenn Sie den Timer wieder deaktivieren möchten, drücken Sie die Taste ON/AUTO/OFF
Die grüne Anzeigelampe AUTO SET
im Filterkorb 1(und Wasser in den
q
. Stellen Sie die Glaskanne lin die
e
leer ist und der Wassertank enicht
l
erscheint. Stellen Sie
t
a
zeigt die normale Uhrzeit an.
leuchtet. Die Kaf-
u
noch einmal.
. Die grüne
s
erlischt.
u
o
s
Reinigung
Ziehen Sie vor jeder Reinigung den Netzstecker aus
der Netzsteckdose.
.
Gefahr eines elektrischen Schlags!
Bevor Sie die Kaffeemaschine reinigen, müssen Sie
immer den Netzstecker aus der Netzsteckdose ziehen.
Achtung!
Tauchen Sie die Kaffeemaschine nie unter Wasser.
Das führt zu irreparablen Schäden am Gerät.
- 37 -

Verbrennungsgefahr!
Warten Sie immer, bis die Kaffeemaschine abgekühlt ist, bevor Sie sie reinigen.
• Wischen Sie das Gehäuse mit einem feuchten
Tuch ab. Bei hartnäckigen Verschmutzungen
geben Sie ein mildes Spülmittel auf das Tuch.
Achtung! Geräteschäden!
Reinigen Sie die Glaskanne lniemals in der Spülmaschine. Das führt zu irreparablen Schäden an der
Glaskanne
• Reinigen Sie Glaskanne
korb
sie mit viel klarem Wasser ab.
Hinweis:
Reinigen Sie den Filter
hat, schnellstmöglich. Später lässt dieser sich nur
schwer reinigen.
Wenn sich im Kaffeesieb der Glaskanne
pulver oder ähnliches abgesetzt hat, gehen Sie wie
folgt vor:
• Drehen Sie die Glaskanne
• Drücken Sie die beiden äußeren Verriegelungen
h/k
• Sie können nun die Kaffeedurchlass-Verriegelung
lass
.
l
, Filter qund Filter-
l
in mildem Seifenwasser und spülen Sie
1(
, sobald er sich abgekühlt
q
um.
l
nach innen und halten Sie sie fest.
nach innen schieben. Der Kaffeedurch-
j
öffnet sich. Halten Sie ihn offen.
g
l
Kaffee-
• Die äußeren Verriegelungen h/kkönnen Sie
wieder los lassen.
• Lassen Sie Wasser durch den geöffneten Kaffeedurchlass
ten mit dem Wasser heraus geschwemmt werden. Sollten sie sich immer noch nicht lösen,
benutzen Sie zusätzlich eine weiche Bürste, mit
der Sie über das Sieb streichen.
• Ist das Sieb frei von Rückständen, lassen Sie die
Kaffeedurchlass-Verriegelung
durchlass
laufen. Die Rückstände im Sieb soll-
g
los. Der Kaffee-
j
ist wieder geschlossen.
g
Entkalkung
Bei hohem Härtegrad ist eine Entkalkung bereits
nach ca. 30 Benutzungen notwendig, bei niedrigem
Härtegrad nach ca. 60 Benutzungen.
Verwenden Sie ausschließlich für Kaffeemaschinen
geeignetes Entkalkungsmittel und beachten Sie die
Bedienungsanleitung.
So gehen Sie zum Entkalken vor:
• Geben Sie das Entkalkungsmittel in den Wassertank
.
e
• Füllen Sie die in der Bedienungsanleitung des
Entkalkers angegebene Menge Wasser ein
(max. 12 Tassen).
• Drücken Sie die Taste ON/AUTO/OFF
mal.
Der Brühvorgang startet, die rote Anzeigelampe
leuchtet.
y
• Warten Sie, bis das Wasser vollständig durchgelaufen ist.
• Lassen Sie nach dem Entkalken zwei mal 12 Tassen Wasser durchlaufen.
s
ein-
- 38 -

Aufbewahrung
• Wenn Sie die Kaffeemaschine für längere Zeit
nicht benutzen, ziehen Sie den Netzstecker aus
der Steckdose.
• Verstauen Sie das Kabel im Kabelschacht auf
der Rückseite der Kaffeemaschine.
Fehlerbehebung
Die Kaffeemaschine funktioniert nicht:
• Der Netzstecker steckt nicht in einer Netzsteckdose.
Verbinden Sie das Gerät mit dem Stromnetz.
Stecken Sie den Netzstecker in eine Netzsteckdose.
• Die Netzsteckdose ist defekt. Probieren Sie eine
andere Netzsteckdose.
• Die Kaffeemaschine ist vom vorherigen Brühvorgang noch zu heiß. Warten Sie, bis sich die Kaffeemaschine abgekühlt hat.
Das Wasser steht im Filter
über:
• Das Kaffeepulver ist zu fein gemahlen und verstopft den Filter
mahlenes Kaffeepulver.
Der Brühvorgang dauert ungewöhnlich lange.
Das Gerät schaltet sich während des Brühens
aus.
Das Gerät wird beim Brühen lauter.
Es entsteht übermäßiger Dampf.
• Das Brühsystem des Gerätes ist verkalkt. Entkalken
Sie das Gerät wie unter “Entkalkung” beschrieben.
. Verwenden Sie gröber ge-
q
und läuft dann
q
Entsorgung
Werfen Sie das Gerät keinesfalls in den
normalen Hausmüll. Dieses Produkt
unterliegt der europäischen Richtlinie
2002/96/EC.
Der Brühvorgang startet nicht zur gewünschten
Zeit:
• Der Timer ist nicht aktiviert. Drücken Sie zweimal
die Taste ON/AUTO/OFF
aktivieren.
• Die Uhrzeit ist nicht richtig eingestellt. Kontrollieren Sie die Uhrzeit und stellen Sie sie gegebenenfalls ein.
Der Kaffee ist zu stark/zu schwach:
• Es ist zu wenig/zu viel Wasser im Wassertank
. Füllen Sie die korrekte Wassermenge ein.
e
• Es ist zu viel/zu wenig Kaffeepulver eingefüllt.
Füllen Sie weniger/mehr Kaffeepulver ein.
• Das Kaffeepulver ist zu fein/zu grob gemahlen.
Wählen Sie einen anderen Mahlgrad für Ihr Kaffeepulver.
, um den Timer zu
s
Entsorgen Sie das Gerät über einen zugelassenen
Entsorgungsbetrieb oder über Ihre kommunale
Entsorgungseinrichtung.
Beachten Sie die aktuell geltenden Vorschriften.
Setzen Sie sich im Zweifelsfall mit Ihrer Entsorgungseinrichtung in Verbindung.
Führen Sie alle Verpackungsmaterialien
einer umweltgerechten Entsorgung zu.
- 39 -

Garantie und Service
Sie erhalten auf dieses Gerät 3 Jahre Garantie ab
Kaufdatum. Das Gerät wurde sorgfältig produziert
und vor Anlieferung gewissenhaft geprüft.
Bitte bewahren Sie den Kassenbon als Nachweis
für den Kauf auf. Bitte setzen Sie sich im Garantiefall mit Ihrer Servicestelle telefonisch in Verbindung.
Nur so kann eine kostenlose Einsendung Ihrer Ware
gewährleistet werden.
Die Garantieleistung gilt nur für Material- oder
Fabrikationsfehler, nicht aber für Transportschäden,
Verschleißteile oder für Beschädigungen an zerbrechlichen Teilen, z. B. Schalter oder Akkus. Das
Produkt ist lediglich für den privaten und nicht für
den gewerblichen Gebrauch bestimmt.
Bei missbräuchlicher und unsachgemäßer Behandlung, Gewaltanwendung und bei Eingriffen, die
nicht von unserer autorisierten Service-Niederlassung vorgenommen wurden, erlischt die Garantie.
Ihre gesetzlichen Rechte werden durch diese
Garantie nicht eingeschränkt.
Die Garantiezeit wird durch die Gewährleistung
nicht verlängert. Dies gilt auch für ersetzte und reparierte Teile. Eventuell schon beim Kauf vorhandene
Schäden und Mängel müssen sofort nach dem
Auspacken gemeldet werden, spätestens aber zwei
Tage nach Kaufdatum. Nach Ablauf der Garantiezeit anfallende Reparaturen sind kostenpflichtig.
Schraven
Service- und Dienstleistungs GmbH
Tel.: +49 (0) 180 5 008107
(0,14 EUR/Min. aus dem dt. Festnetz,
Mobilfunk max. 0,42 EUR/Min.)
Fax: +49 (0) 2832 3532
e-mail: support.de@kompernass.com
Kompernaß Service Österreich
Tel.: 0820 899 913 (
e-mail: support.at@kompernass.com
Kompernaß Service Switzerland
Tel.: 0848 000 525 (
e-mail: support.ch@kompernass.com
0,20 EUR/Min.)
max. 0,0807 CHF/Min.)
Importeur
KOMPERNASS GMBH
BURGSTRASSE 21
D-44867 BOCHUM, GERMANY
www.kompernass.com
- 40 -
 Loading...