

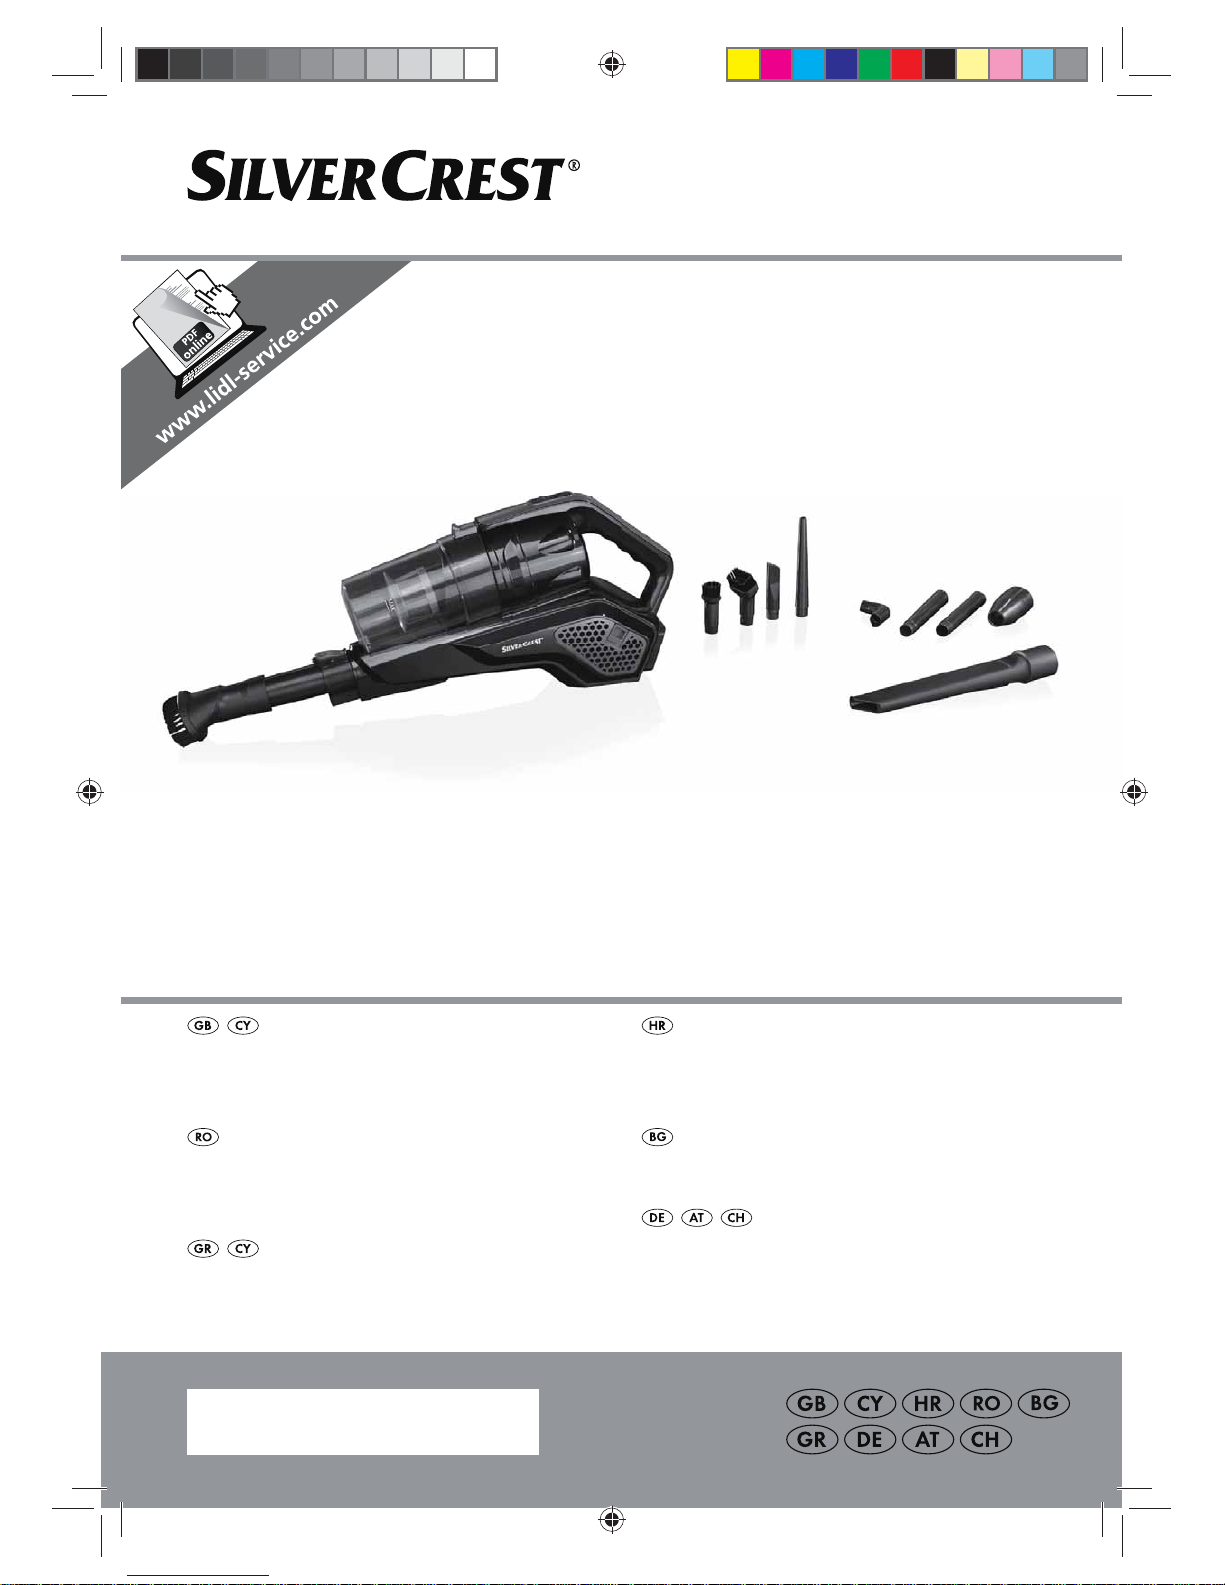
CORDLESS HAND-HELD AND
UPRIGHT VACUUM CLEANER
Operating instructions
ASPIRATOR MANUAL ȘI DE PODEA,
CU ACUMULATOR
Instrucţiuni de utilizare
ΣΚΟΥΠΑ ΜΠΑΤΑΡΙΑΣ ΚΑΙ
ΣΚΟΥΠΑΚΙ ΧΕΙΡΟΣ
Οδηγία χρήσης
AKUMULATORSKI RUČNI I PODNI
USISAVAČ
Upute za korištenje
ПРАХОСМУКАЧКА
Pъководство за обслужване
AKKU-HAND- UND
-BODENSTAUBSAUGER
Bedienungsanleitung
IAN 284657
CORDLESS HAND-HELD AND UPRIGHT VACUUM
CLEANER SHAZ 22.2 A1
Nas284657_Handstaubsauger_Zyklon_Akku_Cover_LB7.indd 2 15.12.16 14:04
English..................................................................................... 2
Hrvatski ................................................................................ 18
Românà................................................................................. 34
ǯȨșȑȎȞȟȘȖ ........................................................................... 50
ƧnjnjLjǎNJNjƽ ............................................................................... 70
Deutsch ................................................................................. 88
ID: SHAZ 22.2 A1_16_V1.6
__CPE284657_Staubsauger_B7.book Seite 1 Mittwoch, 14. Dez embe r 2016 10:31 10
25 26 2827
30
1
31
3
4
9
8
11
15
23
21
33 34
24
22
16
5
17
18
20
19
36 3735 38 39 40 41 42
29
10
13
14
32
2
6
7
12
Overview / Pregled / Privire de ansamblu /
ǽȞȓȑșȓȒ
/
ƧǑNJǔNjǝǑLjǔLj
/ Übersicht
__CPE284657_Staubsauger_B7.book Seite 2 Dienstag, 13. Dezember 2016 2:36 14
2
GB
Contents
1. Overview ........................................................................................ 3
2. Intended purpose ............................. .... ... ............................. ... ... ..... 4
3. Safety instructions ........................................................................... 5
4. Items supplied ................................................................................. 7
5. The base station .............................................................................. 7
5.1 Fastening the base station...................................................................... 7
5.2 Energy supply....................................................................................... 8
5.3 Storing after use ................................................................................... 8
6. Charging the battery ....................................................................... 8
7. Installation ...................................................................................... 9
7.1 Engaging and disengaging connections .................................................. 9
7.2 Prior to every use.................................................................................. 9
7.3 The suction pipe.................................................................................... 9
7.4 The floorhead..................................................................................... 10
7.5 Large nozzle ...................................................................................... 10
7.6 Large brush nozzle.............................................................................. 10
7.7 Small nozzles..................................................................................... 10
7.8 Extensions and angular nozzle ............................................................. 10
8. Vacuum cleaning ........................................................................... 11
8.1 Using the nozzles................................................................................ 11
9. Filter and dust container ................................................................ 11
9.1 Dust container .................................................................................... 11
9.2 Metal filter ........................................................................................ 12
9.3 Paper filter (HEPA) .............................................................................. 12
9.4 Motor protection filter.......................................................................... 12
9.5 Exhaust air filter.................................................................................. 12
10.Cleaning and care .......................................................................... 13
11.Storage ......................................................................................... 13
12.Disposal ........................................................................................ 14
13. Troubleshooting ............................................................................. 14
14.Technical specifications .................................................................. 15
15.Ordering accessories ............... ... ... ............................. ... .... ... ......... 15
16.Warranty of the HOYER Handel GmbH ........................................... 16
__CPE284657_Staubsauger_B7.book Seite 2 Dienstag, 13. Dezember 2016 2:36 14
3
GB
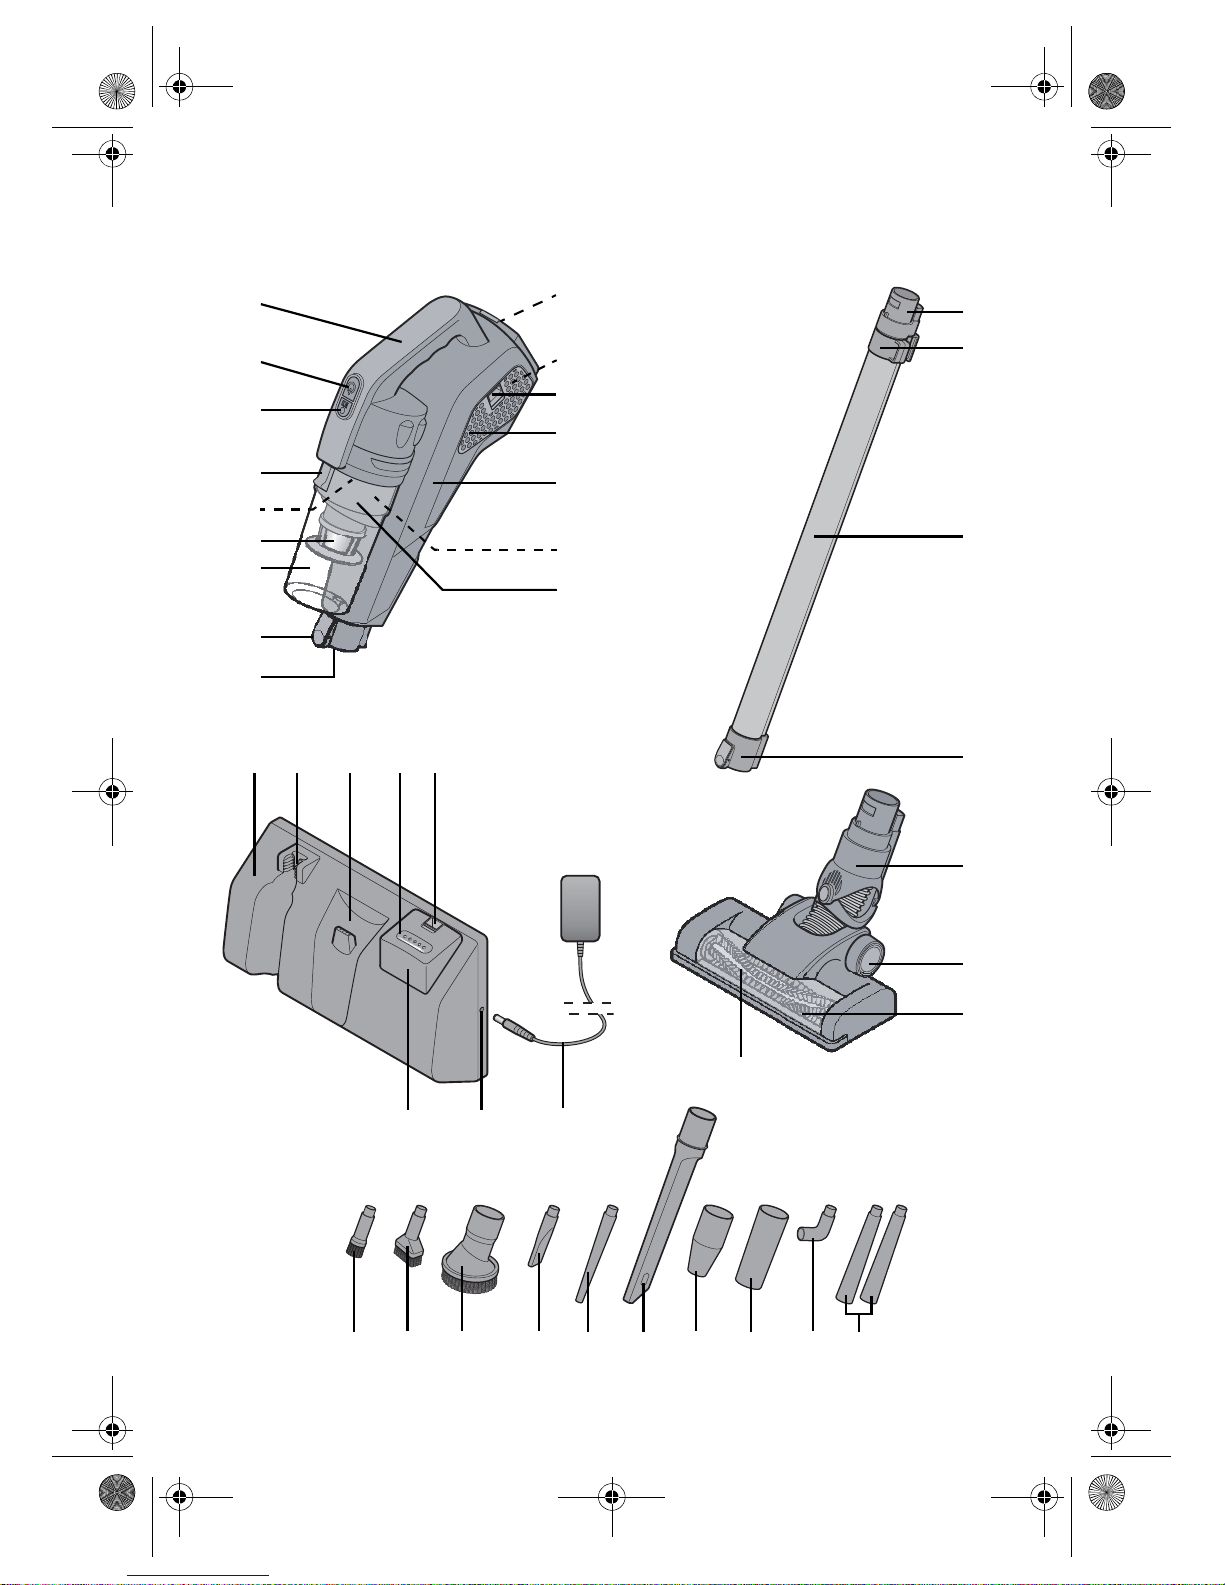
1. Overview
1 Battery compartment
2 Exhaust air filter (under the filter cover)
3 Unlocking mechanism for the filter cover
4 Filter cover
5 Suction de vi ce
6 Paper filter (HEPA) (inside the filter carrier)
7 Filter carrier (inside the dust container)
8 Opening at the suction device for the suction pipe, the floorhead,
the large nozzle and the adapter
9 Unlocking mech anism for the opening|8
10 Dust container
11 Metal filter
12 Motor protection filter (between dust container and suction device)
13 Unlocking mechan ism for the dust container
14 ECO ECO button (reduces the suction power)
15 On/off switch
16 Handle
17 Connection of the suction device
18 Holder to hang up in the base station
19 Suction pipe
20 Opening at the suction pipe for the floorhead, the large nozzle and
the adapter
21 Floorhead (with joint)
22 Rollers of the floorhead
23 Inspection window of the floorhead
24 Rotating brush
25 Base station (for wall mounting)
26 Holder for the suction pipe
27 Holder for the suction device
28 Charging indicator of the battery
29 Unlocking mechanism of the battery
30 Power adapter with power cable
31 Connection for power adapter
32 Battery
33 Small brush nozzle
34 Medium brush nozzle
35 Large brush nozzle (rotatable)
36 Small nozzle (short)
__CPE284657_Staubsauger_B7.book Seite 3 Dienstag, 13. Dezember 2016 2:36 14
4
GB
37 Small nozzle (long)
38 Large nozzle
39 Adapter for the small and medium brush nozzle and small nozzles
40 Adapter for the large brush nozzle
41 Elbow adapter for the small and medium brush nozzle and small nozzles
42 Extensions for the small and medium brush nozzle and small nozzles
not shown:
Fixing material (2 rawlplugs, 2 screws)
Drilling template
Thank you for your trust!
Congratulations on your new rechargeable
hand-held vacuum cleaner.
For a safe handling of the product and in or der to get to know the entire scope of features:
• Thoroughly read these user instructions prior to initial use.
• Above al l, obs erve the safety in structions!
• The device should only be used
as described in these user instructions.
• Keep these user instruction s for
reference.
• If you pass the device on to
someone else, p lease include this
copy of the user instructions.
We hope you enjoy your new battery-powered hand-held vacuum cleaner!
2. Intended purpose
The battery-powered hand-held vacuum
cleaner is suited to vacuum normal, dry
house dust and a little coarser dirt.
The device is designed for private home use
and must not be used for commercial purposes.
The device must only be used indoors.
Foreseeable misuse
VARIOUS DANGERS!
~ The following materials must not be
sucked in:
- Liquids and moist dirt
- Explosive or flammable materials
such as flour or coal dust
- Harmful substances such as asbestos
dust
- Ember, burning matches or other hot
materials
- P articularly fine dusts such as toner
for copying machines. The filte r inside
the device is not suited for such materials.
__CPE284657_Staubsauger_B7.book Seite 4 Dienstag, 13. Dezember 2016 2:36 14
5
GB
3. Safety instructions
Warnings
If necessary, the following warnings will be
used in these user instructions:
DANGER! High risk: failure to observe this warning may result in injury to life and limb.
WARNING! Moderate risk: failure to observe this warning may result in injury or serious material damage.
CAUTION: low risk: failure to observe this
warning may result in minor injury or material damage.
NOTE: circumstances and specifics that
must be observed when handling the device.
Instructions for safe operation
~ This device can be used by children from the age of 8 and peo-
ple with restricted physical, sensory or intellectual abilities or
people without adequate experience and/or understanding, if
they are supervised or instructed on how to use this devic e safely
and if they are aware of the resulting ha zards. Child ren must not
play with the device. Cleaning and maintenance by the user
must not be performed by children without supervision.
~
Children must not play with the device.
~ Prior to cleaning, the battery must be removed from the vacuum
cleaner.
~ The device must not be used after falling or when showing visible
damage, or if it is leaking.
~ If the power cable of this device should become damaged, it
must be replac ed by the manufactur er, the manufacturer's customer service department or a similarly qualified specialist, in order
to avoid any hazards.
DAN GER for children
~ Children must not play with packing ma-
terial. Do not allow children to play with
plastic bags. There is a risk of suffocation.
DANGER to and from pets
and livestock
~ Electrical devices can represent a haz-
ard to pets and livestock. In addition,
animals can also cause damage to the
device. For this reason you should keep
animals away from electrical devices at
all times.
DANGER! Risk of electric
shock due to moisture
~ Protect the device from moisture, water
drops and water splashes.
~ The device, the cable and the mains
plug must not be immersed in water or
any other liquids.
~ If liquid gets into the device, remove the
mains plug immediately. Have the device checked before reusing.
__CPE284657_Staubsauger_B7.book Seite 5 Dienstag, 13. Dezember 2016 2:36 14
6
GB
~ If the device (base station) has neverthe-
less fallen into water , pull out the power
adapter immediately, and only then
take the device out of the water. Do not
use the device again, and have it
checked by a specialist workshop.
~ Never touch the device with wet hands.
DANGER! Risk of elect ric
shock
~
Lay the power cable such that no one can
step on it, get caught on it, or trip ove r it.
~ Only connect the power adapter to a
prope rly installed and easily accessible
wall socket whose voltage corresponds
to the specifications on the rating plate.
The wall socket must continue to be easily accessible after the device is
plugged in.
~
Ensure that the power cable cannot be
damaged by sharp edges or hot points.
Do not wrap the power cable around the
device (Danger! Risk of cable damage!).
~ Ensure that the power cable cannot be
trapped or crushed.
~ To pull the power adapter out of the
wall socket, always pull on the power
adapter, and never on the power cable.
~ Disconnect the power adapter from the
wall socket…
… if there is a fault,
… as long as you do not charge the bat-
tery,
… prior to cleaning the base station,
and
… during thunderstorms.
~ If the power cable or the device (base
station) is damaged, immediately pull
the power adapter out of the wall socket.
DANGER - danger of
explosion
~ Never throw the battery into open fire.
WA RNING! Risk of material damage
~ Fasten the base station firmly to the
wall. Check whether the enclosed fixing
material is suitable. If necessary, use
other screws and rawlplugs. If in doubt,
have the assembly performed by an expert.
~ Before drilling, check that there are no
water pipes or power cables in the wall
at the relevant point.
~ Only use the rechargeable vacuum
cleaner with all filters installed. Vacuuming without the filters installed destroys
the motor.
~ Never come close to hair or loose cloth-
ing with the rotating brush.
~ Use the original accessories only.
~ Do not use any astringent or abrasive
cleaning agents.
NOTES on the battery
• Only use the original battery charger
(base station) to load the batteries.
• The battery becomes warm during the
charging process. This is normal.
__CPE284657_Staubsauger_B7.book Seite 6 Dienstag, 13. Dezember 2016 2:36 14
7
GB
4. Items supplied
1 suction device|5 with dust container|10
1 base station|25
1 power adapter|30
1 battery|32
1 suction pipe|19|
1 floorhead|21
1 small brush nozzle|33
1 medium brush nozzle|34
1 large brush nozzle (rotatable)|35
1 small nozzle (short)|36
1 small nozzle (long)|37
1 large nozzle|38
1 adapter|39 for the small and medium
brush nozzle and small nozzles|
1 adapter|40 for the large brush nozzle|
1 elbow adapter|41 for the small and me-
dium brush nozzle and small nozzles
2 extensions|42 for the small and medium
brush nozzle and small nozzles
1 drilling template
1 set of fixing material (2 rawlplugs,
2|screws)
1 copy of the user instructions
5. The base station
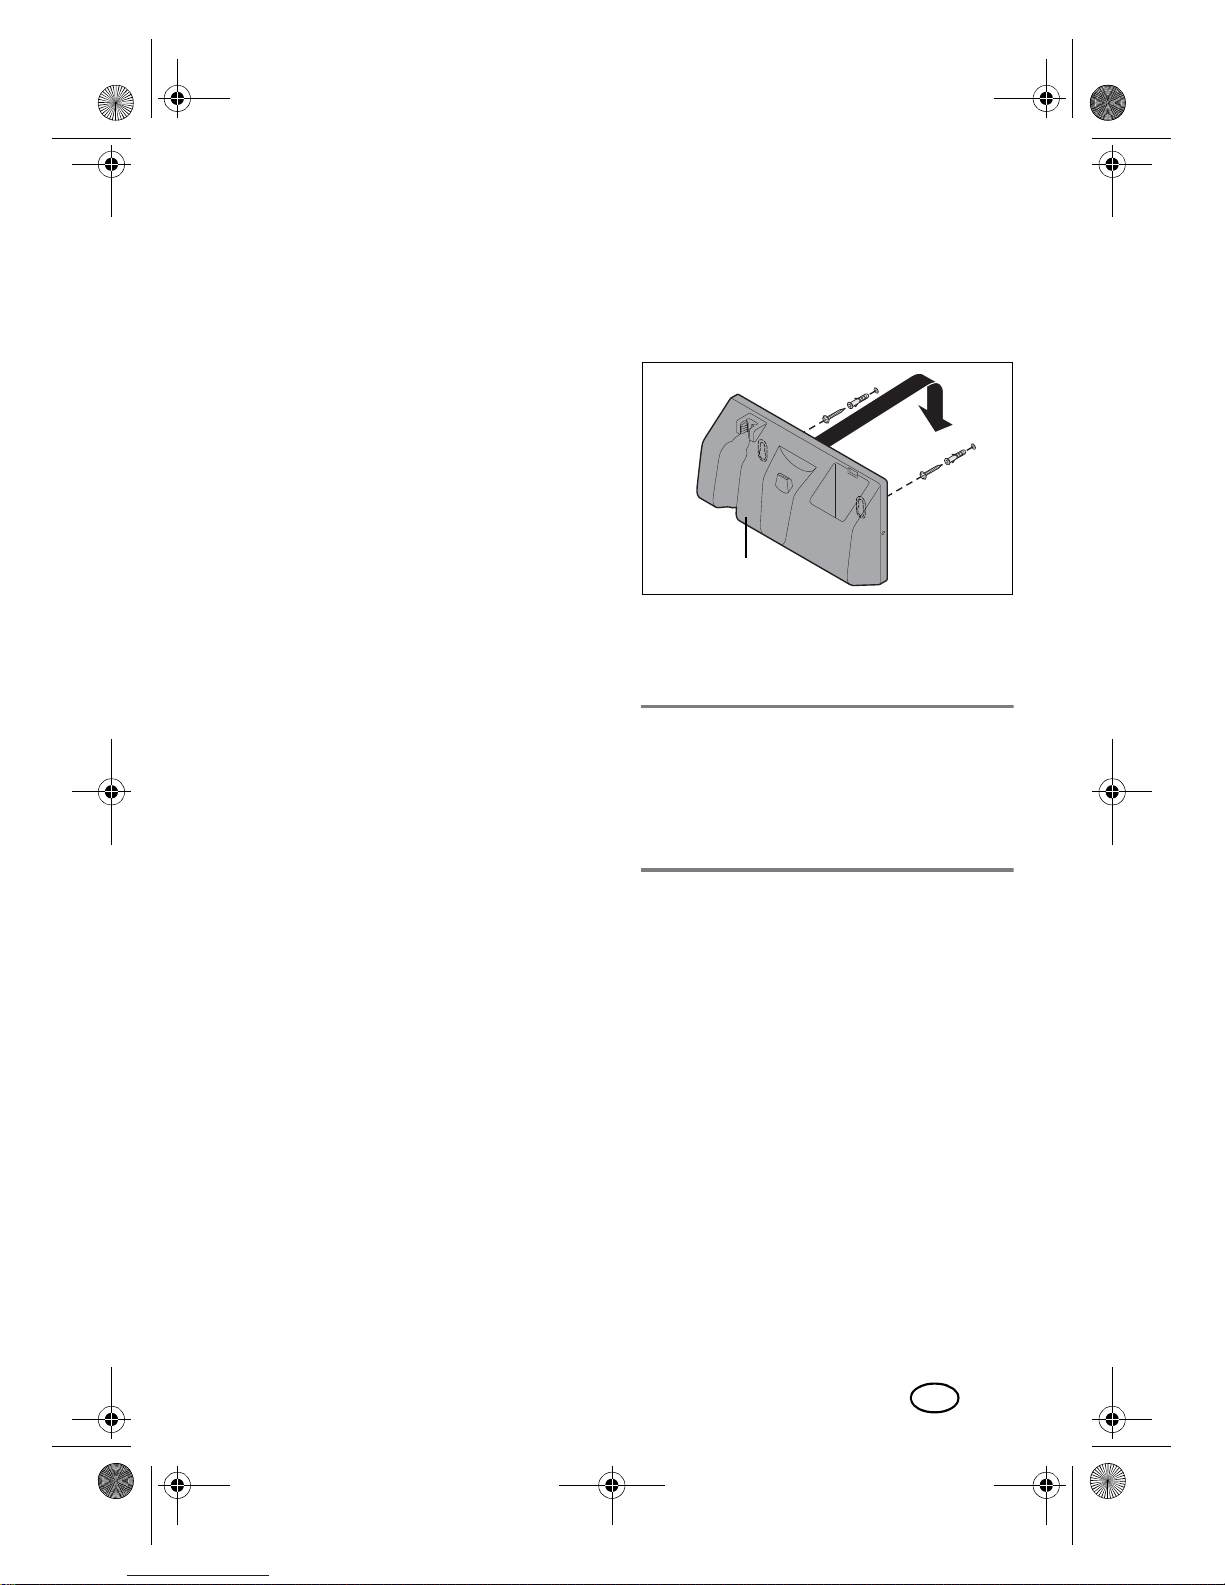
5.1 Fastening the base station
Fasten the base station|25 to the wall using
the drilling template and the fixing material
included in the delivery.
NOTE:
• Before fastening, check that the fixing
material included in the delivery meets
your requirements (e.g. wall structure).
If not, replace it with suitable fixing material.
1. Look f or a pla ce on the w all for the ba se
station|25. Make sure that there is a
wall socket nearby.
2. Using the drilling template, draw the
marking for the drill holes on the wall.
3. Drill holes with a diameter of 6 mm us-
ing a drill.
4. Insert the rawlplugs into the drill holes.
5. Tighten the screws in the rawlplugs.
6. Hang the base station|25 up on the
wall and check for a secure hold.
|25
__CPE284657_Staubsauger_B7.book Seite 7 Dienstag, 13. Dezember 2016 2:36 14
8
GB
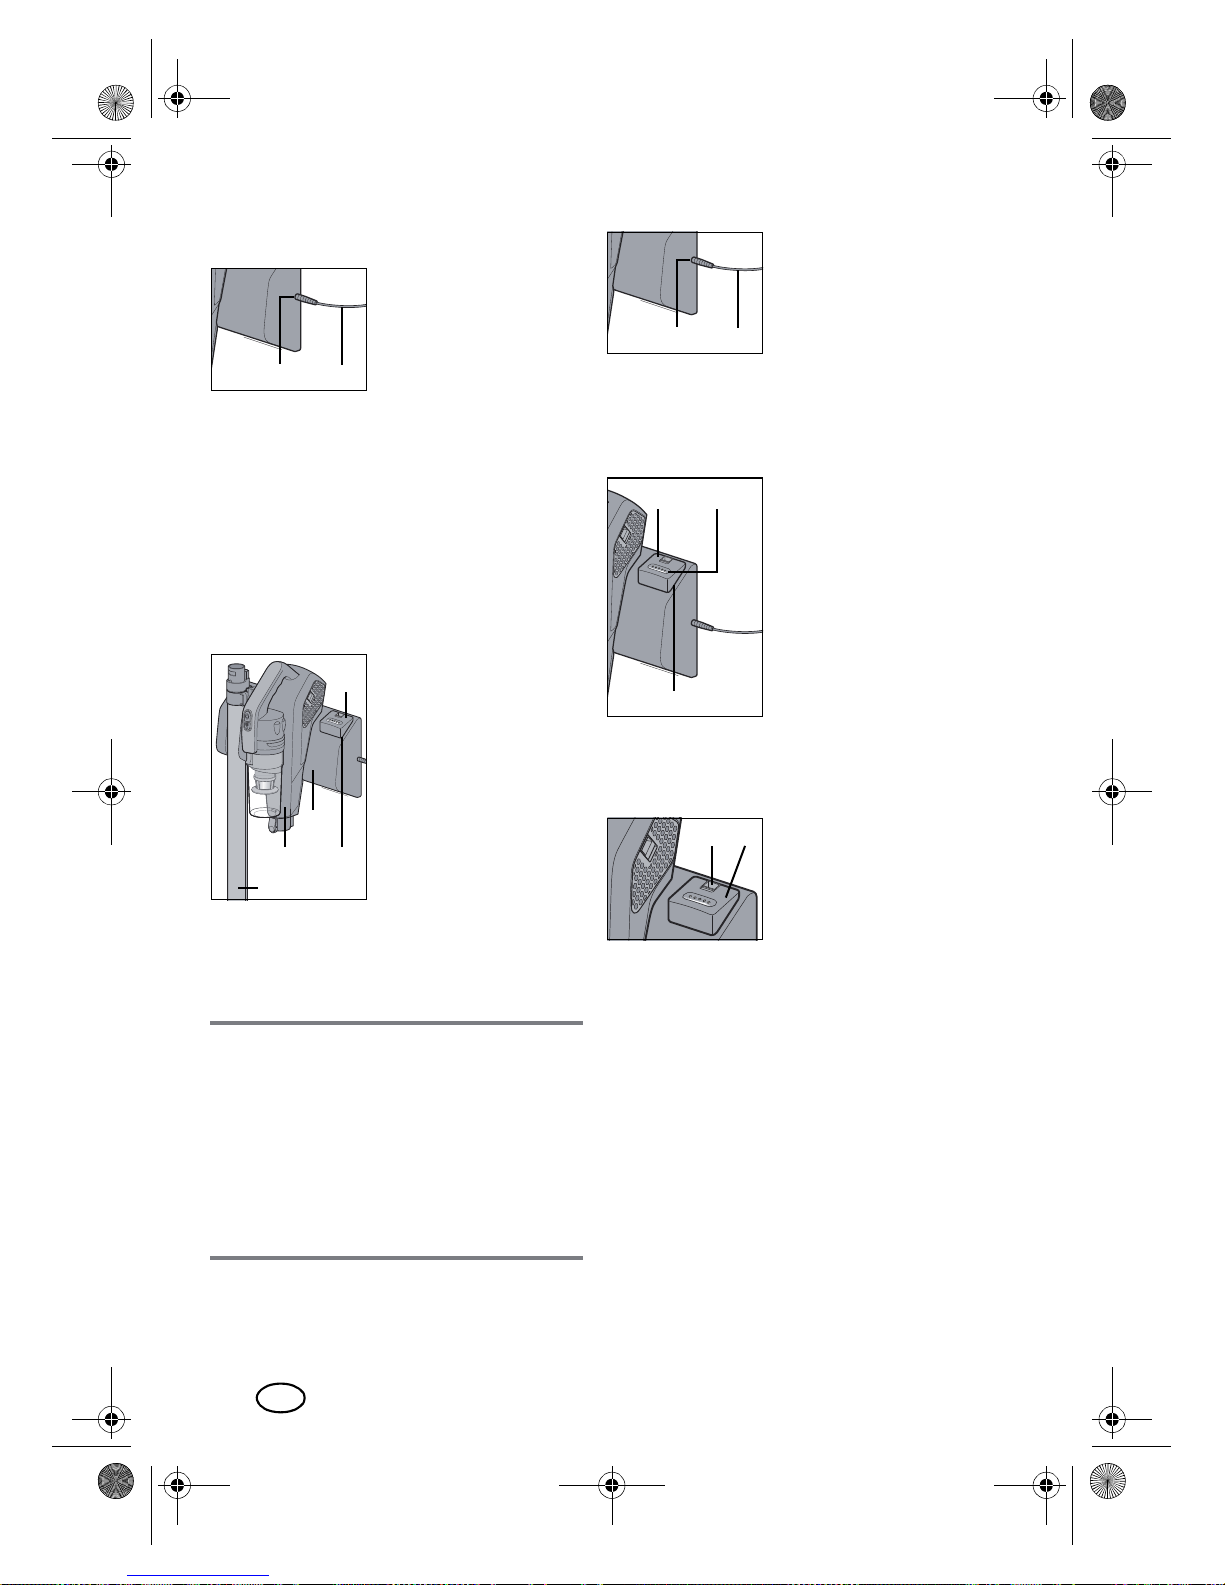
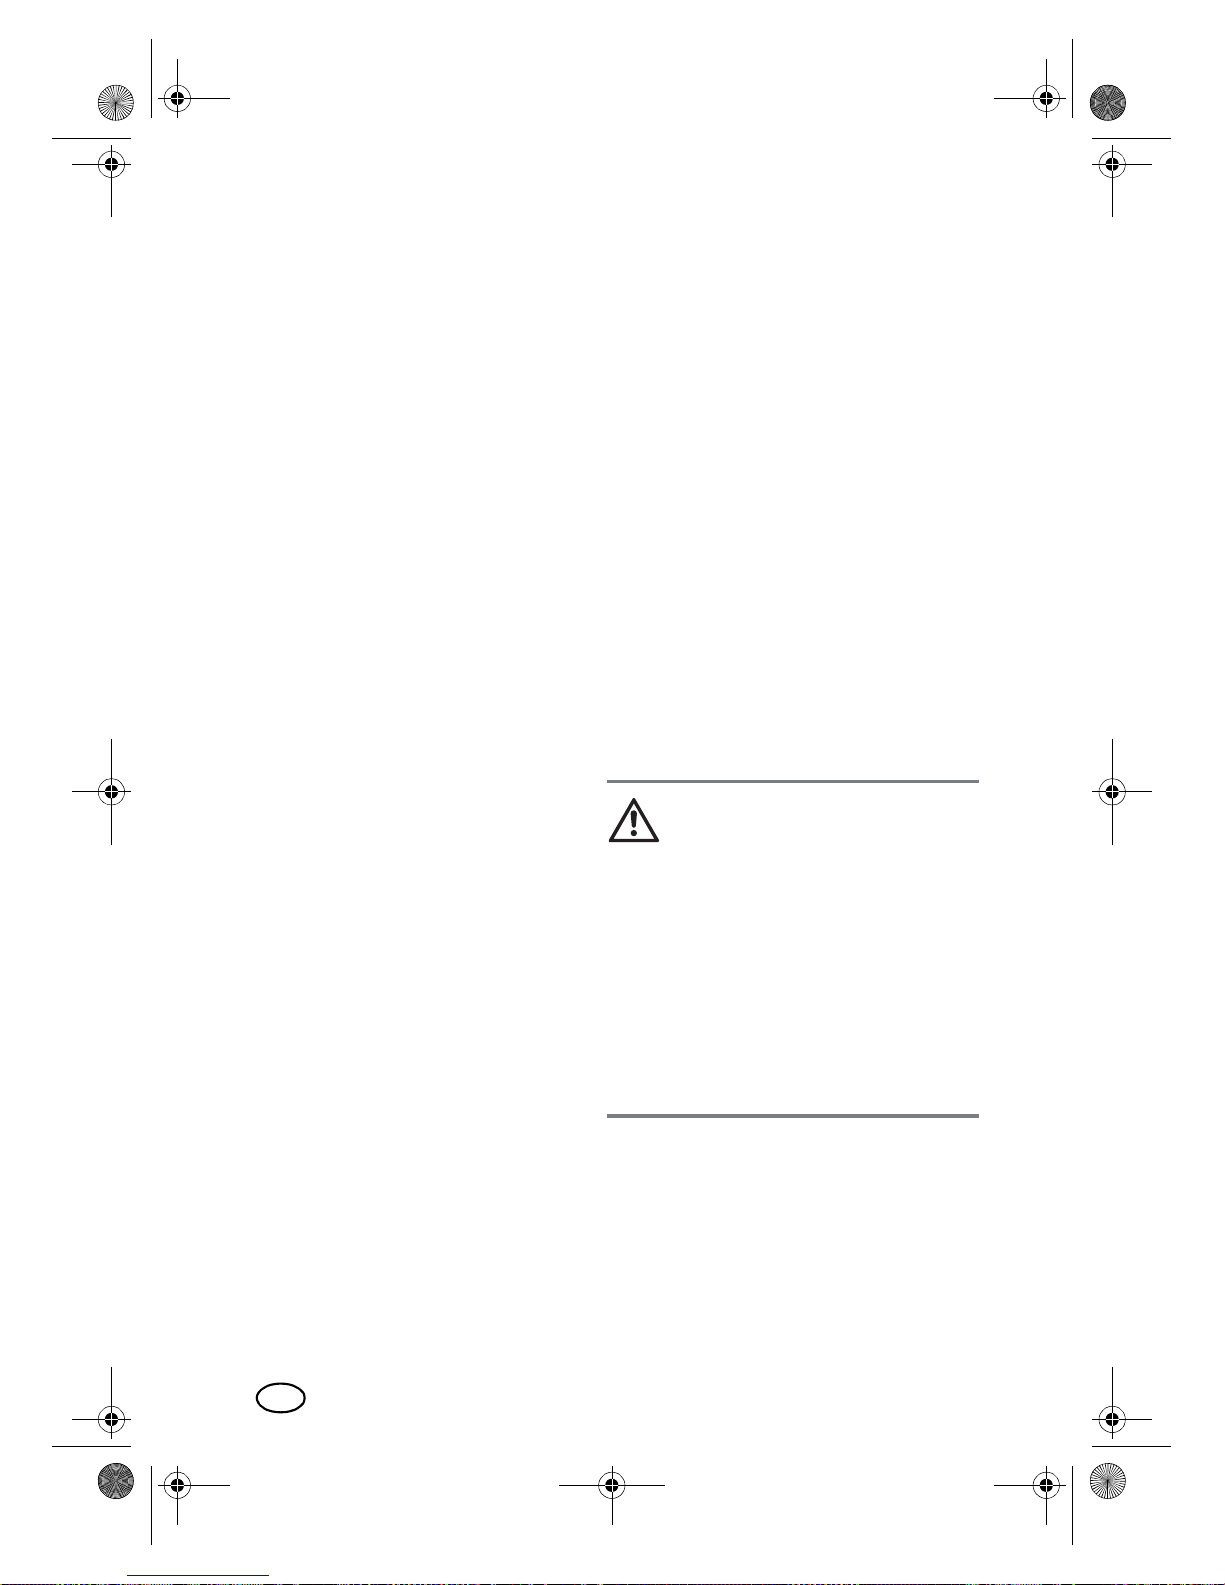
5.2 Energy supply
•Plug the power
adapter|30 into a
suitable wall socket
and connect the power cable with the connection for the power adapter|31.
The wall socket must continue to be easily
accessible after the device is plugged in.
5.3 Storing after use
The base station|25 is used as a holder for
the suction device|5 and the suction
pipe|19|and it serves as a battery charger
for the battery|32.
• After every use, hang
the suction device|5
and the suction
pipe|19 up in the
base station|25.
• Insert the battery|32
into the battery compartment|1. The battery can be charged
only here.
6. Charging the battery
NOTES:
• Fully charge the battery before using it
for the first time. This takes approx.
5hours.
• After use, insert the battery into the battery compartment of the base station.
This ensures that the sucti on device will
always work at full power. The battery
is not damaged by regular charging.
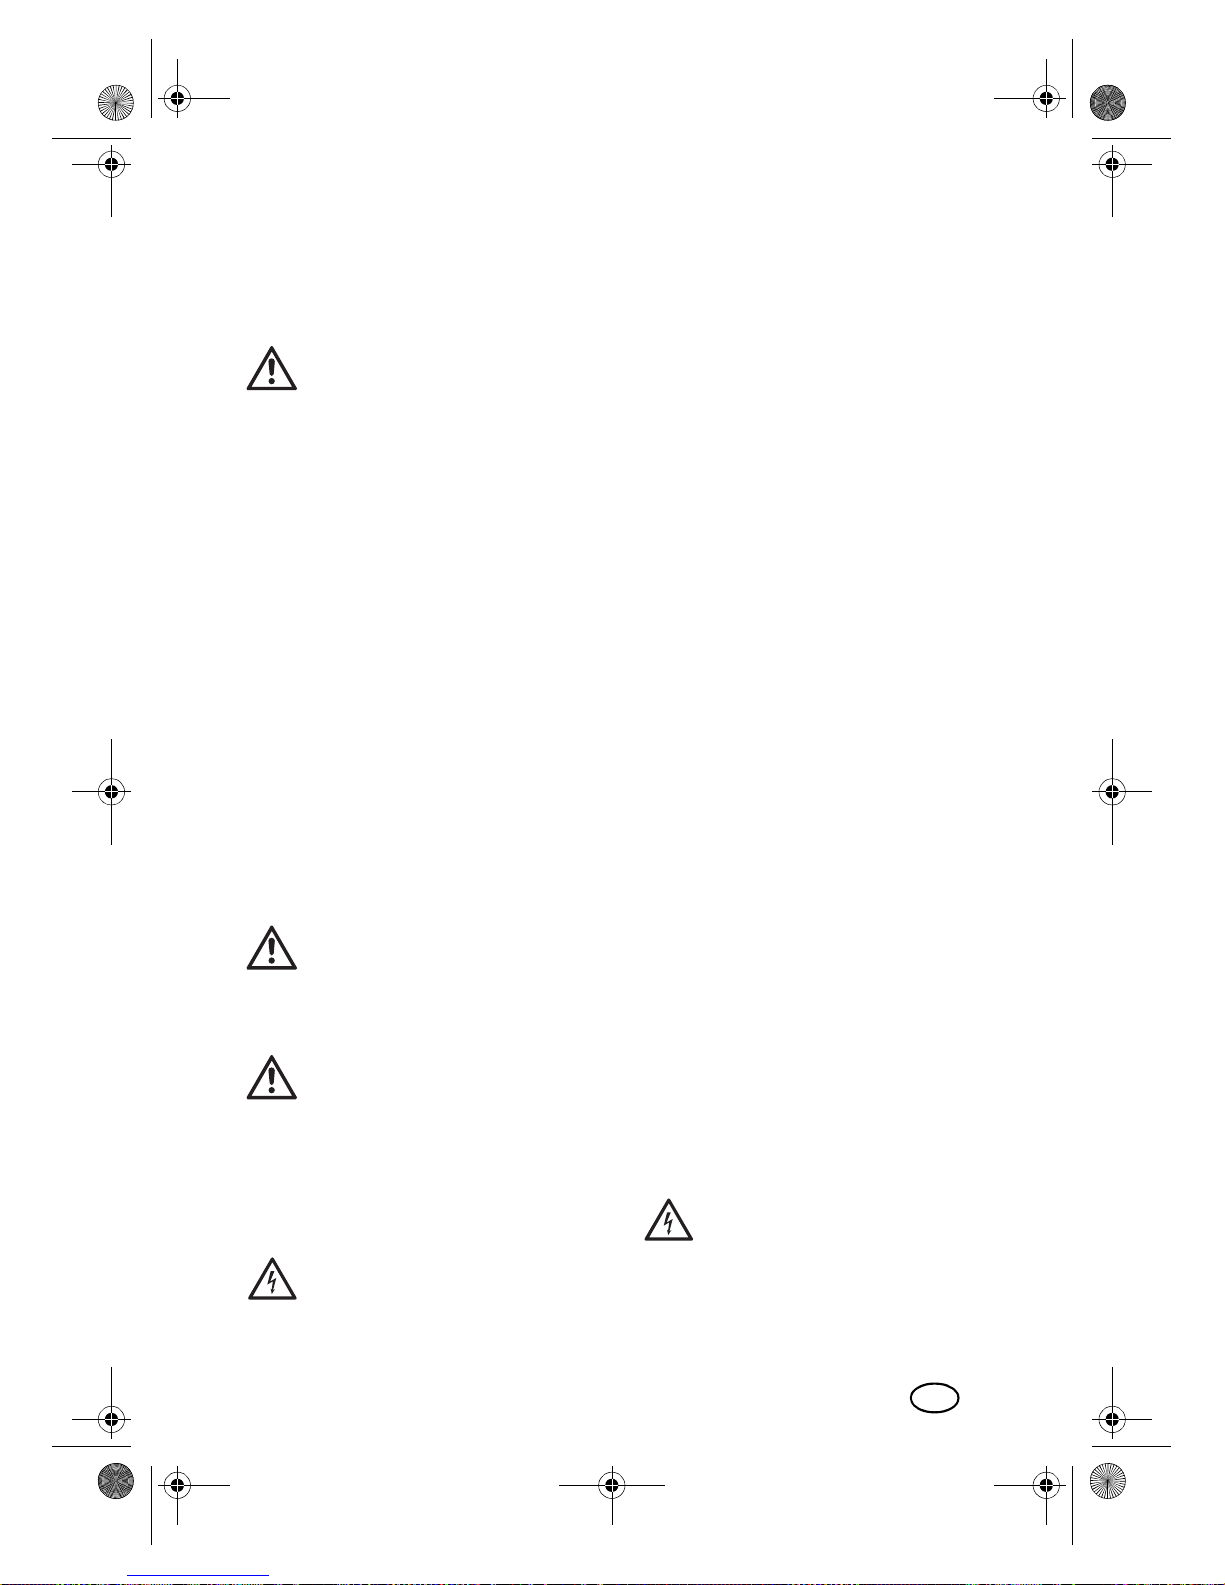
1. Plug the power
adapter|30 into a
suitable wall socket
and connect the
power cable with
the connection for
the power adapter|31.
The wall socket must continue to be easily
accessible after the device is plugged in.
2. Insert the battery|32 into the battery compartment|1
until the LEDs of the
charging indicator|28 are lit or start
flashing. Once all
LEDs are lit, the battery is completely
charged. With a full
charge, you can use
the vacuum cleaner
for approx.
20 minutes.
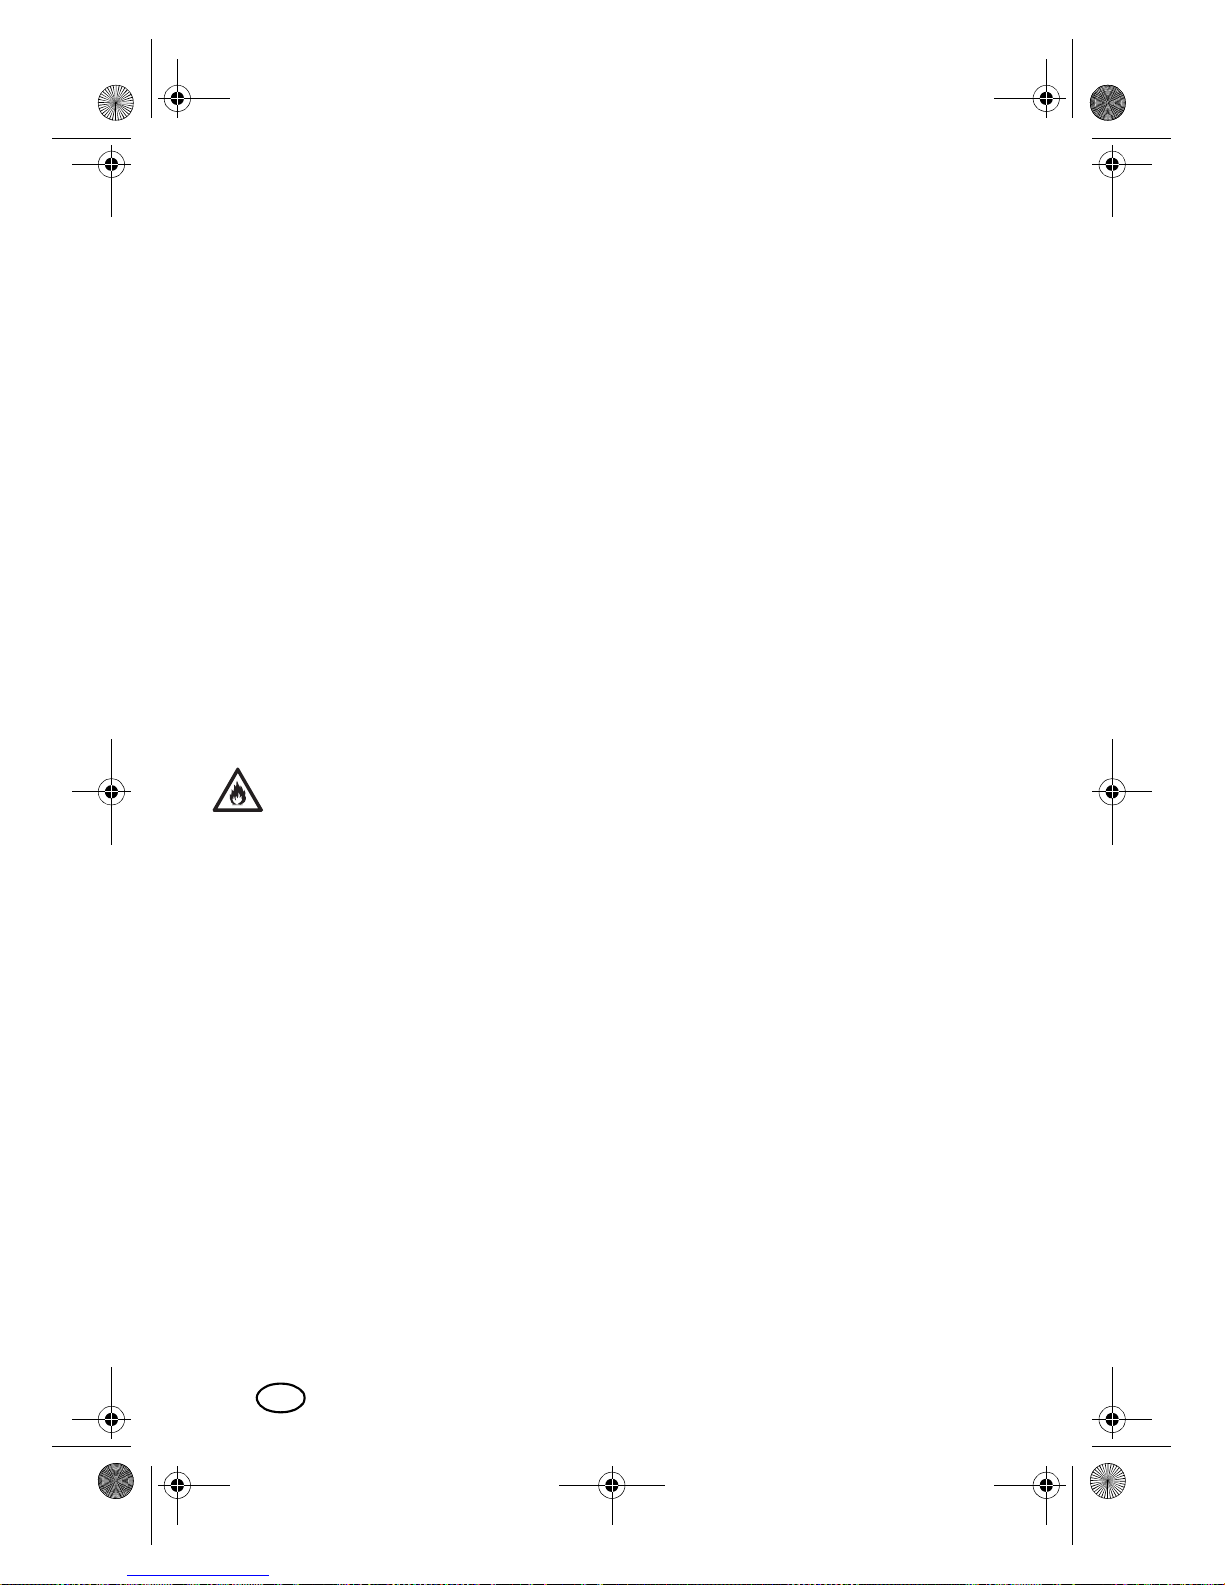
3. To remove the battery|32, press the
unlocking mechanism|29 in the direction of the LEDs
and remove the battery.
LED signals on the base station
- Lit LEDs show the current char ging state.
- Flashing LEDs show the consumed portion. When all LEDs are flashing, you
should charge the battery. With an insufficient charge, the device will stop
working.
LED signals during operation
- Lit LEDs show the current char ging state.
- Unlit LEDs show the consumed portion.
- Only the LED above Empty is flashing:
battery weak; the device will turn off
soon.
|30|31
|32
|19
|5 |1
|25
|30|31
|32 |28
|1
|29
|32
__CPE284657_Staubsauger_B7.book Seite 8 Dienstag, 13. Dezember 2016 2:36 14

9
GB
7. Installation
With its extensive accessories, there are numerous options enabling you to react perfectly to almost any conceivable requirement
on a vacuum cleaner. In this section, we describe the assembly for the most frequent applications.
CAUTION:
~ During all assembly steps, the vacuum
cleaner must be switched off.
7.1 Engaging and disengaging connections
There are two ways to mount and dismantle
parts.
The suction pipe|19, the floorhead|21, the
dust container|10, the filter covers|4 and
the battery|32 are inserted until they engage audibly. Press the respective release
button to disengage the connections.
All other parts are pushed on and pulled off.
If necessary , slightly rotate the parts in opposite directions.
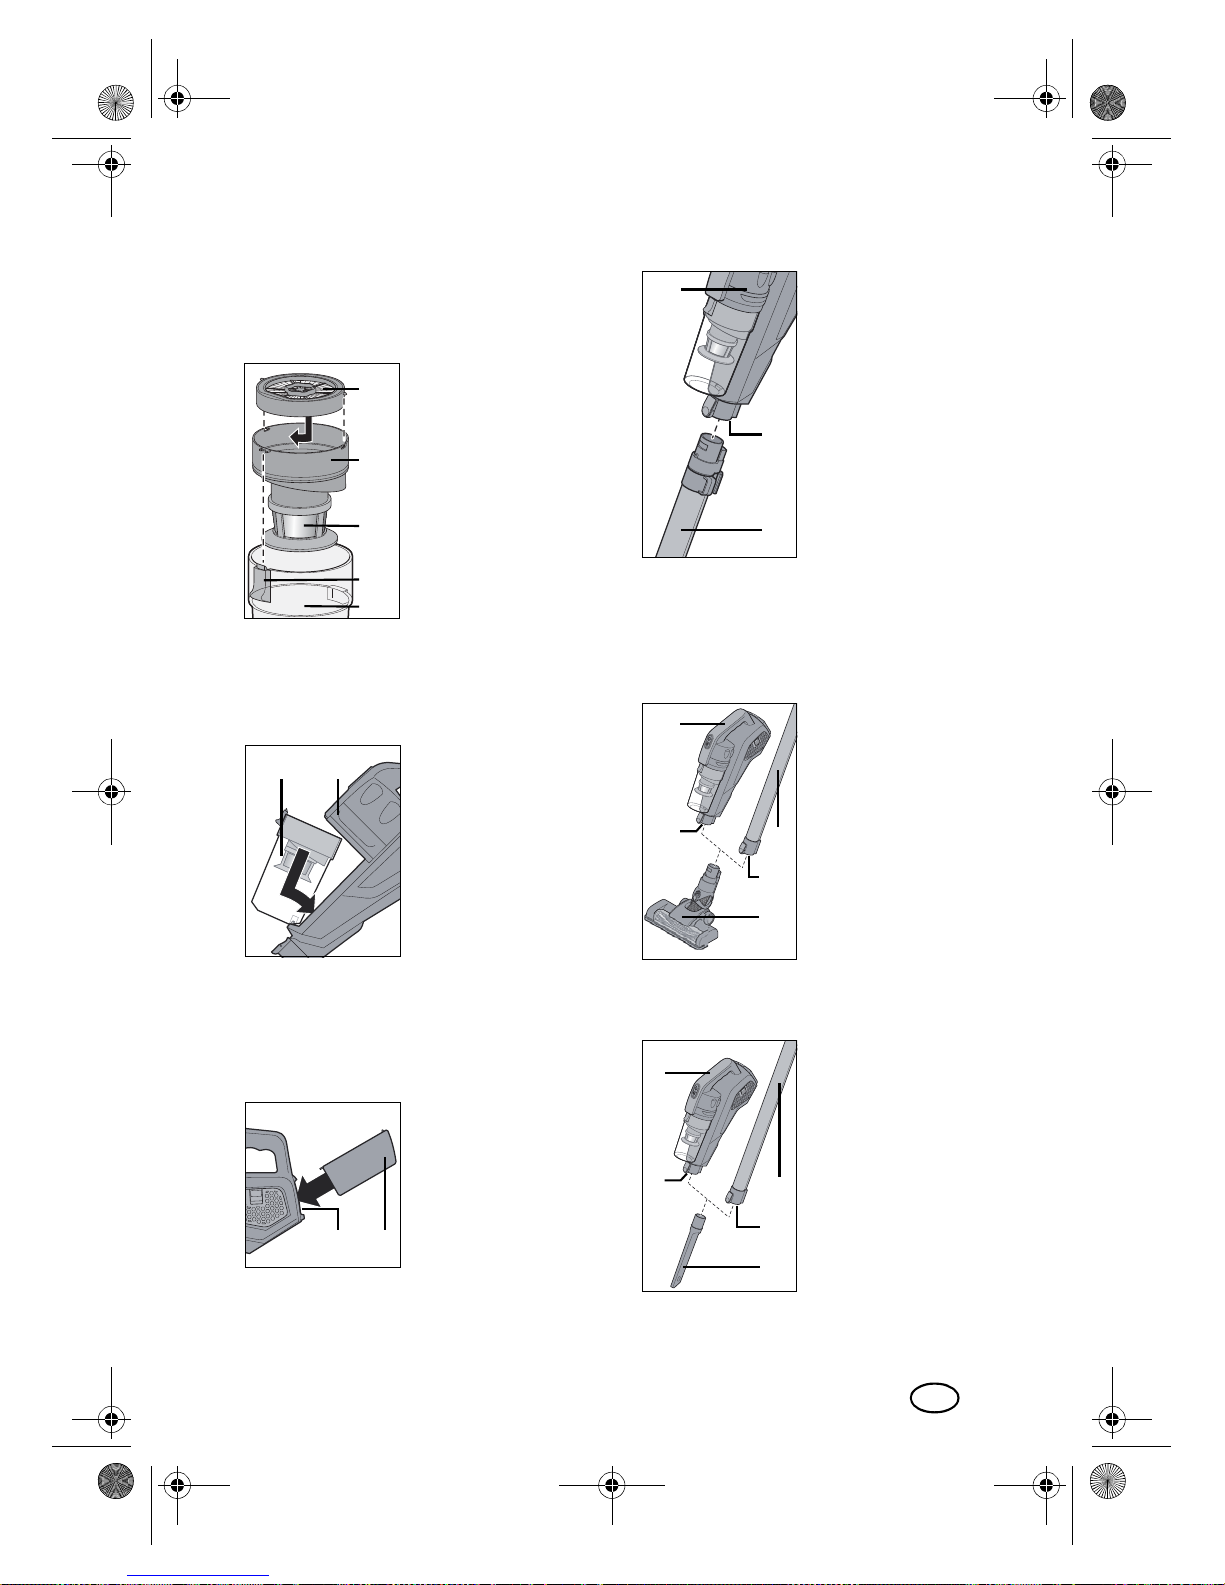
7.2 Prior to every use
Prior to every use, the following parts must
be assembled:
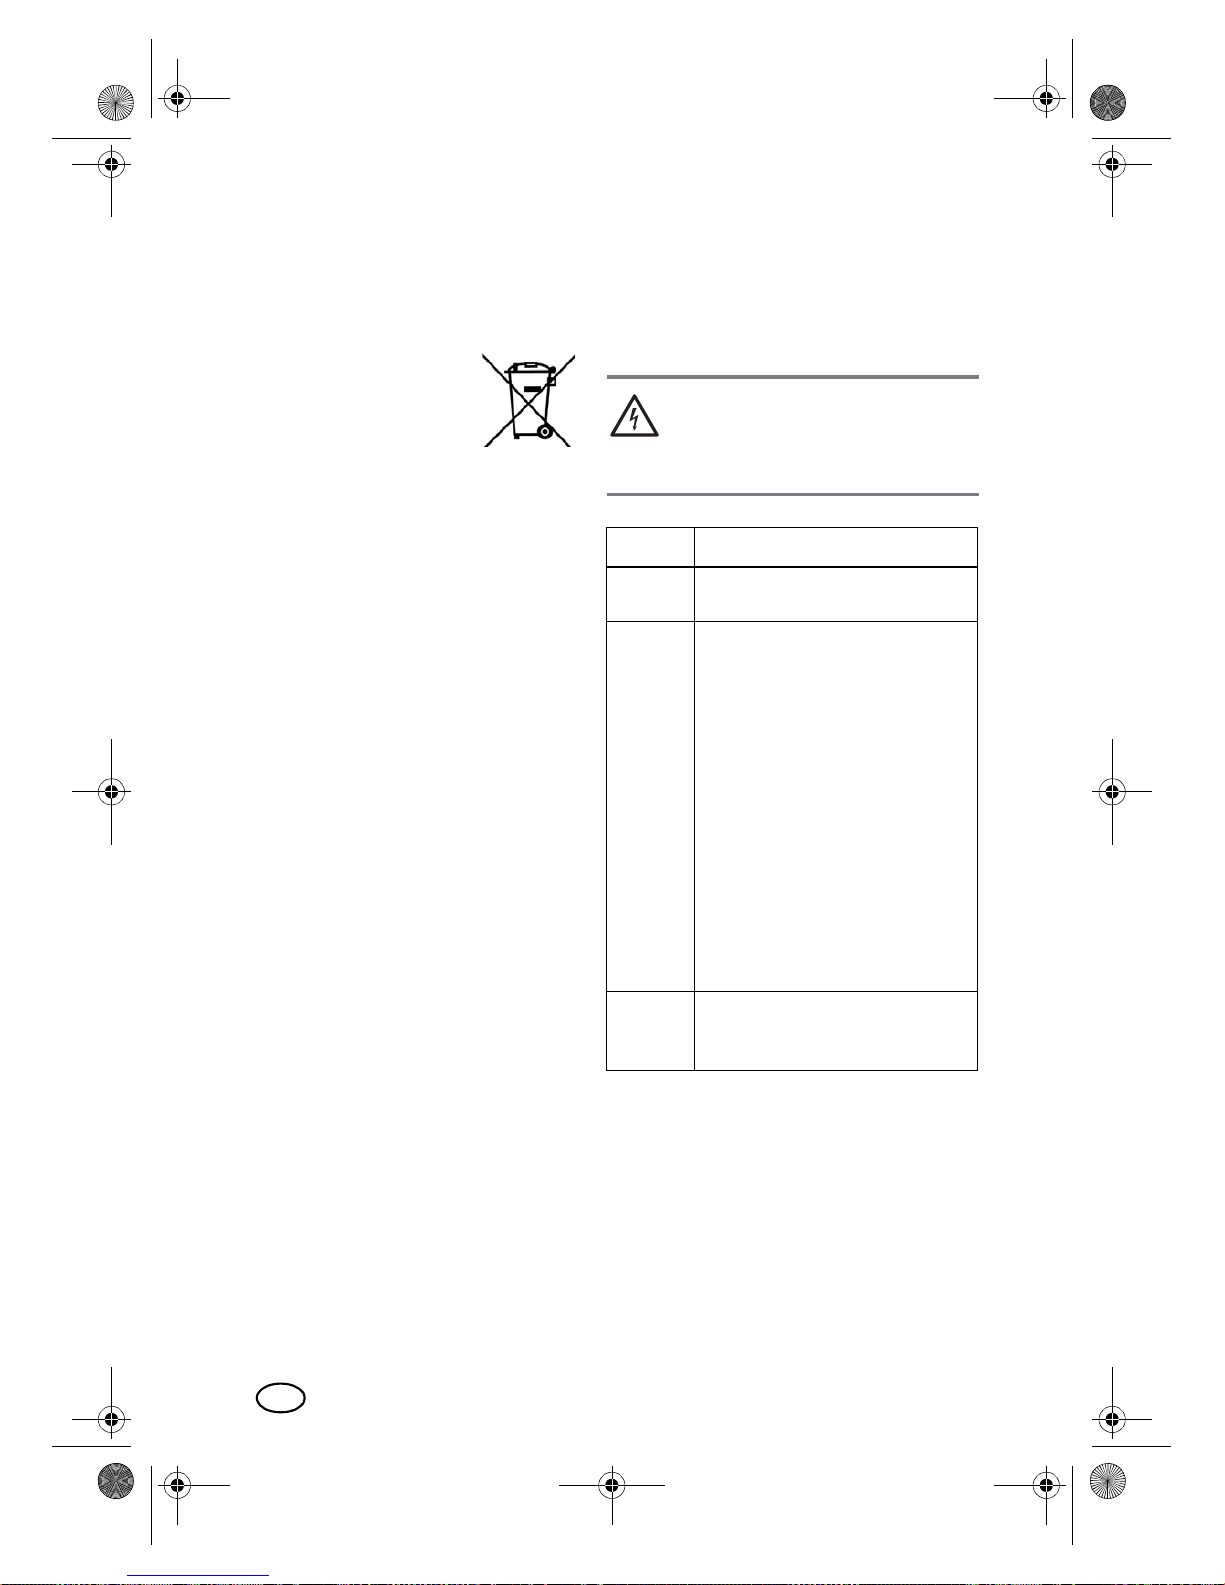
Filter unit
The filter unit consists of:
the filter carrier|7, the
metal filter|11 and the
paper filter|6.
•Always insert the
complete filter unit
into the dust container|10.
• Both small guide pins of the filter carrier|must fit accurately into the small
openings underneath the unlocking
mechanism|13 of the dust container.
Dust container
Only use the dust container|10 with the complete filter unit.
• Place the dust container|10 on the suction device|5.
• Hook the bottom end
on and then push
down the upper end
until it engages audibly.
Battery
The vacuum cleaner
cannot be operated
without the charged battery mounted.
• Insert the battery|32
into the battery compartment|1 until it engages audibly.
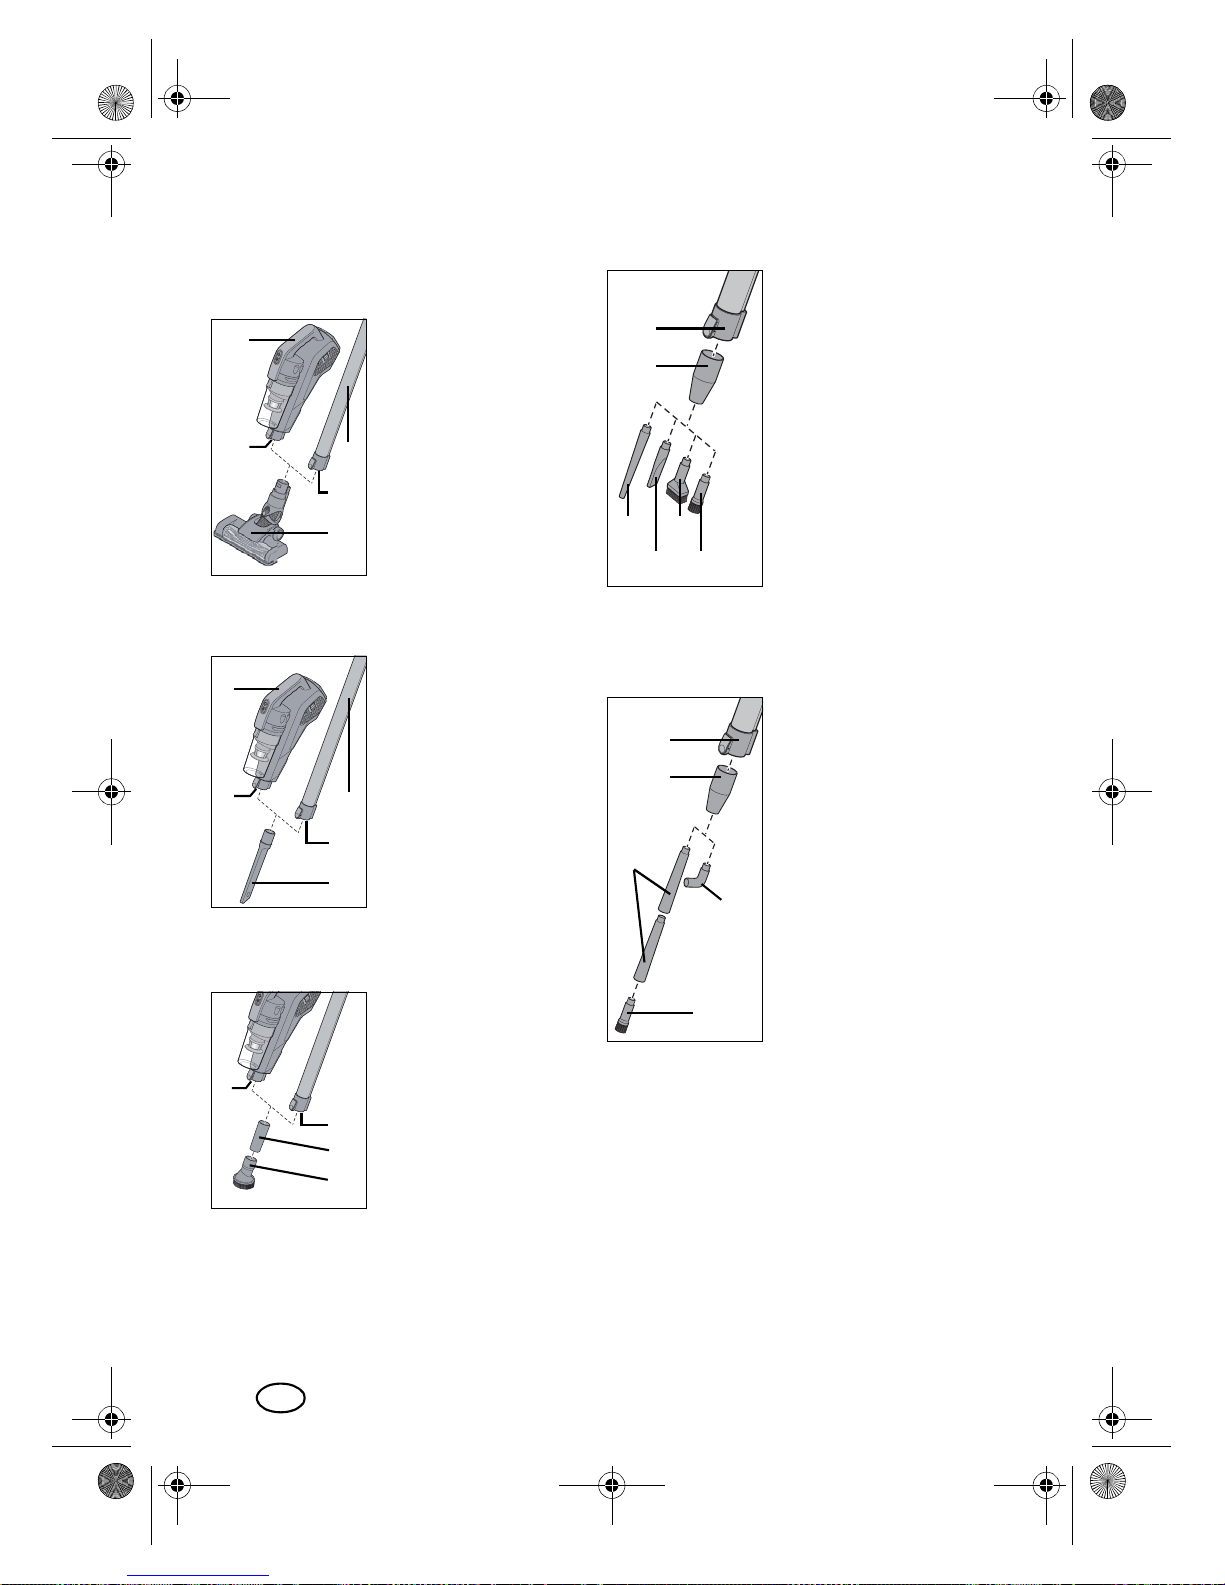
7.3 The suction pipe
The suction pipe|19 is
used as an extension.
All parts to be connected to the clear end of
the suction pipe can
also be plugged directly
into the opening|8 at
the suction device|5.
• Insert the suction
pipe|19 into the
opening|8 until it engages.
|6
|11
|13
|10
|7
|10 |5
|1 |32
|5
|19
|8
__CPE284657_Staubsauger_B7.book Seite 9 Dienstag, 13. Dezember 2016 2:36 14
10
GB
7.4 The floorhead
In many cases, you will work with the floorhead.
You can attach the floorhead|21 directly to the
suction device|5 or the
suction pipe|19.
• Insert the floorhead|21 into the
opening|8 of the suction device|5 or into
the opening|20 of
the suction pipe|19.
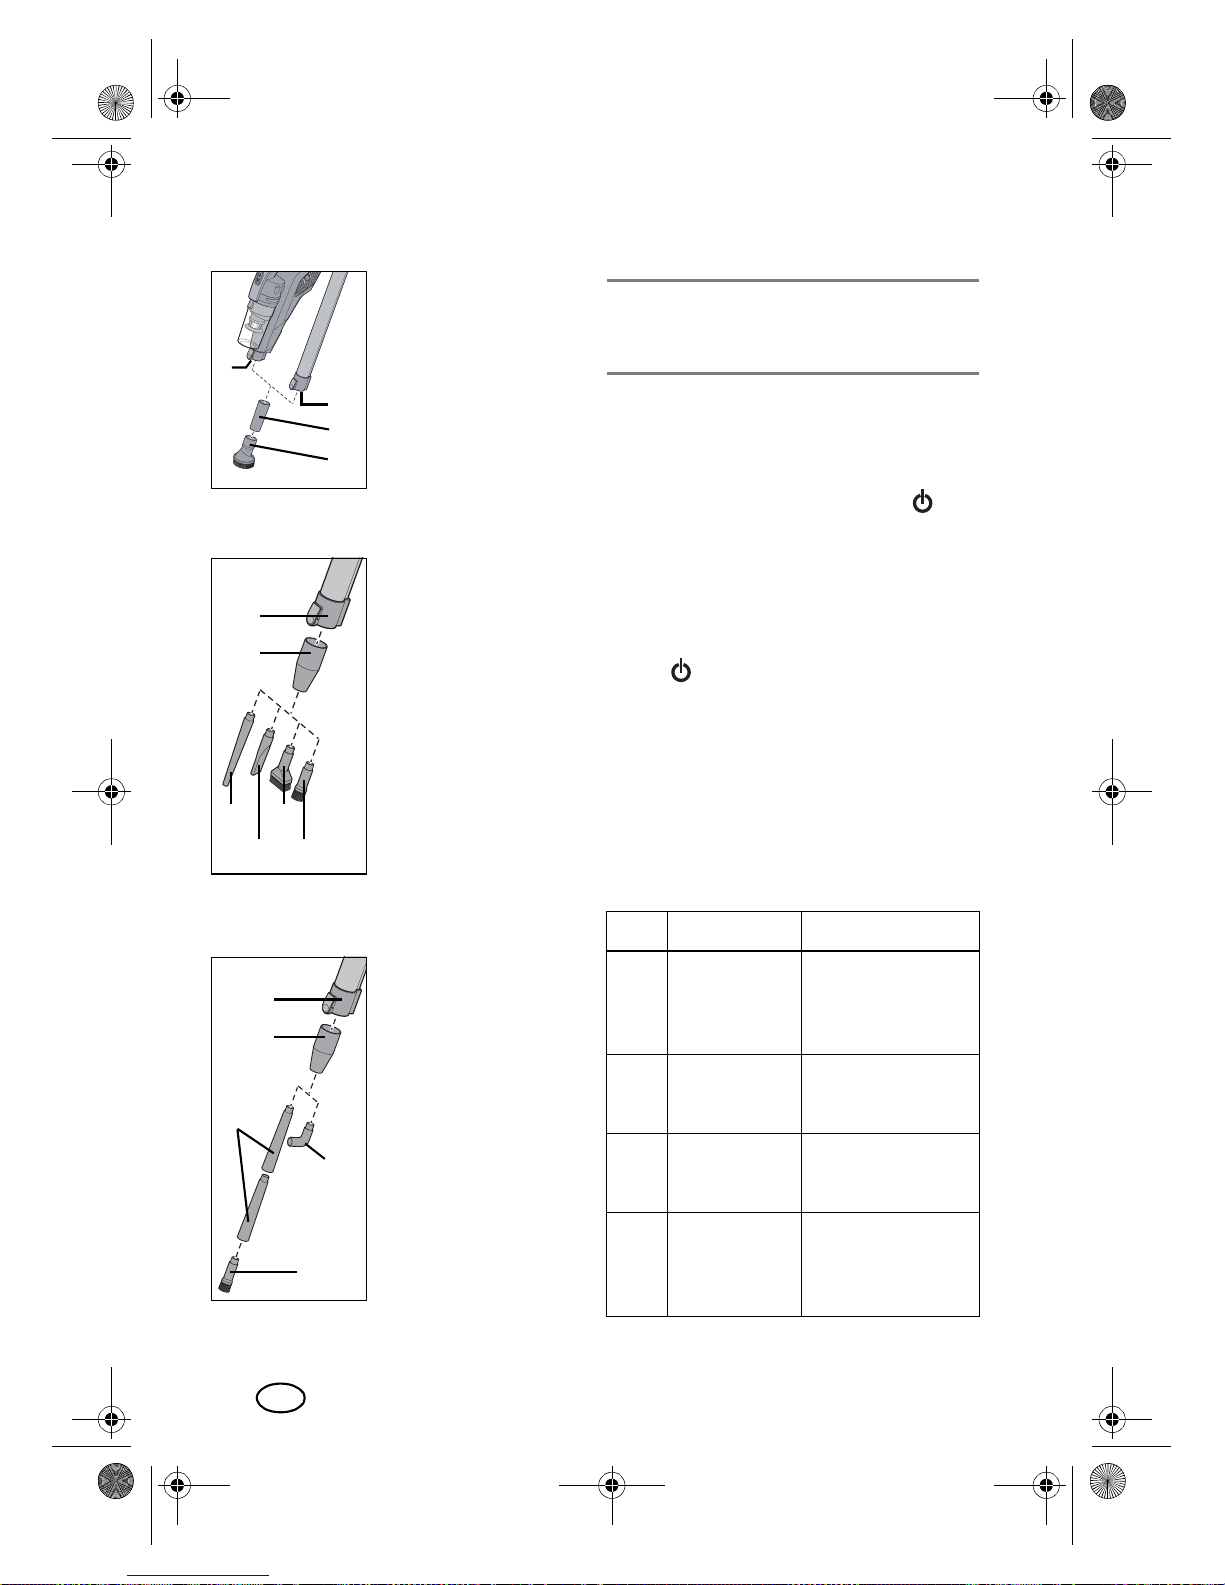
7.5 Large nozzle
The large nozzle|38
can be inserted directly
into the suction device|5
or into the suction
pipe|19.
• Insert the large nozzle|38 into opening|8 or|20.
7.6 Large brush no zzle
The large brush nozzle|35 is always used
with the adapter|40.
• Insert the adapter|40 into opening|8 or|20.
• Plug the large brush
nozzle|35 onto the
adapter|40.
7.7 Small nozzles
The small nozzles|36
and|37, the small brush
nozzle|33 and the medium brush nozzle|34
are always used with
the adapter|39.
• Insert the adapter|39 into opening|8 or|20.
• Plug the required nozzle onto the adapter|39.
7.8 Extensio ns and angular
nozzle
For especially inaccessible
positions, yo u can in sert
the following adapters between the s mall noz zles|
33,|34,|36 or|37
and the adapter|39:
- the extensions|
42
- the elbow adapter|41.
These adapters can be
combined as needed.
|5
|19
|21
|20
|8
|5
|19
|38
|20
|8
|40
|20
8
|35
37 |34
|36
|20
|39
|33
|42
|41
|33
|20
|39
__CPE284657_Staubsauger_B7.book Seite 10 Dienstag, 13. Dezember 2016 2:36 14
11
GB
8. Vacuum cleaning
CAUTION:
~ Vacuum cleaning always requires all fil-
ters and the dust container|10 to be
mounted.
1. Mount the accessories needed.
2. Insert the battery|32 into the battery
compartment|1.
3. Press the on/off switch |15
to switch
the device on.
- I f you woul d like to redu ce the suction
power, press the ECO button|14
once. The button is lit green. To switch
off the function, press the button
again.
4. T o switch off the dev ice, push the on/off
switch |15 again.
5. Empty the dust container|10 and hang
up the parts in the base station|25.
8.1 Using the nozzl e s
In the following table, you will find an overview of the cleaning tasks for which the various nozzles are particularly suitable.
9. Filter and dust
container
CAUTION:
~
Vacuum cleaning always requires all filters
and the dust container|10 to be mounted.
Every operation requires the dust container|10 and all filters to be inserted:
- the metal filter|11 inside the dust con-
tainer|10,
- the paper filter|6 inside the dust con-
tainer|10,
- the motor protection filter|12 between
the dust container|10 and the suction
device|5 and
- both exhaust air filters|2 on the si des of
the suction device|5.
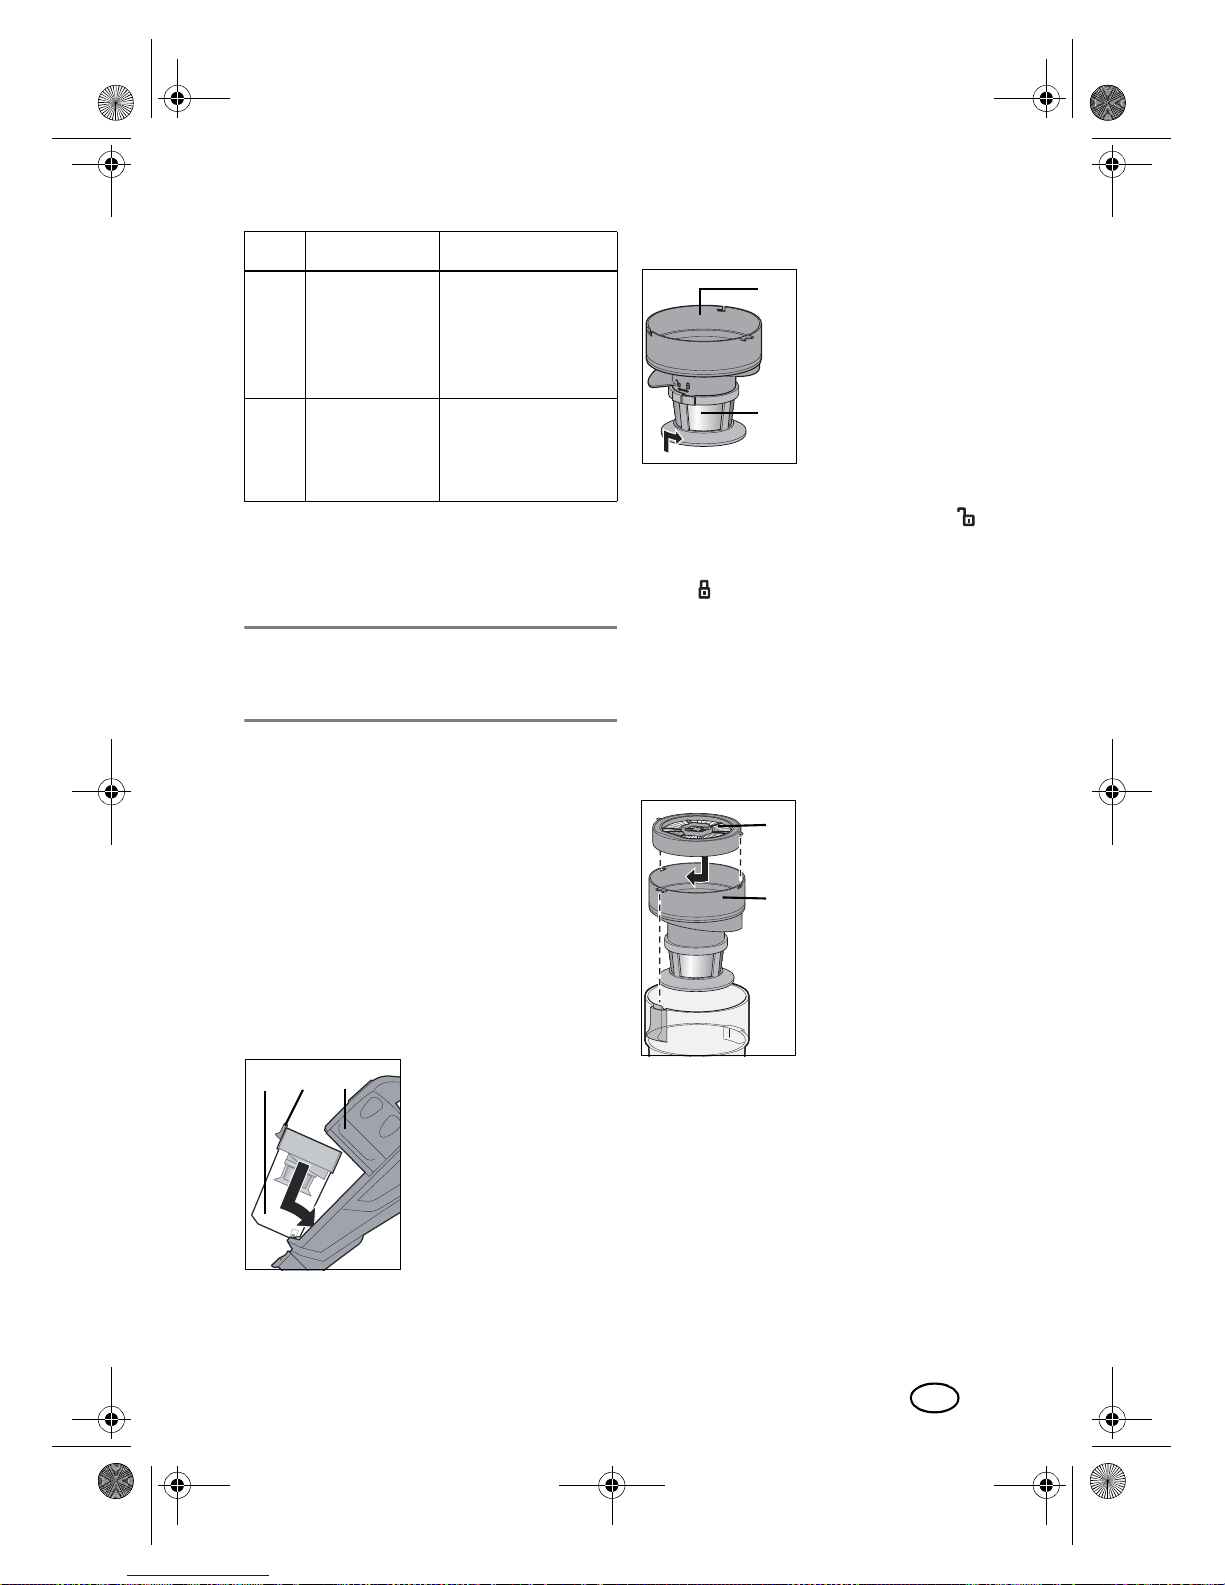
9.1 Dust container
• Hook the dust container|10 on at the
bottom of the suction
device|5. Then press
it down at the top until it engages.
• Remove by pressing the unlocking
mechanism|13 at the suction device
and remove the dust container|10.
No. Nozzle Use
|33
small
brush nozzle
Mini round brush:
keyboards and other small electrical
devices
|34
medium
brush nozzle
Sofas, armchairs,
mattresses, furniture, textiles
|35
large
brush nozzle
Round brush:
bookshelves, hidden corners, floors
|36
small nozzle
(short)
Mini crevice nozzle:
small gaps and
openings
|37
small nozzle
(long)
Mini round nozzle:
electrical devices
e.g. TV, air-conditioning units
|38
large nozzle Crevice nozzle:
cabinets, crevices,
corners, gaps
No. Nozzle Use
|5|13|10
__CPE284657_Staubsauger_B7.book Seite 11 Dienstag, 13. Dezember 2016 2:36 14
12
GB
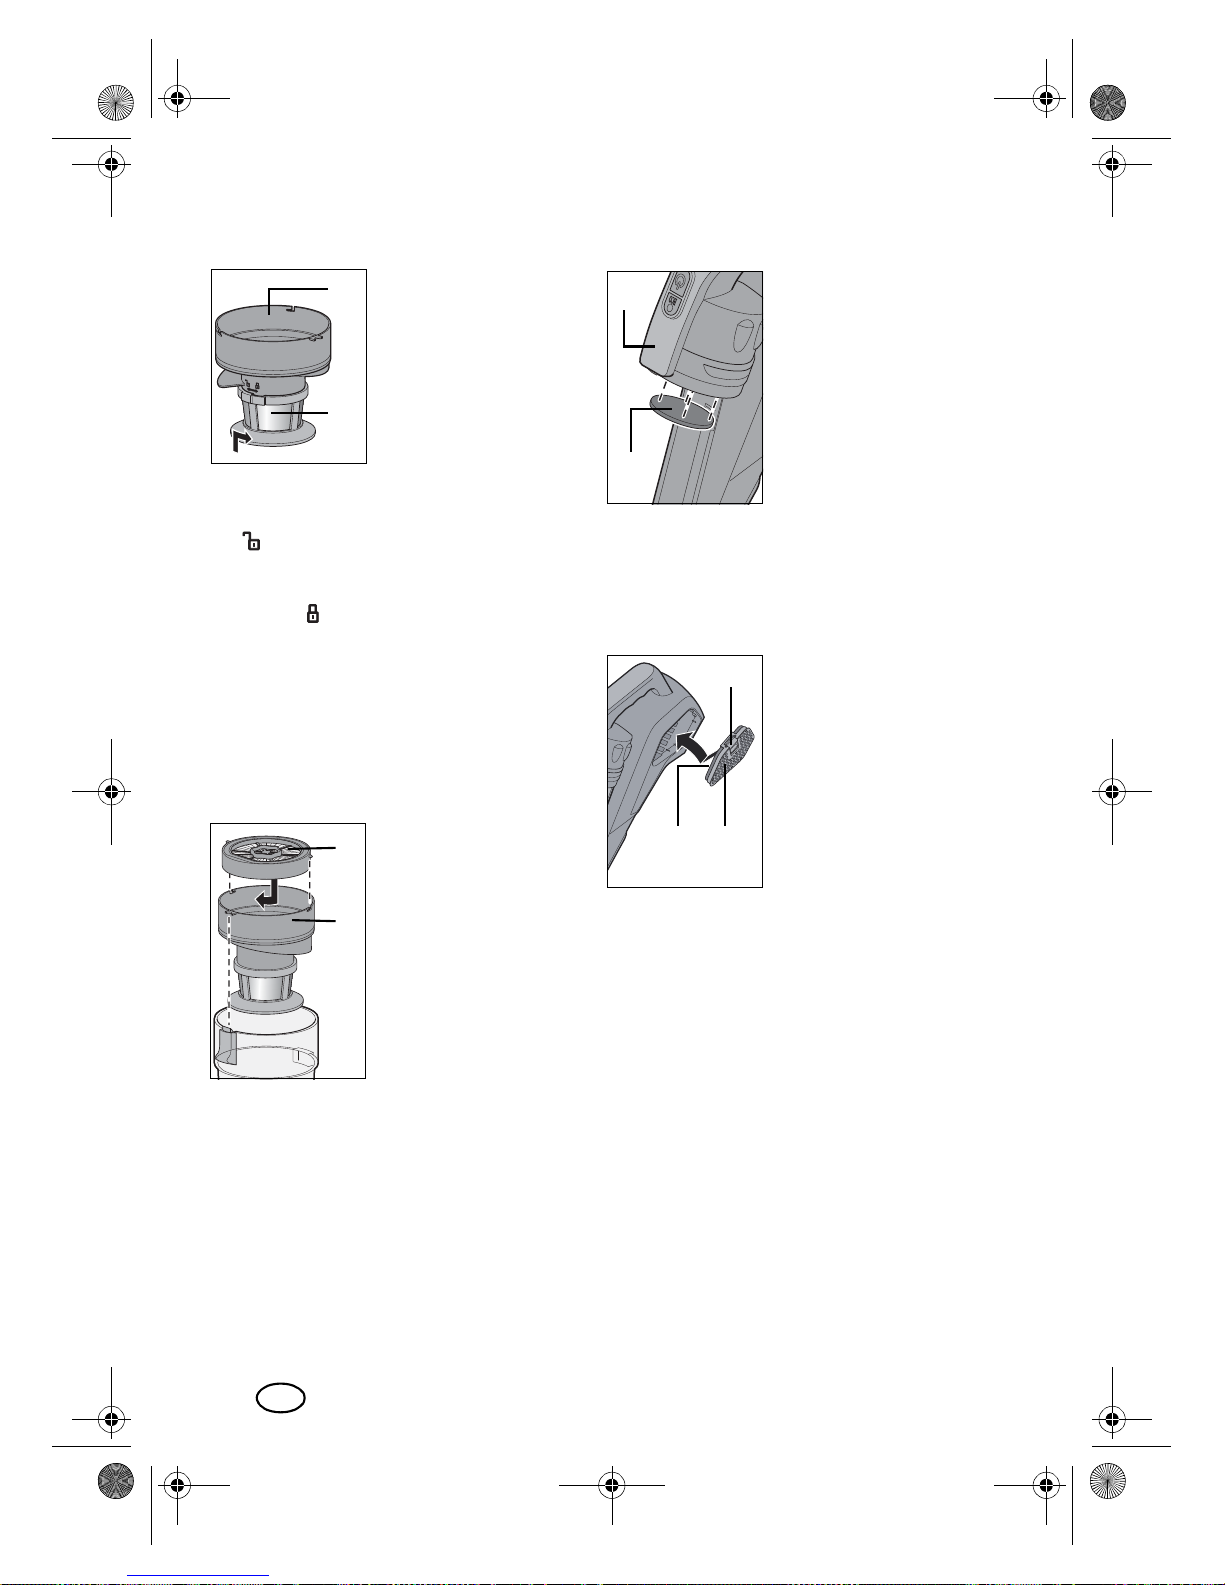
9.2 Metal filter
The metal filter|11 is located at the end of the
filter carrier|7. With a
slight twist, the metal filter|11 can be released
and put on again.
• To release, rotate the metal filter|11 in
the direction of the open lock symbol
.
• When assembling, rotate the metal filter|11 in the direction of the closed lock
symbol . Ensure that the metal filter|11
clicks firmly into place.
9.3 Paper filter (HEPA)
The paper filter|6 is locate d at the u pper end
of the filter carrier|7.
• Release the paper filter|6 with a slight
twist before pulling it off.
•When inserting the
filter, ensure the position of the small lateral pins at the paper
filter|6. They mus t fit
into the openings of
the filter carrier|7.
Then, lock the paper
filter|6 again.
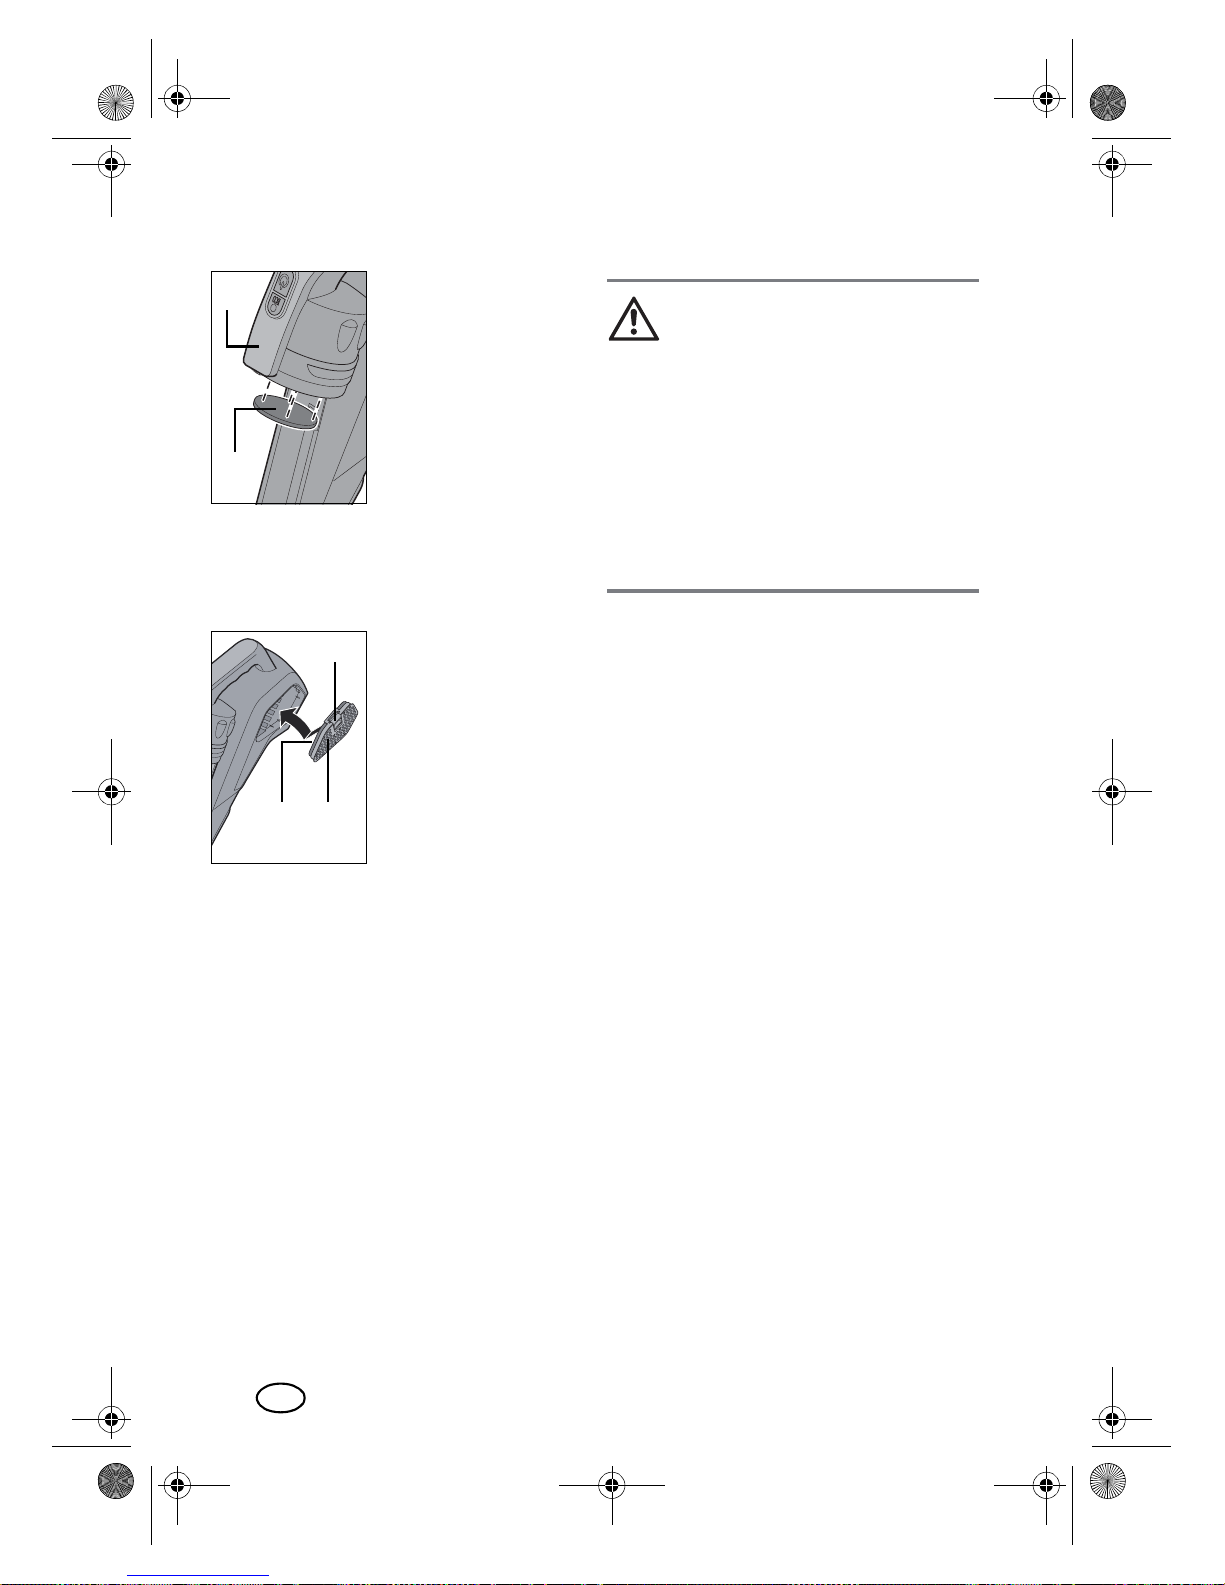
9.4 Motor protection filter
Between the dust container|10 and the suction device|5 the motor
protection filter|12 is located.
• Remove the dust container|10 from the
suction device|5.
Then, you can remove the motor protection filter|12 from
the inside of the suction device|5.
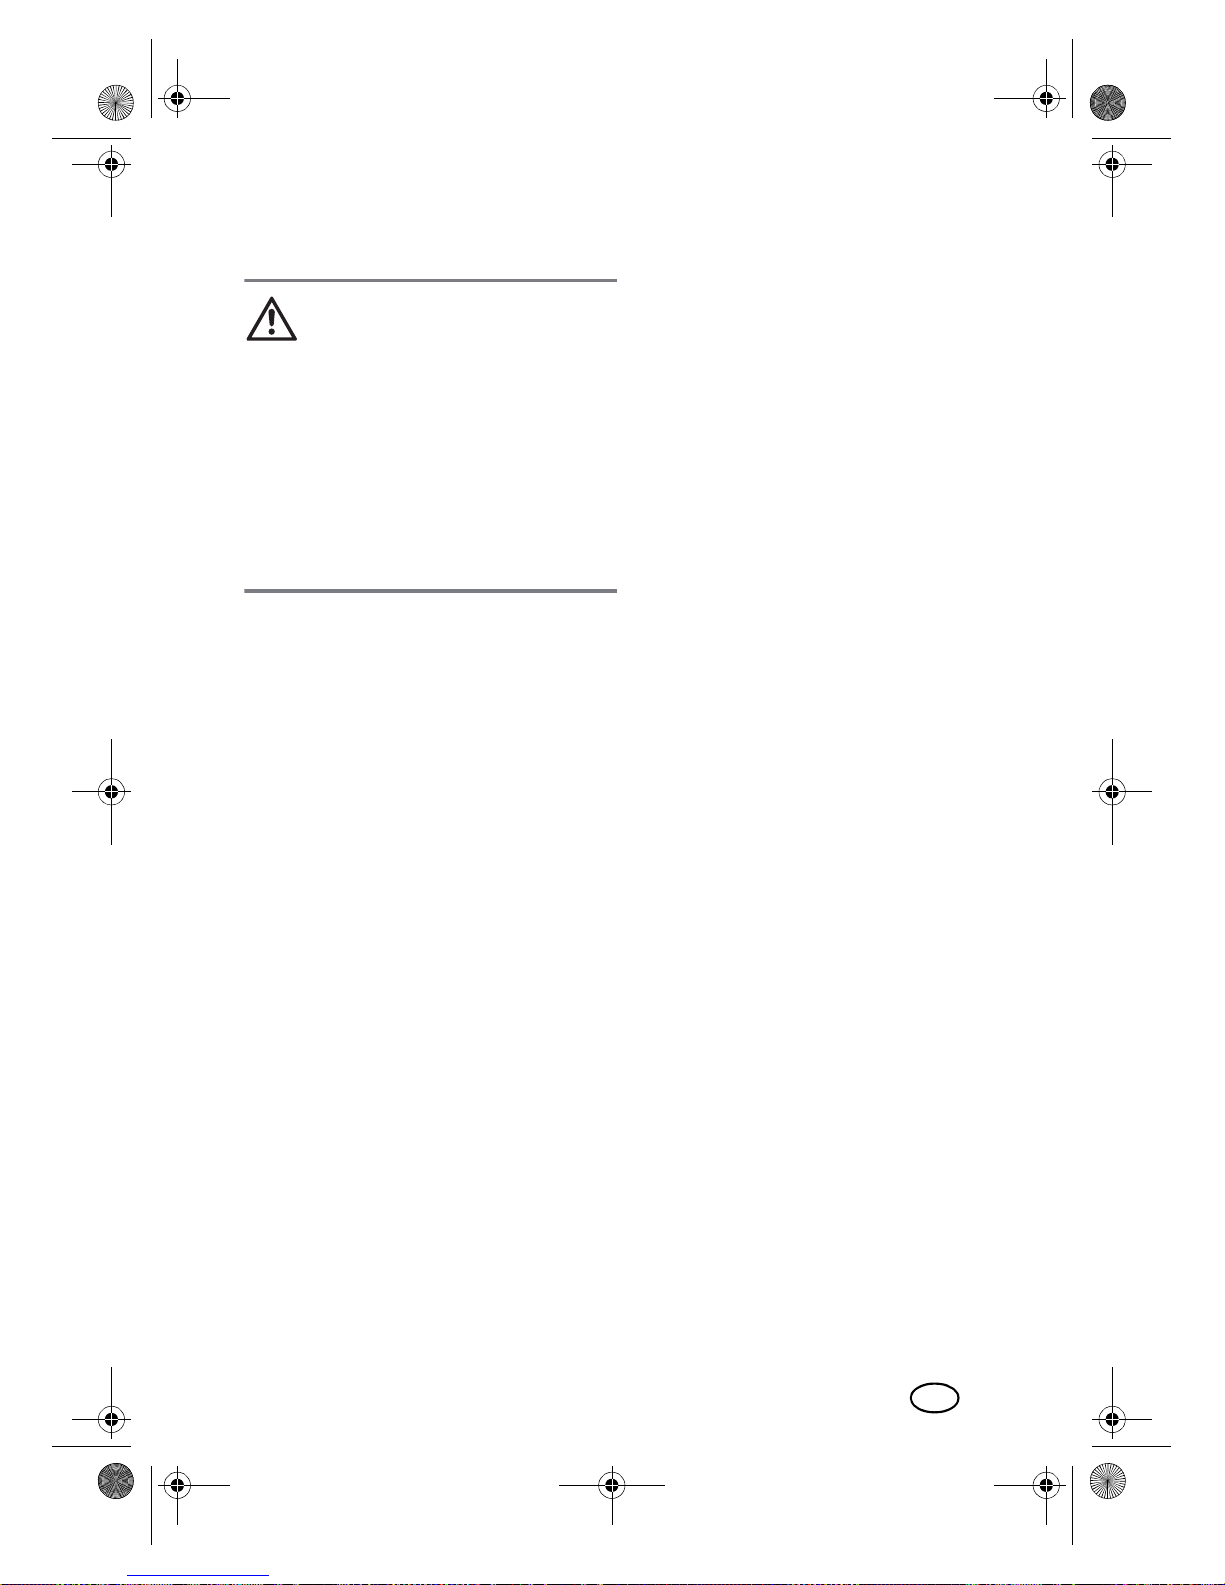
9.5 Exhaust air filter
There are two exha u s t
air filters|2 at the sides
of the suction device|5.
• To remove the filters,
press the unlocking
mechanism|3 at the
filter cover|4. Then,
you can remove the
exhaust air filter|2
from the filter cover|4.
|7
|11
|6
|7
|5
|12
|3
|4
|2
__CPE284657_Staubsauger_B7.book Seite 12 Dienstag, 13. Dezember 2016 2:36 14
13
GB
10. Cleaning and care
DANGER!
~ Pull the mains plug out of the wall socket
before you clean the device.
~ Allow the device to cool down before
cleaning.
CAUTION:
~ All parts becoming damp or wet, must
be dried completely prior to the next
use.
~ Do not use any astringent or abrasive
cleaning agents.
Switch off the device prior to cleaning and
remove the battery.
Cleaning of the suction device
and the battery
• Use a damp, soft cloth to clean the suc-
tion device|5, the floorhead|21 and the
battery|32.
Cleaning the nozzles (except for
the floorhead) and the extensions
• The parts can be cleaned under running
water.
Cleaning of the metal filter and
the exhaust air filter
• The metal filter|11 and the exhaust air
filters|2 can be cleaned under running
water.
Cleaning of the motor protection
filter and the paper filter
• The motor protection filter|12 and the
paper filter|6 are tapped out.
Replacing the filters
• Check all filters regularly for damage or
deformations. Damaged or deformed
filters or filters that cannot be cleaned
anymore must be replaced to maintain
the full effectiveness of the vacuum
cleaner and to avoid damage to the device.
• Filter sets can be reordered (see “Ordering accessories” o n page 15).
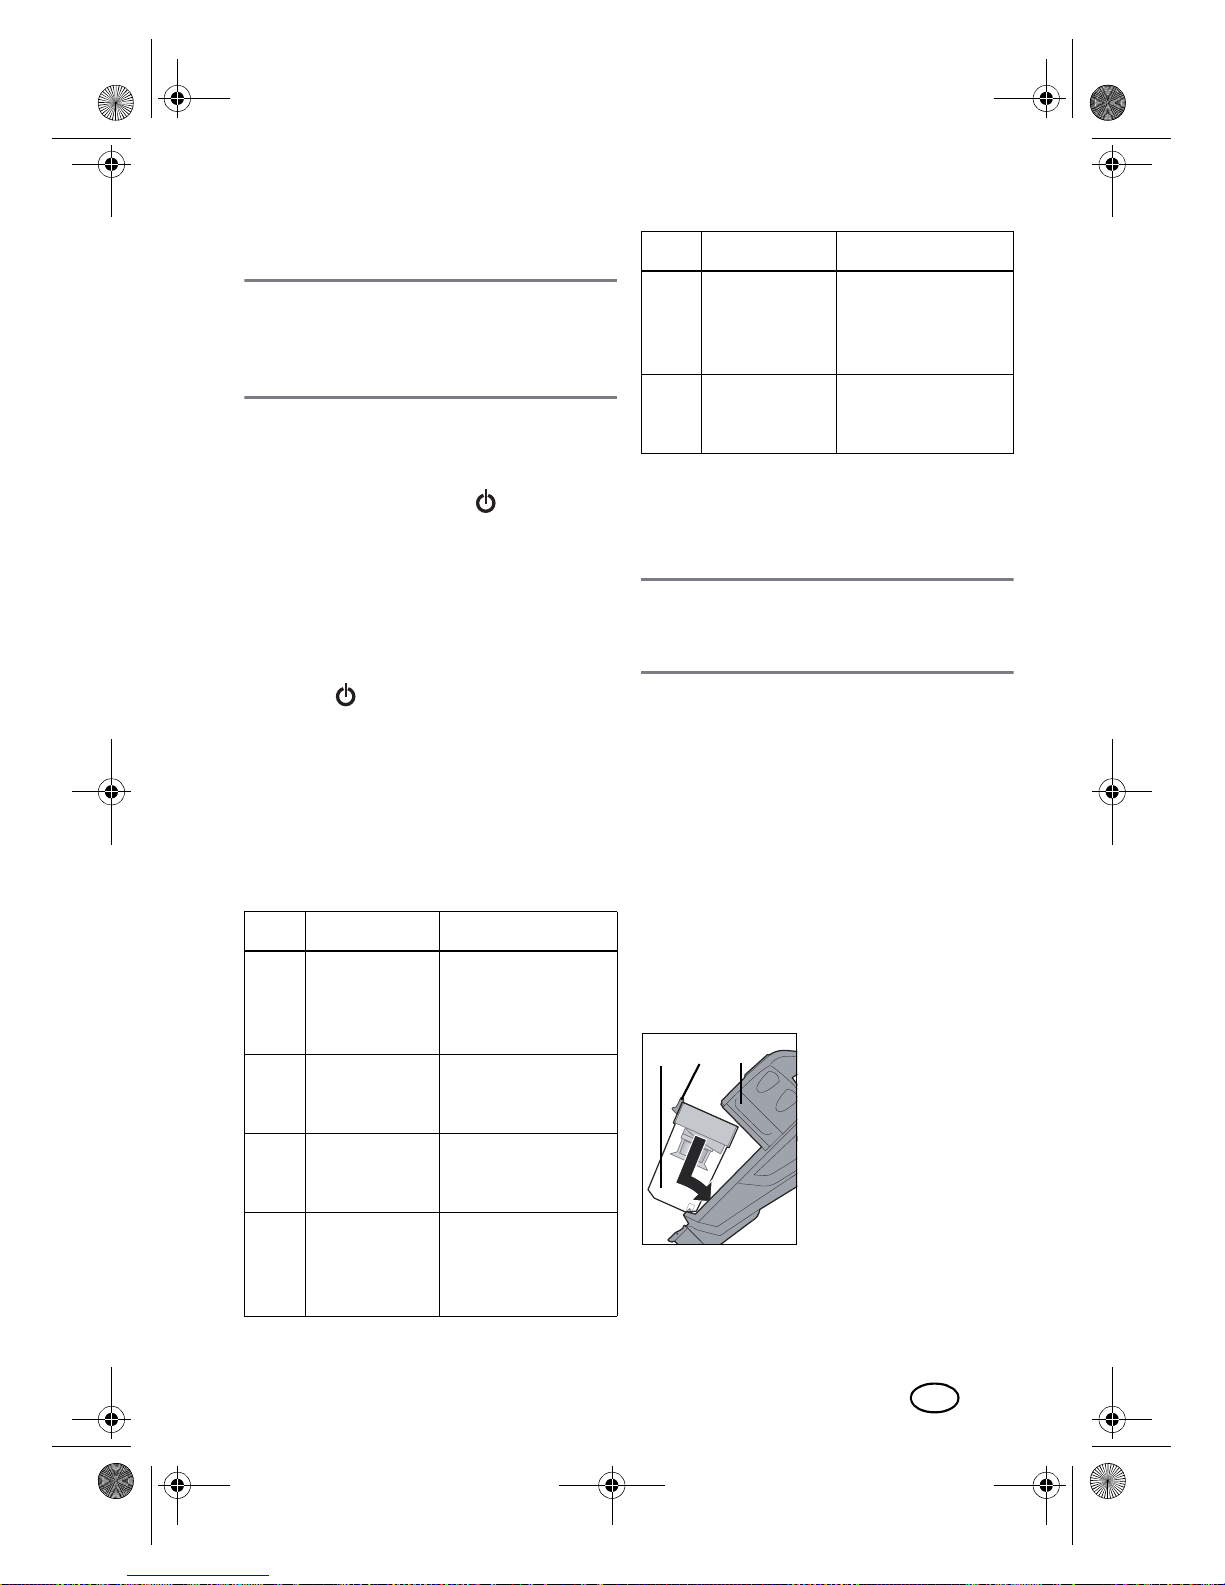
Cleaning the rotating brush inside the floorhead
1. Turn the floorhead|21 upside down.
2. Press the fastener with the double arrow
to the outside. This is a bit difficult so
that it will not diseng age during vac uum
cleaning.
3. Remove the rotating brush|24 from the
floorhead|21.
4. Tap out the brush|24 slightly. Has, for
instance, hair been caught, use your fingers to pull them off.
5. Reinsert the brush|24 into the floorhead|21.
6. Press the small fastener back into the direction of the brush.
11. Storage
If you do not want to use the device for extended periods, keep it in a dry location.
__CPE284657_Staubsauger_B7.book Seite 13 Dienstag, 13. Dezember 2016 2:36 14
14
GB
12. Disposal
The battery used with this device must not be
treated as household waste. The device and
the battery must be disposed of properly.
This product is subject to the
provisions o f Europ ean Direc tive 2012/19/EC. The symbol showing a wheelie bin
crossed through indicates
that the product requires separate refuse collection in the European Union. This applies to the product and all
accessories marked with this symbol. Products identified with this symbol may not be
discarded with normal household waste, but
must be taken to a collection point for recycling electric and electronic appliances. Recycling helps to reduce the consumption of
raw materials and protect the environment.
Packaging
When disposing of the packaging, make
sure you comp ly with the en vironmental regulations applicable in your country.
13. Troubleshooting
If your device fails to function as required,
please try this checklist first. Perhaps there is
only a minor problem, and you can solve it
yourself.
DANGER! Risk of electric
shock!
~ Do not attempt to repair the device your-
self under any circumstances.
Fault Possible causes/Action
None
Function
• Charge the battery|32.
Suction
power insufficient
• Have all parts been properly
connected?
• Is one of the nozzles or suction pipe|19 clogged?
• Is the dust container|10 full?
• Is one or several filters heavily contaminated?
•Does the ECO button|14
light up?
• Does the rotating brush|24
turn within the floorhead|21?
• Battery|32 too weak? Check
the LEDs of the char ging indicator|28.
Device
switches
off
• Check the battery|32.
__CPE284657_Staubsauger_B7.book Seite 14 Dienstag, 13. Dezember 2016 2:36 14
15
GB
14. Technical
specifications
Subject to technical modification.
15. Ordering accessories
Accessories for the r echar geable hand-he ld
vacuum cleaner SHAZ 22.2 A1 can be reordered.
Order online
http://shop.hoyerhandel.com
1. Scan the QR code with your smartphone/tablet.
2. The QR code will take you to a website
where you can reorder.
Model: SHAZ 22.2 A1
Base station: Input: 27|V ,
500|mA
Battery:
1x 27|V Li-Ion,
2200|mAh,
6 cells
Power unit
(MODEL:
ZD12D270050EU)
Input: 100 - 240|V ~
50/60|Hz, 0,5|A
Output:
27|V , 500|mA
Protection class of
the power unit: II
Ambient conditions:
only approved for
indoor use
Operating tem p e rature: 10 °C to +40 °C
Safety isolating transformer short circuit
proof
__CPE284657_Staubsauger_B7.book Seite 15 Mittwoch, 14. Dezember 2016 10:32 10
16
GB
16. Warranty of the
HOYER Handel GmbH
Dear Customer,
your device is provided with a 3 year warranty starting with the purchase date. In the
event of product defects, you ar e en titled to
statutory rights against the vendor. These
statutory rights are not restricted by our warranty presented in the following.
Warranty conditions
The warranty period starts with th e purchase
date. Please keep the original purchase receipt in a safe place. This document is required to verify the purchase.
If within three years from the purchase date
of this product a material or factory defect
occurs, the product will be repaired or replaced by us – at our discretion – free of
charge to you. This warranty implies that
within the period of three years the defective
device and the purchase receipt are pr esented, including a brief written description of
the defect and the time it occurred.
If the defect is covered by our warranty, the
repaired or a new product will be returned
to you. No new warranty period starts with
a repair or replacement of the product.
Warranty peri o d and statutory
claims for defects
The warranty period is not extended when
the warr anty has been claimed. T his also a pplies to replaced and repaired parts. Any
damages and defects already existing at the
time of purchase must be reported immediately upon unpacking. Repairs arising after
the expiration of the warranty period are
subject to a charge.
Warranty covera ge
The device was produced carefully according
to strict quality guidelines and tested diligently prior to delivery.
The warra nty ap pl ies to mat er ial or fa ctory
defects.
Excluded from the warranty are
wear parts subject to normal wear
and damages to fragile parts, e.g.
switches, batteries, lam ps or ot he r
parts manufactured from glass.
This warranty expir es if the pr oduct is damaged, not used as intended or not serviced.
For the proper operation of the product, all instructions listed in the operating instructions
must be observed carefully. Any form of use
and handling that is advised against in the
operating instructions or warned against
must always be av oid ed.
The product is only intended for private and
not for commercial use. In the case of incorrect and improper treatment, use of force and
interventions not performed by our authorised Service Centre, the warranty shall cease.
Handling in case of a warranty
claim
In order to ensure prompt processing of your
matter, please observe the following notes:
• Please keep the article number
IAN: 284657 and the purchase receipt as a purchase verification for all
inquiries.
• The article number can be found on the
rating plate, an engraving, the title
page of your instructions (in the bottom
left), or as a label on the rear or underside of the device.
• If faulty operation or other defects occur,
first contact the Service Centre listed in
the following by telephone or email.
• Then, you are able to send a product reported as defective free of charge to th e
service address specified to you, including the purchase receipt and the information on the defect and when it
occurred.
Please visit www .lidl-service.com to
download this and many other
manuals, product videos and software.
__CPE284657_Staubsauger_B7.book Seite 16 Dienstag, 13. Dezember 2016 2:36 14
17
GB
Service Centre
Service Great Britain
Tel.: 0871 5000 720 (£ 0.10/Min.)
E-Mail: hoyer@lidl.co.uk
Service Ireland
Tel.: 1890 930 034
(0,08 EUR/Min., (peak))
(0,06 EUR/Min., (off peak))
E-Mail: hoyer@lidl.ie
Service Cyprus
Tel.: 8009 4409
E-Mail: hoyer@lidl.com.cy
IAN: 284657
Supplier
Please note that the following address is no
service address. First contact the afore-
mentioned Service Centre.
HOYER Handel GmbH
Tasköprüstraße 3
22761 Hamburg
Germany
GB
IE
CY
__CPE284657_Staubsauger_B7.book Seite 17 Dienstag, 13. Dezember 2016 2:36 14
18 HR
Sadržaj
1. Pregled .......................................................................................... 19
2. Predviîena uporaba ................................ ... ............................. ... ... 20
3. Sigurnosne upute ........................................................................... 21
4. Opseg isporuke ............................................................................. 22
5. Postolje ......................................................................................... 23
5.1 Priêvršäivanje postolja ......................................................................... 23
5.2 Napajanje ......................................................................................... 23
5.3 Skladištenje nakon usisavanja .............................................................. 23
6. Punjenje baterije ............................................................................ 24
7. Montaža ........................................................................................ 24
7.1 Spajanje i odvajanje........................................................................... 24
7.2 Prije svake uporabe............................................................................. 25
7.3 Usisna cijev........................................................................................ 25
7.4 Nastavak za pod................................................................................ 25
7.5 Veliki nastavak ................................................................................... 25
7.6 Velika êetka ....................................................................................... 26
7.7 Mali nastavci........................................ .............................................. 26
7.8 Produžeci i kutni nastavak.................................................................... 26
8. Usisavanje ..................................................................................... 26
8.1 Uporaba nastavaka ............................................................................ 26
9. Filtar i spremnik za prašinu ..................................................... ... ... 27
9.1 Spremnik za prašinu ........................................................................... 27
9.2 Metalni filtar ...................................................................................... 27
9.3 Filtar od papira (HEPA)........................................................................ 27
9.4 Filtar za zaštitu motora ........................................................................ 28
9.5 Ispušni filtar........................................................................................ 28
10.éišäenje i njega .............................................................................. 28
11. Pohranjivanje ................................................................................ 29
12.Uklanjanje otpada ......................................................................... 29
13.Rješavanje problema ..................................................................... 30
14.Tehniêki podaci .............................................................................. 30
15.Naruêivanje prib ora ................................................ ... ... ................ 31
16.Jamstvo tvrtke HOYER Handel GmbH ............................................ 31
__CPE284657_Staubsauger_B7.book Seite 18 Dienstag, 13. Dezember 2016 2:36 14
19HR
1. Pregled
1 pretinac za bateriju
2 ispušni filtar (ispod poklopca filtra)
3 deblokada za poklopac filtra
4 poklopac filtra
5 usisavaê
6 filtar od papira (HEPA) (u nosaêu filtra)
7 nosaê filtra (u spremniku za prašinu)
8 otvor na usisavaêu za usisnu cijev, nastavak za pod, veliki nastavak i adap-
ter
9 deblokada za otvor|8
10 spremnik za prašinu
11 metalni filtar
12 filtar za zaštitu motora (izmeîu spremnika za prašinu i usisavaêa)
13 deblokada za spremnik za prašinu
14 ECO ECO-tipka (smanjuje snagu usisavanja)
15 sklopka za ukljuêivanje/iskljuêivanje
16 ruêka
17 prikljuêak usisavaêa
18 držaê za montažu na postolje
19 usisna cijev
20 otvor na usisnoj cijevi za nastavak za pod, veliki nastavak i adapter
21 nastavak za pod (sa zglobom)
22 valjci nastavka za pod
23 prozorêiä nastavka za pod
24 rotirajuäa êetka
25 postolj e (za zidnu montažu)
26 prihvat za usisnu cijev
27 prihvat za usisavaê
28 prikaz punjenja baterije
29 deblokada baterije
30 mrežni adapter s prikljuênim kabelom
31 prikljuêak za mrežni adapter
32 baterija
33 mala êetka
34 srednja êetka
35 velika êetka (zakretna)
36 mali nastavak (kratki)
37 mali nastavak (dugi)
__CPE284657_Staubsauger_B7.book Seite 19 Dienstag, 13. Dezember 2016 2:36 14
20 HR
38 veliki nastavak
39 adapter za malu i srednju êetku i male nastavke
40 adapter za veliku êetku
41 kutni adapter za malu i srednju êetku i male nastavke
42 produžeci za malu i srednju êetku i male nastavke
bez slike:
materijal za priêvršäivanje (2 priêvrsnice, 2 vijka)
predložak za bušenje
Zahvaljujemo vam na
povjerenju!
éestitamo na kupnji novog ruênog usisava-
êa na baterije.
Kako biste omoguäili sigurno korištenje pro-
izvoda te se upoznali sa svim njego vim r adnim znaêajkama:
• Prije prvog korištenja pažljivo
proêitajte ove upute za korištenje.
• Prije svega pridržavajte se sigurnosnih napomena!
•Ureîaj se smije koristiti samo
kako je opisano u ovim uputama
za korištenje.
•Saêuvajte ove upute za korište-
nje.
•Ako ureîaj namjeravate dati u
treäe ruke, priložite i ove upute
za korištenje.
Uživajte u korištenju novog ruênog usisava-
êa na baterije!
2. Predviîena uporaba
Ruêni usisavaê na baterije namijenjen je us isavanju uobiêajene, suhe kuäne prašine i
malo veäe prljavštine.
Ureîaj je predviîen za domaäinstva i ne
smije se upotreblja vati u komer cijalne svrhe.
Ureîaj se smije upotrebljavati samo u unutarnjim prostorima.
Moguäa pogrešna uporaba
RAZLIéITE OP AS NOSTI!
~ Sljedeäe tvari ne smiju se usisavati:
-tekuäine i vlažna prljavština
- eksplozivne ili gorive tvari poput primjerice prašine brašna ili ugljene prašine
- tvari opasne za zdravlje poput primjerice prašine azbesta
-žar, goruäe šibice ili druge vruäe tvari
- posebno finu prašinu poput tonera za
ureîaj za kopiranje. Filtar u ureîaju
nije namijenjen z a takve tvari.
__CPE284657_Staubsauger_B7.book Seite 20 Dienstag, 13. Dezember 2016 2:36 14
21HR
3. Sigurnosne upute
Napomene upozorenja
Po potrebi äe se u ovim uputama za korištenje primijeniti sljedeäe oznake upozorenja:
OPASNOST! Visoki rizik: nepoštovanje upozorenja može biti opasno
po zdravlje i život.
UPOZORENJE! Srednji rizik: nepoštivanje
upozorenja može uzrok ovati ozljede ili veliku materijalnu štetu.
OPREZ: Niski rizik: nepoštovanje upozorenja može uzroko vati lakše ozlj ede ili materijalnu štetu .
NAPOMENA: stanja i posebnosti kojih se
prilikom korištenja ureîaja potrebno pridržavati.
Upute za siguran rad
~ Ovaj ureîaj mogu rabiti djeca od 8 godina i osobe s ograniêe-
nim fiziêkim, senzornim ili mentalnim sposobnostima ili osobe
bez iskustva i/ili znanja ako su pod nadzor om ili su dobile upute
o sigurnoj uporabi ureîaja i razumjele opasnosti koje proizlaze
iz iste. Djeca se ne smiju igrati ureîajem. éišäenje i održavanje
ne smiju obavljati djeca bez nadzora.
~
Djeca se ne smiju igrati ureîajem.
~ Prije êišäenja potrebno je izvaditi bateriju iz usisavaêa.
~ Ureîaj se ne smije koristiti ako je pao na pod, ako ima vidljiva
ošteäenja ili propušta.
~ Kada se prikljuêni kabel ovog ureîaja ošteti, mora ga zam ijeniti
proizvoîaê ili servisna služba ili osoba sa sliênim kvalifikacijama kako bi se izbjegle opasnosti.
OPASNOST za djecu
~ Ambalaža nije djeêja igraêka. Djeca se
ne smiju igrati plastiênim vreäicama. Postoji opasnost od gušenja.
OPASNOST za i od strane
kuänih i domaäih životinja
~ Elektroniêki ureîaji mogu predstavljati
opasnost za kuäne i domaäe životinje.
Nadalje, životinje takoîer mogu uzrokovati štetu na ureîaju. Stoga držite životinje u naêelu dalje od elektroniêkih
ureîaja.
OP A SNOS T od udara struje
uslijed dodira s vlagom
~ Zaštitite ureîaj od vlage i vode koja ka-
plje ili se raspršuje.
~ Ureîaj, kabel i mrežni utikaê nikada ne
uranjajte u vodu ili druge tekuäine.
~ Ako voda dospije u ureîaj, odmah izvu-
cite mrežni utikaê. Prije ponovnog korištenja zatražite provjeru ureîaja.
~ Ako ureîaj (postolje) padne u vodu, od-
mah izvucite mrežni adapter i tek tada
izvadite ureîaj. U tom sluêaju nemojte
nastaviti ko ristiti ureîaj, nego ga dajte
na provjeru struênom serviseru.
~ Ne rukujte ureîajem mokrim rukama.
OP ASNOST od strujnog udara
~
Prikljuêni kabel odložite tako da nitko ne
može ga ziti p o nje mu , zap eti ili p asti p re ko njega.
__CPE284657_Staubsauger_B7.book Seite 21 Dienstag, 13. Dezember 2016 2:36 14
22 HR
~ Mrežni adapter prikljuêite samo u pra-
vilno instaliranu i lako dostupnu utiênicu
êiji napon odgovara podacima s tipske
oznake. Utiênica i nakon prikljuêenja
kabela mora biti lako dostupna.
~
Pazite da se prikljuêni kabel ne ošteti oštrim rubovim a ili v ruäim mjestima. Ne na-
matajte prikljuêni kabel oko ureîaja
(opasnost od pucanja kabela!).
~ Pazite da se prikljuêni kabel ne priklije-
šti ili zgnjeêi.
~ Prilikom izvlaêenja mrežnog adaptera
iz utiênice, uvijek povucite za mrežni
adapter, a nikada za prikljuêni kabel.
~ Izvucite mrežni adapter iz utiênice...
… kod pojave smetnje,
… ako ne punite bateriju,
…prije êišäenja postolja i
…u sluêaju nevremena.
~ U sluêaju ošteäenja mrežnog kabela ili
ureîaja (postolja), odmah izvucite
mrežni adapter iz utiênice.
OP ASNOST - Opasnost od
eksplozije
~ Ne bacajte bateriju u vatru.
UPOZORENJE na materijalnu štetu
~ Priêvrstite postolje êvrsto na zid. Ispitaj-
te je li priloženi materijal za priêvršäi-
vanje odgovar ajuäi. P o potrebi koristite
druge vijke i priêvrsnice. Ako niste sigurni, montažu prepustite struênjaku.
~ Prije bušenja provjerite da se cijevi za
vodu ili strujni vodovi ne nalaze na odgovarajuäem mjestu u zidu.
~ Usisavaê na baterije koristite samo
kada su svi filtri umetnuti. Usisavanje
bez filtra ošteäuje motor.
~ Rotirajuäe êetke nikada nemojte pribli-
žavati kosi ili širokoj odjeäi.
~ Upotrebljavajte samo originalni pribor.
~ Ne koristite jaka ili nagrizajuäa sred-
stva za êišäenje.
NAPOMENE za bateriju
• Za punjenje baterije koristite samo originalnu stanicu za punjenje (postolje).
• Baterija se zagrijava tijekom punjenja.
To je normalan postupak.
4. Opseg isporuke
1 usisavaê|5 sa spremniko m za praši-
nu|10
1 postolje|25
1 mrežni adapter|30
1 baterija|32
1 usisna cijev|19|
1 nastavak za pod|21
1 mala êetka|33
1 srednja êetka|34
1 velika êetka (zakretna)|35
1 mali nastavak (kratki)|36
1 mali nastavak (dugi)|37
1 veliki nastavak|38
1 adapter|39 za malu i srednju êetku i
male nastavke|
1 adapter|40 za veliku êetku|
1 kutni adapter|41 za malu i sr ednju êetku
i male nastavke
2 produžetka|42 za malu i srednju êetku i
male nastavke
1 predložak za bušenje
1 komplet materijala za priêvršäivanje
(2 priêvrsnice, 2 vijka)
1 upute za korištenje
__CPE284657_Staubsauger_B7.book Seite 22 Dienstag, 13. Dezember 2016 2:36 14

23HR
5. Postolje
5.1 Priêvršäivanje postolja
Priêvrstite postolje|25 uz pomoä predloška
za bušenje i dostavljenih materijala za priêvršäivanje na zid.
NAPOMENA:
• Ispitajte prije priêvršäivanja odgovara li
dostavljeni materijal za priêvršäivanje
vašoj okolini (npr. tekstura zida). Ako
ne, zamijenite ga odgovarajuäim materijalom za priêvršäivanje.
1. Pronaîite mjesto za postolje|25 na zi-
du. Pripazite da se utiênica nalazi u bl izini.
2. Uz pomoä predloška za bušenje nacr-
tajte oznaku za provrte na zidu.
3. Probušite r upe promjera od 6 mm po-
moäi svrdla.
4. Utaknite priêvrsnice u provrte.
5. Priêvrstite vijke u priêvrsnice.
6. Objesite postolje|25 na zid i provjerite
drži li êvrsto.
5.2 Napajanje
• Utaknite mrežni
adapter|30 u odgovarajuäu utiênicu i
spojite prikljuêni vod
prikljuêkom za mrež-
ni adapter|31.
Utiênica i nakon prikljuêenja mora biti u svakom trenutku lako dostupna.
5.3 Skladištenje nak on usi savanja
Postolje|25 služi kao držaê za usisavaê|5 i
usisnu cijev|19|te kao stanica za punjenje
za bateriju|32.
• Objesite usisavaê|5 i
usisnu cijev|19 nakon svakog korištenja u postolje|25.
• Umetnite bateriju|32
u pretinac za bateriju|1. Tek tu se baterija puni.
|25
|30|31
|32
|19
|5 |1
|25
__CPE284657_Staubsauger_B7.book Seite 23 Dienstag, 13. Dezember 2016 2:36 14
24 HR
6. Punjenje bateri je
NAPOMENE:
• P rije prve uporab e napuni te bater iju do
kraja. To traje otprilike pet sati.
• Pomaknite bateriju nakon korištenja u
pretinac za bateriju postolja. Na taj na-
êin vam je maksima lna snaga usisava-
êa uvijek na raspolaganju. Baterija se
redovitim punj enjem ne ošteäuje.
1. Utaknite mrežni
adapter|30 u odgovarajuäu utiênicu i
spojite prikljuêni
vod prikljuêkom za
mrežni adapter|31.
Utiênica i nakon prikljuêenja mora biti u svakom trenutku lako dostupna.
2. Pomaknite bateriju|32 u pretinac za
bateriju|1, sve dok
LED-lampice prikaza
punjenja|28 svijetle ili trepäu. Kada
sve LED-lampice svijetle baterija je potpuno napunjena. To
je dovoljno za cca.
20 minuta u sisavanja.
3. Za uklanjanje baterije|32 pritisnite deblokadu|29 u smjeru LED-lampica i
potom izvucite bateriju.
LED-signali na po sto lje
-Svjetleäe LED-lampice upuäuju na trenut-
no stanje napunjenosti.
-Trepäuäe LED-lampice upuäuju na potro-
šeni dio. Ako sve LED-lampice trepäu,
trebate napuniti bateriju. Ako je baterija
preslaba, ureîaj se iskljuêuje.
LED-signali tijekom rada
-Svjetleäe LED-lampice upuäuju na trenut-
no stanje napunjenosti.
- LED-lampice k oje ne svijetle, u puäuju na
potrošeni dio.
- Samo LED-lampica iznad Empty trepäe: Baterija slaba; ureîaj se ubrzo isklju
êuje.
7. Montaža
S opsežnim priborom imate višestruke moguänosti savršeno reagirati na gotovo sve
potrebe za usisavaê koje može te zamisliti.
U ovom poglavlju opisat äemo montažu za
najêešäa podruêja primjene.
OPREZ:
~ Kod svih koraka montaže usisavaê
mora biti iskljuêen.
7.1 Spajanje i odvajanje
Postoje dva naêina za montažu i ponovno
odvajanje dijelova.
Usisna cijev|19, nastavak za pod|21, spremnim za prašinu|10, poklopac filtra|4 i baterija|32 se umeäu d ok s e êujno ne uklope.
Za otpuštanje spojeva pritisnite odgovarajuäu tipku za deblokadu.
Svi ostali dijelovi mora ju se natak nuti i izvu äi. Eventualno okrenite dijelove lagano jedan prema drugom.
|30|31
|32 |28
|1
|29
|32
__CPE284657_Staubsauger_B7.book Seite 24 Dienstag, 13. Dezember 2016 2:36 14
25HR
7.2 Prije sv ake uporabe
Prije svake uporabe sljedeäi d ijelovi mor aju
biti montirani:
Jedinica filtra
Jedinica filtra sastoji se
od: nosaêa filtra|7, metalnog filtra|11 i filtra
od papira|6.
• Jedinicu filtra uvijek
stavljajte kompletnu u
spremnik za prašinu|10.
• Obje male vodilice nosaêa filtra|moraju
precizno odgovarati malim otvorima i
deblokadi|13 spremnika za prašinu.
Spremnik za prašinu
Spremnik za prašinu|10 dozvoljeno je koristiti samo s
kompletnom jedinicom
filtra.
• Postavite spremnik za
prašinu|10 na usisavaê|5.
•Zakvaêite donji rub i
potom pritisnite gornji kraj prema dolje
dok se êujno ne uklopi.
Baterija
Nije dozvoljeno usisavati bez montirane i napunjene baterije.
• Umetnite bateriju|32
u pretinac za bateriju|1 dok se êujno ne
uklopi.
7.3 Usisna cijev
Usisna cijev|19 služi
kao produžetak. Svi dijelovi koji se mogu prikljuêiti na slobodan kraj
usisne cijevi mogu se
utaknuti izravno na
otvori|8 na usisavaêu|5.
•Utaknite usisnu cijev|19 u otvor|8 dok
se êujno ne uklopi.
7.4 Nastavak za pod
U veäini sluêajeva radit äete s nastavkom za
pod.
Nastavak za pod|21
možete montirati izravno na usisavaê|5 ili na
usisnu cijev|19.
• Utaknite nastavak za
pod|21 u otvor|8 na
usisavaêu|5 ili u
otvor|20 na usisno j
cijevi|19.
7.5 Veliki nastavak
Veliki nastavak|38 moguäe je utaknuti izravno
na usisavaê|5 ili na usisnu cijev|19.
•Utaknite veliki nastavak|38 u otvor|8
ili|20.
|6
|11
|13
|10
|7
|10 |5
|1 |32
|5
|19
|8
|5
|19
|21
|20
|8
5
|19
|38
|20
8
__CPE284657_Staubsauger_B7.book Seite 25 Dienstag, 13. Dezember 2016 2:36 14
26 HR
7.6 Velika êetka
Velika êetka|35 koristi
se uvijek s adapterom|40.
• Utaknite adapter|40
u otvor|8 ili|20.
•Utaknite veliku êet-
ku|35 na adapter|40.
7.7 Mali nastavci
Mali nastavci|36 i|37,
mala êetka|33 i srednja
êetka|34 koriste se uvijek s adapterom|39.
• Utaknite adapter|39
u otvor|8 ili|20.
• Utaknite željeni nastavak na adapter|39.
7.8
Produžeci i kutni nastavak
Za posebno nedostupna
mjesta možete izmeîu
malih nastavaka|33,|34,|36 ili|37 i
adaptera|39 umetnuti
sljedeäe dijelove:
-produžetke|
42
- kutni adapter|41.
Ti dijelovi mogu se proizvoljno meîusobno
kombinirati.
8. Usisavanje
OPREZ:
~ Kod usisavanja potrebno je uvijek mon-
tirati sve filtre i posudu za prašinu|10 .
1. Montirajte željeni pribor.
2. Umetnite bateriju|32 u pretinac za bateriju|1.
3. Za ukljuêivanje ureîaja pritisnite sklopku za ukljuêivanje/iskljuêivanje||15
.
- Ako želite smanjiti snagu usisavanja,
pritisnite 1x tipku ECO|14. Tipka svi-
jetli zeleno. Za iskljuêivanje funkcije
ponovno pritisnite tipku.
4. Za iskljuêivanje ponovno pritisnite
sklopku za ukljuêivanje/iskljuêiva-
nje||15.
5. Ispraznite spremnik za prašinu|10 i
objesite dijelove ponovno u postolje|25.
8.1 Uporab a na stavaka
U donjoj tablici nalazi se pregled zadataka
êišäenja za koje su razliêiti n astav nic i na mijenjeni.
|40
|20
8
|35
37 |34
|36
|20
|39
|33
|42
|41
|33
|20
|39
Br. Nastavak Uporaba
|33
mala
êetka
mini okrugla êetka:
tipkovnice i drugi
mali elektroniêki
ureîaji
|34
srednja
êetka
kauêi, fotelje, madraci, namještaj,
tekstil
|35
velika
êetka
okrugla êetka:
regali s knjigama,
skriveni uglovi, pod
|36
mali nastavak
(kratki)
mini nastavak za
žljebove:
mali procjep i i otv o ri
__CPE284657_Staubsauger_B7.book Seite 26 Dienstag, 13. Dezember 2016 2:36 14
27HR
9. Filtar i spremnik za
prašinu
OPREZ:
~ Kod usisavanja potrebno je uvijek mon-
tirati sve filtre i posudu za prašinu|10.
Kod svakog usisavanja spremnik za prašinu|10 i svi filtri moraju biti umetnuti:
- metalni filtar|11 u spremniku za praši-
nu|10,
- filtar od papira|6 u spremniku za praši-
nu|10,
- filtar za zaštitu motora|12 izmeîu spre-
mnika za prašinu|10 i usisavaêa|5 i
- oba ispušna filtra|2 na stranicama usi-
savaêa|5.
9.1 Spremnik za prašinu
•Zakvaêite spremnik
za prašinu|10 na donjem kraju usisavaêa|5. U nastavku pri-
tisnite ga prema dolje
dok se ne uklopi.
•Za vaîenje pritisnite
deblokadu|13 na usisavaêu i potom izvadite spremnik za prašinu|10.
9.2 Metalni filtar
Metalni filtar|11 nalazi
se na kraju nosaêa filtra|7. Laganim okretanjem se metalni
filtar|11 može otpustiti i
ponovno postaviti.
• Za otpuštanje okrenite metalni filtar|11
u smjeru simbola otvorene brave .
• Kod sastavljanja okrenite metalni filtar|11 u smjeru simbola zatvorene brave . Pripazite na to da metalni
filtar|11 êvrsto dosjedne.
9.3 Filtar od papira (HEPA)
Filtar od papira|6 sjedi na gornjem kr aju nosaêa filtra|7.
• Deblokirajte filtar od papira|6 laganim
okretanjem i potom ga izvucite.
• Za umetanje obratite
pozornost na položaj malih boênih igala na filtru od papira|6. Moraju se
uklopiti u otvo r e nos aêa filtra|7. Potom po-
novno blokirajte filtar
od papira|6.
|37
mali nastavak
(dugi)
mini okrugli nastavak:
elektroniêki ureîaji
poput klima ureîa-
ja
|38
veliki nastavak nastavak za žljebo-
ve:
ormari, žljebovi,
kutovi, procjepi
Br. Nastavak Uporaba
|5|13|10
|7
|11
|6
|7
__CPE284657_Staubsauger_B7.book Seite 27 Dienstag, 13. Dezember 2016 2:36 14
28 HR
9.4 Filtar za zaš titu motora
Izmeîu spremnika za
prašinu|10 i usisavaêa|5 nalazi se filtar za
zaštitu motora|12.
• Izvadite spremnik za
prašinu|10 iz usisavaêa|5.
U nastavku možete
skinuti filtar za zaštitu
motora|12 s unutrašnje strane usisavaêa|5.
9.5 Ispušni filtar
Postoje dva ispušna filtra|2 na stranicama usisavaêa|5.
•Za vaîenje pritisnite
deblokadu|3 na poklopcu filtra|4. U nastavku možete izvaditi ispušni filtar|2 i
poklopca filtra|4.
10. éišäenje i njega
OP ASNOST!
~ Prije êišäenja ureîaja izvucite mrežni
utikaê iz utiênice.
~ Prije êišäenja priêekajte da se ureîaj
ohladi.
OPREZ:
~ Svi dijelovi koji mogu biti vlažni ili m o-
kri moraju se prije sljedeäe uporabe
potpuno osušiti.
~ Ne koristite jaka ili nagrizajuäa sred-
stva za êišäenje.
Prije êišäenja iskljuêite ureîaj i izvadite bateriju.
éišäenje usisavaêa i baterije
•Za êišäenje usisavaêa|5, nastavka za
pod|21 i baterije|32 koristite vlažnu
mekanu krpu.
éišäenje nastavka (osim nastavka za pod) i produžetaka
• Dijelovi se mogu êistiti pod tekuäom vo-
dom.
éišäenje metalnog filtra i ispušnog filtra
• Metalni filtar|11 i ispušni filtar|2 mogu
se êistiti pod tekuäom vodom.
éišäenje filtra za zaštitu motora i
filtra od papira
• Filtar za zaštitu motora|12 i filtar od pa-
pira|6 se mogu isprašiti.
Zamjena filtra
• Redovito provjeravajte sve filtre na ošte-
äenja ili deformacije. Ošteäeni ili defo r-
mirani filtar ili filtri koji se više ne mogu
oêistiti moraju se zamijeniti kako bi se
zadržala maksimalna snaga usisavaêa
i izbjegla ošteäenja na ureîaju.
|5
|12
|3
|4
|2
__CPE284657_Staubsauger_B7.book Seite 28 Dienstag, 13. Dezember 2016 2:36 14
 Loading...