


ELECTRIC OVEN & GRILL SGBR 1500 B3
ELECTRIC OVEN & GRILL
Operating instructions
PEČICA S FUNKCIJO ŽARA
Navodila za uporabo
AUTOMAT NA
GRILOVANIE A PEČENIE
Návod na obsluhu
IAN 274498
GRILLSÜTŐ
Használati utasítás
TROUBA NA GRILOVÁNÍ A PEČENÍ
Návod k obsluze
GRILL- UND BACKAUTOMAT
Bedienungsanleitung

Before reading, unfold the page containing the illustrations and familiarise yourself with all functions of
the device.
Olvasás előtt kattintson az ábrát tartalmazó oldalra és végezetül ismerje meg a készülék mindegyik
funkcióját.
Pred branjem odprite stran s slikami in se nato seznanite z vsemi funkcijami naprave.
Před čtením si otevřete stranu s obrázky a potom se seznamte se všemi funkcemi přístroje.
Pred čítaním si odklopte stranu s obrázkami a potom sa oboznámte so všetkými funkciami prístroja.
Klappen Sie vor dem Lesen die Seite mit den Abbildungen aus und machen Sie sich anschließend mit allen
Funktionen des Gerätes vertraut.
GB Operating instructions Page 1
HU Használati utasításs Oldal 21
SI Navodila za uporabo Stran 43
CZ Návod k obsluze Strana 63
SK Návod na obsluhu Strana 83
DE / AT / CH Bedienungsanleitung Seite 103

A
B
6
-
3
!
0.

Contents
Introduction ............................................................2
Proper use .............................................................2
Package contents .......................................................2
Appliance description ....................................................2
Technical data ..........................................................2
Safety instructions ......................................................3
Setting up .............................................................6
Using the appliance .....................................................6
Glass door .........................................................................6
Inserting the crumb tray ...............................................................6
Using the rotisserie ...................................................................7
Using the baking tray/rack ............................................................8
Before first use .........................................................8
Operating the appliance .................................................9
Function switch ......................................................................9
Temperature control ..................................................................9
Timer .............................................................................9
Grilling and baking .....................................................9
Grilling with the rotisserie ...............................................10
Cleaning and care ......................................................12
Storage ..............................................................12
Troubleshooting .......................................................13
Disposal ..............................................................14
Kompernass Handels GmbH warranty ....................................14
Service ...........................................................................15
Importer ..........................................................................15
Recipes ...............................................................15
│
GB
SGBR 1500 B3
1 ■

Introduction
Congratulations on the purchase of your new
appliance.
You have selected a high-quality product.
The operating instructions are part of this product.
They contain important information on safety, usage
and disposal. Before using the product, familiarise
yourself with all handling and safety guidelines.
Use the product only as described and for the
range of applications specified. Please also pass
these operating instructions on to any future
owner(s).
Proper use
The automatic oven and grill is intended for the
heating, cooking and grilling of food.
This appliance is intended solely for use in private
homes. Do not use it for commercial applications.
All other uses are deemed to be improper and may
result in property damage or even in personal injury.
Package contents
♦ Electric Oven & Grill
♦ 1 baking tray
♦ 1 rack
♦ 2 tongs
♦ Rotisserie with 2 clamps
♦ 1 crumb tray
♦ Operating instructions
NOTE
Check contents for completeness and damage
immediately after unpacking. Contact Customer
Services if necessary.
Appliance description
Figure A:
Drive
Temperature control
Function switch
Timer
Control lamp
Glass door
Crumb tray
Lower heating element
Spit fitting
Figure B:
Tongs (baking tray or rack)
- Baking tray
3 Tongs (for spit)
! rack
. Restrainer
0 Skewer clamps
6 Rotisserie
Technical data
Rated voltage: 220 - 240 V ~,
50/60 Hz
Max. power consumption: 1500 W
All of the parts of this appliance
that come into contact with food
are food-safe.
■ 2 │ GB
SGBR 1500 B3

Safety instructions
DANGER – RISK OF ELECTRIC SHOCK!
► Do not open the housing of the appliance or attempt to
repair it. Doing so can lead to risks and also invalidates the
warranty. Defective appliances should be repaired by the
retailer or authorized personnel only.
► Arrange for defective power plugs and/or cables to be
replaced as soon as possible by a qualified technician or by
our Customer Service Department to avoid the risk of injury.
► Do not allow any liquids to penetrate the housing. Do not
expose the appliance to moisture and do not use it outdoors.
Additionally, do not place fluid-filled receptacles such as
flower vases on the appliance. This increases the risk of fire
and of receiving an electric shock! If liquids permeate into
the housing, unplug the appliance immediately and arrange
for it to be repaired by a qualified technician.
► Never touch the appliance, power cable or power plug with
wet hands. There is a risk of electric shock!
NEVER immerse the appliance in water or other liquids!
Risk of electrocution if residual liquids come into contact
with live components during operation.
SGBR 1500 B3
GB
│
3 ■

WARNING – RISK OF INJURY!
► This appliance may be used by children of the age of 8 years
or more and by persons with reduced physical, sensory or
mental capabilities or lack of experience and/or knowledge if
they are being supervised or have been instructed with regard
to the safe use of the appliance and have understood the
potential risks.
► Children must not use the appliance as a plaything.
► Cleaning and user maintenance must not be performed by
children unless they are older than 8 years of age and are
supervised.
► Children younger than 8 years of age must be kept away
from the appliance and the power cable.
► Route the power cable in such a way that no one can tread
on it or trip over it.
► Never touch the glass door or the housing during use, these
can get very hot. Use oven gloves or something similar to
open the glass door to avoid being burnt!
► Never touch the heating elements or the viewing window
when the appliance is in use, or before it has cooled down
completely. Do not reach into the cooking chamber when
the appliance is in use. Wait until the appliance has cooled
down. Otherwise, you could be burnt.
► Allow the appliance to cool down after use before trans-
porting it.
► Always use oven gloves or a pot holder if you need to take
hold of the appliance.
Caution! Hot surface!
■ 4 │ GB
SGBR 1500 B3

CAUTION – PROPERTY DAMAGE!
► Do not use an external timer switch or a separate remote
control system to operate the appliance.
► Never leave the appliance unattended during operation.
► Ensure that the appliance, the power cable and the plug do
not come into contact with heat sources such as hotplates or
naked flames.
► Only operate the appliance with the original accessories
supplied.
► Do not kink or crush the mains cable.
► To disconnect, always remove the plug itself from the mains
power socket, do not pull on the power cable.
► When the appliance is in use, ensure that there are no easily
inflammable materials in the immediate vicinity (e.g. dishcloths,
oven cloths, etc.).
► Never dry textiles or other objects on or above the appliance.
This increases the risk of fire!
SGBR 1500 B3
GB
│
5 ■

Setting up
Using the appliance
WARNING! RISK OF FIRE!
► Never place the appliance beneath wall cup-
boards or next to curtains, cupboard walls or
other flammable objects.
► Always ensure a minimum distance between
the appliance and hanging cupboards, ceilings,
side walls or similar of at least 10 cm above
the appliance and 5 cm at the sides. For this
reason the appliance may not be used, for
example, in cupboards or similar. Otherwise
there is likely to be insufficient ventilation for the
appliance, which could cause a fire or damage.
► Always place the appliance on a heat-resistant
surface. Failure to do so increases the risk of
fire or of it being damaged. The area under
the bottom can discolour and be damaged.
Additionally, if placed on a soft upper surface,
the appliance could cause permanent damage
to it due to pressure indentations.
DANGER – ELECTRIC SHOCK!
► Do not place the appliance immediately ad-
jacent to sources of water, e.g. sinks or basins,
or in damp cellar areas. Otherwise, there is
a risk of receiving an electric shock.
■ Place the appliance on a solid, level and heat-
resistant surface (e.g. stainless steel worktops
or natural stone worktops such as granite).
Ensure there is sufficient ventilation around the
appliance.
■ Push the appliance up against the wall, with its
rear side facing the wall. The spacers on the
back must touch the wall. Ensure that the wall is
made of heat-resistant material, e.g. tiles, natural
stone or granite.
■ Clean all components as described in the
section “Cleaning and care”.
Glass door
ATTENTION! DAMAGE TO PROPERTY!
►
Do not lean on the glass door . Do not
place any objects on the glass door .
This can cause damage to the hinges.
■ If you are cooking especially fatty foodstuffs, this
can result in increased smoke production. In this
case, do not close the glass door completely;
instead, leave it slightly open:
The glass door has a latching position so that
it remains open a little: if you carefully push the
glass door closed, it clicks into this position
shortly before closing completely.
■ When drying fruit (to make dried fruit), the glass
door should remain in the latching position
to ensure that moisture can escape and that the
fruit dries better.
Inserting the crumb tray
■ Push the crumb tray under the lower heating
element so that it rests flat on the bottom of
the appliance
a handle.
. You can use the bent up side as
■ 6 │ GB
SGBR 1500 B3
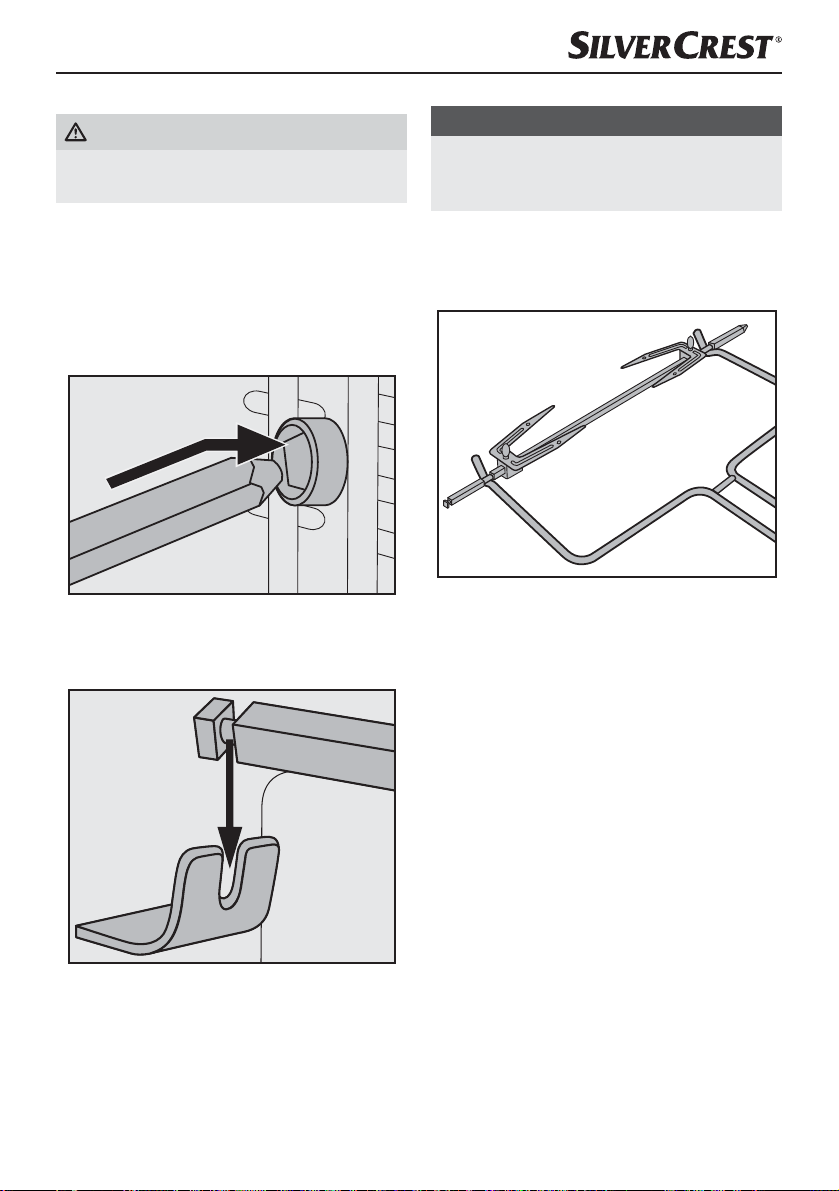
Using the rotisserie
WARNING! RISK OF INJURY!
► Always use the tongs 3to insert the hot rotis-
serie 6 into the appliance or to remove it.
■ You can use the two skewer clamps 0 to fix the
food onto the rotisserie 6. Loosen the restrainer .
on the skewer clamps 0, push them so that the
food is fixed firmly in between the clamps and
then screw the restrainer . tight again.
■ First push the end of the rotisserie 6 without the
notch into the drive (Figure 1):
NOTE
► Always slide the baking tray - into the lower
rail when you use the rotisserie 6.
This will collect any drips.
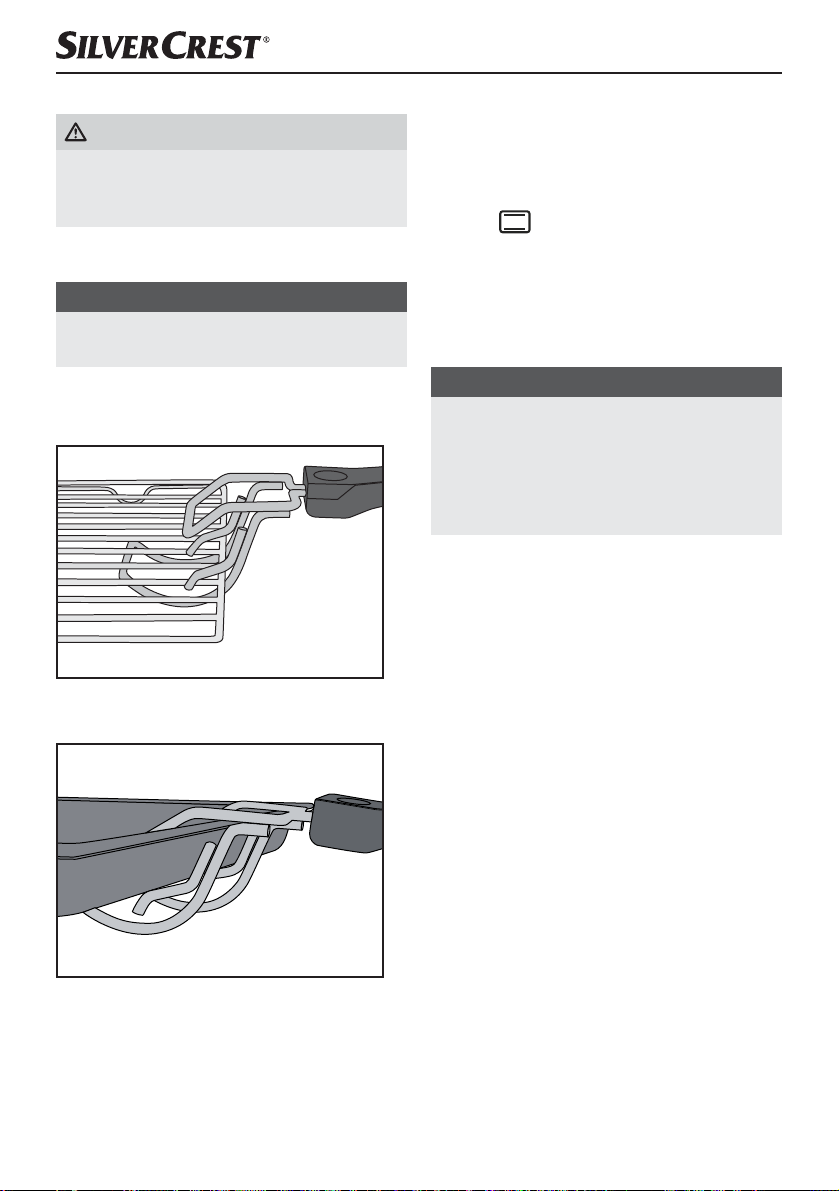
■ To remove the hot rotisserie 6, grip with
the hooks at the end of the tongs 3 into the
recesses on the rotisserie 6 (Figure 3):
Fig. 1: Push the rotisserie 6 into the drive .
■ Then insert the other end of the rotisserie 6 with
the deep groove in the spit fitting (Figure 2):
Fig. 2: Insert the rotisserie 6 in the spit fitting .
SGBR 1500 B3
Fig. 3: Hooking the tongs 3 onto the rotisserie 6
■ F
irst lift the left-hand side of the rotisserie 6 out
of the spit fitting and then pull the rotisserie 6
from the drive .
│
GB
7 ■
Using the baking tray/rack
WARNING! RISK OF INJURY!
► Always use the tongs to insert the hot
baking tray -/the hot rack ! into the appliance or to remove it.
■ Push the baking tray -/the rack ! into one of
the 3 rails in the cooking chamber of the appliance.
ATTENTION! DAMAGE TO PROPERTY!
► Never place the baking tray -/the rack !
directly onto the heating elements .
■ To remove the hot baking tray - or the rack !,
hook the tongs onto them as follows:
Fig. 4: Hooking the tongs onto the rack !
Before first use
1) Insert the plug into a mains power socket.
2) Turn the temperature control clockwise to
the maximum temperature (to the stop).
3) Turn the function switch to "upper and lower
heat"
4) Open the glass door leave this open for this
operation.
5) Remove any installed accessories from the
cooking chamber.
6) Turn the timer to 20 minutes.
NOTE
► The first time the appliance heats up, a
small amount of smoke and odour may be
generated due to production-related residue.
This is normal and is completely harmless.
Provide sufficient ventilation by opening a
window, for example.
The appliance switches off automatically
after 20 minutes.
If you want to interrupt the heating process
prematurely, turn the temperature control
counter-clockwise to the stop and set the
timer to "OFF".
7) Allow the appliance to cool down, then clean
the appliance as described in the chapter
"Cleaning and care".
The appliance is now ready for use.
.
Fig. 5: Hooking the tongs onto the baking
tray -
■ 8 │ GB
SGBR 1500 B3

Operating the appliance
Function switch
You can switch on the appliance with the function
switch , and also set 5 different functions:
Symbol Meaning
“Lower heat”
e.g. for baking
“Upper heat”
e.g. to gratinate
"Upper & lower heat"
e.g. for baking a pizza
"Upper heat/hot air/
rotisserie"
e.g. to roast poultry
"Upper & lower heat/hot air"
e.g. to reheat rolls
"OFF" the appliance is
switched off.
Temperature control
Use the temperature control to set the desired
temperature.
■ If you set the temperature for the functions
“Upper heat”
“Upper & lower heat”
marked with “
■ If you set the temperature for the functions “Upper
heat/hot air/rotisserie”
heat/hot air”
, “Lower heat” or
use the scale
“.
or “Upper & lower
use the scale marked with „ “.
Timer
User the timer to set the cooking time.
■ Set the timer to the desired cooking time.
After expiry of the set time a signal tone sounds
and the appliance stops heating.
If the function "Upper heat/hot air/rotisserie"
is selected, the rotisserie 6 will also stop
turning.
Grilling and baking
1) Put the crumb tray into the appliance.
2) Remove the rack ! and baking tray - from
the appliance. If required, cover these with
baking paper or lightly grease the baking tray with suitable baking fat.
NOTE
► Depending on the meal, the oven must be
preheated. Refer to the guidelines in the
respective recipe. Preheating is useful for:
– very short baking times,
– crisp crusts,
– sensitive meals that require a constant
temperature, such as soufflés.
► If no preheating is required, skip step 3).
3) Allow the appliance to heat up for approx.
10 minutes (depending on the temperature
setting) to the required temperature:
– Select the required temperature using the
temperature control . Ensure that you use
the correct scale (see chapter "Temperature
control").
– Select the required function with the function
switch .
SGBR 1500 B3
GB
│
9 ■

NOTE
► As a general rule, if you are baking or grilling
with hot air you can dispense with a preheating
of the grilling/cooking space.
– Use the timer to set the preheat time
(approx. 10 minutes).
– Close the glass door .
4) Once the warm-up period is finished, place
the foodstuffs on the rack ! or the baking
tray - and slide it in on one of the rails.
Ensure that there is sufficient space between
the foodstuffs and the inner walls/heating
elements of the appliance.
NOTE
► If you wish to prepare food on the rack !
that drips excessively, then slide the baking
tray - onto the bottom rail. By doing this,
dripping fat for example will be caught and
the appliance is then easier to clean.
5) Close the glass door before starting the
grilling or baking process.
6) Use the timer to set the required grilling or
baking time. The maximum grilling or baking
time is 120 minutes.
NOTE
► If the cooking time for the food is less than
20 minutes, first set the timer to 40 minutes
and then turn it back to the required grilling
or baking time.
The appliance switches off automatically after the
set period, there is a beep and the control lamp
switches off.
NOTE
If you want to interrupt the heating process
prematurely, turn the temperature control
counter-clockwise to the stop and set the timer
to "OFF ".
7) After cooking, remove the rack ! or the baking
tray - using the tongs .
8) Set the function switch to "OFF".
Grilling with the rotisserie
1) Put the crumb tray into the appliance.
2) If inserted, remove the rotisserie 6 from the
appliance.
3) Push the baking tray - onto the lower rail.
4) Fix the food to be grilled with the skewer
clamps 0. Ensure that the food in the cooking
chamber can turn freely without touching the
sides. The rotisserie 6may change its direction
of rotation if the food strikes against a resistance.
The two depressions on the rotisserie 6 must remain freely accessible, otherwise you will not be
able to grasp the rotisserie 6 with the tongs 3.
5) Fit the rotisserie 6 in the cooking chamber
(see chapter "Using the rotisserie")
6) Close the glass door .
The control lamp indicates that the appliance is
now switched on. The switch of the timer now
rotates itself anti-clockwise to "OFF ".
■ 10 │ GB
SGBR 1500 B3

NOTE
If you want to interrupt the heating process prematurely, turn the temperature control counterclockwise to the stop and set the timer to
"OFF ".
7) Adjust the temperature control to the desired
temperature.
8) Set the function switch to "Upper heat/
hot air/rotisserie"
desired grill time.
The appliance starts the grilling process and
the rotisserie 6 starts turning.
The control lamp indicates that the appliance is
now switched on. The switch of the timer now
rotates itself anti-clockwise to "OFF ".
The appliance switches off automatically after the
set period, there is a beep and the control lamp
switches off.
NOTE
If you want to interrupt the heating process
prematurely, turn the temperature control
counter-clockwise to the stop and set the timer
to "OFF ".
9) After the grilling process is completed remove
the rotisserie 6 with the help of the tongs 3.
10) Set the function switch to "OFF".
. Set the timer to the
EXAMPLE: GRILLED CHICKEN
Ingredients
♦ Grilling chicken (approx. 1.3 kg,
guts removed)
♦ Spices (salt, paprika)
♦ Cooking oil
1) Season the chicken on the inside and outside
with salt and paprika powder. Brush it from
the outside with heat resistant cooking oil.
2) Push the chicken onto the spit and fix it in
place with the skewer clamps 0. Ensure that
the notches on the rotisserie 6 remain free
so that you can remove the rotisserie 6with
the help of the tongs 3. Depending on the
shape of the chicken, it may be necessary
to fasten the wings and legs with a fireproof
string to stop them impacting the sides when
turning.
3) Push the baking tray - onto the lower rail.
4) Preheat the appliance for about 10 minutes
using the function "Upper & lower heat/hot
air"
to 210°C.
5) Put the chicken on the rotisserie into the
appliance using the tongs 3.
6) Set the function switch to "Upper heat/hot
air/rotisserie"
7) Set the timer approx. 80 minutes. The
cooking time can vary depending on the
size and nature of the chicken.
8) Brush the chicken every now and again with
some cooking oil. This will make it crispy.
9) Once the set time is up, carefully remove the
rotisserie with the chicken using the tongs 3.
Loosen the skewer clamps 0 and pull the
chicken off the rotisserie 6.
and close the door.
SGBR 1500 B3
GB
│
11 ■
Cleaning and care
DANGER – ELECTRIC SHOCK!
► Before cleaning the appliance, disconnect the
plug from the mains power socket!
Risk of electric shock!
NEVER immerse the appliance in water or
any other liquid!
WARNING! RISK OF INJURY!
► Always allow the appliance to cool down
before cleaning it. Otherwise there is a risk
of burns!
■ It is best to clean the appliance and accessories
as soon as they have cooled down. This makes
food residues easier to remove.
ATTENTION! DAMAGE TO PROPERTY!
► Do not use abrasive or aggressive cleaning
materials. These could damage the surface of
the appliance!
► Do not clean the components of the appliance
in a dishwasher!
► Do not clean the cooking chamber with an
oven spray as this may make residues on the
heating elements impossible to remove.
■ Wipe the appliance with a damp cloth. If neces-
sary, put a little mild detergent on the cloth and
wipe this off afterwards with a cloth dampened
with clean water. Dry everything properly.
■ Clean the cooking chamber and the glass door
with a moist cloth. If necessary, put a little mild
detergent on the cloth and wipe this off afterwards with a cloth dampened with clean water.
Dry everything properly.
■ Clean the tongs /3, the rotisserie 6, the
skewer clamps 0, the restrainer ., the baking
tray -, the rack ! and the crumb tray in
warm soapy water. Dry all parts properly after
cleaning.
Storage
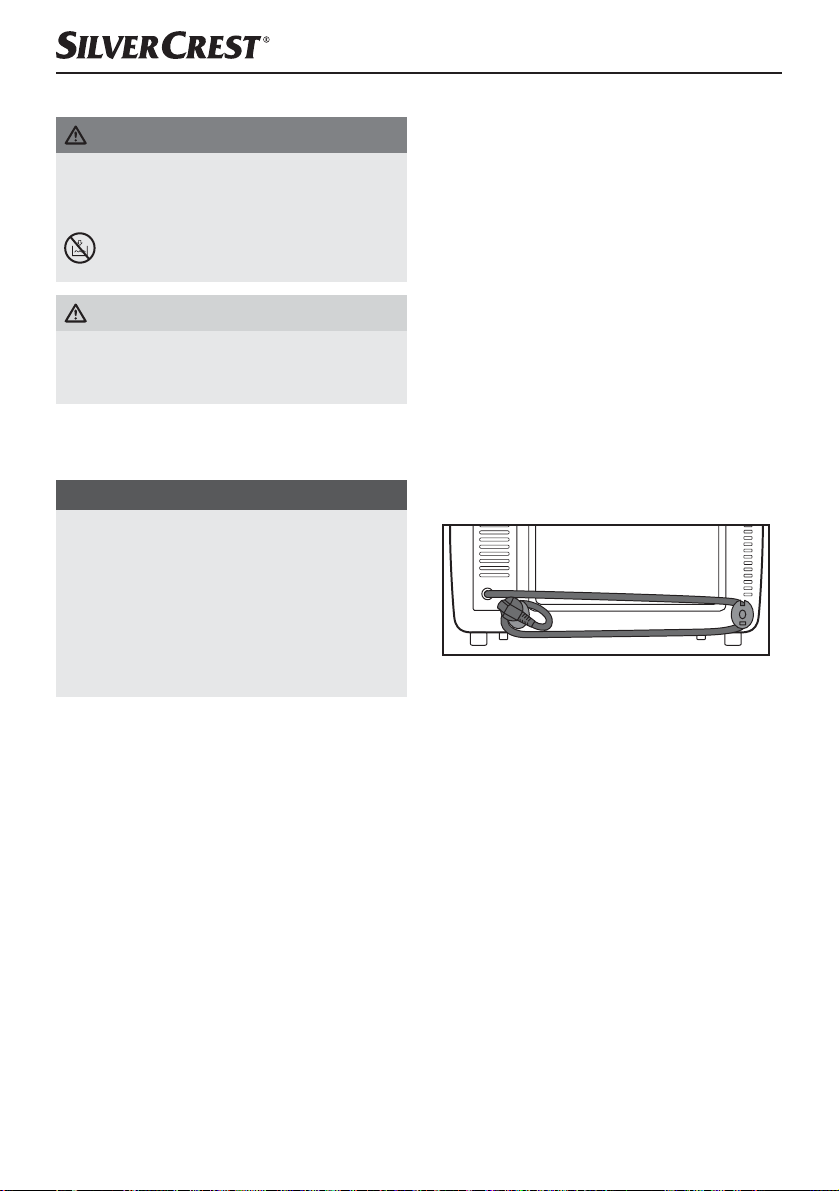
■ You can wind the mains cable around the spacers
on the rear side of the appliance and attach the
plug to one of the spacers:
■ Store the cleaned appliance and its accessories
in a clean, dust-free and dry location.
■ 12 │ GB
SGBR 1500 B3

Troubleshooting
Fault Cause Solution
The mains plug is not connected to the
mains power.
The appliance is not
working.
The control lamp
comes on and but the
appliance does not
heat up.
The cooking time of
the food seems very
long
Smoke and smells
develop during use.
If the malfunction cannot be corrected with the above suggestions, or if you have found some other
kind of malfunction, please contact our Customer Service.
The mains power socket is defective.
The appliance is defective. Contact Customer Services.
The function switch is set to OFF.
The glass door has been opened often
to check the cooking progress.
The wrong temperature level has been set. Check the temperature settings.
There is detergent or food residue on the
heating elements.
Insert the plug into a mains power
socket.
Use a different mains power
socket.
Turn the function switch to the
desired function.
Do not open the glass door
any more often than is absolutely
necessary.
Remove the food from the appliance and continue cooking
process with the glass door
open until the smoke stops.
SGBR 1500 B3
GB
│
13 ■

Disposal
Under no circumstance should
the appliance be disposed of
as standard domestic waste.
This product is subject to the
provisions of European Directive 2012/19/EU.
Dispose of the appliance via an approved waste
disposal company or your municipal waste disposal
facility. Please observe applicable regulations.
Please contact your waste disposal facility if you
are in any doubt.
The packaging is made of environmen-
tally friendly materials which you can
dispose of at your local recycling centre.
Kompernass Handels GmbH
warranty
Dear Customer,
This appliance has a 3-year warranty valid from
the date of purchase. If this product has any faults,
you, the buyer, have certain statutory rights. Your
statutory rights are not restricted in any way by the
warranty described below
Warranty conditions
The validity period of the warranty starts from the
date of purchase. Please keep your original receipt
in a safe place. This document will be required as
proof of purchase.
If any material or production fault occurs within
three years of the date of purchase of the product,
we will either repair or replace the product for you
at our discretion. This warranty service is dependent on you presenting the defective appliance and
the proof of purchase (receipt) and a short written
description of the fault and its time of occurrence.
If the defect is covered by the warranty, your product
will either be repaired or replaced by us. The repair
or replacement of a product does not signify the
beginning of a new warranty period.
.
Warranty period and statutory
claims for defects
The warranty period is not prolonged by repairs
effected under the warranty. This also applies to
replaced and repaired components. Any damage
and defects present at the time of purchase must
be reported immediately after unpacking. Repairs
carried out after expiry of the warranty period shall
be subject to a fee.
Scope of the warranty
This appliance has been manufactured in accordance with strict quality guidelines and inspected
meticulously prior to delivery.
The warranty covers material faults or production
faults. The warranty does not extend to product
parts subject to normal wear and tear or fragile
parts such as switches, batteries, baking moulds or
parts made of glass.
The warranty does not apply if the product has
been damaged, improperly used or improperly
maintained. The directions in the operating instructions for the product regarding proper use of
the product are to be strictly followed. Uses and
actions that are discouraged in the operating
instructions or which are warned against must be
avoided.
This product is intended solely for private use and
not for commercial purposes. The warranty shall be
deemed void in cases of misuse or improper handling,
use of force and modifications/repairs which have
not been carried out by one of our authorised
Service centres.
■ 14 │ GB
SGBR 1500 B3

Warranty claim procedure
To ensure quick processing of your case, please
observe the following instructions:
▯ Please have the till receipt and the item number
(e.g. IAN 12345) available as proof of purchase.
▯ You will find the item number on the type plate,
an engraving on the front page of the instructions
(bottom left), or as a sticker on the rear or bottom
of the appliance.
▯ If functional or other defects occur, please
contact the service department listed either by
telephone or by e-mail.
▯ You can return a defective product to us free of
charge to the service address that will be provided
to you. Ensure that you enclose the proof of purchase (till receipt) and information about what
the defect is and when it occurred.
You can download these instructions
along with many other manuals,
product videos and software on
www.lidl-service.com.
Service
Service Great Britain
Tel.: 0871 5000 720 (£ 0.10/Min.)
E-Mail: kompernass@lidl.co.uk
IAN 274498
Importer
Please note that the following address is not the
service address. Please use the service address
provided in the operating instructions.
KOMPERNASS HANDELS GMBH
BURGSTRASSE 21
44867 BOCHUM
GERMANY
www.kompernass.com
Recipes
In this section, we provide you with various sample
recipes for preparing dishes. These examples are
recommendations. Cooking times may vary.
These recipes are provided without guarantee.
All information on ingredients and preparation is
indicative only. Modify the suggested recipes to
taste. We hope you enjoy the recipes and wish
you “bon appetit”!
NOTE
Take note of the preparation guidelines provided
on the food packaging.
Muffins
Ingredients for four people:
♦ 1 cup of flour
♦ 1 teaspoon of baking powder
♦ 1 egg
♦ 1 tablespoon of melted butter
♦ 1 cup of milk
♦ 3 tablespoons of sugar
♦ 1 pinch salt
♦ for variations: also nuts, chopped bananas or
chocolate flakes
Preparation:
1) Gradually mix the flour, baking powder, egg,
milk, salt and sugar together in a bowl, one
by one.
2) Melt the butter in a saucepan and mix it into
the dough.
3) Subject to taste, blend in the nuts, chocolate
flakes or mashed bananas.
4) Place the prepared dough into standard muffin
moulds and place them on the baking tray -.
5) Bake the muffins at 220°C on the bottom rail
using top & bottom heat for about 15 minutes.
SGBR 1500 B3
GB
│
15 ■

Hawaiian toast
Ingredients for 4 pieces of toast:
♦ 4 slices of toasting bread
♦ 1–2 tablespoons of remoulade
♦ 120 g cooked ham
♦ 1/2 tin of pineapples
♦ 4 slices of cheese for gratinating
♦ Curry
Preparation:
♦ Toast the bread slices.
♦ Spread the remoulade thinly over the pieces of
toast and lay the slices of cooked ham on top.
♦ Lay one slice of pineapple on each piece of
toast. Season with curry.
♦ Then place a slice of cheese over each of the
pineapple slices.
♦ Lay the Hawaiian toasts on the rack ! and
bake at 200°C for about 8 minutes on the
upper rail using top heat.
Baking deep-frozen pizza
Preparation:
♦ Place the rack ! on the upper rail in the cooking
chamber.
♦ Place the deep-frozen pizza (without packaging)
onto the rack !.
♦ Bake the pizza, using upper and lower heat, for
about 20 minutes.
♦ Please follow the instructions on the packaging
regarding temperature.
Spritzgebäck cookies
Ingredients:
♦ 125 g butter
♦ 125 g sugar
♦ 1 packet of vanilla sugar
♦ 1 pinch salt
♦ 1 egg
♦ 1 egg white
♦ 250 g flour (type 405)
♦ 1 teaspoon of baking powder
♦ Zest of half a lemon
Preparation:
1) Beat the butter until foamy.
2) Add the sugar, vanilla sugar, lemon zest and
eggs.
3) Mix the flour, baking powder and salt and stir
into the mixture using a mixing spoon.
4) Allow the dough to stand for about 10 minutes.
5) Shape the dough as desired, e.g. with the assistance of a mincer, cookie cutters or a piping
bag.
6) Line the baking tray - with baking paper and
place the cookies on this.
7) Bake the cookies on the top rail of a preheated
oven at 180°C, using top and bottom heat,
for about 10–15 minutes, until they are golden
brown.
NOTE
This quantity of dough is sufficient for several
baking trays -.
■ 16 │ GB
SGBR 1500 B3

Bread rolls
Ingredients:
♦ 300 g flour (or wholemeal flour)
♦ 2 heaped teaspoons of baking powder
♦ 200 g linseeds
♦ 1 egg
♦ 500 g quark or curd cheese
♦ 1 teaspoon of salt
♦ Subject to taste: caraway seeds, onions,
bacon ...
Preparation:
1) Knead all ingredients together well and then
shape into small rolls.
2) Line the baking tray - with baking paper and
place the rolls on this.
3) Bake on the top rail at about 200°C for
around 30 minutes.
NOTE
This quantity of dough is sufficient for several
baking trays -.
Meringues
Ingredients:
♦ 1 egg white
♦ Salt
♦ 45 g sugar
Preparation:
1) Place the chilled egg white into a fat-free mixing
bowl. Ensure that no egg yolk is mixed in with
it or the meringue will not solidify.
2) Beat the egg white at a slow speed, so that the
bubbles formed in the meringue are not too
large.
3) Add a pinch of salt to taste.
4) Gradually add in half of the sugar when the
meringue starts to solidify.
5) Then beat it at the highest speed until stiff.
6) Add the remaining sugar. This allows the
meringue to attain the required solidity.
7) Fill a piping bag fitted with a large star nozzle
with the meringue mixture and squeeze out
rosettes, slithers or other shapes onto a baking
tray - lined with baking paper. Leave a little
space between each shape.
8) Preheat the oven with grill to approx. 100° C
with hot air.
9) Bake the meringues with hot air at approx.
100° C for about 2 hours.
SGBR 1500 B3
GB
│
17 ■

Buttered croutons
Ingredients:
♦ 2 slices of toasting bread
♦ 1 tbsp. butter
Preparation:
1) Cut the bread into small cubes.
2) Melt the butter at low heat in a saucepan and
mix in the cubed bread.
3) Line a baking tray - with baking paper and
distribute the bread cubes evenly on it.
4) Bake the bread cubes at 170°C (top heat)
on the upper rail until golden brown (approx.
15–20 minutes).
NOTE
You can also use herb or garlic butter instead
of regular butter. Baking time is then reduced by
about 5 minutes.
Minced meat baguettes
Ingredients:
♦ 2 baguette rolls
♦ 250 g minced meat (half and half)
♦ 2 tomatoes
♦ 1 onion (diced)
♦ 2 tbsp. tomato purée
♦ 40 g grated Parmesan cheese
♦ 4 slices of cheese
♦ Salt and pepper
Preparation:
1) Slice the baguettes and hollow them out.
2) Mix together the minced meat, tomato paste,
onion, Parmesan, some salt and a little pepper.
3) Shape the minced meat into four equal-sized,
flat burgers and place them on the baguette
halves.
4) Cut the tomatoes into slices and arrange them
on the baguettes.
5) Arrange the cheese slices on the baguettes.
6) Place the baguettes on a baking tray - and
then bake them on the bottom rail at about
230°C in a preheated oven using top and
bottom heat for about 20 minutes.
■ 18 │ GB
NOTE
You can also season the minced meat mixture
with basil, chilli or other spices.
SGBR 1500 B3

Cauliflower (gratinated)
Ingredients:
♦ 1/2 head cauliflower (about 250g)
♦ 3 lemon slices
♦ 1 tbsp. butter
♦ 1 heaped tsp. flour
♦ 1 tbsp. lemon juice
♦ 1 tbsp. slivered almonds
♦ 2 tbsp. gratin cheese (grated)
♦ Salt, pepper, nutmeg
Salmon-filled flaky pastries (burek)
Ingredients:
♦ 1 pack of flaky pastry slices (approx. 8 pieces)
♦ 1 pack of smoked salmon, sliced (about 200 g)
♦ 1 lemon
♦ 1 onion
♦ 1 pack of cream cheese (200 g)
♦ Fresh dill
♦ Salt and pepper
♦ 1 egg yolk
Preparation:
1) Divide the cauliflower into florets and wash
them.
2) Cook the cauliflower with the lemon slices in
boiling, salted water for 8–10 minutes until the
cauliflower is al dente. Retain about 150 ml
of the cooking water before pouring the rest
away.
3) Melt the butter in a saucepan and then brown
the flour, while stirring continuously, for about
1 minute.
4) Continue stirring and pour in the cauliflower
water and let it cook for about 2 minutes. If the
roux gets too solid, gradually add more water
until a creamy consistency is achieved. Season
with lemon juice, nutmeg, salt and pepper.
5) Place the cauliflower in a baking dish (about
14 cm in diameter) and pour the sauce evenly
over it.
6) Sprinkle in the cheese and almond slivers over it.
7) Place the baking dish on the baking tray -.
8) Bake the prepared dish at 200 °C in a preheated oven, using top and bottom heat, for
about 20 minutes on the bottom rail.
Preparation:
1) Separate the puff pastry sheets and, if necessary, allow them to thaw.
2) Mix the cream cheese with salt, pepper and
the juice of one lemon.
3) Finely dice the onion.
4) Add half of the salmon and the onion to the
cream cheese mixture and mix it all coarsely
with a blender.
5) Cut the remaining salmon into thin strips.
6) Add the salmon and the dill to the mixture and
blend all ingredients together.
7) Place individual tablespoonfuls of the mixture
on a flaky pastry sheet and fold them over.
8) Coat the resulting pouch with egg yolk.
9) Place the burek pieces on a baking sheet -.
Leave sufficient space between the individual
pouches because the flaky pastry will expand.
10) Bake the pastries on the lower rail at around
230°C using top and bottom heat for about
25–30 minutes. The flaky pastry should turn
light brown in colour.
NOTE
The stated quantity of pastry is sufficient for
several baking trays -.
SGBR 1500 B3
GB
│
19 ■

■ 20 │ GB
SGBR 1500 B3

Tartalomjegyzék
Bevezető .............................................................22
Rendeltetésszerű használat ..............................................22
A csomag tartalma .....................................................22
A készülék leírása .....................................................22
Műszaki adatok .......................................................22
Biztonsági utasítások ...................................................23
A készülék felállítása ...................................................26
A készülék használata ..................................................26
Üvegajtó .........................................................................26
Morzsatálca behelyezése ............................................................26
Nyárs használata ..................................................................27
Sütőlemez/sütőrács használata .......................................................28
Az első használat előtt ..................................................28
A készülék használata ..................................................29
Funkciókapcsoló ...................................................................29
Hőmérséklet-szabályozó
Időzítő
...........................................................................29
Grillezés és sütés ......................................................29
.............................................................29
Grillezés nyárssal ......................................................30
Tisztítás és ápolás ......................................................32
Tárolás ...............................................................32
Hibaelhárítás .........................................................33
Ártalmatlanítás ........................................................34
Szerviz ...........................................................................34
Gyártja ..........................................................................34
Jótállási tájékoztató ....................................................35
Receptek .............................................................37
│
HU
SGBR 1500 B3
21 ■

Bevezető
Gratulálunk új készüléke megvásárlásához!
Vásárlásával kiváló minőségű termék mellett döntött.
A használati utasítás a termék része. Fontos tudnivalókat tartalmaz a biztonságra, használatra és
ártalmatlanításra vonatkozóan. A termék használata előtt ismerkedjen meg valamennyi használati
útmutatóval és biztonsági figyelmeztetéssel. Csak
a leírtak szerint és a megadott célokra használja
a készüléket. A készülék harmadik személynek
történő továbbadása esetén adja át a készülékhez
tartozó valamennyi leírást is.
Rendeltetésszerű használat
A grillező- és sütőautomata kizárólag ételek
melegítésére, sütésére és grillezésére szolgál.
A készülék kizárólag magánháztartásokban
használható. Ne használja kereskedelmi célra.
Minden egyéb felhasználás rendeltetésellenesnek
minősül és anyagi károkat vagy személyi sérülést
idézhet elő
A csomag tartalma
♦ Grillsütő
♦ 1 sütőlemez
♦ 1 sütőrács
♦ 2 fogó
♦ nyárs 2 kapoccsal
♦ 1 morzsatálca
♦ használati útmutató
TUDNIVALÓ
Közvetlenül kicsomagolás után ellenőrizze a csomag tartalmának teljességét és sértetlenségét.
Szükség esetén forduljon a szervizhez.
A készülék leírása
„A“ ábra:
hajtómű
hőmérséklet-szabályozó
funkciókapcsoló
időzítő
működésjelző lámpa
üvegajtó
behelyezett morzsatálca
alsó fűtőszálak
nyárstartó
„B“ ábra:
fogó (sütőlemezhez vagy sütőrácshoz)
- sütőlemez
3 fogó (nyárshoz)
! sütőrács
. rögzítő
0 nyárskapcsok
6 nyárs
Műszaki adatok
Névleges feszültség: 220 - 240 V ~,
50/60 Hz
Maximális
teljesítményfelvétel 1500 W
A készülék élelmiszerekkel érintkező
részei élelmiszer-biztosak.
■ 22 │ HU
SGBR 1500 B3

Biztonsági utasítások
VESZÉLY – ÁRAMÜTÉS!
► Tilos a készülékház felnyitása vagy a készülék javítása. Ez
nem biztonságos és a garancia is érvényét veszti. A meghibásodott készüléket a kereskedő, vagy felhatalmazott szakember segítségével kell kijavíttatni.
► A veszélyek elkerülése érdekében a sérült hálózati csatlako-
zót vagy vezetéket azonnal cseréltesse ki erre feljogosított
szakemberrel vagy az ügyfélszolgálattal.
► A készülékházba nem kerülhet folyadék. Védje a készüléket
a nedvességtől és ne használja a szabadban. Ezen kívül
nem szabad folyadékkal töltött tárgyakat, mint pl. vázát
a készülékre állítani. Tűzveszély és elektromos áramütés
veszélye áll fenn! Ha mégis folyadék kerül a készülékházba,
azonnal húzza ki a készülék hálózati dugóját a hálózati
csatlakozóaljzatból és javíttassa meg a készüléket.
► Soha ne fogja meg nedves kézzel a készüléket, a hálózati
kábelt és a csatlakozódugót. Ekkor elektromos áramütés
veszélye áll fenn.
Soha ne merítse a készüléket vízbe vagy más folyadékba!
Ilyen esetben áramütés miatt életveszély alakul ki, ha működés közben folyadék kerül a feszültség alatt álló részekre.
SGBR 1500 B3
HU
│
23 ■

FIGYELMEZTETÉS – SÉRÜLÉSVESZÉLY!
► A készüléket 8 éves kor feletti gyermekek, valamint csökkent
fizikai, érzékszervi vagy mentális képességű vagy tapasztalattal és/vagy tudással nem rendelkező személyek csak
felügyelet mellett használhatják, vagy ha megtanították őket
a készülék biztonságos használatára és megértették az
ebből eredő veszélyeket.
► Gyermekek nem játszhatnak a készülékkel.
► Tisztítást és a felhasználói karbantartást 8 évesnél fiatalabb
vagy felügyelet nélküli gyermekek nem végezhetnek.
► Ne engedjen 8 évesnél fiatalabb gyerekeket a készülék és a
csatlakozóvezeték közelébe.
► Úgy helyezze el a hálózati kábelt, hogy arra senki ne lép-
hessen rá és senki ne botolhasson meg benne.
► Használat közben ne érjen hozzá az üvegajtóhoz vagy a
burkolathoz, mert ezek felforrósodnak. Az üvegajtó kinyitásához edényfogót használjon, nehogy megégesse magát!
► Soha ne érjen a fűtőszálakhoz vagy a kémlelő ablakhoz a
készülék működése közben vagy a készülék lehűlése előtt.
Működés közben ne nyúljon a sütőtérbe. Várjon amíg a
készülék lehűl. Egyébként megégetheti magát.
► Használat után hagyja lehűlni a készüléket, mielőtt azt
elszállítaná!
► A forró készüléket edényfogó kesztyűvel vagy edényfogó
kendővel fogja meg!
Vigyázat! Forró felület!
■ 24 │ HU
SGBR 1500 B3

FIGYELEM – ANYAGI KÁR!
► A készülék üzemeltetéséhez ne használjon külső időkapcsolót
vagy külön távműködtető rendszert.
► Üzemeltetés közben soha se hagyja a készüléket felügyelet
nélkül.
► Ügyeljen arra, hogy a készülék, a hálózati kábel és a csatla-
kozó ne érjen forró felülethez (pl. főzőlap), illetve azokat ne
érje nyílt láng.
► Csak a mellékelt eredeti tartozékokkal üzemeltesse a készü-
léket.
► Ne törje meg és ne szorítsa be a hálózati kábelt.
► A csatlakozót soha ne a kábelnél fogva húzza ki, mindig a
csatlakozóvéget fogja meg.
► Működés közben nem szabad semmilyen gyúlékony anyagot
a grillező- és sütőautomata közvetlen közelében tárolni
(pl. edénytörlő, edényfogó kendő stb.).
► Soha ne szárítson textíliákat vagy egyéb tárgyakat a
készüléken, a készülék fölött vagy a készülék belsejében.
Ez tűzveszélyes.
SGBR 1500 B3
HU
│
25 ■

A készülék felállítása
A készülék használata
FIGYELMEZTETÉS! TŰZVESZÉLY!
► Soha ne állítsa a készüléket fali szekrény
alá vagy függöny, szekrénysor, illetve más
gyúlékony tárgyak mellé.
► A készülék és a faliszekrények, mennyezet,
oldalfal, stb. között felfelé legalább 10 cm,
oldalirányban pedig 5 - 5 cm távolságnak
kell lennie. Ezért nem szabad a készüléket pl.
szekrénybe vagy hasonló helyekre állítani.
Ellenkező esetben a készülék megfelelő szellőzése nem biztosított és tüzet okozhat vagy
megrongálódhat.
► A készüléket csak hőálló felületre helyezze!
Ellenkező esetben tűzveszély fenyeget és
a készülék megrongálódhat. A készülék
alatti terület elszíneződhet és megsérülhet.
Ezenkívül, puha felület esetén maradandó
nyomok keletkezhetnek a felületen.
VESZÉLY - ELEKTROMOS ÁRAMÜTÉS!
► Ne állítsa a készüléket víz közvetlen közelébe,
pl. mosogató, mosdókagyló mellé, vagy nedves pincehelyiségekbe. Ellenkező esetben
áramütés veszélye áll fenn.
■ A készüléket stabil, sík és hőálló felületre állítsa
(pl. rozsdamentes acél munkalapra vagy természetes kőből pl. gránitból készült munkalapra).
Gondoskodjon a készülék körüli megfelelő
szellőzésről.
■ Tolja a készüléket hátlapjával egészen a falig.
A hátoldali távtartóknak a falhoz kell érniük.
Győződjön meg arról, hogy a fal hőálló anyagból, például csempéből, természetes kőből vagy
gránitból készült.
■ Tisztítson meg minden alkatrészt a „Tisztítás és
ápolás“ részben leírtak alapján.
Üvegajtó
FIGYELEM! ANYAGI KÁR VESZÉLYE!
►
Ne támaszkodjon az üvegajtóra .
Ne tegyen tárgyakat az üvegajtóra .
Ezáltal megsérülhetnek a csuklópántok.
■ Ha különösen magas zsírtartalmú ételt készít,
akkor nagyobb füst képződhet. Ebben az
esetben ne csukja be teljesen az üvegajtót ,
hanem hagyja résnyire nyitva:
Az üvegajtó ütköző pozícióval rendelkezik, így
csak résnyire marad nyitva: Ha az üvegajtót
óvatosan csukja be, akkor kevéssel a bezáródás
előtt ebben a helyzetben marad.
■ Az aszalt gyümölcs készítését szolgáló gyümölcs-
szárításnál is bekattanó állásban kell maradnia
az üvegajtónak , így a nedvesség el tud
távozni és a gyümölcs jobban megszárad.
Morzsatálca behelyezése
■ Tolja be a morzsatálcát az alsó fűtőszálak
alá oly módon, hogy egyenletesen feküdjön a
készülék alján
ként is használható.
. A magasan ívelt oldal fogantyú-
■ 26 │ HU
SGBR 1500 B3

Nyárs használata
FIGYELMEZTETÉS! SÉRÜLÉSVESZÉLY!
► A forró nyárs 6 készülékbe helyezéséhez és
kiemeléséhez mindig használja a fogót 3.
■ A grillezni kívánt élelmiszert a két
nyárskapoccsal 0 rögzítheti a nyársra 6.
Oldja ki a nyárskapcsok 0 rögzítőit ., majd
tolja el ezeket oly módon, hogy a grillezni kívánt
élelmiszert megfelelően tartsák, végül szorítsa
meg ismét a rögzítőket ..
■ Először a nyárs 6 horony nélküli végét tolja
be a hajtóműbe (1. ábra):
1. ábra: Nyárs 6 betolása a hajtóműbe .
■ Ezután a nyárs 6 horonnyal ellátott másik végét
helyezze be a nyárstartóba (2. ábra):
TUDNIVALÓ
► Nyárs 6 használata esetén a sütőlemezt -
mindig az alsó sínre kell helyezni. A tepsi
ilyenkor felfogja a lecsepegő folyadékot.
■ A forró nyárs 6 kiemeléséhez helyezze a
fogó 3 végén lévő kampót a nyárs 6végén
lévő mélyedésekbe (3. ábra):
3. ábra: A fogó 3 beakasztása a nyársba 6
■ Először a nyárs 6 bal oldalát emelje ki a nyárs-
tartóból , majd a nyársat 6 húzza ki a
hajtóműből .
2. ábra: Nyárs 6 behelyezése a nyárstartóba
SGBR 1500 B3
HU
│
27 ■

Sütőlemez/sütőrács használata
FIGYELMEZTETÉS! SÉRÜLÉSVESZÉLY!
► A forró sütőlemez -/forró sütőrács ! ké-
szülékbe való behelyezéséhez, vagy kiemeléséhez használja mindig a fogót .
■ A sütőlemezt -/sütőrácsot ! tolja be a készü-
lék sütőterében lévő 3 sín egyikére.
FIGYELEM! ANYAGI KÁR VESZÉLYE!
► A sütőlemezt -/sütőrácsot ! soha ne tolja
közvetlenül a fűtőszálakra .
■ A forró sütőlemez - vagy a sütőrács ! kieme-
léséhez a fogót az alábbiak szerint kell
beakasztani:
4. ábra: A fogó beakasztása a sütőrácsba !
Az első használat előtt
1) Csatlakoztassa a hálózati csatlakozót egy
aljzatba.
2) Forgassa a hőmérséklet-szabályozót az
óramutató járásával megegyező irányba
ütközésig, a legmagasabb hőmérsékletre.
3) A funkciókapcsolót tekerje „felső és alsó
sütésre“
4) Nyissa ki az üvegajtót és a művelet közben
hagyja nyitva.
5) Vegye ki az esetlegesen a sütőtérbe helyezett
tartozékokat.
6) Állítsa be az időzítőt 20 percre.
TUDNIVALÓ
► A készülék első felmelegedése során a gyár-
tásból visszamaradt anyagok miatt enyhe
füstöt és szagot érezhet. Ez teljesen normális
és veszélytelen.
Gondoskodjon elegendő szellőzésről, nyisson
ki például egy ablakot.
A készülék 20 perc múlva magától kikapcsol.
A sütési folyamat idő előtti megszakításához
forgassa el a hőmérséklet-szabályozót
az óramutató járásával ellentétes irányba,
egészen ütközésig, és állítsa az időzítőt
„OFF - 0” állásba.
7) Hagyja lehűlni a készüléket és tisztítsa meg
a “Tisztítás és ápolás” részben leírtak szerint.
A készülék ezzel üzemkész.
.
5. ábra: A fogó beakasztása a sütőlemezbe -.
■ 28 │ HU
SGBR 1500 B3

A készülék használata
Funkciókapcsoló
A funkciókapcsoló segítségével bekapcsolhatja
a készüléket, és 5 különféle funkciót állíthat be:
Jelzések Jelentés
Időzítő
Az időzítő segítségégével a sütési időt állíthatja be:
■ Állítsa az időzítőt a kívánt sütési időre.
A beállított idő elteltével hangjelzés hangzik fel,
és a készülék felfűtése leáll.
A „felső sütés/légkeverés/nyárs“
kiválasztása esetén megáll a nyárs 6 forgatása.
funkció
„Alsó sütés”
pl. sütemény sütéséhez
„Felső sütés”
pl. átsütéshez
„Felső & alsó sütés“
pl. pizza sütéséhez
„Felső sütés/
légkeverés/nyárs“
pl. szárnyas grillezéséhez
„Felső & alsó sütés/
légkeverés“
pl. zsemle átsütéséhez
„OFF“ a készülék ki van
kapcsolva
Hőmérséklet-szabályozó
A hőmérséklet-szabályzóval beállíthatja a kívánt
hőmérsékletet.
■ A „felső sütés“
ső & alsó sütés“
„ “ jelzésű skála segítségével állíthatja be.
■ A „felső sütés/légkeverés/nyárs“
„felső & alsó sütés/légkeverés“
hőmérsékletét a „ “ jelzésű skála segítségével
állíthatja be.
, „alsó sütés“ vagy „fel-
megfelelő hőmérsékletét a
vagy
megfelelő
Grillezés és sütés
1) Helyezze be a morzsatálcát a készülékbe.
2) Vegye ki a sütőrácsot ! és a sütőlemezt - a
készülékből. Szükség esetén bélelje ki sütőpapírral a sütőlemezt -, illetve kenje be sütéshez
alkalmas zsiradékkal.
TUDNIVALÓ
► Az ételtől függően a sütő előmelegítést
igényel. Tartsa magát az adott receptben
foglaltakhoz. Az előmelegítés az alábbi
esetekben jelent megoldást:
– nagyon rövid sütési idő,
– ropogós kéreg,
– állandó hőmérsékletet igénylő, érzékeny
ételek, például szuflék.
► Ha nem szükséges előmelegítés, akkor hagyja
ki a 3. lépést).
3) Fűtse fel a készüléket kb. 10 percen keresztül
(hőmérséklet-beállítástól függően) a kívánt
hőmérsékletre:
– Válassza ki a kívánt hőmérsékletet a hőmér-
séklet-szabályozóval . Ügyeljen a megfe-
lelő skála használatára (lásd: „Hőmérsékletszabályozó“.)
– Ezt követően, válassza ki a kívánt funkciót
a funkciókapcsolóval .
SGBR 1500 B3
HU
│
29 ■

TUDNIVALÓ
► A légkeverés használata esetén elhagyhatja
a sütő- és grillezőtér előmelegítését.
– Állítsa be az előmelegítési időt (kb. 10 perc)
az időzítővel .
– Csukja be az üvegajtót .
4) Az idő lejártát követően, helyezze a grillezni,
illetve sütni kívánt élelmiszert a sütőrácsra !,
illetve a sütőlapra -, majd tolja be a sínek
egyikére. Ügyeljen arra, hogy a grillezni, illetve
sütni kívánt élelmiszer megfelelő távolságra legyen a készülék belső falaitól és a fűtőszálaktól.
A beállított idő elteltével a készülék automatikusan
kikapcsol, hangjelzés hallatszik fel, és a működésjelző lámpa kialszik.
TUDNIVALÓ
A sütési folyamat idő előtti megszakításához
forgassa el a hőmérséklet-szabályozót az
óramutató járásával ellentétes irányba, egészen
ütközésig, és állítsa az időzítőt „OFF - 0"
állásba.
7) A sütést követően vegye ki a sütőrácsot, !,
illetve a sütőlemezt - a fogó segítségével.
8) Állítsa a funkciókapcsolót „OFF" állásba.
TUDNIVALÓ
► Ha a sütőrácson ! erősen csöpögő grillételt
készít, tolja a sütőlemezt - a legalsó sínre.
Így felfogható a lecsöpögő zsiradék és a készülék a későbbikben könnyebben tisztítható.
5) A grillezés/sütés megkezdése előtt csukja be
az üvegajtót .
6) Állítsa be a kívánt grillezési, illetve sütési időt
az időzítővel . A maximális grillezési, illetve
sütési idő 120 perc.
TUDNIVALÓ
► Amennyiben az étel grillezési/sütési ideje
nem éri el a 20 percet, akkor az időzítőt
először állítsa 40 percre, majd állítsa vissza
a kívánt grillezési/sütési időre.
A működésjelző lámpa jelzi a készülék be-
kapcsolt állapotát. Az időzítő kapcsolója az
óramutató járásával ellentétesen, az „OFF - 0“
felé forog.
Grillezés nyárssal
1) Helyezze be a morzsatálcát a készülékbe.
2) Ha esetleg be van helyezve, vegye ki a nyársat 6
a készülékből.
3) Csúsztassa a sütőlemezt - a legalsó sínre.
4) Rögzítse a grillezni kívánt élelmiszert a nyárskapcsok 0 segítségével. Ügyeljen arra, hogy
a grillezni kívánt élelmiszer a sütőtér-fal érintése
nélkül, szabadon tudjon forogni a sütőtérben.
A nyárs 6forgásiránya könnyen megváltozhat akkor, ha ellenállásba ütközik a grillétel.
A nyárson 6 lévő két mélyedésnek szabadon
kell maradnia, ellenkező esetben a nyársat 6
nem lehet megfogni a fogóval 3.
5) Rögzítse a nyársat 6 a sütőtérben (lásd a
„Nyárs használata“ fejezetet).
6) Csukja be az üvegajtót .
■ 30 │ HU
SGBR 1500 B3

TUDNIVALÓ
A sütési folyamat idő előtti megszakításához
forgassa el a hőmérséklet-szabályozót az
óramutató járásával ellentétes irányba, egészen
ütközésig, és állítsa az időzítőt OFF - 0
állásba.
7) Állítsa be a hőmérséklet-szabályozón a
kívánt hőmérsékletet.
8) Állítsa a funkciókapcsolót „felső sütés/
légkeverés/nyárs“
időzítőn a kívánt grillezési időt.
A készülék megkezdi a grillezést, és a nyárs 6
forogni kezd.
A működésjelző lámpa jelzi a készülék be-
kapcsolt állapotát. Az időzítő kapcsolója az
óramutató járásával ellentétesen, az „OFF - 0”
felé forog.
A beállított idő elteltével a készülék automatikusan
kikapcsol, hangjelzés hallatszik fel, és a működést
jelző lámpa kialszik.
TUDNIVALÓ
A sütési folyamat idő előtti megszakításához
forgassa el a hőmérséklet-szabályozót az
óramutató járásával ellentétes irányba, egészen
ütközésig, és állítsa az időzítőt „OFF - 0“
állásba.
9) A grillezést követően távolítsa el a nyársat 6
a fogó 3 segítségével.
10) Állítsa a funkciókapcsolót „OFF" állásba.
állásba. Állítsa be az
GRILLCSIRKE - PÉLDA
Hozzávalók
♦ grillcsirke (kb. 1,3 kg, megtisztítva)
♦ fűszerek (só, paprika)
♦ étolaj
1) Belülről és kívülről sózza be és paprikázza
be a grillcsirkét. Külső részét kenje be hőálló
étolajjal.
2) Tolja fel grillnyársra a grillcsirkét, majd
rögzítse a nyárskapcsok 0 segítségével.
Ügyeljen arra, hogy a nyárs 6mélyedései
szabadon maradjanak, így azokat 6könynyedén megfoghatja a fogó 3segítségével.
A grillcsirke formájától függően, szükség
lehet a szárnyak és combok tűzálló kötöző
cérnával történő rögzítésére, hogy forgás
közben ne ütközzenek a készülékhez.
3) Csúsztassa a sütőlemezt - a legalsó sínre.
4) A készüléket melegítse kb. 10 percen keresztül a „Felső & alsó sütés/légkeverés“
funkcióval kb. 210°C-ra.
5) A nyársra helyezett grillcsirkét helyezze be
a készülékbe a fogó 3 segítségével.
6) Állítsa a funkciókapcsolót „felső sütés/
légkeverés/nyárs
be az ajtót.
7) Állítsa az időzítőt kb. 80 percre.
A sütési idő a grillcsirke méretétől és jellemzőitől függően eltérő lehet.
8) A grillcsirkét időnként kenegesse át étolajjal.
Bőre így ropogós lesz.
9) A beállított idő leteltét követően óvatosan
vegye ki a nyársra helyezett grillcsirkét
a fogó 3 segítségével. Oldja ki a nyárskapcsokat 0 és húzza le a nyárson lévő
grillcsirkét 6.
“ pozícióba, és csukja
SGBR 1500 B3
HU
│
31 ■

Tisztítás és ápolás
VESZÉLY - ELEKTROMOS ÁRAMÜTÉS!
► Tisztítás előtt mindig húzza ki az aljzatból a
hálózati csatlakozót. Elektromos áramütés
veszélye áll fenn!
Soha ne merítse a készüléket vízbe vagy
más folyadékba!!
FIGYELMEZTETÉS! SÉRÜLÉSVESZÉLY!
► Mindig hagyja lehűlni a készüléket, mielőtt
megtisztítaná. Egyéb esetben balesetveszély
áll fenn!
■ A készüléket nedves kendővel törölje át. Szükség
esetén tegyen mosogatószert a törlőkendőre,
majd tiszta vízzel benedvesített kendővel törölje
át a felületet. Töröljön mindent teljesen szárazra.
■ A sütőteret és az üvegajtót nedves kendővel
tisztítsa. Szükség esetén tegyen mosogatószert
a törlőkendőre, majd tiszta vízzel benedvesített
kendővel törölje át a felületet. Töröljön mindent
teljesen szárazra.
■ A fogót /3, a nyársat 6, a nyárskapcsokat 0,
a rögzítőket ., a sütőlapot -, a sütőrácsot !
és a morzsatálcát meleg mosogatószeres
vízben tisztítsa. A tisztítás után minden alkatrészt
alaposan szárítson meg.
■ A legjobb, ha a készüléket és a tartozékokat
rögtön a lehűlés után megtisztítja. Ebben az
esetben az élelmiszer-maradékok könnyebben
eltávolíthatók.
FIGYELEM! ANYAGI KÁR VESZÉLYE!
► Ne használjon súroló vagy erős hatású tisztí-
tószert! Ezek kárt tehetnek a felületben.
► Ne tisztítsa a készüléket mosogatógépben!
► Ne tisztítsa a sütőteret sütőtisztító spray-vel,
mivel a fűtőszálakra ragadt maradványokat
nem lehet eltávolítani.
Tárolás
■ A hálózati kábelt és a készülék hátoldalán lévő
távtartó köré tekerheti és a csatlakozódugót a
távtartón rögzítheti:
■ A megtisztított készüléket és a tartozékokat
tiszta, pormentes és száraz helyen kell tárolni.
■ 32 │ HU
SGBR 1500 B3

Hibaelhárítás
Hiba Oka Megoldás
A hálózati csatlakozó nincs az elektromos
hálózatra csatlakoztatva.
A készülék nem
működik.
Világít a működés-
jelző lámpa ,
de a készülék nem
melegszik fel.
Az ételek sütési ideje
nagyon hosszúnak
tűnik.
Használat közben
füst és szag kelet-
kezik.
Ha a hibát nem lehet elhárítani a fenti hibaelhárító tippekkel, vagy ha ezektől eltérő zavarokat észlel,
akkor forduljon szervizünkhöz.
A hálózati csatlakozó aljzat hibás.
A készülék elromlott. Forduljon a szervizhez.
A funkciókapcsoló OFF állásban áll.
Nagyon sokszor kinyitották az üvegajtót
a sütés ellenőrzéséhez.
Helytelen hőmérséklet-értéket állítottak be.
A fűtőszálakon tisztítószer vagy
élelmiszer-maradványok maradtak.
Csatlakoztassa a hálózati
csatlakozót egy aljzatba.
Használjon másik csatlakozó
aljzatot!
Tekerje a funkciókapcsolót
a kívánt funkcióra.
Az üvegajtót csak szükség
esetén nyissa ki.
Ellenőrizze a hőmérséklet-beállítást.
Vegye ki az ételeket és a füst
teljes megszűnéséig nyitott üveg
ajtóval folytassa a sütést.
SGBR 1500 B3
HU
│
33 ■

Ártalmatlanítás
Semmi esetre se dobja a
készüléket a háztartási
hulladékba. A termékre a
2012/19/EU uniós irányelv
vonatkozik.
A készüléket engedélyezett hulladékgyűjtő helyen
vagy a helyi hulladékeltávolító üzemnél tudja leadni.
Vegye figyelembe az érvényben lévő előírásokat.
Ha bizonytalan, vegye fel a kapcsolatot a hulladékkezelővel.
A csomagolás környezetbarát anyagok-
ból áll, melyet a helyi hulladékhasznosítónál adhat le.
Szerviz
Szerviz Magyarország
Tel.: 0640 102785
E-Mail: kompernass@lidl.hu
IAN 274498
Gyártja
Ügyeljen arra, hogy az alábbi cím nem a szerviz
címe. Először forduljon a megjelölt szervizhez.
KOMPERNASS HANDELS GMBH
BURGSTRASSE 21
44867 BOCHUM
GERMANY
www.kompernass.com
■ 34 │ HU
SGBR 1500 B3

JÓTÁLLÁSI TÁJÉKOZTATÓ
A termék megnevezése:
Grillsütő
A termék típusa:
SGBR 1500 B3
A gyártó cégneve és címe:
KOMPERNASS HANDELS GMBH
BURGSTRASSE 21
44867 BOCHUM
GERMANY
Az importáló és forgalmazó cégneve és címe: Lidl Magyarország Kereskedelmi Bt.,
H-1037 Budapest, Rádl árok 6.
1) A jótállási idő a Magyar Köztársaság területén, Lidl Magyarország Kereskedelmi Bt. üzletében történt
vásárlás napjától számított 3 év.
2) A jótállási igény a jótállási jeggyel érvényesíthető. A jótállási jegy szabálytalan kiállítása, vagy
átadásának elmaradása nem érinti a jótállási kötelezettség-vállalás érvényességét. Kérjük, hogy a
vásárlás tényének és időpontjának bizonyítására őrizze meg a pénztári fizetésnél kapott jótállási
jegyet (nyugtát).
3) A vásárlástól számított három napon belül érvényesített csereigény esetén a forgalmazó köteles a
terméket kicserélni, feltéve ha a hiba a rendeltetésszerű használatot akadályozza. A jótállási jogokat
a termék tulajdonosaként a fogyasztó érvényesítheti az áruházakban, valamint a jótállási tájékoztatóban feltüntetett szervizekben.
A fogyasztó jótállási kifogásáról a forgalmazó (szerviz) jegyzőkönyvet köteles felvenni, amelyben
rögzíteni kell a fogyasztó nevét, címét, a fogyasztási cikk (termék) megnevezését, vételárát, a vásárlás
időpontját, a hiba bejelentésének időpontját, a hiba leírását, a fogyasztó által érvényesíteni kívánt
igényt, a kifogás rendezésének módját.
Amennyiben a kifogás rendezésének módja a fogyasztó igényétől eltér, ennek indokolását a jegyzőkönyvben meg kell adni. A jegyzőkönyv másolatát a fogyasztónak át kell adni. Ha a kötelezett
a fogyasztó igényének teljesíthetőségéről annak bejelentésekor nem tud nyilatkozni, álláspontjáról
legkésőbb három munkanapon belül köteles értesíteni a fogyasztót.
A jótállás ideje alatt a fogyasztó kérheti a termék kijavítását, kicserélését, vagy ha a termék nem javítható vagy cserélhető, árleszállítást kérhet, vagy elállhat a szerződéstől és visszakérheti a vételárat. Ha
a forgalmazó, vagy szerviz a termék kijavítását megfelelő határidőre nem vállalja, vagy nem végzi el,
a fogyasztó a hibát a forgalmazó költségére kijavíthatja, vagy mással kijavíttathatja. A kijavítás során
a termékbe csak új alkatrész kerülhet beépítésre.
Gyártási szám:
274498
A termék azonosításra alkalmas részeinek meghatározása:
A szerviz neve, címe és telefonszáma:
Szerviz Magyarország
Zrinyi Utca 39, 2600 Vac,
Tel.: 06800 21225
/ Hornos Ltd.
SGBR 1500 B3
HU
│
35 ■

4) A fogyasztó a hiba felfedezésé után a lehető legrövidebb időn belül köteles a hibát bejelenteni és a
terméket a jótállási jogok érvényesítése céljából átadni. A hiba felfedezésétől számított két hónapon
belül bejelentett jótállási igényt időben közöltnek kell tekinteni. A közlés elmaradásából eredő kárért
a fogyasztó felelős. A jótállási igény érvényesíthetőségének határideje a termék, vagy fődarabjának
kicserélése, kijavítása esetén a kicserélt, vagy kijavított termékre, illetve alkatrészre újra kezdődik.
5) A rögzített bekötésű, illetve a 10 kg-nál súlyosabb, vagy tömegközlekedési eszközön nem szállítható
terméket az üzemeltetés helyén kell megjavítani. Abban az esetben, ha a javítás a helyszínen nem
végezhető el, a termék ki- és visszaszereléséről, valamint szállításáról a forgalmazónak kell gondoskodnia.
6) A jótállás nem áll fenn, ha a hiba a nem rendeltetésszerű használatból, átalakításból, helytelen tárolásból, vagy a használati utasítástól eltérő kezelésből, vagy bármely a vásárlást követő behatásból fakad,
vagy elemi kár okozta, és azt a forgalmazó, vagy a szerviz bizonyítja. A jótállás nem vonatkozik a
mozgó kopó alkatrészek (világítótestek, gumiabroncsok stb.) rendeltetésszerű elhasználódására. A
szerviz és a forgalmazó a kijavítás során nem felel a terméken a fogyasztó vagy harmadik személyek
által tárolt adatokért vagy beállításokért.
A jótállás a fogyasztó törvényből eredő szavatossági jogait és azok érvényesíthetőségét nem érinti.
A jótállási igény bejelentésének és javításra
átvételi időpontja:
A fogyasztó részére történő visszaadás
időpontja:
A szerviz bélyegzője, kelt és aláírása: A javításra tekintettel a jótállás új határideje:
A hiba oka:
A hiba javításának módja:
■ 36 │ HU
SGBR 1500 B3

Receptek
Ebben a fejezetben néhány ételkészítési példát
olvashat. Ezek a példák csak ajánlások.
Az elkészítési idők változhatnak.
A receptek sikerét nem garantáljuk. Valamennyi
hozzávaló és elkészítési mód adata csak hozzávetőleges érték. Egészítse ki a receptajánlatokat személyes tapasztalataival. Sok szerencsét kívánunk
a receptekhez és jó étvágyat.
TUDNIVALÓ
Ügyeljen az élelmiszerek csomagolásán található elkészítési útmutatókra.
Muffin
Hozzávalók négy főre:
♦ 1 bögre liszt
♦ 1 teáskanál sütőpor
♦ 1 tojás
♦ 1 evőkanál olvasztott vaj
♦ 1 bögre tej
♦ 3 evőkanál cukor
♦ 1 csipet só
♦ ezen kívül a különböző változatokhoz dió/
mogyoró, apróra vágott banán vagy csokoládépehely
Elkészítés:
1) Keverőtálban lassan és a megadott sorrendben
keverje össze a lisztet, a sütőport, a tojást, a
tejet, a sót és a cukrot.
2) Egy másik edényben olvassza fel a vajat és
keverje bele a tésztába.
3) Ízlés szerint keverjen bele diót/mogyorót,
csokoládépelyhet vagy összetört banánt.
4) A kész tésztát tegye megszokott muffin formába
és helyezze a sütőlemezre -.
5) Az alsó sínekre helyezett muffinokat süsse
220° C-on felső és alsó sütéssel kb. 15 percig.
Hawaii pirítós
Hozzávalók 4 pirítóshoz:
♦ 4 szelet pirítós kenyér
♦ 1-2 evőkanál remoulade
♦ 120 g főtt sonka
♦ 1/2 konzervdoboz ananász
♦ 4 szelet sajt a pirításhoz
♦ curry
Elkészítés:
♦ Pirítsa meg a pirítós kenyér szeleteket.
♦ Ezt követően kenje meg a pirítós kenyér sze-
leteket remoulade-mártással és tegye rá a főtt
sonkát.
♦ A megkent, sonkás pirítós kenyérszeletekre
tegyen ananászt. Fűszerezze curryvel.
♦ Végül helyezzen egy-egy szelet sajtot az ananász
tetejére.
♦ Helyezze a Hawaii pirítóst a sütőrácsra ! és
süsse a grillező- és sütőautomata felső sínjeire
helyezve, felső sütéssel 200°C-on kb. 8 percig.
Mélyfagyasztott pizza sütése
Elkészítés:
♦ Csúsztassa a sütőrácsot ! a grillező- és sütőtér
felső sínjeire.
♦ È mélyhűtött pizzát csomagolás nélkül tegye fel
a rácsrostélyra !.
♦ Süsse a pizzát felső és alsó sütéssel kb. 20 percig.
♦ Kérjük vegye figyelembe a csomagoláson talál-
ható hőmérséklet-információkat.
SGBR 1500 B3
HU
│
37 ■

Omlós teasütemény
Hozzávalók:
♦ 125 g vaj
♦ 125 g cukor
♦ 1 csomag vaníliás cukor
♦ 1 csipet só
♦ 1 tojás
♦ 1 tojásfehérje
♦ 250 g (405 típusú) liszt
♦ 1 teáskanál sütőpor
♦ fél citrom reszelt héja
Elkészítés:
1) Keverje habosra a vajat.
2) Adja hozzá a cukrot, a vaníliás cukrot, a
citromhéjat és a tojást.
3) Keverje össze a lisztet, a sütőport és a sót és
fakanállal keverje a tésztába.
4) Hagyja pihenni a tésztát kb. 10 percig.
5) Alakítsa a tésztát a kívánt formára, pl. húsdaráló,
kiszúró forma vagy kinyomó zsák segítségével.
6) Helyezze az omlós teasüteményt a sütőpapírral
bélelt sütőlemezre -.
7) Az omlós teasüteményt előmelegített sütő felső
sínjein, 180°C-on, felső és alsó sütéssel kb.
10-15 percig addig süsse, amíg aranybarna
nem lesz.
Zsemle
Hozzávalók:
♦ 300 g liszt (vagy teljes kiőrlésű liszt)
♦ bő 2 teáskanál sütőpor
♦ 200 g lenmag
♦ 1 tojás
♦ 500 g túró
♦ 1 teáskanál só
♦ ízlés szerint kömény, hagyma, szalonna ...
Elkészítés:
1) Alaposan gyúrja össze a hozzávalókat és a
tésztából formázzon kis zsemléket.
2) Helyezze a zsemléket a sütőpapírral bélelt
sütőlemezre -.
3) Süsse a zsömléket felső sütéssel kb. 200°C-on
kb. 30 percig a felső síneken.
TUDNIVALÓ
A tészta mennyisége több sütőlemezre elegendő.
TUDNIVALÓ
A tészta mennyisége több sütőlemezre elegendő.
■ 38 │ HU
SGBR 1500 B3

Habcsók
Hozzávalók:
♦ 1 tojásfehérje
♦ só
♦ 45 g cukor
Elkészítés:
1) Tegye a lehűtött tojásfehérjét egy zsírmentes
keverőtálba. Tojássárga nem keveredhet
hozzá, ellenkező esetben a tojáshab nem lesz
kemény.
2) A tojásfehérjét alacsony fordulatszámon úgy
verje fel, hogy ne képződjenek túl nagy buborékok a tojáshabban.
3) Fűszerezze egy csipet sóval.
4) Fokozatosan adagolja hozzá a cukor felét
akkor, ha a tojáshab már elkezd keményedni.
5) Ezt követően verje fel a tojásfehérjét a legmagasabb fokozaton.
6) Adja hozzá a maradék cukrot. Ezzel érheti el
a habcsók-massza szükséges szilárdságát.
7) Töltse a habcsók-masszát egy nagy csillag-nyílású
habzsákba és nyomjon ki rózsákat, nyelveket
vagy más formákat egymástól kis távolságra a
sütőpapírral bélelt sütőlemezre -.
8) A grillező- és sütőautomatát kb. 100° C légkeringetésre fűtse elő.
9) A habcsókot a középső sínen kb. 100° C
légkeringetésen, mintegy két órán át süsse.
Vajas pirított kenyérkockák
Hozzávalók:
♦ 2 szelet pirítós kenyér
♦ 1 evőkanál vaj
Elkészítés:
1) Vágja fel apró kockákra a pirítós kenyeret.
2) Egy edényben olvassza fel a vajat alacsony
hőmérsékleten és keverje bele a pirítós kenyeret.
3) Bélelje ki a sütőlemezt - sütőpapírral és ossza
el rajta egyenletesen a kenyérkockákat.
4) Addig süsse a kenyér kockákat kb. 170°C-on,
felső sütéssel a felső sínen, amíg aranybarnák
nem lesznek (kb. 15-20 perc).
TUDNIVALÓ
A sima vaj helyett fűszernövényes vagy fokhagymás vajayt is használhat. Ebben az esetben a
sütési idő kb. 5 perccel csökken.
SGBR 1500 B3
HU
│
39 ■

Darált húsos baguette
Hozzávalók:
♦ 2 baguette-zsemle
♦ 250 g darált hús (fele-fele)
♦ 2 paradicsom
♦ 1 fej hagyma (kockára vágva)
♦ 2 evőkanál paradicsomsűrítmény
♦ 40 g reszelt parmezán sajt
♦ 4 szelet sajt
♦ só és bors
Karfiol (pirítva)
Hozzávalók:
♦ 1/2 fej karfiol (kb. 250 g)
♦ 3 szelet citrom
♦ 1 evőkanál vaj
♦ 1 púpos teáskanál liszt
♦ 1 evőkanál citromlé
♦ 1 evőkanál forgácsolt mandula
♦ 2 evőkanál sütni való sajt (reszelve)
♦ só, bors, szerecsendió
Elkészítés:
1) Vágja fel a baguettet és vájja ki a belsejét.
2) Keverje össze a darált húst, a paradicsompürét,
a hagymát, a parmezán sajtot, kevés sót és
borsot.
3) Formázzon a húsmasszából 4 egyforma nagyságú, lehetőleg lapos húspogácsát és helyezze
azokat a félbevágott baguette-ekre.
4) Szeletelje fel a paradicsomot és ossza szét a
baguette-eken.
5) Ossza szét a sajtot a baguette-eken.
6) Helyezze a baguette-ket a sütőlemezre - és
süsse kb. 20 percig, kb. 230°C-ra előmelegített sütőben, az alsó sínen, felső és alsó
sütéssel.
TUDNIVALÓ
A darált húst bazsalikommal, chilivel vagy egyéb
fűszerekkel is fűszerezheti.
Elkészítés:
1) Szedje rózsáira és mossa meg a karfiolt.
2) Citromszeletekkel együtt, forrásban lévő sós
vízben főzze 8-10 percen keresztül puhára a
karfiolt. A kiöntésnél hagyjon meg kb. 150 ml
főzővizet.
3) Edényben olvassza fel a vajat és pirítsa a lisztet
folyamatos keverés mellett kb. 1 percig.
4) Folyamatos keverés közben adja hozzá a karfiol
főzővizét és főzze kb. 2 percig. Ha a rántás
túl sűrű, fokozatosan addig adjon hozzá kevés
vizet, amíg krémes állagú nem lesz. Fűszerezze
citromlével, sóval, borssal és szerecsendióval.
5) Tegye a karfiolt kb. 14 cm átmérőjű sütőedénybe
és egyenletesen elosztva öntse rá a mártást.
6) Szórja rá a sajtot és a mandulát.
7) Helyezze a sütőedényt a sütőlemezre -.
8) Süsse a felfújtat kb. 200°C-on előmelegített
sütőben, felső és alsó sütéssel kb. 20 percig
az alsó sínen.
■ 40 │ HU
SGBR 1500 B3

Lazaccal töltött levelestészta-batyu
Hozzávalók:
♦ 1 csomag levelestészta-lapok (kb. 8 darab)
♦ 1 csomag szeletelt füstölt lazac (kb. 200 g)
♦ 1 citrom
♦ 1 fej hagyma
♦ 1 csomag krémsajt (200 g)
♦ friss kapor
♦ só és bors
♦ 1 tojássárgája
Elkészítés:
1) Szedje szét a levelestészta-lapokat és szükség
esetén hagyja kiolvadni.
2) Keverje össze a krémsajtot sóval, borssal és
egy citrom levével.
3) Darabolja apró kockákra a hagymát.
4) Adja a lazac felét és a hagymát a krémsajtmasszához és az egészet pürésítse durva
állagúra egy botmixer segítségével.
5) A többi lazacot darabolja vékony csíkokra.
6) Adja a lazacot és a kaprot a masszához és
az egészet keverje össze.
7) Tegyen egy-egy evőkanál masszát a leveles
tészta lapokra és hajtsa össze azokat.
8) A kész batyut kenje meg tojássárgájával.
9) Helyezze a levelestészta-batyukat sütőlemezre -.
Hagyjon elegendő helyet a batyuk között, mert
a leveles tészta megkel.
10) Süsse a leveles tészta batyukat az alsó sínen
kb. 230°C-on felső és alsó sütéssel kb. 25-30
percen keresztül. A leveles tésztának enyhén
barnának kell lennie.
TUDNIVALÓ
A megadott mennyiség több sütőlemezre elegendő.
SGBR 1500 B3
HU
│
41 ■

■ 42 │ HU
SGBR 1500 B3

Kazalo
Uvod ................................................................44
Predvidena uporaba ...................................................44
Vsebina kompleta .....................................................44
Opis naprave .........................................................44
Tehnični podatki .......................................................44
Varnostni napotki ......................................................45
Namestitev ...........................................................48
Uporaba naprave ......................................................48
Steklena vrata .....................................................................48
Vstavljanje pladnja za drobtine ........................................................48
Uporaba vrtljivega nabodala .........................................................49
Uporaba pekača/rešetke ............................................................50
Pred prvo uporabo .....................................................50
Uporaba naprave ......................................................51
Funkcijsko stikalo ...................................................................51
Gumb za nastavitev temperature
Časovnik
.........................................................................51
Peka na žaru in v pečici .................................................51
.......................................................51
Peka na žaru z vrtljivim nabodalom .......................................52
Čiščenje in vzdrževanje .................................................54
Shranjevanje ..........................................................54
Odprava napak .......................................................55
Odstranjevanje med odpadke ...........................................56
Proizvajalec ..........................................................56
Pooblaščeni serviser. . . . . . . . . . . . . . . . . . . . . . . . . . . . . . . . . . . . . . . . . . . . . . . . . . . .56
Garancijski list ........................................................56
Recepti ...............................................................57
│
SI
SGBR 1500 B3
43 ■

Uvod
Iskrene čestitke ob nakupu vaše nove naprave.
Odločili ste se za kakovosten izdelek. Navodila za
uporabo so sestavni del izdelka. Vsebujejo pomembne napotke za varnost, uporabo in odstranjevanje
naprave med odpadke. Preden začnete izdelek
uporabljati, se seznanite z vsemi napotki o njegovi
uporabi in varnosti. Izdelek uporabljajte le tako,
kot je opisano v navodilih, in samo za navedena
področja uporabe. Ob predaji izdelka tretji osebi
zraven priložite vso dokumentacijo.
Predvidena uporaba
Pečica z žarom je namenjena izključno za segrevanje, pripravo in peko jedi na žaru.
Naprava je namenjena izključno za uporabo v
zasebnih gospodinjstvih. Ne uporabljajte je v
poslovne namene.
Vsaka druga vrsta uporabe velja za nepredvideno
in lahko privede do materialne škode ali celo do
telesnih poškodb.
Vsebina kompleta
♦ Pečica s funkcijo žara
♦ 1 pekač
♦ 1 rešetka
♦ 2 prijemali
♦ Vrtljivo nabodalo z 2 sponkama
♦ 1 pladenj za drobtine
♦ Navodila za uporabo
NAPOTEK
Takoj ko izdelek in vse sestavne dele vzamete iz
embalaže, preverite, ali komplet vsebuje vse dele
in ali ti niso poškodovani. Po potrebi se obrnite
na servisno službo.
Opis naprave
Slika A:
pogon
gumb za nastavitev temperature
funkcijsko stikalo
časovnik
kontrolna lučka
steklena vrata
vstavljen pladenj za drobtine
spodnji grelni palici
sprejemni nastavek za vrtljivo nabodalo
Slika B:
prijemalo (za pekač ali rešetko)
- pekač
3 prijemalo (za vrtljivo nabodalo)
! rešetka
. zapora
0 sponki vrtljivega nabodala
6 vrtljivo nabodalo
Tehnični podatki
Nazivna napetost: 220 - 240 V~,
50/60 Hz
Največja poraba
električne energije: 1500 W
Vsi deli te naprave, ki lahko pridejo v stik
z živili, so primerni za živila.
■ 44 │ SI
SGBR 1500 B3

Varnostni napotki
NEVARNOST – ELEKTRIČNI UDAR!
► Ohišja naprave ne smete odpirati ali popravljati. V tem
primeru varnost ni zagotovljena in jamstvo preneha veljati.
Okvarjeno napravo dajte v popravilo samo trgovcu ali pooblaščenim strokovnim osebam.
► Da se izognete nevarnostim, naj vam poškodovane električne
vtiče ali električne kable takoj zamenjajo pooblaščeni strokovnjaki ali servisna služba.
► Ne dovolite, da bi v ohišje naprave zašle tekočine. Napra-
ve ne smete izpostavljati vlagi in je uporabljati na prostem.
Poleg tega na napravo ne postavljajte nobenih predmetov,
napolnjenih s tekočino, npr. vaz. Obstaja nevarnost požara
in električnega udara! Če v ohišje naprave vseeno vdre
tekočina, električni vtič naprave takoj potegnite iz vtičnice in
dajte napravo v popravilo.
► Naprave, električnega kabla in vtiča se nikoli ne dotikajte z
mokrimi rokami. V nasprotnem primeru lahko pride do udara
električnega toka.
Naprave nikoli ne potopite v vodo ali druge tekočine!
Če pridejo med delovanjem ostanki tekočine v stik z deli
pod električno napetostjo, lahko pride do smrtne nevarnosti
zaradi električnega udara.
SGBR 1500 B3
SI
│
45 ■

OPOZORILO – NEVARNOST TELESNIH POŠKODB!
► Napravo lahko uporabljajo otroci od 8. leta starosti naprej
in osebe z omejenimi fizičnimi, zaznavnimi ali duševnimi
sposobnostmi ali s pomanjkljivimi izkušnjami in/ali znanjem,
če jih pri tem nekdo nadzoruje ali jih je poučil o varni uporabi
naprave in so razumele nevarnosti, ki izhajajo iz uporabe
naprave.
► Otroci se z napravo ne smejo igrati.
► Otroci ne smejo naprave čistiti ali je vzdrževati kot uporabniki,
razen če so starejši od 8 let in dela izvajajo pod nadzorom.
► Otrokom, ki so mlajši od 8 let, približevanje napravi in pri-
ključni napeljavi ni dovoljeno.
► Električni kabel položite tako, da nihče ne more stopiti nanj
ali se spotakniti čezenj.
► Med uporabo se nikoli ne dotikajte steklenih vrat ali ohišja,
saj se to zelo segreje. Za odpiranje steklenih vrat uporabljajte
krpo za prijemanje loncev ipd., da preprečite opekline!
► Nikoli se ne dotikajte grelnih palic ali okna med delovanjem
naprave ali preden se je naprava ohladila. Med delovanjem
pečice vanjo ne segajte. Počakajte, da se naprava ohladi.
Drugače bi se lahko opekli.
► Po uporabi napravo pustite, da se ohladi, preden jo prestavite
drugam.
► Pri delu z vročo napravo vedno uporabljajte rokavice ali
krpe za prijemanje loncev!
Previdno! Vroča površina!
■ 46 │ SI
SGBR 1500 B3

POZOR – MATERIALNA ŠKODA!
► Naprave ne uporabljajte z zunanjo stikalno uro ali ločenim
daljinskim sistemom.
► Naprave med delovanjem nikoli ne pustite brez nadzora.
► Preprečite, da bi naprava, električni kabel ali električni vtič
prišel v stik z viri vročine, kot so kuhalne plošče ali odprti
plameni.
► Napravo uporabljajte samo s priloženo originalno opremo.
► Električnega kabla ne prepogibajte in ga ne stiskajte.
► Električni kabel iz električne vtičnice zmeraj povlecite za vtič,
ne vlecite pa za sam kabel.
► Med delovanjem v neposredni bližini pečice z žarom ne
sme biti hitro vnetljivih materialov (npr. kuhinjske krpe, krpe
za prijemanje loncev itd.).
► Na, nad ali v napravi nikoli ne sušite tekstilnih izdelkov ali
predmetov. Obstaja nevarnost požara.
SGBR 1500 B3
SI
│
47 ■

Namestitev
Uporaba naprave
OPOZORILO! NEVARNOST POŽARA!
► Naprave nikoli ne postavljajte pod viseče
omarice ali poleg zaves, sten omar ali drugih
vnetljivih predmetov.
► Razdalja naprave do visečih omaric, stropov,
sten ali podobnega mora navzgor znašati
najmanj 10cm, ob strani pa po 5cm. Zato
naprave ne smete postavljati v omare ipd.
V nasprotnem primeru ni možno zadostno
prezračevanje naprave in lahko pride do
požara ali okvare pečice.
► Napravo postavite samo na podlago, odporno
proti vročini. V nasprotnem primeru lahko pride
do požara in okvare naprave. Površina pod
dnom naprave se lahko obarva in poškoduje.
Poleg tega bi na mehki podlagi lahko ostale
trajne sledi.
NEVARNOST ‒ ELEKTRIČNI UDAR!
► Naprave ne postavljajte v neposredno bližino
vode, npr. ob pomivalna korita, kadi za pranje
ali v vlažne kletne prostore. V nasprotnem
primeru lahko pride do električnega udara.
■ Napravo postavite na trdno, ravno in proti vročini
odporno podlago (npr. na delovne površine iz
nerjavnega jekla ali na plošče iz naravnega
kamna, na primer granita). Poskrbite za zadosten pretok zraka okrog naprave.
■ Napravo s hrbtno stranjo postavite ob steno.
Odmični nastavki na hrbtni strani se morajo dotikati stene. Pazite na to, da je stena iz toplotno
odpornega materiala, npr. iz keramičnih ploščic,
naravnega kamna ali granita.
■ Očistite vse dele naprave, kot je opisano v po-
glavju „Čiščenje in vzdrževanje“.
Steklena vrata
POZOR! MATERIALNA ŠKODA!
►
Ne naslanjajte se na steklena vrata .
Na steklena vrata ne odlagajte nobenih
predmetov. To bi poškodovalo tečaje vrat.
■ Če so živila, ki jih pripravljate, zelo mastna, se
lahko pojavi močnejši dim. V takem primeru
steklenih vrat ne zaprite popolnoma, ampak
jih pustite odprta za velikost špranje:
Steklena vrata imajo položaj, v katerem se
zaskočijo, tako da ostanejo odprta za velikost
špranje: Če steklena vrata previdno priprete,
se malce pred zaprtjem zaskočijo v tem položaju.
■ Tudi pri sušenju sadežev za izdelavo suhega
sadja morajo steklena vrata ostati v položaju,
v katerem so se zaskočila, da vlaga lahko uhaja
in se sadje bolje posuši.
Vstavljanje pladnja za drobtine
■ Potisnite pladenj za drobtine pod spodnji
grelni palici , tako da se po vsej površini
prilega dnu naprave
lahko uporabljate kot ročaj.
. Navzgor upognjeno stran
■ 48 │ SI
SGBR 1500 B3

Uporaba vrtljivega nabodala
OPOZORILO!
NEVARNOST TELESNE POŠKODBE!
► Vedno uporabljajte prijemalo 3 za vstavljanje
vročega vrtljivega nabodala 6 v napravo in
za jemanje iz naprave.
■
Z obema s
živilo za peko na žaru pritrdite na vrtljivem nabodalu 6.
Sprostite zapori . na sponkah vrtljivega nabodala 0, premaknite ju tako, da je živilo za peko
na žaru trdno vpeto med sponkama, in zapori .
ponovno trdno privijte.
■ N
brez utora v pogon (slika 1):
ponkama vrtljivega nabodala 0 lahko
ajprej potisnite konec vrtljivega nabodala 6
NAPOTEK
► Vedno vstavite pekač - v spodnje vodilo,
kadar uporabljate vrtljivo nabodalo 6.
Pekač prestreže tekočino, ki se cedi iz jedi.
■ Za odstranjevanje vročega vrtljivega nabo-
dala 6 kavlja na koncu prijemala 3 vstavite
v vdolbini na vrtljivem nabodalu 6(slika 3):
Slika 3: Vstavitev prijemala 3 pod vrtljivo nabodalo 6
Slika 1: Potisnite vrtljivo nabodalo 6 v pogon .
■ Potem vstavite drugi konec vrtljivega nabodala 6
z globokim utorom v sprejemni nastavek za
vrtljivo nabodalo (slika 2):
Slika 2: Vstavite vrtljivo nabodalo 6 v sprejemni
nastavek za vrtljivo nabodalo .
SGBR 1500 B3
■ Najprej dvignite levo stran vrtljivega nabodala 6
iz sprejemnega nastavka za vrtljivo nabodalo ,
potem pa vrtljivo nabodalo 6 povlecite iz
pogona .
│
SI
49 ■

Uporaba pekača/rešetke
OPOZORILO!
NEVARNOST TELESNE POŠKODBE!
► Vedno uporabljajte prijemalo , kadar v
napravo vstavljate ali iz nje jemljete vroči
pekač -/vročo rešetko !.
■ Potisnite pekač -/rešetko ! v eno od 3 vodil
v pečici naprave.
POZOR! MATERIALNA ŠKODA!
► Pekača -/rešetke ! nikoli ne odlagajte
neposredno na grelni palici .
■ Da lahko odstranite vroč pekač - ali rešetko !,
vstavite prijemalo , kot sledi:
Slika 4: Vstavitev prijemala pri rešetki !.
Pred prvo uporabo
1) Električni vtič priklopite v električno vtičnico.
2) Gumb za nastavitev temperature obrnite
do konca v smeri urnega kazalca na najvišjo
temperaturo.
3) Obrnite funkcijsko stikalo na „zgornji in
spodnji grelnik“
4) Odprite steklena vrata in jih za ta postopek
pustite odprta.
5) Odstranite morebiti vstavljen pribor iz pečice.
6) Obrnite in nastavite časovnik na 20 minut.
NAPOTEK
► Pri prvem segrevanju naprave lahko zaradi
ostankov od proizvodnje nastaneta rahel
dim in vonj. To je popolnoma normalno in ni
nevarno.
Poskrbite za zadostno prezračevanje, tako
da na primer odprete okno.
Naprava se po 20 minutah samodejno izklopi.
Če želite postopek segrevanja predčasno prekiniti, do konca obrnite gumb za nastavitev
temperature v nasprotni smeri urnega kazalca in časovnik nastavite na "OFF – 0".
7) Počakajte, da se naprava ohladi, in jo očistite,
kot je opisano v poglavju „Čiščenje in vzdrževanje“.
Naprava je zdaj pripravljena za uporabo.
.
Slika 5: Vstavitev prijemala pri pekaču -.
■ 50 │ SI
SGBR 1500 B3

Uporaba naprave
Funkcijsko stikalo
S funkcijskim stikalom lahko vklopite napravo in
nastavite 5 različnih funkcij:
Simbol Pomen
„spodnji grelnik“
npr. za peko peciva
„zgornji grelnik“
npr. za opekanje
„zgornji in spodnji grelnik“
npr. za peko pice
„zgornji grelnik/kroženje
zraka/vrtljivo
nabodalo“
npr. za peko perutnine na
žaru
„zgornji in spodnji grelnik/
kroženje zraka“
npr. za dokončno peko
žemljic
„OFF“ – naprava je
izklopljena
Gumb za nastavitev temperature
Z gumbom za nastavitev temperature lahko
nastavite želeno temperaturo.
■ Ko nastavljate temperaturo za funkcije „zgornji
grelnik“
in spodnji grelnik“
oznako „ “.
■ Ko nastavljate temperaturo za funkcije „zgornji
grelnik/kroženje zraka/vrtljivo nabodalo“
„zgornji in spodnji grelnik/kroženje zraka“ , si
pomagajte s skalo z oznako „ “.
, „spodnji grelnik“
, si pomagajte s skalo z
ali „zgornji
ali
Časovnik
S pomočjo časovnika lahko nastavite čas
priprave jedi:
■ Časovnik prestavite na želeno stopnjo priprave
jedi. Po koncu nastavljenega časa se oglasi
zvočni signal in naprava se preneha segrevati.
Če je izbrana funkcija „zgornji grelnik/kroženje
zraka/vrtljivo nabodalo“
obračanje vrtljivega nabodala 6.
, se zaustavi tudi
Peka na žaru in v pečici
1) Položite pladenj za drobtine v napravo.
2) Rešetko ! in pekač - vzemite iz naprave.
Po potrebi ju obložite s papirjem za peko oz.
pekač - premažite z maščobo, primerno
za peko.
NAPOTEK
► Odvisno od jedi je pečico morda treba pred-
hodno segreti. Upoštevajte navodila v svojem
receptu. Predhodno segrevanje je vsekakor
smiselno pri:
– zelo kratkem času peke,
– hrustljavi skorji,
– občutljivih jedeh, za katere je potrebna
stalna temperatura, kot na primer sufle.
► Če predhodno segrevanje ni potrebno,
preskočite 3. korak.
3) Počakajte pribl. 10 minut (odvisno od nastavljene temperature), da se naprava segreje na
želeno temperaturo:
– Izberite želeno temperaturo z gumbom za
nastavitev temperature . Pazite na to, da
uporabljate pravilno skalo (glejte poglavje
„Gumb za nastavitev temperature“).
– Potem s funkcijskim stikalom izberite
želeno funkcijo.
SGBR 1500 B3
SI
│
51 ■

NAPOTEK
► Če izberete funkcijo kroženja zraka, lahko
praviloma pečete brez predhodnega segrevanja pečice.
– S časovnikom nastavite čas predhodnega
segrevanja (pribl. 10 minut).
– Zaprite steklena vrata .
4) Ko čas poteče, jed za pripravo na žaru oz.
peko položite na rešetko ! oz. v pekač - in
rešetko ali pekač potisnite v eno od vodil v pečici. Pri tem pazite, da ima jed za pripravo na
žaru oz. peko zadostno razdaljo do notranjih
sten in grelnih palic naprave.
NAPOTEK
► Če na rešetki ! pripravljate močno kaplja-
joče živilo za peko na žaru, v najnižje vodilo
potisnite pekač -. Tako se npr. prestreže
maščoba, ki kaplja z živila, in lahko napravo
pozneje lažje očistite.
5) Pred začetkom peke ali priprave jedi na žaru
zaprite steklena vrata .
6) S časovnikom nastavite želeni čas priprave
jedi na žaru oz. peke. Najdaljši možen čas
priprave jedi na žaru oz. peke je 120minut.
NAPOTEK
► Če znaša čas priprave vaše jedi na žaru oz.
peke manj kot 20minut, časovnik najprej
prestavite na 40 minut in potem nazaj na
želeni čas priprave jedi na žaru oz. peke.
Naprava se po poteku nastavljenega časa samodejno izklopi, oglasi se zvočni signal in kontrolna
lučka ugasne.
NAPOTEK
Če želite postopek segrevanja predčasno prekiniti,
do konca obrnite gumb za nastavitev temperature v nasprotni smeri urnega kazalca in
časovnik nastavite na „OFF“.
7) Po postopku segrevanja rešetko ! oz. pekač -
s pomočjo prijemala vzemite ven.
8) Funkcijsko stikalo prestavite na „OFF“.
Peka na žaru z vrtljivim
nabodalom
1) Položite pladenj za drobtine v napravo.
2) Če je vstavljeno, vzemite vrtljivo nabodalo 6
iz naprave.
3) Potisnite pekač - v najnižje vodilo.
4) Pritrdite živilo za peko na žaru s sponkama
vrtljivega nabodala 0. Pazite na to, da se
živilo za peko na žaru lahko prosto vrti v pečici,
ne da bi ga pri tem kaj oviralo. Zgodi se lahko,
da vrtljivo nabodalo 6spremeni smer vrtenja,
če živilo za peko na žaru zadene ob oviro.
Obe vdolbini na vrtljivem nabodalu 6 morata
biti prosto dostopni, drugače vrtljivega nabodala 6 ni mogoče prijeti s prijemalom 3.
5) Pritrdite vrtljivo nabodalo 6 v pečici (glejte
poglavje „Uporaba vrtljivega nabodala“).
6) Zaprite steklena vrata .
Kontrolna lučka prikazuje, da je naprava vklopljena. Stikalo časovnika se sedaj pomika v na-
sprotni smeri urnega kazalca proti „OFF“.
■ 52 │ SI
SGBR 1500 B3

NAPOTEK
Če želite postopek segrevanja predčasno prekiniti,
do konca obrnite gumb za nastavitev temperature v nasprotni smeri urnega kazalca in
časovnik nastavite na „OFF – 0“.
7) Z gumbom za nastavitev temperature nastavite želeno temperaturo.
8) Prestavite funkcijsko stikalo na „zgornji grelnik/
kroženje zraka/vrtljivo nabodalo“
Na časovniku nastavite želeni čas peke na
žaru.
Naprava zažene postopek peke na žaru in
vrtljivo nabodalo 6 se vrti.
Kontrolna lučka prikazuje, da je naprava vklopljena. Stikalo časovnika se sedaj pomika v
nasprotni smeri urnega kazalca proti „OFF“.
Naprava se po poteku nastavljenega časa samodejno izklopi, oglasi se zvočni signal in kontrolna
lučka ugasne.
NAPOTEK
Če želite postopek segrevanja predčasno prekiniti,
do konca obrnite gumb za nastavitev temperature v nasprotni smeri urnega kazalca in časovnik nastavite na „OFF – 0“.
9) Po koncu peke na žaru vrtljivo nabodalo 6
s pomočjo prijemala 3 vzemite ven.
10) Funkcijsko stikalo prestavite na „OFF“.
.
PRIMER PIŠČANCA NA ŽARU
Sestavine
♦ piščanec za peko na žaru (pribl. 1,3 kg,
brez drobovine)
♦ začimbe (sol, paprika)
♦ jedilno olje
1) Piščanca za peko na žaru s soljo in mleto
papriko začinite zunaj ter znotraj. Na
zunanji strani ga premažite z jedilnim oljem,
odpornim proti vročini.
2) Potisnite piščanca za peko na žaru na vrtljivo
nabodalo in ga pritrdite s sponkama vrtljivega nabodala 0. Pri tem pazite na to, da
vdolbine na vrtljivem nabodalu 6ostanejo
prosto dostopne, da lahko vrtljivo nabodalo 6
primete s prijemalom 3. Odvisno od oblike
piščanca je mogoče treba njegova krila in
bedra pritrditi z ognjevarno vrvico, da med
obračanjem ne udarjajo okrog sebe.
3) Potisnite pekač - v najnižje vodilo.
4) Napravo v času pribl. 10 minut s funkcijo
„zgornji in spodnji grelnik/kroženje zraka“
predhodno segrejte na pribl. 210 °C.
5) Piščanca na vrtljivem nabodalu s pomočjo
prijemala 3 namestite v napravo.
6) Nastavite funkcijsko stikalo na „zgornji grelnik/
kroženje zraka/vrtljivo nabodalo“
zaprite vrata.
7) Časovnik nastavite na pribl. 80 minut.
Čas priprave jedi se lahko razlikuje, kar je
odvisno od velikosti in lastnosti
piščanca za peko na žaru.
8) Piščanca za peko na žaru med pripravo
vedno znova premažite z malce jedilnega
olja. Tako bo bolj hrustljav.
9) Ko je nastavljeni čas potekel, vzemite nabodalo s piščancem previdno ven s prijemalom 3.
Sprostite sponki vrtljivega nabodala 0 in
piščanca povlecite z nabodala 6.
in
SGBR 1500 B3
SI
│
53 ■

Čiščenje in vzdrževanje
NEVARNOST ‒ ELEKTRIČNI UDAR!
► Pred vsakim čiščenjem električni vtič izvlecite
iz električne vtičnice! Obstaja nevarnost
električnega udara!
Naprave nikoli ne potopite v vodo ali
druge tekočine!
OPOZORILO!
NEVARNOST TELESNE POŠKODBE!
► Pred čiščenjem vedno počakajte, da se na-
prava ohladi. V nasprotnem primeru obstaja
nevarnost opeklin!
■ Najbolje, da napravo in dele pribora očistite,
takoj ko se ohladijo. Tako boste lažje odstranili
ostanke živil.
POZOR! MATERIALNA ŠKODA!
► Ne uporabljajte grobih ali agresivnih čistilnih
sredstev. Ta bi lahko poškodovala površino!
► Delov naprave ne čistite v pomivalnem stroju!
► Notranjosti pečice ne čistite s pršilom za
čiščenje pečic, saj ostankov pršila na grelnih
palicah ne bo več mogoče odstraniti.
■ Napravo obrišite z vlažno krpo. Po potrebi na
krpo nanesite blago pomivalno sredstvo in površine naknadno obrišite s krpo, navlaženo s čisto
vodo. Vse dele naprave skrbno osušite.
■ Notranjost pečice in steklena vrata očistite
z vlažno krpo. Po potrebi na krpo nanesite
blago pomivalno sredstvo in površine naknadno
obrišite s krpo, navlaženo s čisto vodo. Vse dele
naprave skrbno osušite.
■ Očistite prijemali /3, vrtljivo nabodalo 6,
sponki vrtljivega nabodala 0, zapori .,
pekač -, rešetko ! in pladenj za drobtine
v topli vodi za pomivanje. Po čiščenju vse dele
dobro osušite.
Shranjevanje
■ Električni kabel lahko ovijete okrog odmičnih na-
stavkov na hrbtni strani naprave in vtič pritrdite
na enem od distančnikov:
■ Očiščeno napravo in njen pribor hranite na
čistem ter suhem mestu brez prisotnosti prahu.
■ 54 │ SI
SGBR 1500 B3

Odprava napak
Napaka Vzrok Rešitev
Električni vtič ni priklopljen na električno
omrežje.
Naprava ne deluje.
Kontrolna lučka
sveti, naprava pa se
ne segreva.
Čas priprave jedi se
zdi zelo dolg.
Med uporabo se
pojavljata tudi dim in
neprijeten vonj.
Če motenj ni mogoče odpraviti s pomočjo navedenih ukrepov ali če ugotovite druge vrste motenj, se
obrnite na naš servis.
Električna vtičnica je pokvarjena.
Naprava je okvarjena. Obrnite se na servisno službo.
Funkcijsko stikalo je na OFF.
Steklena vrata so bila zelo pogosto
odprta zaradi preverjanja napredovanja
priprave jedi.
Nastavljena je napačna temperatura. Preverite temperaturne nastavitve.
Na grelnih palicah so ostanki čistilnih
sredstev ali živil.
Električni vtič priklopite v električno
vtičnico.
Uporabite drugo električno
vtičnico.
Obrnite funkcijsko stikalo na
želeno funkcijo.
Steklenih vrat ne odpirajte
pogosteje, kot je nujno potrebno.
Vzemite jedi iz naprave in
nadaljujte postopek priprave
pri odprtih steklenih vratih ,
dokler dim ne preneha nastajati.
SGBR 1500 B3
SI
│
55 ■

Odstranjevanje med odpadke
Naprave nikakor ne
odvrzite med običajne
gospodinjske odpadke.
Za izdelek velja evropska
direktiva 2012/19/EU.
Napravo oddajte pri podjetju, registriranem za odstranjevanje odpadkov, ali pri svojem komunalnem
podjetju za odstranjevanje odpadkov. Upoštevajte
trenutno veljavne predpise. V primeru dvoma se
obrnite na najbližje podjetje za odstranjevanje
odpadkov.
Embalaža je iz okolju prijaznih mate-
rialov, ki jih lahko oddate na krajevnih
zbirališčih odpadkov za recikliranje.
Proizvajalec
KOMPERNASS HANDELS GMBH
BURGSTRASSE 21
44867 BOCHUM
GERMANY
www.kompernass.com
Pooblaščeni serviser
Servis Slovenija
Tel.: 080080917
E-Mail: kompernass@lidl.si
IAN 274498
Garancijski list
1) S tem garancijskim listom Kompernass Handels
GmbH jamčimo, da bo izdelek v garancijskem
roku ob normalni in pravilni uporabi brezhibno
deloval in se zavezujemo, da bomo ob izpolnjenih spodaj navedenih pogojih odpravili
morebitne pomanjkljivosti in okvare zaradi napak
v materialu ali izdelavi oziroma po svoji presoji
izdelek zamenjali ali vrnili kupnino.
2) Garancija je veljavna na ozemlju Republike
Slovenije.
3) Garancijski rok za proizvod je 3 leta od datuma izročitve blaga. Datum izročitve blaga je
razviden iz računa.
4) Kupec je dolžan okvaro javiti pooblaščenemu
servisu oziroma se informirati o nadaljnjih postopkih na zgoraj navedeni telefonski številki.
Svetujemo vam, da pred tem natančno preberete navodila o sestavi in uporabi izdelka.
5) Kupec je dolžan pooblaščenemu servisu
predložiti garancijski list in račun, kot potrdilo
in dokazilo o nakupu ter dnevu izročitve blaga.
6) V primeru, da proizvod popravlja nepooblaščeni servis ali oseba, kupec ne more uveljavljati
zahtevkov iz te garancije.
7) Vzroki za okvaro oziroma nedelovanje izdelka
morajo biti lastnosti stvari same in ne vzroki, ki
so zunaj proizvajalčeve oziroma prodajalčeve
sfere. Kupec ne more uveljavljati zahtevkov iz
te garancije, če se ni držal priloženih navodil
za sestavo in uporabo izdelka ali če je izdelek
kakorkoli spremenjen ali nepravilno vzdrževan.
8) Jamčimo servisiranje in rezervne dele za minimalno dobo, ki je zahtevana s strani zakonodaje.
9) Obrabni deli oz. potrošni material so izvzeti iz
garancije.
10) Vsi potrebni podatki za uveljavljanje garancije
se nahajajo na dveh ločenih dokumentih
(garancijski list, račun).
11) Ta garancija proizvajalca ne izključuje pravic
potrošnika, ki izhajajo iz odgovornosti prodajalca
za napake na blagu.
Prodajalec:
Lidl Slovenija d.o.o. k.d., Pod lipami 1, SI-1218
Komenda
■ 56 │ SI
SGBR 1500 B3

Recepti
V tem poglavju vam nudimo nekaj primerov priprave
jedi. Primeri so le priporočila. Čas priprave se lahko
razlikuje od navedenega.
Vsi recepti so brez zagotovila za uspeh. Vsi podatki
o sestavinah in pripravi so približni. Predloge
receptov dopolnite s svojimi izkušnjami. Vsekakor
vam želimo veliko uspeha in dober tek.
NAPOTEK
Upoštevajte navodila za pripravo, navedena na
embalaži živil.
Mafini
Sestavine za štiri osebe:
♦ 1 skodelica moke
♦ 1 žlička pecilnega praška
♦ 1 jajce
♦ 1 jedilna žlica stopljenega masla
♦ 1 skodelica mleka
♦ 3 žlice sladkorja
♦ 1 ščepec soli
♦ po želji še oreški, koščki banane ali čokoladni
kosmiči
Priprava:
1) V skledi počasi in drugo za drugim pomešajte
moko, pecilni prašek, jajce, mleko, sol ter
sladkor.
2) V primerni posodi raztopite maslo in ga umešajte v testo.
3) Po želji primešajte oreške, čokoladne kosmiče
ali pretlačene banane.
4) Izdelano testo dajte v ustrezne modelčke za
mafine, te pa položite na pekač -.
5) Mafine v pekaču pecite pri 220°C z zgornjo
vročino in kroženjem zraka na spodnjem vodilu približno 15 minut.
Havajski opečenec
Sestavine za 4 opečence:
♦ 4 rezine opečenca (toast)
♦ 1–2 jedilni žlici remulade
♦ 120 g kuhane šunke
♦ 1/2 konzerve ananasa
♦ 4 rezine sira za popeko
♦ curry
Priprava:
♦ Rezine opečenca opecite.
♦ Nato jih na tanko namažite z remulado in obložite
s kuhano šunko.
♦ Na vsak obloženi opečenec položite po eno
rezino ananasa. Začinite s curryjem.
♦ Potem na vsak kos ananasa položite rezino sira.
♦ Kose havajskega opečenca položite na rešetko !
in jih v pečici z žarom pribl. 8 minut pecite
na zgornjem vodilu pri pribl. 200°C zgornje
vročine.
Peka zamrznjene pice
Priprava:
♦ Potisnite rešetko ! v zgornje vodilo v prostoru
za pripravo jedi.
♦ Položite zamrznjeno pico brez embalaže na
rešetko !.
♦ Pico pecite na zgornji in spodnji vročini pribl.
20 minut.
♦ Upoštevajte podatke o temperaturi, navedene
na embalaži.
SGBR 1500 B3
SI
│
57 ■

Brizgani keksi
Sestavine:
♦ 125 g masla
♦ 125 g sladkorja
♦ 1 zavitek vaniljevega sladkorja
♦ 1 ščepec soli
♦ 1 jajce
♦ 1 beljak
♦ 250 g moke (tip 405)
♦ 1 žlička pecilnega praška
♦ nastrgana lupina polovice limone
Priprava:
1) Maslo penasto umešajte.
2) Dodajte sladkor, vaniljev sladkor, limonino
lupino in jajca.
3) Moki primešajte pecilni prašek in sol ter jo
s kuhalnico umešajte v testo.
4) Testo pustite mirovati pribl. 10 minut.
5) Testo oblikujte v želeno obliko, npr. s pomočjo
strojčka za mletje mesa, modelčkov za izrezovanje ali vrečk za brizganje testa.
6) Kekse zložite na pekač -, obložen s papirjem
za peko.
7) Brizgane kekse pecite v poprej ogreti pečici
pri 180°C zgornje in spodnje vročine,
pribl.10–15 minut na zgornjem vodilu, dokler
niso zlatorumeni.
Žemlje
Sestavine:
♦ 300 g moke (ali polnozrnate moke)
♦ 2 čajni žlički pecilnega praška
♦ 200 g lanenih semen
♦ 1 jajce
♦ 500 g skute
♦ 1 čajna žlička soli
♦ po želji kumina, čebula, slanina ...
Priprava:
1) Vse skupaj dobro premesite in oblikujte majhne
žemljice.
2) Žemljice položite na pekač -, obložen s
papirjem za peko.
3) Na zgornjem vodilu jih pri pribl. 200°C zgornje vročine pecite približno 30 minut.
NAPOTEK
Količina testa zadostuje za več pekačev -.
NAPOTEK
Količina testa zadostuje za več pekačev -.
■ 58 │ SI
SGBR 1500 B3

Beljakovi poljubčki
Sestavine:
♦ 1 beljak
♦ sol
♦ 45 g sladkorja
Priprava:
1) Ohlajen beljak dajte v nenamaščeno posodo za
mešanje. V beljaku ne sme biti nič rumenjaka,
sicer se sneg iz beljaka ne bo strdil.
2) Beljak stepajte z majhno hitrostjo, da v snegu
ne nastanejo preveliki mehurčki.
3) Začinite ga z majhnim ščepcem soli.
4) Polovico sladkorja dodajajte postopoma, ko se
sneg začne strjevati.
5) Potem ga na največji stopnji zmešajte tako, da
postane trden.
6) Dodajte preostali sladkor. Tako bo masa za
poljubčke postala dovolj trdna.
7) Maso dajte v vrečko za brizganje z velikim
zvezdastim nastavkom in na majhni razdalji na
pekaču -, obloženem s papirjem za peko, z
brizganjem oblikujte rozete, jezičke ali druge
oblike.
8) Avtomat za jedi z žara in peko segrejte na
pribl. 100 °C s kroženjem zraka.
9) Poljubčke na zgornjem vodilu pecite pri pribl.
100 °C s kroženjem zraka pribl. 2 uri.
Maslene kruhove kockice
Sestavine:
♦ 2 rezini opečenca (toast)
♦ 1 žlica masla
Priprava:
1) Narežite opečenec na majhne kocke.
2) V loncu raztopite maslo na majhni vročini in
vmešajte koščke opečenca.
3) Na pekač - položite papir za peko in kocke
opečenca enakomerno razporedite po papirju.
4) Kocke opečenca pecite na pribl. 170°C
zgornje vročine na zgornjem vodilu, tako da se
zlatorumeno zapečejo (pribl. 15‒20 minut).
NAPOTEK
Namesto običajnega masla lahko uporabite
tudi takšnega z zelišči ali česnom. Čas peke se
potem skrajša za pribl. 5 minut.
SGBR 1500 B3
SI
│
59 ■

Francoske štruce (bagete) z mletim mesom
Sestavine:
♦ 2 francoski štruci
♦ 250 g mletega mesa (mešano)
♦ 2 paradižnika
♦ 1 čebula (narezana na kocke)
♦ 2 jedilni žlici paradižnikove mezge
♦ 40 g nastrganega parmezana
♦ 4 rezine sira
♦ sol in poper
Cvetača (popečena)
Sestavine:
♦ 1/2 glave cvetače (pribl. 250 g)
♦ 3 rezine limone
♦ 1 žlica masla
♦ 1 zvrhana žlica moke
♦ 1 žlica limoninega soka
♦ 1 žlica nasekanih mandljev
♦ 2 žlici sira za gratiniranje (nastrganega)
♦ sol, poper, muškatni orešek
Priprava:
1) Francoski štruci prerežite in odstranite sredico.
2) Zmešajte mleto meso, paradižnikovo mezgo,
čebulo, parmezan, malce soli in malce popra.
3) Iz mletega mesa oblikujte 4 enako velike, po
možnosti ploske polpete in jih položite na
polovice francoskih štruc.
4) Narežite paradižnik na rezine in te porazdelite
po polovicah štruc.
5) Potem po štrucah porazdelite še sir.
6) Položite francoske štruce na pekač - in jih
pecite pri pribl. 230°C v poprej segreti pečici
z zgornjo in spodnjo vročino pribl. 20 minut na
spodnjem vodilu.
NAPOTEK
Maso iz mletega mesa lahko začinite tudi z baziliko, čilijem ali drugimi začimbami.
Priprava:
1) Cvetačo razdelite na posamezne cvetove in
jih operite.
2) Cvetačo kuhajte z rezinami limone v vreli slani
vodi 8‒10 minut, tako da je cvetača ravno
dovolj mehka za ugriz. Pri odlivanju vode od
kuhanja dajte pribl. 150 ml na stran.
3) V loncu stopite maslo in dodajte moko ter ob
nenehnem mešanju v pribl. 1 minuti naredite
prežganko.
4) Ob nenehnem mešanju dolivajte vodo od
cvetače in vse skupaj pustite, da se kuha pribl.
2 minuti. Če je prežganka pregosta, ji postopoma dolivajte vodo, tako da pridobi mehko
konsistenco. Začinite jo z limoninim sokom,
soljo, poprom in muškatnim oreščkom.
5) Cvetačo dajte v posodo za pripravo narastka
(pribl. 14 cm premera) in jo enakomerno
prelijte z omako.
6) Potem čez vse skupaj potresite sir in mandljeve
koščke.
7) Posodo za narastek postavite na pekač -.
8) Narastek pecite pri pribl. 200°C v poprej
ogreti pečici na zgornji in spodnji vročini pribl.
20 minut na spodnjem vodilu.
■ 60 │ SI
SGBR 1500 B3

Žepki iz listnatega testa z lososovim nadevom
Sestavine:
♦ 1 zavitek kosov listnatega testa (pribl. 8 kosov)
♦ 1 zavitek dimljenega lososa v rezinah (pribl.
200 g)
♦ 1 limona
♦ 1 čebula
♦ 1 lonček sveži sir (200 g)
♦ sveži koper
♦ sol in poper
♦ 1 rumenjak
Priprava:
1) Kose listnatega testa ločite med seboj in jih po
potrebi pustite, da se odtalijo.
2) Zmešajte sveži sir s soljo, poprom in sokom ene
limone.
3) Narežite čebulo na fine kocke.
4) Svežemu siru dodajte polovico lososa in čebulo
ter vse skupaj na grobo stlačite s paličnim
mešalnikom.
5) Narežite preostalega lososa na tanke trakove.
6) Dodajte lososa in koper k siru ter vse skupaj
premešajte.
7) Na vsak list testa dajte po eno žlico sirove
mase in testo prepognite.
8) Tako nastale žepke premažite z rumenjakom.
9) Položite žepke iz listnatega testa na pekač -.
Med posameznimi žepki pustite dovolj prostora,
saj bo listnato testo vzhajalo.
10) Žepke iz listnatega testa na zgornjem vodilu
pecite pri pribl. 230°C zgornje in spodnje
vročine pribl. 25–30 minut. Listnato testo se
mora rahlo rjavo obarvati.
NAPOTEK
Navedena količina testa zadostuje za več
pekačev -.
SGBR 1500 B3
SI
│
61 ■

■ 62 │ SI
SGBR 1500 B3

Obsah
Úvod ................................................................64
Použití vsouladu surčením ..............................................64
Rozsah dodávky .......................................................64
Popis přístroje .........................................................64
Technické údaje .......................................................64
Bezpečnostní pokyny ...................................................65
Umístění ..............................................................68
Použití přístroje ........................................................68
Skleněná dvířka ....................................................................68
Vložení plechu na drobky ............................................................68
Použití otočného rožně ..............................................................69
Použití pečicího plechu / mřížového roštu ................................................70
Před prvním použitím ...................................................70
Obsluha přístroje ......................................................71
Přepínač funkcí .....................................................................71
Regulátor teploty
Časovač
Grilování a pečení .....................................................71
...................................................................71
..........................................................................71
Grilování sotočným rožněm .............................................72
Čištění a údržba .......................................................74
Uložení ...............................................................74
Odstranění závad ......................................................75
Likvidace .............................................................76
Záruka společnosti Kompernass Handels GmbH ............................76
Servis ............................................................................77
Dovozce .........................................................................77
Recepty ..............................................................77
│
CZ
SGBR 1500 B3
63 ■

Úvod
Gratulujeme vám kzakoupení nového přístroje.
Rozhodli jste se pro vysoce kvalitní výrobek. Návod
kobsluze je součástí tohoto výrobku. Obsahuje
důležité informace obezpečnosti, použití a likvidaci.
Před použitím výrobku se prosím dobře seznamte
se všemi provozními a bezpečnostními pokyny.
Výrobek používejte pouze předepsaným způsobem
a prouvedené oblasti použití. Při předávání výrobku
třetím osobám předejte spolu sním i tyto podklady.
Použití vsouladu surčením
Grilovací a pečicí trouba slouží výhradně kohřívání,
pečení a grilování jídel.
Tento přístroj je určen výhradně kpoužití v
domácnostech pro soukromé účely. Není určen
kprofesionálnímu použití.
Jakékoli jiné použití neodpovídá určenému účelu a
může vést ke vzniku hmotných škod, nebo dokonce
ke škodám na zdraví osob.
Rozsah dodávky
♦ Trouba na grilování a pečení
♦ 1 pečicí plech
♦ 1 mřížový rošt
♦ 2 kleště
♦ Otočný rožeň s2svorkami
♦ 1 plech na drobky
♦ Návod kobsluze
UPOZORNĚNÍ
Po vybalení ihned zkontrolujte rozsah dodávky,
zda je úplná a není poškozená. Vpřípadě potřeby
se obraťte na servis.
Popis přístroje
ObrázekA:
Pohon
Regulátor teploty
Přepínač funkcí
Časovač
Kontrolka
Skleněná dvířka
Vložený plech na drobky
Dolní topné tyče
Upínání otočného rožně
ObrázekB:
Kleště (pro pečicí plech a mřížový rošt)
- Pečicí plech
3 Kleště (pro otočný rožeň)
! Mřížový rošt
. Zajišťovací šrouby
0 Svorky otočného rožně
6 Otočný rožeň
Technické údaje
Jmenovité napětí: 220 - 240 V ~,
50/60 Hz
Max. příkon: 1500 W
Všechny části tohoto přístroje, přicházející
do styku s potravinami, jsou bezpečné pro
potraviny.
■ 64 │ CZ
SGBR 1500 B3

Bezpečnostní pokyny
NEBEZPEČÍ ÚRAZU ELEKTRICKÝM PROUDEM!
► Kryt přístroje nesmíte otvírat nebo opravovat. Vtakovém
případě není zaručena bezpečnost a zaniká záruka. Vadný
přístroj nechte opravit pouze prodejcem nebo autorizovaným
odborným personálem.
► Poškozené zástrčky nebo poškozený přívodní kabel nechte
ihned vyměnit autorizovaným odborným personálem nebo
zákaznickým servisem – vyhnete se tím nebezpečí.
► Dbejte na to, aby do krytu přístroje nepronikly žádné kapa-
liny. Přístroj nevystavujte vlhkosti ani jej nepoužívejte venku.
Na přístroj nestavte předměty naplněné vodou jako např.
vázy. Hrozí nebezpečí požáru a úrazu elektrickým proudem!
Pokud se přesto někdy dostane kapalina do krytu přístroje,
vytáhněte ihned zástrčku přístroje ze zásuvky a nechte jej
opravit.
► Přístroje, síťového kabelu ani zástrčky se nikdy nedotýkejte
vlhkýma rukama, jinak hrozí nebezpečí zásahu elektrickým
proudem.
Přístroj nikdy neponořujte do vody či jiných tekutin! Pokud
se během provozu dostanou zbytky tekutiny do kontaktu
se součástmi, které jsou pod napětím, může dojít k ohrožení
života vdůsledku zásahu elektrickým proudem.
SGBR 1500 B3
CZ
│
65 ■

VÝSTRAHA – NEBEZPEČÍ ZRANĚNÍ!
► Děti od 8let a osoby somezenými fyzickými, smyslovými
nebo mentálními schopnostmi či nedostatkem zkušeností a/
nebo znalostí mohou tento přístroj používat pouze tehdy,
pokud jsou pod dohledem nebo pokud byly poučeny o
bezpečném používání přístroje a pokud porozuměly ztoho
vyplývajícímu nebezpečí.
► Děti si nesmí spřístrojem hrát.
► Čištění a uživatelskou údržbu nesmí provádět děti, ledaže
jsou starší 8let a jsou pod dohledem.
► Děti mladší 8let nesmí mít přístup kpřístroji a přívodnímu
kabelu.
► Pokládejte síťový kabel tak, aby na něj nemohl nikdo stoup-
nout nebo oněj zakopnout.
► Během používání se nikdy nedotýkejte skleněných dvířek
nebo krytu, protože tyto části jsou velice horké. Kotevírání
skleněných dvířek používejte kuchyňskou chňapku apod.,
abyste se nepopálili!
► Nikdy se nedotýkejte topných tyčí nebo průzoru za provo-
zu nebo dokud přístroj nevychladne. Za provozu nesahejte
do grilovacího a pečicího prostoru. Vyčkejte, dokud přístroj
nevychladne. Mohli byste se spálit.
► Chystáte-li se přístroj po použití přemísťovat, nechte jej nej-
dříve zchladnout.
► Když manipulujete shorkým přístrojem, používejte vždy
kuchyňské chňapky!
Pozor! Horký povrch!
■ 66 │ CZ
SGBR 1500 B3

POZOR – VĚCNÉ ŠKODY!
► Kprovozu přístroje nepoužívejte externí spínací hodiny ani
samostatné dálkové ovládání.
► Přístroj během provozu nikdy nenechávejte bez dozoru.
► Zajistěte, aby se přístroj, síťový kabel nebo síťová zástrčka
nedostaly do kontaktu stepelnými zdroji, jakými jsou například varná plotýnka nebo otevřený oheň.
► Přístroj provozujte výhradně spolu sdodaným originálním
příslušenstvím.
► Nepřehýbejte ani nestlačujte síťový kabel.
► Síťový kabel vždy vytahujte ze zásuvky za zástrčku, nikdy
netahejte za samotný kabel.
► Při provozu nesmí být vbezprostřední blízkosti grilovací a
pečicí trouby žádné snadno hořlavé materiály (např. utěrka,
chňapka apod.).
► Nikdy na přístroji, nad ním nebo vněm nesušte textilie ani
jiné předměty. Hrozí nebezpečí požáru.
SGBR 1500 B3
CZ
│
67 ■

Umístění
Použití přístroje
VÝSTRAHA! NEBEZPEČÍ POŽÁRU!
► Přístroj nikdy nestavte pod závěsné skříňky
nebo vedle záclon, skříňových stěn nebo
jiných vznětlivých předmětů.
► Vzdálenost přístroje od závěsných skříněk,
stropů, bočních stěn a podobných předmětů
musí být minimálně 10 cm směrem nahoru
a 5 cm na obě strany. Proto se přístroj nesmí
stavět např. do skříní apod. Tam není zajištěno dostatečné odvětrávání přístroje, takže
by mohlo dojít kpožáru nebo by se trouba
mohla poškodit.
► Přístroj stavte pouze na žáruvzdorný podklad,
jinak hrozí nebezpečí požáru a přístroj by
se mohl poškodit. Oblast pod dnem přístroje
může změnit barvu a poškodit se. Kromě
toho by přístroj mohl na měkkém podkladu
způsobit trvalé otisky.
NEBEZPEČÍ ÚRAZU
ELEKTRICKÝM PROUDEM!
► Nestavte přístroj do bezprostřední blízkosti
vody, např. kdřezům, vanám nebo do vlhkých sklepních místností. Vopačném případě
hrozí nebezpečí úrazu elektrickým proudem.
■ Postavte přístroj na pevný, rovný a žáruvzdorný
podklad (např. pracovní desku zušlechtilé oceli
nebo zpřírodního kamene, jako je žula).
Zajistěte kolem přístroje dostatečné větrání.
■ Přisuňte přístroj zadní stranou až ke zdi. Distanční
držáky na zadní straně se musejí zdi dotýkat.
Dbejte na to, aby zeď byla ze žáruvzdorného
materiálu, např. keramických obkladaček,
přírodního kamene nebo žuly.
■ Všechny části přístroje vyčistěte tak, jak je
popsáno vkapitole „Čištění a údržba“.
Skleněná dvířka
POZOR! VĚCNÉ ŠKODY!
►
Neopírejte se oskleněná dvířka .
Na skleněná dvířka nepokládejte žádné
předměty. Mohou se tím poškodit závěsy.
■ Připravujete-li obzvlášť mastná jídla, může se
ve zvýšené míře tvořit kouř. Vtakovém případě
skleněná dvířka nedovírejte úplně, ale nechte
je pootevřená na malou škvírku:
Skleněná dvířka mají aretační polohu, ve
které jsou pootevřená na malou škvírku: když
skleněná dvířka pomalu zavíráte, krátce
před zavřením vtéto poloze zaaretují.
■ Také během sušení ovoce, aby se vytvořilo sušené
ovoce, by skleněná dvířka měla zůstat v
uzamčené poloze, aby vlhkost mohla unikat a
ovoce se lépe usušit.
Vložení plechu na drobky
■ Vsuňte plech na drobky pod dolní topné tyče
tak, aby přiléhal plochou ke dnu přístroje. Nahoru
ohnutou stranu můžete používat jako rukojeť
.
■ 68 │ CZ
SGBR 1500 B3

Použití otočného rožně
VÝSTRAHA! NEBEZPEČÍ ZRANĚNÍ!
► Pro vkládání horkého otočného rožně 6 do
přístroje nebo jeho vyjímání používejte vždy
kleště 3.
■ Pomocí obou svorek otočného rožně 0 můžete na
otočném rožni 6 zafixovat grilovanou potravinu.
Povolte zajišťovací šrouby . na svorkách otočného rožně 0, posuňte svorky tak, aby pevně
svíraly grilovanou potravinu, a utáhněte opět
zajišťovací šrouby ..
■ Nejprve zasuňte konec otočného rožně 6 bez
drážky do pohonu (Obr.1):
Obr.1: Zasuňte otočný rožeň 6 do pohonu
■ Potom vložte druhý konec otočného rožně 6
shlubokou drážkou do upínání otočného
rožně (Obr.2):
UPOZORNĚNÍ
► Když používáte otočný rožeň 6, zasuňte
vždy do dolní kolejnice pečicí plech -.
Poslouží kzachycování odkapávajících tekutin.
Chcete-li vyjmout horký otočný rožeň 6, zahák-
■
něte háky na konci kleští 3 do vybrání na
otočném rožni 6(Obr.3):
Obr.3: Zaháknutí kleští 3 do vybrání otočného
rožně 6
■ Vyjměte nejprve levou stranu otočného rožně 6
zupínání otočného rožně a potom otočný
rožeň 6 vytáhněte zpohonu .
Obr.2: Vložte otočný rožeň 6 do upínání otočného
rožně
SGBR 1500 B3
CZ
│
69 ■

Použití pečicího plechu /
mřížového roštu
VÝSTRAHA! NEBEZPEČÍ ZRANĚNÍ!
► Pro vkládání horkého pečicího plechu - /
horkého mřížového roštu !do přístroje nebo
jejich vyjímání používejte vždy kleště .
■ Zasuňte pečicí plech - / mřížový rošt ! do
jedné ze 3kolejnic vgrilovacím a pečicím
prostoru přístroje.
POZOR! VĚCNÉ ŠKODY!
► Nepokládejte pečicí plech - / mřížový
rošt ! nikdy přímo na topné tyče .
■ Chcete-li vyjmout horký pečicí plech - nebo
mřížový rošt !, zahákněte kleště takto:
Obr.4: Zaháknutí kleští do mřížového roštu !
Před prvním použitím
1) Zasuňte zástrčku do síťové zásuvky.
2) Otočte regulátor teploty až na doraz ve
směru hodinových ručiček na nejvyšší teplotu.
3) Otočte přepínač funkcí na „Vrchní a spodní
pečení“
4) Otevřete skleněná dvířka a nechte je pro
tento proces otevřená.
5) Vyjměte zgrilovacího a pečicího prostoru
případně vložené příslušenství.
6) Otočte časovač na 20minut.
UPOZORNĚNÍ
► Při prvním zahřátí přístroje může kvůli
zbytkům vzniklým při výrobě dojít k výskytu
lehkého kouře nebo zápachu. To je zcela
normální a není to nebezpečné.
Zajistěte dostatečné větrání – otevřete například okno.
Přístroj se automaticky vypne po 20minutách.
Chcete-li vyhřívání předčasně přerušit, otočte
regulátor teploty až na doraz proti směru
hodinových ručiček a nastavte časovač
na „OFF - 0“.
7) Nechte přístroj vychladnout a vyčistěte jej tak,
jak je popsáno vkapitole “Čištění a údržba”.
Nyní je přístroj připravený kprovozu.
.
Obr.5: Zaháknutí kleští do pečicího plechu -
■ 70 │ CZ
SGBR 1500 B3

Obsluha přístroje
Přepínač funkcí
Přepínačem funkcí můžete zapnout přístroj
a nastavit 5různých funkcí:
Symbol Význam
„Spodní pečení“
např. kpečení koláčů
Časovač
Pomocí časovače můžete nastavit dobu grilování
a pečení:
■ Nastavte časovač na požadovanou dobu
grilování a pečení. Po ukončení nastavené doby
zazní signální tón a přístroj se přestane vyhřívat.
Pokud je zvolena funkce „Vrchní & spodní pečení / cirkulace horkého vzduchu / otočný
rožeň“
rožně 6.
, zastaví se také otáčení otočného
„Vrchní pečení“
např. kzapékání
„Vrchní & spodní pečení“
např. kpečení pizzy
„Vrchní pečení /
cirkulace horkého vzduchu /
otočný rožeň“
např. ke grilování drůbeže
„Vrchní & spodní pečení /
cirkulace horkého vzduchu“
např. krozpékání housek
„OFF“ přístroj je vypnutý
Regulátor teploty
Pomocí regulátoru teploty můžete nastavit
požadovanou teplotu.
■ Když nastavujete teplotu pro funkce „Vrchní
pečení“
„Vrchní & spodní pečení“
podle stupnice označené symbolem „ “.
■ Když nastavujete teplotu pro funkce „Vrchní
pečení / cirkulace horkého vzduchu / otočný
rožeň“
cirkulace horkého vzduchu“
podle stupnice označené symbolem „ “.
, „Spodní pečení“ nebo
, orientujte se
nebo „Vrchní & spodní pečení /
, orientujte se
Grilování a pečení
1) Vložte do přístroje plech na drobky .
2) Vyjměte zpřístroje mřížový rošt ! a pečicí
plech -. Vyložte je případně pečicím papírem,
resp. potřete pečicí plech - tukem vhodným
na pečení.
UPOZORNĚNÍ
► Podle typu jídla se trouba musí předehřát.
Řiďte se pokyny uvedenými upříslušného
receptu. Předehřátí má vkaždém případě
smysl:
– při velmi krátké době pečení,
– ukřupavých povrchových vrstev,
– ucitlivých jídel, která vyžadují konstantní
teplotu, jako např. suflé.
► Pokud předehřátí není nutné, krok3) přeskočte.
3) Nechte přístroj cca 10minut (podle nastavené
teploty) rozehřívat na požadovanou teplotu:
– Zvolte požadovanou teplotu regulátorem
teploty . Dbejte na to, abyste použili
správnou stupnici (viz kapitola „Regulátor
teploty“.)
– Poté vyberte přepínačem funkcí požado-
vanou funkci.
SGBR 1500 B3
CZ
│
71 ■

UPOZORNĚNÍ
► Pokud vyberete funkci scirkulací horkého
vzduchu, nebývá předehřívání grilovacího
a pečicího prostoru zpravidla nutné.
– Nastavte časovačem dobu předehřívání
(cca 10minut).
– Zavřete skleněná dvířka .
4) Jakmile doba uplyne, položte potravinu
určenou ke grilování nebo pečení na mřížový
rošt !, resp. pečicí plech - a zasuňte jej do
jedné zkolejnic. Dbejte při tom na dostatečnou
vzdálenost potraviny určené ke grilování,
resp. pečení od vnitřních stěn a topných tyčí
přístroje.
UPOZORNĚNÍ
► Pokud na mřížovém roštu ! připravujete
potraviny, zkterých hodně odkapává tuk,
zasuňte vtomto případě do nejspodnější
kolejnice pečicí plech -. Tak se kapající tuk
zachytí a přístroj lze později lépe vyčistit.
5) Než zapnete grilování nebo pečení, zavřete
skleněná dvířka .
6) Nastavte časovačem požadovanou dobu
grilování nebo pečení. Maximální doba grilování, resp. pečení je 120minut.
UPOZORNĚNÍ
► Je-li doba přípravy vašeho jídla kratší než
20minut, nastavte časovač nejprve na
40minut a pak zpět na požadovanou dobu
grilování, resp. pečení.
Přístroj se po uplynutí nastavené doby automaticky
vypne, zazní signální tón a zhasne kontrolka .
UPOZORNĚNÍ
Chcete-li vyhřívání předčasně přerušit, otočte
regulátor teploty až na doraz proti směru
hodinových ručiček a nastavte časovač na
„OFF - 0“.
7) Po grilování nebo pečení vyjměte mřížový rošt !,
resp. pečicí plech - pomocí kleští .
8) Nastavte přepínač funkcí na „OFF“.
Grilování sotočným rožněm
1) Vložte do přístroje plech na drobky .
2) Pokud je otočný rožeň 6 vložen do přístroje,
vyjměte ho.
3) Zasuňte pečicí plech - do nejspodnější
kolejnice.
4) Zafixujte potravinu, kterou chcete grilovat, svorkami otočného rožně 0.
grilovaná potravina mohla vgrilovacím prostoru
volně otáčet, aniž by do něčeho narážela.
Může se stát, že otočný rožeň změní směr otáčení, když grilovaná potravina narazí na odpor.
Obě vybr
rožni 6, musejí zůstat volně přístupná, jinak
není možné otočný rožeň 6 uchopit pomocí
kleští 3.
5) Upevněte otočný rožeň 6 vgrilovacím prostoru
(viz kapitola „Použití otočného rožně“).
6) Zavřete skleněná dvířka .
ání, která se nacházejí na otočném
Dbejte na to, aby se
Kontrolka ukazuje, že je přístroj zapnutý. Spínač
časovače se nyní pohybuje proti směru hodinových ručiček na „OFF - 0“.
■ 72 │ CZ
SGBR 1500 B3

UPOZORNĚNÍ
Chcete-li vyhřívání předčasně přerušit, otočte
regulátor teploty až na doraz proti směru
hodinových ručiček a nastavte časovač na
„OFF - 0“.
7) Na regulátoru teploty nastavte požadovanou
teplotu.
8) Nastavte přepínač funkcí na „Vrchní
pečení / cirkulace horkého vzduchu / otočný
rožeň“
požadovanou dobu grilování.
Přístroj zahájí grilování a otočný rožeň 6 se
začne otáčet.
Kontrolka ukazuje, že je přístroj zapnutý. Spínač
časovače se nyní pohybuje proti směru hodinových ručiček na „OFF - 0“.
Přístroj se po uplynutí nastavené doby automaticky
vypne, zazní signální tón a zhasne kontrolka .
UPOZORNĚNÍ
Chcete-li vyhřívání předčasně přerušit, otočte
regulátor teploty až na doraz proti směru
hodinových ručiček a nastavte časovač na
„OFF - 0“.
9) Po grilování vyjměte otočný rožeň 6 pomocí
kleští 3.
10) Nastavte přepínač funkcí na „OFF“.
. Na časovači nastavte
PŘÍKLAD – GRILOVANÉ KUŘE
Ingredience
♦ kuře na grilování (cca 1,3kg, bez drobů)
♦ koření (sůl, paprika)
♦ stolní olej
1) Okořeňte kuře zevnitř a zvenku solí a
paprikou. Potřete ho zvenku stolním olejem
vhodným pro vysoké teploty.
2) Nasuňte kuře na grilovací rožeň a zafixujte
ho svorkami otočného rožně 0. Dbejte při
tom na to, aby vybrání na otočném rožni 6
zůstala volná, abyste rožeň 6mohli uchopit
pomocí kleští 3. Podle tvaru kuřete může
být zapotřebí svázat křídla a stehna žáruvzdorným provázkem, aby během otáčení
na něco nenarážela.
3) Zasuňte pečicí plech - do nejspodnější
kolejnice.
4) Předehřívejte přístroj cca 10minut pomocí
funkce „Vrchní & spodní pečení / cirkulace
horkého vzduchu“
5) Vložte kuře na otočném rožni pomocí kleští 3
do přístroje.
Nastavte přepínač funkcí na „Vrchní pečení /
cirkulace horkého vzduchu / otočný rožeň“
a zavřete dvířka.
6) Nastavte časovač na cca 80minut.
Doba přípravy se může mírně lišit podle
velikosti a vlastností grilovaného kuřete.
7) Potírejte grilované kuře průběžně vždy
trochou stolního oleje. Dosáhnete tak křupavého povrchu.
8) Po uplynutí nastavené doby grilovací rožeň
sgrilovaným kuřetem opatrně vyjměte pomocí
kleští 3. Povolte svorky otočného rožně 0
a stáhněte zněj grilované kuře 6.
na cca 210°C.
SGBR 1500 B3
CZ
│
73 ■

Čištění a údržba
NEBEZPEČÍ ÚRAZU
ELEKTRICKÝM PROUDEM!
► Před každým čištěním vytáhněte zástrčku ze
zásuvky! Hrozí nebezpečí úrazu elektrickým
proudem!
Přístroj nikdy neponořujte do vody či jiných
tekutin!
VÝSTRAHA! NEBEZPEČÍ ZRANĚNÍ!
► Před čištěním nechte přístroj vždy nejprve
vychladnout, jinak hrozí nebezpečí popálení!
■ Přístroj a díly příslušenství čistěte nejlépe hned
po vychladnutí. Tak lze zbytky potravin lépe
odstranit.
POZOR! VĚCNÉ ŠKODY!
► Nepoužívejte abrazivní nebo agresivní čisticí
prostředky. Mohou poškodit povrch přístroje!
► Díly přístroje nemyjte vmyčce!
► Nečistěte grilovací a pečicí prostor sprejem
na trouby, protože zbytky na topných tyčích
pak již nejdou odstranit.
■ Otřete přístroj vlhkým hadříkem. Podle potřeby
naneste na hadřík jemný mycí prostředek a nakonec přístroj otřete hadříkem navlhčeným čistou
vodou. Dobře vše osušte.
■ Vyčistěte grilovací a pečicí prostor a skleněná
dvířka vlhkým hadříkem. Podle potřeby naneste na hadřík jemný mycí prostředek a nakonec
vyčištěné plochy otřete hadříkem navlhčeným
čistou vodou. Dobře vše osušte.
■ Umyjte kleště /3, otočný rožeň 6, svorky
otočného rožně 0, zajišťovací šrouby ., pečicí
plech -, mřížový rošt ! a plech na drobky
vteplé vodě sprostředkem na mytí nádobí. Po
umytí všechny díly dobře osušte.
Uložení
■ Síťový kabel můžete na zadní straně přístroje
omotat kolem distančních držáků a zástrčku
můžete upevnit na jednom z distančních držáků:
■ 74 │ CZ
■ Vyčištěný přístroj a jeho příslušenství uložte na
čistém, bezprašném a suchém místě.
SGBR 1500 B3

Odstranění závad
Závada Příčina Řešení
Zástrčka není zapojená do zásuvky.
Přístroj nefunguje.
Kontrolka svítí, ale
přístroj se nezahřívá.
Doba přípravy jídel
se zdá být velmi
dlouhá.
Během používání
vzniká kouř a zápach.
Pokud nemůžete odstranit poruchy výše popsaným způsobem nebo pokud zjistíte jakoukoli jinou
závadu, obraťte se na náš servis.
Zásuvka je vadná. Použijte jinou síťovou zásuvku.
Přístroj je vadný. Obraťte se na servis.
Přepínač funkcí je vpoloze OFF.
Kvůli kontrole pokroku při pečení či grilování
byla skleněná dvířka otvírána příliš často.
Je nastavena nesprávná teplota. Zkontrolujte nastavení teploty.
Na topných tyčích se nacházejí zbytky
čisticího prostředku nebo potravin.
Zasuňte zástrčku do síťové
zásuvky.
Otočte přepínač funkcí na
požadovanou funkci.
Neotvírejte skleněná dvířka
častěji, než je nezbytně nutné.
Vyjměte potraviny zpřístroje a
při otevřených skleněných
dvířkách mějte troubu
zapnutou tak dlouho, až
se kouř přestane tvořit.
SGBR 1500 B3
CZ
│
75 ■

Likvidace
Přístroj vžádném případě
nevyhazujte do běžného
domovního odpadu. Tento
výrobek podléhá evropské
směrnici č. 2012/19/EU.
Přístroj předejte klikvidaci odborné firmě oprávněné
knakládání sodpady nebo využijte možnost likvidace zajišťovanou obcí. Dodržujte aktuálně platné
předpisy. Vpřípadě pochybností se informujte ve
sběrném dvoře.
Obal se skládá zekologických materiálů,
které lze v komunálních sběrných dvorech
odevzdat k recyklaci.
Záruka společnosti
Kompernass Handels GmbH
Vážená zákaznice, vážený zákazníku,
na tento přístroj získáváte záruku vtrvání 3 let od
data zakoupení. V případě závad tohoto výrobku
máte zákonná práva vůči prodejci výrobku. Tato
zákonná práva nejsou omezena naší níže uvedenou
zárukou.
Záruční podmínky
Záruční doba začíná plynout dnem nákupu. Dobře
uschovejte originál pokladního lístku. Tento doklad
je potřebný jako důkaz o koupi.
Pokud do tří let od data zakoupení tohoto výrobku
dojde k vadě materiálu nebo vý robní závadě, pak
Vám podle našeho uvážení výrobek zdarma opravíme nebo vyměníme. Předpokladem této záruky
je, že bude během tříleté lhůty předložen vadný
přístroj a doklad o koupi (pokladní lístek) a stručně
se popíše v čem závada spočívá a kdy se vyskytla.
Vztahuje-li se na závadu naše záruka, obdržíte
zpět buď opravený nebo nový produkt. Opravou
nebo výměnou výrobku nezačne plynout nová
záruční doba.
Záruční doba a zákonné nároky
vyplývající ze závad
Záručním plněním se záruční doba neprodlužuje.
To platí ipro vyměněné a opravené součásti.
Poškození nebo vady vyskytující se případně již
při nákupu se musí oznámit ihned po vybalení. Po
uplynutí záruční doby podléhají veškeré opravy
zpoplatnění.
Rozsah záruky
Přístroj byl vyroben pečlivě podle přísných směrnic
kvality a před expedicí byl svědomitě vyzkoušen.
Záruka se vztahuje na materiálové nebo výrobní
vady. Tato záruka se nevztahuje na součásti produktu, které jsou vystaveny normálnímu opotřebení,
a proto je lze považovat za opotřebovatelné díly
nebo za poškození křehkých součástí jako jsou
např. spínače, akumulátory, formy na pečení nebo
části, které jsou vyrobeny ze skla.
Tato záruka zaniká, pokud je výrobek poškozen,
nebyl řádně používán nebo udržován. Pro zajištění
správného používání výrobku se musí přesně
dodržovat všechny pokyny uvedené v návodu k obsluze. Účelům použití a úkonům, které se v návodu
kobsluze nedoporučují nebo se před nimi varuje,
je třeba se bezpodmínečně vyhnout.
Výrobek je určen pouze pro soukromé účely a ne
pro komerční použití. Při nesprávném a neodborném
používání, při použití násilí a při zásazích, které
nebyly provedeny našimi autorizovanými servisními
provozovnami, záruční nároky zanikají.
■ 76 │ CZ
SGBR 1500 B3

Vyřízení v případě záruky
Pro zajištění rychlého Vaší žádosti postupujte podle
následujících pokynů:
▯ Pro všechny dotazy mějte připraven pokladní
lístek a číslo výrobku (např. IAN 12345) jako
doklad o koupi.
▯
▯ Pokud by se měly vyskytovat funkční vady nebo
▯ Výrobek, zaevidovaný jako vadný výrobek pak
Na webových stránkách
obku naleznete na typovém štítku, rytině,
Číslo výr
na titulní straně svého návodu (vlevo dole) nebo
jako nálepku na zadní nebo spodní straně.
jiné závady, kontaktujte nejprve níže uvedené
servisní oddělení telefonicky nebo e-mailem.
můžete při přiložení dokladu o nákupu (pokladní
lístek) a při uvedení, v čem spočívá vada a kdy k
ní došlo, poslat výrobek pro Vás bez poštovného
na adresu, kterou Vám oznámí servis.
www.lidl-service.com si můžete
stáhnout tyto a mnoho dalších
příruček, videí o výrobku a software.
Servis
Servis Česko
Tel.: 800143873
E-Mail: kompernass@lidl.cz
IAN 274498
Dovozce
Dbejte prosím na to, že následující adresa není adresou servisu. Kontaktujte nejprve uvedený servis.
KOMPERNASS HANDELS GMBH
BURGSTRASSE 21
44867 BOCHUM
GERMANY
www.kompernass.com
Recepty
Vtéto kapitole uvádíme několik příkladů pro přípravu
jídel. Tyto příklady jsou pouze doporučení.
Doba přípravy se může mírně lišit.
Recepty bez záruky. Všechny údaje opřísadách a
opřípravě jsou pouze orientační. Doplňte tyto
navrhované recepty osvé vlastní zkušenosti.
Vkaždém případě vám přejeme, ať se dílo podaří
a ať vám chutná.
UPOZORNĚNÍ
Dodržujte pokyny kpřípravě uvedené na obalu
potravin.
Muffiny
Ingredience pro čtyři osoby:
♦ 1šálek mouky
♦ 1lžička prášku do pečiva
♦ 1vejce
♦ 1lžíce rozpuštěného másla
♦ 1šálek mléka
♦ 3lžíce cukru
♦ 1špetka soli
♦ pro různé varianty navíc ořechy, rozmačkané
banány nebo čokoládové vločky
Příprava:
1) Vmíse promíchejte postupně pomalu mouku,
prášek do pečiva, vejce, mléko, sůl a cukr.
2) Rozpusťte máslo vrendlíku a zamíchejte je do
těsta.
3) Podle chuti přimíchejte ořechy, čokoládové
vločky nebo rozmačkané banány.
4) Hotové těsto dejte do typických formiček na
muffiny a ty postavte na pečicí plech -.
5) Muffiny pečte při 220°C na vrchní a spodní
ohřev zhruba 15minut na dolní liště.
SGBR 1500 B3
CZ
│
77 ■

Havajské toasty
Ingredience pro 4toasty:
♦ 4krajíce toastového chleba
♦ 1–2lžíce remulády (ochucené majonézy)
♦ 120g vařené šunky
♦ 1/2konzervy ananasu
♦ 4plátky sýra na zapečení
♦ kari koření
Příprava:
♦ Krajíce toastového chleba předem opečte.
♦ Potom je potřete tenkou vrstvou remulády
a poklaďte vařenou šunkou.
♦ Na každý obložený toast dejte jedno kolečko
ananasu. Toast ochuťte kari kořením.
♦ Potom dejte nahoru na ananas vždy jeden
plátek sýra.
♦ Havajské toasty položte na mřížový rošt ! a
zapečte vgrilovací a pečicí troubě na horní liště
při cca 200°C na vrchní ohřev zhruba 8minut.
Pečení hluboce zmražené pizzy
Příprava:
♦ Zasuňte mřížový rošt ! do horní lišty grilovacího
a pečicího prostoru.
♦ Položte hluboce mraženou pizzu bez obalu na
mřížový rošt !.
♦ Pečte pizzu při vrchním a spodním pečení cca
20 minut.
♦ Dodržujte prosím údaje oteplotě uvedené na
obalu.
Stříkané pečivo
Ingredience:
♦ 125g másla
♦ 125g cukru
♦ 1balíček vanilkového cukru
♦ 1špetka soli
♦ 1vejce
♦ 1bílek
♦ 250g mouky (typ 405)
♦ 1lžička prášku do pečiva
♦ strouhaná kůra způlky citronu
Příprava:
1) Vyšlehejte máslo do pěny.
2) Přidejte cukr, vanilkový cukr, citronovou kůru
a vejce.
3) Smíchejte mouku, prášek do pečiva a sůl
a měchačkou je zamíchejte do těsta.
4) Nechte těsto cca 10minut odpočívat.
5) Vytvořte ztěsta požadované tvary, např. pomocí mlýnku na maso, vykrajovacích formiček
nebo cukrářského sáčku na zdobení.
6) Stříkané pečivo položte na pečicí plech -,
vyložený papírem na pečení.
7) Stříkané pečivo pečte dozlatova vpředehřáté
troubě při 180°C na vrchní a spodní ohřev
zhruba 10–15minut na horní liště.
UPOZORNĚNÍ
Množství těsta stačí na několik pečicích plechů -.
■ 78 │ CZ
SGBR 1500 B3

Housky
Ingredience:
♦ 300g mouky (nebo celozrnné mouky)
♦ 2vrchovaté lžičky prášku do pečiva
♦ 200g lněných semínek
♦ 1vejce
♦ 500g tvarohu
♦ 1lžička soli
♦ podle chuti kmín, cibule, slanina...
Příprava:
1) Všechno dobře prohněťte a ztěsta tvarujte
malé housky.
2) Housky položte na pečicí plech -, vyložený
papírem na pečení.
3) Pečte při teplotě cca 200°C na vrchní ohřev
zhruba 30minut na horní liště.
UPOZORNĚNÍ
Množství těsta stačí na několik pečicích plechů -.
Bezé (pusinky)
Ingredience:
♦ 1bílek
♦ sůl
♦ 45g cukru
Příprava:
1) Vychlazený bílek dejte do mísy, ve které nejsou
zbytky tuku. Nesmíte přimíchat žádný žloutek,
protože jinak sníh zbílku nebude dostatečně
pevný.
2) Šlehejte bílek na pomalý stupeň, aby se ve
sněhu netvořily příliš velké bubliny.
3) Přidejte malou špetku soli.
4) Když sníh začne tuhnout, přidávejte postupně
polovinu cukru.
5) Potom vyšlehejte dotuha na nejvyšší stupeň.
6) Přidejte zbývající cukr. Tím získá sněhová
hmota potřebnou pevnost.
7) Sněhovou hmotou naplňte cukrářský sáček
na zdobení svelkou hvězdicovitou špičkou a
smírným odstupem stříkejte na pečicí plech -,
vyložený papírem na pečení, růžice, jazýčky
nebo jiné tvary.
8) Troubu na grilování a pečení předehřejte na
cca 100° C s cirkulací horkého vzduchu.
9) Pusinky pečte v horní kolejnici při cca 100° C
s recirkulací horkého vzduchu cca 2 hodiny.
SGBR 1500 B3
CZ
│
79 ■

Máslové krutony
Ingredience:
♦ 2krajíce toastového chleba
♦ 1lžíce másla
Příprava:
1) Nakrájejte toastový chléb na malé kostičky.
2) Rozpusťte máslo vrendlíku při mírné teplotě
a přidejte kněmu toastový chléb.
3) Vyložte pečicí plech - papírem na pečení a
rozložte na něj rovnoměrně kostičky toastového
chleba.
4) Pečte kostičky toastového chleba při teplotě
cca 170°C na vrchní ohřev na horní liště, až
budou zlatavě nahnědlé (zhruba 15-20minut).
UPOZORNĚNÍ
Místo normálního másla můžete také použít
bylinkové nebo česnekové máslo. Doba pečení
se pak zkrátí zhruba o5minut.
Bagety smletým masem
Ingredience:
♦ 2bagety
♦ 250g mletého masa (půl hovězího na půl
vepřového)
♦ 2rajčata
♦ 1cibule (nakrájená na kostičky)
♦ 2lžíce rajského protlaku
♦ 40g nastrouhaného parmezánu
♦ 4plátky sýra
♦ sůl a pepř
Příprava:
1) Bagety podélně rozřízněte a vydlabte je.
2) Promíchejte mleté maso, rajský protlak, cibuli,
parmezán, trochu soli a trochu pepře.
3) Vytvarujte mleté maso do 4stejně velkých,
pokud možno plochých karbanátků a položte
je na půlky baget.
4) Nakrájejte rajčata na kolečka a položte je na
bagety.
5) Rozdělte na bagety sýr.
6) Položte bagety na pečicí plech - a pečte je
při teplotě cca 230°C vpředehřáté troubě na
vrchní a spodní ohřev po dobu zhruba 20minut
na dolní liště.
■ 80 │ CZ
UPOZORNĚNÍ
Mleté maso můžete ochutit také bazalkou, čili
nebo jiným kořením.
SGBR 1500 B3

Květák (zapečený)
Ingredience:
♦ 1/2hlávky květáku (cca 250g)
♦ 3kolečka citronu
♦ 1lžíce másla
♦ 1vrchovatá lžička mouky
♦ 1lžíce citronové šťávy
♦ 1lžíce mandlových lupínků
♦ 2lžíce (strouhaného) sýra vhodného
na gratinování
♦ sůl, pepř, muškátový oříšek
Taštičky zlistového těsta, plněné lososem
Ingredience:
♦ 1 bal. listového těsta (cca 8plátků)
♦ 1 bal. uzeného lososa, plátky (cca 200g)
♦ 1citron
♦ 1cibule
♦ 1 bal. tzv. „čerstvého“ sýra, např.
Lučina (200g)
♦ čerstvý kopr
♦ sůl a pepř
♦ 1žloutek
Příprava:
1) Rozdělte květák na růžičky a operte je.
2) Povařte květák skolečky citronu po dobu
8-10minut ve slané vodě do poloměkka (al
dente). Při slévání vody zkvětáku zní zachyťte
cca 150ml.
3) Rozpusťte vrendlíku máslo a za stálého míchání pražte mouku po dobu cca 1minuty.
4) Za stálého míchání přidejte vodu slitou zkvětáku a povařte jíšku cca 2minuty. Je-li jíška příliš
hustá, přidávejte postupně trochu vody, až
bude mít jíška viskózní konzistenci. Okořeňte
citronovou šťávou, solí, pepřem a muškátovým
oříškem.
5) Dejte květák do zapékací nádoby (oprůměru
cca 14cm) a polijte ho rovnoměrně omáčkou.
6) Posypte ho sýrem a mandlovými lupínky.
7) Postavte zapékací nádobu na pečicí plech -.
8) Nákyp zapékejte při teplotě cca 200°C
vpředehřáté troubě na vrchní a spodní ohřev
po dobu zhruba 20minut na dolní liště.
Příprava:
1) Oddělte od sebe plátky listového těsta a nechte je případně rozmrazit.
2) Promíchejte sýr se solí, pepřem a šťávou zjednoho citronu.
3) Nakrájejte cibuli na drobné kostičky.
4) Ksýrové hmotě přidejte polovinu lososa a
cibuli a všechno nahrubo promíchejte tyčovým
mixérem.
5) Nakrájejte zbytek lososa na jemné proužky.
6) Přidejte lososa a kopr ksýrové hmotě a všechno promíchejte.
7) Dejte po jedné lžíci hmoty na každý plátek
listového těsta a ten pak uzavřete do tvaru
taštičky.
8) Vzniklé taštičky potřete žloutkem.
9) Položte taštičky zlistového těsta na pečicí
plech -. Ponechte dostatek místa mezi jednotlivými taštičkami, protože listové těsto nabude
na objemu.
10) Taštičky zlistového těsta pečte na dolní liště při
teplotě cca 230°C na vrchní a spodní ohřev
zhruba 25-30minut. Listové těsto by mělo být
lehce nahnědlé.
SGBR 1500 B3
UPOZORNĚNÍ
Uvedené množství stačí na několik pečicích
plechů -.
│
CZ
81 ■

■ 82 │ CZ
SGBR 1500 B3

Obsah
Úvod ................................................................84
Používanie vsúlade surčením ...........................................84
Rozsah dodávky .......................................................84
Popis elektrického spotrebiča ............................................84
Technické údaje .......................................................84
Bezpečnostné upozornenia ..............................................85
Inštalácia .............................................................88
Používanie elektrického spotrebiča .......................................88
Sklenené dvierka ...................................................................88
Vloženie plechu na omrvinky ..........................................................88
Používanie otočného ražňa ...........................................................89
Používanie plechu na pečenie/mriežkového roštu. . . . . . . . . . . . . . . . . . . . . . . . . . . . . . . . . . . . . . . . . .90
Pred prvým použitím ...................................................90
Obsluha elektrického spotrebiča .........................................91
Prepínač funkcií ....................................................................91
Regulátor teploty ...................................................................91
Časový spínač .....................................................................91
Grilovanie a pečenie ...................................................91
Grilovanie na otočnom ražni .............................................92
Čistenie a ošetrovanie ..................................................94
Skladovanie ..........................................................94
Odstraňovanie porúch ..................................................95
Zneškodnenie .........................................................96
Záruka spoločnosti Kompernass Handels GmbH ............................96
Servis ............................................................................97
Dovozca .........................................................................97
Recepty ..............................................................97
│
SK
SGBR 1500 B3
83 ■

Úvod
Srdečne vám gratulujeme ku kúpe vášho nového
elektrického spotrebiča.
Touto kúpou ste sa rozhodli pre vysokokvalitný výrobok. Návod na obsluhu je súčasťou tohto výrobku.
Obsahuje dôležité upozornenia týkajúce sa bezpečnosti, používania a zneškodnenia. Pred používaním výrobku sa oboznámte so všetkými pokynmi
na obsluhu abezpečnostnými upozorneniami.
Výrobok používajte iba tak, ako je popísané aiba
vuvedených oblastiach použitia. Pri postúpení
výrobku tretej osobe odovzdajte sním aj všetky
podklady.
Popis elektrického spotrebiča
Obrázok A:
Pohon
Regulátor teploty
Prepínač funkcií
Časový spínač
Kontrolka
Sklenené dvierka
Vložený plech na omrvinky
Spodné vyhrievacie tyče
Uchytenie otočného ražňa
Používanie vsúlade surčením
Automat na pečenie a grilovanie slúži výlučne na
zohrievanie, dusenie a grilovanie pokrmov.
Tento elektrický spotrebič je určený výlučne na
používanie vsúkromných domácnostiach.
Nepoužívajte ho komerčne.
Akékoľvek iné používanie sa považuje za používanie vrozpore surčením a môže spôsobiť vecné
škody alebo dokonca poškodenie zdravia.
Rozsah dodávky
♦ Automat na grilovanie a pečenie
♦ 1 plech na pečenie
♦ 1 mriežkový rošt
♦ 2 kliešte
♦ Otočný ražeň s 2 svorkami
♦ 1 plech na omrvinky
♦ Návod na obsluhu
UPOZORNENIE
Ihneď po vybalení skontrolujte, či je rozsah dodávky
úplný a či nie je poškodený. Vprípade potreby sa
obráťte na servis.
Obrázok B:
Kliešte (na plech na pečenie a mriežkový rošt)
- Plech na pečenie
3 Kliešte (na otočný ražeň)
! Mriežkový rošt
. Aretačný prvok
0 Svorky otočného ražňa
6 Otočný ražeň
Technické údaje
Menovité napätie: 220 – 240 V ~,
50/60 Hz
Max. príkon: 1500 W
Všetky časti tohto prístroja, ktoré prichádzajú
do kontaktu s potravinami, sú bezpečné
pre potraviny.
■ 84 │ SK
SGBR 1500 B3

Bezpečnostné upozornenia
NEBEZPEČENSTVO ÚRAZU ELEKTRICKÝM PRÚDOM!
► Teleso elektrického spotrebiča nesmiete otvárať ani opravovať.
Vtakom prípade je ohrozená bezpečnosť azanikne záruka.
Chybný elektrický spotrebič nechajte opraviť len predajcovi
alebo autorizovanému odbornému personálu.
► Poškodenú elektrickú zástrčku alebo sieťový kábel nechajte
ihneď vymeniť kvalifikovaným a autorizovaným personálom
alebo vzákazníckom servise, aby ste zabránili ohrozeniu
zdravia.
► Zabráňte vniknutiu kvapaliny do telesa elektrického spotre-
biča. Elektrický spotrebič nesmiete vystaviť vlhkosti ani ho
používať vexteriéri. Takisto nesmiete umiestňovať na elektrický spotrebič predmety naplnené vodou ako napr. vázy.
Hrozí nebezpečenstvo vzniku požiaru alebo zasiahnutia
elektrickým prúdom! Vprípade, že by sa do skrine predsa
len dostala tekutina, vytiahnite zástrčku elektrického spotrebiča
zo zásuvky anechajte ho opraviť.
► Elektrický spotrebič, sieťový kábel a elektrickú zástrčku nikdy
nechytajte mokrými rukami. Hrozí nebezpečenstvo zásahu
elektrickým prúdom.
Nikdy neponárajte elektrický spotrebič do vody ani do
iných tekutín! Môže dôjsť kohrozeniu života vdôsledku
zásahu elektrickým prúdom, ak sa pri prevádzke dostanú
zvyšky kvapaliny na časti, ktoré sú pod napätím.
SGBR 1500 B3
SK
│
85 ■

VÝSTRAHA – NEBEZPEČENSTVO PORANENIA!
► Tento elektrický spotrebič môžu používať deti od 8 rokov,
ako aj osoby so zníženými fyzickými, senzorickými alebo
mentálnymi schopnosťami, prípadne s nedostatočnými skúsenosťami alebo znalosťami, ak sú pod dohľadom alebo boli
dostatočne poučené o bezpečnom používaní elektrického
spotrebiča a pochopili z toho vyplývajúce riziká.
► Deti sa nesmú hrať s elektrickým spotrebičom.
► Čistenie aužívateľskú údržbu nesmú vykonávať deti, okrem
prípadov, ak sú staršie ako 8 rokov asú pod dozorom.
► Deti mladšie ako 8 rokov nesmú mať prístup kspotrebiču ani
kprípojnému káblu.
► Sieťový kábel umiestnite tak, aby naň nikto nemohol stúpiť
ani oň zakopnúť.
► Počas prevádzky sa nikdy nedotýkajte sklenených dvierok
alebo telesa, lebo sú veľmi horúce. Na otváranie sklených
dvierok používajte chňapku alebo inú ochranu, aby ste sa
nepopálili!
► Počas prevádzky alebo pred vychladnutím elektrického
spotrebiča sa nikdy nedotýkajte ohrievacích tyčí alebo
kontrolného okienka. Počas prevádzky nikdy nesiahajte do
priestoru na tepelnú úpravu. Vyčkajte, kým elektrický spotrebič vychladne. Vopačnom prípade by ste si mohli spôsobiť
popáleniny.
► Po použití nechajte spotrebič najprv vychladnúť, až potom
ho premiestňujte.
► Keď manipulujete s horúcim elektrickým spotrebičom, vždy
používajte kuchynské rukavice alebo chňapky!
■ 86 │ SK
Pozor! Horúci povrch!
SGBR 1500 B3

POZOR – VECNÉ ŠKODY!
► Na zapínanie avypínanie spotrebiča nepoužívajte externý
časový spínač, ani samostatný systém diaľkového ovládania.
► Počas prevádzky nenechávajte elektrický spotrebič nikdy
bez dozoru.
► Zabezpečte, aby sa elektrický spotrebič, prípojný kábel alebo
elektrická zástrčka nemohli dostať do kontaktu s tepelnými
zdrojmi, ako sú napr. varné platne alebo otvorený oheň.
► Spotrebič používajte výhradne len s originálnym príslušen-
stvom, ktoré je súčasťou dodávky.
► Sieťový kábel neohýbajte ani nestláčajte.
► Sieťový kábel vyťahujte zo zásuvky za zástrčku, nikdy nie za
samotný kábel.
► Počas prevádzky sa v bezprostrednej blízkosti automatu na
pečenie a grilovanie nesmú nachádzať ľahko horľavé materiály (napr. utierka na riady, chňapka atď.).
► Nad alebo vo vnútri spotrebiča nikdy nesušte textilné výrob-
ky alebo iné predmety. Hrozí nebezpečenstvo požiaru.
SGBR 1500 B3
SK
│
87 ■

Inštalácia
VÝSTRAHA!
NEBEZPEČENSTVO POŽIARU!
► Nikdy neumiestňujte elektrický spotrebič pod
závesné skrinky alebo vedľa záclon, nábytkových stien, prípadne iných horľavých predmetov.
► Vzdialenosť prístroja k závesným skrinkám,
stropom, bočným stenám alebo podobným
prvkom musí byť smerom hore minimálne 10
cm a po stranách vždy 5 cm. Z tohto dôvodu
nie je možné postaviť elektrický spotrebič do
skrine a podobne. V opačnom prípade nie je
možné dostatočné vetranie elektrického spotrebiča, čím by mohlo dôjsť k požiaru alebo
jeho poškodeniu.
► Spotrebič postavte vždy na tepelne odolnú
podložku. V opačnom prípade hrozí nebezpečenstvo požiaru a môže dôjsť k poškodeniu
elektrického spotrebiča. Oblasť pod dnom
elektrického spotrebiča sa môže sfarbiť a
poškodiť. Navyše by pri mäkkom podklade
mohli v ňom vzniknúť trvalé otlačky.
NEBEZPEČENSTVO ZÁSAHU
ELEKTRICKÝM PRÚDOM!
► Neumiestňujte elektrický spotrebič do bez-
prostrednej blízkosti vody, napr. na drez, umývadlo alebo do vlhkých pivničných priestorov.
V opačnom prípade hrozí nebezpečenstvo
zásahu elektrickým prúdom.
■ Prístroj postavte na pevnom a rovnom podklade,
odolnom voči teplu (napr. platne z ušľachtilej
ocele alebo dosky z prírodného kameňa ako
žula). Okolo elektrického spotrebiča zabezpečte
dostatočné vetranie.
■ Posuňte prístroj zadnou stranou až ku stene. Roz-
pierky na zadnej strane sa musia dotýkať steny.
Dbajte na to, aby stena bola zo žiaruvzdorného
materiálu, ako sú napr. obkladačky, prírodný
kameň alebo žula.
■ Vyčistite všetky diely tak, ako je uvedené vkapi-
tole „Čistenie aúdržba“.
Používanie elektrického
spotrebiča
Sklenené dvierka
POZOR! VECNÉ ŠKODY!
► Nikdy sa neopierajte o sklenené dvierka .
Na sklenené dvierka neukladajte žiadne
predmety. To by malo za následok poškodenie závesov.
■ Keď pripravujete jedlá s mimoriadne vysokým
obsahom tuku, môže dôjsť ku zvýšenej tvorbe
dymu. V takomto prípade sklenené dvierka
úplne nezatvorte, ale nechajte ich trošku pootvorené:
Sklenené dvierka sú vybavené západkovým
zaistením, takže tieto ostanú na šírku medzery
pootvorené: Ak sklenené dvierka opatrne privriete, západka zaskočí krátko pred zatvorením
v tejto polohe.
■ Tiež počas sušenia ovocia na vyrobenie sušeného
ovocia, by sklenené dvierka mali zostať v
uzamknutej polohe, aby vlhkosť mohla unikať a
ovocie sa lepšie usušiť.
Vloženie plechu na omrvinky
■ Plech na omrvinky zasuňte pod spodné
vyhrievacie tyče tak, aby plocho priliehal
na dno elektrického spotrebiča. Nahor ohnutú
stranu môžete používať ako rukoväť.
■ 88 │ SK
SGBR 1500 B3

Používanie otočného ražňa
VÝSTRAHA!
NEBEZPEČENSTVO PORANENIA!
► Vždy používajte kliešte 3, aby ste vložili alebo
vybrali horúci otočný ražeň 6 do / z elektrického spotrebiča.
■ Obidvoma svorkami otočného ražňa 0 môžete
grilovanú potravinu na otočnom ražni 6 fixovať.
Uvoľnite aretačný prvok . na svorkách otočného
ražňa 0, posuňte ich tak, aby sa grilovaná
potravina medzi ne pevne upla a aretačný
prvok . opäť zaistite.
■ Najprv posuňte koniec otočného ražňa 6 bez
drážky do pohonu (obr. 1):
Obr. 1: Otočný ražeň 6 zasuňte do pohonu .
■ Potom položte druhý koniec otočného ražňa 6 s
hlbokou drážkou do uchytenia otočného ražňa
(obr. 2):
UPOZORNENIE
► Keď používate otočný ražeň 6, zasuňte do
spodnej vodiacej drážky plech na pečenie -.
Takto sa zachytáva kvapkajúca kvapalina.
■ Pre odoberanie horúceho otočného ražňa 6
hákom na konci klieští 3 zachyťte priehlbiny
na otočnom ražni 6(obr. 3):
Obr. 3: Zakvačenie klieští 3 pri otočnom ražni 6
■ N
ajprv zodvihnite ľavú stranu otočného ražňa 6
z uchytenia otočného ražňa a potom vytiahnite otočný ražeň 6 z pohonu .
Obr. 2: Otočný ražeň 6 vložte do uchytenia
otočného ražňa
SGBR 1500 B3
SK
│
89 ■

Používanie plechu na pečenie/
mriežkového roštu
VÝSTRAHA!
NEBEZPEČENSTVO PORANENIA!
► Vždy používajte kliešte , aby ste vložili alebo
vybrali horúci plech na pečenie -/ horúci
mriežkový rošt !do/z elektrického spotrebiča.
■ Zasuňte plech na pečenie -/ rošt ! do jednej
z troch vodiacich drážok v priestore na tepelnú
úpravu elektrického spotrebiča.
POZOR! VECNÉ ŠKODY!
► Nikdy neukladajte plech na pečenie -/
mriežkový rošt ! na vyhrievacie tyče .
■ Aby bolo možné odobranie plechu na pečenie -
alebo mriežkového roštu !, zakvačte kliešte
nasledujúcim spôsobom:
Obr. 4: Zakvačenie klieští pri mriežkovom rošte !
Pred prvým použitím
1) Zasuňte zástrčku do elektrickej zásuvky.
2) Otočte regulátor teploty až na doraz v smere
pohybu hodinových ručičiek na najvyššiu teplotu.
3) Prepínač funkcií otočte na „horný a spodný
ohrev“
4) Otvorte sklenené dvierka a nechajte ich pri
tomto procese otvorené.
5) Z priestoru na tepelnú úpravu vyberte, prípadne
použité príslušenstvo.
6) Časový spínač otočte na 20 minút.
UPOZORNENIE
► Pri prvom zohrievaní prístroja môže dôjsť
k vzniku mierneho zápachu a dymu, čo je
spôsobené zvyškami podmienenými výrobou.
Je to úplne normálne a nie je to nebezpečné.
Zabezpečte dostatočné vetranie, napr.
otvorte okno.
Elektrický spotrebič sa po 20 minútach automaticky vypne.
Keď chcete proces vyhrievania predčasne
pre-rušiť, otočte regulátor teploty až na
doraz proti smeru otáčania hodinových
ručičiek a časový spínač nastavte do
polohy „OFF – 0“.
7) Nechajte elektrický spotrebič vychladnúť a
vy-čistite ho tak, ako je uvedené v kapitole
„Čistenie a ošetrovanie“.
Elektrický spotrebič je teraz pripravený na prevádzku.
.
Obr. 5: Zakvačenie klieští pri plechu
na pečenie -
■ 90 │ SK
SGBR 1500 B3

Obsluha elektrického
spotrebiča
Prepínač funkcií
Prepínačom funkcií môžete elektrický spotrebič
zapnúť a tiež nastaviť 5 rôznych funkcií:
Symbol Význam
„Ohrievanie zdola“
napr. pri pečení koláča
„Ohrievanie zhora“
napr. pri zapekaní
„Ohrievanie zhora a zdola“
napr. pri pečení pizze
„Ohrievanie zhora/cirkulujúci
vzduch/otočný ražeň“
napr. pri grilovaní hydiny
„Ohrievanie zhora a zdola/
cirkulujúci vzduch“
napr. pri dopekaní pečiva
„OFF“ – elektrický spotrebič
je vypnutý.
Regulátor teploty
Na regulátore teploty môžete nastaviť požadovanú teplotu.
■ Pri nastavení teploty na funkciu „Ohrievanie
zhora“
„Ohrievanie zhora a zdola“
podľa stupnice označenej „ “.
■ Pri nastavení teploty pre funkciu „Ohrievanie
zhora/cirkulujúci vzduch/otočný ražeň“
alebo „Ohrievanie zhora a zdola/cirkulujúci
vzduch“
označenej „ “.
, „Ohrievanie zdola“
sa orientujte podľa stupnice
alebo
sa orientujte
Časový spínač
Časovým spínačom môžete nastaviť čas tepelnej
úpravy:
■ Nastavte časový spínač na požadovaný čas
tepelnej úpravy. Po uplynutí nastaveného času
sa ozve signál a elektrický spotrebič ohrev
zastaví.
Ak je zvolená funkcia „Ohrievanie zhora/cirku-
lujúci vzduch/otočný ražeň“
otáčanie otočného ražňa 6.
, zastaví sa aj
Grilovanie a pečenie
1) Do elektrického spotrebiča vložte plech na
omrvinky .
2) Vyberte mriežkový rošt ! a plech na pečenie z elektrického spotrebiča. Vyložte tieto prípadne
papierom na pečenie, resp. vymastite plech na
pečenie - tukom určeným pre pečenie.
UPOZORNENIE
► Podľa druhu potraviny musíte rúru na pečenie
vopred vyhriať. Postupujte podľa zadaní príslušného receptu. Predhrievanie má v každom
prípade význam pri:
– veľmi krátkych časoch pečenia,
– chrumkavých kôrach,
– citlivých pokrmoch, ktoré vyžadujú kon-
štantnú teplotu, napr. suflé.
► Ak predhrievanie nie je potrebné, prekročte
manipulačný krok 3).
3) Elektrický spotrebič nechajte približne 10 minút
(podľa nastavenej teploty) vyhriať na požadovanú teplotu:
– Požadovanú teplotu nastavte regulátorom
teploty . Dbajte na to, aby ste používali
správnu stupnicu (pozri kapitolu „Regulátor
teploty“.)
– Následne prepínačom funkcií zvoľte
požadovanú funkciu.
SGBR 1500 B3
SK
│
91 ■

UPOZORNENIE
► Ak zvolíte funkciu s cirkulujúcim vzduchom,
priestory na grilovanie a tepelnú úpravu
spravidla predhrievať nemusíte.
– Časovým spínačom nastavte čas predhrie-
vania (približne 10 minút).
– Sklenené dvierka zatvorte.
4) Po uplynutí nastaveného času položte grilovaný, príp. pečený pokrm na mriežkový rošt !,
resp. plech na pečenie - a zasuňte ho do
jednej z vodiacich drážok. Dbajte pritom na
dostatočný odstup grilovaného, príp. pečeného
pokrmu od vnútorných stien a vyhrievacích tyčí.
UPOZORNENIE
► Ak pripravujete na mriežkovom rošte !
nadmerne kvapkajúce potraviny, tak plech
na pečenie - zasuňte do najspodnejšej
vodiacej drážky. Takým spôsobom sa zachytí
odkvapkávajúci tuk a elektrický spotrebič sa
bude neskôr ľahšie čistiť.
5) Zatvorte sklenené dvierka skôr, než spustíte
grilovanie, príp. pečenie.
6) Časovým spínačom nastavte požadovaný
čas grilovania, príp. pečenia. Maximálny čas
grilovania, príp. pečenia predstavuje 120 minút.
UPOZORNENIE
► Keď je čas tepelnej úpravy vášho grilovaného,
príp. pečeného pokrmu kratšia ako 20 minút,
nastavte časový spínač najprv na 40 minút
a potom späť na požadovaný čas grilovania,
resp. pečenia.
Elektrický spotrebič sa podľa nastaveného času
automaticky vypne, ozve sa signál a kontrolka
zhasne.
UPOZORNENIE
Ak chcete ohrev predčasne prerušiť, otočte regulátor teploty až na doraz proti smeru otáčania hodinových ručičiek a časový spínač na-
stavte do polohy „OFF – 0“.
7) Po ukončení ohrevu mriežkový rošt !, príp.
plech na pečenie - vyberte pomocou klieští .
8) Prepínač funkcií nastavte do polohy „OFF“.
Grilovanie na otočnom ražni
1) Do elektrického spotrebiča vložte plech na
omrvinky .
2) Ak je vložený, otočný ražeň 6 vyberte z
elektrického spotrebiča.
3) Plech na pečenie - zasuňte do najspodnejšej
vodiacej drážky.
4) Grilovaný pokrm fixujte svorkami otočného
ražňa 0. Dbajte na to, aby sa grilovaný pokrm mohol voľne otáčať v priestore na tepelnú
úpravu bez toho, aby do neho narážal. Môže
sa stať, že otočný ražeň 6zmení smer otáčania,
keď grilovaný pokrm narazí na prekážku.
Obidve priehlbiny, ktoré sa nachádzajú na
otočnom ražni 6, musia zostať voľne prístupné,
inak nie je možné otočný ražeň 6 uchopiť
kliešťami 3.
5) Otočný ražeň 6 pripevnite v priestore na
tepelnú úpravu (pozri kapitolu „Používanie
otočného ražňa“).
6) Sklenené dvierka zatvorte.
Kontrolka signalizuje, že elektrický spotrebič
je zapnutý. Časový spínač sa teraz otáča proti
smeru otáčania hodinových ručičiek na „OFF“.
■ 92 │ SK
SGBR 1500 B3

UPOZORNENIE
Ak chcete ohrev predčasne prerušiť, otočte regulátor teploty až na doraz proti smeru otáčania hodinových ručičiek a časový spínač na-
stavte do polohy „OFF – 0“.
7) Regulátorom teploty nastavte požadovanú
teplotu.
8) Prepínač funkcií nastavte na „Ohrievanie
zhora/cirkulujúci vzduch/otočný ražeň“
Na časovom spínači nastavte požadovaný
čas grilovania.
Elektrický spotrebič spustí grilovanie a otočný
ražeň 6 sa otáča.
Kontrolka signalizuje, že elektrický spotrebič je
zapnutý. Prepínač časového spínača sa teraz
otáča proti smeru otáčania hodinových ručičiek na
„OFF“.
Elektrický spotrebič sa po uplynutí nastaveného času
automaticky vypne, ozve sa signál a kontrolka
zhasne.
UPOZORNENIE
Ak chcete ohrev predčasne prerušiť, otočte regulátor teploty až na doraz proti smeru otáčania hodinových ručičiek a časový spínač na-
stavte do polohy „OFF – 0“.
9) Po ukončení grilovania odoberte pomocou
klieští 3 otočný ražeň 6.
10) Prepínač funkcií nastavte do polohy „OFF“.
.
PRÍKLAD – GRILOVANÉ KURČA
Prísady
♦ Kurča na grilovanie (cca 1,3 kg, bez
vnútorností)
♦ korenie (soľ, paprika)
♦ stolový olej
1) Okoreňte kurča zvnútra a zvonka soľou a
mletou paprikou. Zvonka ho potrite tepelne
odolným stolovým olejom.
2) Kurča na grilovanie nasuňte na grilovací ražeň
a fixujte ho svorkami otočného ražňa 0.
Dbajte pritom na to, aby priehlbiny na
otočnom ražni 6ostali voľné, aby ste
kliešťami 3 mohli otočný ražeň 6uchopiť.
Podľa tvaru grilovaného kurčaťa musíte
krídla a stehná fixovať tepelne odolným
viazacím motúzom, aby tieto počas otáčania
nenarážali.
3) Plech na pečenie - zasuňte do najspodnejšej
vodiacej drážky.
4) Elektrický spotrebič predhrejte počas približne 10 minút funkciou „Ohrievanie zhora a
zdola/cirkulujúci vzduch“
210 °C.
5) Kliešťami 3 umiestnite grilované kurča na
otočnom ražni do elektrického spotrebiča.
6) Prepínač funkcií nastavte na „Ohrievanie zhora/cirkulujúci vzduch/otočný ražeň“
dvere zatvorte.
7) Časový spínač nastavte na približne 80
minút. Čas tepelnej úpravy môže byť v
závislosti od veľkosti a akosti grilovaného
kuraťa rôzny.
8) Z času na čas potrite grilované kurča opakovane trochou stolového oleja. Takto bude
chrumkavé.
9) Keď nastavený čas uplynul, odoberte opatrne
kliešťami 3 grilovací ražeň s grilovaným
kurčaťom. Uvoľnite svorky otočného ražňa 0
a grilované kurča stiahnite z otočného ražňa 6.
na približne
a
SGBR 1500 B3
SK
│
93 ■

Čistenie a ošetrovanie
NEBEZPEČENSTVO ZÁSAHU
ELEKTRICKÝM PRÚDOM!
► Pred každým čistením vytiahnite zástrčku
zelektrickej zásuvky! Hrozí nebezpečenstvo
zásahu elektrickým prúdom!
Nikdy neponárajte elektrický spotrebič do
vody ani do iných tekutín!
VÝSTRAHA!
NEBEZPEČENSTVO PORANENIA!
► Pred čistením elektrického spotrebiča ho
nechajte vždy najskôr vychladnúť. Inak hrozí
nebezpečenstvo popálenia!
■ Spotrebič utierajte vlhkou handrou. Podľa
potreby pridajte na handru trocha jemného
čistiaceho prostriedku a následne poutierajte
handrou navlhčenou v čistej vode. Všetko
poriadne vytrite dosucha.
■ Vlhkou handrou vyčistite priestor na tepelnú
úpravu a sklenené dvierka . Podľa potreby
pridajte na handru trocha jemného čistiaceho
prostriedku a následne poutierajte handrou navlhčenou v čistej vode. Všetko poriadne vytrite
dosucha.
■ Vyčistite kliešte /3, otočný ražeň 6, svorky
otočného ražňa 0, aretačný prvok ., plech
na pečenie -, mriežkový rošt ! a plech na
omrvinky v teplej premývacej vode.
Po vyčistení všetky diely dôkladne vysušte.
■ Elektrický spotrebič a diely príslušenstva umyte
najlepšie ihneď po vychladnutí. Vtedy sa dajú
zvyšky potravín ľahšie odstrániť.
POZOR! VECNÉ ŠKODY!
► Nepoužívajte žiadne abrazívne alebo agre-
sívne čistiace prostriedky. Mohli by poškodiť
povrch elektrického spotrebiča!
► Časti elektrického spotrebiča v žiadnom
prípade neumývajte vumývačke riadu!
► Priestor na tepelnú úpravu nečistite sprejom
na rúry na pečenie, pretože sa jeho zvyšky
nadajú odstrániť z ohrievacích tyčí.
Skladovanie
■ Sieťový kábel môžete omotať okolo rozpierok
na zadnej stranľ prístroja a zástrčku môžete
upevniť na jednej z rozpierok:
■ Elektrický spotrebič odložte na čistom,
bezprašnom asuchom mieste.
■ 94 │ SK
SGBR 1500 B3

Odstraňovanie porúch
Chyba Príčina Riešenie
Sieťová zástrčka nie je zapojená do
elektrickej siete.
Elektrický spotrebič
nefunguje.
Kontrolka svieti,
ale elektrický spotre-
bič sa nezohrieva.
Čas tepelnej úpravy
pokrmov sa sa zdá
byť veľmi dlhý.
V priebehu používa-
nia sa vytvára dym a
zápach.
Ak sa poruchy nedajú odstrániť spôsobom uvedeným hore v tabuľke alebo ak zistíte iné druhy
porúch, obráťte sa, prosím, na náš servis.
Elektrická zásuvka je chybná. Použite inú elektrickú zásuvku.
Elektrický spotrebič je chybný. Obráťte sa na servis.
Prepínač funkcií je nastavený na OFF.
Sklenené dvierka boli veľmi často
otvárané, z dôvodu kontroly procesu
tepelnej úpravy.
Je nastavená nesprávna teplota. Prekontrolujte nastavenia teploty.
Na ohrievacích tyčiach sa nachádzajú zvyšky čistiaceho prostriedku alebo potravín.
Zasuňte zástrčku do elektrickej
zásuvky.
Prepínač funkcií otočte na
požadovanú funkciu.
Sklenené dvierka neotvárajte
častejšie, ako to je bezpodmienečne nevyhnutné.
Z elektrického spotrebiča vyberte
jedlo a s procesom tepelnej
úpravy pokračujte pri otvorených
sklenených dvierkach , až kým
sa neprestane tvoriť dym.
SGBR 1500 B3
SK
│
95 ■

Zneškodnenie
Elektrický spotrebič vžiad-
nom prípade nevyhadzujte
do bežného komunálneho
odpadu. Na tento výrobok sa
vzťahuje európska smernica
č. 2012/19/EU.
Elektrický spotrebič zneškodnite odovzdaním v
autorizovanej prevádzke na zneškodňovanie odpadu alebo vo vašejkomunálnej zberni na zneškodňovanie odpadu. Dodržiavajte pritom aktuálne
platné predpisy. V prípade pochybností kontaktujte
vašu zberňu na zneškodňovanie odpadu.
Obal sa skladá z ekologických materiá-
lov, ktoré môžete zneškodniť vmiestnych
recyklačných strediskách.
Záruka spoločnosti
Kompernass Handels GmbH
Vážená zákazníčka, vážený zákazník,
natento prístroj máte záruku 3roky od dátumu za-
kúpenia. V prípade nedostatkov tohto výrobku máte
práva vyplývajúce zo zákona voči predajcovi tohto
výrobku. Tieto Vaše práva vyplývajúce zo zákona
nie sú obmedzené našou zárukou, uvedenou nižšie.
Záručné podmienky
Záručná doba začína plynúť dátumom nákupu.
Prosím, uschovajte si originálny pokladničný blok.
Tento doklad slúži ako doklad ozakúpení.
Ak v priebehu troch rokov od dátumu zakúpenia
tohto výrobku dôjde k chybe materiálu alebo výrobnej chybe, výrobok Vám podľa nášho uváženia
bezplatne opravíme alebo vymeníme. Podmienkou
tohto záručného plnenia je, že počas trojročnej
lehoty sa poškodený prístroj a doklad o zakúpení
(pokladničný blok) predložia so stručným popisom,
v čom spočíva chyba prístroja a kedy k nej došlo.
Ak je chyba pokrytá našou zárukou, zašleme Vám
späť opravený alebo nový výrobok. Opravou alebo
výmenou výrobku nezačína plynúť žiadna nová
záručná doba.
Záručná doba a zákonné nároky na
odstránenie chýb
Záručná doba sa záručným plnením nepredĺži. To
platí aj pre vymenené aopravené diely. Poškodenia
a chyby zistené prípadne už pri kúpe, sa musia
hlásiť okamžite po vybalení. Po uplynutí záručnej
doby podliehajú prípadné opravy poplatku.
Rozsah záruky
Prístroj bol starostlivo vyrobený v súlade s prísnymi
smernicami kvality apred dodaním bol svedomito
preskúšaný.
Záručné plnenie sa vzťahuje na chyby materiálu a
výrobné chyby. Táto záruka sa nevzťahuje na časti
výrobku, ktoré sú vystavené bežnému opotrebovaniu,
a preto ich možno pokladať za opotrebované diely
alebo za poškodenia krehkých dielov, ako sú napríklad spínače, akumulátory, formy na pečenie alebo
diely vyrobené zo skla.
Táto záruka zaniká v prípade poškodenia výrobku
neodborným používaním alebo neodbornou
údržbou. Na správne používanie výrobku sa musia
presne dodržiavať všetky pokyny, uvedené v návode
na obsluhu. Bezpodmienečne sa musí zabrániť použitiu alebo úkonom, ktoré sa v návode na obsluhu
neodporúčajú alebo pred ktorými sa varuje.
Výrobok je určený len na súkromné použitie a nie na
priemyselné používanie Záruka zaniká pri nesprávnom aneodbornom zaobchádzaní, pri použití
násilia apri zásahoch, ktoré neboli vykonané naším
autorizovaným servisom.
■ 96 │ SK
SGBR 1500 B3

Vybavenie v prípade záruky
Na zaručenie rýchleho vybavenia Vašej žiadosti
postupujte podľa nasledujúcich pokynov:
▯ Na všetky otázky majte pripravený pokladničný
doklad a číslo výrobku (napr. IAN 12345) ako
doklad o nákupe.
▯
▯ Ak dôjde k funkčným poruchám alebo iným
▯ Výrobok, zaevidovaný ako poruchový, môžete
obku nájdete na výrobnom štítku, gravúre,
Číslo výr
na titulnej stránke Vášho návodu na obsluhu
(dole vľavo) alebo ako nálepku na zadnej
alebo spodnej strane.
nedostatkom, kontaktujte najprv nižšie uvedené
servisné oddelenie telefonicky alebo
e-mailom.
potom spolu s dokladom o nákupe (pokladničný
blok) a uvedením popisu chyby a dátumu, kedy
k nej došlo, bezplatne odoslať na adresu servisného strediska, ktorá Vám bude oznámená.
a webových stránkach
N
www.lidl-service.com si môžete
stiahnuť tieto a mnoho ďalších príručok,
videá o výrobkoch a softvéry.
Servis
Servis Slovensko
Tel. 0850 232001
E-Mail: kompernass@lidl.sk
IAN 274498
Dovozca
Majte na pamäti, že nižšie uvedená adresa nie je
adresou servisného strediska. Najprv kontaktujte
uvedené servisné stredisko.
KOMPERNASS HANDELS GMBH
BURGSTRASSE 21
44867 BOCHUM
GERMANY
www.kompernass.com
Recepty
V tejto kapitole Vám uvedieme niekoľko príkladov
na prípravu jedál. Tieto príklady sú odporúčania.
Doba prípravy jedla sa môže líšiť.
Recepty bez záruky. Všetky informácie oprísadách
apríprave sú orientačné. Doplňte si tieto recepty
oVaše vlastné skúsenosti. Želáme Vám úspešné
pečenie a dobrú chuť!
UPOZORNENIE
Dodržiavajte tiež upozornenia k príprave jedál
na obale potravín.
Muffiny
Prísady pre štyri osoby:
♦ 1 šálka múky
♦ 1 čajová lyžička prášku do pečiva
♦ 1 vajce
♦ 1 polievková lyžica rozpusteného masla
♦ 1 šálka mlieka
♦ 3 PL cukru
♦ 1 štipka soli
♦ pre rôzne varianty dodatočne orechy, nakrájané
banány alebo čokoládové vločky
Príprava:
1) V miske pomaly jedno po druhom zmiešajte
múku, prášok do pečiva, vajce, mlieko, soľ a
cukor.
2) Rozpustite maslo v hrnci a zamiešajte do cesta.
3) Podľa chuti primiešajte orechy, čokoládové
vločky alebo roztlačené banány.
4) Hotové cesto dajte do typických formičiek na
muffiny a tieto postavte na plech na pečenie -.
5) Muffiny pečte pri 220°C s horným a dolným
ohrevom približne 15 minút na spodnej lište.
SGBR 1500 B3
SK
│
97 ■
 Loading...