


MINI FOUR/GRIL SGBR 1500 B3
MINI FOUR/GRIL
Mode d'emploi
ELECTRIC OVEN & GRILL
Operating instructions
IAN 274498
GRILL- UND BACKAUTOMAT
Bedienungsanleitung

Avant de lire le mode d'emploi, ouvrez la page contenant les illustrations et familiarisez-vous ensuite avec
toutes les fonctions de l'appareil.
Klappen Sie vor dem Lesen die Seite mit den Abbildungen aus und machen Sie sich anschließend mit allen
Funktionen des Gerätes vertraut.
Before reading, unfold the page containing the illustrations and familiarise yourself with all functions of
the device.
FR / BE Mode d'emploi Page 1
DE / AT / CH Bedienungsanleitung Seite 21
GB Operating instructions Page 41

A
B
6
-
3
!
0.

Table des matières
Introduction ............................................................2
Usage conforme ........................................................2
Matériel livré ...........................................................2
Description de l'appareil .................................................2
Caractéristiques techniques ...............................................2
Consignes de sécurité ....................................................3
Installation ............................................................6
Utilisation de l'appareil ..................................................6
Porte vitrée .........................................................................6
Insérer le tiroir ramasse-miettes .........................................................6
Utiliser le tournebroche ...............................................................7
Utiliser le plateau/la grille .............................................................8
Avant la première utilisation ..............................................8
Utilisation de l'appareil ..................................................9
Commutateur de fonctions .............................................................9
Thermostat .........................................................................9
Minuterie ..........................................................................9
Grillade et cuisson ......................................................9
Grillade avec tournebroche ..............................................10
Nettoyage et entretien ..................................................12
Entreposage ..........................................................12
Dépannage ...........................................................13
Mise au rebut .........................................................14
Garantie de Kompernass Handels GmbH ..................................14
Service après-vente .................................................................15
Importateur .......................................................................15
Recettes ..............................................................16
SGBR 1500 B3
FR│BE
│
1 ■

Introduction
Toutes nos félicitations pour l'achat de votre nouvel
appareil.
Ainsi, vous venez d'opter pour un produit de grande
qualité. Le mode d'emploi fait partie de ce produit.
Il contient des remarques importantes concernant la
sécurité, l'usage et la mise au rebut. Avant l'usage
du produit, veuillez vous familiariser avec toutes les
consignes d'utilisation et de sécurité. N'utilisez le
produit que conformément aux consignes et pour
les domaines d'utilisation prévus. Si vous cédez le
produit à un tiers, remettez-lui également tous les
documents.
Description de l'appareil
Figure A:
Entraînement
Thermostat
Commutateur de fonction
Minuterie
Voyant de contrôle
Porte vitrée
Tiroir ramasse-miettes installé
Barreaux chauffants inférieurs
Logement du tournebroche
Usage conforme
Le four grill automatique sert exclusivement à
réchauffer, cuire et griller des aliments.
Cet appareil est exclusivement réservé à un usage
domestique. Évitez de l'utiliser à des fins professionnelles.
Toute autre utilisation est considérée comme non
conforme et peut entraîner des dommages matériels, voire des accidents.
Matériel livré
♦ Mini four/gril
♦ 1 plateau
♦ 1 grille
♦ 2 pinces
♦ Tournebroche avec 2 bornes
♦ 1 tiroir ramasse-miettes
♦ Mode d'emploi
REMARQUE
Contrôlez le matériel livré directement après avoir
procédé au déballage afin de vous assurer que
tout est complet et que rien n'a été endommagé.
Si nécessaire, veuillez vous adresser au service
après-vente.
Figure B:
Pince (pour plateau et grille)
- Plateau
3 Pince (pour tournebroche)
! Grille
. Dispositif de blocage
0 Bornes du tournebroche
6 Tournebroche
Caractéristiques techniques
Tension nominale: 220 - 240 V ~,
50/60 Hz
Puissance absorbée max. : 1500 W
Tous les éléments de cet appareil,
entrant en contact avec les aliments sont
approuvés pour le contact alimentaire.
│
BE
SGBR 1500 B3■ 2 │ FR

Consignes de sécurité
DANGER - RISQUE D'ÉLECTROCUTION!
► Il est interdit d'ouvrir ou de réparer le boîtier de l'appareil.
Dans ce cas, la sécurité n'est plus assurée et vous perdez le
bénéfice de la garantie. Confiez la réparation d'un appareil
défectueux uniquement au revendeur ou à un technicien
spécialisé.
► Faites immédiatement remplacer la fiche secteur ou le cor-
don d'alimentation endommagé par des techniciens spécialisés agréés ou par le service clientèle, pour éviter tout risque.
► Ne laissez pas pénétrer de liquide dans le boîtier de l'appa-
reil. Il est interdit d'exposer l'appareil à l'humidité et de l'utiliser à l'extérieur. Éviter également de poser l'appareil sur des
récipients contenant un liquide (vases, etc.). Risque d'incendie
ou d'électrocution! Si toutefois du liquide devait pénétrer
dans le boîtier de l'appareil, débranchez immédiatement la
fiche de la prise de courant et confier l'appareil à un atelier
spécialisé pour vérification.
► Ne saisissez jamais l'appareil, le cordon ou la fiche avec
des mains humides. Risque d'électrocution.
Ne plongez jamais l'appareil dans de l'eau ou d'autres
liquides! Il y a danger de mort par électrocution si des
restes de liquide entrent en contact avec des pièces sous
tension pendant le fonctionnement.
SGBR 1500 B3
FR│BE
│
3 ■

ATTENTION – RISQUE DE BLESSURE!
► Cet appareil peut être utilisé par des enfants à partir de 8
ans et par des personnes ayant des capacités physiques,
sensorielles ou mentales réduites ou un manque d'expérience
et de connaissances à condition qu'elles soient surveillées ou
qu'elles aient été instruites concernant I'utilisation en toute
sécurité de I'appareil et qu'elles aient compris les dangers
encourus.
► Ne pas laisser les enfants jouer avec l'appareil.
► Le nettoyage et la maintenance réalisés par l'utilisateur ne
doivent pas être effectués par des enfants à moins qu'ils
soient âgés de plus de 8 ans et surveillés.
► Éloignez l’appareil et son cordon de raccordement des
enfants âgés de moins de 8 ans.
► Acheminez le cordon d'alimentation de telle manière que
personne ne puisse marcher ou trébucher dessus.
► Ne touchez jamais la porte vitrée ou le boîtier en cours
d'utilisation car ils peuvent devenir très chauds. Pour ouvrir la
porte vitrée, utilisez une manique ou une protection similaire
pour éviter les brûlures!
► Ne touchez jamais les barreaux chauffants ou la vitre en
cours d'opération: attendre que l'appareil soit refroidi.
Ne pas mettre la main dans l'enceinte de cuisson en cours
d'opération. Attendre que l'appareil soit refroidi. Sinon
risque de brûlure.
► Laissez d'abord l'appareil refroidir avant de le transporter.
► Utilisez toujours des gants ou des maniques lorsque vous
manipulez l'appareil chaud.
Attention! Surface brûlante!
│
BE
SGBR 1500 B3■ 4 │ FR

ATTENTION – DÉGÂTS MATÉRIELS!
► N'utilisez pas de minuterie externe ni de dispositif de com-
mande à distance séparé pour opérer l'appareil.
► Ne laissez jamais l'appareil sans surveillance en cours
d'opération.
► Assurez-vous que l'appareil, le cordon d'alimentation ou la
fiche secteur n'entrent pas en contact avec des sources chaudes
telles que des plaques de cuisson ou des flammes nues.
► Opérez l'appareil uniquement avec les accessoires d'origine
fournis.
► Ne pas tordre, ni plier, ni écraser le cordon d'alimentation.
► Pour retirer le cordon d'alimentation, toujours prendre soin
de retirer la fiche de la prise et ne pas tirer sur le cordon.
► Éviter toute présence de matériau inflammable à proximité
immédiate de l'appareil lorsqu'il est en marche (chiffon,
manique, etc.).
► Ne jamais utiliser l'appareil pour sécher des textiles ou un
objet quelconque, que ce soit en posant l'objet à sécher sur
ou dans l'appareil. Danger d'incendie!
SGBR 1500 B3
FR│BE
│
5 ■

Installation
Utilisation de l'appareil
AVERTISSEMENT!
RISQUE D'INCENDIE!
► N'installez jamais l'appareil sous des armoires
suspendues ou à côté de rideaux, de parois
d'armoire ou d'autres objets inflammables.
► La distance entre l’appareil et les armoires
suspendues, plafonds, murs latéraux ou autres
doit être d’au moins 10 cm en hauteur et 5
cm de chaque côté. Ne pas installer l'appareil
dans un buffet, une armoire ou tout espace
confiné. En effet, il faut disposer d'un espace
libre suffisant autour de l'appareil pour la
ventilation (sinon risque de surchauffe ou
d'incendie).
► N'installez l'appareil que sur un support ré-
sistant à la chaleur. Sinon, il y a un risque
d'incendie et de mise hors service de l'appareil. La zone située sous le fond de l'appareil
peut décolorer et être endommagée. D'autre
part éviter d'installer le mini-four sur un support en matériau souple, ce qui risquerait de
laisser des marques.
DANGER -
RISQUE D'ÉLECTROCUTION!
► Ne pas mettre l'appareil à proximité immé-
diate d'eau, par ex. dans un évier, une bassine
ou dans des caves humides. Sinon, il y a un
risque d'électrocution.
■ Posez l'appareil sur un support stable, plat et
résistant à la chaleur (par ex. plans de travail
en inox ou plans de travail en pierre naturelle
comme le granit). Vérifiez qu'il y a un espace
suffisant autour de l'appareil pour la ventilation.
■ Poussez l’appareil le dos contre le mur. Les écar-
teurs au dos doivent toucher le mur. Veillez à ce
que le mur soit composé d’un matériau résistant
à la chaleur, par ex. carrelage, pierre naturelle
ou granit.
■ Nettoyez toutes les pièces, comme indiqué au
chapitre «Nettoyage et entretien».
Porte vitrée
ATTENTION!
RISQUE DE DÉGÂTS MATÉRIELS!
►
Ne pas prendre appui sur la porte vitrée .
De même, ne pas mettre d'objet sur la porte
vitrée . Risque de dommage sur les charnières.
■ Des fumées peuvent apparaître lors de la cuisson
de préparations ayant une forte teneur en corps
gras. Dans ce cas, ne pas fermer complètement
la porte vitrée , mais laisser entrouvert:
la porte vitrée a une position de crantage qui
lui permet de rester entrouverte: en refermant
la porte vitrée doucement, celle-ci présente
une légère résistance sur cette position avant
fermeture complète.
■ Lors de la déshydratation de fruits également,
pour obtenir des fruits secs, la porte vitrée
doit rester en position de crantage pour que
l’humidité puisse s’échapper et que les fruits
sèchent mieux.
Insérer le tiroir ramasse-miettes
■ Glissez le tiroir ramasse-miettes sous les
barreaux chauffants inférieurs , de sorte
qu'il repose à plat sur le fond de l'appareil.
Vous pouvez utiliser le côté relevé et courbé
comme poignée.
│
BE
SGBR 1500 B3■ 6 │ FR
Utiliser le tournebroche
AVERTISSEMENT !
RISQUE DE BLESSURES!
► Utilisez toujours la pince 3 pour insérer ou reti-
rer le tournebroche chaud 6 dans l'appareil
A
■
vec les deux bornes du tournebroche 0,
vous pouvez fixer les aliments à griller sur le
tournebroche 6.
Desserrez le dispositif de blocage . sur les
bornes du tournebroche 0, poussez celui-ci de
telle sorte que les aliments à griller soient bien
serrés entre les deux et vissez à nouveau le
dispositif de blocage . fermement
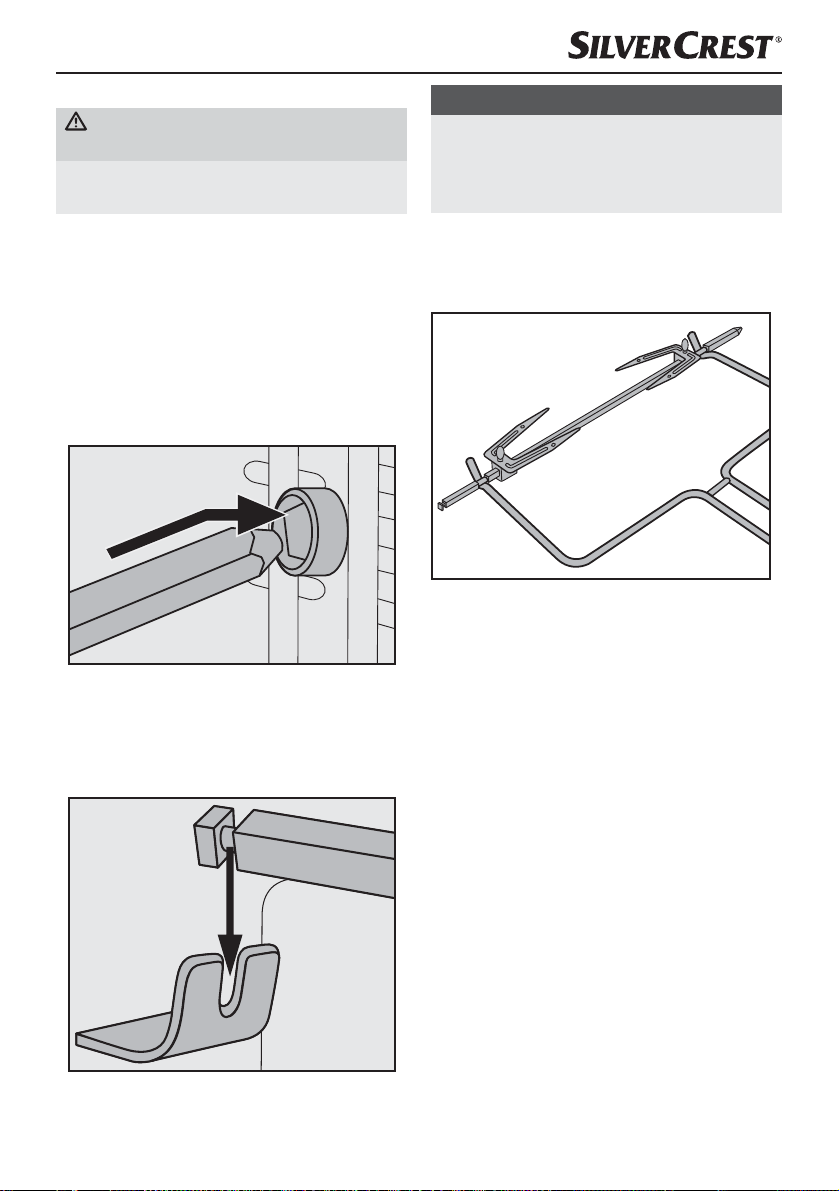
■ Glissez d'abord l'extrémité du tournebroche 6
sans rainure dans l'entraînement (fig. 1):
.
REMARQUE
► Glissez toujours le plateau - dans la glissière
inférieure lorsque vous utilisez le tournebroche 6. Les liquides qui tombent sont
.
ainsi récupérés.
■ Pour retirer le tournebroche chaud 6, saisissez-le
avec le crochet situé à l'extrémité de la pince 3
dans les rainures du tournebroche 6(fig. 3):
Fig. 3: Accrochage de la pince 3 avec le tourne-
broche 6
Fig. 1 : Glissez le tournebroche 6 dans l'entraîne-
ment .
■ Posez ensuite l'autre extrémité du tournebroche 6
avec la rainure profonde dans le logement du
tournebroche (fig. 2):
Fig. 2: Poser le tournebroche 6 dans le logement
du tournebroche
SGBR 1500 B3
■ Soulevez d'abord le côté gauche du tourne-
broche 6 du logement du tournebroche et
retirez ensuite le tournebroche 6 de l'entraîne-
ment .
FR│BE
│
7 ■

Utiliser le plateau/la grille
AVERTISSEMENT!
RISQUE DE BLESSURES!
► Utilisez toujours la pince pour insérer
ou retirer le plateau -chaud/la grille !
chaude dans l'appareil.
■ Glissez le plateau -/la grille ! dans l'une
des 3 glissières de l'enceinte de cuisson de
l'appareil.
ATTENTION!
RISQUE DE DÉGÂTS MATÉRIELS!
► Ne posez jamais le plateau -/la grille !
directement sur les barreaux chauffants .
■ Afin de pouvoir retirer le plateau - chaud ou
la grille ! accrochez la pince comme suit:
Fig. 4: Accrochage de la pince avec la grille !
Avant la première utilisation
1) Branchez la fiche secteur dans une prise secteur.
2) Réglez le thermostat à la température la
plus élevée, en allant jusqu'à la butée dans le
sens des aiguilles d'une montre.
3) Tournez le commutateur de fonctions sur
«Chaleur haut + bas»
4) Ouvrez la porte vitrée et laissez-la ouverte
pour ce processus.
5) Retirez éventuellement les accessoires insérés
de l'enceinte de cuisson.
6) Réglez la minuterie sur 20 minutes.
REMARQUE
► Lorsque vous faites chauffer l’appareil pour
la première fois, les résidus de fabrication
peuvent entraîner une légère formation de
fumée ou d’odeur. Ce phénomène est tout à
fait normal et sans risque.
Assurez une aération suffisante, en ouvrant
une fenêtre par exemple.
L'appareil s'éteint automatiquement après
20 minutes.
Si vous voulez interrompre prématurément le
processus de chauffage, réglez le thermostat
jusqu'à la butée dans le sens inverse des aiguilles d'une montre et mettez la minuterie sur
«OFF - 0».
7) Laissez l'appareil refroidir et nettoyez l'appareil
tel que stipulé au chapitre «Nettoyage et
entretien».
L'appareil est maintenant prêt à l'emploi.
.
Fig. 5: Accrochage de la pince avec
le plateau -.
│
BE
SGBR 1500 B3■ 8 │ FR
Utilisation de l'appareil
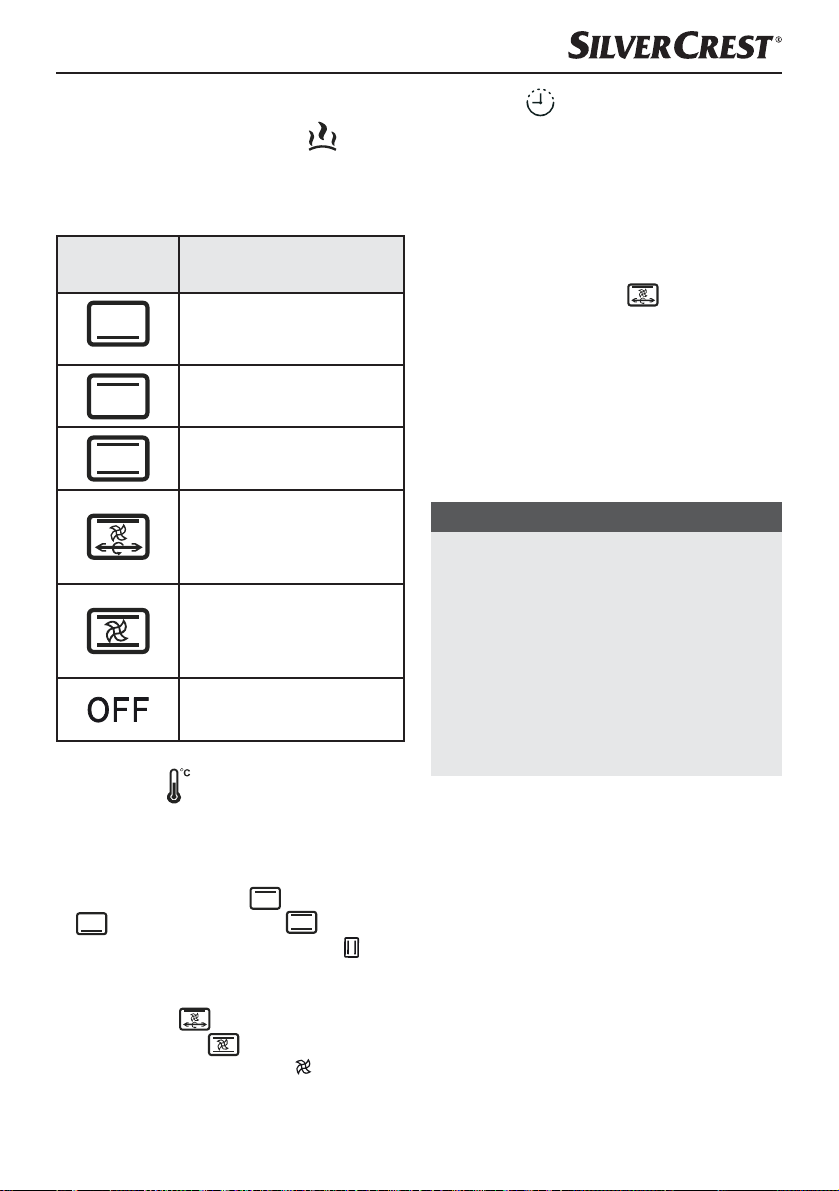
Commutateur de fonctions
Sur le commutateur de fonctions vous pouvez
mettre l'appareil en marche et régler 5 fonctions
différentes :
Symbole Signification
«Chaleur bas»,
par ex. pour faire de
la pâtisserie
«Chaleur haut»,
par ex. pour faire gratiner
«Chaleur haut + bas»
par ex. pour cuire des pizzas
«Chaleur haut/
chaleur tournante/
tournebroche»
par ex. pour griller de la volaille
«Chaleur haut + bas/
chaleur tournante»
par ex. pour réchauffer
des petits pains
«OFF» l'appareil est éteint
Thermostat
Sur le thermostat , vous pouvez régler la température désirée
■ Lorsque vous réglez la température pour les
fonctions «Chaleur haut»
ou «Chaleur haut + bas» , reportez-
vous à l'échelle graduée signalée par «
■ Lorsque vous réglez la température pour les
fonctions «Chaleur haut/chaleur tournante/
tournebroche»
chaleur tournante»
l'échelle graduée signalée par « ».
ou «chaleur haut + bas/
, «Chaleur bas»
».
reportez-vous à
Minuterie
La minuterie vous permet de régler le temps de
cuisson.
■ Mettez la minuterie sur le temps de cuisson
désiré. A la fin de la durée programmée, un
signal sonore retentit et l'appareil arrête de
chauffer.
Dans la cas où la fonction «Chaleur haut/chaleur
tournante/tournebroche»
la rotation du tournebroche 6s'arrête.
est sélectionnée,
Grillade et cuisson
1) Posez le tiroir ramasse-miettes dans l'appareil.
2) Retirez la grille ! et le plateau - de l'appareil.
Disposez le cas échéant une feuille de papier
sulfurisé ou enduisez le plateau - de graisse
adaptée à la cuisson.
REMARQUE
► Selon le plat, le four doit être préchauffé.
Tenez-vous en aux directives dans chaque
recette. Le préchauffage est utile dans tous
les cas pour:
– les temps de cuisson très courts,
– les croûtes croustillantes,
– les plats sensibles qui nécessitent une tem-
pérature constante, tels que les soufflés.
► Si aucun préchauffage n'est nécessaire,
passez à l'étape d'action3.
3) Mettez l'appareil en chauffe 10 minutes environ
(selon le réglage de température) jusqu'à la
température souhaitée:
– Sélectionnez la température souhaitée avec
le thermostat . Veillez à utiliser la bonne
échelle graduée (voir chapitre «Thermostat».)
– Ensuite, sélectionnez la fonction désirée à
l'aide du commutateur de fonctions .
SGBR 1500 B3
FR│BE
│
9 ■

REMARQUE
► Si vous sélectionnez la fonction à chaleur
tournante, un préchauffage du grill et de
l'enceinte de cuisson est en général inutile.
– Réglez la minuterie sur le temps de
préchauffage (environ 10 minutes).
– Refermez la porte vitrée .
4) Le délai écoulé, mettre le plat ou la préparation
sur la grille ! ou le plateau - et mettre en
place dans l'une des glissières du four. Vérifiez
qu'il y a un espace suffisant entre le plat et
les parois du four d'une part, et les barreaux
chauffants d'autre part.
REMARQUE
► Si vous préparez des aliments qui gouttent
fortement sur la grille !, alors faites glisser
le plateau - dans la glissière inférieure. La
graisse qui s'égoutte est récupérée et l'appareil
est ensuite plus facile à nettoyer.
5) Refermez la porte vitrée avant de lancer la
cuisson.
6) Mettre la minuterie sur le temps de cuisson
souhaité. Le temps maximal de la minuterie est
de 120 minutes.
REMARQUE
► Lorsque le temps de cuisson pour la prépara-
tion du plat est inférieure à 20 minutes, mettre
la minuterie d'abord sur 40 minutes, puis
sur le temps de cuisson normalement prévu.
Le voyant de contrôle indique que l'appareil est
allumé. Le bouton de la minuterie se déplace
maintenant dans le sens inverse des aiguilles d'une
montre vers «OFF-0».
L'appareil s'éteint automatiquement après le délai
préréglé, un signal sonore retentit et le voyant de
contrôle s'éteint.
REMARQUE
Si vous voulez interrompre prématurément le processus de chauffage, réglez le thermostat
jusqu'à la butée dans le sens inverse des aiguilles
d'une montre et mettez la minuterie sur
«OFF - 0».
7) Après le processus de chauffage, retirez la
grille ! ou le plateau - à l'aide de la pince .
8) Réglez le commutateur de fonctions sur «OFF».
Grillade avec tournebroche
1) Posez le tiroir ramasse-miettes dans l'appareil.
2) S'il est installé, retirez le tournebroche 6 de
l'appareil.
3) Glissez le plateau - dans la glissière inférieure.
4) Fixez les aliments à griller aux bornes du tournebroche 0. Assurez-vous que les aliments à
griller peuvent tourner librement dans l'enceinte
de cuisson sans toucher l'enceinte de cuisson. Il
peut arriver que le tournebroche 6 change de
sens de rotation lorsque les aliments à griller
butent contre une résistance.
Les deux rainures qui se trouvent sur le tournebroche 6 doivent rester librement accessibles
sans quoi il est impossible de saisir le tournebroche 6 avec la pince 3.
5) Fixez le tournebroche 6 dans l'enceinte de
cuisson (voir chapitre«Utilisation du tournebroche»).
6) Refermez la porte vitrée .
│
BE
SGBR 1500 B3■ 10 │ FR

REMARQUE
Si vous voulez interrompre prématurément le processus de chauffage, réglez le thermostat
jusqu'à la butée dans le sens inverse des aiguilles
d'une montre et mettez la minuterie sur «OFF - 0».
7) Réglez la température désirée sur le thermostat .
8) Réglez le commutateur de fonctions sur
«Chaleur haut/chaleur tournante/ tourne-
broche»
tée sur la minuterie . L’appareil démarre la
cuisson et le tournebroche 6 tourne.
Le voyant de contrôle indique que l’appareil est
allumé. Le bouton de la minuterie se déplace
maintenant dans le sens inverse des aiguilles d’une
montre vers «OFF - 0».
L’appareil s’éteint automatiquement après le délai
préréglé, un signal sonore retentit et le voyant de
contrôle s’éteint.
REMARQUE
Si vous voulez interrompre prématurément le processus de chauffage, réglez le thermostat
jusqu'à la butée dans le sens inverse des aiguilles
d'une montre et mettez la minuterie sur
«OFF - 0».
9) Une fois la cuisson finie, retirez le tournebroche 6 à l’aide de la pince 3.
10) Réglez le commutateur de fonctions sur
«OFF».
. Réglez la durée de grill souhai-
EXEMPLE POULET GRILLÉ
Ingrédients
♦ Poulet à griller (env. 1,3 kg, éviscéré)
♦ Épices (sel, poivre)
♦ Huile de cuisson
1) Assaisonnez le poulet à griller à l’intérieur
et à l’extérieur avec du sel et du poivre.
Badigeonnez-le en surface d’huile de cuisson résistante à la chaleur.
2) Glissez le poulet à griller sur la broche 6
et fixez-la aux bornes du tournebroche 0.
Assurez-vous que les rainures sur le tournebroche 6restent dégagées afin que vous
puissiez attraper le tournebroche 6à l’aide
de la pince 3. Selon la forme du poulet à
griller, il est nécessaire de fixer les ailes et les
cuisses avec une ficelle de liage réfractaire
afin que celles-ci ne heurtent pas le four en
tournant.
3) Glissez le plateau - dans la glissière
inférieure.
4) Préchauffez l’appareil env. 10 minutes avec
la fonction «Chaleur haut + bas/chaleur
tournante»
5) Insérez le poulet à griller sur le tournebroche
à l’aide de la pince 3 dans l’appareil.
6) Réglez le commutateur de fonctions sur
«Chaleur haut/chaleur tournante/
tournebroche»
7) Réglez la minuterie sur env. 80 minutes.
Le temps de cuisson peut varier selon la
taille et la nature du poulet à griller.
8) Arrosez le poulet grillé de temps en temps
avec un peu d’huile de cuisson. Ainsi, il sera
croustillant.
9) Lorsque la durée programmée est écoulée,
retirez la broche du poulet grillé doucement
avec la pince 3. Desserrez les bornes
du tournebroche 0 et retirez le poulet du
tournebroche 6.
sur 210°C.
et fermez la porter.
SGBR 1500 B3
FR│BE
│
11 ■

Nettoyage et entretien
DANGER -
RISQUE D'ÉLECTROCUTION!
► Avant chaque nettoyage, retirez la fiche
secteur de la prise secteur!
Risque d'électrocution!
Ne plongez jamais l'appareil dans de l'eau
ou d'autres liquides!
AVERTISSEMENT!
RISQUE DE BLESSURES!
► Laissez toujours refroidir l'appareil avant de le
nettoyer. Sinon, il y a un risque de blessures!
■ Nettoyez l'appareil et les accessoires le plus
tôt possible après le refroidissement. Les restes
alimentaires peuvent ensuite être enlevés plus
facilement.
ATTENTION!
RISQUE DE DÉGÂTS MATÉRIELS!
► N'utilisez pas de produit nettoyant abrasif ou
agressif. Ceux-ci peuvent en effet endommager la surface!
► Ne nettoyez pas les pièces de l'appareil dans
le lave-vaisselle!
► Ne nettoyez pas l'enceinte de cuisson avec
un spray pour four, étant donné que les
résidus ne peuvent plus être enlevés sur les
barreaux chauffants.
■ Essuyez l'appareil avec un chiffon humide. Si
nécessaire, ajoutez du produit vaisselle doux
sur le chiffon et rincez avec un chiffon humidifié
à l'eau claire. Bien sécher le tout.
■ Nettoyez l'enceinte de cuisson et la porte vitrée
à l'aide d'un chiffon humidifié. Si nécessaire,
ajoutez du produit vaisselle doux sur le chiffon
et rincez avec un chiffon humidifié à l'eau claire.
Bien sécher le tout.
■ Nettoyez les pinces /3, le tournebroche 6,
les bornes du tournebroche 0, le dispositif de
blocage ., le plateau -, la grille ! et le tiroir
ramasse-miettes dans de l'eau chaude savonneuse. Veillez à bien sécher toutes les pièces
après le nettoyage.
Entreposage
■ Vous pouvez enrouler le cordon d’alimentation
autour de l’espaceur au dos de l’appareil et
fixer le connecteur à un espaceur :
■ Conservez l'appareil nettoyé et ses accessoires
dans un endroit sec, propre et exempt de
poussières.
│
BE
SGBR 1500 B3■ 12 │ FR

Dépannage
Défaut Cause Solution
La fiche secteur n'est pas raccordée au
réseau électrique.
L'appareil ne
fonctionne pas.
Le voyant de
contrôle est
allumé mais l'appareil ne chauffe pas.
Le temps de cuisson
des plats semble très
longtemps.
Pendant l'utilisation, il
se forme de la fumée
et des odeurs.
Si vous ne parvenez pas à remédier aux pannes à l'aide des indications données ci-dessus ou si vous
constatez d'autres types de pannes, veuillez vous adresser à notre service après-vente.
La prise secteur est défectueuse. Utilisez une autre prise secteur.
L'appareil est défectueux.
Le commutateur de fonctions est sur OFF.
La porte vitrée a été ouverte très souvent
pour contrôler l'avancée de la cuisson.
Une mauvaise température est réglée.
Des résidus de nettoyage ou des restes
alimentaires se trouvent sur les barreaux
chauffants.
Branchez la fiche secteur dans
une prise secteur.
Adressez-vous au service aprèsvente.
Tournez le commutateur de fonctions sur la fonction souhaitée.
N'ouvrez pas la porte vitrée
plus souvent qu'il n'est absolument nécessaire.
Vérifiez les réglages de température.
Retirez les aliments de l'appareil
et poursuivez la cuisson avec la
porte vitrée ouverte jusqu'à ce
que les fumées disparaissent.
SGBR 1500 B3
FR│BE
│
13 ■

Mise au rebut
Ne jamais jeter l'appareil
avec les ordures ménagères.
Ce produit est assujetti à
la directive européenne
2012/19/EU.
Éliminez l'appareil par l'intermédiaire d'une entreprise de traitement des déchets autorisée ou via le
service de recyclage de votre commune. Respectez
la réglementation en vigueur. En cas de doute,
veuillez contacter votre centre de recyclage.
L'emballage est réalisé à l'aide de
matériaux écologiques qu'il est possible
de confieraux centres de recyclage
proches de chez vous.
Le produit récyclable doit être trié ou
rapporté dans un point de collecte
pour être recycle.
Garantie de
Kompernass Handels GmbH
Chère cliente, cher client,
Cet appareil est garanti 3 ans à partir de la date
d’achat. Si ce produit venait à présenter des vices,
vous disposez de droits légaux face au vendeur de
ce produit. Vos droits légaux ne sont pas restreints
par notre garantie présentée ci-dessous.
Conditions de garantie
La période de garantie débute à la date de l’achat.
Veuillez bien conserver le ticket de caisse d’origine.
Ce document servira de preuve d’achat.
Si dans un délai de trois ans suivant la date d’achat de
ce produit, un vice de matériel ou de fabrication venait
à apparaître, le produit sera réparé ou remplacé gratuitement par nos soins, selon notre choix. Cette prestation
de garantie nécessite dans un délai de trois ans la
présentation de l’appareil défectueux et du justificatif
d’achat (ticket de caisse) ainsi que la description
brève du vice et du moment de son apparition.
Si le vice est couvert par notre garantie, vous
recevrez le produit réparé ou un nouveau produit
en retour. Aucune nouvelle période de garantie ne
débute avec la réparation ou l’échange du produit.
Période de garantie et réclamation
légale pour vices cachés
L’exercice de la garantie ne prolonge pas la période
de garantie. Cette disposition s’applique également
aux pièces remplacées ou réparées. Les dommages
et vices éventuellement déjà présents à l’achat doivent
être signalés immédiatement après le déballage.
Toute réparation survenant après la période sous
garantie fera l’objet d’une facturation.
Étendue de la garantie
L’appareil a été fabriqué avec soin conformément
à des directives de qualité strictes et consciencieusement contrôlé avant sa livraison.
La prestation de garantie est valable pour des vices
de matériel et de fabrication. Cette garantie ne
s’étend pas aux pièces du produit qui sont exposées
à une usure normale et peuvent de ce fait être
considérées comme pièces d’usure, ni aux détériorations de pièces fragiles, par ex. connecteur, accu,
moules ou pièces en verre.
Cette garantie devient caduque si le produit est détérioré, utilisé ou entretenu de manière non conforme.
Toutes les instructions listées dans le manuel d’utilisation doivent être exactement respectées pour une
utilisation conforme du produit. Des buts d’utilisation
et actions qui sont déconseillés dans le manuel d’utilisation, ou dont vous êtes avertis doivent également
être évités.
Le produit est uniquement destiné à un usage privé et
ne convient pas à un usage professionnel. La garantie
est annulée en cas d’entretien incorrect et inapproprié,
d’usage de la force et en cas d’intervention non réalisée par notre centre de service après-vente agréé.
Article L211-16 du Code de la
consommation
Lorsque l‘acheteur demande au vendeur, pendant
le cours de la garantie commerciale qui lui a été
consentie lors de l‘acquisition ou de la réparation
d‘un bien meuble, une remise en état couverte par
la garantie, toute période d‘immobilisation d‘au
moins sept jours vient s‘ajouter à la durée de la
garantie qui restait à courir. Cette période court à
compter de la demande d‘intervention de l‘acheteur ou de la mise à disposition pour réparation
du bien en cause, si cette mise à disposition est
postérieure à la demande d‘intervention.
│
BE
SGBR 1500 B3■ 14 │ FR

Indépendamment de la garantie commerciale
souscrite, le vendeur reste tenu des défauts de
conformité du bien et des vices rédhibitoires dans
les conditions prévues aux articles L211-4 à
L211-13 du Code de la consommation et aux
articles 1641 à 1648 et 2232 du Code Civil.
Article L211-5 du Code de la
consommation
Pour être conforme au contrat, le bien doit :
1° Etre propre à l‘usage habituellement attendu
d‘un bien semblable et, le cas échéant :
– correspondre à la description donnée
parle vendeur et posséder les qualités que
celui-ci a présentées à l‘acheteur sous forme
d‘échantillon ou de modèle ;
– présenter les qualités qu‘un acheteur peut
légitimement attendre eu égard aux déclarations publiques faites par le vendeur, par le
producteur ou par son représentant, notamment dans la publicité ou l‘étiquetage ;
2° Ou présenter les caractéristiques définies d‘un
commun accord par les parties ou être propre
à tout usage spécial recherché par l‘acheteur,
porté à la connaissance du vendeur et que ce
dernier a accepté.
Article L211-12 du Code de la
consommation
L‘action résultant du défaut de conformité se prescrit
par deux ans à compter de la délivrance du bien.
Article 1641 du Code civil
Le vendeur est tenu de la garantie à raison des
défauts cachés de la chose vendue qui la rendent
impropre à l‘usage auquel on la destine, ou qui
diminuent tellement cet usage que l‘acheteur ne
l‘aurait pas acquise, ou n‘en aurait donné qu‘un
moindre prix, s‘il les avait connus
.
Article 1648 1er alinéa du Code civil
L‘action résultant des vices rédhibitoires doit être intentée par l‘acquéreur dans un délai de deux ans à compter de la découverte du vice. Les pièces détachées
indispensables à l’utilisation du produit sont disponibles
pendant la durée de la garantie du produit.
Procédure en cas de garantie
Afin de garantir un traitement rapide de votre
demande, veuillez suivre les indications suivantes :
▯ Veuillez avoir à portée de main pour toutes ques-
tions le ticket de caisse et la référence article (par ex.
IAN 12345) en tant que justificatif de votre achat.
▯ Vous trouverez la référence sur la plaque signalé-
tique, une gravure, sur la page de garde de votre
manuel d’utilisation (en bas à gauche) ou sous
forme d’autocollant au dos ou sur le dessous.
▯ Si des erreurs de fonctionnement ou d’autres
vices venaient à apparaître, veuillez d’abord
contacter le département service clientèle cité
ci-dessous par téléphone ou par e-mail.
▯ Vous pouvez ensuite retourner un produit enregis-
tré comme étant défectueux en joignant le ticket
de caisse et en indiquant en quoi consiste le vice
et quand il est survenu, sans devoir l’affranchir à
l’adresse de service après-vente communiquée.
Sur www.lidl-service.com, vous pouvez
télécharger ce manuel ainsi que beaucoup
d’autres, des vidéos produit et logiciels.
Service après-vente
Service France
Tel.: 0800 919270
E-Mail: kompernass@lidl.fr
Service Belgique
Tel.: 070 270 171 (0,15 EUR/Min.)
E-Mail: kompernass@lidl.be
IAN 274498
Importateur
Veuillez tenir compte du fait que l’adresse suivante
n’est pas une adresse de service après-vente.
Veuillez d’abord contacter le service mentionné.
KOMPERNASS HANDELS GMBH
BURGSTRASSE 21
44867 BOCHUM
GERMANY
www.kompernass.com
SGBR 1500 B3
FR│BE
│
15 ■

Recettes
Ce chapitre vous présente quelques exemples de
recettes. Ces exemples ne sont que des recommandations. Les temps de préparation peuvent varier.
Recettes sans garantie. Toutes les indications relatives aux ingrédients et aux préparations sont des
valeurs approximatives. Complétez ces propositions
de recette avec vos expériences personnelles.
Nous vous souhaitons beaucoup de réussite et un
bon appétit.
Toast Hawaii
Ingrédients pour 4 toasts :
♦ 4 tranches de toast
♦ 1 ou -2 cuillères à soupe de rémoulade
♦ 120 g de jambon blanc
♦ 1/2 boîte d’ ananas
♦ 4 tranches de fromage pour gratiner
♦ Curry
REMARQUE
Noter les conseils de préparation donnés sur les
emballages des produits alimentaires.
Muffins
Recette pour quatre personnes :
♦ 1 tasse de farine
♦ 1 cuillère à café de levure chimique
♦ 1 œuf
♦ 1 cuillère à soupe de beurre fondu
♦ 1 tasse de lait
♦ 3 c-à-s de sucre
♦ 1 pincée de sel
♦ et pour différentes variantes des noix, de la
banane écrasée ou des flocons de chocolat
Préparation :
1) Mélanger lentement dans un bol à la file la
farine, la levure, l’œuf, le lait, le sel et le sucre.
2) Fondre le beurre dans une casserole et le
mélanger à la pâte.
3) Selon les goûts, ajouter des noix, de la banane
écrasée ou des flocons de chocolat.
4) Mettre la pâte dans des moules à muffin typiques
et les placer sur la plaque de cuisson -.
5) Faire cuire à 220°C à chaleur haut + bas
pendant env. 15 minutes sur le rail inférieur.
Préparation :
♦ Préchauffer les tranches de toast.
♦ Puis mettre une fine couche de rémoulade et
garnir avec le jambon.
♦ Placer respectivement une tranche d’ananas
sur le toast. Assaisonner avec du curry.
♦ Puis disposer une tranche de fromage sur la
tranche d’ananas.
♦ Mettre les toasts Hawaii sur la grille !, mettre
la grille dans la position supérieure et cuire environ 8 minutes à environ 200 °C à chaleur haut.
Cuisson d’une pizza congelée
Préparation :
♦ Engager la grille ! dans le rail supérieur de
l’enceinte de cuisson et de grill.
♦ Placer la pizza congelée sans son emballage
sur la grille !.
♦ Cuire la pizza pendant environ 20 minutes à
chaleur de voûte et de sole.
♦ Veuillez tenir compte des indications données
sur l’emballage concernant la température.
│
BE
SGBR 1500 B3■ 16 │ FR

Biscuits sablés
Ingrédients :
♦ 125 g de beurre
♦ 125 g de sucre
♦ 1 paquet de sucre vanillé
♦ 1 pincée de sel
♦ 1 œuf
♦ 1 blanc d’œuf
♦ 250 g de farine (type 405)
♦ 1 cuillère à café de levure chimique
♦ Zeste râpé d’un demi-citron
Préparation :
1) Battre le beurre en mousse.
2) Ajouter le sucre, le sucre vanillé, le zeste de
citron et les œufs.
3) Mélanger la farine, la levure chimique et le
sel et les incorporer à la pâte à l’aide d’une
cuillère en bois.
4) Laisser reposer la pâte environ 10 minutes.
5) Mettre la pâte dans le moule souhaité à l’aide
d’un hachoir, d’emporte-pièces ou d’une poche
à douille.
6) Placer les biscuits sablés sur la plaque de
cuisson -recouverte de papier sulfurisé.
7) Faire cuire les biscuits sablés dans un four
préchauffé à 180°C à chaleur haut + bas
pendant 10–15 minutes environ sur le rail
supérieur jusqu’à obtenir une belle couleur
dorée.
Petits pains
Ingrédients :
♦ 300 g de farine (ou de farine complète)
♦ 2 bonnes cuillères à café de levure chimique
♦ 200 g de graines de lin
♦ 1 œuf
♦ 500 g de fromage blanc
♦ 1 cuillère à café de sel
♦ plus selon les goûts du cumin, des oignons,
du lard ...
Préparation :
1) Bien pétrir le tout et former des petits pains.
2) Disposer les petits pains sur une plaque de
cuisson - recouvert de papier sulfurisé.
3) Cuire à 200 °C environ à chaleur haut pendant
30 minutes sur le rail supérieur.
REMARQUE
La quantité de pâte suffit pour plusieurs
plaques de cuisson -.
REMARQUE
La quantité de pâte suffit pour plusieurs plaques
de cuisson -.
SGBR 1500 B3
FR│BE
│
17 ■

Meringue
Ingrédients :
♦ 1 blanc d’œuf
♦ Sel
♦ 45 g de sucre
Préparation :
1) Mettre le blanc d’œuf frais dans un saladier
sans gras. Ne pas mélanger de jaune d’œuf,
sinon le blanc d’œuf ne montera pas en neige.
2) Battre le blanc d’œuf doucement, pour éviter
la formation de grosses bulles dans la neige.
3) Assaisonner avec une pincée de sel.
4) Ajouter à petites doses la moitié du sucre
lorsque la neige commence à prendre de la
consistance.
5) Puis fouetter plus énergiquement.
6) Ajouter le reste du sucre. La masse de
meringue prend une consistance ferme.
7) Remplir de meringue dans une poche à douille
avec un grand bec verseur et verser sur la
plaque de cuisson - recouvert de papier
sulfurisé en formant des rosettes, des langues
ou tout autre motif.
8) échauffer le mini four/grill à environ 100 °C
avec la fonction chaleur tournante.
9) Faire cuire environ 2 heures les meringues en position supérieure dans le four à environ 100 °C,
en chaleur tournante.
Croûtons au beurre
Ingrédients :
♦ 2 tranches de toast. toa
♦ 1 CS de beurre
Préparation :
1) Coupez le toast en petits dés.
2) Faites fondre le beurre à feu doux dans une
casserole et ajoutez les dés de toast.
3) Placez du papier sulfurisé sur la plaque de
cuisson - et répartissez-y les dés de toast de
manière uniforme.
4) Faites cuire les dés de toast à env. 170°C
à chaleur haut sur le rail supérieur jusqu’à
obtenir une jolie couleur dorée (env. 15 à
20 minutes).
REMARQUE
Vous pouvez également utiliser du beurre aux
herbes ou du beurre à l'ail au lieu de beurre
nature. Le temps de cuisson se réduit alors d'env.
5 minutes.
│
BE
SGBR 1500 B3■ 18 │ FR

Baguettes à la viande hachée
Ingrédients :
♦ 2 petites baguettes
♦ 250 g de viande hachée
(moitié porc et moitié veau)
♦ 2 tomates
♦ 1 oignon, coupé en dés
♦ 2 CS de concentré de tomates
♦ 40 g de parmesan râpé
♦ 4 tranches de fromage
♦ Sel et poivre
Préparation :
1) Coupez les baguettes en deux et retirez la mie.
2) Mélangez la viande hachée, le concentré de
tomates, les oignons, le parmesan, un peu de
sel et un peu de poivre.
3) Formez quatre boulettes de viande hachée
de taille similaire, les plus plates possibles et
posez-les sur les moitiés de baguettes.
4) Coupez la tomate en tranches et répartissez-la
sur les baguettes.
5) Répartissez le fromage sur les baguettes.
6) Placez les baguettes sur la plaque de cuisson -
et faites-les cuire à env. 230°C à four préchauffé à chaleur haut+bas pendant env.
20 minutes sur le rail inférieur.
REMARQUE
N'hésitez pas à assaisonner la viande hachée à
l'aide de basilic, de chili ou d'autres épices.
Gratin de chou-fleur
Ingrédients :
♦ 1/2 tête de chou-fleur (env. 250 g)
♦ 3 tranches de citron
♦ 1 CS de beurre
♦ 1 CC bombée de farine
♦ 1 CS de jus de citron
♦ 1 CS d’amandes effilées
♦ 2 CS de fromage à gratin (râpé)
♦ Sel, poivre, noix de muscade
Préparation :
1) Détachez les bouquets du chou-fleur et lavez-les.
2) Faites cuire le chou-fleur avec les tranches de
citron à l’eau bouillante salée pendant 8 à
10 minutes, jusqu’à ce que le chou-fleur soit
bien ferme. Réservez env. 150 ml de l’eau de
cuisson.
3) Faites fondre le beurre dans une casserole
et réalisez un roux en remuant la farine
constamment pendant env. 1 minute.
4) En remuant constamment, ajoutez l’eau de
cuisson du chou-fleur et faites bouillir pendant
env. 2 minutes. Si le roux devient trop ferme,
ajoutez progressivement encore un peu d’eau
jusqu’à obtenir une consistance veloutée.
Assaisonner d’un jus de citron, de sel, de
poivre et de noix de muscade.
5) Mettez le chou-fleur dans un moule à gratin
(d’un diamètre d’env. 14 cm) et nappez-le
uniformément de sauce.
6) Parsemez de fromage et d’amandes effilées.
7) Placez le moule à gratin sur une plaque de
cuisson -.
8) Faites cuire le gratin à env. 200°C à four
préchauffé à chaleur haut+bas pendant env.
20 minutes sur le rail inférieur.
SGBR 1500 B3
FR│BE
│
19 ■

Friands farcis au saumon
Ingrédients :
♦ 1 paquet de pâte feuilletée (env. 8 pièces)
♦ 1 paquet de saumon fumé en tranches
(env. 200 g)
♦ 1 citron
♦ 1 oignon
♦ 1 paquet de fromage frais (200 g)
♦ De l’aneth fraîche
♦ Sel et poivre
♦ 1 jaune d’œuf
Préparation :
1) Séparez les feuilles de pâte feuilletée et le cas
échéant, laissez-les décongeler.
2) Mélangez le fromage frais avec du sel, du
poivre et le jus d’un citron.
3) Coupez l’oignon en dés fins.
4) Ajoutez la moitié du saumon et les oignons au
fromage frais et hachez le tout grossièrement à
l’aide d’un mixeur.
5) Coupez le reste du saumon en fines lamelles.
6) Ajoutez le saumon et l’aneth à la préparation
et mélangez le tout.
7) Mettez une cuillère à soupe remplie de
préparation sur une feuille de pâte feuilletée et
rabattez les bords.
8) Badigeonnez le friand ainsi obtenu de jaune
d’œuf.
9) Posez les friands sur la plaque de cuisson -.
Laissez suffisamment d’écart entre les différents
friands, car la pâte feuilletée gonflera.
10) Faire cuire environ 25 - 30 minutes sur le rail
inférieur à environ 230° C, à chaleur haut +
bas. La pâte feuilletée doit légèrement brunir.
REMARQUE
Les quantités indiquées suffisent pour plusieurs
plaques de cuisson -.
│
BE
SGBR 1500 B3■ 20 │ FR

Inhaltsverzeichnis
Einleitung .............................................................22
Bestimmungsgemäßer Gebrauch .........................................22
Lieferumfang ..........................................................22
Gerätebeschreibung. . . . . . . . . . . . . . . . . . . . . . . . . . . . . . . . . . . . . . . . . . . . . . . . . . . .22
Technische Daten ......................................................22
Sicherheitshinweise ....................................................23
Aufstellen ............................................................26
Benutzung des Gerätes .................................................26
Glastür ...........................................................................26
Krümelblech einlegen ...............................................................26
Drehspieß benutzen .................................................................27
Backblech/Gitterrost benutzen ........................................................28
Vor dem ersten Gebrauch ...............................................28
Bedienen des Gerätes ..................................................29
Funktionsschalter ...................................................................29
Temperaturregler ...................................................................29
Timer ............................................................................29
Grillen und Backen .....................................................29
Grillen mit Drehspieß ...................................................30
Reinigung und Pflege ...................................................32
Aufbewahrung ........................................................32
Fehlerbehebung .......................................................33
Entsorgung ...........................................................34
Garantie der Kompernaß Handels GmbH ..................................34
Service ...........................................................................35
Importeur .........................................................................35
Rezepte ..............................................................36
SGBR 1500 B3
DE│AT│CH
│
21 ■

Einleitung
Herzlichen Glückwunsch zum Kauf Ihres neuen
Gerätes.
Sie haben sich damit für ein hochwertiges Produkt
entschieden. Die Bedienungsanleitung ist Bestandteil dieses Produkts. Sie enthält wichtige Hinweise
für Sicherheit, Gebrauch und Entsorgung. Machen
Sie sich vor der Benutzung des Produkts mit allen
Bedien- und Sicherheitshinweisen vertraut. Benutzen Sie das Produkt nur wie beschrieben und für
die angegebenen Einsatzbereiche. Händigen Sie
alle Unterlagen bei Weitergabe des Produkts an
Dritte mit aus.
Gerätebeschreibung
Abbildung A:
Antrieb
Temperaturregler
Funktionsschalter
Timer
Kontrollleuchte
Glastür
eingesetztes Krümelblech
untere Heizstäbe
Drehspießaufnahme
Bestimmungsgemäßer
Gebrauch
Der Grill- und Backautomat dient ausschließlich dem
Erhitzen, Garen und Grillen von Speisen.
Dieses Gerät ist ausschließlich für die Benutzung in
privaten Haushalten bestimmt. Nutzen Sie es nicht
gewerblich.
Jede andere Verwendung gilt als nicht bestimmungsgemäß und kann zu Sachschäden oder sogar zu
Personenschäden führen.
Lieferumfang
♦ Grill- und Backautomat
♦ 1 Backblech
♦ 1 Gitterrost
♦ 2 Zangen
♦ Drehspieß mit 2 Klemmen
♦ 1 Krümelblech
♦ Bedienungsanleitung
HINWEIS
Kontrollieren Sie den Lieferumfang direkt nach
dem Auspacken auf Vollständigkeit und Beschädigungen. Wenden Sie sich, wenn nötig, an den
Service.
Abbildung B:
Zange (für Backblech und Gitterrost)
- Backblech
3 Zange (für Drehspieß)
! Gitterrost
. Feststeller
0 Drehspießklemmen
6 Drehspieß
Technische Daten
Nennspannung: 220 - 240 V ~,
50/60 Hz
max. Leistungsaufnahme: 1500 W
Alles Teile dieses Gerätes, die mit
Lebensmitteln in Berührung kommen,
sind lebensmittelecht.
■ 22 │ DE
│AT│
CH
SGBR 1500 B3

Sicherheitshinweise
GEFAHR – ELEKTRISCHER SCHLAG!
► Sie dürfen das Gerätegehäuse des Gerätes nicht öffnen
oder reparieren. In diesem Falle ist die Sicherheit nicht gegeben und die Gewährleistung erlischt. Lassen Sie ein defektes
Gerät nur vom Händler oder autorisiertem Fachpersonal
reparieren.
► Lassen Sie beschädigte Netzstecker oder Netzkabel sofort
von autorisiertem Fachpersonal oder dem Kundenservice
austauschen, um Gefährdungen zu vermeiden.
► Lassen Sie keine Flüssigkeiten in das Gerätegehäuse gelan-
gen. Sie dürfen das Gerät keiner Feuchtigkeit aussetzen und
nicht im Freien benutzen. Darüber hinaus dürfen Sie keine
mit Flüssigkeiten gefüllten Gegenstände, wie z. B. Vasen auf
dem Gerät abstellen. Es besteht Brandgefahr und Gefahr
eines elektrischen Schlags! Falls doch einmal Flüssigkeit in
das Gerätegehäuse gelangt, ziehen Sie sofort den Netzstecker des Geräts aus der Netzsteckdose und lassen Sie es
reparieren.
► Fassen Sie Gerät, Netzkabel und -stecker nie mit nassen
Händen an. Es besteht sonst die Gefahr eines elektrischen
Schlags.
Tauchen Sie das Gerät niemals in Wasser oder andere
Flüssigkeiten! Hier kann Lebensgefahr durch elektrischen
Schlag entstehen, wenn im Betrieb Flüssigkeitsreste auf
spannungsführende Teile gelangen.
SGBR 1500 B3
DE│AT│CH
│
23 ■

WARNUNG – VERLETZUNGSGEFAHR!
► Dieses Gerät kann von Kindern ab 8 Jahren sowie von Per-
sonen mit reduzierten physischen, sensorischen oder mentalen
Fähigkeiten oder Mangel an Erfahrung und/oder Wissen
benutzt werden, wenn sie beaufsichtigt oder bezüglich des
sicheren Gebrauchs des Gerätes unterwiesen wurden und
die daraus resultierenden Gefahren verstanden haben.
► Kinder dürfen nicht mit dem Gerät spielen.
► Reinigung und Benutzer-Wartung dürfen nicht durch Kinder
durchgeführt werden, es sei denn, sie sind älter als 8 Jahre
und beaufsichtigt.
► Kinder jünger als 8 Jahre sind von Gerät und Anschlusslei-
tung fernzuhalten.
► Verlegen Sie das Netzkabel so, dass niemand darauf treten
oder darüber stolpern kann.
► Berühren Sie niemals die Glastür oder das Gehäuse wäh-
rend der Benutzung, da diese sehr heiß werden. Verwenden Sie zum Öffnen der Glastür einen Topflappen o.ä., um
Verbrennungen zu vermeiden!
► Berühren Sie niemals die Heizstäbe oder das Sichtfenster
während des Betriebs oder bevor das Gerät abgekühlt ist.
Fassen Sie während des Betriebs nicht in den Garraum.
Warten Sie bis das Gerät abgekühlt ist. Sie könnten sich
andernfalls verbrennen.
► Lassen Sie das Gerät nach dem Gebrauch erst abkühlen,
bevor Sie es transportieren.
► Benutzen Sie immer Topfhandschuhe oder Topflappen, wenn
Sie mit dem heißen Gerät hantieren!
Vorsicht! Heiße Oberfläche!
■ 24 │ DE
│AT│
CH
SGBR 1500 B3

ACHTUNG – SACHSCHADEN!
► Benutzen Sie keine externe Zeitschaltuhr oder ein separates
Fernwirksystem, um das Gerät zu betreiben.
► Lassen Sie das Gerät während des Betriebes niemals unbeauf-
sichtigt.
► Stellen Sie sicher, dass das Gerät, das Netzkabel oder der
Netzstecker nicht mit heißen Quellen, wie Kochplatten oder
offenen Flammen, in Berührung kommen.
► Betreiben Sie das Gerät ausschließlich mit dem mitgeliefer-
ten Originalzubehör.
► Knicken oder quetschen Sie das Netzkabel nicht.
► Ziehen Sie das Netzkabel stets am Stecker aus der Steckdo-
se, ziehen Sie nicht am Kabel selbst.
► Es dürfen sich während des Betriebs keine leicht brennbaren
Materialien in unmittelbarer Umgebung des Grill- und Backautomaten befinden (z. B. Geschirrhandtuch, Topflappen etc.).
► Trocknen Sie niemals Textilien oder Gegenstände auf, über
oder im Gerät. Es besteht Brandgefahr.
SGBR 1500 B3
DE│AT│CH
│
25 ■

Aufstellen
Benutzung des Gerätes
WARNUNG! BRANDGEFAHR!
► Stellen Sie das Gerät niemals unter Hänge-
schränke oder neben Gardinen, Schrankwänden
oder anderen entzündlichen Gegenständen.
► Der Abstand des Gerätes zu Hängeschränken,
Decken, seitlichen Wänden oder ähnlichem
muss nach oben hin mindestens 10 cm und
seitlich jeweils 5 cm betragen. Daher darf
das Gerät z. B. nicht in Schränke o. ä. gestellt
werden. Andernfalls ist keine ausreichende
Belüftung des Gerätes möglich und es könnte
einen Brand verursachen oder beschädigt
werden.
► Stellen Sie das Gerät nur auf eine hitzebestän-
dige Unterlage. Andernfalls besteht Brandgefahr und das Gerät kann beschädigt werden.
Der Bereich unter dem Geräteboden kann sich
verfärben und beschädigt werden. Darüber
hinaus können bei einem weichen Untergrund
dauerhafte Abdrücke in der Unterlage entstehen.
GEFAHR - ELEKTRISCHER SCHLAG!
► Stellen Sie das Gerät nicht in unmittelbarer
Nähe von Wasser auf, z. B. an Spülbecken,
Waschwannen oder in feuchten Kellerräumen. Andernfalls besteht die Gefahr eines
Stromschlags.
■ Stellen Sie das Gerät auf einem festen, ebenen
und hitzebeständigen Untergrund (z. B. Edelstahlarbeitsplatten oder Natursteinarbeitsplatten
wie Granit) auf. Sorgen Sie für ausreichende
Belüftung rund um das Gerät.
■ Schieben Sie das Gerät mit der Rückseite bis an
die Wand. Die Abstandhalter an der Rückseite
müssen die Wand berühren. Achten Sie darauf,
dass die Wand aus hitzebeständigem Material
besteht, z. B. ein Fliesenspiegel, Naturstein oder
Granit.
■ Reinigen Sie alle Teile wie im Kapitel „Reinigung
und Pflege“ beschrieben.
Glastür
ACHTUNG! SACHSCHADEN!
►
Stützen Sie sich nicht auf der Glastür
ab. Stellen Sie keine Gegenstände auf die
Glastür . Das führt zu Beschädigungen an
den Scharnieren.
■ Wenn Sie besonders fetthaltige Speisen zuberei-
ten, kann es zu erhöhter Rauchentwicklung kommen. Schließen Sie in diesem Fall die Glastür
nicht ganz, sondern lassen Sie sie einen Spalt
breit offen stehen:
Die Glastür hat eine Raststellung, so dass
diese einen Spalt breit offen steht: Wenn Sie die
Glastür vorsichtig zuklappen, rastet diese
kurz vor dem Schließen in dieser Stellung ein.
■ Auch beim Trocknen von Obst, um Trockenobst
herzustellen, sollte die Glastür in der Raststellung stehen bleiben, damit die Feuchtigkeit
entweichen kann und das Obst besser trocknet.
Krümelblech einlegen
■ Schieben Sie das Krümelblech unter die
unteren Heizstäbe , so dass es flach auf dem
Geräteboden aufliegt
können Sie als Griff benutzen.
. Die hochgebogene Seite
■ 26 │ DE
│AT│
CH
SGBR 1500 B3

Drehspieß benutzen
WARNUNG! VERLETZUNGSGEFAHR!
► Benutzen Sie immer die Zange 3, um den
heißen Drehspieß 6 in das Gerät einzusetzen
oder herauszunehmen.
■ Mit den beiden Drehspießklemmen 0 können
Sie das Grillgut am Drehspieß 6 fixieren.
Lösen Sie die Feststeller . an den Drehspießklemmen 0, verschieben Sie diese so, dass das
Grillgut dazwischen fest geklemmt wird und
schrauben Sie die Feststeller . wieder fest.
■ Schieben Sie zuerst das Ende des Drehspießes 6
ohne Nut in den Antrieb (Abb. 1):
Abb. 1: Drehspieß 6 in den Antrieb schieben.
■ Legen Sie dann das andere Ende des Drehspie-
ßes 6 mit der tiefen Nut in die Drehspießaufnahme (Abb. 2):
HINWEIS
► Schieben Sie immer das Backblech - in die
untere Schiene, wenn Sie den Drehspieß 6
verwenden. So werden herunterfallende
Flüssigkeiten aufgefangen.
■ Um den heißen Drehspieß 6 zu entnehmen grei-
fen Sie mit den Haken am Ende der Zange 3 in
die Vertiefungen am Drehspieß 6(Abb
Abb. 3: Einhaken der Zange 3 beim Drehspieß 6
■ Heben Sie zuerst die linke Seite des Drehspie-
ßes 6 aus der Drehspießaufnahme und
ziehen Sie dann den Drehspieß 6 aus dem
Antrieb .
. 3):
Abb. 2: Drehspieß 6 in die Drehspießaufnahme
legen
SGBR 1500 B3
DE│AT│CH
│
27 ■

Backblech/Gitterrost benutzen
WARNUNG! VERLETZUNGSGEFAHR!
► Benutzen Sie immer die Zange , um das hei-
ße Backblech -/den heißen Gitterrost !in
das Gerät einzusetzen oder herauszunehmen.
■ Schieben Sie das Backblech -/den Gitterrost !
in eine der 3 Schienen im Garraum des Gerätes.
ACHTUNG! SACHSCHADEN!
► Legen Sie das Backblech -/den Gitterrost !
niemals direkt auf die Heizstäbe .
■ Um das heiße Backblech - oder den Gitter-
rost ! entnehmen zu können, haken Sie die
Zange folgendermaßen ein:
Abb. 4: Einhaken der Zange beim Gitterrost !
Vor dem ersten Gebrauch
1) Stecken Sie den Netzstecker in eine Netzsteckdose.
2) Drehen Sie den Temperaturregler bis zum
Anschlag im Uhrzeigersinn auf die höchste
Temperatur.
3) Drehen Sie den Funktionsschalter auf
„Ober- und Unterhitze“
4) Öffnen Sie die Glastür und lassen Sie diese
für diesen Vorgang geöffnet.
5) Entnehmen Sie eventuell eingesetztes Zubehör
aus dem Garraum.
6) Drehen Sie den Timer auf 20 Minuten.
HINWEIS
► Beim erstmaligen Aufheizen des Gerätes
kann es durch fertigungsbedingte Rückstände
zu leichter Rauch- und Geruchsentwicklung
kommen. Das ist normal und völlig ungefährlich.
Sorgen Sie für ausreichende Belüftung, öffnen
Sie zum Beispiel ein Fenster.
Das Gerät schaltet sich nach 20 Minuten
automatisch aus.
Wenn Sie den Heizvorgang vorzeitig
unterbrechen wollen, drehen Sie den
Temperaturregler bis zum Anschlag
gegen den Uhrzeigersinn und stellen Sie
den Timer auf „OFF“.
7) Lassen Sie das Gerät abkühlen und reinigen
Sie das Gerät wie im Kapitel „Reinigen und
Pflegen“ beschrieben.
Das Gerät ist nun betriebsbereit.
.
Abb. 5: Einhaken der Zange beim Backblech -
■ 28 │ DE
│AT│
CH
SGBR 1500 B3

Bedienen des Gerätes
Funktionsschalter
Am Funktionsschalter können Sie das Gerät
einschalten, sowie 5 verschiedene Funktionen
einstellen:
Symbol Bedeutung
„Unterhitze“
z. B. zum Kuchenbacken
„Oberhitze“
z. B. zum Überbacken
„Ober- & Unterhitze“
z. B. zum Pizza backen
„Oberhitze/Umluft/Dreh-
spieß“
z. B. um Geflügel zu grillen
„Ober- & Unterhitze/Umluft“
z. B. um Brötchen aufzuba-
cken
„OFF“
das Gerät ist ausgeschaltet
Temperaturregler
Am Temperaturregler können Sie die gewünschte Temperatur einstellen.
■ Wenn Sie die Temperatur für die Funktionen
„Oberhitze“
„Ober- & Unterhitze“
ren Sie sich an der mit „
Skala.
■ Wenn Sie die Temperatur für die Funktionen
„Oberhitze/Umluft/Drehspieß“
„Ober- & Unterhitze/Umluft“
orientieren Sie sich an der mit „ “ gekennzeichneten Skala.
, „Unterhitze“ oder
einstellen, orientie-
“ gekennzeichneten
oder
einstellen,
Timer
Mit Hilfe des Timers können Sie die Garzeit
einstellen:
■ Stellen Sie den Timer auf die gewünschte
Garzeit. Nach Beendigung der eingestellten
Zeit erklingt ein Signalton und das Gerät stoppt
das Heizen.
Falls die Funktion „Oberhitze/Umluft/Dreh-
spieß“
des Drehspießes 6
gewählt ist, stoppt auch das Drehen
.
Grillen und Backen
1) Legen Sie das Krümelblech in das Gerät.
2) Nehmen Sie den Gitterrost ! und das
Backblech - aus dem Gerät. Legen Sie diese
gegebenenfalls mit Backpapier aus bzw.
bestreichen Sie das Backblech - mit zum
Backen geeignetem Fett.
HINWEIS
► Je nach Gericht, muss der Backofen vorge-
heizt werden. Halten Sie sich an die Vorgaben im jeweiligen Rezept. Das Vorheizen ist
auf jeden Fall sinnvoll bei:
– sehr kurzen Backzeiten,
– knusprigen Krusten,
– empfindlichen Gerichten, die eine konstan-
te Temperatur erfordern, wie zum Beispiel
Soufflés.
► Wenn kein Vorheizen nötig ist, überspringen
Sie Handlungsschritt 3).
3) Lassen Sie das Gerät ca. 10 Minuten (je nach
Temperatureinstellung) auf die gewünschte
Temperatur aufheizen:
– Wählen Sie die gewünschte Temperatur mit
dem Temperaturregler . Achten Sie darauf, die korrekte Skala zu benutzen (siehe
Kapitel „Temperaturregler“.)
– Anschließend wählen Sie mit dem Funktions-
schalter die gewünschte Funktion.
SGBR 1500 B3
DE│AT│CH
│
29 ■

HINWEIS
► Falls Sie die Funktion mit Umluft wählen,
können Sie in der Regel auf ein Vorheizen
des Grill- und Garraums verzichten.
– Stellen Sie mit dem Timer die Vorheizzeit
ein (ca. 10 Minuten).
– Schließen Sie die Glastür .
4) Ist die Zeit abgelaufen, legen Sie das Grillbzw. Backgut auf den Gitterrost ! bzw. das
Backblech - und schieben Sie es in eine der
Schienen. Achten Sie dabei auf einen ausreichenden Abstand des Grill- bzw. Backguts zu
den Innenwänden und den Heizstäben des
Geräts.
HINWEIS
► Wenn Sie stark tropfendes Grillgut auf dem
Gitterrost ! zubereiten, dann schieben Sie
das Backblech - in die unterste Schiene. So
wird z. B. herunter tropfendes Fett aufgefangen und das Gerät ist später leichter zu
reinigen.
5) Schließen Sie die Glastür , bevor Sie den
Grill- Backvorgang starten.
6) Stellen Sie mit dem Timer die gewünschte
Grill- bzw. Backzeit ein. Die maximale Grillbzw. Backzeit beträgt 120 Minuten.
HINWEIS
► Wenn die Garzeit Ihres Grill- bzw. Backguts
weniger als 20 Minuten beträgt, stellen Sie
den Timer zunächst auf 40 Minuten und
dann zurück auf die gewünschte Grill- bzw.
Backzeit.
Das Gerät schaltet sich nach der eingestellten Zeit
automatisch aus, ein Signalton erklingt und die
Kontrollleuchte erlischt.
HINWEIS
Wenn Sie den Heizvorgang vorzeitig unterbrechen wollen, drehen Sie den Temperaturregler
bis zum Anschlag gegen den Uhrzeigersinn und
stellen Sie den Timer auf „OFF“.
7) Entnehmen Sie nach dem Heizvorgang den
Gitterrost ! bzw. das Backblech - mit Hilfe
der Zange .
8) Stellen Sie den Funktionsschalter auf „OFF“.
Grillen mit Drehspieß
1) Legen Sie das Krümelblech in das Gerät.
2) Falls eingesetzt, nehmen Sie den Drehspieß 6
aus dem Gerät.
3) Schieben Sie das Backblech - in die unterste
Schiene.
4) Fixieren Sie das Grillgut mit den Drehspießklemmen 0. Achten Sie darauf, dass das Grillgut sich frei im Garraum drehen kann, ohne im
Garraum anzustoßen. Es kann passieren, dass
der Drehspieß 6die Drehrichtung wechselt,
wenn das Grillgut gegen einen Widerstand
stößt. Die beiden Vertiefungen, die sich am
Drehspieß 6 befinden, müssen frei zugänglich
bleiben, ansonsten kann man den Drehspieß 6
nicht mit der Zange 3 greifen.
5) Befestigen Sie den Drehspieß 6 im Garraum
(siehe Kapitel „Drehspieß benutzen“).
6) Schließen Sie die Glastür .
Die Kontrollleuchte zeigt an, dass das Gerät eingeschaltet ist. Der Schalter des Timers bewegt
sich nun gegen den Uhrzeigersinn auf „OFF“ zu.
■ 30 │ DE
│AT│
CH
SGBR 1500 B3

HINWEIS
Wenn Sie den Heizvorgang vorzeitig unterbrechen wollen, drehen Sie den Temperaturregler
bis zum Anschlag gegen den Uhrzeigersinn und
stellen Sie den Timer auf „OFF“.
7) Stellen Sie am Temperaturregler die ge-
wünschte Temperatur ein.
8) Stellen Sie den Funktionsschalter auf „Ober-
hitze/Umluft/Drehspieß“
Timer die gewünschte Grillzeit ein.
Das Gerät startet den Grillvorgang und der
Drehspieß 6 dreht sich.
Die Kontrollleuchte zeigt an, dass das Gerät eingeschaltet ist. Der Schalter des Timers bewegt
sich nun gegen den Uhrzeigersinn auf „OFF“ zu.
Das Gerät schaltet sich nach der eingestellten Zeit
automatisch aus, ein Signalton erklingt und die
Kontrollleuchte erlischt.
HINWEIS
Wenn Sie den Heizvorgang vorzeitig unterbrechen wollen, drehen Sie den Temperaturregler
bis zum Anschlag gegen den Uhrzeigersinn und
stellen Sie den Timer auf „OFF“.
9) Entnehmen Sie nach dem Grillvorgang den
Drehspieß 6 mit Hilfe der Zange 3.
10) Stellen Sie den Funktionsschalter auf „OFF“.
.Stellen Sie am
BEISPIEL GRILLHÄHNCHEN
Zutaten
♦ Grillhähnchen (ca. 1,3 kg, ausgenommen)
♦ Gewürze (Salz, Paprika)
♦ Speiseöl
1) Würzen Sie das Grillhähnchen von innen
und außen mit Salz und Paprikapulver. Streichen Sie es von außen mit hitzebeständigem
Speiseöl ein.
2) Schieben Sie das Grillhähnchen auf den
Drehspieß 6 und fixieren Sie es mit den
Drehspießklemmen 0. Achten Sie dabei
darauf, dass die Vertiefungen am Drehspieß
6frei bleiben, damit Sie den Drehspieß 6
mit Hilfe der Zange 3greifen können. Je
nach Form des Grillhähnchens ist es nötig
die Flügel und Schenkel mit einer feuerfesten
Bindeschnur zu fixieren, damit diese während
des Drehens nicht anstoßen.
3) Schieben Sie das Backblech - in die
unterste Schiene.
4) Heizen Sie das Gerät ca. 10 Minuten mit
der Funktion „Ober- & Unterhitze/Umluft“
auf 210°C vor.
5) Setzen Sie das Grillhähnchen auf dem
Drehspieß mit Hilfe der Zange 3 in das
Gerät ein.
6) Stellen Sie den Funktionsschalter auf „Oberhitze/Umluft/Drehspieß“
Sie die Tür.
7) Stellen Sie den Timer auf ca. 80 Minuten.
Die Garzeit kann je nach Größe und Beschaffenheit des Grillhähnchens variieren.
8) Bestreichen Sie das Grillhähnchen zwischendurch immer wieder mit etwas Speiseöl. So
wird es knusprig.
9) Wenn die eingestellte Zeit abgelaufen ist,
entnehmen Sie den Grillspieß mit dem Grillhähnchen vorsichtig mit der Zange 3. Lösen
Sie die Drehspießklemmen 0 und ziehen
Sie das Grillhähnchen vom Drehspieß 6.
und schließen
SGBR 1500 B3
DE│AT│CH
│
31 ■

Reinigung und Pflege
GEFAHR - ELEKTRISCHER SCHLAG!
► Ziehen Sie vor jeder Reinigung den Netzste-
cker aus der Netzsteckdose! Es besteht die
Gefahr eines elektrischen Schlages!
Tauchen Sie das Gerät niemals in Wasser
oder andere Flüssigkeiten!
WARNUNG! VERLETZUNGSGEFAHR!
► Lassen Sie das Gerät immer erst abkühlen,
bevor Sie es reinigen. Es besteht sonst Verbrennungsgefahr!
■ Reinigen Sie das Gerät und die Zubehörteile am
besten sofort nach dem Abkühlen. Dann lassen
sich Lebensmittelreste leichter entfernen.
ACHTUNG! SACHSCHADEN!
► Verwenden Sie keine scheuernden oder
aggressiven Reinigungsmittel. Diese können
die Oberfläche beschädigen!
► Reinigen Sie die Teile des Gerätes nicht in der
Spülmaschine!
► Reinigen Sie den Garraum nicht mit einem
Backofenspray, da sich Rückstände auf den
Heizstäben nicht mehr entfernen lassen.
■ Wischen Sie das Gerät mit einem feuchten Tuch
ab. Bei Bedarf geben Sie ein mildes Spülmittel
auf das Tuch und wischen Sie mit einem mit klarem Wasser befeuchteten Tuch nach. Trocknen
Sie alles gut ab.
■ Reinigen Sie den Garraum und die Glastür
mit einem feuchten Tuch. Bei Bedarf geben Sie
ein mildes Spülmittel auf das Tuch und wischen
Sie mit einem mit klarem Wasser befeuchteten
Tuch nach. Trocknen Sie alles gut ab.
■ Reinigen Sie die Zangen /3, den Drehspieß 6,
die Drehspießklemmen 0, die Feststeller ., das
Backblech -, den Gitterrost ! und das Krümelblech in warmem Spülwasser. Trocknen Sie
alle Teile nach der Reinigung gut ab.
Aufbewahrung
■ Sie können das Netzkabel um die Abstandhalter
auf der Rückseite des Gerätes wickeln und den
Stecker an einem der Abstandhalter fixieren:
■ Bewahren Sie das gereinigte Gerät und seine
Zubehörteile an einem sauberen, staubfreien
und trockenen Ort auf.
■ 32 │ DE
│AT│
CH
SGBR 1500 B3

Fehlerbehebung
Fehler Ursache Lösung
Der Netzstecker ist nicht mit dem Stromnetz
verbunden.
Das Gerät
funktioniert nicht.
Die Kontrollleuchte
leuchtet, aber das
Gerät heizt nicht.
Die Garzeit der
Speisen erscheint
sehr lang.
Während der Benutzung tritt Rauch- und
Geruchsentwicklung
auf.
Sollten sich die Störungen nicht mit oben stehenden Fehlerbehebungen beheben lassen, oder wenn
Sie andere Arten von Störungen feststellen, wenden Sie sich bitte an unseren Service.
Die Netzsteckdose ist defekt.
Das Gerät ist defekt. Wenden Sie sich an den Service.
Der Funktionsschalter steht auf OFF.
Die Glastür wurde sehr oft geöffnet, um
den Garfortschritt zu kontrollieren.
Es ist eine falsche Temperatur eingestellt.
An den Heizstäben befinden sich Reinigungs- oder Lebensmittelrückstände.
Stecken Sie den Netzstecker in
eine Netzsteckdose.
Benutzen Sie eine andere Netzsteckdose.
Drehen Sie den Funktionsschalter
auf die gewünschte Funktion.
Öffnen Sie die Glastür nicht
öfter, als unbedingt notwendig.
Überprüfen Sie die Temperatureinstellungen.
Entnehmen Sie die Speisen aus
dem Gerät und führen Sie den
Garvorgang mit geöffneter
Glastür fort, bis die Rauchent-
wicklung verschwunden ist.
SGBR 1500 B3
DE│AT│CH
│
33 ■

Entsorgung
Werfen Sie das Gerät kei-
nesfalls in den normalen
Hausmüll. Dieses Produkt
unterliegt der europäischen
Richtlinie 2012/19/EU.
Entsorgen Sie das Gerät über einen zugelassenen
Entsorgungsbetrieb oder über Ihre kommunale
Entsorgungseinrichtung. Beachten Sie die aktuell
geltenden Vorschriften. Setzen Sie sich im Zweifelsfall mit Ihrer Entsorgungseinrichtung in Verbindung.
Die Verpackung besteht aus umweltfreund-
lichen Materialien, die Sie über die örtlichen Recyclingstellen entsorgen können.
Garantie der
Kompernaß Handels GmbH
Sehr geehrte Kundin, sehr geehrter Kunde,
Sie erhalten auf dieses Gerät 3 Jahre Garantie ab
Kaufdatum. Im Falle von Mängeln dieses Produkts
stehen Ihnen gegen den Verkäufer des Produkts
gesetzliche Rechte zu. Diese gesetzlichen Rechte
werden durch unsere im Folgenden dargestellte
Garantie nicht eingeschränkt.
Garantiebedingungen
Die Garantiefrist beginnt mit dem Kaufdatum. Bitte
bewahren Sie den Original Kassenbon gut auf.
Diese Unterlage wird als Nachweis für den Kauf
benötigt.
Tritt innerhalb von drei Jahren ab dem Kaufdatum
dieses Produkts ein Material- oder Fabrikationsfehler auf, wird das Produkt von uns – nach unserer
Wahl – für Sie kostenlos repariert oder ersetzt.
Diese Garantieleistung setzt voraus, dass innerhalb
der Drei-Jahres-Frist das defekte Gerät und der
Kaufbeleg (Kassenbon) vorgelegt und schriftlich
kurz beschrieben wird, worin der Mangel besteht
und wann er aufgetreten ist.
Wenn der Defekt von unserer Garantie gedeckt ist,
erhalten Sie das reparierte oder ein neues Produkt
zurück. Mit Reparatur oder Austausch des Produkts
beginnt kein neuer Garantiezeitraum.
Garantiezeit und gesetzliche
Mängelansprüche
Die Garantiezeit wird durch die Gewährleistung
nicht verlängert. Dies gilt auch für ersetzte und
reparierte Teile. Eventuell schon beim Kauf vorhandene Schäden und Mängel müssen sofort nach
dem Auspacken gemeldet werden. Nach Ablauf
der Garantiezeit anfallende Reparaturen sind
kostenpflichtig.
Garantieumfang
Das Gerät wurde nach strengen Qualitätsrichtlinien
sorgfältig produziert und vor Auslieferung gewissenhaft geprüft.
Die Garantieleistung gilt für Material- oder Fabrikationsfehler. Diese Garantie erstreckt sich nicht auf
Produktteile, die normaler Abnutzung ausgesetzt
sind und daher als Verschleißteile angesehen werden
können oder für Beschädigungen an zerbrechlichen
Teilen, z. B. Schalter, Akkus, Backformen oder Teile
die aus Glas gefertigt sind.
Diese Garantie verfällt, wenn das Produkt beschädigt,
nicht sachgemäß benutzt oder gewartet wurde. Für
eine sachgemäße Benutzung des Produkts sind alle
in der Bedienungsanleitung aufgeführten Anweisungen genau einzuhalten. Verwendungszwecke und
Handlungen, von denen in der Bedienungsanleitung
abgeraten oder vor denen gewarnt wird, sind unbedingt zu vermeiden.
Das Produkt ist nur für den privaten und nicht für
den gewerblichen Gebrauch bestimmt. Bei missbräuchlicher und unsachgemäßer Behandlung,
Gewaltanwendung und bei Eingriffen, die nicht
von unserer autorisierten Service-Niederlassung
vorgenommen wurden, erlischt die Garantie.
■ 34 │ DE
│AT│
CH
SGBR 1500 B3

Abwicklung im Garantiefall
Um eine schnelle Bearbeitung ihres Anliegens
zu gewährleisten, folgen Sie bitte den folgenden
Hinweisen:
▯ Bitte halten Sie für alle Anfragen den Kassenbon
und die Artikelnummer (z. B. IAN 12345) als
Nachweis für den Kauf bereit.
▯ Die Artikelnummer entnehmen Sie bitte dem
Typenschild, einer Gravur, auf dem Titelblatt
ihrer Anleitung (unten links) oder als Aufkleber
auf der Rück- oder Unterseite.
▯ Sollten Funktionsfehler oder sonstige Mängel
auftreten kontaktieren Sie zunächst die nachfolgend benannte Serviceabteilung telefonisch
oder per E-Mail.
▯
Ein als defekt er
unter Beifügung des Kaufbelegs (Kassenbon)
und der Angabe, worin der Mangel besteht und
wann er aufgetreten ist, für Sie portofrei an die
Ihnen mitgeteilte Service Anschrift übersenden.
Auf www.lidl-service.com können Sie
fasstes Produkt können Sie dann
diese und viele weitere Handbücher,
Produktvideos und Software herunterladen.
Importeur
Bitte beachten Sie, dass die folgende Anschrift
keine Serviceanschrift ist. Kontaktieren Sie zunächst
die benannte Servicestelle.
KOMPERNASS HANDELS GMBH
BURGSTRASSE 21
44867 BOCHUM
GERMANY
www.kompernass.com
Service
Service Deutschland
Tel.: 0800 5435 111 (Kostenfrei aus dem
dt. Festnetz/Mobilfunknetz)
E-Mail: kompernass@lidl.de
Service Österreich
Tel.: 0820 201 222 (0,15 EUR/Min.)
E-Mail: kompernass@lidl.at
Service Schweiz
Tel.: 0842 665566 (0,08 CHF/Min.,
Mobilfunk max. 0,40 CHF/Min.)
E-Mail: kompernass@lidl.ch
IAN 274498
SGBR 1500 B3
DE│AT│CH
│
35 ■

Rezepte
In diesem Kapitel geben wir Ihnen einige Beispiele
für die Zubereitung von Speisen. Diese Beispiele
sind Empfehlungen. Die Zubereitungsdauer kann
variieren.
Rezepte ohne Gewähr. Alle Zutaten- und Zubereitungsangaben sind Anhaltswerte. Ergänzen
Sie diese Rezeptvorschläge um Ihre persönlichen
Erfahrungswerte. Wir wünschen Ihnen auf jeden
Fall gutes Gelingen und guten Appetit.
Hawaiitoast
Zutaten für 4 Toasts:
♦ 4 Scheiben Toast
♦ 1–2 Esslöffel Remoulade
♦ 120 g gekochter Schinken
♦ 1/2 Dose Ananas
♦ 4 Scheiben Käse zum Überbacken
♦ Curry
HINWEIS
Beachten Sie Zubereitungshinweise auf der
Verpackung der Lebensmittel.
Muffins
Zutaten für vier Personen:
♦ 1 Tasse Mehl
♦ 1 Teelöffel Backpulver
♦ 1 Ei
♦ 1 Esslöffel geschmolzene Butter
♦ 1 Tasse Milch
♦ 3 Esslöffel Zucker
♦ 1 Prise Salz
♦ für verschiedene Varianten zusätzlich Nüsse,
zerkleinerte Bananen oder Schokoflocken
Zubereitung:
1) Vermischen Sie in einer Schale Mehl, Backpulver, Ei, Milch, Salz und Zucker langsam
nacheinander.
2) Die Butter in einem Topf schmelzen und mit
dem Teig verrühren.
3) Je nach Geschmack mit Nüssen, Schokoflocken oder zerdrückten Bananen mischen.
4) Den fertigen Teig in typische Muffin-Formen
geben und diese auf das Backblech - stellen.
5) Die Muffins bei 220° C mit Ober- und Unterhitze etwa 15 Minuten auf der unteren Schiene
backen.
Zubereitung:
♦ Die Toastscheiben vortoasten.
♦ Anschließend dünn mit Remoulade bestreichen
und mit dem gekochten Schinken belegen.
♦ Jeweils eine Scheibe Ananas auf den belegten
Toast legen. Mit Curry würzen.
♦ Danach jeweils eine Scheibe Käse oben auf die
Ananas legen.
♦ Die Hawaiitoasts auf den Gitterrost ! legen
und im Grill- und Backautomaten auf der oberen
Schiene bei ca. 200 °C, Oberhitze ca. 8 Minuten überbacken.
Tiefgefrorene Pizza backen
Zubereitung:
♦ Schieben Sie den Gitterrost ! in die obere
Schiene des Grill- und Backraums.
♦ Legen Sie die tiefgefrorene Pizza ohne Verpa-
ckung auf den Gitterrost !.
♦ Backen Sie die Pizza bei Ober- und Unterhitze
ca. 20 Minuten.
♦ Bitte beachten Sie die Verpackungsangaben
bezüglich der Temperatur.
■ 36 │ DE
│AT│
CH
SGBR 1500 B3

Spritzgebäck
Zutaten:
♦ 125 g Butter
♦ 125 g Zucker
♦ 1 Päckchen Vanillinzucker
♦ 1 Prise Salz
♦ 1 Ei
♦ 1 Eiweiß
♦ 250 g Mehl (Type 405)
♦ 1 Teelöffel Backpulver
♦ abgeriebene Schale einer halben Zitrone
Zubereitung:
1) Die Butter schaumig schlagen.
2) Den Zucker, den Vanillinzucker, die Zitronenschale und die Eier dazugeben.
3) Das Mehl, das Backpulver und das Salz
mischen und mit einem Rührlöffel unter den
Teig rühren.
4) Teig ca. 10 Minuten ruhen lassen.
5) Den Teig in die gewünschte Form, z. B. mit
Hilfe von Fleischwolf, Ausstechformen oder
Spritzbeutel, bringen.
6) Das Spritzgebäck auf das mit Backpapier
ausgelegte Backblech - legen.
7) Das Spritzgebäck im vorgeheizten Backofen
bei ca. 180°C Ober- und Unterhitze, ca.
10–15 Minuten auf der oberen Schiene,
goldgelb backen.
Brötchen
Zutaten:
♦ 300 g Mehl (oder Vollkornmehl)
♦ gut 2 Teelöffel Backpulver
♦ 200 g Leinsamen
♦ 1 Ei
♦ 500 g Quark
♦ 1 Teelöffel Salz
♦ je nach Geschmack Kümmel, Zwiebeln, Speck
...
Zubereitung:
1) Alles gut durchkneten und kleine Brötchen
daraus formen.
2) Die Brötchen auf das mit Backpapier ausgelegte Backblech - legen.
3) Bei ca. 200° C Oberhitze ungefähr 30 Minuten auf der oberen Schiene backen.
HINWEIS
Die Teigmenge reicht für mehrere Backbleche -.
HINWEIS
Die Teigmenge reicht für mehrere Backbleche -.
SGBR 1500 B3
DE│AT│CH
│
37 ■

Baiser
Zutaten:
♦ 1 Eiweiß
♦ Salz
♦ 45 g Zucker
Zubereitung:
1) Das gekühlte Eiweiß in eine fettfreie Rührschüssel geben. Es darf kein Eigelb damit vermischt
werden, sonst wird der Eischnee nicht fest.
2) Das Eiweiß auf langsamer Stufe anschlagen,
damit sich keine zu großen Blasen im Eischnee
bilden.
3) Mit einer kleinen Prise Salz würzen.
4) Die Hälfte des Zuckers nach und nach
zufügen, wenn der Eischnee anfängt fest zu
werden.
5) Dann auf höchster Stufe steif schlagen.
6) Den restlichen Zucker zufügen. Dadurch erhält
die Baisermasse die nötige Festigkeit.
7) Das Baiser in einen Spritzbeutel mit großer
Sternentülle füllen und mit wenig Abstand Rosetten, Zungen oder sonstige Formen auf das
mit Backpapier belegte Backblech - spritzen.
8) Den Grill- und Backautomaten auf ca. 100° C
Umluft vorheizen.
9) Das Baiser auf der oberen Schiene bei ca.
100° C Umluft ca. 2 Stunden backen lassen.
Buttercroutons
Zutaten:
♦ 2 Scheiben Toastbrot
♦ 1 EL Butter
Zubereitung:
1) Schneiden Sie das Toastbrot in kleine Würfel.
2) Schmelzen Sie die Butter bei sanfter Hitze in einem Topf und mischen Sie das Toastbrot unter.
3) Legen Sie ein Backblech - mit Backpapier
aus und verteilen Sie die Toastbrot-Würfel
gleichmäßig darauf.
4) Backen Sie die Toastbrot-Würfel bei ca.
170°C Oberhitze auf er oberen Schiene, bis
Sie goldbraun sind (ca. 15 - 20 Minuten).
HINWEIS
Sie können auch Kräuter- oder Knoblauchbutter
anstatt der normalen Butter verwenden. Die
Backzeit verringert sich dann um ca. 5 Minuten.
■ 38 │ DE
│AT│
CH
SGBR 1500 B3

Hackfleisch-Baguettes
Zutaten:
♦ 2 Baguette-Brötchen
♦ 250 g Hackfleisch (halb und halb)
♦ 2 Tomaten
♦ 1 Zwiebel (gewürfelt)
♦ 2 EL Tomatenmark
♦ 40 g geriebenen Parmesan
♦ 4 Scheiben Käse
♦ Salz und Pfeffer
Blumenkohl (überbacken)
Zutaten:
♦ 1/2 Kopf Blumenkohl (ca. 250 g)
♦ 3 Zitronenscheiben
♦ 1 EL Butter
♦ 1 gehäufter TL Mehl
♦ 1 EL Zitronensaft
♦ 1 EL Mandelstifte
♦ 2 EL Gratinkäse (gerieben)
♦ Salz, Pfeffer, Muskat
Zubereitung:
1) Schneiden Sie die Baguettes auf und höhlen
Sie sie aus.
2) Vermengen Sie das Gehackte, das Tomatenmark, die Zwiebel, den Parmesan, etwas Salz
und etwas Pfeffer.
3) Formen Sie das Hackfleisch zu 4 gleich großen, möglichst flachen, Frikadellen und legen
Sie sie auf die Baguette-Hälften.
4) Schneiden Sie die Tomate in Scheiben und
verteilen Sie sie auf den Baguettes.
5) Verteilen Sie den Käse auf den Baguettes.
6) Legen Sie die Baguettes auf ein Backblech und backen Sie sie bei ca. 230°C im vorgeheizten Backofen bei Ober- und Unterhitze für
ca. 20 Minuten auf der unteren Schiene.
HINWEIS
Sie können das Hackfleisch auch mit Basilikum,
Chili oder anderen Gewürzen abschmecken.
Zubereitung:
1) Teilen Sie den Blumenkohl in Röschen und
waschen Sie diese.
2) Garen Sie den Blumenkohl mit den Zitronenscheiben in kochendem Salzwasser für 8-10
Minuten, so dass der Blumenkohl bissfest ist.
Fangen Sie beim Abgießen ca. 150 ml des
Kochwassers auf.
3) Lassen Sie in einem Topf die Butter schmelzen
und schwitzen Sie das Mehl unter ständigem
Rühren ca. 1 Minute an.
4) Gießen Sie unter ständigem Rühren das Kochwasser des Blumenkohls hinzu und lassen Sie
es ca. 2 Minuten kochen. Wird die Mehlschwitze zu fest, geben Sie nach und nach noch etwas Wasser hinzu, bis eine sämige Konsistenz
entsteht. Mit Zitronensaft, Salz, Pfeffer und
Muskat würzen.
5) Geben Sie den Blumenkohl in eine Auflaufform
(ca. 14 cm Durchmesser) und gießen Sie die
Sauce gleichmäßig darüber.
6) Streuen Sie den Käse und die Mandelstifte
darüber.
7) Stellen Sie die Auflaufform auf das Backblech -.
8) Überbacken Sie den Auflauf bei ca. 200°C im
vorgeheizten Backofen bei Ober- und Unterhitze für ca. 20 Minuten auf der unteren Schiene.
SGBR 1500 B3
DE│AT│CH
│
39 ■

Blätterteigtaschen mit Lachsfüllung
Zutaten:
♦ 1 Pck. Blätterteigplatten (ca. 8 Stück)
♦ 1 Pck. Lachs, geräuchert, in Scheiben
(ca. 200 g)
♦ 1 Zitrone
♦ 1 Zwiebel
♦ 1 Pck. Frischkäse (200 g)
♦ frischer Dill
♦ Salz und Pfeffer
♦ 1 Eigelb
Zubereitung:
1) Nehmen Sie die Blätterteigplatten auseinander
und lassen Sie sie gegebenenfalls auftauen.
2) Vermischen Sie den Frischkäse mit Salz, Pfeffer
und dem Saft einer Zitrone.
3) Schneiden Sie die Zwiebel in feine Würfel.
4) Geben Sie die Hälfte des Lachses und die
Zwiebeln zu der Frischkäsemasse und pürieren
Sie alles grob mit einem Stabmixer.
5) Schneiden Sie den restlichen Lachs in feine
Streifen.
6) Geben Sie den Lachs und den Dill zu der
Masse hinzu und vermischen Sie alles.
7) Geben Sie je einen Esslöffel mit der Masse auf
eine Blätterteigplatte und klappen Sie diese
zusammen.
8) Bestreichen Sie die entstandene Tasche mit
Eigelb.
9) Legen Sie die Blätterteigtaschen auf das
Backblech -. Lassen Sie genügend Abstand
zwischen den einzelnen Taschen, da der
Blätterteig aufgeht.
10) Die Blätterteigtaschen auf der unteren Schiene
bei ca. 230° C Ober- und Unterhitze ca.
25-30 Minuten backen lassen. Der Blätterteig
sollte sich leicht braun färben.
HINWEIS
Die angegebene Menge reicht für mehrere
Backbleche -.
■ 40 │ DE
│AT│
CH
SGBR 1500 B3

Contents
Introduction ...........................................................42
Proper use ............................................................42
Package contents ......................................................42
Appliance description ...................................................42
Technical data .........................................................42
Safety instructions .....................................................43
Setting up ............................................................46
Using the appliance ....................................................46
Glass door ........................................................................46
Inserting the crumb tray ..............................................................46
Using the rotisserie ..................................................................47
Using the baking tray/rack ...........................................................48
Before first use ........................................................48
Operating the appliance ................................................49
Function switch .....................................................................49
Temperature control .................................................................49
Timer ............................................................................49
Grilling and baking ....................................................49
Grilling with the rotisserie ...............................................50
Cleaning and care ......................................................52
Storage ..............................................................52
Troubleshooting .......................................................53
Disposal ..............................................................54
Kompernass Handels GmbH warranty ....................................54
Service ...........................................................................55
Importer ..........................................................................55
Recipes ...............................................................55
│
GB
SGBR 1500 B3
41 ■

Introduction
Congratulations on the purchase of your new
appliance.
You have selected a high-quality product.
The operating instructions are part of this product.
They contain important information on safety, usage
and disposal. Before using the product, familiarise
yourself with all handling and safety guidelines.
Use the product only as described and for the
range of applications specified. Please also pass
these operating instructions on to any future
owner(s).
Proper use
The automatic oven and grill is intended for the
heating, cooking and grilling of food.
This appliance is intended solely for use in private
homes. Do not use it for commercial applications.
All other uses are deemed to be improper and may
result in property damage or even in personal injury.
Package contents
♦ Electric Oven & Grill
♦ 1 baking tray
♦ 1 rack
♦ 2 tongs
♦ Rotisserie with 2 clamps
♦ 1 crumb tray
♦ Operating instructions
NOTE
Check contents for completeness and damage
immediately after unpacking. Contact Customer
Services if necessary.
Appliance description
Figure A:
Drive
Temperature control
Function switch
Timer
Control lamp
Glass door
Crumb tray
Lower heating element
Spit fitting
Figure B:
Tongs (baking tray or rack)
- Baking tray
3 Tongs (for spit)
! rack
. Restrainer
0 Skewer clamps
6 Rotisserie
Technical data
Rated voltage: 220 - 240 V ~,
50/60 Hz
Max. power consumption: 1500 W
All of the parts of this appliance
that come into contact with food
are food-safe.
■ 42 │ GB
SGBR 1500 B3

Safety instructions
DANGER – RISK OF ELECTRIC SHOCK!
► Do not open the housing of the appliance or attempt to
repair it. Doing so can lead to risks and also invalidates the
warranty. Defective appliances should be repaired by the
retailer or authorized personnel only.
► Arrange for defective power plugs and/or cables to be
replaced as soon as possible by a qualified technician or by
our Customer Service Department to avoid the risk of injury.
► Do not allow any liquids to penetrate the housing. Do not
expose the appliance to moisture and do not use it outdoors.
Additionally, do not place fluid-filled receptacles such as
flower vases on the appliance. This increases the risk of fire
and of receiving an electric shock! If liquids permeate into
the housing, unplug the appliance immediately and arrange
for it to be repaired by a qualified technician.
► Never touch the appliance, power cable or power plug with
wet hands. There is a risk of electric shock!
NEVER immerse the appliance in water or other liquids!
Risk of electrocution if residual liquids come into contact
with live components during operation.
SGBR 1500 B3
GB
│
43 ■

WARNING – RISK OF INJURY!
► This appliance may be used by children of the age of 8 years
or more and by persons with reduced physical, sensory or
mental capabilities or lack of experience and/or knowledge if
they are being supervised or have been instructed with regard
to the safe use of the appliance and have understood the
potential risks.
► Children must not use the appliance as a plaything.
► Cleaning and user maintenance must not be performed by
children unless they are older than 8 years of age and are
supervised.
► Children younger than 8 years of age must be kept away
from the appliance and the power cable.
► Route the power cable in such a way that no one can tread
on it or trip over it.
► Never touch the glass door or the housing during use, these
can get very hot. Use oven gloves or something similar to
open the glass door to avoid being burnt!
► Never touch the heating elements or the viewing window
when the appliance is in use, or before it has cooled down
completely. Do not reach into the cooking chamber when
the appliance is in use. Wait until the appliance has cooled
down. Otherwise, you could be burnt.
► Allow the appliance to cool down after use before trans-
porting it.
► Always use oven gloves or a pot holder if you need to take
hold of the appliance.
Caution! Hot surface!
■ 44 │ GB
SGBR 1500 B3

CAUTION – PROPERTY DAMAGE!
► Do not use an external timer switch or a separate remote
control system to operate the appliance.
► Never leave the appliance unattended during operation.
► Ensure that the appliance, the power cable and the plug do
not come into contact with heat sources such as hotplates or
naked flames.
► Only operate the appliance with the original accessories
supplied.
► Do not kink or crush the mains cable.
► To disconnect, always remove the plug itself from the mains
power socket, do not pull on the power cable.
► When the appliance is in use, ensure that there are no easily
inflammable materials in the immediate vicinity (e.g. dishcloths,
oven cloths, etc.).
► Never dry textiles or other objects on or above the appliance.
This increases the risk of fire!
SGBR 1500 B3
GB
│
45 ■

Setting up
Using the appliance
WARNING! RISK OF FIRE!
► Never place the appliance beneath wall cup-
boards or next to curtains, cupboard walls or
other flammable objects.
► Always ensure a minimum distance between
the appliance and hanging cupboards, ceilings,
side walls or similar of at least 10 cm above
the appliance and 5 cm at the sides. For this
reason the appliance may not be used, for
example, in cupboards or similar. Otherwise
there is likely to be insufficient ventilation for the
appliance, which could cause a fire or damage.
► Always place the appliance on a heat-resistant
surface. Failure to do so increases the risk of
fire or of it being damaged. The area under
the bottom can discolour and be damaged.
Additionally, if placed on a soft upper surface,
the appliance could cause permanent damage
to it due to pressure indentations.
DANGER – ELECTRIC SHOCK!
► Do not place the appliance immediately ad-
jacent to sources of water, e.g. sinks or basins,
or in damp cellar areas. Otherwise, there is
a risk of receiving an electric shock.
■ Place the appliance on a solid, level and heat-
resistant surface (e.g. stainless steel worktops
or natural stone worktops such as granite).
Ensure there is sufficient ventilation around the
appliance.
■ Push the appliance up against the wall, with its
rear side facing the wall. The spacers on the
back must touch the wall. Ensure that the wall is
made of heat-resistant material, e.g. tiles, natural
stone or granite.
■ Clean all components as described in the
section “Cleaning and care”.
Glass door
ATTENTION! DAMAGE TO PROPERTY!
►
Do not lean on the glass door . Do not
place any objects on the glass door .
This can cause damage to the hinges.
■ If you are cooking especially fatty foodstuffs, this
can result in increased smoke production. In this
case, do not close the glass door completely;
instead, leave it slightly open:
The glass door has a latching position so that
it remains open a little: if you carefully push the
glass door closed, it clicks into this position
shortly before closing completely.
■ When drying fruit (to make dried fruit), the glass
door should remain in the latching position
to ensure that moisture can escape and that the
fruit dries better.
Inserting the crumb tray
■ Push the crumb tray under the lower heating
element so that it rests flat on the bottom of
the appliance
a handle.
. You can use the bent up side as
■ 46 │ GB
SGBR 1500 B3

Using the rotisserie
WARNING! RISK OF INJURY!
► Always use the tongs 3to insert the hot rotis-
serie 6 into the appliance or to remove it.
■ You can use the two skewer clamps 0 to fix the
food onto the rotisserie 6. Loosen the restrainer .
on the skewer clamps 0, push them so that the
food is fixed firmly in between the clamps and
then screw the restrainer . tight again.
■ First push the end of the rotisserie 6 without the
notch into the drive (Figure 1):
NOTE
► Always slide the baking tray - into the lower
rail when you use the rotisserie 6.
This will collect any drips.
■ To remove the hot rotisserie 6, grip with
the hooks at the end of the tongs 3 into the
recesses on the rotisserie 6 (Figure 3):
Fig. 1: Push the rotisserie 6 into the drive .
■ Then insert the other end of the rotisserie 6 with
the deep groove in the spit fitting (Figure 2):
Fig. 2: Insert the rotisserie 6 in the spit fitting .
SGBR 1500 B3
Fig. 3: Hooking the tongs 3 onto the rotisserie 6
■ F
irst lift the left-hand side of the rotisserie 6 out
of the spit fitting and then pull the rotisserie 6
from the drive .
│
GB
47 ■

Using the baking tray/rack
WARNING! RISK OF INJURY!
► Always use the tongs to insert the hot
baking tray -/the hot rack ! into the appliance or to remove it.
■ Push the baking tray -/the rack ! into one of
the 3 rails in the cooking chamber of the appliance.
ATTENTION! DAMAGE TO PROPERTY!
► Never place the baking tray -/the rack !
directly onto the heating elements .
■ To remove the hot baking tray - or the rack !,
hook the tongs onto them as follows:
Fig. 4: Hooking the tongs onto the rack !
Before first use
1) Insert the plug into a mains power socket.
2) Turn the temperature control clockwise to
the maximum temperature (to the stop).
3) Turn the function switch to “upper and
lower heat”
4) Open the glass door leave this open for this
operation.
5) Remove any installed accessories from the
cooking chamber.
6) Turn the timer to 20 minutes.
NOTE
► The first time the appliance heats up, a
small amount of smoke and odour may be
generated due to production-related residue.
This is normal and is completely harmless.
Provide sufficient ventilation by opening a
window, for example.
The appliance switches off automatically
after 20 minutes.
If you want to interrupt the heating process
prematurely, turn the temperature control
counter-clockwise to the stop and set the
timer to “OFF”.
7) Allow the appliance to cool down, then clean
the appliance as described in the chapter
“Cleaning and care”.
The appliance is now ready for use.
.
Fig. 5: Hooking the tongs onto the baking
tray -
■ 48 │ GB
SGBR 1500 B3

Operating the appliance
Function switch
You can switch on the appliance with the function
switch , and also set 5 different functions:
Symbol Meaning
“Lower heat”
e.g. for baking
“Upper heat”
e.g. to gratinate
"Upper & lower heat"
e.g. for baking a pizza
"Upper heat/hot air/
rotisserie"
e.g. to roast poultry
"Upper & lower heat/hot air"
e.g. to reheat rolls
"OFF" the appliance is
switched off.
Temperature control
Use the temperature control to set the desired
temperature.
■ If you set the temperature for the functions
“Upper heat”
“Upper & lower heat”
marked with “
■ If you set the temperature for the functions “Upper
heat/hot air/rotisserie”
heat/hot air”
, “Lower heat”
use the scale
“.
or “Upper & lower
use the scale marked with „ “.
or
Timer
User the timer to set the cooking time.
■ Set the timer to the desired cooking time.
After expiry of the set time a signal tone sounds
and the appliance stops heating.
If the function “Upper heat/hot air/rotisserie”
is selected, the rotisserie 6 will also stop
turning.
Grilling and baking
1) Put the crumb tray into the appliance.
2) Remove the rack ! and baking tray - from
the appliance. If required, cover these with
baking paper or lightly grease the baking tray with suitable baking fat.
NOTE
► Depending on the meal, the oven must be
preheated. Refer to the guidelines in the
respective recipe. Preheating is useful for:
– very short baking times,
– crisp crusts,
– sensitive meals that require a constant
temperature, such as soufflés.
► If no preheating is required, skip step 3).
3) Allow the appliance to heat up for approx.
10 minutes (depending on the temperature
setting) to the required temperature:
– Select the required temperature using the
temperature control . Ensure that you use
the correct scale (see chapter “Temperature
control”).
– Select the required function with the function
switch .
SGBR 1500 B3
GB
│
49 ■

NOTE
► As a general rule, if you are baking or grilling
with hot air you can dispense with a preheating
of the grilling/cooking space.
– Use the timer to set the preheat time
(approx. 10 minutes).
– Close the glass door .
4) Once the warm-up period is finished, place
the foodstuffs on the rack ! or the baking
tray - and slide it in on one of the rails.
Ensure that there is sufficient space between
the foodstuffs and the inner walls/heating
elements of the appliance.
NOTE
► If you wish to prepare food on the rack !
that drips excessively, then slide the baking
tray - onto the bottom rail. By doing this,
dripping fat for example will be caught and
the appliance is then easier to clean.
5) Close the glass door before starting the
grilling or baking process.
6) Use the timer to set the required grilling or
baking time. The maximum grilling or baking
time is 120 minutes.
NOTE
► If the cooking time for the food is less than
20 minutes, first set the timer to 40 minutes
and then turn it back to the required grilling
or baking time.
The appliance switches off automatically after the
set period, there is a beep and the control lamp
switches off.
NOTE
If you want to interrupt the heating process
prematurely, turn the temperature control
counter-clockwise to the stop and set the timer
to "OFF ".
7) After cooking, remove the rack ! or the baking
tray - using the tongs .
8) Set the function switch to “OFF”.
Grilling with the rotisserie
1) Put the crumb tray into the appliance.
2) If inserted, remove the rotisserie 6 from the
appliance.
3) Push the baking tray - onto the lower rail.
4) Fix the food to be grilled with the skewer
clamps 0. Ensure that the food in the cooking
chamber can turn freely without touching the
sides. The rotisserie 6may change its direction
of rotation if the food strikes against a resistance.
The two depressions on the rotisserie 6 must remain freely accessible, otherwise you will not be
able to grasp the rotisserie 6 with the tongs 3.
5) Fit the rotisserie 6 in the cooking chamber
(see chapter “Using the rotisserie”)
6) Close the glass door .
The control lamp indicates that the appliance is
now switched on. The switch of the timer now
rotates itself anti-clockwise to “OFF “.
■ 50 │ GB
SGBR 1500 B3

NOTE
If you want to interrupt the heating process prematurely, turn the temperature control counterclockwise to the stop and set the timer to
"OFF ".
7) Adjust the temperature control to the desired
temperature.
8) Set the function switch to “Upper heat/
hot air/rotisserie”
desired grill time.
The appliance starts the grilling process and
the rotisserie 6 starts turning.
The control lamp indicates that the appliance is
now switched on. The switch of the timer now
rotates itself anti-clockwise to “OFF “.
The appliance switches off automatically after the
set period, there is a beep and the control lamp
switches off.
NOTE
If you want to interrupt the heating process
prematurely, turn the temperature control
counter-clockwise to the stop and set the timer
to "OFF ".
9) After the grilling process is completed remove
the rotisserie 6 with the help of the tongs 3.
10) Set the function switch to “OFF”.
. Set the timer to the
EXAMPLE: GRILLED CHICKEN
Ingredients
♦ Grilling chicken (approx. 1.3 kg,
guts removed)
♦ Spices (salt, paprika)
♦ Cooking oil
1) Season the chicken on the inside and outside
with salt and paprika powder. Brush it from
the outside with heat resistant cooking oil.
2) Push the chicken onto the spit and fix it in
place with the skewer clamps 0. Ensure that
the notches on the rotisserie 6 remain free
so that you can remove the rotisserie 6with
the help of the tongs 3. Depending on the
shape of the chicken, it may be necessary
to fasten the wings and legs with a fireproof
string to stop them impacting the sides when
turning.
3) Push the baking tray - onto the lower rail.
4) Preheat the appliance for about 10 minutes
using the function "Upper & lower heat/hot
air"
to 210°C.
5) Put the chicken on the rotisserie into the
appliance using the tongs 3.
6) Set the function switch to "Upper heat/hot
air/rotisserie"
7) Set the timer approx. 80 minutes. The
cooking time can vary depending on the
size and nature of the chicken.
8) Brush the chicken every now and again with
some cooking oil. This will make it crispy.
9) Once the set time is up, carefully remove the
rotisserie with the chicken using the tongs 3.
Loosen the skewer clamps 0 and pull the
chicken off the rotisserie 6.
and close the door.
SGBR 1500 B3
GB
│
51 ■

Cleaning and care
DANGER – ELECTRIC SHOCK!
► Before cleaning the appliance, disconnect the
plug from the mains power socket!
Risk of electric shock!
NEVER immerse the appliance in water or
any other liquid!
WARNING! RISK OF INJURY!
► Always allow the appliance to cool down
before cleaning it. Otherwise there is a risk
of burns!
■ It is best to clean the appliance and accessories
as soon as they have cooled down. This makes
food residues easier to remove.
ATTENTION! DAMAGE TO PROPERTY!
► Do not use abrasive or aggressive cleaning
materials. These could damage the surface of
the appliance!
► Do not clean the components of the appliance
in a dishwasher!
► Do not clean the cooking chamber with an
oven spray as this may make residues on the
heating elements impossible to remove.
■ Wipe the appliance with a damp cloth. If neces-
sary, put a little mild detergent on the cloth and
wipe this off afterwards with a cloth dampened
with clean water. Dry everything properly.
■ Clean the cooking chamber and the glass door
with a moist cloth. If necessary, put a little mild
detergent on the cloth and wipe this off afterwards with a cloth dampened with clean water.
Dry everything properly.
■ Clean the tongs /3, the rotisserie 6, the
skewer clamps 0, the restrainer ., the baking
tray -, the rack ! and the crumb tray in
warm soapy water. Dry all parts properly after
cleaning.
Storage
■ You can wind the mains cable around the spacers
on the rear side of the appliance and attach the
plug to one of the spacers:
■ Store the cleaned appliance and its accessories
in a clean, dust-free and dry location.
■ 52 │ GB
SGBR 1500 B3

Troubleshooting
Fault Cause Solution
The mains plug is not connected to the
mains power.
The appliance is not
working.
The control lamp
comes on and but the
appliance does not
heat up.
The cooking time of
the food seems very
long
Smoke and smells
develop during use.
If the malfunction cannot be corrected with the above suggestions, or if you have found some other
kind of malfunction, please contact our Customer Service.
The mains power socket is defective.
The appliance is defective. Contact Customer Services.
The function switch is set to OFF.
The glass door has been opened often
to check the cooking progress.
The wrong temperature level has been set. Check the temperature settings.
There is detergent or food residue on the
heating elements.
Insert the plug into a mains power
socket.
Use a different mains power
socket.
Turn the function switch to the
desired function.
Do not open the glass door
any more often than is absolutely
necessary.
Remove the food from the appliance and continue cooking
process with the glass door
open until the smoke stops.
SGBR 1500 B3
GB
│
53 ■

Disposal
Under no circumstance should
the appliance be disposed of
as standard domestic waste.
This product is subject to the
provisions of European Directive 2012/19/EU.
Dispose of the appliance via an approved waste
disposal company or your municipal waste disposal
facility. Please observe applicable regulations.
Please contact your waste disposal facility if you
are in any doubt.
The packaging is made of environmen-
tally friendly materials which you can
dispose of at your local recycling centre.
Kompernass Handels GmbH
warranty
Dear Customer,
This appliance has a 3-year warranty valid from
the date of purchase. If this product has any faults,
you, the buyer, have certain statutory rights. Your
statutory rights are not restricted in any way by the
warranty described below
Warranty conditions
The validity period of the warranty starts from the
date of purchase. Please keep your original receipt
in a safe place. This document will be required as
proof of purchase.
If any material or production fault occurs within
three years of the date of purchase of the product,
we will either repair or replace the product for you
at our discretion. This warranty service is dependent on you presenting the defective appliance and
the proof of purchase (receipt) and a short written
description of the fault and its time of occurrence.
If the defect is covered by the warranty, your product
will either be repaired or replaced by us. The repair
or replacement of a product does not signify the
beginning of a new warranty period.
.
Warranty period and statutory
claims for defects
The warranty period is not prolonged by repairs
effected under the warranty. This also applies to
replaced and repaired components. Any damage
and defects present at the time of purchase must
be reported immediately after unpacking. Repairs
carried out after expiry of the warranty period shall
be subject to a fee.
Scope of the warranty
This appliance has been manufactured in accordance with strict quality guidelines and inspected
meticulously prior to delivery.
The warranty covers material faults or production
faults. The warranty does not extend to product
parts subject to normal wear and tear or fragile
parts such as switches, batteries, baking moulds or
parts made of glass.
The warranty does not apply if the product has
been damaged, improperly used or improperly
maintained. The directions in the operating instructions for the product regarding proper use of
the product are to be strictly followed. Uses and
actions that are discouraged in the operating
instructions or which are warned against must be
avoided.
This product is intended solely for private use and
not for commercial purposes. The warranty shall be
deemed void in cases of misuse or improper handling,
use of force and modifications/repairs which have
not been carried out by one of our authorised
Service centres.
■ 54 │ GB
SGBR 1500 B3

Warranty claim procedure
To ensure quick processing of your case, please
observe the following instructions:
▯ Please have the till receipt and the item number
(e.g. IAN 12345) available as proof of purchase.
▯ You will find the item number on the type plate,
an engraving on the front page of the instructions
(bottom left), or as a sticker on the rear or bottom
of the appliance.
▯ If functional or other defects occur, please
contact the service department listed either by
telephone or by e-mail.
▯ You can return a defective product to us free of
charge to the service address that will be provided
to you. Ensure that you enclose the proof of purchase (till receipt) and information about what
the defect is and when it occurred.
You can download these instructions
along with many other manuals,
product videos and software on
www.lidl-service.com.
Service
Service Great Britain
Tel.: 0871 5000 720 (£ 0.10/Min.)
E-Mail: kompernass@lidl.co.uk
IAN 274498
Importer
Please note that the following address is not the
service address. Please use the service address
provided in the operating instructions.
KOMPERNASS HANDELS GMBH
BURGSTRASSE 21
44867 BOCHUM
GERMANY
www.kompernass.com
Recipes
In this section, we provide you with various sample
recipes for preparing dishes. These examples are
recommendations. Cooking times may vary.
These recipes are provided without guarantee.
All information on ingredients and preparation is
indicative only. Modify the suggested recipes to
taste. We hope you enjoy the recipes and wish
you “bon appetit”!
NOTE
Take note of the preparation guidelines provided
on the food packaging.
Muffins
Ingredients for four people:
♦ 1 cup of flour
♦ 1 teaspoon of baking powder
♦ 1 egg
♦ 1 tablespoon of melted butter
♦ 1 cup of milk
♦ 3 tablespoons of sugar
♦ 1 pinch salt
♦ for variations: also nuts, chopped bananas or
chocolate flakes
Preparation:
1) Gradually mix the flour, baking powder, egg,
milk, salt and sugar together in a bowl, one
by one.
2) Melt the butter in a saucepan and mix it into
the dough.
3) Subject to taste, blend in the nuts, chocolate
flakes or mashed bananas.
4) Place the prepared dough into standard muffin
moulds and place them on the baking tray -.
5) Bake the muffins at 220°C on the bottom rail
using top & bottom heat for about 15 minutes.
SGBR 1500 B3
GB
│
55 ■

Hawaiian toast
Ingredients for 4 pieces of toast:
♦ 4 slices of toasting bread
♦ 1–2 tablespoons of remoulade
♦ 120 g cooked ham
♦ 1/2 tin of pineapples
♦ 4 slices of cheese for gratinating
♦ Curry
Preparation:
♦ Toast the bread slices.
♦ Spread the remoulade thinly over the pieces of
toast and lay the slices of cooked ham on top.
♦ Lay one slice of pineapple on each piece of
toast. Season with curry.
♦ Then place a slice of cheese over each of the
pineapple slices.
♦ Lay the Hawaiian toasts on the rack ! and
bake at 200°C for about 8 minutes on the
upper rail using top heat.
Baking deep-frozen pizza
Preparation:
♦ Place the rack ! on the upper rail in the cooking
chamber.
♦ Place the deep-frozen pizza (without packaging)
onto the rack !.
♦ Bake the pizza, using upper and lower heat, for
about 20 minutes.
♦ Please follow the instructions on the packaging
regarding temperature.
Spritzgebäck cookies
Ingredients:
♦ 125 g butter
♦ 125 g sugar
♦ 1 packet of vanilla sugar
♦ 1 pinch salt
♦ 1 egg
♦ 1 egg white
♦ 250 g flour (type 405)
♦ 1 teaspoon of baking powder
♦ Zest of half a lemon
Preparation:
1) Beat the butter until foamy.
2) Add the sugar, vanilla sugar, lemon zest and
eggs.
3) Mix the flour, baking powder and salt and stir
into the mixture using a mixing spoon.
4) Allow the dough to stand for about 10 minutes.
5) Shape the dough as desired, e.g. with the assistance of a mincer, cookie cutters or a piping
bag.
6) Line the baking tray - with baking paper and
place the cookies on this.
7) Bake the cookies on the top rail of a preheated
oven at 180°C, using top and bottom heat,
for about 10–15 minutes, until they are golden
brown.
NOTE
This quantity of dough is sufficient for several
baking trays -.
■ 56 │ GB
SGBR 1500 B3

Bread rolls
Ingredients:
♦ 300 g flour (or wholemeal flour)
♦ 2 heaped teaspoons of baking powder
♦ 200 g linseeds
♦ 1 egg
♦ 500 g quark or curd cheese
♦ 1 teaspoon of salt
♦ Subject to taste: caraway seeds, onions,
bacon ...
Preparation:
1) Knead all ingredients together well and then
shape into small rolls.
2) Line the baking tray - with baking paper and
place the rolls on this.
3) Bake on the top rail at about 200°C for
around 30 minutes.
NOTE
This quantity of dough is sufficient for several
baking trays -.
Meringues
Ingredients:
♦ 1 egg white
♦ Salt
♦ 45 g sugar
Preparation:
1) Place the chilled egg white into a fat-free mixing
bowl. Ensure that no egg yolk is mixed in with
it or the meringue will not solidify.
2) Beat the egg white at a slow speed, so that the
bubbles formed in the meringue are not too
large.
3) Add a pinch of salt to taste.
4) Gradually add in half of the sugar when the
meringue starts to solidify.
5) Then beat it at the highest speed until stiff.
6) Add the remaining sugar. This allows the
meringue to attain the required solidity.
7) Fill a piping bag fitted with a large star nozzle
with the meringue mixture and squeeze out
rosettes, slithers or other shapes onto a baking
tray - lined with baking paper. Leave a little
space between each shape.
8) Preheat the oven with grill to approx. 100° C
with hot air.
9) Bake the meringues with hot air at approx.
100° C for about 2 hours.
SGBR 1500 B3
GB
│
57 ■

Buttered croutons
Ingredients:
♦ 2 slices of toasting bread
♦ 1 tbsp. butter
Preparation:
1) Cut the bread into small cubes.
2) Melt the butter at low heat in a saucepan and
mix in the cubed bread.
3) Line a baking tray - with baking paper and
distribute the bread cubes evenly on it.
4) Bake the bread cubes at 170°C (top heat)
on the upper rail until golden brown (approx.
15–20 minutes).
NOTE
You can also use herb or garlic butter instead
of regular butter. Baking time is then reduced by
about 5 minutes.
Minced meat baguettes
Ingredients:
♦ 2 baguette rolls
♦ 250 g minced meat (half and half)
♦ 2 tomatoes
♦ 1 onion (diced)
♦ 2 tbsp. tomato purée
♦ 40 g grated Parmesan cheese
♦ 4 slices of cheese
♦ Salt and pepper
Preparation:
1) Slice the baguettes and hollow them out.
2) Mix together the minced meat, tomato paste,
onion, Parmesan, some salt and a little pepper.
3) Shape the minced meat into four equal-sized,
flat burgers and place them on the baguette
halves.
4) Cut the tomatoes into slices and arrange them
on the baguettes.
5) Arrange the cheese slices on the baguettes.
6) Place the baguettes on a baking tray - and
then bake them on the bottom rail at about
230°C in a preheated oven using top and
bottom heat for about 20 minutes.
■ 58 │ GB
NOTE
You can also season the minced meat mixture
with basil, chilli or other spices.
SGBR 1500 B3

Cauliflower (gratinated)
Ingredients:
♦ 1/2 head cauliflower (about 250g)
♦ 3 lemon slices
♦ 1 tbsp. butter
♦ 1 heaped tsp. flour
♦ 1 tbsp. lemon juice
♦ 1 tbsp. slivered almonds
♦ 2 tbsp. gratin cheese (grated)
♦ Salt, pepper, nutmeg
Salmon-filled flaky pastries (burek)
Ingredients:
♦ 1 pack of flaky pastry slices (approx. 8 pieces)
♦ 1 pack of smoked salmon, sliced (about 200 g)
♦ 1 lemon
♦ 1 onion
♦ 1 pack of cream cheese (200 g)
♦ Fresh dill
♦ Salt and pepper
♦ 1 egg yolk
Preparation:
1) Divide the cauliflower into florets and wash
them.
2) Cook the cauliflower with the lemon slices in
boiling, salted water for 8–10 minutes until the
cauliflower is al dente. Retain about 150 ml
of the cooking water before pouring the rest
away.
3) Melt the butter in a saucepan and then brown
the flour, while stirring continuously, for about
1 minute.
4) Continue stirring and pour in the cauliflower
water and let it cook for about 2 minutes. If the
roux gets too solid, gradually add more water
until a creamy consistency is achieved. Season
with lemon juice, nutmeg, salt and pepper.
5) Place the cauliflower in a baking dish (about
14 cm in diameter) and pour the sauce evenly
over it.
6) Sprinkle in the cheese and almond slivers over it.
7) Place the baking dish on the baking tray -.
8) Bake the prepared dish at 200 °C in a preheated oven, using top and bottom heat, for
about 20 minutes on the bottom rail.
Preparation:
1) Separate the puff pastry sheets and, if necessary, allow them to thaw.
2) Mix the cream cheese with salt, pepper and
the juice of one lemon.
3) Finely dice the onion.
4) Add half of the salmon and the onion to the
cream cheese mixture and mix it all coarsely
with a blender.
5) Cut the remaining salmon into thin strips.
6) Add the salmon and the dill to the mixture and
blend all ingredients together.
7) Place individual tablespoonfuls of the mixture
on a flaky pastry sheet and fold them over.
8) Coat the resulting pouch with egg yolk.
9) Place the burek pieces on a baking sheet -.
Leave sufficient space between the individual
pouches because the flaky pastry will expand.
10) Bake the pastries on the lower rail at around
230°C using top and bottom heat for about
25–30 minutes. The flaky pastry should turn
light brown in colour.
NOTE
The stated quantity of pastry is sufficient for
several baking trays -.
SGBR 1500 B3
GB
│
59 ■

KOMPERNASS HANDELS GMBH
BURGSTRASSE 21
44867 BOCHUM
DEUTSCHLAND / GERMANY
www.kompernass.com
Version des informations · Stand der Informationen
Last Information Update:
06 / 2016 · Ident.-No.: SGBR1500B3-042016-1
IAN 274498
2
 Loading...