

Page 1
HORNO ELÉCTRICO CON GRILL
FORNO ELETTRICO CON GRILL SGBR 1500 A1
HORNO ELÉCTRICO CON GRILL
Instrucciones de uso
FORNO ELETTRICO CON GRILL
Istruzioni per l'uso
ELECTRIC OVEN & GRILL
Operating instructions
IAN 102464
GRILL- UND BACKAUTOMAT
Bedienungsanleitung
Page 2
Antes de empezar a leer abra la página que contiene las imágenes y, en seguida, familiarícese con todas
las funciones del dispositivo.
Prima di leggere aprire la pagina con le immagini e prendere confi denza con le diverse funzioni
dell'apparecchio.
Before reading, unfold the page containing the illustrations and familiarise yourself with all functions of
the device.
Klappen Sie vor dem Lesen die Seite mit den Abbildungen aus und machen Sie sich anschließend mit allen
Funktionen des Gerätes vertraut.
ES Instrucciones de uso Página 1
IT / MT Istruzioni per l'uso Pagina 15
GB / MT Operating instructions Page 29
DE / AT / CH Bedienungsanleitung Seite 43
Page 3
A
9
1
2
B
8
7
6
3
4
5
0
q
w
z
e
tr
Page 4

Índice
Introducción . . . . . . . . . . . . . . . . . . . . . . . . . . . . . . . . . . . . . . . . . . . . . . . . . . . . . . . . . . .2
Uso previsto . . . . . . . . . . . . . . . . . . . . . . . . . . . . . . . . . . . . . . . . . . . . . . . . . . . . . . . . . . .2
Volumen de suministro . . . . . . . . . . . . . . . . . . . . . . . . . . . . . . . . . . . . . . . . . . . . . . . . . . .2
Descripción del aparato . . . . . . . . . . . . . . . . . . . . . . . . . . . . . . . . . . . . . . . . . . . . . . . . . .2
Características técnicas . . . . . . . . . . . . . . . . . . . . . . . . . . . . . . . . . . . . . . . . . . . . . . . . . .2
Indicaciones de seguridad . . . . . . . . . . . . . . . . . . . . . . . . . . . . . . . . . . . . . . . . . . . . . . . .3
Instalación . . . . . . . . . . . . . . . . . . . . . . . . . . . . . . . . . . . . . . . . . . . . . . . . . . . . . . . . . . . . .6
Uso del aparato . . . . . . . . . . . . . . . . . . . . . . . . . . . . . . . . . . . . . . . . . . . . . . . . . . . . . . . .6
Puerta de cristal . . . . . . . . . . . . . . . . . . . . . . . . . . . . . . . . . . . . . . . . . . . . . . . . . . . . . . . . . . . . . . . . . . . . . 6
Inserción de la bandeja para migas . . . . . . . . . . . . . . . . . . . . . . . . . . . . . . . . . . . . . . . . . . . . . . . . . . . . . 6
Uso del espetón . . . . . . . . . . . . . . . . . . . . . . . . . . . . . . . . . . . . . . . . . . . . . . . . . . . . . . . . . . . . . . . . . . . . . 7
Uso de la bandeja de horno/parrilla . . . . . . . . . . . . . . . . . . . . . . . . . . . . . . . . . . . . . . . . . . . . . . . . . . . . 8
Antes del primer uso . . . . . . . . . . . . . . . . . . . . . . . . . . . . . . . . . . . . . . . . . . . . . . . . . . . .8
Manejo del aparato . . . . . . . . . . . . . . . . . . . . . . . . . . . . . . . . . . . . . . . . . . . . . . . . . . . . .9
Selector de función . . . . . . . . . . . . . . . . . . . . . . . . . . . . . . . . . . . . . . . . . . . . . . . . . . . . . . . . . . . . . . . . . . 9
Regulador de temperatura . . . . . . . . . . . . . . . . . . . . . . . . . . . . . . . . . . . . . . . . . . . . . . . . . . . . . . . . . . . . . 9
Temporizador . . . . . . . . . . . . . . . . . . . . . . . . . . . . . . . . . . . . . . . . . . . . . . . . . . . . . . . . . . . . . . . . . . . . . . 9
ES
Gratinado y horneado . . . . . . . . . . . . . . . . . . . . . . . . . . . . . . . . . . . . . . . . . . . . . . . . . . .9
Gratinado con espetón . . . . . . . . . . . . . . . . . . . . . . . . . . . . . . . . . . . . . . . . . . . . . . . . .10
Limpieza y mantenimiento . . . . . . . . . . . . . . . . . . . . . . . . . . . . . . . . . . . . . . . . . . . . . .12
Almacenamiento . . . . . . . . . . . . . . . . . . . . . . . . . . . . . . . . . . . . . . . . . . . . . . . . . . . . . . .12
Eliminación de fallos . . . . . . . . . . . . . . . . . . . . . . . . . . . . . . . . . . . . . . . . . . . . . . . . . . . .13
Garantía y asistencia técnica . . . . . . . . . . . . . . . . . . . . . . . . . . . . . . . . . . . . . . . . . . . . .14
Desecho . . . . . . . . . . . . . . . . . . . . . . . . . . . . . . . . . . . . . . . . . . . . . . . . . . . . . . . . . . . . . .14
Importador . . . . . . . . . . . . . . . . . . . . . . . . . . . . . . . . . . . . . . . . . . . . . . . . . . . . . . . . . . .14
SGBR 1500 A1
1
Page 5

Introducción
ES
Felicidades por la compra de su aparato nuevo.
Ha adquirido un producto de alta calidad. Las
instrucciones de uso forman parte del producto y
contienen indicaciones importantes acerca de la
seguridad, el uso y el desecho de este aparato.
Antes de usar el producto, familiarícese con todas
las indicaciones de manejo y de seguridad. Utilice
el producto únicamente como se describe y para
los ámbitos de aplicación indicados. Entregue todos
los documentos cuando transfi era el producto a
terceros.
Uso previsto
El horno con función de gratinado sirve exclusivamente para calentar, asar y gratinar alimentos.
Este aparato está previsto exclusivamente para
su uso doméstico privado. No lo utilice con fi nes
comerciales.
Cualquier otro uso se considera como no conforme
al previsto y puede provocar daños materiales e
incluso personales.
Volumen de suministro
♦ Horno eléctrico con grill
♦ 1 bandeja de horno
♦ 1 parrilla
♦ 2 mangos
♦ Espetón giratorio con 2 pinchos de sujeción
♦ 1 bandeja para migas
♦ Instrucciones de uso
Descripción del aparato
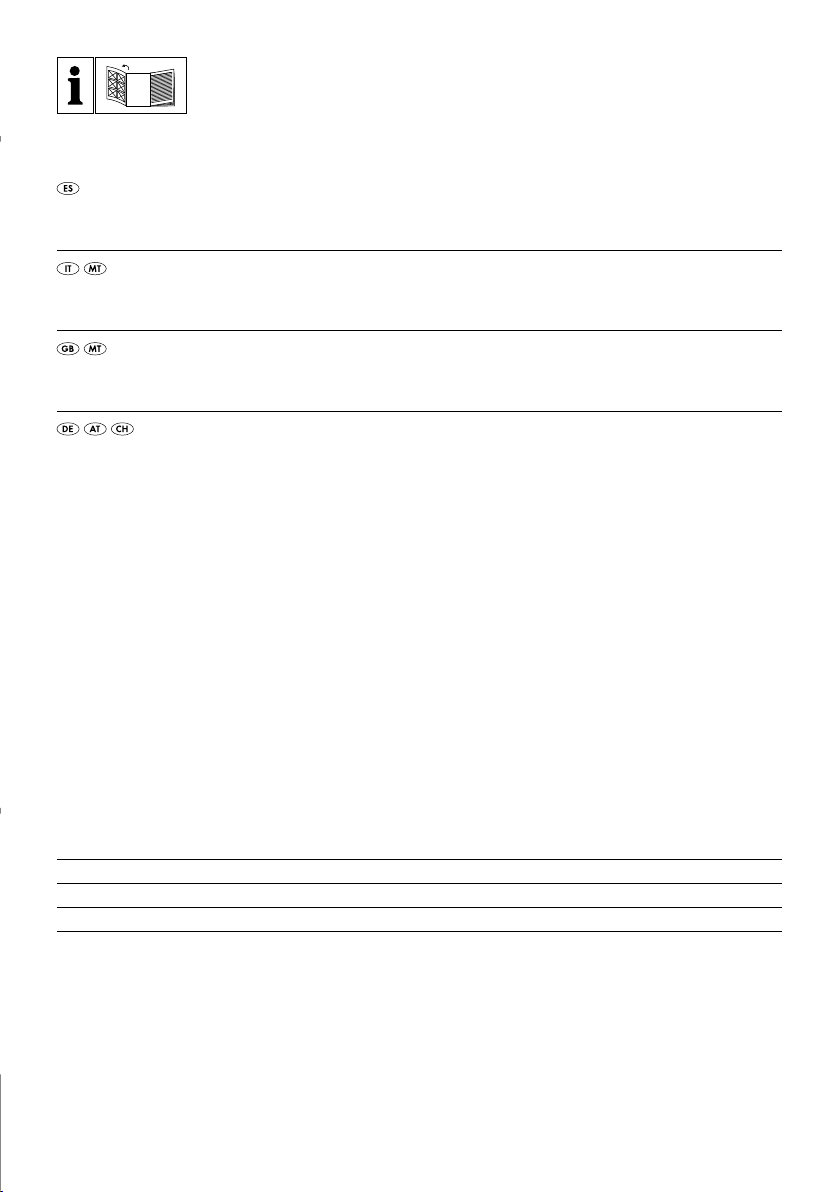
Figura A:
1 Accionamiento
2 Regulador de temperatura
3 Selector de función
4 Temporizador
5 Piloto de control
6 Puerta de cristal
7 Bandeja para migas integrada
8 Varillas calefactoras inferiores
9 Alojamiento del espetón
Figura B:
0 Mango (para la bandeja de horno y
para la parrilla)
q Bandeja de horno
w Mango (para el espetón)
e Parrilla
r Elemento de fi jación
t Pinchos de sujeción
z Espetón
Características técnicas
Tensión nominal: 220 - 240 V ~,
50/60 Hz
Máx.
consumo de potencia: 1500 W
INDICACIÓN
Compruebe que el volumen de suministro esté
completo y que carezca de daños después de
desembalarlo. En caso necesario, póngase en
contacto con el ser
vicio de asistencia técnica.
2
SGBR 1500 A1
Page 6

Indicaciones de seguridad
¡PELIGRO DE DESCARGA ELÉCTRICA!
► No se permite la apertura ni la reparación de la carcasa del apa-
rato. De lo contrario, no podrá garantizarse la seguridad del
aparato y se anulará el derecho a la garantía. Si el aparato está
defectuoso, encomiende su reparación exclusivamente al personal
especializado autorizado.
► Si la clavija de red o el cable de red están dañados, encomiende
su sustitución al personal técnico autorizado o al servicio de
asistencia técnica con el fi n de evitar riesgos.
► No permita que ningún líquido penetre en la carcasa del aparato.
El aparato no debe estar expuesto a la humedad ni utilizarse a la
intemperie. Además, no deben colocarse objetos llenos de líquido,
como, p. ej., jarrones, encima del aparato. ¡Existe peligro de
incendio y de descarga eléctrica! Si por cualquier motivo penetrase líquido en la carcasa del aparato, retire inmediatamente la
clavija de red de la base de enchufe y llévelo a reparar.
► No toque el aparato, el cable ni la clavija de red con las manos
húmedas. De lo contrario, existe peligro de descarga eléctrica.
ES
No sumerja nunca el aparato en agua ni en otros líquidos.
Posible peligro de muerte por descarga eléctrica si penetran
restos de líquidos en piezas sometidas a tensión.
SGBR 1500 A1
3
Page 7

ES
¡ADVERTENCIA – PELIGRO DE LESIONES!
► Este aparato puede ser utilizado por niños a partir de 8 años y
por personas cuyas facultades físicas, sensoriales o mentales sean
reducidas o carezcan de los conocimientos y de la experiencia
necesaria siempre que sean vigilados o hayan sido instruidos
correctamente sobre el uso seguro del aparato y hayan comprendido los peligros que entraña.
► Los niños no deben jugar con el aparato.
► Los niños no deben realizar las tareas de limpieza y manteni-
miento del aparato a no ser que sean mayores de 8 años y estén
bajo supervisión.
► Los niños menores de 8 años deben mantenerse alejados del
aparato y del cable de conexión.
► Tienda el cable de red de modo que nadie pueda tropezar con
él ni pisarlo.
► Nunca toque la puerta de cristal ni la carcasa mientras el aparato
esté en uso, ya que podrían estar muy calientes. ¡Para prevenir
quemaduras, use una manopla o algo similar para abrir la puerta
de cristal !
► No toque nunca las varillas calefactoras ni la ventana durante
el funcionamiento ni antes de que el aparato se haya enfriado.
No introduzca la mano dentro del horno durante el funcionamiento. Espere a que el aparato se haya enfriado. De lo contrario,
podría quemarse.
► Después de su uso, deje que el aparato se enfríe antes de trans-
portarlo.
► Utilice siempre guantes o trapos de cocina para tocar el aparato.
¡Precaución! ¡Superfi cie caliente!
4
SGBR 1500 A1
Page 8

ATENCIÓN – ¡DAÑOS MATERIALES!
► No utilice ningún tipo de reloj programador externo ni sistema de
control remoto para accionar el aparato.
► No deje nunca el aparato desatendido durante su funcionamiento.
► Asegúrese de que el aparato, el cable de red o la clavija de red
no entren en contacto con fuentes de calor, como placas de
cocina o llamas abiertas.
► Utilice el aparato exclusivamente con los accesorios originales
suministrados.
► No doble ni aplaste el cable de red.
► Extraiga siempre el cable de red del enchufe tirando de la clavija
y nunca directamente del propio cable.
► Durante el funcionamiento, no debe haber materiales fácilmente
infl amables en las inmediaciones del horno con función de gratinado (p. ej., paños o guantes de cocina, etc.).
► No seque nunca tejidos ni objetos encima de, sobre o dentro del
aparato. ¡Existe peligro de incendio!
ES
SGBR 1500 A1
5
Page 9

Instalación
ES
¡ADVERTENCIA!
¡RIESGO DE INCENDIO!
► No coloque nunca el aparato bajo armarios
suspendidos ni junto a cortinas, par
armarios ni cualquier otro objeto infl amable.
► La distancia entre el aparato y cualquier
armario suspendido, cubiertas, par
elementos similares debe ser de un mínimo
de 10 cm en la parte superior y de 5 cm en
los laterales. Por ello, no debe instalarse el
aparato en el interior de armarios o similares.
De lo contrario, la ventilación del horno no
sería sufi ciente, lo que podría causar un
incendio o dañar el aparato.
► Instale exclusivamente el aparato sobre una
base termorresistente.
peligro de incendio y el aparato podría
dañarse. La zona bajo la base del aparato
puede decolorarse y dañarse. Además, si se
coloca el aparato sobre una superfi cie blanda, podrían producirse marcas permanentes
en la base.
¡PELIGRO DE DESCARGA ELÉCTRICA!
► No coloque el aparato en la proximidad
de agua, como, p. ej., cerca de fr
lavabos o en sótanos húmedos. De lo contrario, existe riesgo de descarga eléctrica.
■ Coloque el aparato sobre una superfi cie fi ja,
plana y termorresistente (p. ej., encimer
acero inoxidable o de piedra natural, como
el granito). Procure que haya una ventilación
sufi ciente alrededor del aparato.
■ Limpie todas las piezas tal y como se describe
en el capitulo "Limpieza y mantenimiento".
De lo contrario, existe
edes de
edes o
egaderos,
as de
Uso del aparato
Puerta de cristal
¡ATENCIÓN!
¡PELIGRO DE DAÑOS MATERIALES!
► No se apoye en la puerta de cristal 6.
No coloque ningún objeto sobre la puer
cristal 6. De lo contrario, podrían producirse
daños en las bisagras.
■ Si prepara alimentos con un contenido especial-
mente elev
más humo. En tal caso, no cierre completamente
la puerta de cristal 6, sino que deje abierta
una rendija:
La puerta de cristal 6 posee una posición de
encastre que permite dejar abierta una rendija:
Si cierra con cuidado la puerta de cristal 6,
quedará encastrada en esta posición justo antes
de cerrarse.
ado de grasa, es posible que se forme
Inserción de la bandeja para migas
■ Inserte la bandeja para migas 7 bajo las
varillas calefactoras inferiores 8 de forma que
quede colocada de forma plana sobre la base
del aparato.
ta de
6
SGBR 1500 A1
Page 10
Uso del espetón
¡ADVERTENCIA!
¡PELIGRO DE LESIONES!
► Utilice siempre el mango w para intr
el espetón z caliente en el aparato o para
o extraerlo.
■ Con los dos pinchos de sujeción t, puede
jarse el alimento al espetón z.
fi
Afl oje el elemento de fi jación r de los pinchos
de sujeción t, desplácelos de forma que el
alimento quede bien fi jo y vuelva a apretar el
elemento de fi jación r.
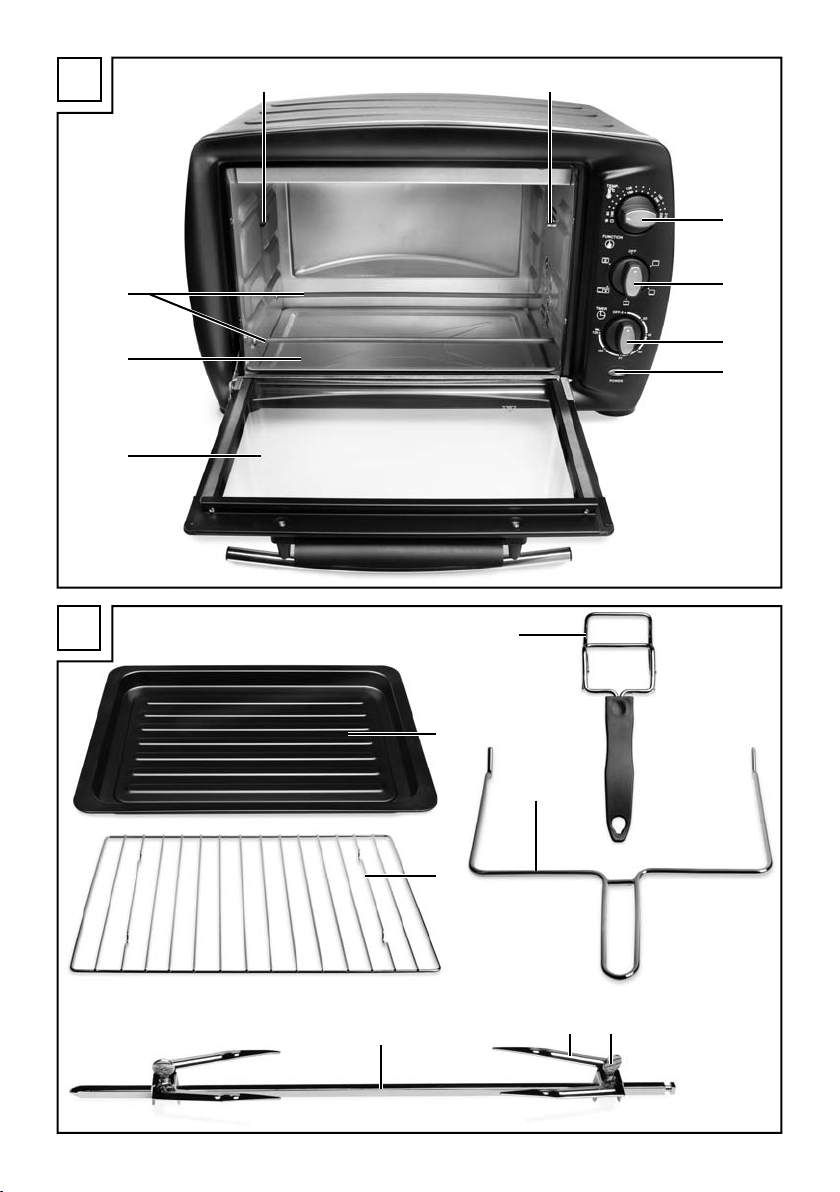
■ Introduzca primero el extremo del espetón z
sin muesca en el accionamiento 1 (fi g.
oducir
1):
INDICACIÓN
► Coloque siempre la bandeja de horno q en
el carril inferior cuando utilice el espetón z.
Así podrán r
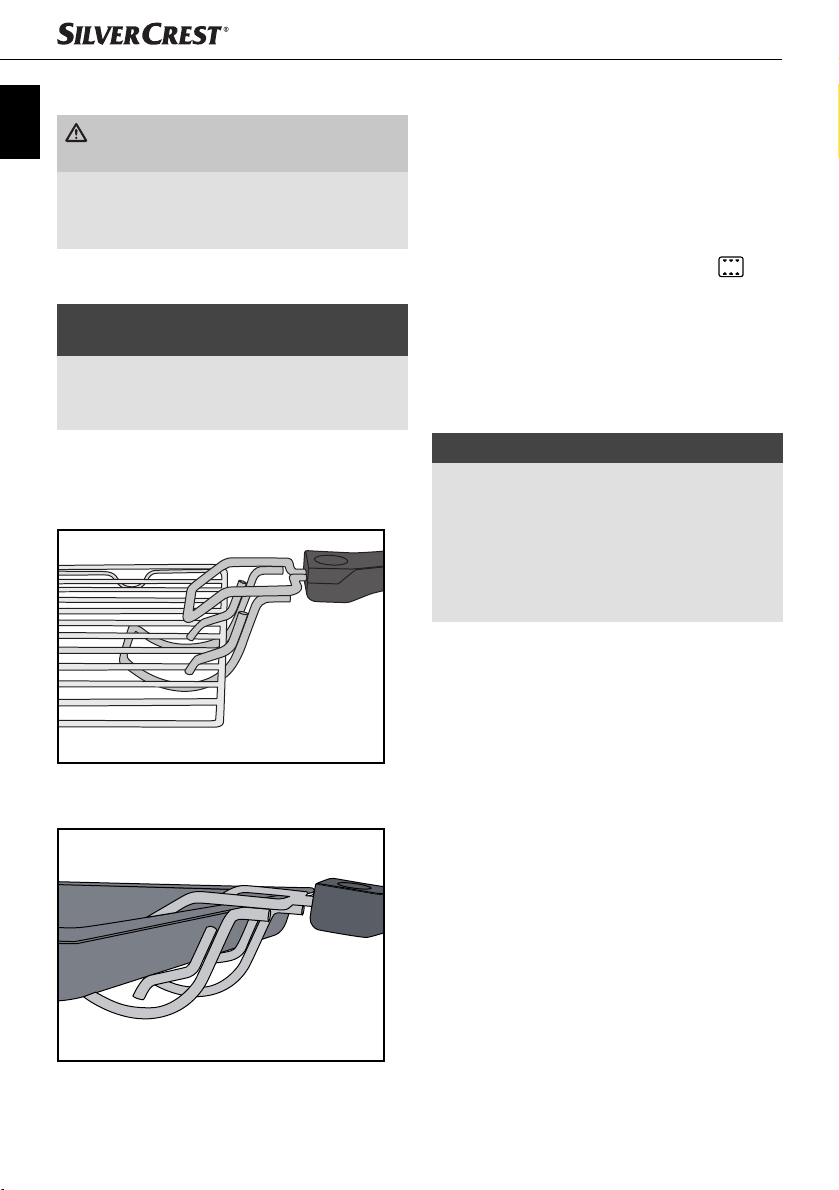
■ Para retirar el espetón z caliente, inserte los
ganchos del e
orifi cios del espetón z (fi g. 3):
Fig. 3: Enganche del mango w en el espetón z
ecogerse los líquidos que goteen.
xtremo del mango w en los
ES
Fig. 1: Introducción del espetón z en el acciona-
miento 1.
■ Tras esto, inserte ahora el otro extremo del espe-
tón z con la muesca profunda en el alojamiento
del espetón 9 (fi g. 2):
Fig. 2: Colocación del espetón z en el alojamiento
del espetón 9
SGBR 1500 A1
■ Eleve primero el lado izquierdo del espetón z
para e
xtraerlo del alojamiento del espetón 9
y retire el espetón z del accionamiento 1.
7
Page 11
Uso de la bandeja de horno/parrilla
ES
¡ADVERTENCIA!
¡PELIGRO DE LESIONES!
► Utilice siempre el mango 0 para inser
bandeja de horno q/parrilla e caliente
en el aparato o para extraerlas.
■ Inserte la bandeja de horno q/parrilla e en
uno de los 3 carriles del aparato.
¡ATENCIÓN!
¡PELIGRO DE DAÑOS MATERIALES!
► No coloque nunca la bandeja de horno q/
parrilla e directamente sobr
calefactoras 8.
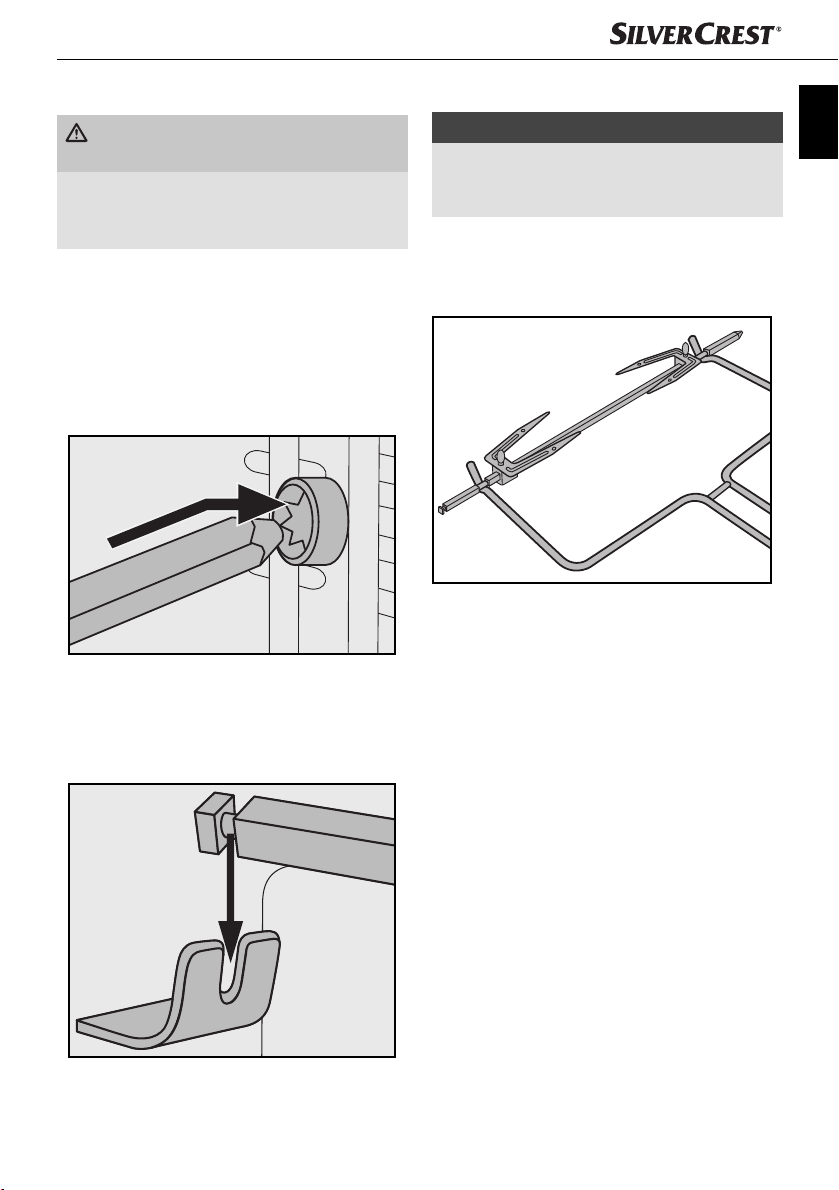
■ Para poder extraer la bandeja de horno q o
la parrilla e caliente, enganche el mango 0
de la siguiente manera:
Fig. 4: Enganche del mango 0 en la parrilla e
e las varillas
tar la
Antes del primer uso
1) Inserte la clavija de red en una base de
enchufe.
2) Gire el regulador de temperatura 2 hasta el
tope en sentido horario para ajustar la máxima
temperatura.
3) Gire el selector de función 3 para ajustar
la posición de "Calor arriba y abajo"
4) Abra la puerta de cristal 6 y déjela abierta
para este proceso.
5) Retire cualquier accesorio que haya en el
horno.
6) Gire el temporizador 4 y ajústelo en
20 minutos.
INDICACIÓN
► Al calentar el aparato por primera vez, es
posible que se genere un poco de humo
y olor debido a los r
fabricación. Esto es perfectamente normal e
inofensivo.
Procure que haya sufi ciente ventilación; por
ejemplo, abra una ventana.
El aparato se desconecta automáticamente
una vez transcurridos los 20 minutos.
Si desea interrumpir brevemente el proceso de
calentamiento, gire el regulador de temperatura 2 hasta el tope en sentido antihorario
y ajuste el temporizador 4 en la posición
“OFF - 0” (apagado).
7) Deje que el aparato se enfríe y límpielo de
la manera descrita en el capítulo “Limpieza
y mantenimiento”.
El aparato estará ahora listo para funcionar.
estos derivados de su
.
Fig. 5: Enganche del mango 0 en la bandeja de
horno q
8
SGBR 1500 A1
Page 12

Manejo del aparato
Selector de función
Con el selector de función 3, puede encender
el aparato y ajustar 5 funciones distintas:
Símbolo Signifi cado
"Calor arriba"
p. ej., para gratinados
"Calor abajo"
p. ej., para hornear tartas/
pasteles
"Calor arriba y abajo"
p. ej., para hornear pizzas
"Calor arriba y abajo/
ventilador/espetón"
p. ej., para hornear aves al
espetón
"Calor arriba y abajo/
ventilador"
p. ej., para hornear panecillos
OFF
Regulador de temperatura
Con el regulador de temperatura 2, puede ajustar
la temperatura deseada.
■ Para ajustar la temperatura de las funciones
"Calor arriba"
arriba y abajo" , utilice la escala indicada
con el símbolo " " como referencia.
■ Para ajustar la temperatura de las funciones
"Calor arriba y abajo/ventilador/espetón"
o "Calor arriba y abajo/ventilador" ,
utilice la escala indicada con el símbolo " "
como referencia.
"OFF": el aparato está
apagado
, "Calor abajo" o "Calor
Temporizador
Puede ajustar el tiempo de horneado deseado con
el temporizador 4.
■ Ajuste el temporizador 4 en el tiempo deseado.
T
ras fi nalizar el tiempo ajustado, se emite un
sonido y el aparato detiene el calentamiento.
Si se selecciona la función "Calor arriba y
abajo/ventilador/espetón"
detiene la rotación del espetón z.
, también se
Gratinado y horneado
1) Introduzca la bandeja para migas 7 en el
aparato.
2) Extraiga la parrilla e y la bandeja de horno q
del aparato. En caso necesario, cúbralas con
papel de horno o engrase la bandeja de
horno q.
INDICACIÓN
► Es posible que deba precalentarse el horno
según el plato que desee prepar
las instrucciones de la receta correspondiente.
El precalentamiento es especialmente necesario para lo siguiente:
– Tiempos de horneado muy cortos.
– Cortezas crujientes.
– Platos delicados que requieran una tem-
a constante, como, por ejemplo,
peratur
sufl és.
► Si no es necesario el precalentamiento, vaya
directamente al paso 3).
3)
Deje que el aparato alcance la temperatura
deseada durante aprox. 10 minutos (dependiendo del ajuste de temperatura):
– Seleccione la temperatura deseada con el
regulador de temper
de utilizar la escala correcta (consulte el
capítulo "Regulador de temperatura").
– A continuación, seleccione la función
deseada con el selector de función 3.
atura 2. Asegúrese
arse. Observe
ES
SGBR 1500 A1
9
Page 13

INDICACIÓN
ES
► Si selecciona la función con ventilador, por
norma general, puede pr
lentamiento del horno.
– Ajuste el tiempo de precalentamiento con
el temporizador 4 (apro
– Cierre la puerta de cristal 6.
4) Una v
INDICACIÓN
5) Cierre la puerta de cristal 6 antes de empezar
6) Ajuste el tiempo de horneado que desee por
INDICACIÓN
El piloto de control 5 indica que el aparato está
encendido. El interruptor del temporizador 4
se mueve ahora en sentido antihorario hacia la
posición "OFF - 0" (apagado).
ez transcurrido el tiempo, coloque los
alimentos en la parrilla e o la bandeja q e
insértela en uno de los carriles. Al hacerlo, procure mantener una distancia sufi ciente entre los
alimentos y las paredes interiores y las varillas
calefactoras del aparato.
► Si prepara un alimento que pueda gotear in-
tensamente sobre la parrilla e
bandeja de horno q en el carril inferior. De
este modo, puede recogerse, p. ej., la grasa
que gotee para después limpiar el aparato
con mayor facilidad.
a hornear los alimentos.
medio del temporizador 4. El tiempo máximo
de gratinado u horneado es de 120 minutos.
► Si el tiempo de horneado de los alimentos
es inferior a 20 minutos, ajuste primero el
temporizador
pués retroceder hasta el tiempo de horneado
deseado.
4 en 40 minutos para des-
escindirse del preca-
x. 10 minutos).
, introduzca la
El aparato se apaga automáticamente una vez
transcurrido el tiempo ajustado, se emite un sonido
y el piloto de control 5 se apaga.
INDICACIÓN
Si desea interrumpir brevemente el proceso
de calentamiento, gire el r
ratura 2 hasta el tope en sentido antihorario y
ajuste el temporizador 4 en la posición "OFF - 0"
(apagado).
7) Una vez fi nalizado el proceso de calentamiento,
retire la parrilla e y/o la bandeja de horno q
con el mango 0.
8) Ajuste el selector de función 3 en "OFF"
(apagado).
egulador de tempe-
Gratinado con espetón
1) Introduzca la bandeja para migas 7 en el
aparato.
2) Retire el espetón z del aparato si está en su
interior.
3) Coloque la bandeja de horno q en el carril
inferior.
4) Fije el alimento con los pinchos de sujeción t
en el espetón. Asegúrese de que el alimento
pueda girar libremente en el horno. Es posible
que el espetón z cambie la dirección de giro
si el alimento choca contra un obstáculo.
Los dos orifi cios del espetón z deben permanecer accesibles; de lo contrario, no podrá
engancharse el espetón z con el mango w.
5) Fije el espetón z en el horno (consulte el
capítulo "Uso del espetón").
6) Cierre la puerta de cristal 6.
10
SGBR 1500 A1
Page 14

INDICACIÓN
Si desea interrumpir brevemente el proceso
de calentamiento, gire el r
tura 2 hasta el tope en sentido antihorario
y ajuste el temporizador 4 en la posición
"OFF - 0" (apagado).
7) Ajuste el regulador de temperatura 2 en la
temperatura deseada.
8) Ajuste el selector de función 3 en "Calor arriba
y abajo/ventilador/espetón“
tiempo deseado con el temporizador 4.
El aparato inicia el proceso de horneado y
el espetón z comienza a girar.
El piloto de control 5 indica que el aparato está
encendido. El interruptor del temporizador 4
se mueve ahora en sentido antihorario hacia la
posición "OFF - 0" (apagado).
El aparato se apaga automáticamente una vez
transcurrido el tiempo ajustado, se emite un sonido
y el piloto de control 5 se apaga.
INDICACIÓN
Si desea interrumpir brevemente el proceso de
calentamiento, gire el r
ra 2 hasta el tope en sentido antihorario
y ajuste el temporizador 4 en la posición
"OFF - 0" (apagado).
9) Una vez fi nalizado el proceso de horneado,
extraiga el espetón z con el mango w.
10) Ajuste el selector de función 3 en "OFF"
(apagado).
egulador de tempera-
.Ajuste el
egulador de temperatu-
EJEMPLO: POLLO ASADO
Ingredientes
♦ Pollo entero (aprox. 1,3 kg, limpio)
♦ Condimentos (sal, pimentón)
♦ Aceite de cocina
1)
Condimente el pollo por dentr
con sal y pimentón. Unte el exterior del pollo
con aceite de cocina.
2) Introduzca el pollo en el espetón y fíjelo con
los pinchos de sujeción t. Procure que los
orifi cios del espetón z queden accesibles
para que pueda engancharse el mango w
en el espetón z. Según la forma del pollo,
es posible que deban fi jarse las alitas y los
muslos con una cuerda termorresistente para
que no obstaculicen el giro del espetón.
3) Coloque la bandeja de horno q en el carril
inferior.
4) Precaliente el horno durante aprox. 10 minutos con la función "Calor arriba y abajo/
ventilador"
5) Coloque el pollo ya insertado en el espetón
en el aparato con ayuda del mango w.
6) Ajuste el selector de función en "Calor arriba
y abajo/ventilador/espetón
la puerta.
7) Ajuste el temporizador 4 en aprox. 90 minutos. El tiempo de horneado puede variar
según el tamaño y la forma del pollo.
8) Engrase el pollo de vez en cuando con un
poco de aceite durante el horneado. Así la
piel quedará crujiente.
9) Una vez transcurrido el tiempo ajustado,
extraiga cuidadosamente el espetón con el
pollo con ayuda del mango w. Retire los
pinchos de sujeción t y extraiga el pollo
del espetón z.
a 210 °C.
o y por fuera
" y cierre
ES
SGBR 1500 A1
11
Page 15

Limpieza y mantenimiento
ES
¡PELIGRO DE DESCARGA ELÉCTRICA!
► ¡Antes de limpiar el aparato, extraiga siempre
la clavija de r
¡Existe riesgo de descarga eléctrica!
No sumerja nunca el aparato en agua ni
en otros líquidos.
¡ADVERTENCIA!
¡PELIGRO DE LESIONES!
► Deje que el aparato se enfríe antes de
limpiarlo. De lo contrario, e
quemaduras.
■ Limpie el aparato y los accesorios en cuanto se
hayan enfriado. Así, ser
restos de alimentos.
¡ATENCIÓN!
¡PELIGRO DE DAÑOS MATERIALES!
► No utilice productos de limpieza abrasivos
ni agresiv
► ¡No lave las piezas del aparato en el lava-
vajillas!
► No limpie el interior del horno con un spray
para hornos, y
podrán eliminarse los restos de las varillas
calefactoras.
ed de la base de enchufe!
á más fácil retirar los
os. ¡Podrían dañar la superfi cie!
a que, de lo contrario, no
xiste peligro de
■ Limpie el aparato con un paño húmedo. En
caso necesario, añada un producto de limpieza
suav
e en el paño y después frote el aparato con
un paño humedecido con agua limpia. Seque
todo bien.
■ Limpie el interior del horno y la puerta de cristal
6 con un paño húmedo. En caso necesario,
añada un producto de limpieza suav
paño y después frote el aparato con un paño
humedecido con agua limpia. Seque todo bien.
■ Limpie los mangos 0/w, el espetón z, los
pinchos de sujeción t, el elemento de fi
r, la bandeja de horno q, la parrilla e y la
bandeja para migas 7 con agua caliente y
con un producto de limpieza. Seque todas las
piezas adecuadamente después de la limpieza.
e en el
jación
Almacenamiento
■ Guarde el aparato limpio y sus accesorios en
un lugar limpio, seco y sin polvo.
12
SGBR 1500 A1
Page 16

Eliminación de fallos
Error Causa Solución
ES
La clavija de red no está conectada a la red
eléctrica.
El aparato no
funciona.
El piloto de
control 5 se ilumina,
pero el aparato no
se calienta.
Parece que el
horneado requiere
demasiado tiempo.
Durante el funciona-
miento, se genera
humo y se escuchan
ruidos anómalos.
Si no logra solucionar los fallos siguiendo las instrucciones de eliminación de fallos mencionadas o
comprueba la existencia de otras anomalías, póngase en contacto con nuestro servicio de asistencia
técnica.
La base de enchufe está defectuosa.
El aparato está defectuoso.
El selector de función 3 está en la posición
OFF (apagado).
Se ha abierto la puerta de cristal 6 con
demasiada frecuencia para comprobar el
progreso del horneado.
Se ha ajustado una temperatura inadecuada.
Hay restos de productos de limpieza o de
alimentos en las varillas calefactoras.
Inserte la clavija de red en una
base de enchufe.
Utilice una base de enchufe
distinta.
Póngase en contacto con el
servicio de asistencia técnica.
Ajuste el selector de función 3
en la función deseada.
No abra la puerta de cristal 6
con más frecuencia de la necesaria.
Compruebe el ajuste de la
temperatura.
Retire los alimentos del aparato
y continúe con el proceso de
horneado con la puerta de
cristal 6 abierta hasta que
desaparezca el humo.
SGBR 1500 A1
13
Page 17
Garantía y asistencia técnica
ES
Este aparato tiene 3 años de garantía desde la
fecha de compra. El aparato ha sido fabricado
cuidadosamente y examinado en profundidad
antes de su entrega. Guarde el comprobante de
caja como justifi cante de compra. Si necesitara
hacer uso de la garantía, póngase en contacto
por teléfono con su punto de servicio habitual.
Este es el único modo de garantizar un envío
gratuito.
La garantía cubre los defectos de fabricación o
del material, pero no los daños de transporte, las
piezas sujetas a desgaste ni los daños sufridos por
las piezas frágiles (p. ej., interruptores o pilas). Este
producto ha sido diseñado exclusivamente para el
uso particular y no para el uso industrial.
En caso de manipulación indebida e incorrecta, uso
de la fuerza y apertura del aparato por personas
ajenas a nuestros centros de asistencia técnica
autorizados, la garantía pierde su validez.
Sus derechos legales no se ven limitados por esta
garantía.
La duración de la garantía no se prolonga por hacer
uso de ella. Este principio rige también para las
piezas sustituidas y reparadas. Si después de
la compra del aparato, se detecta la existencia
de daños o de defectos al desembalarlo, deben
notifi carse de inmediato o, como muy tarde, dos
días después de la fecha de compra. Cualquier
reparación que se realice una vez fi nalizado el
plazo de garantía está sujeta a costes.
Desecho
No deseche nunca el aparato
con la basura doméstica.
Este aparato está sujeto a
la Directiva europea
2012/19/EU.
Deseche el aparato en un centro de residuos autorizado a través de las instalaciones de desecho de
residuos comunitarias. Observe las normas vigentes.
En caso de duda, póngase en contacto con las
instalaciones municipales de desecho de residuos.
El embalaje consta de materiales ecoló-
gicos que pueden desecharse a través
de los centros de reciclaje locales.
Importador
KOMPERNASS HANDELS GMBH
BURGSTRASSE 21
44867 BOCHUM
GERMANY
www.kompernass.com
Servicio España
Tel.: 902 59 99 22
(0,08 EUR/Min. + 0,11 EUR/llamada
(tarifa normal))
(0,05 EUR/Min. + 0,11 EUR/llamada
(tarifa reducida))
E-Mail: kompernass@lidl.es
IAN 102464
Disponibilidad de la línea de atención al
cliente:
de lunes a viernes de 8.00 a 20.00 h (CET)
14
SGBR 1500 A1
Page 18

Indice
Introduzione . . . . . . . . . . . . . . . . . . . . . . . . . . . . . . . . . . . . . . . . . . . . . . . . . . . . . . . . . .16
Uso conforme . . . . . . . . . . . . . . . . . . . . . . . . . . . . . . . . . . . . . . . . . . . . . . . . . . . . . . . . .16
Volume della fornitura . . . . . . . . . . . . . . . . . . . . . . . . . . . . . . . . . . . . . . . . . . . . . . . . . .16
Descrizione dell'apparecchio . . . . . . . . . . . . . . . . . . . . . . . . . . . . . . . . . . . . . . . . . . . . .16
Dati tecnici . . . . . . . . . . . . . . . . . . . . . . . . . . . . . . . . . . . . . . . . . . . . . . . . . . . . . . . . . . . .16
Indicazioni relative alla sicurezza . . . . . . . . . . . . . . . . . . . . . . . . . . . . . . . . . . . . . . . . .17
Installazione . . . . . . . . . . . . . . . . . . . . . . . . . . . . . . . . . . . . . . . . . . . . . . . . . . . . . . . . . .20
Utilizzo dell’apparecchio . . . . . . . . . . . . . . . . . . . . . . . . . . . . . . . . . . . . . . . . . . . . . . . .20
Sportello di vetro . . . . . . . . . . . . . . . . . . . . . . . . . . . . . . . . . . . . . . . . . . . . . . . . . . . . . . . . . . . . . . . . . . . 20
Inserimento del vassoio raccoglibriciole . . . . . . . . . . . . . . . . . . . . . . . . . . . . . . . . . . . . . . . . . . . . . . . . . 20
Utilizzo dello spiedo . . . . . . . . . . . . . . . . . . . . . . . . . . . . . . . . . . . . . . . . . . . . . . . . . . . . . . . . . . . . . . . . 21
Utilizzo della teglia da forno/griglia . . . . . . . . . . . . . . . . . . . . . . . . . . . . . . . . . . . . . . . . . . . . . . . . . . . . 22
Prima del primo impiego . . . . . . . . . . . . . . . . . . . . . . . . . . . . . . . . . . . . . . . . . . . . . . . .22
Utilizzo dell'apparecchio . . . . . . . . . . . . . . . . . . . . . . . . . . . . . . . . . . . . . . . . . . . . . . . .23
Commutatore di funzione . . . . . . . . . . . . . . . . . . . . . . . . . . . . . . . . . . . . . . . . . . . . . . . . . . . . . . . . . . . . 23
Regolatore della temperatura . . . . . . . . . . . . . . . . . . . . . . . . . . . . . . . . . . . . . . . . . . . . . . . . . . . . . . . . . 23
Timer . . . . . . . . . . . . . . . . . . . . . . . . . . . . . . . . . . . . . . . . . . . . . . . . . . . . . . . . . . . . . . . . . . . . . . . . . . . . 23
IT
MT
Cottura alla griglia e cottura al forno . . . . . . . . . . . . . . . . . . . . . . . . . . . . . . . . . . . . . .23
Cottura alla griglia con spiedo . . . . . . . . . . . . . . . . . . . . . . . . . . . . . . . . . . . . . . . . . . .24
Pulizia e manutenzione . . . . . . . . . . . . . . . . . . . . . . . . . . . . . . . . . . . . . . . . . . . . . . . . .26
Conservazione . . . . . . . . . . . . . . . . . . . . . . . . . . . . . . . . . . . . . . . . . . . . . . . . . . . . . . . .26
Eliminazione dei guasti . . . . . . . . . . . . . . . . . . . . . . . . . . . . . . . . . . . . . . . . . . . . . . . . .27
Garanzia e assistenza . . . . . . . . . . . . . . . . . . . . . . . . . . . . . . . . . . . . . . . . . . . . . . . . . .28
Smaltimento . . . . . . . . . . . . . . . . . . . . . . . . . . . . . . . . . . . . . . . . . . . . . . . . . . . . . . . . . .28
Importatore. . . . . . . . . . . . . . . . . . . . . . . . . . . . . . . . . . . . . . . . . . . . . . . . . . . . . . . . . . .28
SGBR 1500 A1
15
Page 19

Introduzione
Congratulazioni per l'acquisto del Suo nuovo
apparecchio.
È stato acquistato un prodotto di alta qualità.
IT
Il manuale di istruzioni è parte integrante del pre-
MT
sente prodotto. Esso contiene importanti indicazioni
per la sicurezza, l'uso e lo smaltimento. Prima di
utilizzare il prodotto, familiarizzarsi con tutte le
indicazioni relative ai comandi e alla sicurezza.
Utilizzare l'apparecchio solo come descritto e per
i campi d'impiego indicati. In caso di cessione del
prodotto a terze persone, consegnare anche tutta
la relativa documentazione.
Descrizione dell'apparecchio
Figura A:
1 Azionamento
2 Regolatore della temperatura
3 Commutatore di funzione
4 Timer
5 Spia di controllo
6 Sportello di vetro
7 Vassoio raccoglibriciole inserito
8 Elementi riscaldanti inferiori
9 Vano di ricezione dello spiedo
Uso conforme
Il forno elettrico con grill serve esclusivamente
a scaldare, cuocere e grigliare pietanze.
Questo apparecchio è destinato esclusivamente
all'uso in ambienti domestici. Non utilizzarlo per
fi ni commerciali.
Qualsiasi altro impiego viene considerato non
conforme e può dare luogo a danni a cose o a
persone.
Volume della fornitura
♦ Forno elettrico con grill
♦ 1 teglia forno
♦ 1 griglia
♦ 2 pinze
♦ Spiedo con 2 morsetti
♦ 1 vassoio raccoglibriciole
♦ Istruzioni per l'uso
AVVERTENZA
Subito dopo aver disimballato il prodotto, con-
e che sia completo e integro. Se necessario,
trollar
rivolgersi al servizio clienti.
Figura B:
0 Pinza (per teglia da forno e griglia)
q Teglia da forno
w Pinza (per spiedo)
e Griglia
r Dispositivo di bloccaggio
t Morsetti spiedo
z Spiedo
Dati tecnici
Tensione nominale: 220 - 240 V ~,
50/60 Hz
Potenza max. assorbita: 1500 W
16
SGBR 1500 A1
Page 20

Indicazioni relative alla sicurezza
PERICOLO DI SCOSSA ELETTRICA!
► Non è consentito aprire l'alloggiamento dell'apparecchio o tentare
di ripararlo. Aprendolo ci si espone a pericoli e la garanzia decade. Fare riparare l'apparecchio guasto solo dal rivenditore o da
personale specializzato autorizzato.
► Al fi ne di evitare pericoli, fare sostituire immediatamente spine o
cavi danneggiati da personale specializzato autorizzato o dal
centro di assistenza clienti.
► Impedire la penetrazione di liquidi nell'involucro dell'apparecchio.
Non esporre l'apparecchio all'umidità e non utilizzarlo all'aperto.
Non collocare, inoltre, sull'apparecchio oggetti pieni di liquidi,
come ad es. vasi. Sussiste pericolo di incendio e di scossa elettrica!
In caso di infi ltrazioni di liquidi nell'alloggiamento dell'apparecchio,
staccare subito la spina dalla presa di rete e farlo riparare.
► Non toccare mai l'apparecchio, il cavo di rete e la spina di rete
con le mani umide. In caso contrario sussiste il pericolo di scossa
elettrica.
IT
MT
Non immergere mai l'apparecchio in acqua o altri liquidi! Può
sussistere pericolo di morte a causa di folgorazione in caso di
contatto di liquidi con parti sotto tensione dell'apparecchio in
funzione.
SGBR 1500 A1
17
Page 21

IT
MT
AVVERTENZA – PERICOLO DI LESIONI!
► Questo apparecchio può essere utilizzato dai bambini di almeno
8 anni di età e da persone con capacità fi siche, sensoriali o mentali
ridotte o insuffi ciente esperienza o conoscenza, solo se sorvegliati
o istruiti sull'uso sicuro dell'apparecchio e qualora ne abbiano
compreso i pericoli associati.
► I bambini non devono giocare con l'apparecchio.
► La pulizia e la manutenzione a cura dell'utente non devono essere
eseguite da bambini, a meno che non abbiano almeno 8anni
di età e siano sorvegliati.
► Tenere lontani dall'apparecchio e dal cavo di allacciamento i
bambini di età inferiore agli 8 anni.
► Collocare il cavo di rete in modo che non venga calpestato o
costituisca intralcio.
► Non toccare mai lo sportello di vetro o l'alloggiamento durante
l'uso, poiché tali superfi ci sono surriscaldate. Per aprire lo sportello di vetro usare una presina o simili per evitare scottature!
► Non toccare mai gli elementi riscaldanti o l'apertura d'ispezione
nello sportello durante il funzionamento o prima che l'apparecchio
si sia raff reddato. Durante il funzionamento non introdurre le
mani nel vano di cottura. Attendere il completo raff reddamento
dell'apparecchio. In caso contrario sussiste il rischio di ustioni.
► Prima di trasportare l'apparecchio, farlo raff reddare dopo l'uso.
► Quando si maneggia l'apparecchio bollente, utilizzare sempre
guanti o da cucina o presine.
Attenzione! Superfi cie rovente!
18
SGBR 1500 A1
Page 22

ATTENZIONE – DANNI MATERIALI!
► Non utilizzare timer esterni o un sistema di telecomando separato
per azionare l'apparecchio.
► Non lasciare mai l'apparecchio incustodito durante l'uso.
► Assicurarsi che l'apparecchio, il cavo di rete o la spina non
vengano mai a contatto con sorgenti di calore come piastre di
cottura o fi amme libere.
► Usare l'apparecchio solo con gli accessori originali forniti in
dotazione.
► Non piegare né schiacciare il cavo di alimentazione.
► Per disinserire la spina dalla presa, tirare sempre dalla spina,
mai dal cavo.
► Durante il funzionamento non devono trovarsi materiali facilmente
infi ammabili nelle immediate vicinanze del forno elettrico con grill
(ad es. canovaccio da cucina, presine, ecc.).
► Non asciugare mai tessuti né oggetti sopra o dentro l'apparecchio.
Sussiste pericolo di incendio.
IT
MT
SGBR 1500 A1
19
Page 23

Installazione
Utilizzo dell’apparecchio
IT
MT
ATTENZIONE! PERICOLO D'INCENDIO!
► Non collocare mai l'apparecchio sotto pensili
o accanto a tendine, pareti di armadi o altri
oggetti infi
► La distanza dell'apparecchio da pensili, soffi tto,
pareti o simili de
10 cm e lateralmente di 5 cm per lato.
Per questa ragione l'apparecchio non può
essere collocato in armadi o similari. In caso
contrario non è possibile ventilare adeguatamente l'apparecchio e quest'ultimo potrebbe
provocare un incendio o subire danni.
► Collocare l'apparecchio solo su un supporto
resistente al calor
di incendio e l'apparecchio potrebbe subire
danni. La zona sotto il fondo dell'apparecchio
potrebbe cambiare colore o danneggiarsi.
In presenza di una base morbida possono
rimanere impronte durature nella base.
PERICOLO DI FOLGORAZIONE!
► Non collocare l'apparecchio nelle immediate
vicinanze di acqua, ad es. di lav
o in cantine umide. In caso contrario sussiste
pericolo di scossa elettrica.
■ Collocare l'apparecchio su una superfi cie stabile,
piana e termoresistente (per es. piani di lav
in acciaio inox o piani di lavoro in pietra naturale
come granito). Provvedere affi nché l'apparecchio
sia suffi cientemente ventilato lungo tutto il suo
perimetro.
■ Pulire tutti i componenti dell'apparecchio, così come
descritto al capitolo "Pulizia e manutenzione".
ammabili.
ve essere verso l'alto di almeno
e. Altrimenti sussiste pericolo
elli, vaschette
oro
Sportello di vetro
ATTENZIONE!
PERICOLO DI DANNI MATERIALI!
► Non appoggiarsi sullo sportello di vetro 6.
Non appoggiare oggetti sullo spor
vetro 6. Ciò provoca danni alle cerniere.
■ In caso di cottura di alimenti grassi, si può svi-
luppare un quantitativ
cuo. In tal caso, non chiudere completamente lo
sportello di vetro 6, bensì lasciarlo leggermente
aperto:
Lo sportello di vetro 6 è dotato di una posizione di arresto, può quindi rimanere leggermente
aperto: se si chiude lo sportello di vetro 6 con
cautela, questo scatta automaticamente in questa posizione poco prima della chiusura.
o di fumo piuttosto cospi-
tello di
Inserimento del vassoio
raccoglibriciole
■ Infi lare il vassoio raccoglibriciole 7 sotto gli
elementi riscaldanti inferiori 8 in modo tale
che poggi piatto sul fondo dell'apparecchio.
20
SGBR 1500 A1
Page 24

Utilizzo dello spiedo
ATTENZIONE! PERICOLO DI LESIONI!
► Per inserire lo spiedo bollente z nell'appa-
recchio o per estr
sempre la pinza w.
■ Con i due morsetti dello spiedo t si può fi
la pietanza allo spiedo z.
Sbloccare i dispositivi di bloccaggio r dei
morsetti dello spiedo t, spostate questi ultimi in
modo tale che gli alimenti rimangano bloccati in
mezzo e riavvitare i dispositivi di bloccaggio r.
■ Infi lare nell'azionamento 1 prima l'estremità
dello spiedo
Fig. 1: Infi lare lo spiedo z nell'azionamento 1.
■ Inserire poi l'altra estremità dello spiedo z,
quella con la scanalatura pr
di ricezione dello spiedo 9 (fi g. 2):
arlo da esso, utilizzare
ssare
z senza scanalatura (fi g. 1):
ofonda, nel vano
AVVERTENZA
► Quando si utilizza lo spiedo z, infi
sempre la teglia da forno q nella guida
inferiore. In tal modo il sugo che cola viene
raccolto.
■ Per prelevare lo spiedo bollente z, introdurr
il gancio presente sull'estremità della pinza w
negli avvallamenti dello spiedo z (fi g. 3):
Fig. 3: Aggancio della pinza w allo spiedo z
■ Estrarre dapprima il lato sinistro dello spiedo z
dal suo vano di ricezione 9
tirare fuori lo spiedo z dall'azionamento 1.
lare
sollevandolo, poi
IT
MT
e
Fig. 2: Inserire lo spiedo z nel vano di ricezione
dello spiedo 9
SGBR 1500 A1
21
Page 25

Utilizzo della teglia da forno/griglia
ATTENZIONE! PERICOLO DI LESIONI!
IT
MT
► Per inserire nell'apparecchio o estrarre da
esso la teglia da forno bollente q/la griglia
bollente e, utilizzare sempr
■ Infi lare la teglia da forno q/la griglia e in
una delle 3 guide presenti nel v
dell'apparecchio.
ATTENZIONE!
PERICOLO DI DANNI MATERIALI!
► Non appoggiare mai la teglia da forno q/
la griglia e direttamente sugli elementi
riscaldanti 8.
■ Per poter prelevare la teglia da forno bollente q
o la griglia bollente e agganciare la pinza
come descritto qui di seguito:
Fig. 4: Aggancio della pinza 0 alla griglia e
e la pinza 0.
ano interno
Prima del primo impiego
1) Inserire la spina in una presa di corrente.
2) Ruotare il regolatore della temperatura 2 in
senso orario fi no al fermo per raggiungere la
temperatura massima.
3) Posizionare il commutatore di funzione 3 su
"Calore superiore e inferiore"
4) Aprire lo sportello di vetro 6 e lasciarlo aperto
per questa operazione.
5) Prelevare dal vano interno dell'apparecchio accessori che sono stati eventualmente introdotti.
6) Ruotare il timer 4 portandolo su 20 minuti.
AVVERTENZA
► Nel corso del primo riscaldamento dell’ap-
0
parecchio, può v
zione di odore e di fumo, dovuta ai resti di
lavorazione. Si tratta di un evento normale e
completamente innocuo.
Provvedere a un’aerazione suffi ciente, aprendo
ad esempio una fi nestra.
L'apparecchio si spegne automaticamente
dopo 20 minuti.
Se si desidera interrompere precocemente il
processo di riscaldamento, ruotare il regolatore
della temperatura 2 in senso antiorario fi no al
fermo e portare il timer 4 su "OFF - 0".
7) Fare raff reddare l'apparecchio e pulirlo come
descritto al capitolo "Pulizia e manutenzione".
L'apparecchio è pronto per l'uso.
erifi carsi una leggera forma-
.
Fig. 5: Aggancio della pinza 0 alla teglia da
forno q
22
SGBR 1500 A1
Page 26

Utilizzo dell'apparecchio
Commutatore di funzione
Sul commutatore di funzione 3 si può sia accendere
l'apparecchio sia impostare 5 diverse funzioni.
Simbolo Signifi cato
"Calore superiore"
per es. per dorare
Timer
Con l'ausilio del timer 4 si può impostare il tempo
di cottura:
■ Impostare il timer 4 sul tempo di cottura deside-
r
ato. Alla scadenza del tempo impostato viene
emesso un segnale acustico e l'apparecchio
cessa di riscaldare.
Qualora fosse selezionata la funzione "Calore
superiore e inferiore/ventilazione/spiedo"
si ferma anche la rotazione dello spiedo z.
IT
MT
"Calore inferiore"
per es. per cuocere dolci
"Calore superiore e inferiore"
per es. per cuocere la pizza
"Calore superiore e inferiore/
ventilazione/spiedo"
per es. per cuocere pollame
alla griglia
"Calore superiore e inferiore/
ventilazione"
per es. per cuocere panini
OFF "OFF": l'apparecchio è spento
Regolatore della temperatura
Con il regolatore di temperatura 2 si può impostare
la temperatura desiderata.
■ Quando si imposta la temperatura per le fun-
zioni "Calore superior
o "Calore superiore e inferiore" , basarsi
sulla scala contrassegnata con " ".
■ Quando si imposta la temperatura per le funzio-
ni "Calore superior
spiedo" o "Calore superiore e inferiore/
ventilazione" , basarsi sulla scala contrassegnata con " ".
e"
, "Calore inferiore"
e e inferiore/ventilazione/
Cottura alla griglia e cottura
al forno
1) Introdurre il vassoio raccoglibriciole 7 nel-
l'apparecchio.
2) Estrarre la griglia e e la teglia forno q
dall'apparecchio. Coprire all'occorrenza la
griglia con carta forno o rispettivamente imburrare la teglia da forno q con grasso adatto
alla cottura al forno.
AVVERTENZA
► A seconda della ricetta potrebbe essere
necessario preriscaldar
a quanto prescritto nella relativa ricetta. Il
preriscaldamento è sicuramente opportuno
nei seguenti casi:
– tempi di cottura molto brevi,
– croste croccanti,
– piatti sensibili che richiedono una tempe-
a costante, come per esempio suffl è.
ratur
► Se il preriscaldamento non è necessario,
saltare l'oper
3) Far riscaldare l'apparecchio per circa 10 minuti
(in funzione della temperatura impostata) fi no
al raggiungimento della temperatura desiderata:
– Selezionare la temperatura desiderata con
il regolator
utilizzare la scala corretta (vedi capitolo
"Regolatore della temperatura").
– Infi ne selezionare con il commutatore di
funzione 3 la funzione desiderata.
azione 3).
e di temperatura 2. Badare di
e il forno. Attenersi
SGBR 1500 A1
23
Page 27

AVVERTENZA
► In caso venisse selezionata la funzione con
ventilazione, di solito non è necessario pr
IT
MT
scaldare il forno elettrico con grill.
– Con il timer 4 impostare la dur
preriscaldamento (circa 10 minuti).
– Chiudere lo sportello di vetro 6.
4) Una v
AVVERTENZA
5) Prima di avviare la cottura al forno/al grill,
6) Con il timer 4 impostare il tempo di cottura
AVVERTENZA
La spia di controllo 5 indica che l'apparecchio è
acceso. L'interruttore del timer 4 si sposta quindi
in senso antiorario su "OFF - 0".
olta trascorso il tempo impostato, posizionare la pietanza da grigliare o cuocere sulla griglia e o sulla teglia q e infi larla in una
delle guide. Prestare attenzione che vi sia una
distanza suffi ciente degli alimenti da cuocere
al forno o grigliare dalle pareti interne e dagli
elementi riscaldanti dall'apparecchio.
► Se si preparano alimenti gocciolanti sulla
griglia e, inserire la teglia forno q
guida più in basso. In tal modo, ad esempio,
il grasso che gocciola verrà raccolto e in
seguito sarà più facile pulire l'apparecchio.
chiudere lo sportello di vetro 6.
alla griglia/al forno desiderato. Il tempo max
di cottura al forno e al grill è di 120 minuti.
► Se il tempo di cottura della pietanza alla
griglia o al forno è inferiore a 20 minuti,
e dapprima il timer 4 su 40 minuti
impostar
e poi tornare indietro al tempo di cottura al
forno/alla griglia desiderato.
ata del
nella
eri-
Alla scadenza del tempo impostato l'apparecchio
si spegne automaticamente, viene emesso un segnale acustico e la spia di controllo 5 si spegne.
AVVERTENZA
Se si desidera interrompere precocemente il
processo di riscaldamento, ruotar
della temperatura 2 in senso antiorario fi no al
fermo e portare il timer 4 su "OFF - 0".
7) Dopo il processo di riscaldamento prelevare
la griglia e o rispettivamente la teglia da
forno q con l'ausilio della pinza 0.
8) Posizionare il commutatore di funzione 3 su
"OFF".
e il regolatore
Cottura alla griglia con spiedo
1) Introdurre il vassoio raccoglibriciole 7 nel-
l'apparecchio.
2) Se lo spiedo z si trova dentro l'apparecchio,
rimuoverlo.
3) Infi lare la teglia da forno q nella guida più
in basso.
4) Fissare la pietanza con i morsetti dello spiedo t.
Badare che la pietanza si possa girare nel
vano di cottura senza scontrarsi con le sue pareti. Potrebbe capitare che lo spiedo z cambi
il senso di rotazione se la pietanza si scontra
con una resistenza. I due avvallamenti che si
trovano sullo spiedo z devono rimanere liberamente accessibili, altrimenti non è più possibile
aff errare lo spiedo z con la pinza w.
5) Fissare lo spiedo z nel vano di cottura (vedi
capitolo "Utilizzo dello spiedo").
6) Chiudere lo sportello di vetro 6.
24
SGBR 1500 A1
Page 28

AVVERTENZA
Se si desidera interrompere precocemente il
processo di riscaldamento, ruotar
della temperatura 2 in senso antiorario fi no al
fermo e portare il timer 4 su "OFF - 0".
7) Impostare la temperatura con il regolatore
della temperatura 2.
8) Portare il commutatore di funzione 3 su
"Calore superiore e inferiore/ventilazione/
spiedo
di cottura alla griglia desiderato.
L'apparecchio avvia la cottura alla griglia e
lo spiedo z ruota.
La spia di controllo 5 indica che l'apparecchio è
acceso. L'interruttore del timer 4 si sposta quindi
in senso antiorario su "OFF - 0".
Alla scadenza del tempo impostato l'apparecchio
si spegne automaticamente, viene emesso un segnale acustico e la spia di controllo 5 si spegne.
AVVERTENZA
Se si desidera interrompere precocemente il
processo di riscaldamento, ruotar
della temperatura 2 in senso antiorario fi no al
fermo e portare il timer 4 su "OFF - 0".
9) Dopo la cottura alla griglia prelevare lo
spiedo z con l'ausilio della pinza w.
10) Posizionare il commutatore di funzione 3 su
"OFF".
".Impostare sul timer 4 il tempo
e il regolatore
e il regolatore
ESEMPIO GALLETTO ALLA GRIGLIA
Ingredienti
♦ Galletto (ca. 1,3 kg, sventrato)
♦ Spezie (sale, peperoncino)
♦ Olio da cucina
1)
Speziar
e il galletto all'interno e all'esterno
con sale e peperoncino in polvere. Spennellare l'interno e l'esterno del galletto con olio
da cucina resistente ad alte temperature.
2) Infi lare il galletto sullo spiedo e fi ssarlo con
i morsetti dello spiedo t. Nel far questo
badare che gli avvallamenti dello spiedo z
rimangano liberi, in modo tale che si possa
aff errare lo spiedo z con la pinza w.
A seconda della forma del galletto, potrebbe
essere necessario fi ssare le ali e le cosce
con un fi lo pirofi lo affi nché esse durante la
rotazione non si scontrino con i lati del vano
di cottura.
3) Infi lare la teglia da forno q nella guida più
in basso.
4) Preriscaldare l'apparecchio per circa 10
minuti con la funzione "Calore superiore e
inferiore/ventilazione"
5) Introdurre il grilletto allo spiedo nell'apparecchio con l'ausilio della pinza w.
6) Portare il commutatore di funzione su "Calore
superiore e inferiore/ventilazione/spiedo
" e chiudere lo sportello.
7) Impostare il timer 4 su circa 90 minuti.
Il tempo di cottura può variare a seconda
delle dimensioni e della costituzione del
galletto.
8) Di tanto in tanto spennellare il galletto con
un po' di olio da cucina. Così diventa ben
croccante.
9) Alla scadenza del tempo impostato prelevare
con cautela lo spiedo con il galletto con
l'ausilio della pinza w. Sbloccare i morsetti
dello spiedo t e sfi lare il galletto dallo
spiedo z.
a circa 210°C.
IT
MT
SGBR 1500 A1
25
Page 29

Pulizia e manutenzione
PERICOLO DI FOLGORAZIONE!
IT
MT
► Prima della pulizia staccare sempre la spina
dalla presa di r
scossa elettrica!
Non immergere mai l'apparecchio in acqua
o altri liquidi!
ATTENZIONE! PERICOLO DI LESIONI!
► Fare sempre raff reddare l'apparecchio prima
di pulirlo. In caso contrario, si corr
di ustioni!
■ Si consiglia di pulire l'apparecchio e gli acces-
sori appena si sono raff
è possibile rimuovere facilmente i residui di
alimenti.
ATTENZIONE!
PERICOLO DI DANNI MATERIALI!
► Non utilizzare detergenti abrasivi o aggressivi.
trebbero danneggiare la superfi cie!
Po
► Non pulire i componenti dell'apparecchio
nella lavasto
► Non pulire il vano di cottura con uno spray
per forno, in quanto altrimenti non è più
possibile rimuov
sugli elementi riscaldanti.
ete! Sussiste il pericolo di
viglie!
ere i resti di pietanza rimasti
e il rischio
reddati. In tal modo
■ Pulire l'apparecchio con un panno umido. In
caso di necessità, applicare sul panno qualche
goccia di deter
la superfi cie con un panno inumidito di acqua
pulita. Asciugare tutto accuratamente.
■ Pulire il vano di cottura e lo sportello di vetro 6
con un panno umido. In caso di necessità, applicare sul panno qualche goccia di deter
delicato e risciacquare poi la superfi cie con un
panno inumidito di acqua pulita. Asciugare tutto
accuratamente.
■ Pulire le pinze 0/w, lo spiedo z, i morsetti
dello spiedo
la teglia da forno q, la griglia e e il vassoio
raccoglibriciole 7 in acqua calda. Dopo la pulizia, asciugare accuratamente tutti i componenti.
gente delicato e risciacquare poi
gente
t, i dispositivi di bloccaggio r,
Conservazione
■ Riporre l'apparecchio pulito e i suoi accessori
in un luogo pulito, privo di polvere e asciutto.
26
SGBR 1500 A1
Page 30

Eliminazione dei guasti
Guasto Causa Soluzione
La spina di rete non è collegata alla rete di
corrente.
L'apparecchio non
funziona.
La spia di
controllo 5 è accesa
ma l'apparecchio
non si riscalda.
Il tempo di cottura
delle pietanze sem-
bra essere
molto lungo.
Durante l'utilizzo
fuoriescono fumo
e odore.
Qualora i guasti non potessero venire risolti con i rimedi indicati sopra o si riscontrassero altri tipi di
guasti, rivolgersi all'assistenza.
La presa di corrente è guasta.
L'apparecchio è guasto. Rivolgersi al servizio clienti.
Il commutatore di funzione 3 si trova su
OFF.
Lo sportello di vetro 6 è stato aperto
diverse volte per controllare il progredire
della cottura.
È stata impostata una temperatura sbagliata.
Sugli elementi riscaldanti si trovano resti di
detergente o di alimenti.
Inserire la spina in una presa di
corrente.
Utilizzare un'altra presa di
corrente.
Posizionare il commutatore
di funzione 3 sulla funzione
desiderata.
Non aprire lo sportello di vetro 6
più del necessario.
Controllare l'impostazione della
temperatura.
Rimuovere gli alimenti dall'apparecchio e proseguire la cottura a
sportello di vetro aperto 6 fi no a
quando il fumo non è scomparso.
IT
MT
SGBR 1500 A1
27
Page 31

Garanzia e assistenza
Questo apparecchio è garantito per tre anni a
partire dalla data di acquisto. L'apparecchio è
stato prodotto con cura e debitamente collaudato
IT
prima della consegna. Conservare lo scontrino
MT
come prova di acquisto. Nei casi contemplati
dalla garanzia, mettersi in comunicazione telefonicamente con il centro di assistenza più vicino.
Solo in tal modo è possibile garantire una spedizione gratuita della merce.
La garanzia vale solo per difetti del materiale o di
fabbricazione, ma non per i danni da trasporto,
danni alle parti soggette a usura o alle parti fragili,
come per es. interruttori o accumulatori. Il prodotto
è destinato esclusivamente all'uso domestico e non
a quello commerciale.
La garanzia decade in caso di impiego improprio
o manomissione, uso della forza e interventi non
eseguiti dalla nostra fi liale di assistenza autorizzata.
Questa garanzia non costituisce alcun limite ai
diritti legali del consumatore.
Il periodo di garanzia non viene prolungato da
interventi in garanzia. Ciò vale anche per le parti
sostituite e riparate. I danni e difetti eventualmente
presenti già all'atto dell'acquisto devono venire
comunicati immediatamente dopo il disimballo, e
comunque entro e non oltre due giorni dalla data
di acquisto. Le riparazioni eseguite dopo la scadenza del periodo di garanzia sono a pagamento.
Assistenza Italia
Tel.: 02 36003201
E-Mail: kompernass@lidl.it
IAN 102464
Assistenza Malta
Tel.: 80062230
E-Mail: kompernass@lidl.com.mt
IAN 102464
Raggiungibilità della hotline:
dal lunedì al venerdì, dalle 8.00 alle 20.00 (CET)
Smaltimento
Non smaltire per alcun motivo
l'apparecchio assieme ai
normali rifi uti domestici.
Questo prodotto è soggetto
alla Direttiva Europea
2012/19/EU-RAEE.
Smaltire l'apparecchio attraverso un'azienda di
smaltimento autorizzata o attraverso l'ente di smaltimento comunale. Rispettare le norme attualmente
in vigore. In caso di dubbi mettersi in contatto con
l'ente di smaltimento competente.
L'imballaggio è costituito da materiali
ecocompatibili che possono venire
smaltiti tramite gli appositi centri di
raccolta e riciclaggio.
Importatore
KOMPERNASS HANDELS GMBH
BURGSTRASSE 21
44867 BOCHUM
GERMANY
www.kompernass.com
28
SGBR 1500 A1
Page 32

Contents
Introduction . . . . . . . . . . . . . . . . . . . . . . . . . . . . . . . . . . . . . . . . . . . . . . . . . . . . . . . . . . .30
Proper use . . . . . . . . . . . . . . . . . . . . . . . . . . . . . . . . . . . . . . . . . . . . . . . . . . . . . . . . . . . .30
Package contents . . . . . . . . . . . . . . . . . . . . . . . . . . . . . . . . . . . . . . . . . . . . . . . . . . . . . .30
Appliance description . . . . . . . . . . . . . . . . . . . . . . . . . . . . . . . . . . . . . . . . . . . . . . . . . . .30
Technical data . . . . . . . . . . . . . . . . . . . . . . . . . . . . . . . . . . . . . . . . . . . . . . . . . . . . . . . . .30
Safety instructions . . . . . . . . . . . . . . . . . . . . . . . . . . . . . . . . . . . . . . . . . . . . . . . . . . . . .31
Setting up . . . . . . . . . . . . . . . . . . . . . . . . . . . . . . . . . . . . . . . . . . . . . . . . . . . . . . . . . . . .34
Using the appliance . . . . . . . . . . . . . . . . . . . . . . . . . . . . . . . . . . . . . . . . . . . . . . . . . . . .34
Glass door . . . . . . . . . . . . . . . . . . . . . . . . . . . . . . . . . . . . . . . . . . . . . . . . . . . . . . . . . . . . . . . . . . . . . . . . 34
Inserting the crumb tray . . . . . . . . . . . . . . . . . . . . . . . . . . . . . . . . . . . . . . . . . . . . . . . . . . . . . . . . . . . . . . 34
Using the rotisserie . . . . . . . . . . . . . . . . . . . . . . . . . . . . . . . . . . . . . . . . . . . . . . . . . . . . . . . . . . . . . . . . . . 35
Using the baking tray/rack . . . . . . . . . . . . . . . . . . . . . . . . . . . . . . . . . . . . . . . . . . . . . . . . . . . . . . . . . . . 36
Before fi rst use . . . . . . . . . . . . . . . . . . . . . . . . . . . . . . . . . . . . . . . . . . . . . . . . . . . . . . . .36
Operating the appliance . . . . . . . . . . . . . . . . . . . . . . . . . . . . . . . . . . . . . . . . . . . . . . . .37
Function switch . . . . . . . . . . . . . . . . . . . . . . . . . . . . . . . . . . . . . . . . . . . . . . . . . . . . . . . . . . . . . . . . . . . . . 37
Temperature control . . . . . . . . . . . . . . . . . . . . . . . . . . . . . . . . . . . . . . . . . . . . . . . . . . . . . . . . . . . . . . . . . 37
Timer . . . . . . . . . . . . . . . . . . . . . . . . . . . . . . . . . . . . . . . . . . . . . . . . . . . . . . . . . . . . . . . . . . . . . . . . . . . . 37
GB
MT
Grilling and baking . . . . . . . . . . . . . . . . . . . . . . . . . . . . . . . . . . . . . . . . . . . . . . . . . . . .37
Grilling with the rotisserie . . . . . . . . . . . . . . . . . . . . . . . . . . . . . . . . . . . . . . . . . . . . . . .38
Cleaning and care . . . . . . . . . . . . . . . . . . . . . . . . . . . . . . . . . . . . . . . . . . . . . . . . . . . . . .40
Storage . . . . . . . . . . . . . . . . . . . . . . . . . . . . . . . . . . . . . . . . . . . . . . . . . . . . . . . . . . . . . .40
Troubleshooting . . . . . . . . . . . . . . . . . . . . . . . . . . . . . . . . . . . . . . . . . . . . . . . . . . . . . . .41
Warranty and service . . . . . . . . . . . . . . . . . . . . . . . . . . . . . . . . . . . . . . . . . . . . . . . . . .42
Disposal . . . . . . . . . . . . . . . . . . . . . . . . . . . . . . . . . . . . . . . . . . . . . . . . . . . . . . . . . . . . . .42
Importer . . . . . . . . . . . . . . . . . . . . . . . . . . . . . . . . . . . . . . . . . . . . . . . . . . . . . . . . . . . . .42
SGBR 1500 A1
29
Page 33

Introduction
Congratulations on the purchase of your new
appliance.
You have selected a high-quality product.
The operating instructions are part of this product.
They contain important information on safety, usage
and disposal. Before using the product, familiarise
GB
yourself with all handling and safety guidelines.
Use the product only as described and for the
MT
range of applications specifi ed. Please also pass
these operating instructions on to any future
owner(s).
Proper use
The automatic oven and grill is intended for the
heating, cooking and grilling of food.
This appliance is intended solely for use in private
homes. Do not use it for commercial applications.
All other uses are deemed to be improper and may
result in property damage or even in personal injury.
Package contents
♦ Electric Oven & Grill
♦ 1 baking tray
♦ 1 rack
♦ 2 tongs
♦ Rotisserie with 2 clamps
♦ 1 crumb tray
♦ Operating instructions
Appliance description
Figure A:
1 Drive
2 Temperature control
3 Function switch
4 Timer
5 Control lamp
6 Glass door
7 Crumb tray
8 Lower heating element
9 Spit fi tting
Figure B:
0 Tongs (baking tray or rack)
q Baking tray
w Tongs (for spit)
e rack
r Restrainer
t Skewer clamps
z Rotisserie
Technical data
Rated voltage: 220 - 240 V ~,
50/60 Hz
Max. power consumption: 1500 W
NOTE
Check contents for completeness and damage
immediately after unpacking. Contact Customer
vices if necessary.
Ser
30
SGBR 1500 A1
Page 34

Safety instructions
DANGER – RISK OF ELECTRIC SHOCK!
► Do not open the housing of the appliance or attempt to repair it.
Doing so can lead to risks and also invalidates the warranty.
Defective appliances should be repaired by the retailer or
authorized personnel only.
► Arrange for defective power plugs and/or cables to be replaced
as soon as possible by a qualifi ed technician or by our Customer
Service Department to avoid the risk of injury.
► Do not allow any liquids to penetrate the housing. Do not expose
the appliance to moisture and do not use it outdoors. Additionally,
do not place fl uid-fi lled receptacles such as fl ower vases on the
appliance. This increases the risk of fi re and of receiving an electric
shock! If liquids permeate into the housing, unplug the appliance
immediately and arrange for it to be repaired by a qualifi ed
technician.
► Never touch the appliance, power cable or power plug with wet
hands. There is a risk of electric shock!
GB
MT
NEVER immerse the appliance in water or other liquids!
Risk of electrocution if residual liquids come into contact with
live components during operation.
SGBR 1500 A1
31
Page 35

GB
MT
WARNING – RISK OF INJURY!
► This appliance may be used by children of the age of 8 years or
more and by persons with reduced physical, sensory or mental
capabilities or lack of experience and/or knowledge if they are
being supervised or have been instructed with regard to the safe
use of the appliance and have understood the potential risks.
► Children must not use the appliance as a plaything.
► Cleaning and user maintenance must not be performed by children
unless they are older than 8 years of age and are supervised.
► Children younger than 8 years of age must be kept away from
the appliance and the power cable.
► Route the power cable in such a way that no one can tread on it
or trip over it.
► Never touch the glass door or the housing during use, these can
get very hot. Use oven gloves or something similar to open the
glass door to avoid being burnt!
► Never touch the heating elements or the viewing window when
the appliance is in use, or before it has cooled down completely.
Do not reach into the cooking chamber when the appliance is in
use. Wait until the appliance has cooled down. Otherwise, you
could be burnt.
► Allow the appliance to cool down after use before transporting it.
► Always use oven gloves or a pot holder if you need to take hold
of the appliance.
Caution! Hot surface!
32
SGBR 1500 A1
Page 36

CAUTION – PROPERTY DAMAGE!
► Do not use an external timer switch or a separate remote control
system to operate the appliance.
► Never leave the appliance unattended during operation.
► Ensure that the appliance, the power cable and the plug do not
come into contact with heat sources such as hotplates or naked
fl ames.
► Only operate the appliance with the original accessories supplied.
► Do not kink or crush the mains cable.
► To disconnect, always remove the plug itself from the mains
power socket, do not pull on the power cable.
► When the appliance is in use, ensure that there are no easily
infl ammable materials in the immediate vicinity (e.g. dishcloths,
oven cloths, etc.).
► Never dry textiles or other objects on or above the appliance.
This increases the risk of fi re!
GB
MT
SGBR 1500 A1
33
Page 37

Setting up
Using the appliance
GB
MT
WARNING! RISK OF FIRE!
► Never place the appliance beneath wall cup-
boards or ne
other fl ammable objects.
► Always ensure a minimum distance between
the appliance and hanging cupboards, ceilings,
walls or similar of at least 10 cm above the
appliance and 5 cm at the sides. For this
reason the appliance may not be used, for
example, in cupboards or similar. Otherwise
there is likely to be insuffi cient ventilation for
the appliance, which could cause a fi re or
damage.
► Always place the appliance on a heat-resistant
surface. F
fi re or of it being damaged. The area under
the bottom can discolour and be damaged.
Additionally, if placed on a soft upper surface,
the appliance could cause permanent damage
to it due to pressure indentations.
DANGER – ELECTRIC SHOCK!
► Do not place the appliance immediately ad-
jacent to sour
or in damp cellar areas. Otherwise, there is
a risk of receiving an electric shock.
■ Place the appliance on a solid, level and heat-
resistant sur
or natural stone worktops such as granite).
Ensure there is suffi cient ventilation around the
appliance.
■ Clean all components as described in the
section “Cleaning and care”.
xt to curtains, cupboard walls or
ailure to do so increases the risk of
ces of water, e.g. sinks or basins,
face (e.g. stainless steel worktops
Glass door
ATTENTION! DAMAGE TO PROPERTY!
► Do not lean on the glass door 6. Do not
place any objects on the glass door 6
This can cause damage to the hinges.
■ If you are cooking especially fatty foodstuff s, this
can result in incr
case, do not close the glass door 6 completely;
instead, leave it slightly open:
The glass door 6 has a latching position so that
it remains open a little: if you carefully push the
glass door 6 closed, it clicks into this position
shortly before closing completely.
eased smoke production. In this
Inserting the crumb tray
■ Push the crumb tray 7 under the lower heating
element 8 so that it rests fl at on the bottom of
the appliance.
.
34
SGBR 1500 A1
Page 38

Using the rotisserie
WARNING! RISK OF INJURY!
► Always use the tongs w to insert the hot r
serie z into the appliance or to remove it.
■ You can use the two skewer clamps t to fi
food onto the rotisserie z. Loosen the restrainer r
on the skewer clamps t, push them so that the
food is fi xed fi rmly in between the clamps and
then screw the restrainer r tight again.
■ First push the end of the rotisserie z without
notch into the drive 1 (Figure 1):
otis-
x the
the
NOTE
► Always slide the baking tray q into the low
rail when you use the rotisserie z.
This will collect any drips.
■ To remove the hot rotisserie z, grip with
the hooks at the end of the tongs w
recesses on the rotisserie z (Figure 3):
Fig. 3: Hooking the tongs w onto the rotisserie z
into the
er
GB
MT
Fig. 1: Push the rotisserie z into the drive 1.
■ Then insert the other end of the rotisserie z with
the deep groo
Fig. 2: Insert the rotisserie z in the spit fi tting 9.
ve in the spit fi tting 9 (Figure 2):
SGBR 1500 A1
■ First lift the left-hand side of the rotisserie z out
of the spit fi
from the drive 1.
tting 9 and then pull the rotisserie z
35
Page 39

Using the baking tray/rack
WARNING! RISK OF INJURY!
► Always use the tongs 0 to insert the hot
baking tr
ance or to remove it.
GB
MT
■ Push the baking tray q/the rac
the 3 rails in the cooking chamber of the appliance.
ATTENTION! DAMAGE TO PROPERTY!
► Never place the baking tray q/the ra
directly onto the heating elements 8.
■ To remove the hot baking tray q or the ra
hook the tongs 0 onto them as follows:
Fig. 4: Hooking the tongs 0 onto the rack e
ay q/the hot rack e into the appli-
k e into one of
ck e
ck e,
Before fi rst use
1) Insert the plug into a mains power socket.
2) Turn the temperature control 2 clockwise to
the maximum temperature (to the stop).
3) Turn the function switch 3 to “upper and
lower heat”
4) Open the glass door 6 leave this open for this
operation.
5) Remove any installed accessories from the
cooking chamber.
6) Turn the timer 4 to 20 minutes.
NOTE
► The fi rst time the appliance heats up, a
small amount of smoke and odour may be
ated due to production-related residue.
gener
This is normal and is completely harmless.
Provide suffi cient ventilation by opening a
window, for example.
The appliance switches off automatically
after 20 minutes.
If you want to interrupt the heating process
prematurely, turn the temperature control 2
counter-clockwise to the stop and set the
timer 4 to “OFF - 0”.
7) Allow the appliance to cool down, then clean
the appliance as described in the chapter
“Cleaning and care”.
The appliance is now ready for use.
.
Fig. 5: Hooking the tongs 0 onto the baking
tray q
36
SGBR 1500 A1
Page 40

Operating the appliance
Function switch
You can switch on the appliance with the function
switch 3, and also set 5 diff erent functions:
Symbol Meaning
"Upper heat"
e.g. to gratinate
"Lower heat"
e.g. for baking
"Upper & lower heat"
e.g. for baking a pizza
"Upper & lower heat/hot air/
rotisserie"
e.g. to roast poultry
"Upper & lower heat/hot air"
e.g. to reheat rolls
OFF
Temperature control
Use the temperature control 2 to set the desired
temperature.
■ If you set the temperature for the functions
“Upper heat”
& lower heat”
”.
■ If you set the temperature for the functions
“Upper & low
or “Upper & lower heat/hot air” use the
scale marked with “ ”.
"OFF" the appliance is
switched off .
, “Lower heat” or “Upper
use the scale marked with “
er heat/hot air/rotisserie”
Timer
User the timer 4 to set the cooking time.
■ Set the timer 4 to the desired cooking time.
Af
ter expiry of the set time a signal tone sounds
and the appliance stops heating.
If the function “Upper & lower heat/hot air/
rotisserie”
will also stop turning.
is selected, the rotisserie z
Grilling and baking
1) Put the crumb tray 7 into the appliance.
2) Remove the rack e and baking tray q from
the appliance. If required, cover these with
baking paper or lightly grease the baking tray q
with suitable baking fat.
NOTE
► Depending on the meal, the oven must be
preheated. R
respective recipe. Preheating is useful for:
– very short baking times,
– crisp crusts,
– sensitive meals that require a constant
temperatur
► If no preheating is required, skip step 3).
3) Allo
w the appliance to heat up for approx.
10 minutes (depending on the temperature
setting) to the required temperature:
– Select the required temperature using the
temperatur
the correct scale (see chapter “Temperature
control”).
– Select the required function with the function
switch 3.
efer to the guidelines in the
e, such as souffl és.
e control 2. Ensure that you use
GB
MT
SGBR 1500 A1
37
Page 41

NOTE
► As a general rule, if you are baking or grilling
with hot air you can dispense with a pr
of the grilling/cooking space.
– Use the timer 4 to set the preheat time
(appr
ox. 10 minutes).
GB
MT
– Close the glass door 6.
4) Once the w
the foodstuff s on the rack e or the baking
tray q and slide it in on one of the rails.
Ensure that there is suffi cient space between
the foodstuff s and the inner walls/heating
elements of the appliance.
NOTE
► If you wish to prepare food on the rack e
that drips ex
tray q onto the bottom rail. By doing this,
dripping fat for example will be caught and
the appliance is then easier to clean.
5) Close the glass door 6 before starting the
grilling or baking process.
6) Use the timer 4 to set the required grilling or
baking time. The maximum grilling or baking
time is 120 minutes.
NOTE
► If the cooking time for the food is less than
20 minutes, fi
and then turn it back to the required grilling
or baking time.
arm-up period is fi nished, place
cessively, then slide the baking
rst set the timer 4 to 40 minutes
eheating
The appliance switches off automatically after the
set period, there is a beep and the control lamp 5
switches off .
NOTE
If you want to interrupt the heating process
prematur
counter-clockwise to the stop and set the timer 4
to "OFF - 0".
7) After cooking, remove the rack e or the baking
8) Set the function switch 3 to “OFF”.
ely, turn the temperature control 2
tray q using the tongs 0.
Grilling with the rotisserie
1) Put the crumb tray 7 into the appliance.
2) If inserted, remove the rotisserie z from the
appliance.
3) Push the baking tray q onto the lower rail.
4) Fix the food to be grilled with the skewer
clamps t. Ensure that the food in the cooking
chamber can turn freely without touching the
sides. The rotisserie z may change its direction
of rotation if the food strikes against a resistance.
The two depressions on the rotisserie z must
remain freely accessible, otherwise you will
not be able to grasp the rotisserie z with the
tongs w.
5) Fit the rotisserie z in the cooking chamber
(see chapter “Using the rotisserie”)
6) Close the glass door 6.
The control lamp 5 indicates that the appliance is
now switched on. The switch of the timer 4 now
rotates itself anti-clockwise to “OFF - 0”.
38
SGBR 1500 A1
Page 42

NOTE
If you want to interrupt the heating process pre-
, turn the temperature control 2 counter-
maturely
clockwise to the stop and set the timer 4 to
"OFF - 0".
7) Adjust the temperature control 2 to the desired
temperature.
8) Set the function switch 3 to “Upper & lower
heat/hot air/rotisserie”
to the desired grill time.
The appliance starts the grilling process and
the rotisserie z starts turning.
The control lamp 5 indicates that the appliance is
now switched on. The switch of the timer 4 now
rotates itself anti-clockwise to “OFF - 0”.
The appliance switches off automatically after the
set period, there is a beep and the control lamp 5
switches off .
NOTE
If you want to interrupt the heating process pre-
, turn the temperature control 2 counter-
maturely
clockwise to the stop and set the timer 4 to
"OFF - 0".
9) After the grilling process is completed remove
the rotisserie z with the help of the tongs w.
10) Set the function switch 3 to “OFF”.
. Set the timer 4
EXAMPLE: GRILLED CHICKEN
Ingredients
♦ Grilling chicken (approx. 1.3 kg,
guts remo
♦ Spices (salt, paprika)
♦ Cooking oil
1)
2) Push the chicken onto the spit and fi x it in
3) Push the baking tray q onto the lower rail.
4) Preheat the appliance for about 10 minutes
5) Put the chicken on the rotisserie into the
6) Set the function switch to "Upper & lower
7) Set the timer 4 approx. 90 minutes. The
8) Brush the chicken every now and again with
9) Once the set time is up, carefully remove the
ved)
Season the chick
with salt and paprika powder. Brush it from
the outside with heat resistant cooking oil.
place with the skewer clamps t. Ensure that
the notches on the rotisserie z remain free
so that you can remove the rotisserie z with
the help of the tongs w. Depending on the
shape of the chicken, it may be necessary
to fasten the wings and legs with a fi reproof
string to stop them impacting the sides when
turning.
using the function "Upper & lower heat/hot
to 210°C.
air"
appliance using the tongs w.
heat/hot air/rotisserie"
door.
cooking time can vary depending on the
size and nature of the chicken.
some cooking oil. This will make it crispy.
rotisserie with the chicken using the tongs w.
Loosen the skewer clamps t and pull the
chicken off the rotisserie z.
en on the inside and outside
and close the
GB
MT
SGBR 1500 A1
39
Page 43

Cleaning and care
DANGER – ELECTRIC SHOCK!
► Before cleaning the appliance, disconnect the
plug from the mains po
Risk of electric shock!
NEVER immerse the appliance in water or
GB
any other liquid!
MT
WARNING! RISK OF INJURY!
► Always allow the appliance to cool down
before cleaning it. Other
of burns!
■ It is best to clean the appliance and accessories
as soon as they hav
food residues easier to remove.
ATTENTION! DAMAGE TO PROPERTY!
► Do not use abrasive or aggressive cleaning
materials. These could damage the surface of
the appliance!
► Do not clean the components of the appliance
in a dishwasher!
► Do not clean the cooking chamber with an
ov
en spray as this may make residues on the
heating elements impossible to remove.
wer socket!
wise there is a risk
e cooled down. This makes
■ Wipe the appliance with a damp cloth. If neces-
sary
, put a little mild detergent on the cloth and
wipe this off afterwards with a cloth dampened
with clean water. Dry everything properly.
■ Clean the cooking chamber and the glass door 6
with a moist cloth. If necessary
detergent on the cloth and wipe this off afterwards with a cloth dampened with clean water.
Dry everything properly.
■ Clean the tongs 0/w, the ro
skewer clamps t, the restrainer r, the baking
tray q, the rack e and the crumb tray 7 in
warm soapy water. Dry all parts properly after
cleaning.
, put a little mild
tisserie z, the
Storage
■ Store the cleaned appliance and its accessories
in a clean, dust-free and dry location.
40
SGBR 1500 A1
Page 44

Troubleshooting
Fault Cause Solution
The mains plug is not connected to the
mains power.
The appliance is not
working.
The control lamp 5
comes on and but the
appliance does not
heat up.
The cooking time of
the food seems very
long
Smoke and smells
develop during use.
If the malfunction cannot be corrected with the above suggestions, or if you have found some other
kind of malfunction, please contact our Customer Service.
The mains power socket is defective.
The appliance is defective. Contact Customer Services.
The function switch 3 is set to OFF.
The glass door 6 has been opened often
to check the cooking progress.
The wrong temperature level has been set. Check the temperature settings.
There is detergent or food residue on the
heating elements.
Insert the plug into a mains power
socket.
Use a diff erent mains power
socket.
Turn the function switch 3 to the
desired function.
Do not open the glass door 6
any more often than is absolutely
necessary.
Remove the food from the appliance and continue cooking
process with the glass door 6
open until the smoke stops.
GB
MT
SGBR 1500 A1
41
Page 45

Warranty and service
The warranty provided for this appliance is
3 years from the date of purchase. This appliance
has been manufactured with care and inspected
meticulously prior to delivery. Please retain your
receipt as proof of purchase. In the event of a
warranty claim, please contact your Customer
Service unit by telephone. This is the only way to
GB
guarantee free return of your goods.
MT
The warranty only covers claims for material and
manufacturing defects, not for transport damage,
wearing parts or for damage to fragile components
such as switches or batteries. This appliance is
intended solely for private use and not for commercial purposes.
The warranty shall be deemed void in the case
of misuse or improper handling, use of force and
interventions which have not been carried out by
one of our authorised Service centres.
Your statutory rights are not restricted by this warranty.
The warranty period is not prolonged by repairs
eff ected under the warranty. This also applies to
replaced and repaired components. Any damage
and defects present at the time of purchase must
be reported immediately after unpacking, but no
later than two days after the date of purchase.
Repairs made after expiry of the warranty period
are chargeable.
Service Great Britain
Tel.: 0871 5000 720 (£ 0.10/Min.)
E-Mail: kompernass@lidl.co.uk
IAN 102464
Service Malta
Tel.: 80062230
E-Mail: kompernass@lidl.com.mt
IAN 102464
Hotline availability:
Monday to Friday 08:00 - 20:00 (CET)
Disposal
Under no circumstance should
the appliance be disposed of
as standard domestic waste.
This product is subject to the
provisions of European Directive 2012/19/EU.
Dispose of the appliance via an approved waste
disposal company or your municipal waste disposal facility. Please observe applicable regulations.
Please contact your waste disposal facility
if you are in any doubt.
The packaging is made of environmen-
tally friendly materials which you can
dispose of at your local recycling centre.
Importer
KOMPERNASS HANDELS GMBH
BURGSTRASSE 21
44867 BOCHUM
GERMANY
www.kompernass.com
42
SGBR 1500 A1
Page 46

Inhaltsverzeichnis
Einleitung . . . . . . . . . . . . . . . . . . . . . . . . . . . . . . . . . . . . . . . . . . . . . . . . . . . . . . . . . . . . .44
Bestimmungsgemäßer Gebrauch . . . . . . . . . . . . . . . . . . . . . . . . . . . . . . . . . . . . . . . . .44
Lieferumfang . . . . . . . . . . . . . . . . . . . . . . . . . . . . . . . . . . . . . . . . . . . . . . . . . . . . . . . . . .44
Gerätebeschreibung. . . . . . . . . . . . . . . . . . . . . . . . . . . . . . . . . . . . . . . . . . . . . . . . . . . .44
Technische Daten . . . . . . . . . . . . . . . . . . . . . . . . . . . . . . . . . . . . . . . . . . . . . . . . . . . . . .44
Sicherheitshinweise . . . . . . . . . . . . . . . . . . . . . . . . . . . . . . . . . . . . . . . . . . . . . . . . . . . .45
Aufstellen . . . . . . . . . . . . . . . . . . . . . . . . . . . . . . . . . . . . . . . . . . . . . . . . . . . . . . . . . . . .48
Benutzung des Gerätes . . . . . . . . . . . . . . . . . . . . . . . . . . . . . . . . . . . . . . . . . . . . . . . . .48
Glastür . . . . . . . . . . . . . . . . . . . . . . . . . . . . . . . . . . . . . . . . . . . . . . . . . . . . . . . . . . . . . . . . . . . . . . . . . . . 48
Krümelblech einlegen . . . . . . . . . . . . . . . . . . . . . . . . . . . . . . . . . . . . . . . . . . . . . . . . . . . . . . . . . . . . . . . 48
Drehspieß benutzen . . . . . . . . . . . . . . . . . . . . . . . . . . . . . . . . . . . . . . . . . . . . . . . . . . . . . . . . . . . . . . . . . 49
Backblech/Gitterrost benutzen . . . . . . . . . . . . . . . . . . . . . . . . . . . . . . . . . . . . . . . . . . . . . . . . . . . . . . . . 50
Vor dem ersten Gebrauch . . . . . . . . . . . . . . . . . . . . . . . . . . . . . . . . . . . . . . . . . . . . . . .50
Bedienen des Gerätes . . . . . . . . . . . . . . . . . . . . . . . . . . . . . . . . . . . . . . . . . . . . . . . . . .51
Funktionsschalter . . . . . . . . . . . . . . . . . . . . . . . . . . . . . . . . . . . . . . . . . . . . . . . . . . . . . . . . . . . . . . . . . . . 51
Temperaturregler . . . . . . . . . . . . . . . . . . . . . . . . . . . . . . . . . . . . . . . . . . . . . . . . . . . . . . . . . . . . . . . . . . . 51
Timer . . . . . . . . . . . . . . . . . . . . . . . . . . . . . . . . . . . . . . . . . . . . . . . . . . . . . . . . . . . . . . . . . . . . . . . . . . . . 51
Grillen und Backen . . . . . . . . . . . . . . . . . . . . . . . . . . . . . . . . . . . . . . . . . . . . . . . . . . . . .51
Grillen mit Drehspieß . . . . . . . . . . . . . . . . . . . . . . . . . . . . . . . . . . . . . . . . . . . . . . . . . . .52
Reinigung und Pfl ege . . . . . . . . . . . . . . . . . . . . . . . . . . . . . . . . . . . . . . . . . . . . . . . . . . .54
Aufbewahrung . . . . . . . . . . . . . . . . . . . . . . . . . . . . . . . . . . . . . . . . . . . . . . . . . . . . . . . .54
Fehlerbehebung . . . . . . . . . . . . . . . . . . . . . . . . . . . . . . . . . . . . . . . . . . . . . . . . . . . . . . .55
DE
AT
CH
Garantie und Service . . . . . . . . . . . . . . . . . . . . . . . . . . . . . . . . . . . . . . . . . . . . . . . . . . .56
Entsorgung . . . . . . . . . . . . . . . . . . . . . . . . . . . . . . . . . . . . . . . . . . . . . . . . . . . . . . . . . . .56
Importeur . . . . . . . . . . . . . . . . . . . . . . . . . . . . . . . . . . . . . . . . . . . . . . . . . . . . . . . . . . . .56
SGBR 1500 A1
43
Page 47

Einleitung
Herzlichen Glückwunsch zum Kauf Ihres neuen
Gerätes.
Sie haben sich damit für ein hochwertiges Produkt
entschieden. Die Bedienungsanleitung ist Bestandteil dieses Produkts. Sie enthält wichtige Hinweise
für Sicherheit, Gebrauch und Entsorgung. Machen
Sie sich vor der Benutzung des Produkts mit allen
Bedien- und Sicherheitshinweisen vertraut. Benutzen Sie das Produkt nur wie beschrieben und für
DE
die angegebenen Einsatzbereiche. Händigen Sie
AT
alle Unterlagen bei Weitergabe des Produkts an
CH
Dritte mit aus.
Gerätebeschreibung
Abbildung A:
1 Antrieb
2 Temperaturregler
3 Funktionsschalter
4 Timer
5 Kontrollleuchte
6 Glastür
7 eingesetztes Krümelblech
8 untere Heizstäbe
9 Drehspießaufnahme
Bestimmungsgemäßer
Gebrauch
Der Grill- und Backautomat dient ausschließlich dem
Erhitzen, Garen und Grillen von Speisen.
Dieses Gerät ist ausschließlich für die Benutzung in
privaten Haushalten bestimmt. Nutzen Sie es nicht
gewerblich.
Jede andere Verwendung gilt als nicht bestimmungsgemäß und kann zu Sachschäden oder sogar zu
Personenschäden führen.
Lieferumfang
♦ Grill- und Backautomat
♦ 1 Backblech
♦ 1 Gitterrost
♦ 2 Zangen
♦ Drehspieß mit 2 Klemmen
♦ 1 Krümelblech
♦ Bedienungsanleitung
HINWEIS
Kontrollieren Sie den Lieferumfang direkt nach
dem Auspacken auf V
digungen. Wenden Sie sich, wenn nötig, an den
Service.
ollständigkeit und Beschä-
Abbildung B:
0 Zange (für Backblech und Gitterrost)
q Backblech
w Zange (für Drehspieß)
e Gitterrost
r Feststeller
t Drehspießklemmen
z Drehspieß
Technische Daten
Nennspannung: 220 - 240 V ~,
50/60 Hz
max. Leistungsaufnahme: 1500 W
44
SGBR 1500 A1
Page 48

Sicherheitshinweise
GEFAHR – ELEKTRISCHER SCHLAG!
► Sie dürfen das Gerätegehäuse des Gerätes nicht öff nen oder
reparieren. In diesem Falle ist die Sicherheit nicht gegeben und
die Gewährleistung erlischt. Lassen Sie ein defektes Gerät nur
vom Händler oder autorisiertem Fachpersonal reparieren.
► Lassen Sie beschädigte Netzstecker oder Netzkabel sofort von
autorisiertem Fachpersonal oder dem Kundenservice austauschen, um Gefährdungen zu vermeiden.
► Lassen Sie keine Flüssigkeiten in das Gerätegehäuse gelangen.
Sie dürfen das Gerät keiner Feuchtigkeit aussetzen und nicht im
Freien benutzen. Darüber hinaus dürfen Sie keine mit Flüssigkeiten
gefüllten Gegenstände, wie z. B. Vasen auf dem Gerät abstellen.
Es besteht Brandgefahr und Gefahr eines elektrischen Schlags!
Falls doch einmal Flüssigkeit in das Gerätegehäuse gelangt, ziehen
Sie sofort den Netzstecker des Geräts aus der Netzsteckdose
und lassen Sie es reparieren.
► Fassen Sie Gerät, Netzkabel und -stecker nie mit nassen Händen
an. Es besteht sonst die Gefahr eines elektrischen Schlags.
Tauchen Sie das Gerät niemals in Wasser oder andere Flüssigkeiten! Hier kann Lebensgefahr durch elektrischen Schlag
entstehen, wenn im Betrieb Flüssigkeitsreste auf spannungsführende Teile gelangen.
DE
AT
CH
SGBR 1500 A1
45
Page 49

DE
AT
CH
WARNUNG – VERLETZUNGSGEFAHR!
► Dieses Gerät kann von Kindern ab 8 Jahren sowie von Personen
mit reduzierten physischen, sensorischen oder mentalen Fähigkeiten
oder Mangel an Erfahrung und/oder Wissen benutzt werden,
wenn sie beaufsichtigt oder bezüglich des sicheren Gebrauchs
des Gerätes unterwiesen wurden und die daraus resultierenden
Gefahren verstanden haben.
► Kinder dürfen nicht mit dem Gerät spielen.
► Reinigung und Benutzer-Wartung dürfen nicht durch Kinder
durchgeführt werden, es sei denn, sie sind älter als 8 Jahre und
beaufsichtigt.
► Kinder jünger als 8 Jahre sind von Gerät und Anschlussleitung
fernzuhalten.
► Verlegen Sie das Netzkabel so, dass niemand darauf treten oder
darüber stolpern kann.
► Berühren Sie niemals die Glastür oder das Gehäuse während
der Benutzung, da diese sehr heiß werden. Verwenden Sie zum
Öff nen der Glastür einen Topfl appen o.ä., um Verbrennungen zu
vermeiden!
► Berühren Sie niemals die Heizstäbe oder das Sichtfenster während
des Betriebs oder bevor das Gerät abgekühlt ist. Fassen Sie
während des Betriebs nicht in den Garraum. Warten Sie bis das
Gerät abgekühlt ist. Sie könnten sich andernfalls verbrennen.
► Lassen Sie das Gerät nach dem Gebrauch erst abkühlen, bevor
Sie es transportieren.
► Benutzen Sie immer Topfhandschuhe oder Topfl appen, wenn Sie
mit dem heißen Gerät hantieren!
Vorsicht! Heiße Oberfl äche!
46
SGBR 1500 A1
Page 50

ACHTUNG – SACHSCHADEN!
► Benutzen Sie keine externe Zeitschaltuhr oder ein separates Fern-
wirksystem, um das Gerät zu betreiben.
► Lassen Sie das Gerät während des Betriebes niemals unbeaufsichtigt.
► Stellen Sie sicher, dass das Gerät, das Netzkabel oder der Netz-
stecker nicht mit heißen Quellen, wie Kochplatten oder off enen
Flammen, in Berührung kommen.
► Betreiben Sie das Gerät ausschließlich mit dem mitgelieferten
Originalzubehör.
► Knicken oder quetschen Sie das Netzkabel nicht.
► Ziehen Sie das Netzkabel stets am Stecker aus der Steckdose,
ziehen Sie nicht am Kabel selbst.
► Es dürfen sich während des Betriebs keine leicht brennbaren
Materialien in unmittelbarer Umgebung des Grill- und Backautomaten befi nden (z. B. Geschirrhandtuch, Topfl appen etc.).
► Trocknen Sie niemals Textilien oder Gegenstände auf, über oder
im Gerät. Es besteht Brandgefahr.
DE
AT
CH
SGBR 1500 A1
47
Page 51

Aufstellen
Benutzung des Gerätes
DE
AT
CH
WARNUNG! BRANDGEFAHR!
► Stellen Sie das Gerät niemals unter Hänge-
e oder neben Gardinen, Schrankwänden
schränk
oder anderen entzündlichen Gegenständen.
► Der Abstand des Gerätes zu Hängeschränken,
Decken, W
oben hin mindestens 10 cm und seitlich jeweils
5 cm betragen. Daher darf das Gerät z. B.
nicht in Schränke o. ä. gestellt werden. Andernfalls ist keine ausreichende Belüftung des
Gerätes möglich und es könnte einen Brand
verursachen oder beschädigt werden.
► Stellen Sie das Gerät nur auf eine hitzebestän-
dige Unterlage. Andernfalls besteht Br
fahr und das Gerät kann beschädigt werden.
Der Bereich unter dem Geräteboden kann sich
verfärben und beschädigt werden. Darüber
hinaus können bei einem weichen Untergrund
dauerhafte Abdrücke in der Unterlage entstehen.
GEFAHR - ELEKTRISCHER SCHLAG!
► Stellen Sie das Gerät nicht in unmittelbarer
Nähe von W
Waschwannen oder in feuchten Kellerräumen. Andernfalls besteht die Gefahr eines
Stromschlags.
■ Stellen Sie das Gerät auf einem festen, ebenen
und hitzebeständigen Unter
stahlarbeitsplatten oder Natursteinarbeitsplatten
wie Granit) auf. Sorgen Sie für ausreichende
Belüftung rund um das Gerät.
■ Reinigen Sie alle Teile wie im Kapitel „Reinigung
und Pfl
änden oder ähnlichem muss nach
andge-
asser auf, z. B. an Spülbecken,
grund (z.B. Edel-
ege“ beschrieben.
Glastür
ACHTUNG! SACHSCHADEN!
► Stützen Sie sich nicht auf der Glastür 6
ab. Stellen Sie keine Gegenstände auf die
6. Das führt zu Beschädigungen an
Glastür
den Scharnieren.
■ Wenn Sie besonders fetthaltige Speisen zuberei-
ten, kann es zu erhöhter R
men. Schließen Sie in diesem Fall die Glastür 6
nicht ganz, sondern lassen Sie sie einen Spalt
breit off en stehen:
Die Glastür 6 hat eine Raststellung, so dass
diese einen Spalt breit off en steht: Wenn Sie die
Glastür 6 vorsichtig zuklappen, rastet diese
kurz vor dem Schließen in dieser Stellung ein.
auchentwicklung kom-
Krümelblech einlegen
■ Schieben Sie das Krümelblech 7 unter die
unteren Heizstäbe 8, so dass es fl ach auf dem
Geräteboden aufl iegt.
48
SGBR 1500 A1
Page 52

Drehspieß benutzen
WARNUNG! VERLETZUNGSGEFAHR!
► Benutzen Sie immer die Zange w, um den
heißen Dr
oder herauszunehmen.
■ Mit den beiden Drehspießklemmen t können
Sie das Grillgut am Dr
Lösen Sie die Feststeller r an den Drehspießklemmen t, verschieben Sie diese so, dass das
Grillgut dazwischen fest geklemmt wird und
schrauben Sie die Feststeller r wieder fest.
■ Schieben Sie zuerst das Ende des Drehspießes z
ohne
Abb. 1: Drehspieß z in den Antrieb 1 schieben.
■ Legen Sie dann das andere Ende des Drehspie-
ßes z mit der tiefen Nut in die Drehspießaufnahme
ehspieß z in das Gerät einzusetzen
ehspieß z fi xieren.
Nut in den Antrieb 1 (Abb. 1):
9 (Abb. 2):
HINWEIS
► Schieben Sie immer das Backblech q in die
e Schiene, wenn Sie den Drehspieß z
unter
verwenden. So werden herunterfallende
Flüssigkeiten aufgefangen.
■ Um den heißen Drehspieß z zu entnehmen grei-
fen Sie mit den Hak
die Vertiefungen am Drehspieß z (Abb. 3):
Abb. 3: Einhaken der Zange w beim Drehspieß z
■ Heben sie zuerst die linke Seite des Drehspießes z
aus der Drehspießaufnahme
dann den Drehspieß z aus dem Antrieb 1.
en am Ende der Zange w in
9 und ziehen Sie
DE
AT
CH
Abb. 2: Drehspieß z in die Drehspießaufnahme 9
legen
SGBR 1500 A1
49
Page 53

Backblech/Gitterrost benutzen
WARNUNG! VERLETZUNGSGEFAHR!
► Benutzen Sie immer die Zange 0, u
ße Backblech q/den heißen Gitterrost e in
das Gerät einzusetzen oder herauszunehmen.
■ Schieben Sie das Backblech q/den Gitterrost e
in eine der 3 Schienen im Garraum des Gerätes.
ACHTUNG! SACHSCHADEN!
DE
AT
CH
► Legen Sie das Backblech q/den Gitterrost e
niemals direkt auf die Heizstäbe 8.
■ Um das heiße Backblech q oder den Gitterrost
e entnehmen zu k
0 folgendermaßen ein:
Abb. 4: Einhaken der Zange 0 beim Gitterrost e
önnen, haken Sie die Zange
m das hei-
Vor dem ersten Gebrauch
1) Stecken Sie den Netzstecker in eine Netzsteckdose.
2) Drehen Sie den Temperaturregler 2 bis zum
Anschlag im Uhrzeigersinn auf die höchste
Temperatur.
3) Drehen Sie den Funktionsschalter 3 auf
„Ober- und Unterhitze“
4) Öff nen Sie die Glastür 6 und lassen Sie diese
für diesen Vorgang geöff net.
5) Entnehmen Sie eventuell eingesetztes Zubehör
aus dem Garraum.
6) Drehen Sie den Timer 4 auf 20 Minuten.
HINWEIS
► Beim erstmaligen Aufheizen des Gerätes
kann es dur
zu leichter Rauch- und Geruchsentwicklung
kommen. Das ist normal und völlig ungefährlich.
Sorgen Sie für ausreichende Belüftung, öff nen
Sie zum Beispiel ein Fenster.
Das Gerät schaltet sich nach 20 Minuten
automatisch aus.
Wenn Sie den Heizvorgang vorzeitig
unterbrechen wollen, drehen Sie den
Temperaturregler 2 bis zum Anschlag
gegen den Uhrzeigersinn und stellen Sie
den Timer 4 auf „OFF - 0“.
7) Lassen Sie das Gerät abkühlen und reinigen
Sie das Gerät wie im Kapitel „Reinigen und
Pfl egen“ beschrieben.
Das Gerät ist nun betriebsbereit.
ch fertigungsbedingte Rückstände
.
Abb. 5: Einhaken der Zange 0 beim Backblech q.
50
SGBR 1500 A1
Page 54

Bedienen des Gerätes
Funktionsschalter
Am Funktionsschalter 3 können Sie das Gerät
einschalten, sowie 5 verschiedene Funktionen
einstellen:
Symbol Bedeutung
„Oberhitze“
z.B. zum Überbacken
„Unterhitze“
z.B. zum Kuchenbacken
„Ober- & Unterhitze“
z.B. zum Pizza backen
„Ober- & Unterhitze/Umluft/
Drehspieß“
z.B. um Gefl ügel zu grillen
„Ober- & Unterhitze/Umluft“
z.B. um Brötchen aufzubacken
OFF
das Gerät ist ausgeschaltet
Temperaturregler
Am Temperaturregler 2 können Sie die gewünschte Temperatur einstellen.
■ Wenn Sie die Temperatur für die Funktionen
„Oberhitze“
& Unterhitze“
an der mit „
■ Wenn Sie die Temperatur für die Funktionen
„Ober- & Unterhitz
oder „Ober- & Unterhitze/Umluft“
einstellen, orientieren Sie sich an der mit „ “
gekennzeichneten Skala.
, „Unterhitze“ oder „Ober-
einstellen, orientieren Sie sich
“ gekennzeichneten Skala.
e/Umluft/Drehspieß“
„OFF“
Timer
Mit Hilfe des Timers 4 können Sie die Garzeit
einstellen:
■ Stellen Sie die Timer 4 auf die gewünschte
Gar
zeit. Nach Beendigung der eingestellten
Zeit erklingt ein Signalton und das Gerät stoppt
das Heizen.
Falls die Funktion „Ober- & Unterhitze/Umluft/
Drehspieß“ gewählt ist, stoppt auch das
Drehen des Drehspießes z.
Grillen und Backen
1) Legen Sie das Krümelblech 7 in das Gerät.
2) Nehmen Sie den Gitterrost e und das
Backblech q aus dem Gerät. Legen Sie diese
gegebenenfalls mit Backpapier aus bzw.
bestreichen Sie das Backblech q mit zum
Backen geeignetem Fett.
HINWEIS
► Je nach Gericht, muss der Backofen vorge-
heizt wer
ben im jeweiligen Rezept. Das Vorheizen ist
auf jeden Fall sinnvoll bei:
► Wenn kein Vorheizen nötig ist, überspringen
Sie Handlungsschritt 3).
3) Lassen Sie das Ger
Temperatureinstellung) auf die gewünschte
Temperatur aufheizen:
den. Halten Sie sich an die Vorga-
– sehr kurzen Backzeiten,
– knusprigen Krusten,
– empfi ndlichen Gerichten, die eine konstan-
te Temper
Souffl és.
– Wählen Sie die gewünschte Temperatur mit
dem Temper
auf, die korrekte Skala zu benutzen (siehe
Kapitel „Temperaturregler“.)
– Anschließend wählen Sie mit dem Funktions-
schalter 3 die gewünschte F
atur erfordern, wie zum Beispiel
ät ca. 10 Minuten (je nach
aturregler 2. Achten Sie dar-
unktion.
DE
AT
CH
SGBR 1500 A1
51
Page 55

HINWEIS
► Falls Sie die Funktion mit Umluft wählen,
können Sie in der R
des Grill- und Garraums verzichten.
– Stellen Sie mit dem Timer 4 die Vorheizz
ein (ca. 10 Minuten).
– Schließen Sie die Glastür 6.
4) Ist die Zeit abgelaufen, legen Sie das Grill. Backgut auf den Gitterrost e bzw. das
bzw
DE
AT
CH
Backblech q und schieben Sie es in eine der
Schienen. Achten Sie dabei auf einen ausreichenden Abstand des Grill- bzw. Backguts zu
den Innenwänden und den Heizstäben des
Geräts.
HINWEIS
► Wenn Sie stark tropfendes Grillgut auf dem
Gitterrost
das Backblech q in die unterste Schiene. So
wird z.B. herunter tropfendes Fett aufgefangen und das Gerät ist später leichter zu
reinigen.
5) Schließen Sie die Glastür 6, bevor Sie den
Grill- Backvorgang starten.
6) Stellen Sie mit dem Timer 4 die gewünschte
Grill- bzw. Backzeit ein. Die maximale Grillbzw. Backzeit beträgt 120 Minuten.
HINWEIS
► Wenn die Garzeit Ihres Grill- bzw. Backguts
weniger als 20 Minuten betr
den Timer 4 zunächst auf 40 Minuten und
dann zurück auf die gewünschte Grill- bzw.
Backzeit.
e zubereiten, dann schieben Sie
egel auf ein Vorheizen
ägt, stellen Sie
Das Gerät schaltet sich nach der eingestellten Zeit
automatisch aus, ein Signalton erklingt und die
Kontrollleuchte 5 erlischt.
HINWEIS
Wenn Sie den Heizvorgang vorzeitig unterbre-
eit
chen wollen, dr
bis zum Anschlag gegen den Uhrzeigersinn und
stellen Sie den Timer 4 auf „OFF - 0“.
7) Entnehmen Sie nach dem Heizvorgang den
Gitterrost e bzw. das Backblech q mit Hilfe
der Zange 0.
8) Stellen Sie den Funktionsschalter 3 auf „OFF“.
ehen Sie den Temperaturregler 2
Grillen mit Drehspieß
1) Legen Sie das Krümelblech 7 in das Gerät.
2) Falls eingesetzt, nehmen Sie den Drehspieß z
aus dem Gerät.
3) Schieben Sie das Backblech q in die unterste
Schiene.
4) Fixieren Sie das Grillgut mit den Drehspießklemmen t. Achten Sie darauf, dass das Grillgut sich frei im Garraum drehen kann, ohne im
Garraum anzustoßen. Es kann passieren, dass
der Drehspieß z die Drehrichtung wechselt,
wenn das Grillgut gegen einen Widerstand
stößt. Die beiden Vertiefungen, die sich am
Drehspieß z befi nden, müssen frei zugänglich
bleiben, ansonsten kann man den Drehspieß
z nicht mit der Zange w greifen.
5) Befestigen Sie den Drehspieß z im Garraum
(siehe Kapitel „Drehspieß benutzen“).
6) Schließen Sie die Glastür 6.
Die Kontrollleuchte 5 zeigt an, dass das Gerät
eingeschaltet ist. Der Schalter des Timers 4
bewegt sich nun gegen den Uhrzeigersinn auf
„OFF - 0“ zu.
52
SGBR 1500 A1
Page 56

HINWEIS
Wenn Sie den Heizvorgang vorzeitig unterbrechen wollen, dr
bis zum Anschlag gegen den Uhrzeigersinn und
stellen Sie den Timer 4 auf „OFF - 0“.
7) Stellen Sie am Temperaturregler 2 die ge-
wünschte Temperatur ein.
8) Stellen Sie den Funktionsschalter 3 auf „Ober-
& Unterhitze/Umluft/Drehspieß“
Sie am Timer 4 die gewünschte Grillzeit ein.
Das Gerät startet den Grillvorgang und der
Drehspieß z dreht sich.
Die Kontrollleuchte 5 zeigt an, dass das Gerät
eingeschaltet ist. Der Schalter des Timers 4
bewegt sich nun gegen den Uhrzeigersinn auf
„OFF - 0“ zu.
Das Gerät schaltet sich nach der eingestellten Zeit
automatisch aus, ein Signalton erklingt und die
Kontrollleuchte 5 erlischt.
HINWEIS
Wenn Sie den Heizvorgang vorzeitig unterbrechen wollen, dr
bis zum Anschlag gegen den Uhrzeigersinn und
stellen Sie den Timer 4 auf „OFF - 0“.
9) Entnehmen Sie nach dem Grillvorgang den
Drehspieß z mit Hilfe der Zange w.
10) Stellen Sie den Funktionsschalter 3 auf „OFF“.
ehen Sie den Temperaturregler 2
.Stellen
ehen Sie den Temperaturregler 2
BEISPIEL GRILLHÄHNCHEN
Zutaten
♦ Grillhähnchen (ca. 1,3 kg, ausgenommen)
♦ Gewürze (Salz, Paprika)
♦ Speiseöl
1)
W
ürzen Sie das Grillhähnchen von innen
und außen mit Salz und Paprikapulver. Streichen Sie es von außen mit hitzebeständigem
Speiseöl ein.
2) Schieben Sie das Grillhähnchen auf den
Grillspieß und fi xieren Sie es mit den Drehspießklemmen t. Achten Sie dabei darauf,
dass die Vertiefungen am Drehspieß z frei
bleiben, damit Sie den Drehspieß z mit Hilfe
der Zange w greifen können. Je nach Form
des Grillhähnchens ist es nötig die Flügel
und Schenkel mit einer feuerfesten Bindeschnur zu fi xieren, damit diese während des
Drehens nicht anstoßen.
3) Schieben Sie das Backblech q in die
unterste Schiene.
4) Heizen Sie das Gerät ca. 10 Minuten mit
der Funktion „Ober- & Unterhitze/Umluft“
auf 210°C vor.
5) Setzen Sie das Grillhähnchen auf dem
Drehspieß mit Hilfe der Zange w in das
Gerät ein.
6) Stellen Sie den Funktionsschalter auf „Ober& Unterhitze/Umluft/Drehspieß
schließen Sie die Tür.
7) Stellen Sie den Timer 4 auf ca. 90 Minuten.
Die Garzeit kann je nach Größe und Beschaff enheit des Grillhähnchens variieren.
8) Bestreichen Sie das Grillhähnchen zwischendurch immer wieder mit etwas Speiseöl. So
wird es knusprig.
9) Wenn die eingestellte Zeit abgelaufen ist,
entnehmen Sie den Grillspieß mit dem Grillhähnchen vorsichtig mit der Zange w. Lösen
Sie die Drehspießklemmen t und ziehen
Sie das Grillhähnchen vom Drehspieß z.
“ und
DE
AT
CH
SGBR 1500 A1
53
Page 57

Reinigung und Pfl ege
GEFAHR - ELEKTRISCHER SCHLAG!
► Ziehen Sie vor jeder Reinigung den Netzste-
cker aus der Netzsteckdose! Es besteht die
Gefahr eines elektrischen Schlages!
Tauchen Sie das Gerät niemals in Wasser
oder andere Flüssigkeiten!
DE
AT
CH
WARNUNG! VERLETZUNGSGEFAHR!
► Lassen Sie das Gerät immer erst abkühlen,
or Sie es reinigen. Es besteht sonst Verbren-
bev
nungsgefahr!
■ Reinigen Sie das Gerät und die Zubehörteile am
besten sofort nach dem A
sich Lebensmittelreste leichter entfernen.
ACHTUNG! SACHSCHADEN!
► Verwenden Sie keine scheuernden oder
aggressiv
die Oberfl äche beschädigen!
► Reinigen Sie die Teile des Gerätes nicht in der
Spülmaschine!
► Reinigen Sie den Garraum nicht mit einem
Back
Heizstäben nicht mehr entfernen lassen.
en Reinigungsmittel. Diese können
ay, da sich Rückstände auf den
ofenspr
bkühlen. Dann lassen
■ Wischen Sie das Gerät mit einem feuchten T
ab. Bei Bedarf geben Sie ein mildes Spülmittel
auf das Tuch und wischen Sie mit einem mit klarem Wasser befeuchteten Tuch nach. Trocknen
Sie alles gut ab.
■ Reinigen Sie den Garraum und die Glastür 6
mit einem feuchten Tuch. Bei Bedar
ein mildes Spülmittel auf das Tuch und wischen
Sie mit einem mit klarem Wasser befeuchteten
Tuch nach. Trocknen Sie alles gut ab.
■ Reinigen Sie die Zangen 0/w, den Drehspieß
z, die Drehspießklemmen t, die Feststeller r,
das Backblech q, den Gitterrost e und das
Krümelblech 7 in warmem Spülwasser. Trocknen
Sie alle Teile nach der Reinigung gut ab.
f geben Sie
Aufbewahrung
■ Bewahren Sie das gereinigte Gerät und seine
Zubehörteile an einem sauberen, staubfreien
und trockenen Ort auf.
uch
54
SGBR 1500 A1
Page 58

Fehlerbehebung
Fehler Ursache Lösung
Der Netzstecker ist nicht mit dem Stromnetz
verbunden.
Das Gerät
funktioniert nicht.
Die Kontrollleuchte 5
leuchtet, aber das
Gerät heizt nicht.
Die Garzeit der
Speisen erscheint
sehr lang.
Während der Benutzung tritt Rauch- und
Geruchsentwicklung
auf.
Sollten sich die Störungen nicht mit oben stehenden Fehlerbehebungen beheben lassen, oder wenn
Sie andere Arten von Störungen feststellen, wenden Sie sich bitte an unseren Service.
Die Netzsteckdose ist defekt.
Das Gerät ist defekt. Wenden Sie sich an den Service.
Der Funktionsschalter 3 steht auf OFF.
Die Glastür 6 wurde sehr oft geöff net, um
den Garfortschritt zu kontrollieren.
Es ist eine falsche Temperatur eingestellt.
An den Heizstäben befi nden sich Reinigungs- oder Lebensmittelrückstände.
Stecken Sie den Netzstecker in
eine Netzsteckdose.
Benutzen Sie eine andere Netzsteckdose.
Drehen Sie den Funktionsschalter 3
auf die gewünschte Funktion.
Öff nen Sie die Glastür 6 nicht
öfter, als unbedingt notwendig.
Überprüfen Sie die Temperatureinstellungen.
Entnehmen Sie die Speisen aus
dem Gerät und führen Sie den
Garvorgang mit geöff neter
Glastür 6 fort, bis die Rauchent-
wicklung verschwunden ist.
DE
AT
CH
SGBR 1500 A1
55
Page 59

Garantie und Service
Sie erhalten auf dieses Gerät 3 Jahre Garantie
ab Kaufdatum. Das Gerät wurde sorgfältig
produziert und vor Anlieferung gewissenhaft
geprüft. Bitte bewahren Sie den Kassenbon als
Nachweis für den Kauf auf. Bitte setzen Sie sich
im Garantiefall mit Ihrer Servicestelle telefonisch
in Verbindung. Nur so kann eine kostenlose
Einsendung Ihrer Ware gewährleistet werden.
Die Garantieleistung gilt nur für Material- oder
Fabrikationsfehler, nicht aber für Transportschäden,
DE
Verschleißteile oder für Beschädigungen an zerbrech-
AT
lichen Teilen, z. B. Schalter oder Akkus. Das Produkt
CH
ist lediglich für den privaten und nicht für den
gewerblichen Gebrauch bestimmt.
Bei missbräuchlicher und unsachgemäßer Behandlung, Gewaltanwendung und bei Eingriff en, die
nicht von unserer autorisierten Service-Niederlassung vorgenommen wurden, erlischt die Garantie.
Ihre gesetzlichen Rechte werden durch diese Garantie nicht eingeschränkt.
Die Garantiezeit wird durch die Gewährleistung
nicht verlängert. Dies gilt auch für ersetzte und reparierte Teile. Eventuell schon beim Kauf vorhandene
Schäden und Mängel müssen sofort nach dem
Auspacken gemeldet werden, spätestens aber zwei
Tage nach Kaufdatum. Nach Ablauf der Garantiezeit anfallende Reparaturen sind kostenpfl ichtig.
Entsorgung
Werfen Sie das Gerät kei-
nesfalls in den normalen
Hausmüll. Dieses Produkt
unterliegt der europäischen
Richtlinie 2012/19/EU.
Entsorgen Sie das Gerät über einen zugelassenen
Entsorgungsbetrieb oder über Ihre kommunale
Entsorgungseinrichtung. Beachten Sie die aktuell
geltenden Vorschriften. Setzen Sie sich im Zweifelsfall mit Ihrer Entsorgungseinrichtung in Verbindung.
Die Verpackung besteht aus umweltfreund-
lichen Materialien, die Sie über die örtlichen Recyclingstellen entsorgen können.
Importeur
KOMPERNASS HANDELS GMBH
BURGSTRASSE 21
44867 BOCHUM
GERMANY
www.kompernass.com
Service Deutschland
Tel.: 0800 5435 111 (Kostenfrei aus dem
dt. Festnetz/Mobilfunknetz)
E-Mail: kompernass@lidl.de
IAN 102464
Service Österreich
Tel.: 0820 201 222 (0,15 EUR/Min.)
E-Mail: kompernass@lidl.at
IAN 102464
Service Schweiz
Tel.: 0842 665566 (0,08 CHF/Min.,
Mobilfunk max. 0,40 CHF/Min.)
E-Mail: kompernass@lidl.ch
IAN 102464
Erreichbarkeit Hotline: Montag bis Freitag von
8:00 Uhr – 20:00 Uhr (MEZ)
56
SGBR 1500 A1
Page 60

KOMPERNASS HANDELS GMBH
BURGSTRASSE 21
44867 BOCHUM
DEUTSCHLAND / GERMANY
www.kompernass.com
Estado de las informaciones · Versione delle informazioni
Last Information Update · Stand der Informationen:
06/ 2014 · Ident.-No.: SGBR1500A1-022014-2
IAN 102464
5
 Loading...