

Page 1
Cordless/Plug-In shaver sFr 1200 a1
Cordless/Plug-In shaver
Operation and Safety Notes
IAN 74435
Page 2

Before reading, unfold the page containing the illustrations and familiarise yourself with all functions of the
device.
GB / IE Operation and Safety Notes Page 5
Page 3
1 2
3 4 5
5
12
6
7
10
8
9
11
Page 4
a
B C
d e
Page 5

Table of Contents
Introduction
Intended use ........................................................................................................................................ Page 6
Scope of delivery ................................................................................................................................ Page 6
Description of parts ............................................................................................................................. Page 6
Technical data ..................................................................................................................................... Page 7
Safety
General safety instructions .................................................................................................................Page 7
In order to avoid experiencing a life-threatening electric shock,
the following must be observed .........................................................................................................Page 7
In order to ensure that your shaver works perfectly, please observe the following .......................Page 8
Before first use
Operating the shaver using the AC adaptor plug ............................................................................ Page 8
Charging the rechargeable batteries.................................................................................................Page 8
Using the safety lock-out ..................................................................................................................... Page 9
Use
Foil shave (dry shave) ......................................................................................................................... Page 9
Wet shave ...........................................................................................................................................Page 10
Trimmer ................................................................................................................................................ Page 10
3-day beard attachment ..................................................................................................................... Page 10
Cleaning and maintenance
Cleaning .............................................................................................................................................. Page 10
Maintenance ....................................................................................................................................... Page 11
Disposal
Removal of rechargeable batteries .................................................................................................... Page 11
Warranty and service ........................................................................................................... Page 12
Conformity .....................................................................................................................................Page 13
5 GB/IE
Page 6

Introduction
The following pictograms are used in these operating instructions / on the device:
Read instruction manual!
Observe caution and safety notes!
Caution – electric shock! Dangerous
electric current – Danger to life!
Volt (AC)
V
~
Cordless/Plug-In Shaver
Introduction
Dear Customer,
We would like to thank you for your purchase and
hope you will enjoy using your new Wet & Dry
Men‘s Electric Shaver.
This shaver has a three-way shaving system with
two spring-mounted, counter-oscillating cutters with
an integrated trimmer, a combination which ensures
the best shaving performance for all hair types.
The protective cap can also be used as a 3-day
beard attachment. The device can be used for dry
or wet shaving (Wet & Dry function). The wide input
voltage range (100–240 V~) of the plug-in mains
adapter makes the shaver ideal for use when
travelling.
These instructions will help you familiarise yourself
with your shaver and make it easier for you to use it.
Please read the directions for use through carefully
before you start using your shaver and keep them
in a safe place for future reference.
You must follow the safety instructions to avoid
causing any accidents, injuries or damage.
V
Direct current
(Type of current and voltage)
Keep children and other unauthorised
personnel at a safe distance when using
electrical tools.
Suitable for cleaning under running water.
Dispose packaging and appliance in an
environmentally-friendly way!
Intended use
The razor is intended for private use only and its use
has not been approved for commercial purposes. It
is only designed for shaving facial hair. The guarantee
expires if it is used for purposes other than intended.
Scope of delivery
1 Shaver
1 Protective cap
1 AC adaptor plug with flex
1 Travel pouch with zip
1 Cleaning brush
1 Directions for use
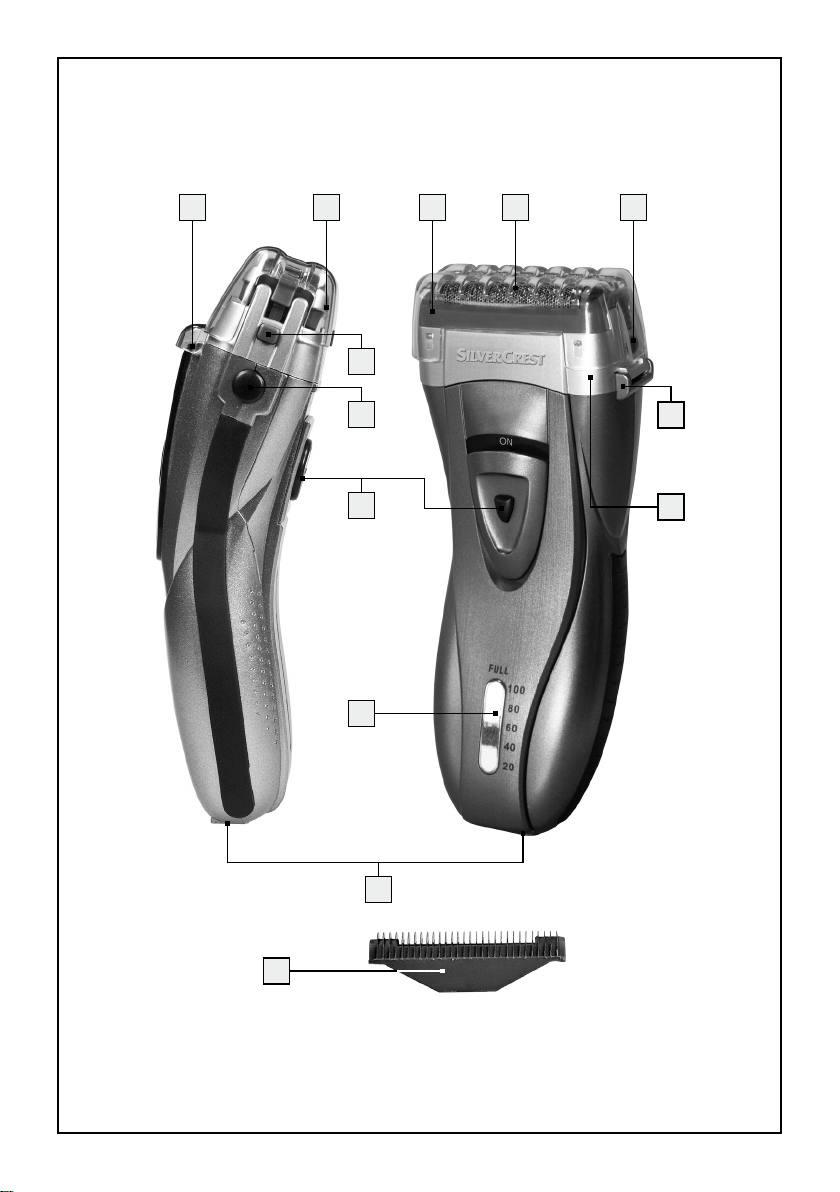
Description of parts
1
Long hair trimmer
2
Protective cap = 3-day beard attachment
3
Shaving foil frame
4
Shaving foil
5
Release button for foil frame
6
Release button for shaving head
7
ON / OFF switch
8
Spring-loaded pop-up hinge for shaver head
9
Shaver head
10
Charge monitor with power indicator
6 GB/IE
Page 7

11
Input socket for plug-in mains adapter
12
Cutter set
Technical data
Introduction / Safety
In order to avoid
experiencing a lifethreatening electric
shock, the following
must be observed
Plug-in mains adapter:
Input voltage: 100–240 V~, 50 / 60 Hz
Output voltage: 4.5 V
Protection class:
Protection type: Splash water protected, IP44
Ambient conditions: For indoor use only
Shaver:
L&P Art. No.: 9113059
Rechargeable
batteries: 2 x 1.2 V HR6 (AA) Ni-MH,
1200 mAh
Permissible ambient
temperature range: 0 °C to +40 °C
, 1000 mA
Safety
Please read these instructions carefully
before using this shaver.
General safety
instructions
This device is not designed to be used
by people (including children) with
limited physical, sensory or mental
abilities or by those who lack the experience and / or knowledge to use it,
unless they are supervised by a person responsible for ensuring safety or
receive instructions from such person
regarding how to use the device. Chil-
dren should be supervised in order to ensure
that they do not play with the device.
Never take hold of the AC adaptor plug with wet
hands when you are inserting it or removing it
from the socket.
Only use the device in line with the specifications
on the type plate.
The installation of a residual-current-operated
protective device (RCD) with a design tripping
current of not more than 30 mA offers more
protection. Installation of such a device should
only be carried out by a certified electrician.
Please keep the shaver and AC
adaptor plug out of the reach of
children.
Switch the device off immediately after using it.
Take hold of the AC adaptor plug when pulling
it out of the socket.
CAUTION! RISK OF ELECTRIC SHOCK!
The device and AC adaptor plug are not waterproof and may not be operated under the
shower or in the bath. Before cleaning the cutting
parts under running water, the shaver must be
disconnected from the flex. When cleaning the
shaving foil
mersed into water. You can clean the casing
with a damp cloth.
CAUTION! RISK OF ELECTRIC SHOCK!
Keep the AC adaptor plug and the flex dry at
all times.
If the device has fallen into water, you must pull
the AC adaptor plug out of the socket before
putting your hand into the water.
4
, the shaver must not be fully im-
7 GB/IE
Page 8

Safety / Before first use
In order to ensure that
your shaver works
perfectly, please observe
the following
Never expose your shaver to temperatures below
0 °C or above +40 °C. Do not place the shaver
down on radiators or fan heaters.
Always make sure that the flex does not get
jammed in cupboard doors or is pulled over
hot surfaces.
Do not use a screwdriver or pliers to change
the cutter set
4
foil
Please use only the original AC adaptor plug
supplied with your shaver for mains operation.
Insert the plug only into a socket within easy
reach. In order to avoid inadmissible overheating,
do not cover the AC adaptor plug.
Please check the AC adaptor plug and shaver
for any mechanical faults at regular intervals.
Replace faulty parts with an original part if
possible (see your specialist dealer). Never try
to repair a faulty appliance yourself! Repairs
should only be carried out by a specialist
dealer or by our service centre (see section
“Warranty and service”).
Used or defective rechargeable bat-
take your used rechargeable batteries to the
designated collection point (see section on
“Disposal”).
12
. This will damage the shaving
.
teries must not be disposed of with
the usual domestic waste! Always
Before first use
CAUTION! Oil residue on the shaving foil.
Due to the manufacturing process, you may find
some oil residue still on the shaving foil when
you unpack the razor. Remove the oil with an
absorbent, lint-free cloth before starting the
device for the first time.
The shaver can be used as a battery-operated or
mains-operated device.
Operating the shaver using the
AC adaptor plug
CAUTION! RISK OF ELECTRIC SHOCK!
Never touch the device with wet hands when it
is connected to the mains supply.
First insert the connection lead of the plug-in
mains adapter into the input socket for the
plug-in mains adapter
the device and insert the plug-in mains adapter
into the mains socket. The device is ready for
immediate use.
11
on the underside of
Charging the rechargeable
batteries
The shaver has two high-capacity Ni-MH rechargeable batteries with overcharge protection. The
batteries can be recharged without undergoing
a reduction in performance. There is no risk of overcharging them.
Note: Allowing the rechargeable batteries to be
completely discharged before recharging them will
increase their overall service life. To completely
discharge the batteries, run the device until the
charge reduces to 20 % and the LED starts to flash
red (indicating that a recharge is necessary).
The rechargeable battery in the shaver should be
charged for at least 120 minutes before the shaver
is used for the first time. For subsequent recharging
processes, a charging time of about 90 minutes is
adequate. Proceed as follows to charge the batteries:
Switch off the device. Slide the ON / OFF
7
switch
Connect the connection lead of the plug-in mains
adapter to the input socket for the plug-in mains
adapter
the charging process.
downwards.
11
on the shaver. The device begins
8 GB/IE
Page 9

Before first use / Use
Note: The green light-emitting diodes (LEDs)
of the charge indicator
10
on the front of the
shaver show the present charge state in percent.
A quick-charge process is completed in 5 minutes.
This method of charging is adequate for one shave.
Fully charged batteries provide enough charge for
cordless operation for about 90 minutes.
If your shaver stops during shaving because a battery has run of out charge then you can continue
by connecting the shaver to the plug-in mains
adapter.
After the shaver is switched off, the indicators show
the present charge state of the batteries for a few
seconds. The LEDs flash green, starting with the
20 % charge state LED then following one after the
other, up to the present charge state. Then the
charge indicator ceases to illuminate.
Advice on battery care: Bear in mind that,
for technical reasons, the capacity of a rechargeable
battery reduces over a long period of non-use.
Therefore you should avoid long periods of non-use
and the associated interruption of the series of
charging and discharging cycles.
Using the safety lock-out
This function prevents the shaver from inadvertently
switching on during transport.
To release the safety lock-out, press the small
button on the ON / OFF switch
7
at the same
time as you switch on the device.
Use
Note:
This device can be used for dry or wet shaving
(Wet & Dry function). The best shaving performance
is obtained on dry skin. For a thorough shave, we
recommend that you first carefully wash and dry
your face and neck first.
Foil shave (dry shave)
Do not use the shaver if you have:
– skin lesions
– inflamed skin
– sunburn
– spots and blisters.
Familiarisation:
After using your shaver, you may have red or irritated
skin for a while. This is a normal reaction because
your skin has to first get used to this kind of shave.
This generally takes 2–3 weeks. Consult a doctor if
the redness or irritation continues for longer than
this period.
CAUTION! THE SHAVER IS NOT WATERPROOF!
the bath as this could damage the appliance.
Remove the protective cap 2 from the shaver
head
Slide the ON / OFF switch 7 upwards. When
doing this press the small black button on the
ON / OFF switch
Now hold the shaver upright and, using slight
pressure, guide it over the surface of the skin
against the direction of hair growth. Use your
free hand to stretch the skin on your face so
that your facial hairs stand up better. A gentle,
circular motion of the shaver head
shave off individual facial hairs.
The integrated long hair trimmer
trim long facial hair.
CAUTION! Avoid pressing too hard down on
the foil to avoid breaking it. Pressing down too
hard on the skin will also have an adverse effect
on the shaving results and can lead to skin irritation.
Switching off: Push the ON / OFF button 7
downwards.
Replace the protective cap 2 to protect the
shaving foil
Do not use under the shower or in
9
.
7
(safety lock-out).
9
1
helps to
4
!
helps to
9 GB/IE
Page 10

Use / Cleaning and maintenance
Wet shave
Use a fine-bubbled shaving foam.
CAUTION! We advise against the use of
shaving gel, as it can stick the foil
cutter set
12
together.
Apply a thin layer of shaving foam to your
face. Shaving foam is the most suitable choice
from the wide range of available cosmetic
shaving products. Do not use a thick layer of
shaving foam, as this can detrimentally affect
the performance of the shaver.
Proceed with the shave in all other respects as
described in the section “Foil shave”.
If the shaving head 9 becomes blocked, rinse
the shaver under running water (refer to the
section “Wet cleaning”).
Trimmer
The trimmer 1 on the back of the device can be
switched on by pushing it out into the locked position.
Slide the trimmer towards the shaving head
far as it will go.
It can be used for shortening longer beard hair,
trimming contours, sideburns and walrus moustaches.
After use, slide the trimmer 1 back into its initial
position.
3-day beard attachment
The supplied protective cap 2 can be used as a
3-day beard attachment. Regular use of this attachment allows you to create the effect of a three day
beard.
Note: Please note that using the 3-day beard attachment produces a shave corresponding to anything
between a 3-day and a 7-day beard, depending
on the rate of growth of your beard.
Place the protective cap 2 on to the shaving
9
head
and ensure it engages. The trimmer 1
is now blocked by the protective cap
4
and the
2
9
as
.
To switch on the device, slide the ON / OFF
7
switch
upwards. You can now trim your beard.
To switch off the device, slide the ON / OFF
7
switch
downwards.
Note: When you are using the protective
2
cap
as a 3-day beard attachment, the direct
contact of the foil with your skin is lost. The natural lubrication of the cutting system by the secretions from your skin no longer takes place. After
each use of the 3-day beard attachment, spread
a drop of cutter or sewing machine oil on the
foil after cleaning. This will preserve the excellent
shaving performance of your shaver.
Take off the protective cap 2 if you wish to
have a “1-day shave” without using the 3-day
beard attachment, or if you wish to use the
trimmer
the shaving head
Cleaning and maintenance
Cleaning
1
. Detach the protective cap 2 from
9
to do this.
CAUTION! RISK OF ELECTRIC SHOCK!
Always disconnect the shaver from the mains
supply and the flex before cleaning it. Do not
immerse into water or other fluids!
Always clean the razor after each use in order
to ensure it works well.
When cleaning the appliance regularly with warm
water, occasionally moisten the long hair trim-
1
mer
and cutter set 12 with sewing machine
oil.
Dry cleaning:
CAUTION! Do not clean the foil with the brush
as this could damage it. Do not remove the foil!
Press the release buttons 5 on the side and
pull the shaving foil frame
3
out or blow it out.
Knock the shaving foil frame 3 out on an even
surface.
Brush the cutter set 12 with the cleaning brush.
10 GB/IE
Page 11

Cleaning and maintenance / Disposal
Wet cleaning:
CAUTION! Above a temperature of about
45 °C there is the risk of scolding injury. Set your
mixer tap to a lower temperature or ensure that no
hot water can come into contact with your hands
or arms.
The shaving head
9
and cutter set 12 can be
washed under lukewarm to hot running water
(max. 70 °C):
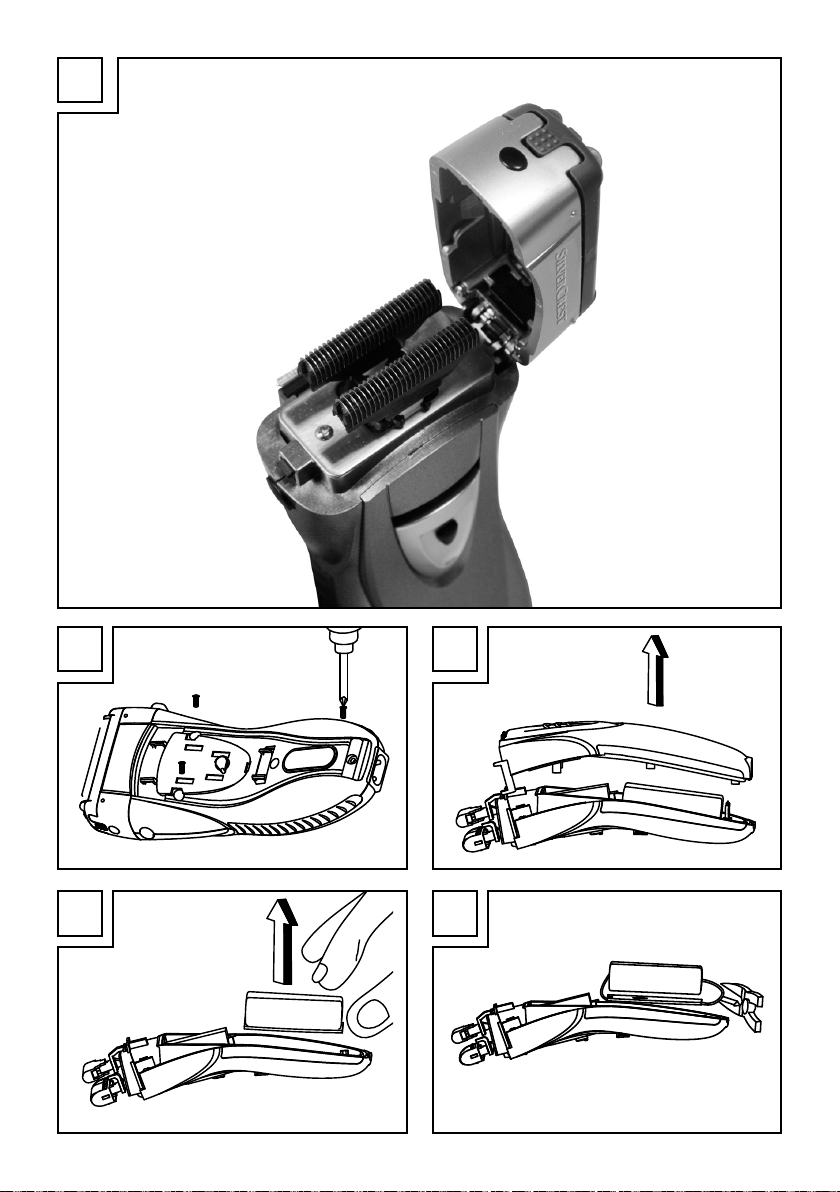
Press the release button 6: The shaving head 9
flips up (see Fig. A).
If necessary add some liquid soap.
Switch on the device during washing to achieve
a more intensive cleaning action (cordless operation only).
Wipe the housing with a soft, slightly moistened
cloth.
Allow the shaver and cutting parts to dry.
CAUTION! In order to avoid accidents, do not
use force when attaching the shaver head
and do not press down on the shaving foil
9
4
Hold the sides of the shaver head 9 and press
it down until it clips into place.
Replace the protective cap 2.
Maintenance
Check cutting parts and replace
if necessary
The quality of the shave is largely affected by the
condition of the cutting parts. As they are subject to
natural wear and tear, you must replace them in
due time.
As both cutting parts adapt themselves to each other
over time, we recommend that you replace the shaving foil
4
(as a unit with the shaving foil frame
3
and the cutter set 12 at the same time. You can
easily order these replacement parts through our
Service Centre (see Service Hotline on the accompanying guarantee sheet).
RISK OF INJURY FROM
SHARP CUTTING EDGES!
CAUTION! In order to avoid injuries, do not
press down on the shaving foil
4
when fitting
it! Replace bent or damaged foils!
Press the release buttons
pull the shaving foil frame
5
on the sides and
3
off upwards.
Take hold of the cutter set 12 at both ends and
pull off upwards.
Insert the new parts in reverse order.
CAUTION! In order to avoid injuries, you
must allow the cutter sets
12
click into place!
Holding only the sides of the shaving foil
3
frame
Disposal
, push down until it clips into place.
You are not permitted to throw away
single-use or rechargeable batteries with
!
household refuse. Please dispose of singleuse or rechargeable batteries through a
battery return system or a battery collection
point run by your dealer or local council.
When you decide to discard the device,
please do not place it (even without batteries) into the household refuse bin.
Contact your local council to find out about
environmentally friendly and proper disposal of the device as electrical scrap.
The packaging consists of environmentally-
friendly materials which you can dispose
of at your local recycling points.
Removal of rechargeable
)
batteries
In order to avoid injuries, do
not operate a disassembled appliance! Do not
short-circuit any rechargeable batteries you remove
from the appliance; they could become very hot if
they are still charged!
11 GB/IE
Page 12

Disposal / Warranty and service
This is how you can disassemble your
appliance to ensure environmentally
friendly disposal of it:
First disconnect the shaver from the AC adaptor
plug.
Remove the decorative strips on the side; lever
the upper cover plate off with a screwdriver or
similar.
Unscrew the 4 screws with a Phillips screwdriver
(see Fig. B).
Disassemble the two halves of the casing with
a screwdriver or similar (see Fig. C).
Separate the batteries and the trimmer or similar
components from the printed circuit board and
the motor (see Figs. D, E). Dispose of the parts
separately.
Warranty and service
The Service Hotline for your country is
shown on the enclosed warranty documentation.
Extreme care was used in the manufacture of our
product. Therefore we are able to provide a warranty
for the defect-free condition and functioning of the
product within the provisions of our warranty terms
and conditions. However, should a fault develop,
we will rectify all defects that are attributable to
faults in materials or manufacture.
The period of warranty is 36 months and begins on
the day of purchase. The performance of a service
under the warranty does not extend or renew the
warranty period. Please retain the sales voucher as
proof of the purchase date. Your warranty rights
under law are not limited by this warranty.
The following types of damage and items are not
covered by the warranty:
– wear parts such as foils
– parts that undergo wear naturally or as a conse-
quence of use,
– damage to fragile components,
– damage caused by unauthorised interference.
– damage caused by the use of non-original replace-
ment parts,
– damage caused by improper handling,
– damage caused by force majeure,
– damage caused by non-observance of the
maintenance advice,
– single-use and rechargeable batteries.
Similarly we cannot accept liability for the consequences of improper use of the device.
Procedure in the case of warranty
In order to ensure quick processing of your request,
please follow the instructions below:
• Please have your receipt and the product number
(e.g. IAN 12345) available for any queries and
as proof of purchase.
• Please take the product number from the type
plate engraving, from the title page of your
instructions (bottom left) or from the label on the
rear side or underside.
• Should functional faults or other defects arise,
first contact the service department by phone.
• You can send a product, which has rst been
registered as defective, postage free to the
address given to you by the service department,
enclosing the purchase slip (receipt) and written
details of the fault and the date it occurred.
Tel: 00800 36 46 36 00 (0.00 EUR / Min.)
4
and cutter set 12,
IAN 74435
12 GB/IE
Page 13

Conformity /
In accordance with the following European directives,
the CE marking has been affixed to the product:
Low-voltage directive (2006 / 95 / EC)
EMC Directive (2004 / 108 / EC)
The attendant declaration of conformity is lodged
at the distributor‘s premises.
LUTTER & PARTNER GmbH
Schleissheimer Str. 93a
D-85748 Garching bei München
Note: As part of ongoing product improvements,
we retain the right to make technical and visual
changes to the shaver and its accessories.
Conformity
13 GB/IE
Page 14

Page 15

Lutter & Partner GmbH
Schleissheimer Strasse 93 a
D-85748 Garching bei München
L&P Art.-Nr. 9113059
© by ORFGEN Marketing
Last Information Update · Stand
der Informationen: 05 / 2012
Ident.-No.: SFR 1200 A1052012-6
IAN 74435
 Loading...