

JUICER SFE 450 D2
JUICER
Operating instructions
SOKOVNIK
Navodilo za uporabo
ODŠŤAVOVAČ
Návod na obsluhu
IAN 284970
CPe284970 Entsafter_Cover_LB4.indd 2 12.12.16 09:16
GYÜMÖLCSCENTRIFUGA
Kezelési útmutató
ODŠŤAVŇOVAČ
Návod k obsluze
ENTSAFTER
Bedienungsanleitung
__CPE284970_Fruchtentsafter_B4.book Seite 1 Donnerstag, 1. Dezember 2016 8:35 20
English..................................................................................... 2
Magyar ................................................................................. 20
Slovenšêina ........................................................................... 38
éesky.................................................................................... 54
Slovenêina............................................................................. 70
Deutsch ................................................................................. 88
ID: SFE 450 D2_16_V1.6
18
15
15
18
1515
5
7
1
2
3
4
8
5
10
14
13
15
16
18
7
12
17
11
9
6
19
1
12
2
18
5
4
6
20
8
__CPE284970_Fruchtentsafter_B4.book Seite 2 Donnerstag, 1. Dezember 2016 8:35 20
Overview / Áttekintés / Pregled / Pįehled / PrehĘad / Übersicht
A
B
C
D
E
F
16
G
19
H
2
3
10
11
I
1
12
2
K

__CPE284970_Fruchtentsafter_B4.book Seite 2 Donnerstag, 1. Dezember 2016 8:35 20
Contents
1. Overview ........................................................................................ 3
2. Intended purpose ............................. .... ... ...................... .... ... ........... 4
3. Safety information ........................................................................... 4
4. Items supplied ................................................................................. 7
5. How to use ...................................................................................... 7
5.1 Disassembly......................................................................................... 8
5.2 Assembly............................................................................................. 8
6. Preparing food ................................................................................ 9
7. Operation ........................................................................................ 9
7.1 General............................................................................................... 9
7.2 Interruptions during juice extraction....................................................... 10
8. Cleaning and storing ..................................................................... 11
8.1 Disassembly............ ............... .............. ............... .............. ............... .. 12
8.2 Cleaning................. ............... .............. .............................................. 12
8.3 After cleaning..................................................................................... 13
8.4 Storage ............................................................................ ............... .. 13
9. Disposal ........................................................................................ 14
10.Troubleshooting ............................................................................. 14
11.Technical specifications .................................................................. 15
12. Recipes .......................................................................................... 15
13.Warranty of the HOYER Handel GmbH ........................................... 17
2
GB
__CPE284970_Fruchtentsafter_B4.book Seite 3 Donnerstag, 1. Dezember 2016 8:35 20
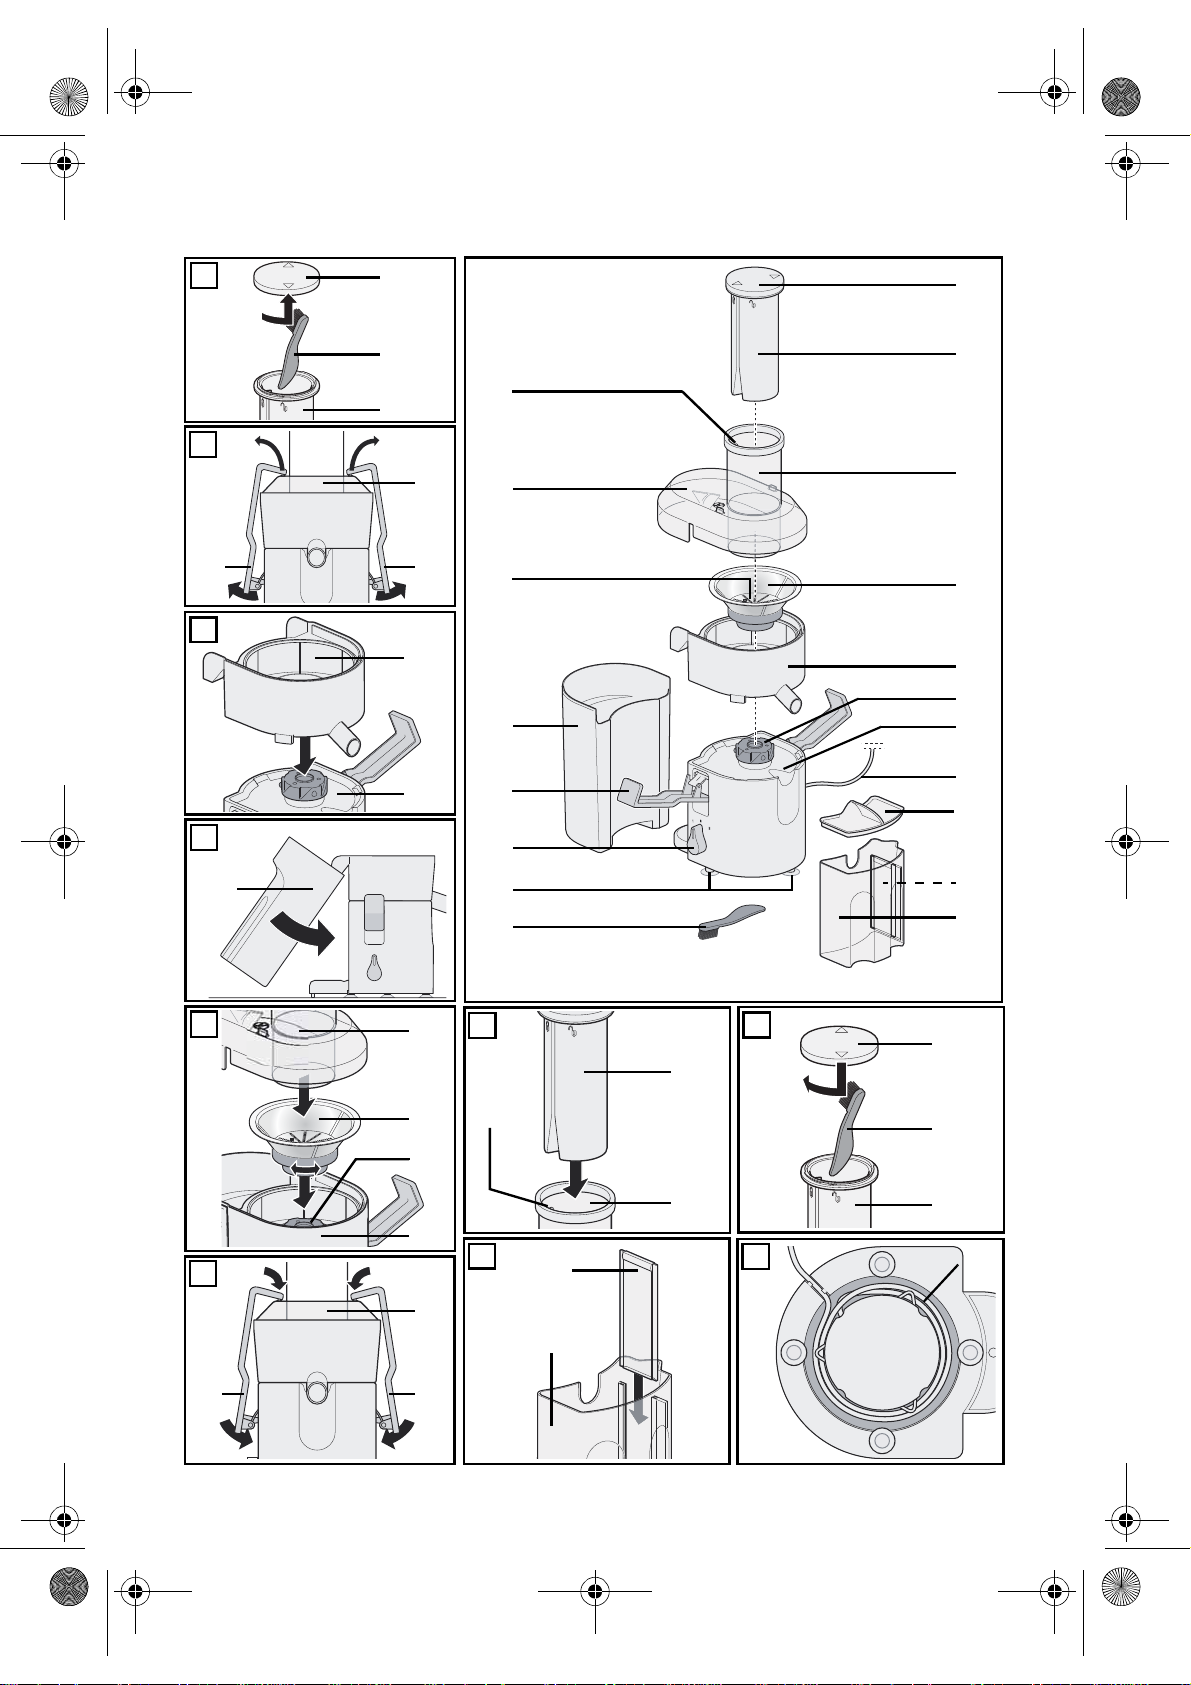
1. Overview
1 Lid of the food pusher
2 Food pusher
3 Food chute
4 Micro-mesh strainer with chopping unit
5 Juice collector pan
6 Drive unit
7 Motor block
8 Power cable with mains plug
9 Lid of the juice co ntainer
10 Foam separator
11 Juice container (stored inside pulp container|16 upon delivery)
12 Brush (for cleaning the micro-mesh strainer) (stored inside food pusher|2 upon deliv-
ery)
13 Suction feet
14 1 0 2 On/off switch (with two speed settings)
15 Safety catch
16 Pulp container
17 Chopping unit (small blades)
18 Lid
19 “Ridge” in food chute
20 Cable spool
Thank you for your trust!
Congratulations on your new juice extractor.
For a safe handling of the device and in or-
der to get to know the entire scope of features:
• Thoroughly read these operating instru ctions prior to initial
commissioning.
• Above all, observe the safety instructions!
• The device should only be used
as described in these operating
instructions.
• Keep these operating instructions for reference.
• If you pass the device on to
someone else, please in c lude
these operating instructions.
We hope you enjoy your new juice extractor!
Symbols on your appliance
Never reach into the food chute
while the micro-mesh strainer is rotating.
The food-safe material of devices
with this symbol will not ch ange the
taste or smell of food.
GB
3

__CPE284970_Fruchtentsafter_B4.book Seite 4 Donnerstag, 1. Dezember 2016 8:35 20
2. Inten ded purpose
The device is intended for extracting juice
from prepared fruit and vegetables.
The device is designed for use in private
households. The device must only be used indoors.
This device must not be used for commercial
purposes.
Foreseeable misuse
WARNING! Risk of material damage!
~ The device must not be used for very
hard fruit and vegetables (e.g. sugarcane) or for very fibrous fruits/vegetables (e.g. rhubarb, bananas, papayas,
avocados, figs).
~ Thick or firm skins (e.g. of citrus fruits,
pineapples) and stones of stone fruits
(e.g. cherries, peaches, apricots) must
be removed before juice extraction.
3. Safety information
Warnings
If necessary , the following warnings will be
used in these operating instructions:
DANGER! High risk: failure to observe this warning may resu lt in inju-
ry to life and limb.
WARNING! Moderate risk: failure to observe this warning may res ult in i njury or serious material damage.
CAUTION: low risk: failure to observe this
warning may result in minor injury or material damage.
NOTE: circumstances and specifics that
must be observed when handling the device.
Instructions for safe operation
~ Children must be prevented from using this device.
~ This device with its power cable must be stored out of the reach
of children.
~ Cleaning and user maintenance must not be performed by chil-
dren.
~ Children must be supervised to ensure that they do not play with
the device.
~ This device can be used by people with restricted physical, sen-
sory or intellectual abilities or people without adequate experience and/or understanding if they are supervised or instructed
on how to use this device safely and if they are aware of the resulting risks.
~ Never reach into the food chute while the micro-mesh strainer is
rotating. Never hold spoons or similar objects against the rotating micro-mesh strainer. Also keep long hair and loose clothing
well away from the rotating micro-mesh strainer.
4
GB
__CPE284970_Fruchtentsafter_B4.book Seite 5 Donnerstag, 1. Dezember 2016 8:35 20
~ The micro-mesh strainer keeps on turning for a while after the de-
vice has been switched off. Wait until it has stopped turning before opening the device.
~ The small blades at the bottom of the micro-mesh strainer are
sharp. Please be very careful when handling them. When cleaning by hand, best results are achieved by using the provided
cleaning brush.
~ The device must be disconnected from the mains if left unattend-
ed and prior to assembly, disassembly or cleaning.
~ If the rotating micro-mesh strainer is damaged, the device may
not be operated.
~ This device is not intended to be operated using an externa l timer
clock or a separate remote control system.
~ If the power cable of this device should become damaged, it
must be replac ed by the manufa cturer, the manufac turer's customer service department or a similarly qualified specialist, in order
to avoid any hazards.
~ Prior to replacement of parts or attachments which move when in
operation, the device must be switched off and disconnected
from the mains.
~ Please take note of the chapter on cleaning (see “Cleaning and
storing” on page 11).
DANGER for children
~ Packing materials are not children's
toys. Children should not be allowed to
play with the plastic bags: there is a risk
of suffocation.
~ Please ensure that children are not able
to pull the device down from the work
surface with the power cable.
~ Keep the device out of the reach of chil-
dren.
DANGER to and from pets
and livestock
~ Electrical devices can represent a haz-
ard to pets and livestock. In addition,
animals can also cause damage to the
device. For this reason you should keep
animals away from electrical devices at
all times.
DANGER! Risk of electric
shock due t o m oisture
~ The motor block, the power cable and
the mains plug must not be immersed in
water or any other liquids.
~ Protect the device from moisture, water
drops and water spray.
~ If liquid gets into the motor block, re-
move the mains plug immediately. Have
the device checked before reusing.
~ The device should only be used in dry
indoor rooms, not outside and not near
water-filled vessels, e.g. sinks.
~ Never touch the device with wet hands.
GB
5

__CPE284970_Fruchtentsafter_B4.book Seite 6 Donnerstag, 1. Dezember 2016 8:35 20
~ If the device falls into water, disconnect
the mains plug immediately. Only then
is it safe to retrieve the device.
DANGER! Ri sk of elec tric
shock
~ Only plug the mains plug into the wall
socket after the device has been completely assemble d.
~ Only connect the mains plug to a prop-
erly installed and easily accessible wall
socket whose voltage corresponds to
the specifications on the rating plate.
The wall socket must continue to be easily accessible after the device is
plugged in .
~ Ensure that the power cable cannot be
damaged by sharp edges or hot points.
Do not wrap the power cable around
the device.
~ The device is not fully disconnected from
the power supply, even after it is
switched off. In order to fully disconnect
it, pull out the mains plug.
~ When using the device, ensu re that the
power cable cannot be trapped or
crushed.
~ When removing the mains plug, always
pull the plug and never the cable.
~ Disconnect the mains plug fr om the wall
socket…
… if there is a fault,
… when you are not using the de vice,
… when you leave the device unattend-
ed,
… before assembly and disassembly,
… before you clean the device and
… during thunderstorms.
~ To avoid any risk, do not make modifi-
cations to the device.
~ Do not use the device if there is visible
damage to the device or the power cable.
DANGER! Risk of injury
from cutting
~ Never reach into the food chute while
the micro-mesh strainer is rotating. Never hold spoons or similar objects
against the rotating micr o-mesh strainer.
Also keep long hair and loose clothing
well away from the rotating micro-mesh
strainer.
~ The micro-mesh strainer keeps on turn-
ing for a while after the device has
been switched off. Wait until it has
stopped turning before opening the device.
~ The small blades at the bottom of the mi-
cro-mesh strainer are sharp. Please be
very careful when handling them.
When cleaning by hand, best results
are achieved by using the provided
cleaning brush.
FIRE HAZARD!
~ Never switch on the device at the same
time as there is another device with a
high power consumption attached to the
same multi-socket po wer strip.
~ When using an extension cable, this
must correspond to the applicable safety regulations.
WARNING! Risk of material
damage
~ The device is designed for a maximum
operating time of 30 minutes without interruption. After this period of operation, the device must remain switched
off until the motor block has cooled
down completely.
~ In order to prevent damage to the de-
vice, please do not apply too much
pressure to the food pusher. Interrupt the
juice extraction process immediately if
the micro-mesh strainer stops turning or
is turning with difficulty. Unplug the
mains plug to check whether there is an
obstruction blocking the micro-mesh
6
GB
__CPE284970_Fruchtentsafter_B4.book Seite 7 Donnerstag, 1. Dezember 2016 8:35 20
strainer and whether the device is assembled correctly.
~ Do not use the device if the micro-mesh
strainer is damaged.
~ Please be careful not to damage the mi-
cro-mesh strain er. Do not apply to much
pressure to the micro-mesh strainer.
~ Only use the original accessories.
~ Never place the device on hot surfaces
(e.g. hob plates) or near heat sources or
open fire.
~ Do not use any astringent or abrasive
cleaning agents.
~ The device is fitted with non-slip plasti c
feet. As furniture is coated with a variety
of different varnishes and acrylics and
treated with different cleaning agents,
we cannot rule out that some of these
substances could damage and soften
the rubber feet. If necessary, place a
non-slip mat under the device.
NOTES:
• Do not store the fruit juice for mor e than
24 hours in the juice container or in
contact with other parts of the product.
This also applies to storage in the refrigerator.
• Some foodstuffs (e.g. carrots) stain the
plastic. Apply some cooking oil and
place it in the dishwasher.
In this way, most stains are removed effortlessly. Stains do neither damage the
plastic, nor do they affect the taste.
4. Items supplied
1 Juice extractor consisting of
- Food pusher|2 with lid|1 and
brush|12
-Lid|18
- Micro-mesh strainer|4
- Juice collector pan|5
- Motor block|7
- Juice container|11 with lid|9 and
foam separator|10
- Pulp container|16
1 copy of the user instructions
5. How to use
DANGER! Risk of injury from
cutting
~ Please keep in mind during operation,
that the small blades|17 at the bottom
of the micro-mesh strainer|4 are sharp.
WARNING!
~ If the micro-mesh strainer|4 is dam-
aged, the device may not be operated.
NOTE:
• Please clean the device prior to the first
use (see “Cleaning and storing” on
page 11).
• Remove all packing material.
• Check to ensure that all parts are present and undamaged.
GB
7
__CPE284970_Fruchtentsafter_B4.book Seite 8 Donnerstag, 1. Dezember 2016 8:35 20
5.1 Disassembly
The device is delivered completely assembled. For cleaning before the first use, the
device must be disassembled.
1. Pull the food pusher|2 off u pwa r ds from
the food chute|3.
2. Figure A: rotate the lid of the food
pusher|1, so that one of the arrows
points at the open lock symbol on the
food pusher|2. From inside the food
pusher|2, remove the brush|12.
3. Reattach the lid of the food pusher|1 to
the food pusher|2, so that one of the ar-
rows points at the open lock symbol| .
Turn the arrow to point at the closed
lock symbol .
4. Figure B: release the two safety catches|15 at the lower end, and unhook
them from the lid|18 at the top.
5. Remove the lid|18 upwards.
6. Hold the pulp container|16 by the two
recessed grips and lift it away from the
motor block|7 at a slight angle.
7. Remove the juice container|11 from the
pulp container|16.
8. Remove the lid|9 from the juice container|11.
9. Pull the foam separator|10 up ward s out
of the juice container|11.
10.Using both hands, pull out the juice collector pan|5 with the micro-mesh strainer|4 upwards.
11.Remove the micro-mesh strainer|
the juice collector pan|5.
12.Disassembly is completed. Begin the
cleaning process (see “Cleaning and
storing” on page 11).
4 from
5.2 Assembly
1. Before operation, fully unwind the power cable|8 from around the cable
spool|20.
2. Place the device on a dry , level, non-slip
and heat-resistant surface.
3. Figure C: place the juice c ollector
pan|5 on the motor block|7.
4.
Figure D:
slightly and push it under the outlet of the
juice collec tor pan|
the device a t the bottom .
5. Figure E: place the micro-mesh strainer|4 onto the drive unit|6. Rotate the micro-mesh stra iner|4 if necessary, until it
fits into the recesses and can be pressed
down completely . It mu st sit firmly on the
drive unit|6.
6. Figure E: replace the lid|18.
7. Figure F: close the safety catches|15
by placing them on top of the lid|18
and pushing them down until they click
into place.
NOTE:
• The device will only work if it has been
assembled correctly and the safety
catches|15 are firmly closed.
8. Figure G: fit the food pusher|2 into the
food chute|3 on the lid|18 in such a
manner, that the little ridge|19 on the
edge of the food chute|3 fits into the
groove on the food pusher|2.
9. Figure H: slide the foam separator|10
into the holder in the juice con tainer|11
from above. An opening is left at the
bottom.
10.Place the lid|9 onto the juice container|11.
11.Slide the juice container|11 under the
outflow of the juice collector pan|5.
tilt the pulp conta iner|16
5
. Then slide it towar ds
8
GB
__CPE284970_Fruchtentsafter_B4.book Seite 9 Donnerstag, 1. Dezember 2016 8:35 20
6. Preparing food
WARNING!
~ The device must not be used for very
hard fruit and vegetables (e.g. sugarcane) or for very fibrous fruits/vegetables (e.g. rhubarb, bananas, papayas,
avocados, figs).
~ Thick or firm skins (e.g. of citrus fruits,
pineapples), stems, and the stones of
stone fruits (e.g. cherries, peaches, apricots) must be remo ved before juice extraction.
NOTES:
• Dried fruit is not suitable for ju ice extr action. It contains too little juice.
• To ensure that the juice has the highest
possible vitamin content, use fres hly harvested, seasonal fruit and vegetables
and drink the juice immediately after it
has been produced.
• T o ensure that apples do not turn brown,
add a little lemon juice.
• Do not store the fruit juice for mor e than
24 hours in the juice container or in
contact with other parts of the product.
This also applies to storage in the refrigerator.
e.g. carrots and apples can be processed as a whole.
7. Operation
DANGER! Risk of injury from
cutting
~ Never reach into the food chute|3 while
the micro-mesh strai ner|4 is rotating.
Never hold spoons or similar objects
against the rotating micro-mesh strainer|4. Also keep long hair and loose
clothing well away from the rotating micro-mesh strainer|4.
~ The micro-mesh strainer|4 keeps on turn-
ing for a while after the device has
been switched off. Wait until it has
stopped turning before opening the device.
CAUTION:
~ The device is designed for a maximum
operating time of 30 minutes without interruption. After this period of operation, the device must remain switched
off until the motor block|7 has cooled
down completely.
• The fruit used should be as ripe as possible. It will produce lots of juice. W ith unripe fruit, it may be necessary to clean
the micro-mesh strainer|4 more often.
• Remove overripe or mouldy fruit. Wash
the fruit and vegetables.
• Coarse or hard peels (e.g. of citrus
fruits, mangoes, pomegranates and
pineapples) must be removed.
• Thin peels (e.g. of apples or pears), thin
stems (e.g. of blackcurrants) and small
pips (e.g. of apples or raspberries) do
not need to be removed.
• Cut large fruit and vegetables into pieces which fit into the food chute|3. The
device has a wide food chute, so that
7.1 General
1. Check that the device has been completely assembled and that the on/off
switch|14 is set to 0.
2. F ully unwind the power cable|8 from
around the cable spool|20.
3. Plug the mains plug|8 into an easily accessible wall socket.
4. Turn the on/off switch|14 to the desired
processing speed:
- I (lower speed) for soft and water-rich
fruit and vegetables, such as raspberries, cucumbers, tomatoes, grapes,
watermelon.
- II (higher speed) is suitable for all oth-
er types of fruit and vegetables.
GB
9
__CPE284970_Fruchtentsafter_B4.book Seite 10 Donnerstag, 1. Dezember 2016 8:35 20
5. Remove the food pusher|2 from the
food chute|3, fill the prepared foodstuffs
into the chute|3 and close it as quickly
as possible with the food pusher|2.
6. Pr ess the food pusher|2 down slowly
with only a little pressure. In this way
you achieve the greatest juic e extraction
yield.
7. To pause the juice extraction process,
turn the on/off switch|14 to 0. Empty
the pulp container|16 if necessary:
- Open the safety catches|15.
- Remove the lid|18.
- Tilt the pulp container|16 slightly, re-
move it and empty it.
8. Empty the juic e from the juice container|11 at the latest when the maximum
filling level of 1 litre has been reached.
NOTE:
• The foam separator|10 ensures that
most of the foam stays in the juice container|11. Pour the juice out slowly.
9. To switch off the device, turn the on/off
switch|14 to 0. Unplug the mains
plug|8 and wait until the micro-mesh
strainer|4 has come to a standstill before you take off the lid|18. Clean the
device as soon as possible after use.
7.2 Interruptions during juice
extraction
Operating period
If the device has been in operation for 30
minutes without interruption, switch it off until the motor block|7 has cooled down completely.
Emptying the micro-mesh
strainer / removing blockages
• The micro-mesh strainer|4 must be emp-
tied when...
… the juice coming out becomes thicker,
… if juice is coming out between the
lid|18 and the juice collector pan|5
or
… when the motor becomes audibly
slower.
• Blockage: if a piece of fruit or vegeta-
ble is blocking the mi cro-mesh strainer|4, it must be removed immediately.
You can recognise a blockage...
… if no more juice is produced,
… if the fruit can no longer be pressed
down in the food chute,
… if there are unusual sounds, or
… when the motor becomes audibly
slower.
• Proceed as follows:
-Turn the on/off switch|14 to 0.
- Pull out the mains plug|8.
- Wait until the micro-mesh strainer|4
has come to a standstill.
- Open the safety catches|15.
- Remove the lid|18.
- Lift off the juice collector pan|5 with
the micro-mesh strainer|4 upward s.
- Remove the micro-mesh strainer|4
and empty it.
- Reassemble the parts and proceed
with juice extraction .
10
GB
__CPE284970_Fruchtentsafter_B4.book Seite 11 Donnerstag, 1. Dezember 2016 8:35 20
Emptying the pulp container
• The pulp c onta iner |16 must be emptied
when it is full. Check the filling level
from time to time, e.g. when emptyin g
the micro-mesh strainer|4.
• To empty the pulp container|16:
-Turn the on/off switch|14 to 0.
- Pull out the mains plug|8.
- Wait until the micro-mesh strainer|4
has come to a standstill.
- Open the safety catches|15.
- Remove the lid|18.
- Tilt the pulp container|16 slightly, re-
move it and empty it.
- Reassemble the parts and proceed
with juice extraction.
8. Cleaning and storing
Clean the device befo re the first use
and after every subsequent use!
DANGER! Risk of electric
shock through moisture !
~ The motor block|7, the power cable
and the mains plug|8 must not be immersed in water or any other liquids.
~ Disconnect the mains plug|8 from the
wall socket, …
- before assembling or disassembling
the device and
- before you clean the device.
DANGER! Risk of injury from
cutting
~ The small blades|17 at the bottom of
the micro-mesh strai ner|4 are sharp.
Please be very careful when handling
them. When cleaning by hand, please
use the provided cleaning brush|12.
WARNING! Risk of material damage!
~ Please be careful not to damage the mi-
cro-mesh strainer|4. Do not apply to
much pressure to the micro-mesh strainer surfaces.
~ No part of the device may be cleaned
with boiling water.
~ Please clean all parts immediately after
use. In this way, you can prevent the
fruit residues from drying on the device
and causing possible blockage (e.g. of
the screen).
~ Do not use any astringent or abrasive
cleaning agents.
GB
11
__CPE284970_Fruchtentsafter_B4.book Seite 12 Donnerstag, 1. Dezember 2016 8:35 20
8.1 Disassembly
1. Pull the food pusher|2 off u pwa r ds from
the food chute|3.
2. F o r thorough cleaning in the dishwasher, and in order to remove the brushes|12: rotate the lid of the food
pusher|1, so that one of the arrows
points at the open lock symbol on the
food pusher|2, and remove the lid.
3. Figure B: release the two safety catches|15 at the lower end, and unhook
them from the lid|18 at the top.
4. Remove the lid|18 upwards.
5. Hold the pulp container|16 by the two
recessed grips and lift it away from the
motor block|7 at a slight angle.
6. Remove the lid|9 from the juice container|11 upwards.
7. Pull the foam separator|10 up ward s out
of the juice container|11.
8. Using both hands, pull out the juice collector pan|5 with the micro-mesh strainer|4 upwards.
9. Remove the micro-mesh strainer|4 from
the juice collector pan|5.
10.Disassembly is completed. Begin the
cleaning process.
8.2 Cleaning
Outer surfaces
• Clean the motor block|7 and the power
cable|8 with a soft, slightly moistened
cloth.
Cleaning by hand
WARNING!
~ The micro- mesh strainer|4 must not be
cleaned in a dishwasher.
NOTE:
•The brush|12 included in delivery for
cleaning the micro-mesh strainer|4 is located inside the food pusher|2 upon delivery. It can be stored there after
thorough cleaning.
• Figure A: rotate the lid of the food
pusher|1, so that one of the arrows
points at the open lock symbol on the
food pusher|2. From inside the food
pusher|2, remove the brush|12 included in delivery.
• The micro- mesh strainer|4 can be
cleaned with the brush|12. Hold the micro-mesh strainer|4 under flowing water
and clean it from both sides with the
brush|12.
12
GB
__CPE284970_Fruchtentsafter_B4.book Seite 13 Donnerstag, 1. Dezember 2016 8:35 20
In the dishwasher
WARNING!
~ The micro-mesh strainer|4 must not be
cleaned in a dishwasher.
NOTES:
• If the dishwasher is not going to be
switched on immediately, all parts
should be rinsed off briefly after use. In
this way, you can prevent foods from
drying out and producing stains on the
appliance parts.
• Some foods (e.g. carrots) can stain the
plastic. Apply some cooking oil and
place it in the dishwasher.
In this way, most stains are removed effortlessly. Stains do neither damage the
plastic, nor do they affect the taste.
• The following parts can be cleaned in
the dishwasher:
- food pusher|2,
- the lid of the food pusher|1,
- the juice collector pan|5,
- the juice container|11,
- the foam separator|10,
- the lid of the juice container|9,
- the pulp container|16 and
-the lid|18
• Remove the pulp from the pulp container|16 and dispose of it promptly.
• Place the parts in the dishwasher.
8.3 After cleaning
• Before assembling, packing and storing
the device, allow the parts to dry completely.
• For assembly: (see “Assembly” on
page 8)
8.4 Storage
DANGER for children !
~ Please store the juice e xtractor out of the
reach of children.
• The device must be completely cleaned
and dried before being put into storage.
• Select a location where neither high
temperatures nor moistur e can affect the
device.
• The fully dried brush|12 can be st o red
in the food pusher|2:
-Place the brush|12 into the food push-
er|2.
- Figure I: place the lid of the food
pusher|1 onto the food pusher|2, so
that one of the arrows points at the
open lock symbol| . Turn the arrow
to point at the closed lock symbol .
• Figure K: the power cable|8 can be
wound around the cable spool|20 on
the underside of the motor block|7 for
storage.
GB
13
__CPE284970_Fruchtentsafter_B4.book Seite 14 Donnerstag, 1. Dezember 2016 8:35 20
9. Disposal
This product is subject to the
provisio ns of Europ ean Dire ctive 2012/19/EC. The symbol showing a wheelie bin
crossed through indicates
that the product requires separate refuse collection in the European Union. This applies to the product and all
accessories marked with this symbol. Products identified with this symbol may not be
discarded with normal household waste, but
must be taken to a collection point for recycling electric and electronic appliances. Recycling helps to reduce the consumption of
raw materials and protect the environment.
Packaging
When disposing of the packaging, make
sure you comp ly with the en vi r onm ental r egulations applicable in your country.
10. Troubleshooting
If your device fails to function as required,
please try this checklist first. Perhaps there is
only a minor problem, and you can solve it
yourself.
DANGER! Risk of electric
shock!
~ Do not attempt to repair the device your-
self under any circumstances.
Fault
No function
Possible causes/
Action
• Has the device been
connected to the power supply?
• Are the safety catches|15 closed correctly?
Fault
The device
smells strange,
is making an
unusual noise
or is heating up
excessively.
The motor
comes to a
standstill.
Juice is leaking
from under the
lid|18.
The micro-mesh
strainer|4 is vibrating st rongly or is making
grinding noi ses.
The micro-mesh
strainer|4 gets
blocked.
V ery moist fruit
residue - very
little juice.
Possible causes/
Action
• Switch the on/off
switch|14 to 0 and
unplug the mains
plug|8. Allow the device to cool down.
• W as the device in operation continuously
for longe r than 30
minutes?
• Is the micro-m esh
strainer|4 blocked?
• Is the micro-m esh
strainer|4 blocked?
• Place less pressure on
the food pusher|2 and
work more slowly.
• Is the micro-m esh
strainer|4 blocked?
• Switch the on/off
switch|14 to 0, unplug the mains plug|8
and wait for the micromesh strainer to come
to a|4 standstill.
Check whether the micro-mesh strainer|4 is
correctly installed and
stable.
• Foreign matter in the
micro-mesh strainer|4?
• Foodstuffs too hard?
• Place less pressure on
the food pusher|2 and
work more slowly.
• Place less pressure on
the food pusher
work more slowly.
2 and
|
14
GB

__CPE284970_Fruchtentsafter_B4.book Seite 15 Donnerstag, 1. Dezember 2016 8:35 20
11. Technical
specifications
Model: SFE 450 D2
Mains voltage: 220 - 240 V~,
50 Hz
Protection class: II
Volume of juice con-
tainer:
Volume of pulp con-
tainer:
KB
(short operating
time):
Power rating: Max. 450 W
Subject to technical modification.
1litre
2.5 litres
up to 30 min.
12. Recipes
NOTES:
• Prepare fruit as described (see “Preparing food” on page 9).
• The fo llowing recipes are suggestions .
Try you own variations. The following
recipes are for 2 - 4 glasses. The quantity depends on the size of the fruit, the
yield and the processing speed.
Tips
• Freshness count s : drink your juice
freshly pressed. Only press as much as
you are likely to drink right away, as the
juice does not last long.
• How to make your juices last
longer: to make your juice last longer,
you should pasteurise i.e. heat it. Heat
the juice quickly to approx. 72 °C. Do
not let the juice boil, as this would destroy the vitamins.
• Jelly: boil the juice with sugar and a
gelling agent to produce jelly.
• Sorbet: mix the juice with sugar syrup
and let it freeze. F or the sorbet to become creamy and to prevent lumps from
forming, it needs to be stirred often.
• Seasoning: vegetable juices can be
"pepped up" very well with salt, pepper
and other spices.
• Carrots: the provitamin A from carrots
will be absorbed better by the body if
you add a few drops of oil or if you consume it together with food containing
fats.
GB
15

__CPE284970_Fruchtentsafter_B4.book Seite 16 Donnerstag, 1. Dezember 2016 8:35 20
Early starter
3 carrots
2 apples
1 orange
1. Extract the juice from the carrots, apples
and oranges one after another.
2. Stir well and, if desired, serve with ice
cubes.
Fire devil
3 beetroots
1-3 squirts of tabasco
1. Extract the juice from the beetroots.
2. Add tabasco to taste and stir well.
Red and yellow
1 beetroot
3 oranges
1. Extract the juice from the beetroots and
oranges.
2. Stir well.
Pineapple-mango-apple-orange
1/2 pineapple
1 mango
1 apple
1 orange
1. First of all, extract the juice from the apple and orange.
2. Extract the juice from the mango.
3. Extract the juic e from the halved pineapple.
4. Stir well and enjoy right away.
Pineapple-mango
1/2 pineapple
1 mango
1. Extract the juice from the mango.
2. Extract the juic e from the halved pineapple.
3. Stir well and enjoy right away.
Green hell
2 green apples
3 kiwis
1/2 cucumber
1. Extract the juice from the apples, kiwis
and the halved cucumber.
2. Stir well and enjoy right away.
Kiwi-grapes-lemon
3 kiwis
500 g grapes
1 lime (or lemon)
1. Extract the juice from the kiwis, grapes
and the lime.
2. Stir well and enjoy right away.
Pomegranate and co.
1 pomegranate
1/4 pineapple
1 orange
1. Scoop out the pips from the pomegranate and extract the juice.
2. Extract the juice from the quartered
pineapple and orange.
3. Stir well and enjoy right away.
Fruity bell peppers
2 red bell peppers
3 oranges
2 apples
2 pears
1. Juice oranges, apples, pears and bell
peppers consecutively.
2. Stir well and enjoy right away.
Orange-apple-lemon-pineapple
1 orange
1 apple
1 lemon
1/4 pineapple
1. Extract the juic e from the fruits.
2. Stir well and enjoy right away.
16
GB
__CPE284970_Fruchtentsafter_B4.book Seite 17 Donnerstag, 1. Dezember 2016 8:35 20
13. Warranty of the
HOYER Handel GmbH
Dear Customer,
your device is provided with a 3 year warranty starting with the purchase date. In the
event of product defects, you ar e entitled to
statutory rights against the vendor. These
statutory rights are not restricted by our warranty presented in the following.
Warranty conditions
The warranty period s tarts with the purchase
date. Please keep the original purchase receipt in a safe place. This document is required to verify the purchase.
If within three years fr om the pur chase date
of this product a material or factory defect
occurs, the product will be repaired or replaced by us – at our discretion – free of
charge to you. This warranty implies that
within the period of three years the defective
device and the purchase receipt are pr esented, including a brief written description of
the defect and the time it occurred.
If the defect is covered by our warranty, the
repaired or a new product will be returned
to you. No new warranty period starts with
a repair or replacement of the product.
Warranty period and statutory
claims for defects
The warranty period is not extended when
the warr anty has been claimed. T his also ap plies to replaced and repaired parts. Any
damages and defects already existing at the
time of purchase must be reported immediately upon unpacking. Repairs arising after
the expiration of the warranty period are
subject to a charge.
Warranty coverage
The device was produced carefully according
to strict quality guidelines and tested diligently prior to delivery.
The warr a nty ap pl ies to mat er ial o r fa ctory
defects.
Excluded from the warranty are
wear parts subject to normal wear
and damages to fragile parts, e.g.
switches, batteries, la mp s or othe r
parts manufactured from glass.
This warranty expires if the product is damaged, not used as intended or not serviced.
For the proper operation of the product, all instructions listed in the operating instructions
must be observed carefully. Any form of use
and handling that is advised against in the
operating instructions or warned against
must always be avoided.
The product is only intended for private and
not for commercial use. In the case of incorrect and improper treatment, use of force and
interventions not performed by our authorised Service Centre, the warranty shall cease.
Handling in case of a warranty
claim
In order to ensure prompt proc essing of your
matter, please observe the following notes:
• Please keep th e article numb er
IAN: 284970
as a purchase verification for all inquiries.
• The article number can be found on the
rating plate, an engraving, the title
page of your instructions (in the bottom
left), or as a label on the rear or underside of the device.
• If faulty operation or other defects occur ,
first contact the Service Centre listed in
the following by telephone or email.
• Then, you are able to send a product reported as defective free of charge to the
service address specified to you, including the purchase receipt and the information on the defect and when it
occurred.
Please visit www .lidl-service.com to
download this and many other
manuals, product videos and software.
and the purchase receipt
GB
17
GB
IE
__CPE284970_Fruchtentsafter_B4.book Seite 18 Donnerstag, 1. Dezember 2016 8:35 20
Service Centre
Service Great Britain
Tel.: 0871 5000 720 (£ 0.10/Min.)
E-Mail: hoyer@lidl.co.uk
Service Ireland
Tel.: 1890 930 034
(0,08 EUR/Min., (peak))
(0,06 EUR/Min., (off peak))
E-Mail: hoyer@lidl.ie
IAN: 284970
Supplier
Please note that the following address is no
service address. First contact the afore-
mentioned Service Centre.
HOYER Handel GmbH
Tasköprüstraße 3
22761 Hamburg
Germany
18
GB
__CPE284970_Fruchtentsafter_B4.book Seite 19 Donnerstag, 1. Dezember 2016 8:35 20
GB
19
__CPE284970_Fruchtentsafter_B4.book Seite 20 Donnerstag, 1. Dezember 2016 8:35 20
Tartalom
1. Áttekintés....................................................................................... 21
2. RendeltetésszerŅ használat............................................................. 22
3. Biztonsági utasítások...................................................................... 22
4. A csomag tartalma ......................................................................... 25
5. Üzembe helyezés............................................ ... .... ...................... ... 25
5.1 Szétszerelés ........................................................................................ 26
5.2 Összeszerelés ..................................................................................... 26
6. Az élelmiszerek elĩkészítése........................................................... 27
7. Használat....................................................................................... 27
7.1 Általános tudnivalók............................................................................. 27
7.2 A préselés megszakítása....................................................................... 28
8. Tisztítás és tárolás ................ .... ... ...................... .... ... ...................... 29
8.1 Szétszerelés ........................................................................................ 30
8.2 Tisztítás .............................................................................................. 30
8.3 A tisztítás után..................................................................................... 31
8.4 Tárolás ............................................................................................... 31
9. Leselejtezés .................................................................................... 32
10.Hibaelhárítás.................................................................................. 32
11.MŅszaki adatok.............................................................................. 33
12.Receptek ........................................................................................ 33
13.Garancia ........................................................................................ 35
20
HU
__CPE284970_Fruchtentsafter_B4.book Seite 21 Donnerstag, 1. Dezember 2016 8:35 20
1. Áttekintés
1 a turmixrúd fedele
2 turmixrúd
3 betöltĩnyílás
4 filter aprítóegységgel
5 légyŅjtĩ edény
6 hajtómŅ
7 motorblokk
8 csatlakozóvezeték hálózati csatlakozódugóval
9 a létároló edény fedele
10 hableválasztó
11 létároló edény (kiszállításkor a gyümölcsrostgyŅjtĩ edényben|16 található)
12 kefe (a filter tisztításához) (kiszállításkor a turmixrúdban|2 található)
13 tapadókorong-lábak
14 1 0 2 be-/kikapcsoló (két sebességfokozattal)
15 biztonsági zár
16 gyümölcsrostgyŅjtĩ edény
17 aprítóegység (kis pengék)
18 fedĩ
19 „kiugró rész“ a betöltĩnyílásban
20 kábeltekercselés
Köszönjük bizalmát!
Gratulálunk új konyhai présgépének vásárlásához.
A készülék biztonságos használata,
továbbá a szolgáltatások teljes körŅ megismerése érdekében:
•Az elsĩ használatba vétel elĩtt
figyelmesen olvassa végig a
használati útmutatót.
• Feltétlenül tartsa be az útmutató
biztonsági utasításait!
• A készülék kizáról ag a has z nálati útmutatóban ismertetett
módon üzemeltethetĩ.
• Ĩrizze meg a használati útmutatót.
• Amennyiben késĩbb másnak
adná a készüléket, akkor kérjük, mellékelje a használati
útmutatót is.
Sok örömöt kívánunk az új konyhai présgép
használatához!
Jelek a ké szüléken
Soha ne nyúljon a betöltĩnyílásba,
mialatt a filter forog.
Az ezzel a jelzéssel megjelölt
anyagok nem változtatják meg az
élelmiszerek ízét vagy illatát.
HU
21

__CPE284970_Fruchtentsafter_B4.book Seite 22 Donnerstag, 1. Dezember 2016 8:35 20
2. RendeltetésszerŅ
használat
A készülék elĩkészített gyümölcsök és zöldségek préselésére szolgál.
A készülék kizárólag háztartási célokra
készült. A készülék et belsĩ terekben szabad
csak használni.
A készüléket nem szabad ipari célokra használni.
Rendeltetésellenes használat
FIGYELMEZTETÉS anyagi károkra!
~ A készülék nem h as ználha tó n agy on k e -
mény gyümölcsök és zöldségek (pl. cukornád) vagy magas rosttartalmú
gyümölcsök/zöldségek (pl. rebarbara,
banán, papaja, avokádó, füge) esetében.
~ A vastag, kemény héjakat (pl. citrusfé-
lék, ananász esetén) és a magvas gyümölcsök magvait (pl. cseresznye,
ĩszibarack, sárgabarack) a préselés
elĩtt el kell távolítani.
3. Biztonsági utasítások
Figyelmeztetĩ jelzések
A kezelési útmutató szükség esetén a következĩ figyelmeztetĩ jelzéseket használja:
VESZÉLY! Magas kockázat: A
figyelmeztetés figyelmen kívül
hagyása súlyos, életveszélyes sérü-
lést okozhat.
FIGYELMEZTETÉS! Közepes kockázat: A
figyelmeztetés figyelmen kívül h agyása sérüléseket vagy súlyos anyagi károkat okozhat.
VIGYÁZAT: Alacsony kockázat: A figyelmeztetés figyelmen kívül hagyása könnyŅ
sérüléseket vagy anyagi károkat okozhat.
MEGJEGYZÉS: Tények és különlegességek, amelyeket a készülék használata sor án
ajánlatos figyelembe venni.
Tudnivalók a biztonságos üzemeltetéshez
~ Gyermekek nem használhatják a készüléket.
~ A készüléket és a csatlakozóvezetéket tartsa távol a gyermekek-
tĩl.
~ A tisztítást és a felhasználói karbantartást gyerekek nem végez-
hetik.
~ Felügyelni kell a gyermekeket, hogy biztosan ne játsszanak a
készülékkel.
~ Csökkent fizikai, érzékszervi vagy mentális képességekkel ren-
delkezĩ személyek, illetve akik nem rendelkeznek megfelelĩ
tapasztalattal és/vagy tudással, csak felügyelet mellett használhatják a készüléket, illetve miután a készülék biztonságos használatáról tájékoztatást kaptak és a lehetséges veszélyeket
megértették.
HU
22

__CPE284970_Fruchtentsafter_B4.book Seite 23 Donnerstag, 1. Dezember 2016 8:35 20
~ Soha ne nyúljon a betöltĩnyílásba, mialatt a filter forog. Ne tart-
son kanalat vagy egyéb hasonló tárgyat a forgó filterhez. A hosszú hajat és bĩ ruházatot is tartsa távol a forgó filtertĩl.
~ A filter a kikapcsolást követĩen tovább for og. Várja meg a teljes
leállást, mielĩtt kinyitná a készüléket.
~ A filter alján található kis pengék élesek. Óvatosan bánjon velük.
Kézi tisztítás esetén legjobb, ha a készülékhez járó tisztító kefét
használja.
~ Ha a készüléket felügyelet nélkül hagyja, vagy összeszerelni,
szétszerelni, tisztítani kívánja, elĩtte mindig válassza le az elekt-
romos hál ózatról.
~ Amennyiben a forgó filter sérült, ne használja a készüléket.
~ A készülék nem üzemeltethetĩ külsĩ idĩkapcsoló órával vagy
külön távvezérlĩ rendszerrel.
~ Ha a készülék csatlakozóvezetéke megsérül, akkor azt a gyártó-
val, szervizével vagy más hasonlóan képzett szakemberrel cseréltesse ki a veszélymegelĩzés érdekében.
~ A használat során mozgó tartozékok vagy pótalkatrészek cse-
réje elĩtt kapcsolja ki és válassza le a készüléket az elektromos
hálózatról.
~ Tartsa be a fejezet utasításait a tisztítás során (lásd „Tisztítás és
tárolás” a kö ve tkezõ oldalon|29).
VESZÉL Y gyermekekre
nézve
~ A csomagolóanyag nem gyermekjáték.
Gyermekek nem játszhatnak a
mŅanyag zacskókkal. Fulladásveszély
áll fenn.
~ Ügyeljen rá, hogy a gyerekek ne húz-
hassák le a készüléket a csatlakozóvezetéknél fogva a munkaterületrĩl.
~ Tartsa távol a készüléket a gyermekek-
tĩl.
VESZÉLY házi- és haszonállatokra nézve és az általuk okozott veszély
~ Az elektromos készülékek veszélyt je-
lenthetnek a házi- és haszonállatokra
nézve. Ezenkívül az állatok is károsíthat-
ják a készüléket. Ezért alapvetĩen tartsa
távol az állatokat az elektronikus készülékektĩl.
VESZÉLY Nedvesség
következtében fellépĩ
áramütés
~ A motorblokkot, a csatlakozóvezetéket
és a hálózati csatlakozódugót nem szabad vízbe vagy más folyadékba mártani.
~ Óvja a készüléket a nedvesség tĩl, cse-
pegĩ és fröccsenĩ ví z t ĩl.
~ Amennyiben folyadék kerül a motorb-
lokkba, azonnal húzza ki a hálózati
csatlakozódugót. Az újbóli üzembe helyezés elĩtt ellenĩriztesse a készüléket.
HU
23
__CPE284970_Fruchtentsafter_B4.book Seite 24 Donnerstag, 1. Dezember 2016 8:35 20
~ A készüléket csak szár az belsĩ terekben
használja, ne használja azt a szabadban, valamint vízzel töltött tárolóedények, pl. mosogató közelében.
~ Ne használja a készüléket vizes kézzel.
~ Ha a készülék vízbe esne, akkor a háló-
zati csatlakozódugót azonnal ki kell
húzni. Csak ezután vegye ki a vízbĩl a
készüléket.
VESZÉLY áramütés miatt
~ A hálózati csatlakozót csak akkor dugja
a dugaszolóaljzatba, ha a készüléket
már teljesen összeszerelte.
~ A hálózati csatlakozódugót kizárólag
olyan szabályszerŅen felszerelt, könnyen hozzáférhetĩ dugaszoló aljzathoz csatlakoztassa, amelynek
feszültsége megfelel a készülék adattábláján feltüntetett értéknek. A dugaszoló
aljzatnak a csatlakoztatást követĩen is
könnyen hozzáférhetĩnek kell lennie.
~ Ügyeljen arra, hogy a csatlakozóveze-
ték ne sérüljön meg éles peremek vagy
forró felületek miatt. Ne tekerje a csatlakozóvezetéket a k észülékre.
~ A készülék a kikapcsolását követĩen
még nincs leválasztva a hálózati
áramellátásról. Ehhez ki kell húznia a
hálózati csatlakozódugót.
~ A készülék használata során ügyeljen
arra, hogy a csatlakozóvezeték ne
akadjon vagy csípĩdjön be.
~ A hálózati csatlakozódugó kihúzása-
kor mindig a csatlakozódugót fogja,
soha ne a vezetéket.
~ Húzza ki a hálózati csatlakozódugót a
csatlakozóaljzatból mindig, ...
... ha üzemzavar lép fel,
... ha nem használja a készüléket,
... mielĩtt a készüléket felügyelet nélkül
hagyja,
... össze- és szétszerelés elĩtt,
... mielĩtt a készüléket tisztítaná és
... vihar idején.
~ A veszélymegelĩzés érdekében ne vé-
gezzen módosításokat a készüléken.
~ Ne használja a készüléket, ha azon
vagy a csatlakozóvezetéken látható sérülést talál.
VESZÉLY sérülések vágás
által
~ Soha ne nyúljon a betöltĩnyílásba, mia-
latt a filter forog. Ne tartson kanalat
vagy egyéb hasonló tárgyat a forgó filterhez. A hosszú hajat és bĩ ruházatot
is tartsa távol a forgó filtertĩl.
~ A filter a kikapcsolást követĩen tovább
forog. V árja meg a teljes leállást, mielĩtt
kinyitná a készüléket.
~ A filter alján található kis pengék éle-
sek. Óvatosan bánjon velük. Kézi tisztítás esetén legjobb, ha a készülékhez
járó tisztító kefét használja.
TńZVESZÉLY!
~ Ne kapcsolja be az eszközt másik ma-
gas teljesítményfelvételŅ eszközzel egyszerre, mely ugyanahhoz a többszörös
dugaszolóaljzathoz csatlakozik.
~ Hosszabbító kábel használata esetén a
vonatkozó biztonsági elĩírásoknak
megfelelĩt kell választani.
FIGYELMEZTETÉS anyagi károkra
~ A készüléket maximálisan 30 percig le-
het megszakítás nélkül mŅködtetni. Ezután kikapcsolt állapotban kell tartani a
készüléket, míg a motorblokk teljesen le
nem hŅl.
~ A készülék meghibásodásának elkerülé-
se érdekében ne fejtsen ki a készülékre
erĩs nyomást a tömĩkarral. Azonnal
szakítsa meg a préselési folyamatot, ha
a filter nem vagy csak nehezen forog.
Húzza ki a hálózati csatlakozódugót és
vizsgálja meg, hogy megakasztotta-e
valami a filtert, illetve hogy a készülék
helyesen van-e összeszerelve.
24
HU

__CPE284970_Fruchtentsafter_B4.book Seite 25 Donnerstag, 1. Dezember 2016 8:35 20
~ Ne használja a készüléket, ha a filter
sérült.
~ Ügyeljen arra, hogy a filter ne sérüljön
meg. Ne fejtsen ki nagy nyomást a filterre.
~ Kizárólag eredeti tartozékokat használ-
jon.
~ A készüléket soha ne helyezze forró fe-
lületre (pl. tŅzhelyre), hĩforrások vagy
nyílt láng közelébe.
~ Ne alkalmazzon hegyes eszközöket
vagy súroló hatású tisztítószereket.
~ A készülék csúszásmentes mŅanyag lá-
bakkal van felszerelve. Mivel a bútorok
számos különbözĩ festékkel és
mŅanyaggal vannak bevonva, és különbözĩ ápolószerekkel kezelik ezeket,
ezért nem zárható ki teljességgel, hogy
az ilyen anyagok olyan alkotórészeket
tartalmaznak, amelyek a mŅanyag lábakat megtámadhatják és feloldhatják.
Adott esetben helyezzen csúszásmentes alátétet a készülék alá.
MEGJEGYZÉSEK:
• Ne tartsa a gyümölcslevet 24 óránál tovább a létároló edényben vagy a termék egyéb részeivel érintkezve. Ez a
hŅtĩszekrényben való tárolásra is vonatkozik.
• Bizonyos élelmiszerek (pl. répa) elszínezhetik a mŅanyagot. Dörzsölje be
ezeket a részeket egy kis étolajjal, majd
tegye ĩket a mosogatógépbe.
Ily módon az elszínezĩdések általában
egyszerŅen eltávolíthatók. Az elszínezĩ-
dések nem tesznek kárt a mŅanyagban,
illetve az étel ízét sem befolyásolják.
4. A csomag tartalma
1présgép a következĩ részekkel
-turmixrúd|2 fedéllel|1 és kefével|12
- fedél|18
-filter|4
-légyŅjtĩ edény|5
- motorblokk|7
- létároló edény|11 fedéllel|9 és hableválasztóval|10
-gyümölcsrostgyŅjtĩ edény|16
1 használati útmutató
5. Üzembe helyezés
VÁGÁS ÁLTALI SÉRÜLÉS veszélye!
~ Használatkor ügyeljen arra, hogy a kis
pengék|17 a filter|4 alján élesek.
FIGYELMEZTETÉS!
~ Amennyiben a filter|4 sérült, ne hasz-
nálja a készüléket.
MEGJEGYZÉS:
• Tisztítsa meg a készüléket az elsĩ használat elĩtt (lásd „Tisztítás és tárolás” a
következõ oldalon|29)!
• Távolítson el minden csomagolóanyagot.
• Ellenĩrizze, hogy megvan-e minden tartozék, és sértetlenek-e.
HU
25

__CPE284970_Fruchtentsafter_B4.book Seite 26 Donnerstag, 1. Dezember 2016 8:35 20
5.1 Szétszerelés
A készüléket összeszerelve szállítjuk. Az
elsĩ használatot megelĩzĩ tisztításhoz a k é szüléket szét kell szerelni.
1. Húzza ki a turmixrudat|2 felfelé a betöltĩnyílásból|3.
2. A kép: Fordítsa el a turmixrúd fedelét|1 úgy, hogy az egyik nyíl a turmix rúdon|2 lévĩ nyitott lakat szimbólumra|
mutasson. Vegye ki a turmixrúd|2 belsejébĩl a kefét|12.
3. Helyezze a turmixrúd fedelét|1 vissza a
turmixrúdra|2 úgy, hogy az egyik nyíl a
nyitott lakat szimbólumra mutasson.
Fordítsa a nyilat a zárt lakat
szimbólumhoz .
4. B kép: Oldja ki a két biztonsági zárat|15 az alsó végüknél fogva, és akassza ki ĩket fent a fedélnél|18.
5. Egyenesen emelje le a fedelet|18.
6. Fogja meg a gyümölcsrostgyŅjtĩ
edényt|16 a két fogást segítĩ bemélyedésnél, és enyhén megbillentve húzza
le lefele a motorblokkról|7.
7. Vegye ki a létároló edényt|11 a gyümölcsrostgyŅjtĩ edénybĩl|
8. Vegye ki a fedelet|9 a létároló edénybĩl|11.
9. Húzza ki a hableválasztót|10 felfelé a
létároló edénybĩl|11.
10.Mindkét kezével egyenesen emelje le a
légyŅjtĩ edényt|5 a filterrel|4.
11.Vegye ki a filtert|4 a légyŅjtĩ edénybĩl|5.
12.A szétszerelésnek vége. Kezdje el a
tisztítást (lásd „Tisztítás és tárolás” a következõ oldalon|29).
16.
5.2 Összeszerelés
1. Az üzembe helyezéshez teljesen tekerjük le a csatlakozóvezetéket|8 a kábeltekercselĩrĩl|20.
2. Helyezze a készüléket száraz, vízszintes, csúszásmentes és hĩálló felületre.
3. C kép: Helyezze fel a légyŅjtĩ
edényt|5 a motorblokkra|7.
4.
D kép:
rostgyŅjtĩ edé nyt|
edény|
tolja a készülék irányába.
5. E kép: Helyezze fel a filtert|4 a hajtómŅre|6. Adott ese tben úgy fo rga ssa a
filtert|4, hogy az illeszkedjen a nyílásokba és teljesen lenyomható legyen. A
filternek stabilan kell illeszkednie a hajtómŅre|6.
6. E kép: Tegye fel a fedelet|18.
7. F kép: Csukja be a biztonsági zárakat|15 úgy, hogy fent ráhelyezi ĩket a
fedélre|18, és lenyomja, amíg a helyükre nem kattannak.
MEGJEGYZÉS:
• A készülék csak akkor mŅködik, ha helyesen van összeszerelve és a biztonsági zárak|15 szorosan le vannak zárva.
8. G kép: Úgy tegye a turmixrudat|2 a fedél|3 betöltĩnyílásába|18, hogy a betöltĩnyílás|19 szélén található kiugró
rész|3 illeszkedjen a turmixrúd|2 menetébe.
9. H kép: Tolja a hableválasztót|10 felülrĩl a létároló edényben|11 lévĩ tartókba. Lent marad egy nyílás.
10.Te gye rá a fedelet|9 a létároló edényre|11.
11.Tolja a létár oló edényt|11 a légyŅjtĩ
edény|5 kivezetĩ nyílása alá.
Finoman döntse meg a gyümölcs-
16
, és tolja a légyŅjtĩ
5
kivezetĩ nyílása alá. Azután alul
26
HU

__CPE284970_Fruchtentsafter_B4.book Seite 27 Donnerstag, 1. Dezember 2016 8:35 20
6. Az élelmiszerek
elĩkészítése
FIGYELMEZTETÉS!
~ A készülék ne m h asz nálha tó n a gyo n ke-
mény gyümölcsök és zöldségek (pl. cukornád) vagy magas rosttartalmú
gyümölcsök/zöldségek (pl. rebarbara,
banán, papaja, avokádó, füge) esetében.
~ A kemény héjakat (pl.: citrusfélék, ana-
nász esetén), a gyümölcs szárát és a
magvas gyümölcsök magvait (pl. cseresznye, barack, ĩszibarack) a préselés
elĩtt el kell távolítani.
MEGJEGYZÉSEK:
• A szárított gyümölcsök nem alkalmasak
a préselésre. Túl kevés levet tartalmaznak.
• Hogy a préslének a lehetĩ legmaga-
sabb vitamintartalma legyen, lehetĩleg
frissen betakarított, szezonális zöldséget és gyümölcsöt használjon fel, és az
elĩállítást követĩen rögtön igya meg a
préslét.
• Hogy az almalé bebarnulását elkerülje,
adjon hozzá egy kis citromlevet.
• Ne tartsa a gyümölcslevet 24 óránál to-
vább a létároló edényben vagy a termék egyéb részeivel érintkezve. Ez a
hŅtĩszekrényben való tárolásra is vonatkozik.
• Lehetĩleg érett gyümölcsöt használjon.
A érett gyümölcsbĩl ugyanis sok préslé
lesz. Éretlen gyümölcs használata esetén gyakrabban kell tisztítani a filtert|4.
• Távolítsa el a puha vagy penészes gyü-
mölcsöket. Mossa meg a gyümölcsöt és
a zöldséget.
• A durva, kemény héjakat (pl. citr usfélék,
mangó, gránátalma, ananász esetében)
távolítsa el.
• A vékony héjakat (pl. alma, körte) és vé-
kony szárakat (pl. ribizli), valamint a
kisméretŅ magokat (pl. alma, málna
esetében) nem kell eltávolítani.
• Úgy ossza szét a nagyobb gyümölcs- és
zöldségdarabokat, hogy azok beleférjenek a betöltĩnyílásba|3. A készülék betöltĩnyílása széles, így a készülék pl. a
répát vagy az almát rendszerint egészben fel tudja dolgozni.
7. Használat
VÁGÁS általi sérülés veszélye!
~ Soha ne nyúljon a betöltĩnyílásba|3,
mialatt a filter|4 forog. Ne tartson kana-
lat vagy egyéb hasonló tárgyat a forgó
filterhez|4. A hosszú hajat és bĩ ruházatot is tartsa távol a forgó filtertĩl|4.
~ A filter|4 a kikapcsolást követĩen to-
vább forog. Várja meg a teljes leállást,
mielĩtt kinyitná a készüléket.
VIGYÁZAT:
~ A készüléket maximálisan 30 percig
szabad megszakítás nélkül mŅködtetni.
Ezután kikapcsolt állapotban kell tartani
a készüléket, míg a motorblokk|7 teljesen le nem hŅl.
7.1 Általános tudnivalók
1. Ellenĩrizze, hogy a készülék teljesen össze van-e szerelve és hogy a be-/kikapcsoló|14 a 0 pozícióban áll-e.
2. Tekerje le a kábelvezetĩrĩl|8 a csatlakozóvezetéket|20.
3. Dugja a csatlakozódugót|8 egy könnyen hozzáférhetĩ csatlakozóaljzatba.
HU
27
__CPE284970_Fruchtentsafter_B4.book Seite 28 Donnerstag, 1. Dezember 2016 8:35 20
4. Kapcsolja a be-/kikapcsolót|14 a kívánt feldolgozási sebességbe:
- I (kisebb sebesség) az olyan puha,
magas víztartalmú gyümölcsökhöz és
zöldségekhez, mint például a málna,
uborka, paradicsom, szĩlĩ, görögdinnye.
- II (magasabb sebesség) minden gyü-
mölcs- és zöldségfajtához alkalmazható.
5. Húzza ki a turmixrudat|2 a betöltĩnyí-
lásból|3, helyezze a nyílásba az elĩkészített élelmiszert, és a turmixrúd|2
segítségével lehetĩleg minél gyorsabban zárja le a betöltĩnyílást|3.
6. Lassan, kis nyomást kifejtve ny omja lefelé a turmixrudat|2. Így nyerheti ki az
élelmiszerbĩl a legnagyobb mennyiségŅ préslét.
7. A préselés szüneteltetéséhez kapcsolja
a be-/kikapcsolót|14 a 0 pozícióba.
Adott esetben ürítse ki a gyümölcsrostgyŅjtĩ edényt|16:
- Nyissa ki a biztonsági zárakat|15.
- Vegye le a készülék fedelét|18.
- Finoman döntse meg, vegye le és ürít-
se ki a gyümölcsrostgyŅjtĩ
edényt|16.
8. A préslét legkésĩbb akkor öntse ki a létároló edénybĩl|11, ha az elérte a maximális, 1 literes töltési magasságot.
MEGJEGYZÉS:
• A hableválasztó|10 arra szolgál, hogy
a hab nagy része a lé tároló edényben|11 maradjon. Lassan öntse ki a
préslét.
7.2 A préselés megszakítása
Az üzemeltetés idĩtartama
Ha 30 perce megszakítás nélkül présel, kapcsolja ki a készüléket, míg a motorblokk|7
teljesen le nem hŅl.
A filter kiürítése/elakadások
megszüntetése
•A filtert|4 ki kell üríteni,...
… ha a préslé sokkal sŅrŅbb lesz,
… ha a fedél|18 és a légyŅjtĩ edény|5
között folyadék távozik, vagy
… ha a motor hallhatóan lelassul.
• Elakadás: Ha egy gyümöl cs- vagy
zöldségdarab eltömíti a filtert|4, azonnal el kell távolítani. Az elakadást arról
lehet felismerni, ...
… hogy nem folyik ki a préslé,
… hogy nem lehet lenyomni a gyümöl-
csöt a betöltĩnyílásba,
… hogy szokatlan zajok hallatszanak a
termékbĩl vagy
… ha a motor hallhatóan lelassul.
•A következĩ módon járjon el:
- Állítsa a be-/kikapcsolót|14 a 0 ál-
lásra.
- Húzza ki a hálózati csatlakozót|8.
- Várja meg a filter|4 leállását.
- Nyissa ki a biztonsági zárakat|15.
- Vegye le a készülék fedelét|18.
- Emelje le a légyŅjtĩ edényt|5 a filter-
rel|4.
-Vegye ki a filtert|4 és ürítse ki.
- Újból szerelje össze az alkatrészeket,
és folytassa a préselést.
9. A kikapcsoláshoz állítsa a be-/kikapcsolót|14 0 pozícióra. Húzza ki a háló-
zati csatlakozót|8, és várja meg a
filter|4 leállását, mielĩtt a fedelet|18 leveszi. Lehetĩleg közvetlenül használat
után tisztítsa a készüléket.
HU
28
 Loading...