

Page 1
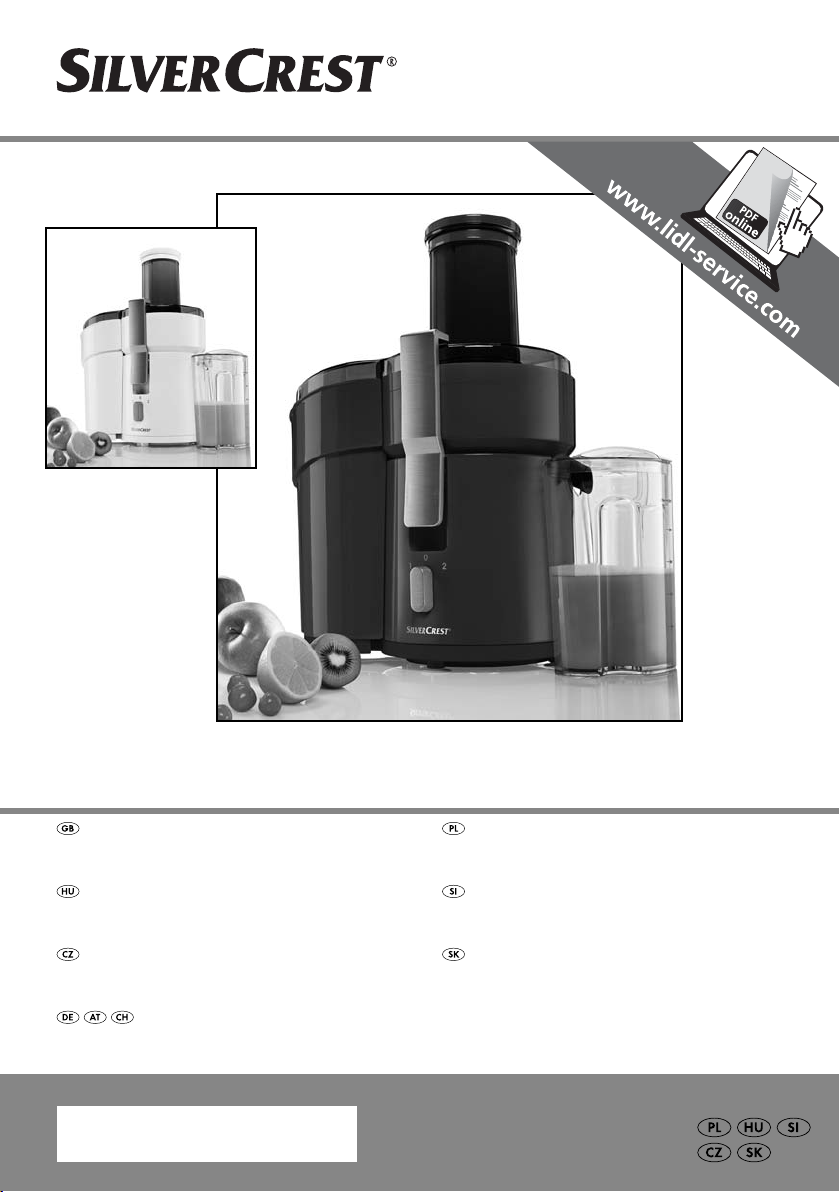
JUICER SFE 450 C1
JUICER
Operating instructions
GYÜMÖLCSCENTRIFUGA
Használati utasítás
ODŠŤAVŇOVAČ
Návod k obsluze
ENTSAFTER
Bedienungsanleitung
IAN 104378
SOKOWIRÓWKA
Instrukcja obsługi
SOKOVNIK
Navodila za uporabo
ODŠŤAVOVAČ
Návod na obsluhu
Page 2
Before reading, unfold the page containing the illustrations and familiarise yourself with all functions of
the device.
Przed przeczytaniem proszę rozłożyć stronę z ilustracjami, a następnie proszę zapoznać się z wszystkimi
funkcjami urządzenia.
Olvasás előtt kattintson az ábrát tartalmazó oldalra és végezetül ismerje meg a készülék mindegyik
funkcióját.
Pred branjem odprite stran s slikami in se nato seznanite z vsemi funkcijami naprave.
Před čtením si otevřete stranu s obrázky a potom se seznamte se všemi funkcemi přístroje.
Pred čítaním si odklopte stranu s obrázkami a potom sa oboznámte so všetkými funkciami prístroja.
Klappen Sie vor dem Lesen die Seite mit den Abbildungen aus und machen Sie sich anschließend mit allen
Funktionen des Gerätes vertraut.
GB Operating instructions Page 1
PL Instrukcja obsługi Strona 13
HU Használati utasítás Oldal 25
SI Navodila za uporabo Stran 37
CZ Návod k obsluze Strana 49
SK Návod na obsluhu Strana 61
DE / AT / CH Bedienungsanleitung Seite 73
Page 3
A
B
Page 4

CONTENT PAGE
Introduction 2
Intended Application 2
Items supplied 2
Operating Elements 2
Technical data 2
Important safety instructions 3
Assembling and operating the appliance 5
Preparing the fruits/vegetables 5
Juicing 6
Emptying the pulp container and the filter 6
Disassembly of the juice extractor 7
Cleaning and Care 7
Storage 8
Disposal 8
Warranty and Service 8
Importer 8
Troubleshooting 9
Recipes 10
Summer drink . . . . . . . . . . . . . . . . . . . . . . . . . . . . . . . . . . . . . . . . . . . . . . . . . . . . . . . . . . . . . .10
Apple-pear-strawberry drink . . . . . . . . . . . . . . . . . . . . . . . . . . . . . . . . . . . . . . . . . . . . . . . . . .10
Energy drink . . . . . . . . . . . . . . . . . . . . . . . . . . . . . . . . . . . . . . . . . . . . . . . . . . . . . . . . . . . . . .10
Breakfast drink . . . . . . . . . . . . . . . . . . . . . . . . . . . . . . . . . . . . . . . . . . . . . . . . . . . . . . . . . . . . .10
Honeydew melon drink . . . . . . . . . . . . . . . . . . . . . . . . . . . . . . . . . . . . . . . . . . . . . . . . . . . . . .11
Sweet fruit drink . . . . . . . . . . . . . . . . . . . . . . . . . . . . . . . . . . . . . . . . . . . . . . . . . . . . . . . . . . . .11
Pineapple-mango drink . . . . . . . . . . . . . . . . . . . . . . . . . . . . . . . . . . . . . . . . . . . . . . . . . . . . . .11
Beetroot drink . . . . . . . . . . . . . . . . . . . . . . . . . . . . . . . . . . . . . . . . . . . . . . . . . . . . . . . . . . . . .11
Fruit-bell pepper drink . . . . . . . . . . . . . . . . . . . . . . . . . . . . . . . . . . . . . . . . . . . . . . . . . . . . . . .12
Peach-pear-pineapple drink . . . . . . . . . . . . . . . . . . . . . . . . . . . . . . . . . . . . . . . . . . . . . . . . . .12
Read the operating instructions carefully before using the device for the first time and preserve this booklet
for later reference. Pass this manual on to whoever might acquire the device at a future date.
- 1 -
Page 5

Juicer
Introduction
Congratulations on the purchase of your new appliance.
You have clearly decided in favour of a quality product. These operating instructions are a part of this
product. They contain important information in regard to safety, use and disposal. Before using the
product, familiarise yourself with all of these operating and safety instructions. Use the product only as
described and only for the specified areas of application. In addition, pass these documents on, together with the product, to any future owner.
Intended Application
Operating Elements
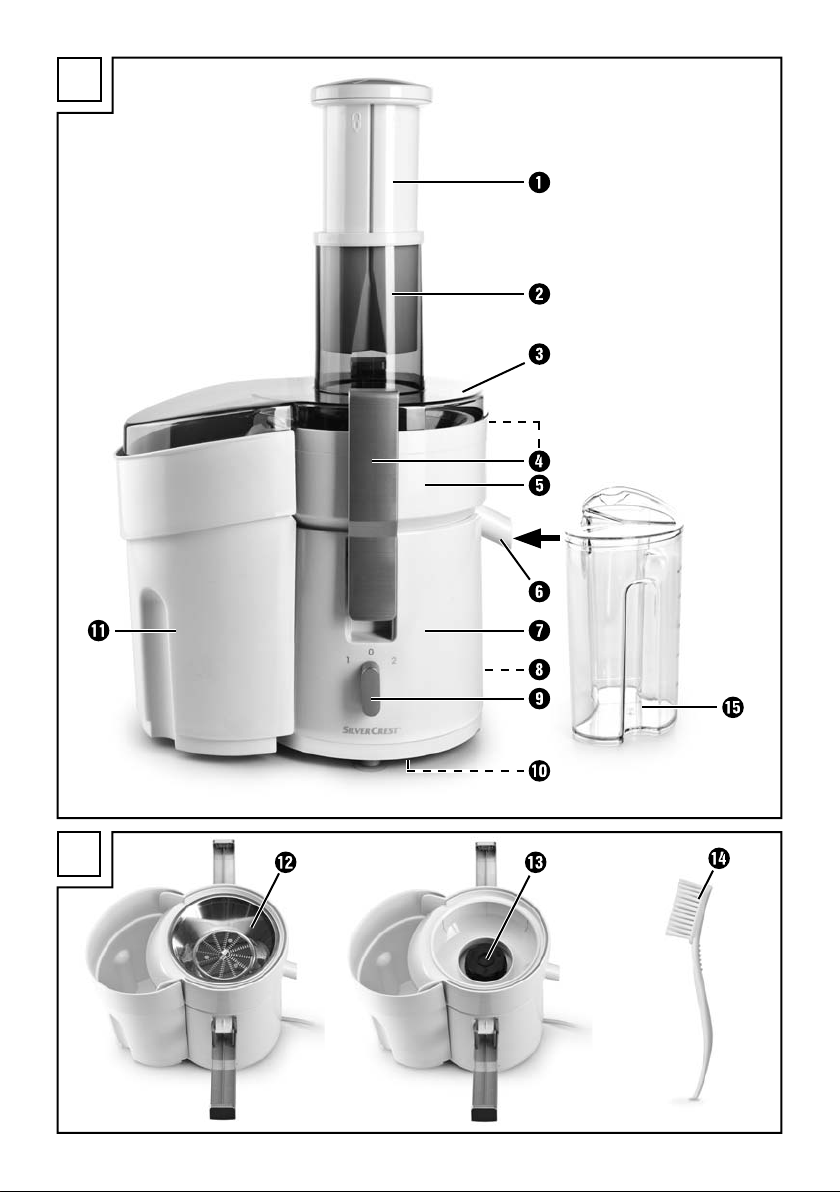
Figure A:
Stodger
q
Loading shaft
w
Housing lid
e
Clasps
r
Juice container
t
Juice outlet
y
Appliance base
u
Power cable with plug
i
On/Off switch (2 speed levels)
o
Cable rewind
a
Container (for fruit pulp and vegetable mash)
s
Figure B:
Filter
d
Drive shaft
f
Nylon brush (in the stodger on delivery)
g
The appliance is both intended and suitable for the
juicing of well ripened and peeled fruits and vegetables. Only foodstuffs may be processed with the
appliance. Only the original attachments and accessories, as described herein, may be used. Any other
use or modification is considered improper use and
brings with it the great risk of serious accidents.
The manufacturer declines to accept responsibility
for damage(s) arising out of usage that is contrary
to the instructions specified below. Not for commercial
use.
Items supplied
Juicer
Nylon brush (in the stodger)
Operating instructions
Figure A:
separate juice collector with foam separator
h
(on delivery, packed in the container for pulp
and mash)
Technical data
Mains voltage: 220 - 240 V ~, 50 Hz
Rated power: 450 W
CO time: 30 Minutes
Protection class: II /
CO Time
The C.O. Time (Continuous Operation) details how
long an appliance may be used without the motor
overheating and being damaged. After the appliance
has run for this period it must be switched off until
the motor has cooled itself down.
- 2 -
Page 6

Important safety instructions
DANGER – risk of electrical shock!
• The voltage of the power source must correspond with the details given on the
type plate of the appliance.
• To prevent accidents, have defective plugs and/or power cables replaced immediately by a qualified specialist technician or our Customer Service department.
• Appliances which do not work properly or have been damaged must be chekked immediately and repaired by Customer Service.
• Do not expose the appliance to rain, and never use it in a humid or wet environment. Take steps to ensure the power cable never becomes wet or moist during use.
Never immerse the base of the machine in water or other liquids!
WARNING – Risk of injury!
• Never use the appliance for purposes other than those described in these instructions.
• The appliance should always be disconnected from the mains when not supervised and before assembly, disassembly or cleaning.
• This appliance shall not be used by children.
• The appliance and its connecting cable must be kept away from children.
• This appliance may be used by people with reduced physical, sensory or mental capabilities or lack of experience and/or knowledge if they are supervised
and have been instructed in how to use the appliance safely and have understood the potential risks.
• Children must not play with the appliance.
• If the rotating filter is damaged, the appliance may not be used!
• Before changing any accessories or additional parts that move during operation,
the appliance must be switched off and disconnected from the mains power.
• The cutter is extremely sharp! Handle it with great care.
• Do not operate the appliance if the rotating sieve is damaged.
• To prevent injuries, ensure that all parts are inserted correctly.
- 3 -
Page 7

Never put your hands or other objects into the filler opening. This can lead
to severe injuries or damage to the appliance If it is not possible to remove
pieces of fruit using the stodger, switch off the appliance and open the appliance.
• Ensure that the power plug is easily accessible in case of emergency, and that
there is no risk of tripping over the cable.
• After use, switch the appliance off and unplug it. The appliance may not be
dismantled until the motor is at a complete standstill.
• Never attempt to touch rotating parts.
• Never leave the appliance unattended during operation.
• Set up the appliance in a stable location.
Never use the appliance:
• if the filter, mains cable or plug are damaged,
• in the event of any malfunctions or if it has been damaged in any other way or
has been dropped. Have the appliance checked or repaired by Customer Service.
• The use of accessories not recommended or sold by the manufacturer can cause a fire, electric shock or injury.
Tips for safe handling:
• In case of danger, remove the plug from the socket immediately.
• Remain alert at all times! Always pay attention to what you are doing and act
with common sense. Do not use the appliance if you are distracted or feeling
unwell.
• Ensure that the appliance is completely assembled before using it for the first
time. The appliance cannot be operated until the clasps are closed. If the
clasps come open during operation, the appliance stops automatically.
• After every use of the juicer, ensure that the on/off switch is in the "OFF" position ("0"). The motor must be at a complete standstill before you begin dismantling the appliance.
• Do not use the appliance outdoors.
- 4 -
Page 8

Assembling and operating the
appliance
• Thoroughly clean all component parts as described in the section "Cleaning and care" before
using the appliance for the first time.
• Select a safe and secure positioning for the
juice extractor. For optimal handling we recommend that the appliance is positioned with the
power cable running from the rear of the appliance to the wall socket. All operating elements
can now be directly and easily handled:
- at the front, the On/Off switch
- to the left, the container for fruit pulp and
vegetable mash
- to the right, the outlet pipe for the juice
s
.
Warning:
Ensure that the appliance is switched off and the plug
removed from the wall socket before assembling the
appliance. If you do not, there is a great risk that
you could injure yourself.
1. Place the juice container
base
, so that the three detents and the juice
u
outlet
2. Place the filter
it down so that it perceptibly engages. Ensure
that it is firmly seated before continuing with the
assembly.
3. Slide the container for fruit pulp and vegetable
mash
(see fold-out page).
4. Place the housing lid
so that the loading shaft wis seated
above the cutters in the filter
5. Ensure that the housing lid
the recesses of the juice container
clasps
housing lid
6. Press the lower part of the claps
appliance until they engage.
are securely engaged in the recesses.
y
d
from below under the ejection shaft
s
and clip them into the notches on the
r
.
e
t
on the drive shaft fand press
on the juice container
e
,
o
on the appliance
.
d
is seated firmly in
e
. Lift the
t
ragainst the
r
y
.
t
7. Push the foam separator plate in the separate
juice collector
the separate juice collector
ance so that the juice outlet
juice collector
8. Insert the power cable with plug
socket.
and then put the lid on. Place
h
next to the appli-
h
projects into the
y
.
h
into the wall
i
Preparing the fruits/vegetables
• Important: Use only well ripened fruit, as otherwise the filter
This would require repeated cleaning of the
filter
.
d
• Wash or peel the fruits/vegetables that you wish
to process.
• Large seeds or stones should always be removed
before filling the appliance.
• Stone fruit (such as apples, pears) can be processed with the skin and seed centres. Remove
all other stones (peaches, plums etc.), all large
seeds (melons etc.) and stalks to avoid possible
damage to the appliance.
• Fruits and vegetables with thick peels (e.g. citrus
fruits, melons, kiwis, beets) must always be peeled
first.
• The main stalk is to be removed from grapes.
• Cut the fruit or vegetables into pieces that are
sized to fit into the loading shaft
Note:
Raisins are not suitable for juicing as they contain
too little juice. Rhubarb or other fibrous vegetables/
fruits are not suitable for juicing as the fibres block
the juice extractor.
could become quickly blocked.
d
.
w
- 5 -
Page 9
Juicing
Warning:
DO NOT operate the juice extractor for longer than
30 minutes (CO-Time) without a break. After 30 minutes of continuous use allow the juice extractor to
cool down. Otherwise the appliance could be
damaged.
Warning:
NEVER insert your hands or other objects into the
loading shaft
This could lead to grave personal injuries and/or
serious damage to the appliance.
1. Switch the appliance on at the On/Off switch
For juicing fruit/vegetables that contain a lot of
liquid, use speed level 1. For drier fruit/
vegetables, select speed level 2.
2. Hold the stodger
fruit and vegetable pieces with the other hand
into the loading shaft
ger
q
ces into the loading shaft
fruit/ vegetables are being processed, insert further pieces into the loading shaft. Do not switch
the appliance off.
Note:
Add carrots one after the other into the loading
shaft
: the top of the carrot must be at the bottom
w
and the pointed end at the top.
when working with the appliance.
w
o
in one hand and feed the
q
. ALWAYS use the stod-
w
to carefully press the fruit/vegetable pie-
. Whilst the loaded
w
Note:
To avoid fruit or v egetables becoming blocked in
the loading shaft
is switched on. Should fruit or vegetable pieces become stuck in the loading shaft
be promptly freed with the stodger
follows to avoid damage to the appliance:
• Immediately switch the appliance off and
remove the power cable with plug
the wall socket.
• Loosen the clasps
lid
.
e
• Remove the fruit or vegetable pieces causing the
blockage.
• Reassemble the appliance and continue with
.
juice extraction.
3. Always switch the appliance off immediately after
all of the fruit/vegetables have been processed.
, only fill it when the appliance
w
and they cannot
w
, proceed as
q
i
and remove the housing
r
Warning:
To avoid blockage of the juice outlet yand/or
damage to the appliance, regularly clean the juice
outlet
every usage.
and juice container t, and always after
y
Emptying the pulp container
and the filter
You can extract juices continuously until the container
for fruit pulp and vegetable mash
full.
is completely
s
from
Warning:
Remove the plug from the power source when
emptying the filter
starting of the motor.
When the extracted juices suddenly become thicker,
or when you hear that the motor is running slower, the
filter
must be emptied. When you have removed the
d
fruit pulp/vegetable mash, reassemble the appliance.
- 6 -
. This prevents an unintended
d
Page 10
Disassembly of the juice extractor
If you wish to disassemble the juice extractor, e.g.
to clean it, proceed as follows:
1. Remove the power cable with plug
wall socket.
2. Open the clasps
3. Remove the housing lid
4. Carefully lift up the juice container
the filter
d
You can now take the filter
container
t
.
r
with the stodger q.
e
releases itself from the drive shaft f.
out of the juice
d
.
from the
i
. With this,
t
Cleaning and Care
Warning:
ALWAYS remove the power plug from the wall sokket before removing or installing accessories and
before cleaning the appliance. To avoid blockage
of the juice outlet and/or damage to the appliance,
all appliance and ancillary parts must be regularly,
and after every use, cleaned free of fruit pulp and
vegetable mash.
• For cleaning the appliance housing and the power
cable, use a cloth that is only lightly moistened.
• Clean the stodger
separate juice catchment container
sing cover
mace
off carefully.
The stodger q, the juice container t, the housing
lid
e
tainer for fruit pulp and vegetable mash
table for cleaning in a dishwasher and can be cleaned there. To clean the filter
nylon brush
• Turn the lid of the stodger
points to the opened lock on the stodger
shaft. You can now remove it. The nylon brush
is inside the stodger q. To re-close the lid, place
it on the stodger so that the arrow points to the
opened lock .
Then turn it until the arrow points at the closed
lock . The lid now sits firmly.
• Hold the filter
under running water and clean it with the nylon
brush
e
in warm soapy water then rinse them
s
, the separate juice collector hand the con-
:
g
.
g
, the juice container t, the
q
, the hou-
h
and the container for pulp and po-
are sui-
s
, use the supplied
d
until the arrow
q
(with the underside upwards)
d
g
Note:
DO NOT use any aggressive cleaning agents to
clean the juice extractor. The appliance and its
ancillaries may not be cleaned in boiling water.
Warning:
To avoid receiving an electrical shock, NEVER
submerse the motor/appliance base
or other fluids.
• Switch the appliance off at the On/Off switch o.
• Soiling or overflowing fruit juices should be cleared
away immediately, as fruit stains are difficult to
remove later.
u
in water
Colouring:
• Some fruits or vegetables could permanently discolour parts of the juice extractor. This is not damaging and does not impair the appliance in its
functions.
- 7 -
Page 11
Storage
If you do not intend to use the juice extractor for an
extended period, wrap the cable around the cable
rewind
on the underside of the appliance.
a
Disposal
Do not dispose of the appliance in your
normal domestic waste. This appliance
is subject to the European Guidelines
2012/19/EU.
Dispose of the appliance through an approved disposal centre or at your community waste facility.
Observe the currently applicable regulations. In
case of doubt, please contact your local waste
disposal centre.
Dispose of all packaging materials in an
environmentally friendly manner.
The warranty covers only claims for material and
maufacturing defects, but not for transport damage,
for wearing parts or for damage to fragile components, e.g. buttons or batteries. This product is for private use only and is not intended for commercial use.
The warranty is void in the case of abusive and improper handling, use of force and internal tampering
not carried out by our authorized service branch.
Your statutory rights are not restricted in any way by
this warranty.
The warranty period will not be extended by repairs
made under warranty. This applies also to replaced
and repaired parts. Any damage and defects extant
on purchase must be reported immediately after unpacking the appliance, at the latest, two days after
the purchase date. Repairs made after the expiration
of the warranty period are subject to payment.
Service Great Britain
Tel.: 0871 5000 720 (£ 0.10/Min.)
E-Mail: kompernass@lidl.co.uk
IAN 104378
Warranty and Service
The warranty for this appliance is for 3 years from
the date of purchase. The appliance has been manufactured with care and meticulously examined before delivery.
Please retain your receipt as proof of purchase. In
the event of a warranty claim, please make contact
by telephone with our Service Department. Only in
this way can a post-free despatch for your goods
be assured.
Importer
KOMPERNASS HANDELS GMBH
BURGSTRASSE 21
44867 BOCHUM
GERMANY
www.kompernass.com
- 8 -
Page 12

Troubleshooting
Problem Possible Causes Possible solutions
The appliance does not function.
The motor stays still while juicing
or it turns noticeably slow or unregularly.
The vegetable mash is moist and
you obtain too little juice.
The juice wells out between the
edge of the housing lid
the juice container
e and
t.
• The power plug i is not
connected.
• The appliance is not switched on.
• The clasps r are not secured. • Secure the clasps r.
• The filter d is blocked.
• You are working too fast. • Work a little slower.
• The filter d is blocked.
• You are working too fast. • Work a little slower.
• The filter
• The wrong speed setting has
d or the juice outlet t
is blocked.
been selected.
• Connect the appliance to
a power socket.
• Switch the appliance on with
the On/Off switch
• Immediately switch the appliance
off and disconnect the power
plug
i. Eliminate the blockage
(see chapter "Juicing").
• Clean the filter d (see chapter
"Cleaning and Care").
• Clean the filter d and the juice
container
"Cleaning and Care").
• Select speed setting I at the
On/Off switch
t (see chapter
.
o
o.
The juice sprays from the juice
outlet
y.
During the processing juice runs
down from the appliance base
• You are working too fast.
• The wrong speed setting has
been selected.
• The filter
d or the juice outlet y
is blocked.
u.
• The wrong speed setting has
been selected.
- 9 -
• Work a little slower.
• Do not press so hard with the
stodger
q when inserting more
product.
• Select speed setting I at the
On/Off switch
• Clean the filter d and the juice
outlet
y (see chapter "Cleaning
and Care").
• Select speed setting I at the
On/Off switch
o
o
.
.
Page 13

Recipes
Energy drink
2 people
Summer drink
2 people
Ingredients
1 large slice of watermelon
1 lemon
4 apples, sweet-sour
(e.g. "Jonagold” or “Jonathan”)
Preparation
1. Prepare the watermelon, lemon and apples as
per the instructions given in the instruction manual
for the juicer.
2. Juice the watermelon, the lemon and the apples.
3. Serve the summer drink cool.
Apple-pear-strawberry drink
2 people
Ingredients
1 apple, green (e.g. "Granny Smith")
3 small, ripe pears
10 medium-sized strawberries
Preparation
1. Prepare the apple, pears and strawberries as per
the instructions given in the instruction manual for
the juicer.
2. Juice everything using the juicer.
3. Mix the juices together and serve the drink
immediately.
Ingredients
2 apples, sweet (e.g. "Red Delicious")
2 large apricots
1 large pear
250 ml of mineral water (carbonated)
a little crushed ice
Preparation
1. Prepare the apples, apricots and pear as per the
instructions given in the instruction manual for the
juicer.
2. Juice the apples, apricots and the pear.
3. Mix the juices together and then add the mineral
water.
4. Serve the drink on the crushed ice.
Breakfast drink
2 people
Ingredients
4 to 5 carrots
2 apples
1 tsp. olive oil
Preparation
1. Prepare the carrots and apples as per the instructions given in the instruction manual for the
juicer.
2. Juice the carrots first and then the apples.
3. Add the olive oil.
4. Stir everything well.
- 10 -
Page 14

Honeydew melon drink
2 people
Pineapple-mango drink
2 people
Ingredients
approx. 1/3 honeydew melon
1 mango
1 apple, sweet-sour
(e.g. "Jonagold” or “Jonathan”)
1 apple, green (e.g. "Granny Smith")
Preparation
1. Prepare the melon, mango and apples as per
the instructions given in the instruction manual
for the juicer.
2. Juice the melon first, then the mango and finally
the apples. Stir everything together.
Sweet fruit drink
2 people
Ingredients
1/2 honeydew melon
4 peaches
200 g seedless grapes
6 mangoes
Preparation
1. Prepare the honeydew melon, the peaches, the
grapes and the mangoes as per the instructions
given in the instruction manual for the juicer.
2. Juice the fruits one after the other.
3. Mix the juices together and serve the drink slightly
cooled.
Ingredients
1/2 pineapple
1/2 mango
1 apple
1 orange
2 tsp. wheat germ oil
Preparation
1. Prepare the pineapple, the mango, the apple
and the orange as per the instructions given in
the instruction manual for the juicer.
2. Juice the pineapple first, then the mango.
3. Juice the apple and the orange.
4. Mix the juices together.
5. Then add the 2 tsp. wheat germ oil and stir
everything well.
Beetroot drink
2 people
Ingredients
1 beetroot
3 oranges
2 tbsp. currants
Preparation
1. Prepare the beetroot, oranges and currants as per
the instructions given in the instruction manual for
the juicer.
2. Juice the beetroot, the oranges and the currants
and then mix the juices well.
- 11 -
Page 15

Fruit-bell pepper drink
2 people
Ingredients
2 yellow bell peppers
3 oranges
2 apples
2 pears
1/2 grapefruit
Preparation
1. Prepare the bell peppers, oranges, apples, pears
and grapefruit as per the instructions given in the
instruction manual for the juicer.
2. Juice all the ingredients one after the other and
serve the juice immediately.
Peach-pear-pineapple drink
2 people
Ingredients
2 peaches
2 small pears
1/2 pineapple
Preparation
1. Prepare the peaches, pears and pineapple as per
the instructions given in the instruction manual for
the juicer.
2. Juice all the ingredients one after the other and
serve the juice immediately.
Note
These recipes are provided subject to change.
All ingredients and preparation information are
guidelines. Enhance these recipe suggestions in
accordance with your own experience.
- 12 -
Page 16

SPIS TREŚCI STRONA
Wprowadzenie 14
Zastosowanie zgodnie z przeznaczeniem 14
Zakres dostawy 14
Elementy obsługowe 14
Dane techniczne 14
Ważne wskazówki bezpieczeństwa 15
Złożenie i obsługa urządzenia 17
Przygotowanie owoców / warzyw 17
Wyciskanie soku 18
Opróżnienie pojemnika na miąższ i filtra 18
Demontaż sokownika 19
Czyszczenie i pielęgnacja 19
Przechowywanie 20
Usuwanie/wyrzucanie 20
Gwarancja i serwis 20
Importer 20
Usuwanie usterek 21
Przepisy 22
Napój letni . . . . . . . . . . . . . . . . . . . . . . . . . . . . . . . . . . . . . . . . . . . . . . . . . . . . . . . . . . . . . . .22
Napój z jabłek, gruszek i truskawek . . . . . . . . . . . . . . . . . . . . . . . . . . . . . . . . . . . . . . . . . . .22
Napój energetyczny . . . . . . . . . . . . . . . . . . . . . . . . . . . . . . . . . . . . . . . . . . . . . . . . . . . . . . . .22
Napój śniadaniowy . . . . . . . . . . . . . . . . . . . . . . . . . . . . . . . . . . . . . . . . . . . . . . . . . . . . . . . .22
Napój z melona . . . . . . . . . . . . . . . . . . . . . . . . . . . . . . . . . . . . . . . . . . . . . . . . . . . . . . . . . . .23
Słodki napój owocowy . . . . . . . . . . . . . . . . . . . . . . . . . . . . . . . . . . . . . . . . . . . . . . . . . . . . . .23
Napój z ananasa i mango . . . . . . . . . . . . . . . . . . . . . . . . . . . . . . . . . . . . . . . . . . . . . . . . . . .23
Napój z czerwonych buraków . . . . . . . . . . . . . . . . . . . . . . . . . . . . . . . . . . . . . . . . . . . . . . . .23
Napój owocowo-paprykowy . . . . . . . . . . . . . . . . . . . . . . . . . . . . . . . . . . . . . . . . . . . . . . . . .24
Napój brzoskwiniowo-gruszkowo-ananasowy . . . . . . . . . . . . . . . . . . . . . . . . . . . . . . . . . . .24
Przed pierwszym użyciem urządzenia należy dokładnie przeczytać niniejszą instrukcję obsługi i zachować ją na
przyszłość. W przypadku przekazania urządzenia osobom trzecim należy przekazać im także instrukcję.
- 13 -
Page 17

Sokowirówka
Wprowadzenie
Gratulujemy Ci zakupu naszego urządzenia.
Jest to produkt wysokiej jakości. Instrukcja obsługi
stanowi część tego produktu. Zawiera ona ważne
wskazówki dotyczące bezpieczeństwa, użytkowania i utylizacji urządzenia. Przed przystąpieniem do
użytkowania produktu zapoznaj się z wszystkimi
wskazówkami obsługi i bezpieczeństwa. Używaj
produkt zgodnie z opisem i w podanych obszarach
użytkowania. W razie przekazania produktu następnej osobie, nie zapomnij dołączyć również instrukcji obsługi.
Zastosowanie zgodnie
z przeznaczeniem
Urządzenie jest przeznaczone do odciągania soku
z dojrzałych i obranych owoców i warzyw. Urządzenie nadaje się wyłącznie do przetwarzania
produktów spożywczych. Należy używać wyłącznie
oryginalnych przystawek, takich jak opisane
w instrukcji. Jakiekolwiek inne użycie lub zmiany
urządzenia uważane będą za niezgodne z przeznaczeniem i kryją w sobie poważne niebezpieczeństwo
wypadku.
Producent nie bierze na siebie żadnej odpowiedzialności w przypadku powstania szkody, wynikającej
z użytkowania urządzenia w sposób całkowicie
niezgodny z przeznaczeniem. Nie nadaje się do
użytku w przemyśle.
Zakres dostawy
Sokowirówka
Szczotka nylonowa (w zatyczce)
Instrukcja obsługi
Elementy obsługowe
Rysunek A:
zatyczka
q
lejek do napełniania
w
pokrywa obudowy
e
klamry
r
pojemnik na sok
t
wylot soku
y
podstawa urządzenia
u
kabel sieciowy z wtyczką
i
włącznik/wyłącznik (2 stopnie prędkości)
o
schowek na kabel zasilający
a
pojemnik (na miąższ i odpadki)
s
Rysunek B:
filtr
d
wał napędowy
f
szczotka nylonowa (dołączona do zatyczki)
g
Rysunek A:
oddzielne naczynie na sok z oddzielaczem
h
piany (w chwili dostawy znajduje się w naczyniu na miąższ i wytłoki)
Dane techniczne
Napięcie sieciowe: 220 - 240 V ~, 50 Hz
Moc znamionowa: 450 W
Czas pracy: 30 minut
Klasa ochrony: II /
Czas pracy
Czas pracy określa, jak długo można używać
urządzenie bez zagrożenia przegrzaniem silnika
i tym samym jego uszkodzenia. Po upływie określonego czasu pracy urządzenie należy wyłączyć
i poczekać, aż silnik się ostudzi.
- 14 -
Page 18
Ważne wskazówki bezpieczeństwa
NIEBEZPIECZEŃSTWO porażenia prądem elektrycznym!
• Napięcie źródła prądu musi być zgodne z danymi na tabliczce znamionowej
urządzenia.
• Naprawę uszkodzonego wtyku lub kabla sieciowego zleć niezwłocznie wykwalifikowanemu specjaliście lub serwisowi, aby uniknąć wszelkich zagrożeń.
• Urządzenia, które uległy uszkodzeniu lub nie działają prawidłowo, należy oddać natychmiast do przeglądu lub naprawy w serwisie.
• Urządzenia nie wolno wystawiać na działanie deszczu ani używać go w wilgotnym, ani też mokrym środowisku. Uważaj, aby podczas używania urządzenia kabel sieciowy był zawsze suchy.
Nigdy nie wolno zanurzać urządzenia w wodzie ani w innych cieczach.
OSTRZEŻENIE – niebezpieczeństwo odniesienia obrażeń!
• Nie używaj urządzenia do innych celów niż opisane w tej instrukcji.
• Przy braku nadzoru oraz przed montażem, złożeniem, rozłożeniem lub
czyszczeniem należy zawsze odłączać urządzenie od zasilania sieciowego.
• Dzieci nie mogą posługiwać się urządzeniem.
• Urządzenie oraz jego kabel zasilający należy trzymać poza zasięgiem dzieci.
• To urządzenie może być używane przez osoby o zmniejszonych zdolnościach
fizycznych, sensorycznych lub umysłowych lub też osoby nieposiadające odpowiedniego doświadczenia i/lub wiedzy, wyłącznie pod nadzorem lub po
przeszkoleniu w zakresie bezpiecznego używania urządzenia oraz wynikających z niego zagrożeń.
• Dzieci nie mogą bawić się urządzeniem.
• Jeżeli filtr obrotowy jest uszkodzony, nie wolno dalej używać urządzenia!
• Przed wymianą osprzętu lub elementów dodatkowych, które podczas pracy
są w ruchu, należy wyłączyć urządzenie i odłączyć je od sieci elektrycznej.
• Nóż jest bardzo ostry! Prosimy obchodzić się z nim niezwykle ostrożne.
• Nie używać urządzenia, jeżeli sito obrotowe jest uszkodzone.
• Aby uniknąć obrażeń, należy dopilnować, by wszystkie części były poprawnie zamontowane i zamocowane.
- 15 -
Page 19

Podczas pracy z urządzeniem nigdy nie wkładać dłoni ani innych przedmiotów do otworu do napełniania. Nieprzestrzeganie instrukcji może spowodować obrażenia u ludzi lub uszkodzenie produktu. Jeżeli kawałków
owoców nie można usunąć za pomocą popychacza, należy wyłączyć urządzenie, wyjąć wtyk z gniazda i otworzyć urządzenie.
• Zadbać o możliwość szybkiego dostępu do wtyku sieciowego w przypadku
niebezpieczeństwa oraz wyeliminować ryzyko potknięcia się o kabel sieciowy.
• Po użyciu wyłączyć urządzenie i wyjąć wtyk kabla sieciowego z gniazda. Urządzenie można rozmontować dopiero wtedy, gdy silnik całkowicie się zatrzyma.
• Nie dotykać obracających się części.
• Pracującego urządzenia nigdy nie pozostawiać bez nadzoru.
• Ustawić urządzenie na stabilnym podłożu.
Nigdy nie używać urządzenia, gdy:
• filtr, kabel sieciowy lub wtyk kabla są uszkodzone,
• urządzenie nie działa poprawnie lub gdy zostało w inny sposób uszkodzone
lub upadło. W takim przypadku urządzenie należy oddać przeglądu wzgl.
naprawy do serwisu.
• Używanie akcesoriów, których producent urządzenia nie zaleca ani ich nie
sprzedaje, może spowodować pożar, porażenie prądem elektrycznym lub obrażenia.
Zasady bezpiecznego użytkowania:
• W przypadku zagrożenia natychmiast wyciągnij wtyk z gniazda sieciowego.
• Zawsze zachowuj ostrożność! Zawsze koncentruj się na tym, co robisz i postępuj rozsądnie. Nigdy nie używaj urządzenia, gdy masz trudności z koncentracją lub źle się czujesz.
• Upewnij się, że urządzenie jest kompletne i poprawnie zmontowane, zanim
zaczniesz pracę z jego użyciem. Korzystanie z urządzenia wolno zacząć dopiero wtedy, gdy klamry są zamknięte. Jeżeli klamry zostaną otwarte podczas
pracy urządzenia, urządzenie zatrzyma się automatycznie.
• Po każdym użyciu sokowirówki upewnić się, że włącznik/wyłącznik znajduje
się w położeniu „Wył.” („0”). Przed rozmontowaniem urządzenia silnik musi
się całkowicie zatrzymać.
• Nie używać urządzenia na otwartej przestrzeni.
- 16 -
Page 20

Złożenie i obsługa urządzenia
• Przed pierwszym użyciem urządzenia dokładnie
wyczyść wszystkie części, jak opisano w rozdziale „Czyszczenie i pielęgnacja”.
• Wybierz odpowiednie miejsce na postawienie
sokownika. Urządzenie obsługuje się z optymalną
wygodą wtedy gdy kabel sieciowy jest podłączony
do gniazdka z tyłu. Wszystkie elementy można
wtedy łatwo obsługiwać:
- z przodu włącznik/wyłącznik
- z lewej strony pojemnik na miąższ i odpadki
- oraz z prawej strony otwór wylotowy soku y.
Uwaga:
Przed przystąpieniem do złożenia upewnij się, czy
urządzenie jest wyłączone a wtyczka wyciągnięta
z gniazdka. W przeciwnym razie należy liczyć się
z niebezpieczeństwem odniesienia obrażeń.
1. Pojemnik na sok
dzenia
soku
2. Załóż filtr
go, aż do usłyszenia wyraźnego zatrzaśnięcia.
Przed dokończeniem składania urządzenia
upewnij się, czy poszczególne elementy są
dobrze założone.
3. Pojemnik na miąższ owocowy i odpadki
od dołu pod wylot (patrz od strony rozkładanej).
4. Załóż pokrywę urządzenia
sok
się nad nożami filtra
5. Sprawdź, czy pokrywa urządzenia
dzona prawidłowo w wycięciu pojemnika na
sok
ki pokrywy
6. Dolną część klamer
aż do zatrzaśnięcia.
tak, by trzy trzpienie i otwór wylotowy
u
wchodziły w otwory.
y
d
tak, by lejek do napełniania wznalazł
t
. Podnieś klamry ri zaczep je o wypust-
t
postaw na podstawę urzą-
t
na wałek napędowy fi dociśnij
.
d
.
e
dociśnij do urządzenia,
r
,
o
na pojemnik na
e
e
wsuń
s
jest osa-
s
7. Wsuń płytkę oddzielacza piany do oddzielnego
naczynia na sok
oddzielne naczynie na sok
w taki sposób, by ujście soku
oddzielnego naczynia na sok
8. Podłącz wtyczkę
i załóż pokrywę. Postaw
h
obok urządzenia
h
wchodziło do
y
.
h
do gniazdka zasilania.
i
Przygotowanie owoców / warzyw
• Uwaga: Używaj wyłącznie dobrze dojrzałych
owoców, ponieważ w przeciwnym razie może dojść do zatkania filtra
ponownego czyszczenia.
• Wyciskane owoce lub warzywa najpierw umyj
lub obierz.
• Pamiętaj o wyjęciu większych nasion lub pestek
przed umieszczeniem owoców w urządzeniu.
• Owoce pestkowe (jabłka, gruszki) można wyciskać
ze skórką i gniazdem nasiennym. Pestki innych
owoców (brzoskwinie, śliwki itp.), wszystkie
większe nasiona (arbuzy itp.) oraz łodygi usuń,
by nie doprowadzić do uszkodzenia urządzenia.
• Owoce o grubych skórkach (np. owoce cytrusowe,
arbuzy, kiwi, buraki) zawsze najpierw obierz.
• Od winogron odetnij główną łodygę.
• Owoce lub warzywa potnij na takie kawałki, by
zmieściły się w lejku do napełniania
, co wymagałoby jego
d
w
d
.
- 17 -
Page 21
Uwaga:
Rodzynki nie nadają się do wyciskania, ponieważ
zawierają zbyt mało soku. Rabarbar lub inne warzywa/owoce włókniste nie nadają się do wyciskania,
ponieważ włókna będą powodowały zatkanie sokownika.
Wyciskanie soku
Uwaga:
Nigdy nie używaj sokownika jednorazowo dłużej
niż 30 minut (czas pracy). Urządzenie po upływie
30 minut pracy wyłącz i pozostaw do ostygnięcia.
W przeciwnym razie można doprowadzić do nieodwracalnego uszkodzenia urządzenia.
Wskazówka:
W celu uniknięcia utkwienia owocu w lejku o napełniania
urządzeniu. W przypadku utkwienia kawałków
owocu w lejku do napełniania
przy próbie przepchania zatyczką
następujące czynności, by uniknąć uszkodzenia
urządzenia:
• Wyłącz natychmiast urządzenie i wyciągnij
• Zwolnij klamry
• Wyciągnij kawałki owoców, które utkwiły
• Złóż ponownie urządzenie i przystąp ponownie
dokładaj owoc zawsze przy włączonym
w
i niepowodzeniu
w
wtyczkę sieciową
w urządzeniu.
do wyciskania soku.
.
i
i zdejmij pokrywę obudowy e.
r
q
wykonaj
Uwaga:
Nigdy nie wkładaj rąk ani żadnych przedmiotów
do lejka do napełniania
działa. Mogłoby to doprowadzić do odniesienia
poważnych obrażeń ciała i/lub uszkodzenia sokownika.
1. Włącznikiem/wyłącznikiem
dzenie.
Do wirowania owoców/warzyw o dużej zawartości cieczy używaj stopnia prędkości 1.
Do suchych owoców i warzyw wybierz stopień
prędkości 2.
2. Przytrzymaj zatyczkę
wkładaj kawałki owoców lub warzyw do lejka do
napełniania
by ostrożnie wcisnąć owoce/warzywa w lejek do
napełniania
owoców lub warzyw. Nie wyłączaj przy tym
urządzenia.
w
w
, podczas gdy urządzenie
w
włącz urzą-
o
jedną ręką, a drugą
q
. Korzystaj zawsze z zatyczki q,
. Dokładaj stale kolejne kawałki
Wskazówka:
Przy wkładaniu do lejka do napełniania wkolejnych marchwi wkładać je grubszym końcem (od
strony natki) w dół i wąskim zakończeniem korzenia
do góry.
3. Po wyciśnięciu soku z wszystkich owoców
natychmiast wyłącz urządzenie.
Uwaga:
Otwór wylotowy sokuyi pojemniktczyść regularnie i po każdym użyciu. Pozwoli to na uniknięcie zatkania otworu wylotowego
ządzenia.
i/lub uszkodzenia ur-
y
Opróżnienie pojemnika na
miąższ i filtra
Możesz wyciskać owoce lub warzywa nieprzerwanie
aż do momentu zapełnienia pojemnika na miąższ
i odpadki
Przy opróżnianiu filtra dnajpierw wyjmij wtyczkę
z gniazdka. Zapobiega to przypadkowemu
uruchomieniu silnika.
Filtr
d
lub w razie usłyszenia, że zmniejsza się prędkość
obrotowa silnika. Po wyjęciu całego miąższu
ponownie złóż urządzenie.
.
s
Uwaga:
trzeba wymienić, gdy sok nagle zgęstnieje
- 18 -
Page 22
Demontaż sokownika
By zdemontować sokownik, np. w celu wymycia,
wykonaj następujące działania:
1. Wyciągnij wtyczkę sieciową
2. Otwórz klamry
3. Zdejmij pokrywę obudowy
4. Ostrożnie zdejmij pojemnik na sok
to odłączenie filtra
Teraz możesz wyjąć filtr
.
r
od wału napędowego f.
d
.
i
z zatyczką q.
e
t
z pojemnika t.
d
. Powoduje
Czyszczenie i pielęgnacja
Uwaga:
Przed przystąpieniem do założenia/zdjęcia akcesoriów, a także przed czyszczeniem najpierw wyciągnij
wtyczkę z gniazdka. Wszystkie elementy urządzenia
i akcesoria należy regularnie i po każdym użyciu
wyczyścić, by nie dopuścić do zatkania otworu wylotowego soku i/lub uszkodzenia urządzenia.
Uwaga:
Do czyszczenia sokownika nigdy nie używaj żrących
środków czyszczących. Urządzenia ani jego
elementów nie wolno czyścić we wrzącej wodzie.
• Oczyścić obudowę urządzenia i kabel sieciowy
lekko wilgotną ściereczką do mycia.
• Popychacz
pojemnik zlewowy
pojemnik na miąższ i wytłoki
wodzie z dodatkiem płynu do mycia naczyń, a
następnie starannie wypłucz.
Zatyczka
wy
, oddzielne naczynie na sok hi naczynie na
e
miąższ i wytłoki
warce. Do umycia filtra
szczoteczki nylonowej
• Pokrywkę zatyczki
aż strzałka będzie pokazywała kierunek w
stronę otwartej kłódki w komorze. Teraz
możesz zdjąć pokrywę. We wnętrzu zatyczki
znajduje się szczotka nylonowag. By ponownie zamknąć pokrywę, załóż ją ponownie w ten
sposób, by strzałka była skierowana w stronę
otwartej kłódki .
Następnie obróć ją tak, by strzałka pokazywała
zamkniętą kłódkę .Pokrywa jest teraz mocno
osadzona.
• Przytrzymaj filtr
wodą i wyczyść go szczotką nylonową
, pojemnik na sok t, oddzielny
q
, pokrywę obudowy ei
h
umyj w ciepłej
s
, naczynie na sok t, pokrywa obudo-
q
nadają się do mycia w zmy-
s
używaj dołączonej
d
:
g
obrócić do momentu,
q
(dnem do góry) pod bieżącą
d
g
q
.
Uwaga:
By uniknąć porażenia prądem elektrycznym,
silnika/podstawy urządzenia
wkładaj pod wodę ani żadną inną ciecz.
• Włącznikiem/wyłącznikiem owyłącz urządzenie.
• Natychmiast usuń zanieczyszczenia i przelaną
ilość soku, ponieważ zaschnięte plamy od soku
owocowego trudno się usuwa.
nigdy nie
u
Odbarwienia:
• Niektóre owoce i warzywa mogą trwałe przebarwienie niektórych elementów. Nie jest to
szkodliwe i w niczym nie zakłóca normalnego
działania.
- 19 -
Page 23
Przechowywanie
W razie zaplanowania dłuższej przerwy w użytkowani,
zawiń kabel o schowek na kabel zasilający
o dolną część sokownika.
a
oraz
Usuwanie/wyrzucanie
W żadnym przypadku nie należy wyrzucać urządzenia do normalnych śmieci
domowych. W odniesieniu do produktu ma zastosowanie dyrektywa europejska 2012/19/EU.
Urządzenie należy poddać utylizacij w akredytowanym zakładzie utylizacji lub komunalnym zakładzie
utylizacji odpadów.
Przestrzegaj aktualnie obowiązujących przepisów.
W razie pytań należy skontaktować się z komunalnym
zakładem utylizacji odpadów.
Wszystkie materiały wchodzące w skład
opakowania należy przekazać do odpowiednich punktów zbiórki odpadów.
Gwarancja i serwis
Urządzenie objęte jest 3-letnią gwarancją, licząc
od daty zakupu. Urządzeniezostało starannie wyprodukowane i poddane skrupulatnej kontroli przed
wysyłką. Paragon należy zachować jako dowód
dokonania zakupu. W przypadku roszczeń gwarancyjnych należy skontaktować się telefonicznie z
serwisem. Tylko w ten sposób można zagwarantować bezpłatną wysyłkę zakupionego produktu.
Gwarancja obejmuje wyłącznie wady materiałowe
i fabryczne, natomiast nie obejmuje szkód powstałych podczas transportu, części ulegających zużyciu ani uszkodzeń części łatwo łamliwych/podatnych na uszkodzenia mechaniczne, np.
wyłączników, akumulatorów.
Produkt przeznaczony jest wyłącznie do użytku
domowego, a nie do zastosowań profesjonalnych.
Gwarancja traci ważność w przypadku niewłaściwego używania urządzenia, używania niezgodnego z przeznaczeniem, użycia siły lub ingerencji w
urządzenie dokonywanej poza naszymi autoryzowanymi punktami serwisowymi. Niniejsza gwarancja nie ogranicza ustawowych praw nabywcy urządzenia.
Okres gwarancji nie ulega wydłużeniu o czas trwania usługi gwarancyjnej. Dotyczy to również wymienionych i naprawionych części. Szkody i wady zauważone już w chwili zakupu należy zgłosić od razu
po rozpakowaniu, nie później niż po upływie dwóch
dni od daty zakupu. Po upływie okresu gwarancyjnego wszystkie naprawy będą wykonywane płatnie.
Serwis Polska
Tel.: 22 397 4996
E-Mail: kompernass@lidl.pl
IAN 104378
Importer
KOMPERNASS HANDELS GMBH
BURGSTRASSE 21
44867 BOCHUM
GERMANY
www.kompernass.com
- 20 -
Page 24

Usuwanie usterek
Problem Możliwe przyczyny Możliwe rozwiązania
Urządzenie nie działa.
Silnik przy wyciskaniu soku nie
uruchamia się lub pracuje stanowczo za wolno wzgl. nierówno.
Odpadki są za mokre i sokownik
wyciska za mało soku.
Sok wycieka między krawędzią
pokrywy urządzenia
jemnikiem na sok
e a po-
t.
• Wtyczka i nie jest podłączona.
• Urządzenie nie jest włączone.
• Klamry r nie są zaryglowane. • Zarygluj klamry r.
• Filtr d jest zatkany.
• Praca za szybka. • Pracuj nieco wolniej.
• Filtr d jest zatkany.
• Praca za szybka. • Pracuj nieco wolniej.
d lub pojemnik na sok t
• Filtr
są zatkane.
• Ustawiona nieprawidłowa
prędkość pracy.
• Podłącz urządzenie do gniazdka
zasilania.
• Włącz urządzenie włącznikiem/
wyłącznikiem
• Wyłącz sokownik i wyciągnij
wtyczkę
zatkania (patrz rozdział
„Wyciskanie soku”).
• Wyczyść filtr d (patrz rozdział
„Czyszczenie i konserwacja”).
• Wyczyść filtr
na sok
„Czyszczenie i konserwacja”).
• Ustaw włącznik/wyłącznik
na zakres prędkości I.
o.
i. Usuń przyczynę
d i pojemnik
t (patrz rozdział
o
Sok tryska z otworu wylotu y.
Podczas pracy sok ścieka na
podstawę urządzenia
u.
• Praca za szybka.
• Ustawiona nieprawidłowa
prędkość pracy.
• Filtr
d lub otwór wylotowy
soku
y są zatkane.
• Ustawiona nieprawidłowa
prędkość pracy.
- 21 -
• Pracuj nieco wolniej.
• Ne naciskaj zbyt mocno na
zatyczkę
• Ustaw włącznik/wyłącznik
na zakres prędkości I.
• Wyczyść filtr d i otwór wylotowy
soku
czenie i konserwacja”).
• Ustaw włącznik/wyłącznik
na zakres prędkości I.
q.
o
y (patrz rozdział „Czysz-
o
Page 25

Przepisy
Napój letni
Dla 2 osób
Składniki
1 duży arbuz
1 cytryna
4 jabłka, słodko-kwaśne
(np. odmiany „Jonagold” lub „Jonatan”)
Przygotowanie
1. Przygotuj arbuza, cytrynę i jabłka zgodnie ze
wskazówkami w instrukcji obsługi sokowirówki.
2. Odwiruj arbuza, cytrynę i jabłka.
3. Podawaj napój schłodzony.
Napój energetyczny
Dla 2 osób
Składniki
2 jabłka, słodkie (np. „Red Delicious”)
2 duże morele
1 duża gruszka
250 ml wody mineralnej (gazowanej)
nieco pokruszonego lodu
Przygotowanie
1. Przygotuj jabłka, morele i gruszkę zgodnie ze
wskazówkami w instrukcji obsługi sokowirówki.
2. Odwiruj jabłka, morele i gruszkę.
3. Wymieszaj sok i dodaj wodę mineralną.
4. Podawaj napój z pokruszonym lodem.
Napój z jabłek, gruszek i truskawek
Dla 2 osób
Składniki
1 jabłko, zielone (np. „Granny Smith”)
3 małe, dojrzałe gruszki
10 średniej wielkości truskawek
Przygotowanie
1. Przygotuj jabłko, gruszki i truskawki zgodnie ze
wskazówkami w instrukcji obsługi sokowirówki.
2. Odwiruj wszystkie owoce w sokowirówce.
3. Zmieszaj soki i podawaj napój od razu.
Napój śniadaniowy
Dla 2 osób
Składniki
4-5 marchewek
2 jabłka
1 łyżka oliwy
Przygotowanie
1. Przygotuj marchewki i jabłka zgodnie ze wskazówkami w instrukcji obsługi sokowirówki.
2. Odwiruj najpierw marchewki, następnie jabłka.
3. Dodaj oliwę.
4. Całość dobrze wymieszaj.
- 22 -
Page 26

Napój z melona
Dla 2 osób
Napój z ananasa i mango
Dla 2 osób
Składniki
ok. 1/3 melona miodowego
1 owoc mango
1 jabłko, słodko-kwaśne
(np. odmiany „Jonagold” lub „Jonatan”)
1 jabłko, zielone (np. „Granny Smith”)
Przygotowanie
1. Przygotuj melon, mango i jabłka zgodnie ze
wskazówkami w instrukcji obsługi sokowirówki.
2. Odwiruj najpierw melon, następnie mango i
jabłka. Całość wymieszaj.
Słodki napój owocowy
Dla 2 osób
Składniki
1/2 melona miodowego
4 brzoskwinie
200 g winogron bez pestek
6 owoców mango
Przygotowanie
1. Przygotuj melon miodowy, brzoskwinie, winogrona i jabłka zgodnie ze wskazówkami w instrukcji obsługi sokowirówki.
2. Kolejno odwiruj owoce
3. Wymieszaj soki i podawaj napój lekko schłodzony.
Składniki
1/2 ananasa
1/2 owocu mango
1 jabłko
1 pomarańcza
2 łyżki do herbaty oleju z kiełków pszenicznych
Przygotowanie
1. Przygotuj ananas, mango, jabłko i pomarańczę
zgodnie ze wskazówkami w instrukcji obsługi
sokowirówki.
2. Odwiruj najpierw ananasa, następnie mango.
3. Odwiruj jabłko i pomarańczę.
4. Wymieszaj soki.
5. Dodaj 2 łyżki do herbaty oleju z kiełków pszenicznych i wymieszaj całość.
Napój z czerwonych buraków
Dla 2 osób
Składniki
1 czerwony burak
3 pomarańcze
2 łyżki stołowe porzeczek
Przygotowanie
1. Przygotuj burak, pomarańcze i porzeczki zgodnie
ze wskazówkami w instrukcji obsługi sokowirówki.
2. Odwiruj burak, pomarańcze i porzeczki, wymieszaj soki.
- 23 -
Page 27

Napój owocowo-paprykowy
Dla 2 osób
Składniki
2 żółte papryki
3 pomarańcze
2 jabłka
2 gruszki
1/2 grejpfruta
Przygotowanie
1. Przygotuj papryki, pomarańcze, jabłka, gruszki i
grejpfruta zgodnie ze wskazówkami w instrukcji
obsługi sokowirówki.
2. Odwiruj kolejno owoce i podawaj sok od razu.
Napój brzoskwiniowogruszkowo-ananasowy
Dla 2 osób
Składniki
2 brzoskwinie
2 małe gruszki
1/2 ananasa
Przygotowanie
1. Przygotuj brzoskwinie, gruszki i ananasa zgodnie
ze wskazówkami w instrukcji obsługi sokowirówki.
2. Odwiruj kolejno owoce i podawaj sok natychmiast.
Wskazówka
Przepisy bez gwarancji. Wszystkie składniki i dane
o przygotowaniu są wartościami orientacyjnymi.
Uzupełnij niniejsze przepisy własnymi dodatkami.
- 24 -
Page 28

TARTALOMJEGYZÉK OLDALSZÁM
Bevezető 26
Rendeltetésszerű használat 26
Tartozékok 26
Kezelőelemek 26
Műszaki adatok 26
Fontos biztonsági utasítások 27
A készülék összeszerelése és kezelése 29
A gyümölcs/zöldség előkészítése 29
Gyümölcspréselés 30
A gyümölcshús-tartály és a filter ürítése 30
A gyümölcscentrifuga szétszerelése 31
Tisztítás és karbantartás 31
Tárolás 32
Ártalmatlanítás 32
Garancia és szerviz 32
Gyártja 32
Hibaelhárítás 33
Receptek 34
Nyári hűsítő ital . . . . . . . . . . . . . . . . . . . . . . . . . . . . . . . . . . . . . . . . . . . . . . . . . . . . . . . . . . . .34
Almás-körtés-epres ital . . . . . . . . . . . . . . . . . . . . . . . . . . . . . . . . . . . . . . . . . . . . . . . . . . . . . . .34
Energiaital . . . . . . . . . . . . . . . . . . . . . . . . . . . . . . . . . . . . . . . . . . . . . . . . . . . . . . . . . . . . . . . .34
Reggeli ital . . . . . . . . . . . . . . . . . . . . . . . . . . . . . . . . . . . . . . . . . . . . . . . . . . . . . . . . . . . . . . . .34
Sárgadinnye ital . . . . . . . . . . . . . . . . . . . . . . . . . . . . . . . . . . . . . . . . . . . . . . . . . . . . . . . . . . .35
Édes gyümölcsital . . . . . . . . . . . . . . . . . . . . . . . . . . . . . . . . . . . . . . . . . . . . . . . . . . . . . . . . . .35
Ananászos-mangós ital . . . . . . . . . . . . . . . . . . . . . . . . . . . . . . . . . . . . . . . . . . . . . . . . . . . . . .35
Céklaital . . . . . . . . . . . . . . . . . . . . . . . . . . . . . . . . . . . . . . . . . . . . . . . . . . . . . . . . . . . . . . . . .35
Gyümölcsös paprikaital . . . . . . . . . . . . . . . . . . . . . . . . . . . . . . . . . . . . . . . . . . . . . . . . . . . . .36
Őszibarack-ananász ital . . . . . . . . . . . . . . . . . . . . . . . . . . . . . . . . . . . . . . . . . . . . . . . . . . . . .36
Az első használat előtt figyelmesen olvassa el a használati utasítást majd későbbi használatra tegye el.
A készülék harmadik személy részére történő továbbadásakor adja át a leírást is.
- 25 -
Page 29

Gyümölcscentrifuga
Bevezető
Gratulálunk új készüléke megvásárlásához.
Vásárlásával kiváló minőségű termék mellett döntött. A használati útmutató a termék része. Fontos
tudnivalókat tartalmaz a biztonságra, használatra
és ártalmatlanításra vonatkozólag. A termék használata előtt ismerkedjen meg a használati és biztonsági utasításokkal. Csak a leírtak szerint és a megadott célokra használja a terméket. A készülék
harmadik személynek történő továbbadásakor adja
a termékhez valamennyi leírást is.
Rendeltetésszerű használat
A készülék érett és meghámozott gyümölcsök és
zöldségek préselésére alkalmas. Csak élelmiszert
szabad feldolgozni a készülékkel. Kizárólag eredeti
tartozékokat, és azokat is csak a leírtak szerint szabad
használni. Minden másfajta használat vagy változtatás nem rendeltetésszerűnek minősül és balesetveszélyes.
A nem rendeltetésszerű használatból eredő károkért
a gyártó nem vállal felelősséget. Ipari használatra
nem alkalmas .
Tartozékok
Kezelőelemek
„A“ ábra:
töltő
q
betöltőnyílás
w
burkolatfedél
e
csipeszek
r
létartály
t
gyümölcslé kifolyó
y
készülék talpazat
u
hálózati kábel hálózati dugóval
i
kapcsoló (2 sebességfokozat)
o
vezetékcsévélő
a
tartály (gyümölcshúshoz és gyömölcsrosthoz)
s
„B“ ábra:
szűrő
d
meghajtótengely
f
nejlonkefe (szállításkor a tömködőben található)
g
„A“ ábra:
külön léfelfogó edény habelválasztóval (kiszállí-
h
táskor a gyümölcshús- és a rosttartóban található)
Műszaki adatok
Hálózati feszültség: 220 - 240 V ~, 50 Hz
Névleges teljesítmény: 450 W
Folyamatos üzemmód: 30 perc
Védettségi osztály : II /
Gyümölcscentrifuga
használati útmutató (a töltőben)
kezelési utasítás
Rövid üzemeltetési idő
A rövid üzemeltetési idő azt jelzi, hogy mennyi ideig
lehet üzemeltetni a készüléket a motor túlhevülése
és károsodása nélkül. A megadott rövid üzemeltetési
idő lejárta után a készüléket addig ki kell kapcsolni,
amíg a motor le nem hűl.
- 26 -
Page 30

Fontos biztonsági utasítások
VESZÉLY - elektromos áramütés!
• Az áramforrás feszültségének meg kell egyeznie a készülék típustábláján szereplő adatokkal.
• A veszélyek elkerülése érdekében a sérült hálózati csatlakozót vagy vezetéket
azonnal cseréltesse ki erre felhatalmazott szakemberrel vagy az ügyfélszolgálattal.
• A nem tökéletesen működő vagy sérült készüléket azonnal ellenőriztesse és javíttassa meg az ügyfélszolgálattal.
• Ne tegye ki a készüléket esőnek és soha ne használja nedves vagy vizes környezetben. Ügyeljen arra, hogy a hálózati kábel működés közben soha ne legyen vizes vagy nedves.
Soha ne merítse a készülék alját vízbe vagy más folyadékba!
FIGYELMEZTETÉS - sérülésveszély!
• Ne használja a készüléket az ebben az útmutatóban leírtaktól eltérő célra.
• A készüléket mindig válassza le a hálózatról, ha felügyelet nélkül hagyja, valamint az összeszerelés, a szétszedés vagy tisztítás előtt.
• A készüléket nem használhatják gyermekek.
• A készüléket és csatlakozóvezetékét gyermekektől távol kell tartani.
• A készüléket csökkent fizikai, érzékszervi vagy szellemi képességű, vagy kellő
tapasztalattal, és/vagy tudással nem rendelkező személyek csak akkor használhatják, ha felügyelet alatt állnak, vagy ha felvilágosították őket a készülék
biztonságos használatáról, és megértették az ebből eredő veszélyeket.
• Gyermekek nem játszhatnak a készülékkel.
• Amennyiben a forgó szűrő sérült, a készüléket nem szabad tovább működtetni!
• A használat közben mozgó tartozékok vagy kiegészítők cseréje előtt a készüléket ki kell kapcsolni és le kell választani a hálózatról.
• A vágószerszám nagyon éles. Bánjon vele óvatosan.
• Ne használja a készüléket sérült forgó szitával.
• A sérülések elkerülése érdekében ügyeljen az alkatrészek helyes behelyezésére.
- 27 -
Page 31

A készülékkel történő munka során soha ne tegye a kezét vagy más tárgyakat a betöltőnyílásba. Ez súlyos sérüléshez vagy a készülék rongálódásához vezethet. Ha a gyümölcsdarabok nem távolíthatók el a tömködővel, akkor kapcsolja ki a készüléket, húzza ki a hálózati csatlakozódugót és nyissa
ki a készüléket.
• Gondoskodjon arról, hogy a hálózati csatlakozódugó vészhelyzetben gyorsan
elérhető legyen és a vezetékben le lehessen megbotlani.
• Használat után kapcsolja ki a készüléket és húzza ki a hálózati csatlakozódugót. A készüléket csak akkor szabad szétszedni, ha a motor teljesen leállt.
• Ne érintse meg a forgó alkatrészeket.
• Működés közben soha ne hagyja a készüléket felügyelet nélkül.
• Gondoskodjon arról, hogy a készülék stabilan álljon.
Soha ne használja a készület:
• ha a szűrő, a hálózati kábel vagy a hálózati csatlakozódugó sérült,
• működési hiba esetén, vagy ha a készülék más módon megsérült vagy leesett.
Ellenőriztesse, illetve javíttassa meg a készüléket az ügyfélszolgálattal.
• Az olyan tartozékok használata, amelyeket a készülékgyártó nem ajánl vagy
nem értékesít, tüzet, elektromos áramütést vagy sérüléseket okozhat.
Így jár el helyesen:
• Veszély esetén azonnal húzza ki a hálózati csatlakozódugót az aljzatból.
• Mindig legyen figyelmes! Figyeljen arra, amit csinál, és mindig ésszerűen járjon el. Semmiképpen se használja a készüléket, ha szétszórt vagy rosszul érzi
magát.
• Üzembe helyezés előtt győződjön meg a készülék helyes és hiánytalan összeállításáról. A készülék csak a kapcsok zárását követően helyezhető üzembe. A
készülék automatikusan megáll, ha működés közben kioldanak a kapcsok.
• A gyümölcslé-készítő minden egyes használata után ellenőrizze, hogy a be/kikapcsoló „Ki“ ("0") helyzetben van. A készülék szétszerelése előtt a motornak teljesen le kell állnia.
• Ne használja a készüléket a szabadban.
- 28 -
Page 32

A készülék összeszerelése és
kezelése
• Az első használat előtt tisztítson meg valamennyi
alkatrészt a “Tisztítás és karbantartás” fejezetben
leírtak alapján.
• Válasszon a gyümölcsprésnek egy megfelelő
helyet. Az optimális kezelés érdekében ajánlatos
a készüléket úgy felállítani, hogy a vezeték hátrafele a dugaszoló aljzat irányába vezessen.
A tartozékok közvetlenül és jól kezelhetően
kezelhetőek legyenek:
- elöl a kapcsoló
- balra a gyümölcshús és gyümölcsrost tartálya
- és a jobb oldalon lévő gyümölcslékifolyó y.
Figyelem:
Mielőtt a készüléket összeszerelné, bizonyosodjon
mag arról, hogy a készülék ki van kapcsolva és a
hálózati dugó ki van húzva. Máskülönben fennáll
annak a veszélye, hogy megsérti magát.
1. Helyezze a létartályt
, hogy a három rögzítő és a gyümölcslé kifoly-
u
ója
a mélyedésbe illeszkedjen bele.
y
2. Helyezze a szűrőt
és nyomja le addig, amíg érezhetően be nem
pattan a helyére. Ellenőrizze a helyes rögzítést,
mielőtt folytatná az összeszerelést.
3. Tolja a gyümölcshús és a gyümölcsrost tartályát
alulról a kifolyó alá (lásd a kihajtható oldalon).
4. Helyezze a burkolatfedelet
hogy a betöltőnyílás
legyen
5. Ügyeljen arra, hogy a burkolatfedél
illeszkedjen a létartály
meg a csipeszeket
burkolatfedél
6. Tolja a gyümölcshús és a gyümölcsrost tartályát
alulról a kifolyó alá.
d
.
,
o
a készülék talpazatára
t
a meghajtótengelyre
d
a szűrő vágókése fölött
w
t
és akassza be őket a
r
kiemelkedéseibe.
e
f
a létartályra t,
e
szorosan
e
mélyedésébe. Emelje
s
s
s
7. Tolja a habelválasztó lemezt a külön gyümölcsléfelfogó tartályba
helyezze a külön gyümölcsléfelfogó tartályt
készülék mellé, hogy a gyümölcslé kiöntője
külön gyümölcsléfelfogó edénybe
8. Dugja be a csatlakozót
és tegye rá a fedelét. Úgy
h
nyúljon.
h
a dugaszoló aljzatba.
i
y
h
a
A gyümölcs/zöldség előkészítése
• Fontos: Csak érett gyümölcsöt használjon, különben eltömődhet a szűrő
újbóli tisztítását tenné szükségessé.
• Mossa vagy hámozza meg a feldolgozandó
gyümölcsöt vagy a zöldséget.
• A nagyobb magvakat betöltés előtt mindig el
kell távolítani a gyümölcsből.
• Az almatermésű gyümölcsöket (pl. alma, körte)
héjastól és magvastól fel lehet dolgozni. Az egyéb magvakat (barack, szilva, stb.), magokat
(dinnye) és szárakat el kell távolítani a készülék
károsodásának elkerülése érdekében.
• A vastaghéjú gyümölcsöket és zöldségeket
(pl. citrusfélék, dinnye, kivi, répa) először mindig
meg kell hámozni.
• A szőlőről le kell vágni a főszárat.
• Vágja a gyümölcsöket és a zöldségeket akkora
darabokra, hogy azok beleférjenek a betöltőnyílásba
w
.
Tanács:
Mazsolát nem lehet centrifugálni, mert túl kevés
nedvességet tartalmaz. A rebarbara és más rostos
gyümölcs/növény sem alkalmas centrifugálásra,
mert a rostok eltömíthetik a gyömölcscentrufigát.
. Ez a szűrő
d
d
a
- 29 -
Page 33

Gyümölcspréselés
Figyelem:
Ne üzemeltesse a centrifugát 30 percnél hosszabb
ideig (rövid üzemelési idő) megszakítás nélkül. 30
percig hagyja kihűlni a gyümölcscentrifugát tartós
használat után. Máskülönben a készülék elromolhat.
Figyelem:
Soha ne dugja bele a kezét vagy más tárgyat
működés közben a betöltő nyílásba
üzemelése közben. Ez súlyos sérülésekhez és/vagy
a gyümölcscentrifuga meghibásodásához vezethet.
1. Kapcsolja be a készüléket a kapcsolóval
A nagy nedvességtartalmú gyümölcsfajták levét
A sok folyadékot tartalmazó zöldség/gyümölcs
esetében használja az 1 sebességfokozatot.
A szárazabb zöldséghez/gyümölcshöz válassza a 2 sebességfokozatot.
2. Fél kézben tartsa a tömködőt
zével adagolja a gyümölcs- vagy zöldségdarabkákat a betöltő nyílásba
használja arra, hogy a gyümölcsöt vagy zöldséget
óvatosan belenyomja a betöltő nyílásba
közben folyik a gyümölcs vagy a zöldség feldolgozása, töltsön be további gyümölcs/ zöldségdarabokat. Eközben ne kapcsolja ki a készüléket.
. Mindig a tömködőt
w
a készülék
w
és a másik ke-
q
w
o
. Mi-
.
q
Tanács:
Annak elkerülése érdekében, hogy gyümölcs nehogy beragadjon a betöltőnyílásba
töltse meg a készüléket, ha az már be van kapcsolva. Ha beleragadtak a gyümölcsdarabok a betöltő
nyílásba
, az alábbiak szerint járjon el, ha el szeretné kerülni
a készülék sérülését:
• Azonnal kapcsolja ki a készüléket és húzza ki
• Oldja ki a csipeszeket
• Távolítsa el az ottmaradt gyümölcsdarabokat.
• Ismét szerelje össze a készüléket és folytassa
3. Kapcsolja ki ismét a készüléket, ha az összes
és nem lehet őket kiszedni a tömködővel
w
a hálózati csatlakozót
i
r
fedelét
a gyümülcsök kipréselését.
gyümölcsöt feldolgozta.
e
.
, csak akkor
w
.
és vegye le a készülék
Figyelem:
A gyümölcslékifolyótyés a létartályttrendszeresen tisztítsa használat után, hogy elkerülje a
gyömölcslé kifolyójának eltömődését
készülék meghibásodását.
és/vagy a
y
A gyümölcshús-tartály és a
filter ürítése
q
Tudnivaló:
Helyezzen egymás után több répát a betöltőnyílásba
: a répazöld csonkjának lefelé, és a gyökérc-
w
súcsnak felfelé kell mutatnia.
Folyamatosan addig préselheti ki a gyümölcs levét,
amíg a gyümölcshús és gyümölcsrostnak fenntartott
tartály
meg nem telik.
s
Figyelem:
Húzza ki a hálózati csatlakozót, ha a szűrőt dki
szeretné üríteni. Ez megakadályozza a motor
véletlen elindítását.
Ha a gyümölcslé hirtelen sokkal sűrűbb lesz, vagy
a motor fordulatszáma hallhatóan lelassul, a szűrőt
ki kell üríteni. Miután kivette a gyümölcshúst, szerelje össze újra a készüléket.
- 30 -
d
Page 34

A gyümölcscentrifuga
szétszerelése
Ha szét szeretné szerelni a gyümölcscentrifugát, pl.
ha meg szeretné tisztítani, akkor az alábbiak szerint
járjon el:
1. Húzza ki a csatlakozót
2. Nyissa ki a kapcsokat
3. Vegye le a tömködővel
latát
.
e
4. Óvatosan emelje le a létartályt
ezáltal leválik a meghajtótengelyről f. Ekkor ki
lehet venni a szűrőt
.
i
.
r
a készülék burko-
q
t
a létartályból t.
d
. A szűrő
d
Tisztítás és karbantartás
Figyelem:
Mindig húzza ki a hálózati dugót, mielőtt tartozékokat
szeretne felszerelni vagy levenni és mielőtt meg
szeretné tisztítani a készüléket. Valamennyi készülék- és
tartozékrészt rendszeresen és használat után mindig
meg kell tisztítani a gyümölcsmaradékoktól és gyümölcsrosttól, ha el szeretné kerülni a gyümölcslé kifolyó eldugulását és/vagy a készülék károsodását.
Tanács:
Ne használjon erős tisztítószereket a gyümölcscentrifuga tisztításához.A készüléket és részeit ne tisztítsa
forró vízben.
Figyelem:
Ne merítse a motort/a burkolat talpazatát
vízbe vagy más folyadékba, nehogy áramütést kapjon.
u
• A készülék burkolatát és a vezetéket enyhén
nedves törlőkendővel tisztítsa.
• Meleg szappanos vízben tisztítsa meg a tömködőt
, a gyümölcslé tartályt t, a külön gyüm-
q
ölcsléfelfogó tartályt
a gyümölcshús és rost tartályt
öblítse le.
A betöltést segítő eszközt q, a gyümölcslétartályt
, a készülék burkolatát e, a külön gyümölcsléfel-
t
fogó tartályt
mosogatógépben is lehet tisztítani. A szűrő
tásához használja a csomagban található nejlonkefét
:
g
• Fordítsa el a tömködő
nyíl a tömködő nyelén lévő nyitott zárra mutasson. Ekkor leveheti a fedelet. A tömködő
belsejében található a nejlonkefeg. Ha vissza
szeretné zárni a fedelet, ismét úgy helyezze fel,
hogy a nyíl a nyitott zárra mutasson.
Majd fordítsa el annyira, hogy a nyíl a zárt zárra
mutasson. A fedél ekkor szorosan illeszkedik.
• Tartsa a szűrőt
alá és tisztítsa meg a nejlonkefével
és a gyümölcshús- és rosttartót sa
h
d
, a burkolat fedelét eés
h
, és alaposan
s
tisztí-
d
fedelét annyira, hogy a
q
q
(az alsó részével felfele) vízcsap
.
g
Elszíneződés:
• Néhány gyümölcs vagy zöldség tartósan elszínezheti a gyümölcscentrifuga fehér részeit. Ez
nem okoz kárt benne és nem befolyásolja a
készülék működését.
• Kapcsolja ki a készüléket a kapcsolóval o.
• Távolítsa el körültekintően a szennyeződéseket
és a kifolyt gyümölcslevet, mert a gyümölcsfoltokat
később csak nagyon nehezen lehet eltávolítani.
- 31 -
Page 35

Tárolás
Ha a gyümölcscentrifugát hosszabb ideig nem
használja, csavarja fel a vezetéket a gyümölcscentrifuga alján lévő vezetékcsévélőre
a
.
Ártalmatlanítás
Semmi esetre se dobja a készüléket a
háztartási hulladékba. A termékre az
2012/19/EU irányelv vonatkozik.
A garancia érvényét veszti visszaélésszerű vagy
szakavatatlan kezelés, erőszak alkalmazása vagy
olyan beavatkozások esetén, amelyeket nem engedélyeztetett szervizelő üzleteink hajtottak végre. Az
ön törvényes jogait ez a garancia nem korlátozza.
A garanciaidő nem hosszabbodik a jótállással. Ez
a kicserélt vagy javított alkatrészekre is érvényes.
Az esetlegesen már a megvételkor meglévő károkat
és hiányosságokat azonnal kicsomagolás után, legkésőbb két nappal a vétel dátumától számítva jelezni kell. A garanciális idő lejárta után esedékes javítások térítéskötelesek.
A készüléket engedélyeztetett hulladékgyűjtő helyen
vagy a helyi hulladékeltávolító üzemnél tudja kidobni.
Tartsa be az érvényes előírásokat. Kétség esetén
vegye fel a kapcsolatot a hulladékfeldolgozó
vállalattal.
Valamennyi csomagolóanyagot juttasson el
a környezetbarát hulladékhasznosítóhoz.
Garancia és szerviz
A készülékre 3 év garanciát adunk a vásárlás dátumától számítva. A készüléket gondosan gyártottuk,
és szállítás előtt lelkiismeretesen ellenőriztük. Kérjük, a
vásárlás igazolására őrizze meg a pénztári blokkot.
Kérjük, garanciaigény esetén vegye fel a kapcsolatot telefonon az Ön közelében lévő szervizzel.
Csak ebben az esetben garantálhatjuk, hogy ingyen tudja beküldeni az árut.
A garancia csak anyag- és gyártási hibára vonatkozik, nem pedig szállítási kárra, kopásra vagy törékeny részek (pl. kapcsoló vagy elem) sérülésére. A termék kizárólag magánhasználatra, nem üzleti
használatra készült.
Szerviz Magyarország
Tel.: 0640 102785
E-Mail: kompernass@lidl.hu
IAN 104378
Gyártja
KOMPERNASS HANDELS GMBH
BURGSTRASSE 21
44867 BOCHUM
GERMANY
www.kompernass.com
- 32 -
Page 36

Hibaelhárítás
Probléma Lehetséges okok Lehetséges megoldások
A készülék nem működik.
A motor centrifugáláskor megáll
vagy feltűnően lassan és egyenetlenül forog.
A visszamaradó gyümölcshús és
-rost túl nedves és túl kevés lé jön
ki a készülékből.
A burkolatfedél e és a létartály
t között kifolyik a lé.
• A csatlakozó i nincs bedugva.
• A készülék nincs bekapcsolva.
• A csipeszek r nem voltak elreteszelve.
• A szűrő d el van tömődve.
• Túl gyorsan csinálja. • Lassabban csinálja!
• A szűrő d el van tömődve.
• Túl gyorsan csinálja. • Lassabban csinálja!
• A szűrő
• Rossz sebességfokozat van
d vagy a létartály t
el van tömődve.
beállítva.
• Csatlakoztassa a készüléket
egy konnektorba.
• Kapcsolja be a készüléket
a kapcsolóval
• Zárja le a csipeszeket r.
• Azonnal kapcsolja ki a gyümölcscentrifugát és húzza ki
a csatlakozót
meg az eltömődést (lásd a
„Gyümölcscentrifugálás“ részt).
• Tisztítsa meg a szűrőt d (lásd a
„Tisztítás és ápolás“ részben).
• Tisztítsa meg a szűrőt d és a
létartályt
és ápolás“ részt).
• Állítsa be a kapcsolón
I-es sebességfokozatot!
o.
i. Szünetesse
t (lásd a „Tisztítás
o
az
A lé kispriccel a gyümölcslékifolyóból
Üzemeltetés közben folyik le a lé
a készülék talpazatán
y.
u.
• Túl gyorsan csinálja.
• Rossz sebességfokozat van
beállítva.
• A szűrő
• Rossz sebességfokozat van
d vagy a gyümölcslé-
kifolyó
y el van tömődve.
beállítva.
- 33 -
• Lassabban csinálja!
• Ne nyomja annyira utántöltéskor
a tömködőt
• Állítsa be a kapcsolón
I-es sebességfokozatot!
• Tisztítsa meg a szűrőt d és a
gyümölcslékifolyót
„Tisztítás és ápolás“ részt).
• Állítsa be a kapcsolón
I-es sebességfokozatot!
q.
o
y (lásd a
o
az
az
Page 37

Receptek
Nyári hűsítő ital
2 személy részére
Hozzávalók
1 nagy görögdinnye
1 citrom
4 édes-savanykás alma
(pl. jonagold vagy jonatán)
Elkészítése
1. A gyümölcscentrifuga leírásának utasítása alapján
készítse elő a görögdinnyét, a citromot és az
almát.
2. Préselje ki a görögdinnyét, a citromot és az almát.
Almás-körtés-epres ital
2 személy részére
Hozzávalók
1 zöld alma (pl. Granny Smith)
3 érett kis körte
10 közepes méretű eper
Elkészítése
1. A gyümölcscentrifuga leírásának utasítása alapján
készítse elő az almát, a körtét és az epret.
2. Préselje ki mindet a gyümölcscentrifugával.
3. Keverje össze a leveket és azonnal szolgálja
fel az italt.
Energiaital
2 személy részére
Hozzávalók
2 édes alma (pl. Red Delicious)
2 nagy sárgabarack
1 nagy körte
2,5 dl ásványvíz (szénsavas)
kevés jégkása
Elkészítése
1. Készítse elő az almát, a barackot és a körtét a
gyümölcscentrifuga leírásának utasítása alapján.
2. Facsarja ki az almát, a barackot és a körtét.
3. Keverje össze a leveket és adja hozzá az ásványvizet.
4. Jégkására öntve szolgálja fel az italt.
Reggeli ital
2 személy részére
Hozzávalók
4 -5 sárgarépa
2 alma
1 teáskanál olívaolaj
Elkészítése
1. A gyümölcscentrifuga leírásának utasításai szerint készítse elő a sárgarépát és az almát.
2. Facsarja ki a géppel először a sárgarépa, majd
az alma levét.
3. Adja hozzá az olívaolajat.
4. Az egészet jól keverje össze.
- 34 -
Page 38

Sárgadinnye ital
2 személy részére
Ananászos-mangós ital
2 személy részére
Hozzávalók
kb. 1/3 sárgadinnye
1 mangó
1 édes-savanykás alma
(pl. jonagold vagy jonatán)
1 zöld alma (pl. Granny Smith)
Elkészítése
1. A gyümölcscentrifuga leírásának utasítása alapján
készítse elő a dinnyét, a mangót és az almát.
2. Először a dinnyének, majd a mangónak és az
almának facsarja ki a levét a géppel. Keverje
össze az egészet.
Édes gyümölcsital
2 személy részére
Hozzávalók
1/2 sárgadinnye
4 őszibarack
2 dkg mag nélküli szőlő
6 mangó
Elkészítése
1. A gyümölcscentrifuga leírásának utasítása alapján
készítse elő a dinnyét, a őszibarackot, a szőlőt
és a mangót.
2. Egymás után facsarja ki a gyümölcsöket.
3. Keverje össze a leveket és kissé hűtve szolgálja
fel az italt.
Hozzávalók
1/2 ananász
1/2 mangó
1 alma
1 narancs
2 teáskanál búzacsíra olaj
Elkészítése
1. A gyümölcscentrifuga leírásának utasítása alapján
készítse elő az ananászt, a mangót, az almát és
a narancsot.
2. Először az ananászt, majd a mangót facsarja
ki a géppel.
3. Facsarja ki a géppel az almát és a narancs levét.
4. Keverje össze a leveket.
5. Tegyen bele 2 teáskanál búzacsíra olajat és az
egészet keverje össze.
Céklaital
2 személy részére
Hozzávalók
1 cékla
3 narancs
2 evőkanál ribizli
Elkészítése
1. A gyümölcscentrifuga leírásának utasítása alapján
készítse elő a céklát, a narancsot és a ribizlit.
2. Facsarja ki a géppel a céklát, a narancsot és
a ribizlit, majd keverje össze a leveket.
- 35 -
Page 39

Gyümölcsös paprikaital
2 személy részére
Hozzávalók
2 sárga paprika
3 narancs
2 alma
2 körte
1/2 grépfrút
Elkészítése
1. A gyümölcscentrifuga leírásának utasítása alapján
készítse elő a paprikát, a narancsot, az almát,
a körtét és a grépfrútot.
2. Facsarja ki egymás után az összeset és azonnal
szolgálja fel a gyümölcslevet.
Őszibarack-ananász ital
2 személy részére
Hozzávalók
2 őszibarack
2 kis körte
1/2 ananász
Elkészítése
1. A gyümölcscentrifuga leírásának utasítása alapján
készítse elő az őszibarackot, a körtét és az ananászt.
2. Facsarja ki egymás után az összeset és azonnal
szolgálja fel a gyümölcslevet.
Tanács:
A receptek sikerét nem garantáljuk. Valamennyi
hozzávaló és elkészítési mód adata csak hozzávetőleges érték. Egészítse ki a receptajánlatokat személyes tapasztalataival
- 36 -
Page 40

KAZALO VSEBINE STRAN
Uvod 38
Predvidena uporaba 38
Obseg dobave 38
Upravljalni elementi 38
Tehnični podatki 38
Pomembni varnostni napotki 39
Sestavitev in uporaba naprave 41
Priprava sadja/zelenjave 41
Iztiskanje soka 42
Praznjenje posode za ostanke sadežev in filtra 42
Demontaža sokovnika 43
Čiščenje in nega 43
Shranjevanje 44
Odstranitev 44
Proizvajalec 44
Servis 44
Garancijski list 44
Odprava napak 45
Recepti 46
Poletni napitek . . . . . . . . . . . . . . . . . . . . . . . . . . . . . . . . . . . . . . . . . . . . . . . . . . . . . . . . . . . . .46
Napitek iz jabolk, hrušk in jagod . . . . . . . . . . . . . . . . . . . . . . . . . . . . . . . . . . . . . . . . . . . . . .46
Energijski napitek . . . . . . . . . . . . . . . . . . . . . . . . . . . . . . . . . . . . . . . . . . . . . . . . . . . . . . . . . .46
Napitek za zajtrk . . . . . . . . . . . . . . . . . . . . . . . . . . . . . . . . . . . . . . . . . . . . . . . . . . . . . . . . . .46
Napitek iz sladkih melon . . . . . . . . . . . . . . . . . . . . . . . . . . . . . . . . . . . . . . . . . . . . . . . . . . . .47
Sladek sadni napitek . . . . . . . . . . . . . . . . . . . . . . . . . . . . . . . . . . . . . . . . . . . . . . . . . . . . . . . .47
Napitek z ananasom in mangom . . . . . . . . . . . . . . . . . . . . . . . . . . . . . . . . . . . . . . . . . . . . . .47
Napitek iz rdeče pese . . . . . . . . . . . . . . . . . . . . . . . . . . . . . . . . . . . . . . . . . . . . . . . . . . . . . .47
Sadni napitek s papriko . . . . . . . . . . . . . . . . . . . . . . . . . . . . . . . . . . . . . . . . . . . . . . . . . . . . .48
Napitek z breskvami, hruškami in ananasom . . . . . . . . . . . . . . . . . . . . . . . . . . . . . . . . . . . .48
Pred prvo uporabo ta navodila skrbno preberite in jih shranite za poznejšo uporabo. Ob predaji naprave
tretji osebi zraven priložite tudi navodila za uporabo.
- 37 -
Page 41

Sokovnik
Uvod
Iskrene čestitke ob nakupu vaše nove naprave.
Odločili ste se za kakovosten izdelek. Ta navodila za
uporabo so sestavni del vašega izdelka. Vsebujejo pomembne napotke za njegovo varnost, uporabo in odstranitev. Preden izdelek začnete uporabljati, si preberite vse napotke za njegovo varno uporabo. Izdelek
uporabljajte samo na opisani način in le za navedena
področja uporabe. Ob predaji naprave tretji osebi zraven priložite tudi vso dokumentacijo.
Predvidena uporaba
Naprava je namenjena za iztiskanje soka iz ustrezno
zrelega in olupljenega sadja in zelenjave. Z napravo
se lahko predelujejo le živila. Uporabljati se sme
izključno originalni pribor, kot je naveden spodaj.
Vsakršna druga uporaba ali sprememba naprave
velja za nepredvideno in pomeni bistveno nevarnost
nezgod.
Za škodo zaradi nepredvidene uporabe proizvajalec
ne prevzame odgovornosti. Ni za obrtno uporabo.
Upravljalni elementi
Slika A:
Potiskalo
q
Polnilni nastavek
w
Pokrov ohišja
e
Sponke
r
Posoda za sok
t
Iztok soka
y
Podstavek naprave
u
Omrežni kabel z omrežnim vtičem
i
Stikalo za vklop/izklop (2 stopnji hitrosti)
o
Navitje kabla
a
Posoda (za ostanke sadežev in tropine)
s
Slika B:
Filter
d
Pogonska gred
f
Najlonska ščetka (pri novi napravi se nahaja
g
v potiskalu)
Slika A:
Posebna posoda za sok z ločilnikom pene
h
(pri novem izdelku se ta nahaja v posodi za
ostanke sadežev in tropine)
Tehnični podatki
Obseg dobave
Sokovnik
Najlonska ščetka (v potiskalu)
Navodila za uporabo
Omrežna napetost: 220-240 V ~, 50 Hz
Nazivna moč: 450 W
Čas kratkotrajne uporabe: 30 minut
Razred zaščite: II /
Čas kratkotrajne uporabe:
Čas KU (kratkotrajne uporabe) nam pove, kako dolgo
lahko neko napravo uporabljamo, preden se motor
pregreje in poškoduje. Po poteku navedenega časa
KU mora naprava ostati izklopljena tako dolgo,
dokler se motor ni ohladil.
- 38 -
Page 42

Pomembni varnostni napotki
NEVARNOST - električni udar!
• Napetost vira električnega toka se mora skladati z navedbami na tipski tablici
naprave.
• Da se izognete nevarnostim, naj vam poškodovane električne vtiče ali električne kable takoj zamenjajo pooblaščeni strokovnjaki ali servisna služba.
• Napravo, ki ne bi delovala brezhibno ali bi bila poškodovana, naj takoj pregleda in popravi servisna služba.
• Naprave ne imejte na dežju in je nikoli ne uporabljajte v vlažnem ali mokrem
okolju. Zmeraj pazite na to, da se električni kabel med delovanjem naprave ne
namoči ali navlaži.
Podstavka naprave nikoli ne potopite pod vodo ali druge tekočine!
OPOZORILO – nevarnost telesnih poškodb!
• Naprave nikoli ne zlorabljajte za druge namene, kot so opisani v teh navodilih.
• Kadar naprava ni pod nadzorom in preden jo začnete sestavljati, razstavljati
ali čistiti, jo vedno ločite od omrežja.
• Otroci naprave ne smejo uporabljati.
• Napravo in njen priključni kabel je treba hraniti zunaj dosega otrok.
• Osebe z omejenimi fizičnimi, zaznavnimi ali duševnimi sposobnostmi ali s pomanjkljivimi izkušnjami in/ali znanjem to napravo lahko uporabljajo le, če jih
pri tem nekdo nadzoruje ali jih je poučil o varni uporabi naprave in so razumele nevarnosti, ki izhajajo iz uporabe naprave.
• Otroci se z napravo ne smejo igrati.
• Če bi se vrteči se filter poškodoval, naprave ni dovoljeno več uporabljati!
• Pred menjavanjem pribora ali dodatnih delov, ki se med delovanjem premikajo, je napravo treba izklopiti in jo izključiti iz električnega omrežja.
• Rezilo je zelo ostro. Z rezilom ravnajte previdno.
• Naprave ne uporabljajte, če je vrteče se sito poškodovano.
• Da preprečite telesne poškodbe, pazite na to, da so vsi deli previdno vstavljeni.
- 39 -
Page 43

Pri delu z napravo nikoli ne vtikajte rok ali drugih predmetov v odprtino za
polnjenje. To bi lahko privedlo do težkih telesnih poškodb ali poškodbe naprave. Če kosov sadja ne morete odstraniti s pomočjo potiskala, napravo izklopite, izvlecite električni vtič iz vtičnice in napravo odprite.
• Zagotovite, da je električni vtič v primeru nevarnosti hitro dosegljiv in da električni kabel ne more povzročati spotikanja.
• Po uporabi napravo izklopite in električni vtič povlecite iz vtičnice. Napravo je
dovoljeno razstavljati, šele ko motor povsem miruje.
• Ne dotikajte se vrtečih se delov.
• Naprave med delovanjem nikoli ne pustite nenadzorovane.
• Poskrbite za varen položaj naprave.
Naprave nikoli ne uporabljajte:
• če je filter, električni kabel ali električni vtič naprave poškodovan,
• v primeru napak v delovanju, če je poškodovana ali je padla na tla. Napravo
naj vam preveri oziroma popravi servisna služba.
• Uporaba delov pribora, ki jih ne priporoča ali prodaja proizvajalec naprave,
lahko povzroči nastanek ognja, udarov električnega toka ali telesne poškodbe.
Tako ravnate varno:
• V primeru nevarnosti električni vtič takoj potegnite iz vtičnice.
• Bodite nenehno pozorni! Vedno pazite na to, kaj delate, in vedno ravnajte premišljeno. Naprave nikakor ne uporabljajte, če ste nekoncentrirani ali se ne počutite dobro.
• Preden začnete napravo uporabljati, preverite, ali je pravilno in popolnoma
sestavljena. Napravo je mogoče uporabljati, šele ko so sponke pritrjene. Če se
sponke med delovanjem odprejo, se naprava samodejno zaustavi.
• Po vsaki uporabi sokovnika preverite, ali je stikalo za vklop/izklop v položaju
za „Izklop“ („0“). Preden smete napravo razstavljati, mora biti motor popolnoma zaustavljen.
• Naprave ne uporabljajte na prostem.
- 40 -
Page 44

Sestavitev in uporaba naprave
• Pred prvo uporabo očistite vse dele, kot je opisano v poglavju "Čiščenje in nega".
• Za svoj sokovnik poiščite primeren kraj uporabe.
Za optimalno uporabo vam priporočamo, da
napravo postavite tako, da omrežni kabel poteka
k vtičnici zadaj za napravo. Tako lahko sedaj
neposredno in preprosto uporabljate vse elemente:
- spredaj stikalo za vklop/izklop
- levo posoda za ostanke sadežev in tropine
- in na desni strani iztok soka y.
Pozor:
Preden napravo začnete sestavljati, preverite, ali je
izklopljena in je omrežni vtič potegnjen iz vtičnice.
Drugače se lahko poškodujete.
1. Posodo za sok
prave
zataknejo v odprtinah.
2. Filter
pritisnite navzdol, tako da se opazno zaskoči.
Preden nadaljujete s sestavljanjem, preverite
trdnost njegove namestitve.
3. Posodo za ostanke sadežev in tropine
spodaj potisnite pod izmet (glejte razklopno
stran).
4. Pokrov ohišja
sok
rezili v filtru
5. Poskrbite, da bo pokrov ohišja
v reži na posodi za sok
jih namestite na izbokline na pokrovu ohišja
6. Spodnji del sponk
se ne zaskočijo.
, tako da se trije nastavki in iztok soka
u
namestite na pogonsko gred fin ga
d
, tako da bo polnilni nastavek wnad
t
namestite na podstavek na-
t
namestite na posodo za
e
.
d
. Dvignite sponke rin
t
pritisnite na napravo, dokler
r
,
o
s
trdno zataknjen
e
od
e
s
.
7. Potisnite ploščo ločilnika pene v posebno posodo
za sok
sodo za sok
iztok soka
8. Omrežni vtič
in nanjo namestite pokrov. Posebno po-
h
postavite poleg naprave, tako da
h
sega v posebno posodo za sok h.
y
vtaknite v vtičnico.
i
Priprava sadja/zelenjave
• Pomembno: Uporabljajte samo močno zrele
sadeže, ker se filter
To bi pomenilo pogosto čiščenje filtra
• Sadje ali zelenjavo za obdelavo operite ali
olupite.
• Večje pečke ali koščice morate odstraniti iz sadežev,
preden jih daste v napravo.
• Pečkato sadje (kot so jabolka, hruške) lahko obdelujete z lupino in sredico. Druge koščice
(breskvi, slive itd.), vse večje pečke (melone itd.)
y
in peclje odstranite, da preprečite poškodbe
naprave.
• Sadeže z debelo lupino (npr. citrusi, melona,
kivi, pesa) je zmeraj treba najprej olupiti.
• Pri grozdju je treba pecelj odrezati.
• Sadeže ali zelenjavo narežite na tako velike
kose, da bodo primerni za polnilni nastavek
Napotek:
Rozine niso primerne za iztiskanje soka, ker vsebujejo
premalo soka. Rabarbara ali druga vlaknasta zelenjava/sadje ni primerna za iztiskanje soka, ker
vlakna sokovnik zamašijo.
drugače lahko zamaši.
d
d
.
.
w
- 41 -
Page 45

Iztiskanje soka
Pozor:
Sokovnika nikoli ne uporabljajte več kot 30 minut
(čas KU) brez prekinitve. Sokovnik po 30 minutah
trajnega obratovanja pustite, da se ohladi. Naprava
se drugače lahko poškoduje.
Pozor:
V polnilni nastavek wnikoli ne vtikajte rok ali predmetov, medtem ko naprava obratuje. To lahko privede
do težkih telesnih poškodb in/ali poškodb sokovnika.
Napotek:
Da preprečite nalaganje sadja v polnilnem nastavku
, ga dodajajte le pri vklopljeni napravi. Če so
w
se v polnilnem nastavku
jih ne morete takoj odstraniti s potiskalom
opajte, kot sledi, da preprečite poškodbe naprave:
• Napravo takoj izklopite in omrežni vtič
tegnite iz vtičnice.
• Sprostite sponke
• Odstranite nakopičene koščke sadja.
• Napravo ponovno sestavite in nadaljujte z
iztiskanjem soka.
nabrali koščki sadja in
w
q
i
in pokrov ohišja esnemite.
r
, post-
po-
1. Napravo vklopite s stikalom za vklop/izklop
Za sadje/zelenjavo, ki vsebuje veliko tekočine,
uporabite hitrost 1.
Za bolj suho sadje/zelenjavo izberite hitrost 2.
2. Potiskalo
zelenjave z drugo roko dajajte v nastavek za
polnjenje
da z njim lahko sadje/zelenjavo previdno potisnete
v polnilni nastavek
zelenjava obdelujeta, dodajajte nadaljnje koščke. Pri tem naprave ne izklapljajte.
držite v eni roki in koščke sadja ali
q
. Potiskalo qzmeraj uporabljajte,
w
. Medtem ko se sadje ali
w
o
Napotek:
Korenčke enega za drugim vstavljajte v polnilni nastavek
navzdol, konica korenčka pa navzgor.
: konec z ostankom stebel mora kazati
w
.
3. Napravo zmeraj takoj izklopite, kakor hitro ste
porabili vso sadje.
Pozor:
Iztok sokayin posodo za soktredno in po vsaki upo-rabi očistite, da preprečite zamašitev iztoka
soka
in/ali poškodbe naprave.
y
Praznjenje posode za ostanke
sadežev in filtra
Sok lahko neprekinjeno iztiskate, dokler posoda
za ostanke sadja in tropine
Pozor:
Ko filter dpraznite, omrežni vtič potegnite iz vtičnice.
To prepreãuje nehoten zagon motorja.
Ko se sadni sok nenadoma močno zgosti, ali ko slišite, da se število vrtljajev motorja upočasni, je
filter
treba sprazniti. Potem ko ste ostanke sadja
d
odstranili, napravo ponovno sestavite.
ni napolnjena.
s
- 42 -
Page 46

Demontaža sokovnika
Če sokovnik želite razstaviti, da ga npr. lahko očistite,
postopajte kot sledi:
1. Omrežni vtič
2. Odprite sponke
3. Pokrov ohišja
4. Posodo za sok
tako odstranjen od pogonske gredi
sedaj lahko vzamete iz posode za sok t.
potegnite iz vtičnice.
i
.
r
s potiskalom qodstranite.
e
previdno dvignite. Filter dje
t
f
. Filter
d
Čiščenje in nega
Pozor:
Omrežni vtič zmeraj potegnite iz vtičnice, preden
nameščate ali odstranjujete dele pribora in preden
napravo začnete čistiti. Vse dele naprave in pribora
je treba redno in po vsaki uporabi očistiti ostankov
sadežev in tropin, da preprečite zamašitev iztoka
soka in/ali poškodbe naprave.
Napotek:
Ne uporabljajte agresivnih čistil za čiščenje sokovnika. Naprave in njenih sestavnih delov ne smete čistiti
z vrelo vodo.
Pozor:
Motorja/podstavka naprave unikoli ne
potapljajte v vodo ali druge tekočine, da
preprečite električni udar.
• Očistite ohišje naprave in omrežni kabel z rahlo
navlaženo krpo za posodo.
• Potiskalo
do za sok
ostanke sadežev in tropine
nici in jih skrbno splahnite.
Potiskalo q, posoda za sok t, pokrov ohišja e,
posebna posoda za sok
sadežev in tropine
in jih lahko pomijete v stroju. Za čiščenje filtra
uporabite priloženo najlonsko ščetko g:
• Pokrov potiskala
puščica kaže na odprto ključavnico na deblu
potiskala. Sedaj pokrov lahko snamete. V notranjosti potiskala
Za zapiranje pokrova tega ponovno namestite
tako, da puščica kaže na odprto ključavnico
kaže na zaprto ključavnico . Pokrov je sedaj
pritrjen.
• Držite filter
tekočo vodo in ga očistite z najlonsko ščetko
, posodo za sok t, posebno poso-
q
, pokrov naprave ein posodo za
h
očistite v topli mil-
s
in posoda za ostanke
h
so primerni za pomivalni stroj
s
d
obrnite tako daleč, da
q
se nahaja najlonska ščetka g.
q
. Potem ga obrnite tako daleč, da puščica
(s spodnjo stranjo navzgor) pod
d
g
Obarvanja:
• Nekatero sadje ali zelenjava lahko dele sokovnika
trajno obarva. To ni škodljivo in ne omejuje delovanja naprave.
.
• Napravo izklopite s stikalom za vklop/izklop
• Umazanijo ali packe od soka je treba takoj odstraniti, ker se madeži zaradi sadja pozneje komaj še dajo odstraniti.
o
.
- 43 -
Page 47

Shranjevanje
Če sokovnika dlje časa ne uporabljate, kabel ovijte
okrog navitja kabla
na spodnji strani sokovnika.
a
Odstranitev
Naprave v nobenem primeru ne odvrzite v običajne hišne smeti. Ta proizvod je podvržen evropski Direktivi
2012/19/EU.
Napravo oddajte pri podjetju, registriranem za
predelavo odpadkov, ali pri svojem komunalnem
podjetju za predelavo odpadkov.
Upoštevajte trenutno veljavne predpise. V primeru
dvoma se obrnite na svoje podjetje za predelavo
odpadkov.
Vse embalažne materiale oddajte v reciklažo.
Proizvajalec
KOMPERNASS HANDELS GMBH
BURGSTRASSE 21
44867 BOCHUM
GERMANY
www.kompernass.com
Servis
Servis Slovenija
Tel.: 080080917
E-Mail: kompernass@lidl.si
IAN 104378
Garancijski list
1. S tem garancijskim listom jamčimo
Kompernass GmbH, da bo izdelek v garancijskem roku ob normalni in pravilni uporabi brezhibno deloval in se zavezujemo, da bomo ob
izpolnjenih spodaj navedenih pogojih odpravili
morebitne poma-njkljivosti in okvare zaradi
napak v materialu ali izdelavi oz. po svoji
presoji izdelek zamenjali ali vrnili kupnino.
2. Garancija je veljavna na ozemlju Republike
Slovenije.
3. Garancijski rok za proizvod je 3 leta od dneva
nabave.
4. Kupec je dolžan okvaro javiti pooblaščenemu
servisu oz. se informirati o nadaljnjih postopkih
na zgoraj navedeni telefonski številki. Svetujemo
vam, da pred tem natančno preberete navodila
o sestavi in uporabi izdelka.
5. Kupec je dolžan pooblaščenemu servisu predložiti garancijski list in račun, kot potrdilo in dokazilo
o nakupu.
6. V primeru, da proizvod popravlja nepooblaščeni
servis ali oseba, kupec ne more uveljavljati zahtevkov iz te garancije.
7. Vzroki za okvaro oz. nedelovanje izdelka morajo
biti lastnosti stvari same, in ne vzroki, ki so zunaj
proizvajalčeve oz. prodajalčeve sfere. Kupec ne
more uveljavljati zahtevkov iz te garancije, če se
ni držal priloženih navodil za sestavo in uporabo
izdelka ali, če je izdelek kakorkoli spremenjen
ali nepravilno vzdrževan.
8. Jamčimo servisiranje in rezervne dele za minimalno dobo, ki je zahtevana s strani zakonodaje.
9. Obrabni deli oz. potrošni material so izvzeti iz
garancije.
10. Vsi potrebni podatki za uveljavljanje garancije se nahajajo na dveh ločenih dokumentih
(garancijski list, račun).
11. Ta garancija proizvajalca ne izključuje pravic
potrošnika, ki izhajajo iz odgovornosti prodajalca za napake na blagu.
Prodajalec:
Lidl d.o.o.k.d., Pod lipami 1, SI-1218 Komenda
- 44 -
Page 48

Odprava napak
Problem Možni vzroki Možne rešitve
Naprava ne deluje.
Motor pri iztiskanju soka obstane
ali pa se obrača opazno počasneje ali neenakomerno.
Tropine so premokre in dobivate
premalo soka.
Sok teče ven skozi režo med pokrovom ohišja
sok
t.
e in posodo za
• Omrežni vtič i ni priključen.
• Aparat ni vklopljen.
• Sponke r niso zapete. • Zapnite sponke r.
• Filter d je zamašen.
• Prehitro delate. • Delajte počasneje.
• Filter d je zamašen.
• Prehitro delate. • Delajte počasneje.
d ali iztok soka t je za-
• Filter
mašen.
• Nastavljena je napačna stopnja
hitrosti.
• Napravo priklopite na omrežno
vtičnico.
• Napravo vklopite s stikalom za
vklop/izklop
• Sokovnik takoj izklopite in omrežni vtič
Odpravite zamašitev (glejte poglavje "Iztiskanje soka").
• Očistite filter d (glejte poglavje
"Čiščenje in nega").
• Očistite filter
sok
t (glejte poglavje "Čiščenje
in nega").
• Na stikalu za vklop/izklop
nastavite stopnjo hitrosti I.
o.
i potegnite iz vtičnice.
d in posodo za
o
Sok brizga iz iztoka soka y.
Med delom sok teče po podstavku naprave
u.
• Prehitro delate.
• Nastavljena je napačna stopnja
hitrosti.
d ali iztok soka y je za-
• Filter
mašen.
• Nastavljena je napačna stopnja
hitrosti.
- 45 -
• Delajte počasneje.
• Pri potiskanju ne pritiskajte
preveč na potiskalo
• Na stikalu za vklop/izklop
nastavite stopnjo hitrosti I.
• Očistite filter
(glejte poglavje "Čiščenje in
nega").
• Na stikalu za vklop/izklop
nastavite stopnjo hitrosti I.
q.
d in iztok soka y
o
o
Page 49

Recepti
Poletni napitek
2 osebi
Sestavine
1 velik kos lubenice
1 limona
4 jabolka, sladko kiselkasta
(npr. vrste jonagold ali jonatan)
Priprava
1. Pripravite lubenico, limono in jabolka v skladu
z napotki v navodilih za uporabo sokovnika.
2. Iztisnite sok iz lubenice, limone in jabolk.
3. Poletni napitek postrezite ohlajen.
Napitek iz jabolk, hrušk in jagod
2 osebi
Sestavine
1 jabolko, zeleno (npr. granny smith)
3 majhne, zrele hruške
10 srednje velikih jagod
Priprava
1. Pripravite jabolko, hruške in jagode v skladu
z napotki v navodilih za uporabo sokovnika.
2. V sokovniku iz vseh sestavin iztisnite sok.
3. Sokove med seboj pomešajte in takoj postrezite.
Energijski napitek
2 osebi
Sestavine
2 jabolki, sladke vrste (npr. red delicious)
2 veliki marelici
1 velika hruška
250 ml mineralne vode (gazirane)
malce razdrobljenega leda
Priprava
1. Pripravite jabolki, marelici in hruško v skladu
z napotki v navodilih za uporabo sokovnika.
2. Iztisnite sok iz jabolk, marelic in hruške.
3. Pomešajte sokove med sabo in dodajte mineralno
vodo.
4. Napitek nalijte na razdrobljen led in ga postrezite.
Napitek za zajtrk
2 osebi
Sestavine
4–5 korenčkov
2 jabolki
1 čajna žlička olivnega olja
Priprava
1. Pripravite korenje in jabolki v skladu z napotki
v navodilih za uporabo sokovnika.
2. Najprej iztisnite sok iz korenja, potem pa še iz
jabolk.
3. Dodajte olivno olje.
4. Vse skupaj dobro premešajte.
- 46 -
Page 50

Napitek iz sladkih melon
2 osebi
Napitek z ananasom in mangom
2 osebi
Sestavine
približno 1/3 sladke melone
1 mango
1 jabolko, sladko kiselkasto
(npr. vrste jonagold ali jonatan)
1 jabolko, zeleno (npr. granny smith)
Priprava
1. Pripravite melono, mango in jabolko v skladu
z napotki v navodilih za uporabo sokovnika.
2. Najprej iztisnite sok iz melone, potem pa iz
manga in jabolka. Vse skupaj pomešajte.
Sladek sadni napitek
2 osebi
Sestavine
1/2 sladke melone
4 breskve
200 g grozdja brez pešk
6 mangov
Priprava
1. Pripravite melono, breskve, grozdje in mango
v skladu z napotki v navodilih za uporabo
sokovnika.
2. Iz enega sadeža za drugim iztisnite sok.
3. Sokove med seboj pomešajte in napitek postrezite
rahlo ohlajen.
Sestavine
1/2 ananasa
1/2 manga
1 jabolko
1 pomaranča
2 čajni žlički olja iz pšeničnih kalčkov
Priprava
1. Pripravite ananas, mango, jabolko in pomarančo
v skladu z napotki v navodilih za uporabo
sokovnika.
2. Najprej iztisnite sok iz ananasa, potem pa še
iz manga.
3. Iztisnite sok iz jabolka in pomaranče.
4. Sokove zmešajte.
5. Dodajte 2 čajni žlički olja iz pšeničnih kalčkov
in vse skupaj pomešajte.
Napitek iz rdeče pese
2 osebi
Sestavine
1 rdeča pesa
3 pomaranče
2 jedilni žlici ribeza
Priprava
1. Pripravite rdečo peso, pomaranče in ribez v skladu
z napotki v navodilih za uporabo sokovnika.
2. Iztisnite sok iz rdeče pese, pomaranč in ribeza
ter sokove pomešajte med sabo.
- 47 -
Page 51

Sadni napitek s papriko
2 osebi
Sestavine
2 rumeni papriki
3 pomaranče
2 jabolki
2 hruški
1/2 grenivke
Priprava
1. Pripravite papriki, pomaranče, jabolki, hruški
in grenivko v skladu z napotki v navodilih za
uporabo sokovnika.
2. Iztisnite sok iz vseh sestavin, ene za drugo, in
takoj postrezite z napitkom.
Napitek z breskvami, hruškami in
ananasom
2 osebi
Sestavine
2 breskvi
2 majhni hruški
1/2 ananasa
Priprava
1. Pripravite breskvi, hruški in ananas v skladu
z napotki v navodilih za uporabo sokovnika.
2. Iztisnite sok iz vseh sestavin, ene za drugo,
in takoj postrezite z napitkom.
Napotek
Vsi recepti so brez zagotovila za uspeh. Vsi podatki o
sestavinah in pripravi so približni. Predloge receptov
dopolnite s svojimi izkušnjami.
- 48 -
Page 52

OBSAH STRANA
Úvod 50
Účel použití 50
Obsah dodávky 50
Ovládací prvky 50
Technické údaje 50
Důležitá bezpečnostní upozornění 51
Složení a obsluha přístroje 53
Příprava ovoce/zeleniny 53
Odšťavňování 54
Vyprazdňování nádobky na dužinu a filtru 54
Demontáž odšťavňovače 55
Čištění a údržba 55
Uskladnění 56
Likvidace 56
Záruka a servis 56
Dovozce 56
Odstranění závad 57
Recepty 58
Letní nápoj . . . . . . . . . . . . . . . . . . . . . . . . . . . . . . . . . . . . . . . . . . . . . . . . . . . . . . . . . . . . . . . .58
Nápoj z jablek, hrušek a jahod . . . . . . . . . . . . . . . . . . . . . . . . . . . . . . . . . . . . . . . . . . . . . . .58
Energetický nápoj . . . . . . . . . . . . . . . . . . . . . . . . . . . . . . . . . . . . . . . . . . . . . . . . . . . . . . . . . .58
Ranní nápoj . . . . . . . . . . . . . . . . . . . . . . . . . . . . . . . . . . . . . . . . . . . . . . . . . . . . . . . . . . . . . . .58
Nápoj z cukrového melounu . . . . . . . . . . . . . . . . . . . . . . . . . . . . . . . . . . . . . . . . . . . . . . . . .59
Sladký ovocný nápoj . . . . . . . . . . . . . . . . . . . . . . . . . . . . . . . . . . . . . . . . . . . . . . . . . . . . . . .59
Nápoj z ananasu a manga . . . . . . . . . . . . . . . . . . . . . . . . . . . . . . . . . . . . . . . . . . . . . . . . . .59
Nápoj z červené řepy . . . . . . . . . . . . . . . . . . . . . . . . . . . . . . . . . . . . . . . . . . . . . . . . . . . . . .59
Nápoj z ovoce a papriky . . . . . . . . . . . . . . . . . . . . . . . . . . . . . . . . . . . . . . . . . . . . . . . . . . . .60
Nápoj z broskví, hrušek a ananasu . . . . . . . . . . . . . . . . . . . . . . . . . . . . . . . . . . . . . . . . . . . .60
Před prvním použitím si pozorně přečtěte návod k obsluze a uschovejte jej pro pozdější potřebu. Při předávání
zařízení třetím osobám předejte i tento návod.
- 49 -
Page 53

Odšťavňovač
Úvod
Gratulujeme Vám k zakoupení nového přístroje.
Vaším nákupem jste si vybrali kvalitní výrobek. Návod k obsluze je součástí tohoto výrobku. Obsahuje
důležité pokyny a upozornění ohledně bezpečnosti,
použití a likvidace. Před použitím výrobku si dobře
přečtěte provozní a bezpečnostní pokyny. Výrobek
používejte pouze předepsaným způsobem a v uvedených oblastech použití. Při předávání výrobku třetím osobám předávejte i tyto podklady.
Účel použití
Přístroj je vhodný k odšťavňování dobře vyzrálého
a oloupaného ovoce i zeleniny. V přístroji smějí být
zpracovávány pouze potraviny. Smí se používat
pouze originální příslušenství tak, jak je popsáno
níže. Jakékoliv jiné využití nebo pozměnění přístroje
není v souladu s určením přístroje a znamená značné
nebezpečí.
Pro škody, které vzniknou při použití mimo vymezený účel, neposkytuje výrobce záruku. Není určeno
pro použití v podnikatelské oblasti.
Obsah dodávky
Odšťavňovač
Nylonový kartáč (v pěchovadle)
Návod k obsluze
Ovládací prvky
Obrázek A:
Pěchovač
q
Plnicí prostor
w
Kryt pláště
e
Svorky
r
Nádobka na šťávu
t
Odtok šťávy
y
Podstavec přístroje
u
Síťový kabel se zástrčkou
i
Vypínač ZAP/VYP (2 rychlostní stupně)
o
Navíjení kabelu
a
Nádobka (na dužinu a tresť)
s
Obrázek B:
Filtr
d
Hnací hřídel
f
Nylonový kartáč (nachází se v pěchovači)
g
Obrázek A:
separační záchytná nádoba na šťávu s odělova-
h
čem pěny (nachází se při dodání v nádobě na
dužinu a výlisky)
Technické údaje
Jmenovité napětí: 220 - 240 V ~, 50 Hz
Jmenovitý výkon: 450 W
Krátká provozní doba: 30 minut
Třída ochrany: II /
Krátká provozní doba
Krátká provozní doba udává, jak dlouho je možné
přístroj provozovat, aniž by se přehřál, a tím poškodil
motor. Po uvedené krátké provozní době se musí
přístroj vypnout na tak dlouho, až se motor ochladí.
- 50 -
Page 54

Důležitá bezpečnostní upozornění
NEBEZPEČÍ zásahu elektrickým proudem!
• Napětí elektrického zdroje musí souhlasit s údaji na typovém štítku přístroje.
• Poškozené síťové zástrčky nebo síťový kabel nechte ihned vyměnit autorizovanými odborníky nebo zákaznickým servisem, tím zabráníte nebezpečí.
• Přístroje, které nefungují bez závad nebo byly poškozeny, nechte okamžitě
přezkoumat a opravit v zákaznickém servisu.
• Nevystavujte přístroj působení deště a rovněž jej nikdy nepoužívejte ve vlhkém
nebo mokrém prostředí. Dbejte na to, aby síťový kabel během provozu nebyl
nikdy vlhký nebo mokrý.
Nikdy neponořujte podstavec přístroje do vody ani jiných kapalin!
VÝSTRAHA - nebezpečí zranění!
• Nepoužívejte přístroj nikdy pro jiné účely, než je popsáno v tomto návodu.
• Přístroj se při chybějícím dohledu a před montáží, demontáží nebo čištěním
musí vždy odpojit od sítě.
• Přístroj nesmějí používat děti.
• Přístroj a jeho přípojný kabel se musí uchovávat mimo dosah dětí.
• Osoby s omezenými fyzickými, smyslovými nebo mentálními schopnostmi či nedostatkem zkušeností a/nebo znalostí mohou používat tento přístroj pouze tehdy, pokud jsou pod dohledem nebo pokud byly poučeny o bezpečném používání přístroje a pokud porozuměly z toho vyplývajícímu nebezpečí.
• Děti si nesmí hrát s přístrojem.
• Pokud je rotující filtr poškozený, nesmí se přístroj dál provozovat!
• Před výměnou příslušenství nebo doplňků, které se během provozu pohybují,
se přístroj musí vypnout a odpojit od elektrické sítě.
• Řezací mechanismus je velmi ostrý. Zacházejte s ním opatrně.
• Je-li rotující síto poškozené, přístroj nepoužívejte.
• Pro zabránění zranění dbejte na to, aby byly všechny díly správně nasazeny.
- 51 -
Page 55

Během práce s přístrojem nikdy nestrkejte ruce či jiné předměty do plnicího
prostoru. Mohlo by dojít k závažným zraněním nebo by se mohl přístroj poškodit. Není-li možné odstranit kusy ovoce pomocí pěchovače, vypněte přístroj, vytáhněte zástrčku ze sítě a přístroj otevřete.
• Zajistěte, aby byla zástrčka v případě nebezpečí rychle dosažitelná a aby nemohlo dojít k zakopnutí o síťový kabel.
• Po dokončení použití přístroj vypněte a vytáhněte zástrčku ze zásuvky. Přístroj
se smí rozmontovat teprve tehdy, když je motor zcela v klidu.
• Nedotýkejte se rotujících částí.
• Přístroj během provozu nikdy nenechávejte bez dozoru.
• Zajistěte, aby byl přístroj postaven stabilně.
Přístroj nikdy nepoužívejte:
• pokud je poškozen filtr, síťový kabel nebo síťová zástrčka,
• pokud přístroj nefunguje správně nebo pokud byl nějakým způsobem poškozen či spadl. V těchto případech přístroj odevzdejte k přezkoušení nebo opravě do zákaznického servisu.
• Při použití částí příslušenství, které vám nedoporučil nebo neprodal výrobce
zařízení, může dojít ke vzniku požáru, zásahu elektrickým proudem nebo k
poranění.
Tak se zachováte bezpečně:
• V případě nebezpečí okamžitě vytáhněte síťovou zástrčku ze zásuvky.
• Buďte stále pozorní! Vždy dávejte pozor na to, co děláte, a vždy postupujte
rozumně. V žádném případě přístroj nepoužívejte, pokud se nemůžete soustředit nebo se necítíte dobře.
• Dříve než zařízení uvedete do chodu, zajistěte, aby bylo zařízení správně a
kompletně složeno. Přístroj je možné provozovat až po uzavření svorek. Pokud
se svorky během provozu uvolní, přístroj se automaticky vypne.
• Po každém použití odšťavňovače se ujistěte, že se vypínač ZAP/VYP nachází v
poloze „Vyp“ ("0"). Před rozebráním přístroje musí být motor zcela zastavený.
• Přístroj nikdy nepoužívejte venku.
- 52 -
Page 56

Složení a obsluha přístroje
• Před prvním použitím očistěte přístroj tak, jak je
popsáno v kapitole „Čištění a údržba“.
• Pro odšťavňovač vyberte vhodné stanoviště. Aby
se Vám s přístrojem manipulovalo co nejlépe,
umístěte přístroj tak, aby síťový kabel vedl dozadu
směrem k zásuvce. V tomto případě lze všechny
ovládací prvky obsluhovat přímo a jednoduše:
- vepředu vypínač ZAP/VYP
- vlevo nádobku na dužinu a tresť
- a vpravo odtok šťávy y.
Pozor:
Než začnete přístroj skládat, ujistěte se, že je vypnutý
a že je zástrčka vytažena ze sítě. V opačném případě
hrozí nebezpečí poranění.
1. Nádobku na šťávu
přístroje
zapadly do příslušných vyhloubení.
2. Filtr
směrem dolů, aby zaklapl. Dbejte na jeho pevné
usazení, teprve poté můžete v sestavování pokračovat.
3. Umístěte nádobku na dužinu a tresť
pod vývod (viz vyklápěcí stranu).
4. Kryt pláště
tak, aby se plnicí prostor wnacházel nad řezacími noži filtru
5. Dbejte na to, aby kryt pláště
v příslušných vyhloubeních nádobky na šťávu
Nadzvedněte svorky
ných částí krytu pláště
6. Zatlačte na spodní část svorek
tak, abyste slyšeli jejich zaklapnutí.
tak, aby tři zámky a odtok šťávy
u
nasaďte na hnací hřídel fa zatlačte jej
d
e
nasaďte na podstavec
t
nasaďte na nádobku na šťávu
.
d
r
e
,
o
s
y
zespodu
s
pevně seděl
e
t
a upevněte je do vyvýše-
.
proti přístroji
r
t
7. Zasuňte destičku odělovače pěny do separátní
záchytné nádoby na šťávu
parátní záchytnou nádobu na šťávu
vedle přístroje tak, aby výtok na šťávu
val do separátní záchytné nádoby na šťávu
8. Síťovou zástrčku
zasuňte do zásuvky.
i
nasaďte víko. Se-
h
Příprava ovoce/zeleniny
• Důležité: Používejte pouze dobře uzrálé plody.
V opačném případě se může filtr
To by si vyžádalo opakované čištění filtru
• Omyjte nebo oloupejte ovoce nebo zeleninu,
které/kterou chcete zpracovat.
• Velká jádra nebo pecky je nutné z plodů před
zpracováním vždy odstranit.
• Jádrové ovoce (např. jablka, hrušky) lze zpracovávat včetně slupky i jádřince. Ostatní pecky (broskve,
švestky atd.), všechna velká jádra (melouny atd.)
a stopky odstraňte, aby nedošlo k poškození přístroje.
• Plody se silnými slupkami (např. citrusy, melouny,
kiwi, řepa) musíte nejprve oloupat.
• Od hroznů vína odřízněte hlavní stopku.
• Ovoce nebo zeleninu nakrájejte na kousky, které
se vejdou do plnicího prostoru
Poznámka:
Rozinky se k odšťavňování nehodí, protože obsahují
.
málo šťávy. Rebarbora nebo jiná vláknitá zelenina/
ovoce se k odšťavňování nehodí, protože vlákna
odšťavňovač ucpávají.
d
w
.
postavte
h
y
zanést.
vyční-
h
.
d
.
- 53 -
Page 57

Odšťavňování
Pozor:
Odšťavňovač nikdy nepoužívejte déle než 30 minut
bez přerušení. Odšťavňovač nechte po 30 minutách
nepřetržitého provozu vychladnout. V opačném případě může dojít k poškození přístroje.
Pozor:
Během provozu přístroje nikdy nezastrkujte ruce či
předměty do plnicího prostoru
k těžkým zraněním a/nebo poškozením odšťavňovače.
1. Přístroj zapněte vypínačem ZAP/VYP o.
Pro ovoce/zeleninu, které obsahují hodně šťávy,
použijte rychlostní stupeň 1.
Pro sušší ovoce/zeleninu zvolte rychlostní
stupeň 2.
2. Pěchovač
nebo zeleniny vkládejte druhou rukou do plnicího
prostoru
vkládání ovoce/zeleniny do plnicího prostoru
Během zpracovávání ovoce nebo zeleniny doplňujte postupně další kousky. Přístroj při tom nevypínejte.
držte v jedné ruce a kousky ovoce
q
. Pěchovač qpoužívejte pro opatrné
w
Upozornění:
Vkládejte jednu mrkev za druhou do plnicího prostoru
: Část mrkve ze strany od natě musí přitom
w
směřovat dolů a špička kořene směrem nahoru.
. To by mohlo vést
w
w
Upozornění:
Nechcete-li, aby se ovoce usazovalo v plnicím prostoru
, vkládejte ho pouze při zapnutém přístroji.
w
Došlo-li k usazení kousků plodů v plnicím prostoru
a nelze-li je ihned odstranit pomocí pěchovače q,
postupujte prosím následovně, aby nedošlo
k poškození přístroje:
• Přístroj okamžitě vypněte a vytáhněte zástrčku
ze sítě
• Uvolněte svorky
• Odstraňte usazené kousky plodů.
• Přístroj znovu sestavte a pokračujte v odšťavňování.
3. Jakmile máte všechny plody zpracovány, přístroj
vždy znovu okamžitě vypněte.
i
.
a sejměte kryt pláště e.
r
Pozor:
Po každém použití pravidelně čistěte odtok šťávy
a nádobku na šťávu t, čímž se vyhnete ucpání odtoku šťávy
.
a/nebo poškození přístroje.
y
Vyprazdňování nádobky
na dužinu a filtru
Šťávu můžete průběžně lisovat až do okamžiku,
kdy je nádobka na dužinu a tresť s
Pozor:
Před čištěním filtru dvytáhněte zástrčku ze sítě. To
zabrání nezamýšlenému spuštění motoru.
Je-li šťáva z plodů najednou mnohem hustší nebo
pokud slyšíte, že se snižují otáčky motoru, je třeba
vyprázdnit filtr
sestavte.
. Po vyjmutí dužiny přístroj znovu
d
s
w
y
naplněna.
- 54 -
Page 58

Demontáž odšťavňovače
Chcete-li odšťavňovač demontovat, např. za účelem
vyčištění, postupujte následovně:
1. Vytáhněte zástrčku
2. Otevřete svorky
3. Sejměte kryt pláště
4. Opatrně zvedněte nádobku na šťávu
se tím uvolní od hnací hřídele f. Nyní můžete
filtr
vyjmout z nádobky na šťávu t.
d
ze sítě.
i
.
r
s pěchovačem q.
e
t
. Filtr
d
Čištění a údržba
• Plášť přístroje a síťový kabel čistěte pouze lehce
navlhčeným hadříkem.
• Posunovač
zachytávací nádobu na šťávu
nádobu na dužinu a výlisky
mýdlové vodě a pečlivě je opláchněte pod tekoucí vodou.
Posunovací zařízení
rací víko
a nádoba na dužinu a výlisky sjsou vhodná
h
pro myčku na nádobí a lze je v myčce umývat. K čištění filtru
kartáč
g
, nádobu na šťávu t, separátní
q
, víko krytu ea
h
omýjte v teplé
s
, nádoba na šťávu t, uzaví-
q
, separátní záchytná nádoba na šťávu
e
použijte v dodávce zahrnutý nylonový
d
:
Pozor:
Před nasazením nebo sejmutím příslušenství a před
čištěním přístroje vždy nejprve vytáhněte zástrčku
ze sítě.Veškeré části přístroje a příslušenství je nutné
pravidelně a po každém použití očistit od zbytků
plodů a tresti, aby nedocházelo k ucpání odtoku
šťávy a/nebo poškození přístroje.
Poznámka:
K čištění odšťavňovače nepoužívejte agresivní čisticí
prostředky. Přístroj a jeho součásti nesmějí být čištěny
ve vroucí vodě.
Pozor:
Motor/podstavec přístroje unikdy neponořujte do vody či jiné tekutiny, aby nedošlo k úrazu elektrickým proudem.
• Přístroj vypněte vypínačem ZAP/VYP
• Nečistoty nebo šťávu, která přeteče, je nutné
odstraňovat ihned, protože skvrny po ovoci se
dají později vyčistit jen obtížně.
o
.
• Otočte krytem pěchovače
řovala na symbol otevřeného zámku na násadě pěchovače. Nyní můžete kryt sejmout. Uvnitř pěchovače
Chcete-li kryt znovu zavřít, nasaďte jej znovu
tak, aby šipka směřovala na symbol otevřeného
zámku . Poté jím otočte tak, aby šipka směřovala
na symbol zavřeného zámku . Kryt je nyní pevně
usazen.
• Filtr
držte (spodní stranou otočenou nahoru)
d
pod tekoucí vodou a vyčistěte jej nylonovým
kartáčem
se nachází nylonový kartáč g.
q
.
g
tak, aby šipka smě-
q
Zabarvení:
• Některé druhy ovoce nebo zeleniny mohou součásti odšťavňovače natrvalo zabarvit. Tato zabarvení nejsou na škodu a neomezují funkčnost
přístroje.
- 55 -
Page 59

Uskladnění
Pokud odšťavňovač delší dobu nepoužíváte, omotejte kabel kolem navíjení kabelu
odšťavňovače.
na spodní straně
a
Likvidace
V žádném případě nevyhazujte přístroj do normálního domovního odpadu. Tento výrobek podléhá evropské
směrnici 2012/19/EU.
Přístroj předejte k likvidaci odborné firmě či jej
odevzdejte ve Vašem místním recyklačním zařízení.
Dodržujte aktuálně platné předpisy. V případě
pochyb se poraďte s recyklační firmou.
Také všechny obalové materiály zlikvidujte
v souladu s ekologickými předpisy.
Záruka se vztahuje pouze na chyby materiálu nebo
výrobní závady, ale ne na škody,vzniklé při přepravě, ne na součásti, podléhající rychlému opotřebení
nebo na poškození křehkých dílů, jako jsou např.
spínače nebo akumulátory. Výrobek je určen pouze
pro privátní použití, ne průmyslové.
Při nesprávném a neodborném využívání, při použití
násilí a při zásazích, které nebyly provedeny našimi
autorizovanými servisními provozovnami, záruční
nároky zanikají. Vaše práva vyplývající ze zákona
touto zárukou nejsou omezena.
Záruční doba se zárukou neprodlouží. Toto platí
také pro náhradní díly a opravené součásti. Případné škody a vady, existující už při koupi, se musí hlásit ihned po vybalení, nejpozději však do dvou dnů
od data nákupu. Po uplynutí záruční doby se provedené opravy musí zaplatit.
Servis Česko
Tel.: 800143873
E-Mail: kompernass@lidl.cz
IAN 104378
Záruka a servis
Na tento přístroj platí 3 letá záruka od data zakoupení. Přístroj byl vyroben s nejvyšší pečlivostí a před
odesláním prošel výstupní kontrolou. Uschovejte si,
prosím, pokladní
lístek jako doklad o nákupu. V případě uplatňování
záruky kontaktujte telefonicky Vaší servisní službu.
Pouze tak může být zajištěno bezplatné zaslání Vašeho zboží.
Dostupnost horké linky:
pondělí až pátek 8:00 hod. – 20:00 hod. (SEČ)
Dovozce
KOMPERNASS HANDELS GMBH
BURGSTRASSE 21
44867 BOCHUM
GERMANY
www.kompernass.com
- 56 -
Page 60

Odstranění závad
Problém Možné příčiny Možná řešení
Spotřebič nefunguje.
Motor zůstává při odšťavňování
stát nebo se točí nápadně pomalu či nerovnoměrně.
Výlisky jsou příliš vlhké a získáváte
málo šťávy.
Šťáva prýští mezi okrajem
víka pouzdra
šťávu
e a nádoby na
t.
• Zástrčka i není zapojena.
• Přístroj není zapnutý.
• Spony r nejsou zajištěné. • Zajistěte spony r.
• Filtr d je ucpaný.
• Pracujete příliš rychle. • Pracujte pomaleji.
• Filtr d je ucpaný.
• Pracujete příliš rychle. • Pracujte pomaleji.
d nebo nádoba na
• Filtr
šťávu
t jsou ucpané.
• Je nastavena nesprávná rychlost.
• Zapojte spotřebič do zásuvky.
• Zapněte spotřebič pomocí vypínače
o.
• Odštavňovač ihned vypněte
a vytáhněte zástrčku
Odstraňte ucpání (viz kapitola
„Odšťavňování“).
• Vyčistěte filtr d (viz kapitola
„Čištění a údržba“).
• Vyčistěte filtr d a nádobu na
šťávu
t (viz kapitola „Čištění
a údržba“).
• Nastavte na vypínači
rychlostní stupeň I.
i.
o
Šťáva stříká z výtokového
otvoru
y.
Během práce stéká šťáva na
podstavec spotřebiče
u.
• Pracujete příliš rychle.
• Je nastavena nesprávná rychlost.
• Filtr
d nebo výtokový otvor na
ovocnou šťávu
• Je nastavena nesprávná rychlost.
y je ucpaný.
- 57 -
• Pracujte pomaleji.
• Netlačte při posunování tak
pevně na podavač
• Nastavte na vypínači
rychlostní stupeň I.
• Vyčistěte filtr d a výtokový otvor
na ovocnou šťávu
„Čištění a údržba“).
• Nastavte na vypínači
rychlostní stupeň I.
q.
o
y (viz kapitola
o
Page 61

Recepty
Letní nápoj
2 osoby
Ingredience
1 velký kus vodního melounu
1 citron
4 jablka, sladko-kyselá
(např. odrůdy “Jonagold” nebo “Jonathan”)
Příprava
1. Vodní meloun, citron a jablka připravte podle
pokynů, uvedených v návodu odšťavňovače.
2. Odšťavněte vodní meloun, citron a jablka.
3. Letní nápoj podávejte chlazený.
Nápoj z jablek, hrušek a jahod
2 osoby
Ingredience
1 jablko, zelené (např. odrůda “Granny Smith”)
3 malé, zralé hrušky
10 středně velkých jahod
Příprava
1. Jablko, hrušky a jahody připravte podle návodu
pro odšťavňovač.
2. Z každého druhu ovoce vytlačte v odšťavňovači
šťávu.
3. Šťávy smíchejte a nápoj ihned podávejte.
Energetický nápoj
2 osoby
Ingredience
2 jablka, sladká (např. odrůda “Red Delicious”)
2 velké meruňky
1 velká hruška
250 ml minerální vody (perlivá)
trochu ledové tříště
Příprava
1. Jablka, meruňky a hrušku připravte podle pokynů,
uvedených v návodu odšťavňovače.
2. Odšťavněte jablka, meruňky a hrušku.
3. Šťávy smíchejte dohromady a přidejte minerální
vodu.
4. Nápoj podávejte na ledové tříšti.
Ranní nápoj
2 osoby
Ingredience
4-5 mrkví
2 jablka
1 čajová lžička olivového oleje
Příprava
1. Připravte mrkve a jablka podle pokynů, uvedených v návodu odšťavňovače.
2. V odšťavňovači vytlačte šťávu nejdříve z mrkví
a poté z jablek.
3. Pak přidejte olivový olej.
4. Vše dobře promíchejte.
- 58 -
Page 62

Nápoj z cukrového melounu
2 osoby
Nápoj z ananasu a manga
2 osoby
Ingredience
cca 1/3 cukrového melounu
1 mango
1 jablko, sladko-kyselé
(např. odrůdy “Jonagold” nebo “Jonathan”)
1 jablko, zelené (např. odrůda “Granny Smith”)
Příprava
1. Meloun, mango a jablka připravte podle pokynů,
uvedených v návodu odšťavňovače.
2. V odšťavňovači vytlačte šťávu nejdříve z melounu,
poté z manga a jablek. Vše promíchejte.
Sladký ovocný nápoj
2 osoby
Ingredience
1/2 cukrového melounu
4 broskve
200 g hroznů bez zrníček
6 kusů manga
Příprava
1. Cukrový meloun, broskve, hrozny a manga
připravte podle pokynů, uvedených v návodu
odšťavňovače.
2. Ovoce postupně odšťavněte.
3. Šťávy smíchejte a nápoj podávejte mírně vychlazený.
Ingredience
1/2 ananasu
1/2 manga
1 jablko
1 pomeranč
2 čajové lžičky oleje z pšeničných klíčků
Příprava
1. Ananas, mango, jablko a pomeranč připravte
podle pokynů, uvedených v návodu odšťavňovače.
2. V odšťavňovači vytlačte nejdříve šťávu z ananasu
a poté z manga.
3. V odšťavňovači vytlačte nejdříve šťávu z jablka
a pomeranče.
4. Šťávy smíchejte dohromady.
5. Přidejte 2 čajové lžičky oleje z pšeničných klíčků
a vše promíchejte.
Nápoj z červené řepy
2 osoby
Ingredience
1 červená řepa
3 pomeranče
2 polévkové lžíce rybízu
Příprava
1. Červenou řepu, pomeranče a rybíz připravte
podle pokynů, uvedených v návodu odšťavňovače.
2. V odšťavňovači vytlačte nejdříve šťávu z červené
řepy, pomeranče a rybízu a šťávy smíchejte.
- 59 -
Page 63

Nápoj z ovoce a papriky
2 osoby
Ingredience
2 žluté papriky
3 pomeranče
2 jablka
2 hrušky
1/2 grepu
Příprava
1. Papriky, pomeranče, jablka, hrušky a grep
připravte podle pokynů, uvedených v návodu
odšťavňovače.
2. Vše postupně odšťavněte a šťávu ihned podávejte.
Nápoj z broskví, hrušek a ananasu
2 osoby
Ingredience
2 broskve
2 malé hrušky
1/2 ananasu
Příprava
1. Broskve, hrušky a ananas připravte podle pokynů,
uvedených v návodu odšťavňovače.
2. Vše postupně odšťavněte a šťávu ihned podávejte.
Upozornění
Recepty bez záruky. Všechny údaje o přísadách
a o přípravě jsou pouze orientační. Doplňte tyto
navrhované recepty o své vlastní zkušenosti.
- 60 -
Page 64

OBSAH STRANA
Úvod 62
Používanie v súlade s určením 62
Obsah dodávky 62
Súčasti 62
Technické údaje 62
Dôležité bezpečnostné pokyny 63
Poskladanie a obsluha prístroja 65
Príprava ovocia a zeleniny 65
Odšťavovanie 66
Vyprázdnenie nádoby na dužinu a filtra 66
Demontáž odšťavovača 67
Čistenie a údržba 67
Uskladnenie 68
Likvidácia 68
Záruka a servis 68
Dovozca 68
Odstraňovanie porúch 69
Recepty 70
Letný nápoj . . . . . . . . . . . . . . . . . . . . . . . . . . . . . . . . . . . . . . . . . . . . . . . . . . . . . . . . . . . . . . .70
Nápoj z jabĺk, hrušiek a jahôd . . . . . . . . . . . . . . . . . . . . . . . . . . . . . . . . . . . . . . . . . . . . . . . .70
Energetický nápoj . . . . . . . . . . . . . . . . . . . . . . . . . . . . . . . . . . . . . . . . . . . . . . . . . . . . . . . . . .70
Raňajkový nápoj . . . . . . . . . . . . . . . . . . . . . . . . . . . . . . . . . . . . . . . . . . . . . . . . . . . . . . . . . . .70
Nápoj z medových melónov . . . . . . . . . . . . . . . . . . . . . . . . . . . . . . . . . . . . . . . . . . . . . . . . .71
Sladký ovocný nápoj . . . . . . . . . . . . . . . . . . . . . . . . . . . . . . . . . . . . . . . . . . . . . . . . . . . . . . .71
Ananásovo-mangový nápoj . . . . . . . . . . . . . . . . . . . . . . . . . . . . . . . . . . . . . . . . . . . . . . . . . .71
Cviklový nápoj . . . . . . . . . . . . . . . . . . . . . . . . . . . . . . . . . . . . . . . . . . . . . . . . . . . . . . . . . . . .71
Ovocný paprikový nápoj . . . . . . . . . . . . . . . . . . . . . . . . . . . . . . . . . . . . . . . . . . . . . . . . . . . .72
Broskyňovo-hruškovo-ananásový nápoj . . . . . . . . . . . . . . . . . . . . . . . . . . . . . . . . . . . . . . . . .72
Pred prvým použitím si pozorne prečítajte návod na používanie a uschovajte si ho pre prípadné ďalšie použitie. Pri odovzdávaní prístroja tretej osobe odovzdajte prístroj spolu s návodom.
- 61 -
Page 65

Odšťavovač
Úvod
Srdečne vám gratulujeme ku kúpe tohto nového prístroja.
Rozhodli ste sa tým pre vysokokvalitný výrobok. Návod na používanie je súčasťou tohto výrobku. Obsahuje dôležité pokyny týkajúce sa bezpečnosti, používania a likvidácie zariadenia. Pred používaním
tohto výrobku sa oboznámte so všetkými pokynmi
na ovládanie a bezpečnostnými pokynmi. Výrobok
používajte iba tak, ako je tu opísané a iba v tých
oblastiach použitia, ktoré sú tu uvedené. Pri odovzdávaní výrobku tretej osobe s ním odovzdajte aj
všetky podklady.
Používanie v súlade s určením
Prístroj je určený na odšťavovanie celkom zrelého
a olúpaného ovocia a zeleniny. Prístrojom sa smú
spracovávať len potraviny. Používajte výlučne originálne príslušenstvo, tak ako je tu opísané. Akýkoľvek iný spôsob používania alebo prebudovanie sa
považuje za nezodpovedajúce určeniu a je skrytým
zdrojom nebezpečenstva úrazu.
Za škody vzniknuté používaním, ktoré je v rozpore
s deklarovaným účelom nepreberá výrobca žiadnu
záruku. Prístroj nie je určený na obchodné použitie.
Súčasti
Obrázok A:
Vtláčadlo
q
Plniaca šachta
w
Kryt prístroja
e
Svorky
r
Nádoba na šťavu
t
Nádoba na dužinu
y
Podstavec prístroja
u
Sieťová šnúra so zástrčkou
i
Vypínač (2 rýchlosti)
o
Navíjanie kábla
a
Nádoba (na dužinu a výlisky)
s
Obrázok B:
Filter
d
Hnací hriadeľ
f
Nylonová kefa (pri dodávke je vo vtláčadle)
g
Obrázok A:
samostatná nádoba na zachytávanie šťavy s
h
oddeľovačom peny (pri expedícii z výroby je v
nádobe na dužinu a výlisky)
Technické údaje
Sieťové napätie: 220 - 240 V ~, 50 Hz
Menovitý výkon: 450 W
Krátkodobá prevádzka: 30 minút
Trieda ochrany : II /
Obsah dodávky
Odšťavovač
Nylonová kefa (vo vtláčadle)
Návod na používanie
Krátkodobá prevádzka
Krátkodobá prevádzka udáva, ako dlho sa dá prevádzkovať prístroj bez toho, aby sa motor prehrial
a došlo k jeho poškodeniu. Po udanej dobe krátkodobej prevádzky musí prístroj zostať vypnutý dovtedy, než motor vychladne.
- 62 -
Page 66

Dôležité bezpečnostné pokyny
NEBEZPEČENSTVO zásahu elektrickým prúdom!
• Napätie sieťového zdroja musí súhlasiť s údajmi na typovom štítku prístroja.
• Poškodenú sieťovú zástrčku alebo sieťový kábel nechajte ihneď vymeniť kvalifikovaným a autorizovaným personálom alebo v zákazníckom servise, aby sa
zabránilo nebezpečenstvu.
• Prístroje, ktoré sa poškodili alebo nefungujú bezchybne, nechajte okamžite
skontrolovať a opraviť v zákazníckom servise.
• Prístroj nevystavujte dažďu a nikdy ho nepoužívajte vo vlhkom alebo mokrom
prostredí. Dbajte na to, aby sieťový kábel počas prevádzky nikdy nebol mokrý
ani vlhký.
Nikdy neponárajte podstavec prístroja do vody ani do iných tekutín!
VAROVANIE – Nebezpečenstvo poranenia!
• Nepoužívajte elektrický spotrebič na iné účely, ako je popísané v tomto návode.
• Pokiaľ nie je elektrický spotrebič pod dohľadom a pred zložením, rozoberaním
alebo čistením ho vždy odpojte od siete.
• Tento elektrický spotrebič nesmú používať deti.
• Elektrický spotrebič a jeho prípojný kábel musíte uchovávať mimo dosahu detí.
• Tento elektrický spotrebič môžu používať osoby so zníženými fyzickými, senzorickými alebo mentálnymi schopnosťami, prípadne s nedostatočnými skúsenosťami alebo znalosťami, ak sú pod dozorom alebo boli dostatočne poučené o
bezpečnom používaní prístroja a pochopili z toho vyplývajúce riziká.
• Deti sa s elektrickým spotrebičom nesmú hrať.
• Ak je poškodený rotujúci filter, prístroj sa nesmie uvádzať do prevádzky!
• Pred výmenou príslušenstva alebo prídavných dielov, ktoré sa počas prevádzky pohybujú, sa prístroj musí vypnúť a odpojiť od siete.
• Rezací nôž je veľmi ostrý. Zaobchádzajte s ním opatrne.
• Prístroj nepoužívajte, ak je poškodené rotačné sitko.
• Aby sa zabránilo zraneniu, dbajte na to, aby všetky diely boli správne nasadené.
- 63 -
Page 67

Ak pracujete s prístrojom, nikdy nedávajte ruky alebo iné predmety do plniaceho otvoru. To môže spôsobiť vážne zranenia alebo poškodenia prístroja. Ak kúsky ovocia nemožno odstrániť pomocou vtláčadla, vypnite prístroj,
vytiahnite sieťovú zástrčku a prístroj otvorte.
• Postarajte sa o to, aby sieťová zástrčka v prípade nebezpečenstva bola ľahko
dostupná a nebolo možné zakopnúť o sieťový kábel.
• Po použití odstavte prístroj a vytiahnite sieťovú zástrčku. Prístroj sa smie rozobrať iba vtedy, keď sa motor úplne zastavil.
• Nedotýkajte sa rotujúcich častí.
• Prístroj nenechávajte počas prevádzky nikdy bez dozoru.
• Zaistite pre prístroj bezpečné miesto.
Prístroj nikdy nepouÏívajte:
• Ak je poškodený filter, sieťový kábel alebo sieťová zástrčka,
• V prípade nesprávneho fungovania alebo ak sa nejakým iným spôsobom poškodil alebo spadol na zem. Ak treba prístroj preskúšať alebo opraviť, odovzdajte ho do zákazníckeho servisu.
• Používanie častí príslušenstva, ktoré nie sú odporučené alebo predávané výrobcom, môže spôsobiť požiar, zásah elektrickým prúdom alebo poranenia.
Takto sa zachováte bezpečne:
• V prípade nebezpečenstva ihneď vytiahnite sieťovú zástrčku zo zásuvky. Buďte vždy pozorní! Dávajte vždy pozor na to, čo robíte, a vždy konajte uvážlivo.
Zariadenie v žiadnom prípade nepoužívajte vtedy, keď ste nesústredený alebo
sa necítite dobre.
• Skôr ako uvediete prístroj do prevádzky, sa ubezpečte, či bol správne a úplne
zložený. Prístroj je možné prevádzkovať len vtedy, ak boli uzavreté svorky. Ak
sa svorky uvoľnia počas prevádzky, prístroj sa automaticky vypne.
• Po každom použití odšťavovača zabezpečte, aby bol zapínač/vypínač v polohe „Vyp“ ("0"). Motor musí byť úplne zastavený, než sa začne s rozoberaním prístroja.
• Prístroj nepoužívajte vonku.
- 64 -
Page 68

Poskladanie a obsluha prístroja
• Pred prvým použitím vyčistite prístroj tak, ako je
uvedené v kapitole „Čistenie a údržba“.
• Pre odšťavovač zvoľte vhodné miesto. Pre optimálnu
manipuláciu odporúčame prístroj tak postaviť,
aby sieťová šnúra išla dozadu k zásuvke. Všetky
prvky sa teraz dajú priamo a jednoducho obsluhovať:
- vpredu vypínač
- vľavo nádoba na dužinu a výlisky
- a na pravej strane výtok šťavy y.
Upozornenie:
Pred poskladaním prístroja sa uistite, že je vypnutý
a zástrčka je vytiahnutá zo zásuvky. Inak hrozí nebezpečenstvo, že sa poraníte.
1. Nasaďte nádobu na šťavu
stroja
šťavy
2. Nasaďte filter
ho nadol, dokiaľ hlasno nezaklapne. Než budete ďalej pokračovať v skladaní prístroja, tak sa uistite, či je filter dobre upevnenýl.
3. Zasuňte nádobu na dužinu a tresť
pod vyhadzovací otvor (pozri vyklápaciu stranu).
4. Nasaďte kryt prístroja
tak, aby bola plniaca šachta wnad rezacími
nožmi filtra
5. Dbajte na to, aby kryt prístroja
vo vyhĺbenine nádoby na šťavu
svorky
prístroja
6. Stlačte spodný diel svoriek
zaklapnú.
tak, aby tri zarážky a hrdlo na vytekanie
u
zapadli do vyhĺbenín.
y
d
a zaháknite ich do vrúbkov na kryte
r
.
e
,
o
s
na podstavec prí-
t
na hnací hriadeľ fa stlačte
d
s
na nádobu na šťavu
e
.
pevne sedel
e
. Nadzdvihnite
t
proti prístroju, až
r
zospodu
t
7. Zasuňte dosku oddeľovača peny do samostatnej
nádobky na zachytávanie peny
veko. Samostatnú nádobku na zachytávanie
šťavy
šťavy
zachytávanie šťavy
8. Zasuňte sieťovú zástrčku
postavte vedľa prístroja tak, aby výtok
h
siahal do samostatnej nádobky na
y
.
h
i
a nasaďte
h
do zásuvky.
Príprava ovocia a zeleniny
• Dôležité: Používajte len celkom zrelé ovocie,
inak sa môže filter
valo opakované čistenie filtra
• Umyte alebo olúpte ovocie alebo zeleninu,
ktoré chcete spracovať.
• Veľké jadierka alebo kôstky by ste mali vždy
vybrať pred vložením ovocia do prístroja.
• Ovocie s jadierkami (ako sú jablká alebo hrušky)
sa dá spracovať aj so šupkou a šupkami jadierok.
Iné kôstky (slivky, broskyne a pod.), všetky veľké
jadierka (melóny apod.) a stopky odstráňte, aby
ste zabránili poškodeniu prístroja.
• Plody s hrubou šupkou (napr. citrusové plody,
melóny, kiwi, repa) sa musí vždy najprv olúpať.
• Z hrozna treba odrezať hlavnú stopku.
• Nakrájajte ovocie alebo zeleninu na také veľké
kúsky, aby sa dali vložiť do plniacej šachty
Upozornenie:
Hrozienka nie sú vhodné na odšťavovanie, lebo
obsahujú príliš málo šťavy. Rebarbora alebo iná
vláknitá zelenina alebo ovocie sa nehodí na odšťavovanie, lebo vlákna upchajú odšťavovač.
zaniesť. To by si vyžado-
d
.
d
w
.
- 65 -
Page 69

Odšťavovanie
Upozornenie:
Nikdy nepoužívajte odšťavovač dlhšie než 30 minút
(krátkodobá prevádzka) bez prerušenia. Po 30 minútach trvalej prevádzky nechajte odšťavovač vychladnúť.
Inak by ste mohli prístroj poškodiť.
Upozornenie:
Ak sa chcete vyhnúť tomu, aby sa ovocie vzpriečilo
v plniacej šachte
zapnutý. Ak sa kúsky plodov vzpriečili v plniacej
šachte
postupujte nasledujúcim spôsobom, aby ste sa vyhli
poškodeniu prístroja:
a nedajú sa hneď odstrániť vtláčadlom q,
w
, vkladajte ho, len keď je prístroj
w
Upozornenie:
Nikdy neklaďte ruky ani žiadne predmety do plniacej
šachty
poraneniam alebo poškodeniam odšťavovača.
1. Zapnite prístroj vypínačom o.
2. Držte vtláčadlo
, keď prístroj beží. Môže to viesť k ťažkým
w
Na ovocie/zeleninu, ktoré obsahujú veľa tekutiny,
používajte rýchlostný stupeň 1.
Na suchšie ovocie/zeleninu zvoľte rýchlostný
stupeň 2.
v jednej ruke a kúsky ovocia
q
alebo zeleniny vkladajte druhou rukou do plniacej
šachty
ovocie alebo zelenina opatrne vtlačili do plniacej
šachty
zeleniny dopĺňajte ďalšie kúsky. Pritom prístroj
nevypínajte.
. Vždy používajte vtláčadlo q, aby ste
w
. V priebehu spracovávania ovocia alebo
w
Upozornenie:
Dávajte jednu mrkvu po druhej do plniacej šachty
: vňať mrkvy musí pritomukazovať smerom nadol
w
a špička koreňa smerom nahor.
• Ihneď vypnite prístroj a vytiahnite sieťovú
zástrčku
• Uvoľnite svorky
• Odstráňte vzpriečené kúsky plodov.
• Znova poskladajte prístroj a pokračujte v odšťavovaní.
3. Len čo je všetko ovocie odšťavené, vždy ihneď
vypnite prístroj.
i
.
a dajte dolu kryt prístroja e.
r
Upozornenie:
Pravidelne a po každom použití vyčistite výtok
šťavy
zapchatiu výtoku alebo poškodeniu prístroja.
a nádobu na šťavu t, aby ste zabránili
y
Vyprázdnenie nádoby
na dužinu a filtra
Šťavu môžete trvale vytláčať, až kým nie je nádoba
na dužinu a výlisky
Upozornenie:
Vytiahnite sieťovú zástrčku, keď idete vyprázdniť
filter
. To zabraÀuje neúmyselnému spusteniu
d
motora.
s
plná.
Keď je šťava odrazu oveľa hustejšia alebo počujete, že sa otáčky motora znižujú, musíte vyprázdniť
filter
. Po vybratí dužiny znova poskladajte prístroj.
d
- 66 -
Page 70

Demontáž odšťavovača
Keď chcete odšťavovač demontovať, napr. kvôli
čisteniu, postupujte takto:
1. Vytiahnite sieťovú zástrčku
2. Otvorte svorky
3. Vyberte kryt prístroja
4. Opatrne zdvihnite nádobu na šťavu
sa tým uvoľní z hnacieho hriadeľa f. Teraz môžete
filter
sňať z nádoby na šťavu t.
d
r
.
.
i
s vtláčadlom q.
e
t
. Filter
d
Čistenie a údržba
Upozornenie:
Vždy vytiahnite sieťovú zástrčku pred nasadzovaním
alebo snímaním dielov príslušenstva a pred čistením
prístroja. Všetky diely prístroja a príslušenstva sa
musia pravidelne a po každom použití očistiť od
zvyškov plodov a zvyškov výliskov, aby sa zabránilo
upchatiu výtoku šťavy alebo poškodeniu prístroja.
Upozornenie:
Na čistenie odšťavovača nepoužívajte žiadny agresívne
čistiace prostriedky. Prístroj a jeho diely sa nesmú
čistiť vriacou vodou.
Upozornenie:
Nikdy neponárajte motor/podstavec prístroja
do vody alebo inej tekutiny. Hrozí nebez-
u
pečenstvo úrazu elektrickým prúdom.
• Kryt prístroja a sieťovú šnúru čistite len mierne
navlhčenou utierkou.
• Vyčistite vtláčadlo
mostatnú záchytnú nádobu na šťavu
stroja
ky
poriadne opláchnite.
Vtláčadlo q, nádoba na šťavu t, veko prístroja e,
samostatná nádobka na zachytávanie šťavy
nádoba na dužinu a výlisky
ývanie v umývačke riadu a môžu sa v nej čistiť. Ak
chcete vyčistiť filter
kefku
• Otáčajte kryt vtláčadla
ukazuje na otvorenú zámku na držadle vtláčadla. Teraz môžete kryt vybrať. Vo vnútri vtláčadla
znova zatvoriť, nasaďte ho späť tak, aby šípka
ukazovala na otvorenú zámku . Potom ho
otáčajte dovtedy, až bude šípka ukazovať na
zatvorenú zámku . Teraz sedí kryt pevne.
• Držte filter
vodou a očistite ho nylonovou kefou
a nádobu na odšťavenú dužinu a zvyš-
e
v teplej mydlovej vode a potom ich
s
:
g
je nylonová kefag. Ak chcete kryt
q
d
, nádobu na šťavu t, sa-
q
, kryt prí-
h
h
sú vhodné na um-
s
, použite priloženú nylonovú
d
dovtedy, až šípka
q
(dolnou stranou nahor) pod tečúcou
.
g
a
Zafarbenie:
• Niektoré ovocie alebo zelenina môžu diely odšťavovača natrvalo zafarbiť. Nie je to škodlivé
a nijako to neobmedzuje funkcie prístroja.
• Vypnite prístroj vypínačom o.
• Nečistoty alebo pretečenú šťavu z plodov treba
bezodkladne odstrániť, pretože fľaky od ovocia
sa neskôr dajú len veľmi ťažko odstrániť.
- 67 -
Page 71

Uskladnenie
Keď nebudete odšťavovač dlhšiu dobu používať,
oviňte sieťovú šnúru okolo navíjania kábla
spodnej strane odšťavovača.
a
na
Likvidácia
Prístroj v žiadnom prípade nevyhadzujte
do normálneho domového odpadu.
Tento výrobok podlieha európskej
smernici 2012/19/EU.
Záruka prestáva platiť pri zaobchádzaní nezodpovedajúcom účelu, pri neprimeranom zaobchádzaní,
pri používaní násilia a pri zásahoch, ktoré neurobil
nami autorizovaný servis. Práva vyplývajúce zo zákona nie sú touto zárukou obmedzené.
Záručná doba sa nepredlžuje o dobu trvania záručných opráv. To platí aj na vymenené alebo opravené diely. Prípadné poškodenia a nedostatky zistené
už pri nákupe musíte ohlásiť ihneď po vybalení, najneskoršie však do dvoch dní od dátumu zakúpenia.
V prípade opráv spadajúcich do obdobia po uplynutí záručnej doby ste povinní uhradiť vzniknuté
náklady.
Prístroj zlikvidujte v príslušnom zariadení (firme) na
likvidáciu odpadu.
Dodržte pritom aktuálne platné predpisy. V prípade
pochybností sa spojte so zariadením na likvidáciu
odpadu.
Všetok baliaci materiál zlikvidujte ekologikkým spôsobom.
Záruka a servis
Na tento prístroj máte 3 ročnú záruku od dátumu
nákupu. Prístroj bol starostlivo vyrobený a pred expedíciou dôkladne vyskúšaný. Uschovajte si, prosím, účtenku ako dôkaz o nákupe. V prípade uplatňovania záruky sa spojte s opravovňou telefonicky.
Len tak sa dá zabezpečiť bezplatné zaslanie tovaru.
Záruka platí len na chyby materiálu a výroby, nie
na poškodenia spôsobené prepravou, opotrebením
ani na poškodenia krehkých častí, ako sú spínače
alebo akumulátory.
Výrobok je určený výlučne na súkromné používanie
a nie na komerčné účely.
Servis Slovensko
Tel.: 0850 232001
E-Mail: kompernass@lidl.sk
IAN 104378
Dostupnosť hotline:
pondelok až piatok od 8:00 hod. - 20:00 hod.
(SEČ)
Dovozca
KOMPERNASS HANDELS GMBH
BURGSTRASSE 21
44867 BOCHUM
GERMANY
www.kompernass.com
- 68 -
Page 72

Odstraňovanie porúch
Problém Možné príčiny Možné riešenia
Prístroj nefunguje.
Motor zostáva pri odšťavovaní
stáť alebo sa točí nápadne pomaly alebo nerovnomerne.
Výlisky (odpad) sú príliš mokré
a šťavy je málo.
Šťava prýšti von medzi okrajom
krytu prístroja
šťavu
e a nádobou na
t.
• Sieťová zástrčka i nie je
pripojená.
• Prístroj nie je zapnutý.
• Svorky r nie sú zaistené. • Zaistite svorky r.
• Filter d je upchatý.
• Pracujete veľmi rýchlo. • Pracujte pomalšie.
• Filter d je upchatý.
• Pracujete veľmi rýchlo. • Pracujte pomalšie.
d alebo nádoba na šťa-
• Filter
vu
t sú upchaté.
• Je nastavený nesprávny
rýchlostný stupeň.
• Pripojte prístroj do sieťovej
zásuvky.
• Zapnite prístroj vypínačom o.
• Ihneď vypnite odšťavovač a
vytiahnite sieťovú zástrčku
Odstráňte upchatie (pozri kapitola „Odšťavovanie“).
• Vyčistite filter d (pozri kapitola
„Čistenie a údržba“).
• Vyčistite filter d a nádobu
na šťavu
„Čistenie a údržba“).
• Vypínačom
rýchlostný stupeň I.
t (pozri kapitola
nastavte
o
i.
Šťava vystrekuje z výtoku
šťavy
y.
Počas práce vyteká šťava spod
podstavca prístroja
u.
• Pracujete veľmi rýchlo.
• Je nastavený nesprávny rýchlostný stupeň.
d alebo výtok šťavy y
• Filter
sú upchaté.
• Je nastavený nesprávny rýchlostný stupeň.
- 69 -
• Pracujte pomalšie.
• Pri posúvaní (dopĺňaní) netlačte
tak silno na vtláčadlo
• Vypínačom
lostný stupeň I.
• Vyčistite filter
(pozri kapitola „Čistenie a
údržba“).
• Vypínačom
lostný stupeň I.
o
d a výtok šťavy y
o
q.
nastavte rých-
nastavte rých-
Page 73

Recepty
Letný nápoj
2 osoby
Prísady
1 veľký kus vodného melónu
1 citrón
4 jablká, sladkokyslé
(napr. „Jonagold“ alebo „Jonatán“)
Príprava
1. Vodný melón, citrón a jablká pripravte podľa
pokynov, uvedených v návode odšťavovača.
2. V odšťavovači vytlačte z vodného melóna, citróna
a jabĺk šťavu.
3. Letný nápoj servírujte chladený.
Nápoj z jabĺk, hrušiek a jahôd
2 osoby
Prísady
1 jablko, zelené (napr. „Granny Smith“)
3 malé, zrelé hrušky
10 stredne veľkých jahôd
Príprava
1. Jablká, hrušky a jahody pripravte podľa pokynov,
uvedených v návode pre odšťavovač.
2. Všetko odšťavte v odšťavovači.
3. Šťavy zmiešajte a nápoj ihneď servírujte.
Energetický nápoj
2 osoby
Prísady
2 jablká, sladké (napr. „Red Delicious“)
2 veľké marhule
1 veľká hruška
250 ml minerálnej vody (s obsahom oxidu uhličitého)
trochu drveného ľadu
Príprava
1. Jablká, marhule a hrušku pripravte podľa pokynov,
uvedených v návode pre odšťavovač.
2. Z jabĺk, marhulí a hrušky vytlačte šťavu.
3. Šťavy zmiešajte a pridajte minerálnu vodu.
4. Nápoj servírujte s drveným ľadom.
Raňajkový nápoj
2 osoby
Prísady
4 - 5 mrkiev
2 jablká
1 ČL olivového oleja
Príprava
1. Mrkvy a jablká pripravte podľa pokynov,
uvedených v návode pre odšťavovač.
2. Najskôr vytlačte šťavu z mrkvy a potom z jabĺk.
3. Pridajte olivový olej.
4. Všetko dobre premiešajte.
- 70 -
Page 74

Nápoj z medových melónov
2 osoby
Ananásovo-mangový nápoj
2 osoby
Prísady
ca 1/3 medového melónu
1 mango
1 jablko, sladkokyslé
(napr. „Jonagold“ alebo „Jonatán“)
1 jablko, zelené (napr. „Granny Smith“)
Príprava
1. Melón, mango a jablká pripravte podľa pokynov,
uvedených v návode pre odšťavovač.
2. Najskôr vytlačte šťavu z melóna, potom z manga
a jabĺk. Všetko premiešajte.
Sladký ovocný nápoj
2 osoby
Prísady
1/2 medového melónu
4 broskyne
200 g hrozna bez jadierok
6 máng
Príprava
1. Medový melón, broskyne, hrozno a mangá pripravte podľa pokynov, uvedených v návode pre
odšťavovač.
2. Postupne vytlačte z ovocia šťavu.
3. Zmiešajte šťavy a nápoj servírujte mierne chladený.
Prísady
1/2 ananásu
1/2 manga
1 jablko
1 pomaranč
2 ČL oleja z pšeničných klíčkov
Príprava
1. Pripravte ananás, mango, jablko a pomaranč
podľa pokynov, uvedených v návode pre odšťavovač.
2. Najskôr vytlačte šťavu z ananásu, potom z manga.
3. Z jablka a pomaranča vytlačte šťavu.
4. Šťavy zmiešajte.
5. Do šťavy pridajte 2 ČL oleja z pšeničných klíčkov
a všetko dobre premiešajte.
Cviklový nápoj
2 osoby
Prísady
1 červená cvikla
3 pomaranče
2 PL ríbezlí
Príprava
1. Cviklu, pomaranče a ríbezle pripravte podľa
pokynov, uvedených v návode pre odšťavovač.
2. Z cvikle, pomaranča a ríbezlí vytlačte šťavu
a šťavy zmiešajte.
- 71 -
Page 75

Ovocný paprikový nápoj
2 osoby
Prísady
2 žlté papriky
3 pomaranče
2 jablká
2 hrušky
1/2 grapefruitu
Príprava
1. Papriku, pomaranče, jablká, hrušky a grapefruit
pripravte podľa pokynov, uvedených v návode
pre odšťavovač.
2. Z každého ovocia postupne vytlačte šťavu a túto
ihneď servírujte.
Broskyňovo-hruškovoananásový nápoj
2 osoby
Prísady
2 broskyne
2 malé hrušky
1/2 ananásu
Príprava
1. Broskyne, hrušky a ananás pripravte podľa
pokynov, uvedených v návode pre odšťavovač.
2. Z každého ovocia postupne vytlačte šťavu a túto
ihneď servírujte.
Upozornenie
Recepty bez záruky. Všetky informácie o prísadách
a príprave sú orientačné. Doplňte si tieto recepty
o vaše vlastné skúsenosti.
- 72 -
Page 76

INHALTSVERZEICHNIS SEITE
Einleitung 74
Bestimmungsgemäßer Gebrauch 74
Lieferumfang 74
Bedienelemente 74
Technische Daten 74
Sicherheitshinweise 75
Gerät zusammenbauen und bedienen 77
Vorbereitung der Früchte / Gemüse 77
Entsaften 78
Entleerung des Fruchtfleischbehälters und des Filters 78
Demontage des Entsafters 79
Reinigung und Pflege 79
Aufbewahrung 80
Entsorgen 80
Garantie und Service 80
Importeur 80
Fehlerbehebung 81
Rezepte 82
Sommer-Drink . . . . . . . . . . . . . . . . . . . . . . . . . . . . . . . . . . . . . . . . . . . . . . . . . . . . . . . . . . . . .82
Apfel-Birne-Erdbeer-Drink . . . . . . . . . . . . . . . . . . . . . . . . . . . . . . . . . . . . . . . . . . . . . . . . . . . .82
Energie-Drink . . . . . . . . . . . . . . . . . . . . . . . . . . . . . . . . . . . . . . . . . . . . . . . . . . . . . . . . . . . . . .82
Frühstücks-Drink . . . . . . . . . . . . . . . . . . . . . . . . . . . . . . . . . . . . . . . . . . . . . . . . . . . . . . . . . . . .82
Honigmelonen-Drink . . . . . . . . . . . . . . . . . . . . . . . . . . . . . . . . . . . . . . . . . . . . . . . . . . . . . . . .83
Süßer Frucht-Drink . . . . . . . . . . . . . . . . . . . . . . . . . . . . . . . . . . . . . . . . . . . . . . . . . . . . . . . . . .83
Ananas-Mango-Drink . . . . . . . . . . . . . . . . . . . . . . . . . . . . . . . . . . . . . . . . . . . . . . . . . . . . . . .83
Rote Bete-Drink . . . . . . . . . . . . . . . . . . . . . . . . . . . . . . . . . . . . . . . . . . . . . . . . . . . . . . . . . . . .83
Früchte-Paprika-Drink . . . . . . . . . . . . . . . . . . . . . . . . . . . . . . . . . . . . . . . . . . . . . . . . . . . . . . . .84
Pfirsich-Birnen-Ananas-Drink . . . . . . . . . . . . . . . . . . . . . . . . . . . . . . . . . . . . . . . . . . . . . . . . . .84
Lesen Sie die Bedienungsanleitung vor der ersten Verwendung aufmerksam durch und heben Sie diese für
den späteren Gebrauch auf. Händigen Sie bei Weitergabe des Gerätes an Dritte auch die Anleitung aus.
- 73 -
Page 77

Entsafter
Einleitung
Herzlichen Glückwunsch zum Kauf Ihres neuen
Gerätes.
Sie haben sich damit für ein hochwertiges Produkt
entschieden. Die Bedienungsanleitung ist Bestandteil dieses Produkts. Sie enthält wichtige Hinweise
für Sicherheit, Gebrauch und Entsorgung. Machen
Sie sich vor der Benutzung des Produkts mit allen
Bedien- und Sicherheitshinweisen vertraut. Benutzen
Sie das Produkt nur wie beschrieben und für die
angegebenen Einsatzbereiche. Händigen Sie alle
Unterlagen bei Weitergabe des Produkts an Dritte
mit aus.
Bestimmungsgemäßer
Gebrauch
Das Gerät ist zum Entsaften von gut gereiften und
geschälten Früchten und Gemüse geeignet. Es dürfen nur Lebensmittel mit dem Gerät verarbeitet werden. Es darf ausschließlich Originalzubehör wie
beschrieben verwendet werden. Jede andere Verwendung oder Veränderung gilt als nicht bestimmungsgemäß und birgt erhebliche Unfallgefahren.
Für aus bestimmungswidriger Verwendung entstandene Schäden übernimmt der Hersteller keine
Haftung. Nicht für gewerblichen Einsatz.
Bedienelemente
Abbildung A:
Stopfer
q
Einfüllschacht
w
Gehäusedeckel
e
Klammern
r
Saftbehälter
t
Fruchtsaftauslauf
y
Gerätesockel
u
Netzkabel mit Netzstecker
i
Ein-/Ausschalter (2 Geschwindigkeitsstufen)
o
Kabelaufwicklung
a
Behälter (für Fruchtfleisch und Trester)
s
Abbildung B:
Filter
d
Antriebswelle
f
Nylonbürste (befindet sich bei Auslieferung
g
im Stopfer)
Abbildung A:
separater Saftauffangbehälter mit
h
Schaumtrenner (befindet sich bei Auslieferung
im Behälter für Fruchtfleisch und Trester)
Technische Daten
Netzspannung: 220 - 240 V ~, 50 Hz
Nennleistung: 450 W
KB-Zeit: 30 Minuten
Schutzklasse: II /
Lieferumfang
Entsafter
Nylonbürste (im Stopfer)
Bedienungsanleitung
KB-Zeit
Die KB-Zeit (Kurzzeitbetrieb) gibt an, wie lange
man ein Gerät betreiben kann, ohne dass der
Motor überhitzt und Schaden nimmt. Nach der
angegebenen KB-Zeit muss das Gerät solange
ausgeschaltet werden, bis sich der Motor abgekühlt hat.
- 74 -
Page 78

Sicherheitshinweise
GEFAHR - elektrischer Schlag!
• Die Spannung der Stromquelle muss mit den Angaben auf dem Typenschild
des Gerätes übereinstimmen.
• Lassen Sie beschädigte Netzstecker oder Netzkabel sofort von autorisiertem
Fachpersonal oder dem Kundenservice austauschen, um Gefährdungen zu
vermeiden.
• Lassen Sie Geräte, die nicht einwandfrei funktionieren oder beschädigt wurden,
sofort vom Kundendienst untersuchen und reparieren.
• Setzen Sie das Gerät nicht dem Regen aus und benutzen Sie es auch niemals
in feuchter oder nasser Umgebung. Achten Sie darauf, dass das Netzkabel
während des Betriebs niemals nass oder feucht wird.
Tauchen Sie den Gerätesockel niemals in Wasser oder andere Flüssigkeiten!
WARNUNG - Verletzungsgefahr!
• Missbrauchen Sie das Gerät nicht für andere Zwecke, als in dieser Anleitung
beschrieben.
• Das Gerät ist bei nicht vorhandener Aufsicht und vor dem Zusammenbau, dem
Auseinandernehmen oder Reinigen stets vom Netz zu trennen.
• Das Gerät darf nicht von Kindern benutzt werden.
• Das Gerät und seine Anschlussleitung sind von Kindern fernzuhalten.
• Dieses Gerät kann von Personen mit reduzierten physischen, sensorischen oder
mentalen Fähigkeiten oder Mangel an Erfahrung und/oder Wissen benutzt werden, wenn sie beaufsichtigt oder bezüglich des sicheren Gebrauchs des Gerätes
unterwiesen wurden und die daraus resultierenden Gefahren verstanden haben.
• Kinder dürfen nicht mit dem Gerät spielen.
• Falls der sich drehende Filter beschädigt ist, darf das Gerät nicht weiter betrieben werden!
• Vor dem Auswechseln von Zubehör oder Zusatzteilen, die im Betrieb bewegt
werden, muss das Gerät ausgeschaltet und vom Netz getrennt werden.
• Das Schneidwerk ist sehr scharf. Gehen Sie vorsichtig damit um.
• Benutzen Sie das Gerät nicht, wenn das rotierende Sieb beschädigt ist.
• Um Verletzungen zu vermeiden, achten Sie darauf, dass alle Teile korrekt eingesetzt worden sind.
- 75 -
Page 79

Wenn Sie mit dem Gerät arbeiten, stecken Sie niemals Ihre Hände oder andere Gegenstände in die Einfüllöffnung. Dies kann zu schweren Verletzungen
oder Beschädigungen des Gerätes führen. Wenn Fruchtstücke nicht mittels
des Stopfers entfernt werden können, schalten Sie das Gerät aus, ziehen
Sie den Netzstecker und öffnen Sie das Gerät.
• Sorgen Sie dafür, dass der Netzstecker bei Gefahr schnell erreichbar ist und
das Netzkabel nicht zur Stolperfalle werden kann.
• Nach Gebrauch stellen Sie das Gerät aus und ziehen Sie den Netzstecker.
Das Gerät darf erst auseinander genommen werden, wenn der Motor vollständig stillsteht.
• Berühren Sie keine rotierenden Teile.
• Das Gerät während des Betriebs niemals unbeaufsichtigt lassen.
• Sorgen Sie für einen sicheren Stand des Gerätes.
Benutzen Sie das Gerät niemals:
• wenn Filter, das Netzkabel oder der Netzstecker beschädigt sind,
• im Falle von Fehlfunktionen, oder wenn es in anderer Weise beschädigt wurde
oder herunter gefallen ist. Geben Sie das Gerät zur Überprüfung bzw. Reparatur
an den Kundendienst.
• Die Verwendung von Zubehörteilen, die nicht von dem Gerätehersteller
empfohlen oder verkauft werden, kann Feuer, elektrische Stromschläge oder
Verletzungen hervorrufen.
So verhalten Sie sich sicher:
• Ziehen Sie bei Gefahr sofort den Netzstecker aus der Steckdose.
• Seien Sie stets aufmerksam! Achten Sie immer darauf was Sie tun und gehen
Sie stets mit Vernunft vor. Benutzen Sie das Gerät in keinem Fall, wenn Sie
unkonzentriert sind oder sich unwohl fühlen.
• Stellen Sie sicher, dass das Gerät korrekt und vollständig zusammengesetzt
worden ist, bevor Sie es in Betrieb nehmen. Das Gerät kann erst betrieben
werden, sobald die Klammern geschlossen worden sind. Werden die Klammern
während des Betriebs gelöst, stoppt das Gerät automatisch.
• Stellen Sie nach jedem Gebrauch des Entsafters sicher, dass sich der Ein-/
Ausschalter in der Position „Aus“ ("0") befindet. Der Motor muss vollständig
stillstehen, bevor Sie das Gerät auseinanderbauen dürfen.
• Verwenden Sie das Gerät nicht im Freien.
- 76 -
Page 80

Gerät zusammenbauen und
bedienen
• Reinigen Sie das Gerät vor der ersten Benutzung
wie im Kapitel „Reinigung und Pflege” beschrieben.
• Wählen Sie für Ihren Entsafter einen geeigneten
Standort. Für eine optimale Handhabung empfehlen wir, das Gerät so aufzustellen, dass das
Netzkabel nach hinten zur Steckdose verläuft.
Alle Elemente lassen sich nun direkt und einfach
bedienen:
- vorne der Ein-/Ausschalter
- links der Behälter für Fruchtfleisch und
Trester
s
- rechts der Fruchtsaftauslauf y.
Achtung:
Vergewissern Sie sich, dass das Gerät ausgeschaltet und der Netzstecker gezogen ist, bevor Sie das
Gerät zusammensetzen. Ansonsten besteht die
Gefahr, dass Sie sich verletzen.
1. Setzen Sie den Saftbehälter
sockel
der Fruchtsaftauslauf
greifen.
2. Setzen Sie den Filter
und drücken Sie ihn herunter, so dass er spürbar
einrastet. Achten Sie auf festen Sitz, bevor Sie
mit dem Zusammenbau fortfahren.
3. Schieben Sie den Behälter für Fruchtfleisch und
Trester
Ausklappseite).
4. Setzen Sie den Gehäusedeckel
behälter
den Schneidmessern des Filters
5. Achten Sie darauf, dass der Gehäusedeckel
fest in der Aussparung des Saftbehälters tsitzt.
Heben Sie die Klammern
diese in die Erhebungen des Gehäusedeckels
ein.
6. Drücken Sie den unteren Teil der Klammern
gegen das Gerät, bis diese einrasten.
, so dass die drei Arretierungen und
u
y
d
von unten unter den Auswurf (siehe
s
, so dass der Einfüllschacht wüber
t
,
o
auf den Geräte-
t
in die Aussparungen
auf die Antriebswelle
auf den Saft-
e
sitzt.
d
an und klinken Sie
r
f
e
e
r
7. Schieben Sie den Schaumtrenner in den separaten Saftauffangbehälter
den Deckel auf. Stellen Sie den separaten Saftauffangbehälter
der Fruchstaftauslauf
auffangbehälter
8. Stecken Sie den Netzstecker
Steckdose.
h
h
ein und setzen Sie
h
so neben das Gerät, dass
in den separaten Saft-
y
ragt.
in die
i
Vorbereitung der Früchte /
Gemüse
• Wichtig: Verwenden Sie nur gut gereifte Früchte,
da der Filter
Dieses würde wiederholtes Reinigen des Filters
erfordern.
• Waschen oder schälen Sie die Früchte oder das
Gemüse, die / das Sie verarbeiten möchten.
• Große Kerne oder Steine sollten immer vor dem
Einfüllen aus den Früchten entfernt werden.
• Kernobst (wie Äpfel, Birnen) kann mit Schale
und Kerngehäuse verarbeitet werden. Sonstige
Steine (Pfirsiche, Pflaumen etc.), alle großen Kerne (Melonen etc.) und Stiele entfernen, um eine
Beschädigung des Gerätes zu vermeiden.
• Früchte mit dicken Schalen (z.B. Zitrusfrüchte,
Melonen, Kiwis, Rüben) müssen immer zuerst
geschält werden.
• Von Weintrauben ist der Hauptstiel
abzuschneiden.
• Schneiden Sie Früchte oder Gemüse in derart
große Stücke, dass sie in den Einfüllschacht
passen.
Hinweis:
Rosinen eignen sich nicht zum Entsaften, da sie zu
wenig Saft enthalten. Rhabarber oder anderes faseriges Gemüse/Obst eignet sich nicht zum Entsaften,
da die Fasern den Entsafter verstopfen.
sich sonst zusetzen kann.
d
d
w
- 77 -
Page 81

Entsaften
Achtung:
Betreiben Sie den Entsafter nie länger als 30 Minuten (KB-Zeit) ohne Unterbrechung. Lassen Sie den
Entsafter nach 30 Minuten Dauerbetrieb abkühlen.
Ansonsten kann das Gerät beschädigt werden.
Hinweis:
Um zu vermeiden, dass sich Obst/Gemüse im Einfüllschacht
tetem Gerät ein. Wenn sich Fruchtstücke im Einfüllschacht
mit dem Stopfer
Sie bitte folgendermaßen vor, um eine Beschädigung des Gerätes zu vermeiden:
festsetzt, füllen Sie es nur bei eingeschal-
w
festgesetzt haben und nicht umgehend
w
entfernt werden können, gehen
q
Achtung:
Stecken Sie niemals Ihre Hände oder Gegenstände
in den Einfüllschacht
Betrieb ist. Dieses könnte zu schweren Körperverletzungen und/oder Beschädigungen des Entsafters
führen.
1. Schalten Sie das Gerät am Ein-/Ausschalter
ein.
Verwenden Sie für Obst/Gemüse, das viel Flüssigkeit enthält, Geschwindigkeitsstufe 1.
Für trockeneres Obst/Gemüse wählen Sie
Geschwindigkeitsstufe 2.
2. Halten Sie den Stopfer
geben Sie die Obst- oder Gemüsestücke mit der
anderen Hand in den Einfüllschacht
zen Sie immer den Stopfer
Gemüse vorsichtig in den Einfüllschacht
einzudrücken. Während das Obst/Gemüse verarbeitet wird, füllen Sie weitere Stücke nach.
Schalten Sie das Gerät dabei nicht aus.
, während das Gerät in
w
in einer Hand und
q
w
, um das Obst/
q
. Benut-
hin-
w
o
Hinweis:
Führen Sie Möhren eine nach der anderen in den
Einfüllschacht
muss dabei nach unten weisen und die Wurzelspitze
nach oben.
ein: der Krautansatz der Möhre
w
• Schalten Sie das Gerät sofort aus und ziehen
Sie den Netzstecker
• Lösen Sie die Klammern
Gehäusedeckel
• Entfernen Sie die festgesetzten Fruchtstücke.
• Setzen Sie das Gerät wieder zusammen und
fahren Sie mit dem Entsaften fort.
3. Schalten Sie das Gerät immer sofort wieder aus,
sobald das gesamte Obst/Gemüse verarbeitet ist.
e
heraus.
i
und nehmen Sie den
r
ab.
Achtung:
Reinigen Sie den Fruchtsaftauslauf yund den Saftbehälter
um ein Verstopfen des Fruchtsaftauslaufes
oder eine Beschädigung des Gerätes zu vermeiden.
regelmäßig und nach jedem Gebrauch,
t
y
und/
Entleerung des Fruchtfleischbehälters und des Filters
Sie können kontinuierlich Saft auspressen, bis der
Behälter für Fruchtfleisch und Trester
Achtung:
Ziehen Sie den Netzstecker, wenn Sie den Filter
leeren. Das verhindert unbeabsichtigtes Starten des
Motors.
gefüllt ist.
s
d
Wenn der Fruchtsaft plötzlich viel dicker wird, oder
wenn Sie hören können, dass sich die Motordrehzahl verlangsamt, muss der Filter
Nachdem Sie das Fruchtfleisch herausgenommen
haben, setzen Sie das Gerät wieder zusammen.
- 78 -
geleert werden.
d
Page 82

Demontage des Entsafters
Wenn Sie den Entsafter demontieren wollen, z.B.
um ihn zu reinigen, gehen Sie wie folgt vor:
1. Ziehen Sie den Netzstecker
2. Öffnen Sie die Klammern
3. Nehmen Sie den Gehäusedeckel
Stopfer
4. Heben Sie vorsichtig den Saftbehälter
Der Filter
welle
Saftbehälter
ab.
q
löst sich dadurch von der Antriebs-
d
. Sie können den Filter dnun aus dem
f
herausnehmen.
t
r
i
.
.
mit dem
e
ab.
t
Reinigung und Pflege
• Reinigen Sie das Gerätegehäuse und das Netzkabel mit einem nur leicht angefeuchteten Tuch.
• Reinigen Sie Stopfer
den separaten Saftauffangbehälter
sedeckel
und Trester
spülen Sie diese sorgfältig ab.
Der Stopfer
deckel
e
und der Behälter für Fruchtfleisch und Trester
sind spülmaschinengeeignet und können in der
Spülmaschine gereinigt werden. Um den Filter
zu reinigen, benutzen Sie die mitgelieferte Nylonbürste
g
und den Behälter für Fruchtfleisch
e
in warmem Seifenwasser und
s
, der Saftbehälter t, der Gehäuse-
q
, der separate Saftauffangbehälter
:
, den Saftbehälter t,
q
h
, Gehäu-
h
s
d
Achtung:
Ziehen Sie immer den Netzstecker bevor Zubehörteile aufgesetzt oder abgenommen werden, und bevor
Sie das Gerät reinigen. Alle Geräte- und Zubehörteile
müssen regelmäßig und nach jedem Gebrauch von
Fruchtresten und Fruchttrester gereinigt werden, um
ein Verstopfen des Fruchtsaftauslaufes und/oder
eine Beschädigung des Gerätes zu vermeiden.
Hinweis:
Verwenden Sie keine aggressiven Reinigungsmittel,
um den Entsafter zu säubern. Das Gerät und dessen
Bestandteile dürfen nicht in kochendem Wasser
gereinigt werden.
Achtung:
Tauchen Sie den Motor/Gerätesockel uniemals in Wasser oder in eine andere Flüssigkeit,
um elektrische Stromschläge zu vermeiden.
• Schalten Sie das Gerät am Ein-/Ausschalter
aus.
• Verschmutzungen oder überlaufender Fruchtsaft
sind umgehend zu beseitigen, da sich Obstflecken später nur schwierig entfernen lassen.
o
• Drehen Sie den Deckel des Stopfers
dass der Pfeil auf das geöffnete Schloss am
Stopferschaft zeigt. Sie können den Deckel nun
abnehmen. Im Inneren des Stopfers
sich die Nylonbürste
zu schließen, setzen Sie ihn wieder so auf, dass
der Pfeil auf das geöffnete Schloss zeigt.
Dann drehen Sie ihn soweit, dass der Pfeil auf
das geschlossene Schloss zeigt . Der Deckel
sitzt nun fest.
• Halten Sie den Filter
oben) unter laufendes Wasser und reinigen Sie
ihn mit der Nylonbürste
. Um den Deckel wieder
g
(mit der Unterseite nach
d
.
g
q
q
so weit,
befindet
Verfärbungen:
• Einige Früchte oder einiges Gemüse können die
Teile des Entsafters dauerhaft verfärben. Dies ist
nicht schädlich und schränkt das Gerät nicht in
seiner Funktion ein.
- 79 -
Page 83

Aufbewahrung
Wenn Sie den Entsafter längere Zeit nicht benutzen,
wickeln Sie das Kabel um die Kabelaufwicklung
an der Unterseite des Entsafters.
a
Entsorgen
Werfen Sie das Gerät keinesfalls in den
normalen Hausmüll. Dieses Produkt
unterliegt der europäischen Richtlinie
2012/19/EU.
Bei missbräuchlicher und unsachgemäßer Behandlung, Gewaltanwendung und bei Eingriffen, die
nicht von unserer autorisierten Service-Niederlassung vorgenommen wurden, erlischt die Garantie.
Ihre gesetzlichen Rechte werden durch diese
Garantie nicht eingeschränkt.
Die Garantiezeit wird durch die Gewährleistung
nicht verlängert. Dies gilt auch für ersetzte und reparierte Teile. Eventuell schon beim Kauf vorhandene
Schäden und Mängel müssen sofort nach dem
Auspacken gemeldet werden, spätestens aber zwei
Tage nach Kaufdatum. Nach Ablauf der Garantiezeit anfallende Reparaturen sind kostenpflichtig.
Entsorgen Sie das Gerät über einen zugelassenen
Entsorgungsbetrieb oder über Ihre kommunale
Entsorgungseinrichtung.
Beachten Sie die aktuell geltenden Vorschriften.
Setzen Sie sich im Zweifelsfall mit Ihrer Entsorgungseinrichtung in Verbindung.
Führen Sie alle Verpackungsmaterialien
einer umweltgerechten Entsorgung zu.
Garantie und Service
Sie erhalten auf dieses Gerät 3 Jahre Garantie ab
Kaufdatum. Das Gerät wurde sorgfältig produziert
und vor Anlieferung gewissenhaft geprüft.
Bitte bewahren Sie den Kassenbon als Nachweis
für den Kauf auf. Bitte setzen Sie sich im Garantiefall mit Ihrer Servicestelle telefonisch in Verbindung.
Nur so kann eine kostenlose Einsendung Ihrer Ware
gewährleistet werden.
Die Garantieleistung gilt nur für Material- oder
Fabrikationsfehler, nicht aber für Transportschäden,
Verschleißteile oder für Beschädigungen an zerbrechlichen Teilen, z. B. Schalter oder Akkus. Das
Produkt ist lediglich für den privaten und nicht für
den gewerblichen Gebrauch bestimmt.
Service Deutschland
Tel.: 0800 5435 111
(Kostenfrei aus dem dt. Festnetz/Mobilfunknetz)
E-Mail: kompernass@lidl.de
IAN 104378
Service Österreich
Tel.: 0820 201 222 (0,15 EUR/Min.)
E-Mail: kompernass@lidl.at
IAN 104378
Service Schweiz
Tel.: 0842 665566 (0,08 CHF/Min.,
Mobilfunk max. 0,40 CHF/Min.)
E-Mail: kompernass@lidl.ch
IAN 104378
Erreichbarkeit Hotline:
Montag bis Freitag von 8:00 Uhr - 20:00 Uhr (MEZ)
Importeur
KOMPERNASS HANDELS GMBH
BURGSTRASSE 21
44867 BOCHUM
GERMANY
www.kompernass.com
- 80 -
Page 84

Fehlerbehebung
Problem Mögliche Ursachen Mögliche Lösungen
Das Gerät funktioniert nicht.
Der Motor bleibt beim Entsaften
stehen oder dreht sich auffallend
langsam oder ungleichmäßig.
Der Trester ist zu feucht und Sie
erhalten zu wenig Saft.
Der Saft quillt zwischen dem
Rand des Gehäusedeckels
und des Saftbehälters t heraus.
e
• Der Netzstecker i ist nicht an-
geschlossen.
• Das Gerät ist nicht eingeschaltet.
• Die Klammern r sind nicht
verriegelt.
• Der Filter d ist verstopft.
• Sie arbeiten zu schnell. • Arbeiten Sie langsamer.
• Der Filter d ist verstopft.
• Sie arbeiten zu schnell. • Arbeiten Sie langsamer.
• Der Filter d oder der Saftbe-
hälter
t ist verstopft.
• Die Geschwindigkeitsstufe ist
zu hoch eingestellt.
• Schließen Sie das Gerät an
eine Netzsteckdose an.
• Schalten Sie das Gerät am
Ein/Ausschalter
• Verriegeln Sie die Klammern r.
• Schalten Sie den Entsafter
sofort aus und ziehen Sie den
Netzstecker
die Verstopfung (siehe Kapitel
„Entsaften“).
• Reinigen Sie den Filter d (siehe
Kapitel „Reinigung und Pflege“).
• Reinigen Sie Filter d und
Saftbehälter
„Reinigung und Pflege“).
• Stellen Sie am Ein-/Ausschalter
Geschwindigkeitsstufe 1 ein.
o
o an.
i. Beseitigen Sie
t (siehe Kapitel
Der Saft spritzt aus dem Fruchtsaftauslauf
Während der Arbeit läuft Saft
am Gerätesockel
y.
u herunter.
• Sie arbeiten zu schnell.
• Die Geschwindigkeitsstufe ist
zu hoch eingestellt.
• Der Filter d oder der Frucht-
saftauslauf
• Die Geschwindigkeitsstufe ist zu
hoch eingestellt.
y ist verstopft.
- 81 -
• Arbeiten Sie langsamer.
• Drücken Sie beim Nachschieben
nicht zu fest auf den Stopfer
• Stellen Sie am Ein-/Ausschalter
Geschwindigkeitsstufe 1 ein.
o
• Reinigen Sie den Filter d und
den Fruchtsaftauslauf
Kapitel „Reinigung und Pflege“).
• Stellen Sie am Ein-/Ausschalter
Geschwindigkeitsstufe 1 ein.
o
q.
y (siehe
Page 85

Rezepte
Energie-Drink
2 Personen
Sommer-Drink
2 Personen
Zutaten
1 großes Stück Wassermelone
1 Zitrone
4 Äpfel, süß-säuerlich
(z.B. “Jonagold” oder “Jonathan”)
Zubereitung
1. Bereiten Sie die Wassermelone, die Zitrone und
die Äpfel gemäß den Anweisungen in der Anleitung für den Entsafter vor.
2. Entsaften Sie die Wassermelone, die Zitrone und
die Äpfel.
3. Servieren Sie den Sommer-Drink gekühlt.
Apfel-Birne-Erdbeer-Drink
2 Personen
Zutaten
1 Apfel, grün (z.B. “Granny Smith”)
3 kleine, reife Birnen
10 mittelgroße Erdbeeren
Zutaten
2 Äpfel, süß (z.B. “Red Delicious”)
2 große Aprikosen
1 große Birne
250 ml Mineralwasser (kohlensäurehaltig)
etwas zerstoßenes Eis
Zubereitung
1. Bereiten Sie die Äpfel, die Aprikosen und die Birne gemäß den Anweisungen in der Anleitung für
den Entsafter vor.
2. Entsaften Sie die Äpfel, die Aprikosen und die
Birne.
3. Vermischen Sie die Säfte und geben Sie das Mineralwasser hinzu.
4. Servieren Sie den Drink auf zerstoßenem Eis.
Frühstücks-Drink
2 Personen
Zutaten
4-5 Karotten
2 Äpfel
1 TL Olivenöl
Zubereitung
1. Bereiten Sie den Apfel, die Birnen und die Erdbeeren gemäß der Anleitung für den Entsafter
vor.
2. Entsaften Sie alles mit dem Entsafter.
3. Vermischen Sie die Säfte und servieren Sie den
Drink sofort.
Zubereitung
1. Bereiten Sie die Karotten und die Äpfel gemäß
den Anweisungen in der Anleitung für den Entsafter vor.
2. Entsaften Sie zuerst die Karotten und dann die
Äpfel.
3. Geben Sie das Olivenöl hinzu.
4. Rühren Sie alles gut um.
- 82 -
Page 86

Honigmelonen-Drink
2 Personen
Ananas-Mango-Drink
2 Personen
Zutaten
ca. 1/3 Honigmelone
1 Mango
1 Apfel, süß-säuerlich
(z.B. “Jonagold” oder “Jonathan”)
1 Apfel, grün (z.B. “Granny Smith”)
Zubereitung
1. Bereiten Sie die Melone, die Mango und die
Äpfel gemäß den Anweisungen in der Anleitung
für den Entsafter vor.
2. Entsaften Sie zuerst die Melone, dann die Mango und die Äpfel. Verrühren Sie alles.
Süßer Frucht-Drink
2 Personen
Zutaten
1/2 Honigmelone
4 Pfirsiche
200 g kernlose Trauben
6 Mangos
Zubereitung
1. Bereiten Sie die Honigmelone, die Pfirsiche, die
Trauben und die Mangos gemäß den Anweisungen in der Anleitung für den Entsafter vor.
2. Entsaften Sie die Früchte nacheinander.
3. Mischen Sie die Säfte und servieren Sie den
Drink leicht gekühlt.
Zutaten
1/2 Ananas
1/2 Mango
1 Apfel
1 Orange
2 TL Weizenkeimöl
Zubereitung
1. Bereiten Sie die Ananas, die Mango, den Apfel
und die Orange gemäß den Anweisungen in der
Anleitung für den Entsafter vor.
2. Entsaften Sie zuerst die Ananas, dann die
Mango.
3. Entsaften Sie den Apfel und die Orange.
4. Vermischen Sie die Säfte.
5. Geben Sie 2 TL Weizenkeimöl hinzu und verrühren Sie alles.
Rote Bete-Drink
2 Personen
Zutaten
1 Rote Bete
3 Orangen
2 EL Johannisbeeren
Zubereitung
1. Bereiten Sie die Rote Bete, die Orangen und die
Johannisbeeren gemäß den Anweisungen in der
Anleitung für den Entsafter vor.
2. Entsaften Sie die Rote Bete, die Orangen und
die Johannisbeeren und vermischen Sie die
Säfte.
- 83 -
Page 87

Früchte-Paprika-Drink
2 Personen
Zutaten
2 gelbe Paprika
3 Orangen
2 Äpfel
2 Birnen
1/2 Grapefruit
Zubereitung
1. Bereiten Sie die Paprika, die Orangen, die Äpfel, die Birnen und die Grapefruit gemäß den
Anweisungen in der Anleitung für den Entsafter
vor.
2. Entsaften Sie alles nacheinander und servieren
Sie den Saft sofort.
Pfirsich-Birnen-Ananas-Drink
2 Personen
Zutaten
2 Pfirsiche
2 kleine Birnen
1/2 Ananas
Zubereitung
1. Bereiten Sie die Pfirsiche, die Birnen und die
Ananas gemäß den Anweisungen in der Anleitung für den Entsafter vor.
2. Entsaften Sie alles nacheinander und servieren
Sie den Saft sofort.
Hinweis:
Rezepte ohne Gewähr. Alle Zutaten- und Zubereitungsangaben sind Anhaltswerte. Ergänzen Sie diese Rezeptvorschläge um Ihre persönlichen Erfahrungswerte.
- 84 -
Page 88

KOMPERNASS HANDELS GMBH
BURGSTRASSE 21
44867 BOCHUM
DEUTSCHLAND / GERMANY
www.kompernass.com
Last Information Update · Stan informacji · Információk állása
Stanje informacij · Stav informací · Stav informácií · Stand der
Informationen: 10 / 2014 · Ident.-No.: SFE450C1102014-1
IAN 104378
4
 Loading...