

Page 1
KITCHEN TOOLS
4
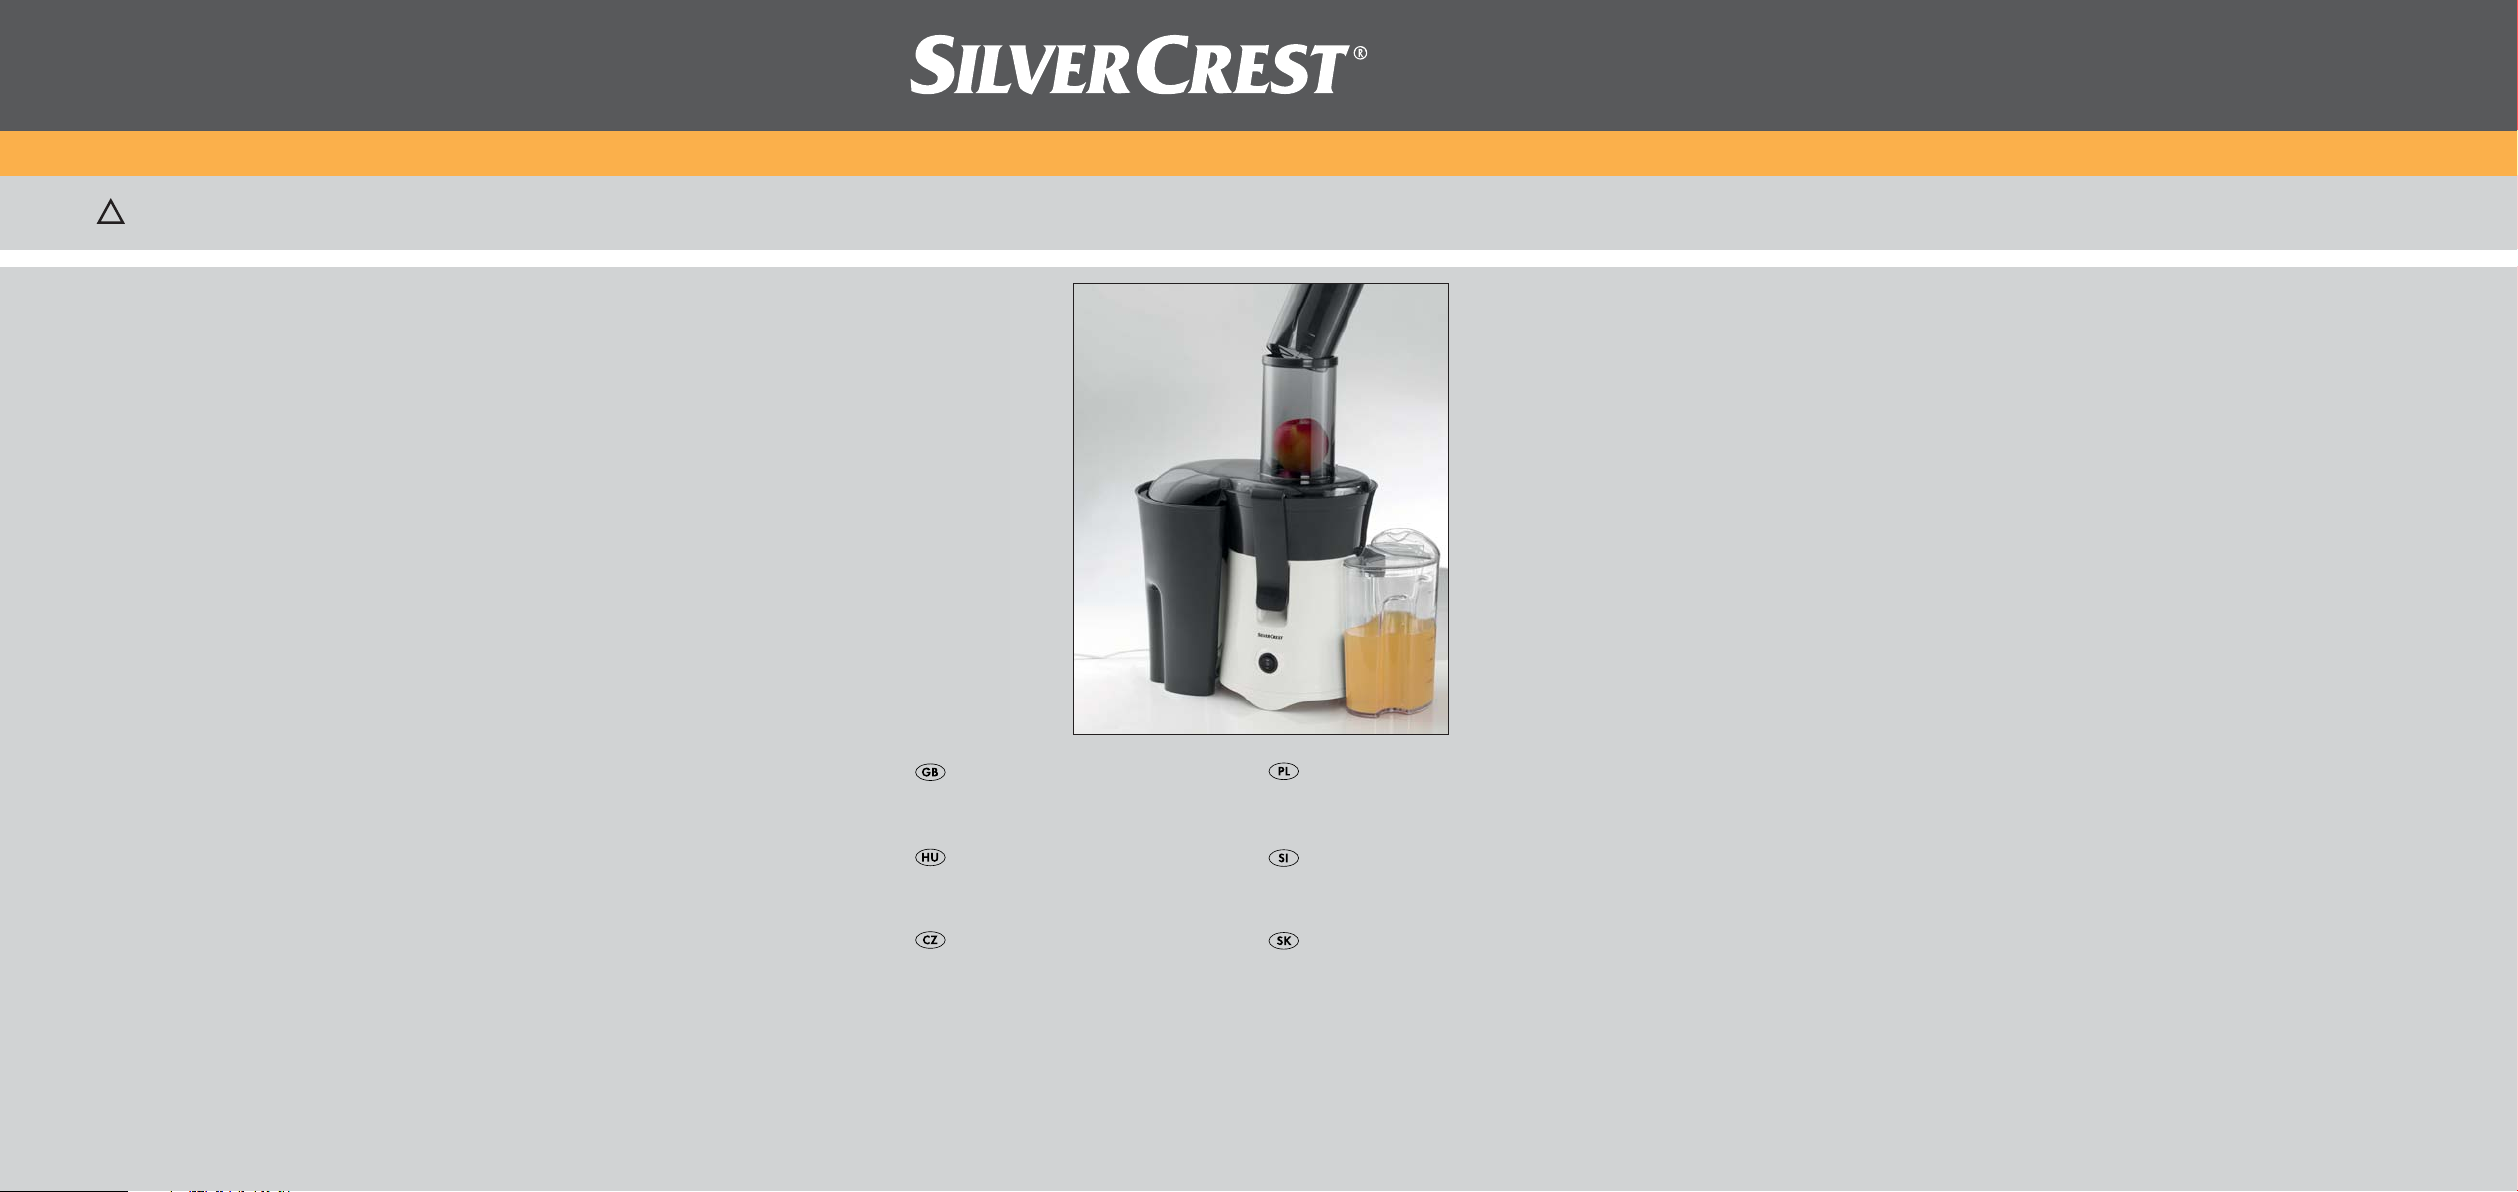
Juicer SFE 450 B1
Juicer
Operating instructions
Sokowirówka
Instrukcja obsługi
KOMPERNASS GMBH
BURGSTRASSE 21 · D-44867 BOCHUM
www.kompernass.com
ID-Nr.: SFE450B1-09/10-V1
IAN: 61778
Gyümölcscentrifuga
Használati utasítás
Odšťavňovač
Návod k obsluze
Sokovnik
Navodila za uporabo
Odšťavovač
Návod na obsluhu
Page 2
SFE 450 B1
q
w
e
r
t
y
s
u
i
o
a
dfg
h
Page 3

CONTENT PAGE
Intended Application 2
Technical data 2
Items supplied 2
Operating Elements 2
Important safety instructions 2
Assembling and operating the appliance 4
Preparing the fruits/vegetables 5
Juicing 5
Emptying the pulp container and the filter 6
Disassembly of the juice extractor 6
Cleaning and Care 6
Storage 7
Disposal 7
Warranty and Service 7
Importer 7
Troubleshooting 8
Read the operating instructions carefully before using the appliance for the first time and preserve this
booklet for later reference. Pass the manual on to whomsoever might acquire the scale at a later date.
- 1 -
Page 4

JUICER
Intended Application
The appliance is both intended and suitable for the
juicing of well ripened and peeled fruits and vegetables. Only foodstuffs may be processed with the
appliance. Only the original attachments and accessories, as described herein, may be used. Any other
use or modification is considered improper use and
brings with it the great risk of serious accidents.
The manufacturer declines to accept responsibility
for damage(s) arising out of usage that is contrary
to the instructions specified below. Not for commercial
use.
Technical data
Mains voltage: 220 - 240 V ~50 Hz
Rated power: 450 W
CO time: 30 Minutes
Protection class: II /
CO Time
The C.O. Time (Continuous Operation) details how
long an appliance may be used without the motor
overheating and being damaged. After the appliance
has run for this period it must be switched off until
the motor has cooled itself down.
Items supplied
Juicer
Nylon brush (in the stodger)
Operating instructions
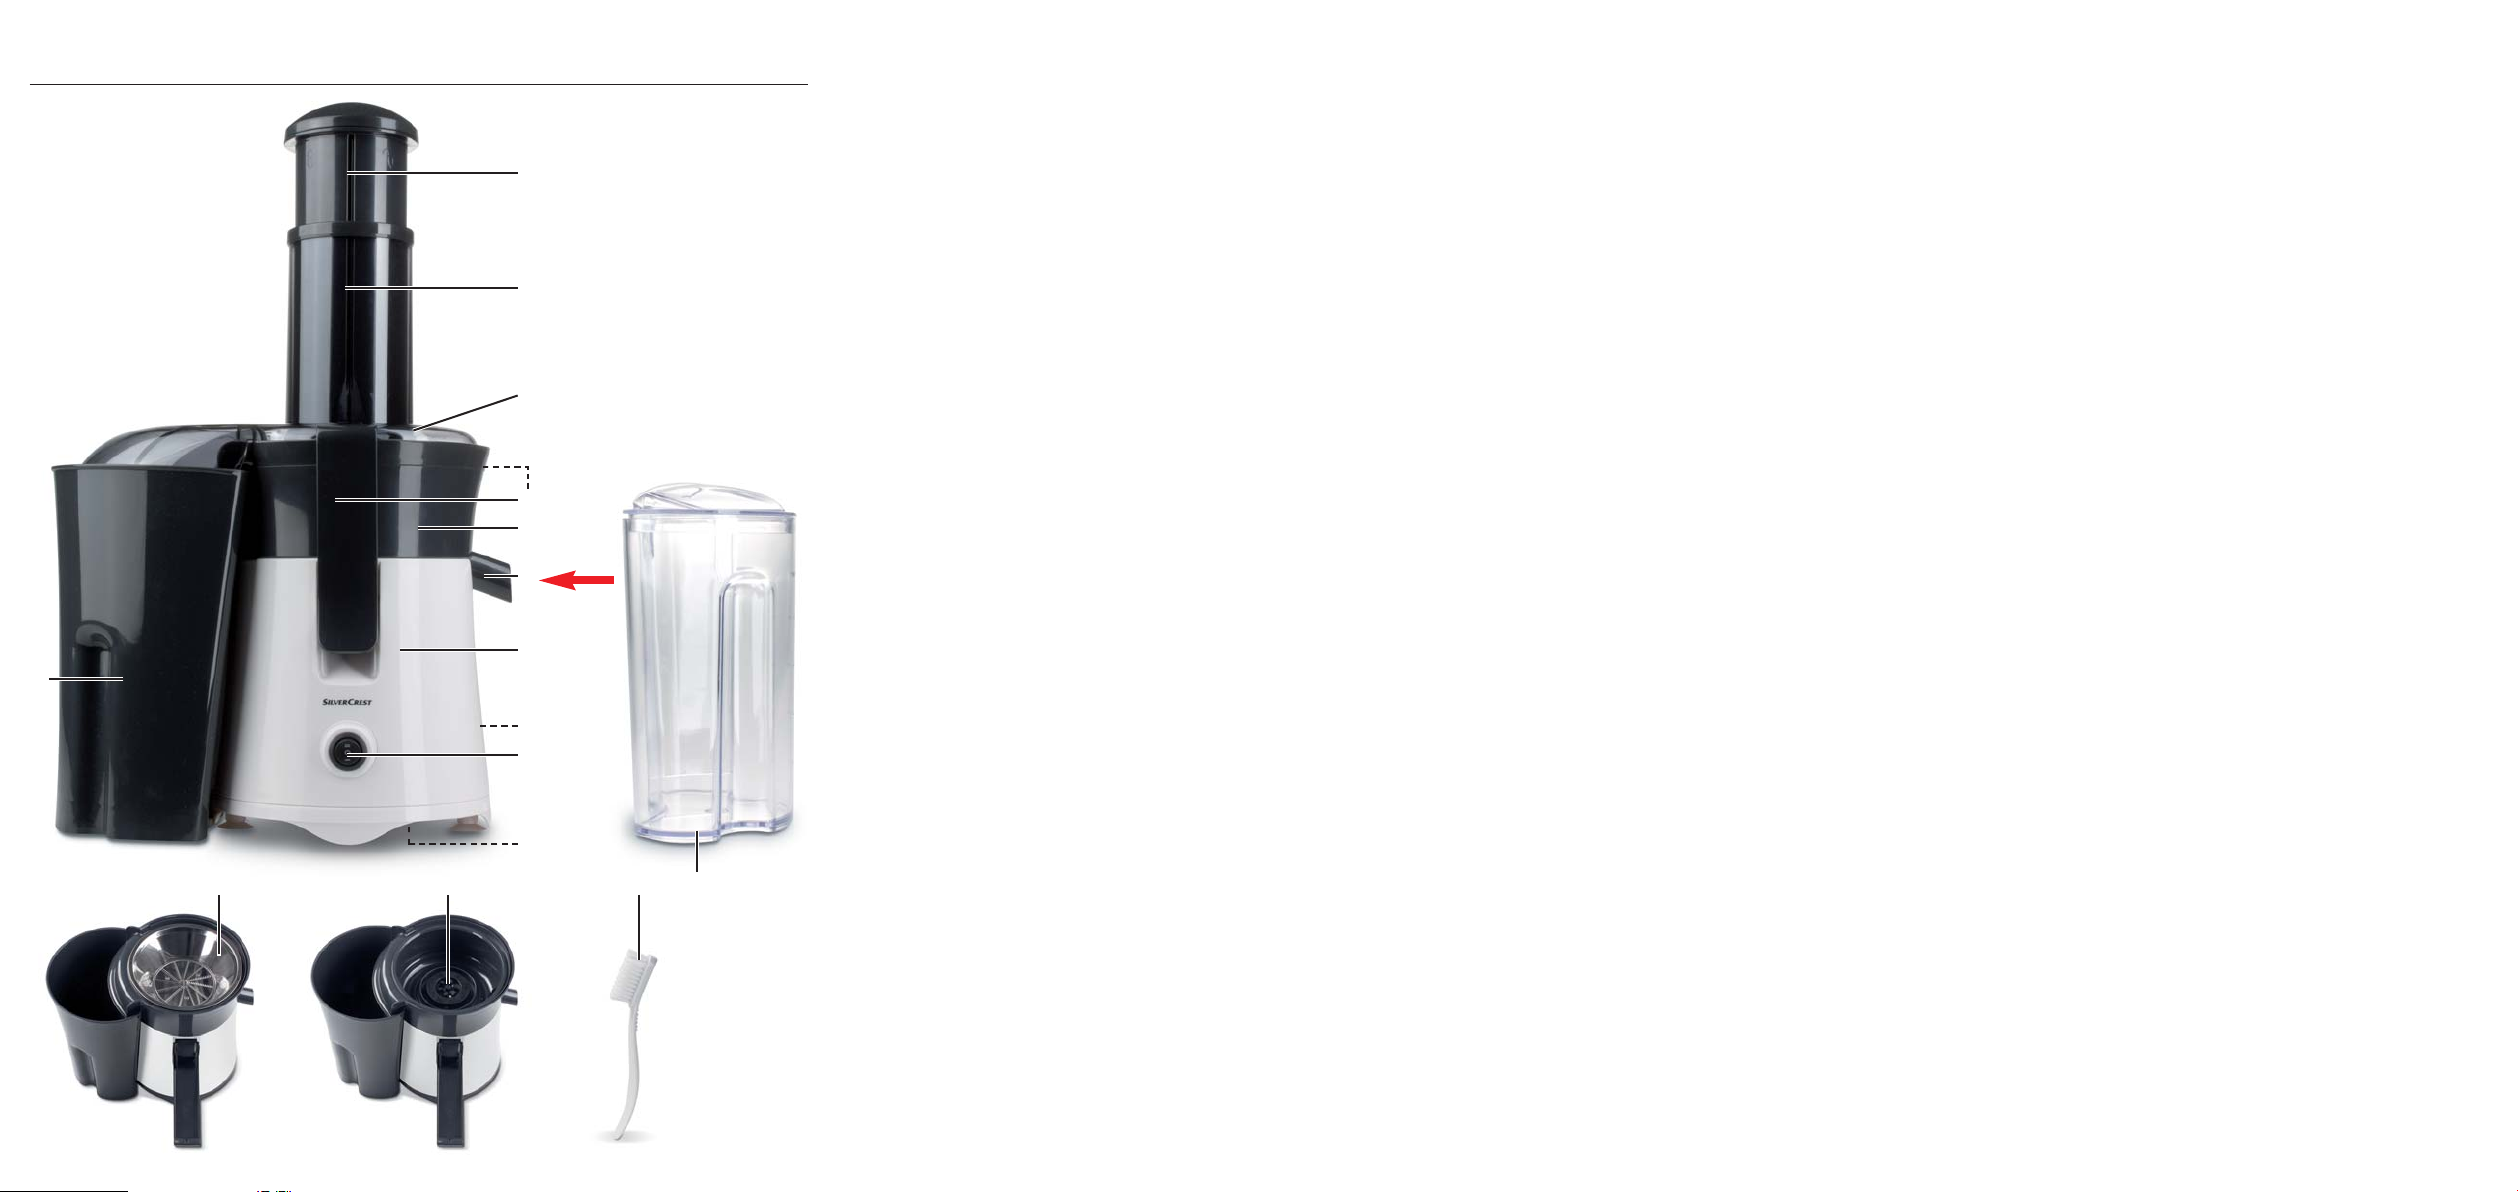
Operating Elements
Stodger
q
Loading shaft
w
Housing lid
e
Clasps
r
Juice container
t
Juice outlet
y
Appliance base
u
Power cable with plug
i
On/Off switch (2 speed levels)
o
Cable rewind
a
Container (for fruit pulp and vegetable mash)
s
Filter
d
Drive shaft
f
Nylon brush (in the stodger on delivery)
g
separate juice collector with foam separator
h
(on delivery, packed in the container for pulp
and mash)
Important safety instructions
The following safety instructions must always be
adhered to when using electrical appliances:
These instructions will help you avoid severe personal
injuries and/or serious damage(s), and enable you
to achieve better working results.
Please read the following information regarding
safety measures and appropriate usage carefully.
Before you begin reading this informaton, please
unfold the page with the illustrations and familiarize
yourself with all functions of the appliance. Carefully
preserve these directions and pass them on, if and
when necessary, to third parties too.
- 2 -
Page 5

• This appliance is not intended for use by individuals
(including children) with restricted physical, physiological or intellectual abilities or deficiences in
experience and/or knowledge unless they are
supervised by a person responsible for their safety
or receive from this person instruction in how the
appliance is to be used. Children should be
supervised to ensure that they do not play with
the appliance.
To avoid potentially fatal electric
shocks
:
• The voltage of the power source must match the
details given on the plate affixed to the appliance.
• Arrange for defective power plugs and/or cables
to be replaced at once by qualified technicians
or our Customer Service Department.
• Should the appliance not operate correctly, or
become damaged, arrange for it to be examined
and repaired by Customer Services as soon as
possible.
• Do not expose the appliance to rain and never
use it in a humid or wet environment. Take steps
to ensure the power cable never becomes wet
or moist during use.
NEVER immerse the appliance base in water
or any other liquid!
To avoid the risks of fire or injuries:
• Never leave the appliance unattended whilst in
use.
• Caution! Keep children away from the power
cable and the appliance. Children frequently
underestimate the danger from electrical appliances.
• Ensure that the appliance stands with a safe and
secure positioning.
• Ensure that the power cable is at all times easily
accessible and that no one can trip over it.
• To avoid injuries, ensure that all the component
parts are correctly connected and installed.
• Before switching the appliance on, ensure that
the lid has been correctly and firmly closed with
the clamps. If not, the appliance will not start.
Should the clamps become loose during operation,
the appliance stops automatically.
When working with the appliance, NEVER insert your hands or other objects into the loading shaft. This could lead to grave personal
injuries or serious damage to the appliance.
If pieces of fruit or vegetable cannot be removed with the stodger, switch the appliance
off, remove the plug from the power socket
and open the appliance.
• Risk of Injury! The cutter is very sharp. Handle
it very carefully.
• DO NOT use the appliance if the rotating sieve
is damaged.
• Do not touch any rotating parts.
• Turn the appliance off after use and remove the
power plug from the wall socket. Only when the
motor has come to a complete stop may the
appliance be disassembled.
NEVER use the appliance:
• if the filter/sieve, power cable or power plug are
damaged,
• in the case of malfunctions, or if it has otherwise
been damaged or dropped. Send the appliance
to Customer Services for checking and/or repair.
• The use of attachments and accessories not recommended or sold by the manufacturer can
cause fire, electric shocks and/or personal injuries.
- 3 -
Page 6

Tips for safety:
• In cases of danger, immediately remove the power
plug from the wall socket.
• Use the appliance exclusively for the purposes
described in these operating instructions.
• Always be alert! Always pay attention to what
you are doing and act with common sense. Never use the appliance when you are distracted
or don’t feel well.
• Ensure that the appliance is correctly and completely assembled before taking it into use. The
appliance can first be taken into use when the
clamps have been closed.
• After every use of the juice extractor ensure that
the On/Off switch is moved to the position "Off"
("0"). . The motor must come to a complete stop
before you begin to disassemble the appliance.
• Remove the power plug from the wall socket
when the appliance is taken out of use, when
removing components and before cleaning it.
• Do not use the appliance outdoors.
Assembling and operating the
appliance
• Select a safe and secure positioning for the
juice extractor. For optimal handling we recommend that the appliance is positioned with the
power cable running from the rear of the appliance to the wall socket. All operating elements
can now be directly and easily handled:
- at the front, the On/Off switch
- to the left, the container for fruit pulp and
vegetable mash
- to the right, the outlet pipe for the juice y.
s
o
,
Warning:
Ensure that the appliance is switched off and the plug
removed from the wall socket before assembling the
appliance. If you do not, there is a great risk that
you could injure yourself.
1. Place the juice catchment bowl
liance base
juice outlet
2. Place the filter
it down so that it perceptibly engages. Ensure
that it is firmly seated before continuing with the
assembly.
3. Place the housing lid
bowl
t
ove the cutters of the filter
4. Ensure that the housing lid
the recesses of the juice catchment bowl
the clasps
the housing lid
5. Press the lower part of the claps
appliance until they engage.
6. Slide the container for fruit pulp and vegetable
mash
s
7. Push the foam separator plate in the separate
juice collector
the separate juice collector
ance so that the juice outlet
juice collector
8. Insert the power plug
, so that the three tenons and the
u
are securely caught in the recesses.
y
on the drive shaft fand press
d
on the juice catchment
e
, so that the loading shaft wis sitting ab-
and hook them into the notches on
r
.
e
from below under the ejection shaft.
and then put the lid on. Place
h
.
h
into the wall socket.
i
on the app-
t
.
d
is sitting firmly in
e
against the
r
next to the appli-
h
projects into the
y
t
. Lift
- 4 -
Page 7
Preparing the fruits/vegetables
• Important: Use only well ripened fruit, as otherwise the filter
This would require repeated cleaning of the filter
.
d
• Wash or peel the fruits/vegetables that you wish
to process.
• Large seeds or stones should always be removed
before filling the appliance.
• Stone fruit (such as apples, pears) can be processed with the skin and seed centres. Remove
all other stones (peaches, plums etc.), all large
seeds (melons etc.) and stalks to avoid possible
damage to the appliance.
• Fruits and vegetables with thick peels (e.g. citrus
fruits, melons, kiwis, beets) must always be peeled
first.
• The main stalk is to be removed from grapes.
• Cut the fruit or vegetables into pieces that are
sized to fit into the loading shaft
Note:
Raisins are not suitable for juicing as they contain
too little juice. Rhubarb or other fibrous vegetables/
fruits are not suitable for juicing as the fibres block
the juice extractor.
could become quickly blocked.
d
.
w
Warning:
NEVER insert your hands or other objects into the
loading shaft
This could lead to grave personal injuries and/or
serious damage to the appliance.
1. Switch the appliance on at the On/Off
switch
For fruit varieties that contain a lot of juice use
speed setting I.
For drier fruits select speed level II.
2. Hold the stodger
fruit and vegetable pieces with the other hand
into the loading shaft
to carefully press the fruit/vegetable pieces
q
into the loading shaft
vegetables are being processed, insert further
pieces into the loading shaft. Do not switch the
appliance off.
when working with the appliance.
w
.
o
in one hand and feed the
q
. ALWAYS use the stodger
w
. Whilst the loaded fruit/
w
Note:
To avoid fruit or vegetables becoming blocked in
the loading shaft
is switched on. Should fruit or vegetable pieces become stuck in the loading shaft
be promptly freed with the stodger
follows to avoid damage to the appliance:
, only fill it when the appliance
w
and they cannot
w
, proceed as
q
Juicing
Warning:
DO NOT operate the juice extractor for longer than
30 minutes (CO-Time) without a break. After 30 minutes of continuous use allow the juice extractor to
cool down. Otherwise the appliance could be
damaged.
• Immediately switch the appliance off and remove
the power plug
• Loosen the clasps
lid
.
e
• Remove the fruit or vegetable pieces causing the
blockage.
• Reassemble the appliance and continue with
juice extraction.
3. Always switch the appliance off immediately
after all of the fruit/vegetables have been
processed.
- 5 -
from the wall socket.
i
and remove the housing
r
Page 8
Warning:
To avoid blockage of the juice outlet yand/or damage to the appliance, regularly clean the juice outlet
and juice container t, and always after every
y
usage.
Emptying the pulp container
and the filter
You can extract juices continuously until the container
for fruit pulp and vegetable mash
full.
is completely
s
Warning:
Remove the plug from the power source when
emptying the filter
starting of the motor.
When the extracted juices suddenly become thicker,
or when you hear that the motor is running slower,
the filter
the fruit pulp/vegetable mash, reassemble the
appliance.
must be emptied. When you have removed
d
. This prevents an unintended
d
Disassembly of the juice extractor
If you wish to disassemble the juice extractor, e.g.
to clean it, proceed as follows:
1. Remove the power plug from the wall socket
2. Open the clasps
3. Remove the housing lid
4. Carefully lift up the juice container
the filter
d
You can now take the filter
container
t
.
.
r
with the stodger q.
e
t
releases itself from the drive shaft f.
out of the juice
d
i
. With this,
Cleaning and Care
Warning:
ALWAYS remove the power plug from the wall socket
before removing or installing accessories and before
cleaning the appliance. To avoid blockage of the
juice outlet and/or damage to the appliance, all
appliance and ancillary parts must be regularly,
and after every use, cleaned free of fruit pulp and
vegetable mash.
Note:
DO NOT use any aggressive cleaning agents to clean
the juice extractor. The appliance and its ancillaries
may not be cleaned in boiling water.
Warning:
To avoid receiving an electrical shock, NEVER
submerse the motor/appliance base
or other fluids.
• Switch the appliance off at the On/Off switch
.
o
• Soiling or overflowing fruit juices should be cleared
away immediately, as fruit stains are difficult to
remove later.
• For cleaning the appliance housing and the power
cable, use a cloth that is only lightly moistened.
• Clean the stodger
.
separate juice catchment container
sing cover
mace
off carefully.
The stodger q, the juice container t, the housing
lid
e
tainer for fruit pulp and vegetable mash
table for cleaning in a dishwasher and can be cleaned there. To clean the filter
nylon brush
e
in warm soapy water then rinse them
s
, the separate juice collector hand the con-
:
g
, the juice container t, the
q
and the container for pulp and po-
, use the supplied
d
u
, the hou-
h
s
in water
are sui-
- 6 -
Page 9
• Turn the lid of the stodger quntil the arrow points
to the opened lock on the stodger shaft. You
can now remove it. The nylon brush
the stodger
stodger so that the arrow points to the opened
lock .
Then turn it until the arrow points at the closed
lock . The lid now sits firmly.
• Hold the filter
under running water and clean it with the nylon
brush
. To re-close the lid, place it on the
q
(with the underside upwards)
d
.
g
g
is inside
Colouring:
• Some fruits or vegetables could permanently discolour parts of the juice extractor. This is not damaging and does not impair the appliance in its
functions.
Storage
If you do not intend to use the juice extractor for an
extended period, wrap the cable around the cable
rewind
on the underside of the appliance.
a
Disposal
Do not dispose of the appliance in your
normal domestic waste. This appliance
is subject to the European Guidelines
2002/96/EC.
Dispose of the appliance through an approved disposal centre or at your community waste facility.
Observe the currently applicable regulations. In
case of doubt, please contact your local waste
disposal centre.
Warranty and Service
The warranty for this appliance is for 3 years from
the date of purchase. The appliance has been manufactured with care and meticulously examined before delivery. Please retain your receipt as proof of
purchase. In the event of a warranty claim, please
make contact by telephone with our Service Department. Only in this way can a post-free despatch for
your goods be assured.
The warranty covers only claims for material and
maufacturing defects, but not for transport damage,
for wearing parts or for damage to fragile components, e.g. buttons or batteries. This product is for
private use only and is not intended for commercial
use. The warranty is void in the case of abusive and
improper handling, use of force and internal tampering not carried out by our authorized service
branch. Your statutory rights are not restricted in
any way by this warranty.
The warranty period will not be extended by repairs
made under warranty. This applies also to replaced
and repaired parts. Any damage and defects extant
on purchase must be reported immediately after unpacking the appliance, at the latest, two days after
the purchase date. Repairs made after the expiration of the warranty period are subject to payment.
DES UK LTD
Tel.: 0871 5000 700
e-mail: support.uk@kompernass.com
Kompernass Service Ireland
Tel: 1850 930 412 (0,082 EUR/Min.)
Standard call rates apply. Mobile operators may vary.
e-mail: support.ie@kompernass.com
(£ 0.10 / minute)
Importer
Dispose of all packaging materials in an
environmentally friendly manner.
KOMPERNASS GMBH
BURGSTRASSE 21
44867 BOCHUM, GERMANY
www.kompernass.com
- 7 -
Page 10

Troubleshooting
Problem Possible Causes Possible solutions
The appliance does not function.
The motor stays still while juicing
or it turns noticeably slow or unregularly.
The vegetable mash is moist and
you obtain too little juice.
The juice wells out between the
edge of the housing lid
the juice container
e and
t.
• The power plug i is not
connected.
• The appliance is not switched
on.
• The clasps r are not secured. • Secure the clasps r.
• The filter d is blocked.
• You are working too fast. • Work a little slower.
• The filter d is blocked.
• You are working too fast. • Work a little slower.
• The filter d or the juice outlet
t is blocked.
• The wrong speed setting has
been selected.
• Connect the appliance to
a power socket.
• Switch the appliance on with
the On/Off switch
• Immediately switch the appliance
off and disconnect the power
plug
i. Eliminate the blockage
(see chapter "Juicing").
• Clean the filter d (see chapter
"Cleaning and Care").
• Clean the filter
container
"Cleaning and Care").
• Select speed setting I at the
On/Off switch
d and the juice
t (see chapter
.
o
o.
The juice sprays from the juice
outlet
y.
During the processing juice runs
down from the appliance base
• You are working too fast.
• The wrong speed setting has
been selected.
• The filter
d or the juice outlet
y is blocked.
u.
• The wrong speed setting has
been selected.
- 8 -
• Work a little slower.
• Do not press so hard with the
• Select speed setting I at the
• Clean the filter
• Select speed setting I at the
q when inserting more
stodger
product.
On/Off switch
o
d and the juice
outlet
y (see chapter "Cleaning
and Care").
On/Off switch
o
.
.
Page 11

SPIS TREŚCI STRONA
Zastosowanie zgodnie z przeznaczeniem 10
Dane techniczne 10
Zakres dostawy 10
Elementy obsługowe 10
Ważne wskazówki bezpieczeństwa 10
Złożenie i obsługa urządzenia 12
Przygotowanie owoców / warzyw 13
Wyciskanie soku 13
Opróżnienie pojemnika na miąższ i filtra 14
Demontaż sokownika 14
Czyszczenie i pielęgnacja 14
Przechowywanie 15
Usuwanie/wyrzucanie 15
Gwarancja i serwis 15
Importer 15
Usuwanie usterek 16
Niniejszą instrukcję należy zachować, aby móc także później z niej skorzystać, w przypadku
przekazywania urządzenia osobom trzecim należy przekazać także instrukcję!
- 9 -
Page 12
SOKOWIRÓWKA
Zastosowanie zgodnie
z przeznaczeniem
Urządzenie jest przeznaczone do odciągania soku
z dojrzałych i obranych owoców i warzyw. Urządzenie nadaje się wyłącznie do przetwarzania
produktów spożywczych. Należy używać wyłącznie
oryginalnych przystawek, takich jak opisane
w instrukcji. Jakiekolwiek inne użycie lub zmiany
urządzenia uważane będą za niezgodne z przeznaczeniem i kryją w sobie poważne niebezpieczeństwo
wypadku.
Producent nie bierze na siebie żadnej odpowiedzialności w przypadku powstania szkody, wynikającej
z użytkowania urządzenia w sposób całkowicie
niezgodny z przeznaczeniem. Nie nadaje się do
użytku w przemyśle.
Dane techniczne
Elementy obsługowe
zatyczka
q
lejek do napełniania
w
pokrywa obudowy
e
klamry
r
pojemnik na sok
t
wylot soku
y
podstawa urządzenia
u
kabel sieciowy z wtyczką
i
włącznik/wyłącznik (2 stopnie prędkości)
o
schowek na kabel zasilający
a
pojemnik (na miąższ i odpadki)
s
filtr
d
wał napędowy
f
szczotka nylonowa (dołączona do zatyczki)
g
oddzielne naczynie na sok z oddzielaczem
h
piany (w chwili dostawy znajduje się w naczyniu na miąższ i wytłoki)
Ważne wskazówki
bezpieczeństwa
Napięcie sieciowe: 220 - 240 V ~50 Hz
Moc znamionowa: 450 W
Czas pracy: 30 minut
Klasa ochrony: II /
Czas pracy
Czas pracy określa, jak długo można używać
urządzenie bez zagrożenia przegrzaniem silnika
i tym samym jego uszkodzenia. Po upływie określonego czasu pracy urządzenie należy wyłączyć
i poczekać, aż silnik się ostudzi.
Zakres dostawy
Sokowirówka
Szczotka nylonowa (w zatyczce)
Instrukcja obsługi
Podczas każdego użytkowania urządzeń elektrycznych należy przestrzegać następujących wskazówek
dotyczących bezpieczeństwa:
Wskazówki te pomogą Państwu uniknąć poważnych
obrażeń i szkód, jak również uzyskać lepsze wyniki
pracy.
Prosimy o uważne zapoznanie się z poniższymi
informacjami dotyczącymi bezpieczeństwa i odpowiedniego użytkowania urządzenia. Przed przeczytaniem instrukcji obsługi przejdź na stronę z ilustracjami
i zapoznaj się ze wszystkimi funkcjami urządzenia.
Należy starannie przestrzegać tych wskazówek
i dać sobie czas na dalsze dokształcanie się.
- 10 -
Page 13
• To urządzenie nie jest przystosowane do użytkowania go przez osoby (w tym dzieci) o ograniczonej sprawności umysłowej, czuciowej lub
umysłowej, bądź w przypadku niedostatecznego
doświadczenia i / lub wiedzy, chyba że będą one
znajdowały się pod opieką odpowiedzialnej
osoby lub też uzyskają od opiekuna instrukcje,
jak należy użytkować urządzenie. Nie można
pozwolić dzieciom na zabawę urządzeniem.
• Aby uniknąć obrażeń ciała, należy zadbać
o prawidłowe zamontowanie wszystkich podzespołów urządzenia.
• Przed włączeniem urządzenia należy upewnić
się, czy pokrywa zamknięta jest klamrami zgodnie
z instrukcją. Nieprawidłowo zamknięte urządzenie
nie włączy się. Zwolnienie klamer mocujących
podczas pracy spowoduje automatyczne zatrzymanie urządzenia.
Aby uniknąć zagrożenia życia przez
porażenie prądem elektrycznym:
• Napięcie źródła zasilania musi być zgodne
z danymi podanymi na tabliczce znamionowej
urządzenia.
• Naprawę uszkodzonej wtyczki lub kabla sieciowego zleć niezwłocznie wykwalifikowanemu
personelowi lub serwisowi klienta.
• Urządzenia nie w pełni sprawne lub uszkodzone
należy niezwłocznie oddawać do serwisu
w celu dokonania przeglądu i naprawy.
• Nie wystawiać urządzenia na działanie deszczu
oraz nie używać go w wilgotnym lub mokrym
otoczeniu. Należy uważać, aby podczas używania urządzenia kabel sieciowy był zawsze suchy.
Podstawy urządzenia nie wolno zanurzać
w wodzie ani innych płynach!
W celu uniknięcia pożaru lub
obrażeń:
• Pracującego urządzenia nigdy nie należy pozostawiać bez nadzoru.
• Ostrzeżenie! Trzymaj dzieci z dala od kabla
zasilającego i urządzenia. Dzieci potrafią lekceważyć niebezpieczeństwo, jakie niesie z sobą kontakt z urządzeniami elektrycznymi.
• Należy dbać o prawidłowy stan techniczny
urządzenia.
• Należy zadbać o to, aby w razie niebezpieczeństwa można było szybko odłączyć wtyczkę
z gniazda sieciowego i aby nie było możliwości
potknięcia się o kabel sieciowy.
Podczas pracy nigdy wkładaj rąk ani żadnych przedmiotów w otwór wlotowy. Mogłoby to doprowadzić do poważnych obrażeń
ciała lub uszkodzenia urządzenia. Gdy nie
będzie możliwe usunięcie fragmentów owoców za pomocą zatyczki, wyłącz urządzenie, wyciągnij wtyczkę z gniazdka i otwórz
pokrywę.
• Zagrożenie odniesienia obrażeń! Nóż tnący
jest bardzo ostry. Przy używaniu ich należy zachować ostrożność.
• Nigdy nie używaj urządzenia gdy uszkodzone
zostało sitko obrotowe.
• Nie należy dotykać żadnych części będących
w ruchu.
• Po użyciu urządzenia wyciągnąć wtyczkę
z gniazda sieciowego i schować go. Przed
przystąpieniem do demontażu należy odczekać
do momentu, gdy silnik całkowicie się zatrzyma.
Nie należy nigdy używać urządzenia
w następujących przypadkach:
• gdy doszło do uszkodzenia filtra, kabla sieciowego
lub wtyczki,
• w razie nieprawidłowego działania, lub w razie
uszkodzeń innego rodzaju lub upadku. Urządzenie należy oddać do przeglądu względnie
naprawy w punkcie serwisowym.
• Nie należy korzystać z akcesoriów niezakupionych
u producenta urządzenia lub niezalecanych
przez niego, gdyż może to doprowadzić do
porażenie prądem, powstania pożaru lub obrażeń ciała.
- 11 -
Page 14

Bezpieczeństwo zapewnią Państwo
sobie w następujący sposób:
• W wypadku zagrożenia natychmiast wyciągać
wtyczkę z gniazdka sieciowego.
• Urządzenie może być używane wyłącznie do
celu, podanego w niniejszej instrukcji.
• Zachowując zawsze ostrożność! Zawsze koncentruj
się na tym, co robisz i postępuj rozsądnie.
W żadnym razie nie używaj urządzenia, gdy nie
możesz się skoncentrować lub źle się czujesz.
• Upewniając się czy urządzenie jest prawidłowo
i całkowicie jest zmontowane, zanim zaczną go
Państwo używać. Urządzenie można uruchomić
dopiero po zamknięciu klamer.
• Po zakończeniu korzystania z sokownika upewnij
się zawsze, że włącznik/wyłącznik znajduje się
w położeniu „Wył.” („0”). Do rozłożenia urządzenia można przystąpić dopiero wtedy gdy
silnika całkowicie się zatrzyma.
• Gdy urządzenie nie jest używane, podczas
demontażu części i przed czyszczeniem należy
wyciągnąć wtyczkę sieciową.
• Urządzenia nie należy używać na wolnym
powietrzu.
Złożenie i obsługa urządzenia
• Wybierz odpowiednie miejsce na postawienie
sokownika. Urządzenie obsługuje się z optymalną
wygodą wtedy gdy kabel sieciowy jest podłączony
do gniazdka z tyłu. Wszystkie elementy można
wtedy łatwo obsługiwać:
- z przodu włącznik/wyłącznik
- z lewej strony pojemnik na miąższ i odpadki
s
- oraz z prawej strony otwór wylotowy soku y.
o
,
Uwaga:
Przed przystąpieniem do złożenia upewnij się, czy
urządzenie jest wyłączone a wtyczka wyciągnięta
z gniazdka. W przeciwnym razie należy liczyć się
z niebezpieczeństwem odniesienia obrażeń.
1. Pojemnik na sok
dzenia
soku
2. Załóż filtr
go aż do usłyszenia wyraźnego zatrzaśnięcia.
Przed dokończeniem składania urządzenia
upewnij się, czy poszczególne elementy są
dobrze założone.
3. Załóż pokrywę urządzenia
sok
się nad nożami filtra
4. Sprawdź, czy pokrywa urządzenia
dzona prawidłowo w wycięciu pojemnika na
sok
pokrywy
5. Dolną część klamer
aż do zatrzaśnięcia.
6. Pojemnik na miąższ owocowy i odpadki
wsuń od dołu pod wyrzut.
7. Wsuń płytkę oddzielacza piany do oddzielnego
naczynia na sok
oddzielne naczynie na sok
w taki sposób, by ujście soku
oddzielnego naczynia na sok
8. Podłącz wtyczkę
tak, by trzy trzpienie i otwór wylotowy
u
wchodziły w otwory.
y
d
tak, by lejek do napełnianiawznalazł
t
. Podnieś klamry ri zaczep je o nacięcia
t
e
postaw na podstawę urzą-
t
na wał napędowy fi dociśnij
na pojemnik na
e
.
d
jest osa-
e
.
dociśnij do urządzenia,
r
i załóż pokrywę. Postaw
h
obok urządzenia
h
wchodziło do
y
.
h
do gniazdka zasilania.
i
s
- 12 -
Page 15

Przygotowanie owoców / warzyw
• Uwaga: Używaj wyłącznie dobrze dojrzałych
owoców, ponieważ w przeciwnym razie może
dojść do zatkania filtra
ponownego czyszczenia.
d
• Wyciskane owoce lub warzywa najpierw umyj
lub obierz.
• Pamiętaj o wyjęciu większych nasion lub pestek
przed umieszczeniem owoców w urządzeniu.
• Owoce pestkowe (jabłka, gruszki) można wyciskać
ze skórką i gniazdem nasiennym. Pestki innych
owoców (brzoskwinie, śliwki itp.), wszystkie
większe nasiona (arbuzy itp.) oraz łodygi usuń,
by nie doprowadzić do uszkodzenia urządzenia.
• Owoce o grubych skórkach (np. owoce cytrusowe,
arbuzy, kiwi, buraki) zawsze najpierw obierz.
• Od winogron odetnij główną łodygę.
• Owoce lub warzywa potnij na takie kawałki, by
zmieściły się w lejku do napełniania
, co wymagałoby jego
d
.
w
Uwaga:
Nigdy nie wkładaj rąk ani żadnych przedmiotów
do lejka do napełniania
działa. Mogłoby to doprowadzić do odniesienia
poważnych obrażeń ciała i/lub uszkodzenia sokownika.
1. Włącznikiem/wyłącznikiem
dzenie.
Do wyciskania owoców zawierających dużą ilość soku używaj stopnia prędkości I.
Do owoców suchych używaj stopnia
prędkości II.
2. Przytrzymaj zatyczkę
wkładaj kawałki owoców lub warzyw do lejka
do napełniania
, by ostrożnie wcisnąć owoce/warzywa w lejek
q
do napełniania
wałki owoców lub warzyw. Nie wyłączaj
przy tym urządzenia.
, podczas gdy urządzenie
w
włącz urzą-
o
jedną ręką, a drugą
q
. Korzystaj zawsze z zatyczki
w
. Dokładaj stale kolejne ka-
w
UWAGA:
Rodzynki nie nadają się do wyciskania, ponieważ
zawierają zbyt mało soku. Rabarbar lub inne warzywa/owoce włókniste nie nadają się do wyciskania,
ponieważ włókna będą powodowały zatkanie sokownika.
Wyciskanie soku
Uwaga:
Nigdy nie używaj sokownika jednorazowo dłużej
niż 30 minut (czas pracy). Urządzenie po upływie
30 minut pracy wyłącz i pozostaw do ostygnięcia.
W przeciwnym razie można doprowadzić do nieodwracalnego uszkodzenia urządzenia.
Wskazówka:
W celu uniknięcia utkwienia owocu w lejku o napełniania
dokładaj owoc zawsze przy włączonym urzą-
w
dzeniu. W przypadku utkwienia kawałków owocu
w lejku do napełniania
próbie przepchania zatyczką
czynności, by uniknąć uszkodzenia urządzenia:
• Wyłącz natychmiast urządzenie i wyciągnij
wtyczkę sieciową
• Zwolnij klamry
.
e
• Wyciągnij kawałki owoców, które utkwiły
w urządzeniu.
• Złóż ponownie urządzenie i przystąp ponownie
do wyciskania soku.
3. Po wyciśnięciu soku z wszystkich owoców
natychmiast wyłącz urządzenie.
- 13 -
r
i niepowodzeniu przy
w
wykonaj następujące
q
.
i
i zdejmij pokrywę obudowy
Page 16

Uwaga:
Otwór wylotowy sokuyi pojemniktczyść regularnie i po każdym użyciu. Pozwoli to na uniknięcie zatkania otworu wylotowego
ządzenia.
i/lub uszkodzenia ur-
y
Opróżnienie pojemnika na
miąższ i filtra
Możesz wyciskać owoce lub warzywa nieprzerwanie
aż do momentu zapełnienia pojemnika na miąższ
i odpadki
s
.
Uwaga:
Przy opróżnianiu filtra dnajpierw wyjmij wtyczkę
z gniazdka. Zapobiega to przypadkowemu
uruchomieniu silnika.
Filtr
trzeba wymienić, gdy sok nagle zgęstnieje
d
lub w razie usłyszenia, że zmniejsza się prędkość
obrotowa silnika. Po wyjęciu całego miąższu
ponownie złóż urządzenie.
Demontaż sokownika
By zdemontować sokownik, np. w celu wymycia,
wykonaj następujące działania:
1. Wyciągnij wtyczkę sieciową
2. Otwórz klamry
3. Zdejmij pokrywę obudowy
4. Ostrożnie zdejmij pojemnik na sok
to odłączenie filtra
Teraz możesz wyjąć filtr
.
r
od wału napędowego f.
d
.
i
z zatyczką q.
e
t
z pojemnika t.
d
. Powoduje
Czyszczenie i pielęgnacja
Uwaga:
Przed przystąpieniem do założenia/zdjęcia akcesoriów, a także przed czyszczeniem najpierw
wyciągnij wtyczkę z gniazdka. Wszystkie elementy
urządzenia i akcesoria należy regularnie i po
każdym użyciu wyczyścić, by nie dopuścić do zatkania otworu wylotowego soku i/lub uszkodzenia
urządzenia.
UWAGA:
Do czyszczenia sokownika nigdy nie używaj żrących
środków czyszczących. Urządzenia ani jego
elementów nie wolno czyścić we wrzącej wodzie.
Uwaga:
By uniknąć porażenia prądem elektrycznym,
silnika/podstawy urządzenia
adaj pod wodę ani żadną inną ciecz.
• Włącznikiem/wyłącznikiem owyłącz urządzenie.
• Natychmiast usuń zanieczyszczenia i przelaną
ilość soku, ponieważ zaschnięte plamy od soku
owocowego trudno się usuwa.
• Oczyścić obudowę urządzenia i kabel sieciowy
lekko wilgotną ściereczką do mycia.
• Popychacz
pojemnik zlewowy
pojemnik na miąższ i wytłoki
wodzie z dodatkiem płynu do mycia naczyń, a
następnie starannie wypłucz.
Zatyczka
wy
, oddzielne naczynie na sok hi naczynie na
e
miąższ i wytłoki
warce. Do umycia filtra
szczoteczki nylonowej
, pojemnik na sok t, oddzielny
q
, pokrywę obudowy ei
h
, naczynie na sok t, pokrywa obudo-
q
nadają się do mycia w zmy-
s
używaj dołączonej
d
:
g
nigdy nie wkł-
u
umyj w ciepłej
s
• Pokrywkę zatyczki
strzałka będzie pokazywała kierunek w stronę
otwartej kłódki w komorze. Teraz możesz
zdjąć pokrywę. We wnętrzu zatyczki
się szczotka nylonowa
- 14 -
obrócić do momentu, aż
q
.
g
q
znajduje
Page 17

By ponownie zamknąć pokrywę, załóż ją ponownie w ten sposób, by strzałka była skierowana w stronę otwartej kłódki .
Następnie obróć ją tak, by strzałka pokazywała
zamkniętą kłódkę .Pokrywa jest teraz mocno
osadzona.
• Przytrzymaj filtr
wodą i wyczyść go szczotką nylonową
(dnem do góry) pod bieżącą
d
g
.
Odbarwienia:
• Niektóre owoce i warzywa mogą trwałe przebarwienie niektórych elementów. Nie jest to
szkodliwe i w niczym nie zakłóca normalnego
działania.
Przechowywanie
W razie zaplanowania dłuższej przerwy w użytkowani,
zawiń kabel o schowek na kabel zasilający
o dolną część sokownika.
a
oraz
Usuwanie/wyrzucanie
W żadnym przypadku nie należy wyrzucać urządzenia do normalnych śmieci
domowych. W odniesieniu do produktu
ma zastosowanie dyrektywa europejska
2002/96/EC.
Urządzenie należy poddać utylizacij w akredytowanym zakładzie utylizacji lub komunalnym zakładzie
utylizacji odpadów.
Przestrzegaj aktualnie obowiązujących przepisów.
W razie pytań należy skontaktować się z komunalnym
zakładem utylizacji odpadów.
Wszystkie materiały wchodzące w skład
opakowania należy przekazać do odpowiednich punktów zbiórki odpadów.
Gwarancja i serwis
Urządzenie objęte jest dwuletnią gwarancją, licząc
od daty zakupu. Urządzenie zostało starannie wyprodukowane i poddane skrupulatnej kontroli przed
wysyłką. Paragon należy zachować jako dowód
dokonania zakupu. W przypadku roszczeń gwarancyjnych należy skontaktować się telefonicznie z
serwisem. Tylko w ten sposób można zagwarantować bezpłatną wysyłkę zakupionego produktu.
Gwarancja obejmuje wyłącznie wady materiałowe
i fabryczne, natomiast nie obejmuje szkód powstałych podczas transportu, części ulegających zużyciu ani uszkodzeń części łatwo łamliwych, np. wyłączników, akumulatorów. Produkt przeznaczony
jest wyłącznie do użytku domowego, a nie do zastosowań profesjonalnych.
Gwarancja traci ważność w przypadku niewłaściwego używania urządzenia, używania niezgodnego z przeznaczeniem, użycia siły lub ingerencji w
urządzenie dokonywanej poza naszymi autoryzowanymi punktami serwisowymi. Niniejsza gwarancja nie ogranicza ustawowych praw nabywcy urządzenia.
Okres gwarancji nie ulega wydłużeniu o czas trwania usługi gwarancyjnej. Dotyczy to również wymienionych i naprawionych części. Szkody i wady zauważone już w chwili zakupu należy zgłosić od razu
po rozpakowaniu, nie później niż po upływie
dwóch dni od daty zakupu. Po upływie okresu
gwarancyjnego wszystkie naprawy będą wykonywane płatnie.
Kompernass Service Polska
Tel.: 022 / 3972212
e-mail: support.pl@kompernass.com
Importer
KOMPERNASS GMBH
BURGSTRASSE 21
44867 BOCHUM, GERMANY
www.kompernass.com
- 15 -
Page 18

Usuwanie usterek
Problem Możliwe przyczyny Możliwe rozwiązania
Urządzenie nie działa.
Silnik przy wyciskaniu soku nie
uruchamia się lub pracuje stanowczo za wolno wzgl. nierówno.
Odpadki są za mokre i sokownik
wyciska za mało soku.
Sok wycieka między krawędzią
pokrywy urządzenia
nikiem na sok
e a pojem-
t.
• Wtyczka i nie jest podłączona.
• Urządzenie nie jest włączone.
• Klamry r nie są zaryglowane. • Zarygluj klamry r.
• Filtr d jest zatkany.
• Praca za szybka. • Pracuj nieco wolniej.
• Filtr d jest zatkany.
• Praca za szybka. • Pracuj nieco wolniej.
• Filtr d lub pojemnik na sok t
są zatkane.
• Ustawiona nieprawidłowa
prędkość pracy.
• Podłącz urządzenie do gniazdka
zasilania.
• Włącz urządzenie włącznikiem/
wyłącznikiem
• Wyłącz sokownik i wyciągnij
wtyczkę
zatkania (patrz rozdział
„Wyciskanie soku”).
• Wyczyść filtr d (patrz rozdział
„Czyszczenie i konserwacja”).
• Wyczyść filtr
na sok
„Czyszczenie i konserwacja”).
• Ustaw włącznik/wyłącznik
na zakres prędkości I.
o.
i. Usuń przyczynę
d i pojemnik
t (patrz rozdział
o
Sok tryska z otworu wylotu y.
Podczas pracy sok ścieka na podstawę urządzenia
u.
• Praca za szybka.
• Ustawiona nieprawidłowa
prędkość pracy.
d lub otwór wylotowy
• Filtr
soku y są zatkane.
• Ustawiona nieprawidłowa
prędkość pracy.
- 16 -
• Pracuj nieco wolniej.
• Ne naciskaj zbyt mocno na
zatyczkę
• Ustaw włącznik/wyłącznik
na zakres prędkości I.
• Wyczyść filtr
soku
czenie i konserwacja”).
• Ustaw włącznik/wyłącznik
na zakres prędkości I.
q.
d i otwór wylotowy
y (patrz rozdział „Czysz-
o
o
Page 19

TARTALOMJEGYZÉK OLDALSZÁM
Rendeltetésszerű használat 18
Műszaki adatok 18
Tartozékok 18
Kezelőelemek 18
Fontos biztonsági utasítások 18
A készülék összeszerelése és kezelése 20
A gyümölcs/zöldség előkészítése 21
Gyümölcspréselés 21
A gyümölcshús-tartály és a filter ürítése 22
A gyümölcscentrifuga szétszerelése 22
Tisztítás és karbantartás 22
Tárolás 23
Ártalmatlanítás 23
Garancia és szerviz 23
Gyártja 23
Hibaelhárítás 24
Őrizze meg ezt a leírást arra az esetre, ha később kérdése merülne fel. A készülék harmadik személynek
történő továbbadásakor adja tovább a leírást is!
- 17 -
Page 20

GYÜMÖLCSCENTRIFUGA
Rendeltetésszerű használat
A készülék érett és meghámozott gyümölcsök és
zöldségek préselésére alkalmas. Csak élelmiszert
szabad feldolgozni a készülékkel. Kizárólag eredeti
tartozékokat, és azokat is csak a leírtak szerint szabad
használni. Minden másfajta használat vagy változtatás nem rendeltetésszerűnek minősül és balesetveszélyes.
A nem rendeltetésszerű használatból eredő károkért
a gyártó nem vállal felelősséget. Ipari használatra
nem alkalmas .
Műszaki adatok
Hálózati feszültség: 220 - 240 V ~50 Hz
Névleges teljesítmény: 450 W
Folyamatos üzemmód: 30 perc
Védettségi osztály : II/
Rövid üzemeltetési idő
A rövid üzemeltetési idő azt jelzi, hogy mennyi ideig
lehet üzemeltetni a készüléket a motor túlhevülése
és károsodása nélkül. A megadott rövid üzemeltetési
idő lejárta után a készüléket addig ki kell kapcsolni,
amíg a motor le nem hűl.
Tartozékok
Gyümölcscentrifuga
használati útmutató (a töltőben)
kezelési utasítás
Kezelőelemek
töltő
q
betöltőnyílás
w
burkolatfedél
e
csipeszek
r
létartály
t
gyümölcslé kifolyó
y
készülék talpazat
u
hálózati kábel hálózati dugóval
i
kapcsoló (2 sebességfokozat)
o
vezetékcsévélő
a
tartály (gyümölcshúshoz és gyömölcsrosthoz)
s
szűrő
d
meghajtótengely
f
nejlonkefe (szállításkor a tömködőben található)
g
külön léfelfogó edény habelválasztóval (kiszállí-
h
táskor a gyümölcshús- és a rosttartóban található)
Fontos biztonsági utasítások
Elektromos eszközök használatakor mindenképpen
figyelembe kell venni a következő biztonsági utasításokat:
Az utasítások segítenek Önnek a súlyos sérülések
és károk elkerülésében és a jobb munkaeredmény
elérésében.
Kérjük, figyelmesen olvassa végig a biztonságról
és a szakszerű használatról szóló következő
információkat. Olvasás előtt lapozza fel az ábrákat
tartalmazó oldalakat, majd ismerkedjen meg a készülék
minden funkciójával. Gondosan őrizze meg ezt a
használati utasítást, és a készülék továbbadása esetén
adja tovább harmadik személynek.
- 18 -
Page 21

• A készülék nem alkalmas arra, hogy olyan személyek (ideértve a gyermekeket is) használják,
akiket testi, érzékszervi vagy elmebeli képességeik
vagy tapasztalatuk és ismeretük hiánya megakadályoznának abban, hogy biztonságosan használják a készüléket, kivéve, ha a biztonságukról
gondoskodó felügyelettel vannak, vagy ha előtte
felvilágosították őket a készülék használatáról.
Vigyázni kell a gyermekekre, hogy ne játsszanak
a készülékkel.
Életveszélyes áramütés elkerülése
érdekében:
• Az áramforrás feszültségének meg kell egyeznie
a készülék típustábláján szereplő adatokkal.
• A veszélyek elkerülése érdekében a sérült hálózati csatlakozót vagy vezetéket azonnal cseréltesse ki engedélyeztetett szakemberrel vagy az
ügyfélszolgálattal.
• A hibásan működő vagy sérült készüléket azonnal
ellenőriztesse és javíttassa meg a vevőszolgálattal.
• Ne tegye ki a készüléket esőnek és soha ne
használja a készüléket nedves vagy vizes
környezetben. Figyeljen arra, hogy a készülék
kábele használat közben soha ne legyen vizes
vagy nedves.
• A balesetek elkerülése érdekében ügyeljen arra,
hogy az alkatrészek megfelelően legyenek
behelyezve.
• A készülék bekapcsolása előtt győződjön meg
arról, hogy a fedél helyesen le van-e zárva a
leszorítóval. Máskülönben a készülék nem indul
el. Ha működés közben kioldja a csipeszeket, a
készülék automatikusan megáll.
Ha a készülékkel dolgozik, soha ne dugja be
a kezét vagy más tárgyat a betöltőnyílásba.
Ez súlyos sérülésekkel és a gyümölcscentrifuga meghibásodásával járhat. Ha a gyümölcsdarabokat a betöltést segítő tömködő segítségével sem lehet eltávolítani, kapcsolja ki
a készüléket, húzza ki a hálózati dugót és nyissa fel a készüléket.
• Sérülésveszély! A vágórész nagyon éles.
Óvatosan bánjon vele.
• Ne használja a készüléket, ha a forgó szűrő
meg van sérülve.
• Ne érintse a forgó részeket.
• Használat után állítsa le a készüléket és húzza
ki a hálózati dugót. A készüléket csak ezután
szabad szétszedni.
Ne merítse vízbe vagy más folyadékba a
készülék talpazatát!
A tűzveszély és a sérülések elkerülése
érdekében:
• A készüléket üzem közben soha ne hagyja felügyelet nélkül.
• Vigyázat! A gyermekeket tartsa távol a készülék
csatlakozóvezetékétől!A gyermekek gyakran
alábecsülik az elektromos készülékek általi
veszélyt.
• Biztosítsa a készülék stabil állóhelyzetét.
• Biztosítsa, hogy veszély esetén a hálózati csatlakozó gyorsan elérhető legyen, és hogy a vezetékben ne lehessen felbotlani!
Soha ne használja a készüléket
• Ha a szűrő, a hálózati vezeték vagy a csatlakozó
meg van sérülve,
• Hibás működés esetén, vagy ha valamilyen módon
sérült vagy leesett. Ilyenkor vigye a készüléket
ellenőrzésre vagy javításra ügyfélszolgálatunkhoz.
• Az olyan alkatrészek, amelyeket nem a készülék
gyártója ajánl vagy forgalmaz, tüzet, áramütést
vagy más sérüléseket idézhetnek elő.
- 19 -
:
Page 22

Így cselekszik helyesen:
• Veszély esetén azonnal húzza ki a hálózati
dugót a csatlakozó aljzatból.
• A készüléket csak a leírásban megadott célra
szabad használni.
• Mindig legyen figyelmes! Figyeljen arra, amit
csinál, és mindig ésszerűen járjon el. Semmi esetre
ne használja a készüléket, ha dekoncentrált,
vagy rosszul érzi magát.
• Bizonyosodjon meg arról, hogy a készülék helyesen van összerakva, mielőtt használatba veszi.
A készüléket csak akkor szabad üzemeltetni, ha
a kapcsok be vannak zárva.
• A gyümölcscentrifuga használata előtt mindig
győződjön meg arról, hogy a kapcsoló KI-állásban
("0") van. Csak akkor szabad szétszedni a
készüléket, ha a motor már teljesen leállt.
• Húzza ki a csatlakozót, ha a készüléket nem
használja, ha alkatrészeket szed ki belőle vagy
ha meg szeretné tisztítani.
• Ne használja a készüléket a szabadban.
A készülék összeszerelése és
kezelése
• Válasszon a gyümölcsprésnek egy megfelelő
helyet. Az optimális kezelés érdekében ajánlatos
a készüléket úgy felállítani, hogy a vezeték hátrafele a dugaszoló aljzat irányába vezessen.
A tartozékok közvetlenül és jól kezelhetően
kezelhetőek legyenek:
- elöl a kapcsoló
- balra a gyümölcshús és gyümölcsrost tartálya
s
- és a jobb oldalon lévő gyümölcslékifolyó y.
o
,
Figyelem:
Mielőtt a készüléket összeszerelné, bizonyosodjon
mag arról, hogy a készülék ki van kapcsolva és a
hálózati dugó ki van húzva. Máskülönben fennáll
annak a veszélye, hogy megsérti magát.
1. Helyezze a gyümölcslétartályt
talpazatára
gyümölcslé kifolyója
bele.
2. Helyezze a szűrőt
nyomja le addig, amíg érezhetően be nem pattan a
helyére. Ellenőrizze a helyes felhelyezést, mielőtt
folytatná az összeszerelést.
3. Helyezze a készülék burkolatát
, hogy a betöltőnyíláswa szűrő vágókése fö-
t
lött legyen
4. Ügyeljen arra, hogy a készülék burkolata
szorosan illeszkedjen a létartály tmélyedésébe.
Emelje meg a csipeszeket
a burkolat fedelének
5. Nyomja a leszorító csipesz
készülékre, amíg az be nem pattan a helyére.
6. Tolja a gyümölcshús és a gyümölcsrost tartályát
alulról a kifolyó alá.
s
7. Tolja a habelválasztó lemezt a külön gyümölcsléfelfogó tartályba
helyezze a külön gyümölcsléfelfogó tartályt
készülék mellé, hogy a gyümölcslé kiöntője
külön gyümölcsléfelfogó edénybe
8. Dugja be a csatlakozót
ba.
, hogy a három pöcök és a
u
a mélyedésbe illeszkedjen
y
a meghajtótengelyre fés
d
.
d
r
mélyedéseibe.
e
és tegye rá a fedelét. Úgy
h
a dugaszoló aljzat-
i
a készülék
t
a létartályra
e
e
és akassza be őket
alsó részét a
r
h
y
nyúljon.
h
a
a
- 20 -
Page 23

A gyümölcs/zöldség előkészítése
• Fontos: Csak érett gyümölcsöt használjon,
különben eltömődhet a szűrő
újbóli tisztítását tenné szükségessé.
• Mossa vagy hámozza meg a feldolgozandó
gyümölcsöt vagy a zöldséget.
• A nagyobb magvakat betöltés előtt mindig el
kell távolítani a gyümölcsből.
• Az almatermésű gyümölcsöket (pl. alma, körte)
héjastól és magvastól fel lehet dolgozni. Az egyéb
magvakat (barack, szilva, stb.), magokat (dinnye)
és szárakat el kell távolítani a készülék károsodásának elkerülése érdekében.
• A vastaghéjú gyümölcsöket és zöldségeket
(pl. citrusfélék, dinnye, kivi, répa) először mindig
meg kell hámozni.
• A szőlőről le kell vágni a főszárat.
• Vágja a gyümölcsöket és a zöldségeket akkora
darabokra, hogy azok beleférjenek a betöltőnyílásba
w
.
. Ez a szűrő
d
d
Tanács:
Mazsolát nem lehet centrifugálni, mert túl kevés
nedvességet tartalmaz. A rebarbara és más rostos
gyümölcs/növény sem alkalmas centrifugálásra,
mert a rostok eltömíthetik a gyömölcscentrufigát.
Gyümölcspréselés
Figyelem:
Ne üzemeltesse a centrifugát 30 percnél hosszabb
ideig (rövid üzemelési idő) megszakítás nélkül. 30
percig hagyja kihűlni a gyümölcscentrifugát tartós
használat után. Máskülönben a készülék elromolhat.
Figyelem:
Soha ne dugja bele a kezét vagy más tárgyat
működés közben a betöltő nyílásba
üzemelése közben. Ez súlyos sérülésekhez és/vagy
a gyümölcscentrifuga meghibásodásához vezethet.
1. Kapcsolja be a készüléket a kapcsolóval
A nagy nedvességtartalmú gyümölcsfajták levét
I-es sebességfokozaton préselje ki.
A száraz gyümölcsökhöz használja a II-es
sebességfokozatot.
2. Fél kézben tartsa a tömködőt
zével adagolja a gyümölcs- vagy zöldségdarabkákat a betöltő nyílásba
használja arra, hogy a gyümölcsöt vagy
q
zöldséget óvatosan belenyomja a betöltő nyílásba
. Miközben folyik a gyümölcs vagy a zöldség
w
feldolgozása, töltsön be további gyümölcs/
zöldségdarabokat. Eközben ne kapcsolja ki a
készüléket.
. Mindig a tömködőt
w
a készülék
w
és a másik ke-
q
o
.
Tanács:
Annak elkerülése érdekében, hogy gyümölcs nehogy
beragadjon a betöltőnyílásba
se meg a készüléket, ha az már be van kapcsolva.
Ha beleragadtak a gyümölcsdarabok a betöltő nyílásba
és nem lehet őket kiszedni a tömködővel q,
w
az alábbiak szerint járjon el, ha el szeretné kerülni
a készülék sérülését:
• Azonnal kapcsolja ki a készüléket és húzza ki
a hálózati csatlakozót
• Oldja ki a csipeszeket
fedelét
• Távolítsa el az ottmaradt gyümölcsdarabokat.
• Ismét szerelje össze a készüléket és folytassa
a gyümülcsök kipréselését.
e
.
i
r
, csak akkor tölt-
w
.
és vegye le a készülék
3. Kapcsolja ki ismét a készüléket, ha az összes
gyümölcsöt feldolgozta.
- 21 -
Page 24

Figyelem:
A gyümölcslékifolyótyés a létartályttrendszeresen tisztítsa használat után, hogy elkerülje a gyömölcslé kifolyójának eltömődését
lék meghibásodását.
és/vagy a készü-
y
A gyümölcshús-tartály és a
filter ürítése
Folyamatosan addig préselheti ki a gyümölcs levét,
amíg a gyümölcshús és gyümölcsrostnak fenntartott
tartály
meg nem telik.
s
Figyelem:
Húzza ki a hálózati csatlakozót, ha a szűrőt dki
szeretné üríteni. Ez megakadályozza a motor
véletlen elindítását.
Ha a gyümölcslé hirtelen sokkal sűrűbb lesz, vagy
a motor fordulatszáma hallhatóan lelassul, a szűrőt
ki kell üríteni. Miután kivette a gyümölcshúst, sze-
d
relje össze újra a készüléket.
A gyümölcscentrifuga
szétszerelése
Ha szét szeretné szerelni a gyümölcscentrifugát, pl.
ha meg szeretné tisztítani, akkor az alábbiak szerint
járjon el:
1. Húzza ki a csatlakozót
2. Nyissa ki a kapcsokat
3. Vegye le a tömködővel
.
e
4. Óvatosan emelje le a létartályt
ezáltal leválik a meghajtótengelyről f. Ekkor ki
lehet venni a szűrőt
.
i
.
r
a készülék burkolatát
q
t
a létartályból t.
d
. A szűrő
d
Tisztítás és karbantartás
Figyelem:
Mindig húzza ki a hálózati dugót, mielőtt tartozékokat
szeretne felszerelni vagy levenni és mielőtt meg
szeretné tisztítani a készüléket. Valamennyi készülék- és
tartozékrészt rendszeresen és használat után mindig
meg kell tisztítani a gyümölcsmaradékoktól és gyümölcsrosttól, ha el szeretné kerülni a gyümölcslé kifolyó eldugulását és/vagy a készülék károsodását.
Tanács:
Ne használjon erős tisztítószereket a gyümölcscentrifuga tisztításához.A készüléket és részeit ne tisztítsa
forró vízben.
Figyelem:
Ne merítse a motort/a burkolat talpazatát
vízbe vagy más folyadékba, nehogy áramütést
kapjon.
• Kapcsolja ki a készüléket a kapcsolóval o.
• Távolítsa el körültekintően a szennyeződéseket
és a kifolyt gyümölcslevet, mert a gyümölcsfoltokat
később csak nagyon nehezen lehet eltávolítani.
• A készülék burkolatát és a vezetéket enyhén
nedves törlőkendővel tisztítsa.
• Meleg szappanos vízben tisztítsa meg a tömködőt
, a gyümölcslé tartályt t, a külön gyüm-
q
ölcsléfelfogó tartályt
a gyümölcshús és rost tartályt
öblítse le.
A betöltést segítő eszközt q, a gyümölcslétartályt
, a készülék burkolatát e, a külön gyümölcsléfel-
t
fogó tartályt
mosogatógépben is lehet tisztítani. A szűrő
tásához használja a csomagban található nejlonkefét
:
g
és a gyümölcshús- és rosttartót sa
h
, a burkolat fedelét eés
h
, és alaposan
s
d
u
tisztí-
- 22 -
Page 25

• Fordítsa el a tömködő qfedelét annyira, hogy a
nyíl a tömködő nyelén lévő nyitott zárra mutasson. Ekkor leveheti a fedelet. A tömködő
belsejében található a nejlonkefeg. Ha vissza
szeretné zárni a fedelet, ismét úgy helyezze fel,
hogy a nyíl a nyitott zárra mutasson.
Majd fordítsa el annyira, hogy a nyíl a zárt zárra
mutasson. A fedél ekkor szorosan illeszkedik.
• Tartsa a szűrőt
alá és tisztítsa meg a nejlonkefével
(az alsó részével felfele) vízcsap
d
g
q
.
Elszíneződés:
• Néhány gyümölcs vagy zöldség tartósan elszínezheti a gyümölcscentrifuga fehér részeit. Ez
nem okoz kárt benne és nem befolyásolja a
készülék működését.
Tárolás
Ha a gyümölcscentrifugát hosszabb ideig nem
használja, csavarja fel a vezetéket a gyümölcscentrifuga alján lévő vezetékcsévélőre
a
.
Ártalmatlanítás
Semmi esetre se dobja a készüléket a
háztartási hulladékba. A termékre az
2002/96/EC irányelv vonatkozik.
A készüléket engedélyeztetett hulladékgyűjtő helyen
vagy a helyi hulladékeltávolító üzemnél tudja kidobni.
Tartsa be az érvényes előírásokat. Kétség esetén
vegye fel a kapcsolatot a hulladékfeldolgozó
vállalattal.
Valamennyi csomagolóanyagot juttasson el
a környezetbarát hulladékhasznosítóhoz.
Garancia és szerviz
A készülékre 3 év garanciát adunk a vásárlás dátumától számítva. A készüléket gondosan gyártottuk,
és szállítás előtt lelkiismeretesen ellenőriztük. Kérjük,
a vásárlás igazolására őrizze meg a pénztári blokkot.
Kérjük, garanciaigény esetén vegye fel a kapcsolatot telefonon az Ön közelében lévő szervizzel.
Csak ebben az esetben garantálhatjuk, hogy ingyen tudja beküldeni az árut.
A garancia csak anyag- és gyártási hibára vonatkozik, nem pedig szállítási kárra, kopásra vagy törékeny részek (pl. kapcsoló vagy elem) sérülésére. A termék kizárólag magánhasználatra, nem üzleti
használatra készült.
A garancia érvényét veszti visszaélésszerű vagy
szakavatatlan kezelés, erőszak alkalmazása vagy
olyan beavatkozások esetén, amelyeket nem engedélyeztetett szervizelő üzleteink hajtottak végre. Az
ön törvényes jogait ez a garancia nem korlátozza.
A garanciaidő nem hosszabbodik a jótállással. Ez
a kicserélt vagy javított alkatrészekre is érvényes.
Az esetlegesen már a megvételkor meglévő károkat
és hiányosságokat azonnal kicsomagolás után, legkésőbb két nappal a vétel dátumától számítva jelezni kell. A garanciális idő lejárta után esedékes javítások térítéskötelesek.
Kompernass Service Hungary
Tel.: 06 40 104680
e-mail: support.hu@kompernass.com
Gyártja
KOMPERNASS GMBH
BURGSTRASSE 21
44867 BOCHUM, GERMANY
www.kompernass.com
- 23 -
Page 26

Hibaelhárítás
Probléma Lehetséges okok Lehetséges megoldások
A készülék nem működik.
A motor centrifugáláskor megáll
vagy feltűnően lassan és egyenetlenül forog.
A visszamaradó gyümölcshús és
-rost túl nedves és túl kevés lé jön
ki a készülékből.
A burkolatfedél e és a létartály
t között kifolyik a lé.
• A csatlakozó i nincs bedugva.
• A készülék nincs bekapcsolva.
• A csipeszek r nem voltak elreteszelve.
• A szűrő d el van tömődve.
• Túl gyorsan csinálja. • Lassabban csinálja!
• A szűrő d el van tömődve.
• Túl gyorsan csinálja. • Lassabban csinálja!
• A szűrő d vagy a létartály t
el van tömődve.
• Rossz sebességfokozat van
beállítva.
• Csatlakoztassa a készüléket
egy konnektorba.
• Kapcsolja be a készüléket
a kapcsolóval
• Zárja le a csipeszeket r.
• Azonnal kapcsolja ki a gyümölcscentrifugát és húzza ki
a csatlakozót
meg az eltömődést (lásd a
„Gyümölcscentrifugálás“ részt).
• Tisztítsa meg a szűrőt d (lásd a
„Tisztítás és ápolás“ részben).
• Tisztítsa meg a szűrőt
létartályt
és ápolás“ részt).
• Állítsa be a kapcsolón
I-es sebességfokozatot!
o.
i. Szünetesse
t (lásd a „Tisztítás
d és a
az
o
A lé kispriccel a gyümölcslékifolyóból
Üzemeltetés közben folyik le a lé
a készülék talpazatán
y.
u.
• Túl gyorsan csinálja.
• Rossz sebességfokozat van
beállítva.
• A szűrő
• Rossz sebességfokozat van
d vagy a gyümölcslé-
kifolyó y el van tömődve.
beállítva.
- 24 -
• Lassabban csinálja!
• Ne nyomja annyira utántöltéskor
a tömködőt
• Állítsa be a kapcsolón
I-es sebességfokozatot!
• Tisztítsa meg a szűrőt
gyümölcslékifolyót
„Tisztítás és ápolás“ részt).
• Állítsa be a kapcsolón
I-es sebességfokozatot!
q.
o
d és a
y (lásd a
o
az
az
Page 27

KAZALO VSEBINE STRAN
Predvidena uporaba 26
Tehnični podatki 26
Obseg dobave 26
Upravljalni elementi 26
Pomembni varnostni napotki 26
Sestavitev in uporaba naprave 28
Priprava sadja/zelenjave 28
Iztiskanje soka 29
Praznjenje posode za ostanke sadežev in filtra 29
Demontaža sokovnika 30
Čiščenje in nega 30
Shranjevanje 30
Odstranitev 31
Garancijski list 31
Proizvajalec 31
Odprava napak 32
Ta navodila shranite za poznejša vprašanja – ob predaji naprave tretji osebi jih priložite zraven!
- 25 -
Page 28

SOKOVNIK
Predvidena uporaba
Naprava je namenjena za iztiskanje soka iz ustrezno
zrelega in olupljenega sadja in zelenjave. Z napravo
se lahko predelujejo le živila. Uporabljati se sme
izključno originalni pribor, kot je naveden spodaj.
Vsakršna druga uporaba ali sprememba naprave
velja za nepredvideno in pomeni bistveno nevarnost
nezgod.
Za škodo zaradi nepredvidene uporabe proizvajalec
ne prevzame odgovornosti. Ni za obrtno uporabo.
Tehnični podatki
Omrežna napetost: 220-240 V ~50 Hz
Nazivna moč: 450 W
Čas kratkotrajne uporabe: 30 minut
Razred zaščite: II /
Čas kratkotrajne uporabe:
Čas KU (kratkotrajne uporabe) nam pove, kako dolgo
lahko neko napravo uporabljamo, preden se motor
pregreje in poškoduje. Po poteku navedenega časa
KU mora naprava ostati izklopljena tako dolgo,
dokler se motor ni ohladil.
Obseg dobave
Sokovnik
Najlonska ščetka (v potiskalu)
Navodila za uporabo
Upravljalni elementi
Potiskalo
q
Polnilni nastavek
w
Pokrov ohišja
e
Sponke
r
Posoda za sok
t
Iztok soka
y
Podstavek naprave
u
Omrežni kabel z omrežnim vtičem
i
Stikalo za vklop/izklop (2 stopnji hitrosti)
o
Navitje kabla
a
Posoda (za ostanke sadežev in tropine)
s
Filter
d
Pogonska gred
f
Najlonska ščetka (pri novi napravi se nahaja
g
v potiskalu)
Posebna posoda za sok z ločilnikom pene
h
(pri novem izdelku se ta nahaja v posodi za
ostanke sadežev in tropine)
Pomembni varnostni napotki
Naslednje varnostne napotke je treba pri uporabi
električnih naprav vsekakor upoštevati:
Napotki vam pomagajo preprečevati težke poškodbe
in škodo ter dosegati boljše rezultate dela.
Skrbno preberite spodnje informacije o varnosti in
pravilni uporabi. Pred branjem odprite prepognjeno
stran s slikami in se seznanite z vsemi funkcijami naprave.
Napotke skrbno shranite in jih po potrebi predajte
tretjim osebam.
- 26 -
Page 29

• Ta naprava ni namenjena temu, da jo uporabljajo
osebe (vključno z otroci) z omejenimi fizičnimi,
zaznavnimi ali duševnimi sposobnostmi ali
s pomanjkljivimi izkušnjami in/ali znanjem, razen
pod nadzorom osebe, ki je zanje odgovorna ali
jim je dala navodila v zvezi z uporabo naprave.
Otroke je treba nadzorovati, da preprečite igranje
z napravo.
Da se izognete smrtni nevarnosti
zaradi električnega udara:
• Napetost vira električnega toka se mora skladati
s podatki na tipski tablici naprave.
• Poškodovane omrežne vtiče ali omrežne kable
naj vam takoj zamenja pooblaščeno strokovno
osebje ali servisna služba, da se izognete nevarnosti.
• Napravo, ki ne bi delovala brezhibno ali bi bila
poškodovana, naj takoj pregleda in popravi servisna služba.
• Naprave ne izpostavljajte dežju in je tudi nikoli
ne uporabljajte v vlažnem ali mokrem okolju.
Zmeraj pazite na to, da se omrežni kabel med
delovanjem naprave ne namoči ali navlaži.
Podstavka naprave nikoli ne potopite pod
vodo ali druge tekočine!
Da se izognete požaru in poškodbam:
• Naprave med uporabo nikoli ne pustite
nenadzorovane.
• Previdno! Otrokom ne dovolite prijemanja in
uporabe omrežnega kabla ter naprave. Otroci
pogosto podcenjujejo nevarnost električnih naprav.
• Poskrbite za varen položaj naprave.
• Zagotovite, da je omrežni vtič v primeru nevarnosti
hitro dosegljiv in da omrežni kabel ne more
povzročati spotikanja.
• Da preprečite poškodbe, pazite na to, da so vsi
deli vstavljeni pravilno.
• Pred vklopom naprave preverite, ali je pokrov
pravilno zaprt in pritrjen s sponkami. Drugače
naprava ne deluje. Če se sponke med obratovanjem odpnejo, se naprava samodejno zaustavi.
Pri delu z napravo nikoli ne vtikajte rok ali
drugih predmetov v odprtino za polnjenje.
To lahko privede do težkih osebnih poškodb
ali poškodb naprave. Če koščkov sadja ne
morete odstraniti s pomočjo potiskala, napravo izklopite, omrežni vtič potegnite iz vtičnice
in napravo odprite.
• Nevarnost poškodb! Rezilo je zelo ostro.
Z njim ravnajte previdno.
• Naprave ne uporabljajte, če je vrtljivo cedilo poškodovano.
• Ne dotikajte se vrtljivih delov.
• Po uporabi napravo izklopite in omrežni vtič
potegnite iz vtičnice. Napravo smete razstaviti
le, kadar motor popolnoma miruje.
Naprave nikoli ne uporabljajte:
• če je filter, omrežni kabel ali omrežni vtič poškodovan,
• v primeru napak pri delovanju ali kakšnih drugih
poškodb ali po padcu. Napravo dajte pregledati
oz. popraviti servisni službi.
• Uporaba delov pribora, ki jih ne priporoča ali
prodaja proizvajalec naprave, lahko povzroči
požar, električne udare ali poškodbe.
- 27 -
Page 30

Tako ravnate varno:
• V primeru nevarnosti omrežni vtič takoj potegnite
iz vtičnice.
• Napravo uporabljajte izključno tako, kot je opisano
v tem navodilu za uporabo.
• Bodite zmeraj pozorni! Pazite, kaj počnete in
ravnajte premišljeno. Naprave nikakor ne uporabljajte, če niste skoncentrirani in se ne počutite
dobro.
• Preverite, da je bila naprava pravilno in v celoti
sestavljena, preden jo zaženete. Napravo lahko
uporabljate šele, ko so sponke zaprte.
• Po vsaki uporabi sokovnika preverite, ali se stikalo
za vklop/izklop nahaja v položaju za "izklop"
("0"). Motor mora popolnoma mirovati, preden
napravo smete razstaviti.
• Omrežni vtič potegnite iz vtičnice, ko naprave ne
uporabljate, ko odstranjujete njene dele in pred
čiščenjem.
• Naprave ne uporabljajte na prostem.
Sestavitev in uporaba naprave
• Za svoj sokovnik poiščite primeren kraj uporabe.
Za optimalno uporabo vam priporočamo, da
napravo postavite tako, da omrežni kabel poteka
k vtičnici zadaj za napravo. Tako lahko sedaj
neposredno in preprosto uporabljate vse elemente:
- spredaj stikalo za vklop/izklop
- levo posoda za ostanke sadežev in tropine
- in na desni strani iztok soka y.
o
,
s
Pozor:
Preden napravo začnete sestavljati, preverite, ali je
izklopljena in je omrežni vtič potegnjen iz vtičnice.
Drugače se lahko poškodujete.
1. Posodo za sok
rave
, tako da se trije nastavki in iztok soka
u
zataknejo v odprtinah.
2. Filter
3. Pokrov ohišja
4. Poskrbite za to, da je pokrov ohišja
5. Spodnji del sponk
6. Posodo za ostanke sadežev in tropin
7. Potisnite ploščo ločilnika pene v posebno posodo
8. Omrežni vtič
namestite na pogonsko gred fin ga
d
pritisnite navzdol, tako da se opazno zaskoči.
Preden nadaljujete s sestavljanjem, preverite
trdnost njegovega prileganja.
, tako da se polnilni nastavekwnahaja nad
t
rezili filtra
nameščen v odprtini posode za sok
sponke
e
se ne zaskočijo.
pod izmet.
za sok
sodo za sok
iztok soka
d
r
.
in nanjo namestite pokrov. Posebno po-
h
y
namestite na podstavku nap-
t
namestite na posodo za sok
e
.
trdno
e
. Dvignite
t
in jih zataknite v režo pokrova ohišja
pritisnite na napravo, dokler
r
potisnite
s
postavite poleg naprave, tako da
h
sega v posebno posodo za sok h.
vtaknite v vtičnico.
i
Priprava sadja/zelenjave
y
• Pomembno: Uporabljajte samo močno zrele
sadeže, ker se filter
To bi pomenilo pogosto čiščenje filtra
• Sadje ali zelenjavo za obdelavo operite ali
olupite.
• Večje pečke ali koščice morate odstraniti iz sadežev,
preden jih daste v napravo.
• Pečkato sadje (kot so jabolka, hruške) lahko obdelujete z lupino in sredico. Druge koščice
(breskvi, slive itd.), vse večje pečke (melone itd.)
in peclje odstranite, da preprečite poškodbe
naprave.
- 28 -
drugače lahko zamaši.
d
d
.
Page 31

• Sadeže z debelo lupino (npr. citrusi, melona,
kivi, pesa) je zmeraj treba najprej olupiti.
• Pri grozdju je treba pecelj odrezati.
• Sadeže ali zelenjavo narežite na tako velike
kose, da bodo primerni za polnilni nastavek
w
Napotek:
Rozine niso primerne za iztiskanje soka, ker vsebujejo
premalo soka. Rabarbara ali druga vlaknasta zelenjava/sadje ni primerna za iztiskanje soka, ker
vlakna sokovnik zamašijo.
Iztiskanje soka
Pozor:
Sokovnika nikoli ne uporabljajte več kot 30 minut
(čas KU) brez prekinitve. Sokovnik po 30 minutah
trajnega obratovanja pustite, da se ohladi. Naprava
se drugače lahko poškoduje.
Pozor:
V polnilni nastavek wnikoli ne vtikajte rok ali predmetov, medtem ko naprava obratuje. To lahko privede
do težkih telesnih poškodb in/ali poškodb sokovnika.
1. Napravo vklopite s stikalom za vklop/izklop
Za vrste sadja ali zelenjave z veliko tekočine
uporabite stopnjo hitrosti I.
Za bolj suhe vrste sadja ali zelenjave uporabite
stopnjo hitrosti II.
2. Potiskalo
zelenjave z drugo roko dajajte v nastavek za
polnjenje
da z njim lahko sadje/zelenjavo previdno potisnete
v polnilni nastavek
zelenjava obdelujeta, dodajajte nadaljnje koščke. Pri tem naprave ne izklapljajte.
držite v eni roki in koščke sadja ali
q
. Potiskalo qzmeraj uporabljajte,
w
. Medtem ko se sadje ali
w
o
Napotek:
Da preprečite nalaganje sadja v polnilnem nastavku
, ga dodajajte le pri vklopljeni napravi. Če so se
w
v polnilnem nastavku
.
ne morete takoj odstraniti s potiskalom
kot sledi, da preprečite poškodbe naprave:
• Napravo takoj izklopite in omrežni vtič
iz vtičnice.
• Sprostite sponke
• Odstranite nakopičene koščke sadja.
• Napravo ponovno sestavite in nadaljujte z
iztiskanjem soka.
3. Napravo zmeraj takoj izklopite, kakor hitro ste
porabili vso sadje.
nabrali koščki sadja in jih
w
q
in pokrov ohišja esnemite.
r
Pozor:
Iztok sokayin posodo za soktredno in po vsaki upo-rabi očistite, da preprečite zamašitev iztoka
soka
in/ali poškodbe naprave.
y
Praznjenje posode za ostanke
sadežev in filtra
Sok lahko neprekinjeno iztiskate, dokler posoda
za ostanke sadja in tropine
.
Pozor:
Ko filter dpraznite, omrežni vtič potegnite iz vtičnice.
To prepreãuje nehoten zagon motorja.
Ko se sadni sok nenadoma močno zgosti, ali ko slišite, da se število vrtljajev motorja upočasni, je
filter
treba sprazniti. Potem ko ste ostanke sadja
d
odstranili, napravo ponovno sestavite.
ni napolnjena.
s
, postopajte,
potegnite
i
- 29 -
Page 32

Demontaža sokovnika
Če sokovnik želite razstaviti, da ga npr. lahko očistite,
postopajte kot sledi:
1. Omrežni vtič
2. Odprite sponke
3. Pokrov ohišja
4. Posodo za sok
tako odstranjen od pogonske gredi
sedaj lahko vzamete iz posode za sok t.
potegnite iz vtičnice.
i
.
r
s potiskalom qodstranite.
e
previdno dvignite. Filter dje
t
f
. Filter
• Potiskalo q, posodo za sok t, posebno posodo za sok
ostanke sadežev in tropine
nici in jih skrbno splahnite.
Potiskalo q, posoda za sok t, pokrov ohišja e,
posebna posoda za sok
sadežev in tropine
in jih lahko pomijete v stroju. Za čiščenje filtra
d
uporabite priloženo najlonsko ščetko g:
, pokrov naprave ein posodo za
h
s
in posoda za ostanke
h
so primerni za pomivalni stroj
s
očistite v topli mil-
d
Čiščenje in nega
Pozor:
Omrežni vtič zmeraj potegnite iz vtičnice, preden
nameščate ali odstranjujete dele pribora in preden
napravo začnete čistiti. Vse dele naprave in pribora
je treba redno in po vsaki uporabi očistiti ostankov
sadežev in tropin, da preprečite zamašitev iztoka
soka in/ali poškodbe naprave.
Napotek:
Ne uporabljajte agresivnih čistil za čiščenje sokovnika.
Naprave in njenih sestavnih delov ne smete čistiti
z vrelo vodo.
Pozor:
Motorja/podstavka naprave unikoli ne
potapljajte v vodo ali druge tekočine, da
preprečite električni udar.
• Napravo izklopite s stikalom za vklop/izklop
• Umazanijo ali packe od soka je treba takoj
odstraniti, ker se madeži zaradi sadja pozneje
komaj še dajo odstraniti.
• Očistite ohišje naprave in omrežni kabel z rahlo
navlaženo krpo za posodo.
o
• Pokrov potiskala
puščica kaže na odprto ključavnico na deblu
potiskala. Sedaj pokrov lahko snamete. V notranjosti potiskala
Za zapiranje pokrova tega ponovno namestite
tako, da puščica kaže na odprto ključavnico
. Potem ga obrnite tako daleč, da puščica
kaže na zaprto ključavnico . Pokrov je sedaj pritrjen.
• Držite filter
tekočo vodo in ga očistite z najlonsko ščetko
d
obrnite tako daleč, da
q
se nahaja najlonska ščetkag.
q
(s spodnjo stranjo navzgor) pod
Obarvanja:
• Nekatero sadje ali zelenjava lahko dele sokovnika
trajno obarva. To ni škodljivo in ne omejuje delovanja naprave.
Shranjevanje
Če sokovnika dlje časa ne uporabljate, kabel ovijte
okrog navitja kabla
.
na spodnji strani sokovnika.
a
g
.
- 30 -
Page 33

Odstranitev
Naprave v nobenem primeru ne odvrzite
v običajne hišne smeti. Ta proizvod je
podvržen evropski Direktivi 2002/96/EC.
Napravo oddajte pri podjetju, registriranem za
predelavo odpadkov, ali pri svojem komunalnem
podjetju za predelavo odpadkov.
Upoštevajte trenutno veljavne predpise. V primeru
dvoma se obrnite na svoje podjetje za predelavo
odpadkov.
Vse embalažne materiale oddajte v reciklažo.
Garancijski list
1. S tem garancijskim listom jamčimo Kompernass
GmbH, da bo izdelek v garancijskem roku ob
normalni in pravilni uporabi brezhibno deloval in
se zavezujemo, da bomo ob izpolnjenih spodaj
navedenih pogojih odpravili morebitne pomanjkljivosti in okvare zaradi napak v materialu ali izdelavi oz. po svoji presoji izdelek zamenjali ali
vrnili kupnino.
2. Garancijski rok za proizvod je 3 leta od dneva
nabave.
3. Kupec je dolžan okvaro javiti pooblaščenemu servisu oz. se informirati o nadaljnih postopkih na
zgoraj navedeni telefonski številki. Svetujemo vam,
da pred tem natančno preberete navodila o sestavi in uporabi izdelka.
4. Kupec je dolžan pooblaščenemu servisu predložiti garancijski list in račun, kot potrdilo in dokazilo
o nakupu.
5. V primeru, da proizvod popravlja nepooblaščeni
servis ali oseba, kupec ne more uveljavljati zahtevkov iz te garancije.
6. Vzroki za okvaro oz. nedelovanje izdelka morajo
biti lastnosti stvari same, in ne vzroki, ki so zunaj
proizvajalčeve oz. prodajalčeve sfere. Kupec ne
more uveljavljati zahtevkov iz te garancije, če se
ni držal priloženih navodil za sestavo in uporabo
izdelka ali, če je izdelek kakorkoli spremenjen ali
nepravilno vzdrževan.
7. Jamčimo servisiranje in rezervne dele za dobo, ki
je minimalno zahtevana s strani zakonodaje.
8. Obrabni deli oz. potrošni material so izvzeti iz
garancije.
9. Vsi potrebni podatki za uveljaljanje garancije
se nahajajo na dveh ločenih dokumentih
(garancijski list, račun).
Prodajalec:
Lidl d.o.o.k.d., Žeje pri Komendi 100,
SI-1218 Komenda
Birotehnika
Phone:+386 (0) 2 522 16 66
Fax: +386 (0) 2 531 17 40
e-mail: support.si@kompernass.com
Proizvajalec
KOMPERNASS GMBH
BURGSTRASSE 21
44867 BOCHUM, GERMANY
www.kompernass.com
- 31 -
Page 34

Odprava napak
Problem Možni vzroki Možne rešitve
Naprava ne deluje.
Motor pri iztiskanju soka obstane
ali pa se obrača opazno počasneje ali neenakomerno.
Tropine so premokre in dobivate
premalo soka.
Sok teče ven skozi režo med pokrovom ohišja
sok
t.
e in posodo za
• Omrežni vtič i ni priključen.
• Aparat ni vklopljen.
• Sponke r niso zapete. • Zapnite sponke r.
• Filter d je zamašen.
• Prehitro delate. • Delajte počasneje.
• Filter d je zamašen.
• Prehitro delate. • Delajte počasneje.
• Filter d ali iztok soka t je za-
mašen.
• Nastavljena je napačna stopnja
hitrosti.
• Napravo priklopite na omrežno
vtičnico.
• Napravo vklopite s stikalom za
vklop/izklop
• Sokovnik takoj izklopite in omrežni vtič
Odpravite zamašitev (glejte poglavje "Iztiskanje soka").
• Očistite filter d (glejte poglavje
"Čiščenje in nega").
• Očistite filter
sok
t (glejte poglavje "Čiščenje
in nega").
• Na stikalu za vklop/izklop
nastavite stopnjo hitrosti I.
o.
i potegnite iz vtičnice.
d in posodo za
o
Sok brizga iz iztoka soka y.
Med delom sok teče po podstavku
naprave
u.
• Prehitro delate.
• Nastavljena je napačna stopnja
hitrosti.
d ali iztok soka y je za-
• Filter
mašen.
• Nastavljena je napačna stopnja
hitrosti.
- 32 -
• Delajte počasneje.
• Pri potiskanju ne pritiskajte
preveč na potiskalo
• Na stikalu za vklop/izklop
nastavite stopnjo hitrosti I.
• Očistite filter
(glejte poglavje "Čiščenje in
nega").
• Na stikalu za vklop/izklop
nastavite stopnjo hitrosti I.
q.
d in iztok soka y
o
o
Page 35

OBSAH STRANA
Účel použití 34
Technické údaje 34
Obsah dodávky 34
Ovládací prvky 34
Důležitá bezpečnostní upozornění 34
Složení a obsluha přístroje 36
Příprava ovoce/zeleniny 37
Odšťavňování 37
Vyprazdňování nádobky na dužinu a filtru 38
Demontáž odšťavňovače 38
Čištění a údržba 38
Uskladnění 39
Likvidace 39
Záruka a servis 39
Dovozce 39
Odstranění závad 40
Uschovejte tento návod pro případné pozdější dotazy a předejte jej v případě přenechání přístroje třetím
osobám zároveň s ním!
- 33 -
Page 36

ODŠŤAVŇOVAČ
Účel použití
Přístroj je vhodný k odšťavňování dobře vyzrálého
a oloupaného ovoce i zeleniny. V přístroji smějí být
zpracovávány pouze potraviny. Smí se používat
pouze originální příslušenství tak, jak je popsáno
níže. Jakékoliv jiné využití nebo pozměnění přístroje
není v souladu s určením přístroje a znamená značné
nebezpečí.
Pro škody, které vzniknou při použití mimo vymezený účel, neposkytuje výrobce záruku. Není určeno
pro použití v podnikatelské oblasti.
Technické údaje
Jmenovité napětí: 220 - 240 V ~50 Hz
Jmenovitý výkon: 450 W
Krátká provozní doba: 30 minut
Třída ochrany: II/
Ovládací prvky
Pěchovač
q
Plnicí prostor
w
Kryt pláště
e
Svorky
r
Nádobka na šťávu
t
Odtok šťávy
y
Podstavec přístroje
u
Síťový kabel se zástrčkou
i
Vypínač ZAP/VYP (2 rychlostní stupně)
o
Navíjení kabelu
a
Nádobka (na dužinu a tresť)
s
Filtr
d
Hnací hřídel
f
Nylonový kartáč (nachází se v pěchovači)
g
separační záchytná nádoba na šťávu s odělova-
h
čem pěny (nachází se při dodání v nádobě na
dužinu a výlisky)
Důležitá bezpečnostní
upozornění
Krátká provozní doba
Krátká provozní doba udává, jak dlouho je možné
přístroj provozovat, aniž by se přehřál, a tím poškodil
motor. Po uvedené krátké provozní době se musí
přístroj vypnout na tak dlouho, až se motor ochladí.
Obsah dodávky
Odšťavňovač
Nylonový kartáč (v pěchovadle)
Návod k obsluze
Při používání elektrických zařízení je třeba bezpodmínečně dodržovat následující bezpečnostní pokyny:
Tyto pokyny vám pomohou zabránit vzniku těžkých
zranění a škodám a dosáhnout lepších pracovních
výsledků.
Pro bezpečné a odborné použití si pozorně přečtěte
následující informace. Před čtením si otevřete stránku
s vyobrazeními a seznamte se se všemi funkcemi zařízení. Tyto pokyny pečlivě uložte a při předávání
zařízení třetí osobě tyto pokyny předejte i s ním.
- 34 -
Page 37

• Tento přístroj není určen k tomu, aby jej používaly
osoby (včetně dětí), které mají omezené fyzické,
senzorické nebo duševní schopnosti či nedostatek
zkušeností a/nebo znalostí, ledaže by jej používaly
pod bezpečnostním dohledem zodpovědné osoby
nebo by od ní obdržely pokyny, jak přístroj používat. Děti by měly být pod dohledem, abyste
měli jistotu, že si s přístrojem nehrají.
Abyste zabránili smrtelnému zranění
způsobenému elektrickým proudem:
• Napětí elektrického zdroje musí souhlasit s údaji
na typovém štítku přístroje.
• Poškozené zástrčky nebo síťový kabel nechte ihned
vyměnit autorizovanými odborníky nebo zákaznickým servisem - vyhnete se tím nebezpečí.
• Přístroje, které nefungují bez závad nebo byly
poškozeny, nechte okamžitě přezkoumat a opravit
v zákaznickém servisu.
• Nevystavujte zařízení působení deště a rovněž
jej nikdy nepoužívejte ve vlhkém nebo mokrém
prostředí. Dbejte na to, aby síťový kabel během
provozu nebyl nikdy vlhký nebo mokrý.
Nikdy nenamáčejte podstavec přístroje do
vody ani jiných kapalin!
Pro eliminaci vzniku požáru a zranění:
• Zařízení během provozu nikdy nenechávejte bez
dozoru.
• Pozor! Dbejte na to, aby se k síťovému kabelu
a přístroji nepřibližovaly děti. Děti často neodhadnou nebezpečí, která elektrická zařízení představují.
• Dbejte na bezpečné umístění přístroje.
• Zajistěte, aby byla zástrčka v případě nebezpečí
rychle dosažitelná a aby nedocházelo k zakopnutí
o síťový kabel.
• Aby se zabránilo poranění, dejte pozor na to,
aby byly všechny díly správně nasazeny.
• Před zapnutím zařízení se ujistěte, že je kryt řádně uzavřen pomocí svorek. V opačném případě
se přístroj nespustí. Dojde-li během provozu k
uvolnění svorek, přístroj se automaticky zastaví.
Během práce s přístrojem nikdy nestrkejte
ruce či jiné předměty do plnicího prostoru.
Mohlo by dojít ke vzniku závažných zranění
nebo by se mohl přístroj poškodit. Není-li možné odstranit kusy ovoce pomocí pěchovače,
vypněte přístroj, vytáhněte zástrčku ze sítě a
přístroj otevřete.
• Nebezpečí zranění! Řezací mechanismus je
velmi ostrý. Zacházejte s ním opatrně.
• Je-li rotující síto poškozené, přístroj nepoužívejte.
• Nedotýkejte se žádných rotujících dílů.
• Po dokončení práce zařízení vypněte a vytáhněte
zástrčku ze zásuvky. Zařízení se smí rozmontovat
teprve tehdy, když je motor zcela v klidu.
Přístroj rozhodně nepoužívejte:
• pokud je poškozen filtr, síťový kabel nebo zástrčka,
• pokud přístroj funguje nesprávně nebo pokud
byl nějakým způsobem poškozen či spadnul.
V těchto případech přístroj odevzdejte k přezkoušení nebo opravě zákaznickému servisu.
• Při použití částí příslušenství, které vám nedoporučil nebo neprodal výrobce zařízení, může dojít
ke vzniku požáru, zásahu elektrickým proudem
nebo k poranění.
- 35 -
Page 38

Bezpečnostní pokyny:
• V případě nebezpečí okamžitě vytáhněte síťovou
zástrčku ze zásuvky.
• Přístroj používejte pouze k účelu, který je popsán
v tomto návodu.
• Buďte stále opatrní! Vždy dávejte pozor na to,
co děláte, a vždy postupujte rozumně. Pokud
se nesoustředíte nebo pokud se necítíte dobře,
v žádném případě zařízení nepoužívejte.
• Dříve než zařízení uvedete do chodu, zajistěte,
aby bylo zařízení správně a kompletně složeno.
Přístroj je možné provozovat až po uzavření svorek.
• Po každém použití odšťavňovače se ujistěte, že
se vypínač ZAP/VYP nachází v poloze „Vyp“
("0"). Před rozebráním přístroje musí být motor
v naprostém klidu.
• Pokud přístroj nepoužíváte, pokud odstraňujete
jeho součásti nebo jej čistíte, vytahujte zástrčku
ze sítě.
• Přístroj nikdy nepoužívejte venku.
Složení a obsluha přístroje
• Pro odšťavňovač vyberte vhodné stanoviště. Aby
se Vám s přístrojem manipulovalo co nejlépe,
umístěte přístroj tak, aby síťový kabel vedl dozadu
směrem k zásuvce. V tomto případě lze všechny
ovládací prvky obsluhovat přímo a jednoduše:
- vepředu vypínač ZAP/VYP
- vlevo nádobku na dužinu a tresť
- a vpravo odtok šťávy y.
o
,
s
Pozor:
Než začnete přístroj skládat, ujistěte se, že je vypnutý
a že je zástrčka vytažena ze sítě. V opačném případě
hrozí nebezpečí poranění.
1. Nádobku na šťávu
stroje
padly do příslušných štěrbin.
2. Filtr
na něj, abyste slyšeli jeho zaklapnutí. Dbejte na
jeho pevné usazení, teprve poté můžete v sestavování pokračovat.
3. Kryt pláště
tak, aby se plnicí prostor nacházelwnad řezacími noži filtru
4. Dbejte na to, aby kryt pláště
štěrbině nádobky na šťávu
svorky
e
5. Zatlačte na spodní část svorek
tak, abyste slyšeli jejich zaklapnutí.
6. Nádobku na dužinu a tresť
pod vývod.
7. Zasuňte destičku odělovače pěny do separátní
záchytné nádoby na šťávu
parátní záchytnou nádobu na šťávu
vedle přístroje tak, aby výtok na šťávu
val do separátní záchytné nádoby na šťávu
8. Síťovou zástrčku
tak, aby tři čepy a odtok šťávy yza-
u
nasaďte na hnací hřídel fa zatlačte
d
e
a zahákněte je do výřezů krytu pláště
r
.
nasaďte na podstavec pří-
t
nasaďte na nádobku na šťávu
.
d
pevně seděl ve
e
. Nadzvedněte
t
proti přístroji
r
přesuňte zespoda
s
nasaďte víko. Se-
h
postavte
h
vyční-
y
zasuňte do zásuvky.
i
h
t
.
- 36 -
Page 39

Příprava ovoce/zeleniny
• Důležité: Používejte pouze dobře uzrálé plody.
V opačném případě se může filtr
To by si vyžádalo opakované čištění filtru
• Omyjte nebo oloupejte ovoce nebo zeleninu,
které/kterou chcete zpracovat.
• Velká jádra nebo pecky je nutné z plodů před
zpracováním vždy odstranit.
• Jádrové ovoce (např. jablka, hrušky) lze zpracovávat včetně slupky i jádřince. Ostatní pecky (broskve,
švestky atd.), všechna velká jádra (melouny atd.)
a stopky odstraňte, aby nedošlo k poškození přístroje.
• Plody se silnými slupkami (např. citrusy, melouny,
kiwi, řepa) musíte nejprve oloupat.
• Od hroznů vína odřízněte hlavní stopku.
• Ovoce nebo zeleninu nakrájejte na kousky, které
se vejdou do plnicího prostoru
w
d
.
zanést.
d
.
Poznámka:
Rozinky se k odšťavňování nehodí, protože obsahují
málo šťávy. Rebarbora nebo jiná vláknitá zelenina/
ovoce se k odšťavňování nehodí, protože vlákna
odšťavňovač ucpávají.
Odšťavňování
Pozor:
Odšťavňovač nikdy nepoužívejte déle než 30 minut
bez přerušení. Odšťavňovač nechte po 30 minutách
nepřetržitého provozu vychladnout. V opačném případě může dojít k poškození přístroje.
Pozor:
Během provozu přístroje nikdy nezastrkujte ruce či
předměty do plnicího prostoru
k těžkým zraněním a/nebo poškozením odšťavňovače.
1. Přístroj zapněte vypínačem ZAP/VYP o.
U plodů, které obsahují hodně šťávy používejte
rychlostní stupeň I.
U sušších plodů zvolte rychlostní stupeň II.
2. Pěchovač
nebo zeleniny vkládejte druhou rukou do plnicího
prostoru
vkládání ovoce/zeleniny do plnicího prostoru
. Během zpracovávání ovoce nebo zeleniny
w
doplňujte postupně další kousky. Přístroj při tom
nevypínejte.
držte v jedné ruce a kousky ovoce
q
. Pěchovač qpoužívejte pro opatrné
w
. To by mohlo vést
w
Upozornění:
Nechcete-li, aby se ovoce usazovalo v plnicím prostoru
, vkládejte ho pouze při zapnutém přístroji.
w
Došlo-li k usazení kousků plodů v plnicím prostoru
a nelze-li je ihned odstranit pomocí pěchovače
w
, postupujte prosím následovně, aby nedošlo
q
k poškození přístroje:
• Přístroj okamžitě vypněte a vytáhněte zástrčku
ze sítě i.
• Uvolněte svorky
• Odstraňte usazené kousky plodů.
• Přístroj znovu sestavte a pokračujte v odšťavňování.
3. Jakmile máte všechny plody zpracovány, přístroj
vždy znovu okamžitě vypněte.
a sejměte kryt pláště e.
r
- 37 -
Page 40

Pozor:
Po každém použití pravidelně čistěte odtok šťávy
a nádobku na šťávut, čímž se vyhnete ucpání odtoku šťávy
a/nebo poškození přístroje.
y
Vyprazdňování nádobky na
dužinu a filtru
Šťávu můžete průběžně lisovat až do okamžiku,
kdy je nádobka na dužinu a tresť
Pozor:
Před čištěním filtru dvytáhněte zástrčku ze sítě. To
zabrání nezam˘‰lenému spu‰tûní motoru.
Je-li šťáva z plodů najednou mnohem hustší nebo
pokud slyšíte, že se snižují otáčky motoru, je třeba
vyprázdnit filtr
sestavte.
. Po vyjmutí dužiny přístroj znovu
d
naplněna.
s
Čištění a údržba
y
Pozor:
Před nasazením nebo sejmutím příslušenství a před
čištěním přístroje vždy nejprve vytáhněte zástrčku
ze sítě.Veškeré části přístroje a příslušenství je nutné
pravidelně a po každém použití očistit od zbytků
plodů a tresti, aby nedocházelo k ucpání odtoku
šťávy a/nebo poškození přístroje.
Poznámka:
K čištění odšťavňovače nepoužívejte agresivní čisticí
prostředky. Přístroj a jeho součásti nesmějí být čištěny
ve vroucí vodě.
Pozor:
Motor/podstavec přístroje unikdy neponořujte do vody či jiné tekutiny, aby nedošlo k úrazu elektrickým proudem.
Demontáž odšťavňovače
Chcete-li odšťavňovač demontovat, např. za účelem
vyčištění, postupujte následovně:
1. Vytáhněte zástrčku
2. Otevřete svorky
3. Sejměte kryt pláště
4. Opatrně zvedněte nádobku na šťávu
se tím uvolní od hnací hřídele f. Nyní můžete
filtr
vyjmout z nádobky na šťávu t.
d
ze sítě.
i
.
r
s pěchovačem q.
e
t
. Filtr
d
• Přístroj vypněte vypínačem ZAP/VYP
• Nečistoty nebo šťávu, která přeteče, je nutné
odstraňovat ihned, protože skvrny po ovoci se
dají později vyčistit jen obtížně.
• Plášť přístroje a síťový kabel čistěte pouze lehce
navlhčeným hadříkem.
• Posunovač
zachytávací nádobu na šťávu
nádobu na dužinu a výlisky
mýdlové vodě a pečlivě je opláchněte pod tekoucí vodou.
Posunovací zařízení
rací víko
a nádoba na dužinu a výlisky sjsou vhodná
h
pro myčku na nádobí a lze je v myčce umývat. K čištění filtru
kartáč
g
- 38 -
, nádobu na šťávu t, separátní
q
, víko krytu ea
h
omýjte v teplé
s
, nádoba na šťávu t, uzaví-
q
, separátní záchytná nádoba na šťávu
e
použijte v dodávce zahrnutý nylonový
d
:
o
.
Page 41

• Otočte krytem pěchovače qtak, aby šipka směřovala na symbol otevřeného zámku na násadě pěchovače. Nyní můžete kryt sejmout. Uvnitř pěchovače
Chcete-li kryt znovu zavřít, nasaďte jej znovu
tak, aby šipka směřovala na symbol otevřeného
zámku . Poté jím otočte tak, aby šipka směřovala
na symbol zavřeného zámku . Kryt je nyní pevně
usazen.
• Filtr
držte (spodní stranou otočenou nahoru)
d
pod tekoucí vodou a vyčistěte jej nylonovým
kartáčem
se nachází nylonový kartáčg.
q
.
g
Zabarvení:
• Některé druhy ovoce nebo zeleniny mohou součásti odšťavňovače natrvalo zabarvit. Tato zabarvení nejsou na škodu a neomezují funkčnost
přístroje.
Uskladnění
Pokud odšťavňovač delší dobu nepoužíváte, omotejte kabel kolem navíjení kabelu
odšťavňovače.
na spodní straně
a
Likvidace
Záruka a servis
Na tento přístroj platí tříletá záruka od data zakoupení. Přístroj byl vyroben s nejvyšší pečlivostí a před
odesláním prošel výstupní kontrolou. Uschovejte si,
prosím, pokladní
lístek jako doklad o nákupu. V případě uplatňování
záruky kontaktujte telefonicky
Vaší servisní službu. Pouze tak může být zajištěno
bezplatné zaslání Vašeho zboží.
Záruka se vztahuje pouze na chyby materiálu nebo
výrobní závady, ale ne na škody,vzniklé při přepravě, ne na součásti, podléhající rychlému opotřebení
nebo na poškození křehkých dílů, jako jsou např.
spínače nebo akumulátory. Výrobek je určen pouze
pro privátní použití, ne průmyslové.
Při nesprávném a neodborném využívání, při použití
násilí a při zásazích, které nebyly provedeny našimi
autorizovanými servisními provozovnami, záruční
nároky zanikají.
Vaše práva vyplývající ze zákona touto zárukou
nejsou omezena.
Záruční doba se zárukou neprodlouží. Toto platí
také pro náhradní díly a opravené součásti. Případné škody a vady, existující už při koupi, se musí hlásit ihned po vybalení, nejpozději však
do dvou dnů od data nákupu. Po uplynutí záruční
doby se provedené opravy musí zaplatit.
V žádném případě nevyhazujte přístroj
do normálního domovního odpadu.
Tento výrobek podléhá evropské směrnici
2002/96/EC.
Přístroj předejte k likvidaci odborné firmě či jej
odevzdejte ve Vašem místním recyklačním zařízení.
Dodržujte aktuálně platné předpisy. V případě
pochyb se poraďte s recyklační firmou.
Také všechny obalové materiály zlikvidujte
v souladu s ekologickými předpisy.
Ing. Martin Šimák, zprostředkovatel
servisu výrobků Kompernass
Hotline: 800 400 235
Fax: 271 722 939
e-mail: support.cz@kompernass.com
Dovozce
KOMPERNASS GMBH
BURGSTRASSE 21
44867 BOCHUM, GERMANY
www.kompernass.com
- 39 -
Page 42

Odstranění závad
Problém Možné příčiny Možná řešení
Spotřebič nefunguje.
Motor zůstává při odšťavňování
stát nebo se točí nápadně pomalu
či nerovnoměrně.
Výlisky jsou příliš vlhké a získáváte
málo šťávy.
Šťáva prýští mezi okrajem víka
pouzdra
e a nádoby na šťávu t.
• Zástrčka i není zapojena.
• Přístroj není zapnutý.
• Spony r nejsou zajištěné. • Zajistěte spony r.
• Filtr d je ucpaný.
• Pracujete příliš rychle. • Pracujte pomaleji.
• Filtr d je ucpaný.
• Pracujete příliš rychle. • Pracujte pomaleji.
• Filtr d nebo nádoba na šťávu
y jsou ucpané.
• Je nastavena nesprávná rychlost.
• Zapojte spotřebič do zásuvky.
• Zapněte spotřebič pomocí vypínače
o.
• Odštavňovač ihned vypněte
a vytáhněte zástrčku
Odstraňte ucpání (viz kapitola
„Odšťavňování“).
• Vyčistěte filtr d (viz kapitola
„Čištění a údržba“).
• Vyčistěte filtr
šťávu
a údržba“).
• Nastavte na vypínači
rychlostní stupeň I.
d a nádobu na
t (viz kapitola „Čištění
i.
o
Šťáva stříká z výtokového otvoru
y.
Během práce stéká šťáva na
podstavec spotřebiče
u.
• Pracujete příliš rychle.
• Je nastavena nesprávná rychlost.
d nebo výtokový otvor na
• Filtr
ovocnou šťávu y je ucpaný.
• Je nastavena nesprávná rychlost.
- 40 -
• Pracujte pomaleji.
• Netlačte při posunování tak
pevně na podavač
• Nastavte na vypínači
rychlostní stupeň I.
• Vyčistěte filtr
na ovocnou šťávu
„Čištění a údržba“).
• Nastavte na vypínači
rychlostní stupeň I.
q.
o
d a výtokový otvor
y (viz kapitola
o
Page 43

OBSAH STRANA
Používanie v súlade s určením 42
Technické údaje 42
Obsah dodávky 42
Súčasti 42
Dôležité bezpečnostné pokyny 42
Poskladanie a obsluha prístroja 44
Príprava ovocia a zeleniny 45
Odšťavovanie 45
Vyprázdnenie nádoby na dužinu a filtra 46
Demontáž odšťavovača 46
Čistenie a údržba 46
Uskladnenie 47
Likvidácia 47
Záruka a servis 47
Dovozca 47
Odstraňovanie porúch 48
Uschovajte si tento návod na použitie v budúcnosti – a pri odovzdávaní prístroja tretej osobe odovzdajte aj
návod!
- 41 -
Page 44

ODŠŤAVOVAČ
Používanie v súlade s určením
Prístroj je určený na odšťavovanie celkom zrelého
a olúpaného ovocia a zeleniny. Prístrojom sa smú
spracovávať len potraviny. Používajte výlučne originálne príslušenstvo, tak ako je tu opísané. Akýkoľvek iný spôsob používania alebo prebudovanie sa
považuje za nezodpovedajúce určeniu
a je skrytým zdrojom nebezpečenstva úrazu.
Za škody vzniknuté používaním, ktoré je v rozpore
s deklarovaným účelom nepreberá výrobca žiadnu
záruku. Prístroj nie je určený na obchodné použitie.
Technické údaje
Sieťové napätie: 220 - 240 V ~50 Hz
Menovitý výkon: 450 W
Krátkodobá prevádzka: 30 minút
Trieda ochrany : II/
Krátkodobá prevádzka
Krátkodobá prevádzka udáva, ako dlho sa dá prevádzkovať prístroj bez toho, aby sa motor prehrial
a došlo k jeho poškodeniu. Po udanej dobe krátkodobej prevádzky musí prístroj zostať vypnutý dovtedy, než motor vychladne.
Obsah dodávky
Súčasti
Vtláčadlo
q
Plniaca šachta
w
Kryt prístroja
e
Svorky
r
Nádoba na šťavu
t
Nádoba na dužinu
y
Podstavec prístroja
u
Sieťová šnúra so zástrčkou
i
Vypínač (2 rýchlosti)
o
Navíjanie kábla
a
Nádoba (na dužinu a výlisky)
s
Filter
d
Hnací hriadeľ
f
Nylonová kefa (pri dodávke je vo vtláčadle)
g
samostatná nádoba na zachytávanie šťavy s
h
oddeľovačom peny (pri expedícii z výroby je v
nádobe na dužinu a výlisky)
Dôležité bezpečnostné pokyny
Pri používaní elektrických prístrojov musíte vždy
dodržiavať tieto bezpečnostné pokyny:
Tieto pokyny vám pomôžu vyvarovať sa ťažkých
poranení a dosiahnuť lepšie pracovné výsledky.
Prečítajte si dôkladne nasledujúce informácie o bezpečnosti a správnom používaní zariadenia. Otvorte
si pred čítaním stránku s obrázkami a zoznámte sa
so všetkými funkciami prístroja. Tieto pokyny starostlivo
uschovajte, príp. ich odovzdajte tretím osobám.
Odšťavovač
Nylonová kefa (vo vtláčadle)
Návod na používanie
- 42 -
Page 45

• Tento prístroj nie je určený na to, aby ho používali
osoby (vrátane detí) s obmedzenými fyzickými,
zmyslovými alebo duševnými schopnosťami, alebo
s nedostatkom skúseností alebo nedostatkom
znalostí, len za predpokladu, že budú pod
dohľadom osoby zodpovednej za ich bezpečnosť
alebo od nej dostanú pokyny, ako sa má prístroj
používať. Na deti treba dohliadať, aby sa zabezpečilo, že sa nebudú hrať s prístrojom.
Aby ste zabránili poraneniu v dôsledku úrazu elektrickým prúdom:
• Napätie elektrického zdroja musí korešpondovať
s údajmi na typovom štítku prístroja.
• Poškodenú sieťovú šnúru alebo zástrčku nechajte
ihneď vymeniť oprávnenému odborníkovi alebo
v zákazníckom servise, aby ste sa vyhli ohrozeniu
zdravia.
• Prístroje, ktoré nefungujú bezchybne alebo boli
poškodené, dajte okamžite skontrolovať a opraviť
v oddelení zákazníckych služieb.
• Prístroj nevystavujte dažďu a nikdy ho nepoužívajte
vo vlhkom alebo mokrom prostredí. Dbajte na to,
aby sieťový kábel počas prevádzky nikdy nezmokol ani nezvlhol.
Nikdy neponárajte podstavec prístroja do
vody alebo iných kvapalín!
Aby ste zabránili vzniku požiaru alebo
poraneniam:
• Nikdy nenechávajte prístroj počas prevádzky
bez dozoru.
• Pozor! Zabezpečte, aby sa v blízkosti sieťovej
šnúry a prístroja nezdržiavali deti. Deti často
podceňujú nebezpečenstvo spojené s elektrickými prístrojmi.
• Postarajte sa o bezpečné umiestnenie prístroja.
• Postarajte sa o to, aby sieťová zástrčka bola ľahko dostupná a aby sa nedalo potknúť o kábel.
• Aby ste zabránili poraneniam, dbajte na to, aby
boli všetky súčasti správne zmontované.
• Pred zapnutím prístroja sa uistite, že je kryt svorkami riadne zavretý. Inak sa prístroj nezapne.
Ak sa svorky počas prevádzky uvoľnia, prístroj
sa automaticky zastaví.
Keď s prístrojom pracujete, nikdy nedávajte
ruky ani žiadne predmety do plniaceho otvoru. Môže to viesť k vážnym úrazom alebo
poškodeniam prístroja. Keď sa nedajú kusy
ovocia odstrániť vtláčadlom, vypnite prístroj,
vytiahnite zástrčku a otvorte prístroj.
• Nebezpečenstvo úrazu! Rezacie ústrojenstvo
je veľmi ostré . Zachádzajte s ním opatrne.
• Nepoužívajte prístroj, keď je poškodené rotujúce
sitko.
• Nedotýkajte sa rotujúcich častí.
• Po použití prístroj vypnite a vytiahnite zástrčku
zo zásuvky. Prístroj môžete začať rozoberať až
potom, keď sa motor úplne zastaví.
Prístroj nikdy nepoužívajte:
• Keď je poškodený filter, sieťová šnúra alebo sieťová
zástrčka,
• V prípade nesprávneho fungovania alebo ak sa
nejakým iným spôsobom poškodil alebo spadol
na zem. Ak treba prístroj preskúšať alebo opraviť,
odovzdajte ho do zákazníckeho servisu.
• Používanie častí príslušenstva, ktoré nie sú odporučené alebo predávané výrobcom, môže spôsobiť
požiar, zásah elektrickým prúdom alebo poranenie.
- 43 -
Page 46

Zaistenie bezpečného používanie:
• Vytiahnite pri nebezpečenstve ihneď zástrčku zo
sieťovej zásuvky.
• Prístroj používajte len na účely a použitie uvedené
v tomto návode na používanie.
• Buďte vždy pozorní! Dbajte vždy na to, čo robíte,
a vždy konajte pozorne. Prístroj v žiadnom prípade nepoužívajte vtedy, keď ste nesústredený
alebo sa necítite dobre.
• Skôr ako uvediete prístroj do prevádzky, zaistite,
aby bol správne a úplne zložený. Prístroj sa dá
používať až potom, keď sú svorky zatvorené.
• Po každom použití odšťavovača zabezpečte,
aby bol vypínač v polohe „Vyp“ ("0"). Motor
musí byť úplne zastavený, keď chcete prístroj
rozobrať.
• Zástrčku vytiahnite z prístroja vždy, keď sa prístroj
nepoužíva, keď demontujete jeho jednotlivé časti
alebo keď ho idete čistiť.
• Nepoužívajte prístroj vonku.
Poskladanie a obsluha prístroja
• Pre odšťavovač zvoľte vhodné miesto. Pre optimálnu
manipuláciu odporúčame prístroj tak postaviť,
aby sieťová šnúra išla dozadu k zásuvke. Všetky
prvky sa teraz dajú priamo a jednoducho obsluhovať:
- vpredu vypínač
- vľavo nádoba na dužinu a výlisky
- a na pravej strane výtok šťavy y.
o
,
s
Upozornenie:
Pred poskladaním prístroja sa uistite, že je vypnutý
a zástrčka je vytiahnutá zo zásuvky. Inak hrozí nebezpečenstvo, že sa poraníte.
1. Nasaďte nádobu na šťavu
prístroja
zapadli do vyhĺbenín.
y
2. Nasaďte filter
ho nadol, až hlasno zaklapne. Než budete ďalej
pokračovať v skladaní prístroja, dajte pozor,
aby pevne sedel.
3. Nasaďte kryt prístroja
tak, aby bola plniaca šachtawnad nožmi filtra
t
.
d
4. Dajte pozor na to, aby kryt prístroja
sedel vo vyhĺbenine v nádobe na šťavu
Zdvihnite svorky
na kryte prístroja
5. Stlačte spodný diel svoriek
zaklapnú.
6. Zasuňte nádobu na dužinu a výlisky
pod vyhadzovací otvor.
7. Zasuňte dosku oddeľovača peny do samostatnej
nádobky na zachytávanie peny
veko. Samostatnú nádobku na zachytávanie
šťavy
šťavy
zachytávanie šťavy
8. Zasuňte sieťovú zástrčku
tak, aby tri výčnelky a výtok šťavy
u
na hnací hriadeľ fa stlačte
d
a zaháknite ich do vrúbkov
r
.
e
postavte vedľa prístroja tak, aby výtok
h
siahal do samostatnej nádobky na
y
h
na podstavec
t
na nádobu na šťavu
e
e
proti prístroju, až
r
s
a nasaďte
h
.
do zásuvky.
i
pevne
.
t
zospodu
- 44 -
Page 47

Príprava ovocia a zeleniny
• Dôležité: Používajte len celkom zrelé ovocie,
inak sa môže filter
valo opakované čistenie filtra
• Umyte alebo olúpte ovocie alebo zeleninu,
ktoré chcete spracovať.
• Veľké jadierka alebo kôstky by ste mali vždy
vybrať pred vložením ovocia do prístroja.
• Ovocie s jadierkami (ako sú jablká alebo hrušky)
sa dá spracovať aj so šupkou a šupkami jadierok.
Iné kôstky (slivky, broskyne a pod.), všetky veľké
jadierka (melóny apod.) a stopky odstráňte, aby
ste zabránili poškodeniu prístroja.
• Plody s hrubou šupkou (napr. citrusové plody,
melóny, kiwi, repa) sa musí vždy najprv olúpať.
• Z hrozna treba odrezať hlavnú stopku.
• Nakrájajte ovocie alebo zeleninu na také veľké
kúsky, aby sa dali vložiť do plniacej šachty
zaniesť. To by si vyžado-
d
.
d
w
.
Upozornenie:
Hrozienka nie sú vhodné na odšťavovanie, lebo
obsahujú príliš málo šťavy. Rebarbora alebo iná
vláknitá zelenina alebo ovocie sa nehodí na odšťavovanie, lebo vlákna upchajú odšťavovač.
Odšťavovanie
Upozornenie:
Nikdy nepoužívajte odšťavovač dlhšie než 30 minút
(krátkodobá prevádzka) bez prerušenia. Po 30 minútach trvalej prevádzky nechajte odšťavovač vychladnúť.
Inak by ste mohli prístroj poškodiť.
Upozornenie:
Nikdy neklaďte ruky ani žiadne predmety do plniacej
šachty
poraneniam alebo poškodeniam odšťavovača.
1. Zapnite prístroj vypínačom o.
2. Držte vtláčadlo
, keď prístroj beží. Môže to viesť k ťažkým
w
Na druhy ovocia, ktoré obsahuje veľa šťavy,
použite rýchlostný stupeň I.
Na suchšie plody zvoľte rýchlostný stupeň II.
v jednej ruke a kúsky ovocia
q
alebo zeleniny vkladajte druhou rukou do plniacej
šachty
ovocie alebo zelenina opatrne vtlačili do plniacej
šachty
zeleniny dopĺňajte ďalšie kúsky. Pritom prístroj
nevypínajte.
. Vždy používajte vtláčadlo q, aby ste
w
. V priebehu spracovávania ovocia alebo
w
Upozornenie:
Ak sa chcete vyhnúť tomu, aby sa ovocie vzpriečilo
v plniacej šachte
zapnutý. Ak sa kúsky plodov vzpriečili v plniacej
šachte
q
vyhli poškodeniu prístroja:
• Ihneď vypnite prístroj a vytiahnite sieťovú
• Uvoľnite svorky
• Odstráňte vzpriečené kúsky plodov.
• Znova poskladajte prístroj a pokračujte v odšťa-
3. Len čo je všetko ovocie odšťavené, vždy ihneď
a nedajú sa hneď odstrániť vtláčadlom
w
, postupujte nasledujúcim spôsobom, aby ste sa
zástrčku i.
vovaní.
vypnite prístroj.
, vkladajte ho, len keď je prístroj
w
a dajte dolu kryt prístroja e.
r
- 45 -
Page 48

Upozornenie:
Pravidelne a po každom použití vyčistite výtok šťavy
a nádobu na šťavut, aby ste zabránili zap-
y
chatiu výtoku alebo poškodeniu prístroja.
Vyprázdnenie nádoby na
dužinu a filtra
Šťavu môžete trvale vytláčať, až kým nie je nádoba
na dužinu a výlisky
Upozornenie:
Vytiahnite sieťovú zástrčku, keď idete vyprázdniť
filter
. To zabraÀuje neúmyselnému spusteniu
d
motora.
s
plná.
Čistenie a údržba
Upozornenie:
Vždy vytiahnite sieťovú zástrčku pred nasadzovaním
alebo snímaním dielov príslušenstva a pred čistením
prístroja. Všetky diely prístroja a príslušenstva sa
musia pravidelne a po každom použití očistiť od
zvyškov plodov a zvyškov výliskov, aby sa zabránilo
upchatiu výtoku šťavy alebo poškodeniu prístroja.
Upozornenie:
Na čistenie odšťavovača nepoužívajte žiadny agresívne
čistiace prostriedky. Prístroj a jeho diely sa nesmú
čistiť vriacou vodou.
Keď je šťava odrazu oveľa hustejšia alebo počujete,
že sa otáčky motora znižujú, musíte vyprázdniť filter
. Po vybratí dužiny znova poskladajte prístroj.
d
Demontáž odšťavovača
Keď chcete odšťavovač demontovať, napr. kvôli
čisteniu, postupujte takto:
1. Vytiahnite sieťovú zástrčku
2. Otvorte svorky
3. Vyberte kryt prístroja
4. Opatrne zdvihnite nádobu na šťavu
sa tým uvoľní z hnacieho hriadeľa f. Teraz môžete
filter
sňať z nádoby na šťavu t.
d
r
.
.
i
s vtláčadlom q.
e
t
. Filter
d
Upozornenie:
Nikdy neponárajte motor/podstavec prístroja
do vody alebo inej tekutiny. Hrozí nebez-
u
pečenstvo úrazu elektrickým prúdom.
• Vypnite prístroj vypínačom o.
• Nečistoty alebo pretečenú šťavu z plodov treba
bezodkladne odstrániť, pretože fľaky od ovocia
sa neskôr dajú len veľmi ťažko odstrániť.
• Kryt prístroja a sieťovú šnúru čistite len mierne
navlhčenou utierkou.
• Vyčistite vtláčadlo
mostatnú záchytnú nádobu na šťavu
stroja
ky
poriadne opláchnite.
Vtláčadlo q, nádoba na šťavu t, veko prístroja
, samostatná nádobka na zachytávanie šťavy
e
a nádoba na dužinu a výlisky ssú vhodné na umývanie v umývačke riadu a môžu sa v nej čistiť. Ak
chcete vyčistiť filter
kefku
a nádobu na odšťavenú dužinu a zvyš-
e
v teplej mydlovej vode a potom ich
s
:
g
, nádobu na šťavu t, sa-
q
, kryt prí-
h
, použite priloženú nylonovú
d
h
- 46 -
Page 49

• Otáčajte kryt vtláčadla qdovtedy, až šípka
ukazuje na otvorenú zámku na držadle vtláčadla. Teraz môžete kryt vybrať. Vo vnútri vtláčadla
znova zatvoriť, nasaďte ho späť tak, aby šípka
ukazovala na otvorenú zámku . Potom ho
otáčajte dovtedy, až bude šípka ukazovať na
zatvorenú zámku . Teraz sedí kryt pevne.
• Držte filter
vodou a očistite ho nylonovou kefou
je nylonová kefag. Ak chcete kryt
q
(dolnou stranou nahor) pod tečúcou
d
g
.
Zafarbenie:
• Niektoré ovocie alebo zelenina môžu diely odšťavovača natrvalo zafarbiť. Nie je to škodlivé
a nijako to neobmedzuje funkcie prístroja.
Uskladnenie
Keď nebudete odšťavovač dlhšiu dobu používať,
oviňte sieťovú šnúru okolo navíjania kábla
spodnej strane odšťavovača.
a
na
Likvidácia
Prístroj v žiadnom prípade nevyhadzujte
do normálneho domového odpadu.
Tento výrobok podlieha európskej
smernici 2002/96/EC.
Prístroj zlikvidujte v príslušnom zariadení (firme) na
likvidáciu odpadu.
Dodržte pritom aktuálne platné predpisy. V prípade
pochybností sa spojte so zariadením na likvidáciu
odpadu.
Všetok baliaci materiál zlikvidujte ekologikkým spôsobom.
Záruka a servis
Na tento prístroj máte trojročnú záruku od dátumu
nákupu. Prístroj bol starostlivo vyrobený a pred expedíciou dôkladne vyskúšaný. Uschovajte si, prosím, účtenku ako dôkaz o nákupe. V prípade uplatňovania záruky sa spojte s opravovňou telefonicky.
Len tak sa dá zabezpečiť bezplatné zaslanie tovaru.
Záruka platí len na chyby materiálu a výroby, nie
na poškodenia spôsobené prepravou, opotrebením
ani na poškodenia krehkých častí, ako sú spínače
alebo akumulátory.
Výrobok je určený výlučne na súkromné používanie
a nie na komerčné účely.
Záruka prestáva platiť pri zaobchádzaní nezodpovedajúcom účelu, pri neprimeranom zaobchádzaní,
pri používaní násilia a pri zásahoch, ktoré neurobil
nami autorizovaný servis. Práva vyplývajúce zo zákona nie sú touto zárukou obmedzené.
Záručná doba sa nepredlžuje o dobu trvania záručných opráv. To platí aj na vymenené alebo opravené diely. Prípadné poškodenia a nedostatky zistené
už pri nákupe musíte ohlásiť ihneď po vybalení, najneskoršie však do dvoch dní od dátumu zakúpenia.
V prípade opráv spadajúcich do obdobia po uplynutí záručnej doby ste povinní uhradiť vzniknuté
náklady.
Kompernass Service Slowakia
Tel. 0850 00 10 16 (
e-mail: support.sk@kompernass.com
0,075 EUR/Min.)
Dovozca
KOMPERNASS GMBH
BURGSTRASSE 21
44867 BOCHUM, GERMANY
www.kompernass.com
- 47 -
Page 50

Odstraňovanie porúch
Problém Možné príčiny Možné riešenia
Prístroj nefunguje.
Motor zostáva pri odšťavovaní stáť
alebo sa točí nápadne pomaly
alebo nerovnomerne.
Výlisky (odpad) sú príliš mokré
a šťavy je málo.
Šťava prýšti von medzi okrajom
krytu prístroja
šťavu
e a nádobou na
t.
• Sieťová zástrčka i nie je
pripojená.
• Prístroj nie je zapnutý.
• Svorky r nie sú zaistené. • Zaistite svorky r.
• Filter d je upchatý.
• Pracujete veľmi rýchlo. • Pracujte pomalšie.
• Filter d je upchatý.
• Pracujete veľmi rýchlo. • Pracujte pomalšie.
• Filter d alebo nádoba na šťa-
vu
t sú upchaté.
• Je nastavený nesprávny rýchlostný stupeň.
• Pripojte prístroj do sieťovej
zásuvky.
• Zapnite prístroj vypínačom o.
• Ihneď vypnite odšťavovač a
vytiahnite sieťovú zástrčku
Odstráňte upchatie (pozri kapitola „Odšťavovanie“).
• Vyčistite filter d (pozri kapitola
„Čistenie a údržba“).
• Vyčistite filter
na šťavu
„Čistenie a údržba“).
• Vypínačom
lostný stupeň I.
d a nádobu
t (pozri kapitola
nastavte rých-
o
i.
Šťava vystrekuje z výtoku šťavy y.
Počas práce vyteká šťava spod
podstavca prístroja
u.
• Pracujete veľmi rýchlo.
• Je nastavený nesprávny rýchlostný stupeň.
d alebo výtok šťavy y
• Filter
sú upchaté.
• Je nastavený nesprávny rýchlostný stupeň.
- 48 -
• Pracujte pomalšie.
• Pri posúvaní (dopĺňaní) netlačte
tak silno na vtláčadlo
• Vypínačom
lostný stupeň I.
• Vyčistite filter
o
d a výtok šťavy
q.
nastavte rých-
y (pozri kapitola „Čistenie
a údržba“).
• Vypínačom
lostný stupeň I.
nastavte rých-
o
 Loading...