

Page 1
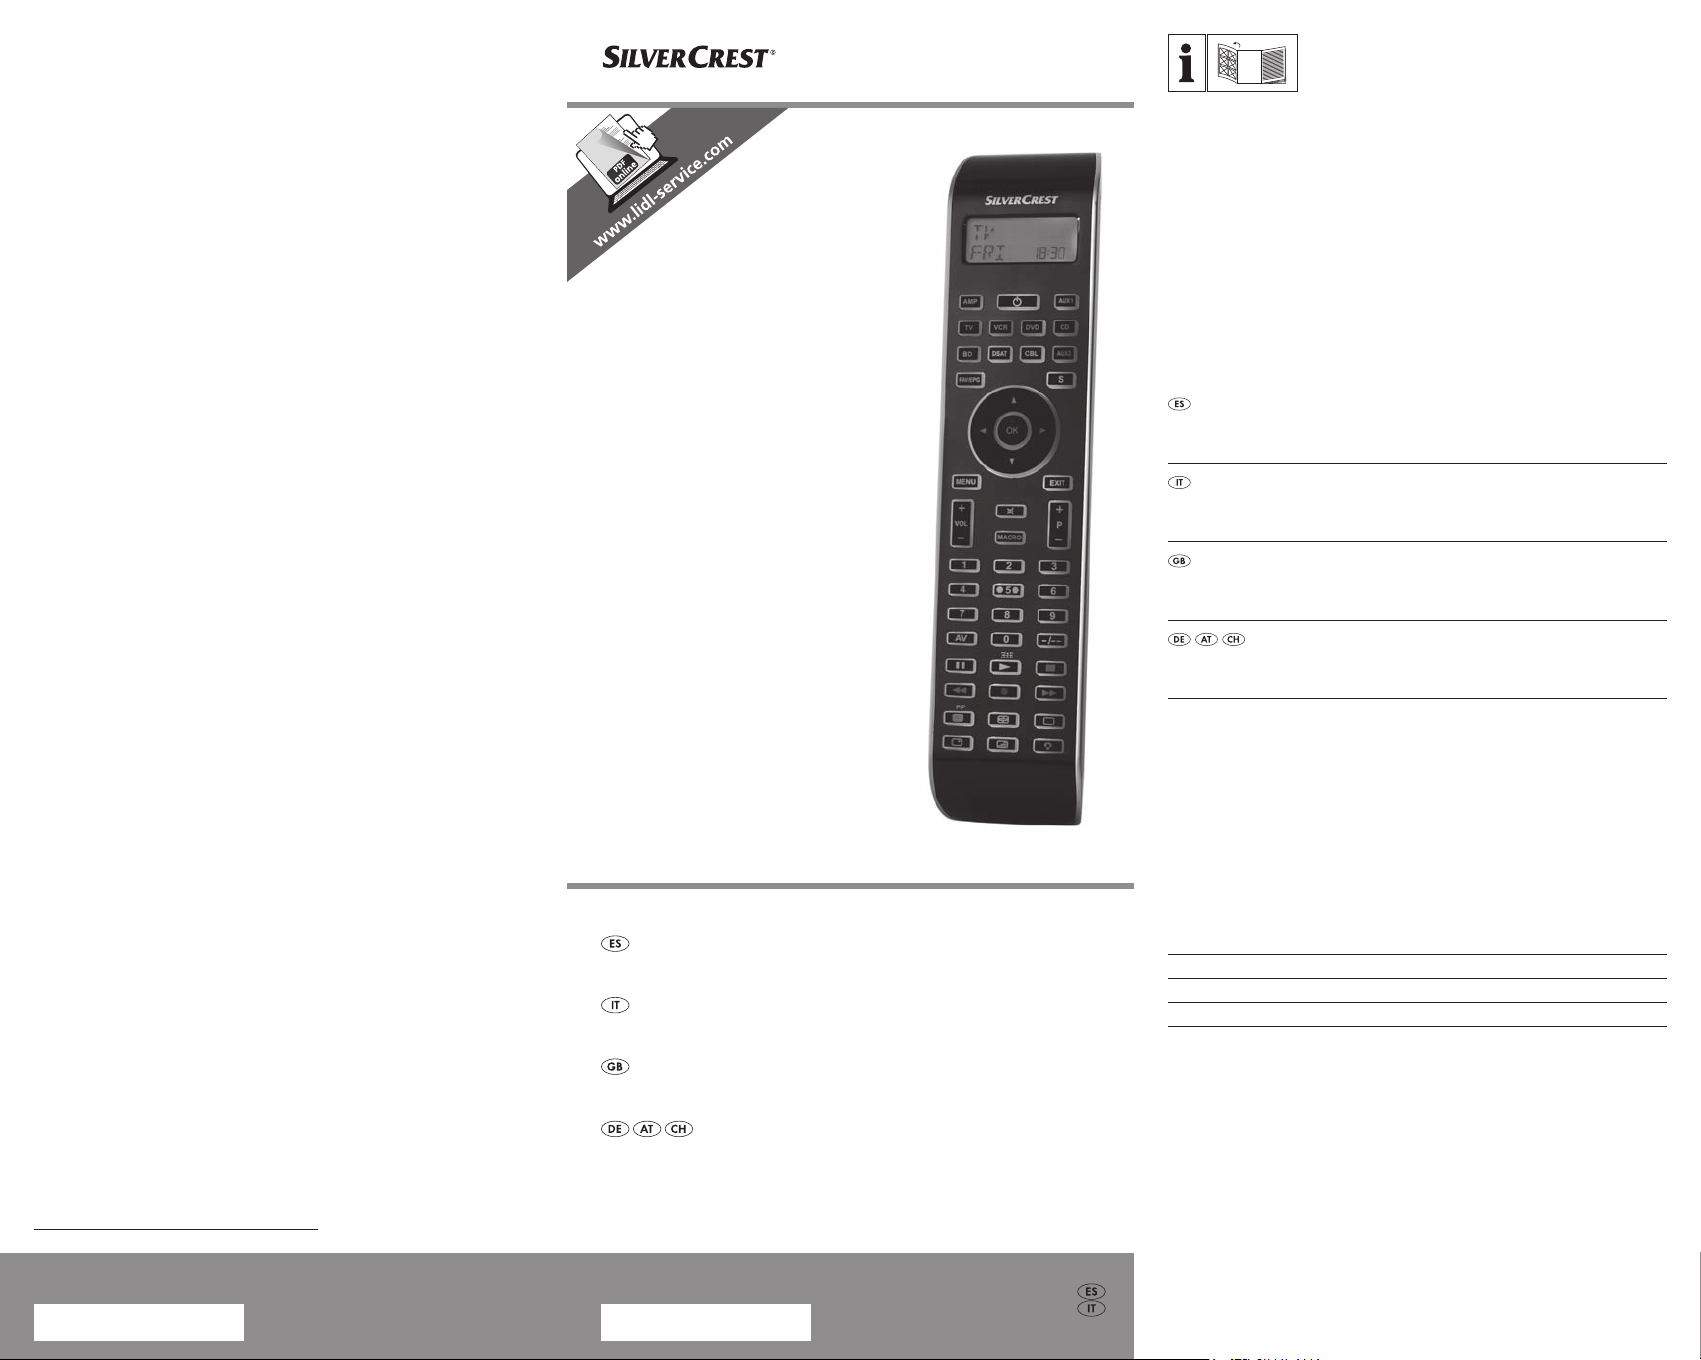
MANDO A DISTANCIA UNIVERSAL SFB 10.1 B2
Antes de empezar a leer abra la página que contiene las imágenes y,
en seguida, familiarícese con todas las funciones del dispositivo.
Prima di leggere aprire la pagina con le immagini e prendere
confidenza con le diverse funzioni dell’apparecchio.
Before reading, unfold the page containing the illustrations and
familiarise yourself with all functions of the device.
Klappen Sie vor dem Lesen die Seite mit den Abbildungen aus und
machen Sie sich anschließend mit allen Funktionen des Gerätes vertraut.
MANDO A DISTANCIA UNIVERSAL
Instrucciones de uso
KOMPERNASS GMBH
Burgstraße 21
D-44867 Bochum
www.kompernass.com
Estado de las informaciones · Versione delle informazioni
Last Information Update:
12 / 2012 · Ident.-No.: SFB 10.1B2102012-3
TELECOMANDO UNIVERSALE
Istruzioni per l‘uso
10-IN-1 REMOTE CONTROL
Operating instructions
UNIVERSALFERNBEDIENUNG
Bedienungsanleitung
IAN 86342 IAN 86342
ES Instrucciones de uso Página 1
IT Istruzioni per l‘uso Pagina 31
GB Operating instructions Page 59
DE / AT / CH Bedienungsanleitung Seite 87
Page 2
Page 3
ÍNDICE PÁGINA
Indicaciones de seguridad importantes 2
Visión general del aparato 3
Puesta en funcionamiento 4
Desembalar el aparato/Comprobar el volumen de suministro 4
Insertar las pilas 4
Elementos de operación 5
Pantalla LCD 5
Botones 6
El menú de conguración 9
Congurar idiomas del menú 11
Congurar código (programación del mando a distancia) 11
Programación mediante búsqueda de código por marcas 11
Programación introduciendo el código manualmente 12
Programación mediante búsqueda automática de código 13
Congurar el sistema 14
Ajustar la hora 14
Ajustar la fecha 15
Ajustar el contraste 15
Luz de fondo 15
Ajustar el volumen/conmutador silenciador general 16
Seleccionar el aparato de cinta/disco para el mando directo 17
Ajustar la función de bloqueo 17
Restaurar el sistema 18
Congurar temporizador 18
Temporizador de desconexión 18
Temporizador de eventos 19
Borrar Timer 20
Congurar aprendizaje 20
Función de programación de códigos 21
Congurar macros 22
Canal de favoritos 23
Regulación del volumen 25
Vol +/—, (silenciamiento) 25
Para la operación 25
Desconexión total 25
Limpieza y almacenamiento 26
Error / Solución 26
Evacuación 27
Características técnicas 28
Indicación acerca de la conformidad 28
Importador 28
Garantía y asistencia técnica 28
- 1 -
Page 4
MANDO A DISTANCIA UNIVERSAL
SFB 10.1 B2
Introducción
Felicidades por la compra de su aparato nuevo.
Ha optado por adquirir un producto de alta calidad. Las instrucciones de uso forman parte del producto. Contiene indicaciones importantes acerca de la seguridad, uso y evacuación.
Antes de usar el producto familiaricese con todas las indicaciones de manejo y de seguridad. Utilice el producto como se
describe y para los ámbitos de aplicación indicados. Guarde
convenientemente estas instrucciones. Entregue todos los documentos cuando transera el producto a terceros.
Derechos de autor
Esta documentación está protegida por derechos de autor.
Se reservan todos los derechos, también de reproducción
fotomecánica, reproducción y difusión por medio de un procedimiento especial (por ejemplo, procesamiento de datos,
soportes de datos y redes de datos), también parcialmente,
así como las modicaciones técnicas y en el contenido.
Indicacionesdeseguridad
importantes
Finalidad de uso
Los niños sólo deben utilizar el mando a distancia bajo la
supervisión de adultos.
El mando a distancia universal puede sustituir como máximo
a diez mandos a distancia. Sólo se puede utilizar con aparatos audiovisuales con receptor de infrarrojos. Las funciones del
mando a distancia universal se corresponden fundamentalmente con las de los mandos a distancia originales. El mando a distancia universal está indicado para el uso privado.
No está indicado para el uso comercial.
Cualquier uso distinto no se considerará conforme a lo previsto. El fabricante no asume ninguna responsabilidad por
daños derivados de un uso no conforme a lo previsto.
Advertencia
Una advertencia de este nivel de peligro indica una posible
situación de peligro. Si no puede evitarse la situación de peligro, pueden producirse lesiones. Deben seguirse las instrucciones de esta advertencia para evitar lesiones a personas.
Atención
Una advertencia de este nivel de peligro indica un posible
daño material. Si no puede evitarse la situación, pueden producirse daños materiales. Deben seguirse las instrucciones de
esta advertencia para evitar daños materiales.
Advertencia
Una indicación advierte de informaciones adicionales que
facilitan el manejo del aparato.
- 2 -
Page 5

¡Advertenciaantepeligrodelesionesdebido
aunusoinadecuadodelaspilas!
Se deben manejar las pilas con especial cuidado. Observe
las siguientes indicaciones de seguridad:
• Saque las pilas del compartimiento de las pilas cuando
estén gastadas.
• No tire las pilas al fuego. No se deben exponer las pilas
a altas temperaturas.
• Si no va a utilizar el aparato durante una temporada, reti-
re las pilas para evitar que se descarguen.
• ¡Riesgo de explosión! No se deben cargar las pilas.
• No abra las pilas ni las cortocircuite.
• El ácido derramado de las pilas puede provocar irritación
en la piel. Lave la zona de contacto con abundante agua.
Si el líquido alcanza los ojos, enjuáguelos bien con agua,
no los frote y acuda inmediatamente al médico.
• Cambie en su caso siempre todas las pilas a la vez y no
mezcle nunca pilas de diferentes tipos.
• Los niños no deben tener acceso a las pilas. Los niños
pueden meterse las pilas en la boca y atragantarse. En
caso de ingestión de una pila consulte inmediatamente
con un médico.
¡Atención!
El mando a distancia universal incorpora un diodo infrarrojo
láser de clase 1. Para evitar lesiones oculares, no lo observe
con dispositivos ópticos.
Dañosenelaparato
• Si el aparato estuviese defectuoso, no intente repararlo
usted mismo. En caso de daños póngase en contacto con
el fabricante o su línea directa de asistencia (véase la tarjeta de garantía).
• Si penetrase líquido en el aparato o resultase dañado de
otro modo, deberá ser revisado por el fabricante o
su línea directa de asistencia. Póngase en contacto con el
fabricante o su línea directa de asistencia (véase la información de la garantía).
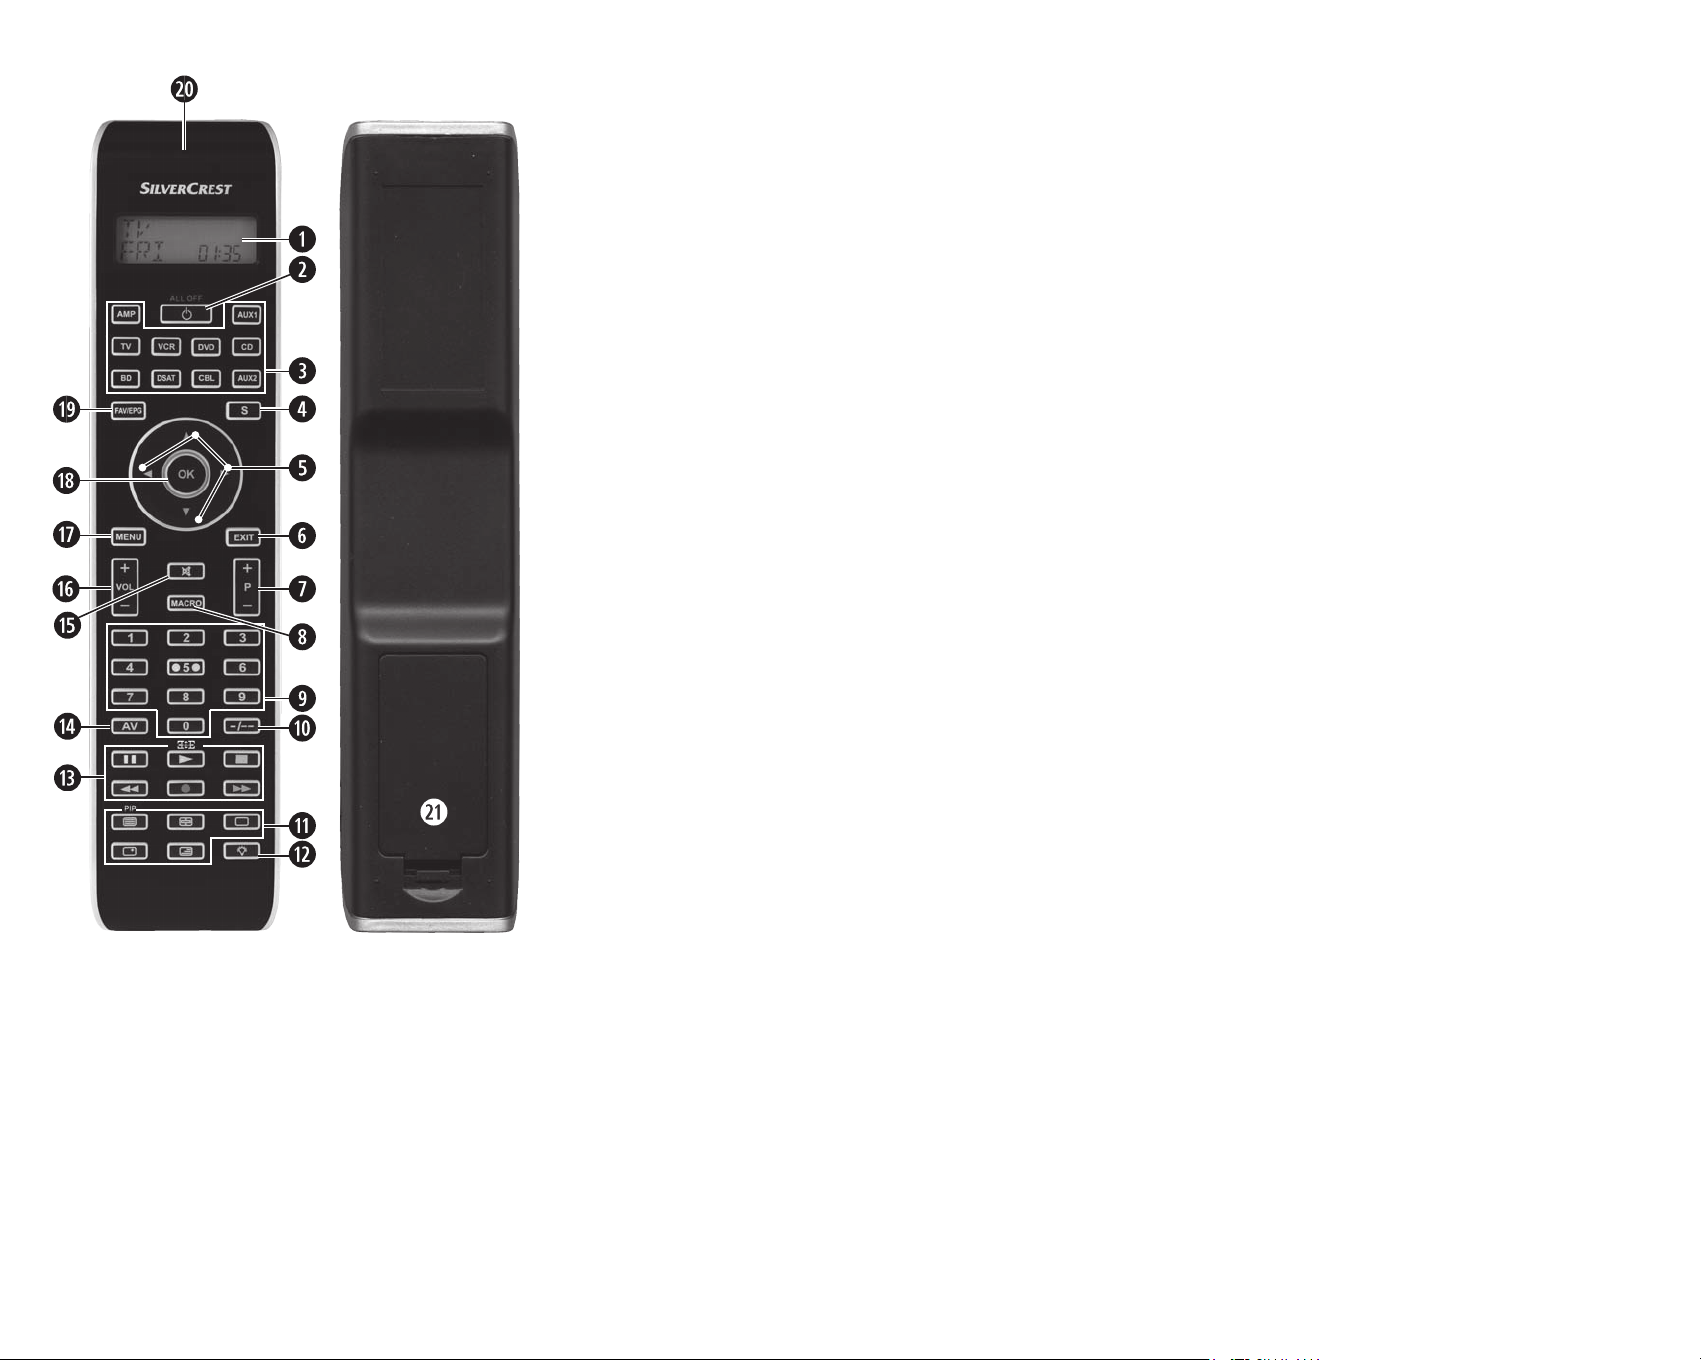
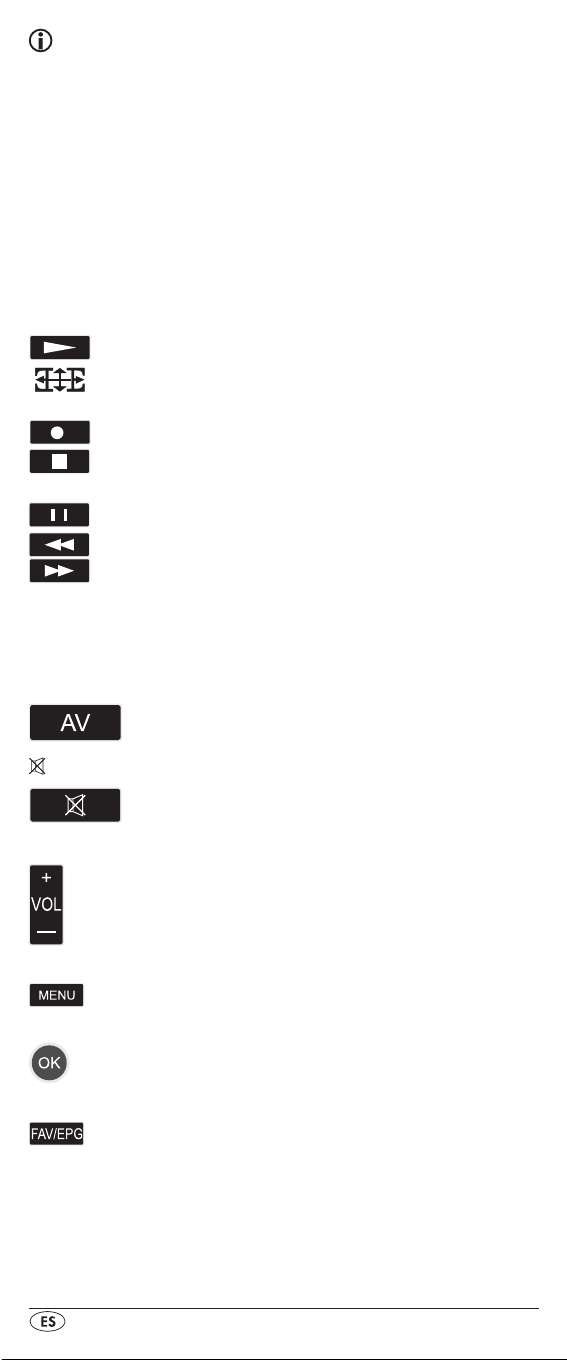
Visióngeneraldelaparato
q Pantalla LCD
w Botón /ALL OFF
e Botones de aparato
r Botón S
t Botones de dirección
y Botón EXIT
u Botones P +/—
i Botón MACRO
o Botones numéricos
a Botón para números de canal de una o dos cifras
s Botones de función de teletexto
- 3 -
Page 6
d Tecla de iluminación
f Tecla de la unidad de disco
g Botón AV
h Silenciamiento
Botones VOL +/—
j
k Botón MENU
l Botón OK
1( Botón FAV / EPG
2) Emisor / receptor de infrarrojos
2! Tapa del compartimento de las pilas
Nota:
• Las funciones aquí descritas hacen referencia al caso ideal
teórico, de que la estructura de los botones del mando a
distancia original correspondiente sea idéntico con el presente mando a distancia universal. Esto corresponde a casos corresponden a casos poco frecuentes. Si no se pueden
simular todas las funciones del mando a distancia original,
no es una deciencia del mando a distancia universal.
• Todos los nombres de marcas en estas instrucciones o
lista de códigos adjuntos son nombres comerciales de las
empresas correspondientes.
Puestaenfuncionamiento
Desembalar el aparato/Comprobar el
volumen de suministro
¡Cuidado!
Mantenga los plásticos de embalaje fuera del alcance de
los niños. Podrían asxiarse.
• Desembale el aparato y los accesorios.
• Compruebe el volumen de suministro:
- Mando a distancia universal (MDU),
- Instrucciones de uso,
- Índice de fabricantes con lista de códigos de los aparatos
- 2 pilas de 1,5 V, tipo AAA/LR03 (micro)
Indicación:Dañosdetransporte
Si aprecia daños de transporte, póngase en contacto con
el fabricante o bien su línea directa de asistencia (véase la
información de la garantía).
Insertar las pilas
¡Atención!
El mando a distancia universal sólo puede utilizarse con pilas de 1,5 Voltios
(tamaño AAA, LR03).
Realice el cambio de las
pilas sin pérdida de tiempo. Los ajustes realizados
- 4 -
Page 7
permanecen memorizados durante aprox. 1 minuto. Si durante este tiempo no ha insertado pilas nuevas, ha de repetir
todos los ajustes de nuevo. Se perderán la hora y la fecha.
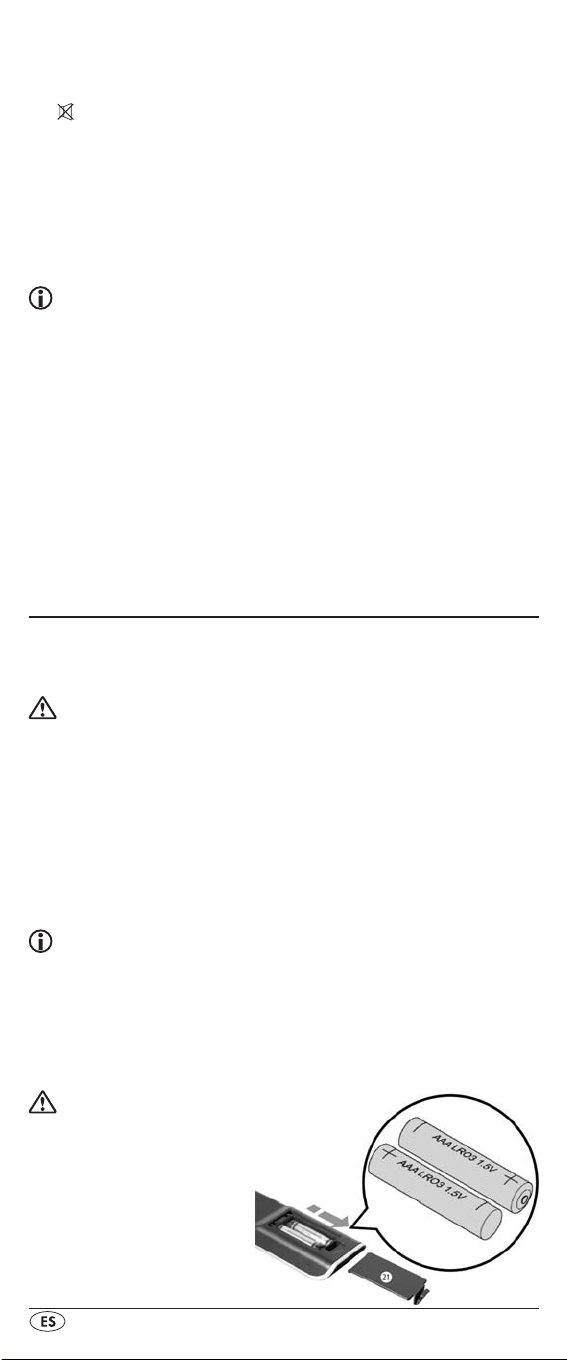
1. Abra la tapa del compartimento de las pilas 2! en el sen-
tido de la echa.
2. Coloque las pilas como se indica en la gura y cierre el
compartimiento de las pilas.
La pantalla LCD q se encuentra activada mientras que estén
las pilas insertadas. La gura siguiente muestre la pantalla
LCD q después de insertar o bien de cambiar las pilas.
Indicación:
Si no se visualiza la pantalla LCD q, compruebe la polaridad
de las pilas o inserte pilas nuevas.
Elementosdeoperación
Pantalla LCD
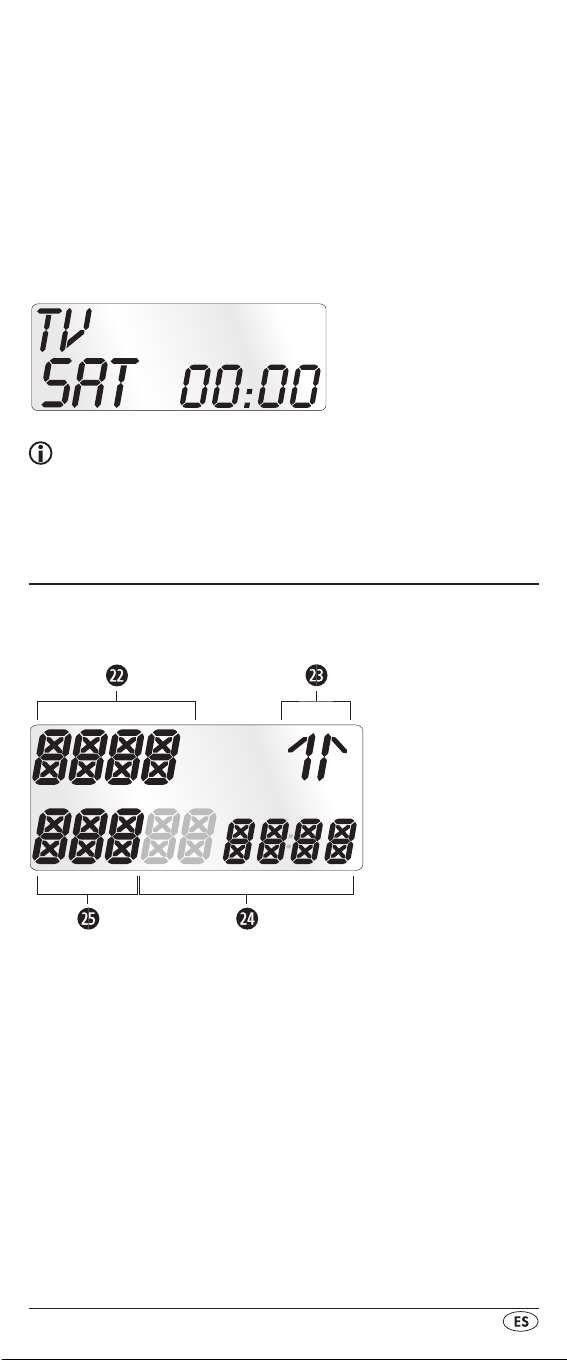
La pantalla LCD q está dividida en campos.
Campo de texto 2@
Aquí se muestra el aparato actual seleccionado, por ejemplo
DVD, TV, VCR, etc.
Símbolo de infrarrojos 2#
Con cada pulsación de botón en la cual se emite una señal
por infrarrojos, se ilumina el símbolo de infrarrojos.
Campo de código / hora 2$
Aquí se muestra la hora o el código del aparato seleccionado actualmente. Cuando se muestra la hora, „
entre los bloques de cifras. Con indicación de la hora en
formato de 12 horas se muestra a la izquierda de la hora la
abreviatura del día.
- 5 -
:“ destella
Page 8
Campo del día de la semana 2%
Aquí puede tomar lectura de la abreviatura del día de la semana actual una vez introducida al fecha.
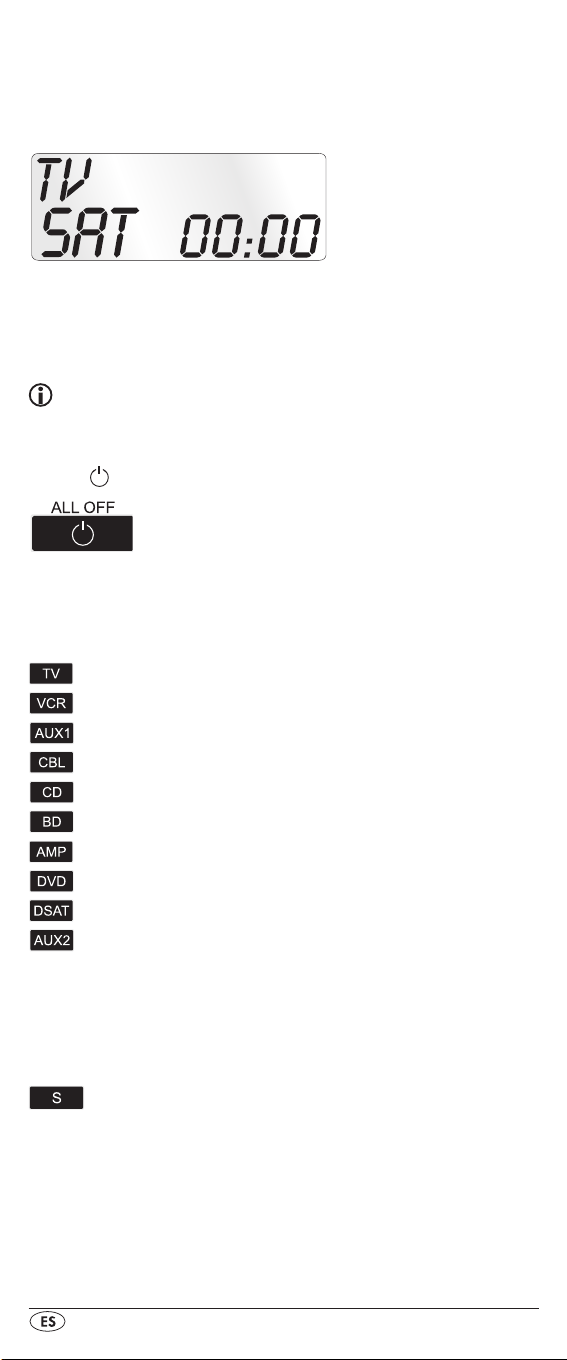
Indicación estándar:
La indicación estándar de la pantalla LCD q se compone de
las indicaciones del aparato actual, p. ej. „TV“, la abreviatura del día de la semana y la hora.
Botones
Indicación:
Evidentemente podrá utilizar las funciones aquí descritas si
el aparato a comandar dispone de dichas funciones.
Botón
/ALL OFF w
; Encender/apagar el aparato; mantenerlo
pulsado unos segundos para encender/
apagar todos los aparatos.
Botones de aparato e
Con los botones de aparato puede seleccionar el aparato
que desea utilizar.
Televisor
Videograbadora
Aparato adicional 1
Receptor con cable
Reproductor de CD
Reproductor BluRay Disc
Amplicador de audio
Reproductor DVD
Receptor satélite digital
Aparato adicional 2
La combinación de teclas indicada no es obligatoria. También puede, por ejemplo, memorizar el código de una videocámara en la posición de memoria TV.
Botón „S“ r
Mantener accionada durante 3 segundos
con el fin de llamar el menú de configuración, accionar brevemente para mostrar la
fecha.
Para acceder a la guía de programas
electrónica (EPG) del aparato de destino,
pulse brevemente la tecla S r, y continuación, la tecla FAV/EPG 1(.
Para controlar la función “PIP” (imagen en
- 6 -
Page 9
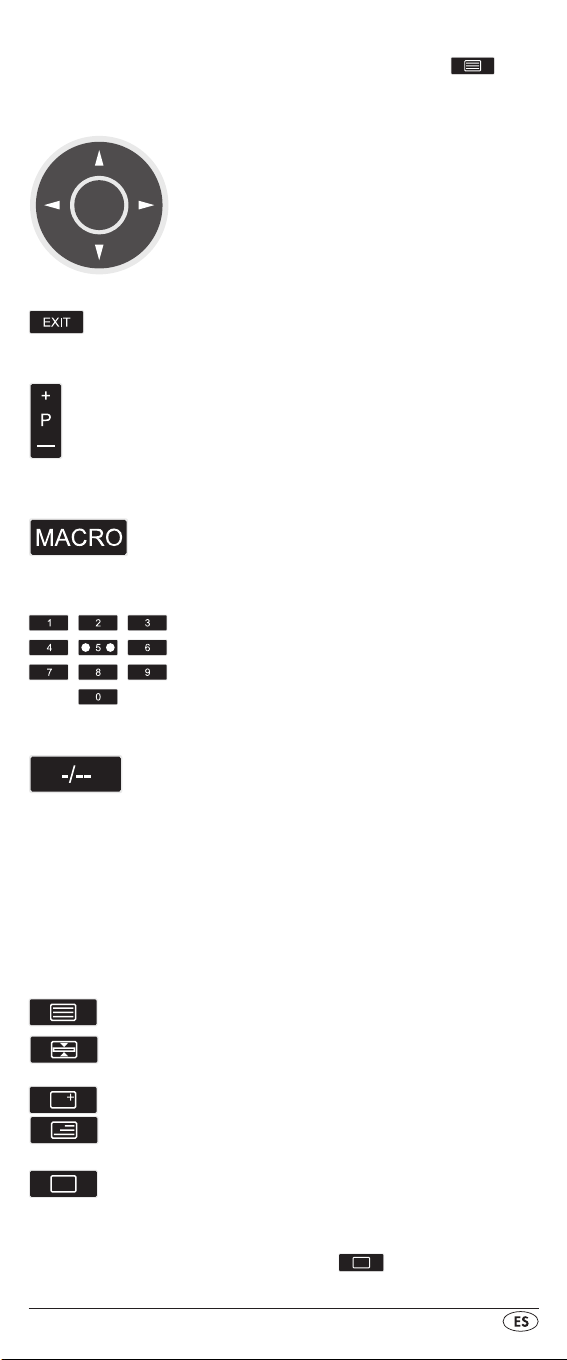
imagen) del televisor,, pulse en primer lugar
la tecla S r seguida de la tecla
de
las teclas de función - videotexto s.
Botones de dirección t
Moverse en los menús hacia arriba, a la
derecha, hacia abajo y a la izquierda
Botón EXIT y
Regresar en el menú a un nivel superior.
Botones P +/— u
Cambiar el canal de recepción.
En modo DVD y CD las teclas controlan
está función SKIP.
Botón MACRO i
El botón MACRO i seguido de un botón
numérico o 1-6, activa la secuencia de comandos memorizada previamente.
Botones numéricos o
Introducir números de programa y de
código de aparato.
Botón para números de canal de una o dos cifras a
Según el tipo de aparato, para seleccionar
un canal de dos cifras pulse primero el
botón a y, acto seguido, introduzca el
número del canal con los botones numéricos o. Pulsando de nuevo la indicación
vuelve a ser de una sola cifra.
Botones de función de teletexto s
En modo de teletexto los botones tienen las funciones siguientes:
Abrir la función de teletexto.
Detener el cambio automático de páginas
de teletexto compuestas por varias páginas.
Aumentar la representación de páginas
Superponer el texto y la imagen de tele-
visión
Cerrar la función de teletexto.
Para llamar la función SWAP del aparato
de destino, pulse brevemente la tecla S r,
seguida de la tecla
- 7 -
.
Page 10
Indicación:
• Esta función de videotexto está disponible sólo en modo
de TV europeo y su televisor deberá ser compatible con
videotexto.
• Además, los botones P +/- u controlan las funciones de
teletexto siguientes:
P+ Avanzar una página
P— Retroceder una página
Teclas de la unidad de disco f
Las teclas de la unidad de disco f controlan aparatos tales
como reproductores de DVD/CD y videograbadoras:
Iniciar la reproducción
Conmutación de formato de imagen
durante el manejo del TV
Grabar
Parar la reproducción/grabación/
rebobinado
Detener la reproducción
Rebobinar
Avanzar
Las marcas de color de las teclas de la unidad de disco hacen
referencia a los campos de color en el videotexto, estas son
controladas mediante funciones de texto emergente.
Botón AV g
Cambiar a la entrada AV.
Silenciamiento h
Encender/apagar el sonido.
Botones VOL+/—j
Ajustar el volumen (Volume).
Botón MENU k
Abrir el menú del aparato controlado.
Botón OK l
Conrme con el botón OK una selección en el menú.
Botón FAV/EPG 1(
Pulse la tecla FAV/EPG para acceder a sus canales
preferidos previamente programados.
Para llamar la función EPG del aparato de destino,
pulse primero brevemente la tecla S r.
- 8 -
Page 11
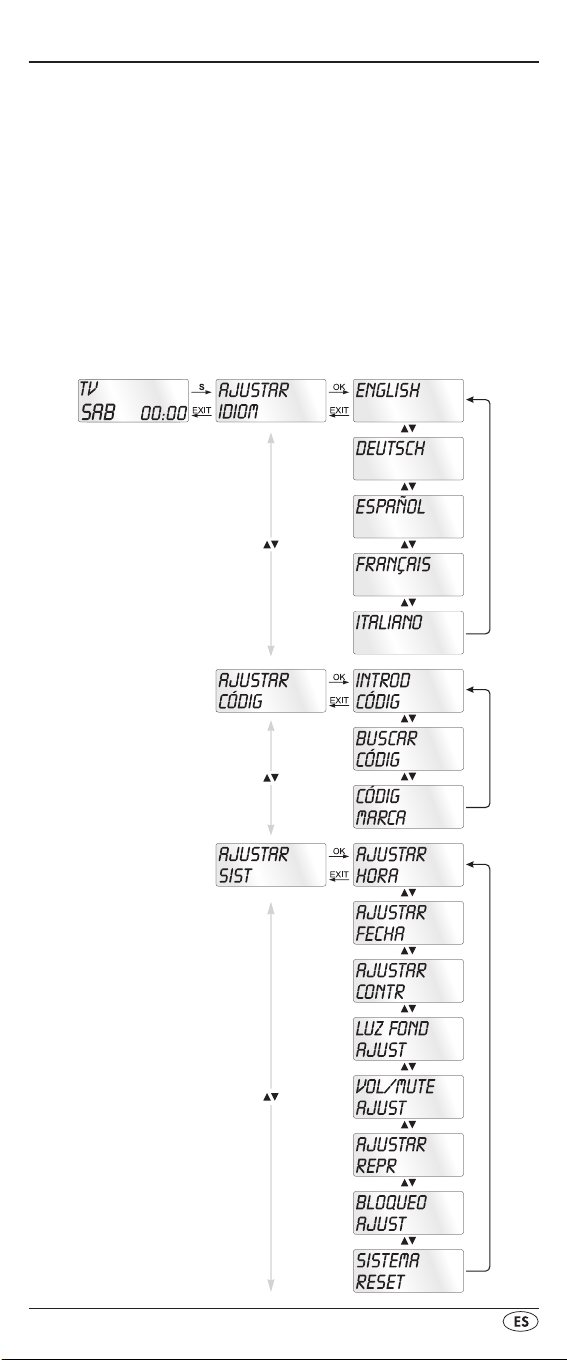
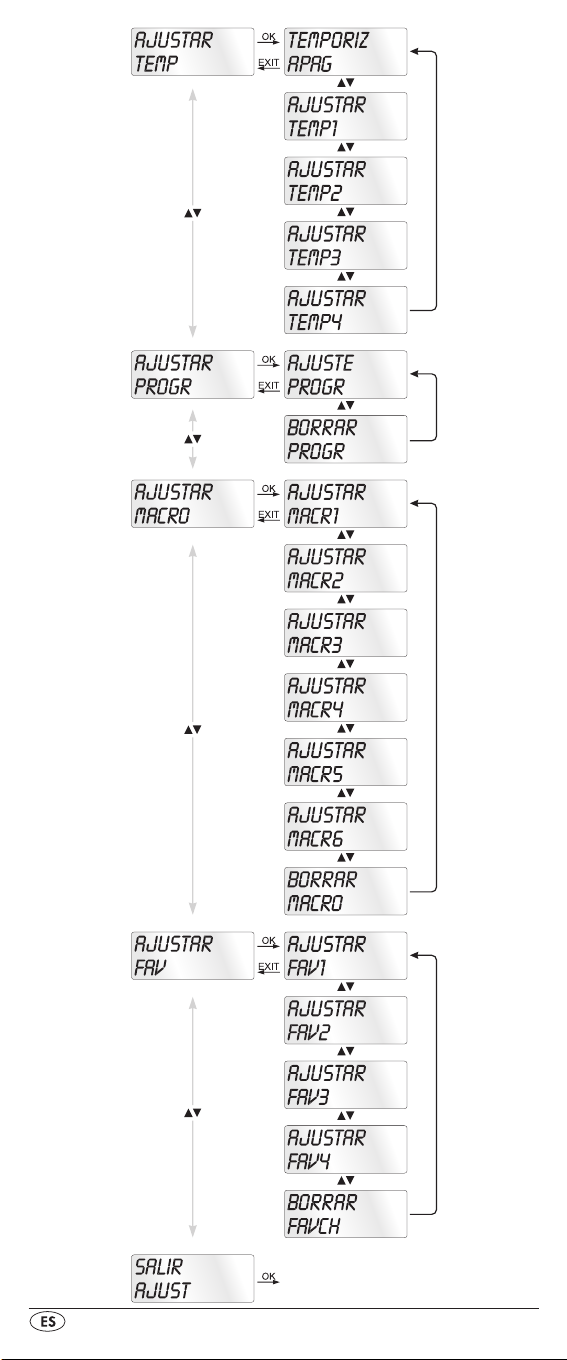
El menú de configuración
En las conguraciones del sistema proceda del modo siguiente:
• Programación del mando a distancia del aparato a controlar
• Ajuste del idioma del menú, la hora, fecha, contraste de
la pantalla, iluminación de fondo, volumen, función de
bloqueo y restablecimiento del sistema
• Conguración del temporizador
• La "programación" de determinados comandos de botones
• Creación de macros
• Creación de favoritos
• etc.
La siguiente página contiene una visión general de la estructura del menú.
- 9 -
Page 12
- 10 -
Page 13

Configurar idiomas del menú
Para la representación del menú del aparato puede elegir
entre 5 idiomas: Inglés, Alemán, Español, Francés e Italiano.
1. Mantenga pulsado el botón S r durante algo más de 3
segundos. Realice las entradas en el menú rápidamente,
puesto que el menú se cierra sin transcurren 15 segundos
sin realizar ninguna entrada.
2. En la pantalla LCD q se visualiza „LANGUAGE SETUP“.
Pulse la tecla OK l.
3. En la pantalla LCD aparece ahora „ENGLISH“ q. Con
las teclas t seleccione el idioma elegido y confirme
con la tecla OK l.
4. Con la tecla EXIT y finaliza el menú.
El menú de aparatos se muestran ahora en el idioma seleccionado. Para el resto de las instrucciones presuponemos
que ha seleccionado el idioma del país.
Configurar código
(programación del mando a distancia)
Están disponibles 3 métodos de programación para el mando
a distancia: Programación mediante búsqueda de código
por marcas, mediante búsqueda de código automática y
mediante entrada directa de código (manual).
En primer lugar debería utilizar la búsqueda de códigos por
marcas, puesto que éste representa el método más rápido de
programación siempre que el fabricante de su aparato se encuentre en la lista de códigos. Como segunda opción se recomienda la entrada directa de código seguida de la búsqueda
automática de código.
Programación mediante búsqueda de código
por marcas
En este método seleccione directamente la marca y el código a
través de la pantalla LCD q.
Para programar su mando a distancia, siga las instrucciones
de operación siguientes:
1. Pulse el botón de aparatos e del aparato para el cual
desea programar el mando a distancia.
2. Mantenga pulsado el botón S r durante algo más de
3 segundos. En la pantalla LCD q aparece „AJUSTAR
IDIOM”. Con la tecla o bien t seleccione „AJUSTAR CÓDIG“ y confirme con la tecla OK l.
3. En la pantalla LCD q aparece ahora „INTROD CÓDIG“.
Seleccione „CÓDIGO MARCA“ con los botones
t y conrme con el botón OK l.
4. A continuación aparece en orden alfabético la primera
marca de la lista de aparatos preprogramados.
- 11 -
Page 14

5. Utilice los 34 botones t para seleccionar las distintas
marcas.
6. Para facilitar el acceso puede saltar con los botones
numéricos o directamente a las letras de inicio:
2 => A 3 => D 4 => G 5 => J
6 => M 7 => P 8 => T 9 => W
Ejemplo para la búsqueda de un código de marca de
TV: Con el botón 5 la indicación salta a la „J“. La pri-
mera marca es „JEC“*. Si dispone por ejemplo de un
aparato de la marca „Kenwood“*, pulse el botón 4 t
para pasar de página hasta que aparezca esta marca.
(* Todos los nombres de marcas son marcas comerciales
de las empresas correspondientes.)
7. La mayoría de los fabricantes utilizan varios códigos diferen-
tes para el mando a distancia. Lo que tiene que descubrir
ahora cuales de los códigos disponibles son los más adecuados para su aparato. En el lado derecho de la pantalla
LCD q, debajo de la marca, se muestra el código actual.
8. Oriente el mando a distancia sobre el aparato actual
y pulse las teclas, que correspondan las funciones de
este aparato, para comprobar estos códigos (excepto
34t, OK l, EXIT y, las teclas de los aparatos
e o las teclas numéricas o).
9. Si funcionan la mayoría de los botones, pulse el botón
OK l, para memorizar el ajuste. En la pantalla LCD q
aparece „OK”. A continuación, el menú se cierra automáticamente.
10. Si no funcionan los botones o si sólo funcionan unas
cuantas, utilice el botón
siguiente código y vuelva a comprobarlo conforme a lo
descrito bajo el punto 8.
11.El botón EXIT y permite regresar un nivel en el menú.
ó t para seleccionar el
Repita estos pasos operativos para todos los aparatos que
desea controlar con el mando a distancia.
Programación introduciendo el código
manualmente
En este modo se puede programar el mando a distancia introduciendo directamente un número de código. Consulte el número código necesario en el índice de fabricantes adjunto a la
lista de códigos de aparatos. Si el código nuevo no es válido,
se restablece el código válido programado como último.
1. Pulse el botón de aparatos e del aparato para el cual
desea programar el mando a distancia.
2. Mantenga pulsado el botón S r durante algo más de
3 segundos. En la pantalla LCD q aparece „AJUSTAR
IDIOM”. Con la tecla o bien t seleccione „AJUSTAR CÓDIG“ y confirme con la tecla OK l.
3. En la pantalla LCD q aparece ahora „INTROD CÓDIG“.
Pulse el botón l para abrir esta función.
4. En la pantalla LCD q aparece el código utilizado actual-
mente para el aparato seleccionado. Ahora parpadea el
- 12 -
Page 15

primer dígito del código esperando que se introduzca el
código. Introduzca el nuevo código de cuatro cifras con los
botones numéricos o. Después de introducir el cuarto dígi-
to parpadea el código completo. Ahora puede comprobar
si el MDU puede controlar con este código el aparato elegido. Pulse las teclas que correspondan a las funciones del
aparato, en el televisor p. ej. PROG +/–. Si el aparato reacciona tal como se desea, conrme la entrada de código
con la tecla OK l. De lo contrario introduzca el siguiente
código posible de la lista y vuelva a comprobarlo.
5. Si el CÓDIGO introducido es válido, se memoriza el
código. En la pantalla LCD
A continuación, el menú se cierra automáticamente. En
caso de un fallo la pantalla LCD q muestra brevemente
„ERROR“ (error), quedando en espera a que se introduzca
el código de nuevo. Repita el paso 4.
6. El botón EXIT y permite subir un nivel en el menú.
qaparece brevemente „OK“.
Programación mediante búsqueda automática
de código
Este proceso puede durar por aparato varios minutos ya que
se ha de recorrer todos los códigos para el aparato seleccionado. Por ello se deberá utilizar este método en caso de no
poder programar el aparato mediante la búsqueda directa
por marcas o bien entrada de código directo y en el caso de
que el aparato no gure en el índice de fabricante con lista
de código de aparatos.
Siga los pasos indicados a continuación para realizar la programación mediante búsqueda automática de códigos.
1. Pulse el botón de aparato e correspondiente al aparato
que quiere controlar (p.ej. VCR).
2. Encienda el aparato que desea controlar con el mando
a distancia. En los aparatos VCR/DVD/CD inserte una
cinta o bien un disco.
3. Mantenga pulsado el botón S r durante algo más de
3 segundos. En la pantalla LCD q aparece „AJUSTAR
IDIOM”. Con la tecla o bien t seleccione „AJUSTAR CÓDIG“ y confirme con la tecla OK l.
4. En la pantalla LCD q aparece ahora „INTROD CÓDIG“.
Pulse el botón o bien t, hasta que en la pantalla
LCD q aparezca „CERCA CODIC“. Oriente el mando a
distancia hacia el aparato y, acto seguido, pulse el botón
OK l para activar el modo "búsqueda automática de
código".
5. Comienza la búsqueda. Durante esta operación, el apa-
rato envía los códigos uno tras otro en orden ascendente.
Esta situación se indica mediante el símbolo de infrarrojos 2#. Cada búsqueda comienza con el código actual
ajustado.
6. Si el aparato reacciona desconectándose, pulse inmedia-
tamente el botón OK l para memorizar el código actual.
En la pantalla LCD q se muestra brevemente „OK“.
- 13 -
Page 16

7. Compruebe si puede controlar con el mando a distancia la
mayor parte de las funciones de su aparato. En caso armativo es muy probable que haya encontrado el código
correcto. Si hay algunas funciones no operativas, puede
iniciar de nuevo la búsqueda automática de códigos a
partir del paso 1.
8. Si el aparato deja de reaccionar, es posible que en el paso
6 no haya pulsado el botón OK l con suciente rapidez.
En este caso, pulse repetidamente el botón EXIT y para salir
del menú y regresar a la indicación estándar.
9. A continuación, mantenga pulsado el botón de aparatos
e correspondiente al aparato cuyo código está buscando. En el lado inferior derecho de la pantalla LCD q se
muestra el código actual. Anote este número.
10. Acto seguido, proceda tal como se explicó en el ca-
pítulo anterior "Programación introduciendo el código
manualmente" y compruebe si el código funciona con la
siguiente combinación de números más baja.
Nota:
1. Cuando la búsqueda de códigos están todos los botones
sin función excepto OK l y EXIT y.
2. Si ha alcanzado la búsqueda automática el nal de la
lista de códigos, se detendrá. La pantalla regresa entonces
a „CERCA CODIC“.
Configurar el sistema
Ajustar la hora
La pantalla LCD q le muestra la hora. La ajusta del modo
siguiente:
1. Mantenga pulsado el botón S r durante algo más de 3
segundos. Aparece la indicación „AJUSTAR IDIOM“. Si
transcurren 15 segundos sin que se realice ninguna entrada, el aparato sale del menú y regresa a la indicación
estándar.
2. Seleccione „AJUSTAR SIST“ con el botón o t y
conrme con el botón OK l.
3. En la pantalla LCD q se visualiza „AJUSTAR HORA“.
Conrme con el botón OK l. En la pantalla LCD q ahora se muestra „TEMPO“ y el formato de la hora (24 HR)
destella.
4. Pulse el botón o t para cambiar al otro formato
de hora (12 HR). Más adelante con la indicación de hora
para visualizar la hora del día se muestra „AM“ o „PM“
antespuesto a la hora. „AM“ representa „AM“ = „ante
meridium“ (por la mañana, 0:00 horas hasta 12:00
horas). „PM“ representa „PM“ = „post meridium“ (por la
tarde, 12:00 horas hasta 0:00 horas). Pulse el botón OK
l para conrmar.
5. Ahora destella la indicación de las horas. Seleccione la
hora actual con el botón o t y pulse el botón OK l.
- 14 -
Page 17

6. Ahora destella la indicación de los minutos. Seleccione
los minutos actuales con el botón o t y pulse el
botón OK l para guardar. Vuelve a aparecer la indicación „AJUSTAR HORA“.
7. Para cerrar este menú o el siguiente, pulse el botón EXIT
y repetidamente hasta que en la pantalla LCD q apa-
rezca la indicación estándar.
Ajustar la fecha
Al pulsar el botón S r, en la pantalla LCD q se muestra la
fecha. Para ajustar la fecha:
1. Mantenga pulsado el botón S r durante algo más de
3 segundos. Aparece la indicación „AJUSTAR IDIOM“.
2.
Seleccione „AJUSTAR SIST“ con el botón o t y
conrme con el botón OK l.
3. En la pantalla LCD q se visualiza „AJUSTAR HORA“.
Pulse el botón t para cambiar a „AJUSTAR FECHA“.
Conrme con el botón OK l.
En la pantalla parpadea el año „2011“. Modique el
4.
año con el botón o t y conrme con el botón OK
l. A continuación, modique el mes con el botón o
t y conrme con el botón OK l. Finalmente destella
el día, que también se puede modicar con el botón o
t.
5. Para guardar, pulse el botón OK l. Vuelve a aparecer la
indicación „AJUSTAR FECHA“.
Ajustar el contraste
El contraste de la pantalla lo puede ajustar del modo siguiente:
1. Mantenga pulsado el botón S r durante algo más de
3 segundos. Aparece la indicación „AJUSTAR IDIOM“.
Seleccione „AJUSTAR SIST“ con el botón o t
2.
y conrme con el botón OK l.
Seleccione „AJUSTAR CONTR“ con el botón o t y
3.
conrme con el botón OK l.
4. En la pantalla LCD q parpadea ahora el valor del con-
traste, que se puede ajustar con el botón o t:
Indicación en la pantalla:
0 = máximo contraste:
15 = mínimo contraste
5. El botón OK l permite memorizar el ajuste elegido. Vuel-
ve a aparecer la indicación „AJUSTAR CONTR“.
Luz de fondo
Se puede ajustar el tiempo durante el cual permanecerá
iluminado el fondo de la pantalla LCD q y las teclas al
terminar de utilizar el mando. Tenga en cuenta que si la luz
permanece encendida mucho rato disminuye la vida útil de
las pilas.
1. Mantenga pulsado el botón S r durante algo más de
3 segundos. Aparece la indicación „AJUSTAR IDIOM“.
- 15 -
Page 18

2. Seleccione „AJUSTAR SIST“ con el botón o t
y conrme con el botón OK l.
Seleccione „LUZ FOND AJUST” con el botón o t
3.
y conrme con el botón OK l.
4. En la pantalla LCD q destellan los segundos de la dura-
ción de la luz de fondo y se pueden ajustar entre 0 y 60
con los botones t. Seleccione „0“ para desconectar completamente la luz de fondo.
5. El botón OK l permite memorizar el ajuste elegido. Vuel-
ve a aparecer la indicación „LUZ FOND AJUST“.
Ajustar el volumen/conmutador silenciador
general
Para no tener que presionar una tecla de dispositivo cada
vez que desee regular el volumen o utilizar el conmutador
silenciador, el MDU dirige estas funciones siempre a un
dispositivo. Puede denir usted mismo este dispositivo de
destino.
1. Mantenga pulsada la tecla S r durante un poco más de
3 segundos. Aparece la indicación „AJUSTAR IDIOM“.
2. Con la tecla o t, seleccione “AJUSTAR SIST” y
conrme la selección con la tecla OK l.
3. Con la tecla o t, seleccione “VOL/MUTE AJUST”
y conrme la selección con la tecla OK l.
4. La pantalla LCD q muestra „TODO VOL AJUST“. Al pul-
sar la tecla OK l, la indicación cambia a „TODO VOL
MODO“.
5. Pulse ahora la tecla de dispositivo e correspondiente al
dispositivo que responderá a la regulación de volumen
general.
6. Si el dispositivo indicado dispone de regulación de volu-
men, se mostrará brevemente „CORRECTO“ y se cerrará
el menú. La regulación de volumen afectará a partir de
entonces al dispositivo indicado de este modo.
7. Si este dispositivo no dispone de regulación de volumen,
el MDU no permitirá la selección y mostrará “ERROR
VOLUM”. También en este caso se cerrará el menú. La
regulación de volumen seguirá entonces afectando al
dispositivo anterior.
También puede desactivar la regulación de volumen general
para determinados aparatos.
1. Seleccione para ello el menú „VOL/MUTE AJUST“ con
la tecla o t la función „MODO VOL AJUST“ y
confirme con la tecla OK l. En la pantalla LCD q aparece „MODO VOL MODO“.
2. Pulse ahora la tecla de dispositivo e correspondiente
al dispositivo que se debe excluir de la regulación de volumen general. La pantalla LCD q mostrará „CORRECTO“
y la regulación de volumen general no estará activa al
utilizar el MDU en el modo de funcionamiento de uno de
los dispositivos seleccionados.
- 16 -
Page 19

Puede cancelar en cualquier momento la configuración
efectuada en el menú “VOL/MUTE AJUST”.
1. Seleccione para ello el menú „VOL/MUTE AJUST“ “
con la tecla o t la función „VOL/MUTE RESET“
y confirme con la tecla OK l.
2. Con el mensaje CONFIRM RESET, la pantalla LCD q le
solicitará que conrme la acción pulsando la tecla OK l.
Si desea borrar las configuraciones pulse la tecla OK
l, la indicación de “CORRECTO” confirma el borrado
de la asignación de aparato respecto a la regulación de
volumen global. Pulse en cambio la tecla EXIT y para
cancelar la eliminación.
Seleccionar el aparato de cinta/disco para el
mando directo
Puede seleccionar un aparato de cinta o de disco que desea
manejar con las teclas de la unidad de disco f, sin tener que
pulsar previamente a la tecla de aparato e correspondiente.
1. Mantenga pulsado el botón S r durante algo más de
3 segundos. Aparece la indicación “AJUSTAR IDIOM”.
2. Con la tecla o tecla t seleccione „AJUSTAR SIST“
y conrme la selección con la tecla OK l.
3. En la pantalla LCD q se visualiza „AJUSTAR HORA“.
Pulse el botón t, para cambiar a „AJUSTAR REPR“.
Conrme con la tecla OK l.
4. Con la tecla o tecla t seleccione el aparato que
desea que reaccione al MDU, al usar las teclas de la
unidad de disco f. Conrme con la tecla OK l.
5. Si en vez de seleccionar un aparato, elige “OFF” y conr-
ma con la tecla OK l, desconectará el mando directo.
Si selecciona “REINIC” y confirma con la tecla OK l
activará los ajustes de fábrica preprogramados para esta
función.(DVD).
6. La indicación LCD q muestra „CORRECTO“ y el aparato
seleccionado no se puede manejar directamente con las
teclas de la unidad de disco f.
Ajustar la función de bloqueo
Con la función de bloqueo puede bloquear el acceso a todos los menús de configuración.
1. Mantenga pulsada la tecla S r durante un poco más de
3 segundos.
2. Con la tecla o t, seleccione “AJUSTAR SIST” y
conrme la selección con la tecla OK l.
3. Con la tecla o t, seleccione “BLOQUEO AJUST”
y conrme la selección con la tecla OK l. La pantalla
LCD q muestra la conguración actual.
4. Con la tecla o t, seleccione la opción “BLO-
QUEAD” (bloqueo activado) o bien “DESBLOQ” (bloqueo desactivado).
5. Guarde la conguración pulsando la tecla OK l. En la
pantalla LCD q aparecerá de nuevo “BLOQUEO AJUST”.
- 17 -
Page 20

Restaurar el sistema
Con esta función puede cancelar la ocupación de todas o
cada una de las teclas de aparatos.
1. Mantenga pulsado el botón S r durante algo más de
3 segundos. Aparece la indicación „AJUSTAR IDIOM“.
2.
Seleccione „AJUSTAR SIST“ con el botón o t
y conrme con el botón OK l.
Seleccione „SISTEMA RESET“ con el botón o t
3.
y conrme con el botón OK l.
4. Ahora puede seleccionar con la tecla o tecla t la
función deseada. Para borrar la ocupación (código) de
todas las teclas de aparatos e así como todos los datos
acerca de los macros, temporizador así como funciones
aprendidas, seleccione „TODO RESET“ y conrme con la
tecla OK l.
5. En la pantalla LCD q se visualiza ahora „CONFIRM
RESET“. Conrme el borrado con la tecla OK l. A
continuación, la pantalla LCD q muestra “CORRECTO
RESET”. Las informaciones han sido borradas y el menú
es nalizado.
6. Para borrar sólo la ocupación de teclas de aparatos in-
dividuales e, seleccione „MODO RESET“ y presione la
tecla OK l. La pantalla LCD q muestra ahora „MODO“
solicitando así que se pulse una tecla de aparato e cuya
ocupación desea borrar. A continuación se visualiza brevemente „CORRECTO“ (= realizado) y de nuevo podrá
leer “MODO” en la pantalla LCD. Pulse según necesidad
otras teclas adicionales de aparato e, para borrar también sus ocupaciones correspondientes.
7 También puede abandonar el menú pulsando la tecla
EXIT y.
Configurar temporizador
El MDU dispone de dos modos de temporización: el temporizador de desconexión y el temporizador de eventos.
Temporizador de desconexión
1. Pulse el botón de aparato e correspondiente al aparato
que quiere controlar (p.ej. VCR).
2. Mantenga pulsado el botón S r durante algo más de
3 segundos. Aparece la indicación „AJUSTAR IDIOM“.
3. Pulse el botón o t hasta que aparezca „AJUSTAR
TEMP“. Pulse el botón OK l para que en la pantalla
LCD q aparezca „TEMPORIZ APAG“. Para seleccionar
esta función, pulse el botón OK l.
4. En la parte inferior derecha de la pantalla LCD q des-
tellan ahora los minutos del tiempo de funcionamiento
restante para el aparato seleccionado. Seleccione un
valor entre 1 y 99 minutos utilizando el botón o t.
Pulse el botón OK l para conrmar. Si está programado
el temporizador Sleep, la pantalla LCD q muestra “
la derecha, junto a la hora.
- 18 -
z
z
” a
Page 21

5. Coloque el mando a distancia de forma que las señales
infrarrojas puedan llegar al aparato que se quiere desconectar. Una vez transcurrido el tiempo seleccionado, el
mando a distancia apagará el aparato en cuestión.
6. Si pulsa ahora la tecla S r, se mostrará “SL” en la parte
inferior izquierda de la pantalla LCD q.
Temporizador de eventos
El mando a distancia dispone de 4 temporizadores de eventos que permiten enviar determinadas series de combinaciones de botones a una hora especíca.
1. Mantenga pulsado el botón S r durante algo más de
3 segundos. Aparece la indicación „AJUSTAR IDIOM“.
2. Seleccione „AJUSTAR TEMP“ con el botón o t y
conrme con el botón OK l. en la pantalla LCD q apa-
rece ahora „TEMPORIZ APAG“. Seleccione la posición de
memoria que quiere utilizar („AJUSTAR TEMP 1“ a „AJUSTAR TEMP 4“) con el botón o t y conrme con el
botón OK l.
3. Ahora destellan las horas de la hora en la cual se debe
ejecutar la combinación de botones pertinente. Seleccione la hora deseada con el botón o t y pulse el
botón OK l para conrmar.
4. Ahora destellan los minutos de la hora en la cual se debe
ejecutar la combinación de botones pertinente. Seleccione el minuto deseado con el botón o t y pulse el
botón OK l para conrmar.
5. En la pantalla LCD q se muestra „TEMP X TECLA“ (X re-
presenta el temporizador utilizado). A continuación, pulse
el botón del aparato e que se debe utilizar seguido de
la secuencia de botones deseada.
6. De forma predeterminada, los comandos de temporizador
se emiten a intervalos de 1 segundo. Dado que muchos
dispositivos tardan un poco en reaccionar, es posible que
la secuencia de comandos de temporizador se emita
con excesiva rapidez al dispositivo. En ese caso puede
programar una pausa de 5 - 21 segundos antes de cada
comando. Para ello, pulse repetidas veces si es necesario
la tecla MACRO i. En la parte derecha inferior de la
pantalla LCD q se muestra la duración actual de las pausas en segundos.
7. Para guardar las entradas y regresar a la visión general
de temporizadores, pulse el botón S r.
8. Si fuera necesario, proceda de la misma forma para pro-
gramar más temporizadores en otra posición de memoria.
9. Si está programado el temporizador de eventos, la pan-
talla LCD q mostrará el símbolo del temporizador “
la derecha, junto a la hora.
” a
Nota:
1. En cada posición de memoria del temporizador se pue-
den programar como máximo 14 botones. Después de
indicar 14 botones, la secuencia se almacena automáticamente y en la pantalla LCD q aparece „COMPLET“.
- 19 -
Page 22

2. Si transcurren 15 segundos sin que se realice ninguna
entrada, el aparato regresa a la indicación estándar también en este menú.
Borrar Timer
De este modo puede borrar un temporizador de evento o de
Sleep programado:
1. Seleccione el temporizador que desea borrar (véase
capítulo temporizador Sleep / temporizador evento) y
accione la tecla OK l. En la pantalla LCD q aparece
„BORRAR TEMP“.
2. Pulse la tecla OK l. La indicación LCD q cambia a
„CONFIRM BORR“.
3. Pulse de nuevo la tecla OK l, para borrar el tempori-
zador. La pantalla LCD q conrma el borrado con exito
con la indicación de „CORRECTO“.
Configurar aprendizaje
El mando a distancia universal (MDU) puede aprender y
memorizar señales de botones de un mando a distancia original. Sino funciona el MDU conforme a los métodos
de programación descritos o no puede ejecutar todos los
comandos, intente realizar la programación del MDU con la
ayuda del/ de los mando/s a distancia originales.
• Utilice pilas nuevas para el MDU y para el mando a
distancia original.
• Mantenga al menos un metro de distancia respecto a
otras fuentes de luz. Las fuentes de luz pueden interferir
en la transmisión de infrarrojos.
• Coloque el MDU y el mando a distancia original a una
distancia de 20 hasta 50 mm entre sí sobre una base
plana de modo que los diodos de infrarrojos 2) queden
enfrentados.
Nota:
1. Utilice a continuación los botones siguientes pero no
para la función de programación: todos los botones de
aparato e, el botón MACRO i, el botón S r y el botón
EXIT y.
2. Si durante la programación, mientras aparece „PRO-
GRAM“ (programación) en la pantalla, no se pulsa ningún
botón del mando a distancia original en el transcurso de
30 segundos, el menú de programación se cierra. Este
modo no se puede cerrar pulsando un botón del MDU.
3. La memoria puede alojar en total 150 comandos. Si la
memoria esta llena, la pantalla LCD q muestra „LEARN
FULL“ y cierra el modo de programación.
4. Pulse el botón EXIT y para regresar al estado precedente
(excepto durante las indicaciones „PROGRAM TECLA“ y
„PROGRAM“).
- 20 -
Page 23

Función de programación de códigos
1. Pulse el botón del aparato e para el cual debe progra-
marse un código de botones en el MDU.
2. Mantenga pulsado el botón S r durante algo más de
3 segundos. Aparece la indicación „AJUSTAR IDIOM“.
3. Seleccione „AJUSTAR PROGR“ (programación) con el
botón o t y, acto seguido, pulse el botón OK l.
4. En la pantalla LCD q se visualiza „AJUSTE PROGR“. A
continuación, pulse el botón OK l. En la pantalla LCD
q aparece „PROGRAM TECLA” (seleccionar botón).
5. Pulse primero sobre el mando a distancia universal (MDU)
el botón sometido a la programación. En la pantalla LCD
q se visualiza „PROGRAM“. El MDU espera la señal de
infrarrojos del mando a distancia original.
Indicación:
si la indicación no cambia a „PROGRAM“, ello signica
que se ha seleccionado un botón para el cual no se puede programar ningún código de botones.
6. Enfrente los sensores de infrarrojos 2) de ambos mandos a
distancia entre sí.
7. Mantenga pulsado el botón elegido del mando a distan-
cia original hasta que en la pantalla LCD q del MDU
aparezca „CORRECTO“ o bien „PROGR ERROR“.
8. Si aparece en la pantalla LCD q „CORRECTO“ (proceso
con éxito), puede continuar la programación de otros botones a partir del paso 5. Si aparece „PROGR ERROR“
(el proceso no ha tenido éxito), repita de nuevo el proceso a partir del paso 5.
9. Para cancelar / finalizar el proceso de aprendizaje, pulse
la tecla S y a continuación durante la visualización de la
“PROGRAM TECLA”, accione la tecla EXIT y, las veces
necesarias hasta que aparezca la indicación estándar en
la pantalla LCD q. Si mientras se muestra la indicación
„PROGRAM“ transcurren 30 segundos sin que se realice
ninguna operación, el aparato cierra el menú.
Borrar todas las teclas programadas de todos los
aparatos
1. Mantenga pulsado el botón S r durante algo más de
3 segundos. Aparece la indicación „AJUSTAR IDIOM“.
Seleccione „AJUSTAR PROGR“ con el botón o t
2.
y, acto seguido, pulse el botón OK l. En la pantalla LCD
q se visualiza „AJUSTE PROGR“.
Seleccione „BORRAR PROGR“ (borrar programación)
3.
con el botón o t y conrme con el botón OK l.
En la pantalla LCD q aparece „CONFIRM BORR“ (conrmar borrado).
4. Conrme con el botón OK l. En la pantalla LCD q apa-
rece „CORRECTO“. Se han eliminado todas las teclas programadas. Finalmente, el menú se cierra automáticamente.
Indicación:
Cuando en la pantalla LCD se muestra „CONFIRM BORR“,
puede cancelar la operación de borrado con el botón EXIT y.
- 21 -
Page 24

Configurar macros
Con la función MACRO puede ejecutar hasta 16 comandos
de botones pulsándolos una sola vez, es decir que varios
comandos de control memorizados previamente pueden
activarse con un botón de MACRO. Para ello están a disposición 6 posiciones de memoria de macros.
Programar una macro
Para la programación de macros proceda del modo siguiente:
1. Mantenga pulsado el botón S r durante algo más de
3 segundos. Aparece la indicación „AJUSTAR IDIOM“.
Seleccione „AJUSTAR MACRO“ con el botón o t
2.
y conrme con el botón OK l. En la pantalla aparece
„AJUSTAR MACR1“.
Seleccione la posición de memoria que quiere programar
3.
(AJUSTAR MACR 1 - 6) con el botón o t y conrme
con el botón OK l.
4. En la pantalla LCD q se visualiza „PASO MACR”. A con-
tinuación, pulse consecutivamente los botones pertinentes
(máx. 16). El primer botón de la secuencia debería ser
un botón de aparato e.
5. De forma predeterminada, los comandos macro se emiten
a intervalos de 1 segundo. Dado que muchos dispositivos
tardan un poco en reaccionar, es posible que la secuencia de comandos macro se emita con excesiva rapidez al
dispositivo. En ese caso puede programar una pausa de
5 - 21 segundos antes de cada comando. Para ello, pulse
(repetidas veces si es necesario) la tecla MACRO i. En
la parte inferior derecha en la pantalla LCD q se muestra
la duración actual de la pausa en segundos.
6. Una vez alcanzado el número máximo de botones, en la
pantalla LCD q aparece „COMPLET“.
7. Memorice la entrada con el botón S r. En la pantalla
LCD q aparece „AJUSTAR MACRO”.
8. Si al seleccionar la macro que se va a programar (paso
3) se selecciona una posición de memoria que ya está
ocupada, se sobrescribe la macro existente.
9. Repita el proceso a partir del paso 3 para crear macros
adicionales.
10.Pulse el botón EXIT y para retroceder un nivel en el
menú, excepto durante la entrada de comandos de
botón.
Nota:
1. En una macro puede memorizar hasta 16 comandos de
botones. Después de introducir el comando 16, aparece
“COMPLET” en la pantalla LCD q.
2. Para salir del modo sin guardar, deje que pasen 15 se-
gundos sin realizar ninguna operación.
3. En el modo „PASO MACR“ sólo se puede regresar al
estado anterior con el botón S r.
- 22 -
Page 25

Ejemplo: Usted desea memorizar una cadena de comandos
en una macro. Comenzamos en el modo „PASO MACR”.
Cadena de comandos elegida: Encender la televisión =>
PAUSA => cambiar a la entrada AV => encender el dispositivo DVD => PAUSA => reproducir DVD.
Para ello deberá introducir los siguientes comandos de
botones en el modo „PASO MACR“:
=> => (duración de pausa) => =>
=> => (duración de pausa) =>
Ejecutar la macro
Para ejecutar una macro previamente programado deberá
proceder del modo siguiente:
1. Pulse el botón MACRO i.
2. Pulse el botón numérico o correspondiente para abrir la
macro deseada (1-6). Ejemplo: para ejecutar la macro 3,
pulse en primer lugar el botón MACRO
tón numérico „
Borrar todas las macros
Para borrar todas las macros programadas previamente,
proceda del siguiente modo:
1. Mantenga pulsado el botón S r durante algo más de
3 segundos. Aparece la indicación „AJUSTAR IDIOM“.
Seleccione „AJUSTAR MACRO“ con el botón o t
2.
y conrme con el botón OK l. En la pantalla aparece
„AJUSTAR MACR1“.
Seleccione „BORRAR MACRO“ con el botón o t
3.
y conrme con el botón OK l.
4. En la pantalla LCD q aparece „CONFIRM BORR” (conr-
mar borrado). Conrme el proceso de borrado con el botón
l. En la pantalla LCD q se muestra breve-mente „CORREC-
TO“. Se borran todas las macros y se cierra el menú.
“ (dentro de un intervalo de 5 segundos).
iseguido del bo-
Nota:
1. Cuando en la pantalla LCD q se muestra „CONFIRM
BORR“ la operación de borrado se puede cancelar con
el botón EXIT y.
2. Algunas macros no se pueden borrar, sólo sobrescribir.
Canaldefavoritos
Indicación:
Esta función permite guardar como favoritos todos sus
canales predilectos.
Programar los favoritos
Su canal de televisión favorito lo puede memorizar del modo
siguiente:
1. Pulse el botón de aparatos e del aparato para el cual
desea guardar un favorito.
2. Mantenga pulsado el botón S r durante algo más de
3 segundos. Aparece la indicación „AJUSTAR IDIOM“.
- 23 -
Page 26

3. Seleccione „AJUSTAR FAV“ con el botón o t
y conrme con el botón OK l. En la pantalla aparece
„AJUSTAR FAV 1“.
Seleccione la posición de memoria que quiere programar
4.
(AJUSTAR FAV 1 - 4) con el botón o t y conrme
con el botón OK l.
5. En la pantalla LCD q se visualiza „FAV PASO”.
A continuación, pulse de forma sucesiva los botones
(4 como máximo) para abrir el canal favorito deseado.
6. Una vez alcanzado el número máximo de botones, en la
pantalla LCD q aparece „COMPLET“.
7. Memorice la entrada con el botón S r. En la pantalla
LCD q aparece „AJUSTAR FAV”.
8. Si al seleccionar el favorito que se va a programar (paso
4) se selecciona una posición de memoria que
ya está ocupada, se sobrescribe el favorito existente.
9. Repita los pasos para crear más favoritos.
10.Pulse el botón EXIT y para retroceder un nivel en el menú,
excepto durante la entrada de comandos de botón.
Indicación:
La entrada del número de canal puede variar según modelo
y marca del aparato seleccionado. En algunos casos, antes
de seleccionar un canal de más de un número debe pulsarse
primero el botón
a.
Abrir los favoritos
Para abrir un favorito programado previamente, pulse el botón FAV/EPG 1( seguido del botón numérico correspondiente a la posición de memoria deseada (1 - 4).
Borrar todos los canales FAV
Para borrar todos los favoritos programados previamente,
proceda del siguiente modo:
1. Mantenga pulsado el botón S r durante algo más de
3 segundos.
Seleccione „AJUSTAR FAV“ con el botón o t y
2.
conrme con el botón OK l. En la pantalla aparece
„AJUSTAR FAV 1“.
Seleccione „BORRAR FAVCH“ con el botón o t
3.
y conrme con el botón OK l.
4. En la pantalla LCD q aparece „CONFIRM BORR” (con-
rmar borrado). Conrme el proceso de borrado con el
botón OK l.
En la pantalla LCD q se muestra brevemente „CORRECTO“. Se borran todos los favoritos y se
cierra el menú.
Nota:
1. Cuando en la pantalla LCD q se muestra „CONFIRM
BORR“ la operación de borrado se puede cancelar con
el botón EXIT y.
2. Algunos favoritos no se pueden borrar, sólo sobrescribir.
- 24 -
Page 27
Regulacióndelvolumen
Vol +/—, (silenciamiento)
Para subir el volumen pulse el botón „VOL +“. Con el botón
„VOL —“ lo reduce. Para enmudecer el sonido, pulse el botón
h. Pulsando de nuevo el botón, se activa de nuevo el
sonido.
Si no ha ajustado ningún otro aparato como aparato destino
para la regulación de volumen global, se activa al accionar
las teclas VOL +/— j de la MDU de forma predeterminada,
la regulación de volumen del televisor, indistintamente si ha
pulsado previamente cualquier tecla del aparato e. Esto no
se aplica a dispositivos “AMP”, “DVD” y “DSAT”, pues se
puede presuponer que estos dispositivos disponen de regulación de volumen propia.
Paralaoperación
> Para utilizar un aparato programado con el MDU, pulse
primero el botón del aparato e correspondiente. Señale a
continuación con el MDU sobre dicho aparato y presione el botón elegido.
> Utilice los botones numéricos o del mismo modo que el
mando a distancia original. Antes de realizar una entrada
de dos dígitos, pulse si procede el botón
> Pulse la tecla S r y a continuación la tecla FAV/EPG 1(,
para iniciar en el aparato equipado con la función de
guía de programa electrónico.
> Al pulsar la tecla S r, se muestra la hora en la parte infe-
rior derecha de la pantalla LCD q durante 10
segundos.
> Mientras se muestra pulsado un botón de aparato e, en
la parte inferior derecha de la pantalla LCD q se muestra
el código activo para este aparato.
> El botón MENU k permite activar el diálogo de congu-
ración de los aparatos de destino correspondientes.
> Pulse la tecla de iluminación d para activar o desactivar
la pantalla y la iluminación de las teclas.
a.
Desconexión total
Nota:
El botón ALL OFF (desconexión total) w permite apagar automáticamente todos los aparatos que están encendidos. Dependiendo del aparato, esta función puede volver a
encender aquellos aparatos que ya están apagados. Para
ello mantenga pulsada la tecla ALL OFF w durante algunos
segundos. Puede tardar hasta 10 segundos hasta que se
desconecten todos los aparatos. Funciona sólo bajo las condiciones siguientes:
1. Existe una conexión visual entre todos los aparatos y el
mando a distancia universal.
- 25 -
Page 28
2. La búsqueda automática de código, búsqueda de código por marcas y funciones de MACRO no se encuentran
activas.
3. Todos los aparatos de destino tienen que ser aptos para
poder ser apagados mediante el mando a distancia.
Para volver a encender automáticamente todos los aparatos,
vuelva mantenga pulsado nuevamente el botón
hasta que se hayan encendido todos los aparatos.
w
Limpiezayalmacenamiento
¡Atención!
¡Al realizar la limpieza tenga cuidado de que no
penetre humedad en la carcasa del aparato! ¡De lo
contrario existe riesgo de un daño irreparable para
el aparato!
> Limpie la carcasa del aparato únicamente con un paño
ligeramente húmedo con detergente suave.
> Almacene el aparato exclusivamente en un entorno con-
forme a las indicaciones en las características técnicas.
> Antes de almacenar extraiga las pilas con el n de que
no se pueda dañar el aparato por si se derramasen durante el almacenamiento.
Error/Solución
Su aparato no reacciona al MDU.
> Compruebe las pilas. Tienen que disponer de tensión su-
ciente e insertadas correctamente.
> ¿Ha pulsado previamente el botón de aparato e correcto
correspondiente al aparato de destino elegido?
> Compruebe si el aparato de destino tiene programado
el código correcto (véase apartado „ Conguración de
códigos“).
El MDU no transmite los comandos correctamente.
> Pulse el botón del aparato e correspondiente para poner
el MDU en el modo correcto.
> Las pilas tienen que disponer de tensión suciente e inser-
tadas correctamente.
> Posiblemente este usando un código incorrecto. Inicie la
búsqueda de código por marcas, la búsqueda automática
de códigos o bien la entrada directa de códigos (de forma manual).
El MDU no cambia de canales en el aparato.
> Pulse el botón del aparato e correspondiente para poner
el MDU en el modo correcto.
> Si el mando a distancia original no dispone del botón
„-/- -“, cambie los canales con los botones P +/— u
o con los botones numéricos o.
> Si sigue sin funcionar, la causa puede ser que está activa-
do el bloqueo de censura en el aparato de destino.
- 26 -
Page 29

Algunos botones del MDU no funcionan correctamente.
> Su MDU posiblemente no disponga de todas las funcio-
nes del mando a distancia original del aparato.
> Posiblemente no ha programado el código más óptimo.
Busque un código con el que pueda controlar más funciones del aparato de destino.
El MDU no reacciona después de pulsar un botón.
> Las pilas tienen que disponer de tensión suciente e inser-
tadas correctamente.
> Oriente el MDU hacia el aparato.
La pantalla LCD q no muestra nada.
> Las pilas tienen que disponer de tensión suciente e inser-
tadas correctamente.
> El contraste está ajustado demasiado bajo. Aumente el
ajuste del contraste.
Evacuación
En ningún caso deberá tirar el aparato a la
basura doméstica. Este producto está sujeto
a la directiva europea 2002/96/EC.
Mando a distancia universal
• Evacue el mando a distancia universal o partes de ella
por medio de una empresa de evacuación de residuos
autorizada o a través de las instalaciones de evacuación
de residuos municipales.
• Preste atención a las normas en vigor. En caso de dudas
póngase en contacto con su centro de evacuación.
Pilas/baterías
• Las pilas/baterías no pueden ser desechadas con la
basura doméstica.
• Las pilas pueden contener sustancias tóxicas perjudiciales
para el medio ambiente. Por ello, evacue las pilas/baterías de acuerdo con las disposiciones ociales vigentes.
• Cada consumidor está obligado legalmente a entregar
las pilas/baterías en un punto de recogida de residuos
de su municipio, barrio o en un establecimiento. Con esta
obligación se consigue que las pilas / baterías se desechen de forma respetuosa con el medio ambiente.
• Devuelva las pilas/acumuladores en estado descargado.
Embalajes
• Evacue todos los materiales de embalaje respetando
el medio ambiente.
- 27 -
Page 30

Característicastécnicas
Aparatos que se
pueden controlar: 10
Medidas A x A x P: 217 x 50 x 22 mm
Peso : 133 g (incl. pilas)
LED de infrarrojos: láser de clase 1
Alimentación de corriente
pilas: 2 x 1,5 V tipo AAA/LR03 (Micro)
(incluida en el volumen de suministro)
Temperatura de servicio : + 5 – +35°C
Temperatura de
almacenamiento: -20 - +50 °C
Humedad: 5 - 90 % (sin condensación)
Indicaciónacercadelaconformidad
Este aparato cumple con los requisitos básicos y con
las demás normas relevantes de la Directiva europea
sobre compatibilidad electromagnética 2004/108/
EC y de la Directiva RoHS 2011/65/EU.
Importador
KOMPERNASS GMBH
BURGSTRASSE 21
44867 BOCHUM, GERMANY
www.kompernass.com
Garantíayasistenciatécnica
Con este aparato recibe usted 3 años de garantía desde la
fecha de compra. El aparato ha sido fabricado cuidadosamente y ha sido probado antes de su entrega. Guarde el comprobante de caja como justicante de compra. Si necesitara
hacer uso de la garantía, póngase en contacto por teléfono
con su centro de servicio habitual.
Éste es el único modo de garantizar un envío gratuito.La
garantía cubre sólo defectos de fabricación o del material,
pero no los daños de transporte, piezas sujetas a desgaste y
los daños sufridos por las piezas frágiles p. ej. el interruptor o
baterías.
Este producto ha sido diseñado exclusivamente para el uso
particular y no para el uso industrial.En caso de manipulación
indebida e incorrecta, uso de la fuerza y en caso de abrir el
aparato personas extrañas a nuestros centros de asistencia
técnica autorizados, la garantía pierde su validez.
Esta garantía no reduce en forma alguna sus derechos
legales.
- 28 -
Page 31

Por el mero hecho de hacer uso de la garantía no implica la
prolongación del período de válidez de la garantía. Ello rige
también para piezas sustituidas y reparadas. Los posibles
daños y defectos detectados al comprar el producto, se han
de noticar de inmediato o como muy tarde dos días desde
la fecha de compra. . Finalizado el periodo de garantía, las
reparaciones se han de abonar.
Servicio España
Tel.: 902 59 99 22
(0,08 EUR/Min. + 0,11 EUR/llamada (tarifa normal))
(0,05 EUR/Min. + 0,11 EUR/llamada (tarifa reducida))
E-Mail: kompernass@lidl.es
IAN 86342
- 29 -
Page 32

- 30 -
Page 33

INDICE PAGINA
Importanti avvertenze di sicurezza 32
Tasti e funzioni apparecchio 33
Messa in funzione 34
Disimballaggio dell'apparecchio/controllo
del materiale in dotazione 34
Inserimento delle pile 34
Elementi di comando 35
Display LCD 35
Tasti 36
I menu di congurazione 39
Congurazione delle lingue del menu 41
Congurazione del codice (Programmazione del telecomando) 41
Programmazione per ricerca del codice marca 41
Programmazione tramite immissione manuale dei codici 42
Programmazione per ricerca automatica dei codici 43
Congurazione del sistema 44
Impostazione dell'ora 44
Impostazione della data 45
Impostazione contrasto 45
Retroilluminazione 45
Impostazione del volume globale/disattivazione del volume 46
Selezionare apparecchio banda/disco per il comando diretto 47
Impostazione della funzione Lock 47
SYSTEM-REIMP 48
Congurazione del timer 48
Sleep-Timer 48
Timer eventi 49
Cancellazione timer 50
Congurazione dell’apprendimento 50
Funzione di apprendimento codici 50
Congurazione macro 52
Canale preferiti 53
Regolazione volume 54
Vol +/—, (disattivazione suono) 54
Uso 55
Tasto ALL OFF 55
Pulizia e conservazione 56
Guasti / Risoluzione 56
Smaltimento 57
Dati tecnici 57
Avviso sulla conformità 58
Importatore 58
Garanzia & assistenza 58
- 31 -
Page 34

TELECOMANDO UNIVERSALE SFB 10.1 B2
Introduzione
Congratulazioni per l’acquisto del nuovo apparecchio.
Lei ha scelto un prodotto di alta qualità. Il manuale di istruzioni è parte integrante del presente prodotto. Esso contiene
importanti indicazioni per la sicurezza, l’uso e lo smaltimento. Prima di utilizzare il prodotto, si familiarizzi con tutte le
indicazioni relative ai comandi e alla sicurezza.Utilizzi il prodotto solo come descritto e per i campi di impiego indicati.
Conservi con cura il manuale. In caso di cessione del prodotto a terzi, consegni anche tutta la documentazione relativa.
Diritto d’autore
La presente documentazione è tutelata dal diritto d'autore.
Tutti i diritti, nonché la riproduzione fotomeccanica, la copia
e la diusione tramite procedimenti particolari (ad es. elaborazione dei dati, supporto dati e reti di dati) anche parziale,
nonché le modiche ai contenuti e le modiche tecniche
sono riservati.
Importantiavvertenzedisicurezza
Uso conforme
I bambini devono utilizzare il telecomando soltanto sotto la
supervisione di adulti. Il telecomando universale può sostituire un massimo di dieci telecomandi. Può essere utilizzato
esclusivamente per apparecchi di elettronica di intrattenimento con un ricevitore a infrarossi. Le funzioni del telecomando
universale corrispondono in essenza a quelle del telecomando originale. Il telecomando universale è concepito per l'uso
privato. Non è idoneo all'uso commerciale.
Ogni altro tipo di impiego non è conforme alla destinazione.
Il produttore non si assume alcuna responsabilità per i danni
derivanti da uso non conforme o da modiche apportate autonomamente.
Avviso
Un'avvertenza contrassegnata da questo livello di pericolo
indica una situazione potenzialmente pericolosa. Qualora
sia impossibile evitare tale situazione pericolosa, essa può
dare luogo a lesioni. Seguire le istruzioni contenute in questa
avvertenza per evitare lesioni personali.
Attenzione
Un'avvertenza contrassegnata da questo livello di pericolo
indica la possibilità di riportare danni materiali. Qualora sia
impossibile evitare tale situazione pericolosa, essa può dare
luogo a danni materiali. Seguire le istruzioni contenute in
questa avvertenza, per evitare danni materiali.
Avvertenza
Un avviso contrassegna ulteriori informazioni volte a facilitare l'uso dell'apparecchio.
- 32 -
Page 35

Avvisorelativoalpericolodilesioniacausa
dell'usoerroneodellepile!
Le pile devono essere trattate con particolare cautela.
Rispettare le seguenti avvertenze di sicurezza:
• Impedire ai bambini di entrare in possesso delle pile.
I bambini potrebbero mettere in bocca le pile e ingoiarle. In
caso di ingestione di una pila, consultare immediatamente
un medico.
• Non gettare le pile nel fuoco. Non sottoporre le pile ad
elevate temperature.
• Pericolo di esplosione! Le pile non devono essere ricaricate.
• Non aprire né cortocircuitare le pile.
• L'acido che fuoriesce dalle pile può provocare irritazioni
cutanee. In caso di contatto con la pelle, risciacquare con
acqua abbondante. Qualora il liquido avesse raggiunto gli
occhi, sciacquare abbondantemente con acqua, non sfregare e consultare subito un medico.
Attenzione!
Il telecomando universale possiede un diodo a infrarossi della classe di laser 1. Non osservare con apparecchi ottici per
evitare lesioni oculari.
Danni all'apparecchio
• Qualora l'apparecchio fosse guasto, non cercare di ri-
pararlo autonomamente. In caso di danni, contattare il
produttore o la hotline di assistenza (v. la scheda di garanzia).
• In caso di penetrazione di liquidi all'interno dell'apparec-
chio o danni di altro genere, farlo controllare dal produttore o dalla hotline di assistenza. Mettersi in contatto con
il produttore o con la relativa Hotline di assistenza (vedere le indicazioni di garanzia).
• Rimuovere le pile dal vano pile non appena si scaricano.
• In caso di inutilizzo prolungato dell'apparecchio, rimuove-
re le pile per evitarne lo scaricamento.
• Sostituire le pile sempre contemporaneamente e utilizzare
sempre pile dello stesso tipo.
Tastiefunzioniapparecchio
q Display LCD
w Tasto /ALL OFF
e Tasti dell'apparecchio
r Tasto S
t Tasti freccia
y Tasto EXIT
u Tasti P +/—
i Tasto MACRO
o Tasti numerici
a Tasto per numeri di programma a una o due cifre
s Tasti di funzione Videotext
- 33 -
Page 36

d Tasto di illuminazione
f Tasti unità disco
g Tasto AV
h Disattivazione dell'audio
Tasti VOL +/—
j
k Tasto MENU
l Tasto OK
1( Tasto FAV / EPG
2) Emittente/ricevente a infrarossi
2! Copertura vano pile
Suggerimenti:
• le funzioni qui descritte si riferiscono a un caso teorico
ideale in cui la struttura dei tasti dei singoli telecomandi
coincide perfettamente con quella di questo telecomando universale. Tale evento è tuttavia rarissimo nella
realtà. Se pertanto non si potessero riprodurre tutte le
funzioni del telecomando originale, tale impossibilità
non dev'essere addebitata a qualche ipotetico difetto
del telecomando universale.
• Tutti i nomi di marchi menzionati nel presente manuale
o nell'acclusa lista dei codici sono marchi commerciali
di proprietà delle relative ditte.
Messainfunzione
Disimballaggio dell'apparecchio/controllo
del materiale in dotazione
Attenzione!
Tenere fuori dalla portata dei bambini anche le pellicole
di imballaggio. Pericolo di soocamento!
• Disimballare l'apparecchio e i relativi accessori.
• Vericare la completezza del materiale in dotazione
- Telecomando universale (UFB),
- Manuale di istruzioni,
- Guida del produttore con l'elenco dei codici degli
apparecchi
- 2 x 1,5 pile, tipo AAA/LR03 (micro)
Avvertenza:dannidatrasporto
Qualora si rilevassero dei danni da trasporto, rivolgersi al
produttore o alla relativa hotline di assistenza (v. indicazioni
di garanzia).
Inserimento delle pile
Attenzione!
Il telecomando universale dev'essere alimentato solo da
pile da 1,5 Volt (AAA, LR03).
Nella sostituzione di pile, inserire immediatamente le pile
nuove. Le impostazioni eseguite restano memorizzate per
circa 1 minuto.
- 34 -
Page 37

Se non si inseriscono le pile nuove entro tale periodo di tempo, tutte le impostazioni dovranno essere reinserite. L’orario e
la data andranno tuttavia perduti in ogni caso.
1. Aprire il coperchio del vano pile 2! nella direzione della
freccia.
2. Inserire le pile come illustrato in gura e chiudere il vano
pile.
Il display LCD q è attivato no a quando le pile sono inserite.
La seguente illustrazione mostra il display LCD q dopo l'inserimento o la sostituzione delle pile.
Avvertenza:
se non è visibile alcun display LCD q, controllare la polarità
delle pile o inserire delle pile nuove.
Elementidicomando
Display LCD
Il display LCD q è suddiviso in campi.
Campo di testo 2@
Qui viene visualizzato l'apparecchio correntemente selezionato, ad esempio DVD, TV, VCR, ecc.
Simbolo a infrarossi 2#
A ogni pressione del tasto viene inviato un segnale a infrarossi e si accende il simbolo Infrarossi.
- 35 -
Page 38

Campo Codice/Ora 2$
Qui viene visualizzato il codice dell'apparecchio selezionato
correntemente o l'ora. All'indicazione dell'ora lampeggia „
centro dei numeri. Con l’indicazione dell’ora in formato 12 ore,
a sinistra del-l’orologio viene indicata la sigla relativa all’ora.
Campo del giorno della settimana 2%
Qui si può leggere l’abbreviazione del giorno della settimana dopo aver inserito la data.
Spia standard:
La spia standard del display LCD q è composta dai dati
relativi all'apparecchio corrente, ad es. „TV“, dalla sigla
del giorno della settimana e dall'orario.
:“ al
Tasti
Avvertenza:
tutte le funzioni qui descritte possono naturalmente essere
utilizzate solo se vengono supportate dal relativo apparecchio.
Tasto
Tasti apparecchi e
Con i tasti apparecchi si selezionano gli apparecchi che devono essere azionati:
L’attribuzione dei tasti menzionata non è obbligatoria.
Ad es., sul tasto TV è possibile salvare anche il codice per il
videoregistratore.
/ALL OFF w
Accendere/spegnere l’apparecchio; per
accendere/spegnere tutti gli apparecchi,
tenere premuto questo pulsante per alcuni
secondi.
Televisore
Videoregistratore
Apparecchio accessorio 1
Ricevitore con cavo
Lettore CD
Lettore di dischi BluRay
Amplicatore audio
Lettore di DVD
Ricevitore satellitare digitale
Apparecchio accessorio 2
Tasto „S“ r
Tenere premuto per 3 secondi, al fine di
richiamare il menu di configurazione, pre-
- 36 -
Page 39

mere brevemente per visualizzare la data.
Per richiamare la guida elettronica ai pro-
grammi dell’apparecchio di destinazione,
premere prima brevemente il tasto S r, e
quindi il tasto FAV/EPG 1(.
Per controllare la funzione “PIP” (immagine
nell’immagine) del televisore, premere prima
il tasto S r seguito dal tasto
- dei tasti
di funzione Videotext s.
Tasti freccia t
Per spostarsi in alto, a destra, in basso e
a sinistra all'interno dei menu.
Tasto EXIT y
Passaggio al livello inferiore del menu.
Tasti P +/—u
Cambiare il canale di ricezione.
Nei modi DVD e CD questi pulsanti control-
lano la funzione SKIP.
Tasto MACRO i
Tasto MACRO i seguito da un tasto
numerico o 1-6, attiva una catena di
comandi precedentemente memorizzata.
Tasti numerici o
Per immettere numeri di programma e di
codici apparecchi.
Tasto per numeri di programma a una/due cifre a
Per i numeri di programmi a due cifre (in
base al tipo di apparecchio) premere prima
il tasto a e quindi inserire il numero del
programma tramite i tasti numerici o.
Un'ulteriore pressione riporterà la visualizzazione a una cifra.
Tasti di funzione Videotext s
Nella modalità Televideo, i tasti hanno le seguenti funzioni:
Richiamo della funzione Videotext.
Passaggio automatico in caso di notizie
televideo su più pagine.
Aumento dimensioni di visualizzazione del-
la pagina
Testo sovrapposto all'immagine TV
Termine della funzione Videotext
- 37 -
Page 40

Per richiamare la funzione SWAP dell’ap-
parecchio di destinazione, premere brevemente il pulsante S r e quindi il pulsante
Suggerimenti:
• La funzione Videotext è a disposizione solo nella modalità
TV europea e l’apparecchio di ricezione deve inoltre possedere l’apposito modulo per il Televideo.
• Inoltre, i tasti P +/- u controllano le seguenti funzioni Te-
levideo:
P+ sfogliare una pagina in avanti
P— sfogliare una pagina all'indietro
Tasti unità disco f
I tasti unità disco f controllano apparecchi come lettori di
DVD/CD e videoregistratori:
Inizio riproduzione
Commutazione del formato immagini
con l'uso della TV
Registrazione
Arresto riproduzione/Registrazione/
avvolgimento
Arresto riproduzione
Riavvolgimento
Avanzamento
.
le marcature colorate dei tasti unità disco si riferiscono ai
campi colorati nel Videotext, tramite cui vengono controllate
le funzioni Toptext.
Tasto AV g
Passaggio all’ingresso AV.
Disattivazione del volume h
Per inserire/disinserire il volume.
Tasti VOL+/—j
Regolazione del volume (Volume).
Tasto MENU k
Richiamo del menu dell'apparecchio
controllato.
Tasto OK l
Con il tasto OK si conferma una selezione
del menu.
Tasto FAV/EPG 1(
Per richiamare le emittenti preferite precedentemen-
te programmate, premere il tasto FAV.CH.
- 38 -
Page 41

Per richiamare la funzione EPG dell’apparecchio di
destinazione, premere prima brevemente il tasto S r.
Imenudicongurazione
Nelle impostazioni di sistema, si può eseguire quanto segue:
• La programmazione del telecomando per gli apparecchi
da controllare
• Impostazione di lingua del menu, ora, data, contrasto del
display, retroilluminazione, volume, funzione Lock nonché
System-Reset
• Le impostazioni del Timer
• L'„apprendimento“ di determinati comandi dei tasti
• La creazione di macro
• L'impostazione dei preferiti
Sulle pagine che seguono è presente una panoramica della
struttura del menu.
- 39 -
Page 42

- 40 -
Page 43

Configurazione delle lingue del menu
Per la visualizzazione del menu dell’apparecchio si può
scegliere fra 5 lingue: inglese, tedesco, spagnolo, francese e
italiano.
1. Tenere premuto il tasto S r per oltre 3 secondi. Inserire
subito i dati nel menu, poiché il menu termina dopo
15 secondi senza immissioni di dati.
2. Il display LCD q mostra il messaggio “LANGUAGE
SETUP”. Premere il tasto OK l.
3. Nel display LCD q compare “ENGLISH”. Con i tasti
t selezionare la lingua desiderata e confermare
con il tasto OK l.
4. Uscire dal menu con il tasto EXIT y.
I menu dell’apparecchio vengono così visualizzati nella lingua
selezionata. Per le ulteriori istruzioni presumiamo che sia stata
selezionata la lingua del proprio paese di origine.
Configurazione del codice
(Programmazione del telecomando)
Sono a disposizione 3 metodi di programmazione per il
telecomando: programmazione tramite ricerca del codice
marca, ricerca automatica del codice e immissione diretta
del codice (manuale).
Utilizzare prima la ricerca con il codice marca, poiché si tratta del metodo di programmazione più rapido, se l'apparecchio è presente nell'elenco dei codici. Come seconda
alternativa si consiglia l'immissione diretta del codice, seguita
dalla ricerca automatica del codice.
Programmazione per ricerca del codice marca
Con questo metodo, selezionare la marca diretta e il codice
tramite il display LCD q.
Procedere in base alle seguenti istruzioni, per programmare
il telecomando:
1. Premere il tasto dell'apparecchio e per l'apparecchio
rispetto al quale si desidera programmare il telecomando.
2. Tenere premuto il tasto S r per oltre 3 secondi. Nel display
LCD q compare “LINGUA SETUP”. Con il tasto o
t selezionare “CODICE SETUP” e confermare con il
tasto OK l.
3. „INVIO CODIC“ compare quindi nel display LCD q. Con
i tasti t selezionare „MARCHIO CODIC“ e confermare con il tasto OK l.
4. Comparirà quindi il primo nome di marca in ordine alfa-
betico nell'elenco degli apparecchi preprogrammati.
5.Con i tasti 34
t selezionare i vari nomi di marche.
- 41 -
Page 44

6. Per facilitare l'accesso, è possibile passare direttamente alle
relative lettere alfabetiche iniziali con i tasti numerici o:
2 => A 3 => D 4 => G 5 => J
6 => M 7 => P 8 => T 9 => W
Esempio per la ricerca di un codice TV: con il tasto 5 si
arriva alla „J“. La prima marca è „JEC“*. Se si possiede
ad es. un apparecchio marca „Kenwood“*, sfogliare in
avanti con il tasto 4 t, no alla comparsa del nome del
marchio. (* Tutti i nomi di marchi qui utilizzati sono marchi
commerciali di proprietà delle rispettive società).
7. La maggior parte dei produttori utilizzano vari codici
diversi per il telecomando. È necessario quindi scoprire
quale dei codici disponibili si adatta meglio al proprio
apparecchio. In basso a destra del nome del marchio viene visualizzato il codice nel relativo display LCD q.
8. Dirigere il telecomando verso l’apparecchio corrente e
premere i tasti corrispondenti alle funzioni di tale apparecchio, per controllare il codice (esclusi i tasti
34t, OK l, EXIT y, i tasti dell’apparecchio e o i
tasti numerici o).
9. Se la maggioranza dei tasti funziona, premere il tasto OK
l, per salvare l'impostazione. Nel display LCD q com-
pare il messaggio „OK“. Inne il menu viene terminato
automaticamente.
10. Se funziona solo uno o pochi tasti, con il tasto
selezionare il codice successivo e controllare come già
descritto al punto 8.
11.Con il tasto EXIT y si avanza di un livello nel menu.
Ripetere questi passaggi per tutti gli apparecchi che si intende comandare con il telecomando.
o t
Programmazione tramite immissione manuale
dei codici
In questa modalità, il telecomando può essere programmato
con l'immissione diretta di un codice numerico. Il numero di
codice necessario si rileva dalla guida dei produttori allegata con l'elenco dei codici degli apparecchi. Qualora il codice non fosse valido, verrà ripristinato l'ultimo codice valido
programmato.
1. Premere il tasto dell'apparecchio e per l'apparecchio
rispetto al quale si desidera programmare il telecomando.
2. Tenere premuto il tasto S r per oltre 3 secondi. Nel display
LCD q compare “LINGUA SETUP”. Con il tasto o
t selezionare “CODICE SETUP” e confermare con il
tasto OK l.
3. „INVIO CODIC“ compare quindi nel display LCD q. Per
richiamare questa funzione premere il tasto OK l.
4. Nel display LCD q compare il codice attualmente utiliz-
zato per l'apparecchio selezionato. Ora la prima cifra
del codice lampeggerà in attesa dell'immissione del codice da parte dell'utente. Inserire il nuovo codice a quattro
cifre tramite i tasti numerici o. All’immissione del quarto
- 42 -
Page 45

carattere, tutto il codice lampeggia. Ora si può vericare
se il telecomando universale riesce a controllare l’apparecchio desiderato con questo codice. Premere i tasti corrispondenti alle funzioni dell’apparecchio, in caso di apparecchio TV, ad es. PROG +/–. Se l’apparecchio reagisce
come desiderato, confermare l’immissione del codice con il
tasto OK l. In caso contrario, inserire il codice successivo
nell’elenco ed eseguire una nuova prova.
5. Se il CODE inserito è corretto, viene salvato. Nel display
LCD q compare brevemente „OK“. Inne il menu viene
terminato automaticamente. In caso di errore del codice,
il display LCD q mostra brevemente il messaggio "ERROR"
(errore) ed è necessario reinserire il codice. Ripetere il punto 4.
Con il tasto EXIT y si torna indietro di un livello nel menu.
6.
Programmazione per ricerca automatica dei
codici
Questo processo può durare vari minuti per apparecchio,
poiché vengono scansionati tutti i codici per l'apparecchio
selezionato. Utilizzare pertanto questo metodo solo se
l'apparecchio non può essere programmati con la ricerca del
codice della marca o con l'immissione diretta del codice, oppure se l'apparecchio non compare nell'elenco dei produttori
con il relativo elenco dei codici degli apparecchi.
Compiere i passaggi descritti di seguito per eseguire la
programmazione tramite la ricerca automatica del codice.
1. Premere il tasto dell'apparecchio e per l'apparecchio da
controllare (ad es. VCR).
2. Accendere l'apparecchio da controllare con il telecoman-
do. Per gli apparecchi VCR/DVD/CD, inserire un nastro
o un disco.
3. Tenere premuto il tasto S r per oltre 3 secondi. Nel display
LCD q compare “LINGUA SETUP”. Con il tasto o
t selezionare “CODICE SETUP” e confermare con il
tasto OK l.
4. „INVIO CODIC“ compare quindi nel display LCD q. Pre-
mere il tasto o t, no alla comparsa di „CERCA
CODIC“ nel display LCD q.
Dirigere il telecomando sull'apparecchio e premere quindi il tasto OK l, per richiamare la modalità „Ricerca auto-
matica del codice“.
5. La ricerca comincia. A tale scopo l'apparecchio invia
i numeri dei codici consecutivamente in sequenza crescente. Il simbolo dell'infrarosso 2# lo indica. Ogni ricerca
si avvia con il codice correntemente inserito.
6. Se l'apparecchio reagisce spegnendosi, premere imme-
diatamente il tasto OK l, per salvare il codice corrente.
Il display LCD q mostra brevemente il messaggio "OK".
- 43 -
Page 46

7. Controllare che sia possibile eseguire la maggior parte
delle funzioni dell'apparecchio con il telecomando. Se è
possibile, si è probabilmente trovato il codice corretto. Se
alcune funzioni non fossero operative, si può ricominciare
la ricerca automatica del codice al punto 1.
8.
Se l'apparecchio non reagisce più, probabilmente al pun-
to 6 non si è premuto velocemente il tasto OK l.
Premere quindi più volte il tasto EXIT y, per uscire dal
menu e ritornare alla visualizzazione standard.
9. Tenere premuto il tasto apparecchi e dell'apparecchio
per il quale si cerca il codice adatto. In basso a destra
nel display LCD q viene visualizzato il codice corrente.
Annotarsi questo numero.
10. Procedere quindi come descritto nel precedente capitolo
„Programmazione tramite immissione manuale dei codici“
e controllare se funziona il codice con la combinazione di
numeri immediatamente inferiore.
Suggerimenti:
1. Con la ricerca attivata del codice tutti i tasti, tranne OK l
ed EXIT y, sono privi di funzioni.
2. Se la ricerca automatica è arrivata alla ne dell'elenco
dei codici, si fermerà a tal punto. Il display torna alla visualizzazione del messaggio „CERCA CODIC“.
Configurazione del sistema
Impostazione dell'ora
Il display LCD q indica l'orario. Per impostarlo, procedere
come segue:
1. Tenere premuto il tasto S r per oltre 3 secondi. Compare
il messaggio „LINGUA SETUP“. Se si attende circa 15
secondi senza inserire alcun dato, l'apparecchio esce dal
menu e ritorna alla visualizzazione standard.
2.Con il tasto o t selezionare „SISTEMA SETUP“
e confermare con il tasto OK l.
3. Il display LCD q mostra il messaggio „TEMPO SETUP“.
Confermare con il tasto OK l. Il display LCD
ora „TEMPO“ e il formato dell'ora (24 HR) lampeggia.
4. Con il tasto o t si può passare all'altro formato
dell'ora (12 HR). In tal caso, nell'indicazione dell'orario,
davanti a esso comparirà la lettera „Am“ o „Pm“. „Am“ sta
per „AM“ = „ante meridiem“ (mattina, dalle ore 0:00
alle ore 12:00). „Pm“ sta per „PM“ = „post meridiem“
(pomeriggio, dalle ore 12:00 alle ore 0:00). Premere
il tasto OK l per la conferma.
5.Lampeggerà quindi l'indicazione dell'ora. Con il tasto
o t selezionare l'ora dell'orario corrente e
confermare con il tasto OK l.
6.Lampeggerà quindi l'indicazione dei minuti. Con il tasto
o t selezionare i minuti dell'orario corrente e confermare con il tasto OK l. Comparirà nuovamente
il messaggio „TEMPO SETUP“.
- 44 -
qmostra
Page 47

7. Per uscire da questo menu o dai seguenti, premere il tasto
EXIT y tante volte no a ottenere il messaggio standard
nel display LCD q.
Impostazione della data
Il display LCD q mostra la data se si preme il tasto S r.
Per impostare la data:
1. Tenere premuto il tasto S r per oltre 3 secondi.
Compare il messaggio „LINGUA SETUP“.
2.Con il tasto o t selezionare „SISTEMA SETUP“
e confermare con il tasto OK l.
3. Il display LCD q mostra il messaggio „TEMPO SETUP“.
Premere il tasto t, per passare a „DATA SETUP“.
Confermare con il tasto OK l.
4.Nel display lampeggia l'indicazione dell'anno „2011“.
Con il tasto o t si può modicare la cifra dell'anno
e con il tasto OK l si può confermarla. Con il tasto
o t si può modicare la cifra relativa ai mesi, mentre
lampeggia, e confermare con il tasto OK l. Lampeggia
quindi l'indicazione del giorno, che si può modicare
nuovamente anche con il tasto o t.
5. Per il salvataggio premere il tasto OK l. Comparirà nuo-
vamente il messaggio „DATA SETUP“.
Impostazione contrasto
Il contrasto del display può essere impostato come segue:
1. Tenere premuto il tasto S r per oltre 3 secondi.
Compare il messaggio „LINGUA SETUP“.
2.Con il tasto o t selezionare „SISTEMA SETUP“
e confermare con il tasto OK l.
3.Con il tasto o t selezionare „CONTR SETUP“ e
confermare con il tasto OK l.
4. Nel display LCD q lampeggia quindi il valore del contra-
sto, che si può impostare con il tasto o t:
Messaggi nel display:
0 = massimo contrasto
15 = minimo contrasto
5. Con il tasto OK l memorizzare le impostazioni desi-
derate. Comparirà nuovamente il messaggio „CONTR
SETUP“.
Retroilluminazione
Si può impostare la durata dell'illuminazione dello sfondo
del display LCD q e dei tasti al termine dell'immissione dei
comandi. Ricordare che una durata maggiore dell'illuminazione riduce la durata di vita delle pile.
1. Tenere premuto il tasto S r per oltre 3 secondi.
Compare il messaggio „LINGUA SETUP“.
2.Con il tasto o t selezionare „SISTEMA SETUP“
e confermare con il tasto OK l.
3.Con il tasto o t selezionare „RETROILL SETUP“
e confermare con il tasto OK l.
- 45 -
Page 48

4. Nel display LCD q lampeggia quindi il numero dei se-
condi per la durata dell'illuminazione che si può impostare da 0 a 60 con i tasti t. Selezionando „0“, la
retroilluminazione viene disattivata.
5. Con il tasto OK l memorizzare le impostazioni deside-
rate. Comparirà nuovamente il messaggio „RETROILL
SETUP“.
Impostazione del volume globale/
disattivazione del volume
Per evitare di dover sempre premere prima un tasto dell’apparecchio per la regolazione e la disattivazione del volume,
il TU per queste funzioni fa riferimento sempre a un unico
apparecchio, di solito il televisore. Questo apparecchio di
destinazione può essere stabilito.
1. Tenere premuto il tasto S r per oltre 3 secondi. Compare il
messaggio “LINGUA SETUP”.
2.Con il tasto o t selezionare “SISTEMA SETUP” e
confermare con il tasto OK l.
3.Con il tasto o t selezionare “VOL/MUTE SETUP”
e confermare con il tasto OK l.
4. Il display LCD q mostra il messaggio “TUTTIVOL IMP”.
Premere il tasto OK l, il display passa al messaggio
“TUTTI VOL MOD”.
5. Ora premere il tasto dell’apparecchio e per l’appa-
recchio che dev’essere controllato tramite la funzione globale di regolazione del volume.
6. Se l’apparecchio indicato possiede un comando di
regolazione del volume, verrà visualizzato brevemente
“SUCCESSO” e il menu verrà terminato. La regolazione
del volume funzionerà da subito sull’apparecchio appena
impostato.
7. Se questo apparecchio non dispone di comandi per la
regolazione del volume, il TU non consente tale selezione
e indica “VOLUME ERR” (= errore). Anche in tal caso il
menu viene terminato. La regolazione del volume continuerà a funzionare sull’apparecchio precedente.
La regolazione globale del volume per determinati apparecchi si può anche disattivare.
1. Nel menu “VOL/MUTE SETUP” con il tasto o t se-
lezionare la funzione “MOD VOL IMP” e confermare con
il tasto OK l. Nel display LCD q compare “MOD VOL
MOD”.
2. Ora premere il tasto dell’apparecchio e per l’appa-
recchio che dev’essere escluso dalla funzione globale
di regolazione del volume. Il display LCD q mostra
“SUCCESSO” e la regolazione globale del volume viene
disattivata se il TU funziona nella modalità di esercizio di
uno degli apparecchi selezionati.
È possibile eliminare nuovamente le impostazioni nel menu
“VOL/MUTE SETUP”.
- 46 -
Page 49

1. Nel menu “VOL/MUTE SETUP”, con i tasti o t se-
lezionare nuovamente la funzione “VOL/MUTE REIMP” e
confermare con il tasto OK l.
2. Il display LCD q con il messaggio CONFERMA REIMP
chiede la conferma con il tasto OK su l. Premere il tasto
OK l, se si desidera eliminare le impostazioni, il messaggio “ERFOLG” indica che è stata eseguita la cancellazione dell’attribuzione dell’apparecchio alla regolazione
globale del volume. Oppure si può premere il tasto EXIT
y per interrompere la cancellazione.
Selezionare apparecchio banda/disco per il
comando diretto
Si può selezionare un apparecchio banda o disco che si può
utilizzare con i tasti unità disco f, senza dover prima premere
i relativi tasti dell’apparecchio e.
1. Tenere premuto il tasto S r per oltre 3 secondi. Compare
il messaggio “LINGUA SETUP”.
2. Con il tasto o t selezionare “SISTEMA SETUP” e
confermare con il tasto OK l.
3. Il display LCD q mostra il messaggio „TEMPO SETUP“.
Premere il tasto t, per passare a „RIPROD SETUP“.
Confermare con il tasto OK l.
4. Con il tasto o t selezionare l’apparecchio che deve
reagire al telecomando universale con l’impiego dei tasti
unità disco f. Confermare con il tasto OK l.
5. Selezionando “OFF” al posto di un apparecchio e con-
fermando con il tasto OK l, si passa al comando diretto.
Selezionando “REIMP” e confermando con il tasto OK
l, si attiva l’impostazione operativa preprogrammata
(DVD) per questa funzione.
6. Il display LCD q indica “SUCCESSO” e l’apparecchio
selezionato può essere ora controllato direttamente con i
tasti unità disco f.
Impostazione della funzione Lock
Con la funzione di blocco si può bloccare l’accesso a tutti i
menu di configurazione.
1. Tenere premuto il tasto S r per oltre 3 secondi.
2. Con il tasto o t selezionare “SISTEMA SETUP”
e confermare con il tasto OK l.
3.Con il tasto o t selezionare “BLOCCA SETUP” e
confermare con il tasto OK l. Il display LCD q indica
l’impostazione corrente.
4.Con il tasto o t selezionare ora scegliendo fra
“BLOCCA” (blocco attivato) o “SBLOCCA” (blocco disattivato).
5. Con il tasto OK l memorizzare l’impostazione. Nel di-
splay LCD q compare di nuovo il messaggio “BLOCCA
SETUP”.
- 47 -
Page 50

SYSTEM-REIMP
Tramite questa funzione si può eliminare la funzione di tutti o
di singoli tasti dell’apparecchio.
1. Tenere premuto il tasto S r per oltre 3 secondi.
Compare il messaggio „LINGUA SETUP“.
2.Con il tasto o t selezionare „SISTEMA SETUP“
e confermare con il tasto OK l.
3.Con il tasto o t selezionare „SYSTEM REIMP“
e confermare con il tasto OK l.
4.Con il tasto o t si può ora selezionare la funzione
desiderata. Per cancellare la funzione (Code) di tutti i tasti
dell’apparecchio e nonché tutti i dati relativi a macro,
timer e funzioni apprese, selezionare “TUTTI REIMP” e
confermare con il tasto OK l.
5. Il display LCD q mostra il messaggio „CONFERMA
REIMP“. Confermare la cancellazione con il tasto OK l.
Quindi il display LCD q indica “SUCCESSO REIMP”. Le
informazioni indicate vengono ora cancellate e il menu
viene terminato.
6. Per cancellare la funzione di singoli tasti dell’apparecchio
e, selezionare “MOD REIMP” e premere il tasto OK l.
Il display LCD q mostra quindi il messaggio “MOD” e la
richiesta di premere un tasto dell’apparecchio e di cui si
desidera eliminare la funzione. Inne viene brevemente
visualizzato il messaggio “SUCCESSO” (= operazione
riuscita), quindi nel display LCD compare nuovamente il
messaggio “MOD”. Se necessario premere ulteriori tasti
dell’apparecchio e, per cancellare anche queste funzioni.
7. Altrimenti uscire dal menu, premendo il tasto EXIT y.
Configurazione del timer
Il telecomando universale ore 2 modalità di Timer:
Sleep-Timer e Timer eventi.
Sleep-Timer
1. Premere il tasto dell'apparecchio e per l'apparecchio da
controllare (ad es. VCR).
2. Tenere premuto il tasto S r per oltre 3 secondi.
Compare il messaggio „LINGUA SETUP“.
3.Premere il tasto o t, no a visualizzare „TIMER
SETUP“. Premere il tasto OK l.„TIMER SLEEP“ compare
quindi nel display LCD q. Con il tasto OK l confermare
la selezione di questa funzione.
4. In basso a destra nel display LCD q lampeggia il numero
dei minuti del tempo di funzionamento residuo dell'apparecchio selezionato. Con il tasto o t impostare
il valore desiderato da 1 a 99 minuti. Premere il tasto OK
l per la conferma. Con lo Sleep-Timer programmato, il
display LCD q mostra “
5. Posizionare il telecomando in modo tale che i suoi segna-
li a infrarossi riescano a raggiungere l'apparecchio da
spegnere. Al termine del tempo impostato, il telecomando
spegnerà l'apparecchio.
z
z
” a destra accanto all’ora.
- 48 -
Page 51

6. Premendo ora il tasto S r, in basso a sinistra nel display
LCD q viene mostrato il messaggio “SL”.
Timer eventi
Il telecomando dispone di 4 Timer eventi tramite cui si
possono inviare determinate serie di combinazioni di tasti
in determinati orari.
1. Tenere premuto il tasto S r per oltre 3 secondi.
Compare il messaggio „LINGUA SETUP“.
2.Con il tasto o t selezionare „TIMER SETUP“ e con-
fermare con il tasto OK l. „TIMER SLEEP“ compare quindi
nel display LCD q. Con il tasto o t selezionare la
posizione di memoria desiderata da „TIMER 1 SETUP“ a
„TIMER 4 SETUP“ e confermare con il tasto OK l.
3.Lampeggerà quindi l'indicazione delle ore dell'orario in
cui si desidera l'esecuzione della combinazione di tasti
selezionata. Con il tasto o t impostare l'ora desiderata e confermare con il tasto OK l.
4.Lampeggerà quindi l'indicazione dei minuti dell'orario in
cui si desidera l'esecuzione della combinazione di tasti
selezionata. Con il tasto o t impostare i minuti desiderati e confermare con il tasto OK l.
5. Nel display LCD q leggere „TIMER X KEY“ (X indica
il Timer desiderato). Premere quindi il tasto dell'apparecchio e desiderato, seguito dalla sequenza desiderata
dei comandi dei tasti.
6. Come standard, i comandi macro vengono inviati a inter-
valli di 1 secondo. Poiché alcuni apparecchi non reagiscono rapidamente, potrebbe succedere che la sequenza
dei comandi macro venga inviata troppo rapidamente
all’apparecchio. Quindi si ha la possibilità di programmare una pausa compresa fra 5 e 21 secondi prima dell’invio di un comando di tasti. Se necessario, premere ripetutamente il tasto MACRO i. In basso a destra, il display
LCD q mostra le lunghezze di pausa correnti espresse in
secondi.
7. Premere il tasto S r, per salvare i dati e ritornare alla
panoramica del Timer.
8. Procedere analogamente per programmare se necessario
anche le altre posizioni di memoria del Timer.
9. Con un timer degli eventi programmato, il display LCD q
mostra il simbolo Timer “
all’ora.
” in basso a destra accanto
Suggerimenti:
1. Per ogni posizione di memoria del Timer si possono pro-
grammare no a un massimo di 14 tasti. Dopo l'immissione del quattordicesimo tasto, la sequenza viene automaticamente salvata e nel display LCD q viene visualizzato
"PIENO".
2. Anche in questo menu, l'apparecchio ritorna alla visualiz-
zazione standard dopo circa 15 secondi senza immissione di dati.
- 49 -
Page 52

Cancellazione timer
Procedere in base alle seguenti istruzioni per cancellare un
orario programmato nel timer (sleep o evento):
1. Selezionare il timer che si desidera cancellare (v. capitolo
Timer sleep/Timer evento) e premere il tasto OK l. Nel
display LCD q si legge „TIMER ELIM“.
2. Premere il tasto OK l. Il display LCD q passa a „CON-
FERMA ELIM“.
3. Premere nuovamente il tasto OK l, per cancellare il timer.
Il display LCD q conferma la cancellazione riuscita con il
display „SUCCESSO“.
Configurazione dell’apprendimento
Il telecomando universale può apprendere e memorizzare
i segnali dei tasti di un telecomando originale. Se il telecomando universale non funziona o non riesce a eseguire tutti
i comandi secondo i metodi di programmazione precedentemente descritti, tentare di istruire il telecomando universale
tramite il telecomando/i originale/i.
• Utilizzare pile nuove per il telecomando universale e per il
telecomando originale.
• Mantenere una distanza di almeno un metro da altre fonti
luminose. Le fonti luminose possono interferire con la trasmissione di infrarossi.
• Collocare il telecomando universale e quello originale a
distanza di 20 - 50 mm l'uno dall'altro, su una supercie
piana, orientando i diodi a infrarossi 2) l'uno verso l'altro.
Suggerimenti:
1. Non utilizzare i seguenti tasti per la funzione di apprendi-
mento: tutti i tasti apparecchi e, MACRO i, tasto S r,
EXIT y.
2. Se durante l'apprendimento, mentre viene visualizzato il
messaggio „LEARNING“ (apprendimento) non si preme
alcun tasto del telecomando originale entro 30 secondi,
il menu di apprendimento viene terminato. Questa modalità non può essere terminata tramite la pressione di un
tasto del telecomando.
3. La memoria comprende in tutto 150 comandi di tasti. Se
la memoria è piena, il display LCD q mostrerà il messaggio „APPRENDI PIENO“ e la modalità di apprendimento
verrà terminata.
4. Con il tasto EXIT y si ritorna allo stato precedente (tranne
che con il messaggio „APPRENDI TASTO“ o „APPRENDI“).
Funzione di apprendimento codici
1. Premere il tasto dell'apparecchio e per l'apparecchio per
il quale si desidera che il telecomando apprenda un codice tasti.
- 50 -
Page 53

2. Tenere premuto il tasto S r per oltre 3 secondi.
Compare il messaggio „LINGUA SETUP“.
3.Con il tasto o t selezionare il menu „APPRENDI
SETUP“ (apprendimento) e premere quindi il tasto OK l.
4. Il display LCD q mostra il messaggio „APPRENDI IMP".
Premere quindi il tasto OK l. Nel display LCD q
compare „APPRENDI TASTO“ (selezione tasto).
5. Premere prima sul telecomando universale il tasto che
dev'essere appreso. Nel display LCD q compare il messaggio „APPRENDI“. Il telecomando universale attende
quindi il segnale a infrarossi del telecomando originale
Avvertenza:
se il messaggio non passa a „APPRENDI“, si è selezionato
un tasto per il quale non è possibile eseguire l'apprendimento del codice tasto.
6. Dirigere i sensori a infrarossi 2) di entrambi i telecomandi
l'uno verso l'altro.
7. Tenere ora premuto il tasto desiderato del telecomando
originale, no a ottenere nel display LCD q del telecomando universale il messaggio „SUCCESSO“ o „APPRENDI ERR“.
8. Se nel display LCD q compare il messaggio „SUCCES-
SO“ (procedimento riuscito), a partire dal punto 5, si
può ottenere l'apprendimento di altri tasti. Se compare
„APPRENDI ERR“ (procedimento non riuscito), ripetere il
procedimento dal punto 5.
9. Per interrompere/terminare il procedimento di apprendi-
mento, premere il tasto S e infine durante la comparsa
del messaggio “APPRENDI TASTO” premere il tasto EXIT
y fino alla comparsa del messaggio standard nel display
LCD q. Mentre è presente il messaggio “APPRENDI”, attendere semplicemente 30 secondi senza eseguire alcun
comando e l’apparecchio terminerà automaticamente il
menu.
Cancellazione di tutti i tasti programmati di tutti gli
apparecchi
1. Tenere premuto il tasto S r per oltre 3 secondi.
Compare il messaggio „LINGUA SETUP“.
2.Con il tasto o t selezionare il menu „APPRENDI
SETUP“ e premere quindi il tasto OK l. Nel display LCD
q compare „APPRENDI IMP“.
Con il tasto o t selezionare „APPRENDI ELIM“
3.
(eliminazione di quanto appreso) e confermare con il
tasto OK l. Nel display LCD q compare „CONFERMA
ELIM“ (conferma della cancellazione).
4. Confermare con il tasto OK l.
Il display LCD q mostra
il messaggio „SUCCESSO”. Tutti i tasti programmati vengono cancellati. Inne il menu viene terminato automaticamente.
Avvertenza:
se il display LCD mostra „CONFERMA ELIM “, si può interrompere la cancellazione con il tasto EXIT y.
- 51 -
Page 54

Configurazione macro
Con la funzione MACRO si possono eseguire no a 16 comandi di tasti con una semplice pressione di un tasto, cioè è
possibile eseguire con un tasto di macro vari comandi precedentemente salvati. Sono a disposizione 6 posizioni di macro.
Programmazione di una macro
Per la programmazione di una macro, procedere come segue:
1. Tenere premuto il tasto S r per oltre 3 secondi.
Compare il messaggio „LINGUA SETUP“.
2.Con il tasto o t selezionare „MACRO SETUP"
e confermare con il tasto OK l. Nel display compare
„MACRO 1 SETUP".
3.Con il tasto o t selezionare la posizione di
memoria da programmare (MACRO SETUP 1 - 6) e
confermare con il tasto OK l.
4. Il display LCD q mostra il messaggio „MACRO FASE".
Premere i tasti desiderati in sequenza (max. 16). La
sequenza deve cominciare con un tasto apparecchi e.
5. Come standard, i comandi macro vengono inviati a intervalli di 1 secondo. Poiché alcuni apparecchi non reagiscono rapidamente, potrebbe succedere che la sequenza
dei comandi macro venga inviata troppo rapidamente
all’apparecchio. Quindi si ha la possibilità di programmare
una pausa compresa fra 5 e 21 secondi prima dell’invio di
un comando di tasti. Premere eventualmente ripetutamente
il tasto MACRO i. In basso a destra, il display LCD q mostra le lunghezze di pausa correnti espresse in secondi.
6. Una volta raggiunta la quantità massima dei comandi
di tasti, il display LCD q indica „PIENO“.
7. Salvare l'immissione con il tasto S r. Il display LCD q
mostra il messaggio „MACRO SETUP".
8. Se durante la selezione della macro da programmare
(punto 3) si seleziona una posizione di memoria già
occupata, la macro preesistente verrà sovrascritta.
9. Ripetere il procedimento dal punto 3 per la creazione
di ulteriori macro.
10.Con il tasto EXIT y si retrocede di un livello nel menu,
tranne durante l’immissione dei comandi dei tasti.
Suggerimenti:
1. In una macro si possono memorizzare un massimo di 16
comandi. Dopo l’immissione del sedicesimo comando di
tasti, nel display LCD q compare la scritta “PIENO”.
2. Per uscire dalla modalità senza salvare, attendere circa
15 secondi senza eseguire immissioni.
3. Nella modalità „MACRO FASE“ si può tornare allo stato
precedente solo con il tasto S r.
Esempio: si desidera salvare una sequenza di comandi in
una macro. Cominciamo nella modalità „MACRO FASE”.
Sequenza di comandi desiderata: accensione della TV =>
PAUSE => passaggio all’ingresso AV => accensione DVD =>
PAUSE => riproduzione DVD.
- 52 -
Page 55

Nella modalità "MACRO FASE"inserire la seguente sequenza
di comandi:
=> => (tempo di pausa) => =>
=> => (tempo di pausa) =>
Esecuzione macro
Per eseguire una macro precedentemente programmata, procedere come segue:
1. Premere il tasto MACRO i.
2. Con il relativo tasto numerico o richiamare la macro
desiderata (1-6). Esempio: se si desidera eseguire la
Macro 3, premere prima il tasto MACRO i e quindi
nel giro di 5 secondi il tasto numerico „
Cancellazione di tutte le macro
Per eliminare tutte le macro precedentemente programmate,
procedere come segue:
1. Tenere premuto il tasto S r per oltre 3 secondi.
Compare il messaggio „LINGUA SETUP“.
2.Con il tasto o t selezionare „MACRO SETUP"
e confermare con il tasto OK l. Nel display compare
„MACRO SETUP 1".
3.Con il tasto o t selezionare „MACRO ELIM“
e confermare con il tasto OK l.
4. Nel display LCD q compare „CONFERMA ELIM“ (conferma della cancellazione). Confermare l'eliminazione
con il tasto OK l. Il display LCD q mostra il messaggio
"SUCCESSO". Tutte le macro vengono annullate, il menu
viene terminato.
“.
Suggerimenti:
1. Se il display LCD q mostra „CONFERMA ELIM“, si può
interrompere la cancellazione con il tasto EXIT y.
2. Non è possibile cancellare le singole macro, ma solo sovrascriverle.
Canalepreferiti
Avvertenza:
con questa funzione si possono salvare le emittenti preferite
come Preferiti.
Programmazione dei Preferiti
Le emittenti preferite possono essere memorizzate come segue:
1. Premere il tasto dell'apparecchio e per l'apparecchio per
il quale si desidera salvare un preferito.
2. Tenere premuto il tasto S r per oltre 3 secondi.
Compare il messaggio „LINGUA SETUP“.
3.Con il tasto o t selezionare „PREF CH SETUP"
e confermare con il tasto OK l. Nel display compare
„PREF CH 1 SETUP".
4.Con il tasto o t selezionare la posizione di
memoria da programmare (PREF CH 1 - 4 SETUP) e
confermare con il tasto OK l.
- 53 -
Page 56

5. Il display LCD q mostra il messaggio „PREF CH FASE".
Premere in sequenza i tasti (max. 4) per richiamare l'emittente desiderata preferita.
6. Una volta raggiunta la quantità massima dei comandi
di tasti, il display LCD q indica „PIENO“.
7. Salvare l'immissione con il tasto S r. Il display LCD q
mostra il messaggio „PREF CH SETUP".
8. Se durante la selezione del preferito da programmare
(punto 4) si seleziona una posizione di memoria già
occupata, il preferito preesistente verrà sovrascritto.
9. Ripetere il procedimento per impostare nuovi preferiti.
10.Con il tasto EXIT y si retrocede di un livello nel menu,
tranne durante l'immissione dei comandi dei tasti.
Avvertenza:
L'immissione dei numeri dei canali può variare a seconda del
modello e della marca dell'apparecchio selezionato. Eventualmente potrebbe essere necessario premere prima
il tasto
Richiamo dei preferiti
Per richiamare uno dei preferiti precedentemente programmati, premere il tasto FAV/EPG 1(, seguito dal relativo tasto
numerico per la posizione di memoria desiderata (1 - 4).
Eliminazione di tutti i canali PREF
Per eliminare tutti i preferiti precedentemente programmati,
procedere come segue:
1. Tenere premuto il tasto S r per oltre 3 secondi.
2.Con il tasto o t selezionare „PREF CH SETUP"
e confermare con il tasto OK l. Nel display compare
„PREF CH SETUP 1".
3.Con il tasto o t selezionare „PREF CH CLEAR“
e confermare con il tasto OK l.
4. Nel display LCD q compare „CONFERMA ELIM“ (conferma della cancellazione). Confermare l'eliminazione
con il tasto OK l. Il display LCD q mostra il messaggio
"SUCCESSO". Tutti i preferiti vengono annullati, il menu
viene terminato.
a in caso di numeri di canali a più cifre.
Suggerimenti:
1. Se il display LCD q mostra „CONFERMA ELIM“, si può
interrompere la cancellazione con il tasto EXIT y.
2. Non è possibile cancellare i singoli preferiti, ma solo sovrascriverli.
Regolazionevolume
Vol +/—, (disattivazione suono)
Premere il tasto "VOL+" per aumentare il volume. Con il tasto
„VOL —“ si può diminuire il volume. Per disattivare il suono,
premere il tasto
tasto riattiverà il suono.
h. Un'ulteriore pressione di questo
- 54 -
Page 57

Se non si è impostato alcun altro apparecchio come apparecchio di destinazione per la regolazione globale del volume, all’azionamento dei tasti VOL +/— j del telecomando,
come standard viene azionata la regolazione del volume
dell’apparecchio TV, indipendentemente dai tasti dell’apparecchio e premuti precedentemente. Ciò tuttavia non vale
per gli apparecchi “AMP”, “DVD” e “DSAT”, poiché si può
partire anche dal presupposto che questi apparecchi dispongano di regolazione autonoma del volume.
Uso
> Per comandare uno degli apparecchi programmati con il
telecomando universale, premere prima di tutto il relativo
tasto apparecchi e. Dirigere quindi il telecomando universale su tale apparecchio e premere il tasto desiderato.
> Impostare i tasti numerici o esattamente come si farebbe
con il telecomando originale. Prima di eseguire un'immissione a due cifre, premere il tasto
> Premere il tasto S r e infine il tasto FAV/EPG 1(, per av-
viare la guida dei programmi di un apparecchio provvisto
di questa funzione.
> Premendo il tasto S r, in basso a destra verrà visualizzata
la data per 10 secondi nel display LCD q.
> Premendo uno dei tasti apparecchi e, in basso a destra
nel display LCD q viene visualizzato il codice attivo per
l'apparecchio.
> Tramite il tasto MENU k richiamare il dialogo per le im-
postazioni del rispettivo apparecchio di destinazione.
> Premere il tasto di illuminazione d, per attivare o disatti-
vare l’illuminazione del display e dei tasti.
a.
Tasto ALL OFF
Suggerimenti:
Con il tasto ALL OFF (tutto spento) w si possono
spegnere automaticamente tutti gli apparecchi accesi.
Questa funzione può riaccendere gli apparecchi già spenti
(a seconda dell'apparecchio). Tenere premuto in tal caso
per qualche secondo il tasto ALL OFF w. Possono essere
necessari no a 10 secondi per lo spegnimento di tutti gli
apparecchi. Tale operazione funziona solo in presenza delle
seguenti condizioni:
1. Esiste una connessione visibile fra tutti gli apparecchi
e il telecomando universale.
2. Le funzioni di ricerca automatica del codice, ricerca del
codice in base alla marca e MACRO non sono attive.
3. Tutti gli apparecchi di arrivo devono essere idonei allo
spegnimento tramite telecomando.
Per riaccendere automaticamente tutti gli apparecchi, tenere
premuto nuovamente il tasto
gli apparecchi.
w no ad accendere tutti
- 55 -
Page 58

Puliziaeconservazione
Attenzione!
Impedire la penetrazione di umidità nell'apparecchio
durante la pulizia! In caso contrario, possono vericarsi
danni irreparabili all'apparecchio!
> Pulire l'alloggiamento dell'apparecchio solo con un
panno leggermente umido e un detergente delicato.
> Collocare l'apparecchio esclusivamente in un ambiente
corrispondente alle indicazioni contenute nella sezione
Dati tecnici.
> Prima della conservazione, rimuovere le pile, in modo da
impedire che esse danneggino l'apparecchio in caso di
deterioramento delle stesse.
Guasti/Risoluzione
L'apparecchio non reagisce al telecomando universale.
> Controllare le pile. È necessaria una tensione suciente e
il corretto inserimento delle pile.
> Si è premuto il tasto apparecchi e corretto per l'apparec-
chio di destinazione desiderato?
> Controllare che sia stato programmato il codice corretto
per l'apparecchio di destinazione (v. paragrafo „CODICE SETUP“).
Il telecomando universale non trasmette correttamente
i comandi.
> Premere il relativo tasto apparecchi e per portare il tele-
comando nella modalità corretta.
> È necessaria una tensione suciente e il corretto inseri-
mento delle pile.
> Probabilmente si sta utilizzando un codice errato. Avviare
la ricerca dei codici delle marche, la ricerca automatica
dei codici o l'immissione diretta del codice (manuale).
Il telecomando universale non cambia l'emittente
sull'apparecchio.
> Premere il relativo tasto apparecchi e per portare il tele-
comando nella modalità corretta.
> Se il telecomando originale non possiede tasti „-/- -“,
cambiare i programmi con i tasti P +/— u o con i tasti
numerici o.
> Se anche tale opzione non funzionasse, controllare che
non sia attivata la protezione bambini per l'apparecchio
di destinazione.
Alcuni tasti del telecomando universale non funzionano
correttamente.
> Il telecomando universale probabilmente non possiede
tutte le funzioni del telecomando originale dell'apparecchio.
- 56 -
Page 59

> Probabilmente non è stato programmato il codice otti-
male. Cercare un codice che supporti maggiori funzioni
dell'apparecchio di destinazione.
Il telecomando universale non reagisce più a seguito
della pressione di un tasto.
> È necessaria una tensione suciente e il corretto inseri-
mento delle pile.
> Dirigere il telecomando universale verso l'apparecchio.
Il display LCD q non mostra alcun messaggio.
> È necessaria una tensione suciente e il corretto inseri-
mento delle pile.
> Il contrasto potrebbe essere troppo ridotto. Aumentare
il contrasto.
Smaltimento
Non gettare per alcun motivo l'apparecchio
insieme ai normali rifiuti domestici. Questo
prodotto è soggetto alla direttiva europea
2002/96/EC.
Telecomando universale
• Smaltire il telecomando universale o parti di esso tramite
un'azienda autorizzata di smaltimento o tramite l'ente municipale competente.
• Rispettare le prescrizioni attualmente in vigore. In caso di
dubbi mettersi in contatto con l'ente di smaltimento competente.
Pile/accumulatori
• Pile e/o accumulatori non devono essere smaltiti insieme
ai riuti domestici.
• Le pile possono contenere sostanze tossiche dannose per
l'ambiente. Smaltire pertanto le pile/gli accumulatori unicamente in conformità alle leggi vigenti.
• Ogni utente è obbligato per legge a restituire le pile/gli
accumulatori a un centro di raccolta comunale, locale
o presso il rivenditore. Questo obbligo è nalizzato allo
smaltimento ecologico delle pile e/o degli accumulatori.
• Restituire pile/accumulatori solo se completamente scarichi.
Imballaggi
• Smaltire tutti i materiali dell'imballaggio in modo
ecologicamente conforme.
Datitecnici
Apparecchi comandabili: 10
Dimensioni L x P x A: 217 x 50 x 22 mm
Peso : 133 g (incl. pile)
LED a infrarossi: classe di laser 1
Alimentazione Pile: 2 x 1,5 V tipo AAA/LR03 (micro)
(incluse nella fornitura)
- 57 -
Page 60

Temperatura di esercizio: +15 – +35 °C
Temperatura di
conservazione: —0 – +50° C
Umidità: ≤ 75 % (senza condensa)
Avvisosullaconformità
Questo apparecchio è conforme ai requisiti di base e alle
altre norme rilevanti della Direttiva europea per la compatibilità elettromagnetica 2004/108/EC nonché Direttiva RoHS
2011/65/EU.
Importatore
KOMPERNASS GMBH
BURGSTRASSE 21
44867 BOCHUM, GERMANY
www.kompernass.com
Garanzia&assistenza
Questo apparecchio è garantito per tre anni a partire dalla
data di acquisto. L'apparecchio è stato prodotto con cura e
debitamente collaudato prima della consegna. Conservare
lo scontrino come prova d'acquisto. Nei casi contemplati dalla garanzia, mettersi in comunicazione telefonicamente con
il centro di assistenza più vicino. Solo in tal modo è possibile
garantire una spedizione gratuita della merce.
La garanzia copre solo i difetti del materiale o di fabbricazione, ma non i danni da trasporto, danni alle parti soggette
a usura o alle parti fragili, come ad esempio interruttori
o accumulatori.
Il prodotto è destinato esclusivamente all'uso domestico e non
a quello commerciale. La garanzia decade in caso di impiego improprio o manomissione, uso della forza e interventi
non eseguiti dalla nostra liale di assistenza autorizzata.
Questa garanzia non costituisce alcun limite ai diritti legali
del consumatore.
Il periodo di garanzia non viene prolungato da interventi in
garanzia. Ciò vale anche per le parti sostituite e riparate.
I danni e i difetti eventualmente presenti già all'acquisto
devono essere comunicati immediatamente dopo il disimballaggio, e comunque entro e non oltre due giorni dalla data
d'acquisto. Le riparazioni eettuate al termine del periodo di
validità della garanzia sono a pagamento.
Assistenza Italia
Tel.: 02 36003201
E-Mail: kompernass@lidl.it
IAN 86342
- 58 -
Page 61

INDEX PAGE
Important safety instructions 60
Device summary 61
Initial use 62
Unpacking the device/checking the package contents 62
Inserting the batteries 62
Operating components 63
LCD display 63
Buttons 64
The conguration menu 67
Menu language conguration 69
Code conguration (Programming the remote control) 69
Programming by brand code search 69
Programming by manual code input 70
Programming by automatic code search 71
System conguration 72
Setting the time 72
Setting the date 72
Adjust contrast 73
Background Illumination 73
Setting the global volume/mute switching 73
Select a Tape-/Disc device for direct operation 74
Setting the lock function 75
System reset 75
Timer conguration 76
Sleep timer 76
Event timer 76
Delete Timer 77
Learn conguration 77
Code learn function 78
Macro conguration 79
Favourites channel 80
Volume control 82
Vol +/—, (Mute switching) 82
For operation 82
All OFF 82
Cleaning and storage 83
Faults / Remedies 83
Disposal 84
Technical data 84
Note regarding conformity 85
Importer 85
Warranty & Service 85
- 59 -
Page 62

10-IN-1 REMOTE CONTROL SFB 10.1 B2
Introduction
Congratulations on the purchase of your new appliance.
You have clearly decided in favour of a quality product. These
operating instructions are a part of this product. They contain
important information in regard to safety, use and disposal.
Before using the product, familiarise yourself with all of these
operating and safety instructions. Use the product only as described and only for the specied areas of application. Retain
these instructions for future reference. In addition, pass these
documents on, together with the product, to any future owner.
Copyright
This documentation is copyright protected. All rights including those of photographic reproduction, duplication and
distribution by means of particular methods (for example
data processing, data carriers and data networks), wholly
or partially as well as substantive and technical changes are
reserved.
Importantsafetyinstructions
Proper use
Children may only operate the remote control under adult
supervision.
The universal remote control can replace a maximum of ten
remote controls. It can only be used for entertainment electronics with infrared receivers. The functions of the Universal
remote control essentially correspond to those of the original
remote control. The universal remote control is intended for
private use. It is not suitable for commercial use.
Any other use is considered improper use. The manufacturer
accepts no responsibility for damage caused by improper
handling or unauthorized reconstruction.
Warning
A warning of this danger level signies a possible dangerous
situation. If the dangerous situation is not avoided it can lead
to injuries. The directives in this warning are there to avoid
personal injuries.
Important
A warning of this danger level signies possible property
damage. If the situation is not avoided it can lead to property
damage. The directives in this warning are there to avoid
property damage.
Note
A note signies additional information that assists in the
handling of the device.
- 60 -
Page 63

Warningofinjurydangerasaresultof
improperhandlingofbatteries!
Batteries must be handled with special care. Take note of the
following safety instructions:
• Keep batteries well away from children. Children can
put batteries into their mouths and swallow them. If a battery is swallowed medical assistance must be sought IMMEDIATELY.
• Do not throw batteries into a re. Never subject batteries
to high temperatures.
• Explosion hazard! Non-rechargeable batteries must never
be recharged.
• Do not open the batteries or short-circuit them.
• Battery acid leaking from a battery can cause inamma-
tion of the skin. In event of contact with the skin, rinse with
large amounts of water. If the liquid comes into contact
with your eyes, rinse thoroughly with water, do not rub
and immediately consult a doctor.
Attention!
The Universal remote control contains an infrared diode of laser class 1. In order to avoid eye injuries do not look at the
diode with optical devices.
Damagetothedevice
• If the device is defective, do not attempt to repair it your-
self. In case of damage, contact the manufacturer or the
manufacturer's service hotline (see Warranty information).
• If liquid escapes from the device or if the device has been
otherwise damaged, it must be inspected by the manufacturer or the manufacturer's service hotline. Contact the
manufacturer or the manufacturer's service hotline (see
Warranty information).
• Take the batteries out of the battery compartment as soon
as they are depleted.
• If you will not be using the device for a long period of time,
remove the batteries to prevent them from discharging.
• Always change all batteries at the same time and always
use batteries of the same type.
Devicesummary
q LCD display
w /ALL OFF button
e Device buttons
r S button
t Arrow buttons
y EXIT button
u P +/— buttons
i MACRO button
o Number buttons
a Button for one or two digit programme numbers
- 61 -
Page 64

s Teletext function buttons
d Illumination button
f Playback buttons
g AV button
h Mute switching
VOL +/— buttons
j
k MENU button
l OK button
1( FAV / EPG button
2) Infrared sender/receiver
2! Battery compartment cover
Tips:
• The functions described here pertain to the theoretically
ideal circumstance that the button structure of the respective original remote control is identical to this universal
remote control. This only occurs, however, in rare cases. If,
therefore, not all of the original remote control's functions
can be reproduced it is not due to a diciency in the Universal remote control.
• All the brand names used in these instructions or in the
accompanying code list are trademarks of the corresponding companies.
Initialuse
Unpacking the device/checking the package
contents
Warning!
Keep the plastic packaging well away from small children.
There is a risk of suocation!
• Unpack the device and accessories.
• Check the package contents
- Universal remote control (URC),
- Operating instructions,
- Manufacturers directory with device code list:
- 2 x 1,5 V Batteries, type AAA/LR03 (Micro)
Note:Transportdamage
If you notice any transport damage contact the manufacturer or
the manufacturer's Service-Hotline (see warranty information).
Inserting the batteries
Attention!
The Universal remote control must only be operated with
1.5 Volt batteries (Type AAA, LR03).
Carry out the battery change as quickly as possible. Preset
settings will remain saved for approx. 1 minute. If new batteries have not been installed within this time all of the settings
will have to be carried out again. The time of day and date
will, however, be lost in either case.
- 62 -
Page 65

1. Open the battery compartment cover 2! in the direction
of the arrow.
2. Insert the batteries as shown in the diagram and close the
battery compartment.
The LCD display q is activated as long as batteries are
installed. The following diagram shows the LCD display q
after the batteries have been installed or changed.
Note:
If no LCD display q is visible check the polarity of the
batteries or install new ones.
Operatingcomponents
LCD display
The LCD display q is divided into elds.
Text field 2@
Here is shown the currently selected device, for example
DVD, TV VCR etc.
Infrared symbol 2#
Every time a button is pressed, with which an infrared signal
is to be sent the Infrared symbol illuminates.
- 63 -
Page 66

Code/Time field 2$
Here is shown the device code of the relevent selected device
or the time of day. With the time of day indicator "
bers blink in the middle. For time displays in the 12-hour format, the period of the day code is shown to the left of the time.
Day of the week field 2%
Here you can read the shortened form of the current day of
the week after you have entered the date.
Standard display:
The standard readout of the LCD display q consists of the
details for the relevent device, for example, "TV", the initial
for the day of the week and the time of day indicator.
:" the num-
Buttons
Note:
All the functions described here can, of course, only be used
if they are supported by the device being controlled.
/ALL OFF button. w
To switch the device on/o; press and hold
for a few seconds to switch all devices on/o.
Device buttons e
The device buttons are used to select the device that should
be operated.
Television
Video recorder
Accessory unit 1
Cable receiver
CD player
BluRay Disc Player
Audio amplier
DVD player
Digital satellite receiver
Accessory unit 2
The mentioned button allocation is not compulsory. You can,
for example, also save the code for the video recorder on
the TV slot.
"S" button r
Press and hold for 3 seconds to access the
configuration menu or press briefly to show
the date.
- 64 -
Page 67

To access the target device’s electronic
programme guide (EPG) first press briefly
the S button r and then the FAV/EPG
button 1(.
To control the “PIP” function (picture in pic-
ture) of your television set, rst press the
S button r followed by the
- button
of the Videotext function buttons s.
Arrow buttons t
Move up, right, left and down in menus.
EXIT button y
Move a level backward in the menu.
P +/— buttons u
Changing the reception channel.
In the DVD and CD-mode these buttons
control the SKIP function
MACRO button i
MACRO button i followed by a number
button o 1-6 activates a previously saved
chain of commands.
Number buttons o
Enter programme and device code numbers.
Button for one/two digit programme numbers a
For two digit programme numbers (depend-
ing on the device type) rst press
the a button then via the number buttons o
enter the programme number.
When pressed again the display becomes
single digit once more.
Teletext function buttons s
In teletext operation the buttons have the following functions:
Access the teletext function.
Stop automatic paging forward for
multi-page teletexts.
Enlarge page presentation
Screen text and TV image one upon the
other
To end the teletext function.
- 65 -
Page 68

To access the SWAP function of the target
device briey press the S button r, followed by the
-button.
Note:
• The teletext function is only available in the European TV
mode and your reception device must be teletext ready.
• In addition the P +/- buttons u control the following
teletext functions:
P+ Leaf one page forward
P— Leaf one page backwards
Playback buttons f
The playback buttons f control devices such as DVD/CD
players and video recorders:
Start playback
Image format switching with TV operation.
Record
Stop Playback/Record/Wind
Pause playback
Rewind
Wind forward
The coloured marking of the playback buttons refer to the
coloured elds in the video text, over which the Toptext functions can be controlled.
AV button g
Switch to the AV input.
Mute switching h
Switch sound on/o.
VOL+/— buttons j
Set volume (Volume).
MENU button k
Access the menu of the controlled device.
OK button l
You can conrm a menu selection with the OK
button.
FAV/EPG button 1(
Press the FAV/EPG button to access your
previously programmed favourite station.
To access the EPG function of the target
device first press briefly the S button r.
- 66 -
Page 69

The configuration menu
In the system settings you undertake the following:
• Programming the remote control to the devices to be con-
trolled
• Settings for the menu language, time of day, date, display
contrast, background illumination, volume, lock function as
well as system reset.
• Timer settings
• The "learning" of designated button commands
• Setting up Macros
• Assigning favourites
On the following page you can see a summary of the menu
structure.
- 67 -
Page 70

- 68 -
Page 71

Menu language configuration
For the device menu display you can select from 5 languages: English, German, Spanish, French and Italian.
1. Hold down the S button r for a little longer than 3 sec-
onds. Carry out entries in the menu quickly because after
approx. 15 seconds without an entry the menu will end.
2. “LANGUAGE SETUP” appears in the LCD display q.
Press the OK button l.
“ENGLISH” now appears in the LCD display q. With the
3.
buttons t select the desired language and confirm
with the OK button l.
With the EXIT button y you exit the menu.
4.
The device menu is now displayed in the selected language.
For the following instructions we are assuming that you have
selected your own language.
Code configuration
(Programming the remote control)
3 Programming methods are available for the remote control:
Programming by brand code search, by automatic code
search and by direct code input (manual).
First you should use the brand code search since this method is
the fastest way of programming if the manufacturer of your device is itemized in the code list. As second is recommended the
direct code input followed by the automatic code search.
Programming by brand code search
With this method you select the brand and code direct via
the LCD display q.
Observe the following operational references to programme
the remote control:
1. Press the device button e for the device that you want to
programme the remote control.
2. Hold down the S button r for a little longer than 3 sec-
onds. “LANGUAGE SETUP” appears in the LCD display
q. With the or button t select “CODE SETUP” and
confirm with the OK button l.
3. "ENTER CODE" now appears in the LCD display q. With
the buttons t select "BRAND CODE" and conrm
with the OK button l.
4. Now appears the alphabetical rst brand name from the
list of pre-programmed devices.
5. With the 34 buttons t select the various brand names.
6. To make access easier you can skip directly to specic let-
ters of the alphabet with the number buttons o:
2 => A 3 => D 4 => G 5 => J
6 => M 7 => P 8 => T 9 => W
Example for the search of a TV brand code: With button
- 69 -
Page 72

number 5 the display skips to the letter "J". The rst brand
is "JEC"*. If, for example, you own a "Kenwood"* brand
device, continue leang with the 4 button t until this
brand name appears. (* All brand names used here are
trademarks of the corresponding manufacturer.)
7. The majority of manufacturers use several dierent codes
for the remote control. You must now ascertain which of
the available codes is best suited to your device. On the
right underneath the brand name the relevent code will
be shown in the LCD display q.
8. To test the code, point the remote control at the actual
device and press the buttons that correspond to the func-
tions of this device (except
34t, OK l, EXIT y,
the device buttons e or the numeric buttons o).
9. If most of the buttons function press the OK button l to
save the setting. In the LCD display q "OK" appears.
Subsequently the menu will close automatically.
10. If, however, none or only a few of the buttons function
select with the
or button t the next code and test
again as described in step 8.
11.
With the EXIT button y you move back one level in the
menu.
Repeat these operational steps for all devices that you would
like to control with the remote control.
Programming by manual code input
In this mode the remote control can be programmed by direct
input of a code number. You can obtain the necessary code
number from the enclosed manufacturers directory with device
code list. In the event that the new code is invalid the last valid
programmed code will be restored.
1. Press the device button e for the device that you want to
programme the remote control.
Hold down the S button r for a little longer than 3 sec-
2.
onds. “LANGUAGE SETUP” appears in the LCD display
q. With the or button t select “CODE SETUP” and
confirm with the OK button l.
3. "ENTER CODE" now appears in the LCD display q.
access this function press the OK button l.
4. In the LCD display q appears the presently used code for
the selected device. Now the rst digit of the code blinks
and waits for your code input. Enter the new four digit
code via the number buttons o. After entering the fourth
digit the whole code ashes. You can now test if the URC
can control the device you want with this code. Press
those keys that correspond to the functions of the device,
with a TV set for example, PROG +/–. If the device re-
acts as required, conrm the code input with the OK but-
ton l. If it does not, enter the next possible code from the
list and try again.
5. If the entered CODE is valid the code will be saved. In
the LCD display q "OK" appears briey. Subsequently
To
- 70 -
Page 73

the menu will close automatically. In the event of failure
the LCD display q shows briey "ERROR" and waits for a
new code entry. Then you repeat step 4.
6.
With the EXIT button y you move back one level in the
menu.
Programming by automatic code search
This process can take several minutes per device since all
codes for the selected device have to be gone through.
Therefore this method should only be used when the device
cannot be programmed via brand code search or direct
code input or if your device is not listed at all in the manufacturers directory with device code list.
Follow the steps listed below to carry out programming by
means of the automatic code search.
1. Press the device button e for the device that is to be con-
trolled (i.e. VCR).
2. Switch the device that is to be controlled with the remote
control on. With VCR/DVD/CD devices please insert a
tape and/or disc.
Hold down the S button r for a little longer than 3 sec-
3.
onds. “LANGUAGE SETUP” appears in the LCD display
q. With the or button t select “CODE SETUP” and
confirm with the OK button l.
4. "ENTER CODE" now appears in the LCD display q. Press
the or button t until "SEARCH CODE" is shown in
the LCD display q. Point the remote control to the device
and then press the OK button l to access the mode "au-
tomatic code search".
5. The search begins. Thereby the device sends, one after
the other, the code numbers in ascending order. The infra-
red symbol 2# indicates this. Every search starts with the
currently programmed code.
6. When the device reacts by switching o press immedi-
ately the OK button l to save the relevent code. The LCD
display q shows briey "OK".
Check to see if the majority of your device's functions can
7.
now be controlled with the remote contol. If yes you have
most probably found the correct code. In the event that a
few functions are not working you can start the automatic
code search again beginning with step 1.
8.
However if the device does not react any more you prob-
ably did not press the OK button l quick enough in step
6. Then press repeatedly the EXIT button y to exit the
menu and return to the standard display.
9. Now hold down the device button e of the device for
which you have just sought the relevent code. Below on
the right in the LCD display q will thereby be shown the
relevent code. Make a note of this number.
- 71 -
Page 74

10. Then proceed as described in the preceding chapter
"Programming by manual code entry" and check to see
if the code with the next lowest number combination will
function.
Tips:
1. While the code search is activated none of the buttons
will function apart from OK l and EXIT y.
2. If the automatic search has reached the end of the code
list it stops there. The display then returns to "SEARCH
CODE".
System configuration
Setting the time
The LCD display q shows you the time of day. You set this as
follows:
1. Hold down the S button r for a little longer than 3 sec-
onds. The notice "LANGUAGE SETUP" appears. If ap-
pox. 15 seconds passes without an entry the device exits
the menu and returns to the standard display.
2. With the or button t select "SYSTEM SETUP" and
conrm with the OK button l.
3. In the LCD display q "TIME SETUP" appears. Conrm
with the OK button l.
"TIME" and the time format (24 HR) blinks.
4.With the or button t you can switch to the other
time format (12 HR). After which the time display for the
time of day will show an “AM” or “PM” before the time.
„AM“ stands fpr “AM” = “ante meridium” (Morning, 0:00
o’clock midnight to 12:00 o’clock midday). „PM“ stands
for “PM” = “post meridium” (Afternoon and evening,
12:00 o’clock midday to 0:00 o’clock midnight). Press
the OK button l to conrm.
5.Now the hour indicator blinks. With the or button t
select the hour number for the present time of day and
press the OK button l.
6.Now the minute indicator blinks. With the or button
t select the minute number for the present time of day
and press the OK button l to save. The "TIME SETUP"
notice appears again.
7. To exit this or the following menus press repeatedly the
EXIT button y until the standard display appears in the
LCD display q.
The LCD display q now shows
Setting the date
The LCD display q shows you the date when you press the S
button r. You set the date in this way:
1. Hold down the S button r for a little longer than 3 sec-
onds. The notice "LANGUAGE SETUP" appears.
2.With the or button t select "SYSTEM SETUP" and
conrm with the OK button l.
- 72 -
Page 75

3. In the LCD display q "TIME SETUP" appears. Press the
button t to change to "DATE SETUP". Conrm with the
OK button l.
4.In the display the year "2011" blinks. With the or
button t you can change the year and conrm with
the OK button l. With the or button t you can
change the now blinking month and conrm with the OK
button l. Now the day indicator blinks which you can
also change with the or button t.
5. To save press the OK button l. The "DATE SETUP"
notice appears again.
Adjust contrast
You can set the display's contrast as follows:
1. Hold down the S button r for a little longer than 3 sec-
onds. The notice "LANGUAGE SETUP" appears.
2.With the or button t select "SYSTEM SETUP" and
conrm with the OK button l.
3.With the or button t select "CONTRAST SETUP"
and conrm with the OK button l.
4. In the LCD display q the contrast value now blinks which
you can set with the or button t.
Display readout:
0 = highest contrast:
15 = lowest contrast
5. With the OK button l you can save the desired setting.
The notice "CONTRAST SETUP" appears again.
Background Illumination
You can set how long the LCD display’s q background and
the button illuminations remain alight after completion of the
operation.. Thereby taking into account that the longer the illumination remains lit the shorter the battery life will be.
1. Hold down the S button r for a little longer than 3 sec-
onds. The notice "LANGUAGE SETUP" appears.
2.With the or button t select "SYSTEM SETUP" and
conrm with the OK button l.
3.With the
conrm with the OK button l.
4. In the LCD display q now blinks the second count for the
length of time that the light is to be left on which you can
set with the buttons t from 0 to 60. If you select
"0" the background illumination will shut o completely.
5. With the OK button l you can save the desired setting.
The notice "BACKLIT SETUP" appears again.
or button t select "BACKLIT SETUP" and
Setting the global volume/mute switching
So that you don’t always have to rst press a device button for
the volume control and mute switching, for these functions the
URC always only responds to an individual device. You can
determine this target device yourself.
- 73 -
Page 76

1.Hold the S button r down for a little longer than
3 seconds. The notice „LANGUAGE SETUP“ appears.
2.With the or button t select “SYSTEM SETUP” and
confirm with the OK button l.
3.With the or button t select “VOL/MUTE SETUP”
and confirm with the OK button l.
4.The LCD display q shows “ALL VOL SET”. Press the OK
button l, the display changes to „ALL VOL MODE“.
5. Now press the device button e for the device that is to be
controlled by the global volume control.
6. If the specified device is equipped with a volume control,
“SUCCESS” will be displayed briefly and the menu will
close. From now on the volume control functions on the
device just specified.
7. If this device is not equipped with its own volume control
the URC will not allow this selection and shows “VOLUME
ERROR”. Even then the menu will close. The volume con-
trol will then continue to function on the former device.
You can also deactivate the global volume control for specific
devices.
1. For this select in the menu “VOL/MUTE SETUP” with the
or button t the function “MODE VOL SET” and
confirm with the OK button l. In the LCD display q ap-
pears „MODE VOL MODE”.
2.Now press the device button e for the device that is to
be excluded from the global volume control. The LCD
display q shows „SUCCESS“ and the global volume
control is deactivated if the URC is working in the opera-
tional mode of one of the selected devices.
You can again override the settings in the “VOL/MUTE
SETUP” menu.
1. For this select in the menu “VOL/MUTE CONF” with the
or button t the function “VOL/MUTE RESET” and
confirm with the OK button l.
2.The LCD display q prompts you, with CONFIRM RESET,
to a confirmation which is done by pressing the OK
button l.
Press the OK button l if you want to delete
the setting, the displayed “SUCCESS” then confirms the
deletion of the device assignment to global volume control. Otherwise you press the EXIT button
yto abort the
deletion.
Select a Tape-/Disc device for direct operation
You can select a tape or disk device that you can control
with the playback buttons f without rst having to press the
corresponding device button e.
1. Hold down the S button r for a little longer than 3 seconds. The notice “LANGUAGE SETUP” appears.
2. With the or button t select “SYSTEM SETUP” and
conrm it with the OK button l.
- 74 -
Page 77

3. In the LCD display q “TIME SETUP” appears. Press the
button t to switch to “PLAYBACK SETUP”. Conrm
with the OK button l.
4. With the or buttons t now select the device that
should respond to the URC when you use the playback
buttons f. Conrm with the OK button l.
5. If instead of a device you select “OFF” and conrm it with
the OK button l, you switch the direct operation o. If
you select “RESET” and confirm with the OK button l
you activate the pre-programmed default settings (DVD)
for this function.
6. The LCD display q shows “SUCCESS” and the selected
device can now be directly controlled using the playback
buttons f.
Setting the lock function
With the lock function you can block access to all configuration menus.
1.Hold down the S button r for a little longer than 3 seconds.
2. With the or button t select „SYSTEM SETUP“ and
confirm with the OK button l.
3.With the or button t select “LOCK SETUP and
confirm with the OK button l. The LCD display q shows
the current settings.
4.With the or button t now select between „LOCK“
(Block) or „UNLOCK“ (Unblock).
5.With the OK button l you save the setting. In the LCD
display q „LOCK SETUP“ then appears again.
System reset
With this function you can delete the assignment of all or individual device buttons.
1. Hold down the S button r for a little longer than 3 seconds. The notice "LANGUAGE SETUP" appears.
2.With the or button t select "SYSTEM SETUP" and
conrm with the OK button l.
3.With the or button t select "SYSTEM RESET" and
conrm with the OK button l.
4. With the or buttons t you can now select the
desired function. To delete the assignments (Code) of all
device buttons e, as well as all data to macros, timer and
learned functions, select “ALL RESET” and conrm it with
the OK button l.
5. In the LCD display q there now appears “CONFIRM
RESET”. Conrm the deletion with the OK button l.
Then the LCD display q shows “SUCCESS RESET”. The
detailed information is now deleted and the menu is terminated.
6. To delete only the assignments of individual device keys e,
select “MODE RESET” and then press the OK button l.
The LCD display q now shows MODE” and asks you to
- 75 -
Page 78

press the device button e whose assignment you want to
delete. To conclude, “SUCCESS” briey appears, then you
will again read “MODE” in the LCD display. Now press
any other further desired device buttons e to also delete
their assignment.
7. Otherwise, you can exit the menu by pressing the EXIT
button y.
Timer configuration
The URC oers 2 timer modes, sleep timer and event timer.
Sleep timer
1. Press the device button e for the device that is to be controlled (i.e. VCR).
2. Hold down the S button r for a little longer than 3 seconds. The notice "LANGUAGE SETUP" appears.
3.Press the or button t until "TIMER SETUP" is
shown. Press the OK button l "TIMER SLEEP" appears in
the LCD display q.
with the OK button l.
4. Now, below to the right in the LCD display q blinks the
minutes for the remaining time of the selected device.
Set with the or button t the desired value from 1
to 99 minutes. Press the OK button l to conrm. With
programmed sleep-timer the LCD display q shows “
on the right next to the time.
5. Position the remote control in such a way that your infrared signal can reach the device to be switched o. After
expiration of the set time the remote control will switch the
device o.
6. If you now press the S button r “SL” is shown in the dis-
play q below on the left.
Conrm the selection of this function
z
z
”
Event timer
The remote control has 4 event timers available via which
you are allowed to send out specic series of button combinations at designated times.
1. Hold down the S button r for a little longer than 3 seconds. The notice "LANGUAGE SETUP" appears.
2.With the or button t select "TIMER SETUP" and
conrm with the OK button l. "TIMER SLEEP" appears
in the LCD display q.
the desired memory slot "TIMER SETUP 1" to "TIMER
SETUP 4" and conrm with the OK button l.
3. Now the hour of the time of day, to which the desired
button combinations are to be carried out, blinks. Set with
the or button t the desired hour and press for conrmation the OK button l.
4. Now the minutes of the time of day, to which the desired
button combinations are to be carried out, blinks. Set with
the or button t the desired minutes and press for
conrmation the OK button l.
With the or button t select
- 76 -
Page 79

5. In the LCD display q you will see "TIMER X KEY" (X
stands for the desired timer). Now press the desired
device button e followed by the desired sequence of the
button commands.
6. By default, the timer commands are sent at intervals of 1
second. Since many devices react sluggishly, it is possible
that the sequences of the timer commands are sent to the
device too quickly. Then you have the option of programming, before a button command, a pause of between 5
to 21 seconds. For this press, if necessary repeatedly, on
the MACRO button i. Below and to the right the LCD
display q shows the current pause length in seconds.
7. Press the S button r to save your entry and to return to
the timer menu.
8. Procede in a similar manner in order to, if required,
programme the other timer memory slots also.
9.With programmed event timer the LCD display q shows
the timer symbol „
Tips:
1. Per timer memory slot a maximum of 14 buttons can be
programmed. After entry of the 14th button the sequence
will be automatically saved and "FULL" is shown in the
LCD display q.
2. In this menu also the device will return to the standard display after approx. 15 seconds without an entry.
” on the right next to the time.
Delete Timer
You can delete a programmed sleep or event timer as follows:
1. Select the timer that you wish to delete (see chapter
Sleep-Timer/Event-Timer) and then press the OK button l.
In the LCD display q you will read „TIMER CLEAR“.
2. Press the OK button l. The LCD display q changes to
„CONFIRM CLEAR“.
3. Press the OK button l once again to delete the timer.
The LCD display q conrms the successful deletion with
the message „SUCCESS“.
Learnconguration
The Universal remote control (URC) can learn and save button signals of an original remote control. If the URC does not
work after applying the programming methods already described or cannot carry out all commands please attempt to
teach the URC with the help of the original remote control.
• Use new batteries for the URC and the original remote
control.
• Maintain a distance of at least one metre from other light
sources. The light sources could disrupt the infrared transmission.
• Place the URC and the original remote control at a dis-
tance of 20 to 50 mm from each other on an even surface
so that the infrared diodes 2) are facing each other.
- 77 -
Page 80

Tips:
1. Do not use the following buttons for the learn function: all
device buttons e, MACRO i, S button r, EXIT y.
2. If when teaching, during the notice "LEARNING", no
button is pressed on the original RC after 25 seconds the
learn menu will end. This mode can not be ended
by pressing a button on the URC.
3. The memory can accommodate 150 button commands.
If the memory is full the LCD display q shows "LEARN
FULL" and the learn mode will end.
4. With the EXIT button y you return to the previous status
(except with a notice of "LEARN KEY" and/or "LEARNING").
Code learn function
1. Press the device button e for the device that the URC
should learn a button code.
2. Hold down the S button r for a little longer than 3 seconds. The notice "LANGUAGE SETUP" appears.
3. With the or button t select the menu "LEARN
SETUP" and then press the OK button l.
4. In the LCD display q "LEARN SET" appears. Then press
the OK button l.
pears.
5. First press the button on the URC that is to be taught. In the
LCD display q "LEARNING" appears. The URC now waits
for the infrared signal from the original remote control.
Note:
Should the notice not change to "LEARNING" you have
selected a button for which no button code can be
taught.
6. Point the infrared sensors 2) of both remote controls
towards each other.
7. Now hold down the desired button of the original
remote control until "SUCCESS" or "LEARN ERROR"
appears in the display q of the URC.
8. If in the LCD display q "SUCCESS" appears (process
successful), you can teach further buttons begining with
step 5. If "LEARN ERROR" appears (process unsuccessful)
repeat the process in any case from step 5.
To stop/end the learn process press the S button and
9.
subsequently, while “LEARN KEY” is displayed, repeatedly
the EXIT button y until the normal indicator appears in the
LCD display q. During the displayed “LEARNING” simply
allow 30 seconds to pass without any operation and the
device will then exit the menu.
In the LCD display q "LEARN KEY" ap-
Delete all programmed buttons of all devices
1. Hold down the S button r for a little longer than 3 seconds. The notice "LANGUAGE SETUP" appears.
2.With the or button t select the menu "LEARN
SETUP" and then press the OK button l. In the LCD
display q "LEARN SET" appears.
- 78 -
Page 81

3.With the or button t select "LEARN CLEAR"
(taught delete) and conrm with the OK button l. In
the LCD display q "CONFIRM CLEAR" (conrm delete)
appears.
4. Conrm with the OK button l.
"SUCCESS" appears. All programmed buttons are de-
leted. Finally the menu will automatically end.
Note:
When the LCD display shows “CONFIRM CLEAR” you can
stop the deletion with the EXIT button y.
In the LCD display q
Macro configuration
With the MACRO function up to 16 button commands can
be carried out with the press of a single button, that is to say,
several previously saved control commands can be deleted
with one MACRO button. There are 6 Macro memory slots
available for you.
To programme a Macro
For Macro programming proceed as follows:
1. Hold down the S button r for a little longer than 3 seconds. The notice "LANGUAGE SETUP" appears.
2.With the or button t select "MACRO SETUP" and
conrm with the OK button l. In the display "MACRO
SETUP 1" appears.
3.With the or button t select the memory slot to be
programmed (MACRO SETUP 1 - 6) and conrm with the
OK button l.
4. In the LCD display q "MACRO STEP" appears. Now
press, one after the other, the desired buttons (max. 16).
The sequence should begin with a device button e.
5.By default the Macro commands are sent in intervals of
1 every second. Since many devices react sluggishly it is
possible that the sequence of the Macro commands are
sent too quickly to the device. Then you have the option
of programming, before a button command, a pause
of between 5 - 21 seconds. For this purpose press, if necessary repeatedly, the MACRO button i. Below
and to the right the LCD display q shows the current
pause length in seconds.
6. When the maximum number of button commands is
reached the LCD display q shows "FULL".
7. Save the entry with the S button r. In the LCD display q
"MACRO SETUP" appears.
8. If, with the selection of the Macros to be programmed
(step 3), you select a memory slot that is already occupied
the existing Macro will be overwritten.
9. Repeat the process from step 3 to create further Macros.
10.With the EXIT button y you move back a level in the
menu, except during the input of the button commands.
- 79 -
Page 82

Tips:
1. A maximum of 16 button commands can be saved in a
Macro. After input of the 16th button command, “FULL”
appears in the LCD display q.
2. To exit the mode without saving allow approx. 15 seconds to pass without an entry.
3. In the mode "MACRO STEP" you can only return to the
previous status with the S button r.
Example: You want to save a command chain in a Macro.
We begin in the mode "MACRO STEP".
Desired command chain: Switch on TV => PAUSE => switch
to the AV input => switch on DVD => PAUSE => Playback
DVD.
In the mode "MACRO STEP", for this you enter the following
button commands:
=> => (Pause time) => => =>
=> (Pause time) =>
Execute a Macro
To execute a pre-programmed Macro proceed as follows:
1. Press the MACRO button i.
2. With the corresponding number button o you access the
desired Macro (1-6). Example: If Macro 3 is to be implemented press rst the Macro button i and then, within 5
seconds, the number button "
".
To delete all Macros
To delete all pre-programmed Macros proceed as follows:
1. Hold down the S button r for a little longer than 3 seconds. The notice "LANGUAGE SETUP" appears.
2.With the or button t select "MACRO SETUP" and
conrm with the OK button l. In the display "MACRO
SETUP 1" appears.
3.With the or button t select "MACRO CLEAR" and
conrm with the OK button l.
4. In the LCD display q "CONFIRM CLEAR" (conrm
delete) appears. Conrm the delete process with the
OK button l.
All Macros are now deleted and the menu will end.
Tips:
1. When the LCD display q shows "CONFIRM CLEAR" you
can stop the delete process with the EXIT button y.
2. Individual Macros can not be deleted they can only be
overwritten.
The LCD display q shows "SUCCESS".
Favouriteschannel
Note:
With this function you can save your preferred stations as
favourites.
- 80 -
Page 83

To programme favourites
Your favourite stations are saved as follows:
1. Press the device button e for the device that you want to
save a favourite.
2. Hold down the S button r for a little longer than 3 seconds. The notice "LANGUAGE SETUP" appears.
3.With the or button t select "FAV CH SETUP" and
conrm with the OK button l. In the display "FAV CH 1
SETUP" appears.
4.With the or button t select the memory slot to be
programmed (FAV CH 1 - 4 SETUP) and conrm with the
OK button l.
5. In the LCD display q "FAV CH STEP" appears. Now
press, one after the other, the buttons (max. 4) for access
to your desired favourite stations.
6. When the maximum number of button commands is
reached the LCD display q shows "FULL".
7. Save the entry with the S button r.
In the LCD display q
"FAV CH SETUP 1 - 4" appears.
8. If, with the selection of the favourites to be programmed
(step 4), you select a memory slot that is already occupied the existing favourite will be overwritten.
9. Repeat the steps to apply further favourites.
10.With the EXIT button y you move a level backwards in the
menu except during the entry of the button commands.
Note:
The input of the channel numbers can vary according to
the model and brand of the selected devices. If necessary,
with multi-digit channel numbers you must rst press the
button a.
To access favourites
To access a pre-programmed favourite press the FAV/EPG
button 1( followed by the corresponding number button for
the desired memory slot (1 - 4).
Delete All FAV channels
To delete all pre-programmed favourites proceed as follows:
1. Hold down the S button r for a little longer than 3 seconds.
2.With the or button t select "FAV CH SETUP" and
conrm with the OK button l. In the display "FAV CH 1
SETUP" appears.
3.With the or button t select "FAV CH CLEAR" and
conrm with the OK button l.
4. In the LCD display q "CONFIRM CLEAR" (conrm delete)
appears. Conrm the delete process with the OK button l.
The LCD display q shows "SUCCESS". All favourites are
now deleted and the menu will end.
Tips:
1. When the LCD display q shows "CONFIRM CLEAR" you
can stop the delete process with the EXIT button y.
- 81 -
Page 84

2. Individual favourites can not be deleted they can only be
overwritten.
Volumecontrol
Vol +/—, (Mute switching)
Press the "VOL+" button to increase the volume. With the
"VOL —" button you reduce the volume. To mute the sound
press the
the sound back on.
If you have not set any other device as the target for the global
volume control, when you press the VOL +/- buttons j on
the URC the volume control of the TV set is addressed by
default, regardless of which device button e was previously
pressed. However, this does not apply to the following de-
vices: “AMP”, “DVD”, and “DSAT” since it can be assumed
that these devices are equipped with their own volume control.
-button h. A further press of this button turns
Foroperation
> To operate one of the programmed devices with the URC
rst press the corresponding device button e. Then point
the URC to this device and press the desired button.
> Put the number buttons o exactly as you do with the
original remote control. Before you make a two digit
entry press, if necessary, the
> Press the S button r and subsequently the FAV/EPG but-
ton 1( to start the electronic programme guide of a device
equipped with this function.
> If you press the S button r the date is superimposed for
10 seconds in the LCD display q below and on the right.
> Whilst you hold down one of the device buttons e the
active code for this device will be superimposed below to
the right in the LCD display q.
> Via the MENU button k you access the dialogue for the
setting of the respective target device.
> Press the illumination button dto switch the display and
button illuminations on and/or off.
button a.
All OFF
Tips:
With the button ALL OFF (all o) w all devices that
are switched on can be automatically switched o. This function can switch on again devices that have already been
switched o (depending on the device). For this, press and
hold the ALL OFF button w for a few seconds. It may take up
to 10 seconds before all devices are switched o. This will
only function under the following circumstances:
1. A visible connection exists between all the devices and
the URC.
- 82 -
Page 85

2. Automatic code search, brand code search and MACRO
function are not active.
3. All target devices must be suitable for remote control
switch o.
To again switch on all devices automatically hold down once
more the button
w until all devices are switched on.
Cleaningandstorage
Attention!
Ensure that moisture cannot permeate into the device
during cleaning! Otherwise there is the danger of
causing irreparable damage to the device!
> Clean the housing of the device exclusively with a soft
moist cloth and a mild dishwashing detergent.
> Store the device exclusively in an environment that com-
plies with the specications given in the technical data.
> Before storing remove the batteries so that they will not
cause damage to the device if, during storage, they
happen to leak.
Faults/Remedies
Your device does not react to the URC.
> Check the batteries. They must have enough voltage and
be properly installed.
> Firstly have you pressed the correct device button e for
the desired target device?
> Check to see that the correct code is programmed in for
the target device (see section "Code Setup").
The URC is transmitting the commands incorrectly.
> Press the corresponding device button e to set the URC
to the correct mode.
> The batteries must have enough voltage and be properly
installed.
> It is possible that you are using the wrong code. Start the
brand code search, the automatic code search or the direct code input (manual).
The URC does not change the station on the device.
> Press the corresponding device button e to set the URC
to the correct mode.
> In the event that the original RC does not have a "-/- -"
button, change the programme with the P +/— buttons u or
the number buttons o.
> If this also does not work the child protection for the
target device could be activated.
Some buttons on the URC do not function properly.
> It is possible that your URC does not have all of the func-
tions that are on the device's original remote control.
- 83 -
Page 86

> It is possible that you have not programmed in the optimal
code. Search for a code that supports more of the target
device's functions.
The URC stops reacting after a button is pressed.
> The batteries must have enough voltage and be properly
installed.
> Point the URC towards your device.
The LCD display q shows nothing.
> The batteries must have enough voltage and be properly
installed.
> The contrast could be set too low. Increase the contrast
setting.
Disposal
Do not dispose of the device in your normal
domestic waste. This product is subject to the
European directive 2002/96/EC.
Universal remote control
• Have the universal remote control or parts of it disposed
of by a professional disposal company or by your communal disposal facility.
• Observe the currently applicable regulations. In case of
doubt contact your disposal facility.
Batteries/rechargeable batteries
• Used batteries/rechargeable batteries may not be dis-
posed of in household waste.
• Batteries can contain poisons which are damaging to the
environment. Therefore, dispose of the batteries/rechargeable batteries in accordance with statutory regulations.
• Every consumer is legally obliged to surrender batteries/
rechargeable batteries to a community collection centre
in their district or to a dealer. The purpose of this obligation is to ensure that batteries are disposed of in a nonpolluting manner.
• Only dispose of batteries when they are fully discharged.
Packaging
• Dispose of packaging materials in an environmen-
tally responsible manner.
Technicaldata
Controllable devices: 10
Dimensions
L x W x H: 217 x 50 x 22 mm
Weight : 133 g (incl. batteries)
Infrared LED: Laser class 1
Power supply
Batteries: 2 x 1.5 V, type AAA/LR03 (micro)
(supplied)
- 84 -
Page 87

Operating temperature: +15 – +35 °C
Storage temperature : —0 – +50 °C
Humidity: ≤ 75 % (No condensation)
Noteregardingconformity
This device satises the fundamental requirements and other
relevant regulations of the EMC Directive 2004/108/EC
and the RoHS Directive 2011/65/EU.
Importer
KOMPERNASS GMBH
BURGSTRASSE 21
44867 BOCHUM, GERMANY
www.kompernass.com
Warranty&Service
You receive a 3-year warranty for this appliance as of the
purchase date. This appliance has been manufactured with
care and meticulously examined before delivery.
Please retain your receipt as proof of purchase. In the case
of a warranty claim, please make contact by telephone with
our service department. Only in this way can a post-free despatch for your goods be assured.
The warranty covers only claims for material and manufacturing defects, but not for transport damage, wearing parts or
for damage to fragile components, e.g. buttons or batteries.
This product is for private use only and is not intended for
commercial use. The warranty is void in the case of abusive
and improper handling, use of force and internal modications not carried out by our authorized Service Centre.
Your statutory rights are not restricted in any way by this warranty.
The warranty period is not extended through repairs made
under warranty. This applies also for replaced or repaired
parts. Any damages or deciencies found on purchase must
be reported as soon as possible after unpacking, at the latest two days after purchase. On expiry of the warranty, all
repairs carried out are subject to payment.
Service Great Britain
Tel.: 0871 5000 720 (£ 0.10/Min.)
E-Mail: kompernass@lidl.co.uk
IAN 86342
Service Ireland
Tel.: 1890 930 034
(0,08 EUR/Min., (peak))
(0,06 EUR/Min., (o peak))
E-Mail: kompernass@lidl.ie
IAN 86342
- 85 -
Page 88

- 86 -
Page 89

INHALTSVERZEICHNIS SEITE
Wichtige Sicherheitshinweise 88
Geräteübersicht 89
Inbetriebnahme 90
Gerät auspacken/Lieferumfang prüfen 90
Batterien einsetzen 90
Bedienelemente 91
LCD-Anzeige 91
Tasten 92
Die Kongurationsmenüs 95
Menüsprachen kongurieren 97
Code kongurieren (Programmierung der Fernbedienung) 97
Programmierung per Marken-Code-Suche 97
Programmierung per manueller Code-Eingabe 98
Programmierung per automatischer Code-Suche 99
System kongurieren 100
Uhrzeit einstellen 100
Datum einstellen 101
Kontrast einstellen 101
Hintergrundbeleuchtung 101
Globale Lautstärke/Stummschaltung einstellen 102
Band-/Discgerät für Direktbedienung auswählen 103
Sperr-Funktion einstellen 103
System Reset 103
Timer kongurieren 104
Sleep-Timer 104
Ereignis-Timer 105
Timer löschen 105
Lernen kongurieren 106
Code-Lernfunktion 106
Makros kongurieren 107
Favoritenkanal 109
Lautstärkeregelung 110
Vol +/—, (Stummschaltung) 110
Zur Bedienung 111
Alle AUS 111
Reinigen und Lagerung 111
Fehler / Abhilfe 112
Entsorgen 113
Technische Daten 113
Hinweis zur Konformität 113
Importeur 114
Garantie & Service 114
- 87 -
Page 90

UNIVERSALFERNBEDIENUNG SFB 10.1 B2
Einführung
Herzlichen Glückwunsch zum Kauf Ihres neuen Gerätes. Sie
haben sich damit für ein hochwertiges Produkt entschieden.
Die Bedienungsanleitung ist Bestandteil dieses Produkts. Sie
enthält wichtige Hinweise für Sicherheit, Gebrauch und Entsorgung. Machen Sie sich vor der Benutzung des Produkts
mit allen Bedien- und Sicherheitshinweisen vertraut. Benutzen
Sie das Produkt nur wie beschrieben und für die angegebenen Einsatzbereiche. Bewahren Sie diese Anleitung gut auf.
Händigen Sie alle Unterlagen bei Weitergabe des Produkts
an Dritte mit aus.
Urheberrecht
Diese Dokumentation ist urheberrechtlich geschützt. Alle
Rechte, auch die der fotomechanischen Wiedergabe, der
Vervielfältigung und der Verbreitung mittels besonderer Verfahren (zum Beispiel Datenverarbeitung, Datenträger und
Datennetze), auch teilweise, sowie inhaltliche und technische
Änderungen vorbehalten.
Wichtige Sicherheitshinweise
Bestimmungsgemäße Verwendung
Kinder dürfen die Fernbedienung nur unter Aufsicht von
Erwachsenen bedienen. Die Universalfernbedienung kann
maximal zehn Fernbedienungen ersetzen. Sie kann nur
für Geräte der Unterhaltungselektronik mit einem InfrarotEmpfänger eingesetzt werden. Die Funktionen der Universalfernbedienung entsprechen im Wesentlichen denen der
Originalfernbedienungen. Die Universalfernbedienung ist
für den privaten Gebrauch bestimmt. Sie ist nicht für eine gewerbliche Nutzung geeignet. Jede andere Verwendung gilt
als nicht bestimmungsgemäß. Für Schäden aufgrund nicht
bestimmungsgemäßer Verwendung oder eigenmächtiger
Umbauten übernimmt der Hersteller keine Haftung.
Warnung
Ein Warnhinweis dieser Gefahrenstufe kennzeichnet eine
mögliche gefährliche Situation. Falls die gefährliche Situation
nicht vermieden wird, kann dies zu Verletzungen führen. Die
Anweisungen in diesem Warnhinweis befolgen, um Verletzungen von Personen zu vermeiden.
Achtung
Ein Warnhinweis dieser Gefahrenstufe kennzeichnet einen möglichen Sachschaden. Falls die Situation nicht vermieden wird,
kann dies zu Sachschäden führen. Die Anweisungen in diesem Warnhinweis befolgen, um Sachschäden zu vermeiden.
Hinweis
Ein Hinweis kennzeichnet zusätzliche Informationen, die den
Umgang mit dem Gerät erleichtern.
- 88 -
Page 91

WarnungvorVerletzungsgefahrdurch
falschenUmgangmitBatterien!
Batterien müssen mit besonderer Vorsicht behandelt werden.
Beachten Sie folgende Sicherheitshinweise:
• Batterien dürfen nicht in die Hände von Kindern gelan-
gen. Kinder könnten Batterien in den Mund nehmen und
verschlucken. Wurde eine Batterie verschluckt, muss sofort
medizinische Hilfe in Anspruch genommen werden.
• Batterien nicht ins Feuer werfen. Batterien keinen hohen
Temperaturen aussetzen.
• Explosionsgefahr! Batterien dürfen nicht aufgeladen werden.
• Batterien nicht önen oder kurzschließen.
• Batteriesäure, die aus einer Batterie austritt, kann zu
Hautreizungen führen. Bei Hautkontakt mit viel Wasser
abspülen. Wenn die Flüssigkeit in die Augen gelangt ist,
gründlich mit Wasser ausspülen, nicht reiben und sofort
einen Arzt aufsuchen.
Achtung!
Die Universalfernbedienung besitzt eine Infrarotdiode der
Laserklasse 1. Betrachten Sie diese nicht mit optischen Geräten, um Augenverletzungen zu vermeiden.
SchadenamGerät
• Sollte das Gerät defekt sein, versuchen Sie nicht, es eigen-
ständig zu reparieren. Kontaktieren Sie in Schadensfällen
den Hersteller oder dessen Service-Hotline (siehe Garantiekarte).
• Sollte Flüssigkeit in das Gerät gelangt sein oder wurde
es anderweitig beschädigt, muss es durch den Hersteller
oder dessen Service-Hotline überprüft werden. Setzen Sie
sich mit dem Hersteller oder dessen Service-Hotline (siehe
Garantiehinweise) in Verbindung.
• Entnehmen Sie die Batterien aus dem Batteriefach, sobald
sie verbraucht sind.
• Wenn Sie das Gerät längere Zeit nicht benutzen, entneh-
men Sie die Batterien, um Entladung zu vermeiden.
• Tauschen Sie ggf. immer alle Batterien gleichzeitig aus
und mischen Sie nie Batterien unterschiedlichen Typs.
Geräteübersicht
q LCD-Anzeige
w Taste /ALL OFF
e Gerätetasten
r S-Taste
t Pfeiltasten
y Taste EXIT
u Tasten P +/—
i Taste MACRO
o Zierntasten
a Taste für ein- oder zweistellige Programm-Nummern
- 89 -
Page 92

s Videotext-Funktionstasten
d Beleuchtungstaste
f Laufwerkstasten
g Taste AV
h Stummschaltung
Tasten VOL +/—
j
k Taste MENU
l Taste OK
1( Taste FAV / EPG
2) Infrarot-Sender/Empfänger
2! Batteriefachabdeckung
Hinweise:
• Die hier beschriebenen Funktionen beziehen sich auf den
theoretischen Idealfall, dass die Tastenstruktur der jeweiligen Originalfernbedienung mit der dieser Universalfernbedienung identisch ist. Dies wird aber nur in den seltensten
Fällen zutreen. Wenn also nicht sämtliche Funktionen der
Originalfernbedienung nachvollzogen werden können, ist
dies kein Mangel der Universalfernbedienung.
• Alle in dieser Anleitung oder der beiliegenden Codeliste
verwendeten Markennamen sind Handelszeichen der entsprechenden Firmen.
Inbetriebnahme
Gerät auspacken/Lieferumfang prüfen
Warnung!
Halten Sie auch die Verpackungsfolien von Kindern fern. Es
besteht Erstickungsgefahr.
• Packen Sie das Gerät und die Zubehörteile aus.
• Überprüfen Sie den Lieferumfang
- Universalfernbedienung (UFB),
- Bedienungsanleitung,
- Herstellerverzeichnis mit Gerätecodeliste
- 2 x 1,5 V Batterien, Typ AAA/LR03 (Micro)
Hinweis:Transportschaden
Sollten Sie einen Transportschaden bemerken, wenden Sie
sich an den Hersteller oder dessen Service-Hotline (siehe
Garantiehinweise).
Batterien einsetzen
Achtung!
Die Universalfernbedienung darf nur mit 1,5 Volt Batterien
(Größe AAA, LR03) betrieben werden.
Führen Sie den Batteriewechsel zügig durch. Vorgenommene
Einstellungen bleiben ca. 1 Minute lang gespeichert. Wenn
in dieser Zeit keine neuen Batterien eingelegt wurden, müssen sämtliche Einstellungen erneut durchgeführt werden.
- 90 -
Page 93

Die Uhrzeit und das Datum gehen allerdings auf jeden Fall
verloren.
1. Batteriefachabdeckung 2! in Pfeilrichtung önen.
2. Batterien entsprechend der Abbildung einsetzen und
Batteriefach schließen.
Die LCD-Anzeige q ist aktiviert, solange Batterien eingelegt sind.
Die folgende Abbildung zeigt die LCD-Anzeige q, nachdem
die Batterien eingelegt oder gewechselt wurden.
Hinweis:
Wenn keine LCD-Anzeige q sichtbar wird, überprüfen Sie
die Polung der Batterien oder setzen Sie neue Batterien ein.
Bedienelemente
LCD-Anzeige
Die LCD-Anzeige q ist in Felder eingeteilt.
Textfeld 2@
Hier wird das aktuell angewählte Gerät angezeigt, zum Beispiel DVD, TV, VCR etc.
Infrarot-Symbol 2#
Bei jedem Tastendruck, bei dem ein Infrarotsignal gesendet
wird, leuchtet das Infrarot-Symbol auf.
- 91 -
Page 94

Code-/Zeitfeld 2$
Hier wird der Gerätecode des aktuell angewählten Gerätes
angezeigt oder die Uhrzeit. Bei der Uhrzeitanzeige blinkt „
in der Mitte der Ziern. Bei Zeitanzeige im 12-Stundenformat
wird links von der Uhrzeit das Tageszeitkürzel angezeigt.
Wochentagsfeld 2%
Hier können Sie die Kurzform des aktuellen Wochentages
ablesen, nachdem Sie das Datum eingegeben haben.
Standardanzeige:
Die Standardanzeige der LCD-Anzeige q besteht aus den
Angaben für das aktuelle Gerät, z.B. „TV“, dem Kürzel für
den Wochentag und der Uhrzeitanzeige.
:“
Tasten
Hinweis:
Alle hier beschriebenen Funktionen können Sie natürlich
nur dann nutzen, wenn diese von dem zu steuernden Gerät
auch unterstützt werden.
Taste
lang gedrückt halten, um alle Geräte ein-/
auszuschalten.
Gerätetasten e
Mit den Gerätetasten wählen Sie das Gerät aus, das bedient
werden soll:
Die genannte Tastenzuordnung ist nicht zwingend. Sie können
also z.B. auch den Code für den Videorecorder auf dem TVPlatz abspeichern.
Taste „S“ r
Kongurationsmenü aufzurufen,
/ALL OFF w
Gerät ein-/ausschalten; einige Sekunden
Fernseher
Videorecorder
Zusatzgerät 1
Kabelempfänger
CD-Spieler
BluRay Disc-Spieler
Audio-Verstärker
DVD-Spieler
Digitaler Satellitenempfänger
Zusatzgerät 2
3 Sekunden gedrückt halten, um das
- 92 -
Page 95

kurz drücken, um das Datum einzublenden.
Um den elektronischen Programmführer
(EPG) des Zielgerätes aufzurufen, drücken
Sie zunächst kurz die S-Taste r, und dann
die FAV/EPG-Taste 1(.
Um die „PIP“-Funktion (Bild im Bild) Ihres
Fernsehgerätes zu steuern, drücken Sie
zunächst die S-Taste r gefolgt von der
-Taste der Videotext-Funktionstasten s.
Pfeiltasten t
In Menüs nach oben, rechts, unten und
links bewegen.
Taste EXIT y
Im Menü eine Ebene zurück wechseln oder
das Menü verlassen.
Tasten P +/— u
Den Empfangskanal wechseln.
Im DVD- und CD-Modus steuern diese
Tasten die SKIP-Funktion.
Taste MACRO i
Taste MACRO i gefolgt von einer Ziern taste o 1-6, aktiviert eine zuvor abgespei cherte Befehlskette.
Zifferntasten o
Programm- und Gerätecode Nummern eingeben.
Taste für ein-/zweistellige Programm-Nummern a
Für zweistellige Programm-Nummern (je
nach Gerätetyp) erst Taste a drücken,
dann über die Zierntasten o die Pro gramm-Nummer eingeben.
Durch erneutes Drücken wird die Anzeige
wieder einstellig.
Videotext-Funktionstasten s
Im Videotextbetrieb haben die Tasten folgende Funktionen:
Die Videotext-Funktion aufrufen.
Automatischer Wechsel bei mehrseitigen
Videotextseiten anhalten.
Seitendarstellung vergrößern
Text und TV-Bild übereinander blenden
Die Videotext-Funktion beenden.
- 93 -
Page 96

Um die SWAP-Funktion des Zielgerätes aufzurufen,
drücken Sie kurz die S-Taste r, gefolgt von der
-Taste.
Hinweise:
• Die Videotext-Funktion steht nur im europäischen
TV-Modus zur Verfügung und Ihr Empfangsgerät muss
videotextfähig sein.
• Darüber hinaus steuern die P +/- Tasten u folgende
Videotextfunktionen:
P +
Eine Seite weiter blättern
P — Eine Seite zurück blättern
Laufwerkstasten f
Die Laufwerkstasten f steuern Geräte wie DVD/CDSpieler und Videorekorder:
Wiedergabe beginnen
Bildformatumschaltung bei TV-Bedienung
Aufnahme
Wiedergabe/Aufnahme/Spulen stoppen
Wiedergabe anhalten
Zurückspulen
Vorspulen
Farbliche Markierungen der Laufwerkstasten beziehen sich
auf die Farbfelder im Videotext, über die die Toptext-Funktionen gesteuert werden.
Taste AV g
Auf den AV-Eingang umschalten.
Stummschaltung h
Ton ein-/ausschalten.
Tasten VOL+/— j
Lautstärke (Volume) einstellen.
Taste MENU k
Das Menü des gesteuerten Gerätes aufrufen.
Taste OK l
Mit der Taste OK bestätigen Sie eine Menü-
Auswahl.
Taste FAV/EPG 1(
Drücken Sie die Taste FAV/EPG, um Ihre zuvor
programmierten Lieblingssender aufzurufen.
Um die EPG-Funktion des Zielgerätes aufzurufen,
drücken Sie zuvor kurz die S-Taste r.
- 94 -
Page 97

Die Kongurationsmenüs
In den Systemeinstellungen nehmen Sie folgendes vor:
• Die Programmierung der Fernbedienung auf die zu
steuernden Geräte
• Einstellung von Menüsprache, Uhrzeit, Datum, Displaykon-
trast, Hintergrundbeleuchtung, Lautstärke, Lock-Funktion
sowie System-Reset
• Timer-Einstellungen
• Das „Lernen“ bestimmter Tastenbefehle
• Anlegen von Makros
• Festlegen von Favoriten
Auf der folgenden Seite sehen Sie eine Übersicht über die
Menüstruktur.
- 95 -
Page 98

- 96 -
Page 99

Menüsprachen kongurieren
Für die Darstellung der Gerätemenüs können Sie aus 5 Sprachen auswählen: Englisch, Deutsch, Spanisch, Französisch
und Italienisch.
1. Halten Sie die S-Taste r für etwas länger als 3 Sekunden
gedrückt. Nehmen Sie Eingaben im Menü zügig vor,
denn nach ca. 15 Sekunden ohne Eingabe wird das
Menü wieder beendet.
2. In der LCD-Anzeige q erscheint „LANGUAGE SETUP“.
Drücken Sie die OK-Taste l.
3. „ENGLISH“ erscheint nun in der LCD-Anzeige q. Mit den
Tasten t wählen Sie die gewünschte Sprache aus
und bestätigen mit der OK-Taste l.
4. Mit der EXIT-Taste y beenden Sie das Menü.
Die Gerätemenüs werden nun in der gewählten Sprache an-
gezeigt. Für die weitere Anleitung gehen wir davon aus, dass
Sie Ihre Landessprache ausgewählt haben.
Code kongurieren
(Programmierung der Fernbedienung)
3 Programmiermethoden stehen für die Fernbedienung zur
Verfügung: Programmierung per Marken-Code-Suche, per
automatischer Code-Suche und direkte Code-Eingabe (manuell).
Zunächst sollten Sie die Marken-Code-Suche verwenden,
da sie die schnellste Methode der Programmierung darstellt,
wenn der Hersteller Ihres Gerätes in der Code-Liste aufgeführt ist. Als Zweites empehlt sich die direkte Code-Eingabe,
gefolgt von der automatischen Code-Suche.
Programmierung per Marken-Code-Suche
Bei dieser Methode wählen Sie direkt Marke und Code über
die LCD-Anzeige q aus.
Folgen Sie nachstehenden Bedienhinweisen, um die Fernbedienung zu programmieren:
1. Drücken Sie die Gerätetaste e für das Gerät, auf das Sie
die Fernbedienung programmieren wollen.
2. Halten Sie die S-Taste r für etwas länger als 3 Sekunden
gedrückt. In der LCD-Anzeige q erscheint „SPRACHE
KONF“. Mit der oder Taste t wählen Sie „CODE
KONF“ an und bestätigen mit der OK-Taste l.
3. „EINGABE CODE“ erscheint nun in der LCD-Anzeige q.
Mit den Tasten t wählen Sie „MARKEN CODE“
und bestätigen mit der OK-Taste l.
4. Nun erscheint der alphabetisch erste Markenname aus
der Liste der vorprogrammierten Geräte.
5. Mit den 34 Tasten t wählen Sie die verschiedenen
Markennamen an.
- 97 -
Page 100

6. Um den Zugri zu erleichtern, können Sie mit den Ziern-
tasten o direkt zu bestimmten Anfangsbuchstaben springen:
2 => A 3 => D 4 => G 5 => J
6 => M 7 => P 8 => T 9 => W
Beispiel für die Suche nach einem TV-Markencode: Mit
Taste 5 springt die Anzeige zum „J“. Die erste Marke
ist „JEC“*. Besitzen Sie z.B. ein Gerät der Marke „Kenwood“*, blättern Sie mit der 4Taste t weiter, bis dieser
Markenname erscheint. (* Alle hier verwendeten Markennamen sind Handelszeichen der entsprechenden Firmen.)
7. Die meisten Hersteller verwenden mehrere unterschiedliche
Codes für die Fernbedienung. Sie müssen nun herausnden,
welcher der verfügbaren Codes am besten zu Ihrem Gerät passt. Rechts unterhalb des Markennamens wird der
aktuelle Code in der LCD-Anzeige q angezeigt.
8. Richten Sie die Fernbedienung auf das aktuelle Gerät und
drücken Sie die Tasten, die den Funktionen dieses Gerätes entsprechen, um den Code zu testen (ausgenommen
34t, OK l, EXIT y, die Gerätetasten e oder
die Zierntasten o).
9. Wenn die meisten Tasten funktionieren, drücken Sie die
OK-Taste l, um die Einstellung zu speichern. In der LCDAnzeige q erscheint „OK“. Anschließend wird das Menü
automatisch beendet.
10. Funktionieren aber keine oder nur wenige Tasten, wählen
Sie mit der
oder Taste t den nächsten Code aus
und testen wieder wie unter 8. beschrieben.
11. Mit der EXIT-Taste y gelangen Sie eine Ebene im Menü
zurück.
Wiederholen Sie diese Bedienschritte für alle Geräte, die Sie
mit der Fernbedienung steuern möchten.
Programmierung per manueller Code-Eingabe
In diesem Modus kann die Fernbedienung durch die direkte
Eingabe einer Code-Nummer programmiert werden. Die
benötigte Code-Nummer entnehmen Sie bitte dem beiliegenden Herstellerverzeichnis mit Gerätecodeliste. Falls der neue
Code nicht gültig ist, wird der zuletzt programmierte, gültige
Code wiederhergestellt.
1. Drücken Sie die Gerätetaste e für das Gerät, auf das Sie
die Fernbedienung programmieren wollen.
2. Halten Sie die S-Taste r für etwas länger als 3 Sekunden
gedrückt. In der LCD-Anzeige q erscheint „SPRACHE
KONF“. Mit der oder Taste t wählen Sie „CODE
KONF“ an und bestätigen mit der OK-Taste l.
3. „EINGABE CODE“ erscheint nun in der LCD-Anzeige q.
Drücken Sie zum Aufrufen dieser Funktion die OK-Taste l.
4. In der LCD-Anzeige q erscheint der für das ausgewählte
Gerät derzeit verwendete Code. Nun blinkt die erste Stelle
des Codes und wartet auf Ihre Code-Eingabe. Geben Sie
den neuen vierstelligen Code über die Zierntasten o
- 98 -
 Loading...