


6
DVD PLAYER/RADIO
DVD PLAYER/RADIO
Operating instructions
KH 6502
KOMPERNASS GMBH · BURGSTRASSE 21 · D-44867 BOCHUM
www.kompernass.com
ID-Nr.: KH6502/16-10/07-V2
KH 6502
2^
A
2%
2$
q
w
e
r
t
y
u
i
o
d
s
a
C
2)
q
w
;
e
r
l
t
k
ff
B
2#
2@
2)
l
j
ghk;2!
y
u
i
o
a
j
s
d
h
f
g
2( 2* 2&
3)
3@
3#
2& 3!

INDEX PAGE
1. Technical Data 4
2. Applications and functions 4
3. Package contents 4
4. Operating elements 5
5. Setting up of the DVD player 5
6. Safety instructions 5
7. Inserting batteries into the remote control and DVD player 6
8. Connecting to a television via the video output (Composite Video) 7
9. Connecting audio components to the DVD player 7
10. Operation 8
11. Radio functions 9
12. DVD player functions 9
Setup menu in DVD mode 9
13. Initial operation of the DVD player 12
14. Playing back DVDs, VCDs or S-VCDs 13
Playback start, stop, pause 14
SKIP function (Chapter/Title forward/backward) 14
Search forward/backwards 14
Slow motion function (DVD, VCD, S-VCD and DivX only) 14
Image enlargement (Zoom) 15
Camera position (DVD only) 15
Repeat function for DVDs, VCDs, S-VCDs and Audio CDs 15
Direct Title/Track selection 15
Direct chapter,title or time selection via the search function 15
Display functions 16
Display disc information 16
Accessing the DVD menu 16
Playback Control (PBC) with VCDs/S-VCDs 16
Superimpose and fade out subtitles (DVDs/VCDs/S-VCDs only) 16
Changing playback language (DVDs/VCDs/S-VCDs only) 17
Programme function 17
15. Display of MP3/WMA/JPEG/AVI/MPEG and DivX data 17
Playback of MP3/ WMA/MPEG and DivX discs 18
Repeat function with MP3/WMA/MPEG/ JPEG/DivX discs 18
Playback of JPEG discs 18
16. Cleaning of the DVD player 19
17. Disposal 19
18. Troubleshooting 19
19. Glossary / Key Word Index 20
20. Warranty & Service 21
21. Importer 21
Read these operating instructions carefully before using the appliance for the first time and preserve this manual for later reference. Pass this manual on to
whoever might acquire the appliance at a future date.
- 3 -

DVD-PLAYER/RADIO KH6502
1. Technical Data
This device has been tested and approved in accordance with the basic
requirements and other relevent regulations of the EMC guidelines
2004/108/EG as well as the guidelines for low voltage appliances
2006/95/EG.
Power supply: AC 220 - 240 V ~50 Hz
Power consumption : 25 Watt
Power consumption:
Standby: 0,7 W
TV standard: PAL/NTSC
Output level: 2 x 2,5 W
Operating temperature: +5 ~+35°C
Humidity: 5 ~90% (no condensation)
Measurements
(L x W x H): 241 x 430 x 50 mm
Weight : 2,1 kg approx.
Protection class: II
Frequency range radio:
MW (AM): 540 – 1600 kHz
UHF (FM): 88 – 108 MHz
Battery operation
8 x 1,5 V, Type CR14/LR14 (Button cell)
Remote Control
Batteries : Type AAA/R03 (Micro cell)
Video Output
Composite video cinch socket
Audio Output
2 Stereo audio cinch sockets
2. Applications and functions
The SilverCrest KH 6502 DVD player is intended exclusively for stationary
use in enclosed spaces. The device is intended exclusively for private, noncommercial use.
This device is intended for use as an electronic entertainment device for the
playback …
• ...of DVD videos in 12 cm and 8 cm (diameter) formats with Country/
Regional code 2 or , designated by the Logo .
- ...of MPEG-4/MPEG-4 ASP video formats and with DivX 3.11, DivX 4.x,
DivX 5.x, DivX 6.x, multichannel DivX and DivX Pro.
• ... of video-CDs (VCDs) and Super video-CDs (S-VCDs) in 12 cm and
8 cm (diameter) formats, designated by the Logo .
• ... of audio-CDs in 12 cm and 8 cm (diameter) formats, designated by
the Logo .
• ... generally of the data formats CD Audio (.cda), MP3 (.mp3), Windows
Media Audio (.wma), DivX (.avi), Nero Digital (.mp4) und JPEG (.jpg)
on the storage mediums CD-R, CD-RW, USB memory sticks as well as
memory cards of the types SD and MMC.
For image output with the playback of DVDs, VCDs, S-VCDs, Audio CDs and
the data format MP3, Windows Media Audio and JPEG you can connect to
the SilverCrest KH 6502 DVD player …
• Stereo and Mono televisions with the formats PAL or NTSC and the
picture formats 4:3/16:9.
• LCD/Plasma picture screens or video-projectors, if for this the corresponding
connection potential is available and the connection of a DVD player is
provided for/allowed by the manufacturer of the playback device
For the output of sound and/or music you can use and/or connect to the
Silvercrest KH 6502 DVD-Player …
• from the speaker of one of the televisions connected to the DVD player
• external audio components such as a HiFi system or receiver
Attention!
No liability/warranty will be assumed for damage resulting from improper
use of the device!
Audio input
3,5 mm Stereo jack
Microphone input
3,5 mm Stereo jack
USB slot
Readable
USB memory sticks: USB1.1 and 2.0 up to a capacity of 1 GB
Memory card slot
Readable memory cards: SD (1 GB), MMC (1 GB)
3. Package contents
– DVD-Player
– Power cord
– Infrared remote control
– 2 Batteries for remote control, type AAA/R03 (Micro cells)
- audio/video RCA (cinch) cable
– Operating manual
- 4 -

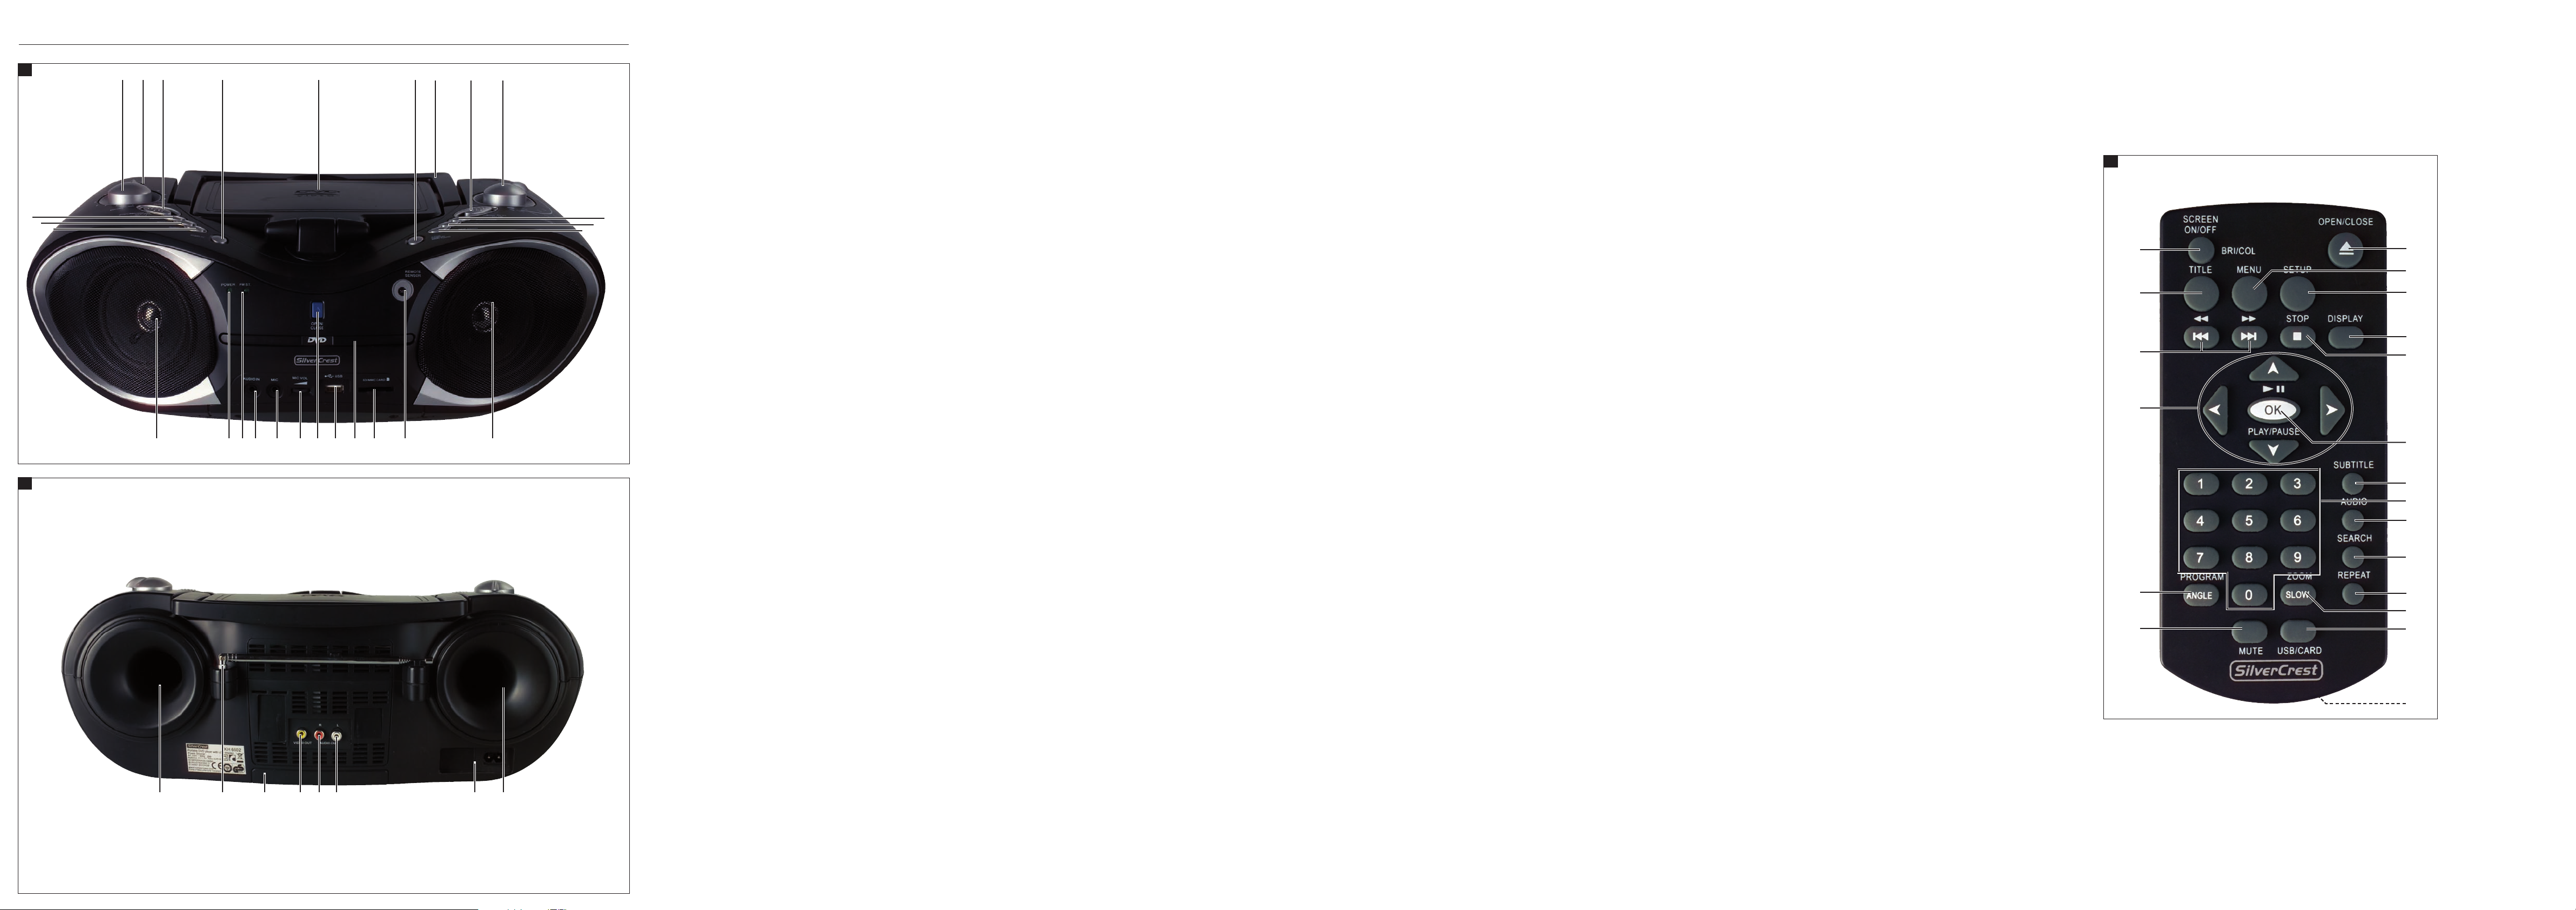
4. Operating elements
A. DVD player front panel
Volume control
q
Headphone output 3,5 mm
w
FUNCTION switch: Switch the device off, switch to DVD or radio operation
e
DISPLAY button: Display playback information
r
LCD display
t
STOP button
y
USB/SD/MMC CARD button: Stop playback/Display USB/
Memory card contents
Carrying handle
u
Band selection switch
i
Frequency control
o
PLAY/PAUSE button
a
SKIP UP button: move forward a title/chapter, fast forward
s
SKIP DOWN button: move back a title/chapter, fast rewind
d
Loud speaker
f
IR sensor for the remote control
g
Memory card slot for SD and MMC cards
h
Disc tray
j
USB slot
k
OPEN/CLOSE: Open/Close the disc tray
l
MIC VOL: Microphone volume control
;
MIC: Microphone input 3,5 mm
2)
AUDIO IN: Stereo audio input 3,5 mm
2!
FM ST.: Indicator for FM stereo reception (green light shows stereo reception)
2@
POWER: Power indicator (green light shows when device is switched on)
2#
AUDIO button: Set the audio language/channel
2$
REPEAT button: Set the repeat function
2%
MENU button: Access disc menu
2^
B. DVD player rear panel
Rear speaker
2&
Telescopic antenna
2*
Battery compartment
2(
VIDEO: Composite video output
3)
AUDIO OUT R: Right audio output
3!
AUDIO OUT L: Left audio output
3@
Power cable connector
3#
C. Remote control
OPEN/CLOSE: Open/Close the disc tray
q
MENU: Access disc menu
w
SETUP: Access the OSD menu
e
DISPLAY: Superimpose disc information
r
STOP: Stop playback
t
PLAY/PAUSE button, OK button: Start/Pause playback, confirm input
y
SUBTITLE: Set the sub-title
u
Number buttons
i
AUDIO: Set the audio language/channel
o
SEARCH: Access the search function
a
REPEAT: Set the repeat function
s
ZOOM/SLOW: Set image enlargement, slow motion function
d
USB/CARD: Playback of USB or memory cards
f
Battery compartment (on the rear panel)
g
MUTE: Switch the sound on/off
h
ANGLE/PROGRAM: Change the camera perspective/
j
Access the programme function
Control buttons
k
SKIP UP: move forward a title/chapter, fast forward
l
SKIP DOWN: move back a title/chapter, fast rewind
TITLE: Access the title menu
;
SCREEN ON/OFF: Switch the LCD display on and off/
2)
set the brightness and colour
5.Setting up of the DVD player
1. Carefully remove the DVD player and the supplied accessories from
the packing.
2. Remove the protective foil from the LCD display.
3. Place the DVD player on a flat, even and firm base.
4. Plug the DVD player's power cord in the power cord connector on
the rear panel of the DVD player.
Attention!
If you want to connect the DVD player to other devices do not plug the
power cord into the mains power at this time. Wait until you have connected the other devices.
In the event that you wish to change the type of video or audio connection you must first pull the power plug from the power socket! Otherwise
the DVD player and possibly equipment connected to it could become
irreparably damaged through voltage peak strikes!
6. Safety instructions
• This device is not suitable for children or other persons, whose physical,
sensorial or mental abilities, without assistance or supervision, impede the
safe operation of the device. Children should be watched-over to ensure
that they do not play with the device
• To avoid unintentionally switching on the device pull the power cord
from the mains supply after use and before cleaning.
• Check the appliance and all parts for visible damage.The safety concept
can work only if the appliance is in a faultless condition.
• The power plug must always be easily accessible, so that the appliance
can be quickly separated from the mains in the event of an emergency.
Risk of electrical shocks.
• Connect the appliance only to correctly installed and earthed mains sockets.
Ensure that the rating of the local power supply tallies completely with
the details given on the rating plate of the appliance.
• Arrange for defective power plugs and/or cables to be replaced at
once by qualified technicians or our Customer Service Department.
• Arrange for customer service to repair or replace connecting cables
and/or appliances that are not functioning properly or have been
damaged.
NEVER submerse the appliance in water. Wipe it only with a slightly
damp cloth.
• Do not expose the appliance to rain and never use it in a humid or wet
environment.
• Ensure that the power cable never becomes wet during operation.
• You must not open the housing or repair the appliance yourself. Should
you do so, appliance safety can no longer be assured and the warranty
will become void.
• Protect the appliance against drip and spray water. Do not place any
water-filled vessels (e.g. flower vases) on or near the appliance.
- 5 -

Risk of fire!
• Do not use the appliance in the vicinity of hot surfaces.
• Do not locate the appliance in places exposed to direct sunlight, If you
do, it may overheat and become irreparably damaged.
• Do not leave the appliance unattended when in use.
• Never cover the ventilation slots of the appliance while it is being used.
• Do not place open fire sources, such as candles, on or near the device.
Injury hazard
• Keep children away from the connecting cable and the appliance. Children
frequently underestimate the dangers of electrical appliances.
• Ensure that the appliance stands with a safe and secure positioning.
• Do not operate the appliance if it has sustained a fall or is damaged.
Arrange for the appliance to be checked and/or repaired by qualified
technicians.
• Keep batteries away from children. Children can put batteries into their
mouths and swallow them.
Danger! Laser radiation!
The appliance is fitted with a „Class 1 Laser“.
• Never open the device.
• Never attempt to repair the device.
• There is invisible laser radiation inside the device.
Do not expose yourself to the laser beam.
Information regarding the handling of batteries
The device and the remote control are operated by batteries. For the handling of
batteries please observe the following:
Risk of explosion!
Do not throw batteries into a fire. Do not recharge the batteries.
• Never open batteries, never solder or weld batteries.
The risk of explosions and injuries exists!
• Regularly check the condition of the batteries. Leaking batteries can
cause damage to the appliance.
• If you do not intend to use the appliance for an extended period, remove
the batteries.
• In the event of the batteries leaking acids, wear protective gloves.
• Clean the battery compartment and the battery contacts with a dry
cloth.
Attention!
No liability/warranty will be considered for damage to the DVD player
caused by the effects of moisture, water penetration or overheating!
7. Inserting batteries into the remote control
and DVD player
Note:
Some aggressive furniture finishes can have a destructive influence on
the device's rubber feet. If necessary, place the device on a nonslip pad.
Thunderstorms!
Equipment connected to a power supply can be damaged during a
thunderstorm. You should therefore always pull the power plug from the
power socket when there is a storm.
Notice regarding surge voltages
(FEO / fast electrical overloads):
In a case of malfunction due to an electrical fast transient (power surge)
the product must be returned to default settings in order to re-establish
normal operation. Possibly the power supply must be separated and then
reconnected. The batteries (if present) must be removed and then reinserted.
Notice regarding separation from mains-power
The FUNCTION switch for this appliance does NOT completely separate
it from the mains-power source. Additionally, the appliance consumes
power when in standby-mode. To completely separate the appliance
from mains-power, the power plug MUST be removed from the wall socket.
7.1. Inserting the Batteries into the Remote Control
1. Open the battery compartment on the rear of the remote control.
2. Place the two, supplied in the package, batteries type AAA/R03
(Micro cells) in the battery compartment. Make sure that the batteries
are inserted in accordance with the correct polarity.
3. Replace the battery compartment cover.
Using the remote control
In order to guarantee faultless operation when using the remote control…
• Always point the remote control, during use, directely at the DVD player
• Make sure that there are no obstructions between the remote control
and the DVD player that will hinder reception
• When using the remote control place yourself not more than 5 metres
from the DVD player
Otherwise interferences can occur during operation of the DVD player functions
with the remote control.
7.2 Inserting the batteries into the DVD player
The DVD player can be operated by batteries. As soon as the DVD player is
connected to a power source via the power cable, power supply from the
batteries is switched off.
1. Open the battery compartment on the underside of the DVD player.
2. Now place 8 batteries type CR14/LR14 (Button cells) into the battery
compartment. Make sure that the batteries are inserted in accordance
with the correct polarity.
3. Replace the battery compartment cover.
7.3. Replacing the batteries
If the operation of the DVD player via the remote control does not function
properly or does not function at all the batteries must be replaced
• Always renew all batteries in order to return the DVD player and the
remote control to their full performance ability.
- 6 -
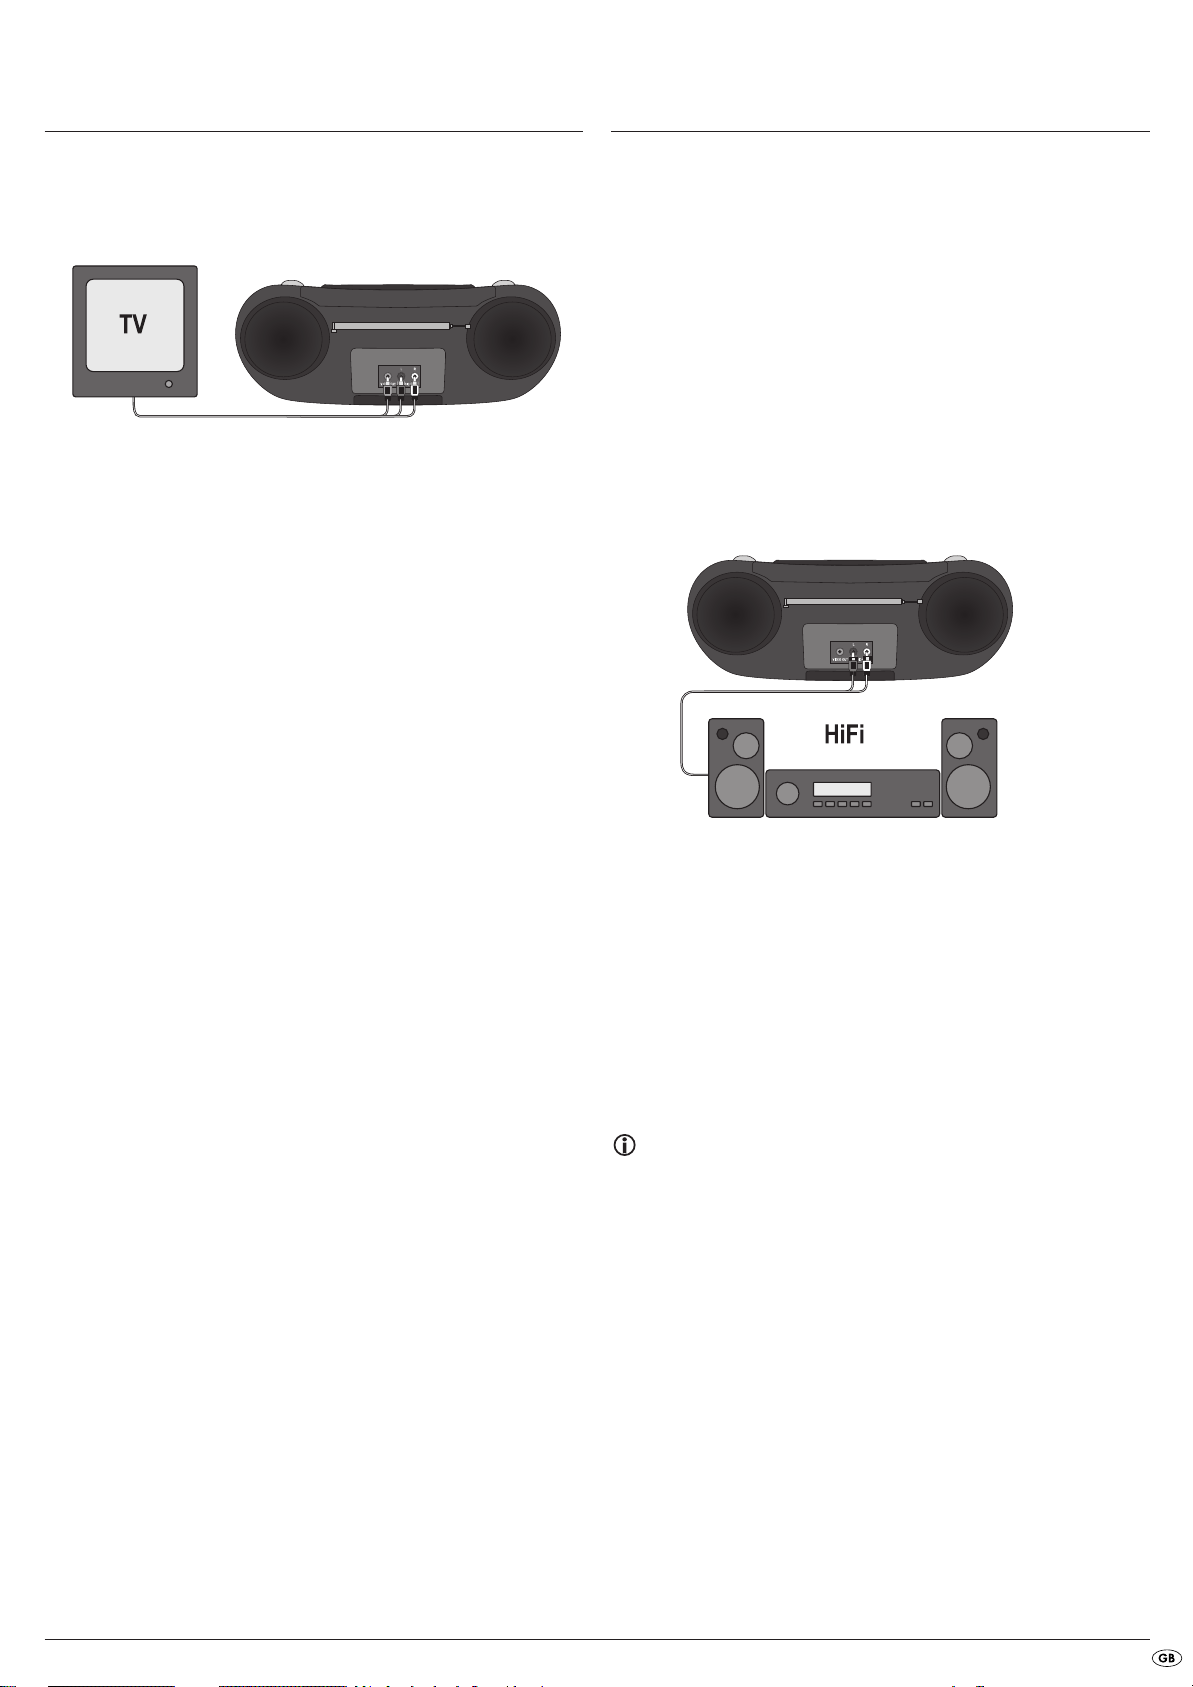
8. Connecting to a television via the video
output (Composite Video)
For this connection variant the television must be equipped with Audio/Video
cinch sockets (Composite Video).
To connect the DVD player to a television via composite video you will need
an audio/video RCA (cinch) cable.
• Connect the yellow socket marked
VIDEO socket via an audio/video cinch cable.
• Insert the white audio/video cinch cable plug into the cinch socket inscribed
AUDIO OUT L on the rear panel of the DVD player.
• Then insert the white plug on the other end of the audio/video cinch cable
into the left channel audio socket on the television.
• Insert the red audio/video cinch cable plug into the cinch socket inscribed
AUDIO OUT R on the rear panel of the DVD player.
• Then insert the red plug on the other end of the audio/video cinch cable
into the right channel audio socket on the television
• For playback select the matching channel on your television Check with
the television's instruction manual on how you can set the AV channel.
VIDEO-OUT to the television's yellow
9. Connecting audio components to the DVD
player
9.1 Connecting a HiFi system or receiver to the DVD player
Besides sound playback of DVDs, VCDs/S-VCDs and audio and MP3 CDs
via the speaker of the television, to which the DVD player is connected,
sound can also be played back via external audio components such as
a HiFi system or receivers.
Requirements for the connection of a HiFi system
In order to enjoy a full sound experience when playing DVDs with the DVD
player you can connect a HiFi system to the player. Before connecting check
with the HiFi system's instruction manual to verify...
• if the HiFi system is suitable for connection to a DVD player. If yes…
• if the HiFi system is equipped with cinch sockets; if yes, you can connect
the HiFi system to the DVD player via cinch cables.
Connecting a HiFi system:
• Insert the white audio/video cinch cable plug into the cinch socket inscribed
AUDIO OUT L on the rear panel of the DVD player.
• Then insert the white plug on the other end of the audio/video cinch
cable into the left channel audio socket of the HiFi system.
• Insert the red audio/video cinch cable plug into the
cinch socket on the rear panel of the DVD player.
• Then insert the red plug on the other end of the audio/video cinch cable
into the right channel audio socket of the HiFi system.
• Check with the instruction manual which settings on the HiFi system may
be necessary in order to reproduce sound via the HiFi system during the
playback of a DVD, VCD/S-VCD, Audio or MP3 CD from the DVD player.
AUDIO OUT R inscribed
Note:
For an optimal sound experience place your HiFi's speakers to the left
and right of the DVD player.
- 7 -

9.2 Playback of external devices sound signals
You can playback the sound signals of external devices, for example a portable
CD/MP3 player, via the DVD player's speaker.
For this you connect the right and left audio outputs of the external device with
a 3.5 mm jack plug to the
As soon as you have inserted the jack plug into the
player to playback the sound signals from the external device.
• Insert the jack plug into the
• To play the sound of the DVD player pull the jack plug from the
AUDIO IN socket on the front panel of the DVD player.
AUDIO IN socket set the DVD
AUDIO IN socket.
AUDIO IN socket.
Note:
As soon as you have inserted the jack plug into the AUDIO IN socket, the
LCD display switches off automatically.
10. Operation
10.1 Switching the appliance on/off and sound source
selection
You switch the device on by selecting a sound source with the FUNCTION
switch:
• DVD/USB/CARD
• OFF
• RADIO
1. Slide the FUNCTION switch to the position of the sound source that you
want.
2. To switch the device off slide the FUNCTION switch to the OFF position.
9.3 Using headphones
You can connect headphones with a 3.5 mm stereo jack plug to the DVD
player. The headphone connection
DVD player.
When you have connected the headphones, the loudspeakers are disconnected
and you will only hear sound via the headphones.
• Before you connect headphones turn the volume down to the lowest level.
• Insert the jack plug of the headphones into the headphone connection.
Important!
Listening to music with headphones for long periods and at high
volume levels can lead to hearing damage!
PHONES is located on the top panel of the
9.4 Connecting a microphone
You can connect a microphone with a 3.5 mm stereo jack plug to the DVD
player. The microphone connection is located on the front panel of the DVD
player. When you have connected the microphone you can control the volume of
the microphone via the
With the microphone you can, for example, use the karaoke function of
DVDs.
• Insert the microphones jack plug into the socket
MIC VOL control on the front panel of the DVD player.
MIC.
10.2 Adjusting the volume
You can adjust the sound volume with the volume regulator.
1. To increase the sound level, turn the volume controller clockwise.
2. To reduce the sound level, turn the volume controller counterclockwise.
10.3 Switch off sound
1. Press the MUTE button to switch the sound off. The message MUTE appears
on the display.
2. To switch the sound on again press the MUTE button once more.
Note:
During operation of the radio the sound can not be switched off with
the
MUTE button.
10.4 Display functions
• You set the display up by flipping it open.
The display can be turned 270° by means of the swivel joint.
Switching the display on and off
1. Hold the SCREEN ON button down briefly to switch off the LCD display.
2. To switch the LCD display back on hold the SCREEN ON button down briefly
once more.
Display settings
1. Press the SCREEN ON button several times to alternate between the messages
BRI (Brightness) and COL (Colour).
2. With the control buttons you can set the brightness and colour
values.
3. If you do not press any button for a period of 5 seconds the display
settings will again fade out.
- 8 -

11. Radio functions
SYSTEM SETUP
TV SYSTEM
LCD MODE
TV TYPE
PASSWORD
RATING
DEFAULT
EXIT SETUP
12. DVD player functions
The LCD display remains switched off during operation of the radio.
1. Set the FUNCTION switch to the RADIO position.
2. Lift the telescopic antenna and pull apart. Adjust the antenna positioning
so that radio reception is optimal.
A reception antenna for receiving MW (AM) transmissions is built into the
unit. In radio operation, turn the whole appliance to a position where the
best radio reception is obtained.
3. Adjust the reception range (AM/FM/FM ST.) with the waveband selector.
With the adjustment to FM ST FM ST, radio programmes transmitted in
stereo will be played back in stereo. If the programme is received in
stereo with full signal strength the FM stereo message
FM ST. lights up.
Note:
Should the stereo signal in the reception range FM ST be too weak,
you can improve it by selecting the adjustment FM. In this adjustment
the sound is played in Mono.
4. Set to the desired radio station by turning the frequency knob.
• Set the FUNCTION switch to the DVD/USB/CARD position.
The LCD display switches on and the background image appears.
Setup menu in DVD mode
Note:
In these instructions the English setup menu is described. At any time
you can set the menu to your countrys language as described in
"Language Setup > OSD Language".
In the DVD mode you can access a settings menu, in which you can implement
image and sound settings as well as activate other functions. When you carry
out changes in the setup menu, these changes are saved even when the device
is switched off.
• You can set the default settings at any time in the SYSTEM SETUP > DEFAULT
menu.
• The setup menu can be accessed during playback.
The setup menu subdivides into the following menus:
• SYSTEM SETUP
• LANGUAGE SETUP
• VIDEO SETUP
• SPEAKER SETUP
Navigating in the menu
1.
Press the SETUP button to access the Setup menu. The main menu
SYSTEM SETUP appears.
• With the control buttons and the OK button you can carry
out all the settings in the menu.
2. With the control buttons you can select a menu by moving the yellow
mark under the corresponding menu symbol.
3. With the control buttons you can select an input in a menu by moving
the yellow bar over an input.
4. With the control button you can alternate in the sub menu of an in-
put and with the control button
you can move back a menu level.
5. To confirm a selection press the OK button.
All navigation possibilities in a current menu are displayed at the lower edge
of the menu.
Exiting the Setup menu (EXIT SETUP)
• You can exit the Setup menu at any time by pressing the SETUP button again.
- 9 -

SYSTEM SETUP menu
SYSTEM SETUP
TV SYSTEM
LCD MODE
TV TYPE
PASSWORD
RATING
DEFAULT
EXIT SETUP
SYSTEM SETUP
TV SYSTEM
LCD MODE
TV TYPE
PASSWORD
RATING
DEFAULT
EXIT SETUP
1 KID SAFE
2 G
3 PG
4 PG13
5 PG-R
6 R
7 NC-17
8 ADULT
SYSTEM SETUP
TV SYSTEM
LCD MODE
TV TYPE
PASSWORD
RATING
DEFAULT
EXIT SETUP
When you access the Setup menu of the disc drive with the button SETUP the
SYSTEM SETUP menu appears. Here you can set the video output and video
format.
TV SYSTEM
Here you set the television standard for the video output.
PAL
NTSC
AUTO
LCD MODE
In this menu you can set height and width image settings of the LCD display.
4:3: Playback in 4:3 format
16:9: Playback in 16:9 format
PAL television standard.
NTSC television standard.
Automatic setting.
The open lock symbol appears behind the input position. You can now
set the age release class in the menu item RATING.
When you operate the device for the first time the password lock is already
switched off.
You switch the password lock on as follows:
1. With the control button move to the input position.
2. With the number buttons enter the factory default password 8200 and
confirm with the
The closed lock symbol appears behind the input position. The age release
class in the menu item RATING now can not be set again.
OK button.
You change the password as follows:
In order to change the password the password lock must be switched off.
1. With the control button move to the input position.
2. With the number buttons enter a new four figure password and confirm
with the
OK button.
The closed lock symbol appears behind the input position. With the new
password you can again switch off the password lock.
In the event that you forget the new password you can switch the password
lock on or off at any time with the factory default password.
RATING
Some DVDs and CDs (predominantly DVDs obtained on the US market) are
coded with encryption signals. In this way DVDs can be divided into eight
different approval classes.
TV TYPE
Here you can match the vertical and horizontal image display to the playback
device in use.
4:3/PS
: Select this setting to display broadcasts in the usual 4:3 format
on a 4:3 television set. Broadcasts in the 16:9 format will be
displayed in full screen without the distracting bars although the
side edges of the image will be trimmed.
4:3/LB
: Display of a film in 16:9 format on a traditional 4:3 format
television. The image is displayed with black bars on the lower
and upper edges of the screen.
16:9
: This setting is recommended when using the built in LCD display
or for the output of the image on a wide screen television in
the 16:9 format.
PASSWORD
Select this menu item to switch the password lock on and off. To set the child
lock in the next menu item RATING the password lock must be switched off.
• When the password lock is switched off the open lock symbol appears
behind the four input positions.
• When the password lock is switched on the closed lock symbol appears
behind the four input positions.
Note:
In order to change the age release class the password lock must be
switched off.
1. With the control button move to the right column.
2. Select one of the following age release classes to safeguard the playback
of this type of media with a password request and confirm with the
button:
8 ADULT: for adults only;
7 NC -17: not for teenagers under 18 years of age;
6 R: for teenagers under 16, adult supervision is strongly
recommended;
5 PG-R: for teenagers under 16, adult supervision is recom-
mended;
4 PG 13: adult supervision strongly recommended; some scenes
are not suitable for children under 12;
3 PG: adult supervision recommended;
2 G.: for all age groups;
1 KID SAFE: also suitable for small children.
OK
You switch the password lock off as follows:
1. With the control button move to the input position.
2. With the number buttons enter the factory default password 8200 and
confirm with the
OK button.
Example
If a DVD was encoded with, for example, approval class 7 or 8 and you
have an approval class setting between 1 and 6 then a message follows
and the password must be entered.
Also only parts of the DVD, that is to say certain film scenes, may be
encoded with an approval class or various approval classes.
- 10 -

3. Subsequently switch the password lock on in the menu item PASSWORD.
LANGUAGE SETUP
OSD LANGUAGE
AUDIO LANG
SUBTITLE LANG
MENU LANG
EXIT SETUP
SPEAKER SETUP
DOWNMIX
EXIT SETUP
VIDEO SETUP
BRIGHTNESS
CONTRAST
HUE
SATURATION
EXIT SETUP
The age release class is now set and can be changed only if the password
lock is previously switched off.
DEFAULT
Select the menu item DEFAULT and confirm with the OK button to reset the
DVD mode settings to the factory default settings.
EXIT SETUP
Select this menu item to exit the Setup menu.
VIDEO SETUP menu
In this menu you set the Brightness, Contrast, Hue and Saturation for disc
playback.
LANGUAGE SETUP menu
In this menu you can set the language settings for menus and subtitles.
OSD LANGUAGE
Here you set the language, in which the OSD Menu will be shown on the display.
AUDIO LANG
Set the audio language here, which should be used as standard when playing
back the film.
SUBTITLE LANG
Set the subtitle language here, which should be used as standard when playing
back the film.
MENU LANG
BRIGHTNESS
With the help of the control buttons you can set the brightness.
• Subsequently press the
OK button to continue.
CONTRAST
With the help of the control buttons you can set the contrast.
• Subsequently press the
OK button to continue.
HUE
With the help of the control buttons you can set the hue.
The further the controller is pushed up the warmer the entire image becomes.
On the other hand when pushed down the image radiates a cooler mood.
• Subsequently press the
OK button to continue.
SATURATION
With the help of the control buttons you can set the colour saturation.
• Subsequently press the
OK button to continue.
EXIT SETUP
Select this menu item to exit the Setup menu.
SPEAKER SETUP menu
In this menu you set the stereo output for the system's loud speaker.
Set the disc menu language here, which should be used as standard when playing
back the film.
EXIT SETUP
Select this menu item to exit the Setup menu.
DOWNMIX
LT/RT
: Select this setting if the film was recorded in Pro Logic Dolby
Digital and you want to hear the sound in cinema quality.
STEREO
: Select this option to output the left and right sound channels of the
DVD. The output with CD playback is a traditional stereo signal.
EXIT SETUP
Select this menu item to exit the Setup menu.
- 11 -

13. Initial operation of the DVD player
After you have …
• placed the DVD player in a suitable location
• connected the DVD player, if desired, to a television by one of the
designated connection options
• connected the DVD player, if desired, to a HiFi system and/or a receiver
• made the remote control ready for operation by inserting the batteries
• and know how to activate and operate the OSD menu with the remote
control
… the DVD player is ready for operation.
13.1 Inserting the DVD
To play a disc with the DVD player:
• Make sure that the DVD player is ready for operation.
• Switch the DVD player on.
When the DVD player and other potentially connected devices (i.e. an audio
component) are ready for operation and are switched on you will now see
the Silvercrest logo in the display.
If no disc is inserted into the DVD player's disc tray:
No Disc will appear in the display.
• Open the disc tray by pressing the button "Open/Close" on the remote
control or on the front panel of the DVD player. Open will appear in
the display.
• Insert the disc in the disc tray with the inscribed/labled side up.
For twin-sided discs: The side you would like to play must face down.
• After you have inserted the disc press the button "Open/Close" on
the remote control or on the front panel of the DVD player again to close
the disc tray.
• The contents of the disc will now be loaded; this may take a few seconds.
In the meantime Loading will appear in the display.
13.2 Inserting memory cards/USB memory sticks with
MP3/WMA/ DivX/JPEG data
Note:
The DVD-Player always starts in DVD mode. In order to read memory
cards press the button
the button
CARD appears in the display. The DVD player recognizes the data
formats JPEG, MP3, WMA und MPEG4 (DivX).
In order to insert memory cards of the types SD and MMC into the DVD player:
• Make sure that the DVD player is ready for operation.
• Switch the DVD player on.
When the DVD player is switched on and ready for operation you will see
the Silvercrest logo in the display.
If no disc is inserted into the DVD player's disc tray: No Disc will appear in
the display.
• Slide the memory card into the memory card slot. Then proceed with
the following steps depending on the type of memory card that you
want the device to read.
USB/SD/MMC CARD on the device until the message READ
USB/CARD several times on the remote control or
Warning!
Always make sure that you insert memory cards into the memory card
slot as described hereafter! Under no circumstances bend or buckle the
memory card when inserting into the memory card slot! Slide the memory
card up to the stop in the memory card slot, with a light pressure.
Allow the memory card to slide in without force:
• Check to make sure that the memory card is one that the DVD player is
capable of reading.
Do not attempt to insert memory cards of another type in the memory
card slot!
• Make sure that you have inserted the memory card into the memory
card slot in the correct manner.
• Under no circumstances attempt to force the memory card into the memory
card slot!
Otherwise the DVD player, memory card and the data on the memory card
could be damaged!
Supported memory card types and capacities
Memory cards of the types SD (1 GB) and MMC (1 GB) can be played
back.
Supported file structure and file formats
– 2 file levels are supported
– The total file count should be not more than 10
(max. 5 files on each of the 2 file levels)
– A max. of 100 files are supported on the memory media
– Files with mixed file formats are not supported
– A JPEG file larger than 1 MB can lead to faulty images
- 12 -

MultiMediaCard- /SecureDigital memory cards (MMC/SD)
MultiMediaCard/SecureDigital memory cards must be inserted into the memory
card slot. Insert the MMC/SD memory cards with the contacts forward and
slide them straight into the memory card slot.
Thereby...
- the side of the memory card with the contacts must face down and
- the slanted corner of the memory card must be on the right side
USB memory sticks (USB)
The DVD player supports USB memory sticks 1.1 and 2.0 up to a capacity
of 1GB.
USB memory sticks must be inserted into the USB port.
14. Playing back DVDs, VCDs or S-VCDs
To play back a DVD/VCD/S-VCD with the DVD player...
• Make sure that the DVD player is ready for operation.
• Switch the DVD player on.
When the DVD player and other potentially connected devices (i.e. an audio
component) are ready for operation and are switched on you will now see
the Silvercrest logo in the display.
• Open the disc tray on the front panel of the DVD player by pressing the
button "Open/Close" on the front panel of the DVD player or on the
remote control.
Open will appear in the display.
• Press the
button on the device until the message READ USB appears in the display.
This procedure also applies to particular memory cards.
USB/CARD button on the remote control or the USB/SD/MMC CARD
Note:
If the memory card or USB memory stick does not contain any playable
data the memory card and/or USB function is not selectable.
13.3 Removing memory cards/USB memory sticks
Memory cards/USB Memory sticks should only be removed after the memory
card/USB slot is deactivated. Thus avoiding the possibility of damage or
data loss.
• Press the
USB/SD/MMC CARD button on the device until the message DVD appears
in the display to return to the DVD mode.
• You can now remove the memory card/USB memory stick from the
memory card/USB slot.
USB/CARD button on the remote control several times or the
• Insert a DVD/VCD/S-VCD disc in the disc tray with the inscribed/labled
side up.
• Press the
the remote control again to close the disc tray.
Close shows in the display while the disc tray is closing.
• The contents of the inserted DVD/VCD/S-VCD will now be loaded; this
may take a few seconds. In the meantime Loading will appear in the
display.
• Playback of the inserted DVD/VCD/S-VCD starts automatically.
OPEN/CLOSE button on the front panel of the DVD player or on
Note:
DVDs, VCDs and S-VCDs, that you want to playback with the DVD player
possibly have a country code, which is printed on the DVD cover.
The DVD player can only playback DVDs/VCDs/S-VCDs with the country
code 2.
If no country code is printed on the cover of a DVD/VCD/S-VCD...
• but instead the symbol , then the DVD/VCD/S-VCD can be played
back with the DVD player
• then the DVD/VCD/S-VCD can possibly not be played back with the
DVD player. You can check this by attempting to play back the DVD.
- 13 -
Depending on the inserted DVD/VCD/S-VCD it is possible that the contents
of the DVD/VCD/s-VCD will not playback immediately, rather first a selection
menu appears in the display.
In this event select the menu option which will start the playback of the film
with the control button on the remote control.
• To begin playback of the film press the
Play is shown briefly in the display.
PLAY/PAUSE button.
Playback start, stop, pause
Depending on the inserted disc it is possible that the contents do not immediately
play back, but first a selection menu appears in the display.
• In this case select with the control buttons
which starts playback of the film.
• To start playback of the film press the
Pause playback
To pause the playback:
• During playback press the button
appears in the display.
The display shows a freeze frame of the scene you have just paused.
• To contine playback of the film press the
the menu item,
PLAY/PAUSE button.
PLAY/PAUSE. The message PAUSE
PLAY/PAUSE button.
SKIP function (Chapter/Title forward/backward)
Note:
This function may not be available on all DVDs/VCDs/S-VCDs! If you
attempt to carry out functions that are not available the message
"INVALID KEY“ appears in the display.
• With the buttons
the film on the inserted DVD/VCD/S-VCD backwards to the previous chapter/
title or to the start of the next chapter/title. The display will show PREV
and/or NEXT.
The respectively selected chapter/title will playback immediately.
SKIP DOWN/SKIP UP you can skip, during playback, within
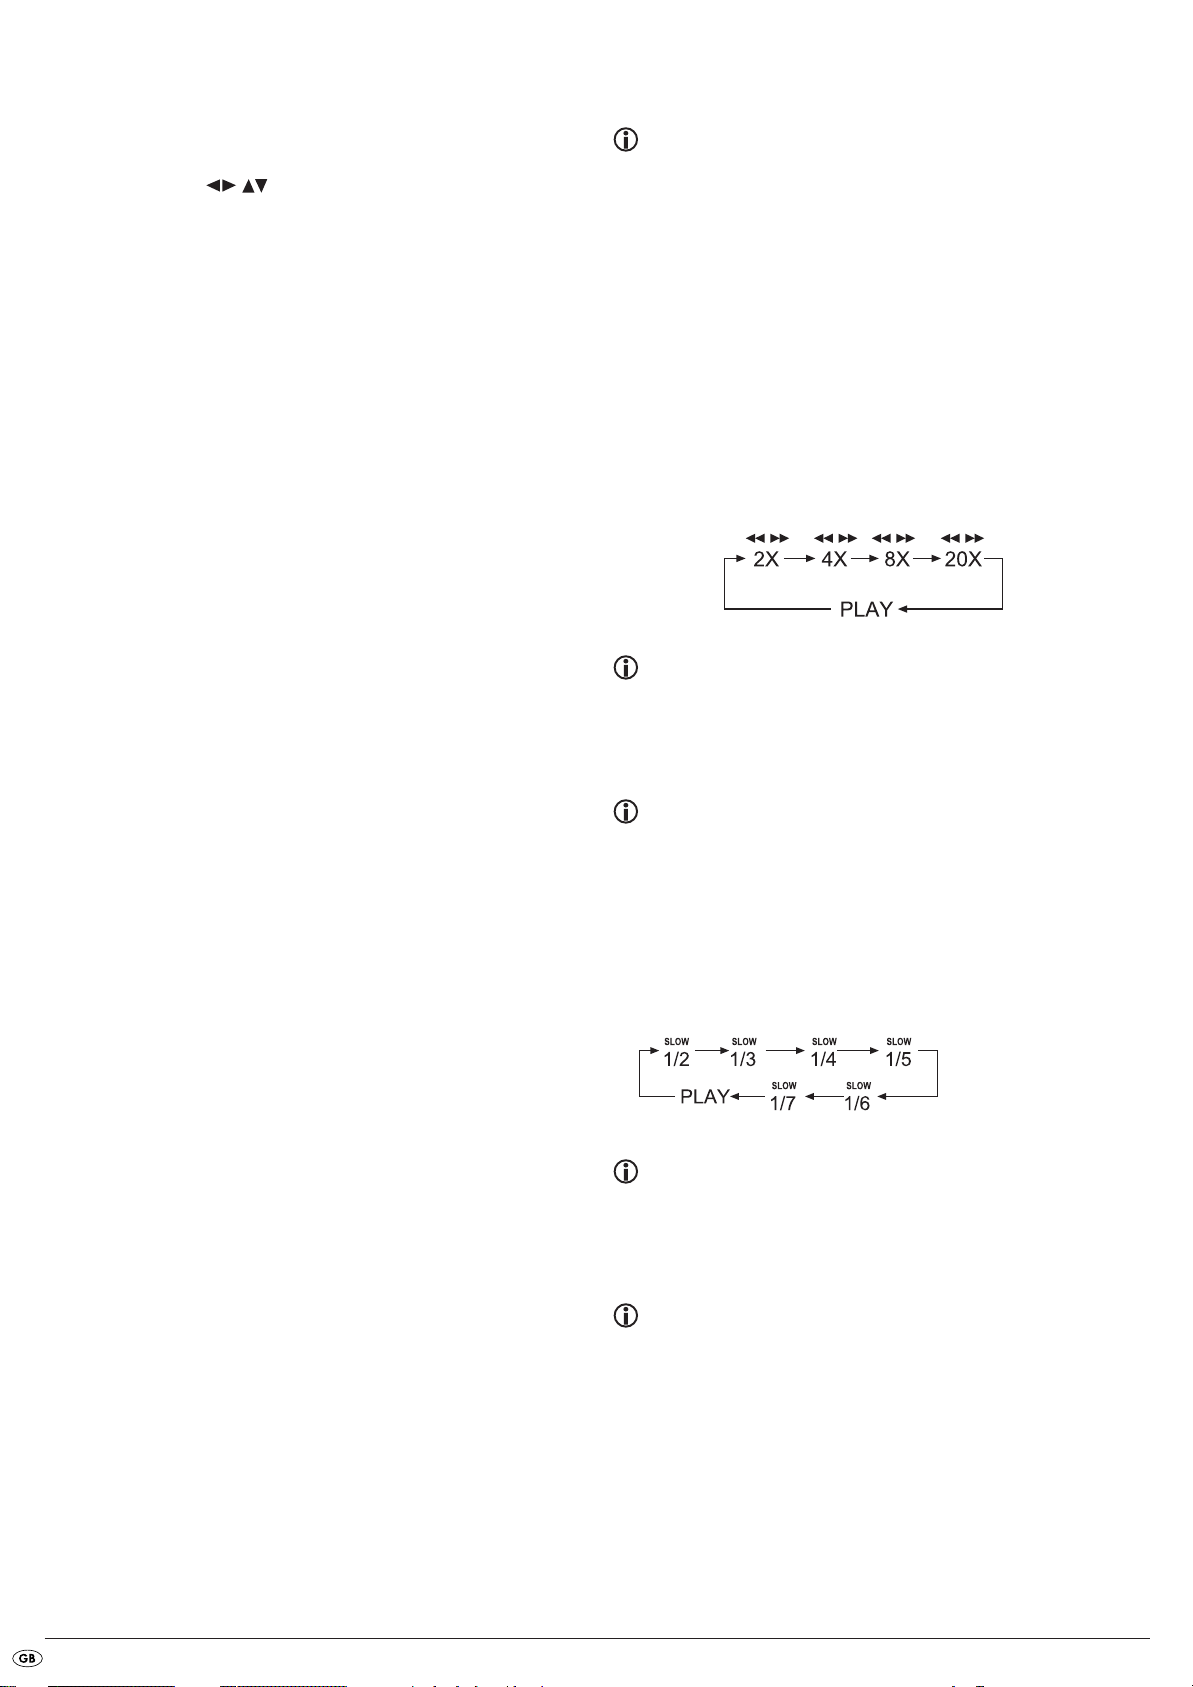
Search forward/backwards
• Hold the SKIP DOWN/SKIP UP button down briefly during playback to start
a backwards/forwards search.
• Hold the
search speeds:
SKIP DOWN/SKIP UP button down repeatedly to apply the following
Stop playback (STOP)
To stop playback press the STOP button.
Resume function
If you have cancelled playback of the inserted DVD/VCD/S-VCD by pressing the
STOP button once the DVD automatically saves the position where
playback was interrupted. This function is called the "resume function".
PRE STOP (Preliminary Stop) is shown in the display.
• As soon as you press the
from the saved position.
• If you press the
you stopped playback, is deleted.
• As soon as you press the
DVD/VCD/S-VCD will start from the beginning.
STOP button a second time the saved position, at which
PLAY/PAUSE button again, playback will continue
PLAY/PAUSE button again playback of the inserted
Note:
During the search no sound will play.
• To continue playback of the film at normal speed from the selected position
press the
PLAY/PAUSE button during the search.
Note:
With playback of MPEG4 files the speed of search forward and search
backwards can be limited. This is data dependent and not a device malfunction.
Slow motion function (DVD, VCD, S-VCD and DivX only)
• Hold the ZOOM/SLOW, button down briefly during playback to set playback
to slow motion. Hold the
following slow motion speeds:
Note:
During slow motion playback no sound will be played.
• To continue playback at normal speed press the
slow motion playback.
ZOOM/SLOW button down repeatedly to apply the
PLAY/PAUSE button during
- 14 -
Note:
With VCDs, S-VCDs and MPEG4 files slow motion backwards is not
supported.

Image enlargement (Zoom)
Note:
This function may not be available on all DVDs/VCDs/S-VCDs! If you
attempt to carry out functions that are not available the message
"INVALID KEY“ appears in the display.
During playback of an inserted DVD/VCD/S-VCD you can enlarge and reduce
the image in the display in three stages.
• Press the
ments and/or reductions:
Sections of the enlarged image can be shunted with the control buttons
ZOOM/SLOW button repeatedly to apply the following enlarge-
.
Camera position (DVD only)
REP ALL Select REP ALL to continuously repeat all available titles on the
disc, thus the entire disc, until playback repeat is switched off
or playback is stopped by pressing the
REP DIR When you have inserted a disc that contains folders, with this
option you can endlessly repeat the contents of the current
folder.
OFF To switch off repeat playback press the
times during playback until the message OFF appears in
the display.
REP A- With this function you can repeat playback of a favourite
sequence within a chapter of the current playback disc.
Select this input as soon as the desired sequence begins
to play back.
REP A-B Select this input as soon as the end of the desired sequence
has played back. With this, bear in mind that the beginning
and end of the sequence must fall within the same chapter.
Repeat playback of the selected sequence starts immediately.
A-B CANCEL The sequence will continuously repeat until you select the
input A-B CANCEL.
STOP button twice.
REPEAT button several
Note:
This function may not be available on all DVDs/VCDs/S-VCDs! If you
attempt to carry out functions that are not available the message
"INVALID KEY“ appears in the display.
Many films on DVD contain chapters, which were recorded from different
viewing angles simultaneously. Films that have such chapters available allow
you to observe these chapters from various perspectives.
• For this, during playback of the inserted DVD, hold the
on the remote control down briefly. With each further brief hold down of
the
ANGLE/PROGRAM button you can switch to one of the available camera
angles.
ANGLE/PROGRAM button
Repeat function for DVDs, VCDs, S-VCDs and Audio CDs
With the repeat function you can…
... with DVDs selectively repeat title or chapter.
... with VCDs/S-VCDs you can repeat individual titles, a folder and/or the
entire VCD/S-VCD.
... with audio CDs you can repeatedly playback individual titles and/or the
entire CD.
Repeat function
• Press the REPEAT button several times during playback.
REP appears in the display with one of the following messages:
CHAPTER Select CHAPTER to continuously repeat the currently playing
back chapter until playback repeat is switched off or playback is stopped by pressing the
TITLE Select TITLE to continuously repeat the currently playing back
title until playback repeat is switched off or playback
is stopped by pressing the
REP1 Select REP1 to continuously repeat the currently playing
back track until playback repeat is switched off or playback
is stopped by pressing the
STOP button twice.
STOP button twice.
STOP button twice.
Direct Title/Track selection
To select a title/track on the disc directly, during playback, enter the title/
track number via the number buttons .
If there is more than 9 titles enter the corresponding title/track number by
pressing the two numbers one after the other.
Example
Enter the number
1
followed by the number 2 to playback title/track 12.
Direct chapter,title or time selection via the search function
Note:
This function may not be available on all DVDs/VCDs/S-VCDs! If you
attempt to carry out functions that are not available the message
"INVALID KEY“ appears in the display.
If you do not want to playback the entire disc you can select a particular
chapter/time position.
• To do this press the
on the medium, the following messages:
With the control buttons select one of the following input fields
and then with the number buttons enter the chapter, title or track number
and/or a time.
Subsequently confirm your input with the
SEARCH button during playback to superimpose, depending
OK button.
- 15 -

DVD
TT: Enter here a title number from where playback should start.
CH
:
Enter here a chapter number from where playback should start.
Enter here a time position for the currently playing back title from
where playback should start.
CD/VCD/SVCD
Trk : Enter here a track number from where playback should start.
Enter here a time position for the currently playing back title from
where playback should start.
Display functions
Display disc information
Note:
This function may not be available on all DVDs/VCDs/S-VCDs! If you
attempt to carry out functions that are not available the message
"INVALID KEY“ appears in the display.
With this function you can, during playback, superimpose in the display the
total available information from a DVD/VCD/S-VCD inserted in the disc tray.
• During playback press repeatedly the
after the other, the following information:
With DVDs:
• The played back so far time of the current chapter
• Audio language, Dolby settings, subtitle language and camera position
• The remaining time of the current chapter
• The played back so far time of the current title
DISPLAY button to superimpose, one
Accessing the DVD menu
Note:
This function may not be available on all DVDs/VCDs/S-VCDs! If you
attempt to carry out functions that are not available the message
"INVALID KEY“ appears in the display.
With many films on DVD there is a main menu on the disc that apart from
the option of playing the main film enables you, for example...
• to choose the language for subtitles and film dialogue
• direct chapter selection
• to playback the films bonus material (Background information,
"Making of" etc.)
If such a menu is present on the DVD that is inserted in the disc tray then you
can access it during playback by pressing the
• The individual menu items can be selected by pressing the control buttons
; to confirm the selected menu item press the PLAY/PAUSE
To return to playback press the MENU button again.
Note:
If you cancel playback by pressing the
without resume function), activation of the main menu from the disc is not
possible.
MENU button.
BUTTON.
STOP button twice (Playback stop
Playback Control (PBC) with VCDs/S-VCDs
Many VCDs/S-VCDs have Playback Control (in short "PBC"). Playback
Control indicates a main menu that allows operation of several functions
of the VCD/S-VCD.
If PCB is available on a VCD/S-VCD inserted in the disc tray you must first
activate it in order to be able to superimpose the menu.
To activate PBC...
• During playback or when playback is stopped press the
The message PBC:OFF appears in the display.
• Press the
MENU button again. The message PBC ON: appears in the display.
PBC is now switched on the discs main menu can be accessed with the
MENU or TITLE buttons.
Note:
If you switch on PBC during playback then it is possible that playback
will stop and start again from the beginning and/or with the main menu.
MENU button.
• The remaining time of the current title
With VCDs/S-VCDs/DivX/MPEG CDs
• The played back so far time of the current title/track
• The remaining time of the current title
Fading out disc information
• To fade out the disc information press the DISPLAY button again.
Superimpose and fade out subtitles
(DVDs/VCDs/S-VCDs only)
Note:
This function may not be available on all DVDs/VCDs/S-VCDs! If you
attempt to carry out functions that are not available the message
"INVALID KEY“ appears in the display.
If the film on the inserted DVD/VCD/S-VCD has subtitles available you can
superimpose these, during playback, in the display by pressing the
button.
• With the first press of the
language is superimposed in the display.
• With each further press of the
one after the other, are superimposed in the display.
In the display the number of the currently superimposed subtitle is superimposed
(i.e. "6" for the sixth available subtitle language).
SUBTITLE button the subtitle of the first available
SUBTITLE button other available subtitle languages,
SUBTITLE
- 16 -

• When the last of the available subtitle languages is superimposed then
you can switch off the subtitle function by pressing the
again. OFF is superimposed in the display.
SUBTITLE button
15 Display of MP3/WMA/JPEG/AVI/MPEG
and DivX data
Changing playback language (DVDs/VCDs/S-VCDs only)
Note:
This function may not be available on all DVDs/VCDs/S-VCDs! If you
attempt to carry out functions that are not available the message
"INVALID KEY“ appears in the display.
• With many films on DVD/VCD/S-VCD you can select another playback
language, during playback, by pressing the
• With the first press of the
will be switched on. With each further press of the
playback languages, one after the other, are switched on.
The respectively switched on playback language and the sound format
(i.e. 5.1CH) are superimposed in the display.
AUDIO button the first available playback language
AUDIO button.
AUDIO button other available
Programme function
You can programme a playback sequence for the titles and chapters that are
available on the DVD, VCD, S-VCD disc.
For this, during playback, press the
following window:
Programming window
ANGLE/PROGRAM button to superimpose the
• Place a memory medium, on which MP3, WMA, JPEG, AVI, MPEG or
DivX data is present, in the disc tray.
The contents of the data medium will be shown on the display:
Display of MP3 data
Display of JPEG data
The programme positions 1-16 are listed. Each programme position contains
the input field for a title (T) and a chapter (C).
1. Select with the control buttons in the first programme position
the input field T for the title.
2. With the number buttons enter the number of the title that is to be played
back first.
3. Select with the control buttons in the first programme position
the input field C for the chapter.
4. With the number buttons enter the number of the chapter that is to be played
back.
5. Select with the control buttons further programme positions
and enter title and chapter numbers for the programme position.
• To delete the programme list select the input Clear and press the
• To cancel the programming function press the
ANGLE/PROGRAM button.
OK button.
6. You start playback of the programme positions by selecting the Play
field and pressing the
During the programmed playback the message PROGRAM PLAY appears
in the display.
The programme list will be deleted as soon as you press the
OK button.
STOP button.
Display of AVI, MPEG and DivX data
• Folders are listed on the left (folder window) and data on the right (data
window). Folders will be depicted with the symbol .
• At the bottom right the available formats on the data carrier (MP3, JPEG
or MPEG/AVI/DivX) are shown.
• Select with the control buttons
The contents of the folder appears in the data window.
• To reach a higher folder level select the symbol with the input "
press the
• With the
PLAY/PAUSE button.
button move to the area on the right select with the control buttons
a data and press the PLAY/PAUSE
playback and/or the JPEG image will be displayed.
a folder and press the PLAY/PAUSE button.
.." and
BUTTON.
The music/video data will
- 17 -

Playback of MP3/ WMA/MPEG and DivX discs
• Select a data with the help of the control buttons . By pressing
the
PLAY/PAUSE button you confirm your selection. Playback starts immediately.
With the playback of music or video data the following functions can be
used:
Play/Pause
See "14 Playing back DVDs, VCDs or S-VCDs"
Stop
See "14 Playing back DVDs, VCDs or S-VCDs"
Skip
See "14 Playing back DVDs, VCDs or S-VCDs"
Search
See "14 Playing back DVDs, VCDs or S-VCDs"
Slow (with MPEG and DivX data only)
See "14 Playing back DVDs, VCDs or S-VCDs"
Selection of slide show transitions:
You can select different transitions for changing from one image to the next.
• During the slide show press the
transition appears in the top left corner of the screen.
ANGLE/PROGRAM button until the name of the
Enlargement and reduction of the image display
• With the ZOOM button you can enlarge or reduce the image.
Zoom (with JPEG, MPEG and DivX data only)
See "14 Playing back DVDs, VCDs or S-VCDs"
AB Repeat
See "14 Playing back DVDs, VCDs or S-VCDs"
Repeat function with MP3/WMA/MPEG/ JPEG/DivX
discs
During playback press the REPEAT button several times to apply the following
repeat functions (the set function appears in the display):
REPEAT 1
Endless repeat of the current title/image.
FOLDER
REPEAT
Repeat the current folder.
REPEAT
ALL
Repeat all titles on the disc and/or data carrier.
Playback of JPEG discs
• With the control buttons mark an image and press the PLAY/PAUSE
button to open that image.
The image is shown on the display
Subsequently change the view to the next available image on the disc/in the
folder.
• To show the currently displayed image longer press the
• To continue with playback press the
• You can access an image direct by entering the image data number with
the number buttons and then confirm by pressing the
• With the control buttons
90° during playback.
• With the control buttons
vertically during playback.
you can rotate the image in increments of
you can mirror the image horizontally and
PLAY/PAUSE button.
PLAY/PAUSE button.
PLAY/PAUSE button.
- 18 -

16. Cleaning of the DVD player
Clean the housing of the DVD player with a slightly damp cloth and a mild
cleanser only. When cleaning, make sure that no moisture gets into the DVD
player!
Clean the inside of the disc tray, if necessary, exclusively with a clean dry
brush (i.e. a lens brush obtainable from a photographic dealer). Never clean
the inside of the disc tray with anything moist!
Warning!
Moisture penetrating into the DVD player creates the risk of an electric
shock! The DVD player may also be irreparably damaged!
17. Disposal
18. Troubleshooting
Display is blank/DVD player shows no functions even though it is
switched on
A Check to see that the power cord is properly plugged into the power
socket.
B Check to make sure that there is power at the power socket, in which
you have plugged the DVD players power cord, by connecting another
appliance to the socket. If necessary plug the DVD players power cord
into another power socket.
C Check to see if the display is switched off. For this press the SCREEN
ON/OFF button on the remote control.
D Switch off the DVD player with the FUNCTION switch and then wait ten
seconds. Subsequently switch the DVD player back on with the
switch.
FUNCTION
Disposing of the appliance
Do not, under any circumstances, discard the appliance in the household
refuse.
This product is subject to the European directive 2002/96/EC.
Dispose of the appliance through an approved disposal centre or at your
community waste facility.
Observe the currently applicable regulations. In case of doubt, please
contact your waste disposal centre.
Disposing of batteries!
Do not dispose of the batteries with household waste. Every consumer is legally
obliged to dispose of batteries at a collection site of his community/city district
or at a retail store.
This obligation is intended to ensure that batteries are disposed of in an environmentally safe fashion.
Only dispose of batteries when they are fully discharged.
Disposal of packaging
Dispose of the packaging materials in an environmentally responsible
manner.
The display shows "No Disc" even though there is a disc inserted
A The disc is dirty, scratched or damaged.
B The Country/Region code on the inserted DVD/VCD/S-VCD does not
correspond to the Country/Region code of the DVD player. In this case
the DVD/VCD/S-VCD cannot be played with the DVD player.
Inserted disc will not playback
It is possible that a layer of condensation has built up on the DVD players laser
scan lens. This can be the case especially if the DVD player has been subjected
to strong temperature fluctuations.
If this is the case place the DVD player in a dry environment at normal room
temperature. First remove the currently inserted disc from the disc tray. Then
leave the DVD player switched off for at least one hour without using until
the condensation film has evaporated.
No image or Black/White image only
A Check to make sure that all connection cables between the DVD player
and the television (or Video projector) are firmly inserted into the
corresponding sockets
B Check to make sure that the settings in the OSD menu match the connec-
tions variant, with which you have connected the DVD player to the television (or Video projector).
For this see chapter 8. „Connecting the DVD player to a television“.
C Check by means of the televisions (or Video projectors) operating in-
structions to see if settings to the television (or Video projector) may be
necessary in order to use the DVD player with the television.
No sound
A Check to see if the DVD player is possibly switched to mute.
B Check to see that all connecting cables between the DVD player and
potentially connected audio components are firmly plugged into the
corresponding sockets
C Check to make sure that the settings in the OSD menu match the connections
variant, with which you have connected the audio component to the
DVD player.
For this see chapter 9. „Connecting an audio component to the DVD
player“.
- 19 -

D Check by means of the televisions operating instructions to see if settings to
the television may be necessary in order to use the DVD player with the
television.
E Check by means of the operating instructions for a potential connected
audio component if settings to it are necessary in order to use it with the
DVD player.
No 4:3 or 16:9 image
A Check by means of the televisions operating instructions, which image
formats the television has at its disposal.
B Check to see if the settings in the OSD menu match the available image
format of the television.
19. Glossary / Key Word Index
What are DVDs, VCDs and S-VCDs?
DVDs
DVD is the short form for "Digital Versatile Disc". DVDs are a storage medium
for audio and video data; they are available in 8 cm and 12 cm (Diameter)
formats. Because of the much higher storage capacity as compared to CD-Rs/
CD-RWs DVDs can provide a playback duration of up to eight hours for the
audio and video data stored on them.
Remote control not functioning
A Check to make sure that the remote control batteries have been inserted
into the battery compartment with the correct polarity.
B Check to see if the remote control batteries are exhausted and, if neces-
sary, change both batteries.
C Make sure that there are no obstacles located between the remote control
and the DVD player.
D Be situated no more than five meters from the DVD player when using
the remote control.
Playback language/ Subtitle language do not correspond to the
settings in the OSD menu
The playback language/Subtitle language setting in the OSD menu is not
available on the inserted disc.
One or several functions can not be switched on
The selected function may not be available on all DVDs/VCDs/S-VCDs!
If you attempt to carry out a function that is not available the message
"INVALID KEYappears in the display.
None of the buttons on the appliance or on the remote control
are functioning/other malfunctions
A Switch the DVD player off with the FUNCTION switch. Wait ten seconds
and then switch the DVD player back on with the
FUNCTION switch.
B If the malfunction is still present: Reset the DVD player to its default
settings.
Contact one of our service partners in your area if …
• the stated function defect can not be resolved as described or
• other functional defects arise.
For this see chapter 20 "Warranty and service".
VCDs/S-VCDs
"Video CD" (VCD) and "Super Video CD" (S-VCD) are designations for two
processes of compressed storage, thus space saving, of films on CDs. VCDs
and S-VCDs are available in 8 cm and 12 cm (Diameter) formats. Their storage
capacity is a great deal lower than that of DVDs. For this reason they only
offer a playback duration, for the saved audio and video data on them, of
20 minutes (8 cm format) and/or 74 minutes (12 cm format).
VCDs are available in two versions:
• Only audio and video data can be played back on version 1.1
VCDs/S-VCDs.
• PBC (Playback control) functions are available on version 2.0 VCDs/
S-VCDs. In addition still images can be played back in a higher resolution.
Playback Control (PBC)
Version 2.0 VCDs/S-VCDs have Playback Control (in short "PBC") at their
disposal. Then on the VCD/S-VCD a main menu is available, by which
various functions of the VCD/S-VCD are allowed to be operated.
What are Title and Chapter?
Title is the name given to the largest units of image and sound units on DVDs;
on many DVDs the (Main) film has the title number 01. For bonus material
(i.e. Film trailer, background information etc.), that is available on many
DVDs, other possible title numbers can be used.
Chapter is the name given to the next smaller image and sound units beneath
title. If the DVD/VCD/S-VCD or its title is divided into chapters, numbers are
assigned to you, through the input of which the chapter can be selected direct.
Bear in mind that not on all DVDs …
• are the DVD or the title divided into (numbered) chapters
• Chapters are also designated as "Scenes" (i.e. in the main menu of DVDs)
What is composite video?
Composite video
Video signal or FBAS signal; thereby it involves an image signal, in which
colour and brightness information are included at the same time.
What are PAL, NTSC and SECAM?
PAL
PAL is the abbreviation for "Phase Alternation Line". PAL is the mid and west
Europe (Exception: France, see the heading "SECAM") customary and most
wide spread colour television standard.
NTSC
NTSC is the abbreviation for "National Television System Committee". NTSC
is a colour television standard that is primarily used in the USA and Japan.
- 20 -

SECAM
ORDNER
MP3
MP3-CD
SECAM is the abbreviation for the french "système en couleur avec mémoire".
SECAM is the customary colour television norm in France and many east
European countries and at present still the most widely spread system in
those countries.
Audio CDs
Audio CDs contain exclusively audio data; they are also available in 8 cm
and 12 cm (Diameter) formats. The playback duration for the audio data stored
on them amounts to 20 minutes (8 cm format) and/or 74 minutes (12 cm format).
Audio data is stored on audio CDs in CDA format.
MP3
MP3 denotes a process and/or format developed by the Fraunhofer Institute
for the compression of audio data. In the MP3 format compressed music pieces
are only a fraction of their original size, which, for example, on CD-Rs/CD-RWs
allows for storage of a considerably greater volume of music than on commercially available audio CDs, on which audio data is stored in the CDA format.
WMA
WMA ("Windows® Media Audio") is a data format developed by Microsoft®
for audio data.
JPEG
JPEG ("Joint Photographics Expert Group") denotes a wide spread graphic
format, developed by the organization with the same name, with which image
data of the colour and grey scales are compressed.
20. Warranty & Service
The warranty for this appliance is for 3 years from the date of purchase.
Should you have grounds for complaint, despite our high quality standards,
please contact our Service Hotline.
In the event that your complaint cannot be resolved over the telephone, you
will receive from them
• a processing number (RMA number) as well as
• an address, to which you can send your product for warranty processing.
In the case of a mail-in shipment please enclose a copy of the purchase receipt
(sales slip). The appliance must be securely packed and rhe RMA number
clearly visible. Shipments without an RMA number can not be processed.
Note:
The warranty provisions cover only material or factory defects.
The warranty provisions do not cover
• worn out parts
• damage to breakable parts like switches or rechargeable batteries.
This product is for private use only and is not intended for commercial use.
The warranty is void in the case of abusive and improper handling, use of force
and internal tampering not carried out by our authorized service branch.
Your statutory warranty claims are not restricted by this warranty.
21. Importer
DivX
DivX is a coding format for videos and multimedia data, invented by the DivX
Networks, Inc company.
MPEG
MPEG ("Moving Picture Experts Group") refers to a video compression format.
USB memory sticks
The term USB memory stick refers to a plugable USB device, which is approximately the size of a cigarette lighter. The expression is only colloquial and
not a designation for a type of product. For the most part with this expression
is meant a USB device that serves as an interchangeable storage media.
What are files?
As opposed to audio CDs the title on a CD-R/CD-RW with MP3-, WMA- or
JPEG data can be stored in files, for example, in order to file titles from different
genres.
The structure of an MP3-CD can, for example, appear as follows, if the MP3
data is stored in files:
FOLDER
KOMPERNASS GMBH
BURGSTRASSE 21
D-44867 BOCHUM
www.kompernass.com
- 21 -

- 22 -

DVD-Player/Radio KH6502
Warranty
In order to guarantee a cost free repair procedure please
get in touch with the service hotline. Make sure you have
your sales slip handy.
Sender, please write clearly:
Last name
First name
Street
City/Town
Completely fill out this section and enclose with the appliance!
Country
Irish Connection
Tel.: 00353 (0) 87 99 62 077
Fax: 00353 18398056
e-mail: support.ie@kompernass.com
www.mysilvercrest.de
Telephone
Date/Signature
Description of fault:
✄

- 24 -
 Loading...