


 Loading...
MODEL 5499
Distributed Power Module
Document 151253
08/12/13 Rev L
151253:L ECN 13-00708
Installation and
Operations Manual

Contents
Section 1 |
|
|
|
Introduction .................................................................................................................................. |
1 |
||
Section 2 |
|
|
|
UL Requirements .................................................................................................................... |
2 |
||
Section 3 |
|
|
|
System Overview .................................................................................................................... |
3 |
||
3.1 |
Terminal Descriptions and Electrical Ratings .............................................................................. |
3 |
|
3.2 |
Signal Input Terminals ................................................................................................................. |
4 |
|
3.3 |
Notification Appliance Circuit Terminals ...................................................................................... |
5 |
|
Section 4 |
|
|
|
Installation |
...................................................................................................................................... |
7 |
|
4.1 |
Mounting |
...................................................................................................................................... |
7 |
|
4.1.1 Preventing ....................................................................................................Water Damage |
7 |
|
4.2 |
Wire Routing ................................................................................................................................ |
8 |
|
4.3 |
Current Requirements ...............................................................................(Standby and Alarm) |
9 |
|
|
4.3.1 Current ...........................................................................................Drawn From Host Panel |
9 |
|
|
4.3.2 Current ..................................................................................................Drawn from Battery |
9 |
|
4.4 |
Connecting ...................................................................................the 5499 to a Control Panel |
11 |
|
|
4.4.1 Common ......................................................................................................Trouble Relay |
12 |
|
4.5 |
Notification .....................................................................................................Appliance Wiring |
13 |
|
|
4.5.1 Class .................................................................................................A Supervised Wiring |
13 |
|
|
Class .................................................................................A Output Notification Circuits |
13 |
|
|
Class ...................................................................................A Supervised Input Circuits |
13 |
|
|
4.5.2 Class .................................................................................................B Supervised Wiring |
14 |
|
|
Class .................................................................................B Output Notification Circuits |
14 |
|
|
Class ...................................................................................B Supervised Input Circuits |
15 |
|
4.6 |
Ground Fault .......................................................................Detection Enable/Disable Jumper |
15 |
|
4.7 |
Battery Connection .................................................................................................................... |
16 |
|
4.8 |
DIP Switch ...................................................................................................................Settings |
17 |
|
|
4.8.1 Selecting ...........................................................the Standard Input/Output Configurations |
18 |
|
|
4.8.1.1 ................ |
Input/Output Configurations That Select ANSI Temporal - Coded Outputs |
19 |
|
4.8.2 Selecting ..................................................................Synchronized Output Configurations |
20 |
|
|
4.8.2.1 ...................................................... |
Selecting Synchronized Faraday Configurations |
20 |
|
4.8.2.2 ........................................................ |
Selecting Synchronized Gentex Configurations |
20 |
|
4.8.2.3 ........................................... |
Selecting Synchronized System Sensor Configurations |
21 |
|
4.8.2.4 .................................................... |
Selecting Synchronized Wheelock Configurations |
21 |
|
4.8.2.5 ....................................................Selecting Synchronized AMSECO Configurations |
21 |
|
|
4.8.3 Setting ..............................................................................................the Loss of AC Delay |
22 |
|
151253 |
i |

5499 Distributed Power Module Installation Manual |
|
|
|
4.8.4 Setting the Auxiliary Output ................................................................................................ |
22 |
Section 5 |
|
|
Sample Applications ......................................................................................................... |
23 |
|
5.1 |
Notification Power Applications ................................................................................................. |
23 |
5.2 |
Non-Resettable Power Application ............................................................................................ |
25 |
5.3 |
Door Holder Application ............................................................................................................ |
26 |
Section 6 |
|
|
Troubleshooting ..................................................................................................................... |
27 |
|
6.1 |
LEDs .......................................................................................................................................... |
27 |
6.2 |
Trouble Conditions .................................................................................................................... |
28 |
6.3 |
Earth Fault Resistance .............................................................................................................. |
29 |
6.4 |
Removing and Replacing the Control Panel ............................................................................. |
30 |
|
6.4.1 Removing the Control Panel ............................................................................................... |
30 |
|
6.4.2 Replacing the Control Panel ............................................................................................... |
30 |
Appendix A |
|
|
UL Listed Notification Appliances ...................................................................... |
33 |
|
A.1 |
Notification Appliances .............................................................................................................. |
33 |
Silent Knight Fire Product Warranty and Return Policy Manufacturer Warranties and Limitation of Liability
ii |
151253 |

Section 1
Introduction
The 5499 is a notification appliance circuit and auxiliary power expander that provides up to 9 amps of filtered, 24 volt power for powering notification appliances and auxiliary devices. The 5499 provides its own AC power connection, battery charging circuit, and battery connections. Used with security and fire alarm control panels, the 5499 enables you to connect and distribute power to many more devices than your panel may normally allow.
•Input Configurations
The 5499 has two optically isolated signaling inputs that provide the signal connection from the main control panel to the 5499 (see Section 3.2 for more details).
•Output Configurations
The 5499 has four power-limited notification appliance circuits that can be configured in various combinations of Class A and Class B circuits (see Section 3.3 for details).
•Auxiliary Power Configurations
The 5499 has a dedicated, power-limited, auxiliary output that can be configured in two different ways. The auxiliary output can either be non-resettable (always on), or configured to switch off during the AC power failure to conserve the battery standby power. When the auxiliary power is configured to switch off, there is a 30 second delay before the auxiliary power is turned off after the AC power fails (see
Section 4.8.4 for details).
•Form C Trouble Relay
The 5499 includes a general trouble relay that will de-energize for any trouble situation. (see Section 4.4.1 for details).
•Earth Fault Detection
The 5499 monitors for earth faults to the system power or system ground. When detected, the system de-energizes the trouble relay and the input supervision relays (see Section 5.2 for details).
•ANSI Temporal Code
The 5499 provides two configuration options that will drive outputs with the ANSI temporal code if the inputs are on constantly (see Section 4.8.1 for details).
•Supports Synchronized appliances
The 5499 provides configuration options that will eliminate the need for synchronized modules when using AMSECO, Faraday, Gentex, System Sensor, or Wheelock synchronization appliances.
151253 |
1 |

5499 Distributed Power Module Installation Manual
Section 2
UL Requirements
When installed in accordance with NFPA 70 and NFPA 72 standards, the 5499 can be connected to UL Listed devices.
The 5499 is also listed to meet UL 864, UL 2572 and power limiting requirements.
The 5499 is compatible with any UL listed control unit utilizing reverse polarity supervised notification appliance circuits, using 24 VDC regulated outputs.
2 |
151253 |

System Overview
Section 3
System Overview
CAUTION
Each output circuit is rated at 3 amps. DO NOT OVERLOAD. Overloading a circuit will cause it to shut down (power limit). The circuit will automatically reset once you remove the overload condition.
3.1Terminal Descriptions and Electrical Ratings
Terminal # |
Description |
Ratings |
|
|
|
|
|
|
|
|
|
|
|
|
TB1 |
|
|
|
|
1 |
AC (black–“hot”) |
|
|
|
|
|
|
|
|
2 |
Earth Ground |
120 VAC 60 Hz, 3A |
|
|
|
|
|
|
|
3 |
AC (white–“neutral”) |
|
|
|
|
|
|
|
|
TB2 |
|
|
|
|
1 |
Auxiliary Power (-) |
27.4 VDC 3.0 amps |
|
|
|
|
|
||
2 |
Auxiliary Power (+) |
|
||
|
|
|||
|
|
|
|
|
3 |
Notification 4 Output (-) |
27.4 VDC 3.0 amps |
|
|
|
|
|
||
4 |
Notification 4 Output (+) |
Although each output |
||
|
||||
|
|
|
|
|
5 |
Notification 3 Output (-) |
27.4 VDC 3.0 amps |
is rated for 3 amps, the |
|
|
|
|
||
6 |
Notification 3 Output (+) |
total current draw from |
||
|
||||
|
|
|
|
|
7 |
Notification 2 Output (-) |
27.4 VDC 3.0 amps |
the 4 outputs and the |
|
|
|
|
||
8 |
Notification 2 Output (+) |
auxiliary power must |
||
|
||||
|
|
|
|
|
9 |
Notification 1 Output (-) |
27.4 VDC 3.0 amps |
not exceed 9 amps. |
|
|
|
|
||
10 |
Notification 1 Output (+) |
|
||
|
|
|||
|
|
|
|
|
11 |
Normally Closed contact |
2.5 A @ 250 VAC |
|
|
|
|
|
|
|
12 |
Common |
or |
|
|
|
|
|
|
|
13 |
Normally Open contact |
2.5 A @ 30 VDC |
|
|
|
|
|
|
|
14 |
Input 2 |
|
|
|
|
|
|
|
|
15 |
Input 2 (-) |
9 - 30 VDC |
|
|
|
|
|
|
|
16 |
Input 2 (+) |
|
|
|
|
|
|
|
|
17 |
Input 1 |
|
|
|
|
|
|
|
|
18 |
Input 1 (-) |
9 - 30 VDC |
|
|
|
|
|
|
|
19 |
Input 1 (+) |
|
|
|
|
|
|
|
151253 |
3 |

5499 Distributed Power Module Installation Manual
3.2Signal Input Terminals
Terminals 14 through 19 are polarized signal input terminals. They provide the signaling connection from the main panel to the 5499. See Figure 4-2 for more details.
The main panel supervises its notification appliance circuits used for communicating with the 5499 the same way it supervises ordinary notification appliance circuits. The signal inputs on the 5499 monitor the polarity of the voltage coming from the main panel’s notification appliance circuits to determine when to operate the notification appliance circuits on the 5499. The 5499 emulates the trouble behavior of a normal notification appliance circuit by interrupting the EOL supervision current for internal or output trouble conditions on the 5499.
Note that the 5499 will accurately sense the polarity of the main panel’s notification appliance circuits to drive the outputs whether or not the supervision connection is intact. The following situations will disconnect the EOL supervision at the signal inputs and indicate a trouble condition:
•Low AC power
•Low Battery condition
•Earth ground fault to the system power or system ground
•Auxiliary output power-limited condition
•EOL supervision trouble or power-limited condition at an output
Trouble conditions will not necessarily occur for both inputs when the trouble is specific to a particular output. Only the signal input controlling the output circuit that is in trouble will indicate a trouble condition. Below are examples where both inputs do NOT indicate trouble for a trouble occurring at only one output circuit.
Example 1: If input 1 controls all four outputs, a fault on any output will cause input 1 to indicate trouble. The fault does not affect input 2.
Example 2: If input 1 controls outputs 1 and 2, and input 2 controls outputs 3 and 4, a fault condition on output 3 or 4 will cause input 2 to indicate trouble. The fault does not affect input 1.
Note: Once the inputs are driven with forward polarity to activate the outputs, the main control panel will not be able to sense trouble conditions through its notification appliance circuit connected to the 5499 input circuits. Use the 5499 trouble relay when it is necessary to monitor trouble conditions and active alarm conditions at the same time.
Section 6 explains the significance of each trouble condition in more detail.
4 |
151253 |

System Overview
3.3Notification Appliance Circuit Terminals
Terminals 3 through 10 are the notification appliance circuit output terminals. Each of the four circuits are rated at 3 amps, although you can only draw a total of 9 amps from the 5499. The 5499 outputs are short-circuit protected (power limited) according to UL 864 standards. Overcurrent indicators are yellow LEDs. The output voltage can vary depending on the load and input voltage.
The four power-limited NAC outputs can be configured as follows:
• Four Class B circuits |
• |
Faraday synchronized outputs |
|
• Two Class A circuits |
• |
Gentex synchronized outputs |
|
• |
One Class A and two Class B circuits |
• System Sensor synchronized outputs |
|
• |
Class B, ANSI temporal-coded circuits |
• |
Wheelock synchronization outputs |
•AMSECO synchronized outputs
One or both 5499 signal inputs control the NAC outputs, depending on the specific configuration setup. Possible configurations for the 5499 are:
For Option: |
These Inputs: |
Control These Outputs: |
As: |
|
|
|
|
|
|
|
|
|
|
|
1 |
Input 1 |
All outputs |
Class B circuits |
|
2 |
Input 1 or |
Outputs 1, 2, 3, and 4 |
Class B ANSI temporal- |
|
Input 2 |
coded circuits |
|||
|
|
|||
|
|
|
|
|
3 |
Input 1 |
Outputs 1 and 2 |
Class B circuits |
|
Input 2 |
Outputs 3 and 4 |
Class B circuits |
||
|
||||
|
|
|
|
|
4 |
Input 1 |
Output 1 |
Class B circuits |
|
Input 2 |
Outputs 2, 3, and 4 |
Class B circuits |
||
|
||||
|
|
|
|
|
5 |
Input 1 |
Outputs 1-2 and 3-4 |
Class A circuit pairs |
|
|
|
|
|
|
|
Input 1 |
Outputs 1 and 2 |
Class B ANSI temporal-coded |
|
6 |
|
|
circuits |
|
|
Input 2 |
Outputs 3 and 4 |
Class B circuits |
|
|
|
|
|
|
7 |
Input 1 |
Outputs 1-2 |
Class A circuit pair |
|
Input 2 |
Outputs 3-4 |
Class A circuit pair |
||
|
||||
|
|
|
|
|
8 |
Input 1 |
Outputs 1-2 |
Class A circuit pair |
|
Input 2 |
Outputs 3 and 4 |
Class B circuits |
||
|
||||
|
|
|
|
|
|
Input 1 (Strobe |
|
Class A or Class B |
|
9 |
Control) |
All outputs |
|
|
|
Input 2 (Audio Control) |
|
Faraday Sync. Output |
|
|
|
|
|
|
|
Input 1 (Strobe |
|
Class A or Class B |
|
10 |
Control) |
All outputs |
|
|
|
Input 2 (Audio Control) |
|
Gentex Sync. Output |
|
|
|
|
|
|
|
Input 1 (Strobe |
|
Class A or Class B |
|
11 |
Control) |
All outputs |
|
|
|
Input 2 (Audio Control) |
|
System Sensor Sync. Output |
|
|
|
|
|
|
|
Input 1 (Strobe |
|
Class A or Class B |
|
12 |
Control) |
All outputs |
|
|
|
Input 2 (Audio Control) |
|
Wheelock Sync. Output |
|
|
|
|
|
151253 |
5 |
5499 Distributed Power Module Installation Manual
For Option: |
These Inputs: |
Control These Outputs: |
As: |
|
|
|
|
|
|
|
|
|
|
|
|
|
|
|
|
|
Input 1 |
(Strobe |
|
Class A or Class B |
13 |
Control) |
All outputs |
|
|
|
Input 2 |
(Audio Control) |
|
Amseco Sync. Output |
|
|
|
|
|
You can select which input controls which output, and which inputs are Class A and
Class B using the 7-position DIP switch on the printed circuit board. Section 4.8 for
DIP switch settings.
6 |
151253 |
Installation
Section 4
Installation
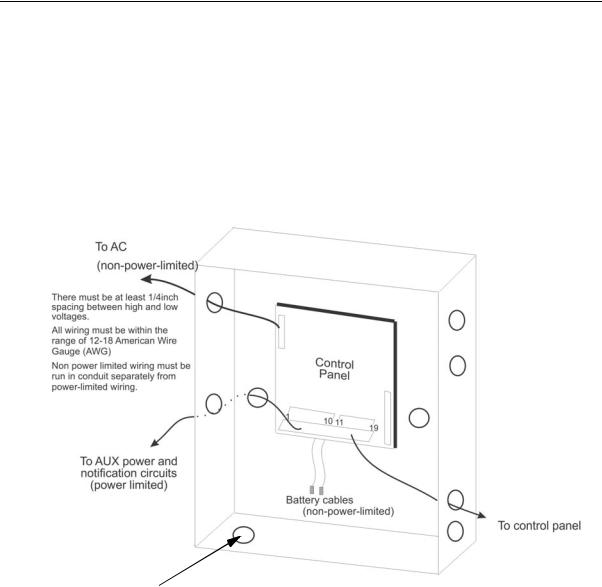
Before installing the 5499, the AC input must first be wired into the building’s main electrical power through the TB1 terminals (see Figure 4-2). Shut off the electrical power to the 5499, and then complete the general installation of the 5499 using the information in this section.
4.1Mounting
Mount the 5499 in locations that meet the following temperature and humidity requirements. Do not expose the panel to conditions outside these ranges. For use in indoor, dry environments.
Temperature |
0o C-49o C (32o F-120o F) |
Humidity |
10%-93% at 30o C (86o F) noncondensing |
When mounting on interior walls, use appropriate screw anchors in plaster. When mounting on concrete, especially when moisture is expected, first attach a piece of 3/
4-inch plywood to the concrete surface. Attach the 5499 to the plywood.
4.1.1Preventing Water Damage
Water damage to the fire system can be caused by moisture entering the cabinet through the conduits. Conduits that are installed to enter the top of the cabinet are most likely to cause water problems. Installers should take reasonable precautions to prevent water from entering the cabinet. Water damage is not covered under warranty.
151253 |
7 |
5499 Distributed Power Module Installation Manual
4.2Wire Routing
To avoid induced noise (transfer of electrical energy from one wire to another), keep input wiring isolated from high current output and power-limited wiring. Induced noise can interfere with telephone communication or even cause false alarms. Avoid pulling a single multiconductor cable for the entire system. Instead, separate high current input/output from low current. Separate power-limited from non-power-limited wiring.
Non-power-limited wiring must be enclosed in conduit.
Wiring within the cabinet should be routed around the perimeter of the cabinet. It should not cross the printed circuit board where it could induce noise into the sensitive microelectronics or pick up unwanted RF noise from the switching power supply circuit.
Note: The use of this knock out will reduce the number and/or size of batteries this cabinet can contain. Evaluation of space is important before using.
Figure 4-1 Sample Wire Routing
Ground fault and wire to wire short impedance to any terminal is 0
8 |
151253 |

Installation
4.3Current Requirements (Standby and Alarm)
4.3.1Current Drawn From Host Panel
Table 4-1 shows the 5499 current draw requirements from the main control panel when the panel’s notification appliance circuit is in alarm. The current draw from the main panel when it is supervising the 5499 is the same current draw that would be present when the main panel supervises an ordinary notification appliance circuit.
Table 4-1: Alarm Current Drawn From Main Control Panel
|
Panel Voltage |
Current |
|
|
|
|
|
Alarm Current (for typical voltages) |
12 VDC |
6.5 mA |
|
drawn from main panel’s notification |
|
|
|
24 VDC |
One input circuit: |
15 mA |
|
appliance circuits. |
|
Both input circuits: |
30 mA |
|
|
||
|
|
|
|
4.3.2Current Drawn from Battery
Batteries used with the 5499 must not exceed 35AH. (33AH max. for FM (Factory Mutual) Installations). Batteries larger than 7 AH will not fit into the 5499 cabinet and must be housed in the RBB Remote Battery Box. See Section 4.7 for battery installation.
The following is the maximum current draw from the auxiliary power terminals for standby calculations. These currents assume 24 or 60 hours of standby time, followed by 5 minutes of maximum alarm current.
•195 mA for 24 Hour Standby Current
•39 mA for 60 Hours of Auxiliary Standby Current
The above numbers were calculated assuming the use of 7 AH batteries at 100% of rated capacity.
The total current of the 5499, plus all items powered from it, must not exceed 9 A when the panel is in alarm. Use Table 4-2 to ensure that the current does not exceed
9 A and, that the desired amount of standby is possible for the battery intended for use with the 5499.
151253 |
9 |
5499 Distributed Power Module Installation Manual
Table 4-2: Battery Calculation Worksheet
|
|
Device |
Number of |
|
|
Current per Device |
Standby |
Alarm |
||
|
|
Devices |
|
|
Current |
Current |
||||
|
|
|
|
|
|
|
|
|||
|
|
|
|
|
|
|
|
|
|
|
|
|
|
|
|
|
|
|
|
|
|
|
|
For each device use this formula: |
This column |
|
X |
This column |
|
= |
Current per number of |
|
|
|
|
|
|
|
|
devices. |
|
||
|
|
|
|
|
|
|
|
|
|
|
|
|
|
|
|
|
|
|
|
|
|
|
|
5499 Distributed Power Module |
1 |
|
Standby: |
|
75 mA |
75 mA |
|
|
|
|
(Current draw from battery) |
|
Alarm: |
|
205 mA |
|
205 mA |
||
|
|
|
|
|
|
|||||
A |
|
|
|
|
|
|
5499 Current |
75 mA |
205 mA |
|
|
|
|
|
|
|
|
|
|
||
|
|
Auxiliary Devices |
|
|
Refer to device manual for current ratings. |
|
||||
|
|
|
|
|
Alarm/Standby |
|
mA |
mA |
mA |
|
|
|
|
|
|
|
|
|
|
|
|
|
|
|
|
|
Alarm/Standby |
|
mA |
mA |
mA |
|
|
|
|
|
|
|
|
|
|
|
|
|
|
|
|
|
Alarm/Standby |
|
mA |
mA |
mA |
|
|
|
|
|
|
|
|
|
|
|
|
|
|
|
|
|
Alarm/Standby |
|
mA |
mA |
mA |
|
|
|
|
|
|
|
|
|
|
|
|
B |
|
|
|
|
Auxiliary Device Current |
mA |
mA |
|||
|
|
|
|
|
|
|
|
|
||
|
|
Notification appliances |
|
|
Refer to device manual for current ratings. |
|
||||
|
|
|
|
|
Alarm: |
|
mA |
0 mA |
mA |
|
|
|
|
|
|
|
|
|
|
|
|
|
|
|
|
|
Alarm: |
|
mA |
0 mA |
mA |
|
|
|
|
|
|
|
|
|
|
|
|
|
|
|
|
|
Alarm: |
|
mA |
0 mA |
mA |
|
|
|
|
|
|
|
|
|
|
|
|
|
|
|
|
|
Alarm: |
|
mA |
0 mA |
mA |
|
|
|
|
|
|
|
|
|
|
||
C |
|
|
Notification Appliance Current |
0 mA |
mA |
|||||
D |
Total current ratings of all devices in system (line A + line B + line C) |
|
|
mA |
mA |
|||||
|
|
|
|
|
|
|||||
E |
Total current ratings converted to amperes (line D x .001): |
|
|
A |
A |
|||||
|
|
|
|
|
|
|
|
|||
F |
Number of standby hours (24 or 60 for NFPA 72, Chapter 1, 1-5.2.5). 24 Hrs. for |
H |
|
|||||||
NBC, section 3.2.7.8 |
|
|
|
|
|
|
|
|
||
G |
Multiply lines E and F. |
|
|
|
Total standby AH |
AH |
|
|||
H |
Alarm sounding period in hours. In accordance with NBC and ULC. |
|
|
|
H |
|||||
(For example, 5 minutes = .0833 hours.) |
|
|
|
|
|
|
||||
I |
Multiply lines E and H. |
|
|
|
Total alarm AH |
|
AH |
|||
J |
Add lines G and I. |
|
|
Total standby and alarm AH |
AH |
|
||||
|
|
Multiply line J by 1.20. |
|
|
|
Total ampere-hours |
AH |
|
||
K |
(20% extra insurance to meet desired performance) |
|
||||||||
|
|
required |
|
|
|
|
|
|
|
|
10 |
151253 |

Installation
4.4Connecting the 5499 to a Control Panel
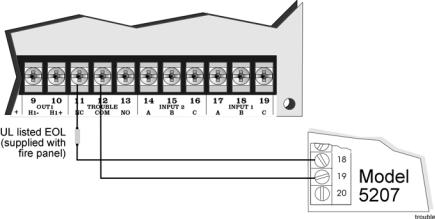
Figure 4-2 shows the general layout of the 5499 PC board. This section also provides specific wiring details for accessories.
Figure 4-2 The Model 5499 PC Board Layout
Consult the installation manual for specific wiring information for the control panel being used.
151253 |
11 |
5499 Distributed Power Module Installation Manual
4.4.1Common Trouble Relay
The 5499 has a Form C trouble relay built into Terminals 11-13. The relay provides a normally open and a normally closed contact, both of which are rated at 2.5A. The trouble relay will deactivate under any trouble condition.
A typical application of the trouble relay is to connect the 5499 normally closed (N.C.) contacts in series with the EOL supplied with the fire alarm control panel. This will cause a trouble on the fire alarm control panel when the 5499 opens its trouble contacts.
Note: The N.C. contact is the contact that is closed when the 5499 has power and there are no trouble conditions.
Must be connected to a power limited source
Figure 4-3 Trouble Relay Connection Example
12 |
151253 |

Installation
4.5Notification Appliance Wiring
Note: Not all devices can use the sync feature. Be sure to check Appendix A to ensure the device you have chosen will work with this feature.
Important!
For all synchronization options, input 1 is the strobe input and input 2 is the audible input. The signals to input 1 and input 2 must be DC signals for the synchronization patterns to work properly. When it is desired to activate both strobes and audibles, input 1 and input 2 must be active. If it is desired to only activate strobes, then input 1 must be active and input 2 must be inactive. The audible can be deactivated and reactivated at any time by changing the signal at input 2 as long as input 1 remains active. If input 1 is not active, then input 2 is ignored.
4.5.1Class A Supervised Wiring
Figure 4-4 shows how to wire for Class A input and output supervision. Use in/out wiring methods for proper supervision. (Refer to Appendix A for notification appliances compatible with the 5499.)
Class A Output Notification Circuits
The configuration shown in Figure 4-4 shows two, 3 A devices wired as Class A. When using the outputs as Class A circuits, loop the wiring back to the corresponding circuit pair. For Class A wiring, no external EOL is necessary since it is built into the
5499 board.
Class A Supervised Input Circuits
The configuration shown in Figure 4-4 shows Class A supervised wiring from a fire alarm control panel to the 5499 board. Pay close attention to the polarities when wiring a panel to the 5499 and follow these requirements:
•When wiring to Terminal 18 on the 5499, you must use two separate wires. Do not loop a single wire or twist two conductors together.
•Do not use notification appliances on Class A circuits connected to a 5499 for input. The 5499 will detect voltage across the input circuits, but is not designed to
151253 |
13 |
Loading...