

Page 1
Application
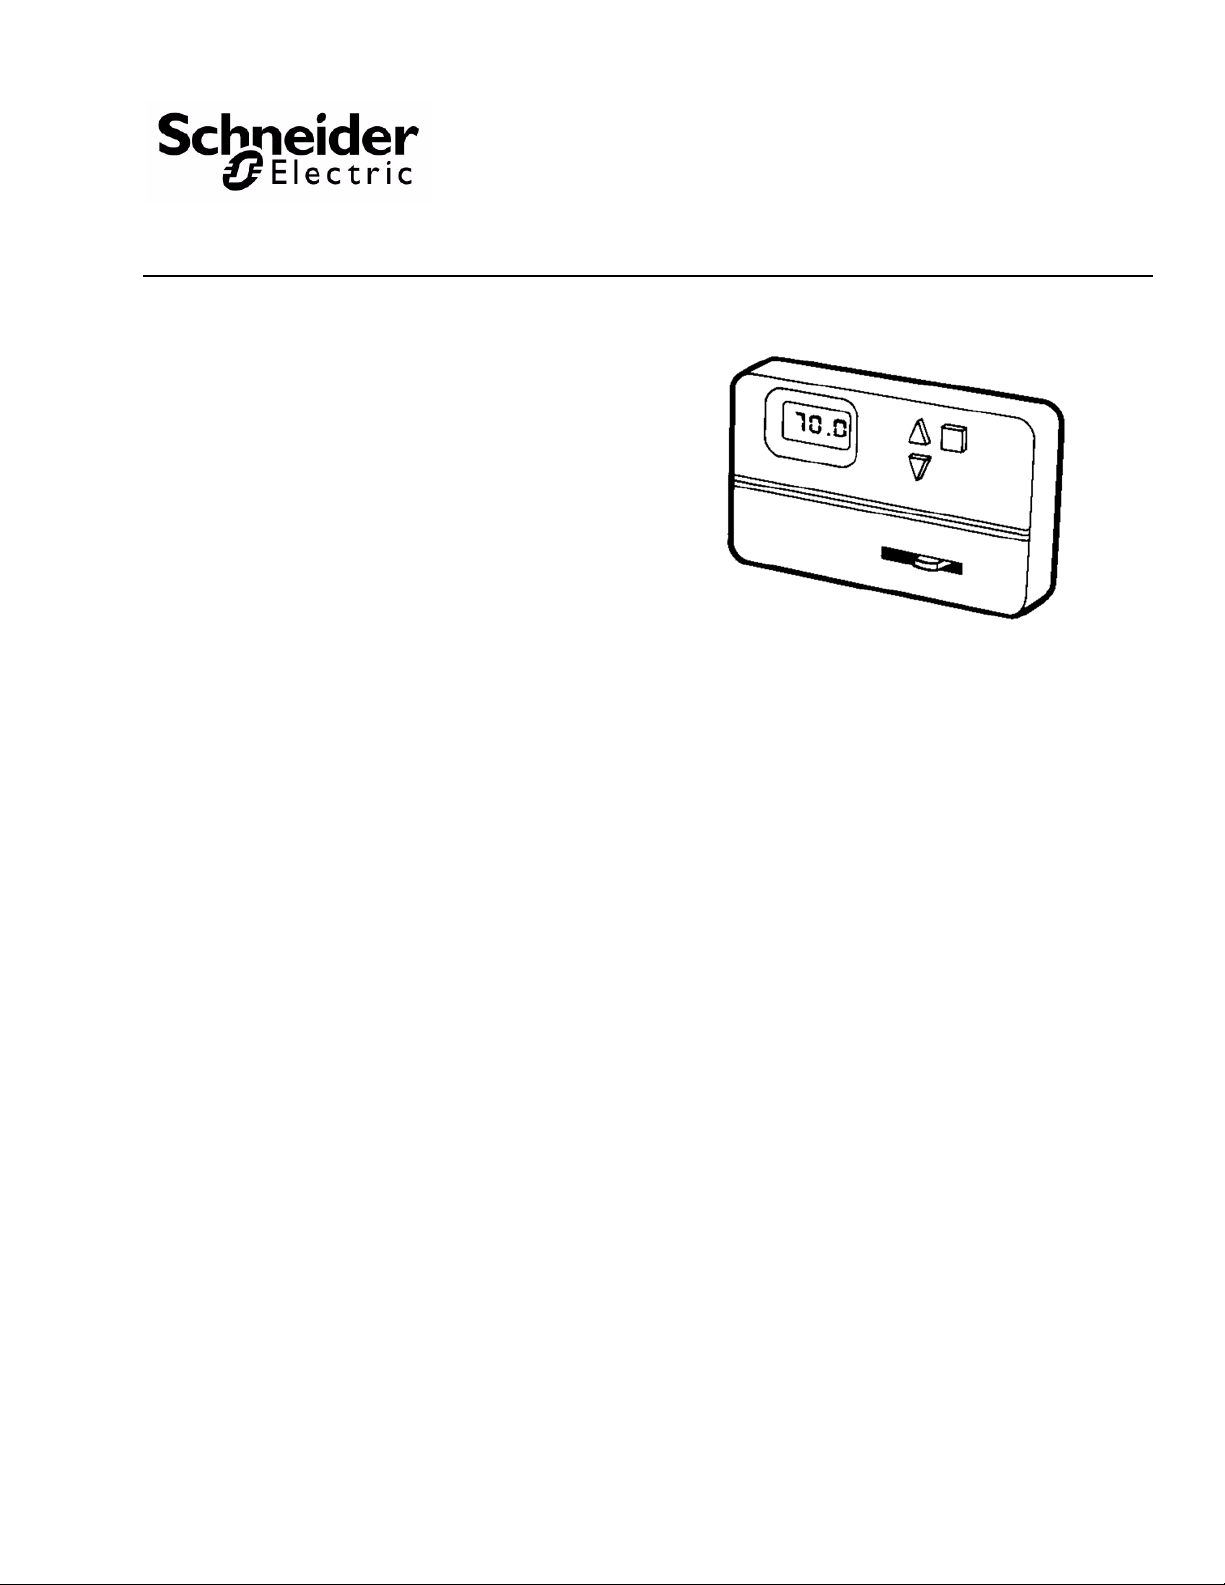
T158 Series
Most models of the T158 series microp rocessor based
thermostat/controller with digital display provide a
combination of three-wire floating and/or on/off contro l.
TA158 models are on/off control only. This series can
control a variety of two-pipe and
four-pipe fan coil units, air handling units, unitary
equipment, for heating and cooling applications.
The microprocessor combines a proportional intergral
control algorithm with adaptive logic. This provides
control without the need for tuning or calibrating the
control algorithm in the field.
Features
T158 Series
Digital, Three-Wire Floating/On-Off
Thermostat/Controller
General Instructions
• Heating and cooling outputs are individually
configu
in
rable for three-wire floating or on/off contro
the normally open or normally closed modes
• Line voltage continuous three-speed fan control
• Manual or automatic changeover
• Remote setback capability from a time clock or
facility management
system
• Fahrenheit or Celsius display capability
• Built-in purge cycle assists the controller to
determine if the controlling agent is provid
he
ating or cooling
ing
• Microprocessor eliminates the necessity for tuning
or
calibration
• Set point may be calibrated to ±5F degrees
l
Printed in U.S.A. 5/10 © Copyright 2010 Schneider Electric All Rights Reserved. F-27041-3
Page 2

t C A U T I O N
SPECIFICATIONS
74
73
72
71
70
69
68
67
66
65
64
100
90
80
70
60
50
40
30
20
10
0
0
60 120 120 240
Time in Minutes
Temp in Degrees F
Valve Position (%)
Valve Position
Room Temp
Figure-1 Typical T158 Performance Curve.
Inputs
Outputs
• Do not use with DC powered motor circu its.
• Do not use on actuators with a stroke time of less than 1 minute or greater than 3 minutes.
• Do not use on actuators with positi o n memo ry.
Power Input: 20 to 28 Vac, nominal 24 Vac. Power Consumption: 25 mA maximum at 24 Vac.
Connections:
Power, Up to 14 AWG wire.
Control, Up to 14 AWG wire.
Electrical:
Output Ratings, 10 VA at 24 Vac.
Operating Differential, 1F degree (0.6C degree).
Setpoint Adjustment Range, 50 to 90° F (10 to 32°C).
Changeover Deadband, 3F degrees (1.6C degrees).
Proportional Band, 2F degrees (1.1C degrees).
Mechanical:
Display Range, 32 to 99°F (0 to 37°C) Material, Rigid vinyl. Finish, Cool gray.
Environment
Temperature Limits:
Shipping & Storage, -30 to 130°F (-34 to 55°C).
Operating, 32 to 130°F (0 to 55°C). Humidity: 95% Non-condensing. Shipping Weight: 0.6 lbs (270 g). Location: NEMA Type 1.
Agency Listings
CE: Compliant.
Performance
2 © Copyright 2010 Schneider Electric All Rights Reserved. F-27041-3
Page 3
Table-1 Fan Switch Current Ratings (Amps).
Voltage
24 N/A N/A N/A 24 VA
120 5.8 34.8 6.0 125 VA
240 2.9 17.4 5.0 125 VA
277 2.4 14.4 4.2 125 VA
Table-2 Model Chart.
Model Outputs
T A158-001 Dual 6 None Yes Yes Off-Auto-Heat-Cool
T A158-002 Dual 6 Off-Hi-Med-Lo Yes Yes Off-Auto-Heat-Cool
TB158-001 Dual 1, 2, 3, 4, 5, 6 None Yes Yes Off-Auto-Heat-Cool
TB158-002 Dual 1, 2, 3, 4, 5, 6 Off-Hi-Med-Lo Yes Yes Off-Auto-Heat-Cool
TB158-003 Single 5, 7 Off-Hi-Med-Lo Yes Yes Off-Heat/Off-Cool
TB158-007 Single 5, 7 None Yes Yes None
Control Signal
Options
Fan Control Remote Sensor Setback System Switches
Inductive
Resistive Amps Pilot Duty
FLA LRA
TB158-015 Single 5, 7 None Yes Yes Off-Heat/Off-Cool
TB158-017 Dual 1, 2, 3, 4, 5, 6 Off/On Yes Yes Off-Auto-Heat-Cool
TB158-018 Single 5, 7 Off/On Yes Yes Off-Heat/Off-Cool
1. Three-wire floating single stage cooling and three-wire floating single stage heating.
2. Three-wire floating cooling and two stage on/off heating.
3. Single stage on/off cooling, on/off fan control and three-wire floating single stage heating.
4. On/off single stage cooling, on/off single stage heating and fan control.
5. Three-wire floating single stage cooling or single stage heating.
6. On/off single stage cooling, and on/off single stage heating.
7. On/off single stage cooling or on/off single stage heating.
Accessories
65345 4-3/4” x 4-3/4” adapter plate.
65406 Remote/changeover sensor, 60" leads 10k Ω @ 77°F (25°C).
F-27041-3 © Copyright 2010 Schneider Electric All Rights Reserved. 3
Page 4
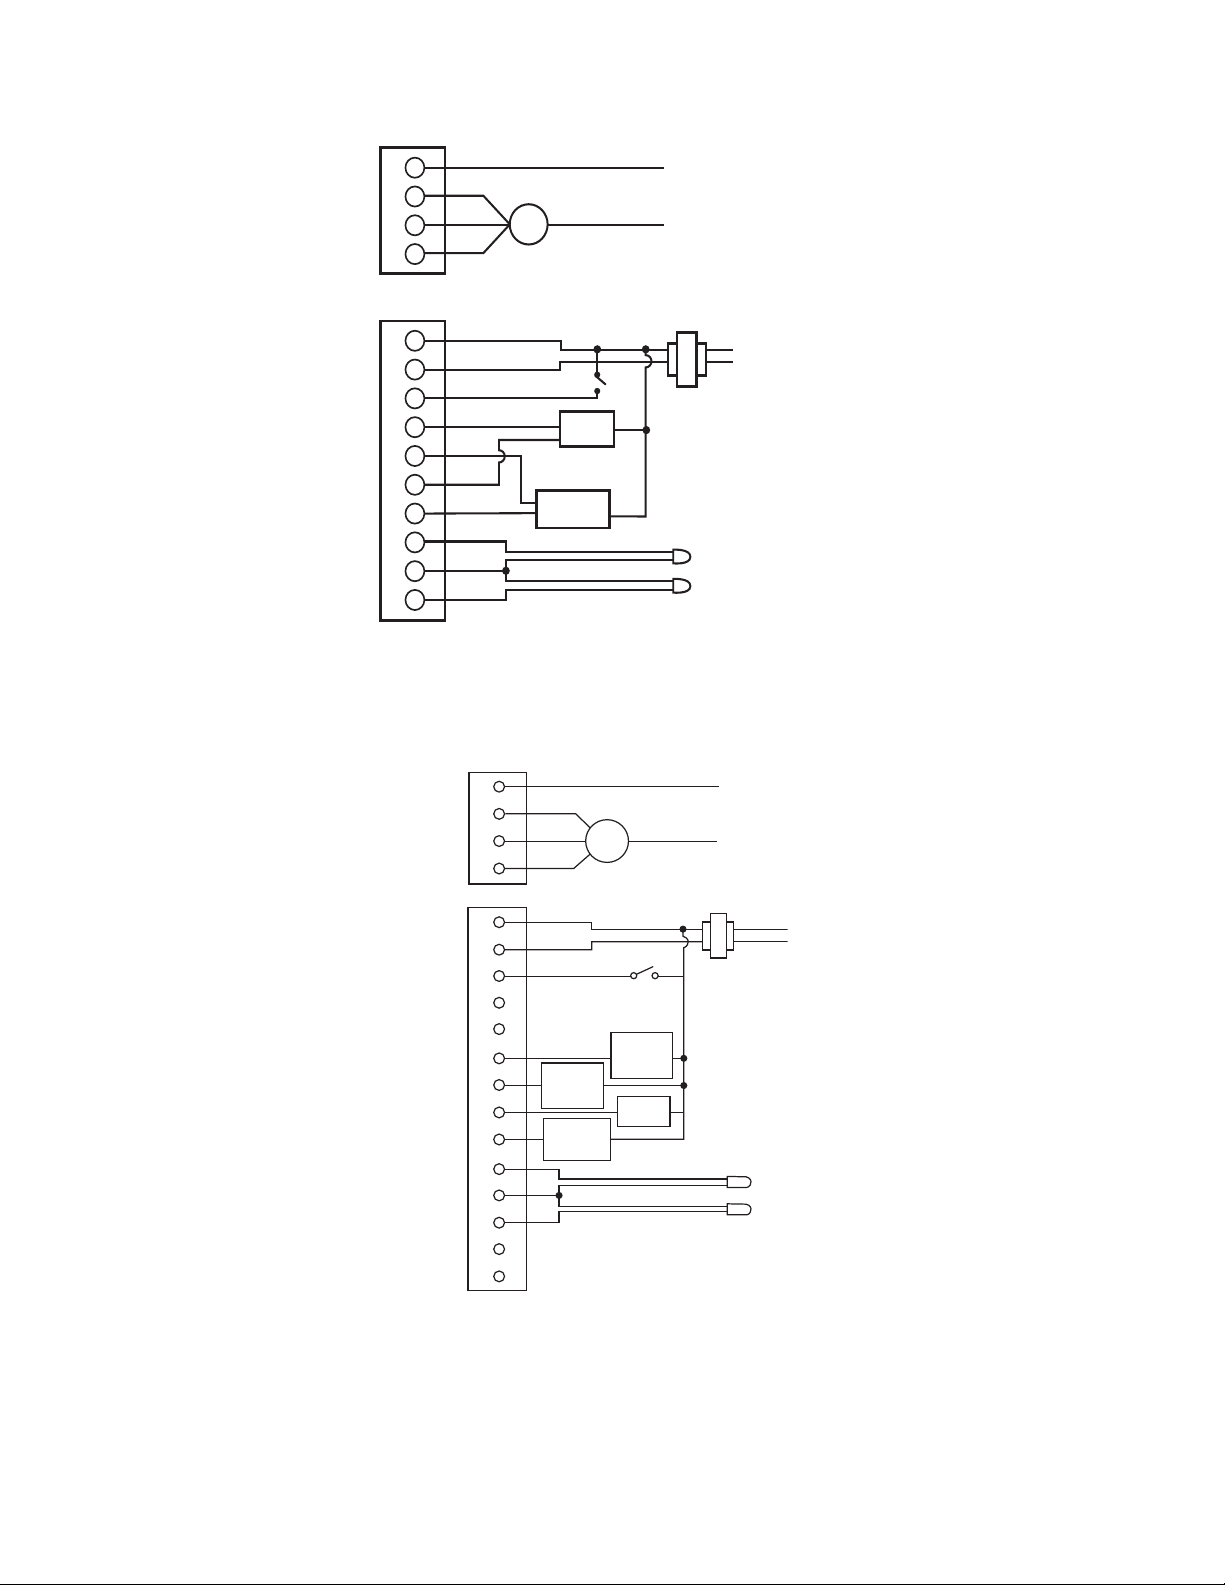
TYPICAL APPLICATIONS (wiring diagram)
1
L1 (HOT)
LO
MED
L2 OR NEUTRAL
H
I
OPTIO
NA
L REMOTE SENSO
R
OPTIONAL SEASONAL
CHAN
GEOVER SENSO
R
OPE
N
OPE
N
C
LOSE
C
LOSE
COM
24 VAC
XF
M
R
2
3
4
5
6
7
10
11
12
13
15
16
17
SET
BACK
INPUT
F
AN
MAI
N
OUTPUT
SECO
NDAR
Y
O
UTPU
T
COM
Figure-2 Typical Wiring For 3-Wire Floating Control.
L1 (HOT)
L2 OR NEUTRAL
LINE VOLTAGE
CONNECTIONS
LOW VOLTAGE
CONNECTIONS
24 VAC
XFMR
SETBACK INPUT
SETBACK
SWITCH
1ST STAGE
SECONDARY
OUTPUT
MAIN
OUTPUT
FAN/
DEMAND
2ND STAGE
SECONDARY
OUTPUT
OPTIONAL REMOTE PROBE
OPTIONAL CHANGEOVER SENSOR
FAN
1
2
3
5
6
7
8
9
10
11
12
13
15
16
17
18
19
4
LO
MED
HI
Figure-3 Typical Wiring For On/Off Control.
4 © Copyright 2010 Schneider Electric All Rights Reserved. F-27041-3
Page 5

INSTALLATION
N O T E
N O T E
Inspection
Requirements
Precautions
Inspect the package for damage. If damaged, notify the appropriate carrier immediately.
If undamaged, open the package and inspect the device for obvious damage.
Return damaged products.
• Tools (not provided)
— Screwdriver
—Digital multimeter
• Training: Installer must be a qualified, experienced technician
• Other accessories as appropriate
General
WARNING:
• Electrical shock hazard! Disconnect power before installation to prevent electrical shock
or equipment damage.
• Make all connections in accordance with the electrical wiring diagram and in accordance
with national and local electrical codes.
CAUTION:
• Avoid locations where excessive moisture, corrosive fumes, explosive vapors, or vibra-
tion are present.
• Avoid electri c al no ise interference. Do not install near large conductors, electrical
machinery, or welding equipment.
Federal Communications Commission (FCC)
This equipment has been tested and found to comply with the limits for a Class B digital
device, pursuant to Part 15 of the FCC Rules. These limits are designed to provide reasonable protection against harmful interference in residential installations. This equipment generates, uses, and can radiate radio frequency energy and may cause harmful interference if
not installed and used in accordance with the instructions. Even when instructions are followed, there is no guarantee that interference will not occur in a particular installation. If this
equipment causes harmful interference to radio and television reception—which can be
determined by turning the equipment off and on—the user is encouraged to try to correct the
interference by one or more of the following measures:
• Reorient or relocate the receiving antenna.
• Increase the separation between the equipment and receiver.
• Connect the equipment to an outlet on a circuit different from that to which the receiver
is connected.
• Consult the dealer or an experienced radio/television technician for help.
Canadian Department of Communications (DOC)
This class B digital apparatus meets all requirements of the Canadian Interference-Causing
Equipment Regulations.
Cet appareil numerique de la classe B respecte toutes les exigences du Reglement sur le
material broilleur du Canada.
European Standard EN 55022
WARNING:
• This is a class B (European Classification) product. In a domestic environment this prod-
uct may cause radio interference in which case the user may be required to take adequate measures.
F-27041-3 © Copyright 2010 Schneider Electric All Rights Reserved. 5
Page 6

Mounting
Figure-4 Mounting.
JP1: REMOVE TO
ALLOW USE OF
REMOTE PROBE
CONNECTIONS
15 REMOTE SENSOR
16 REMOTE SENSOR
& CHANGEOVER SENSOR
17 CHANGEOVER SENSOR
10 MAIN OPEN
11 SECONDARY OPEN
12 MAIN CLOSE
13 SECONDARY CLOSE
5 24 VAC COMMON
6 24 VAC HOT
7 SETBACK INPUT
1 L1 (HOT)
2 FAN LOW/CONTINUOUS
3 FAN MED
4 FAN HIGH
Figure-5 Terminal Definitions.
T158
Mount the T158 series to a suitable surface. Standard holes are provided for mounting
purposes. Refer to Figure-4 . Mount the thermostat five feet above the floor on an inside wall.
Do not mount near a heat source (lamp or sunlight) or behind a door or furniture.
WIRING
6 © Copyright 2010 Schneider Electric All Rights Reserved. F-27041-3
Seasonal Changeover Sensor
Mount the seasonal changeover sensor on to the main coil input or a pipe that will determine
the fluid temperature of the coil. If a well is available use thermal grease for a faster
temperature response. If strap on mounting, insulate the entire sensor and pipe before and
after the sensor for a total of approximately six inches to decrease the affect of ambient
temperature upon the sensor.
Remote Sensor
Install the sensor in a location that will only measure the temperature to be sensed without
any external heating or cooling sources influencing the sensor. Avoid direct sunlight or dead
air spaces. Be aware of the effect air movement and room stratification will have on the
remote sensor.
Page 7

JP4
JP1
JP3
JP2
JP5
DIP SWITCH MODELS
Shown
Closed
OFF ON
234561
23456
1
23456 1
1
2
1 The dip switch housing is labled "ON"
with an arrow for slide switch "ON" direction.
2 Older styles will have cuttable jumpers
uncut = On, cut = Off
ON
TA158
Cuttable
Jumper/Dip Switch
Designation
On/Uncut Off/Cut
1
Secondary 1³
(term 11) NC
Secondary 1³
(term 11 ) NO
2
Main 1³
(term 10) NC
Main 1³
(term 10) NO
3 Fahrenheit Display Celsius Display
4 Not Used Operating Position
5 Not Used Operating Position
6 Setback = 90F & 50F Set back = 85F & 60F
TB158
Cuttable
Jumper/Dip Switch
Designation
On/Uncut Off/Cut
1
Secondary 1³
(term 11) NC
Secondary 1³
(term 11 ) NO
2
Main 1³
(term 10) NC
Main 1³
(term 10) NO
3 Fahrenheit Display Celsius Display
4
Secondary
3-wire Floating
(term 11 & 13)
Secondary
2 Stage On/Off
(term 11 & 13)
5
Main
3-wire Floating
(term 10 & 12)
Main 1 Stage On/Off
1 Demand On/Off
(term 10 & 12)
6 Setback = 90F & 50F Set back = 85F & 60F
a For On/Off control only, has no affect on 3-wire control. Affects the indicated
terminal only.
Figure-6 Field Selectable Jumpers.
Wiring Application
Sensor
In all applications run the sensor wire away from any electronic noise generating devices,
such as motors, fluorescent lights, microwaves, or run in parallel to line voltage wiring. The
maximum length of non-shielded sensor wire should not exceed 25 ft. (7.6 m).
Avoid electronic noise generating devices if possible. In an electronic noisy environment
always use shielded wire. Connect the shielding to an earth ground. The maximum length
of shielded sensor wire should not exceed 100 ft. (30.5 m).
The T158 series thermostats are field configurable for a wide range of applications. Models
built after January 2000 have configuration dip switches in the upper right corner of the
circuit board. Models built before January 2000 were equipped with cuttable jumpers instead
of dip switches for field configuration.
In addition to dip switches there are pin jumpers which are pairs of small pins. The pin jumper
pairs are located on the right hand side of the T158 circuit board. The jumpered state means
that both pins are covered by the black plastic jumper cap. In the un-jumpered state the
jumper cap can be stored by placing the cap over either pin of the pin pair.
F-27041-3 © Copyright 2010 Schneider Electric All Rights Reserved. 7
Page 8

Field Configuration Options
N O T E
A single set point serves as the set point for both heating and cooling.
Cooling/Heating Output Logic
The factory default sets the main output to operate as the cooling output and the secondary
output as the heating output. Follow these steps to change the factory default.
Dual Output Models: Connect a jumper wire from terminal 16 to terminal 17 to make the
main output heating only and to disable the secondary output.
Single Output Models: Connect a jumper wire from terminal 16 to terminal 17 to make the
main output heating.
Changeover Sensor
When no changeover sensor is installed on terminals 16 and 17 the main output controls are
in cooling logic.
When a changeover sensor is installed the main output is cycled from heating to cooling or
from cooling to heating depending upon the temperature measured by the changeover
sensor strapped to the supply pipe or mounted in the return air duct. Refer to “Two Pipe
Seasonal Changeover Sensor Operation” for more information.
CAUTION:
Keep all wiring at least 1-1/2 ft. away from any potential source of electrical interference or
noise.
Remote Sensor
When using a remote sensor remove the jumper cap from pin pair JP1, located in the lower
right corner of the circuit board. You can store the jumper cap on either pin of the JP1 jumper
pair.
CAUTION:
Keep all wiring at least 1-1/2 ft. away from any potential source of electrical interference or
noise.
Three-Wire Float and On/Off Logic
All TA158 models and model TB158-018 are capable of On/Off control only . All other TB158
models are capable of 3-wire float or on/off control.
Models that offer either 3-wire float or on/off control are shipped as 3-wire float units. To
convert to on/off logic dip switches 4 and 5 must be oriented to the Off position. On older
jumper models, cut jumpers 4 and 5 if on/off logic is required. Keep in mind that one output
may be left as an on/off output while the other remains a 3-wire float output.
Demand Heat Logic
If equipped with the demand output, terminal 12, the T158 will automatically provide a 24 V
output to power a fan relay any time there is a call or demand for heating or cooling. The
maximum switched load is 10 VA @ 24 V. The secondary must be configured as an on/off
output for the the demand feature to function properly.
Setback Logic
When in setback mode both the cooling and heating outputs operate as on/off outputs.
With dip switch/jumper 6 in the on state the T158 controls setback is set at 90°F cooling,
50°F heating. In the off state the setback is set at 85°F cooling, 60°F heating.
The setback mode is enabled when a contact closure occurs to terminal 7 on the T158. A
time clock or building automation system must provide a dry contact, unpowered circuit to
terminal 7.
During setback, in cooling mode, at 3 degrees above set point, the cooling device will be fully
opened and will stay open until the temperature drops to the set point. In heating mode at 3
degrees below the set point the heating device will be fully opened until the temperature
rises to the set point.
8 © Copyright 2010 Schneider Electric All Rights Reserved. F-27041-3
Page 9

APPLICATION NOTES
N O T E
N O T E
Digital Display Logic
Setback Override: When in setback mode pressing any of three buttons, up arrow, down
arrow, or system mode, will force the T158 into a 1 hour override. The thermostat will control
the temperature for an hour at the non-setback mode set point.
System Switch Settings
Off: The heating and cooling functions are disabled, the set point can be adjusted and the
fan is still operational.
Heat: Only heating is available. The cooling output will not be energized, no matter how
warm the ambient temperature is.
Cool: Only cooling is available. The heating output will not be energized, no matter how cool
the ambient temperature is.
Auto: The controller automatically determines what mode the controller should be in. When
cooling is needed the controller will display “AUTO-COOL”, when heating is need
“AUTO-HEAT”, and when the controller is satisfied “AUTO” is displayed.
Auto is not available on single output thermostats.
Fan Switch Settings
On: All outputs are active.
Off: Fan and system outputs are Off.
Set Point Adjustment
Setback Mode
Manual Changeover
Operation
A touch of either arrow will display the set point. Continued pressure on either arrow will
scroll the set point to new values. After three seconds with no pressure on either arrow, the
selected set point becomes effective and the display of the room temperature resumes. The
selected value is the control point for both heating and cooling.
Default
Units with a date code after 0599 (5th week of 1999) have a EEPROM installed and will
maintain the last entered set point and operating mode when power is removed. When older
units are powered down, the set point defaults to 70°F (21°C) and the mode defaults to
“AUTO”, these older units are dated codes 0499 and earlier.
When a connection is made between terminals 5 and 7 (contact closure) the thermostat will
be in setback mode. The cooling and heating set points are based on the configuration dip
switch, position 6. While in the unoccupied mode, touching either the set point up arrow,
down arrow or mode button will put the controller set point back to local control for a 1 hour
period. When there is no connection between terminals 5 and 7 the set point is based on the
value entered by the operator.
To indicate setback mode operation the thermostat display is changed by suppressing the
display of all mode information (only the room temperature is displayed).
The thermostat can change modes of operation only through the manual change of a mode
button selection on the thermostat. The manual mode button prevents rapid cycling between
modes of operation. These thermostats could also be described as Dual output: two output
devices can be controlled. Heating and cooling thermostat, both heating and cooling devices
are connected to the same thermostat; 4-pipe application: two valves serve the fan coil unit.
SPDT thermostatic switching, no deadband.
F-27041-3 © Copyright 2010 Schneider Electric All Rights Reserved. 9
Page 10

Auto Changeover
100%
0%
-3 -2 -1 SP
Auto
Note: The following represents:
+1 +2 +3
Auto Heat Auto Cool
Figure-7 On/Off Control.
Automatic changeover via the onboard thermistor or remote sensor, the thermostat changes
modes of operation (AUTO-HEAT or AUTO-COOL) based on the differential between the set
point and the controlled variable. This requires a deadband between the heating and cooling
functions as part of the thermostat design. The deadband prevents rapid cycling between
modes of operation. These thermostats could also be described as dual output: two output
devices can be controlled. Heating and cooling thermostat, both heating and cooling devices
are connected to the same thermostat; 4-pipe application: two valves serve the fan coil unit.
Thermostatic switching is SPDT with no deadband.
When the ambient temperature reaches 3F degrees beyond a satisfied set point the mode
changes to either “AUTO-HEAT” or “AUTO-COOL” with the same set point, see Figure-7.
Cover Removal
Output Measurements
Upon initial startup (with no seasonal changeover sensor installed) the controller is in the
“AUTO” mode. The controller determines automatically if it should be in the “AUTO-HEAT”
or “AUTO-COOL” mode, based on the set point and ambient temperature. If the ambient
temperature is below the set point on initial startup the unit will change to the “AUTO-HEAT”
mode. During normal operation, after startup, when the ambient temperature reaches the set
point, or above by up to 3F degrees, the unit will be in the “AUTO” mode. Once the ambient
temperature reaches more than 3F degrees above the satisfied set point the unit changes
to the “AUTO-COOL” mode. Since the ambient temperature is 3F degrees past the set point,
the output goes to 100%. The unit remains in the “AUTO-COOL” mode until the ambient
temperature again reaches the set point. If the ambient temperature drops below the set
point the mode changes to the “AUTO” mode. If the ambient temperature reaches 3F
degrees below the set point the mode changes to “AUTO-HEAT”.
The T158 cover snaps in to place at the display end and can be retained by a screw. With a
T158 in hand, use a small flat blade screw driver in the cover ventilation slots closest to the
base at the retaining screw end. Simultaneously push on the plastic retaining clip, which is
visible in the slot, and pry up gently on the cover to free the cover from the base clips. It will
be necessary to do this at both retaining clips. With a T158 mounted to a wall there may not
be any space for the screw driver approach above. In that case, firmly grip the thermostat
cover and push it to the left until the left end of the cover is free of the base clips.
Always have a load connected when measuring the output signals with a voltmeter. If a load
is not connected, phantom voltages caused by the output triacs will be read even when the
outputs are off. The phantom values will be in the range of 2 to 24 V ac will have no ability to
power a load, and will be slowly decreased by the drain of the voltmeter. The voltage read
when the outputs are actu al l y off and the decrease rate depends upon the quality of the
meter used for the readings.
Output Signals
With a load connected, the 24 V 3-wire floating output signals can be measured from either
the open (terminals 10 and 11) to common (terminal 5) or close (terminal 12 and 13) to
common (terminal 5) terminals. When reading 24 Vac the algorithm is driving the output
being measured. When the algorith is satisfied, the voltage is removed from the outputs.
With the output value at 0 Vac, either the algorithm is satisfied, or the outputs are at 100%
10 © Copyright 2010 Schneider Electric All Rights Reserved. F-27041-3
Page 11

3-Wire Floating Control
3-Wire Floating Operation
closed or 100% open. If the connected load is a TAC “T” series (3-wire floating control)
modulating valve actuator (or similar), a reading of 14 to 17 Vac will also be noted on some
terminals when outputs are being driven. With 24 Vac present on either the open or close
terminal of the thermostat, the inactive output terminal may read a voltage in the range of 14
to 17 Vac. Voltage on inactive terminals is leakage from the triac circuit. These values will
drop quickly.
Three-wire floating control is a time-based modulating control method that energizes or deenergizes a 24 Vac signal between either the open (terminals 10 and 11) and common, or
the close (terminals 12 and 13) and common terminals. This signal is energized for a
calculated period of time and then de-energized. Once the signal is removed the actuator
stays at the specified position until another signal is sent to change it. The controller retains
the last known position in memory, in % of valve stroke, and determines a new output
position based on the difference between the ambient temperature and set point.
The duration of the voltage output to an actuator by an TAC three-wire floating controller
changes with the differential between the set point and controlled variable. If the controlled
variable is more than 1F degree from the set point, the output is pulsed in 6-second
increments, representing 5% of the actuator stroke for a 2-minute actuator. If the controlled
variable is within 1F degree of the set point, the output is pulsed in 1.2-second increments,
representing 1% of the actuator stroke for a 2-minute actuator.
When the ambient temperature is at the set point, both the heating and cooling outputs will
be de-energized. When the controller is in the “HEAT” or “AUTO-HEAT” mode and the
ambient temperature is between the set point and 2F degrees below the set point the
heating device will be modulated in increments between 0 to 100% open. When the ambient
temperature is 2F degrees or greater the set point, the heating device will be at 100% open.
When the controller is in the “COOL” or “AUTO-COOL” mode and the ambient temperature
is between the set point and 2F degrees above the set point the cooling device will be
modulated in increments, between 0 to 100% open. When the ambient temperature is 2F
degrees or greater above the set point, the cooling device will be at 100% open. When
placed in the “OFF” mode, before shutting down, the 3-wire floating algorithm will first drive
closed any valve that is open.
On/Off Operation
Start-up
At the set point both the heating and cooling outputs will be off. In the “COOL” or
“AUTO-COOL” mode when the ambient temperature is 1F degree above the set point the
cooling output is energized and remains energized until the set point is reached, see
Figure-7. In the “HEAT” or “AUTO-HEA T” mode, the first stage of heat is energized when the
ambient temperature is 1F degree below the set point and remains energized until the set
point is reached. The second stage of heat is energized when the ambient temperature is
4F degrees below the set point or 3F degrees beyond where the first stage turned on. The
second stage of heat turns off at 1F degree below the set point.
Upon start-up when either the main or secondary outputs are configured for three-wire
floating, the controller energizes the close outputs (terminals 12 and 13) for a 3-minute
period. After the 3-minute period the PI algorithm begins normal control of the outputs. This
3-minute initiation period establishes the end of travel position in the controller’s memory
and will be refreshed (by driving the actuator into the end of travel position for 30 seconds to
one minute) whenever the control algorithm causes the valve to stroke to the 0% open or
100% open position. If the controller has a single output (main) the logic automatically puts
it into either the “HEAT” or “COOL” mode depending on the seasonal changeover valve. If
the controller has dual outputs (main and secondary) the logic automatically puts it into
either the “AUTO”, “AUTO-HEAT” or “AUTO-COOL” mode depending on the ambient
temperature and the set point. If all the outputs are configured for On/Off control the
controller starts normal control within 30 seconds after power is applied.
F-27041-3 © Copyright 2010 Schneider Electric All Rights Reserved. 11
Page 12

CALIBRATION
The T158 uses a 10K thermistor sensor to measure temperature. As the air temperature
changes, the resistance of the thermistor changes. The change in the resistance is feed into
the processor and the processor adjusts the output.
Up to 5 degrees of offset can be added or subtracted.
This is a software re-calibration of the room temperature displayed by the thermostat as well
temperature value (controlled variable) which is compared to the set point to determine the
thermostat output.
1. Supply 24 V ac to th e thermo st at.
2. Press the mode button, scrolling the thermostat into the Off mode.
3. Push the up and down arrows at the same time, holding them in the depressed position.
4. In one second the display will show an offset value if an offset was previously entered. If there was no offset the display will read “0.0”.
5. An offset can be set to either positive or negative. a. To create a positive offset, release the down arrow while keeping the up arrow
depressed, until the desired offset is displayed up to 5 degrees.
Example: If the thermistor senses 70°F with a 5 degree positive of fset the thermost at
will read 75°F.
b. To create a negative offset, release the up arrow while keeping the down arrow
depressed, until the desired offset is displayed up to 5 degrees.
Example: If the thermistor senses 70°F with a 5 degree negative offset the the rmostat
will read 65°F.
6. When the correct offset value is displayed release both the up and down arrows.
7. After a two second delay the display will indicate the room temperature plus or minus the offset entered.
Wiring Notes
THEORY OF OPERATION
Control Algorithm
When no changeover sensor is used, the main output is associated with the cooling device
and the secondary output with the heating device.
Connecting a wire between terminals 16 and 17 on a single output unit forces the unit into
the heating mode.
By connecting a wire between terminals 16 and 17 on the dual output units, the main output
is associated with the heating device and the secondary output is disabled.
If terminals 16 and 17 are either shorted or have no sensor connected to them the controller
only polls those connections during startup. If there is a sensor connected the controller
polls its value every second along with the ambient temperature value.
When the unit is powered down the controller’s set point defaults to 70°F (21°C) and the last
entered set point is erased.
The PI control algorithm has a 2F degree proportional band. The proportional band is the
amount of change required by the ambient temperature for the output to go from fully closed
to 100% open. For example, in the heat mode, with a 70°F set point and an ambient
temperature of 70° the output is 0%. At 69° the valve is at approximately 50%, and at 68°
the output is 100%. The integral gain implies that the longer the error between the ambient
and the set point temperatures exists, the more the output will change to eliminate the error.
The integral portion of the algorithm eliminates the temperature offset.
12 © Copyright 2010 Schneider Electric All Rights Reserved. F-27041-3
Page 13

Heat mode
100
%
0
%
-
3
-
2
-
1
SP +
1
+
2
+
3
50
%
Figure-8 Heat Mode Graph.
100
%
0
%
-
3
-
2
-
1
SP +
1
+
2
+
3
50
%
Figure-9 Cool Mode Graph.
Figure-10 Auto Mode Graph.
When the ambient temperature is below the set point the output has positioned the valve
somewhere between 0 and 100% open.
Cool mode
When the ambient temperature is above the set point the output has positioned the valve
somewhere between 0 and 100% open.
Auto mode
Upon initial startup the controller is in the auto mode. The controller determines
automatically if it should be in the “Auto-Heat” or “Auto-Cool” mode, based on the set point
and the ambient temperature. When the ambient temperature is below the set point, the unit
is in the “Auto-Heat” mode. When the ambient temperature reaches the set point or above
by up to 3°F , the unit is in the “Auto” mode. Once the ambient temperature reaches 3°F past
the satisfied set point the unit changes into the “Auto-Cool” mode. Since the ambient
temperature is 3°F past the set point, the output goes to 100% open. The unit remains in the
“Auto-Cool” mode until the ambient temperature reaches the set point. If the ambient
temperature drops below the set point the modes changes into the “Auto” mode. When the
ambient temperature reaches 3°F below the set point the mode changes to the “Auto-Heat”
mode.
100
%
50
%
0
%
-
N
ote
3
:
T
h
e f
ollowing represent
-
2
-
1
s
:
A
uto
SP
A
uto
+
1
+
2
+
3
H
ea
t
A
uto
C
ool
F-27041-3 © Copyright 2010 Schneider Electric All Rights Reserved. 13
Page 14

Seasonal Changeover With the 65406 Sensor
The seasonal changeover logic will compare the sensed temperature at the pipe sensor with
the actual ambient, room temperature as measured by the onboard thermistor in the
thermostat.
During initial startup the thermostat determines the resistance value wired across terminals
16 and 17.
Resistance Below 350 Ohms
When a jumper wire is across terminals 16 and 17 the thermostat is locked into a heating
only logic. Both the single or dual output thermostats will be configured as single output
heating only thermostats. The heating output will be the main and only output. The processor
will not be polled and will not check the status of the changeover terminals.
Resistance Over 350,000 Ohms
When neither a jumper wire or a 65406 thermistor is installed across terminals 16 and 17.
The heating and/or cooling outputs will work normally. The main output is for cooling and the
secondary output is for heating.The processor will not be polled and will not check the status
of the changeover terminals.
Resistance Between 350 Ohms and 350,000 Ohms
When a 65406 thermistor is installed across terminals 16 and 17 of the thermostat. The
processor will poll the resistance once every second and will then authorize the main output
to control in either heating or cooling depending on the continuously changing value of the
resistance.
2 Pipe Seasonal Changeover Sensor
The seasonal changeover function is most commonly used on a thermostat factory
configured for 2-pipe operation. These are single output thermostats that do not have the
“auto changeover” function.
Ambiguous State / Neither Heating or Cooling Logic
If the controller senses that the seasonal changeover temperature is within ±15F degrees of
the ambient temperature, the mode cannot be determined. The word “AUTO” is displayed to
indicate the ambiguous state with no demand for either heating or cooling. The words
“AUTO HEAT” or “AUTO COOL” are displayed to indicate the ambiguous state with a
demand for heating or cooling based on the differential between the ambient temperature
and the set point. With a demand for heating or cooling, the connected valve is driven open
and a 3-minute timer for purge cycle sensing is started. On three-wire floating controllers,
the controller operation is limited to two position control, 100% open or 100% closed.
To determine if heating or cooling is available the controller will start a three minute purge
cycle. After purging for three minutes the controller again checks the seasonal changeover
temperature for the ambiguous state. If the mode is no longer ambiguous the controller
resumes normal operation (with as much as a three minute delay). If the sensor is still in an
ambiguous state the controller does the following:
1. Continues to hold the valve open.
2. Checks if the seasonal changeover temperature is less than 60°F or greater than 80°F.
If the temperature is less than 60°F (cooling mode) or greater than 80°F (heating mode)
the controller is declared to no longer be in an ambiguous state and starts to control
appropriately.
3. If the temperature is between 60 and 80°F the controller is still viewed as being in an
ambiguous state and the purge continues with testing every three minutes until a nonambiguous state occurs, ± 15F degrees criteria or 60/80°F criteria.
4. Once a non-ambiguous state is detected the controller waits for 1 hour before checking
and allowing another purge cycle to occur. During this hour changes from heating to
cooling and back are possible by pipe sensor changes of more than ± 15F degrees from
the ambient.
Summer / Cooling Logic
When the pipe temperature is sensed to be 15F degrees below room temperature the
thermostat will control in the cooling mode. The main output will be controlled via cooling
logic, which means a rise in temperature above the thermostat set point will drive a valve
open.
14 © Copyright 2010 Schneider Electric All Rights Reserved. F-27041-3
Page 15

MAINTENANCE
2-3/4
(70)
1
(25)
1-1/8
(28)
3/8
(8)
1/2
(13)
OPENING FOR WIRING
MOUNTING SLOTS (2)
1/8 X 3/8 (4 X 10)
2-1/8
(53)
3-1/4
(84)
4-1/2
(114)
MODE
OFF HI MED LO
FAN
Figure-11 T158 Series.
FIELD REPAIR
DIMENSIONAL DATA
Winter / Heating Logic
When the pipe temperature is sensed to be 15F degrees above room temperature the
thermostat will control in the heating mode. The main output will be controlled via heating
logic. A fall in temperature below the set point will drive a valve open.
The T158 series requires no maintenance. Replace defective units.
Regular maintenance of the total system is recommended to assure sustained, optimum
performance.
None. Replace any damaged or failed components with functional replacements.
F-27041-3 © Copyright 2010 Schneider Electric All Rights Reserved. 15
Page 16

On October 1st, 200 9, TAC became the Buildings business of its pa rent company Schneider Ele ctric. This document reflects the vi sual identity of Schneider El ectric,
however there remains ref erences to TAC as a corporate brand in the body copy. As each document is updated, the bo dy copy will be cha nged to reflect app ropriate
4-3/4
Figure-12 Adapter Plate.
Figure-13 Remote Sensor.
(120)
3/16 (5) DIA.
BLIND HOLE
10 PLACES
1-13/16
(46)
1-13/16 (46)
3-1/4 (83)
4-3/4 (120)
WALL PLATE (BACK VIEW)
1/8 (3) DIA. BLIND HOLE
2 PLACES
3-1/4
(83)
corporate brand changes.
Copyright 2010, Schneider Electric
All brand names, trademarks and registered
trademarks are the property of their respective
owners. Information contained within this
document is subject to change without notice.
F-27041-3
 Loading...