


TABLE OF CONTENTS |
|
INTRODUCTION........................................................................................................................... |
2 |
IMPORTANT SAFETY INSTRUCTIONS...................................................................................... |
3 |
FCC INFORMATION..................................................................................................................... |
5 |
PREPARATION FOR USE ........................................................................................................... |
6 |
MAINTENANCE........................................................................................................................... |
6 |
BATTERY BACK-UP SYSTEM .................................................................................................... |
7 |
LOCATION OF CONTROLS & INDICATORS ............................................................................. |
9 |
REMOTE CONTROL .................................................................................................................. |
11 |
OPERATING INSTRUCTIONS .................................................................................................. |
12 |
CONNECTING EXTERNAL DEVICES....................................................................................... |
12 |
SETTING & BASIC OPERATION............................................................................................... |
13 |
RADIO OPERATION ................................................................................................................. |
16 |
PRESETTING STATIONS IN THE TUNER MEMORY ............................................................... |
18 |
SLEEP TIMER............................................................................................................................ |
20 |
ALARM SETTING ...................................................................................................................... |
21 |
iPod / iPhone OPERATION ........................................................................................................ |
23 |
DOCK ADAPTOR COMPATIBILITY........................................................................................... |
25 |
iPod / iPhone OPERATION CONTROLS ................................................................................... |
26 |
TROUBLESHOOTING GUIDE.................................................................................................... |
28 |
TECHNICAL SPECIFICATION................................................................................................... |
29 |
THE UNIT SUPPORTS THE LISTED iPods / iPhones................................................................ |
30 |
WARRANTY............................................................................................................................... |
31 |
1

INTRODUCTION
Thank-you for choosing SANYO. This digital music system comes with dual docks for playing and charging iPhone/iPod, an AM/FM stereo digital tuner with 40 presets, dual alarm clock function with wake to iPhone/iPod/radio/buzzer, jumbo backlit LCD display with six level dimmer control, two 2.5” speaker drivers, rear passive subwoofer, 10W system power and a full function remote control.
2

IMPORTANT SAFETY INSTRUCTIONS
1.) Read these instructions. Keep these instructions. Follow all instructions. Heed all warnings.
2.) Install this unit in accordance with the manufacturer’s instructions. 3.) Only use attachments / accessories specified by the manufacturer.
4.) Use only with the cart, stand, tripod, bracket, or table specified by the manufacturer, or sold with the unit. When a cart is used, use caution when moving the cart/unit combination to avoid injury from tip-over.
5.) Use replacement parts as specified by the manufacturer.
6.) Do not install this unit near any heat sources such as radiators, heat registers, stoves, or other apparatus (including amplifiers) that produce heat.
7.) The unit shall not be exposed to dripping or splashing water and no object filled with liquids, such as vases, shall be placed on the apparatus.
8.) Do not use this apparatus near water and clean the unit with dry cloth only.
9.) Disconnect the unit from the power source when cleaning.
10.) No naked flame sources, such as lighted candles, should be placed on the unit.
11.) Keep the player clean and never store it next to a heat source or in dirty, humid or wet places. Keep it out of direct sunlight.
12.) Do not block any ventilation openings; the ventilation should not be impeded by covering the ventilation openings with items, such as newspapers, table-cloths, curtains, etc. Give minimum 100 mm distances around the apparatus for sufficient ventilation.
13.) To prevent fire or shock hazard, do not expose this unit to rain or moisture.
14.) Do not subject the product to harsh impacts. Do not drop the appliance. This may result in damage to the product and loss of data.
15.) Care required with the use of this apparatus in tropical and/or moderate climates.
16.) Do not use this apparatus in an extremely dry environment, as this can lead to static discharge which can damage the player.
17.) When the unit experienced a crash due to a strong electromagnetic field or other interference. Please first switch off the mains and disconnect the main unit with the main power supply for a few minutes. Reconnect the unit with the power supply to reset the unit software, the unit will return to normal opeation.
18.) To prevent fire or shock hazard, do not use this plug with an extension cord. receptacle or other outlet unless the blades can be fully inserted to prevent blade exposure.
19.) Unplug this unit during lightning storms or when unused for long periods of time.
20.) Where the MAINS plug is used as the disconnect device, the disconnect device shall remain readily operable.
3

IMPORTANT SAFETY INSTRUCTIONS
21.) Do not destruct the safety purpose of the polarized or grounding-type plug. A polarized plug has two blades with one wider than the other. A grounding type plug has two blades and a third grounding prong. The wide blade or the third prong is provided for your safety. If the provided plug does not fit into your outlet, consult an electrician for replacement of the obsolete outlet.
22.) Protect the power cord from being walked on or pinched particularly at plugs, convenience receptacles, and the point where they exit from the apparatus.
23.) Do not overload wall outlet. Use only power source as indicated.
24.) Upon completion of any service or repairs to this product, ask the service technician to perform safety checks.
25.) Refer all servicing to qualified service personnel. Servicing is required when the unit has been damaged in any way, such as power-supply cord of plug is damaged. Liquid has been spilled of objects have fallen into the unit, the unit has been exposed to rain or moisture, or has been dropped, does not operate normally.
26.) Batteries shall not be exposed to excessive heat such as sunshine, fire or the like. 27.) Attention should be drawn to the environmental aspects or battery disposal.
28.) This product is not intended for commercial use. Household use only.
29.) Do not install this apparatus in confined space, such as a book case or built-in cabinet. Minimum distance(about 100mm) around the apparatus for sufficient ventilation.
30.) To be completely disconnected the power input, the mains plug of apparatus shall be disconnected from the mains.
WARNING:
Handling the cord on this product or cords associated with accessories sold with this product, will expose you to lead, a chemical known to the state of California to cause cancer, and birth defects or other reproductive harm. Wash hands after handling.
Servicing:
•This unit contains no user serviceable parts. Refer to qualified personnel.
•Consult your dealer if you are ever in doubt about the installation, operation or safety of this product.
4

FCC INFORMATION
NOTICE:
This equipment has been tested and found to comply with the limits for a Class B digital device, pursuant to Part 15 of the FCC Rules. These limits are designed to provide reasonable protection against harmful interference in a residential installation. This equipment generates, uses, and can radiate radio frequency energy and, if not installed and used in accordance with the instructions, may cause harmful interference to radio communications. However, there is no guarantee that interference will not occur in a particular installation. If this equipment does cause harmful interference to radio or television reception, which can be determined by turning the equipment off and on, the user is encouraged to try to correct the interference by one or more of the following measures:
•Reorient or relocate the receiving antenna.
•Increase the separation between the equipment and receiver.
•Connect the equipment into an outlet on a circuit different from that to which the receiver is connected.
•Consult the dealer or an experienced radio/TV technician for help.
This device complies with Part 15 of the FCC Rules. Operation is subject to the following two conditions:
(1)This device may not cause harmful interference, and
(2)This device must accept any interference received, including interference that may cause undesired operation.
WARNING:
Changes or modifications not expressly approved by the party responsible for compliance could void the user’s authority to operate the equipment.
5

PREPARATION FOR USE
Unpacking And Set Up
•Remove the main unit, the AC adaptor, the 6 iPod® adaptors, the lithium battery(CR2032) and the external AM Loop Antenna from the carton, and remove all packing material from the main unit. We recommend that you save the carton and packing material in the event that the unit ever needs to be returned for service.
•Remove any descriptive labels or stickers from the top or front panels of the unit but do not remove any labels or stickers from the back or bottom panels.
MAINTENANCE
Cleaning The Unit
•To prevent fire or shock hazard, disconnect your unit from the mains power source when cleaning.
•If the cabinet becomes dusty wipe it with a soft dry cloth. Do not use any wax or polish sprays on the cabinet.
•If the cabinet becomes dirty or smudged with fingerprints, it may be cleaned with a soft cloth slightly dampened with a mild soap and water solution. Never use abrasive cloths or polishes, and these will damage the finish of your unit.
Caution: Never allow any water or other liquids to get inside the unit while cleaning.
6
BATTERY BACK-UP SYSTEM
This system includes a battery back-up circuit that will maintain the time and alarm settings, and the preset tuner memories, in the event of a temporary power interruption. The battery back-up system requires one 3-Volt lithium button cell (Type CR2032 or equivalent). If the back-up battery is not installed, or the battery is exhausted, and the AC power supply is interrupted, the time, alarm, and preset memory stations will be lost. It will be necessary to reset the unit when the power is restored.
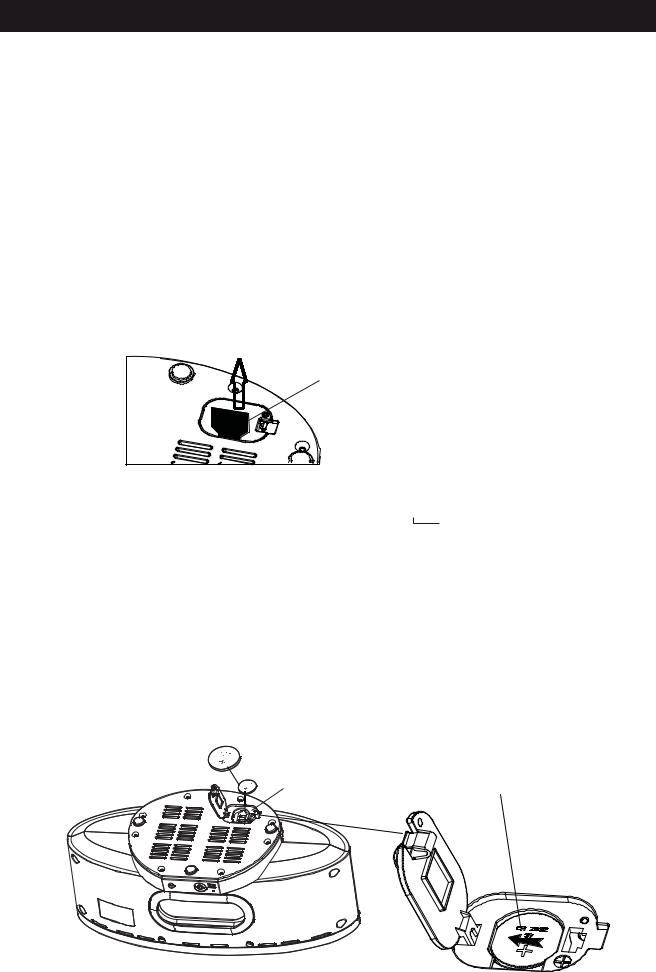
The Battery Back-Up compartment is located on the bottom cabinet.
Activating the Back-Up Battery
The CR2032 lithium battery is already installed in the battery compartment on the bottom, pull out the small mylar insulation tab as shown in the illustration to begin using the unit for maintain the time and alarm settings and the preset tuner memories.
PULL
small mylar insulation tab
Replacing The Back Up Battery
When it’s time to replace the battery the Low Battery lcon (  ) will be shown in the lower left corner of the display. Insert a fresh CR2032 battery following the below procedure, however leave the unit connected to the AC adaptor while replacing the battery to avoid losing all of your settings.
1.Turn the unit upside down on a soft surface such as a cloth or towel to avoid scratching the top cabinet surface.
2.Open the battery compartment cover and remove the old battery as shown in the illustration.
3.Insert a fresh, well-known brand of CR2032 lithium battery into the compartment with the “+” side facing up. Close the battery compartment cover.
4.Turn the unit right side up.
Insert battery
Battery
Compartment
Remove the battery
slide the battery to right side as below illustration and then release.
7
BATTERY BACK-UP SYSTEM
Battery Precautions
Follow these precautions when using a battery in this device.
1.Warning -Danger of explosion if battery is incorrectly replaced. Replace only with the same or equivalent type.
2.Use only the size and type of battery specified.
3.Be sure to follow the correct polarity when installing the battery as indicated in the Battery Compartment. A reversed battery may cause damage to the device.
4.If the device is not to be used for a long period of time, remove the battery to prevent damage or injury from possible battery leakage.
5.Do not try to recharge a battery not intended to be recharged; it can overheat and rupture. (Follow battery manufacturer’s directions.)
6.Battery shall not be exposed to excessive heat such as sunshine, fire or the like.
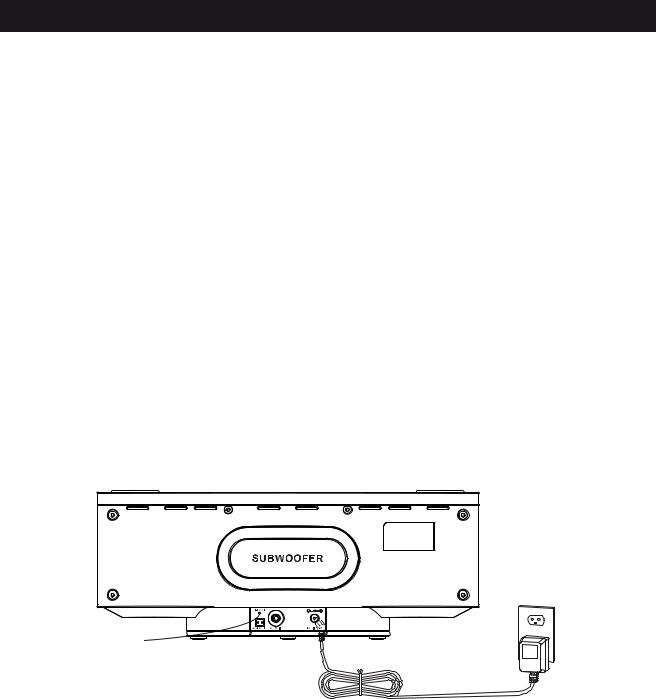
Using The AC Adaptor
Connect the small female plug of the AC adaptor to the DC In Jack on the back panel. Connect the housing of the AC adaptor to the 120V AC outlet.
NOTES:
•The housing of the AC adaptor may become warm during operation. This is normal.
•To reduce the risk of electric shock never connect or disconnect the AC adaptor while your hands are wet.
•Please use original AC adaptor supplied with the unit, otherwise, will damage the unit.
8
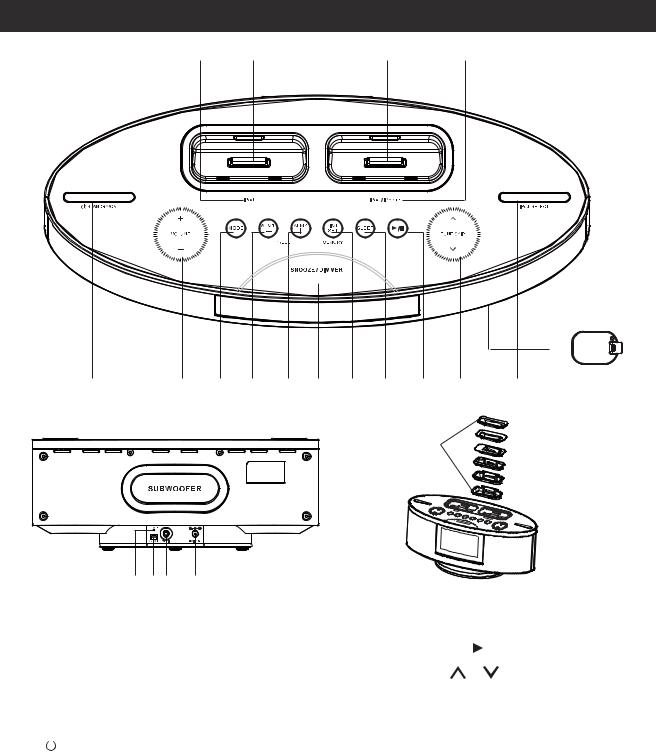
LOCATION OF CONTROLS & INDICATORS
1 |
2 |
3 |
4 |
 16
16
21
5 |
6 |
7 |
8 |
9 |
10 |
11 |
12 |
13 |
14 |
15 |
22
17 18 19 |
20 |
1 |
. iPod Indicator |
13. |
PLAY/PAUSE |
/ |
|
|
|
Control |
||
|
|
|||||||||
|
|
|||||||||
2 |
. Universal Dock for iPod |
14. TUNE/SKIP |
/ |
|
|
|
Control |
|||
3 |
. Universal Dock for iPod/iPhone |
15. iPod SELECT Button |
||||||||
4 |
. iPod/iPhone Indicator |
16. |
Remote Sensor |
|
|
|
|
|||
5 |
. |
|
STANDYBY/ON Button |
17. FM ANTENNA |
|
|
|
|
|
|
|
|
|
|
|
|
|||||
|
|
|
|
|
|
|||||
6 |
. VOLUME + / - Control |
18. AM ANTENNA Socket |
||||||||
7 |
. MODE Control |
19. AUX IN Jack |
|
|
|
|
|
|||
8 |
. ALM 1 / PRESET - Control |
20. |
DC IN Jack |
|
|
|
|
|
||
9 |
. ALM 2 / PRESET + Control |
21. |
Back-Up Battery Compartment |
|||||||
10. |
SNOOZE/DIMMER Control |
|
(On Bottom Cabinet) |
|||||||
11. TIME SET / MEMORY Control |
22. iPod Holders (6 inserts) |
|||||||||
12. |
SLEEP Control |
|
|
|
|
|
|
|
||
9
|
LOCATION OF CONTROLS & INDICATORS |
||
LCD DISPLAY |
|
|
|
Wake To Indicator; |
|
||
iPod,Radio,Buzzer. |
AUX/Radio Frequency/ Volume Level/ |
||
Alarm 1 / 2 |
Left iPod Indicator |
||
‘On’ Indicators |
EQ/ DBBS Indicator |
||
FM/AM Indicator |
|||
|
Right iPod Indicator |
||
|
|
||
Daylight |
|
|
|
Savings Time |
|
STEREO |
|
|
|
||
|
|
Indicator |
|
SLEEP,
SNOOZE
TIME AM / PM 

 Indicator
Indicator
Low Battery Indicator |
Time/Alarm Display |
10
 Loading...