


 Loading...
Samsung UN75RU8000FXZA, QN82Q80RAFXZA, QN75Q60RAFXZA, UN49RU8000FXZA, UN65RU7100FXZA User Manual
...E-MANUAL
Thank you for purchasing this Samsung product. To receive more complete service, please register your product at
www.samsung.com
Model__________________ Serial No.__________________
To directly go to the page that provides instructions on how to use the manual for visually impaired users, select the Learn the Menu Screen link below.
“Learn the Menu Screen” Link
Contents
Quick Guides
Connecting the Samsung Smart Remote to the TV
Using Smart Hub
Using the Ambient Mode
10 Entering Ambient Mode
10 Ambient Mode browser screen
13 Applying effects to the content
13 View detailed information about the content
13 Entering the TV viewing screen from Ambient Mode
Using Bixby
14 Starting Bixby with voice
14Starting Bixby using buttons on the Samsung Smart Remote
15Learning about the Explore Bixby Screen
16Read Before Using Bixby
17Provisions for using Bixby
Updating the TV’s Software
18 Updating through the Internet
18 Updating through a USB device
18 Updating the TV automatically
Getting Support
19 Getting support through Remote Management
19 Finding the contact information for service
19 Requesting service
Connections
Connection Guide
Connecting an Antenna
Connecting to the Internet
21Establishing a wired Internet connection
22Establishing a wireless Internet connection
23Checking the Internet connection status
23Resetting Your Network
23Turning on the TV with a mobile device
23Connecting an IP control device to the TV
23Changing the name of the TV on a network
Connection Cables for External Devices
Switching between external devices connected to the TV
26Editing the name and icon of an external device
27Using additional functions
Connection Notes
28Connection notes for HDMI
29Connection notes for audio devices
29Connection notes for computers
30Connection notes for mobile devices
Remote Control and Peripherals
About the Samsung Smart Remote (QLED TV and The Serif) About the Samsung Smart Remote (UHD TV)
About the Samsung Smart Remote (The Frame) Connecting to the Samsung Smart Remote
Controlling External Devices with a Samsung Remote Control - Using the Universal Remote
Using Anynet+ (HDMI-CEC)
42Connecting an external device through Anynet+ and using their menus
42 Read before connecting an Anynet+ (HDMI-CEC) device
Controlling the TV with a Keyboard, Mouse, or Gamepad
43 Connecting a USB keyboard, mouse, or gamepad
43Connecting a Bluetooth keyboard, mouse, or gamepad
44Using the keyboard and mouse
45Setting up the input devices
Entering Text using the On-Screen Virtual Keyboard
46Entering Text using the remote control's microphone and the on-screen virtual keyboard
Smart Features
Using Smart Hub
48 Displaying the Home Screen
53 Launching Smart Hub automatically
53 Launching the last used app automatically
53 Testing Smart Hub connections
53 Resetting Smart Hub
Using a Samsung account
54Signing in to a Samsung account
54Creating a new account
54Creating a Samsung account using a PayPal account
55Managing your Samsung account
Using the Ambient Mode
56 Entering Ambient Mode
56 Ambient Mode browser screen
59 Applying effects to the content
59 View detailed information about the content
59 Entering the TV viewing screen from Ambient Mode
Using the Remote Access
Using the APPS Service
62Installing an app
62Launching an app
63Managing installed apps
Using the Gallery App
Using the Universal Guide App
Using the SmartThings App
Using the e-Manual
68Launching the e-Manual
69Using the buttons in the e-Manual
Using the Internet
Playing pictures/video/music
72Playing multimedia content on a PC or mobile device
72Playing multimedia content on a USB device
73Listening to your mobile device sound through the TV speaker using Sound Mirroring
73Buttons and functions available while playing multimedia content
Using Bixby
77 Starting Bixby with voice
77Starting Bixby using buttons on the Samsung Smart Remote
78Learning about the Explore Bixby Screen
79Read Before Using Bixby
80Provisions for using Bixby
TV Viewing
Using the Guide
Recording Programs
84Using the instant and schedule recording options from the Guide screen
84Using the instant and schedule recording options while watching a program
85Scheduling a video recording after entering the date and time
85Managing the schedule recording list
85Viewing recorded programs
86Setting up a schedule recording start
Setting Up a Schedule Viewing
86 Using the schedule viewing options from the guide screen
86Using the schedule viewing options while watching a program
87Using schedule viewing to view programs at a specified time on a specified date
87 Setting the schedule Viewing Time
Using Timeshift
Buttons and functions available while recording a program or Timeshift
Using the Channel List
Editing channels
Using a Personal Favorites List
92 Viewing and selecting channels on favorites list only
92 Create a favorites list
TV-Viewing Support Functions
93Changing the broadcast signal
93Scanning for available channels
93Using Program Rating Lock
94Configuring advanced broadcasting audio settings
94Checking digital channel signal info and strength
Picture and Sound
Using the Intelligent Mode
Adjusting the Picture Quality
96Choosing a picture mode
97Configuring advanced picture settings
Setting the Viewing Environment for External Devices
98Playing games on an optimized screen
98Setting the Game Mode details
99Using Input Signal Plus
99 Using HDMI black level
Changing the Picture Size and Position
100 Changing the picture size
100 Fitting the picture to the screen
100 Adjusting the picture size and/or position
Configuring a Sound Mode and Expert Settings
101 Choosing a sound mode
101 Configuring advanced sound settings
Using the Sound Support Functions
102 Selecting speakers
102Listening to the TV through Bluetooth devices
103Listening to the TV through a Samsung audio device that supports the Wi-Fi function
System and Support
Using the Time Functions and the Timers
104Setting the clock automatically
105Adjusting the clock for DST and time zone
105Changing the current time
106Setting the clock manually
106 Using the sleep timer
106 Turning off the TV using the off timer
Using the Auto Protection Time and Energy Saving Functions
107 Setting the Auto Protection Time
107 Reducing the energy consumption of the TV
Updating the TV’s Software
108 Updating through the Internet
108 Updating through a USB device
108 Updating the TV automatically
Protecting the TV from Hacking and Malicious Code
109 Scanning the TV and connected storage for malicious code
Audio and Video Functions for the Visually or Hearing Impaired
110Running the accessibility functions
110Running Accessibility Shortcuts
110Enabling voice guides for the visually impaired
111Changing the volume, speed, and pitch of the Voice Guide
111Enabling audio for the video description function
111White text on black background (high contrast)
111Setting the screen to black and white
112Inverting the screen color
112 Enlarging the font (for the visually impaired)
112Learning about the remote control (for the visually impaired)
112Learning about the TV menu
113Showing captions
113 Selecting the caption language
113Setting the digital caption related options
114Listening to the TV through Bluetooth devices (for the hearing impaired)
114 Enlarging the sign language screen for the hearing impaired 114 Configuring the repeat settings for remote control buttons
Using Other Functions
115Changing the menu language
115Setting up a password
115Selecting Usage or Retail Mode
116Managing External Devices
116Using AirPlay
116Restoring the TV to the factory settings
Troubleshooting
Picture Issues
117 Testing the picture
Sound and Noise Issues
120 Testing the sound
Channel and Broadcast Issues
External Device Connectivity Issues
Network Issues
Anynet+ (HDMI-CEC) Issues
Remote Control Issues
Recording Issues
Apps
Media Files
Voice Recognition Issues
Other issues
Diagnosing TV operational issues
Getting Support
129 Getting support through Remote Management
129 Finding the contact information for service
129 Requesting service
Precautions and Notes
Before Using the Recording and Timeshift Functions
130Before using the recording and schedule recording functions
131Before using the timeshift function
Read Before Using APPS
Read Before Using the Internet Function
134 Read before setting up a wireless Internet connection
Read Before Playing Photo, Video, or Music Files
135Limitations to the use of photo, video, and music files
136Supported subtitles
137Supported image formats and resolutions
137Supported music formats and codecs
138Supported video codecs (RU8 series or higher, QLED TV, The Serif, The Frame)
139Supported video codecs (Q50R model, RU7 series or lower)
141Supported video codecs (Q900RB model)
Read After Installing the TV
143 Picture sizes and input signals
143 Installing an anti-theft lock
Supported Resolutions for UHD Input Signals
144 If Input Signal Plus is set to Off
144 If Input Signal Plus is set to On
Resolutions for Input Signals supported by Q900RB model
145 If Input Signal Plus is set to On
Supported Resolutions for FreeSync
Read Before Connecting a Computer (Supported Resolutions)
147IBM
147MAC
148VESA DMT
149VESA CVT
149CTA-861
Supported Resolutions for Video Signals
150CTA-861
151VESA CVT
Read Before Using Bluetooth Devices
152 Restrictions on using Bluetooth
Blocking programs based on their TV Rating
154 Blocking movies based on their Movie Rating (MPAA)
154Blocking programs based on their Canadian English Rating
155Blocking programs based on their Canadian French Rating
155Blocking Programs based on their Downloadable U.S. Rating
Licenses
Accessibility Guidance
Learn the Menu Screen
Using the Remote control
157 Orientation of the Samsung Smart Remote
157 Description of the Samsung Smart Remote
Using the accessibility menu
159 Running the Accessibility Shortcuts menu
159Running the Accessibility menu functions using the General menu
160Running the Accessibility menu functions using Bixby
161Learning about the Accessibility menu functions
Using the TV with Voice Guide on
163 Changing channel
163Using on-screen number entry via the Samsung Smart Remote
164Changing volume
164 Using program information
Using the guide
166 To view a program on now
166 Other options in the guide
Using Schedule Viewing
168 Setting up a schedule viewing
168 Cancelling a scheduled viewing
Using the Channel List
Recording
170Using the instant and schedule recording options from the guide screen:
171Recording the program you are watching
171Scheduling recording from the program info window
171Changing the recording time
172Viewing recorded programs
172 Deleting a recorded program
Using Smart Hub
173Smart Hub
174Using the Smart Hub Home Screen
Launching the e-Manual
Using Bixby
177 Running Bixby

Quick Guides
You can learn quickly how to run and use the frequently used functions, such as Bixby, Ambient Mode, and Smart Hub.
Connecting the Samsung Smart Remote to the TV
Connect the Samsung Smart Remote to your TV to operate the TV.
When you turn on the TV for the first time, the Samsung Smart Remote pairs to the TV automatically. If the Samsung Smart Remote does not pair to the TV automatically, point it at the front of the TV, and then press and hold the  and
and  buttons simultaneously for 3 seconds or more.
"" The images, buttons, and functions of the Samsung Smart Remote may differ with the model or geographical area.
"" For more information about the Samsung Smart Remote that comes with the QLED TV (except for Q50R model) and The Serif, refer to "About the Samsung Smart Remote (QLED TV and The Serif)."
"" For more information about the Samsung Smart Remote that comes with the UHD TV, refer to "About the Samsung Smart Remote (UHD TV)."
"" For more information about the Samsung Smart Remote that comes with The Frame, refer to "About the Samsung Smart Remote (The Frame)."
"" The Samsung Smart Remote may not be supported depending on the model or geographical area.
- 7 -

Using Smart Hub
Connect to Smart Hub for apps, games, movies, and more.
Enjoy the multiple functions provided by Smart Hub simultaneously on a single screen.
Sources
TV |
HDMI 1 |
HDMI 2 |
USB |
Remote |
Connection |
Universal |
|
Access |
Guide |
Remote |
|||||
|
|
|
|
||||
|
Source |
|
|
|
|
|
"" The image on your TV may differ from the image above depending on the model and geographical area.
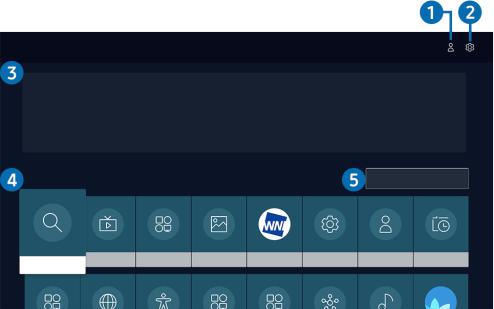
When you press the  button on your remote control, you can use the following functions and features.
1  Notification
You can view a list of notifications for all events that occur on your TV. A notification appears on the screen when it is time to broadcast a scheduled program or when an event occurs on a registered device.
"" For more information, refer to "Displaying the Home Screen."
2  Settings
When the focus is moved to Settings, a list of quick settings icons appears above the top of the menu. You can quickly set frequently used functions by clicking the icons.
3  Source
You can select an external device connected to the TV.
"" For more information, refer to "Switching between external devices connected to the TV."
- 8 -

4  Search
You can search for channels, programs, movie titles, and apps from Smart Hub.
"" To use this feature, the TV must be connected to the Internet.
5  APPS
APPS
You can enjoy a wide range of content including news, sports, weather, and games by installing the corresponding apps on your TV.
"" To use this feature, the TV must be connected to the Internet.
"" For more information, refer to "Using the APPS Service."
6  Ambient Mode
You can enhance your living space with decorative content that matches the surroundings or view essential realtime information such as weather, time, and news on the TV screen when you are not watching TV.
To enter Ambient Mode, press the  button. To return to the TV mode, press the
  button. To shut off the TV, press the
  button.
If you press the  button when the TV is turned off, the TV turns on in Ambient Mode.
"" If you use a remote control other than the Samsung Smart Remote, there may be restrictions to entering Ambient Mode.
"" Because this function is specific to QLED TV (except for Q50R model) and The Serif, it may not be supported depending on the model.
"" For more information about the Ambient Mode, refer to "Using the Ambient Mode."
7 Universal Guide
Universal Guide is an app that allows you to search for and enjoy various content such as TV shows, dramas, and movies in one place. Universal Guide can recommend content tailored to your preferences.
"" For more information about Universal Guide, refer to "Using the Universal Guide App."
"" Images may look blurry depending on the service provider's circumstances.
"" This function may not be supported depending on the model or geographical area.
 Art
Art
When you are not watching TV or when the TV is turned off, you can use the Art mode function to edit image content such as artworks or photos or to display the content.
"" This function is supported only in The Frame.
"" For more information, refer to the provided user manual.
- 9 -
Using the Ambient Mode
Learn about the functions available in Ambient Mode that are specific to the QLED TV (except for Q50R model) and The Serif.

 Ambient Mode
You can enhance your living space with decorative content that matches the surroundings or view essential realtime information such as weather, time, and news on the TV screen when you are not watching TV.
"" Because this function is specific to QLED TV (except for Q50R model) and The Serif, it may not be supported depending on the model.
Entering Ambient Mode
To enter Ambient Mode from the TV viewing screen, press |
button, or select |
|
Ambient Mode. |
|
|
||||
If you press |
button when the TV is turned off, the TV turns on in Ambient Mode. |
|
|
|
"" If you use a remote control other than the Samsung Smart Remote, there may be restrictions to entering Ambient Mode.
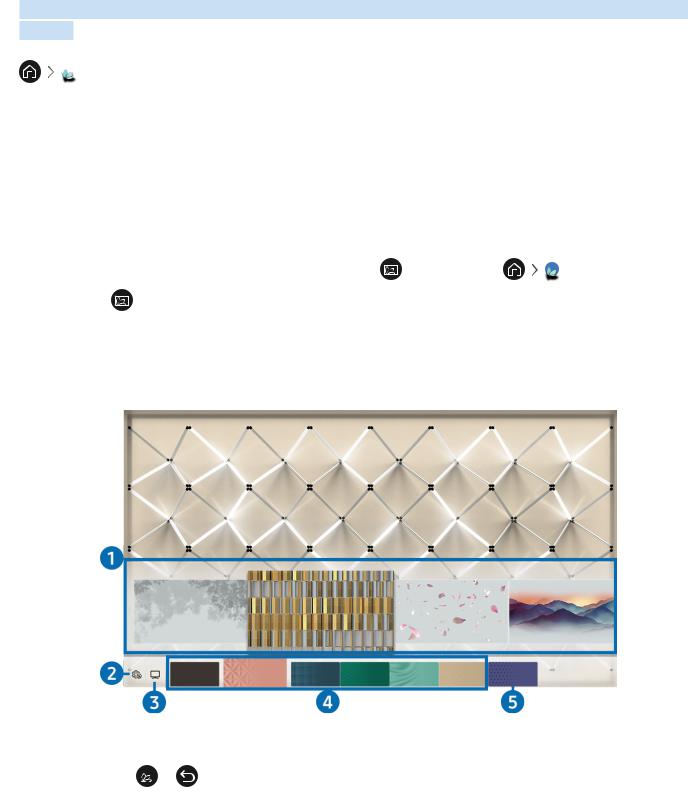
Ambient Mode browser screen
Featured
Special Edition |
Décor |
My Album |
Info |
Artwork |
Background |
About Ambient |
|
Theme |
Mode |
||||||
|
|
|
|
|
"" The image on your TV may differ from the image above depending on the model and geographical area.
When you press  button in Ambient Mode, the Ambient Mode browser screen appears at the bottom of the screen. In the Ambient Mode browser screen, you can select content and change the Ambient Mode settings.
- 10 -
1 Function and content preview
When you select a category at the bottom of the screen, a preview of available functions and content appears here. To view detailed information about a content item, move the focus to it, and then press the up directional button.
2  Ambient Settings
You can configure the following Ambient Mode settings:
●● Auto Brightness
Changes the auto brightness setting for Ambient Mode.
"" When this function is set to Off, the brightness level of the TV screen is not automatically adjusted in response to the surrounding light level.
●● Sleep After
Sets the time when the Ambient Mode screen turns off automatically.
"" If there is no remote control input for the set time, the screen goes off. To turn the screen back on in Ambient Mode, press the  button on the remote control.
●● Reset All Photos
Resets the photos imported from your mobile device or Samsung Cloud.
3  TV
TV
You can enter the TV viewing screen.
- 11 -
4 Selecting a content category
You can select your preferred content and background for the Ambient Mode screen.
"" Available content categories may differ depending on the model or geographical area.
●● Special Edition
Allows you to enjoy creative artwork and interior design content created by the world's finest artists and designers.
●● Décor
Allows you to select content with a sensible and beautiful design.
●● My Album
Allows you to set a photo stored in your mobile device or Samsung Cloud as the wallpaper of the Ambient Mode screen.
"" To import photos from your mobile device or Samsung Cloud, use the SmartThings app on your mobile device.
"" For more information about how to configure the photo settings, select View Help. This function is available after you select a photo in the My Album category.
●● Info
Allows you to select essential real-time information such as weather, temperature, time, and news.
"" This function may not be supported depending on the geographical area.
●● Artwork
Allows you to select content such as world famous photos and artwork.
●● Background Theme
Allows you to select a background theme provided by Samsung.
"" Take a picture of a wall using the SmartThings app on your mobile device to create a custom background theme. When you use this function, there may be a delay in image transmission and optimization depending on network conditions.
"" You can set a background theme you created as a background of a content item. To set a background theme as the background of a content item, press the down directional button while watching the Ambient Mode screen.
5 About Ambient Mode
You can view information about Ambient Mode.
- 12 -
Applying effects to the content
When you are enjoying content in Ambient Mode, press the down directional button to change the following settings for the content:
"" Available functions may not be supported depending on the content.
●● Backgrounds
Changes the background of the content.
"" This function may not be supported depending on the content.
"" You can use the SmartThings app on your mobile device to take a picture of a wall and create a custom background. For more information, select the How-To icon. This function may be a delay in image transmission and optimization depending on network conditions.
●● Shadow Effects
Applies a shadow effect that you select to the content.
"" This function may not be supported depending on the content.
●● Brightness
Adjusts the brightness of the content.
●● Saturation
Adjusts the saturation of the content.
●● Color Tone
Adjusts the colors of the content.
●● Red Tone / Green Tone / Blue Tone
Adjusts the red, green, blue contrast.
View detailed information about the content
When you are enjoying content in Ambient Mode, press the up directional button to view detailed information about the content.
Entering the TV viewing screen from Ambient Mode
To enter the TV viewing screen from Ambient Mode, press the  button, or select
  TV in the Ambient Mode browser screen.
"" If you press the  button when the TV is turned off, the TV viewing screen appears.
- 13 -
Using Bixby
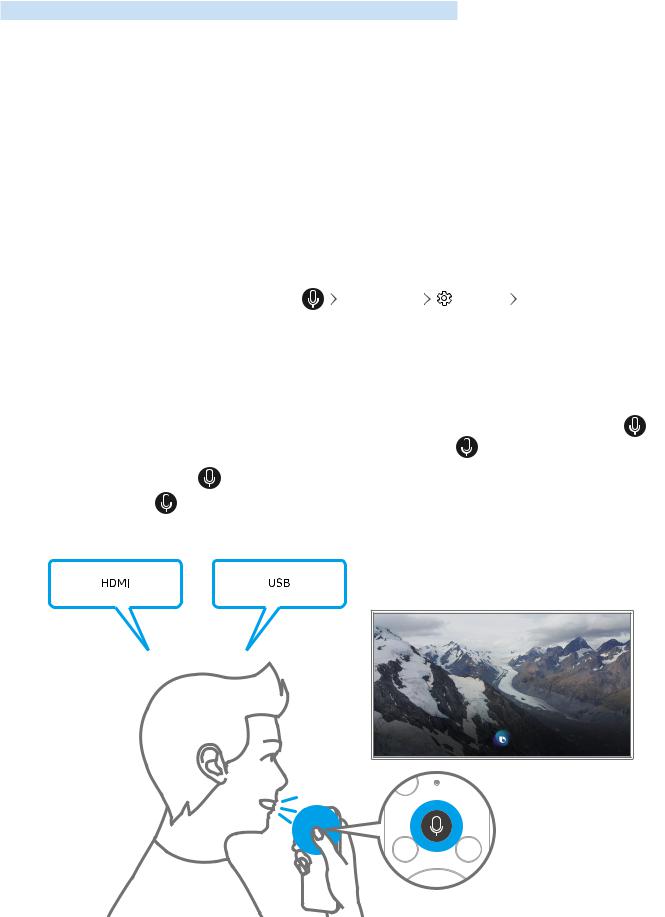
Speak into the microphone on your Samsung Smart Remote to control your TV.
"" Bixby is available only when the TV is connected to the Internet.
"" To use Bixby, you must register and sign in to your Samsung account. Some functions may not be supported if you are not signed in to your Samsung account.
"" Bixby only supports some languages, and the supported functions may differ depending on the geographical area.
"" Bixby may not be supported depending on the model or geographical area.
Starting Bixby with voice
You can immediately start a conversation with Bixby by saying "Hi, Bixby." Say "Hi, Bixby," and the Bixby icon at the
bottom of the TV screen is activated in Listen mode. |
|
speaking. |
Bixby does |
respond to your voice, turn |
on the Voice Wake-up function, and then try again |
|
Explore |
Settings |
Voice Wake-up) |
|
"" This function may not be supported depending on the model.
Starting Bixby using buttons on the Samsung Smart Remote
You can also have a conversation with Bixby using the Samsung Smart Remote |
. Press and hold |
|
button on your Samsung Smart Remote, say a command, and then release |
button. |
|
To view the Bixby guide, |
button once: |
|
●● When you press |
button, the Explore Now button appears at the bottom of the screen. Press the Select |
|
button to go to the Explore Bixby screen.
- 14 -
Learning about the Explore Bixby Screen
Explore Bixby
You can say something like:
“Show me previous channel”
All Services |
View Tutorial |
"" The image on your TV may differ from the image above depending on the model and geographical area.
1  My Profile
Go to the My Profile screen to create a new account or register a voice ID. Sign in to your account with your voice, that is, your registered voice ID.
"" If you are signed out of your Samsung account, select  My Profile to sign in.
2  Settings
You can change the settings for using Bixby.
"" These functions may not be supported depending on the model or geographical area.
●● Language
You can change Bixby's language.
"" The languages of the TV and other apps will not change.
"" Bixby only supports some languages.
- 15 -
●● Voice response
You can change or turn off Bixby's voice.
"" This function may not be supported depending on the language selected for Bixby.
●● Voice Wake-up
You can configure this function to make Bixby respond to your voice.
"" This function may not be supported depending on the model or geographical area.
●● Privacy
You can permit or prohibit Bixby from utilizing your personal information when you are using Bixby services.
3 Recommended commands
Displays recommended commands you can use to control the TV with Bixby given the current context.
4 All Services
You can learn the voice commands that let you use Bixby in various situations. Use the directional buttons to move to the desired command, and then press the Select button. You can operate the TV with various voice commands.
5 View Tutorial
The popup window on using Bixby appears.
Read Before Using Bixby
●● The supported voice interaction languages and features may differ depending on the geographical area.
●● If the language set differs from the language of your country, some features are not available.
●● Bixby is available only when the TV is connected to the Internet.
●● Even if the TV is connected to the Internet, there may be no response due to a Bixby server error.
- 16 -

●● The existing functional specifications may be changed if Bixby is updated.
●● Bixby is available only on TVs that support it and come with remote controls that have a microphone.
●● Symbols including "-" and special characters are not supported. Consequently, if a word or sentence contains numeric values or symbols, the function may not operate properly.
●● Searched results may not provide complete results.
●● You may be required to pay for some apps. Consequently, you may encounter a service application or contract.
●● To change the current channel by saying channel names as voice commands, you must finish Set Service Provider. If Set Up Your Service Provider is not completed, you can complete it using Reset Settings General Reset). Try Now
●● To use the voice text input function and the search function, you must consent to provisions allowing third parties to collect and use your voice data.
●● To use the Bixby function, you must:
–– Agree to Smart Hub's Terms of Use
–– Agree to a guidance regarding the collection and use of personal information for the Smart Hub service.
–– Consent to the collection and use of personal information for the voice interaction-based service.
Provisions for using Bixby
●● The voice interaction rate differs with the volume/tone, pronunciation, and ambient sound environment (TV sound and ambient noise).
●● The optimal volume for voice commands is between 75 dB and 80 dB.
- 17 -

Updating the TV’s Software
View your TV's software version and update it if necessary.
[[ DO NOT turn off the TV’s power until the update is complete. The TV will turn off and on automatically after completing the software update. Video and audio settings will be reset to their defaults after a software update.
 Settings Support Software Update Try Now
Updating through the Internet
Settings Support Software Update Update Now Try Now
"" Updating from the Internet requires an active Internet connection.
Updating through a USB device
Settings Support Software Update Update Now
After downloading the update file from the Samsung website and storing it on a USB device, connect the USB device to the TV to update.
"" To update using a USB device, download the update package from Samsung.com to your computer. Then, save the update package in the USB device's top-level folder. Otherwise, the TV will not be able to locate the update package.
Updating the TV automatically
Settings Support Software Update Auto Update Try Now
If the TV is connected to the Internet, you can have the TV's software update itself automatically while you are watching the TV. When the background update is completed, it is applied the next time the TV is turned on.
If you agree to the Smart Hub terms and conditions, Auto Update is set to On automatically. If you want this function disabled, use the Select button to turn it off.
"" This function may take a longer time if another network function is running concurrently.
"" This function requires an Internet connection.
- 18 -

Getting Support
Get help directly from Samsung if you have a problem with your TV.
Getting support through Remote Management
Settings Support Remote Management Try Now
After consenting to our service agreement, you can use Remote Management to access Remote Support and have a Samsung service technician diagnose your TV, correct problems, and update your TV's software remotely via the web. You can also turn Remote Management on and off.
"" You can also start this function by pressing and holding |
button for 5 or more seconds. |
"" This function requires an Internet connection.
Finding the contact information for service
Settings Support About This TV Try Now
You can view the address of the Samsung website, the call center phone number, your TV's model number, your TV's software version, Open Source License and other information you may need to get service support from a Samsung call agent or the Samsung website.
"" You can also view information by scanning the QR code of your TV.
"" You can also start this function by pressing and holding |
button for 5 or more seconds. For the standard remote |
|
control, press and hold the |
(Play) button for 5 or more seconds. Continue holding the button until the customer |
|
information pop-up window appears. |
|
|
Requesting service
Settings Support Request Support Try Now
You can request service when you encounter a problem with the TV. Select the item matching the problem that you encountered, enter the required item, move the focus to Next, and then press the Select button. Select Request Now
Send or Schedule Appointment Request Send. Your service request will be registered. The Samsung Contact Center will contact you to set up or confirm your service appointment.
"" You must agree to the terms and conditions for the service request.
"" This function may not be supported depending on the geographical area.
"" This function requires an Internet connection.
- 19 -

Connections
You can watch live broadcasts by connecting an antenna and antenna cable to your TV and can get access to the Internet by using a LAN cable or wireless access point. Using various connectors, you can also connect external devices.
Connection Guide
You can view detailed information about external devices that can be connected to the TV.
Source Connection Guide Try Now
It shows you how to connect various external devices such as video devices, game consoles, and PCs using pictures. If you select the connection method and an external device, the connection details appear.
|
Connection Guide |
Video Device |
HDMI |
Game Console |
HDMI Troubleshooting |
Audio Device |
|
PC |
|
Smartphone |
|
External Storage |
|
Input Device |
|
"" The image on your TV may differ from the image above depending on the model and geographical area.
Connecting an Antenna
You can connect an antenna cable to your TV.
"" An antenna connection is not necessary if you connect a cable box or satellite box.
ANT IN
- 20 -
Connecting to the Internet
You can get access to the Internet through your TV.


 Settings
  General
  Network
  Open Network Settings Try Now
Configure network settings to connect to an available network.
Establishing a wired Internet connection


 Settings
  General
  Network
  Open Network Settings
  Wired
Wired
If you connect a LAN cable, the TV automatically accesses the Internet.
LAN
"" If the TV does not automatically connect to the network, refer to "Network Issues" in "Troubleshooting."
"" Use a CAT 7 (*STP type) cable for the connection. * Shielded Twisted Pair
"" The TV will not be able to connect to the Internet if your network speed is below 10 Mbps.
"" This function may not be supported depending on the model.
- 21 -

Establishing a wireless Internet connection


 Settings
  General
  Network
  Open Network Settings
  Wireless
Make sure that you have the wireless access point's SSID (name) and password settings before attempting to connect. The network name (SSID) and security key are available on the wireless access point's configuration screen. See the wireless access point's user manual for more information.
"" The Wireless may not appear depending on the model.
Wireless Connection
Select your wireless network.
Refresh |
Manage Saved Networks |
"" The image on your TV may differ from the image above depending on the model and geographical area.
"" If no wireless access point is found, select Add Network at the bottom of the list and enter the network name (SSID).
"" If your wireless access point has a WPS or PBC button, select Use WPS at the bottom of the list, and then push the WPS or PBC button on your access point within 2 minutes. The TV will connect automatically.
"" To view or delete previously connected network names (SSIDs), move the focus to Manage Saved Networks, and then press the Select button.
- 22 -
Checking the Internet connection status
Settings General Network Network Status Try Now
View the current network and Internet status.
Resetting Your Network
Settings General Network Reset Network Try Now
Restore the network settings to the factory default.
Turning on the TV with a mobile device
Settings General Network Expert Settings Power On with Mobile
You can turn on the TV using a mobile device connected to the same network as the TV.
"" This function is available with a mobile device connected to the TV through the SmartThings app or the AirPlay function.
Connecting an IP control device to the TV
Settings General Network Expert Settings IP Remote
You can connect an IP control device to the TV remotely to manage your IP device.
""
""
""
Changing the name of the TV on a network
Settings General System Manager Device Name Try Now
You can change the name of the TV on the network. Select User Input at the bottom of the list and change the name.
- 23 -

Connection Cables for External Devices
You can view detailed information about the connection cables for external devices that can be connected to the TV.
Cable name |
Image |
Description |
|
|
|
|
|
Each cable simultaneously transmits digital video and audio signals |
|
|
from an external device to the HDMI port on the TV. |
HDMI |
|
Cables are divided into various types according to the types of input/ |
to |
|
output ports on external devices. |
HDMI |
|
|
HDMI to
MINI HDMI
HDMI to
Micro HDMI
HDMI to
USB Type-C
HDMI to DisplayPort
Mini DisplayPort to
HDMI
- 24 -
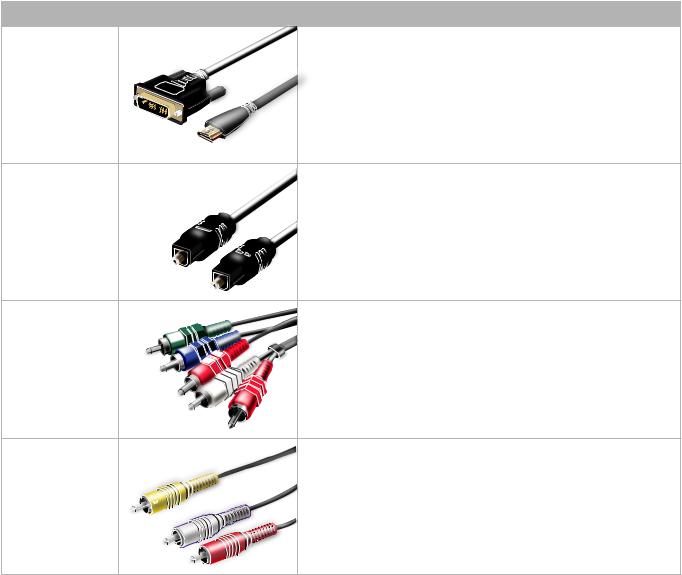
Cable name |
Image |
Description |
|
|
|
DVI to HDMI
Optical
Component
Composite
DVI to HDMI cables can transmit only digital video signals and not audio signals. We recommend that you use HDMI to HDMI cables.
Optical cables are used to transmit audio signals to external speakers with low signal loss.
Optical cables do not transmit video signals.
Component cables transmit analog signals.
The video signal is separated and transmitted to the red, green, and blue terminals to provide HD (1080i) pictures. The audio signal is transmitted to the red and white terminals.
Composite cables transmit analog signals.
The video signal is transmitted to the yellow terminal, and the audio signal is transmitted to the red and white terminals.
"" Available connection cables may differ depending on the model or geographical area.
- 25 -

Switching between external devices connected to the TV
You can switch between TV programs and the content of external devices.


 Source
When you select a connected external device on the Source screen, the output of the selected device is displayed on the TV's screen.
"" On the standard remote control, press the SOURCE button.
"" To control a device (Blu-ray player, game console, etc.) that supports universal remote control with the TV's remote control, connect the device to an HDMI port on the TV, and then turn on the device. The output displayed on the TV is automatically switched to the output of the device or you can configure universal remote control for the device automatically. For more information, refer to "Controlling External Devices with a Samsung Remote Control - Using the Universal Remote."
"" When a USB device is connected to the USB port, a pop-up message appears that lets you switch easily to the media content listed on the device.
"" This function may not be supported depending on the device and geographical area.
Editing the name and icon of an external device


 Source
You can change the port name for a connected external device or add it to the Home Screen.
Universal Remote
Edit
Information
Add to Home
Sources
Source
"" The image on your TV may differ from the image above depending on the model and geographical area.
1.Move the focus to a connected external device.
2.Press the up directional button. The following functions become available.
"" Available functions may differ depending on the port type.
- 26 -
1 Universal Remote
You can control external devices connected to the TV using a Samsung remote control. To control external devices, register them by following the instructions on the screen.
"" This function may not be supported depending on the model or geographical area.
"" For more information, refer to "Controlling External Devices with a Samsung Remote Control - Using the Universal Remote."
2 Edit
You can rename the input ports and change the device icons.
3 Information
You can view detailed information about an external device.
4 Add to Home
You can add the port of an external device to the Home Screen for quick switching.
Using additional functions
You can use the following features on the Source screen.
●● Remote Access
Use the TV to access your PC via remote PC or Screen Sharing (Wireless).
"" For more information, refer to "Using the Remote Access."
●● Connection Guide
Displays device connection instructions.
●● Universal Remote
Lets you register external devices to your Samsung remote control and control them using the Remote.
"" This function may not be supported depending on the model or geographical area.
"" For more information, refer to "Controlling External Devices with a Samsung Remote Control - Using the Universal Remote."
- 27 -

Connection Notes
When connecting an external device, note the following.
"" The number of connectors and their names and locations may differ with the model.
"" Refer to the external device's operating manual when connecting it to the TV. The number of external device connectors and their names and locations may differ with the manufacturer.
Connection notes for HDMI
●● The following types of HDMI cables are recommended:
–– High Speed HDMI Cable
–– High Speed HDMI Cable with Ethernet
–– Premium High Speed HDMI Cable
–– Premium High Speed HDMI Cable with Ethernet
–– Ultra High Speed HDMI Cable
●● Use an HDMI cable with a thickness of 0.66 inches (17 mm) or less.
●● Using a non-certified HDMI cable may result in a blank screen or a connection error.
●● Some HDMI cables and devices may not be compatible with the TV due to different HDMI specifications.
●● This TV does not support HDMI Ethernet Channel. Ethernet is a Local Area Network (LAN) built with coaxial cables standardized by the IEEE.
●● Use a cable shorter than 10 feet (3 m) to get the best UHD viewing quality.
●● Many computer graphics adaptors do not have HDMI ports, but have DVI or DisplayPort ports instead. If your PC does not support HDMI video out, connect your PC with a DVI to HDMI or HDMI to DisplayPort cable.
●● When the TV is connected to an external device such as a DVD/BD player or a set-top box via HDMI, power sync mode will be automatically activated. In the power sync mode, the TV continues to detect and connect external devices via HDMI cable. This function can be deactivated by removing the HDMI cable of the connected device.
"" This function may not be supported depending on the model.
- 28 -
Connection notes for audio devices
●● For better audio quality, it is a good idea to use an AV receiver.
●● If you connect an external audio device using an optical cable, the Sound Output setting is automatically changed to the connected device. However, to make this happen, you must turn on the external audio device before connecting the optical cable. To manually change the Sound Output setting, do one of the following:
–– Use the Quick Settings screen to change to the connected device:
Use the Select button to select Optical on the Sound Output menu. (

 Settings
  up directional button
  Sound Output).
–– Use the Settings screen to change to the connected device:
Select Optical on the Sound Output menu. (

 Settings
  Sound
Sound  Sound Output).
●● An unusual noise coming from a connected audio device while you are using it may indicate a problem with the audio device itself. If this occurs, ask for assistance from the audio device's manufacturer.
●● Digital audio is only available with 5.1 channel broadcasts.
Connection notes for computers
●● For the resolutions supported by the TV, refer to "Read Before Connecting a Computer (Supported Resolutions)."
●● If you want to connect your PC and TV wirelessly, both of them must be connected to each other on the same network.
●● When sharing content with other network-based devices such as those in an IP (Internet Protocol) storage system, sharing may not be supported due to the network’s configuration, quality, or functionality, for example, if the network has an NAS (Network-Attached Storage) device.
- 29 -
Connection notes for mobile devices
●● To use the Smart View function, the mobile device must support a mirroring function such as Screen Mirroring or Smart View. To check whether your mobile device supports the mirroring function, refer to the mobile device's user manual.
●● To use Wi-Fi Direct, the mobile device must support the Wi-Fi Direct function. To check whether your mobile device supports Wi-Fi Direct function, refer to the mobile device's user manual.
●● The mobile device and your Smart TV must be connected to each other on the same network.
●● The video or audio may stop intermittently, depending on network conditions.
●● When sharing content with other network-based devices such as those in an IP (Internet Protocol) storage system, sharing may not be supported due to the network’s configuration, quality, or functionality, for example, if the network has an NAS (Network-Attached Storage) device.
- 30 -
Loading...