


 Loading...
Samsung UN75HU8500FXZA, UN55HU6950FXZA, UN65HU8700FXZA, UN85HU8550FXZA, UN65HU7250FXZA User Manual
...
E-MANUAL
Thank you for purchasing this Samsung product.
To receive more complete service, please register your product at
www.samsung.com/register
Model______________ Serial No.______________
Contents
Quick Guide
Using Smart Hub
Using Voice Control
Using Motion Control
Using the Samsung Smart Control
Using Multi-Link Screen
Connecting Antenna and External devices
Antenna Connection
Video Device Connections
9HDMI Connection
10Component Connection
11Composite (A/V) Connection
Audio Input and Output Connections
12HDMI (ARC) Connection
13Digital Audio (Optical) Connection
14Audio Output Connection
Connecting to a Computer
16Connecting Through the HDMI Port
17Connecting With a DVI to HDMI Cable
18Connecting Through Samsung Link
18Connecting Through DLNA Using Your Home Network
19Connecting via Samsung Smart View 2.0
Connecting To a Mobile Device
20Connecting With an MHL to HDMI Cable
21Screen Mirroring
23Connecting Mobile Devices without a Wireless Router (Wi-Fi Direct)
23Connecting Through Samsung Link
24Connecting Through DLNA Using Your Home Network
24 Connecting via Samsung Smart View 2.0
24 Specifying the Name of the TV on a Network
Switching Between Video Sources
25Other Functions Available When You Display the Source List
25 The Universal Remote Function
Using the Remote Control and
Peripherals
Installing Batteries into the Samsung Smart Control
26 The Low Battery Alarm Window
Pairing the Samsung Smart Control
27 Reconnecting the Samsung Smart Control
Using the Samsung Smart Control
28 Button Functions
31Operating the TV by Moving the Samsung Smart Control
32Using the Touch Pad and the Directional Buttons
34 Displaying and Using the On-Screen Remote
Controlling External Devices with the TV Remote -
Using the Universal Remote
36Connecting the IR Extender Cable
37Setting Up the Universal Remote Control
38Universal Remote Features
Controlling the TV with a Keyboard
39Connecting a Keyboard
40Using the Keyboard
Controlling the TV with a Mouse
41Connecting a Mouse
42Using the Mouse
Entering Text Using the On-Screen QWERTY Keypad
43 Using Additional Functions
Internet Connection
Establishing a Wired Internet Connection
44Using Cat 7 LAN Cables
45Connecting to a Wired Internet Network Automatically
46Connecting to a Wired Internet Network Manually
Establishing a Wireless Internet Connection
48Connecting to a Wireless Internet Network Automatically
49Connecting to a Wireless Internet Network Manually
50Connecting to a Wireless Internet Network with WPS
Troubleshooting Internet Connectivity Issues
51Troubleshooting Wired Internet Connectivity Issues
52Troubleshooting Wireless Internet Connectivity Issues
Checking the Internet Connection Status
Smart Features
Using Multiple Functions on a Single Screen (Multi-Link Screen)
54 Launching Multi-Link Screen
54 Using Multi-Link Screen
Smart Hub
56Testing Smart Hub connections
57Opening the First Screen
58Moving to the Panel Screen
59Using the Smart Hub Tutorial
59Resetting Smart Hub
Using Smart Hub with a Samsung Account
60 Creating a Samsung Account
62Signing in to a Samsung Account
63Linking Your Samsung Account to External Service Accounts
64Changing and Adding Information to a Samsung Account
64Deleting a Samsung Account from the TV
Using the Games Panel
65Using Supported Features via the Pop-Up Menu
66Installing and Running a Game
67Managing Downloaded or Purchased Games
Using the SAMSUNG APPS Panel
69Using Supported Features via the Pop-Up Menu - Downloaded Apps
70Using Supported Features via the Pop-Up Menu - Recommended Apps
70 Installing an App
Using the e-Manual
72Launching the e-Manual
73Accessing the Menu from the e-Manual
73 Loading Reference Pages
73 Updating the e-Manual to the Latest Version
Using Web Browser
74 Browsing Methods
74 Scrolling on the Web Browser
74 Command and Status Bar at a Glance
76 Browsing Preferences
78Relocating an App on the Apps Screen.
78Deleting an App from the TV
79Rating/Reviewing an App
79Updating Apps
80Using Other App Features and Functions
Using the On TV Panel
82 Using Supported Features via the Pop-Up Menu
82Viewing Detailed Program Information
83Configuring On TV Settings
Using the MOVIES & TV SHOWS Panel
85Using Supported Features via the Pop-Up Menu
86Watching a Movie/TV Program
86 Preventing Children from Watching Adult Content
86Preventing Children from Watching Adult UHD Content
87Rating and Sharing a Purchased Content
Using the Multimedia Panel (Playing Photos, Videos,
and Music)
89Playing Media Content Saved on a USB Device
90Playing Multimedia Content Saved on a Computer/ Mobile Device
93Buttons and Functions Available While Viewing Photos
94Buttons and Functions Available While Viewing Videos
96Buttons and Functions Available While Playing Music
97Functions on the Media Content List Screen
Using the NewsON Panel
98 News
98 Weather
Using the SOCCER Panel
100 Setting Your Favorite Team
Controlling the TV with Your Voice (Voice Control) |
Creating a Personal Favorites List |
|||
101 |
Using Imperative Voice Control |
135 |
Registering Channels as a Favorites |
|
103 |
Using Interactive Voice Control |
136 |
Selecting from Favorite List Channels Only |
|
Controlling the TV using Motions (Motion Control) |
Editing a Favorites List |
|||
105 |
Testing Ambient Illumination Using the TV Camera |
137 |
Edit Favorites Screen Menu Items |
|
106 |
Activating Motion Control |
Making Sports Programs More Realistic with Soccer |
||
|
|
|||
108 |
Motion Control Screen Layout |
Mode |
||
Using Face Recognition |
140 |
Enabling Soccer Mode |
||
|
|
|||
111 |
Registering Your Face to Your Samsung Account |
140 |
Extracting Highlights Automatically |
|
|
|
|||
112 |
Changing Your Login Method to Face Recognition |
141 |
Functions Available While Watching Sports in Soccer |
|
|
Mode |
|||
|
|
|
||
112 |
Signing in to a Samsung Account Using Face Recognition |
142 |
Viewing a game recorded in Soccer Mode |
|
|
|
|||
|
|
TV-Viewing Support Features |
||
TV Viewing |
143 |
Showing Captions |
||
|
|
145 |
Enabling the Audio Guide for the Video Description |
|
Digital Broadcast Information at a Glance |
145 |
PIP Broadcast Viewing |
||
113 |
Using the Guide |
146 |
Scanning for Available Channels |
|
114 |
Viewing Detailed Information |
146 |
Selecting the Broadcast Audio Language |
|
115 |
Checking Current Program Info |
147 |
Fine-Tuning the Screen |
|
115 |
Changing the broadcast signal |
147 |
Remove Scrambled Channels |
|
115 |
Digital Channel Signal Info and Strength |
|
|
|
Recording Programs |
Picture and Sound Settings |
|||
116 |
Formatting a USB Recording Device |
|||
|
|
|||
118 |
Recording Programs |
Changing the Picture Mode and Adjusting the Picture |
||
|
|
|||
119 |
Buttons and Functions Available While Recording a |
Quality |
||
|
|
|||
|
Program |
148 |
Choosing the Right Picture Mode for the Viewing |
|
|
|
|||
120 |
Managing the Schedule Recording List |
|
Environment |
|
|
|
|
||
121 |
Viewing Recorded Programs |
149 |
Adjusting the Picture Quality for Each Picture Mode |
|
|
|
|||
124 |
Managing Recorded Files |
150 |
Fine-Tuning Each Picture Mode (Advanced Settings) |
|
|
|
|||
Setting Up a Schedule Viewing |
152 |
Adjusting the Picture for Easier Viewing (Picture Options) |
||
|
|
|||
125 |
Digital Channel Schedule Viewing |
Viewing in 3D |
||
|
|
|||
126 |
Analog Channel Schedule Viewing |
154 |
Starting 3D |
|
|
|
|||
127 |
Canceling a Schedule Viewing |
155 |
Changing the 3D Mode |
|
|
|
|||
127 |
Editing a Schedule Viewing |
156 |
Adjusting the 3D Effect |
|
|
|
|||
Using Timeshift |
Picture Support Functions |
|||
|
|
|||
Using the Channel List |
157 |
PIP Broadcast Viewing |
||
|
|
|||
|
|
158 |
Changing the Picture Size and Position |
|
Registering, Removing, and Editing Channels |
159 |
Listening to Audio Only with the Screen Turned Off |
||
|
|
|||
130 |
Registering and Removing Channels |
|
(Picture Off) |
|
|
|
|
||
131 |
Editing Registered Channels |
159 |
Resetting the Picture Mode Settings |
|
|
|
|||
132 |
Program Rating Lock |
|
|
|
Changing the Sound Mode and Using Sound Effects
160 Choosing the Right Sound Mode for the Environment
160 Using Sound Effects
Sound Support Functions
161Selecting Speakers
162Designating the TV's Installation Type
162Listening to TV Sound through Samsung Bluetooth Audio
163Listening to TV Sound through Samsung Multiroom Link compatible Speakers
164Listening to the TV through Bluetooth Headphones
164Enabling Digital Audio Output
165Listening to 3D Audio in 3D Mode
165 Resetting All Sound Settings
General
Setting the Time and Using the Timer
166 Setting the Current Time
168 Using the Timers
Using the Screen Burn Protection and Energy Saving
Features
170 Preventing Screen Burn
170 Using Energy Saving Features
Using Anynet+ (HDMI-CEC)
171Setting Up Anynet+ (HDMI-CEC)
172Using Anynet+ (HDMI-CEC)
Updating the TV’s Software
173Update now
173Online
174Manually, Using a USB Flash Drive
175Enabling Automatic Software Updates
Protecting the TV from Hacking and malicious code
175Checking the TV and Connected Storage Media
176Automatically Scanning when the TV is Powered On
176 Automatically Adding malicious code to the Blocked List
U
sing Other Functions
177 Setting Up a Password
177 Changing the Menu Language
177Checking Notifications
178Enabling Voice Guides for the Visually Impaired
179Adjusting the Menu Transparency
179White Text on Black Background (High Contrast)
180Expanding the Smart Hub's Focus Area
180 Enabling/Disabling Sound Feedback
180 Locking/Unlocking the Panel Keys
180 Showing/Hiding the Samsung Logo while Booting
180 Enabling the TV to Boot Faster
180Enabling/Disabling the Front Indicators
181UHD Evolution Kit Backup
181Update Recorded Programs
181Enabling Game Mode
182Enjoying Rich Colors and Superior Picture Quality (BD Wise)
182Registering the TV as a DivX-Certified Device (Watching For Pay DivX Movies)
183Restoring the TV to the Factory Settings
183Using the TV as a Display Model (exclusively for retail stores)
Troubleshooting
Getting Support
184Support through Remote Management
185Finding the Information You Need for Service
Requesting support
There is a problem with the picture
186 Testing the Picture
I can't hear the sound clearly
188 Testing the Sound
I can't see 3D images clearly.
189 Testing 3D Picture Quality
There is a problem with the broadcast.
My computer won't connect.
I can't connect to the Internet.
The Schedule Recording/Timeshift function isn't working.
Anynet+ (HDMI-CEC) isn't working.
I am having trouble launching/using apps.
My file won't play.
I want to reset the TV.
Other Issues
Appendix
Before Using the Recording and Timeshift Functions
196Before Using the Recording and Schedule Recording Functions
197Before the Using Timeshift Function
Read Before Using 3D Viewing Mode
198 3D Precautions
S-Recommendation Disclaimer
201 S Recommendation with Voice Interaction
201 S Recommendation
Supported Resolutions for 3D Modes
202 HDMI
202 Component
202 Digital Channel
202 Videos/Photos
202 Computer via HDMI Cable
Supported Resolutions for UHD
203 HDMI Connector except for the MHL-to-HDMI Connector
203 MHL-to-HDMI Connector
Read Before Using Voice, Motion, or Face Recognition
204 Voice, Motion, and Face Recognition Precautions
206Requirements for Using Voice, Motion, or Face Recognition
Read Before Using Apps
Read Before Using the Web Browser
Read Before Playing Photo, Video, or Music Files
211Photo, Video, and Music File Use Limitations
211Compatible Storage Devices for File Transfers
212Supported External Subtitles
212Supported Internal Subtitles
213Supported Image Formats and Resolutions
213Supported Music Formats and Codecs
214Supported Video Codecs
Read After Installing the TV
216 Picture Sizes and Input Signals
216Installing an Anti-Theft Lock
217Read Before Setting Up a Wireless Internet Connection
Read Before Connecting a Computer (Supported
Resolutions)
218 IBM
218MAC
219VESA DMT
Supported Resolutions for Video Signals
220 CEA-861
220 HDMI
Read Before Using the Bluetooth Devices
221 Restrictions for using Bluetooth
License
Glossary
Using Smart Hub
Usability depends on your specific model and local region.
"" Connection and set up is not necessary if you connected the TV to the Internet and set up Smart Hub during the Initial Set up.
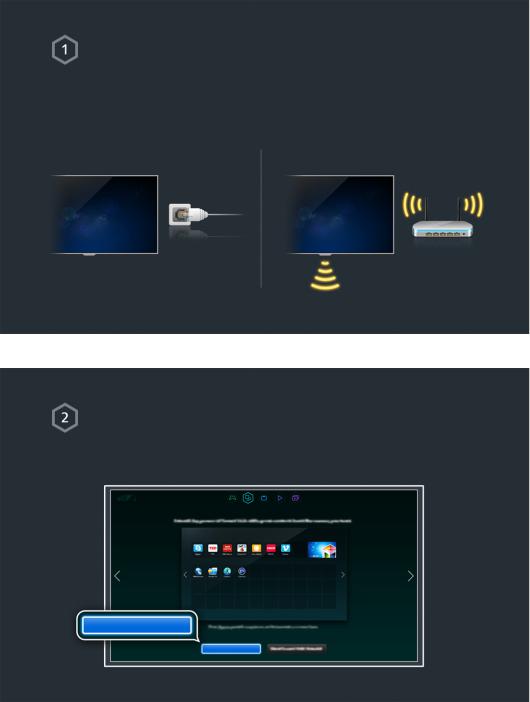
Connecting the TV to the Internet
1.Connect the TV to the Internet via a wired or wireless connection.
2.Set up Network Settings via MENU > Network > Network Settings.
Setting up Smart Hub
The first time you start Smart Hub, you need to set it up. Follow the directions on the screen.
Set Up Smart Hub
Set Up Smart Hub
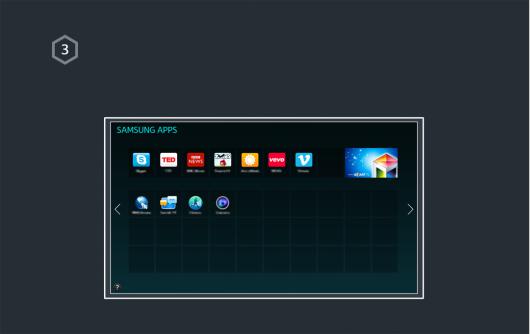
Using Smart Hub
Go to Smart Hub > SAMSUNG APPS and download applications to your Samsung Smart
TV.
"" For more information, refer to "Smart Hub".
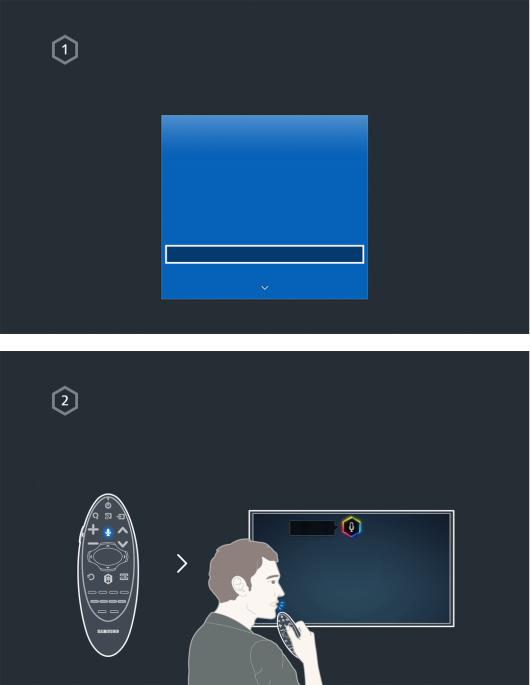
Using Voice Control
"" This function is only available with the UHD 6900 series and higher.
Setting up Voice Control
Set up Voice Control via MENU > System > Voice Control.
System
Accessibility |
|
Setup |
|
Menu Language |
English |
Smart Control Settings |
|
Universal Remote Setup |
|
Voice Control |
|
Motion Control |
On |
Using Voice Control
Press the VOICE button on the Samsung Smart Control, and then say the desired commands.
"" For more information, refer to "Controlling the TV with Your Voice (Voice Control)".
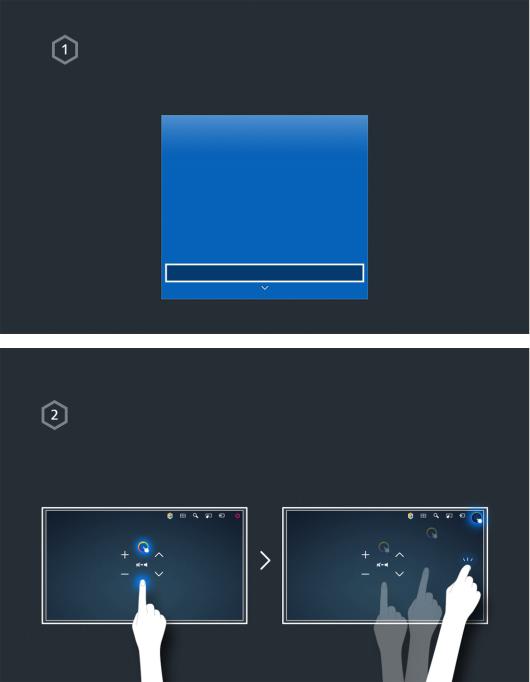
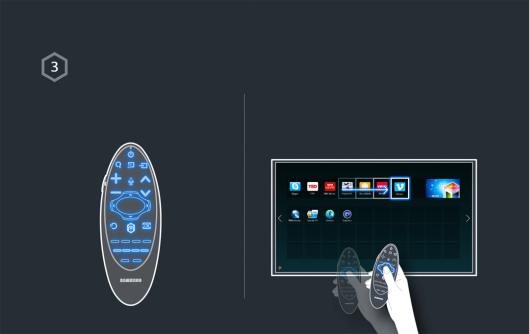
Using Motion Control
Setting up Motion Control
Set up parameters for Motion Control via MENU > System > Motion Control.
System
Accessibility |
|
Setup |
|
Menu Language |
English |
Smart Control Settings |
|
Universal Remote Setup |
|
Voice Control |
|
Motion Control |
On |
Using Motion Control
1.Raise your hand with your index finger extended. Move your hand slowly left and right. A pointer appears on the screen.
2.Move your hand to move the pointer on the screen. Fold down and then raise your index finger to select items.
"" To use Motion Control, you must connect a TV camera (sold separately) to the TV.
"" For more information, refer to "Controlling the TV using Motions (Motion Control)".
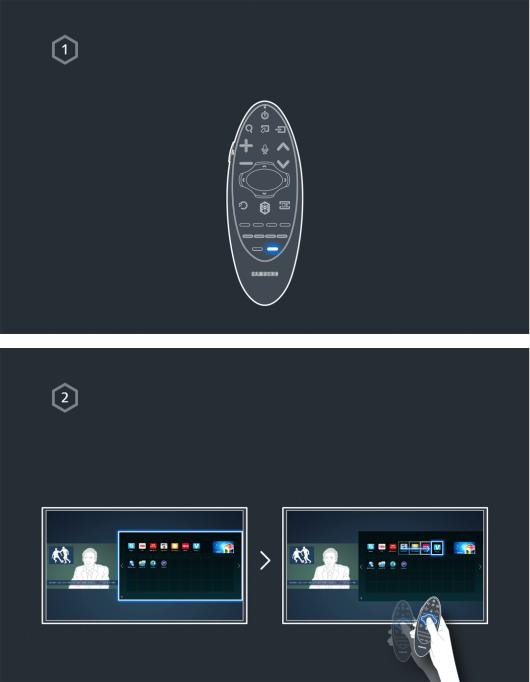
Using the Samsung Smart Control
"" The Samsung Smart Control is only available with the UHD 6900 series and higher.
Pair the Samsung Smart Control to the TV the first time by pressing the Power button on the Samsung Smart Control. To pair again - if necessary - press the RETURN and GUIDE buttons simultaneously for 3 seconds or more.
Pairing with the TV
To pair again, press RETURN and GUIDE simultaneously for 3 seconds or more.
Setting the Samsung Smart Control
Set the Smart Control Settings via MENU > System > Smart Control Settings.
System
Accessibility |
|
Setup |
|
Menu Language |
English |
Smart Control Settings |
|
Universal Remote Setup |
|
Voice Control |
|
Motion Control |
On |
Using the Samsung Smart Control
Use the buttons to perform actions.
Place a finger on the touch pad, and then move the Samsung Smart Control. The pointer moves on the screen.
"" For more information, refer to "Using the Samsung Smart Control".
Using Multi-Link Screen
Running Multi-Link Screen
Press the M.SCREEN button.
Using the Multi-Link Screen
Search the web, use apps, and watch TV at the same time using Multi-Link. While Multi-
Link is running, press the M.SCREEN button to select additional features or options.
"" For more information, refer to "Using Multiple Functions on a Single Screen (Multi-Link Screen)".
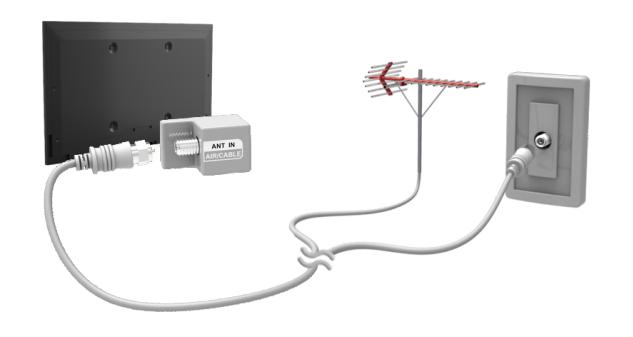
Antenna Connection
If you are not connecting your TV to a cable or satellite box, you must connect an antenna or a cable outlet to the TV to receive broadcast signals.
Connect a cable from an antenna or cable outlet to the ANT IN connector as shown in the diagram below.
"" An antenna connection is not necessary when a cable box or satellite receiver is used.
Video Device Connections
Your TV has a variety of connectors for video input from external devices such as cable boxes, satellite receivers, Blu-ray players, DVD players, camcorders, and gaming consoles. Below is a list of featured connectors shown in descending order of picture quality.
●● HDMI
●● Component
●● Composite (A/V)
Connect a video device to the TV via an HDMI connector for the best picture quality. If the device does not have an HDMI connector, try a component connector to get the next best picture quality.
"" The number of connectors and their names and locations may vary depending on the model.
"" Refer to the external device's operating manual when connecting it to the TV. The number of external device connectors and their names and locations may vary depending on the manufacturer.
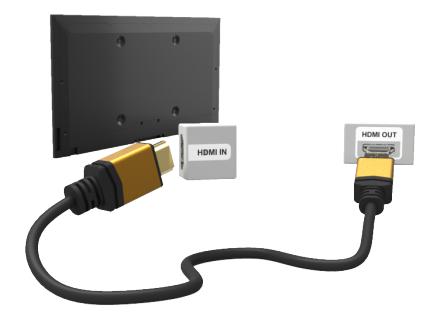
HDMI Connection
The following types of HDMI cables are recommended:
●● High-Speed HDMI Cable
●●
""
""
""
""
High-Speed HDMI Cable with Ethernet
Use an HDMI cable with a thickness of 0.55 inches (14mm) or less.
Using a non-certified HDMI cable may result in a blank screen or a connection error.
Some HDMI cables and devices may not be compatible with the TV due to different HDMI specifications.
This TV does not support HDMI Ethernet Channel. Ethernet is a LAN (Local Area Network) built with coaxial cables standardized by the IEEE.
"" Try a cable shorter than 3M to get the next best UHD viewing quality.
"" HDCP 2.2 is supported only by the TV's HDMI (MHL) port. HDCP is short for "High bandwidth Digital
Content Protection" and is used for video copyright protection.
Refer to the diagram and connect the HDMI cable to the video device's HDMI output connector and the TV's HDMI input connector.
"" The number of connectors and their names and locations may vary depending on the model.
Once the connection has been made, press the SOURCE button to select the connected external device.
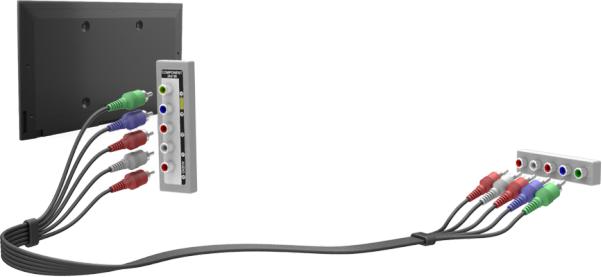
Component Connection
Refer to the diagram and connect the Component cable to the TV's component input connectors and the device's component output connectors.
Make sure the cable colors match the connector colors.
Once the connection has been made, press the SOURCE button to select the connected external device.
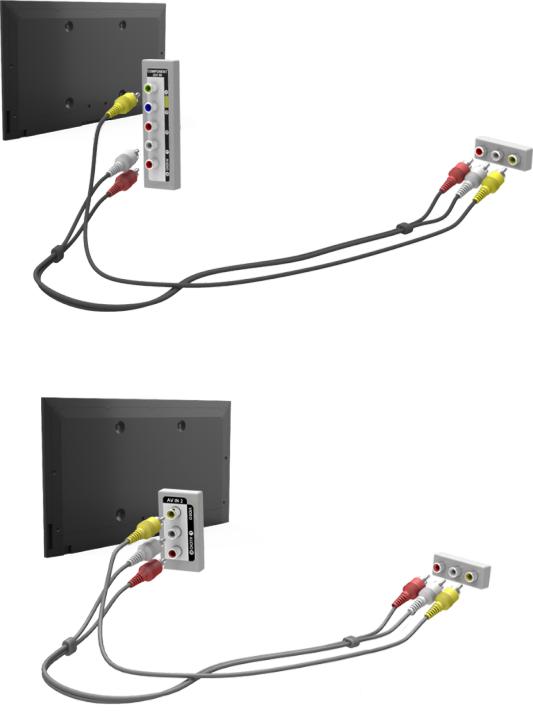
Composite (A/V) Connection
Refer to the diagram and connect the AV cable to the TV's AV input connectors and the device's AV output connectors.
If you are using the TV's AV1 input connectors, connect the device's audio output to the TV using a Y connector.
AV1
If you are using the TV's AV2 input connectors, use the included AV connection adapter to connect the device's audio and video output to the TV.
AV2
AV connection adapter
Once the connection has been made, press the SOURCE button to select the connected external device.
Audio Input and Output Connections
Your TV has a variety of connections for audio input from devices such as Blu-ray players and DVD players and for audio output to such devices as amplifiers. The connections are listed below.
●●
●●
●●
""
""
""
HDMI/ARC (Audio Return Channel)
Digital Audio (Optical)
Audio (Analog)
For better audio quality, it is a good idea to use an AV receiver.
The number of connectors and their names and locations may vary depending on the model.
Refer to the external device's operating manual when connecting it to the TV. The number of external device connectors and their names and locations may vary depending on the manufacturer.
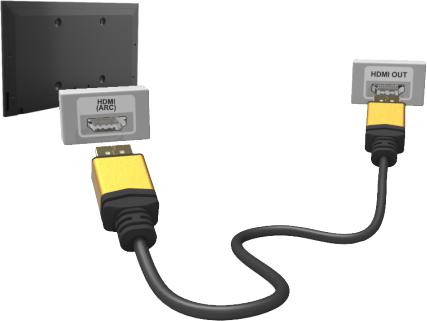
HDMI (ARC) Connection
ARC lets the TV output digital sound to an audio device and input digital sound from the same audio device through one HDMI cable. ARC is only available through the HDMI (ARC) port and only when the TV is connected to an ARC-enabled AV receiver.
"" Certain functions such as Smart Hub may not be available if the Source is set to HDMI and 3D Auto View is set to On. If this is the case, set 3D Auto View or 3D Mode to Off.
Connect an HDMI cable to the TV's HDMI (ARC) connection and the device's HDMI output connection.
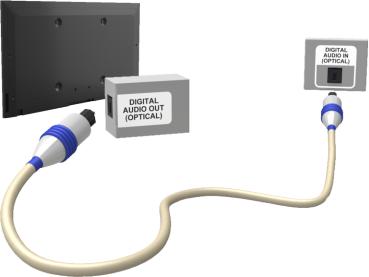
Digital Audio (Optical) Connection
Connecting an AV receiver to the TV via a digital audio (optical) connector lets you listen to digital audio.
"" Connecting a device using an optical cable does not automatically turn off the TV speakers. To turn off the
TV's speakers, set TV Sound Output (Sound > Speaker Settings > TV Sound Output) to something other than TV Speaker.
"" Adjust the audio device's volume using its remote control.
"" An unusual noise coming from the audio device while you are using it may indicate a problem with the audio device itself. If this occurs, ask for assistance from the audio device's manufacturer.
"" Digital audio is only available with 5.1-channel broadcasts.
Refer to the diagram and connect the optical cable to the TV's digital audio output connector and the device's digital audio input connector.

Audio Output Connection
Refer to the diagram and connect an audio cable to the TV's audio output connector and the device's audio input connector.
Once the connection has been made, press the SOURCE button to select the connected external device.
Connecting to a Computer
You can connect a computer directly to the TV using an HDMI or DVI to HDMI cable and use the TV as a monitor. You can also connect the TV to a computer via your home network and access media files saved on the computer on the TV screen. The kinds of connections you can make are listed below.
To use the TV as a Computer Monitor
●● Connect through the HDMI Port using an HDMI cable.
You can connect the computer to the TV using an HDMI cable and display the computer screen on the TV.
●● Connect though the HDMI (DVI) port using a DVI to HDMI cable.
You can connect a computer to the TV by connecting the computer's DVI port to the TV's HDMI (DVI) port with a DVI to HDMI cable and display the computer screen on the TV.
To Access Media Files on a Computer and View or Play Them on the TV
●● Connect Through Samsung Link.
Quickly access photo, video, and music files saved on a computer on which Samsung Link software is installed, even if you do not connect the TV directly to the computer.
●● Connect Through DLNA Using Your Home Network.
Quickly access photo, video, and music files saved on a computer by connecting the TV and the computer to the same router or AP.
●● Connecting via Samsung Smart View 2.0
"" Availability depends on the model.
By installing and running the Smart View 2.0 on the PC, you can view the TV screen on the PC, or play the multimedia content (videos, photos, and music) saved on the PC. Also, you can enter text on your Smart TV using the keyboard connected to your PC. You can also control the TV from the PC.

Connecting Through the HDMI Port
For an HDMI connection, we recommend one of the following HDMI cable types:
●● High-Speed HDMI Cable
●● High-Speed HDMI Cable with Ethernet
"" Use an HDMI cable with a thickness of 0.55 inches (14mm) or less. Using a non-certified HDMI cable may result in a blank screen or a connection error.
"" Some HDMI cables and devices may not be compatible with the TV due to different HDMI specifications.
"" This TV does not support HDMI Ethernet Channel. Ethernet is a LAN (Local Area Network) built on coaxial cables standardized by the IEEE.
"" Many computer graphics adaptors do not have HDMI ports, but have DVI ports instead. If your computer graphics adaptor has a DVI port, use a DVI to HDMI cable to connect the computer to the TV. For more information, refer to "Connecting With a DVI to HDMI Cable".
"" Try a cable shorter than 3M to get the next best UHD viewing quality.
"" HDCP 2.2 is supported only by the TV's HDMI (MHL) port. HDCP is short for "High bandwidth Digital
Content Protection" and is used for video copyright protection.
Refer to the diagram and connect an HDMI cable to the computer's HDMI output connector and the TV's HDMI input connector.
"" The number of ports, and their names and locations may vary depending on the model.
Once the connection has been made, press the SOURCE button to select the connected external device.
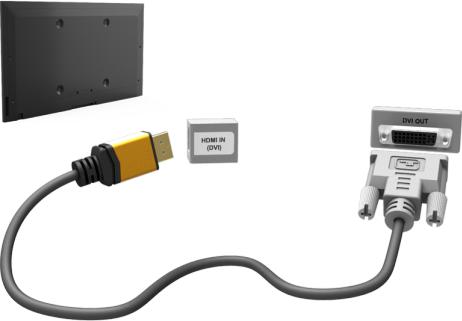
Connecting With a DVI to HDMI Cable
If the graphics adapter of your computer does not support the HDMI interface, connect the computer to the TV with a DVI (Digital Visual Interactive) to HDMI cable. Note that the DVI to HDMI connection is only supported by the HDMI (DVI) port and does not support audio signal transmission. To listen to the computer sound, connect external speakers to the computer’s audio output connector.
"" For the resolutions supported by the TV, refer to "Read Before Connecting a Computer (Supported
Resolutions)".
Refer to the diagram and connect the DVI to HDMI cable to the TV's HDMI (DVI) port and the computer's DVI output port.
Once the connection has been made, press the SOURCE button to select the connected external device.
Connecting Through Samsung Link
Quickly access photo, video, and music files saved on a computer on which Samsung Link software is installed. In addition, using Samsung Link, you can view or play the content of a computer which is
registered with Samsung Link through your Samsung account, even if the computer and the TV are not connected to the same router or AP.
111On a computer, navigate to the Samsung content and service portal (http://link.samsung.com), and then sign into your Samsung account.
"" To install the Samsung Link desktop software, you need to sign into your Samsung account. If you don't have a Samsung account, create one first.
222Install the Samsung Link desktop software. When the installation is complete, the computer will be registered with Samsung Link.
333Specify a folder on the computer to connect to the TV. You can view or play the photo, video, and music files in the specified folder on the TV. For more information about playing or viewing multimedia content, refer to the "Playing Multimedia Content Saved on a Computer/Mobile Device" section.
"" For more information about using the Samsung Link desktop software, refer to the Help section of the
Samsung Link software.
Connecting Through DLNA Using Your Home Network
Quickly access and play photo, video, and music files stored on a computer on the TV.
111Connect the TV and the computer to the same router or AP. Once you connect them to the same router or AP, a home network is configured.
"" DLNA is the technology that lets TV's, computers, and mobile devices connected to one wired or wireless router share content.
222On the computer, select [Control Panel] > [Network and Internet] > [Network and Sharing Center] > [Change advanced sharing settings], and then select [Choose media streaming options...] to activate media streaming.
333 From the list, set the TV to [Allowed].
444Launch Windows Media Player on a computer. Select [Settings] > [Library Management], and then add the location where photo, video, and music files are saved to play them on the TV. For more information about playing content, refer to "Playing Multimedia Content Saved on a Computer/ Mobile Device" section.
"" Alternatively, you can move the files to the default folder specified by Windows Media Player, and then play or view them on the TV.
"" As long as File Sharing is activated, unauthorized access may occur. When you do not need to access data, disable File Sharing.
Connecting via Samsung Smart View 2.0
"" Availability depends on the model.
By installing and running the Smart View 2.0 on the PC, you can view the TV screen on the PC, or play the multimedia content (videos, photos, and music) saved on the PC. Also, you can enter text on your Smart TV using the keyboard connected to your PC. You can also control the TV from the PC.
Download a Smart View 2.0 from the webpage (http://www.samsung.com/smartview2) and install it on your PC.
"" Your PC and Smart TV must be connected on the same network.
"" You can access an Install and Connect guide for user for further information. Navigate to Network Device
(Smart Hub > MULTIMEDIA > Network Device) and select Connect to a Mobile Device.
Connecting To a Mobile Device
You can connect a mobile device such as a smartphone or tablet directly to the TV, or connect it to the network and display the mobile device's screen or play its content on the TV. The kinds of connections you can make are listed below.
●● Connect Using an MHL to HDMI cable
Connect the USB port of the mobile device and the HDMI port of the TV with an MHL to HDMI cable to view the mobile device's screen on the TV screen.
●● Connect by Mirroring the Mobile Device's Screen on the TV (Screen Mirroring)
Wirelessly connect the TV and the mobile device with the mirroring function. You can view the mobile device's screen on the TV screen.
"" This option is available only on a mobile device that supports the mirroring function.
●● Connect Mobile Devices without a Wireless Router (Wi-Fi Direct)
Wi-Fi Direct enables you to connect the TV and the mobile device without a router or AP. Quickly access and play photo, video, and music files in the connected mobile device on the TV.
"" This option is available only on a mobile device that supports the Wi-Fi Direct function.
●● Connect Through Samsung Link
Samsung Link enables you to play photo, video, and music files saved on a Samsung Linkenabled mobile device easily, without the need for a connection to the TV.
●● Connect Through DLNA Using Your Home Network
You can conveniently play photo, video, and music files saved on a mobile device by connecting the mobile device and the TV to the same router or AP.
●● Connecting via Samsung Smart View 2.0
By installing and running the Smart View 2.0 on the mobile device, you can view the TV screen on the mobile device, or play the device's multimedia content (videos, photos, and music) on the TV. Also, you can write texts and control your Smart TV by using the mobile device.
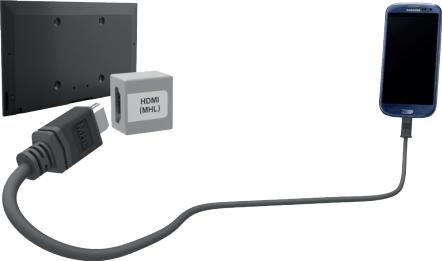
Connecting With an MHL to HDMI Cable
MHL (Mobile High-definition Link) lets you display a mobile device’s screen on the TV. However, MHL is only available through the TV's HDMI (MHL) port and only when used in conjunction with an MHL-enabled mobile device. For information on configuring MHL on your mobile device, refer to the device's User Manual.
"" Connecting the MHL-to-HDMI cable automatically switches Picture Size to Screen Fit. This setting will not change automatically if you are using an HDMI adapter. In this case, change the settings manually in the menu.
"" If you are using an HDMI adapter, the TV recognizes the signal as an HDMI signal and may respond differently than it would to an MHL to HDMI cable connection.
"" HDCP 2.2 is supported only by the TV's HDMI (MHL) port. HDCP is short for "High bandwidth Digital Content Protection" and is used for video copyright protection.
Refer to the diagram and connect the MHL-to-HDMI cable to the TV's HDMI (MHL) port and the mobile device's USB port.
Once the connection has been made, press the SOURCE button to select the connected external device.

Screen Mirroring
MENU > Network > Screen Mirroring Try Now
Wirelessly connect a mirroring-enabled mobile device to the TV and play the video and audio files stored on the device on the TV. Mirroring refers to the function that plays the video and audio files located on a mobile device on a TV and on the mobile device simultaneously.
"" To use the Screen Mirroring function, the mobile device must support a mirroring function such as AllShare Cast or Screen Mirroring. To check whether your mobile device supports the mirroring function, please visit the mobile device manufacturer's website.
"" The video or audio may intermittently stop depending on network conditions.
Connecting via a mobile device
111On the mobile device, run Screen Mirroring. The mobile device searches for available devices to connect to.
222
333
In the search result list, select the TV. The TV displays a pop-up at the top of the screen.
In the pop-up, select Allow to connect the mobile device.
""
""
All previously allowed mobile devices will automatically connect without needing approval.
If you select Deny, the device cannot connect. In addition, you are setting the device's connection status to Deny and it will not be able to connect in the future unless you change its connection status.
To change the connection status of a denied device, Navigate to Network > Screen Mirroring > Device Manager, select the device, and then select Allow.
Connecting by Automatically Allowing the Connection
111Navigate to Network > Screen Mirroring, and then select Screen Mirroring. The Screen Mirroring function starts. You can also start screen mirroring by pressing the SOURCE button on your remote, and then selecting Screen Mirroring from the list at the top of the screen.
222 Launch Screen Mirroring on your mobile device. The device searches for available devices.
333 Select the TV from the list. The TV automatically allows the connection and the device connects.
"" If the mobile device cannot connect, try turning the TV off and on.
Managing the Connection Status of Previously Connected Mobile Devices
"" This function is only available if devices have previously connected to the TV or have previously attempted to connect and been denied.
111Navigate to Network > Screen Mirroring > Device Manager. The TV displays a list of devices that have previously connected to the TV or have tried to connect to the TV and been denied. The status of the connection (Allow/Deny) is also displayed.
222 Select a device. A pop-up appears.
333In the pop-up, you can select Allow connection, Deny connection, or Delete the device from the list.

Connecting Mobile Devices without a Wireless Router (Wi-Fi Direct)
Navigate to MENU > Network > Wi-Fi Direct Try Now
You can connect a mobile device with the Wi-Fi Direct feature directly to the TV without using a wireless router or AP. By connecting a mobile device to the TV through Wi-Fi Direct, you can play photo, video, and music files saved on the mobile device on the TV.
"" This option is available only on a mobile device that supports the Wi-Fi Direct function. Please check if your mobile device supports Wi-Fi Direct.
"" The video or audio may intermittently stop depending on network conditions.
111Enable Wi-Fi Direct on the mobile device, and then navigate to Network and select Wi-Fi Direct on the TV. The TV automatically scans for and displays a list of available devices. The TV's name also appears on the mobile device.
222Select the device from the list to initiate a connection. If a connection request is made by the TV, a permission message appears on the mobile device and vice versa.
333Allow the connection. The TV and mobile device connect. For more information on the multimedia content, refer to the "Playing Multimedia Content Saved on a Computer/Mobile Device" section.
Connecting Through Samsung Link
Samsung Link lets you play the photo, video, and music files saved on a Samsung Link-enabled mobile device. In addition, using Samsung Link, you can play the content of a mobile device, which is registered to Samsung Link through your Samsung account, even if the mobile device and the TV are not connected to the same router or AP.
111 Run the Samsung Link app on the mobile device, and then sign in to your Samsung account.
"" To use Samsung Link, you have to sign in to your Samsung account. If you don't have a Samsung account, create one first.
222Access and play photo, video, and music files saved on the mobile device. For more information about playing multimedia content, refer to the "Playing Multimedia Content Saved on a Computer/ Mobile Device" section.
"" For more information about using the Samsung Link mobile software, refer to the Help section of the software.

Connecting Through DLNA Using Your Home Network
Quickly access and play photo, video, and music files stored on a mobile device on the TV.
111Connect both the TV and the mobile device to the same router or AP. Once you connect them to a single router or AP, a home network is configured.
"" DLNA is the technology that lets TV's, computers, and mobile devices connected to one wired or wireless router share content.
222Enable File Sharing on the mobile device. You can play the content shared on the mobile device on the TV. For more information about playing multimedia content, refer to the "Playing Multimedia Content Saved on a Computer/Mobile Device" section.
"" As long as File Sharing is active, unauthorized access can occur. When you do not need to access data, disable File Sharing.
Connecting via Samsung Smart View 2.0
By installing and running the Smart View 2.0 app on the mobile device, you can view the device screen on the TV, or play the device's multimedia content (videos, photos, and music) on the TV. Also, you can send text messages or control your Smart TV by using the mobile device.
Go to SAMSUNG APPS, Google Play and App Store search for and install Smart View 2.0 on your mobile device.
"" The mobile device and your Smart TV must be connected with each other in the same network.
"" You can access an Install and Connect guide for user for further information. Navigate to Network Device
(Smart Hub > MULTIMEDIA > Network Device) and select Connect to a Mobile Device.
Specifying the Name of the TV on a Network
MENU > Network > Device Name Try Now
Choose or specify a name for the TV that will appear on mobile devices and laptop computers.
111Select Device Name from the Network menu, and then choose a name from the list that appears. Alternatively, select User Input to enter a name manually.
222 Check the name from a mobile device or laptop computer.
Loading...