


UE-46EH5300W

LED TV
user manual
Thank you for purchasing this Samsung product.
To receive more complete service, please register
your product at
www.samsung.com/register
Model _____________Serial No. _____________
© 2012 Samsung Electronics Co., Ltd. All rights reserved.
Contact SAMSUNG WORLD WIDE
If you have any questions or comments relating to Samsung products, please contact the SAMSUNG customer care centre.
Country
Customer Care Centre
Web Site
AUSTRIA 0810 - SAMSUNG (7267864, € 0.07/min) www.samsung.com
BELGIUM 02-201-24-18 www.samsung.com/be (Dutch)
www.samsung.com/be_fr (French)
BOSNIA 05 133 1999 www.samsung.com
BULGARIA 07001 33 11, normal tariff www.samsung.com
CROATIA 062 SAMSUNG (062 726 7864) www.samsung.com
CZECH 800 - SAMSUNG (800-726786) www.samsung.com
Samsung Electronics Czech and Slovak, s.r.o., Oasis Florenc, Sokolovská 394/17, 180 00, Praha 8
DENMARK 70 70 19 70 www.samsung.com
FINLAND 09 85635050 www.samsung.com
FRANCE 01 48 63 00 00 www.samsung.com
GERMANY 0180 5 SAMSUNG bzw.
0180 5 7267864* (*0,14 €/Min. aus dem dt. Festnetz, aus
dem Mobilfunk max. 0,42 €/Min.)
www.samsung.com
CYPRUS 8009 4000 only from landline
(+30) 210 6897691 from mobile and land line
www.samsung.com
GREECE 80111-SAMSUNG (80111 726 7864) only from land line
(+30) 210 6897691 from mobile and land line
www.samsung.com
HUNGARY 06-80-SAMSUNG (726-7864) www.samsung.com
ITALIA 800-SAMSUNG (726-7864) www.samsung.com
LUXEMBURG 261 03 710 www.samsung.com
MACEDONIA 023 207 777 www.samsung.com
MONTENEGRO 020 405 888 www.samsung.com
NETHERLANDS 0900-SAMSUNG (0900-7267864) (€ 0,10/Min) www.samsung.com
NORWAY 815 56480 www.samsung.com
POLAND 0 801-1SAMSUNG (172-678)
+48 22 607-93-33
www.samsung.com
PORTUGAL 808 20-SAMSUNG (808 20 7267) www.samsung.com
ROMANIA 08008 SAMSUNG (08008 726 7864)
TOLL FREE No.
www.samsung.com
SERBIA 0700 Samsung (0700 726 7864) www.samsung.com
SLOVAKIA 0800 - SAMSUNG (0800-726 786) www.samsung.com
SPAIN 902 - 1 - SAMSUNG (902 172 678) www.samsung.com
SWEDEN 0771 726 7864 (SAMSUNG) www.samsung.com
SWITZERLAND 0848 - SAMSUNG(7267864, CHF 0.08/min) www.samsung.com/ch (German)
www.samsung.com/ch_fr (French)
U.K 0330 SAMSUNG (7267864) www.samsung.com
EIRE 0818 717100 www.samsung.com
LITHUANIA 8-800-77777 www.samsung.com
LATVIA 8000-7267 www.samsung.com
ESTONIA 800-7267 www.samsung.com
TURKEY 444 77 11 www.samsung.com
BN68-04053U-01
SUPPORT
For more information on how to view the e-Manual (p. 14)
Figures and illustrations in this User Manual are provided for reference only and may differ from actual product appearance. Product design and
specifications may be changed without notice.
CIS languages (Russian, Ukrainian, Kazakhs) are not available for this product, since this is manufactured for customers in EU region.
Digital TV notice
1. Functionalities related to Digital TV (DVB) are only available in countries/areas where DVB-T (MPEG2 and MPEG4 AVC) digital terrestrial signals are
broadcasted or where you are able to access to a compatible DVB-C (MPEG2 and MPEG4 AAC) cable-TV service. Please check with your local
dealer the possibility to receive DVB-T or DVB-C signal.
2. DVB-T is the DVB European consortium standard for the broadcast transmission of digital terrestrial television and DVB-C is that for the broadcast
transmission of digital TV over cable. However, some differentiated features like EPG (Electric Programme Guide), VOD (Video On Demand) and so
on, are not included in this specification. So, they cannot be workable at this moment.
3. Although this TV set meets the latest DVB-T and DVB-C standards, as of [August, 2008], the compatibility with future DVB-T digital terrestrial and
DVB-C digital cable broadcasts cannot be guaranteed.
4. Depending on the countries/areas where this TV set is used some cable-TV providers may charge an additional fee for such a service and you may
be required to agree to terms and conditions of their business.
5. Some Digital TV functions might be unavailable in some countries or regions and DVB-C might not work correctly with some cable service providers.
6. For more information, please contact your local Samsung customer care centre.
✎
The reception quality of TV may be affected due to differences in broadcasting method between the countries. Please check the TV
performance in the local SAMSUNG Authorized Dealer, or the Samsung Call Centre whether it can be improved by reconfiguring TV setting
or not.
Still image warning
Avoid displaying still images (like jpeg picture files) or still image element (like TV programme logo, panorama or 4:3 image format, stock or news bar at
screen bottom etc.) on the screen. Constant displaying of still picture can cause ghosting of LED screen, which will affect image quality. To reduce risk of
this effect, please follow below recommendations:
• Avoid displaying the same TV channel for long periods.
• Always try do display any image on full screen, use TV set picture format menu for best possible match.
• Reduce brightness and contrast values to minimum required to achieve desired picture quality, exceeded values may speed up the burnout process.
• Frequently use all TV features designed to reduce image retention and screen burnout, refer to e-Manual for details.
Correct Disposal of This Product (Waste Electrical & Electronic Equipment)
(Applicable in countries with separate collection systems)
This marking on the product, accessories or literature indicates that the product and its electronic accessories (e.g. charger,
headset, USB cable) should not be disposed of with other household waste at the end of their working life. To prevent possible
harm to the environment or human health from uncontrolled waste disposal, please separate these items from other types of
waste and recycle them responsibly to promote the sustainable reuse of material resources.
Household users should contact either the retailer where they purchased this product, or their local government office, for details
of where and how they can take these items for environmentally safe recycling.
Business users should contact their supplier and check the terms and conditions of the purchase contract. This product and its
electronic accessories should not be mixed with other commercial wastes for disposal.
Correct disposal of batteries in this product
(Applicable in countries with separate collection systems)
This marking on the battery, manual or packaging indicates that the batteries in this product should not be disposed of with other
household waste at the end of their working life. Where marked, the chemical symbols Hg, Cd or Pb indicate that the battery
contains mercury, cadmium or lead above the reference levels in EC Directive 2006/66. If batteries are not properly disposed of,
these substances can cause harm to human health or the environment.
To protect natural resources and to promote material reuse, please separate batteries from other types of waste and recycle them
through your local, free battery return system.
English - 2
English
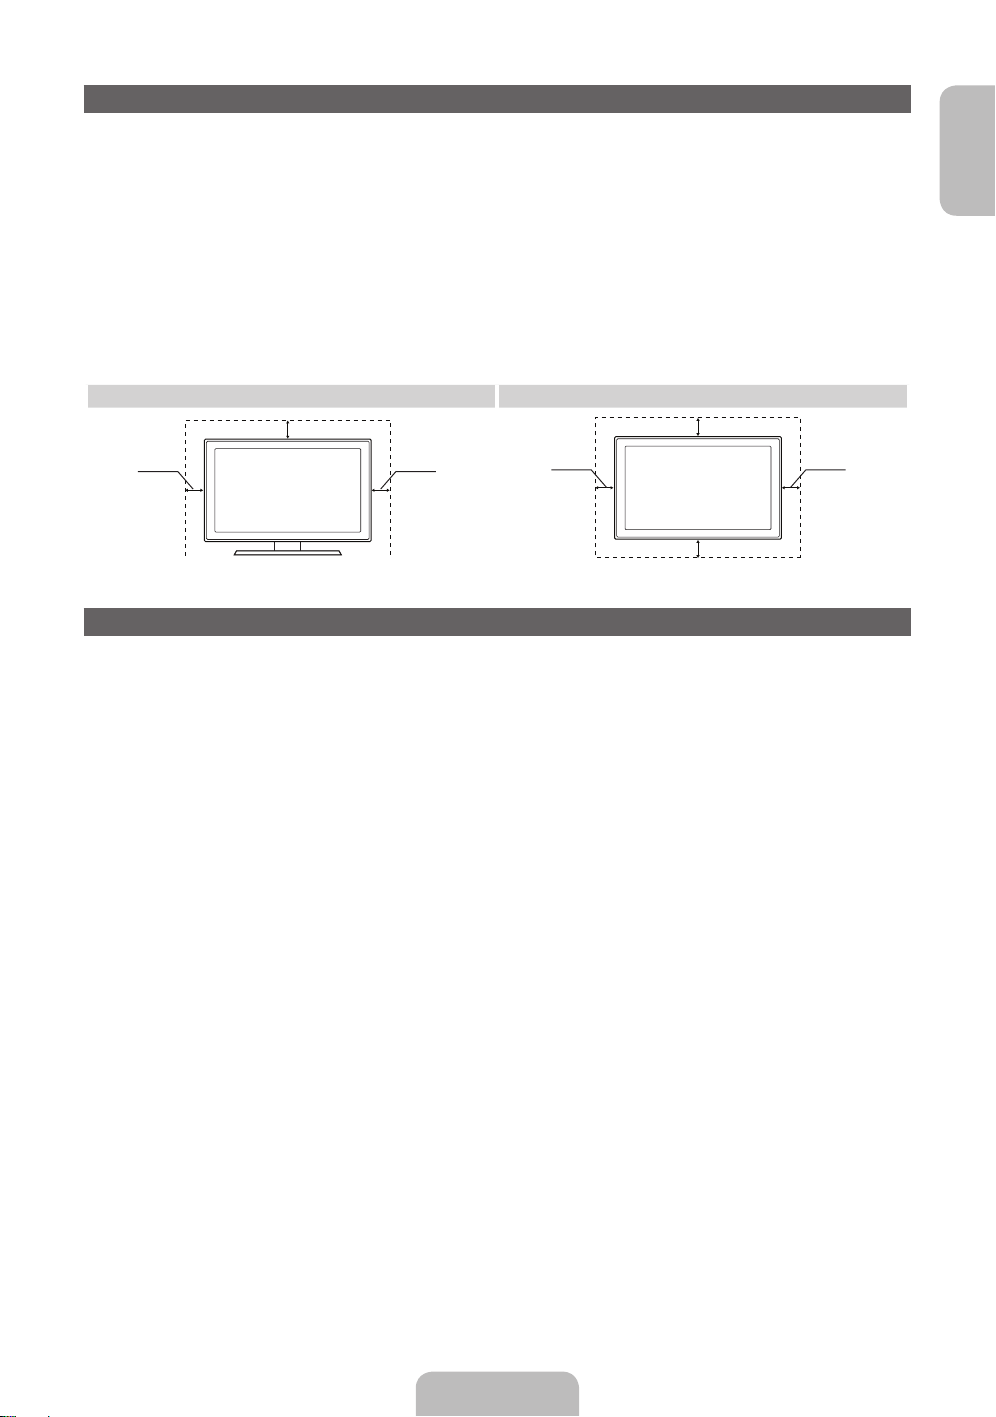
Securing the Installation Space
Keep the required distances between the product and other objects (e.g. walls) to ensure proper
ventilation.
Failing to do so may result in fire or a problem with the product due to an increase in the internal
temperature of the product.
✎
When using a stand or wall-mount, use parts provided by Samsung Electronics only.
• If you use parts provided by another manufacturer, it may result in a problem with the product or an
injury due to the product falling.
✎
The appearance may differ depending on the product.
• Be careful when you contact the TV because some parts can be somewhat hot.
Installation with a stand. Installation with a wall-mount.
10 cm10 cm
10 cm
10 cm
10 cm
10 cm
10 cm
List of Features
• SMART HUB: The Gateway to all content integrated in one place.
− It’s all integrated to guide you to easier and diverse entertainment choices.
− Control your entertainment life with easy and simple user friendly UI.
− Access to diverse Apps that are adding up every day.
− Customize your TV, by App grouping & sorting to your taste.
• AllShare Play: AllShare Play lets you access, view, or play photos, videos, or music located on USB
devices, digital cameras, cell phones, and PCs. PCs, cell phones, and other compatible devices can be
accessed wirelessly, through your wireless network.
• Anynet+ (HDMI-CEC): Allows you to control all connected Samsung devices that support Anynet+
with your Samsung TV’s remote.
• e-Manual: Allows you to read on screen full manual. (p. 14)
English - 3

Accessories
✎
Please make sure the following items are included with your TV. If any items are missing, contact your
dealer.
✎
The items’ colours and shapes may vary depending on the models.
✎
Cables not included in the package contents can be purchased separately.
✎
Check that there is no accessory hidden behind packing materials when you open the box.
[
CAUTION: INSERT SECURELY LEST SHOULD BE DETACHED IN SET
• Remote Control & Batteries (AAA x 2) • Power Cord
• User Manual • Cleaning-Cloth
• Warranty Card (Not available in some locations) / Safety Guide
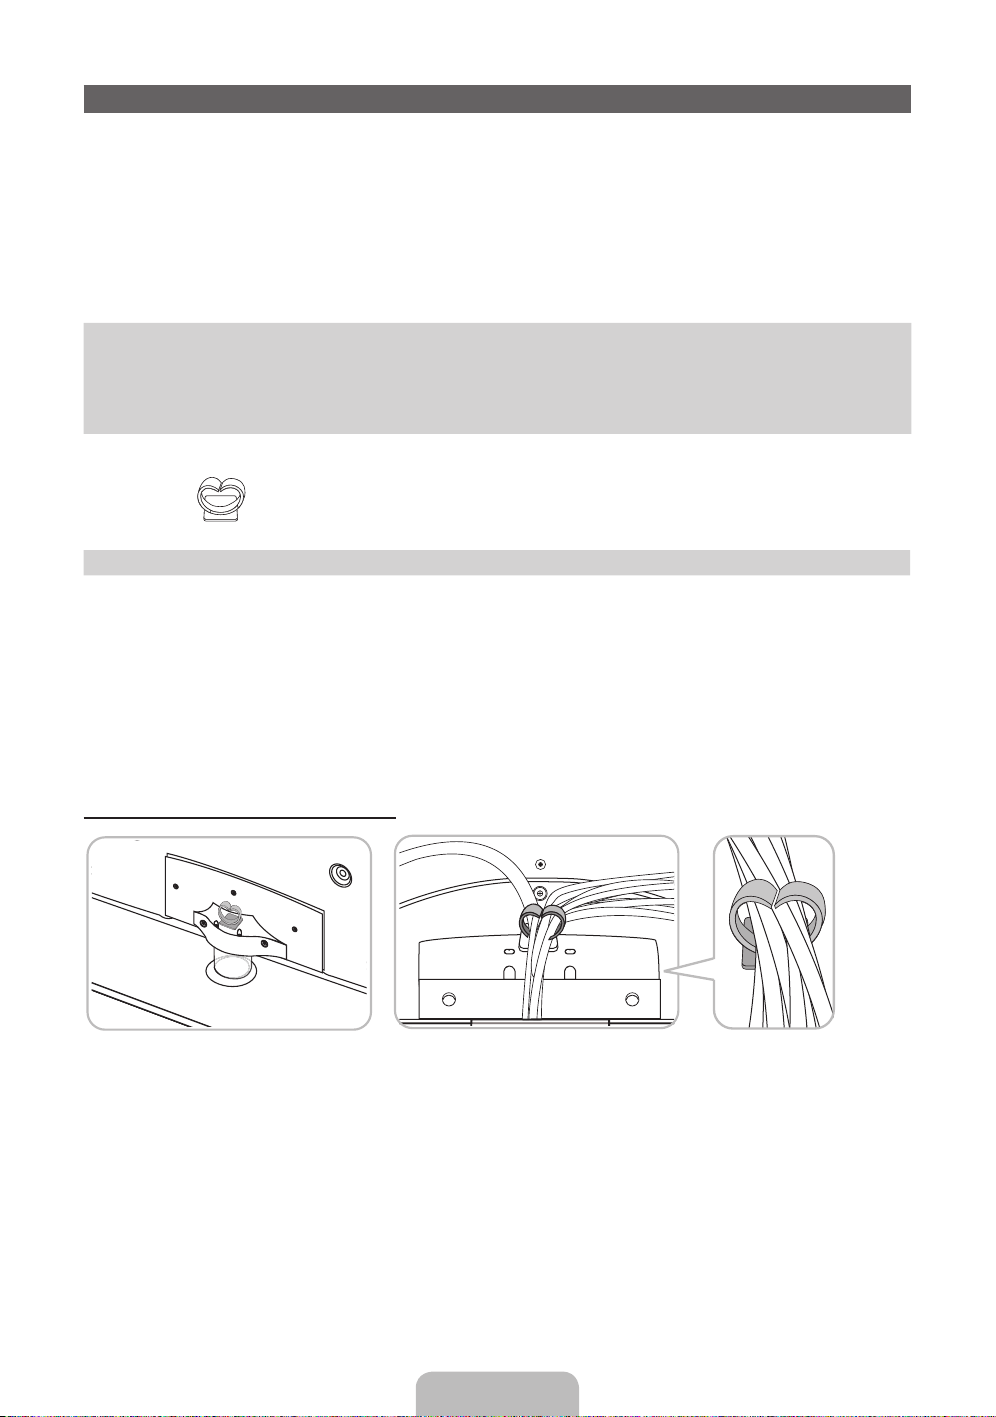
Holder-Wire stand
• An administration fee may be charged if either
− (a) an engineer is called out at your request and there is no defect in the product
(i.e. where you have failed to read this user manual)
− (b) you bring the unit to a repair centre and there is no defect in the product
(i.e. where you have failed to read this user manual).
• The amount of such administration charge will be advised to you before any work or home visit is
carried out.
Assembling the Holder-Wire stand
English - 4

English
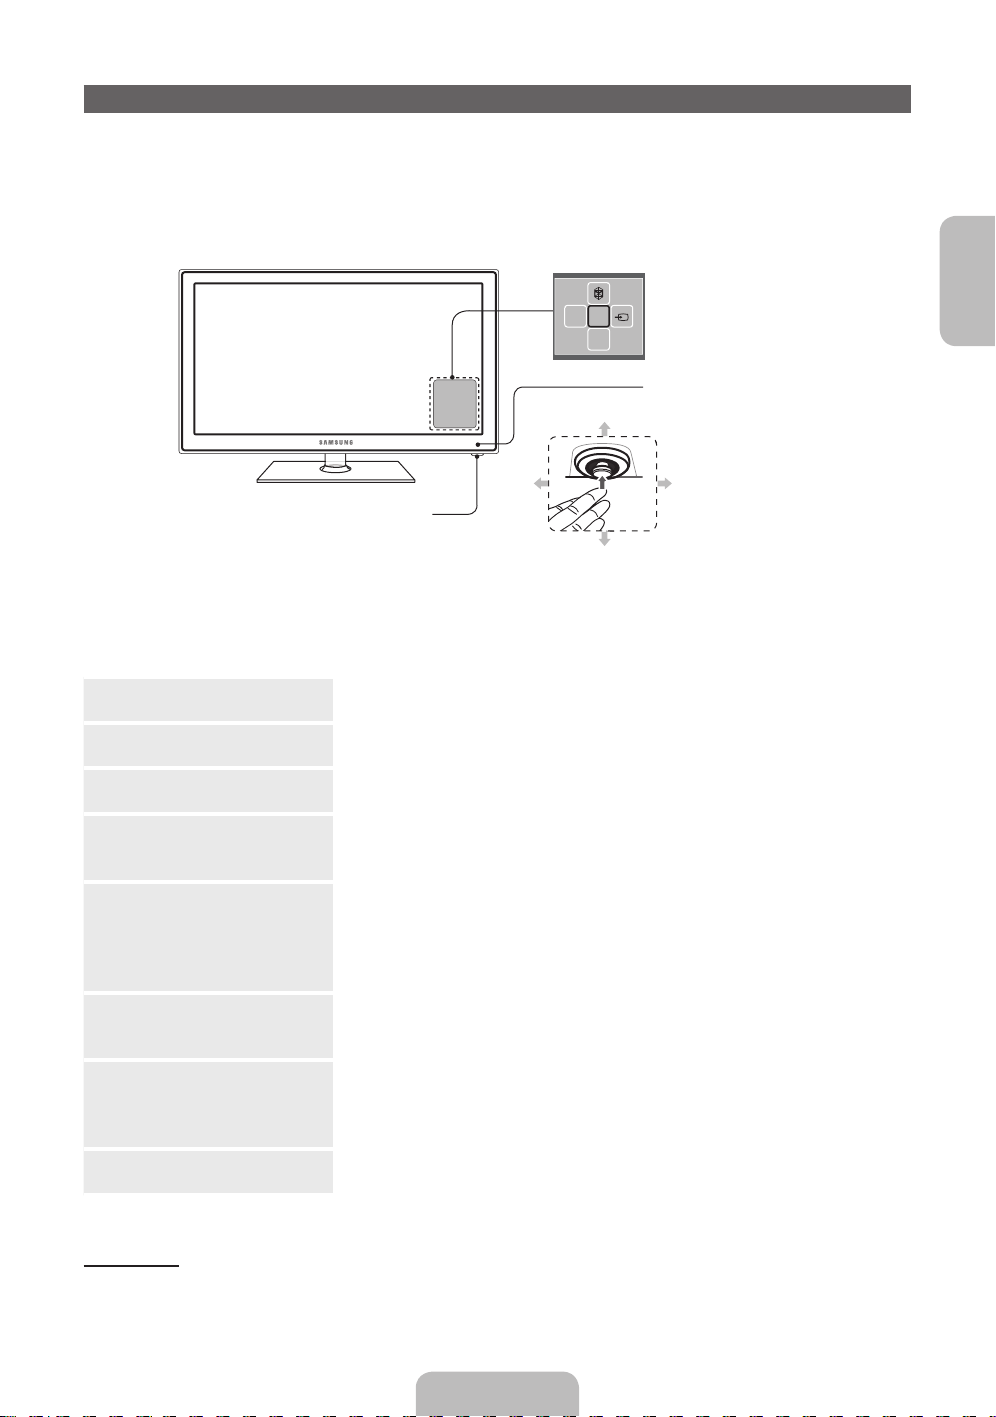
Using the TV's Controller (Panel Key)
TV Controller is a multi directional button that helps navigate without remote control.
✎
Some functions which require a PIN code may not be available.
✎
The product colour and shape may vary depending on the model.
✎
The TV's Controller, a small joy stick like button on the bottom right side of the TV, lets you control the
TV without the remote control.
mR
P
Down(Front)
Function menu
TV Controller
Left
Right
Up(Rear)
Remote control sensor
✎
Follow these instructions facing the front of your TV.
✎
When selecting the function by moving the controller to the forwards/backwards/left/right directions,
be sure not to press the controller. If you press it first, you cannot operate it to move the forwards/
backwards/left/right directions.
Power on
Turn the TV on by pressing the Controller when the TV is in standby mode.
Adjusting the volume Adjusts the volume by moving the controller from side to side when the
power is on.
Selecting a channel Select a channel by moving the Controller backwards and forwards when
the power is on.
Using the function menu To view and use the Function menu, press and release the Controller
when the power is on. To close the Function menu, press and release the
Controller again.
Selecting the MENU (m) With the Function menu visible, select the MENU (m) by moving the
Controller to the left. The OSD (On Screen Display) Menu appears. Select
an option by moving the Controller to the right. Move the Controller to the
right or left, or backwards and forwards to make additional selections. To
change a parameter, select the it, and then press the Controller.
Selecting the SMART HUB
(™)
With the Function menu visible, select SMART HUB (™) by moving the
Controller backwards. The SMART HUB main screen appears. Select an
application by moving the Controller, and then pressing the Controller.
Selecting the Source (s) With the Function menu visible, open the Source (s) by pushing the
Controller to the right. The Source screen appears. To select a Source,
move the Controller back and forth. When the source you want is
highlighted, press the Controller.
Power off (P) With the Function menu visible, select Power off (P) by pulling the
Controller forwards, and then press the Controller.
✎
To close the Menu, Smart Hub, or Source, press the Controller for more than 1 second.
Standby mode
Your TV enters Standby mode when you turn it off and continues to consume a small amount of electric
power. To be safe and to decrease power consumption, do not leave your TV in standby mode for long
periods of time (when you are away on vacation, for example). It is best to unplug the power cord.
English - 5

Remote Control Buttons
✎
This is a special remote control for the visually impaired persons and has Braille points on the Power,
Channel and Volume buttons.
Turns the TV on and off.
Selects the HDMI mode directly.
Returns to the previous channel.
Displays and selects the available video
sources. (p. 12)
Cuts off the sound temporarily.
Changes channels.
Displays channel lists on the screen.
Displays the EPG (Electronic Programme
Guide).
Displays information on the TV screen.
Have direct access to channels.
Adjusts the volume.
Alternately select Teletext ON, Double,
Mix or OFF.
Quickly select frequently used functions.
Use this button in a specific feature.
Opens the OSD.
Brings up the Smart Hub applications.
See e-Manual chapter Advanced
Features → Smart Hub.
Returns to the previous menu.
Use these buttons in a specific feature.
For details, refer to e-Manual.
Family Story: Connect to Family Story
application. See e-Manual chapter
Advanced Features → Family Story.
SEARCH: Support to recommendation
search word and search function. See
e-Manual chapter Advanced Features
→ Search.
DUAL
f
-
g
: Sound effect selection.
SUPPORT: Lets you use various support
functions including e-Manual. (p. 14)
P.SIZE: Lets you select the Picture Size.
See e-Manual chapter Basic Feature →
Changing the Picture Size.
AD/SUBT.: Turns the audio description
on and off. This is not available in some
locations. / Displays digital subtitles. See
e-Manual chapter Other Features →
Subtitle.
u
/
d
/
l
/
r
: Move the cursor on-screen
menu item.
E
: Selects the menu and changes the
corresponding item value.
Exits the on-screen menu.
Use these buttons according to the
direction on screen.
English - 6

English
Installing batteries (Battery size: AAA)
1
3
2
✎
NOTE
• Use the remote control within 23 feet of the TV.
• Bright light may affect the performance of the remote control Avoid using when near special
fluorescent lights or neon signs.
• The colour and shape may vary depending on the model.
Connecting to an Aerial
When the TV is initially powered on, basic settings proceed automatically.
✎
Plug the power cord into a wall outlet only after you have made all other connections.
✎
If you are connecting your TV to a cable or satellite box using HDMI, Component, or Composite
connections, you do not need to connect the ANT IN jack to an aerial or a cable connection.
✎
Use caution when you move or swivel the TV if the aerial cable is tightly connected. You could break
the aerial jack off the TV.
VHF/UHF Aerial Cable
or
Power Input
Aerial Cable (Not supplied)
English - 7

Setup (Initial Setup)
When you turn the TV on for the first time, a sequence of prompts and screens will assist you in configuring
basic settings. To begin Setup, press the P button on your remote.
✎
Setup is available only when the input source is set to TV. See "Changing the Input Source" (p. 12).
✎
To return to the previous step in the Setup sequence, Select Previous.
✎
Before you begin, make sure you have connected the TV to an aerial or a cable connection and that
the TV is plugged in. (p. 7).
✎
To start the Setup select Start.
1
Menu Language:
Selecting a menu
language
Select a menu language you want using your remote, and then select
Next. The TV will be displayed a menu using the selected language since
next step.
2
Use Mode: Select
the Home Use Mode.
Select Home Use using your remote, and then select Next. Store Demo
mode is for retail environments.
3
Network Settings:
Configure network
settings
✎
To connect later,
select Skip.
To set up your network connection, select Next using your remote. If
you do not know your network set up information or want to set to it
later, select Skip. For more detailed information, refer to “Setting up the
Wired or Wireless Network” in the e-Manual for set up requirements and
instructions, and the Network Connection section of this manual (p. 13).
You can set up the network connection later using the Network menu.
4
Software Upgrade:
Upgrading the
software to latest
version
✎
To upgrade later,
select Skip.
Select Next to upgrade TV software. Your TV will automatically upgrade,
if your TV need a software upgrade. If you want to upgrade later, select
the Skip. For more information, refer to Software Upgrade (Preference
Features → Support Menu) in the e-Manual.
✎
This may take some time, depending on network status.
5
Select Country.
(Depending on the
country)
Select the appropriate country.
✎
After selecting the country in the country menu, some models may
proceed with an additional option to setup the pin number.
6
Auto Tuning (1):
Selecting how you
watch your TV
Let’s find and store channels on your TV. Do you need to search for
channels?
• Yes, I need to.: All the channels available will be found and stored on
your TV.
• No, I don’t need to.: My set-top box provides all the channels that
are available, so I don't need to search for channels.
7
Auto Tuning (2):
(Depending on the
country) Selecting a
search options
Select the channel source to memorise. When setting the aerial source to
Cable, a step appears allowing you to assign numerical values (channel
frequencies) to the channels. For more information, refer to Auto Tuning
(Channel Menu → Memorizing Channels) in the e-Manual.
✎
Select Stop at any time to interrupt the memorization process.
English - 8

English
8
Clock: Setting the
Clock Mode
• Auto: Set the current time automatically.
• Manual: Allows you to manually set the current date and time.
9
Time Zone
(Depending on the
country): Setting the
your Time Zone
This step is only available when the clock mode is set to Auto.
• Auto: Set the time zone automatically.
• Manual: Set the time zone manually.
✎
If you selected Manual, you can select whether to turn DST
(Daylight Savings Time) On or Off. (Depending on the country)
10
Setup Complete Select Close to finish.
✎
The completed settings are displayed.
If You Want to Reset This Feature...
Select System - Setup (Initial Setup). Enter your 4 digit PIN number. The default PIN number is “0-0-0-0”
(except France). If you want to change the PIN number, use the Change PIN function.
You should do Setup (Menu → System) again at home although you did in shop.
✎
If you forget the PIN code, press the remote control buttons in the following sequence in Standby
mode, which resets the PIN to “0-0-0-0” (France: “1-1-1-1”): MUTE → 8 → 2 → 4 → POWER (on).
English - 9
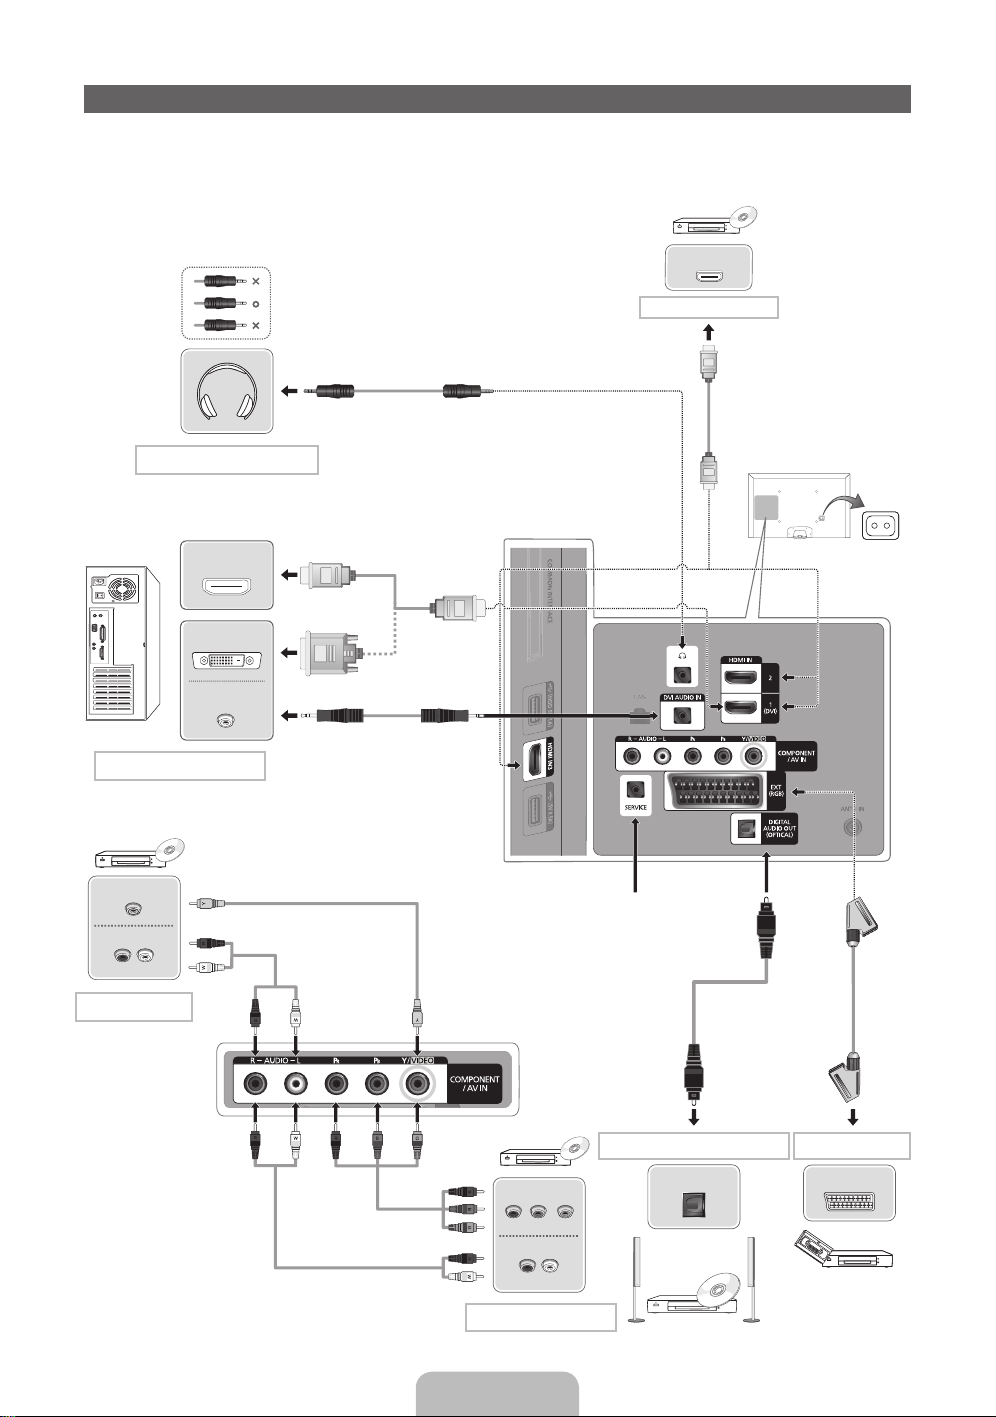
Connections
✎
For more information, refer to Connecting the TV in the e-Manual.
✎
The displayed image may differ depending on the model.
HDMI OUT
AUDIO OUT
R-AUDIO-L
VIDEO OUT
AUDIO OUT
R-AUDIO-L
P
R
P
B
Y
COMPONENT OUT
AUDIO OUT
DVI OUT
HDMI OUT
OPTICAL
EXT
HDMI connection
BD Player
HDMI Cable
(Not Supplied)
Component connection
AV connection
SCART connectionDVD home theatre connection
Video Cable (Not Supplied)
SERVICE: Connector for service only
Audio Cable
(Not Supplied)
BD Player
BD Player
Component Cable
(Not Supplied)
Audio Cable (Not Supplied)
Scart Cable
(Not Supplied)
VCR or DVD
Headphones connection
Optical Cable
(Not Supplied)
Headphone Cable
(Not Supplied)
PC connection
HDMI Cable
(Not Supplied)
HDMI to DVI Cable
(Not Supplied)
Audio Cable (Not Supplied)
Power Input
English - 10

English
Connecting to a COMMON INTERFACE slot (Your TV viewing Card Slot)
Using the “CI or CI+ CARD”
To watch paid channels, the “CI or CI+ CARD” must be
inserted.
• If you don’t insert the “CI or CI+ CARD”, some
channels will display the message “Scrambled
Signal”.
• The pairing information containing a telephone
number, the “CI or CI+ CARD” ID the Host ID and
other information will be displayed in about 2~3
minutes. If an error message is displayed, please
contact your service provider.
• When the configuration of channel information has
finished, the message “Updating Completed” is displayed, indicating the channel list is updated.
✎
NOTE
• You must obtain a “CI or CI+ CARD” from a local cable service provider.
• When removing the “CI or CI+ CARD”, carefully pull it out with your hands since dropping the “CI or
CI+ CARD” may cause damage to it.
• Insert the “CI or CI+ CARD” in the direction marked on the card.
• The location of the COMMON INTERFACE slot may be different depending on the model.
• “CI or CI+ CARD” is not supported in some countries and regions; check with your authorized
dealer.
• If you have any problems, please contact a service provider.
• Insert the “CI or CI+ CARD” that supports the current aerial settings. The screen will be distorted or
will not be seen.
English - 11

Changing the Input Source
Source
™ → Source
Use to select TV or an external input source such as a DVD player / Blu-ray player / cable box / STB
satellite receiver.
■ TV / Ext. / HDMI1/DVI / HDMI2 / HDMI3 / AV / Component
1. Press the ™ button on your remote. The Smart Hub screen appears.
2. Select Source. The Source screen appears.
3. Select a desired external input source.
✎
You can only choose external devices that are connected to the TV. In the displaying Source list,
connected inputs will be highlighted.
✎
In the Source, Ext. is always stays activated.
How to use Edit Name
Edit Name lets you associate a device name to an input source. To access Edit Name, open the Tools
menu when the Source is displayed. The following selections appear under Edit Name:
■ VCR / DVD / Cable STB / Satellite STB / PVR STB / AV Receiver / Game / Camcorder / PC / DVI
PC / DVI Devices / TV / IPTV / Blu-ray / HD DVD / DMA: Name the device connected to the input
jacks to make your input source selection easier.
✎
If you have connected a PC to the HDMI IN 1(DVI) port with an HDMI cable, select PC under Edit
Name to enter a device name.
✎
If you have connected a PC to the HDMI IN 1(DVI) port with an HDMI to DVI cable, select DVI PC
under Edit Name to enter a device name.
✎
If you connected an AV device to the HDMI IN 1(DVI) port with an HDMI to DVI cable, select DVI
Devices under Edit Name to enter a device name.
Information
You can see detailed information about the selected external device.
Refresh
In Source, if the external devices are not displayed, open the Tools menu, and then select Refresh, then
search for the connected devices.
✎
Alternatively, you can refresh the Source list screen by selecting a using your remote.
✎
This function is only available if Anynet+ (HDMI-CEC) function is set to On.
English - 12

English
Network Connection
Network Connection - Wireless
You can connect your TV to your LAN through a standard wireless router or modem. To connect wirelessly,
you must first attach a “Samsung Wireless LAN Adapter” (WIS09ABGNX or WIS12ABGNX - sold
separately) to either the USB port on your TV. See the illustration below.
LAN Cable (Not Supplied)
The LAN Port on
the Wall
Wireless IP sharer
(Router having DHCP server)
Samsung Wireless
LAN Adapter
or
TV Side Panel
Samsung’s Wireless LAN adapter supports the IEEE 802.11a/b/g and n communication protocols.
Samsung recommends using IEEE 802.11n. When you play the video over a IEEE 802.11b/g connection,
the video may not play smoothly.
Most wireless network systems incorporate a security system that requires devices that access the
network through an access point or wireless router (typically a wireless IP Sharer) to transmit an encrypted
security code called an access key.
If Pure High-throughput (Greenfield) 802.11n mode is selected and the Encryption type is set to WEP or
TKIP for your wireless router, Samsung TVs will not support a connection in compliance with new Wi-Fi
certification specifications.
Network Connection - Wired
There are two main ways to connect your TV to your network using cable, depending on your network
setup. They are illustrated below:
LAN Cable (Not Supplied)Modem Cable (Not Supplied)
The Modem Port on the Wall TV Rear Panel
External Modem
(ADSL / VDSL / Cable TV)
The LAN Port on the Wall TV Rear Panel
LAN Cable (Not Supplied)
✎
It is not supported when the network speed is below or equal to 10Mbps.
✎
Use Cat 5(*STP Type) cable for the connection.
*Shielded Twist Pair
English - 13
How to view the e-Manual
SUPPORT
You can fi nd instructions for your TV’s features in the e-Manual. To open the
e-Manual, press the SUPPORT button on your remote.
You can also access it through the menu:
Menu → Support → e-Manual
Access the e-Manual
To use the e-Manual, follow these steps:
1. When you need to help, select Support using your remote. The e-Manual screen appears.
2. Select a desired category.
3. Select a desired topic. The e-Manual displays the page you want to see.
✎
Blue word in e-Manual means menu list on TV screen.
✎
Green icon in e-Manual means a button on your remote.
✎
Arrow steps (e.g. Menu → Support → e-Manual) in e-Manual signifies that a sequence of steps is
required for the function.
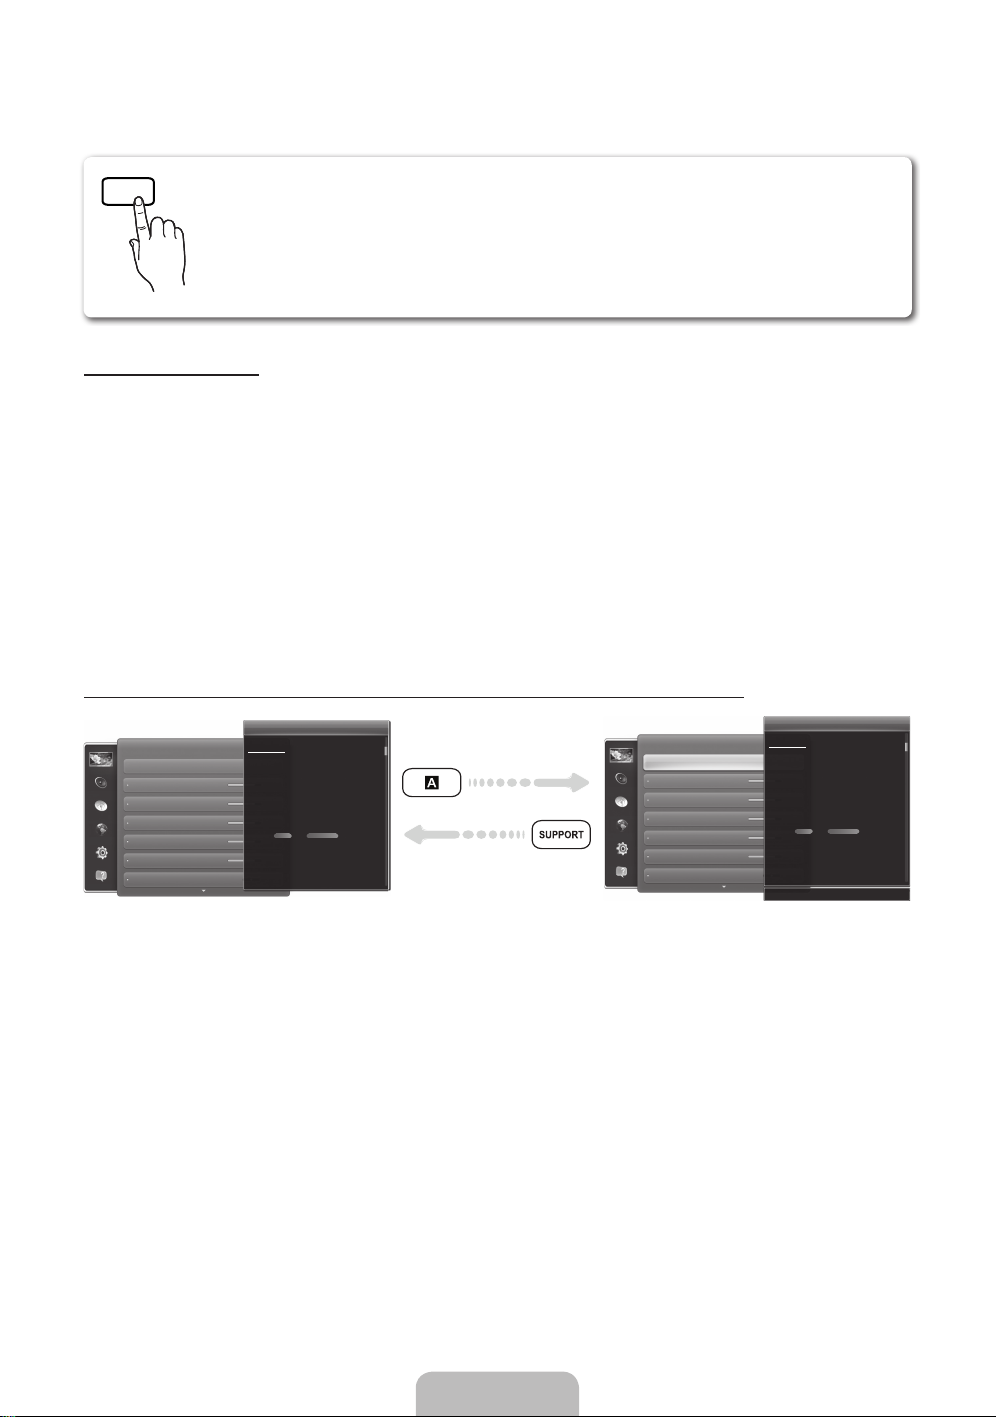
How to toggle between an e-Manual topic and the corresponding OSD menu(s).
Picture
Picture Mode
Backlight
Brightness
Contrast
Sharpness
Colour
Tint (G/R) G50
Changing the Preset Picture Mode
Picture Mode
Menu → Picture → Picture Mode
• Dynamic
Suitable for a bright room.
• Standard
Suitable for a normal environment.
• Natural
for LED TV / Relax for PDP 6500 Series
Suitable for reducing eye strain.
• Movie
Suitable for watching movies in a dark room.
Picture modes apply preset adjustments to the picture.
NWhen connecting a PC using the HDMI-DVI cable, you can only
select Entertain and Standard.
Picture
Changing the Preset Picture Mode
Picture Mode
Menu → Picture → Picture Mode
• Dynamic
Suitable for a bright room.
• Standard
Suitable for a normal environment.
• Natural
for LED TV / Relax for PDP 6500 Series
Suitable for reducing eye strain.
• Movie
Suitable for watching movies in a dark room.
Picture modes apply preset adjustments to the picture.
NWhen connecting a PC using the HDMI-DVI cable, you can only
select Entertain and Standard.
Picture Mode
Backlight
Brightness
Contrast
Sharpness
Colour
Tint (G/R)
‘ Back to e-Manual
✎
This function is not enabled in some menus.
✎
You can’t use the Try Now function if the menu is not available.
1. If you want to execute the corresponding menu(s), press the a using your remote.
2. To return to the e-Manual screen, select Support using your remote.
English - 14

English
Using the coloured and function buttons with e-Manual
• Scroll bar: Scroll the e-Manual screen up or down.
• l / r: Moves the previous or next chapter.
• a Try now: Move the OSD menu that corresponds to the topic. To return to the e-Manual screen,
select Support using your remote.
• b Home: Moves to the e-Manual home screen.
• { Position: Each time you select {, change a position for the e-Manual screen.
• } Index (depending on the country): Displays the Index screen.
• R Return: Return to the previous screen.
How to search for a topic on the index page
1. Select } using your remote. The Index screen appears.
2. To search for a topic, select a letter. The Index displays a list of topics and keywords that begin with the
letter you selected.
3. Select a topic or keyword you want.
4. The e-Manual page with the topic appears.
✎
To close the Index screen, press the RETURNR button.
To Change the screen position of the e-Manual
If the e-Manual screen is not invisible well because the OSD Menus screen, you can change the e-Manual
screen's position.
1. Move the Highlight to the e-Manual screen by pressing the SUPPORT button on your remote.
2. Press the { button on your remote. Each time you select { using your remote, the position of the
e-Manual will change.
English - 15
Installing the Wall Mount
Installing the Wall Mount Kit
The wall mount kit (sold separately) allows you to mount the TV on the wall.
For detailed information on installing the wall mount, see the instructions provided with the wall mount.
Contact a technician for assistance when installing the wall mount bracket. We do not advice you to do it
yourself.
Samsung Electronics is not responsible for any damage to the product or injury to yourself or others if you
elect to install the TV on your own.
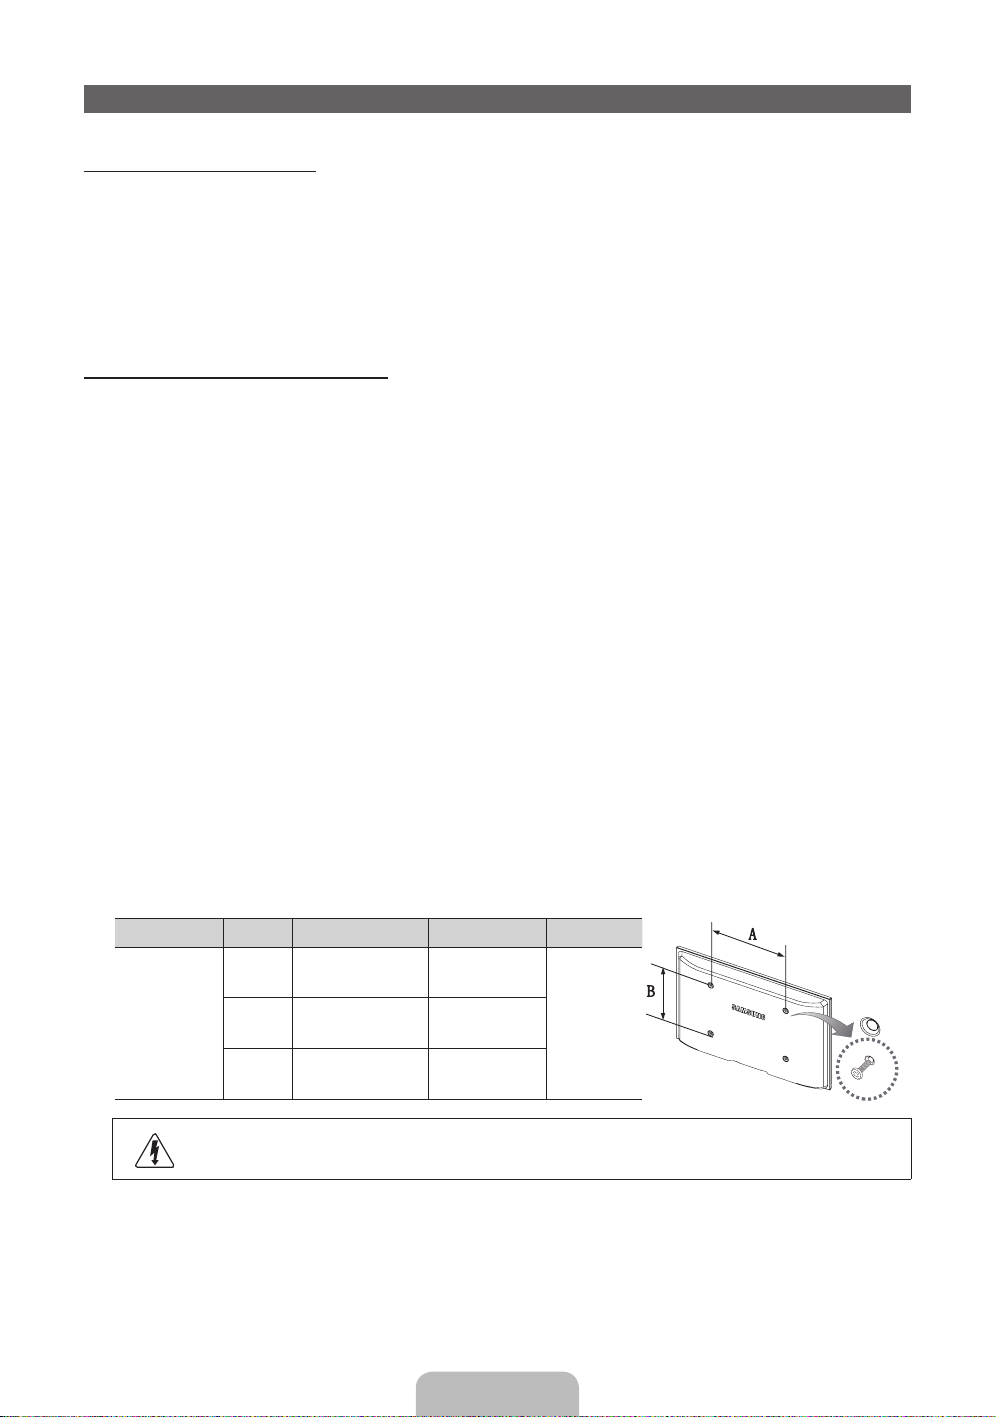
Wall Mount Kit Specifications (VESA)
✎
The wall mount kit is not supplied, but sold separately.
Install your wall mount on a solid wall perpendicular to the floor. When attaching to other building materials,
please contact your nearest dealer. If installed on a ceiling or slanted wall, it may fall and result in severe
personal injury.
✎
NOTE
• Standard dimensions for wall mount kits are shown in the table below.
• When purchasing our wall mount kit, a detailed installation manual and all parts necessary for
assembly are provided.
• Do not use screws that do not comply with the VESA standard screw specifications.
• Do not use screws that are longer than the standard dimension or do not comply with the VESA
standard screw specifications. Screws that are too long may cause damage to the inside of the TV
set.
• For wall mounts that do not comply with the VESA standard screw specifications, the length of the
screws may differ depending on the wall mount specifications.
• Do not fasten the screws that are too strongly; this may damage the product or cause the product
to fall, leading to personal injury. Samsung is not liable for these kinds of accidents.
• Samsung is not liable for product damage or personal injury when a non-VESA or non-specified
wall mount is used or the consumer fails to follow the product installation instructions.
• Do not mount the TV at more than a 15 degree tilt.
Product Family inches VESA Spec. (A * B) Standard Screw Quantity
LED-TV
26 100 X 100 M4
432~40 200 X 200 M6
46~50 400 X 400 M8
Do not install your Wall Mount Kit while your TV is turned on. It may result in personal
injury due to electric shock.
English - 16
English
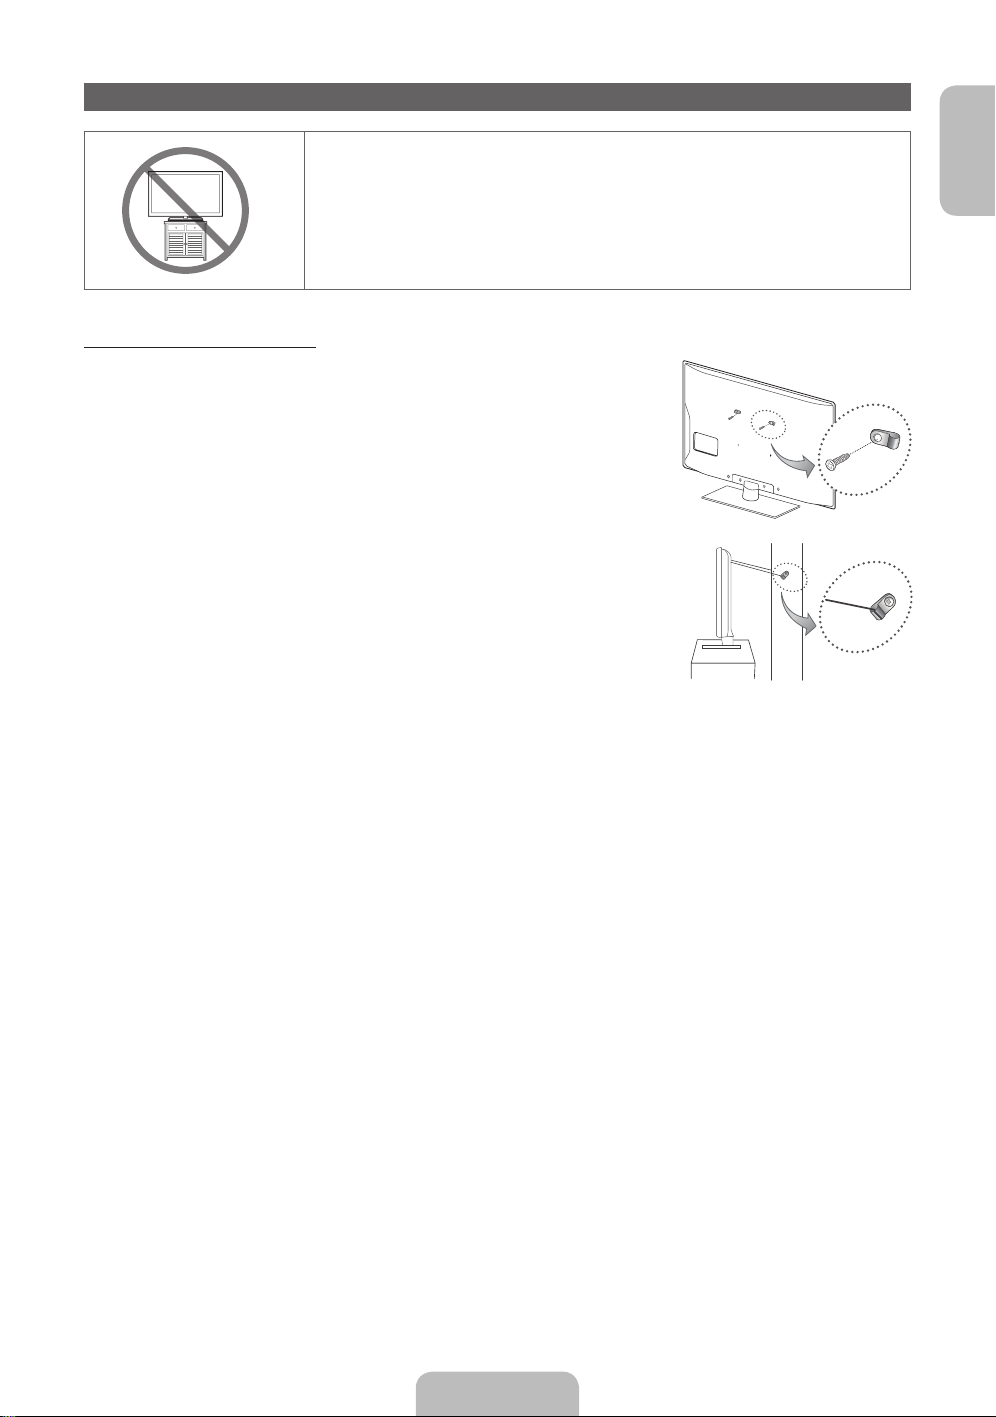
Securing the TV to the Wall
Caution: Pulling, pushing, or climbing on the TV may cause the TV to
fall. In particular, ensure your children do not hang over or destabilize
the TV. Doing so may cause the TV to tip over, causing serious injuries
or death. Follow all safety precautions provided in the included Safety
Flyer with your TV. For added stability and safety, you can purchase
and install the anti fall device as described below.
To Avoid the TV from Falling
1. Put the screws into the clamps and firmly fasten them onto the wall.
Confirm that the screws have been firmly installed onto the wall.
✎
You may need additional material such as an anchor depending
on the type of wall.
✎
Since the necessary clamps, screws, and string are not
supplied, please purchase these additionally.
2. Remove the screws from the back centre of the TV, put the screws
into the clamps, and then fasten the screws onto the TV again.
✎
Screws may not be supplied with the product. In this case,
please purchase the screws of the following specifications.
✎
Screw Specifications
• For a 26 inches: M4
• For a 32 ~ 40 inches: M6
• For a 46 ~ 50 inches: M8
3. Connect the clamps fixed onto the TV and the clamps fixed onto the wall with a strong cable and then
tie the string tightly.
✎
NOTE
• Install the TV near to the wall so that it does not fall backwards.
• It is safe to connect the string so that the clamps fixed on the wall are equal to or lower than the
clamps fixed on the TV.
• Untie the string before moving the TV.
4
. Verify all connections are properly secured. Periodically check connections for any sign of fatigue for failure. If
you have any doubt about the security of your connections, contact a professional installer.
Wall
English - 17

Troubleshooting
If you have any questions about the TV, first refer to this list. If none of these troubleshooting tips apply,
please visit “www.samsung.com,” then click on Support, or contact the call centre listed on the back-cover
of this manual.
Issues Solutions and Explanations
The TV won’t turn on. • Make sure the AC power cord is securely plugged in to the wall outlet
and the TV.
• Make sure the wall outlet is working.
• Try pressing the P button on the TV to make sure the problem is not
the remote. If the TV turns on, refer to “The remote control does not
work.” below.
There is no picture/video. • Check cable connections (remove and reconnect all cables connected
to the TV and external devices).
• Set your external device’s (Cable/Sat Box, DVD, Blu-ray etc.) video
outputs to match the connections to the TV input. For example, if an
external device’s output is HDMI, it should be connected to an HDMI
input on the TV.
• Make sure your connected devices are powered on.
• Be sure to select the correct input source.
• Reboot the connected device by reconnecting the device’s power
cable.
The remote control does not
work.
• Replace the remote control batteries with the poles (+/–) in the right
direction.
• Clean the sensor’s transmission window on the remote.
• Try pointing the remote directly at the TV from 5~6 feet away.
The cable/set top box remote
control doesn’t turn the TV on
or off, or adjust the volume.
• Programme the Cable/Set remote control to operate the TV. Refer to
the Cable/Set user manual for the SAMSUNG TV code.
✎
Some of above pictures and functions are available at specific models only.
✎
You can keep your TV as optimum condition to upgrade the latest firmware on web site (samsung.
com → Support → Downloads) by USB.
English - 18

English
Licence
Storage and Maintenance
✎
If you attached some stickers on the TV screen, it remains some debris after removing the sticker.
Please clean it to watch TV.
Do not spray water directly onto the product. Any
liquid that goes into the product may cause a
failure, fire, or electric shock.
Clean the product with a soft cloth dapped in a
small amount of water. Do not use a flammable
liquid (e.g. benzene, thinners) or a cleaning agent.
English - 19

Specifications
Display Resolution 1920 x 1080
Environmental Considerations
Operating Temperature
Operating Humidity
Storage Temperature
Storage Humidity
10°C to 40°C (50°F to 104°F)
10% to 80%, non-condensing
-20°C to 45°C (-4°F to 113°F)
5% to 95%, non-condensing
TV System Analogue: B/G, D/K, L, I (Depending on your country selection)
Digital: DVB-T/DVB-C
Colour/Video System Analogue: PAL, SECAM, NTSC-4.43, NTSC-3.58, PAL60
Digital: MPEG-2 MP@ML, MPEG-4, H.264/AVC MP@L3, MP@L4.0, HP@L4.0
Sound System BG, DK, L, NICAM, MPEG1, DD, DD+, HEAAC
HDMI IN Video: 1080 24p, 1080p, 1080i, 720p, 576p, 480p
Audio: 2Ch Linear PCM 32/44.1/48kHz, 16/20/24bits.
Stand Swivel (Left / Right) 0˚
Model Name UE32EH5300 UE37EH5300
Screen Size 32 inches (80 cm) 37 inches (94 cm)
Sound
(Output) 10 W X 2
Dimensions (WxHxD)
Body
With stand
738.3 x 444.6 x 93.1 mm
738.3 x 498.1 x 191.6 mm
866.5 x 519.3 x 93.0 mm
866.5 x 575.5 x 227.6 mm
Weight
Without Stand
With Stand
5.9 kg
6.6 kg
8.0 kg
10.2 kg
Model Name UE40EH5300 UE46EH5300
Screen Size 40 inches (101 cm) 46 inches (116 cm)
Sound
(Output) 10 W X 2
Dimensions (WxHxD)
Body
With stand
927.6 x 551.0 x 93.0 mm
927.6 x 606.5 x 227.6 mm
1059.8 x 625.6 x 94.3 mm
1059.8 x 680.7 x 227.6 mm
Weight
Without Stand
With Stand
9.0 kg
11.0 kg
12.5 kg
14.5 kg
Model Name UE50EH5300
Screen Size 50 inches (125 cm)
Sound
(Output) 10 W X 2
Dimensions (WxHxD)
Body
With stand
1137.6 x 669.4 x 94.5 mm
1137.6 x 725.0 x 227.6 mm
Weight
Without Stand
With Stand
15.7 kg
18.3 kg
✎
Design and specifications are subject to change without prior notice.
✎
For information about power supply, and more about power consumption, refer to the label attached
to the product.
✎
Typical power consumption is measured according to IEC 62087 Ed.2
English - 20
English
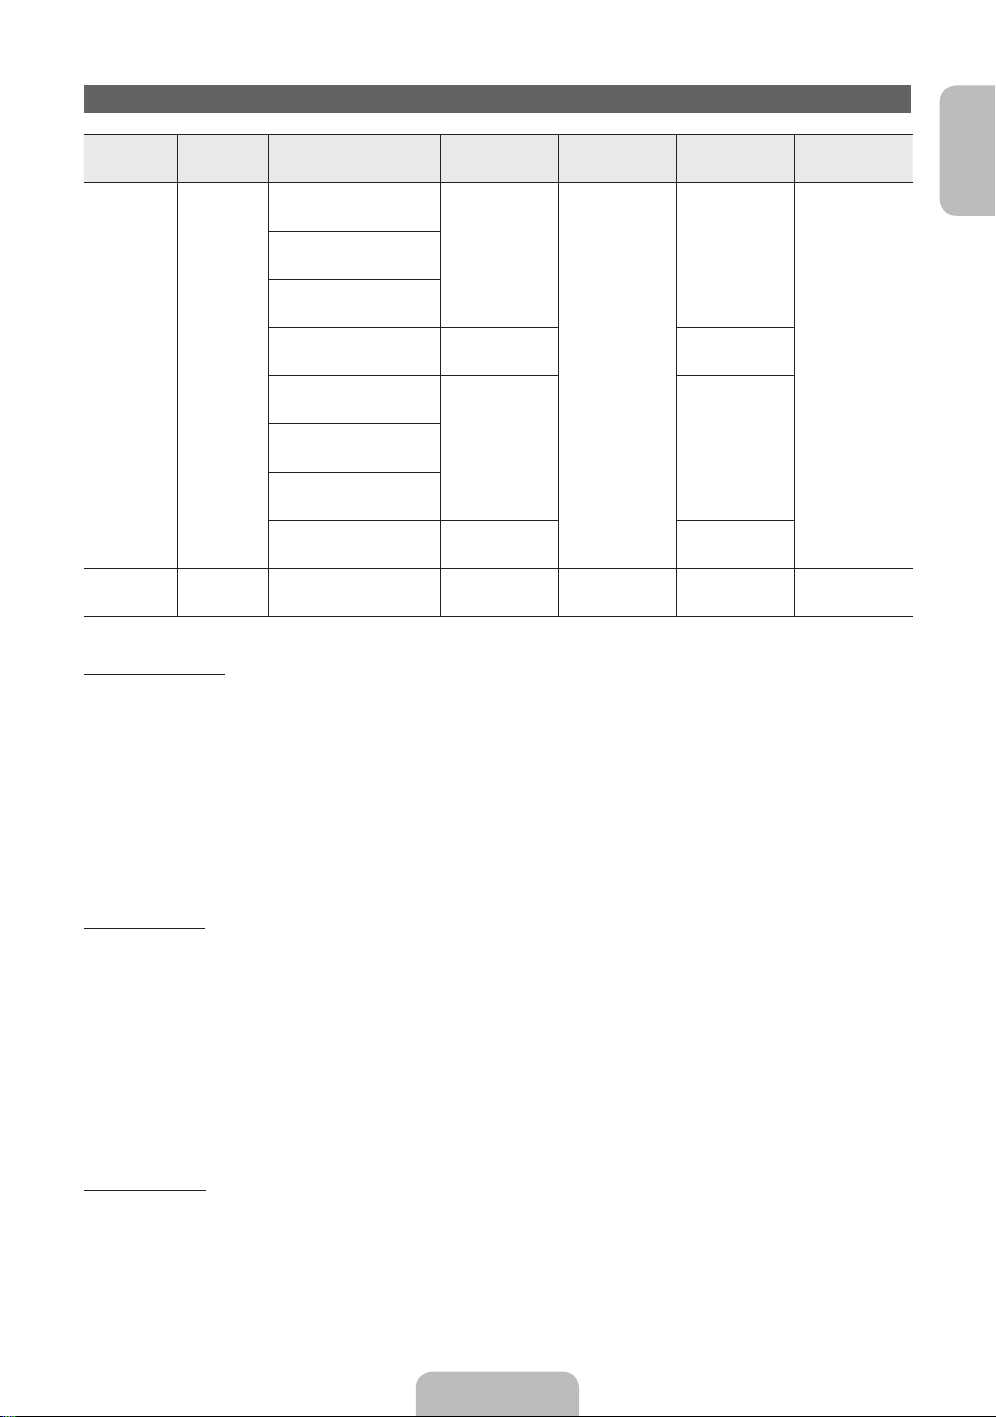
Video Codec
File
Extension
Container Video Codec Resolution
Frame rate
(fps)
Bit rate
(Mbps)
Audio Codec
*.avi
*.mkv
*.asf
*.wmv
*.mp4
*.3gp
*.vro
*.mpg
*.mpeg
*.ts
*.tp
*.trp
*.mov
*.flv
*.vob
*.svi
*.m2ts
*.mts
*.divx
AVI
MKV
ASF
MP4
3GP
VRO
VOB
PS
TS
Divx 3.11/4.x/5.x/6.x
1920 x 1080
6 – 30
30
AC3
LPCM
ADMPCM(IMA, MS)
AAC
HE-AAC
WMA
DD+
MPEG(MP3)
DTS Core
G.711(A-Law,
μ-Law)
MPEG4 SP/ASP
H.264 BP/MP/HP
Motion JPEG 640 x 480 8
Window Media Video v9
1920 x 1080 30MPEG2
MPEG1
VP6 640 x 480 4
*.webm WebM VP8 1920 x 1080 6~30 8 Vorbis
Other Restriction
✎
Video content will not play, or not play correctly, if there is an error in the content or the container.
✎
Sound or video may not work if the contents have a standard bit rate/frame rate above the compatible
Frame/sec listed in the table above.
✎
If the Index Table is in error, the Seek (Jump) function is not supported.
✎
When you play video over a network connection, the video may not be played smoothly.
✎
The menu may take longer to appear if the video’s bit rate exceeds 10Mbps.
✎
Some USB/digital camera devices may not be compatible with the player.
Video decoder
• Supports up to H.264, Level 4.1.
• H.264 FMO / ASO / RS, VC1 SP / MP / AP L4 are not supported.
• For all Video codecs except MVC, VP8, VP6:
− Below 1280 x 720: 60 frame max
− Above 1280 x 720: 30 frame max
• GMC is not supported.
• Supports only SVAF Top/Bottom and Side by Side.
Audio decoder
• WMA 9, 10 Pro supports up to 5.1 channel and M2 profile (except LBR mode of M0).
• WMA lossless audio is not supported.
• If Vorbis is only in Webm container, supports up to 2 channel.
English - 21
Display Resolution
Mode Resolution
Horizontal Frequency
(KHz)
Vertical Frequency
(Hz)
Pixel Clock Frequency
(MHz)
Sync Polarity (H / V)
IBM
640 x 350
720 x 400
31.469
31.469
70.086
70.087
25.175
28.322
+/-
-/+
MAC
640 x 480
832 x 624
1152 x 870
35.000
49.726
68.681
66.667
74.551
75.062
30.240
57.284
100.000
-/-
-/-
-/-
VESA DMT
640 x 480
640 x 480
640 x 480
800 x 600
800 x 600
800 x 600
1024 x 768
1024 x 768
1024 x 768
1152 x 864
1280 x 720
1280 x 800
1280 x 1024
1280 x 1024
1366 x 768
1440 x 900
1600 x 900RB
1680 x 1050
1920 x 1080
31.469
37.861
37.500
37.879
48.077
46.875
48.363
56.476
60.023
67.500
45.000
49.702
63.981
79.976
47.712
55.935
60.000
65.290
67.500
59.940
72.809
75.000
60.317
72.188
75.000
60.004
70.069
75.029
75.000
60.000
59.810
60.020
75.025
59.790
59.887
60.000
59.954
60.000
25.175
31.500
31.500
40.000
50.000
49.500
65.000
75.000
78.750
108.000
74.250
83.500
108.000
135.000
85.500
106.500
108.000
146.250
148.500
-/-
-/-
-/-
+/+
+/+
+/+
-/-
-/-
+/+
+/+
+/+
-/+
+/+
+/+
+/+
-/+
+/+
-/+
+/+
✎
NOTE
• The interlace mode is not supported.
• The set might operate abnormally if a non-standard video format is selected.
Recommendation - EU Only
• Hereby, Samsung Electronics, declares that this LED TV is in compliance with the essential
requirements and other relevant provisions of Directive 1999/5/EC.
• The official Declaration of Conformity may be found at http://www.samsung.com, go to Support >
Search Product Support and enter the model name.
• This equipment may be operated in all EU countries.
English - 22

This page is intentionally
left blank.

Français - 2
Pour plus d'informations sur la consultation du manuel électronique (p.14)
Les schémas et illustrations contenus dans ce mode d'emploi sont fournis uniquement à titre de référence. Elles l'aspect réel du produit peut être
différent. La conception et les spécifications du produit sont susceptibles d'être modifiées sans préavis.
Les langues de la CEI (russe, ukrainien, kazakh) ne sont pas disponibles pour ce produit, fabriqué pour des clients de l'UE.
Avis concernant le téléviseur numérique
1. Les fonctions relatives à la télévision numérique (DVB) ne sont disponibles que dans les pays ou régions où des signaux terrestres numériques
de type DVB-T (MPEG2 et MPEG4 AVC) sont diffusés ou dans lesquels vous avez accès à un service de télévision par câble compatible DVB-C
(MPEG2 et MPEG4 AAC). Consultez votre distributeur local pour connaître les possibilités en matière de réception des signaux DVB-T ou DVB-C.
2. DVB-T est la norme du consortium européen DVB pour la diffusion de signaux terrestres de télévision numérique. La norme DVB-C est, quant à
elle, prévue pour la diffusion des signaux de télévision numérique par câble. Certaines fonctions particulières, telles que le guide électronique des
programmes (Electric Program Guide - EPG) ou encore la vidéo à la demande (Video On Demand - VOD), ne sont toutefois pas incluses dans cette
spécification. Dès lors, elles ne seront pas traitées pour l'instant.
3. Bien que ce téléviseur soit conforme aux dernières normes DVB-T et DVB-C (août 2008), il n'est pas garanti qu'il soit compatible avec les futures
diffusions de signaux numériques terrestres DVB-T et par câble DVB-C.
4. En fonction du pays ou de la région où vous vous trouvez, certains opérateurs de télévision par câble peuvent facturer des frais supplémentaires
pour un tel service. Il se peut également que vous deviez accepter les termes et conditions de ces sociétés.
5. Il se peut que certaines fonctions de TV numérique ne soient pas disponibles dans certains pays ou certaines régions et que la réception des
signaux DVB-C ne soit pas correcte avec tous les opérateurs.
6. Pour plus d'informations, contactez votre service client Samsung.
✎
Les différentes méthodes de diffusion adoptées en fonction des pays peuvent af fecter la qualité de réception du téléviseur. Vérifiez le
fonctionnement du téléviseur chez votre revendeur agréé SAMSUNG ou contactez le centre d'appel de Samsung pour savoir s'il est possible
d'en améliorer les performances en reconfigurant les réglages.
Avertissement d'image fixe
Evitez d'afficher sur l'écran des images fixes (telles que des photos au format JPEG) ou des éléments d'images fixes (tels que des logos de programmes
TV, un format d'image 4:3 ou panoramique, des bandeaux d'actualités ou d'informations boursières au bas de l'écran, etc.). L'affichage permanent
d'images fixes risque, en effet, d'entraîner l'apparition d'images fantôme à l'écran, ce qui peut se traduire par une dégradation de la qualité d'image.
Pour atténuer les risques, suivez scrupuleusement les recommandations suivantes:
• Evitez d'afficher longuement la même chaîne de télévision.
• Essayez toujours d'afficher l'image en plein écran; pour obtenir une correspondance optimale, utilisez le menu de format d'image du téléviseur.
• Réduisez les valeurs de luminosité et de contraste sur le minimum requis pour obtenir la qualité d'image souhaitée. L'utilisation de valeurs trop
élevées risque d'accélérer le processus de brûlure.
• Utilisez fréquemment toutes les fonctions du téléviseur conçues pour réduire le phénomène de rémanence et la brûlure d'écran. Pour plus
d'informations à ce sujet, consultez la section appropriée du mode d'emploi.
Les bons gestes de mise au rebut de ce produit (Déchets d’équipements électriques et électroniques)
(Applicable aux pays disposant de systèmes de collecte séparés)
Ce symbole sur le produit, ses accessoires ou sa documentation indique que ni le produit, ni ses accessoires électroniques
usagés (chargeur, casque audio, câble USB, etc.) ne peuvent être jetés avec les autres déchets ménagers. La mise au rebut
incontrôlée des déchets présentant des risques environnementaux et de santé publique, veuillez séparer vos produits et
accessoires usagés des autres déchets. Vous favoriserez ainsi le recyclage de la matière qui les compose dans le cadre d’un
développement durable.
Les particuliers sont invités à contacter le magasin leur ayant vendu le produit ou à se renseigner auprès des autorités locales
pour connaître les procédures et les points de collecte de ces produits en vue de leur recyclage.
Les entreprises et particuliers sont invités à contacter leurs fournisseurs et à consulter les conditions de leur contrat de vente. Ce
produit et ses accessoires ne peuvent être jetés avec les autres déchets.
Elimination des batteries de ce produit
(Applicable aux pays disposant de systèmes de collecte séparés)
Le symbole sur la batterie, le manuel ou l'emballage indique que les batteries de ce produit ne doivent pas être éliminées en fin
de vie avec les autres déchets ménagers. L'indication éventuelle des symboles chimiques Hg, Cd ou Pb signifie que la batterie
contient des quantités de mercure, de cadmium ou de plomb supérieures aux niveaux de référence stipulés dans la directive CE
2006/66. Si les batteries ne sont pas correctement éliminées, ces substances peuvent porter préjudice à la santé humaine ou à
l'environnement.
Afin de protéger les ressources naturelles et d'encourager la réutilisation du matériel, veillez à séparer les batteries des autres
types de déchets et à les recycler via votre système local de collecte gratuite des batteries.

Français
Français - 3
Sécurisation de l'espace d'installation
Maintenez les distances requises entre le produit et les autres objets (par exemple, les murs) afin de
garantir une ventilation adaptée.
Le non-respect de ces distances peut provoquer un incendie ou un problème au produit en raison d'une
augmentation de la température interne de celui-ci.
✎
Lors de l'utilisation d'un pied ou d'un support mural, utilisez uniquement les pièces fournies par
Samsung Electronics.
• L'utilisation de pièces fournies par un autre fabricant peut occasionner un problème au niveau du
produit ou la chute de celui-ci, ce qui pourrait vous blesser.
✎
L'aspect peut varier en fonction du produit.
• Soyez prudent lorsque vous touchez le téléviseur, car certaines parties peuvent être brûlantes.
Installation avec un pied. Installation avec un support de montage mural.
10 cm10 cm
10 cm
10 cm
10 cm
10 cm
10 cm
Liste des fonctions
• SMART HUB: la Passerelle vers tous les contenus intégrés en un seul lieu.
− Tout est intégré pour faciliter et diversifier les possibilités de loisirs.
− Contrôlez vos loisirs avec une interface simple et conviviale.
− Accédez à diverses applications tous les jours.
− Personnalisez votre téléviseur, en regroupant ou en triant vous applications en fonction de vos
goûts.
• AllShare Play: AllShare Play vous permet d'accéder à des photos, vidéos ou fichiers audio situés
sur des périphériques USB, appareils photos numériques, téléphones portables ou PC. Tous les
périphériques compatibles sont accessible en Wi-Fi, via votre réseau sans fil.
• Anynet+ (HDMI-CEC): vous permet de contrôler tous les appareils Samsung connectés compatibles
Anynet+ à l'aide de votre télécommande Samsung.
• e-Manual: vous permet de lire à l'écran le manuel complet. (p. 14)
Français - 4
Accessoires
✎
Vérifiez que les éléments suivants sont inclus avec votre téléviseur. S'il manque des éléments,
contactez votre revendeur.
✎
Les couleurs et les formes des éléments peuvent varier en fonction des modèles.
✎
Les câbles qui ne se trouvent pas dans le contenu de l'emballage peuvent être achetés séparément.
✎
Vérifiez qu'aucun accessoire n'est caché dans l'emballage lorsque vous ouvrez la boîte.
[
ATTENTION: INSÉREZ FERMEMENT DE MANIÈRE A CE QU'IL NE SE DÉTACHE PAS
• Télécommande & piles (AAAx2) • Câble d'alimentation
• Mode d'emploi • Tissu de nettoyage
• Carte de garantie(non disponible dans certains pays) /
Manuel de sécurité
Support du serre-câble
• Des frais d'administration peuvent vous être facturés si:
− (a) un technicien intervient à votre demande et que le produit ne comporte aucun défaut
(c.-à-d. si vous n'avez pas pris la peine de lire le présent manuel d'utilisation).
− (b) vous amenez le produit dans un centre de réparation alors qu'il ne comporte aucun défaut
(c.-à-d. si vous n'avez pas pris la peine de lire le présent manuel d'utilisation).
• Le montant de ces frais d'administration vous sera signifié avant la réalisation de toute prestation ou
visite à domicile.
Installation du support du serre-câble
Français
Français - 5
Utilisation du contrôleur du téléviseur (touche de panneau)
Le Contrôleur TV est un bouton multi-directionnel qui permet la navigation sans télécommande.
✎
Certaines fonctions exigeant un code PIN peuvent ne pas être disponibles.
✎
Le contrôleur du téléviseur, un petit bouton de type manette de jeu situé sur le côté inférieur droit du
téléviseur, vous permet de commander le téléviseur sans télécommande.
✎
La couleur et la forme du produit peuvent varier en fonction du modèle.
mR
P
Bas (avant)
Menu de fonction
Contrôleur du téléviseur
Gauche
Droite
Haut (arrière)
Capteur de la télécommande
✎
Face au téléviseur, suivez les instructions suivantes.
✎
Lorsque vous sélectionnez une fonction en déplaçant le contrôleur vers le l'avant/l'arrière/la droite/
la gauche, veillez à ne pas appuyer sur ce dernier. Si vous appuyez d'abord dessus, vous ne pouvez
plus le faire bouger vers l'avant/ l'arrière/la gauche/la droite.
Mise sous tension Mettez le téléviseur sous tension en appuyant sur le contrôleur lorsque le
téléviseur est en mode veille.
Réglage du volume Réglez le volume en déplaçant le contrôleur de gauche à droite lorsque le
téléviseur est allumé.
Sélection d'une chaîne Sélectionnez une chaîne en déplaçant le contrôleur d'avant en arrière lorsque le
téléviseur est allumé.
Utilisation du menu Fonction Pour afficher et utiliser le menu de fonction, appuyez brièvement sur le contrôleur
lorsque le téléviseur est allumé. Pour fermer le menu de fonction, appuyez de
nouveau brièvement sur le contrôleur.
Sélection du
MENU
(m)
Lorsque le menu de fonction est visible, sélectionnez le MENU (m) en déplaçant le
contrôleur vers la gauche. Le menu à l'écran (OSD) s'affiche. Sélectionnez une option
en déplaçant le contrôleur vers la droite. Déplacez le contrôleur vers la droite ou la
gauche, ou vers l'arrière et l'avant, pour procéder à d'autres sélections. Pour modifier
un paramètre, sélectionnez-le, puis appuyez sur le contrôleur.
Sélection du SMART HUB (™)
Lorsque le menu de fonction est visible, sélectionnez SMART HUB (
™
) en déplaçant
le contrôleur vers l'arrière. L'écran principal SMART HUB apparaît. Sélectionnez une
application en déplaçant le contrôleur, puis en appuyant sur celui-ci.
Sélection d'une Source (s) Lorsque le menu de fonction est visible, sélectionnez la liste Source (s) en
déplaçant le contrôleur vers la droite. L'écran Source apparaît. Pour sélectionner
une Source, déplacez le contrôleur d'avant en arrière. Lorsque la source de votre
choix est en surbrillance, appuyez sur le contrôleur.
Eteindre (P)
Lorsque le menu de fonction est visible, sélectionnez
Eteindre
(P) en tirant le
contrôleur vers l'avant, puis appuyez sur celui-ci.
✎
Pour fermer le Menu, Smart Hub, ou Source, appuyez sur le contrôleur pendant plus de 1 seconde.
Mode veille
Votre téléviseur entre en mode Veille lorsque vous l'éteignez et continue de consommer une petite quantité
d'alimentation électrique. Pour éviter les risques et réduire la consommation électrique, ne laissez pas le
téléviseur en mode Veille pendant de longues périodes (lorsque vous partez en vacances, par exemple). Il
est préférable de débrancher le cordon d'alimentation.
 Loading...