


E-MANUAL
Thank you for purchasing this Samsung product.
To receive more complete service, please register your product at
www.samsung.com/register
Model______________ Serial No.______________
Contents
Quick Guides
Using Smart Hub
1 Connecting to the Internet
1 Setting up Smart Hub
1 Using Smart Hub
Controlling the TV with Your Voice
2Setting up Voice Recognition
3Controlling the TV with your voice
Controlling the TV with Your Motion
4Setting up Motion Control
5Controlling the TV using motions
Using the Samsung Smart Control
6Operating the TV with the POINTER button
7Setting up the Samsung Smart Control
7 Pairing the TV to the Samsung Smart Control
Improving the Viewing Experience of Sports Events
8 Activating Sports Mode
Editing Channels
9 Running the Edit Channel function
9 Rearranging or deleting channels
Playing Multiple Screens
Connecting Video Devices
21Connecting with an HDMI cable
22Connecting with a component cable
22 Connecting with a composite (A/V) cable
Audio Input and Output Connections
23Connecting with an HDMI (ARC) cable
24Connecting with a digital audio (optical) cable
24 Connecting with a stereo audio cable
Connecting a Computer
25Connecting through the HDMI port
26Connecting with an HDMI-to-DVI cable
26Connecting through your home network
Connecting a Mobile Device
27Connecting with an MHL-to-HDMI Cable
28Using Screen Mirroring
29Connecting mobile devices without a wireless router (Wi-Fi Direct)
29 Connecting a mobile device via Samsung Smart View 2.0
Changing the input signal with external devices
Connection Notes!
31Connection notes for HDMI
32Connection notes for audio devices
32 Connection notes for computers
32 Connection notes for mobile devices
Connections
Remote Control and Peripherals
Connecting an Antenna (Aerial)
Connecting to the Internet |
About the Samsung Smart Control |
12 Establishing a wired Internet connection
Using the Samsung Smart Control
14 Establishing a wireless Internet connection
35 Operating the TV with the POINTER button
Connecting to a Network via a Mobile Dongle 35 Operating the TV with the directional buttons and the Enter button
Troubleshooting Internet Connectivity Issues
36 Displaying and using the On-screen Remote
18 Troubleshooting wired Internet connectivity issues
38 Pairing the TV to the Samsung Smart Control
19 Troubleshooting wireless Internet connectivity issues
Controlling External Devices with the TV Remote - Using the Universal Remote
39 Setting up the universal remote control
Controlling the TV with a Keyboard
40Connecting a keyboard
41Using the keyboard
Controlling the TV with a Mouse
42Connecting a USB mouse
43Using a mouse
Connecting a Bluetooth Gamepad
Entering Text using the On-Screen QWERTY Keypad
44 Using additional functions
Smart Features
Viewing Multiple Screens or Features with Multi-Link
Screen
45 Using Multi-Link Screen
Smart Hub
47 Launching Smart Hub automatically
47Removing or pinning an item in the Recent group
48Testing Smart Hub connections
48 Using the Smart Hub Tutorial
48 Resetting Smart Hub
Using Smart Hub with a Samsung Account
49Creating a Samsung account
50Signing in to a Samsung account
50Linking your Samsung account to external service accounts
51Changing and adding information to a Samsung account
51Deleting a Samsung account from the TV
Using the GAMES Service
52Managing games with the pop-up Options menu
53Installing and running a game
53 Managing downloaded or purchased games
Using the Apps Service
55Managing Apps with the pop-up Options menu
56Installing an app
57Removing an app from the TV
57 Locking and unlocking apps
57Updating apps
57Rearranging apps
58Rating and sharing a purchased content
58 Using other app features and functions
Using the e-Manual
59Launching the e-Manual
60Using the buttons in the e-Manual
Using the web browser
61 Browsing preferences
Using the MY CONTENT Service
62Read before playing media content
63Playing multimedia content in a computer or mobile device
63Playing media content saved on a USB device
64Buttons and functions available while viewing photos
66Buttons and functions available while viewing videos
68Buttons and functions available while playing music
69Listening to music in HD quality
69Functions on the media content list screen
Using the NewsON Service
70 News
70 Weather
Controlling the TV with Your Voice
72 Read before using voice recognition
72 Learning voice recognition basics
74Measuring the Voice Recognition responsiveness
74Using imperative voice recognition
74Using interactive voice recognition at a short distance
75Using voice recognition at a long distance
76Using the Voice Recognition Tutorial
Controlling the TV using Motions (Motion Control)
77Testing ambient illumination using the TV camera
78Activating motion control
81 Changing the motion control screens
Using Face recognition
84Registering your face to your samsung account
85Changing your login method of face recognition
85 Signing in to a Samsung account using face recognition
TV Viewing
Viewing Digital Broadcast Information at a Glance
86 Using the guide
88 Checking current programme info
88 Changing the broadcast signal
88 Checking digital channel signal info and strength
Recording Programmes
89Recording programmes
90Using the functions available while recording a programme
91Using the buttons on the remote control while recording a programme
91Managing the schedule recording list
92Viewing recorded programmes
94 Managing recorded files
Setting Up a Schedule Viewing
95 Setting up a schedule viewing for a channel
Using Timeshift
98Using the buttons on the remote control while using Timeshift
Using the Channel List
Registering, Removing, and Editing Channels
101Registering and removing channels
101Editing registered channels
102Enabling / Disabling password protection on channels
102Locking / Unlocking channels
102Enabling/Disabling Edit Channel Number function
Creating a Personal Favourites List
103 Registering channels as favourites
103 Viewing and selecting channels on favourites lists only
Editing a Favourites List
104 Using the Edit Favourites screen menu items
Making Sports programmes More Realistic with Sports
Mode
106 Enabling sports mode
106Choosing the sports type
107Extracting highlights automatically
108Using the functions available while watching sports in sports mode
110 Viewing a game recorded in sports mode
TV-Viewing Support Features
111Showing subtitles
111Enabling Subtitles
112Setting the preferred languages
112Scanning for available channels
113Selecting the broadcast audio language
113Audio Description
Using the Channel Settings
114 Setting the country (area)
114Tuning broadcast signals manually
115Fine-Tuning the screen
116Transferring channel list
116 Reading digital text
116 Changing teletext language
Picture and Sound
Adjusting the Picture Quality
117Choosing a picture mode
118Adjusting the picture quality
119Adjusting advanced settings
120Adjusting picture options
Viewing in 3D
123 Starting 3D
125 Adjusting 3D effects
Picture Support Functions
126Viewing a picture-in-picture (PIP)
127Changing the picture size and position
129 Listening to audio only (Picture Off)
129 Resetting the picture mode settings
Adjusting the Sound Quality
130Choosing a sound mode
131Applying sound effects
132Customising sound
Using the Sound Support Functions
133 Selecting speakers
133 Specifying the TV's installation type
133Listening to TV sound through a Samsung Bluetooth audio device
134Listening to the TV through Bluetooth headphones
135Listening to TV sound through a Samsung Multiroom Link compatible speaker
137Enabling digital audio output
138Listening to 3D audio in 3D mode
138Resetting all sound settings
System and Support
Setting the Time and Using the Timer
139 Setting the current time
141 Using the timers
Using the Screen Burn Protection and Energy Saving
Functions
143 Preventing screen burn
143 Reducing the energy consumption of the TV
Using Anynet+ (HDMI-CEC)
145Setting up Anynet+ (HDMI-CEC)
146Using Anynet+ (HDMI-CEC)
Updating the TV’s Software
148 Updating the TV’s software to the latest version
148 Updating the TV automatically
Protecting the TV from Hacking and Malicious Code
149Checking the TV and connected storage for malicious code
Using Other Functions
151 Running the accessibility functions quickly
151Enabling voice guides for the visually impaired
152Adjusting the menu transparency
152 White text on black background (high contrast)
152Enlarging font (for the visually impaired)
153Learning about the remote control (for the visually impaired)
153Listening to the TV through Bluetooth headphones (for the hearing impaired)
153 Using the Indian Cinema Mode
153Changing the menu language
154Setting up a password
154 Checking Notifications
154 Adjusting the viewing angle
154Enabling game mode
155Richer colours and superior picture quality (BD Wise)
155 Enabling/Disabling sound feedback
155 Locking/Unlocking the Control Stick
155Showing/Hiding the Samsung logo while booting
156Enabling the TV to boot faster
156Enabling/Disabling the front indicators
156Removing Flickering
157Enabling/Disabling the welcome sound
157Enabling/Disabling the stand light
157Registering the TV as a DivX-certified device (watching for pay DivX movies)
158Restoring the TV to the factory settings
158 Using the TV as a display model (for retail stores)
158Backing up the TV data with UHD Evolution Kit
159Updating recorded programmes
Enabling/ Disabling Data Service function (HbbTV)
Teletext Feature
Troubleshooting
Getting Support
163Support through Remote Management
164Finding the contact information for service
There Is a Problem with the Picture
150 Configuring additional functions |
165 Testing the picture |
|
I Can't Hear the Sound Clearly
168 Testing the sound
I Can't See 3D Images Clearly
169 Testing 3D picture quality
There Is a Problem with the Broadcast
My Computer Won't Connect
I Can't Connect to the Internet
The Schedule Recording/Timeshift Function Isn't
Working
Anynet+ (HDMI-CEC) Isn't Working
I Have Trouble Launching/Using Apps
My File Won't Play
I Want to Reset the TV
Other Issues
Precautions and Notes
Before Using the Recording and Timeshift Functions
176Before using the recording and Schedule Recording functions
178 Before using the Timeshift function
Read Before Using 3D Mode
179 3D precautions
S Recommendation disclaimer
183 S Recommendation with Voice Interaction
183 S Recommendation
Supported Resolutions for 3D Modes
184HDMI
185Component
185Digital channel
185 Videos/Photos
Supported Resolutions for each of UHD Input Signals
186 If HDMI UHD Color is set to Off
186 If HDMI UHD Color is set to On
Read Before Using Voice, Motion, or Face recognition
187Precautions for Voice, Motion, and Face recognition
188Requirements for using Voice, Motion, or Face recognition
Read Before Using Apps
Read Before Using the Web Browser
Read Before Playing Photo, Videos, or Music Files
194Limitations on use of Photo, Videos, and Music files
195Supported external subtitles
195Supported internal subtitles
196Supported image formats and resolutions
196Supported music formats and codecs
197Supported video codecs
Read After Installing the TV
200Picture sizes and input signals
201Installing an anti-theft lock
201 Read before setting up a wireless Internet connection
Read Before Connecting a Computer (Supported
Resolutions)
203IBM
203MAC
204VESA DMT
Supported Resolutions for Video Signals
205 CEA-861
Read Before Using Bluetooth Devices
206 Restrictions on using Bluetooth
Licence
Glossary
Using Smart Hub
Connecting to the Internet
MENU/123  MENU
MENU  Network
  Network Settings
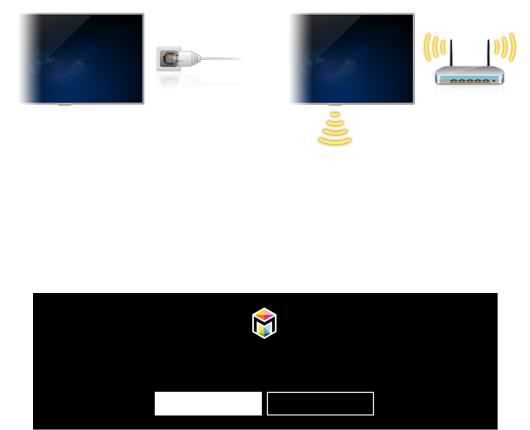
Connect the TV to the Internet wired or wirelessly.
Setting up Smart Hub
Press the  button on your remote control. When you start Smart Hub for the first time, the Set Up Smart Hub screen appears. Follow the instructions on the screen to configure the required settings and complete the setup.
Welcome to Smart Hub
The easiest way to access and discover live TV, movies, apps, games and more.
Set Up Smart Hub |
Learn More |
Using Smart Hub
Enjoy the multiple functions provided by Smart Hub on a single screen.
"" For more information, refer to "Smart Hub."

Controlling the TV with Your Voice
Setting up Voice Recognition
MENU/123  MENU
MENU  System
  Voice Recognition
Finish the settings required for voice recognition, such as the language to use and whether to use Use TV Voice.
System
Accessibility
Setup
Sports Mode
Menu Language |
English |
Smart Security
Universal remote setup
Voice Recognition
"" Your TV's menu may differ from the image above, depending on the model.
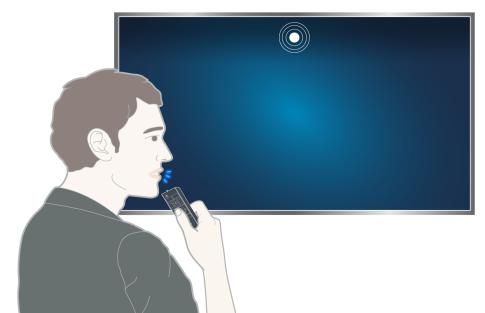
Controlling the TV with your voice
Press and hold the MENU/123 button on the Samsung Smart Control. The Voice Recognition screen appears. When the Voice Recognition icon appears on the screen, speak commands slowly, in a moderately loud voice, into the microphone on the Samsung Smart Control.
"" For the 9500 series models, you can use the voice recognition function with the TV's built-in camera and Samsung Smart Control. Set Enabled Microphones to TV & Remote.
"" For more information, refer to "Controlling the TV with Your Voice."

Controlling the TV with Your Motion
Setting up Motion Control
MENU/123  MENU
MENU  System
  Motion Control
Perform Motion Control Environment Test, then finish the settings required to run motion control, such as how to adjust Pointer Speed and whether to show Animated Motion Guide.
System
Setup
Sports Mode
Menu Language English
Smart Security
Universal remote setup
Voice Recognition
Motion Control
"" Your TV's menu may differ from the image above, depending on the model.
Controlling the TV using motions
MENU/123  MENU
MENU  System
  Motion Control
  Motion Control
1.Set Motion Control to On.
2.Face the TV camera, raise your hand to a comfortable position, and then move your index finger to the left or right slowly with it fully extended upwards.
3.Move your hand left or right slowly to move the pointer to a function.
4.Curl your index finger down to select a function, and then raise it again to run the selected function.
""
""
""
""
This function is not available on certain models in specific geographical areas.
Motion Control is available in either direction control or motion pointing mode.
9000 models need to be connected to the TV camera in order to use Motion Control.
When you use the SEK-3500 series models of UHD Evolution Kit, if your TV does not have the built-in camera, purchase a new optional camera.
"" For more information, refer to "Controlling the TV using Motions (Motion Control)."
Using the Samsung Smart Control
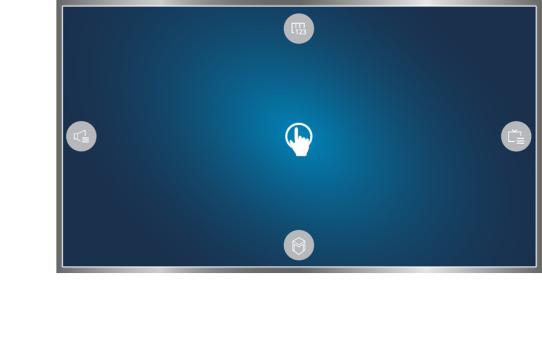
Operating the TV with the POINTER button
Place a finger on the POINTER button and move the Samsung Smart Control. The pointer on the screen moves in the direction you moved the Samsung Smart Control. Move the pointer to one of the following icons on the screen, and then press the POINTER button.
●●  : Displays the On-screen Remote.
●●  : Allows you to adjust the volume or select speakers.
●●  : Displays the channel list.
●●  : Launches Smart Hub.
Setting up the Samsung Smart Control
MENU/123  MENU
MENU  System
  Smart Control Settings
Configure the basic settings for using the Samsung Smart Control.
System
Universal remote setup
Voice Recognition
Motion Control
Time
Notifications
Device Manager
Smart Control Settings
"" Your TV's menu may differ from the image above, depending on the model.
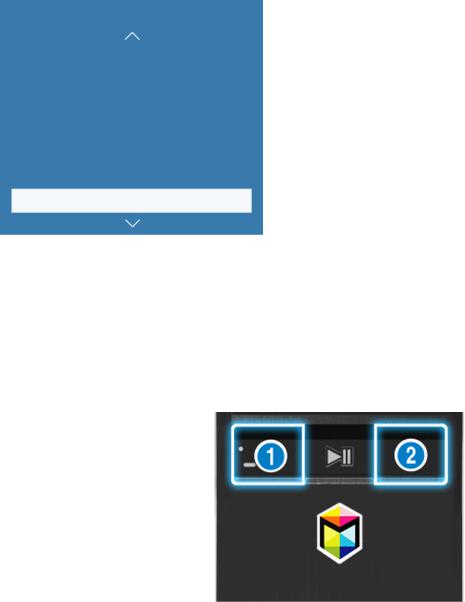
Pairing the TV to the Samsung Smart Control
When you turn on the TV, the Samsung Smart Control is paired to the TV automatically. To re-pair it to the TV, press the and buttons on the Samsung Smart Control simultaneously for 3 seconds or more.
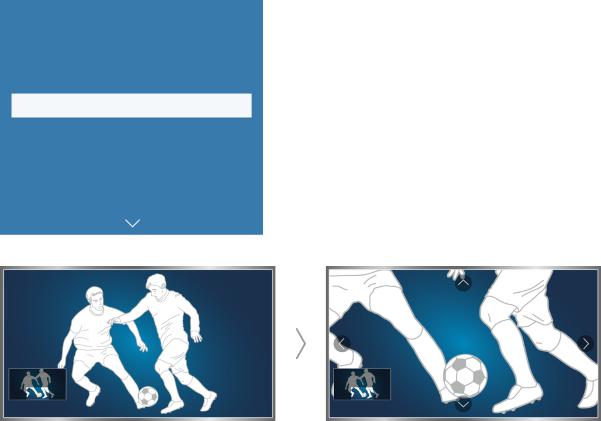
Improving the Viewing Experience of Sports Events
Activating Sports Mode
MENU/123  MENU
MENU  System
  Sports Mode
Set Sports Mode to On. The TV automatically configures the picture and sound settings so that they are suitable for soccer events.
System
Accessibility
Setup
Sports Mode
Menu Language |
English |
Smart Security
Universal remote setup
Voice Recognition
"" You can zoom in the screen while you are using the sports mode. Move the focus to the part of screen to magnify.
"" Your TV's menu may differ from the image above, depending on the model.
"" The actual name may differ from specific geographical areas.
"" For more information, refer to "Making Sports programmes More Realistic with Sports Mode."

Editing Channels
Running the Edit Channel function
MENU/123  MENU
MENU  Broadcasting
  Edit Channel
Broadcasting
Auto Tuning
Aerial |
Terrestrial |
Channel List
Guide
Schedule Manager
Edit Channel
Edit Favourites
"" Your TV's menu may differ from the image above, depending on the model.
Rearranging or deleting channels
MENU/123  MENU
MENU  Broadcasting
  Edit Channel
  Change Number or Delete
You can rearrange the order of channels or delete channels. To change the order of a channel, select it and then select Change Number. To delete a channel, select it and then select Delete.
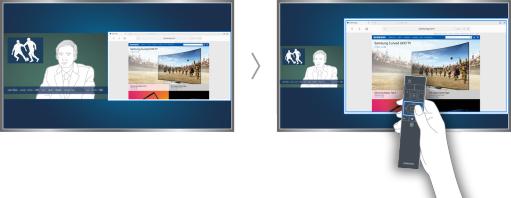
Playing Multiple Screens
You can surf the web or run an app while viewing the TV. You can change the size of each screen by dragging the circle in the middle of the screen to the left or right.
"" For more information, refer to "Viewing Multiple Screens or Features with Multi-Link Screen".
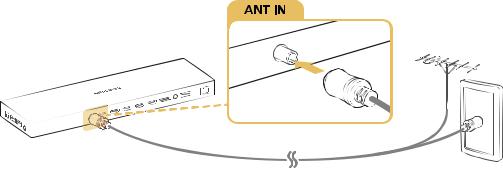
Connecting an Antenna (Aerial)
Connect the TV to an antenna or a cable outlet to receive broadcast signals.
Connect a cable from an antenna or cable outlet to the ANT IN connector, as shown in the image below.
"" An antenna connection is not necessary if you connect a cable box or satellite receiver.
Connecting to the Internet
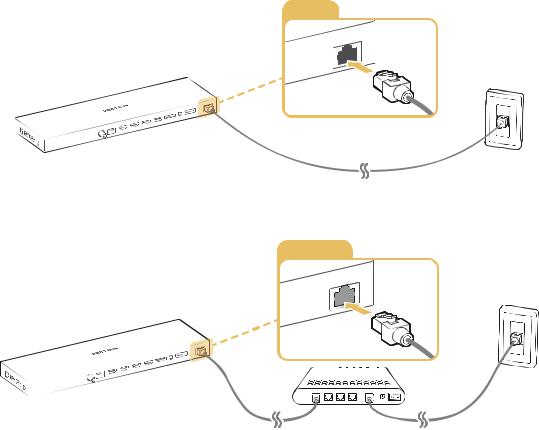
Establishing a wired Internet connection
Using LAN cables
There are three ways to connect the TV to your Internet access points, as shown in the following illustrations:
●● Wall-mounted LAN Outlet
LAN
●● External Modem
LAN

●● IP Router + External Modem
2
1
"" We recommend using Cat 7 LAN cables to link your TV to the Internet Access Points.
"" The TV will not be able to connect to the Internet if the network speed is below 10Mbps.
Connecting to a wired Internet network automatically
MENU/123  MENU
MENU  Network
  Network Settings Try now
Automatically connect to an available network.
1.Select Wired.
2.Once network connection is successful, you will see a confirmation message. If it fails, try again or connect manually.

Establishing a wireless Internet connection
Connecting to a wireless internet network automatically
MENU/123  MENU
MENU  Network
  Network Settings
Make sure that you have the wireless router's SSID (name) and password settings before attempting to connect.
1.Select Wireless. The TV automatically displays a list of available wireless networks.
2.Select a network. If the network you want doesn't appear in the list, select Add Network, and then enter the network's SSID (name) manually.
3.If your network is security enabled, enter the password. If your network is not security-enabled, the TV will bypass the on-screen keyboard and attempt to connect right away.
Connecting to a wireless internet network with WPS
MENU/123  MENU
MENU  Network
  Network Settings
If the router has a WPS(wi-fi protected setup) push button, you can use it to connect the TV to the router automatically.
1.Select Wireless. The TV automatically displays a list of available wireless networks.
2.Select Stop and then select WPS.
3.Press the WPS or PBC buttons on your wireless router in less than two minutes.
4.The TV is connected to the network automatically.
Checking the internet connection status
MENU/123  MENU
MENU  Network
  Network Status Try now
Network
Network Status
Network Settings
Wi-Fi Direct
Multimedia Device Manager
Screen Mirroring
Device Name |
Tizen_Device |
"" Your TV's menu may differ from the image above, depending on the model.
View the current network and Internet status.
Changing the name of the TV on a network
MENU/123  MENU
MENU  Network
  Device Name Try now
You can change a name for the TV that will appear on mobile devices and laptop computers.
1.Select Device Name from the Network menu.
2.Select a name from the list that appears. Alternatively, select User Input to enter a name manually.
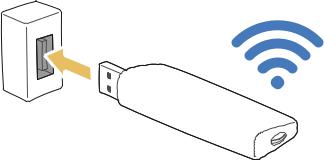
Connecting to a Network via a Mobile Dongle
You can make the TV to connect to a network via a mobile device by connecting a mobile dongle to the TV. Connect the mobile dongle to the USB port in the TV.
""
""
This function is not available on certain models in specific geographical areas.
When you use a large mobile dongle(Data Card), USB devices may not work properly due to interferences among the USB ports, or the wireless network may not work properly due to interferences from the peripherals and surroundings. In this case, use a USB extension cable.
"" Auto Ticker is not available when you set up mobile network.
"" If you have any problems using online services, please contact your Internet service provider.
The mobile service providers and their devices that support this function are as follows:
●● Vodacom (Model No: K4605)
●● MTN (Model No: E3131S, E3251)
●● Safaricom (Model No: E303)
●● Glo Bolt (Model No: E303)
●● Etisalat (Model No: E303)
●● Smart Communication (Model No: E3131S-3)
●● Globe Telecom (Model No: E3331, E359S-2)
●● Viettel (Model No: E173Eu-1)
●● Vinaphone (Model No: E303u-1, E303s-1)
●● DTAC (Model No: E3131)
●● AIS (Model No: E3131, E303)
●● Telkomsel (Model No: E303)
●● Indosat (Model No: E303)
●● Airtel (Model No: E1731, E3276S, E3276s-920, E3272, E8231)
●● Idea (Model No: E1732, E8231)
●● Tata Docomo (Model No: E177, E8231)
●● Open Dongles (Airtel, Idea, TataDocomo, Aircel, Vodafone) (Model No: E303C, E303U, E3121B, E3131B, E369 mini, E8221)
●● Zain (Model No: E367u-1, E303s-1)
●● Orange (Model No: E367u-1, E3131s-2)

Troubleshooting Internet Connectivity Issues
Troubleshooting wired Internet connectivity issues Try now
No network cable found
Make sure that the network cable is plugged in. If it is connected, make sure that the router is turned on. If it is on, try turning it off and on again.
IP auto setting failed
Do the following or configure the IP Settings manually.
1.Make sure that the DHCP server is enabled on the router, and reset the router.
2.If the problem persists, contact your Internet Service Provider.
Unable to connect to the network
1.Check all IP Settings.
2.Make sure that the DHCP server is enabled on the router. Then, unplug the router and plug it back in.
3.If this does not work, contact your Internet Service Provider.
Connected to a local network, but not to the Internet
1.Make sure that the Internet LAN cable is connected to the router's external LAN port.
2.Check the DNS values in IP Settings.
3.If the problem persists, contact your Internet Service Provider.
Network setup is complete, but unable to connect to the Internet
If the problem persists, contact your Internet Service Provider.
Troubleshooting wireless Internet connectivity issues
Wireless network connection failed
If a selected wireless router is not found, go to Network Settings and select the correct router.
Unable to connect to a wireless router
1.Check if the router is turned on. If it is, turn it off and on again.
2.Enter the correct password if required.
IP auto setting failed
Do the following or configure the IP Settings manually.
1.Make sure that the DHCP server is enabled on the router. Then, unplug the router and plug it back in.
2.Enter the correct password if required.
3.If the problem persists, contact your Internet Service Provider.
Unable to connect to the network
1.
2.
3.
Check all IP Settings.
Enter the correct password if required.
If the problem persists, contact your Internet Service Provider.
Connected to a local network, but not to the Internet
1.Make sure that the Internet LAN cable is connected to the router's external LAN port.
2.Check the DNS values in IP Settings.
3.If the problem persists, contact your Internet Service Provider.
Network setup is complete, but unable to connect to the Internet
If the problem persists, contact your Internet Service Provider.
Connecting Video Devices
Your TV has a variety of connectors for video input from external devices. Below is a list of featured connectors shown in descending order of picture quality.
●● HDMI
●● Component
●● Composite (A/V)
Connect a video device to the TV with an HDMI connector for the best picture quality. If the device does not have an HDMI connector, try a component connector.
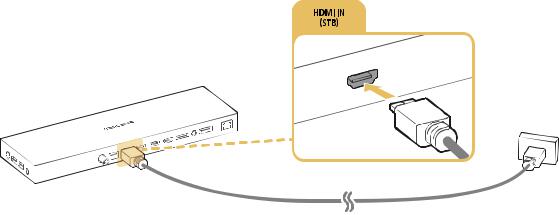
Connecting with an HDMI cable
The following types of HDMI cables are recommended:
●● High-Speed HDMI Cable
●● High-Speed HDMI Cable with Ethernet
Connect the HDMI cable to the HDMI input connector of One Connect and the HDMI output connector of the device as shown in the image below.
"" Set Edit Device Type to DVI PC for a computer connected with a HDMI-to-DVI cable, and PC for a computer connected with HDMI cable. Also, set Edit Device Type to DVI Devices for an A/V device with a
HDMI-to-DVI cable.

Connecting with a component cable
Connect the component cable to the component input connectors of One Connect and the component output connectors of the device as shown in the image below.
Make sure the cable colours match the connector colours.
COMPONENT IN
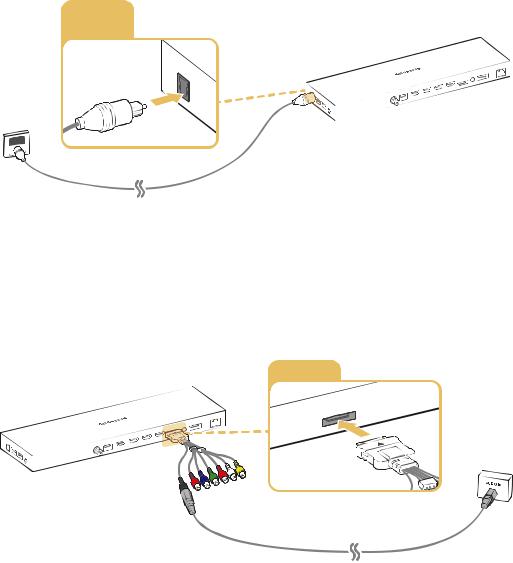
Connecting with a composite (A/V) cable
If using the AUDIO OUT/COMPONENT IN/AV IN 1 connectors of One Connect, connect the AV cable to the AUDIO/COMPONENT/AV Adapter(accessory) and connect it to the AUDIO OUT/COMPONENT IN/AV IN 1 connectors of One Connect and the AV output connectors of the device as shown in the image below.
AV IN
Audio Input and Output Connections
Your TV has a variety of connections for audio input from external devices. The connections are listed below.
●● HDMI/ARC (Audio Return Channel)
●● Digital Audio (Optical)
●● Audio (Analogue)
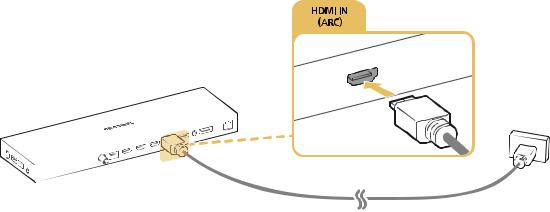
Connecting with an HDMI (ARC) cable
ARC(Audio Return Channel) lets the TV output digital sound to an audio device and input digital sound from the same audio device through one HDMI cable. ARC is only available through the HDMI (ARC) port and only when the TV is connected to an ARC-enabled AV receiver.
Connect an HDMI cable to the HDMI (ARC) input connector of One Connect and the HDMI output connector of the device as shown in the image below.
Connecting with a digital audio (optical) cable
You can listen to digital audio by connecting an AV receiver to the TV via a digital audio (optical) connector.
Connect the optical cable to digital audio output connector of One Connect and the digital audio input connector of the device as shown in the image below.
DIGITAL
AUDIO OUT (OPTICAL)
DIGITAL |
|
|
|
|
|
||
AUDI |
O OUT |
|
|
|
) |
|
|
(OPTICAL |
|
|
|
Connecting with a stereo audio cable
If using the AUDIO OUT/COMPONENT IN/AV IN 1 connectors of One Connect, connect an audio cable to the AUDIO/COMPONENT/AV Adapter(accessory) and connect it to the AUDIO OUT/COMPONENT IN/AV IN 1 connectors of One Connect and the audio output connectors of the device as shown in the image below.
AUDIO OUT
 Loading...