RadioShack PRO-107 Owner Manual

0 (0)

20-107 / PRO-107

User’s Guide

iSCAN Trunking Scanner

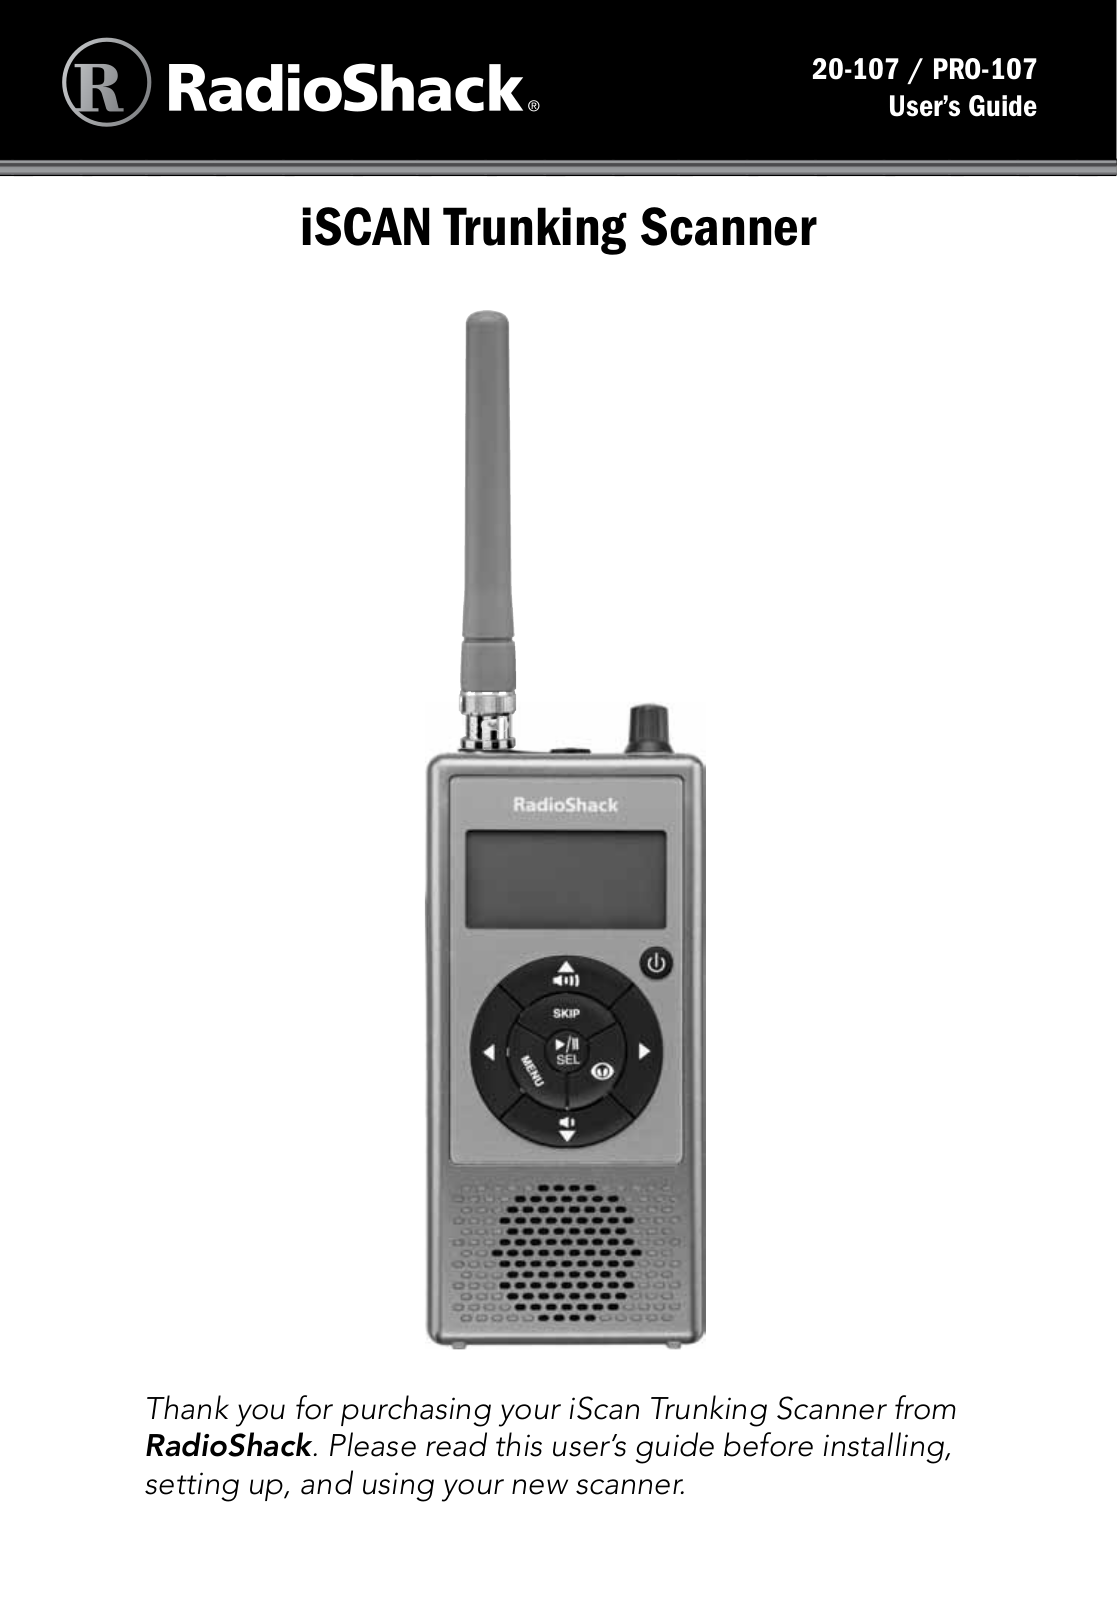
Thank you for purchasing your iScan Trunking Scanner from RadioShack. Please read this user’s guide before installing, setting up, and using your new scanner.

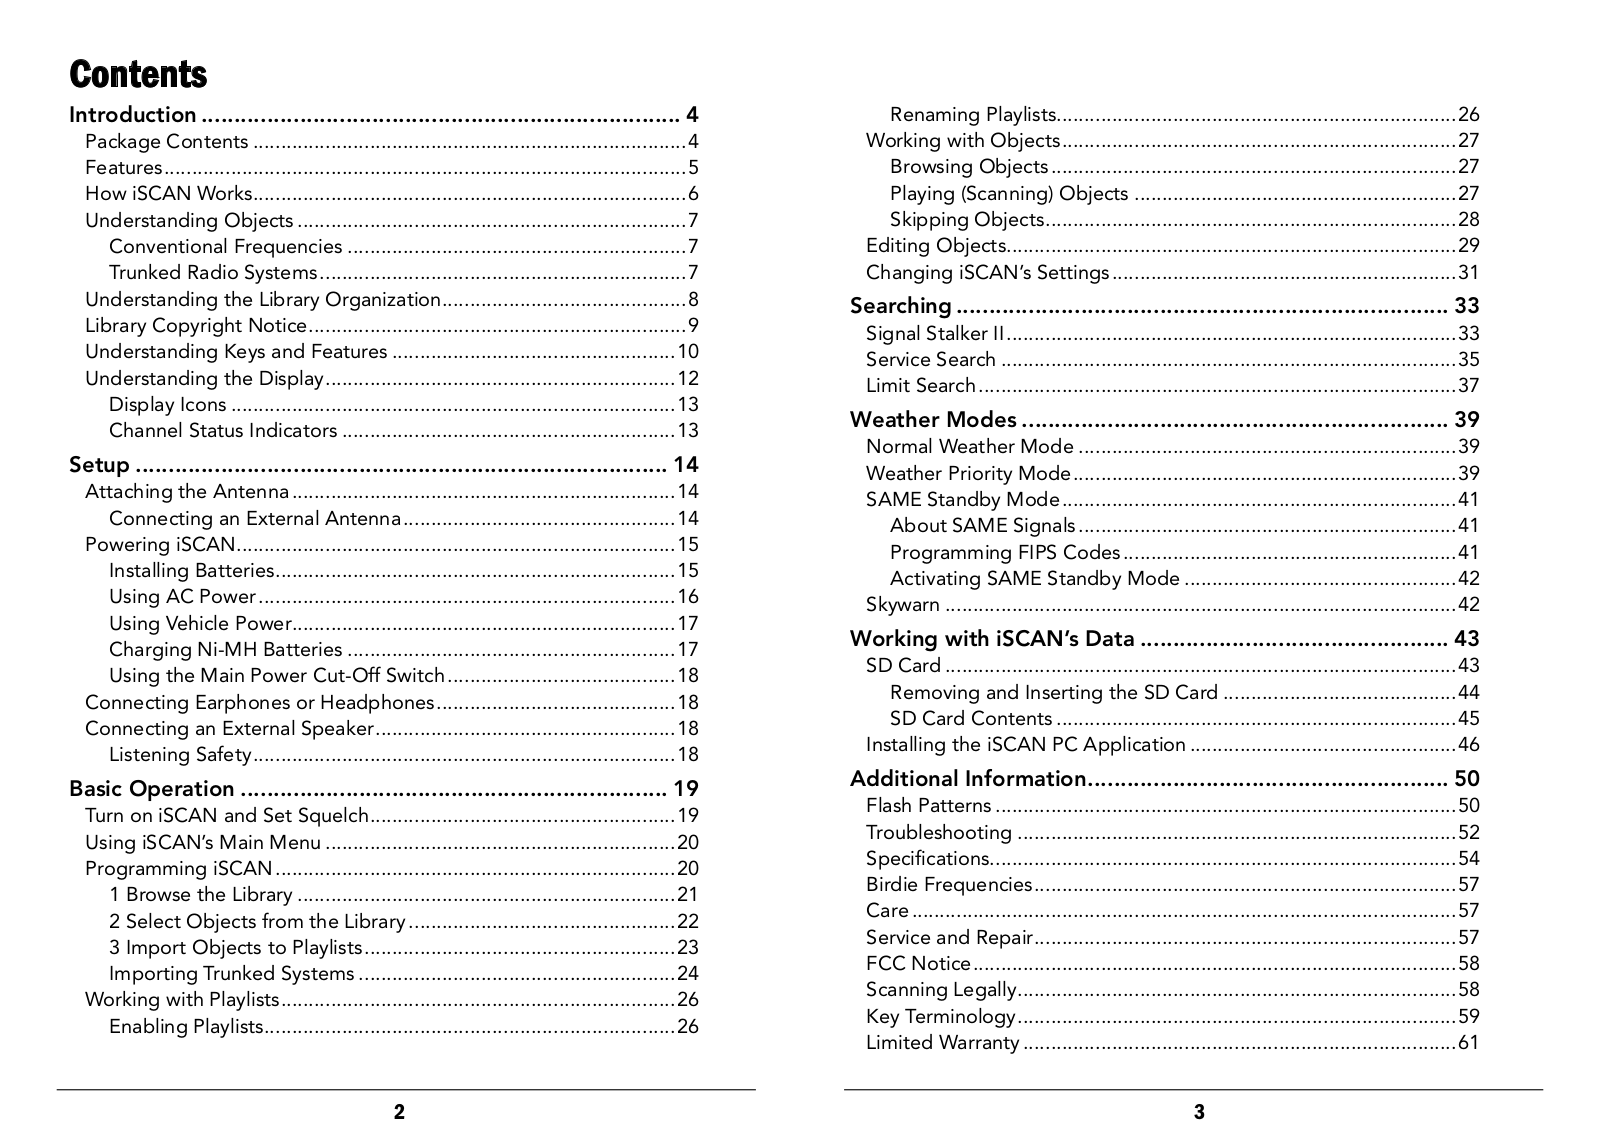
Contents


Introduction..........................................................................

4

Package Contents...............................................................................

4

Features..............................................................................................

5

How iSCAN Works..............................................................................

6

Understanding Objects.......................................................................

7

Conventional Frequencies..............................................................

7

Trunked Radio Systems...................................................................

7

Understanding the Library Organization............................................

8

Library Copyright Notice....................................................................

9

Understanding Keys and Features....................................................

10

Understanding the Display...............................................................

12

Display Icons.................................................................................

13

Channel Status Indicators.............................................................

13

Setup..................................................................................

14

Attaching the Antenna......................................................................

14

Connecting an External Antenna..................................................

14

Powering iSCAN...............................................................................

15

Installing Batteries........................................................................

15

Using AC Power............................................................................

16

Using Vehicle Power.....................................................................

17

Charging Ni-MH Batteries............................................................

17

Using the Main Power Cut-Off Switch..........................................

18

Connecting Earphones or Headphones...........................................

18

Connecting an External Speaker......................................................

18

Listening Safety............................................................................

18

Basic Operation..................................................................

19

Turn on iSCAN and Set Squelch.......................................................

19

Using iSCAN’s Main Menu................................................................

20

Programming iSCAN.........................................................................

20

1 Browse the Library.....................................................................

21

2 Select Objects from the Library.................................................

22

3 Import Objects to Playlists........................................................

23

Importing Trunked Systems..........................................................

24

Working with Playlists.......................................................................

26

Enabling Playlists..........................................................................

26

Renaming Playlists........................................................................

26

Working with Objects.......................................................................

27

Browsing Objects..........................................................................

27

Playing (Scanning) Objects...........................................................

27

Skipping Objects..........................................................................

28

Editing Objects.................................................................................

29

Changing iSCAN’s Settings...............................................................

31

Searching............................................................................

33

Signal Stalker II..................................................................................

33

Service Search...................................................................................

35

Limit Search.......................................................................................

37

Weather Modes..................................................................

39

Normal Weather Mode.....................................................................

39

Weather Priority Mode.....................................................................

39

SAME Standby Mode.......................................................................

41

About SAME Signals.....................................................................

41

Programming FIPS Codes.............................................................

41

Activating SAME Standby Mode..................................................

42

Skywarn.............................................................................................

42

Working with iSCAN’s Data................................................

43

SD Card.............................................................................................

43

Removing and Inserting the SD Card...........................................

44

SD Card Contents.........................................................................

45

Installing the iSCAN PC Application.................................................

46

Additional Information.......................................................

50

Flash Patterns....................................................................................

50

Troubleshooting................................................................................

52

Specifications....................................................................................

54

Birdie Frequencies............................................................................

57

Care...................................................................................................

57

Service and Repair............................................................................

57

FCC Notice.......................................................................................

58

Scanning Legally...............................................................................

58

Key Terminology...............................................................................

59

Limited Warranty...............................................................................

61

2

3

Introduction

Introduction

Welcome to iSCAN, an exciting new way to enjoy the hobby of scanning two-way analog radio communications, including police, fire, EMS, amateur, government, and other channels.

iSCAN combines the simplicity and ease-of-use of a portable media player with the power and sophistication of a state-of-the-art scanning receiver. iSCAN is easy to use for both beginners and experts.

In addition, iSCAN is equipped with the entire USA RadioReference database in a special on-board Library, giving you instant access to the frequencies and systems used by public safety, local government, and business all over the United States!

Please take a few moments to read this manual carefully before using iSCAN. iSCAN is unlike any other scanner ever produced, and we want you to fully understand how it can maximize your enjoyment of the scanning hobby.

Package Contents

iSCAN

Antenna

USB Cable

SD Card (inside the scanner)

CD-ROM

User’s Guide

Quick Start

wWarning:

Always protect iSCAN from exposure to extreme heat or cold temperatures.

iSCAN is not waterproof. Do not expose it to rain, extreme high humidity, or moisture.

Features

Easy-to-understand media player user interface – A simplified keypad and display with familiar Play, Pause, and Navigation controls make it easy to use your iSCAN.

The complete USA RadioReference database on SD card – The entire USA database from www.radioreference.com is stored on a standard SD card that is included with iSCAN, giving you access to the most comprehensive radio data available without connecting iSCAN to a computer or the Internet.

Upgradeable CPU firmware and Library – Keep your radio’s firmware current with enhancements and updates as they become available using the included iSCAN PC Application.

SKYWARN Storm spotter functionality – Instant access to frequencies used by storm spotter networks. You can monitor storm conditions as they occur, and become aware of dangerous conditions before the media or emergency management officials announce them to the general public.

SAME and All Hazards weather alerting – iSCAN features a SAME

Standby Mode, alerting you to severe weather and other hazards in the specific areas that you select. iSCAN can also check your local NOAA weather frequency periodically, even while scanning, and alert you when an All Hazards alert occurs.

Multi–System trunking – Scans most common analog trunked radio system signaling formats, including Motorola, EDACS, and LTR. Both talkgroup and individual call monitoring are supported.

Powerful Signal Stalker II – Quickly sweeps iSCAN’s frequency ranges for transmissions from nearby sources. When a nearby transmission is found, iSCAN automatically tunes to that frequency.

Built-in service searches – Predefined service search ranges make it easy to find activity in your area.

Audible alarms and flash patterns– Programmable alarms and flash patterns can be configured to alert when specific objects are active.

Signal strength meter – Shows relative strength of received signals. Slim, compact case – Large speaker and one-handed operation.

Introduction

4

5

Introduction

How iSCAN Works

iSCAN is designed with a simplified keypad and controls similar to those used by portable media players, including , , , navigation keys, a MENU key, a SKIP key and a /II/SEL key.

iSCAN’s uncluttered keypad gives you instant access to the functions that you need most while using your scanner.

iSCAN is the first handheld scanner designed to use high-capacity SD card memory. The SD card holds the entire RadioReference database for the United States, giving you the ability to automatically program your scanner without using an external software application and without connecting to the Internet. We call this special version of the RadioReference database “the Library.” The SD card also holds iSCAN Playlists and your customized configuration data.

For more information about the RadioReference database, please visit www.radioreference.com.

To use iSCAN, you will first browse the Library to find things that you want to monitor. These things are called “scannable objects,” or simply “objects.” As you find objects in the Library that you want to add to the collection of objects that your radio will scan, you import them to iSCAN’s Playlists. There are twenty regular Playlists in iSCAN, plus a special Skywarn Playlist for monitoring objects during severe weather.

Included with iSCAN is the companion iSCAN PC Application and a PC-USB interface cable, allowing you to add your own objects and edit the objects that are stored in iSCAN’s Playlists. See “Installing the iSCAN PC Application” on page 46 and the application’s help files for more information about using the iSCAN PC Application.

Understanding Objects

iSCAN monitors two types of objects while scanning: conventional frequencies and trunking talkgroups.

Conventional Frequencies

A conventional frequency is a single radio frequency, which is usually broadcast from a radio tower or rooftop radio site. When browsing the iSCAN Library, you will most often find conventional frequencies in the Categories or Agencies sub levels under States or Counties/Cities. You know you’ve browsed to a conventional frequency when you see the word “Frequencies” on the top line of the display.

Trunked Radio Systems

A trunked radio system is a modern radio network allowing many different groups of radio users to share a small number of channels. Trunked radio systems are more complicated than conventional frequencies. They contain both talkgroups and sites. A talkgroup is the name of a group within the trunked system. A site is a set

of control frequencies located throughout the service area of the trunked system. Unlike conventional frequencies, trunking talkgroups have dependency—at least one site from the system must be selected in order for the talkgroups to imported to playlist.

There are many different manufacturers and types of trunked radio systems, each with their own special programming requirements. iSCAN automatically programs the correct requirements whenever you import a talkgroup and site to a Playlist.

When browsing the iSCAN Library, everything you find below the Systems level under States or Counties/Cities is a trunked radio system with its associated talkgroups and sites. You know you’ve browsed to a trunked system when you see the word “Talkgroups” on the top line of the display.

See “Key Terminology” on page 59 for more scanning definitions.

Introduction

6

7

Introduction

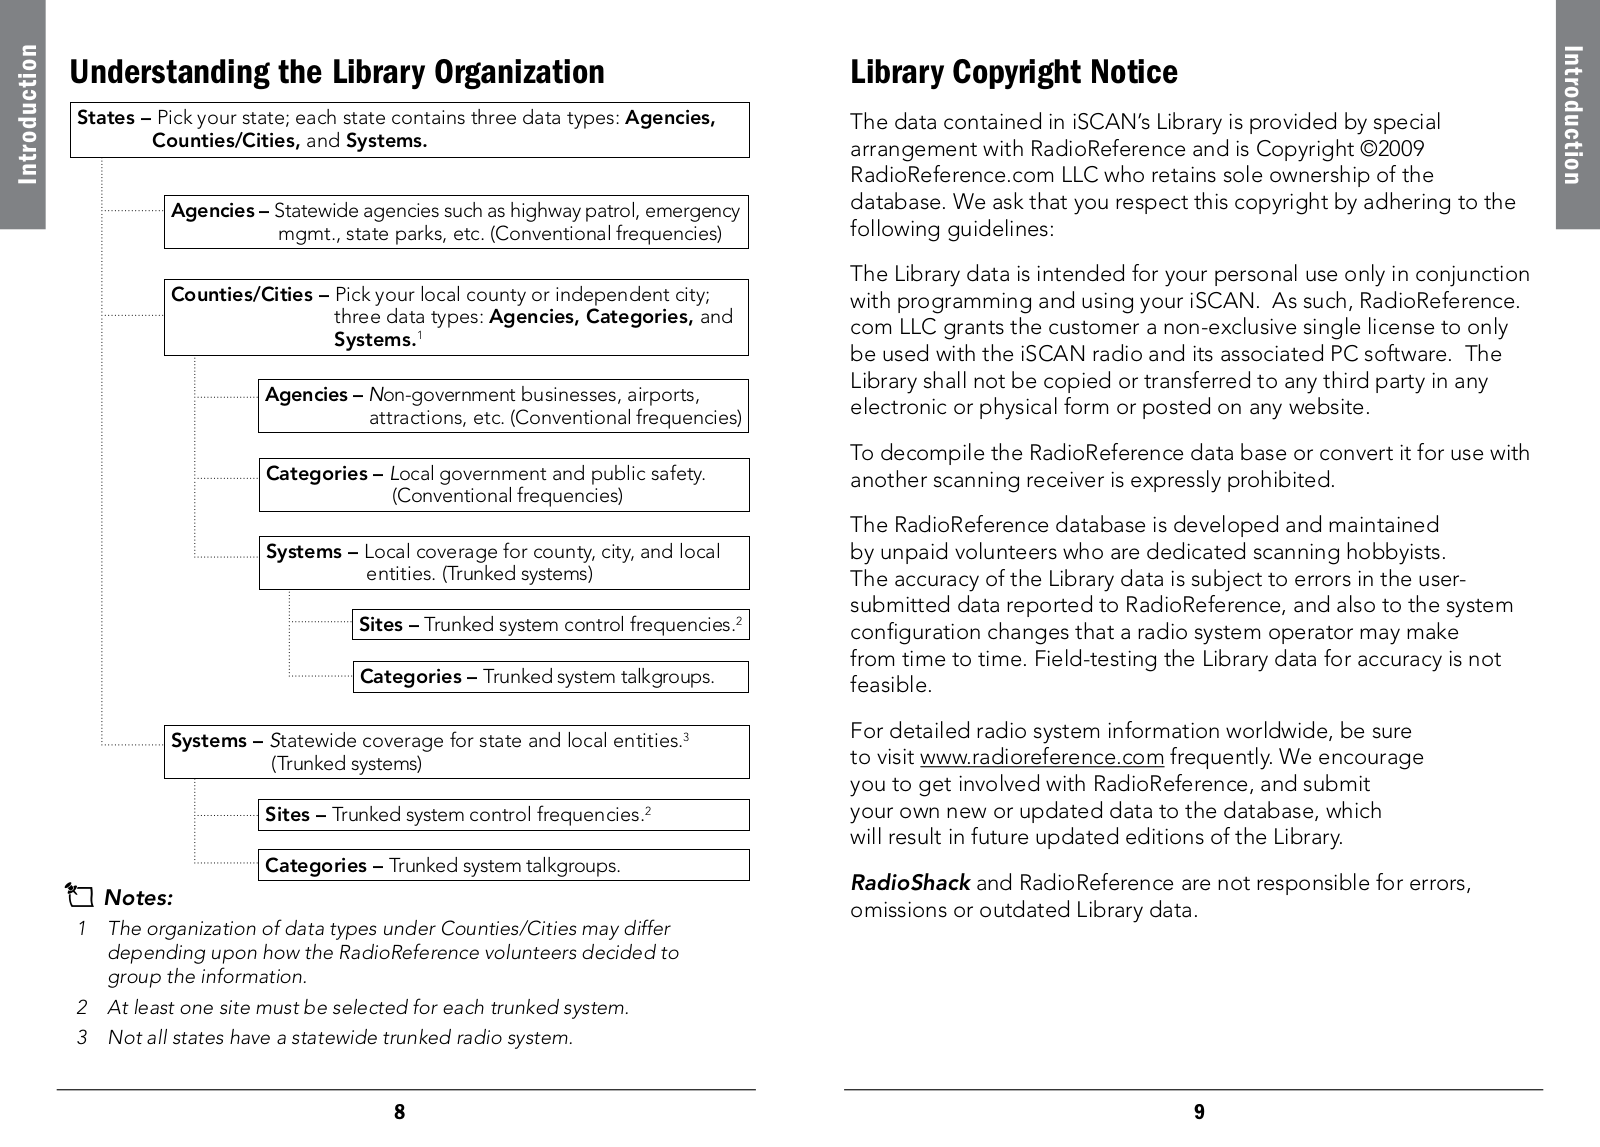
Understanding the Library Organization

States – Pick your state; each state contains three data types: Agencies, Counties/Cities, and Systems.

Agencies – Statewide agencies such as highway patrol, emergency mgmt., state parks, etc. (Conventional frequencies)

Counties/Cities – Pick your local county or independent city; three data types: Agencies, Categories, and Systems.1

Agencies – Non-government businesses, airports, attractions, etc. (Conventional frequencies)

Categories – Local government and public safety.

(Conventional frequencies)

Systems – Local coverage for county, city, and local entities. (Trunked systems)

Sites – Trunked system control frequencies.2

Categories – Trunked system talkgroups.

Systems – Statewide coverage for state and local entities.3

(Trunked systems)

Sites – Trunked system control frequencies.2

Categories – Trunked system talkgroups.

nNotes:

1The organization of data types under Counties/Cities may differ depending upon how the RadioReference volunteers decided to group the information.

2 At least one site must be selected for each trunked system.

3Not all states have a statewide trunked radio system.

Library Copyright Notice

The data contained in iSCAN’s Library is provided by special arrangement with RadioReference and is Copyright ©2009 RadioReference.com LLC who retains sole ownership of the database. We ask that you respect this copyright by adhering to the following guidelines:

The Library data is intended for your personal use only in conjunction with programming and using your iSCAN. As such, RadioReference. com LLC grants the customer a non-exclusive single license to only be used with the iSCAN radio and its associated PC software. The Library shall not be copied or transferred to any third party in any electronic or physical form or posted on any website.

To decompile the RadioReference data base or convert it for use with another scanning receiver is expressly prohibited.

The RadioReference database is developed and maintained by unpaid volunteers who are dedicated scanning hobbyists.

The accuracy of the Library data is subject to errors in the usersubmitted data reported to RadioReference, and also to the system configuration changes that a radio system operator may make from time to time. Field-testing the Library data for accuracy is not feasible.

For detailed radio system information worldwide, be sure to visit www.radioreference.com frequently. We encourage you to get involved with RadioReference, and submit your own new or updated data to the database, which will result in future updated editions of the Library.

RadioShack and RadioReference are not responsible for errors, omissions or outdated Library data.

Introduction

8

9

RadioShack PRO-107 Owner Manual

Introduction

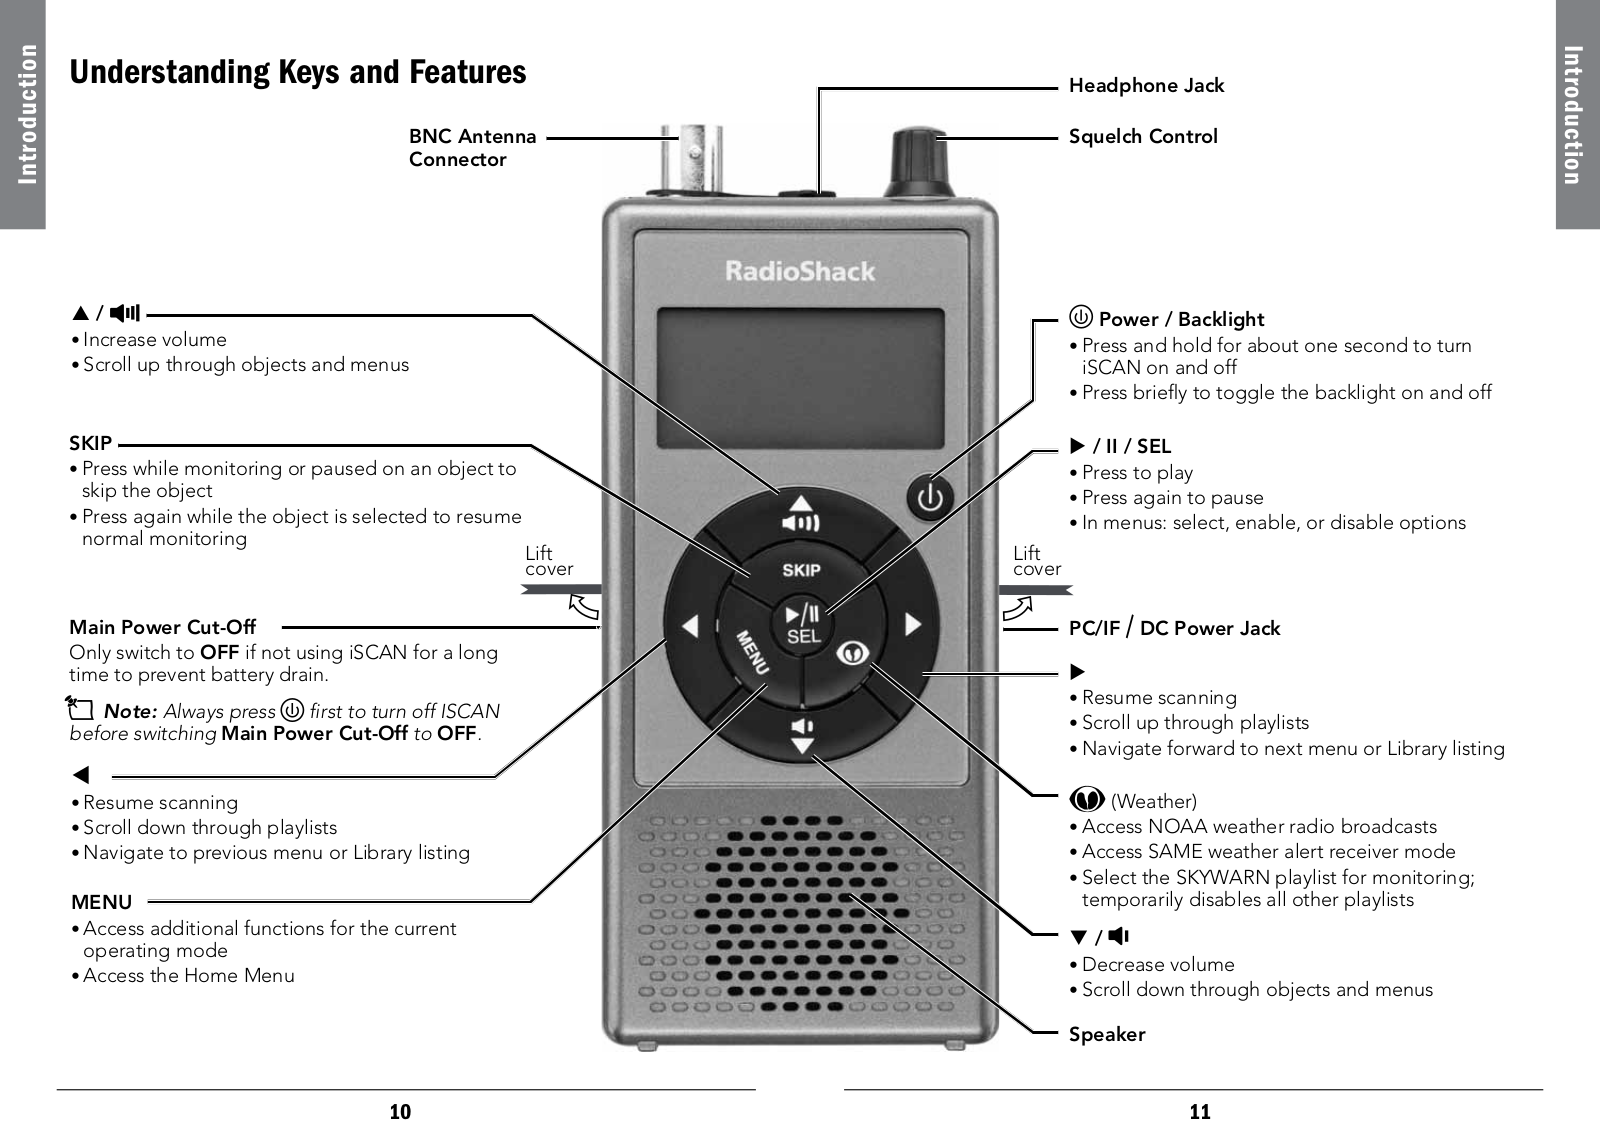
Understanding Keys and Features

BNC Antenna

Connector

/

Increase volume

Scroll up through objects and menus

SKIP

Press while monitoring or paused on an object to skip the object

Press again while the object is selected to resume

normal monitoring

Lift cover

Main Power Cut-Off

Only switch to OFF if not using iSCAN for a long time to prevent battery drain.

nNote: Always press first to turn off ISCAN before switching Main Power Cut-Off to OFF.

Resume scanning

Scroll down through playlists

Navigate to previous menu or Library listing

MENU

Access additional functions for the current operating mode

Access the Home Menu

Headphone Jack

Squelch Control

Power / Backlight

Press and hold for about one second to turn iSCAN on and off

Press briefly to toggle the backlight on and off

/ II / SEL

Press to play

Press again to pause

In menus: select, enable, or disable options

Lift cover

PC/IF / DC Power Jack

Resume scanning

Scroll up through playlists

Navigate forward to next menu or Library listing

(Weather)

Access NOAA weather radio broadcasts

Access SAME weather alert receiver mode

Select the SKYWARN playlist for monitoring; temporarily disables all other playlists

/

Decrease volume

Scroll down through objects and menus

Speaker

Introduction

10

11

Introduction

Understanding the Display

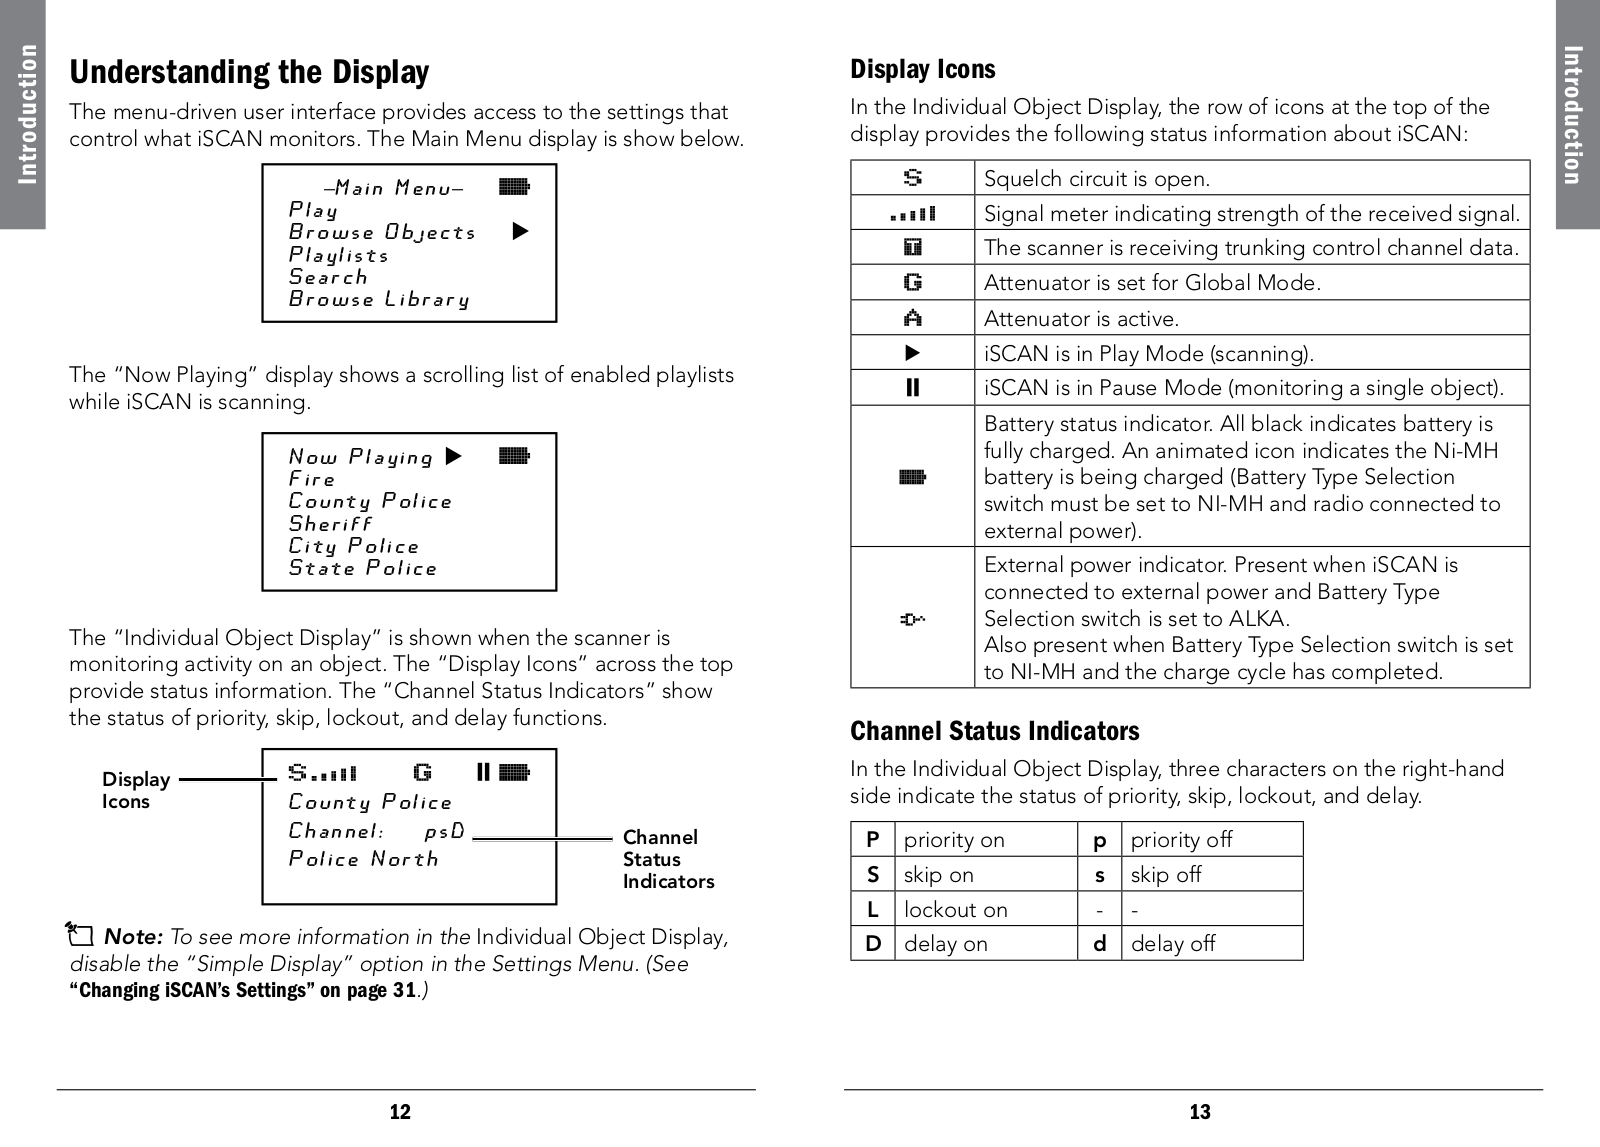
The menu-driven user interface provides access to the settings that control what iSCAN monitors. The Main Menu display is show below.

Main Menu

Play

Browse Objects  

Playlists

Search

Browse Library

The “Now Playing” display shows a scrolling list of enabled playlists while iSCAN is scanning.

Now Playing

Fire

County Police

Sheriff

City Police

State Police

The “Individual Object Display” is shown when the scanner is monitoring activity on an object. The “Display Icons” across the top provide status information. The “Channel Status Indicators” show the status of priority, skip, lockout, and delay functions.

Display


Icons


County Police


Channel:

psD


Channel


Police North


Status


Indicators


nNote: To see more information in the Individual Object Display, disable the “Simple Display” option in the Settings Menu. (See

“Changing iSCAN’s Settings” on page 31.)

Display Icons

In the Individual Object Display, the row of icons at the top of the display provides the following status information about iSCAN:

Squelch circuit is open.

Signal meter indicating strength of the received signal.

The scanner is receiving trunking control channel data.

Attenuator is set for Global Mode.

Attenuator is active.

iSCAN is in Play Mode (scanning).

iSCAN is in Pause Mode (monitoring a single object).

Battery status indicator. All black indicates battery is fully charged. An animated icon indicates the Ni-MH battery is being charged (Battery Type Selection switch must be set to NI-MH and radio connected to external power).

External power indicator. Present when iSCAN is connected to external power and Battery Type Selection switch is set to ALKA.

Also present when Battery Type Selection switch is set to NI-MH and the charge cycle has completed.

Channel Status Indicators

In the Individual Object Display, three characters on the right-hand side indicate the status of priority, skip, lockout, and delay.

P

priority on

p

priority off


S

skip on

s

skip off

L

lockout on

-

-


D

delay on

d

delay off


Introduction

12

13

Setup

Setup

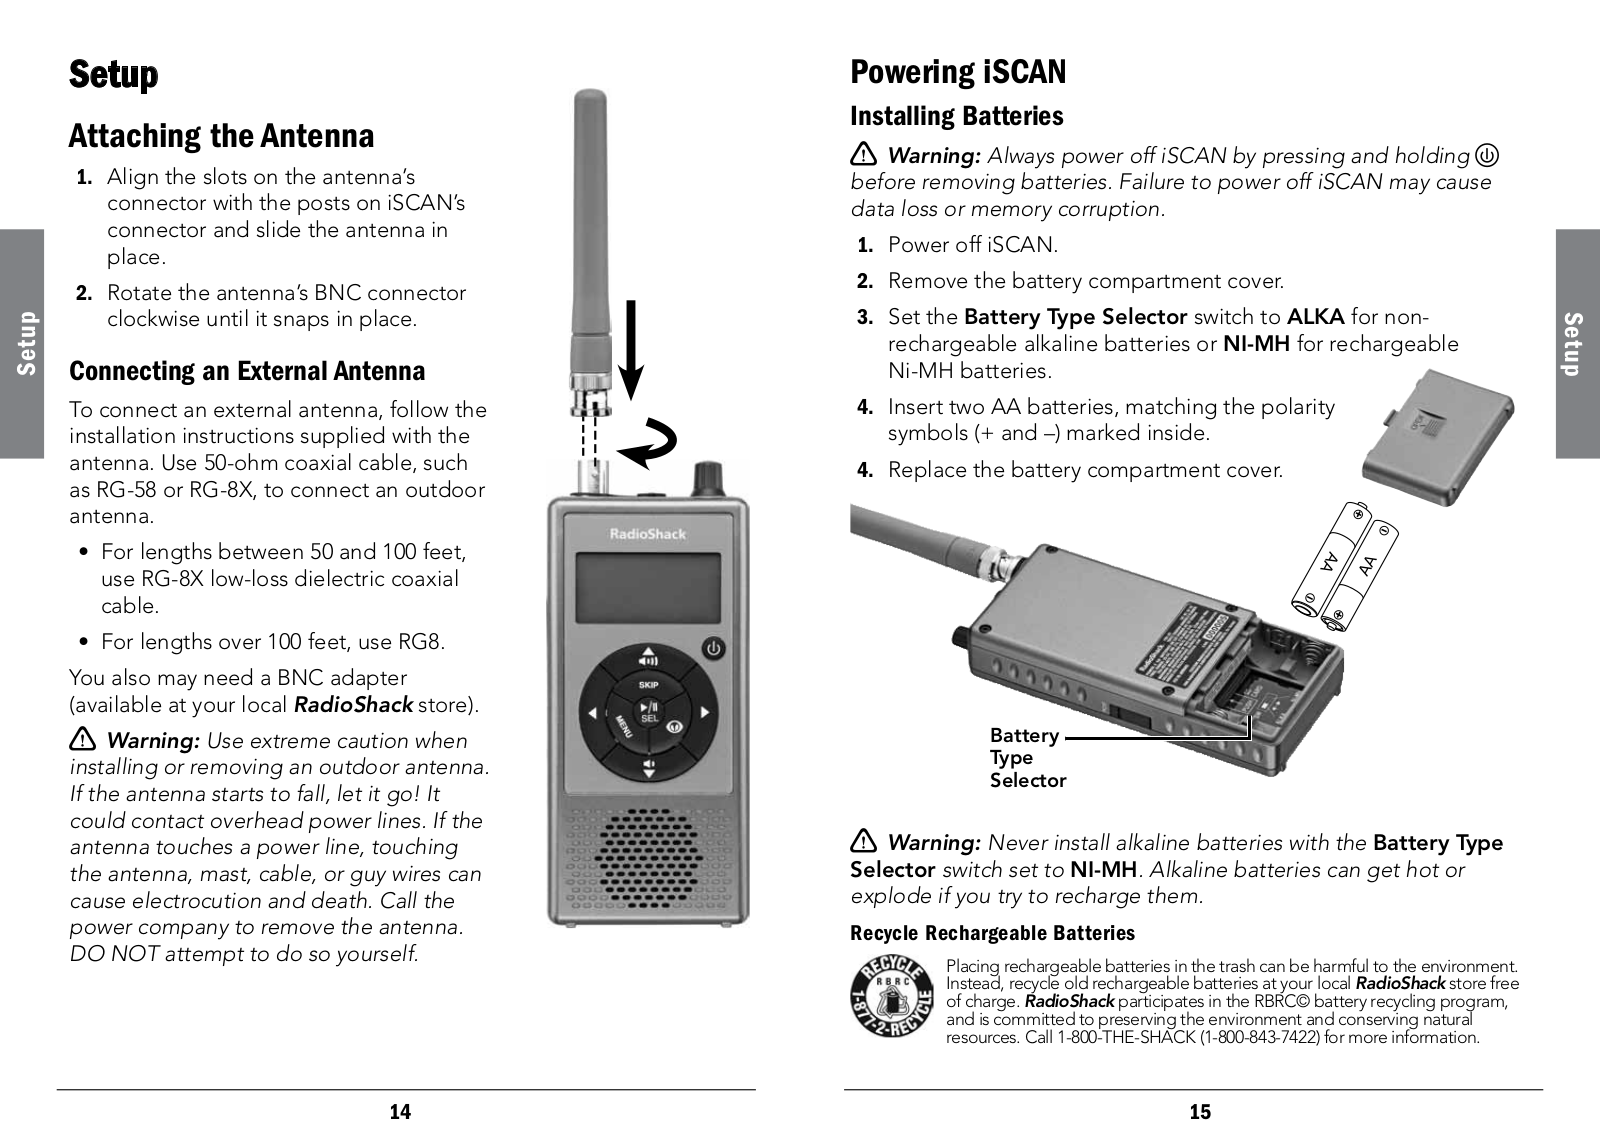
Attaching the Antenna

1.Align the slots on the antenna’s connector with the posts on iSCAN’s connector and slide the antenna in place.

2.Rotate the antenna’s BNC connector clockwise until it snaps in place.

Connecting an External Antenna

To connect an external antenna, follow the installation instructions supplied with the antenna. Use 50-ohm coaxial cable, such as RG-58 or RG-8X, to connect an outdoor antenna.

For lengths between 50 and 100 feet, use RG-8X low-loss dielectric coaxial cable.

For lengths over 100 feet, use RG8.

You also may need a BNC adapter

(available at your local RadioShack store).

wWarning: Use extreme caution when installing or removing an outdoor antenna. If the antenna starts to fall, let it go! It could contact overhead power lines. If the antenna touches a power line, touching the antenna, mast, cable, or guy wires can cause electrocution and death. Call the power company to remove the antenna.

DO NOT attempt to do so yourself.

Powering iSCAN

Installing Batteries

wWarning: Always power off iSCAN by pressing and holding before removing batteries. Failure to power off iSCAN may cause data loss or memory corruption.

1.Power off iSCAN.

2.Remove the battery compartment cover.

3.Set the Battery Type Selector switch to ALKA for nonrechargeable alkaline batteries or NI-MH for rechargeable Ni-MH batteries.

4.Insert two AA batteries, matching the polarity symbols (+ and –) marked inside.

4. Replace the battery compartment cover.

AA

Battery

Type

Selector

wWarning: Never install alkaline batteries with the Battery Type

Selector switch set to NI-MH. Alkaline batteries can get hot or explode if you try to recharge them.

Recycle Rechargeable Batteries

Placing rechargeable batteries in the trash can be harmful to the environment. Instead, recycle old rechargeable batteries at your local RadioShack store free of charge. RadioShack participates in the RBRC© battery recycling program, and is committed to preserving the environment and conserving natural resources. Call 1-800-THE-SHACK (1-800-843-7422) for more information.

Setup

14

15

Setup

bBattery Notes:

A low battery warning sounds every 30 seconds (default setting) when the batteries are nearly depleted.

Dispose of batteries promptly and properly. Do not burn or bury them.

Use only fresh batteries of the required size and type.

Do not mix old and new batteries, different types of batteries (standard, alkaline, or rechargeable), or rechargeable batteries of different capacities.

Discontinue use of any battery that exhibits leakage, swelling, or abnormal generation of heat.

If you do not plan to use the iSCAN for a month or longer, remove the batteries. Batteries can leak chemicals

that can damage electronic parts.

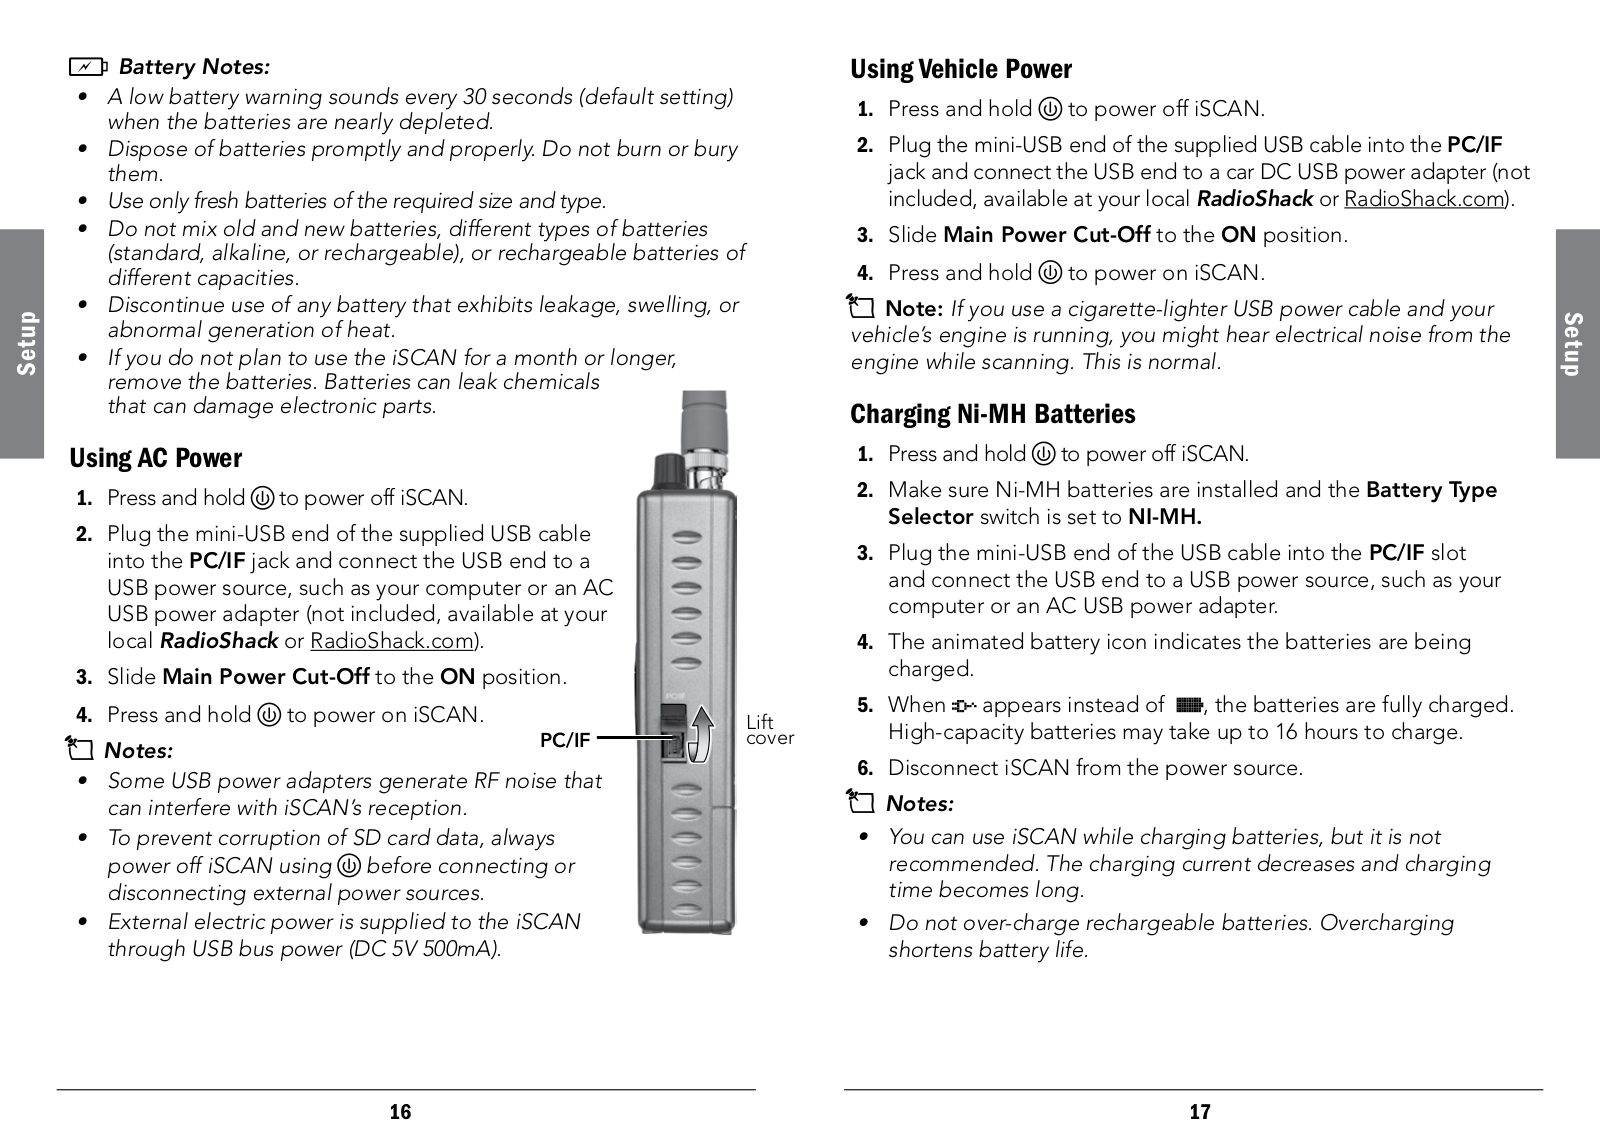
Using AC Power

1.Press and holdto power off iSCAN.

2.Plug the mini-USB end of the supplied USB cable into the PC/IF jack and connect the USB end to a

USB power source, such as your computer or an AC

USB power adapter (not included, available at your local RadioShack or RadioShack.com).

3.Slide Main Power Cut-Off to the ON position.

4. Press and hold to power on iSCAN.

PC/IF

Lift

nNotes:

cover


Some USB power adapters generate RF noise that can interfere with iSCAN’s reception.

To prevent corruption of SD card data, always

power off iSCAN using before connecting or disconnecting external power sources.

External electric power is supplied to the iSCAN through USB bus power (DC 5V 500mA).

Using Vehicle Power

1.Press and hold to power off iSCAN.

2.Plug the mini-USB end of the supplied USB cable into the PC/IF jack and connect the USB end to a car DC USB power adapter (not included, available at your local RadioShack or RadioShack.com).

3.Slide Main Power Cut-Off to the ON position.

4.Press and hold to power on iSCAN.

nNote: If you use a cigarette-lighter USB power cable and your vehicle’s engine is running, you might hear electrical noise from the engine while scanning. This is normal.

Charging Ni-MH Batteries

1.Press and holdto power off iSCAN.

2.Make sure Ni-MH batteries are installed and the Battery Type Selector switch is set to NI-MH.

3.Plug the mini-USB end of the USB cable into the PC/IF slot and connect the USB end to a USB power source, such as your computer or an AC USB power adapter.

4.The animated battery icon indicates the batteries are being charged.

5.When appears instead of , the batteries are fully charged. High-capacity batteries may take up to 16 hours to charge.

6.Disconnect iSCAN from the power source.

nNotes:

You can use iSCAN while charging batteries, but it is not recommended. The charging current decreases and charging time becomes long.

Do not over-charge rechargeable batteries. Overcharging shortens battery life.

Setup

16

17

Setup

Using the Main Power Cut-Off Switch

The Main Power Cut-Off switch is only used to prevent battery drain when iSCAN is not used for long periods of time. Do not use the Main Power Cut-Off switch on a routine basis.

Always press and hold to turn off iSCAN before switching the Main Power Cut-Off switch to OFF and before removing the batteries. Failure to turn off iSCAN using may result in data loss or corrupted memory on the SD card.

wWarning: The Main Power Cut-Off switch will not protect your iSCAN from damage due to battery leakage when iSCAN is stored for long periods of time. Always remove the batteries from iSCAN when placing it into long-term storage.

Connecting Earphones or Headphones

For private listening, you can plug 1/8 inch (3.5 mm) mini-plug earphones or headphones (not supplied) in the HEADPHONE jack on top of iSCAN. This automatically disconnects the internal speaker.

Connecting an External Speaker

In a noisy area, an amplified speaker (not included, available at your local RadioShack or RadioShack.com) might provide more comfortable listening. Plug the speaker cable’s 1/8 inch (3.5 mm) miniplug into iSCAN’s HEADPHONE jack.

Listening Safety

Do not wear headphones, earphones, or earbuds while operating a motor vehicle or riding a bicycle. This can create a traffic hazard and could be illegal in some areas. To protect your hearing, follow these guidelines:

Do not listen at high volume levels. Extended high-volume listening can lead to permanent hearing loss.

Set the volume to the lowest setting. Then turn on your iSCAN and adjust the volume to a comfortable level.

Avoid increasing the volume. Your ears will adapt to the volume level, so a level that does not cause discomfort could still damage your hearing.

18

Basic Operation

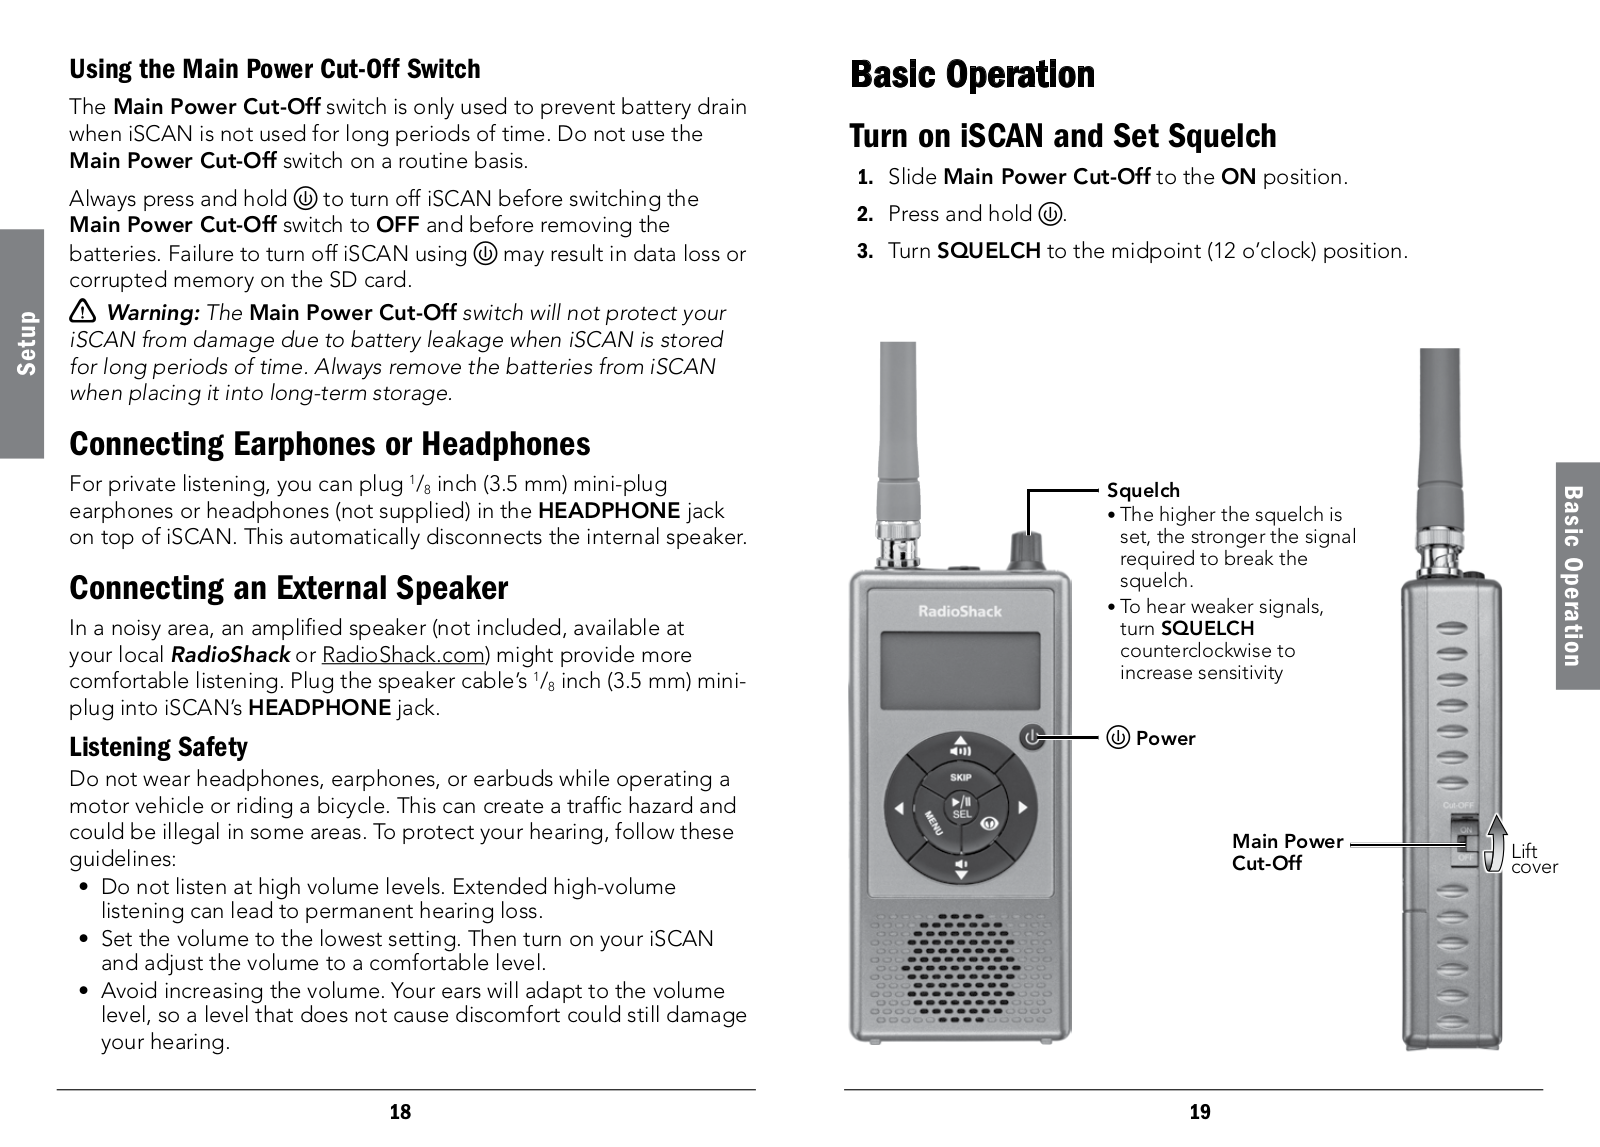
Turn on iSCAN and Set Squelch

1.Slide Main Power Cut-Off to the ON position.

2.Press and hold .

3.Turn SQUELCH to the midpoint (12 o’clock) position.

Squelch

The higher the squelch is set, the stronger the signal required to break the squelch.

To hear weaker signals, turn SQUELCH counterclockwise to increase sensitivity

Power

Main Power

Cut-Off

19

Operation Basic

Lift cover

Loading...
+ 23 hidden pages