


Prince castle DHB-BK24AE, DHB-BK42AE, DHB-BK34AE, DHB-BK23AE, DHB-BK32AE User Manual
...Operation
Manual
Extended Hold Bin
DHB-BKE Series
ATTENTION: Read the instructions before using the machine.
LIMITED WARRANTY |
TABLE OF CONTENTS |
This product is warranted to be free from defects in material and/or workmanship for a period of 3 years (repair parts) and 2 years (labor) from date of original installation, not to exceed 30 months from the date of manufacture.
Any component which proves to be faulty in material and/or workmanship will be replaced or repaired (at the option of Prince Castle LLC) without cost to the customer for parts and labor. This warranty covers on location service (i.e. trip charges and or mileage). Travel mileage is limited to 100 miles (200 Kilometers) round trip (one trip warranty) from an authorized service agency or its sub-service agency. This warranty is subject to the following exceptions/conditions:
•Use of any non-genuine Prince Castle parts voids this warranty.
•All labor to be performed during regular work hours. Overtime premium (the incremental amount) will be charged to the customer.
•Damage caused by carelessness, neglect and/or abuse
(e.g., dropping, tampering or altering parts, equipment damaged in shipment, by fire, flood or an act of nature) is not covered under this warranty.
•All problems due to operation at voltages other than that specified on equipment nameplates are not covered by this warranty. Conversion to correct voltage is the customer’s responsibility.
•This equipment must be serviced by Prince Castle Authorized Service Agency or a Prince Castle Service Technician during the warranty period.
Note: When connected to the Kitchen Minder, the Transfer and Menu functions are disabled on the button bar.
Model Identification . . . . . . . . . . . . . . . . . . . . . . . . . . . . . . . . . . . . . . 2
Model Specifications . . . . . . . . . . . . . . . . . . . . . . . . . . . . . . . . . . . . .2
Safety Information . . . . . . . . . . . . . . . . . . . . . . .. . . . . . . . . . . . . . . . .2
Configurations . . . . . . . . . . . . . . . . . . . . . . . . . .. . . . . . . . . . . . . . . . .3
Product Identification . . . . . . . . . . . . . . . . . . . . . . . . . . . . . . . . . . . . .4
Installation . . . . . . . . . . . . . . . . . . . . . . . . . . . . . . . . . . . . . . . . . . . . .4
Operation . . . . . . . . . . . . . . . . . . . . . . . . . . . . . . . . . . . . . . . . . . . . . .5
Standalone Mode. . . . . . . . . . . . . . . . . . . . . . . . . . . . . . . . . . . . . .6
Setting Product Location (Standalone Mode) . . . . . . . . . . . . . . . . . .7
Cleaning . . . . . . . . . . . . . . . . . . . . . . . . . . . . . . . . . . . . . . . . . . . . . . 7
Setting the Temperature . . . . . . . . . . . . . . . . . . . . . . . . . . . . . . . . . . 8
Calibrating the Heaters . . . . . . . . . . . . . . . . . . . . . . . . . . . . . . . . . . . 9
Changing the Hold and Cook More Times . . . . . . . . . . . . . . . . . . . .10
Changing Product Names . . . . . . . . . . . . . . . . . . . . . . . . . . . . . . . . .11
Changing Temperature Scale . . . . . . . . . . . . . . . . . . . . . . . . . . . . . .12
Adjusting Alarm Volume. . . . . . . . . . . . . . . . . . . . . . . . . . . . . . . . . . 12
Default Menu . . . . . . . . . . . . . . . . . . . . . . . . . . . . . . . . . . . . . . . . . . 13
Zone Layouts . . . . . . . . . . . . . . . . . . . . . . . . . . . . . . . . . . . . . . . . . ..13
Troubleshooting . . . . . . . . . . . . . . . . . . . . . . . . . . . . . . . . . . . . . . . . 14
Diagnostics . . . . . . . . . . . . . . . . . . . . . . . . . . . . . . . . . . . . . . . . . . . 15
Wiring Diagrams . . . . . . . . . . . . . . . . . . . . . . . . . . . . . . . . . . . . . . . .16
Exploded Views . . . . . . . . . . . . . . . . . . . . . . . . . . . . . . . . . . . . . . . ..17
355 EAST KEHOE BLVD. ~ CAROL STREAM, IL, 60188, USA PHONE: 630-462-8800 ~ TOLL FREE: 1-800-PCASTLE
FAX 630-462-1460 ~ WWW.PRINCECASTLE.COM
540-527revE-EN |
1 |
Printed in USA 04/16 © 2016 |

Extended Hold Bin
DHB-BKE Series
Model Identification
DHB-BK24AECE
|
|
Type |
Unit Name |
|
|
|
Number of |
“A” is present if there |
Number of |
Trays per |
are auxiliary timer |
Shelves |
Shelf |
bars (bars on the |
|
|
back of the unit) |
“CE” is present if the bin can be used outside of the US
Model Specifications
STYLE |
MODEL NO. |
WIDTH (mm) |
HEIGHT (mm) |
DEPTH (mm) |
WEIGHT (kgs) |
VOLTAGE |
AMPS |
2H X 2W |
DHB-BK22AE |
19.7 (500) |
11.1 (282) |
14.1 (358) |
64 lbs. (29.0) |
208-240 |
3.8-4.3 |
2H X 3W |
DHB-BK23AE |
27.2 (691) |
11.1 (282) |
14.1 (358) |
74 lbs. (33.6) |
208-240 |
6.8-7.8 |
2H X 4W |
DHB-BK24AE |
33.2 (843) |
11.1 (282) |
14.1 (358) |
97 lbs. (44.0) |
208-240 |
9.0-10.4 |
3H X 2W |
DHB-BK32AE |
19.7 (500) |
18.3 (465) |
14.1 (358) |
80 lbs. (36.3) |
208-240 |
6.8-7.8 |
3H X 4W |
DHB-BK34AE |
33.2 (843) |
18.3 (465) |
14.1 (358) |
120 lbs. (54.4) |
208-240 |
13.5-15.6 |
4H X 2W |
DHB-BK42AE |
19.7 (500) |
20.6 (523) |
14.1 (358) |
94 lbs. (42.6) |
208-240 |
7.5-8.7 |
NOTE: All Model Numbers above are for double-sided units (with auxiliary timer bars).
For single-sided (only main timer bars) remove the letter “A”
NOTE: For international (outside of the US) add “ CE” to the end of the model number.
Safety Information
WARNING
Indicates information important to the proper operation of the unit. Failure to observe may result in damage to the equipment and/or severe bodily injury or death.
CAUTION
Indicates information important to the operation of the unit. Failure to observe may result in damage to the equipment.
Important
Prince Castle reserves the right to change specifications and product design without notice. Such revisions do not entitle the buyer to corresponding changes, improvements, additions or replacements for previously purchased equipment.
Printed in USA 04/16 © 2016 |
2 |
540-527revE-EN |
Extended Hold Bin
DHB-BKE Series
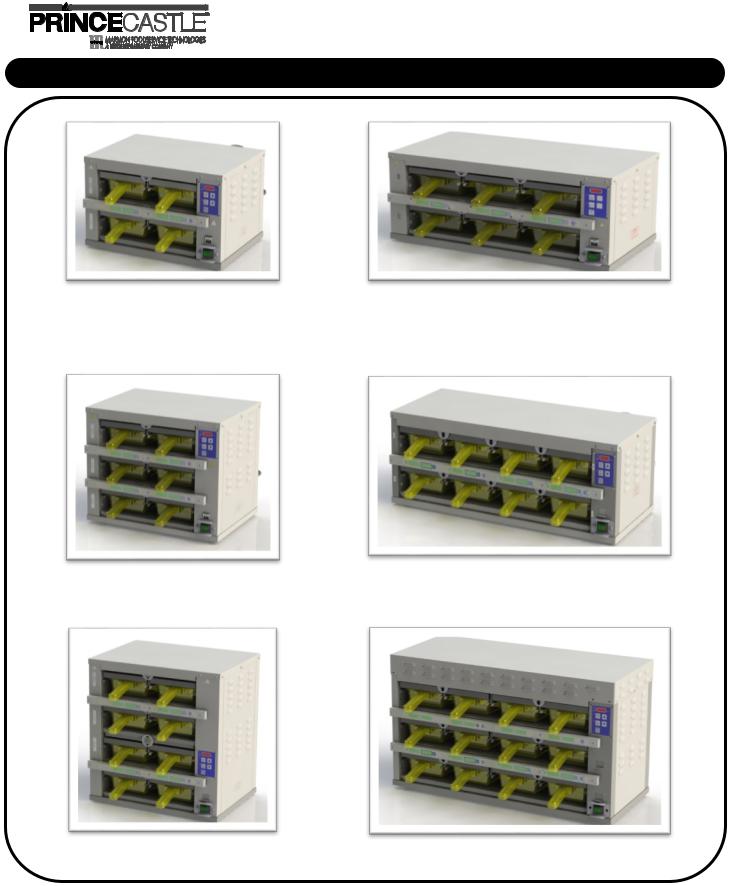
Configurations
DHB-BK22AE |
DHB-BK23AE |
DHB-BK32AE |
DHB-BK24AE |
DHB-BK42AE |
|
DHB-BK34AE |
|
|
|
540-527revE-EN |
3 |
Printed in USA 04/16 © 2016 |

Extended Hold Bin
DHB-BKE Series
Product Identification
PAN LIDS, ONLY used with broiled products. (Fried products DO NOT require lids)
Temperature
Control Panel
Button Bar
Power
ON/OFF
Switch
LED TIMERS ( tri-color) |
TRANSFER Button |
UP and DOWN ARROW |
ENTER Button |
BKFT LED |
(1 for each pan arrow button) |
(Not used) |
|
(Breakfast) |
|
|
|
BUTTON BAR |
|
|
|
|
PRINCE CASTLE |
PAN ARROW Buttons |
UPPER PAN Display |
LOWER PAN Display |
REG LED |
LOGO Button |
(2 for each slot wide) |
(1 for each slot wide) |
(1 for each slot wide) |
(Regular Menu) |
Installation
1 |
Remove the unit from the carton and inspect for signs of |
damage. If there is damage to the unit: |
• notify the carrier within 24 hours of delivery
• save carton and packaging materials for inspection purposes
• contact your local dealer, or if purchased directly, the Prince Castle Sales Department at 800-722-7853 or 1-630-462-8800 to arrange for a replacement unit.
NOTE: Plug the power cord into the proper electrical receptacle. All electrical connections must be in accordance with local electrical codes and any other applicable codes. If the unit is to be networked with other Prince Castle units, refer to the CastleNet® Communication Network section in this manual for installation instructions.
2 |
Place Extend Holding Bin on flat surface. |
|
Remove blue and/or white protective covering. |
||
|
||
|
NOTE: When installing this unit, the ambient temperature |
|
|
at the mounting site should not exceed 100°F (38°C) |
3 |
Plug unit into a grounded |
|
receptacle with a matching |
plug configuration.
WARNING:
All electrical connections must be in accordance with local electrical codes and any other applicable codes.
If the supply cord is damaged, it must be replaced by the manufacturer, its service agent, or similarly qualified persons in order to avoid a hazard.
To prevent an electric shock hazard this device must be bonded to equipment in close proximity with an equipotential bonding conductor. This device is equipped with a grounding lug for this purpose.
Printed in USA 04/16 © 2016 |
4 |
540-527revE-EN |

Extended Hold Bin
DHB-BKE Series
Operation
WARNING: This application is not intended for use by persons (including children) with reduced physical, sensory or mental capabilities, or lack of experience and knowledge, unless they have been given supervision or instruction concerning use of the appliance by a person responsible for their safety.
1 |
To turn on the unit, |
|
Turn Power On/Off switch (A) to ON position. |
||
|
||
|
Allow 20 minutes for heaters to |
|
|
reach operating temperature. |
|
|
The button bar will read “WARM |
|
|
UP” as the unit warms up, they |
|
(A) |
will display the product names. |
|
|
NOTE: Load pan covers (if used) and insert pans into the unit.
2 |
Press all Pan Arrow buttons. |
|
The Pan displays will show the assigned product name. |
||
|
If no product is assigned, the display |
BKFT (Breakfast) or |
|
|
will be dim and show “----”. Pressing |
REG (Regular Menu) |
|
|
the Pan Arrow button will not activate |
will be lit depending on |
|
|
the timer if “----” is displayed. Pressing |
pre-programmed menu. |
|
|
Pan Arrow button when product name |
|
is displayed will start timing cycle. |
|
3 |
LED Timing Status |
|
LED TIMERS
RED (steady) = Ready for product RED (flashing) = Discard product
GREEN (steady) = Oldest product, use first GREEN (flashing) = Cook more product
YELLOW (steady) = Newer product, use green first YELLOW (flashing) = Cook more product
4 |
When LED is steady RED, load product and press |
|
the Pan Arrow button. |
||
|
If only one pan is active for a product, the LED will turn from RED to
GREEN.
If more than one pan is active for a product, the LED for the first pan loaded will turn from RED to GREEN.
The LED for the 2nd pan loaded with the same product will turn from RED to YELLOW.
The LED timer can be stopped (cancelled) at any time by pressing and releasing the corresponding PAN Arrow button.
5 |
When any of the timer LED flash, cook more product |
|
or remove and discard product as indicated. |
||
|
||
|
GREEN (flashing) = Cook more product |
|
|
YELLOW (flashing) = Cook more product |
|
|
RED (flashing) = Discard product |
WARNING: HOT SURFACES
540-527revE-EN |
5 |
Printed in USA 04/16 © 2016 |

Extended Hold Bin
DHB-BKE Series
Standalone Mode
NOTE: Prince Castle Holding bins are not to be connected to each other unless a Kitchen Minder is in use. If attempting to configure bins with Kitchen Minder, please refer to the included Kitchen Minder Setup Manual
1 |
Set all bin addresses to bin1. |
|
The factory default address for all bins and timers is address bin1.
To check the bin address, press and hold the ACTUAL TEMP and SETPOINT buttons. The display will show the
bin address.
Default for a new address is bin1.
To change a bin address, disconnect power to the unit and wait 2 10 seconds. Reconnect power to the unit and immediately press
and hold the ACTUAL TEMP and SETPOINT buttons.
4 |
Set Timer Bar addresses. |
|
|
|
Since each bin is addressed bin1, the bottom bar on each bin will |
|
be addressed bar2. If there is an upper bar on a bin, it will be |
|
addressed bar3. |
|
Remember: if there are bars on the back of the unit, they do not |
|
need to be addressed separately, they follow the front. |
NOTE: This naming scheme only is true without a kitchen management system, if hooked up to a system like Kitchen Minder, it is different. See its user manual for details.
5 |
To check the timer address, press and hold the PRINCE CASTLE |
|
LOGO button and the DOWN Arrow button. The current timer |
||
|
||
|
address will be displayed in the far right timer display. |
|
|
To change the timer address, proceed to Step 6. |
PROG LED 
NOTE: Continue to hold
the buttons until PROG LED turns on.
Use the UP or DOWN Arrow button to scroll to the desired address. 3 Press the PRINCE CASTLE LOGO button to store the new address.
Available addresses are: bin1 thru bin4,
bin1 will always be used when not using Kitchen Minder.
6 |
To change the timer address, disconnect power to the unit and |
|
wait 10 seconds. Reconnect power to the unit and immediately. |
||
|
||
|
Press and hold the PRINCE CASTLE LOGO button and the |
|
|
DOWN Arrow button until the display shows |
|
|
SET ADDR ↑↓ ENTR BAR2. The address number will blink on/ |
|
|
off. |
Use the UP or DOWN Arrow button to scroll to the desired address. 7 Press the ENTER button to store the new address and return to
normal operating mode. Press the PRINCE CASTLE LOGO button to save the setting.
Available addresses are: Bar2 thru Bar9
NOTE: Bar addresses are numbered from the bottom up
Printed in USA 04/16 © 2016 |
6 |
540-527revE-EN |

Extended Hold Bin
DHB-BKE Series
Setting Product Location (Standalone Mode)
1 |
To change a menu selection for a specific pan cavity, use the following steps: |
|
|
|
|
|
A. Press and hold the PRINCE CASTLE LOGO button for 6 seconds. |
C. Press the UP or DOWN Arrow |
|
All Pan displays will show PROG. All LED Timers will be RED. |
button to scroll to the desired |
|
|
menu item. |
D.Press the ENTER button to select the menu item.
B.Press a Pan Arrow button to change the menu. The LED Timer will change to YELLOW and the display will change from PROG to the assigned menu item.
E.Repeat steps A – D as required for other Pan displays. Press the PRINCE CASTLE LOGO button to exit the Program Mode.
NOTE: A pan may be set as “not used” by assigning “- - - -” as its product.
NOTE: Setting a pan to a particular product will automatically change the other pan in that zone to the same product.
2 |
To shut down the unit, |
|
turn the Power On/Off switch (A) to OFF position. |
||
|
(A)
Cleaning
WARNING: |
CAUTION: |
Before performing any maintenance, turn the power switch to the OFF position and unplug the power cord from the electrical receptacle.
This unit is not watertight. Do not clean with a water jet/jet spray. Do not immerse the unit in water.
1.Turn the unit off and unplug the power cord from electrical receptacle.
2.Remove the pans and covers. Wipe all parts and unit with a damp cloth. DO NOT use a green Scotch Bright pad cleaner, ice or water.
540-527revE-EN |
7 |
Printed in USA 04/16 © 2016 |
 Loading...