


 Loading...
Operation
Manual
Product Holding Bin
DHB2PT Series
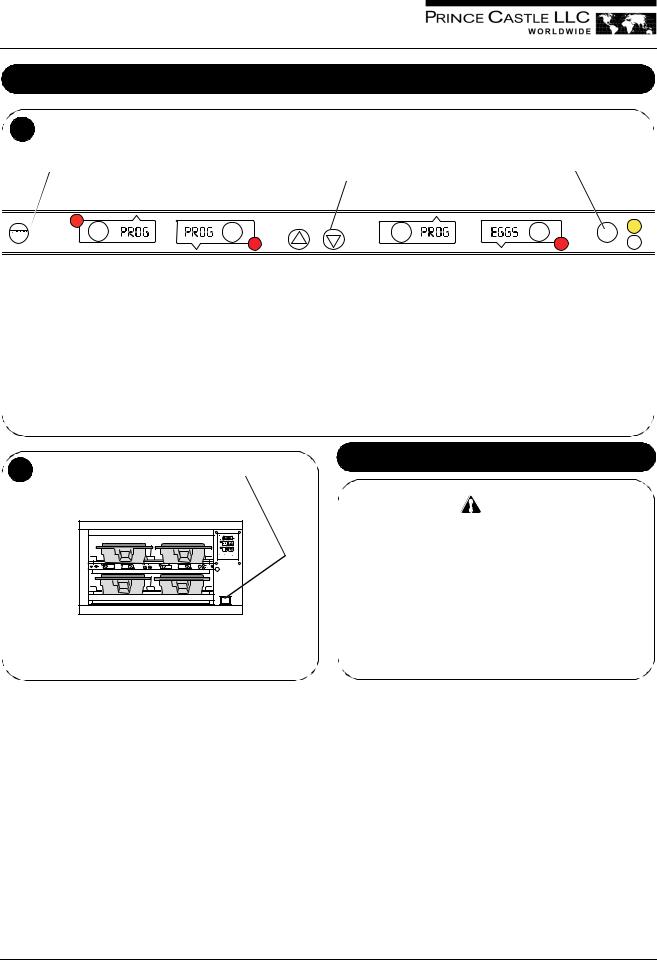
Product Identification
Pan and Cover |
Button Bar |
|
DHB2PT-20 |
Temperature Control Panel |
Upper Pan Displays |
|
PRINCE CASTLE |
(qty. 2 or 3) |
|
|
|
|
LOGO Button |
|
|
LED Timers (tri- |
BKFT (Breakfast) LED |
|
. 4, 6 or |
|
|
|
|
|
|
|
|
|
Power On/Off Switch |
|
|
|
|
|
||
|
|
|
|
|
|||
|
|
Pan Buttons |
|
MENU/ENTER Button |
|||
|
|
|
|
(qty. 4, 6 or 8) |
UP and DOWN Arrow |
REG (Regular Menu) LED |
|
|
|
|
|
|
|
||
|
|
|
|
|
|
Buttons |
|
DHB2PT-27
 Temperature
Control
Panel
|
|
Power |
Pan and Cover |
Button Bar |
On/Off |
Switch |
|
DHB2PT-33 |
|
|
|
Temperature |
|
|
Control |
|
|
Panel |
|
|
Power |
Pan and Cover |
Button Bar |
On/Off |
Switch |
|
|
|
|
|
|
542-517revC-EN |
|
Printed in USA 10/10 © 2010 |

Product Holding Bin
DHB2PT Series
Specifications
Safety Information
Installation
|
|
|
|
|
|
|
|
|
|
|
|
|
|
|
|
|
|
|
|
|
|
|
|
|
|
|
|
|
|
|
|
|
|
|
|
|
|
|
|
|
|
|
|
|
|
|
|
|
|
|
|
|
|
|
|
|
|
|
|
|
|
|
|
|
|
|
|
|
|
|
|
|
|
|
|
|
|
|
|
|
|
|
|
|
|
|
|
|
|
|
|
|
|
|
|
|
|
|
|
|
|
|
|
|
|
|
|
|
|
|
|
|
|
|
|
|
|
|
|
|
|
|
|
|
|
|
|
|
|
|
|
|
|
|
|
|
|
|
|
|
|
|
|
|
|
|
|
|
|
|
|
|
|
|
|
|
|
|
|
|
|
|
|
|
|
|
|
|
|
|
|
|
|
|
|
|
|
|
|
|
|
|
|
|
|
|
|
|
|
|
|
|
|
|
|
|
|
|
|
|
|
|
|
|
|
|
|
|
|
|
|
|
|
|
|
|
|
|
|
|
|
|
|
|
|
|
|
|
|
|
|
|
|
|
|
|
|
|
|
|
|
|
|
|
|
|
|
|
|
|
|
|
|
|
|
|
|
|
|
|
|
|
|
|
|
|
|
|
|
|
|
|
|
|
|
|
|
|
|
|
|
|
|
|
|
|
|
|
|
|
|
|
|
|
|
|
|
|
|
|
|
|
|
|
|
|
|
|
|
|
|
|
|
|
|
|
|
|
|
|
|
|
|
|
|
|
|
|
|
|
|
|
|
|
|
|
|
|
|
|
|
|
|
|
|
|
|
|
|
|
|
|
|
|
|
|
|
|
|
|
|
|
|
|
|
|
|
|
|
|
|
|
|
|
|
|
|
|
|
|
|
|
|
|
|
|
|
|
|
|
|
|
|
|
|
|
|
|
|
|
|
|
|
|
|
|
|
|
|
|
|
|
|
|
|
|
|
|
|
|
|
|
|
|
|
|
|
|
|
|
|
|
|
|
|
|
Printed in USA 10/10 © 2010 |
2 |
|
|
|
|
|
|
|
|
|
|
|
|
|
|
|
|
|
542-517revC-EN |
|||

Product Holding Bin
DHB2PT Series
1
Load pan covers (if used) onto pan racks and insert racks into the unit.
Operation
2
Allow 30 minutes for heaters to reach operating temperature. The Temperature Display will show temperature as unit warms up to the operating temperature.
The PAN DISPLAYS will show the assigned product name.
If no product is assigned, the display will be dim and show “- - - -”. Pressing the PAN button will not activate the timer if “- - - -” is displayed. Pressing PAN button when product name is displayed will start timing cycle.
BKFT (Breakfast) or REG (Regular Menu) will be lit depending on preprogrammed menu.
Power On/Off Switch
3
LED Timers
RED (steady) = Ready for product RED (flashing) = Discard product
GREEN (steady) = Oldest product, use first GREEN (flashing) = Cook more product
YELLOW (steady) = Newer product, use green first YELLOW (flashing) = Cook more product
5
GREEN (flashing) = Cook more product YELLOW (flashing) = Cook more product RED (flashing) = Discard product
 WARNING
Hot surfaces.
4
If only one pan is active for a product, the LED will turn from RED to GREEN.
6
A.Press and release the TRANSFER button. Displays for available bins are brightly Displays for bins currently timing, are dimly lit.
If no other pan is active for a product, the LED for the first pan loaded will turn from RED to GREEN.
The LED for the 2nd pan (3rd pan, etc.) loaded will turn from RED to YELLOW.
An LED timer can be stopped (cancelled) at any time by pressing and releasing the corresponding PAN button.
C.Press and release the TRANSFER button again.
B. Press and release the PAN |
D. Move the product. Press and |
button of the product to be |
release the PAN button for the |
moved. |
new location. The new location |
|
will finish timing the product. |
|
When the transferred pan |
|
timing expires, location will |
|
revert to original menu setting. |
NOTE: If product transfer is not completed within a pre-programmed transfer time, the transfer will be cancelled. See your Manager.
542-517revC-EN |
3 |
Printed in USA 10/10 © 2010 |
Product Holding Bin
DHB2PT Series
Operation (continued)
7
A.Press and hold the PRINCE CASTLE LOGO button for 6 seconds. All Pan displays will show PROG. All LED Timers will be RED.
D.Press the UP or DOWN Arrow button to scroll to the desired product choice.
E.Press the MENU/ENTER button to select the product choice.
B.Press and hold the MENU/ENTER button. The display next to the MENU/ENTER button will display the product choices. While holding the MENU/ENTER button, press the UP or DOWN Arrow button to scroll through the product choices. While scrolling, the BKFT LED will be lit for the breakfast menus and the REG LED will be lit for the regular menus.
C.Press a PAN button to change the product. the LED timer will change to yellow and the display will change from PROG to the assigned product choice and two other displays will change to up and down arrows and ENTR.
F.Repeat Steps A – E as required for other Pan displays. Press the PRINCE CASTLE LOGO button to exit the Program Mode.
NOTE: Up to six products may be programmed for each Pan button (1 for each menu). In addition, a pan may be set as “not used” by assigning “----” as its product.
Cleaning
8
Printed in USA 10/10 © 2010 |
4 |
542-517revC-EN |

Product Holding Bin
DHB2PT Series
Setting the Temperature
1
UPPER SHELF LED
This LED will be lit to indicate upper selected.
PROG LED
This LED will be lit to indicate unit is in
Mode.
LOWER SHELF LED
This LED will be lit to indicate lower shelf selected.
ACTUAL TEMP BUTTON and LED
Press to display actual temperature for the selected heater. LED will be lit when actual temperature is displayed.
SETPOINT BUTTON and LED
Press to display setpoint temperature of a selected heater. LED will be lit when setpoint temperature is displayed.
TEMPERATURE DISPLAY
unit is preset to display temperature Fahrenheit. To display in Celsius, press and
hold the DOWN Arrow button immediately after turning on the power switch. To switch back to Fahrenheit, press and hold the UP Arrow button after turning on the power switch.
UP/DOWN ARROW BUTTONS
with other buttons to scroll through heater and temperature selections.
PRINCE CASTLE LOGO BUTTON
Press to enter temperature selections.
NOTE: To reset all times and temperatures to the factory settings, turn the unit off, then press and hold the UP and DOWN Arrow buttons simultaneously while turning the unit back on. A “P” will appear in the display and all times and temperatures will be reset to original factory settings.
2 |
|
|
|
|
|
3 |
|
|
|
|
|
|
|
|
|
|
|
|
|
|
|
|||||||||
|
|
|
|
|
|
|
|
|
|
|
|
|
|
|
|
|
|
|
|
|
|
|
|
|
|
|
|
|
|
|
|
|
|
|
|
|
|
|
|
|
|
|
|
|
|
|
|
|
|
|
|
|
|
|
|
|
|
|
|
|
|
|
|
|
|
|
|
|
|
|
|
|
|
|
|
|
|
|
|
|
|
|
|
|
|
|
|
|
|
|
|
|
|
|
|
|
|
|
|
|
|
|
|
|
|
|
|
|
|
|
|
|
|
|
|
|
|
|
|
|
|
|
|
|
|
|
|
|
|
|
|
|
|
|
|
|
|
|
|
|
|
|
|
|
|
|
|
|
|
|
|
|
|
|
|
|
|
|
|
|
|
|
|
|
|
|
|
|
|
|
|
|
|
|
|
|
|
|
|
|
|
|
|
|
|
|
|
|
|
|
|
|
|
|
|
|
|
|
|
|
|
|
|
|
|
|
|
|
|
|
|
|
|
|
|
|
|
|
|
|
|
|
|
|
|
|
|
|
|
|
|
|
|
|
|
|
|
|
|
|
|
|
|
|
|
|
|
|
|
|
|
|
|
|
|
|
|
|
|
|
|
|
|
|
|
|
|
|
|
|
|
|
|
|
|
|
|
|
|
|
|
|
|
|
|
|
|
|
|
|
|
|
|
|
|
|
|
|
|
|
|
|
|
|
|
|
|
|
|
|
|
|
|
|
|
|
|
|
|
|
|
|
|
|
|
|
|
|
|
|
|
|
|
|
|
|
|
|
|
|
|
|
|
|
|
|
|
|
|
|
|
|
|
|
|
|
|
|
|
|
|
|
|
|
|
|
|
|
|
|
|
|
|
|
|
|
|
|
|
|
|
|
|
|
|
|
|
|
|
|
|
|
|
|
|
|
|
|
|
|
|
|
|
|
|
|
|
|
|
|
|
|
|
|
|
|
|
|
|
|
|
|
|
|
|
|
|
|
|
|
|
|
|
4 |
|
|
|
|
|
|
|
|
5 |
|
|
|
|
|
|
|
|
|
|
|
|
|
|
||||||
|
|
|
|
|
|
|
|
|
|
|
|
|
|
|
|
|
|
|
|
|
|
|
|
|
|
|
|
|
|
|
|
|
|
|
|
|
|
|
|
|
|
|
|
|
|
|
|
|
|
|
|
|
|
|
|
|
|
|
|
|
|
|
|
|
|
|
|
|
|
|
|
|
|
|
|
|
|
|
|
|
|
|
|
|
|
|
|
|
|
|
|
|
|
|
|
|
|
|
|
|
|
|
|
|
|
|
|
|
|
|
|
|
|
|
|
|
|
|
|
|
|
|
|
|
|
|
|
|
|
|
|
|
|
|
|
|
|
|
|
|
|
|
|
|
|
|
|
|
|
|
|
|
|
|
|
|
|
|
|
|
|
|
|
|
|
|
|
|
|
|
|
|
|
|
|
|
|
|
|
|
|
|
|
|
|
|
|
|
|
|
|
|
|
|
|
|
|
|
|
|
|
|
|
|
|
|
|
|
|
|
|
|
|
|
|
|
|
|
|
|
|
|
|
|
|
|
|
|
|
|
|
|
|
|
|
|
|
|
|
|
|
|
|
|
|
|
|
|
|
|
|
|
|
|
|
|
|
|
|
|
|
|
|
|
|
|
|
|
|
|
|
|
|
|
|
|
|
|
|
|
|
|
|
|
|
|
|
|
|
|
|
|
|
|
|
|
|
|
|
|
|
|
|
|
|
|
|
|
|
|
|
|
|
|
|
|
|
|
|
|
|
|
|
|
|
|
|
|
|
|
|
|
|
|
|
|
|
|
|
|
|
|
|
|
|
|
|
|
|
|
|
|
|
|
|
|
|
|
|
|
|
|
|
|
|
|
|
|
|
|
|
|
|
|
|
|
|
|
|
|
|
|
|
|
|
|
|
|
|
542-517revC-EN |
5 |
Printed in USA 10/10 © 2010 |

Product Holding Bin
DHB2PT Series
1
NOTE: Allow sufficient amount of time for temperatures to stabilize before starting calibration.
Press the UP or DOWN Arrow button until the desired shelf LED and upper (U) or lower (L) heater is selected.
Calibrating Heaters
2
Use a stand-alone temperature meter (not supplied).
 WARNING
Hot surfaces. Use caution when taking temperature readings within the shelf.
|
|
|
3 |
4 |
|
A |
B 


 A
A 


 B
B
Selecting Breakfast and Regular Menus
1 |
2 |
When scrolling, menu numbers appear in this display.
When timers for a different menu are still active, those BKFT or REG LEDs will flash until they are all cancelled.
Printed in USA 10/10 © 2010 |
6 |
542-517revC-EN |
Loading...