


Operating
Instructions
Single Function Timers
M ODEL NO. 741-TF, 741TCE & 741TGB 2, 4, 8 & 12
CHANNEL SERIES (M ERLIN II)
TABLE OF CONTENTS
Installation . . . . . . . . . . . . . . . . . . . . . . . . . . . . . . 2 Displays and Indicators . . . . . . . . . . . . . . . . . . . . 2 Controls . . . . . . . . . . . . . . . . . . . . . . . . . . . . . . . . 2 Programming . . . . . . . . . . . . . . . . . . . . . . . . . . . . 2 Operation . . . . . . . . . . . . . . . . . . . . . . . . . . . . . . . 4 Cleaning . . . . . . . . . . . . . . . . . . . . . . . . . . . . . . . . 4 Parts List . . . . . . . . . . . . . . . . . . . . . . . . . . . . . . . . 5 Exploded View . . . . . . . . . . . . . . . . . . . . . . . . . . . 5 Troubleshooting . . . . . . . . . . . . . . . . . . . . . . . . . . 6 Wiring Diagram . . . . . . . . . . . . . . . . . . . . . . . . . . . 6 Mode d’emploi . . . . . . . . . . . . . . . . . . . . . . . . . . . . 7 Betriebsanweisungen . . . . . . . . . . . . . . . . . . . . . . 12 Istruzioni per il funzionamento. . . . . . . . . . . . . . . . 17 Instrucciones de operación . . . . . . . . . . . . . . . . . . 22
Channel Series
Prince Castle’s second generation of Merlin Timers feature a new slim design which gives you mounting flexibility. The 740 Series Timers are designed so each channel can be programmed independently, and used simultaneously. The timers are simple to program and simple to use. The push of a button activates each channel, and a alarm and multi-colored flashing channel buttons alert the operator when timing is complete.
Electrical
741-Series
230 Volts
50 – 60 Hz
LIMITED WARRANTY
This product is warranted to be free from defects in material and/or workmanship for a period of two years from date of original installation, not to exceed 30 months from date of shipment from our factory.
Any component which proves to be faulty in material and/or workmanship will be replaced or repaired (at the option of Prince Castle, Inc.) without cost to the customer for parts or labor.
This warranty is subject to the following exceptions/ conditions:
•This equipment is portable, charges for on location service (e.g. trip charges and mileage) are not included in the provisions of this warranty.
•Use of any non-genuine Prince Castle parts voids this warranty. All genuine Prince Castle replacement spare parts are warranted for ninety (90) days from date of purchase.
•All work must be performed by an authorized Prince Castle Service Agency. Failure to do so will void this warranty.
•Damage caused by carelessness, neglect, and/or abuse (e.g., dropping, tampering or altering parts), equipment damaged in shipment, by fire, flood or an act of God is not covered under this warranty.
|
355 East Kehoe Blvd. • Carol Stream, IL 60188 USA |
|
|
Telephone: 630-462-8800 • Fax : 630-462-1460 |
|
Printed in 2004 |
Toll Free: 1-800-PCASTLE |
741-500FGISrevA |
Prince Castle Inc. |
www.princecastle.com |
|

INSTALLATION
1.After you have removed the timer from the carton, inspect the unit for signs of damage. If there is damage to the unit:
•Notify carrier within 24 hours after delivery.
•Save carton and packing materials for inspection purposes.
•Contact your local dealer or, if purchased directly, the Prince Castle Customer Sales Department at 1-800-722-7853 to arrange for a replacement to be sent.
2.Verify that all parts have been received. Bracket Mounting screws provided.
3.To mount the timer, place mounting brackets in desired location. Scribe location of mounting holes, center punch, and drill holes. Attach timer to mounting brackets placing star washer between bracket and timer.
CONTROLS
Channel The 741-T2 has 2 channels, the (Timer) 741-T4 has 4 channels, the 741-T8
has 8 channels and the 741T12 has 12 channels.
SCAN/UP In the program mode, it increases ARROW time values for each channel. In the
Run Mode, it is used in conjunction with logo button to increase the volume.
SCAN/DOWN In the program mode, it decreases ARROW time values for each channel. In the Run Mode, it is used in conjunction
with logo button to decrease the volume.
PRINCE Activates Program Mode and used CASTLE to adjust the alarm sound level.
Logo
DISPLAYS AND INDICATORS
TIME Shows the time for the selected Display channel number.
CHANNEL Shows the channel number Display selected and in use. (The 741-T2
model does not have this display.)
H:M Indicates the time value is in Hours and Minutes.
M:S Indicates that the time value is in Minutes and Seconds.
LED Located above each channel timer Indicators button, these lights change color
depending on the stage of the countdown.
Green = first 70% of countdown, Yellow = next 20% of countdown, Red = last 10% of countdown.
PROGRAMMING
1.To program, press and hold the PRINCE CASTLE logo for six seconds. The TIME display changes from ---- to Prog, and a beep will sound. See figure 1.
figure 1
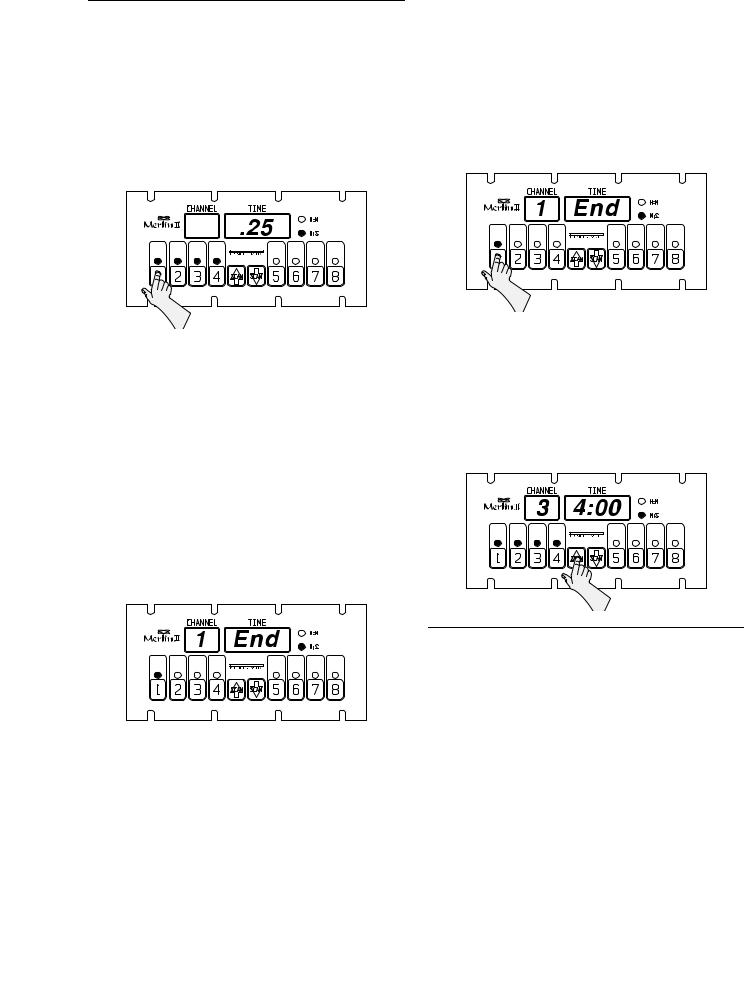
2.Select and press the timer channel to be programmed. The LED indicator for the selected button will turn yellow and a beep will sound. The selected channel number will be displayed in the CHANNEL display, the current programmed time for that channel will be displayed in the TIME display, and the time value will indicate either H:M
OR M:S. See figure 2.
741-500FGISrevA |
2 |

figure 2
3.To change the program time for the selected channel, use the SCAN/UP Arrow or the SCAN/ DOWN Arrow button.
IMPORTANT: To change from Minutes and Seconds M:S to Hours and Minutes H:M. Press and hold the SCAN/UP Button. When the display reaches 59:59 it will automatically change to 1:00 Hour and the LED will switch from M:S to H:M. The program value for the H:M indicator is from 1:00 hour to 17 hours: 59 minutes. See figures 3 and 4.
figure 3
figure 4
4.To program another channel, press the desired channel button. Repeat programming procedures in steps 2 and 3. See figure 5.
figure 5
5.When finished programming each desired channel, momentarily press the PRINCE CASTLE logo to end the Program Mode. This saves the program changes you have made for all channels. See figure 6.
figure 6
6.You can change the sound level of the alarm in RUN MODE. Press and hold the PRINCE CASTLE logo; then, within six seconds, press either the SCAN UP Arrow button or the SCAN DOWN Arrow button. The SCAN UP Arrow button adjusts the sound level to the louder alarm, and the SCAN DOWN Arrow button adjusts the sound level to the lower alarm. See figure 7.
figure 7
3 |
741-500FGISrevA |
OPERATION
1.Press a channel button to activate a timing cycle. (All channels can be activated and running at the same time.) The time channel number with the least amount of time remaining will be displayed in the CHANNEL display, its time remaining will countdown in the TIME display, and the time value M:S or H:M will be illuminated. See figure 8.
figure 8
2.Press the desired channel button three times within five seconds to cancel an active timing cycle.
IMPORTANT: The channel timer button’s multicolored LED indicator shows the status of the timer. The indicator has three colors: green, yellow, and red. The LED will be green during the first 70% of the countdown. It changes to yellow during the next 20% of the countdown. It will be red during the final 10% of the countdown, and will start flashing red once the time has run out.
3.The timer will countdown from the programmed value to zero. At zero, the display flashes End and the alarm sounds. See figure 9.
figure 9
IMPORTANT: There are three indicators that signal the operator when the timing cycle is complete: The CHANNEL display shows the channel associated with the alarm. The TIME display shows End. The LED indicator in the channel button flashes red.
4.When the timing cycle is complete, and the alarm sounds, press the channel button with the flashing red indicator to cancel the alarm. See figure 10.
figure 10
5.The scan feature is used to check the time values on other active channels. There are two different ways to scan active channels. Press the SCAN/ UP or SCAN/DOWN button or press any of the active timer CHANNEL buttons. If no other button is pressed within 5 seconds, the display will change to show the timer with the least amount of time left. See figure 11.
figure 11
CLEANING
1.Do not allow grease to build up on the timer, wipe it down daily with clean damp cloth.
IMPORTANT: Do not use abrasive or chemical cleaners on your timer, this may cause damage to the overlay.
741-500FGISrevA |
4 |

|
|
PARTS LIST |
Item |
Part Number |
Description |
7 |
88-653-2-4SA |
Speaker Assy. |
10 |
741-021 |
I.C. Connector |
11 |
85-101-04S |
Power Supply PCB |
12 |
740-9S |
PCB, Main (T2) |
|
740-225S |
PCB, Main (T4, T8 & T12) |
15 |
735-241S |
Mounting Bracket Kit |
16 |
70-048 |
Knob |
17 |
735-240S |
Switch Panel Assy. (T2) |
|
735-211S |
Switch Panel Assy. (T4) |
|
740-026S |
Switch Panel Assy. (T8) |
|
735-208S |
Switch Panel Assy. (T12) |
19 |
94-301 |
Label |
20 |
86-226 |
Spacer |
24 |
69-079S |
Rivet (Pkg. of 2) |
— |
72-200-1S |
Line Cord (CE) Not Shown |
— |
72-200-2S |
Line Cord (GB) Not Shown |
EXPLODED VIEW
20
19
11
12
16
24
17
15
 7
7
15
16
10 
5 |
741-500FGISrevA |

TROUBLESHOOTING GUIDE
PROBLEM |
CAUSE |
SOLUTION |
|
|
|
A. No displays or indicators lit. |
Unit unplugged. |
Plug unit in. |
|
Store’s circuit breaker blown. |
Reset breaker. |
|
Defective transformer. |
Replace Power Supply Board. |
|
Circuit inoperable. |
Replace Main Circuit Board. |
|
|
|
B. Absence of Audio Alarm. |
Speaker inoperable. |
Replace Speaker. |
|
Circuit inoperable. |
Replace Main Circuit Board. |
|
|
|
C. Unit will not enter program mode. |
All channels are still counting. |
Wait until channels are in stop mode. |
Display does not show “Prog”. |
Logo Switch inoperable. |
Replace Switch Panel. |
|
|
|
D. Unit enters program mode. Display |
The channel is still counting. |
Wait until channel is in stop mode. |
shows “Prog”, but cannot change |
Arrow Switch inoperable. |
Replace Switch Panel. |
times. |
Circuit inoperable. |
Replace Main Circuit Board. |
|
||
|
|
|
E. Unable to start, stop, or store timer |
Circuit inoperable. |
Replace Switch Panel. If problem |
presets in program mode. Missing |
|
persists, replace Main Circuit Board. |
or abnormal characters in displays. |
|
|
|
|
|
|
|
|
WIRING DIAGRAM 741-T2
MAIN PCB MEMBRANE SWITCH
RED
BLACK
POWER SUPPLY PCB |
SPEAKER |
|
GROUND
GRN/YEL
BLUE
BROWN
POWER INLET
| <![if ! IE]> <![endif]>YELLOW |
<![if ! IE]> <![endif]>BLACK |
SPEAKER |
|
|
741-500FGISrevA |
6 |

INSTALLATION
1.Après avoir extrait le minuteur de son emballage, vérifier qu’il est en bon état. En cas de dommages de l’appareil:
•Notifier le transporteur dans les 24 heures qui suivent la livraison.
•Conserver le carton et les matériaux d’emballage à des fins d’examen.
•Contacter le revendeur local ou, en cas d’achat direct, le Service à la clientèle Prince Castle au (+1) 800-722-7853 afin d’obtenir l’envoi d’un appareil de rechange.
2.Vérifier que toutes les pièces ont été reçues. Les vis de fixation des supports sont fournies.
3.Pour poser le minuteur, placer les supports de fixation à l’endroit souhaité. Tracer l’emplacement des trous de fixation, marquer au pointeau et percer. Poser les supports de fixation en plaçant une rondelle éventail entre le support et l’appareil.
ÉCRANS ET INDICATEURS
Écran Affiche la durée pour le canal TIME sélectionné.
Écran Affiche le numéro de canal CHANNEL sélectionné et en cours d’utilisation
(le modèle 741-T2 ne comporte pas cet écran).
H:M Indique que la durée est affichée en Heures et Minutes.
M:S Indique que la durée est affichée en Minutes et Secondes.
Voyants Placés au-dessus de chaque lumineux touche de canal, ces voyants
changent de couleur en fonction de l’avancement du compte à rebours
Vert = premiers 70% du compte à rebours, Jaune = 20% suivants du compte à rebours, Rouge = derniers 10% du compte à rebours.
COMMANDES
Canal Le 741-T2 comporte 2 canaux, le (Minuteur) 741-T4 4 canaux, le 741-T8 8
canaux et le 741T12 12 canaux.
FLÈCHE En mode Programmation, cette SCAN/HAUT touche permet d’augmenter la
valeur de durée d’un canal. En mode Exécution, elle s’utilise en association avec la touche logo pour augmenter le volume.
FLÈCHE En mode Programmation, cette SCAN/BAS touche permet de diminuer la valeur
de durée d’un canal. En mode Exécution, elle s’utilise en association avec la touche logo pour diminuer le volume.
Logo Cette touche active le mode PRINCE Programmation et sert à régler le CASTLE niveau sonore de l’alarme.
PROGRAMMATION
1.Pour programmer, tenir la touche logo PRINCE CASTLE enfoncée pendant six secondes. L’écran TIME passe de ---- à Prog et un bip sonore est audible. Voir figure 1.
figure 1
2.Appuyer sur la touche du canal minuteur à programmer. Le voyant lumineux de la touche sélectionnée s’allume en jaune et un bip sonore est audible. Le numéro du canal sélectionné s’affiche sur l’écran CHANNEL, la durée actuellement programmée pour ce canal s’affiche sur l’écran TIME, cette valeur s’affichant en mode
H:M OU M:S. Voir figure 2.
7 |
741-500FGISrevA |

figure 2
3.Pour changer la durée programmée du canal sélectionnée, utiliser le touche flèche SCAN/ HAUT ou flèche SCAN/BAS.
IMPORTANT : Pour passer du mode d’affichage Minutes et Secondes M:S à Heures et Minutes H:M, tenir la touche SCAN/HAUT enfoncée. Lorsque la valeur atteint 59:59, elle passe automatiquement à 1:00 heure et le voyant lumineux passe de M:S à H:M. La valeur de durée pour le voyant H:M s’étend de 1:00 heure à 17 heures: 59 minutes. Voir figures 3 and 4.
figure 3
figure 4
4.Pour programmer un autre canal, appuyer sur la touche du canal souhaité. Répéter les opérations de programmation des étapes 2 et 3. Voir figure 5.
figure 5
5.Une fois que chaque canal souhaité est programmé, appuyer sur le logo PRINCE CASTLE pour quitter le mode Programmation. Ceci enregistre les modifications effectuées sur tous les canaux. Voir figure 6.
figure 6
6.Le niveau sonore de l’alarme peut être modifié en MODE EXÉCUTION. Tenir la touche logo PRINCE CASTLE enfoncée ; dans les six secondes, appuyer sur la touche flèche SCAN HAUT ou sur la touche flèche SCAN BAS. La touche flèche SCAN HAUT augmente le niveau sonore de l’alarme, la touche flèche SCAN BAS diminue le niveau sonore de l’alarme. Voir figure 7.
figure 7
741-500FGISrevA |
8 |

FONCTIONNEMENT
1.Appuyer sur un bouton de canal pour activer le cycle de minutage correspondant (tous les canaux peuvent être activés et s’exécuter en même temps). L’écran CHANNEL affiche le numéro du canal minuteur dont la durée restante est la plus courte, l’écran TIME affiche le compte à rebours correspondant et le voyant de valeur de durée M:S ou H:M s’allume selon le cas. Voir figure 8.
figure 8
2.Appuyer sur la touche du canal souhaité trois fois dans les cinq secondes pour annuler un cycle de minutage actif.
IMPORTANT : Le voyant lumineux multicolore d’une touche de canal minuteur indique l’état du minuteur. Ce voyant a trois couleurs : vert, jaune et rouge. Le voyant s’affiche en vert pendant les premiers 70% du compte à rebours. Il passe au jaune durant les 20% suivants du compte à rebours. Il s’allume en rouge durant les derniers 10% du compte à rebours et clignote en rouge une fois que la durée est écoulée.
3.Le minuteur compte à rebours depuis la valeur programmée jusqu’à zéro. À zéro, l’écran affiche End en clignotant et l’alarme sonore se déclenche. Voir figure 9.
figure 9
IMPORTANT : Il y trois indicateurs signalant à l’opérateur la fin de cycle du minuteur : L’écran CHANNEL affiche le numéro de canal associé à l’alarme. L’écran TIME affiche End. Le voyant lumineux de la touche du canal clignote en rouge.
4.À la fin du cycle du minuteur, l’alarme sonore se déclenche ; appuyer sur la touche de canal dont le voyant clignote en rouge pour couper l’alarme. Voir figure 10.
figure 10
5.La fonction de consultation permet de vérifier les valeurs de durée des autres canaux actifs. Il y a deux moyens différents de consulter les canaux actifs. Appuyer sur la touche SCAN/HAUT ou SCAN/BAS ou sur la touche de l’un quelconque des canaux minuteurs actifs. Si aucune autre touche n’est enfoncée dans les 5 secondes, l’écran revient à l’affichage du minuteur de durée restante la plus courte. Voir figure 11.
figure 11
NETTOYAGE
1.Ne pas laisser de graisse s’accumuler sur le minuteur, l’essuyer chaque jour avec un chiffon humide propre.
IMPORTANT : Pour éviter d’endommager le revêtement, ne pas utiliser de détergent abrasif ou chimique sur le minuteur.
9 |
741-500FGISrevA |
 Loading...