


DHB3PT-44D
Operation
LIMITED WARRANTY
This product is warranted to be free from defects in material and/or
workmanship for a period of 1 year from date of original installation, not
to exceed 18 months from the date of manufacture.
Any component which proves to be faulty in material and/or workmanship
will be replaced or repaired (at the option of Prince Castle, Inc.) without cost
to the customer for parts and labor. This warranty covers on-location service
(i.e. trip charges and/or mileage). Travel mileage is limited to 100 miles
(200 Kilometers) round trip (one trip warranty) from an authorized service
agency or its sub-service agency.
This warranty is subject to the following exceptions/conditions:
• Use of any non-genuine Prince Castle parts voids this warranty.
• All labor to be performed during regular work hours. Overtime
premium (the incremental amount) will be charged to the customer.
•
Damage caused by carelessness, neglect and/or abuse (e.g., dropping,
tampering or altering parts, equipment damaged in shipment, by fire,
flood or an act of God) is not covered under this warranty.
• All problems due to operation at voltages other than that specified on
equipment nameplates are not covered by this warranty. Conversion
to correct voltage is the customer’s responsibility.
•
This equipment must be serviced by Prince Castle Authorized Service
Agency or a Prince Castle Service Technician during the warranty period.
Manual
Product Identification
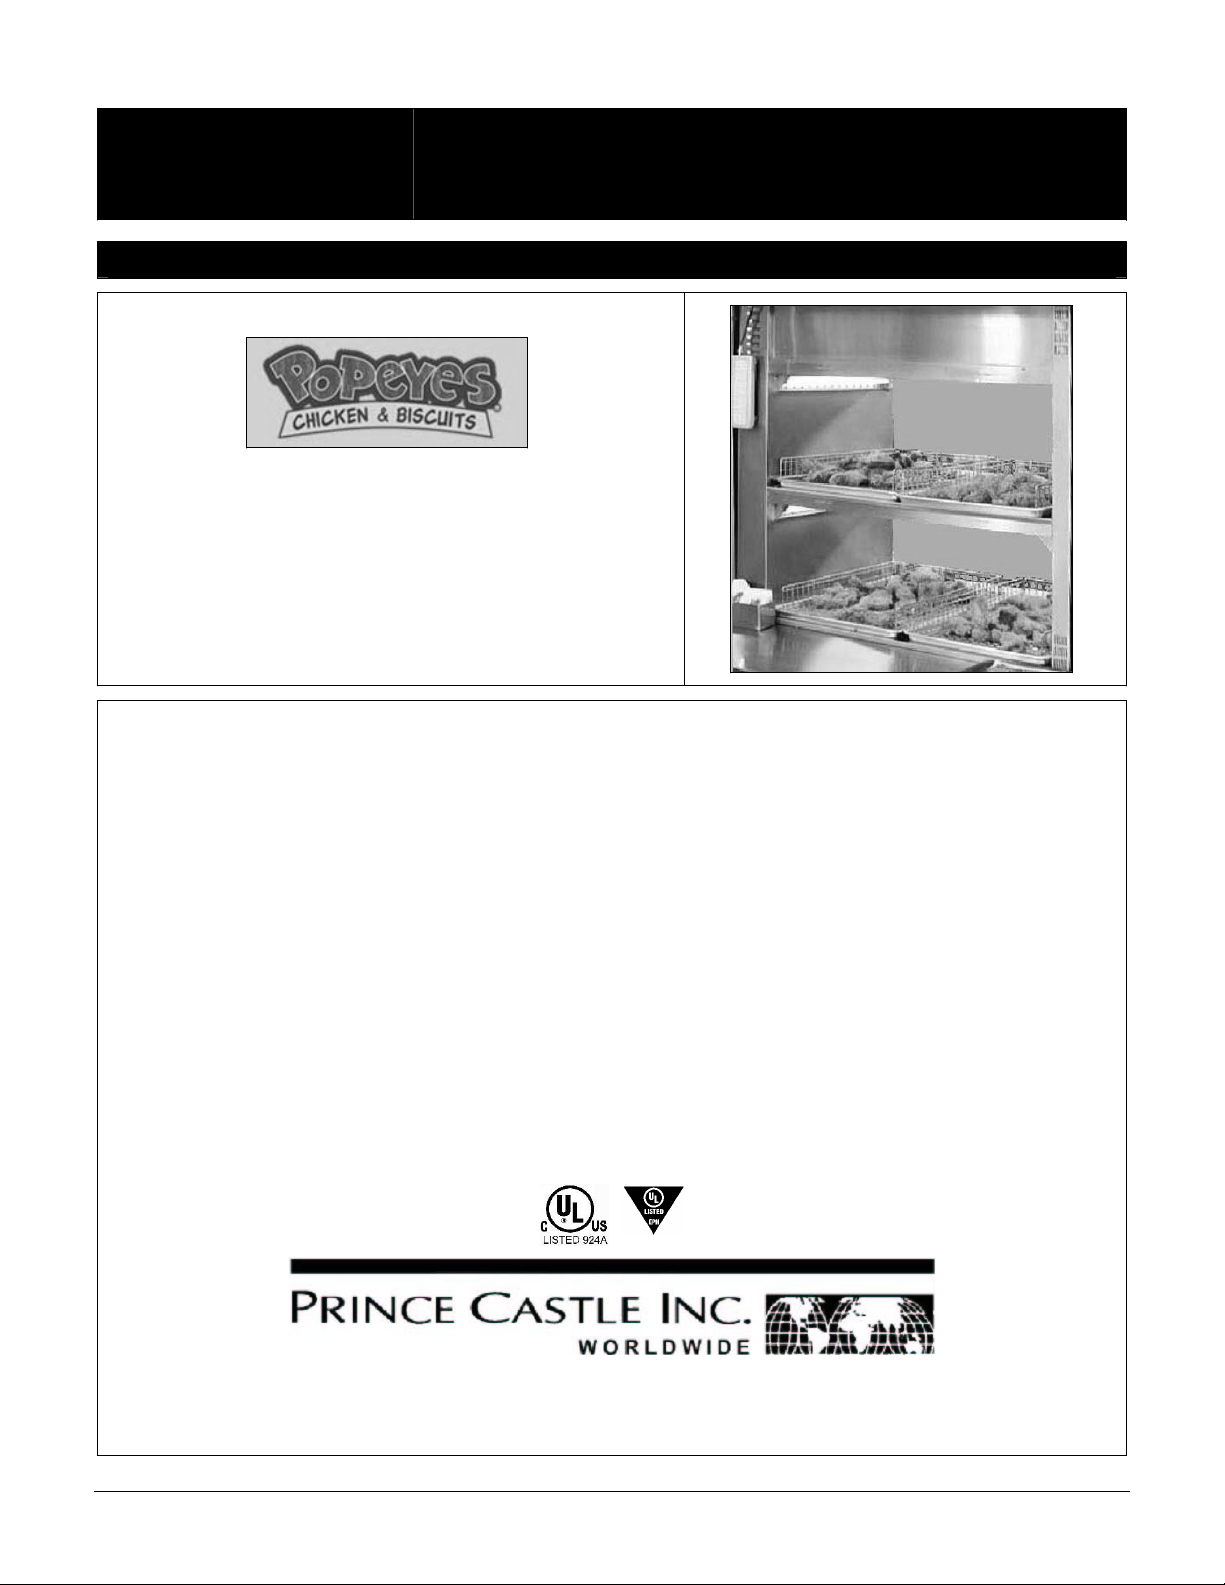
Prince Castle's DHB3PT-44D Chicken Holding Bin is
designed for the Popeyes system to hold all your
bone-in fried chicken better than ever before. Capable of
holding up to 360 pieces of chicken, the DHB3PT-44D is
designed to both hold and merchandise Popeyes’
chicken in a dual line store format.
Popeyes Chicken Holding Bin
DHB3PT-44D
TABLE OF CONTENTS
Product Identification ........................................... 1
Safety Information ............................................... 2
I m p o r t a n t! ... . . . . . . . . .. . .. .. . .. . .. . .. . .. .. . .. . .. . .. . .. . .. . .. .. . .. . .. 2
I n s t a l l a t i o n / S e t u p .. . .. . . . . . . . . .. . . . . . . . . . .. . . . . . . . . .. . . . . . . . . . . 2
I n i t i a l S t a r t u p . . . . . . . . . . . . . . . . . . . .. . . . . . . . . . .. . . . . . . . . .. . . . . . . . . . .. . 3
R e c o m m e n d e d Settings . . . . . . . . . . . . . . . . . . . . . . . . . . . .. . . . . . . . . . .. 3
R e s e t t i n g t o F a c t o r y D e f a u l ts ............. . . . . . . . . . . . . . . . . . . . 3
C o n t r o l Pa ne l . . . . . . . .. . . . . . . . . . .. . . . . . . . . .. . . . . . . . . .. . . . . . . . . . .. . . . 4
P r o g r a m m i n g .. . . . . . . .. . . . . . . . . . .. . . . . . . . . .. . . . . . . . . .. . . . . . . . . .. . . . . 5
C l e a n i n g . . . .. . . . . . . . . . .. . . . . . . . . .. . . . . . . . . . .. . . . . . . . . .. . . . . . . . . .. . . . . 6
T r o u b l e s h o o t i n g . . . . . . . . . . . . . . . . .. . . . . . . . . .. . . . . . . . . .. . . . . . . . . . .. . . 6
P a r t s & S e r v i c e . . . . . . . . . . . . . . . . . .. . . . . . . . . .. . . . . . . . . .. . . . . . . . . . .. . 7
W i r i n g Di ag r a m . . . . .. . . . . . . . . .. . . . . . . . . . .. . . . . . . . . .. . . . . . . . . . .. . . . . 9
355 East Kehoe Blvd. • Carol Stream, IL 60188
Phone: 630-462-8800 • Toll Free: 1-800-PCASTLE
Fax: 630-462-1460 • www.PrinceCastle.com
528-503revC Printed in USA 4/06 © 2006
Popeyes Chicken Holding Bin
DHB3PT-44D
Safety Information Important!
WARNING
Indicates information important to the proper operation of the
unit. Failure to observe may result in damage to the equipment
and/or severe bodily injury or death.
CAUTION
Indicates information important to the operation of the unit.
Failure to observe may result in damage to the equipment.
Installation / Setup
Remove the unit from the carton and inspect for signs of
damage. If there is damage to the unit:
• Notify the carrier within 24 hours of delivery,
• Save carton and packaging materials for inspection purposes,
• Contact your local dealer, or if purchased directly, the Prince
Castle Sales Department at 1-800-722-7853 or 630-462-8800 to
arrange for a replacement unit.
A. Place the bin on a counter or workstation.
1
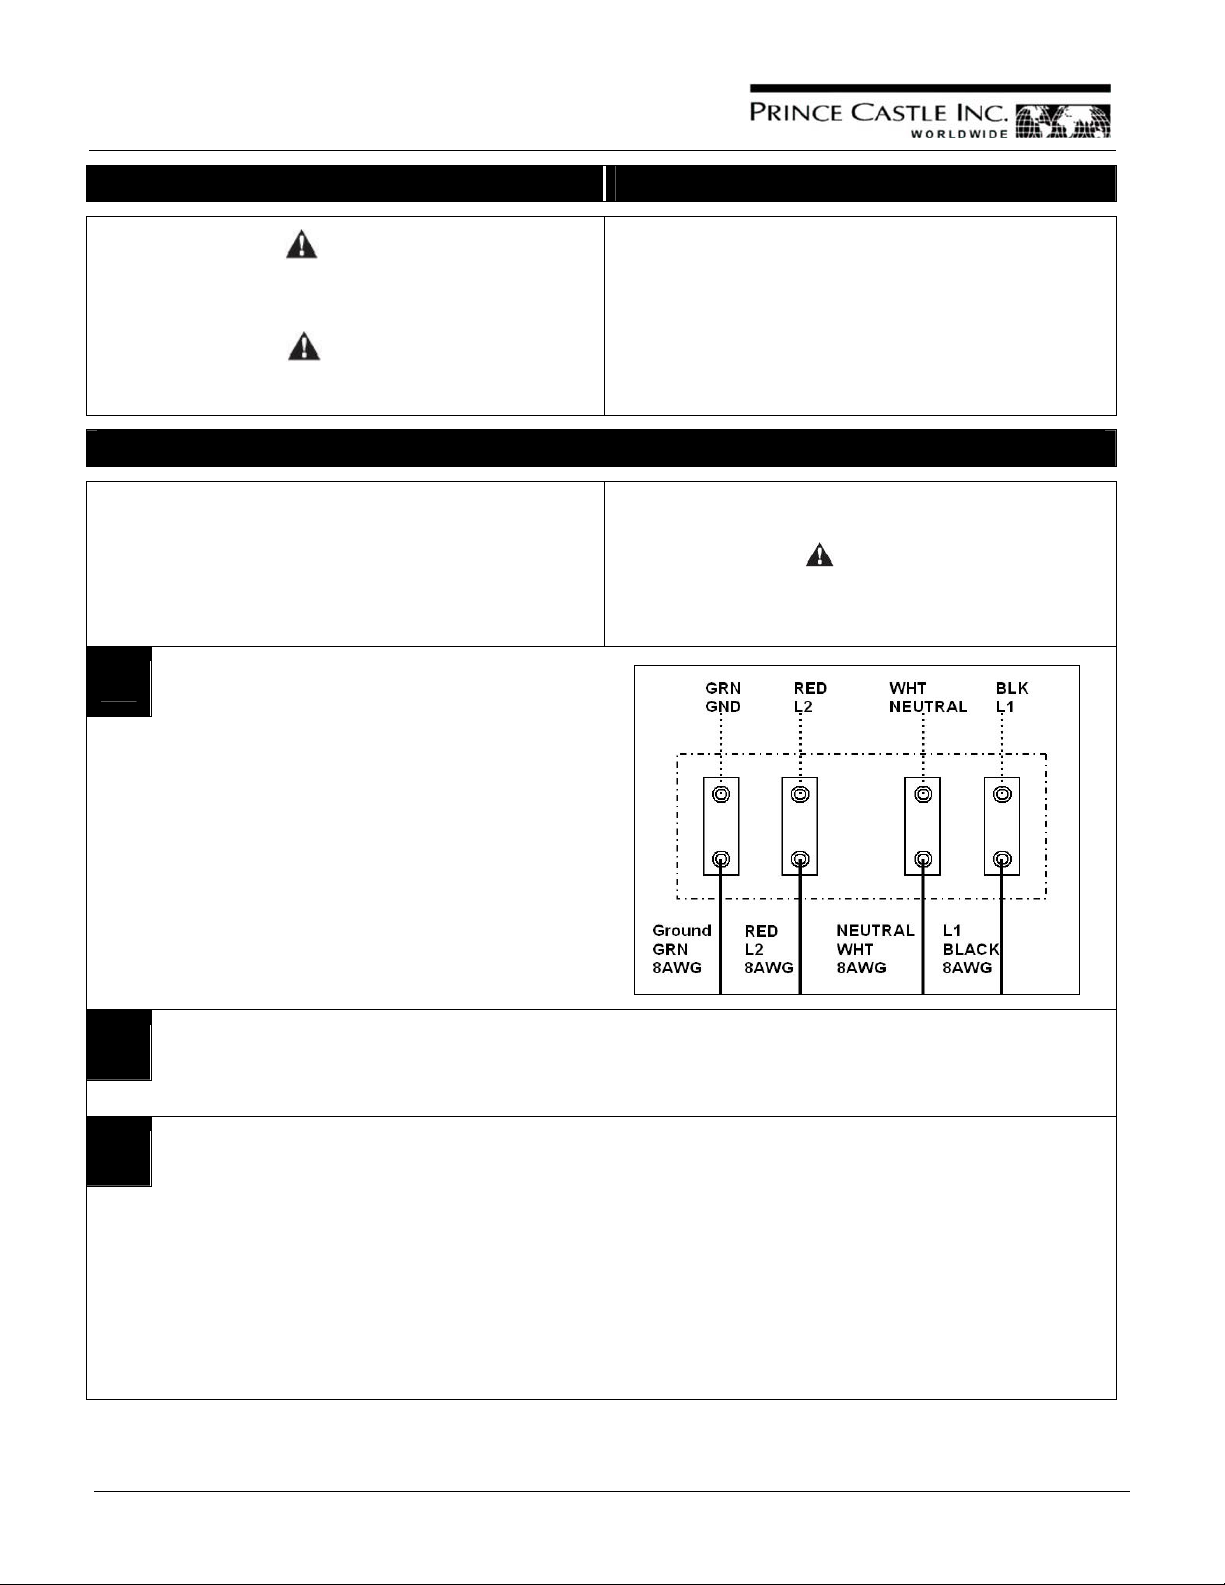
B. Make power connection to the terminal block on
the top of the bin. Required voltage is 120/208 TO
240 VOLTS SINGLE PHASE, and the connections
are L1, L2, Neutral, and Earth Ground (see figure
of wiring diagram).
The bin draws 31 amps at 120/208 or 35 amps at
120/240 volts during the 35 min. warm-up.
The current drops to approximately half when the
heaters reach the set-point temperature.
Prince Castle reserves the right to change specifications and
product design without notice. Such revisions do not entitle the
buyer to corresponding changes, improvements, additions or
replacements for previously purchased equipment.
NOTE: When installing this unit, the ambient temperature at the
mounting site should not exceed 37.8°C (100°F).
CAUTION
All electrical connections must be in accordance with local
electrical codes and any other applicable codes.
Plug the unit into an applicable electrical receptacle.
A. Turn the power switches ON.
2
B. Allow 35 mins. for warm-up.
Environmental Issues
3
Airflow through the bin will adversely affect the
performance of the bin. Sources of airflow include:
Printed in USA 4/06 © 2006 2 528-503revC
• Air conditioning vents
• Air currents
• Make-up air Inflows
• Drive-through window
None of the above should be directing airflow towards the
bin or through the cavities of the bin. To check for airflow,
remove a pan from a hot steam table and watch the
direction of the steam coming out of the steam table.
The direction the steam flows is an indicator of the airflow
direction and its intensity. There is no airflow if the steam
flows straight up as it dissipates. There is an intense airflow
if the steam quickly changes direction and flows parallel to
the floor.
If there is airflow, check for the source(s). It is recommended
that air diverters be installed to direct the airflow away from
the bin.
Do NOT reduce the amount of cooled air brought into the
building. Direct the flow of air away from the cavities of the
Chicken Holding Bin.
Initial Startup
#
#
#
During the first few hours of operation, you may notice a
faint odor. This is normal, and the odor disappears after the
first few hours of use.
The bin is tested and calibrated at the factory before shipment.
However, due to temperature and climate changes during
shipment, the insulation in bin can absorb moisture.
Recommended Settings
The recommended settings listed below are starting points only.
The final setting for each cavity is influenced by the airflow
through the cavity.
The airflow is influenced by the bins location relative to the
Drive-Through window, the front door, and/or the air
conditioning vents.
The final setting must achieve the required serving temperature
at the end of the hold time.
Therefore, the setting of each cavity may have to be adjusted up
or down from the recommended starting points listed below to
meet the quality and temperature requirements.
#
#
#
A higher setting yields hotter chicken, but in achieving a
hotter temperature, more moisture is driven from the
chicken. Thus, there must be a balance at the end of the
maximum hold time, where the chicken is above a
minimum serving temperature and all quality requirements
are met.
Popeyes Chicken Holding Bin
DHB3PT-44D
The odor during the first few hours of use is from the drying out
of the insulation (moisture is driven from the insulation’s
binders, a starch-like material).
If the florescent lights do not turn on, verify that the bulbs are
seated in their sockets.
Upper
Heater
Upper
Heater
Upper
Heater
Lower
Heater
Lower
Heaters
Lower
Heater
Cavity A
Cavity B
Cavity C
Cavity A Factory Settings
1
The recommended setting for the Upper Heater is 235°F and
180°F for the Lower Heater.
The default Set-Point for the Upper Heater is 35%.
The Lower Heater default is OFF.
Cavity B & C Factory Settings
2
Resetting to Factory Defaults
To revert all settings back to the original factory defaults:
A. Turn the unit off.
B. Press and hold both UP and DOWN arrows.
C. Turn the unit back on and wait 5 secs.
D. Release UP and DOWN arrows.
#
#
#
All previously saved settings are lost upon resetting the
defaults! Use with caution.
528-503revC 3 Printed in USA 4/06 © 2006
 Loading...