


Drain Cleaner PPr 4 B2
Drain Cleaner
Operating instructions
PresslufT-rohrreiniger
Bedienungsanleitung
IAN 275680
TryCklufTsrörrensare
Bruksanvisning

Before reading, unfold the page containing the illustrations and familiarise yourself with all functions of
the device.
Vik ut bildsidan och ha den till hands när du läser igenom anvisningarna och gör dig bekant med
apparatens / maskinens funktioner.
Klappen Sie vor dem Lesen die Seite mit den Abbildungen aus und machen Sie sich anschließend mit allen
Funktionen des Gerätes vertraut.
GB / IE Operating instructions Page 1
SE Bruksanvisning Sidan 7
DE / AT / CH Bedienungsanleitung Seite 13

a
b

Kompernass Handels GmbH
BURGSTRASSE 21
44867 BOCHUM
DEUTSCHLAND / GERMANY
www.kompernass.com
Last Information Update · Informationsstatus
Stand der Informationen:
03 /2016 · Ident.-No.: PPR4B2-022016-2
IAN 275680
3

Content
Intended Usage ...................................................2
Safety instructions .................................................2
Items supplied ....................................................2
Description of the appliance .........................................2
Technical Data ....................................................3
Utilisation ........................................................3
Cleaning and care .................................................4
Disposal .........................................................5
Service ..........................................................5
Importer .........................................................5
PPR 4 B2
GB│IE
│
1 ■

Congratulations!
With your purchase you have decided
in favour of a quality product. Familiarise yourself with the product before taking it
into use. To do this, read the following operating
instructions attentively. Use the product only as
described and only for the specified areas of
application. Retain these instructions for future
reference. In addition, pass these documents on,
together with the product, to any future owner.
Intended Usage
This Drain cleaner is intended for the environmentally friendly and chemical-free cleaning of
drainpipes, pipes and other difficult to reach
places, using air pressure.
This appliance is intended for domestic use
only, do not use it for commercial or industrial
applications.
Safety instructions
RISK OF PERSONAL INJURY!
■ Never direct the appliance at people or other
living creatures.
■ This appliance may be used by children aged
8 over and by persons with reduced physical,
sensory or mental capabilities or lack of
experience and knowledge, provided that
they are under supervision or have been told
how to use of the appliance safely and are
aware of the potential risks. Children must not
play with the appliance. Cleaning and user
maintenance tasks must not be carried out by
children unless they are supervised.
■ To avoid potentionally noxious fumes, do not
use solvents, alcohols, carbon-based detergents or similar agents. This appliance works
exclusively with compressed air and without
the addition of chemicals.
WARNING IN REGARD TO PROPERTY
DAMAGE!
■ Remove all loose parts, for example particle
sieves, from the bowl and seal all openings
on the same pipe, for example overflows,
with a wet cloth or something similar. This will
avoid soiling from the sprays which may be
generated by the compressive splice.
■ Use this appliance only on drains able to
withstand pressure. Screwed pipes are able
to bear more pressure than inserted pipes.
Support poorly seated pipes against the
floor! If you do not, the compressive splice
could damage the pipe.
Items supplied
Drain Cleaner
WC attachment
Shower attachment
Attachments Ø 6 cm and Ø 5 cm
Overflow seal
Operating instructions
Description of the appliance
Figure A:
Air release valve
Sealing cap
Pump
Compressive splice actuator
Air exit opening
Figure B:
WC attachment
Shower attachment
Attachment Ø 6 cm
Attachment Ø 5 cm
Overflow seal
■ 2│GB
│
IE
PPR 4 B2

Technical Data
Max. operating
pressure: 4 bar
Attachments: Attachment Ø 6 cm
Attachment Ø 5 cm
WC Attachment
Shower attachment
Utilisation
1. Select the most suitable attachment / /
for the blocked pipe and place it on
/
the air exit opening
Ensure that it is firmly secured.
2. Remove the sieve or any other inserts from
the pipe.
3. Close and seal all openings, for example
overflows, on the pipe to be cleared. Use
the overflow seal for the overflows
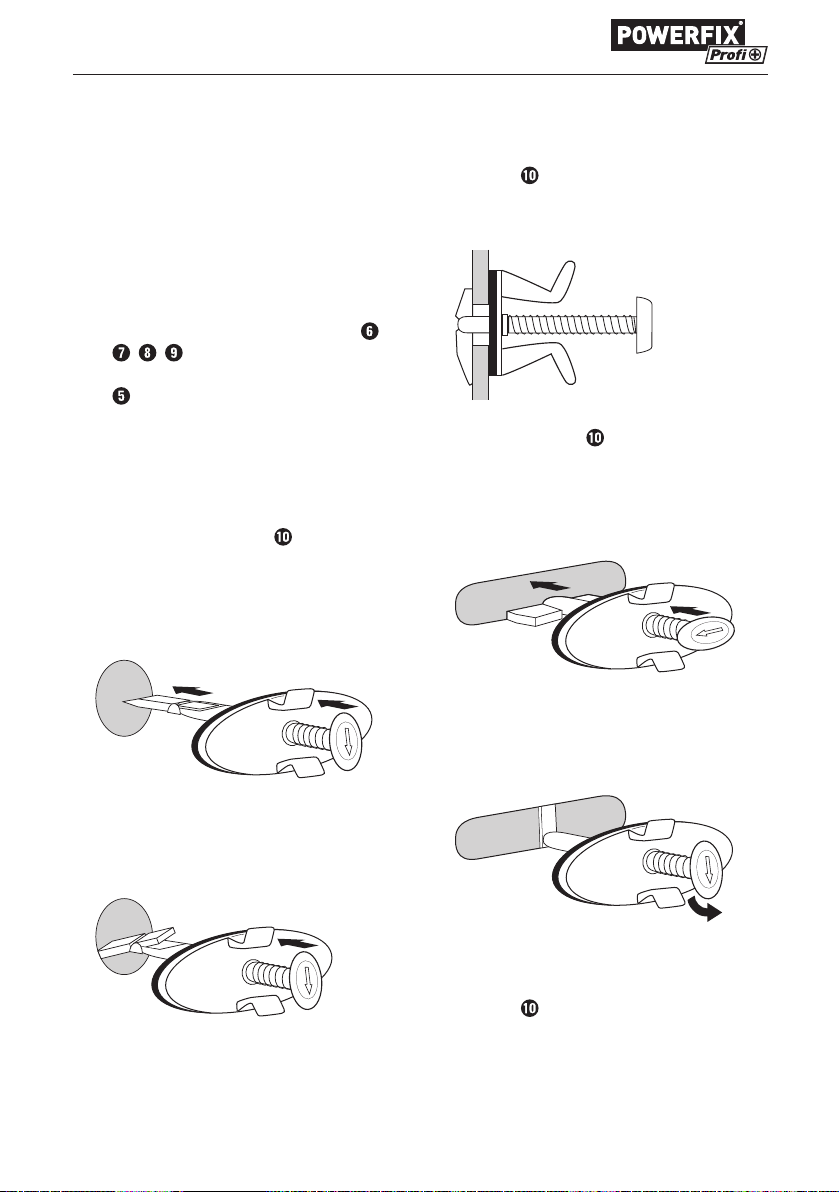
■ With round overflows, press and hold the roll
pin so that the locking lever can be flapped in
such a way that it stands in extension with the
roll pin (Fig. 1).
.
:
■ Slowly release the roll pin and check to
ensure that the overflow is completely closed.
The edges of the overflow seal
as uniformly as possible around the overflow,
otherwise residual soiling could be pressed
out.
Fig. 3: Correctly inserted overflow seal
■ For elongated overflows, press the roll pin
and tip the locking lever so that it stands at
right angles to the roll pin (Fig. 4).
Fig. 4
■ Guide it into the overflow.
■ Turn the roll pin through 90° and slowly
release it (Fig. 5).
must close
Fig. 1
■ Guide it into the overflow. As soon as the lo-
cking lever hits against the rear wall, it opens
itself out (Fig. 2).
Fig. 2
PPR 4 B2
Fig. 5
■ Check to ensure that the overflow is comple-
tely closed. The edges of the overflow seal
must close as uniformly as possible around
the overflow, otherwise residual soiling could
be pressed out.
GB│IE
│
3 ■

NOTE
► The overflow seal
overflows. If the overflow seal cannot
close the overflow, use a cloth or something
similar to seal it.
WARNING IN REGARD TO PROPERTY
DAMAGE!
Use this appliance only on drains and pipeworks
able to withstand pressure. Support poorly
seated pipes against the floor! If you do not, the
pressure surge could damage the pipe.
4. Close the plughole with a stopper and and
pour some warm water into the bowl (up to
about 7 cm above the plughole). The best
possible pressure effect is achieved only
when the blocked pipe is completely filled
with water. Without water in the pipe the
pressure effect is strongly reduced.
5. Build up a little pressure, in that you
activate the pump
times. If you pump too slowly, the air could
escape from the appliance.
6. Remove the stopper and place the appliance, as shown in Fig. 6, on the plughole.
does not fit in all
quickly about 3 - 4
7. Then release the pressure surge.
When doing this, press the appliance firmly
against the plughole.
8. If the blockage is not released, and you
are sure that the pipe can withstand the
pressure, increase the pressure for the next
pressure surge.
9. Take the appliance out of the water and
activate the pump
times.
10. Should you wish to release some pressure
from the appliance, unscrew the air release
.
valve
11. Place the appliance back onto the plughole
and activate the pressure surge.
ImpOrTaNT
► Repeat these pressure surges only for as
long as the water level is above the plughole. If necessary, refill with water.
12. Repeat the pressure surge until the blockage
is cleared.
NOTE
► Should you not be able to build up pressu-
re, check the air release valve
that it is firmly screwed onto the appliance.
rapidly about 10
. Ensure
Fig. 6
■ 4│GB
│
Cleaning and care
■ Clean the attachments / / / and
the housing with a moist cloth. For stubborn
soiling use a mild detergent on the cloth.
ATTENTION! APPLIANCE DAMAGE!
Do not use aggressive, abrasive or chemical
cleaning agents to clean the appliance or its
attachments
the upper surfaces.
NOTE
► The white powder on the pump
soiling. It is a talcum powder that was used
in the factory for the first pump lubrication.
IE
/ / /
These could damage
.
is not
PPR 4 B2
After frequent usage it could happen that the
pump may require lubrication:
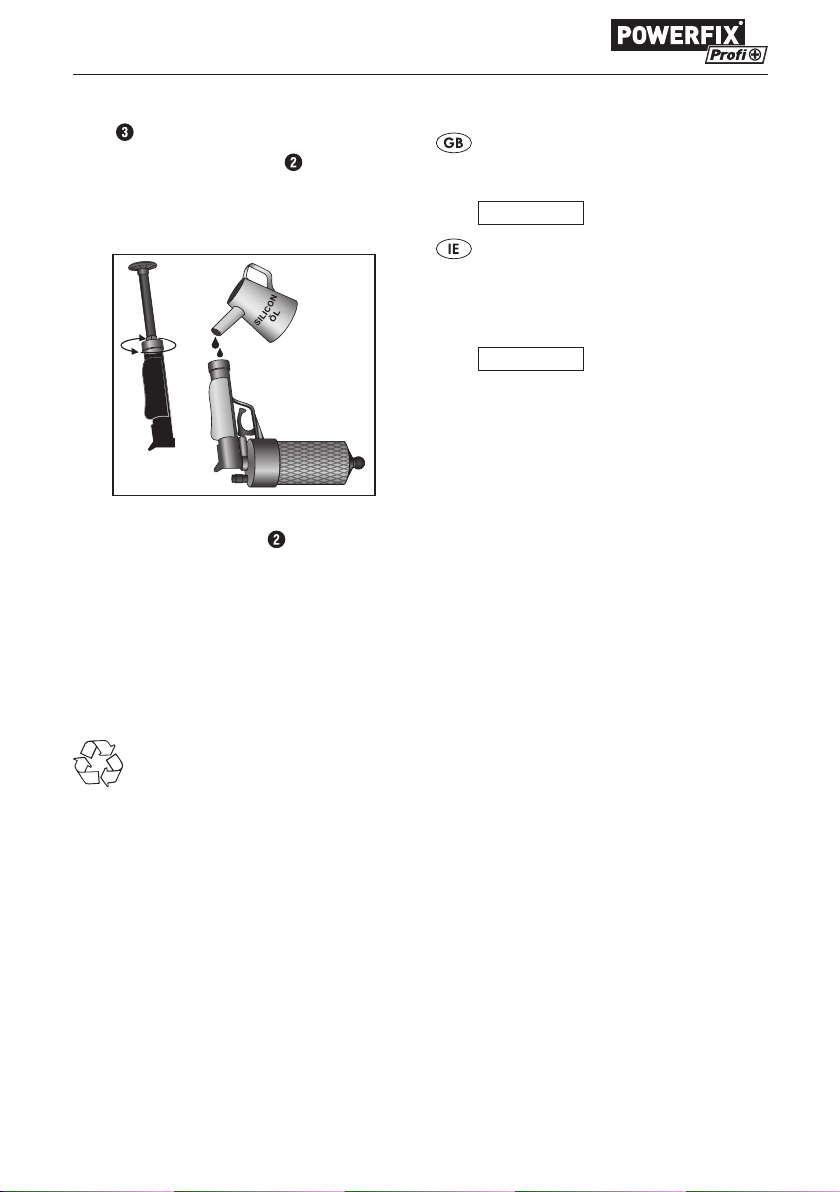
1. Unscrew the sealing cap
2. Insert a few drops of silicon oil into the
handgrip. Other oils could damage the
seals or the plastic.
Fig. 7
3. Screw the sealing cap
tight.
.
back on hand-
Disposal
Dispose of the appliance in an environmentallyfriendly manner.
Observe the currently applicable regulations.
In case of doubt, please contact your waste
disposal centre.
Service
Service Great Britain
Tel.: 0871 5000 720 (£ 0.10/Min.)
E-Mail: kompernass@lidl.co.uk
IAN 275680
Service Ireland
Tel.: 1890 930 034
(0,08 EUR/Min., (peak))
(0,06 EUR/Min., (off peak))
E-Mail: kompernass@lidl.ie
IAN 275680
Importer
KOMPERNASS HANDELS GMBH
BURGSTRASSE 21
44867 BOCHUM
GERMANY
www.kompernass.com
Dispose of all packaging materials in an
environmentally friendly manner.
PPR 4 B2
GB│IE
│
5 ■

■ 6│GB
│
IE
PPR 4 B2

Innehållsförteckning
Föreskriven användning ............................................8
Säkerhetsanvisningar ..............................................8
Leveransens innehåll ...............................................8
Beskrivning ......................................................8
Tekniska data .....................................................9
Användning ......................................................9
Rengöring och skötsel .............................................10
Kassering .......................................................11
Service .........................................................11
Importör ........................................................11
PPR 4 B2
SE
│
7 ■

Ett stort grattis!
Du har just köpt en produkt med hög
kvalitet. Sätt dig in i hur produkten
fungerar innan du tar den i bruk. Läs noga
igenom följande bruksanvisning. Använd endast
produkten enligt beskrivningarna och i de syften
som anges här. Ta väl vara på den här
bruksanvisningen. Lämna över all dokumentation
tillsammans med produkten om du överlåter den
till någon annan person.
Föreskriven användning
Den här avlopssrensaren använder tryckluft för
att rensa avlopp, rör och andra svåråtkomliga
ställen miljövänligt och utan kemikalier.
Apparaten är endast avsedd för privat bruk och
ska inte användas yrkesmässigt eller industriellt.
Säkerhetsanvisningar
RISK FÖR PERSONSKADOR!
■ Rikta aldrig apparaten mot djur eller andra
människor.
■ Den här produkten kan användas av barn
som är minst 8 år och av personer med begränsad fysisk, sensorisk eller mental förmåga
eller bristande erfarenhet och/eller kunskap
om de hålls under uppsikt eller instruerats i
hur produkten används på ett säkert sätt och
inser vilka risker det innebär. Barn får inte
leka med produkten. Rengöring och allmän
service får bara göras av barn om någon
vuxen håller uppsikt.
■ Använd inte bensin, alkohol, karbonhaltigt
rengöringsmedel och liknande för att undvika
uppkomsten av farliga ångor. Den här apparaten arbetar bara med tryckluft utan några
som helst kemikalier.
VARNING FÖR MATERIALSKADOR!
■ Ta bort alla lösa delar, t ex avloppssilen ur
tvättstället, och täta alla öppningar på röret,
som t ex överlopp, med en våt trasa eller
liknande. Då sprutar det inte ut smuts på
grund av tryckluften.
■ Använd bara apparaten till avlopp som tål
att utsättas för tryck. Rör som skruvats ihop tål
tryck bättre än rör som bara stuckits in i
varandra. Sätt stöttor ner till golvet vid
vattenlås (sifoner) som sitter illa! Annars kan
de skadas av tryckluften.
Leveransens innehåll
Tryckluftsrörrensare
WC-tillsats
Duschtillsats
Tillsatser Ø 6 cm och Ø 5 cm
Förslutning till överlopp
Bruksanvisning
Beskrivning
Bild A:
Luftutsläppsventil
Förslutning
Pump
Tryckluftsutlösare
Luftutsläpp
Bild B:
WC-tillsats
Duschtillsats
Tillsats Ø 6 cm
Tillsats Ø 5 cm
Förslutning till överlopp
■ 8│SE
PPR 4 B2

Tekniska data
max. drifttryck: 4 bar
Tillsatser: tillsats Ø 6 cm
tillsats Ø 5 cm
WC-tillsats
Duschtillsats
Användning
1. Välj en tillsats / / / som passar
för det avlopp det är stopp i och sätt den
på luftutsläppet . Kontrollera att tillsatsen
sitter fast ordentligt.
2. Ta ut filter och andra insatser ur vattenlåset.
3. Stäng alla öppningar, som t ex överlopp,
på det rör som ska rensas. Använd förslutningen 0till överloppen
■ Vid runda överloppsrör trycker du in spänn-
stiftet och håller det kvar i det läget så att
låsspaken kan fällas ut och bilda en förlängning av stiftet (Bild 1).
Bild 1
■ För in den i överloppet. Så snart låsspaken
stöter emot den bakre rörväggen reser den
sig upp (Bild 2).
Bild 2
till överloppen:
■ Släpp långsamt spännstiftet och kontrollera
att överloppet är helt stängt. Kanterna på
överfallets lås
fallet som möjligt, annars kan smuts tryckas ut.
Bild 3: Korrekt insatt förslutning till
överlopp
■ Vid avlånga överlopp trycker du in spännstif-
tet och sätter låsspaken i rät vinkel mot stiftet
(Bild 4).
Bild 4
■ För in den i överloppet.
■ Vrid spännstiftet i 90° och släpp det långs-
amt (Bild 5).
Bild 5
■ Kontrollera att överloppet är helt stängt.
Kanterna på överfallets lås
så tätt om överfallet som möjligt, annars kan
smuts tryckas ut.
måste sluta så tätt om över-
måste sluta
PPR 4 B2
SE
│
9 ■

ObsErvEra
► Förslutningen
lopp. Om förslutningen
överloppet stoppar du in en trasa eller
liknande i röret för att göra det tätt.
VARNING FÖR MATERIALSKADOR!
Använd bara apparaten till avlopp och rörledningar som tål att utsättas för tryck. Sätt stöttor
ner till golvet vid vattenlås (sifoner) som sitter illa!
Annars kan de skadas av tryckluften.
4. Stäng avloppet med en propp och fyll på
varmt vatten (till ca 7 cm ovanför avloppet).
Hela röret måste vara fyllt med vatten för
att trycket ska ge bäst resultat. Om det
inte finns något vatten alls i röret minskar
effekten av trycket markant.
5. Bygg upp lite tryck genom att aktivera
pumpen
6. Dra ut proppen och sätt apparaten på
avloppet så som visas på bild 6.
passar inte i alla över-
ca 3 - 4 gånger.
inte kan stänga
7. Utlös en tryckstöt. Tryck apparaten hårt
emot avloppet när du gör det.
8. Om stoppet inte lossar och du är säker på
att röret klarar av det kan du öka trycket i
nästa stöt.
9. Ta upp apparaten ur vattnet och pumpa
snabbt med pumpen
10. Om du vill släppa ut lite tryck från apparaten skruvar du upp luftutsläppsventilen
Skruva sedan fast den igen.
11. Sätt apparaten över avloppet igen och
utlös en ny tryckstöt.
ObsErvEra
► Upprepa bara den här proceduren tills
vattennivån sjunker ner i avloppet. Fyll
eventuellt på mer vatten.
12. Fortsätt att tillföra tryckluft stötvis tills
stoppet lossar.
ObsErvEra
► Om det inte går att bygga upp något tryck
kontrollerar du om luftutsläppsventilen
är stängd. Skruva fast ventilen ordentligt på
apparaten.
ca 10 gånger.
.
Bild 6
■ 10│SE
Rengöring och skötsel
■ Rengör tillsatserna / / / och appa-
ratens utsida med en fuktig trasa. Envis smuts
tar du bort med lite milt diskmedel på trasan.
OBS! RISK FÖR SKADOR PÅ
PRODUKTEN!
Använd inte starka eller kemiska rengöringsmedel eller slipande medel för att rengöra apparaten och tillsatserna
skadas.
/ / / . Då kan ytorna
PPR 4 B2

ObsErvEra
► Det vita dammet på pumpen
smuts. Det är en sorts talkpulver som
används när pumpen smörjs för första
gången på fabriken.
Om apparaten används mycket ofta kan det
hända att pumpen
1. Skruva av förslutningen
2. Häll några droppar silikonolja i handtaget.
Andra typer av olja kan skada tätningar
och plastdelar.
Bild 7
3. Skruva fast förslutningen
behöver smörjas:
är inte
.
för hand
Service
Service Sverige
Tel.: 0770 930739
E-Mail: kompernass@lidl.se
IAN 275680
Service Suomi
Tel.: 010309 3582
E-Mail: kompernass@lidl.fi
IAN 275680
Importör
KOMPERNASS HANDELS GMBH
BURGSTRASSE 21
44867 BOCHUM
GERMANY
www.kompernass.com
Kassering
Kassera apparaten miljövänligt.
Följ gällande föreskrifter.
Kontakta din avfallsanläggning om du har några
frågor.
Lämna in allt förpackningsmaterial till
miljövänlig återvinning.
PPR 4 B2
SE
│
11 ■

■ 12│SE
PPR 4 B2

Inhaltsverzeichnis
Bestimmungsgemäßer Gebrauch ....................................14
Sicherheitshinweise ...............................................14
Lieferumfang ....................................................14
Gerätebeschreibung ..............................................14
Technische Daten .................................................15
Anwendung .....................................................15
Reinigung und Wartung ...........................................16
Entsorgen .......................................................17
Service .........................................................17
Importeur .......................................................17
PPR 4 B2
DE│AT│CH
│
13 ■

Herzlichen Glückwunsch!
Mit Ihrem Kauf haben Sie sich für ein
hochwertiges Produkt entschieden.
Machen Sie sich vor der ersten Inbetriebnahme
mit dem Produkt vertraut. Lesen Sie hierzu aufmerksam die nachfolgende Bedienungsanleitung.
Benutzen Sie das Produkt nur wie beschrieben
und für die angegebenen Einsatzbereiche.
Bewahren Sie diese Anleitung gut auf. Händigen
Sie alle Unterlagen bei Weitergabe des Produkts
an Dritte ebenfalls mit aus.
Bestimmungsgemäßer
Gebrauch
Der Pressluft-Rohrreiniger dient der umweltfreundlichen und chemikalienfreien Reinigung von
Abflüssen, Rohren und anderen unzugänglichen
Stellen durch Luftdruck.
Dieses Gerät ist für den privaten Gebrauch
bestimmt, nutzen Sie es nicht gewerblich oder für
industrielle Zwecke.
Sicherheitshinweise
VERLETZUNGSGEFAHR!
■ Richten Sie das Gerät niemals auf Tiere oder
andere Personen.
■ Dieses Gerät kann von Kindern ab 8
Jahren und darüber sowie von Personen
mit verringerten physischen, sensorischen
oder mentalen Fähigkeiten oder Mangel an
Erfahrung und Wissen benutzt werden, wenn
sie beaufsichtigt oder bezüglich des sicheren
Gebrauchs des Gerätes unterwiesen wurden
und die daraus resultierenden Gefahren
verstehen. Kinder dürfen nicht mit dem Gerät
spielen. Reinigung und Benutzer-Wartung dürfen nicht von Kindern ohne Beaufsichtigung
durchgeführt werden.
■ Benutzen Sie keine Benzine, Alkohole, kar-
bonhaltigen Reinigungsmittel oder ähnliches,
um schädliche Dämpfe zur vermeiden. Dieses
Gerät arbeitet ausschließlich mit Pressluft,
ohne Zusatz von Chemie.
WARNUNG VOR SACHSCHÄDEN!
■ Entfernen Sie alle losen Teile, wie zum
Beispiel Schmutz-Siebe aus dem Becken
und dichten Sie alle Öffnungen des selben
Rohres, wie z.B. Überläufe, mit einem nassen
Tuch o.ä. ab. Dies verhindert Verschmutzungen durch Spritzer, die durch den Druckstoß
entstehen.
■ Benutzen Sie das Gerät nur bei druckbelast-
baren Abflüssen. Verschraubte Rohre sind
druckbelastbarer als gesteckte Rohre. Stützen
Sie schlecht sitzende Siphons gegen den
Fußboden ab! Ansonsten kann der Druckstoß
den Siphon beschädigen.
Lieferumfang
Pressluft-Rohrreiniger
WC-Aufsatz
Dusch-Aufsatz
Aufsätze Ø 6 cm und Ø 5 cm
Überlaufverschluß
Bedienungsanleitung
Gerätebeschreibung
Abbildung A:
Luftablass-Ventil
Verschluss-Kappe
Pumpe
Druckstoß-Auslöser
Luft-Austrittsöffnung
Abbildung B:
WC-Aufsatz
Dusch-Aufsatz
Aufsatz Ø 6 cm
Aufsatz Ø 5 cm
Überlaufverschluss
■ 14│DE
│AT│
CH
PPR 4 B2
Technische Daten
max. Betriebsdruck: 4 bar
Aufsätze: Aufsatz Ø 6 cm
Aufsatz Ø 5 cm
WC-Aufsatz
Dusch-Aufsatz
Anwendung
1. Wählen Sie den passenden Aufsatz /
für den verstopften Abfluss und
/ /
stecken Sie ihn auf die Luft-Austrittsöffnung
2. Nehmen Sie Siebe oder andere Einsätze
aus dem Siphon.
3. Verschließen Sie alle Öffnungen, wie zum
Beispiel Überläufe, der zur reinigenden
Rohrleitung. Nutzen Sie für die Überläufe
den Überlaufverschluss
■ Bei runden Überläufen drücken und halten
Sie den Spannstift so, dass sich der Verriegelungshebel so klappen lässt, dass er in Verlängerung mit dem Spannstift steht (Abb. 1).
Abb. 1
■ Führen Sie ihn in den Überlauf ein. Sobald
der Verriegelungshebel auf die rückwärtige
Wand stößt, stellt er sich auf (Abb. 2).
Abb. 2
. Achten Sie darauf, dass er fest sitzt.
:
■ Lassen Sie langsam den Spannstift los und
kontrollieren Sie, ob der Überlauf komplett
verschlossen ist. Die Kanten des Überlaufverschlusses
um den Überlauf abschließen, da ansonsten
Schmutzreste herausgedrückt werden können.
Abb. 3: Korrekt eingesetzter
Überlaufverschluss
■ Bei länglichen Überläufen drücken Sie den
Spannstift und kippen Sie den Verriegelungshebel so, dass er im rechten Winkel zum
Spannstift steht (Abb. 4).
Abb. 4
■ Führen Sie ihn in den Überlauf ein.
■ Drehen Sie den Spannstift um 90° und lassen
Sie ihn langsam los (Abb. 5).
Abb. 5
■ Kontrollieren Sie, ob der Überlauf komplett
verschlossen ist. Die Kanten des Überlaufverschlusses
um den Überlauf abschließen, da ansonsten
Schmutzreste herausgedrückt werden können.
müssen möglichst gleichmäßig
müssen möglichst gleichmäßig
PPR 4 B2
DE│AT│CH
│
15 ■

HINWEIs
► Der Überlaufverschluss
alle Überläufe. Wenn der Überlaufverschluss den Überlauf nicht schließen
kann, benutzen Sie ein Tuch o.ä., um
diesen zu verschließen.
WARNUNG VOR SACHSCHÄDEN!
Benutzen Sie das Gerät nur bei druckbelastbaren Abflüssen und Rohrleitungen. Stützen Sie
schlecht sitzende Siphons gegen den Fußboden
ab! Ansonsten kann der Druckstoß den Siphon
beschädigen.
4. Verschließen Sie den Abfluss mit einem
Stöpsel und lassen Sie warmes Wasser
ein (bis etwa 7 cm über dem Abfluss).
Nur wenn das verstopfte Rohr komplett mit
Wasser gefüllt ist, wird die bestmögliche
Druckwirkung erzielt. Ohne Wasser im
Rohr wird die Druckwirkung stark reduziert.
5. Bauen Sie ein wenig Druck auf, indem Sie
die Pumpe
Wenn Sie zu langsam pumpen, kann die
Luft wieder aus dem Gerät entweichen.
6. Ziehen Sie den Stöpsel heraus und setzen
Sie das Gerät, wie in Abb. 6 dargestellt,
auf den Abfluss.
ca. 3-4 mal zügig betätigen.
passt nicht in
7. Lösen Sie dann den Druckstoß aus.
Drücken Sie dabei das Gerät fest gegen
den Abfluss.
8. Wenn sich die Verstopfung nicht löst und
Sie sich sicher sind, dass die Rohrleitungen
dem Druck standhalten, erhöhen Sie beim
nächsten Druckstoß den Druck.
9. Nehmen Sie das Gerät aus dem Wasser
und betätigen Sie die Pumpe
ca. 10 mal.
10. Wenn Sie etwas Druck vom Gerät ablassen wollen, schrauben Sie das Luftablass-
auf. Drehen Sie es danach wieder
Ventil
fest.
11. Setzen Sie das Gerät wieder auf den
Abfluss und betätigen Sie den Druckstoß.
HINWEIs
► Wiederholen Sie diesen Ablauf nur so oft,
solange sich der Wasserstand noch über
dem Abfluss befindet. Füllen Sie gegebenenfalls Wasser nach.
12. Wiederholen Sie den Druckstoß so oft, bis
die Verstopfung gelöst ist.
HINWEIs
► Falls sich kein Druck aufbauen lässt,
kontrollieren Sie das Luftablass-Ventil
Schrauben Sie es fest auf das Gerät auf.
zügig
.
Abb. 6
■ 16│DE
│AT│
CH
Reinigung und Wartung
■ Reinigen Sie die Aufsätze / / /
das Gehäuse mit einem feuchten Tuch. Bei
hartnäckigeren Verschmutzungen geben Sie
ein mildes Spülmittel auf das Tuch.
ACHTUNG! GERÄTESCHÄDEN!
Benutzen Sie keine aggressiven oder chemischen
Reinigungsmittel oder Scheuermittel, um das
Gerät oder seine Aufsätze
reinigen. Diese können die Oberflächen
angreifen.
/ / /
und
zu
PPR 4 B2

HINWEIs
► Der weiße Staub an der Pumpe
Verschmutzung. Es handelt sich dabei um
Talkumpuder, der für die erste Pumpenschmierung im Werk verwendet wird.
Nach häufiger Verwendung kann es sein, dass
die Pumpe
1. Schrauben Sie die Verschluss-Kappe
2. Geben Sie einige Tropfen Silikon-Öl in
3. Schrauben Sie die Verschluss-Kappe
geölt werden muss:
den Handgriff. Bei anderen Ölen können
Dichtungen oder Kunststoffe beschädigt
werden.
Abb. 7
handfest auf.
ist keine
Service
Service Deutschland
Tel.: 0800 5435 111 (Kostenfrei aus dem
dt. Festnetz/Mobilfunknetz)
E-Mail: kompernass@lidl.de
IAN 275680
Service Österreich
ab.
Tel.: 0820 201 222 (0,15 EUR/Min.)
E-Mail: kompernass@lidl.at
IAN 275680
Service Schweiz
Tel.: 0842 665566 (0,08 CHF/Min.,
Mobilfunk max. 0,40 CHF/Min.)
E-Mail: kompernass@lidl.ch
IAN 275680
Importeur
KOMPERNASS HANDELS GMBH
BURGSTRASSE 21
44867 BOCHUM
GERMANY
www.kompernass.com
Entsorgen
Entsorgen Sie das Gerät umweltgerecht. Beachten Sie die aktuell geltenden Vorschriften. Setzen
Sie sich im Zweifelsfall mit Ihrer Entsorgungseinrichtung in Verbindung.
Führen Sie alle Verpackungsmaterialien
einer umweltgerechten Entsorgung zu.
PPR 4 B2
DE│AT│CH
│
17 ■

■ 18│DE
│AT│
CH
PPR 4 B2
 Loading...