

Page 1
RULLO PER TINTEGGIARE PPR 1 A1
RULLO PER TINTEGGIARE
Istruzioni per l'uso
PUMPROLLER
Bedienungsanleitung
IAN 104464
PAINT PUMP ROLLER
Operating instructions
Page 2

Prima di leggere aprire la pagina con le immagini e prendere confi denza con le diverse funzioni
dell'apparecchio.
Before reading, unfold the page containing the illustrations and familiarise yourself with all functions of
the device.
Klappen Sie vor dem Lesen die Seite mit den Abbildungen aus und machen Sie sich anschließend mit allen
Funktionen des Gerätes vertraut.
IT / MT Istruzioni per l'uso Pagina 1
GB / MT Operating instructions Page 11
DE / AT / CH Bedienungsanleitung Seite 21
Page 3
2 x
Page 4

Indice
Introduzione . . . . . . . . . . . . . . . . . . . . . . . . . . . . . . . . . . . . . . . . . . . . . . . . . . 2
Uso conforme . . . . . . . . . . . . . . . . . . . . . . . . . . . . . . . . . . . . . . . . . . . . . . . . . . . . . . . . . . . 2
Sicurezza . . . . . . . . . . . . . . . . . . . . . . . . . . . . . . . . . . . . . . . . . . . . . . . . . . . . . 2
Avvertenze di sicurezza di base . . . . . . . . . . . . . . . . . . . . . . . . . . . . . . . . . . . . . . . . . . . . . 2
Descrizione dei componenti . . . . . . . . . . . . . . . . . . . . . . . . . . . . . . . . . . . . . . 3
Volume della fornitura e ispezione per rilevare eventuali
danni da trasporto . . . . . . . . . . . . . . . . . . . . . . . . . . . . . . . . . . . . . . . . . . . . . 3
Montaggio . . . . . . . . . . . . . . . . . . . . . . . . . . . . . . . . . . . . . . . . . . . . . . . . . . . . 4
Impiego . . . . . . . . . . . . . . . . . . . . . . . . . . . . . . . . . . . . . . . . . . . . . . . . . . . . . . 6
Dati tecnici . . . . . . . . . . . . . . . . . . . . . . . . . . . . . . . . . . . . . . . . . . . . . . . . . . . . 8
Pulizia . . . . . . . . . . . . . . . . . . . . . . . . . . . . . . . . . . . . . . . . . . . . . . . . . . . . . . . 8
Pulizia della valvola di riempimento . . . . . . . . . . . . . . . . . . . . . . . . . . . . . . . . . . . . . . . . . . 9
Smaltimento . . . . . . . . . . . . . . . . . . . . . . . . . . . . . . . . . . . . . . . . . . . . . . . . . 10
Assistenza . . . . . . . . . . . . . . . . . . . . . . . . . . . . . . . . . . . . . . . . . . . . . . . . . . . 10
Importatore . . . . . . . . . . . . . . . . . . . . . . . . . . . . . . . . . . . . . . . . . . . . . . . . . . 10
IT
MT
PPR 1 A1
1
Page 5

IT
MT
Introduzione
Congratulazioni!
Con questo acquisto si è scelto un prodotto di alta qualità. Familiarizzarsi con
il prodotto prima della messa in funzione. A tal fi ne leggere con attenzione le
seguenti istruzioni per l'uso. Utilizzare l'apparecchio solo come descritto e per i
campi d'impiego indicati. Conservare con cura il presente manuale di istruzioni.
In caso di cessione del prodotto a terzi, consegnare anche tutta la documentazione relativa.
Uso conforme
Il rullo a pompa è adatto esclusivamente per l'uso non professionale, per applicare liquidi acquosi e vernici diluibili in acqua, ad es. vernici a base di lattice,
a dispersione e acrilici. Un uso diverso o esulante da quanto sopra è considerato
non conforme. Sono escluse rivendicazioni di qualsiasi genere in caso di danni
derivanti da uso non conforme. Il rischio è esclusivamente a carico dell'utente.
Sicurezza
In questo capitolo sono riportate importanti indicazioni di sicurezza per l'uso
dell'apparecchio. Questo apparecchio corrisponde alle disposizioni di sicurezza
prescritte. L'uso non conforme può comportare danni a persone e a cose.
Avvertenze di sicurezza di base
Per l'uso sicuro dell'apparecchio, rispettare le seguenti avvertenze di sicurezza:
■ Questo apparecchio può essere utilizzato dai bambini di almeno 8anni di
età e da persone con capacità fi siche, sensoriali o mentali ridotte o insuffi ciente
esperienza o conoscenza, solo se sorvegliati o istruiti sull'uso sicuro dell'apparecchio e qualora ne abbiano compreso i pericoli associati. I bambini non
devono giocare con l'apparecchio. La pulizia e la manutenzione a cura
dell'utente non devono essere eseguite da bambini, a meno che non siano
sorvegliati.
■ Evitare di apportare autonomamente modifi che o cambiamenti all'apparecchio.
2
PPR 1 A1
Page 6

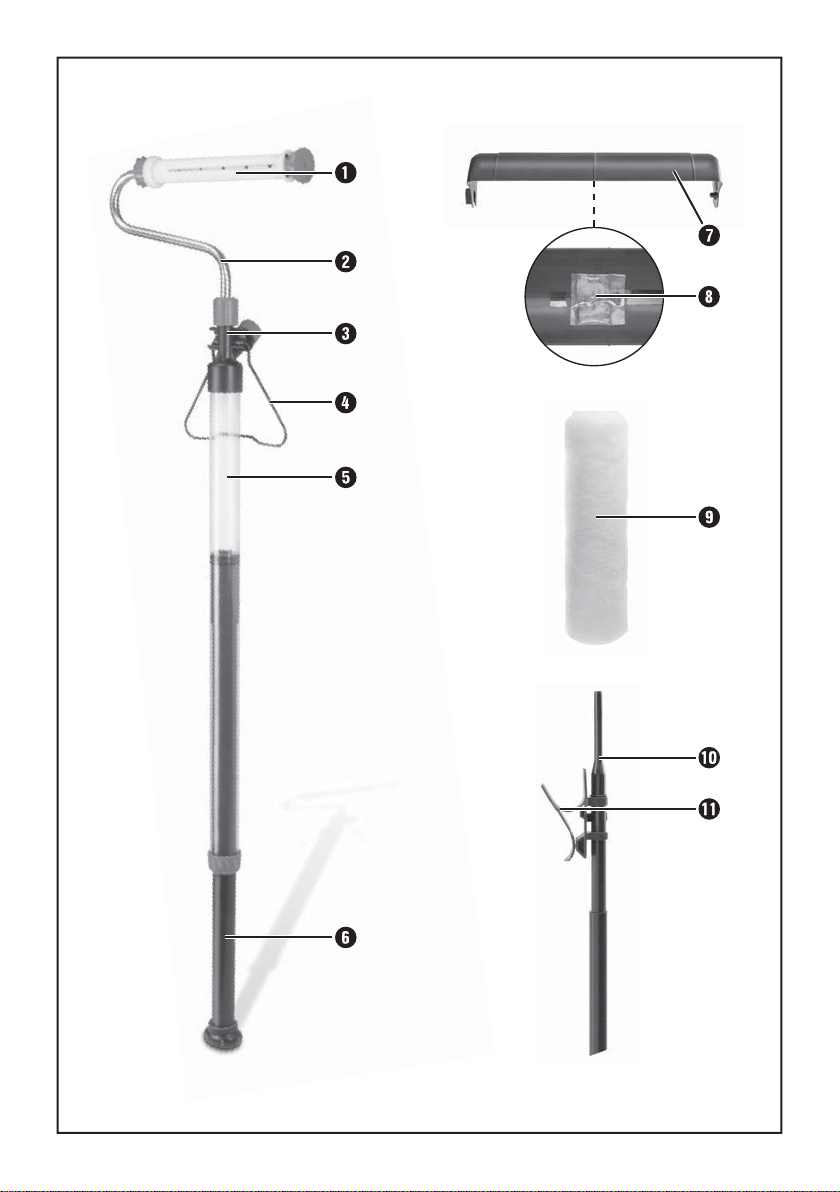
Descrizione dei componenti
Anima rullo per colore
Staff a rullo per colore
Valvola di riempimento
Staff a di appoggio
Cilindro per colore
Biella
Paraschizzi
Vaselina
Rullo per colore
Bocchetta di aspirazione
Piastra di fi ssaggio
Volume della fornitura e ispezione per rilevare
eventuali danni da trasporto
Il rullo a pompa viene fornito con i seguenti componenti standard:
▯ cilindro per colore con valvola di riempimento e biella
▯ staff a per rullo colore con anima e cappuccio di chiusura
▯ staff a di appoggio
▯ bocchetta di aspirazione con piastra di fi ssaggio
▯ paraschizzi
▯ 2 rulli per colore
▯ vaselina
▯ le presenti istruzioni per l'uso
IT
MT
PPR 1 A1
AVVERTENZA
Controllare se la fornitura è integra e se presenta danni visibili.
►
► In caso di fornitura incompleta o in presenza di danni da trasporto o
da imballaggio inadeguato, rivolgersi alla hotline di assistenza (vedere
capitolo Assistenza).
3
Page 7
IT
MT
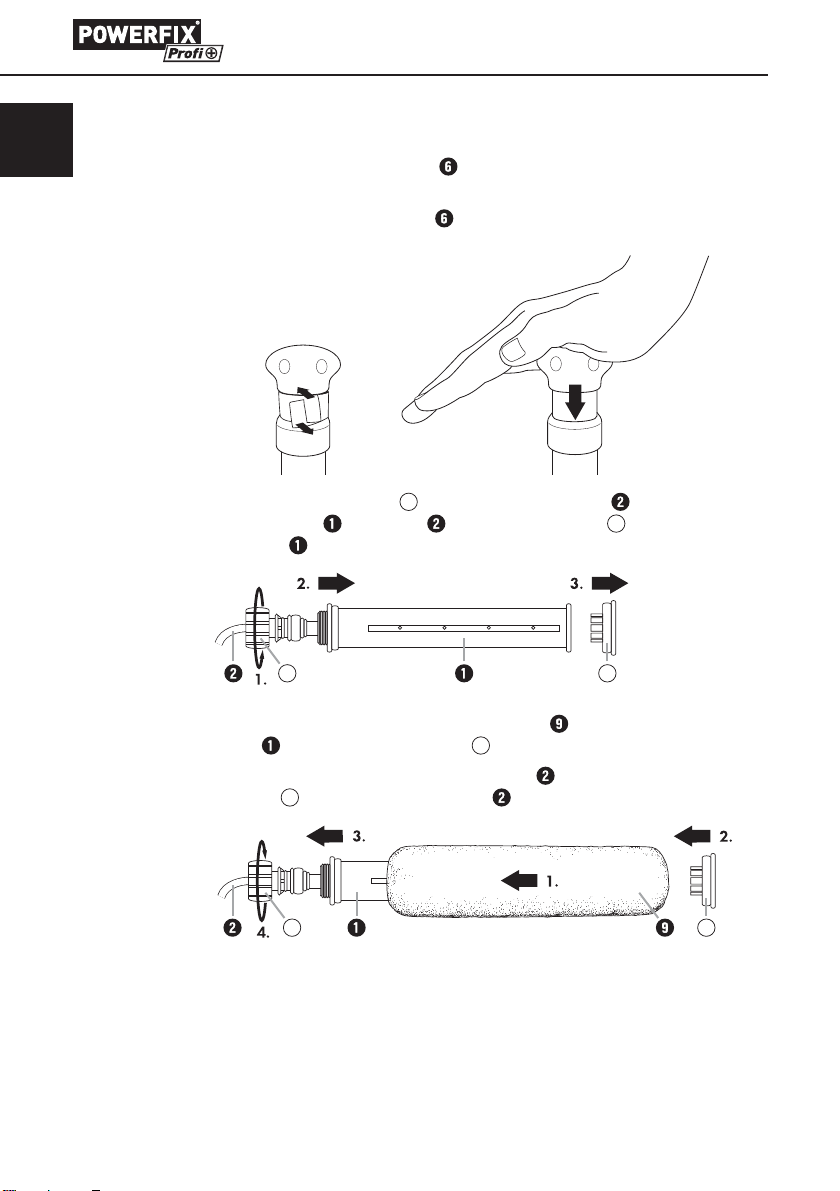
Montaggio
♦ Rimuovere il cartone dalla biella e appoggiarlo sul pavimento con la
manopola verso l'alto.
♦ Per rendere accessibile la biella , premere la manopola con il palmo della
mano verso il basso. Fare attenzione che le dita non si incastrino!
♦ Allentare il dado a risvolto A della staff a rullo per colore e tirare l'anima
rullo per colore
per colore
dalla staff a . Rimuovere la chiusura B dell'anima rullo
.
A B
♦ Far scivolare uno dei due rulli per colore allegati sull'anima rullo per
colore e applicare poi la chiusura B.
♦ Far scivolare tutto il rullo per colore sulla staff a e fi ssarla con il dado
a risvolto A della staff a rullo per colore .
A B
4
PPR 1 A1
Page 8
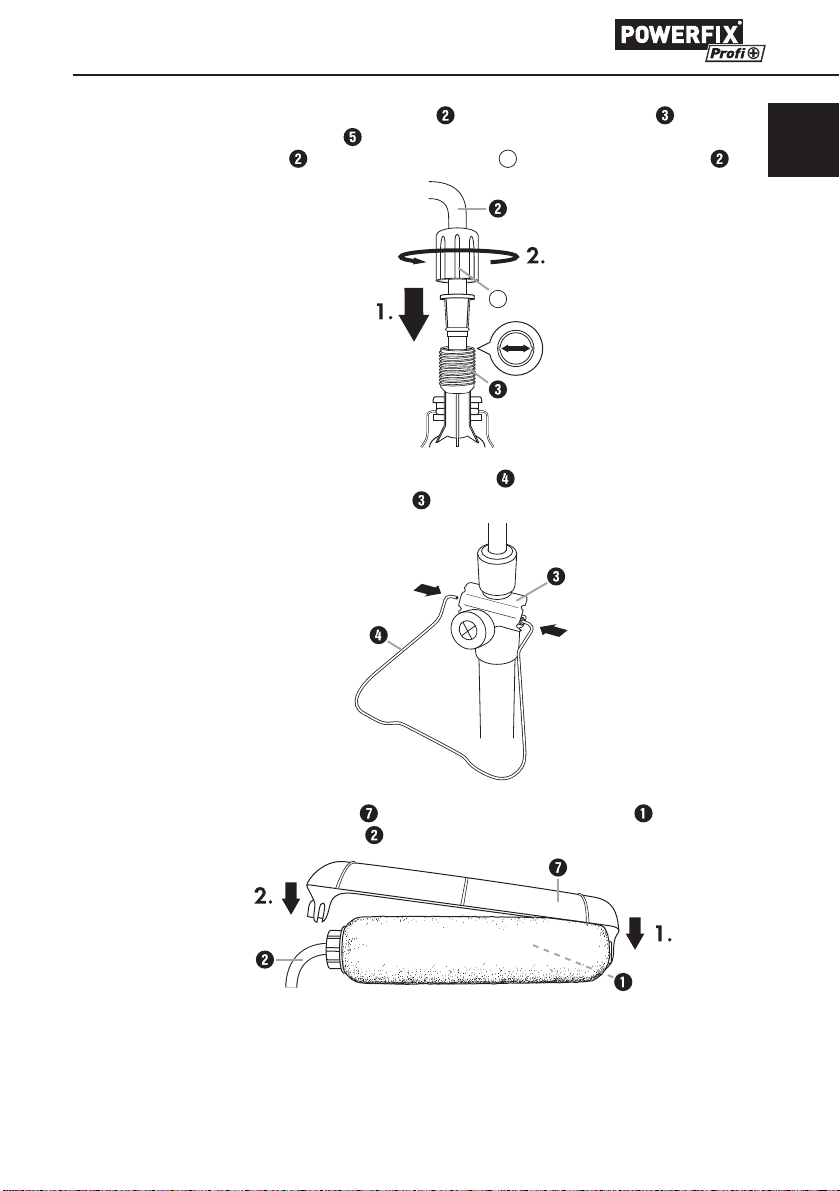
♦ Inserire la staff a rullo per colore nella valvola di riempimento del
cilindro per colore
per colore
♦ Tirare leggermente la staff a di appoggio e inserirla nelle aperture laterali
della valvola di riempimento
. Fare attenzione al bloccaggio. Fissare la staff a rullo
mediante il dado a risvolto
.
C
della staff a rullo per colore .
C
IT
MT
PPR 1 A1
♦ Fissare il paraschizzi dapprima sull'anima rullo per colore e poi sulla
staff a rullo per colore
.
5
Page 9
IT
MT
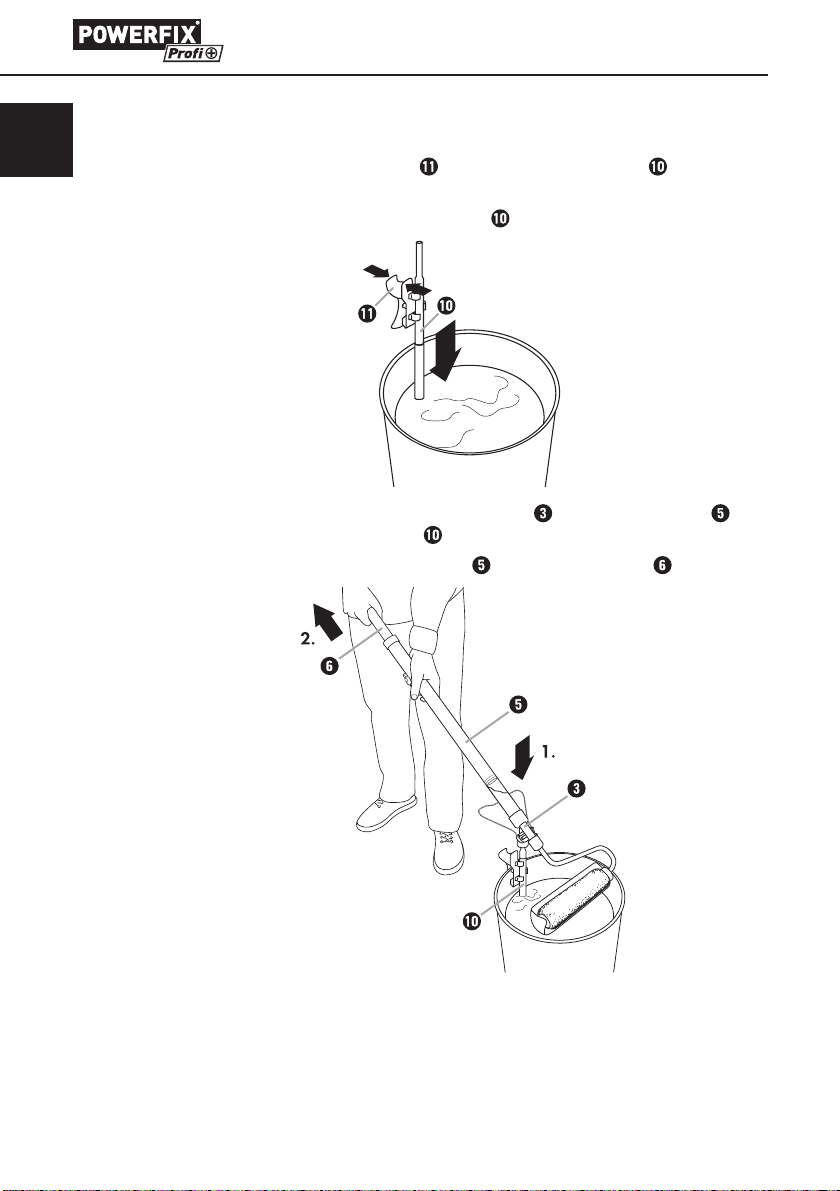
Impiego
♦ Premere la piastra di fi ssaggio della bocchetta di aspirazione sull'estre-
mità superiore e inserirla sul bordo del secchio del colore.
♦ Far scorrere la bocchetta di aspirazione nel secchio del colore.
♦ Premere saldamente la valvola di riempimento del cilindro per colore
sulla bocchetta di aspirazione
♦ Per tirare il colore nel rullo per colore , tirare indietro la biella .
.
6
PPR 1 A1
Page 10
♦ Premere la biella in avanti fi no a quando il colore sul rullo per colore
non diventa visibile. Fare attenzione che il rullo per colore
sivamente saturo.
♦ Premere la biella quando il rullo per colore non rilascia più abbastanza
colore.
AVVERTENZA
non sia ecces-
IT
MT
PPR 1 A1
►
Se la biella durante il riempimento del cilindro per colore è dura da
muovere, applicare una quantità abbondante di vaselina sulle guarnizioni
circolari che si trovano sull'estremità anteriore della biella
► Al prodotto è allegato un pacchettino di vaselina , che alla consegna
viene custodito nel paraschizzi
.
.
7
Page 11
IT
MT
Dati tecnici
Capacità cilindro per colore circa 520 ml
Peso (senza colore) circa 840 g
Pulizia
ATTENZIONE
Per la pulizia utilizzare solo acqua. Preferibilmente acqua tiepida con un
►
po' di detersivo.
♦ Tirare indietro la biella per far tornare il colore in eccesso dall'anima rullo
per colore
♦ Premere la valvola di riempimento del cilindro per colore sulla bocchet-
ta di aspirazione
questo modo è possibile spingere il colore restante nel secchio del colore.
♦ Allentare il dado a risvolto A dalla staff a rullo per colore e rimuovere
tutto il rullo per colore dalla staff a
♦ Rimuovere la chiusura B dell'anima del rullo per colore e premere l'anima
verso l'alto lato fuori dal rullo per colore
nel cilindro per colore .
e far scorrere la biella completamente in avanti. In
.
.
A B
♦ Pulire tutti i pezzi di ricambio utilizzando l'acqua.
8
PPR 1 A1
Page 12

♦ Immergere la bocchetta di aspirazione in acqua e tirare/premere la
biella
♦ Rimuovere la bocchetta di aspirazione dalla valvola di riempimento .
♦ Immergere la valvola di riempimento e la staff a per rullo per colore in
acqua e tirare/premere la biella
♦ Rimuovere poi la staff a per rullo per colore .
♦ Immergere la valvola di riempimento completamente in acqua e tirare/
premere la biella
♦ Allentare il grande dado a risvolto prima della manopola ed estrarre la biella
dal cilindro per colore
♦ In caso di stoccaggio prolungato oliare uniformante le guarnizioni circolari
che si trovano sulla parte anteriore della biella
sulla staff a rullo per colore
circa 5 volte avanti e indietro.
circa 5 volte avanti e indietro.
di nuovo circa 5 volte avanti e indietro.
. Pulire tutti i pezzi di ricambio utilizzando l'acqua.
ad es. con vaselina.
Pulizia della valvola di riempimento
♦ Aprire il dado a risvolto D sulla valvola di riempimento ruotando in
senso antiorario.
♦ Rimuovere la rondella di sicurezza E e la valvola in gomma F dal corpo
della valvola.
♦ Pulire i pezzi di ricambio con cura utilizzando l'acqua.
♦ Inserire di nuovo la valvola in gomma F e la rondella di sicurezza E.
♦ Riavvitare saldamente il dado a risvolto D sul corpo della valvola.
IT
MT
e le guarnizioni presenti
PPR 1 A1
D
E
F
9
Page 13

IT
MT
Smaltimento
Smaltire l'apparecchio attraverso un'azienda di smaltimento autorizzata o attraverso l'ente di smaltimento comunale. Rispettare le norme attualmente in vigore.
In caso di dubbi mettersi in contatto con l'ente di smaltimento competente.
Smaltire tutti i materiali dell'imballaggio in modo ecologicamente conforme.
Assistenza
Assistenza Italia
Tel.: 02 36003201
E-Mail: kompernass@lidl.it
IAN 104464
Assistenza Malta
Tel.: 80062230
E-Mail: kompernass@lidl.com.mt
IAN 104464
Raggiungibilità della hotline: dal lunedì al venerdì, dalle 8.00 alle 20.00 (CET)
Importatore
KOMPERNASS HANDELS GMBH
BURGSTRASSE 21
44867 BOCHUM
GERMANY
www.kompernass.com
10
PPR 1 A1
Page 14

Contents
Introduction . . . . . . . . . . . . . . . . . . . . . . . . . . . . . . . . . . . . . . . . . . . . . . . . . . 12
Intended use . . . . . . . . . . . . . . . . . . . . . . . . . . . . . . . . . . . . . . . . . . . . . . . . . . . . . . . . . . . 12
Safety. . . . . . . . . . . . . . . . . . . . . . . . . . . . . . . . . . . . . . . . . . . . . . . . . . . . . . . 12
Basic safety guidelines . . . . . . . . . . . . . . . . . . . . . . . . . . . . . . . . . . . . . . . . . . . . . . . . . . . . 12
Components. . . . . . . . . . . . . . . . . . . . . . . . . . . . . . . . . . . . . . . . . . . . . . . . . . 13
Package contents and transport inspection . . . . . . . . . . . . . . . . . . . . . . . . 13
Assembly . . . . . . . . . . . . . . . . . . . . . . . . . . . . . . . . . . . . . . . . . . . . . . . . . . . . 14
Use of the appliance . . . . . . . . . . . . . . . . . . . . . . . . . . . . . . . . . . . . . . . . . . . 16
Technical data . . . . . . . . . . . . . . . . . . . . . . . . . . . . . . . . . . . . . . . . . . . . . . . . 18
Cleaning . . . . . . . . . . . . . . . . . . . . . . . . . . . . . . . . . . . . . . . . . . . . . . . . . . . . . 18
Cleaning the fi lling valve . . . . . . . . . . . . . . . . . . . . . . . . . . . . . . . . . . . . . . . . . . . . . . . . . . 19
Disposal . . . . . . . . . . . . . . . . . . . . . . . . . . . . . . . . . . . . . . . . . . . . . . . . . . . . . 20
Service . . . . . . . . . . . . . . . . . . . . . . . . . . . . . . . . . . . . . . . . . . . . . . . . . . . . . . 20
Importer . . . . . . . . . . . . . . . . . . . . . . . . . . . . . . . . . . . . . . . . . . . . . . . . . . . . . 20
GB
MT
PPR 1 A1
11
Page 15

GB
MT
Introduction
Congratulations!
You have purchased a high-quality product. Familiarise yourself with the product
before taking it into use. To do this, read the following operating instructions
carefully. Use the product only as described and for the range of applications
specifi ed. Keep these operating instructions in a safe place. Please also pass
these operating instructions on to any future owner(s).
Intended use
This pump roller is exclusively intended for non-commercial use for the application
of watery liquids and water-based paints such as latex, emulsion and acrylic paints.
It is not intended for any other use or use beyond that specifi ed. Claims of any
kind for damage arising as a result of incorrect use will not be accepted.
The risk shall be borne solely by the user.
Safety
This section contains important safety instructions for using the appliance.
This appliance complies with the statutory safety regulations. Improper use may
result in personal injury and property damage.
Basic safety guidelines
To ensure safe operation of the appliance, follow the safety guidelines set out below:
■ This appliance may be used by children aged 8 years and above and by
persons with limited physical, sensory or mental capabilities or lack of experience and knowledge, provided that they are under supervision or have been
told how to use the appliance safely and are aware of the potential risks.
Children must not use the appliance as a plaything. Cleaning and user maintenance tasks may not be carried out by children unless they are supervised.
■ Do not make any unauthorised modifi cations or alterations to the appliance.
12
PPR 1 A1
Page 16

Components
Paint roller core
Paint roller bracket
Filling valve
Stand
Paint cylinder
Plunger
Spray guard
Petroleum jelly
Paint roller
Intake pipe
Attachment clip
Package contents and transport inspection
The pump roller is delivered with the following components as standard:
▯ Paint cylinder with fi lling valve and piston rod
▯ Paint roller bracket with paint roller core and cap
▯ Support bracket
▯ Plunger with attachment clip
▯ Spray guard
▯ 2 x paint rollers
▯ Petroleum jelly
▯ These operating instructions
GB
MT
PPR 1 A1
NOTE
Check the package for completeness and signs of visible damage.
►
► If the consignment is incomplete or damaged due to defective packaging
or carriage, contact the Service hotline (see the chapter Service).
13
Page 17

GB
MT
Assembly
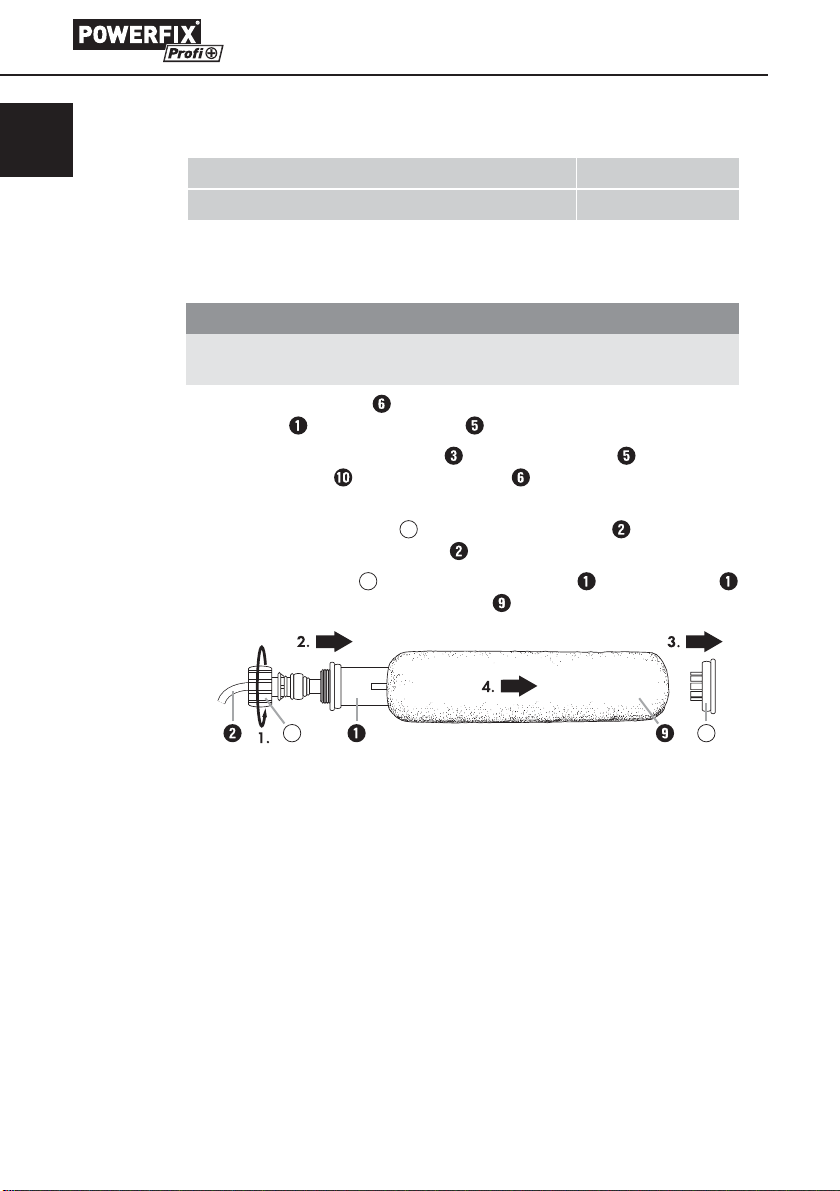
♦ Remove the cardboard from the plunger and place it on the fl oor with the
♦ To free the plunger
♦ Undo the cap nut A of the paint roller bracket and detach the paint
knob facing upwards.
press the knob downwards fi rmly with the fl at of your
hand. Caution! Take care not to trap your fi ngers!
roller core
of the paint roller core
A B
,
from the paint roller bracket . Now remove the stopper B
.
14
♦ Push one of the two provided paint rollers onto the paint roller core
and replace the stopper B.
♦ Push the entire paint roller onto the paint roller bracket and secure it with
the cap nut A of the paint roller bracket .
A B
PPR 1 A1
Page 18

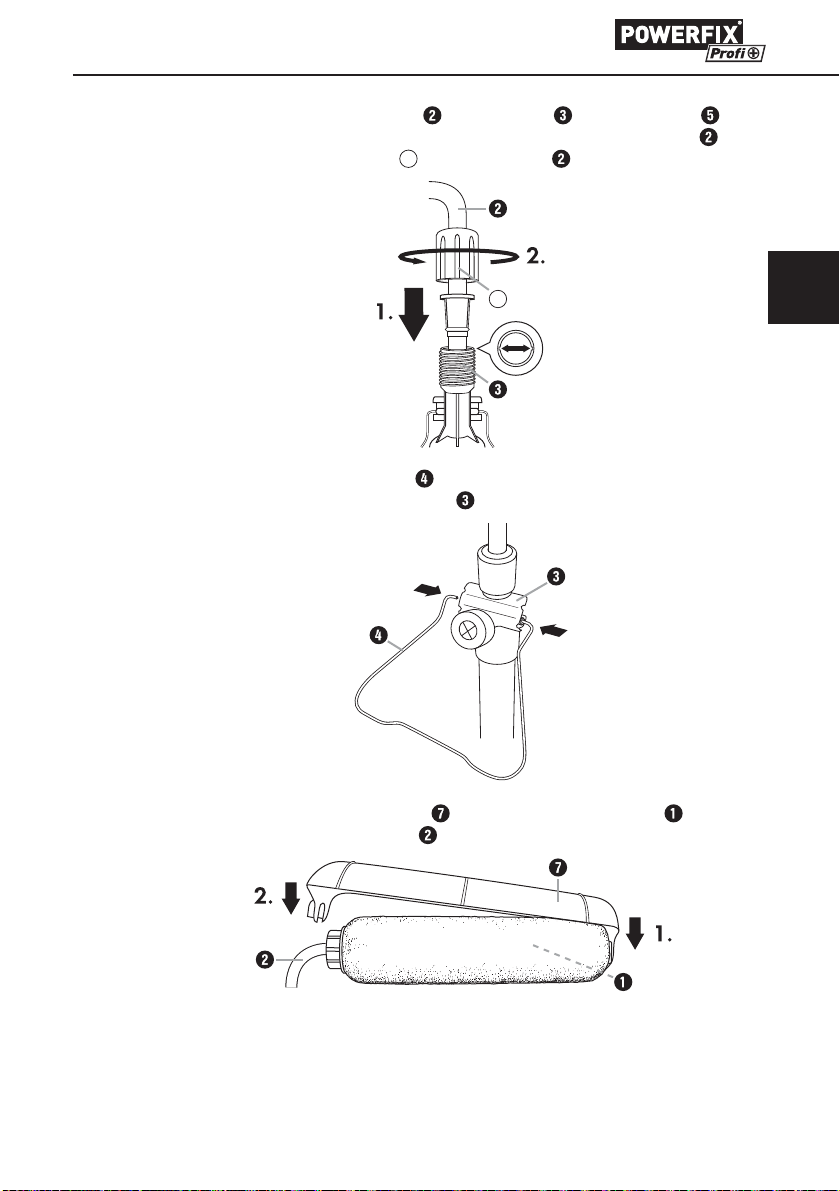
♦ Push the paint roller bracket into the fi lling valve of the paint cylinder .
Pay attention to the catch. Secure the paint roller bracket
C
of the paint roller bracket .
nut
C
♦ Pull the stand apart slightly and plug it into the side openings of the fi lling
.
valve
using the cap
GB
MT
PPR 1 A1
♦ First attach the spray guard to the paint roller core , then to the paint
roller bracket
.
15
Page 19

GB
MT
Use of the appliance
♦ Press together the top end of the attachment clip of the intake pipe
and clamp it onto the edge of the paint bucket.
♦ Slide the intake pipe into the paint bucket.
♦ Push the fi lling valve of the paint cylinder fi rmly onto the the intake
pipe
.
♦ Pull the plunger back to draw paint into the paint cylinder .
16
PPR 1 A1
Page 20

♦ Push the plunger forward until paint is visible on the paint roller .
Take care not to oversaturate the paint roller
♦ Push the plunger a little more if the paint roller is no longer delivering
enough paint.
NOTE
.
GB
MT
PPR 1 A1
If the plunger is stiff when fi lling the paint cylinder apply plenty of
►
petroleum jelly to the O-rings at the front end of the plunger
► A sachet of petroleum jelly is supplied with the product, and can be
found in the spray guard
upon delivery.
.
17
Page 21

GB
MT
Technical data
Paint cylinder capacity approx. 520 ml
Weight (without paint) approx. 840 g
Cleaning
CAUTION
Only use water for cleaning. Preferably lukewarm water with a little
►
washing-up liquid.
♦ Pull the plunger back to transport excess paint from the paint roller
core
back into the paint cylinder .
♦ Push the fi lling valve of the paint cylinder onto the intake pipe and
slide the plunger
remaining paint back into the paint bucket.
♦ Undo the cap nut A of the paint roller bracket and pull the entire paint
roller off the paint roller bracket
♦ Pull off the stopper B of the paint roller core and push the paint roller
core
out of the paint roller at the other side.
all the way forward. In this way, you can deposit the
.
18
A B
♦ Clean all parts with water.
PPR 1 A1
Page 22

♦ Immerse the intake pipe in water and pull/push the plunger back and
forth about fi ve times.
♦ Now remove the intake pipe from the fi lling valve .
♦ Immerse the fi lling valve and the paint roller bracket in water and
pull/push the plunger
♦ Then remove the paint roller bracket .
♦ Immerse the fi lling valve completely in water and pull/push the plunger
back and forth again about fi ve times.
♦ Undo the large cap nut from the knob and pull the plunger out of the paint
cylinder
♦ For long-term storage, please grease the O-rings on the front of the plunger
and the seals on the paint roller bracket
example.
. Clean all parts with water.
Cleaning the fi lling valve
♦ Undo the cap nut D on the fi lling valve by turning it anticlockwise.
♦ Remove the lock washer E and the rubber valve F from the valve housing.
♦ Clean the individual parts with water.
♦ Replace the rubber valve F and the lock washer E.
♦ Screw the cap nut D fi rmly onto the valve housing again.
back and forth again about fi ve times.
evenly with petroleum jelly, for
GB
MT
PPR 1 A1
D
E
F
19
Page 23

GB
MT
Disposal
Dispose of the appliance via an approved waste disposal company or your
municipal waste disposal facility. Please observe the currently applicable
regulations. Please contact your waste disposal facility if you are in any doubt.
Dispose of all packaging materials in an environmentally friendly manner.
Service
Service Great Britain
Tel.: 0871 5000 720 (£ 0.10/Min.)
E-Mail: kompernass@lidl.co.uk
IAN 104464
Service Malta
Tel.: 80062230
E-Mail: kompernass@lidl.com.mt
IAN 104464
Hotline availability: Monday to Friday 08:00 - 20:00 (CET)
Importer
KOMPERNASS HANDELS GMBH
BURGSTRASSE 21
44867 BOCHUM
GERMANY
www.kompernass.com
20
PPR 1 A1
Page 24

Inhaltsverzeichnis
Einleitung . . . . . . . . . . . . . . . . . . . . . . . . . . . . . . . . . . . . . . . . . . . . . . . . . . . . 22
Bestimmungsgemäße Verwendung . . . . . . . . . . . . . . . . . . . . . . . . . . . . . . . . . . . . . . . . . . 22
Sicherheit . . . . . . . . . . . . . . . . . . . . . . . . . . . . . . . . . . . . . . . . . . . . . . . . . . . . 22
Grundlegende Sicherheitshinweise . . . . . . . . . . . . . . . . . . . . . . . . . . . . . . . . . . . . . . . . . . 22
Teilebeschreibung . . . . . . . . . . . . . . . . . . . . . . . . . . . . . . . . . . . . . . . . . . . . . 23
Lieferumfang und Transportinspektion . . . . . . . . . . . . . . . . . . . . . . . . . . . 23
Zusammenbau . . . . . . . . . . . . . . . . . . . . . . . . . . . . . . . . . . . . . . . . . . . . . . . 24
Anwendung . . . . . . . . . . . . . . . . . . . . . . . . . . . . . . . . . . . . . . . . . . . . . . . . . . 26
Technische Daten . . . . . . . . . . . . . . . . . . . . . . . . . . . . . . . . . . . . . . . . . . . . . . 28
Reinigung . . . . . . . . . . . . . . . . . . . . . . . . . . . . . . . . . . . . . . . . . . . . . . . . . . . . 28
Reinigung Füllventil . . . . . . . . . . . . . . . . . . . . . . . . . . . . . . . . . . . . . . . . . . . . . . . . . . . . . . 29
Entsorgen . . . . . . . . . . . . . . . . . . . . . . . . . . . . . . . . . . . . . . . . . . . . . . . . . . . . 30
Service . . . . . . . . . . . . . . . . . . . . . . . . . . . . . . . . . . . . . . . . . . . . . . . . . . . . . . 30
Importeur . . . . . . . . . . . . . . . . . . . . . . . . . . . . . . . . . . . . . . . . . . . . . . . . . . . 30
DE
AT
CH
PPR 1 A1
21
Page 25

DE
AT
CH
Einleitung
Herzlichen Glückwunsch!
Mit Ihrem Kauf haben Sie sich für ein hochwertiges Produkt entschieden. Machen
Sie sich vor der ersten Inbetriebnahme mit dem Produkt vertraut. Lesen Sie hierzu
aufmerksam die nachfolgende Bedienungsanleitung. Benutzen Sie das Produkt
nur wie beschrieben und für die angegebenen Einsatzbereiche. Bewahren Sie
diese Bedienungsanleitung gut auf. Händigen Sie alle Unterlagen bei Weitergabe
des Produkts an Dritte ebenfalls mit aus.
Bestimmungsgemäße Verwendung
Der Pumproller ist ausschließlich für den nicht gewerblichen Gebrauch zum
Auftragen von wässrigen Flüssigkeiten und wasserverdünnbaren Farben, wie
z. B. Latex-, Dispersions- und Acrylfarben geeignet. Eine andere oder darüber
hinausgehende Benutzung gilt als nicht bestimmungsgemäß. Ansprüche jeglicher
Art wegen Schäden aus nicht bestimmungsgemäßer Verwendung sind ausgeschlossen. Das Risiko trägt allein der Benutzer.
Sicherheit
In diesem Kapitel erhalten Sie wichtige Sicherheitshinweise im Umgang mit dem
Gerät. Dieses Gerät entspricht den vorgeschriebenen Sicherheitsbestimmungen.
Ein unsachgemäßer Gebrauch kann zu Personen- und Sachschäden führen.
Grundlegende Sicherheitshinweise
Beachten Sie für einen sicheren Umgang mit dem Gerät die folgenden Sicherheitshinweise:
■ Dieses Gerät kann von Kindern ab 8 Jahren und darüber sowie von Personen
mit verringerten physischen, sensorischen oder mentalen Fähigkeiten oder
Mangel an Erfahrung und Wissen benutzt werden, wenn sie beaufsichtigt
oder bezüglich des sicheren Gebrauchs des Gerätes unterwiesen wurden
und die daraus resultierenden Gefahren verstehen. Kinder dürfen nicht
mit dem Gerät spielen. Reinigung und Benutzer-Wartung dürfen nicht von
Kindern ohne Beaufsichtigung durchgeführt werden.
■ Nehmen Sie keine eigenmächtigen Umbauten oder Veränderungen an
dem Gerät vor.
22
PPR 1 A1
Page 26

Teilebeschreibung
Farbwalzenkern
Farbrollbügel
Füllventil
Ablagebügel
Farbzylinder
Kolbenstange
Spritzschutz
Vaseline
Farbwalze
Ansaugstutzen
Befestigungsspange
Lieferumfang und Transportinspektion
Der Pumproller wird standardmäßig mit folgenden Komponenten geliefert:
▯ Farbzylinder mit Füllventil und Kolbenstange
▯ Farbrollbügel mit Farbwalzenkern und Verschlußkappe
▯ Ablagebügel
▯ Ansaugstutzen mit Befestigungsspange
▯ Spritzschutz
▯ 2 x Farbwalze
▯ Vaseline
▯ Diese Bedienungsanleitung
DE
AT
CH
PPR 1 A1
HINWEIS
Prüfen Sie die Lieferung auf Vollständigkeit und auf sichtbare Schäden.
►
► Bei einer unvollständigen Lieferung oder Schäden infolge mangelhafter
Verpackung oder durch Transport wenden Sie sich an die Service-Hotline
(siehe Kapitel Service).
23
Page 27

DE
AT
CH
Zusammenbau
♦ Entfernen Sie die Pappe von der Kolbenstange und stellen Sie diese mit
dem Knauf nach oben auf den Fußboden.
♦ Drücken Sie nun, um die Kolbenstange gängig zu machen, den Knauf
kraftvoll mit der fl achen Hand nach unten. Vorsicht: Klemmen Sie sich nicht
Ihre Finger ein!
♦ Lösen Sie die Überwurfmutter A des Farbrollbügels und ziehen den Farb-
walzenkern
des Farbwalzenkerns
A B
vom Farbrollbügel ab. Ziehen Sie nun den Verschluss B
ab.
24
♦ Schieben Sie eine der beiden beiliegenden Farbwalzen auf den Farbwal-
zenkern
♦ Schieben Sie die komplette Farbwalze auf den Farbrollbügel und befesti-
gen diese mit der Überwurfmutter
und stecken danach den Verschluss B auf.
A
des Farbrollbügels .
A B
PPR 1 A1
Page 28
♦ Stecken Sie den Farbrollbügel in das Füllventil des Farbzylinders .
Achten Sie dabei auf die Arretierung. Befestigen Sie den Farbrollbügel
mittels der Überwurfmutter C des Farbrollbügels .
C
♦ Ziehen Sie den Ablagebügel leicht auseinander und stecken Sie ihn in die
seitlichen Öff nungen des Füllventils
.
DE
AT
CH
PPR 1 A1
♦ Befestigen Sie den Spritzschutz zuerst an den Farbwalzenkern und
danach an den Farbrollbügel
.
25
Page 29

DE
AT
CH
Anwendung
♦ Drücken Sie die Befestigungsspange des Ansaugstutzens am oberen
Ende zusammen und klemmen Sie es am Rand des Farbeimers.
♦ Schieben Sie den Ansaugstutzen in den Farbeimer.
♦ Drücken Sie das Füllventil des Farbzylinders fest auf den Ansaug-
stutzen
♦ Ziehen Sie die Kolbenstange zurück, um die Farbe in den Farbzylinder
zu ziehen.
.
26
PPR 1 A1
Page 30

♦ Drücken Sie die Kolbenstange so lange nach vorne, bis die Farbe an der
Farbwalze
übersättigen.
♦ Drücken Sie die Kolbenstange nach, wenn die Farbwalze nicht mehr
genügend Farbe abgibt.
HINWEIS
sichtbar wird. Achten Sie darauf, die Farbwalze nicht zu
DE
AT
CH
PPR 1 A1
►
Wenn die Kolbenstange beim Befüllen des Farbzylinders schwergängig ist, tragen Sie bitte großzügig Vaseline auf die O-Ringe am vorderen
Ende der Kolbenstange
► Dem Produkt liegt ein Päckchen Vaseline bei, welches bei Auslieferung
im Spritzschutz
auf.
aufbewahrt ist.
27
Page 31

Technische Daten
Fassungsvermögen Farbzylinder ca. 520 ml
Gewicht (ohne Farbe) ca. 840 g
DE
AT
CH
Reinigung
ACHTUNG
Verwenden Sie zur Reinigung nur Wasser. Am besten lauwarmes Wasser
►
mit etwas Spülmittel.
♦ Ziehen Sie die Kolbenstange zurück, um die überschüssige Farbe aus
dem Farbwalzenkern
♦ Drücken Sie das Füllventil des Farbzylinders auf den Ansaugstutzen
und schieben Sie die Kolbenstange
somit die restliche Farbe zurück in den Farbeimer drücken.
♦ Lösen Sie die Überwurfmutter A vom Farbrollbügel und ziehen die kom-
plette Farbwalze vom Farbrollbügel
♦ Ziehen Sie den Verschluss B des Farbwalzenkerns ab und drücken Sie
den Farbwalzenkern
♦ Reinigen Sie alle Einzelteile mit Wasser.
zurück in den Farbzylinder zu befördern.
bis ganz nach vorne. Sie können
ab.
zur anderen Seite aus der Farbwalze heraus.
A B
28
PPR 1 A1
Page 32

♦ Tauchen Sie den Ansaugstutzen in Wasser und ziehen/drücken Sie die
Kolbenstange
♦ Entfernen Sie nun den Ansaugstutzen aus dem Füllventil .
♦ Tauchen Sie das Füllventil und den Farbrollbügel in Wasser und ziehen/
drücken Sie die Kolbenstange
♦ Entfernen Sie danach den Farbrollbügel .
♦ Tauchen Sie jetzt das Füllventil vollständig in Wasser und ziehen/drücken
Sie die Kolbenstange
♦ Lösen Sie die große Überwurfmutter vor dem Knauf und ziehen die Kolben-
stange
♦ Bei längerer Lagerung fetten Sie bitte die O-Ringe am Vorderteil der Kolben-
stange
mit Vaseline ein.
aus dem Farbzylinder . Reinigen Sie alle Einzelteile mit Wasser.
und die Dichtungen an dem Farbrollbügel gleichmäßig. z. B.
Reinigung Füllventil
♦ Öff nen Sie die Überwurfmutter D am Füllventil , indem Sie gegen den
Uhrzeigersinn drehen.
♦ Entnehmen Sie die Sicherungsscheibe E und das Gummiventil F aus dem
Ventilgehäuse.
♦ Reinigen Sie die Einzelteile sorgfältig mit Wasser.
♦ Setzen Sie das Gummiventil F und die Sicherungsscheibe E wieder ein.
♦ Schrauben Sie die Überwurfmutter D wieder am Ventilgehäuse fest.
ca. 5 mal hin und her.
wieder ca. 5 mal hin und her.
erneut ca. 5 mal hin und her.
DE
AT
CH
PPR 1 A1
D
E
F
29
Page 33

DE
AT
CH
Entsorgen
Entsorgen Sie das Gerät über einen zugelassenen Entsorgungsbetrieb oder über
Ihre kommunale Entsorgungseinrichtung. Beachten Sie die aktuell geltenden
Vorschriften. Setzen Sie sich im Zweifelsfall mit Ihrer Entsorgungseinrichtung in
Verbindung.
Führen Sie alle Verpackungsmaterialien einer umweltgerechten Entsorgung zu.
Service
Service Deutschland
Tel.: 0800 5435 111 (Kostenfrei aus dem dt. Festnetz/Mobilfunknetz)
E-Mail: kompernass@lidl.de
IAN 104464
Service Österreich
Tel.: 0820 201 222 (0,15 EUR/Min.)
E-Mail: kompernass@lidl.at
IAN 104464
Service Schweiz
Tel.: 0842 665566 (0,08 CHF/Min., Mobilfunk max. 0,40 CHF/Min.)
E-Mail: kompernass@lidl.ch
IAN 104464
Erreichbarkeit Hotline: Montag bis Freitag von 8:00 Uhr – 20:00 Uhr (MEZ)
Importeur
30
KOMPERNASS HANDELS GMBH
BURGSTRASSE 21
44867 BOCHUM
GERMANY
www.kompernass.com
PPR 1 A1
Page 34

KOMPERNASS HANDELS GMBH
BURGSTRASSE 21
44867 BOCHUM
DEUTSCHLAND / GERMANY
www.kompernass.com
Versione delle informazioni · Last Information Update
Stand der Informationen: 12 / 2014
Ident.-No.: PPR1A1-102014-2
IAN 104464
5
 Loading...