

■ GB /CY
ORGANISING & STORAGE SET
POAS 2 B1
ORGANISING & STORAGE SET
Operating instructions
SET ZA SORTIRANJE I POHRANJIVANJE
Upute za upotrebu
ORGANIZATOR ACCESORII ATELIER
Instrucţiuni de utilizare
ΣΕΤ ΕΠΙΤΟΙΧΙΕΣ ΘΗΚΕΣ
ΟΡΓΑΝΩΣΗΣ ΕΡΓΑΛΕΙΩΝ
Οδηүίες χρήσης
ORDNUNGS- UND AUFBEWAHRUNGS SET
Bedienungsanleitung
Introduction
Congratulations!
With your purchase you have decided in favour of a
quality product. Familiarise yourself with the product
before taking it into use. To do this, read the following
operating instructions attentively. Use the product only
as described and only for the specified areas of application. Retain these instructions for future reference. In
addition, pass these documents on, together with the
product, to any future owner.
Intended use
The storage set is intended exclusively for the storage
of tools and small parts such as nails, wallplugs, screws
or similar items, in private households. This storage set
is not intended for the storage of flammable, toxic or
corrosive liquids. Do not use this storage set in or for
commercial applications, or for purposes for which
it was not intended. A different or additional usage
is considered to be improper use and can lead to
damage. The manufacturer assumes no responsibility
for damage caused by failure to comply with these instructions, improper use, incompetent repairs, making
unauthorised modifications or for using unapproved
replacement parts.
Safety instructions
For safe interaction with the item pay heed to the
following safety information:
■ When drilling, ensure that damage is not caused
to any electrical cables or other installations, such
as water pipes, in the wall. Drilling into electrical
wires can be fatal!
■ Damaged parts could have sharp edges. There is
also a risk of physical injury! Replace broken or
damaged parts forthwith.
■ Do not burden the wall panels and the boxes too
heavily (see chapter “Technical Data”). This could
lead to irreparable damage.
■ The supplied wallplugs are only suitable for inser-
tion into a concrete or stone wall. It is absolutely
important that you check the suitability of your masonry before inserting the wallplugs. If you do not,
the wallplugs may not hold and the wall panels
could fall off. If in doubt, consult a professional.
Technical data
Maximum load per wall panel 32 kg
Maximum load - small box 1 kg
Maximum load - medium box 1.5 kg
Maximum load - large box 2 kg
Items supplied
Before taking the item into use, check that all of the
parts are complete/available and free of visible
damage. If the items supplied are not complete, or
damaged due to defective packaging or through
transportation, contact Customer Services (see chapter “Importer/Service”).
▯ 2 x Wall panels (42 x 59 cm)
▯ 14 x Boxes small (red) (11.5 x 10 x 7.3 cm)
▯ 2 x Boxes small (blue) (11.5 x 10 x 7.3 cm)
▯ 8 x Boxes medium (blue) (16.5 x 10 x 7.3 cm)
▯ 4 x Boxes large (yellow) (21.5 x 10 x 7.3 cm)
▯ 10 x Hooks (5 cm)
▯ 1 x Drill and bit holder (16.5 x 5 cm)
▯ 1 x Tool holder (21 x 9.5 cm)
▯ 1 x Ring and open-ended spanner holder
(21.8 x 6.8 cm)
▯ 40 x Screws M5 x 30
▯ 40 x Wallplugs S6
▯ This information sheet
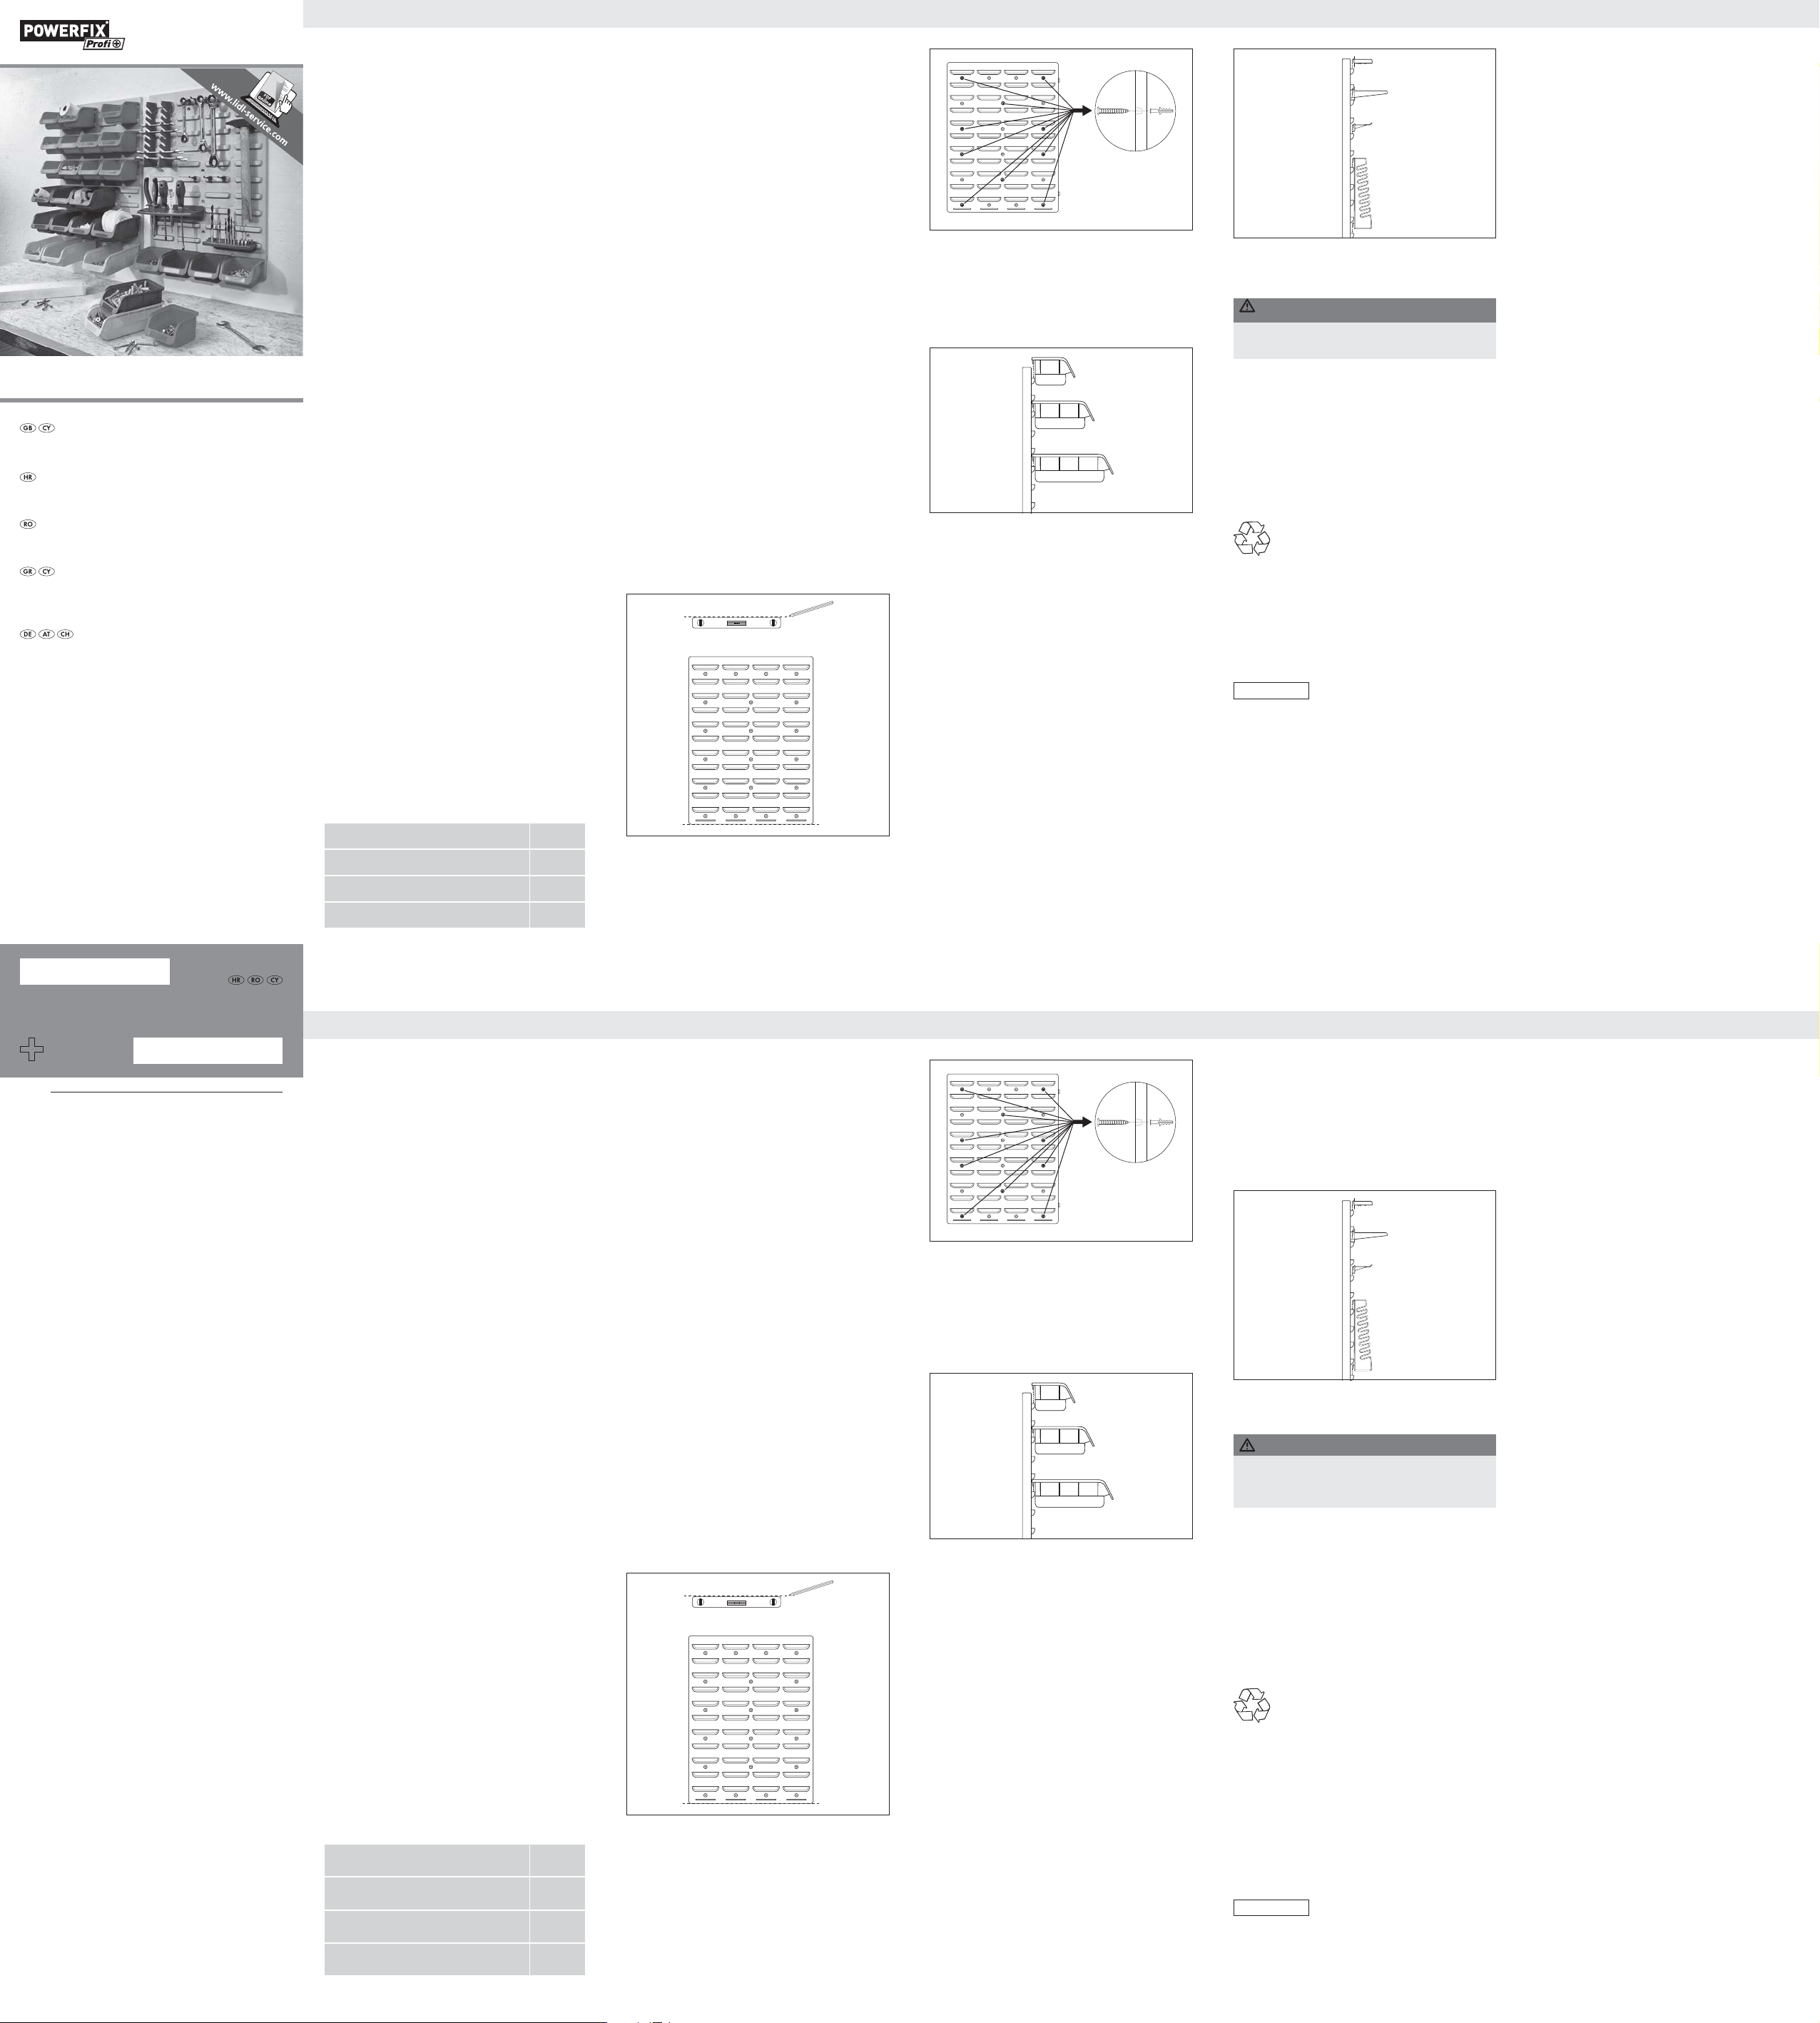
Assembly
Installing the wall panels
▯ Draw a straight line on the wall so as to align the
wall panels with it (see Fig. 1).
▯ Hold the wall panels against the wall and, using
a pointed object, mark the boreholes through the
screw positions.
▯ Drill the holes and insert the supplied plugs into
them.
▯ Screw the wall panels to the wall with at least 10
screws each (see Fig. 2).
Fig. 1
Fig. 2
Mounting the boxes
For one box, you need one free slot in the wall
panels.
▯ Insert the box from above into the open slot such that
both hooks engage in the wall panels (see Fig. 3).
Fig. 3
Securing the hooks
For 10 hooks you need at least two slots. Up to five
hooks can be attached to one slot.
▯ Insert the hook from above into the slot (see Fig. 4).
Securing the drill and bit holder
For the drill and bit holder you need two adjacent slots.
▯ Insert the drill and bit holder from above into the
slots such that both hooks engage in the wall
panel (see Fig. 4).
Securing the tool holder
For the tool holder you need two adjacent slots.
▯ Insert the tool holder from above into the slots
such that both hooks engage in the wall panel
(see Fig. 4).
Securing the ring and open-ended spanner
holder
For the ring and open-ended spanner holder you
need two slots lying adjacent to each other and five
slots one above the other.
▯ Insert the two ring and open-ended spanner hold-
ers from above into the slots such that both hooks
engage in the wall panel (see Fig. 4).
Fig. 4
Cleaning
IMPORTANT
► Do not use abrasive or aggressive cleaning
agents, these could damage the plastic parts.
▯ Clean the wall panels and the boxes with a lightly
moistened cloth. For stubborn soiling use a mild
detergent on the cloth.
Disposal
Dispose of the appliance via a registered waste
disposal firm or at your local community waste
disposal facility. Pay heed to the currently applicable
regulations. In case of doubt, please contact your
waste disposal centre.
Dispose of all packaging materials in an
environmentally friendly manner.
Importer / Service
KOMPERNASS HANDELS GMBH
BURGSTRASSE 21
44867 BOCHUM, GERMANY
Tel.: +49 (0) 2327 3018-0
www.kompernass.com
IAN 273437
IAN 273437
7
A
IAN 273437
■ HR
Uvod
Srdačno čestitamo!
Ident.-No.: POAS2B1-092015-1
Stand der Informationen: 09 / 2015
Vašom kupnjom ste se odlučili za visokovrijedan
Versiunea informaţiilor · Έκδοση των πληροφοριών
proizvod. Prije prvog puštanja u pogon se upoznajte
Last Information Update · Stanje informacija
sa proizvodom. U tu svrhu pažljivo pročitajte slijedeće
upute za rukovanje. Proizvod koristite isključivo na
opisani način i u navedenim područjima primjene.
www.kompernass.com
Ove upute dobro sačuvajte. Svu dokumentaciju u
DEUTSCHLAND / GERMANY
slučaju predaje proizvoda trećim osobama priložite i
44867 BOCHUM
takođe predajte.
BURGSTRASSE 21
KOMPERNASS HANDELS GMBH
Uporaba u skladu sa namjenom
Zidni panel za alat služi isključivo za čuvanje alata
i sitnih dijelova kao što su čavli, tiple, vijci i slični
predmeti, u privatnim domaćinstvima. Panel za
čuvanje nije prikladan za skladištenje zapaljivih,
toksičnih ili agresivnih tekućina. Panel za čuvanje ne
koristite u gospodarske svrhe ili protivno njegovoj
namjeni. Svaki drugi način uporabe i svaka uporaba
koja prelazi navedene okvire smatraju se nenamjenskim i mogu dovesti do nastanka štete. Proizvođač
ne preuzima odgovornost za štete nastale uslijed
nenamjenske uporabe uređaja zbog nepoštivanja
uputa za rukovanje, nestručno izvedenih popravaka,
nedopuštenih preinaka ili korištenja nedopuštenih
zamjenskih dijelova.
Sigurnosne upute
Za sigurno rukovanje proizvodom poštujte slijedeće
sigurnosne napomene:
■ Obratite pažnju na to, da prilikom bušenja ne oštetite
električne vodove ili druge instalacije, kao na primjer
vodovodne cijevi u zidu. Ako oštetite električne
vodove, može doći do opasnosti po život!
■ Oštećeni dijelovi mogu imati oštre ivice. Postoji
opasnost od ozljeđivanja! Razbijene ili oštećene
dijelove neizostavno zamijenite.
■ Zidne panele i kutije ne izložite prevelikom optere-
ćenju (vidi poglavlje „Tehnički podaci“). To može
dovesti do nepopravljivih oštećenja. Priložene tiple
su prikladne samo za pričvršćavanje na betonski
ili kameni zid. Molimo obavezno prije montaže
prekontrolirajte Vaš zid i ustanovite, da li je prikladan za držanje tipli. U protivnom tiple ne mogu
držati i zidni panel će pasti. U slučaju dvojbe
zatražite mišljenje stručnjaka.
Tehnički podaci
Maksimalno dopušteno opterećenje
zidnih panela
Maksimalno dopušteno opterećenje
malih kutija
Maksimalno dopušteno opterećenje
srednjih kutija
Maksimalno dopušteno opterećenje
velikih kutija
- 1 - - 2 - - 3 - - 4 -
Obim isporuke
Prije uporabe provjerite cjelovitost obima isporuke i
provjerite, da li postoje eventualna vidljiva oštećenja.
U slučaju nepotpune isporuke ili oštećenja zbog
neispravnog pakiranja ili transportne štete obratite se
servisu za kupce (vidi poglavlje „Uvoznik/Servis“).
▯ 2 x zidni panel (42 x 59 cm)
▯ 14 x mala kutija (crvena) (11,5 x 10 x 7,3 cm)
▯ 2 x mala kutija (plava) (11,5 x 10 x 7,3 cm)
▯ 8 x srednja kutija (plava) (16,5 x 10 x 7,3 cm)
▯ 4 x velika kutija (žuta) (21,5 x 10 x 7,3 cm)
▯ 10 x kuke (5 cm)
▯ 1 x držač za svrdla i umetke (16,5 x 5 cm)
▯ 1 x držač alata (21 x 9,5 cm)
▯ 1 x držač viličastih i prstenastih ključeva
(21,8 x 6,8 cm)
▯ 40 x vijci M5x30
▯ 40 x tiple S6
▯ Ove upute za uporabu
Montaža
Slika 2
Montaža kutija
Za jednu kutiju treba Vam jedna slobodna konzolica
na zidnom panelu.
▯ Umetnite kutiju sa gornje strane u slobodnu kon-
zolicu, tako da obje kuke zahvataju zidne panele
(vidi sliku 3).
Učvršćavanje držača prstenastih i
viličastih ključeva
Za držač prstenastih i viličastih ključeva potrebna su
Vam dvije susjedne konzolice i pet slobodnih konzolica jedna iznad druge.
▯ Dva držača prstenastih i viličastih ključeva sa gor-
nje strane umetnite u konzolice, tako da obje kuke
zahvaćaju u zidne panele (vidi sliku 4).
Slika 4
Čišćenje
Montaža zidnih panela
PAŽNJA
► Ne koristite ribaća niti agresivna sredstva za
čišćenje, jer takva sredstva mogu oštetiti
plastične dijelove.
▯ Čistite zidne panele i kutije sa blago navlaženom
krpom. U slučaju tvrdokornih onečišćenja na krpu
dodajte blago sredstvo za pranje suđa.
Zbrinjavanje
Zidni panel za čuvanje zbrinite preko autoriziranog
poduzeća za zbrinjavanje otpada ili preko Vaše
komunalne ustanove za zbrinjavanje. Obratite pažnju
na aktualno važeće propise. U slučaju dvojbe se
povežite sa Vašom mjesnom ustanovom za zbrinjavanje otpada.
Sve materijale ambalaže zbrinite na način
neškodljiv za okoliš.
Uvoznik
Lidl Hrvatska d.o.o. k.d.,
p.p. 61
10020 Novi Zagreb
Proizvođač/ Servis:
KOMPERNASS HANDELS GMBH
BURGSTRASSE 21 · 44867 BOCHUM · GERMANY
Tel.: +49 (0) 2327 3018-0
www.kompernass.com
IAN 273437
32 kg
1 kg
1,5 kg
2 kg
▯ Nacrtajte ravnu crtu na zidu, koja će služiti kao
orijentir za zidne panele (vidi sliku 1).
▯ Označite otvore tako, što ćete zidni panel držati
uz zid i pomoću šiljatog predmeta markirati pozici-
je kroz otvore za zavrtanje.
▯ Izbušite otvore i koristite priložene tiple.
▯ Zidne panele sa najmanje po 10 vijaka pričvrstite
na zidu (vidi sliku 2).
Slika 1
Slika 3
Učvršćavanje kuka
Za 10 kuka potrebna su vam najmanje dvije slobodne konzolice. Na jednoj slobodnoj konzolici možete
pričvrstiti do 5 kuka.
▯ Postavite kuku sa gornje strane na slobodnu kon-
zolicu (vidi sliku 4).
Pričvršćavanje držača za svrdla i
umetke
Za držač svrdala i umetaka potrebne su Vam dvije
susjedne konzolice.
▯ Držač za svrdla i umetke postavite sa gornje
strane na konzolice, tako da obje kuke zahvaćaju
u zidne panele (vidi sliku 4).
Učvršćavanje držača alata
Za držač alata potrebna su Vam dvije susjedne
konzolice.
▯ Držač alata postavite sa gornje strane u konzoli-
cu, tako da obje kuke zahvaćaju u zidne panele
(vidi sliku 4).
- 5 - - 6 - - 7 - - 8 -

■ GR/CY ■ RO
Introducere
Felicitări!
Prin această achiziţie v-aţi decis pentru un produs de
calitate excepţională. Înainte de punerea în funcţiune
a produsului, familiarizaţi-vă cu acesta. În acest scop
citiţi cu atenţie instrucţiunile de utilizare de mai jos.
Utilizaţi acest produs numai în modul descris şi doar
pentru domeniile de utilizare specificate. Păstraţi bine
aceste instrucţiuni. Dacă înmânaţi produsul altor persoane, predaţi, de asemenea, şi documentele aferente.
Utilizarea conform destinaţiei
Setul de depozitare este destinat în exclusivitate pentru
păstrarea sculelor şi a componentelor mici precum
cuie, dibluri, şuruburi etc. în locuinţele private. Setul de
depozitare nu poate fi utilizat în scopul păstrării substanţelor inflamabile, toxice sau agresive. Nu utilizaţi
setul în sectorul industrial şi nu îi schimbaţi destinţia de
utilizare. Orice altă formă de utilizare este considerată
neconformă cu destinaţia şi poate provoca defecţiuni.
Producătorul nu este responsabil pentru pagubele
rezultate în urma nerespectării informaţiilor din acest
manual, a utilizării neconforme, a reparaţiilor necorespunzătoare, a modificărilor efectuate fără autorizare
sau a utilizării de piese de schimb nepermise.
Indicaţii de siguranţă
Pentru utilizarea în siguranţă a produsului, respectaţi
următoarele indicaţii de siguranţă:
■ Asiguraţi-vă că în timpul executării găurilor în perete
nu deterioraţi cablurile electrice sau alte instalaţii,
ca de ex. ţevi de apă. În cazul perforării conductelor electrice există pericol de moarte!
■ Componentele deteriorate pot prezenta muchii
ascuţite. Pericol de rănire! Înlocuiţi imediat componentele rupte sau deteriorate.
■ Nu încărcaţi excesiv de mult panourile şi cutiile
(a se vedea capitolul „Date tehnice”). Acest lucru
ar putea provoca daune iremediabile.
■ Diblurile livrate pot fi utilizate numai pentru fixare
într-un perete de beton sau de piatră. Înainte de
montare, verificaţi neapărat dacă zidăria prezintă
caracteristicile necesare pentru utilizarea diblurilor.
În caz contrar diblurile nu se vor prinde în zidărie,
iar panourile vor cădea. Dacă nu sunteţi siguri,
consultaţi un specialist.
Date tehnice
Sarcina maximă per panou 32 kg
Sarcina maximă per cutie mică 1 kg
Sarcina maximă per cutie medie 1,5 kg
Sarcina maximă per cutie mare 2 kg
Furnitura
Înainte de utilizare, verificaţi dacă furnitura este completă
şi dacă prezintă deteriorări. În cazul în care constataţi
că furnitura este incompletă sau că prezintă deteriorări
din cauza ambalajului inadecvat sau a transportului
adresaţi-vă biroului de service (a se vedea capitolul
„Importator/service”).
▯ 2 panouri de perete (42 x 59 cm)
▯ 14 cutii mici (roşii) (11,5 x 10 x 7,3 cm)
▯ 2 cutii mici (albastre) (11,5 x 10 x 7,3 cm)
▯ 8 cutii medii (albastre) (16,5 x 10 x 7,3 cm)
▯ 4 cutii mari (galbene) (21,5 x 10 x 7,3 cm)
▯ 10 cârlige (5 cm)
▯ 1 burghiu şi mandrină (16,5 x 5 cm)
▯ 1 suport de unelte (21 x 9,5 cm)
▯ 1 suport pentru chei tubulare şi chei fixe (21,8 x 6,8 cm)
▯ 40 de şuruburi M5 x 30
▯ 40 de dibluri S6
▯ Instrucţiuni de utilizare
Montarea
Montarea panourilor de perete
▯ Trasaţi o linie dreaptă pe perete pentru a alinia
panourile cu ajutorul acestora (a se vedea fig. 1).
▯ Marcaţi locurile pentru găuri tinând panoul pe
perete şi marcaţi poziţia cu un obiect ascuţit prin
găurile şuruburilor.
▯ Practicaţi găurile şi utilizaţi apoi diblurile livrate.
▯ Înşurubaţi în perete panoul cu cel puţin 10 şu-
ruburi (a se vedea fig. 2).
Fig. 1
Fig. 2
Montajul cutiilor
Pentru o cutie aveţi nevoie de un loc liber pe panoul
de perete.
▯ Introduceţi cutia pe sus în locul liber astfel încât
ambele cârlige să se prindă în panou
(a se vedea fig. 3).
Fig. 3
Fixarea cârligelor
Pentru 10 cârlige aveţi nevoie de cel puţin două locuri
de fixare. În fiecare loc pot fi fixate până la 5 cârlige.
▯ Introduceţi cârligele pe sus în locul de fixare (a se
vedea fig. 4).
Fixarea burghiului şi a mandrinei
Pentru burghiu şi mandrină sunt necesare două locuri
de fixare alăturate.
▯ Introduceţi burghiul şi mandrina pe sus în locurile
de fixare astfel încât ambele cârlige să se prindă
în panoul de perete (a se vedea fig. 4).
Fixarea suportului de unelte
Pentru suportul de unelte sunt necesare două locuri
de fixare alăturate.
▯ Introduceţi suportul de unelte pe sus în locurile de
fixare astfel încât ambele cârlige să se prindă în
panoul de perete (a se vedea fig. 4).
Fixarea suportului pentru chei tubulare
şi chei fixe
Pentru suportul de chei tubulare şi fixe sunt necesare
două locuri de fixare alăturate şi cinci locuri suprapuse.
▯ Introduceţi cele două suporturi pentru chei tubu-
lare şi chei fixe pe sus în locurile de fixare astfel
încât ambele cârlige să se prindă în panoul de
perete (a se vedea fig. 4).
Fig. 4
Curăţarea
ATENŢIE
► A nu se utiliza substanţe de curăţare abrazive
sau agresive întrucât acestea pot deteriora
componentele de plastic.
▯ Curăţaţi panoul de perete şi cutiile cu un material
puţin umezit. În cazul depunerilor persistente
de murdărie adăugaţi puţin detergent uşor pe
material.
Eliminarea aparatelor uzate
Eliminaţi setul de depozitare prin intermediul unei
firmei specializate şi autorizate sau prin intermediul
serviciului local de eliminare a deşeurilor. Respectaţi
reglementările actuale în vigoare. Dacă aveţi nelămuriri, contactaţi serviciul dumneavoastră local de
eliminare a deşeurilor.
Eliminaţi toate materialele de ambalare
într-un mod ecologic.
Importator / Service
KOMPERNASS HANDELS GMBH
BURGSTRASSE 21
44867 BOCHUM, GERMANY
Tel.: +49 (0) 2327 3018-0
www.kompernass.com
IAN 273437
Eισαγωγή
Συγχαρητήρια!
Με την αγορά σας, αποφασίσατε για την απόκτηση
ενός προϊόντος υψηλής ποιότητας. Πριν από την πρώτη θέση σε λειτουργία, εξοικειωθείτε με το προϊόν. Για
αυτό διαβάστε προσεκτικά τις ακόλουθες οδηγίες χρήσεως. Χρησιμοποιείτε το προϊόν μόνο όπως περιγράφεται και για τα αναφερόμενα πεδία χρήσης. Φυλάξτε
αυτές τις οδηγίες καλά. Παραδίδετε όλα τα έγγραφα σε
περίπτωση παράδοσης του προϊόντος σε τρίτους.
Χρήση σύμφωνη με τους κανονισμούς
Το σετ φύλαξης προορίζεται αποκλειστικά για την αποθήκευση εργαλείων και μικρών εξαρτημάτων όπως καρφιά, πείροι , βίδες ή παρόμοια, στο ιδιωτικό νοικοκυριό.
Το σετ φύλαξης δεν προβλέπεται για την αποθήκευση
εύφλεκτων, τοξικών ή επιθετικών υγρών. Μη χρησιμοποιείτε το σετ φύλαξης σε επαγγελματικούς τομείς και για
διαφορετικούς από τους προβλεπόμενους σκοπούς.
Μια άλλη ή διαφορετική χρήση ισχύει ως μη σύμφωνη
με τους κανονισμούς και μπορεί να οδηγήσει σε ζημιές.
Ο κατασκευαστής δεν αναλαμβάνει καμία ευθύνη για
βλάβες από μη τήρηση των οδηγιών, από μη σύμφωνη
με τους κανονισμούς χρήση, από εσφαλμένες επισκευές, από μη εγκεκριμένες διεξαχθείσες τροποποιήσεις ή
χρήση με επιτρεπόμενων εξαρτημάτων.
Υποδείξεις ασφαλείας
Για μια ασφαλή μεταχείριση του προϊόντος προσέξτε
τις ακόλουθες υποδείξεις ασφαλείας:
■ Προσέξτε ότι κατά τη διάτρηση δεν θα προκα-
λέσετε ζημιά σε αγωγούς ηλεκτρικού ή σε άλλες
εγκαταστάσεις όπως π.χ. σε σωλήνες νερού στον
τοίχο. Κατά τη διάτρηση αγωγών ηλεκτρικού
υπάρχει κίνδυνος θανάτου!
■ Τα φθαρμένα τμήματα μπορεί να περιέχουν αιχμηρές
ακμές. Υπάρχει κίνδυνος τραυματισμού! Αντικαθιστάτε τα σπασμένα ή φθαρμένα τμήματα αμέσως.
■ Μην υπερφορτώνετε τα πάνελ τοίχου και τα κουτιά
(δείτε το Κεφάλαιο „Τεχνικές πληροφορίες“). Αυτό
μπορεί να οδηγήσει σε ανεπανόρθωτες ζημιές.
■ Οι απεσταλμένοι πείροι ενδείκνυνται μόνο για
τη στερέωση σε τοίχο από σκυρόδεμα ή πέτρα.
Παρακαλούμε ελέγχετε απαραίτητα πριν από τη
συναρμολόγηση τον τοίχο για την καταλληλότητα
του ως προς τους πείρους. Αλλιώς οι πείροι δεν
πρόκειται να μείνουν στη θέση τους και τα πάνελ
τοίχου θα πέσουν. Σε περίπτωση αμφιβολίας
συμβουλευτείτε έναν ειδικό.
Τεχνικές πληροφορίες
Μέγιστο φορτίο ανά πάνελ τοίχου 32 κιλά
Μέγιστο φορτίο μικρού κουτιού 1 κιλό
Μέγιστο φορτίο μεσαίου κουτιού 1,5 κιλό
Σύνολο αποστολής
Ελέγξτε πριν από τη θέση σε λειτουργία το σύνολο
αποστολής για την πληρότητα και για ενδεχόμενα
ορατές ζημιές. Σε μια ελλιπή αποστολή ή σε φθορές
από ελλιπή συσκευασία ή από τη μεταφορά απευθυνθείτε στο τμήμα του σέρβις (δείτε το Κεφάλαιο
„Εισαγωγέας/Σέρβις“).
▯ 2 x Πάνελ τοίχου (42 x 59 εκ.)
▯ 14 x Μικρά κουτιά (κόκκινο) (11,5 x 10 x 7,3 εκ.)
▯ 2 x Μικρά κουτιά (μπλε) (11,5 x 10 x 7,3 εκ.)
▯ 8 x Μεσαία κουτιά (μπλε) (16,5 x 10 x 7,3 εκ.)
▯ 4 x Μεγάλα κουτιά (κίτρινα) (21,5 x 10 x 7,3 εκ.)
▯ 10 x Άγκιστρα (5 εκ.)
▯ 1 x Συγκράτηση τρυπανιού και εξαρτημάτων
(16,5 x 5 εκ.)
▯ 1 x Συγκράτηση εργαλείων (21 x 9,5 εκ.)
▯ 1 x Συγκράτηση κλειστών και ανοιχτών κλειδιών
(21,8 x 6,8 εκ.)
▯ 40 x Βίδες M5 x 30
▯ 40 x Πείροι S6
▯ Αυτές οι οδηγίες χρήσεως
Μοντάρισμα
Μοντάρισμα των πάνελ τοίχου
▯ Σχεδιάστε μια ίσια γραμμή στον τοίχο, ώστε να ευ-
θυγραμμίσετε εκεί τα πάνελ τοίχου (δείτε την Εικ. 1).
▯ Σημειώστε τις οπές διάτρησης κρατώντας το πάνελ
τοίχου στον τοίχο και σημαδεύοντας τις θέσεις με
ένα αιχμηρό αντικείμενο μέσα από τις οπές βιδών.
▯ Κάντε τις οπές και χρησιμοποιήστε τους απεσταλ-
μένους πείρους.
▯ Βιδώστε στον τοίχο τα πάνελ τοίχου, έκαστο του-
λάχιστο με 10 βίδες (δείτε την Εικ. 2).
Εικ. 1
- 9 - - 10 - - 11 - - 12 - - 13 - - 14 -
Εικ. 2
Μοντάρισμα των κουτιών
Για ένα κουτί χρειάζεστε μια ελεύθερη υποδοχή στα
πάνελ τοίχου.
▯ Εισάγετε το κουτί από επάνω στην ελεύθερη υπο-
δοχή έτσι ώστε και τα δύο άγκιστρα να πιάνουν
στα πάνελ τοίχου (δείτε την Εικ. 3).
Εικ. 3
Στερέωση των άγκιστρων
Για 10 άγκιστρα χρειάζεστε τουλάχιστο δύο υποδοχές.
Μπορούν να στερεωθούν έως και 5 άγκιστρα σε μια
υποδοχή.
▯ Εισάγετε τα άγκιστρα από επάνω στην υποδοχή
(δείτε την Εικ. 4).
Στερέωση της συγκράτησης τρυπανιού
και εξαρτημάτων
Για τη συγκράτηση τρυπανιού και εξαρτημάτων χρειάζεστε
δύο υποδοχές, οι οποίες θα είναι δίπλα - δίπλα.
▯ Εισάγετε τη συγκράτηση τρυπανιού και εξαρτημάτων
από επάνω στις υποδοχές έτσι ώστε και τα δύο άγκιστρα να πιάνουν στα πάνελ τοίχου (δείτε την Εικ. 4).
Στερέωση της συγκράτησης εργαλείων
Για τη συγκράτηση εργαλείων χρειάζεστε δύο υποδοχές, οι οποίες θα είναι δίπλα - δίπλα.
▯ Εισάγετε τη συγκράτηση εργαλείων από επάνω
στις υποδοχές έτσι ώστε και τα δύο άγκιστρα να
πιάνουν στα πάνελ τοίχου (δείτε την Εικ. 4).
Στερέωση της συγκράτησης ανοιχτών
και κλειστών κλειδιών
Για τη συγκράτηση ανοιχτών και κλειστών κλειδιών
χρειάζεστε δύο υποδοχές η μια δίπλα στην άλλη και
πέντε υποδοχές η μια επάνω στην άλλη.
▯ Εισάγετε τη συγκράτηση ανοιχτών και κλειστών
κλειδιών από επάνω στις υποδοχές έτσι ώστε και
τα δύο άγκιστρα να πιάνουν στα πάνελ τοίχου
(δείτε την Εικ.4).
Εικ. 4
Καθαρισμός
ΠΡΟΣΟΧΗ
►
Μη χρησιμοποιείτε τριβικά ή επιθετικά
καθαριστικά μέσα, διότι αυτά μπορεί να
προκαλέσουν ζημιά στα πλαστικά τμήματα.
▯ Καθαρίζετε τα πάνελ τοίχου και τα κουτιά με ένα
ελαφρώς νωπό πανί. Σε πιο σκληρές βρομιές
βάλτε στο πανί λίγο ήπιο απορρυπαντικό.
Απόρριψη
Απορρίπτετε το σετ φύλαξης μέσω μιας εγκεκριμένης επιχείρησης απόρριψης ή μέσω της κοινοτικής
επιχείρησης απόρριψης. Να τηρείτε τους ισχύοντες
κανονισμούς. Επικοινωνήστε σε περίπτωση αμφιβολιών με την επιχείρηση απόρριψης.
Απομακρύνετε όλα τα υλικά συσκευασιών
φιλικά προς το περιβάλλον.
Εισαγωγέας / Σέρβις
KOMPERNASS HANDELS GMBH
BURGSTRASSE 21
44867 BOCHUM, GERMANY
Tel.: +49 (0) 2327 3018-0
www.kompernass.com
IAN 273437
■ DE / AT / CH
Einführung
Herzlichen Glückwunsch!
Mit Ihrem Kauf haben Sie sich für ein hochwertiges
Produkt entschieden. Machen Sie sich vor der ersten
Inbetriebnahme mit dem Produkt vertraut. Lesen Sie
hierzu aufmerksam die nachfolgende Bedienungsanleitung. Benutzen Sie das Produkt nur wie beschrieben
und für die angegebenen Einsatzbereiche. Bewahren Sie
diese Anleitung gut auf. Händigen Sie alle Unterlagen
bei Weitergabe des Produkts an Dritte ebenfalls mit aus.
Bestimmungsgemäße Verwendung
Das Aufbewahrungs-Set dient ausschließlich zur Lagerung von Werkzeugen und Kleinteilen, wie Nägel,
Dübel, Schrauben oder ähnlichem, im privaten Haushalt.
Das Aufbewahrungs-Set ist nicht zur Lagerung von
entzündlichen, toxischen oder aggressiven Flüssigkeiten
vorgesehen. Verwenden Sie das Aufbewahrungs-Set
nicht im gewerblichen Bereich und nicht zweckentfremdet. Eine andere oder darüber hinausgehende
Benutzung gilt als nicht bestimmungsgemäß und kann
zu Beschädigungen führen. Der Hersteller übernimmt
keine Haftung für Schäden aufgrund von Nichtbeachtung der Anleitung, nicht bestimmungsgemäßer Verwendung, unsachgemäßen Reparaturen, unerlaubt
vorgenommener Veränderungen oder Verwendung
nicht zugelassener Ersatzteile.
Sicherheitshinweise
Beachten Sie für einen sicheren Umgang mit dem
Produkt die folgenden Sicherheitshinweise:
■ Achten Sie darauf, dass Sie beim Bohren keine
elektrische Leitungen oder andere Installationen,
wie z.B. Wasserrohre, in der Wand beschädigen.
Beim Anbohren elektrischer Leitungen besteht
Lebensgefahr!
■ Beschädigte Teile können scharfe Kanten haben.
Es besteht Verletzungsgefahr! Ersetzen Sie zerbrochene oder beschädigte Teile sofort.
■ Belasten Sie die Wandpaneele und die Boxen
nicht zu stark (siehe Kapitel „Technische Daten“).
Dies kann zu irreparablen Schäden führen.
■ Die mitgelieferten Dübel sind nur für die Befestigung
in einer Beton- oder Steinwand geeignet. Bitte prüfen Sie unbedingt vor der Montage Ihr Mauerwerk
auf Eignung für die Dübel. Ansonsten halten die
Dübel nicht und die Wandpaneele fällt herunter.
Ziehen Sie im Zweifelsfall einen Fachmann hinzu.
Technische Daten
Maximale Belastbarkeit je Wandpaneel 32 kg
Maximale Belastbarkeit Box klein 1 kg
Maximale Belastbarkeit Box mittel 1,5 kg
Maximale Belastbarkeit Box groß 2 kg
Lieferumfang
Überprüfen Sie vor Inbetriebnahme den Lieferumfang
auf Vollständigkeit und evtl. sichtbare Beschädigungen.
Bei einer unvollständigen Lieferung oder Schäden
infolge mangelhafter Verpackung oder durch Transport wenden Sie sich an den Service (siehe Kapitel
„Importeur/Service“).
▯ 2 x Wandpaneele (42 x 59 cm)
▯ 14 x Box klein (rot) (11,5 x 10 x 7,3 cm)
▯ 2 x Box klein (blau) (11,5 x 10 x 7,3 cm)
▯ 8 x Box mittel (blau) (16,5 x 10 x 7,3 cm)
▯ 4 x Box groß (gelb) (21,5 x 10 x 7,3 cm)
▯ 10 x Haken (5 cm)
▯ 1 x Bohrer- und Bithalter (16,5 x 5 cm)
▯ 1 x Werkzeughalter (21 x 9,5 cm)
▯ 1 x Ring- und Maulschlüsselhalter (21,8 x 6,8 cm)
▯ 40 x Schrauben M5 x 30
▯ 40 x Dübel S6
▯ Diese Bedienungsanleitung
Montage
Montage der Wandpaneele
▯ Zeichnen Sie eine gerade Linie an die Wand, um die
Wandpaneele daran auszurichten (siehe Abb. 1).
▯ Markieren Sie die Bohrlöcher, indem Sie das
Wandpaneel an die Wand halten und mit einem
spitzen Gegenstand durch die Schraublöcher die
Positionen markieren.
▯ Bohren Sie die Löcher und verwenden Sie die
mitgelieferten Dübel.
▯ Schrauben Sie die Wandpaneele mit mindestens
je 10 Schrauben an die Wand (siehe Abb. 2).
Μέγιστο φορτίο μεγάλου κουτιού 2 κιλά
Abb. 2
Montage der Boxen
Für eine Box benötigen Sie einen freien Steckplatz an
der Wandpaneele.
▯ Stecken Sie die Box so von oben in den freien
Steckplatz, dass beide Haken in die Wandpaneele
greifen (siehe Abb. 3).
Abb. 3
Befestigung der Haken
Für 10 Haken benötigen Sie mindestens zwei Steckplätze. Es können bis zu 5 Haken an einem Steckplatz
befestigt werden.
▯ Stecken Sie die Haken von oben in den Steckplatz
(siehe Abb. 4).
Befestigung des Bohrer- und Bithalters
Für den Bohrer- und Bithalter benötigen Sie zwei
nebeneinander liegende Steckplätze.
▯ Stecken Sie den Bohrer- und Bithalter so von oben
in die Steckplätze, dass beide Haken in die Wandpaneele greifen (siehe Abb. 4).
Befestigung des Werkzeughalters
Für den Werkzeughalter benötigen Sie zwei nebeneinander liegende Steckplätze.
▯ Stecken Sie den Werkzeughalter so von oben
in die Steckplätze, dass beide Haken in die Wandpaneele greifen (siehe Abb. 4).
Befestigung des Ring- und Maulschlüsselhalters
Für den Ring- und Maulschlüsselhalter benötigen Sie
zwei nebeneinander liegende und fünf übereinander
liegende Steckplätze.
▯ Stecken Sie die beiden Ring- und Maulschlüssel-
halter so von oben in die Steckplätze, dass beide
Haken in die Wandpaneele greifen (siehe Abb. 4).
Abb. 4
Reinigen
ACHTUNG
► Verwenden Sie keine Scheuer- oder aggressive
Reinigungsmittel, diese können die Kunststoffteile
beschädigen.
▯ Reinigen Sie die Wandpaneele und die Boxen mit
einem leicht angefeuchteten Tuch. Bei hartnäckigen Verschmutzungen geben Sie ein mildes
Spülmittel auf das Tuch.
Entsorgen
Entsorgen Sie das Aufbewahrungs-Set über einen
zugelassenen Entsorgungsbetrieb oder über Ihre
kommunale Entsorgungseinrichtung. Beachten Sie
die aktuell geltenden Vorschriften. Setzen Sie sich
im Zweifelsfall mit Ihrer Entsorgungseinrichtung in
Verbindung.
Führen Sie alle Verpackungsmaterialien einer
umweltgerechten Entsorgung zu.
Importeur/Service
KOMPERNASS HANDELS GMBH
BURGSTRASSE 21
44867 BOCHUM
GERMANY
Tel.: +49 (0) 2327 3018-0
www.kompernass.com
IAN 273437
Abb. 1
- 15 - - 16 - - 17 - - 18 - - 19 - - 20 -
 Loading...