


STEREO CD CASSETTE DECK RECEIVER
AMPLI-TUNER/LECTEUR CD/ DOUBLE PLATINE A CASSETTE
XR-A780 XR-A3800 XR-A380
SPEAKER SYSTEM
ENCEINTES ACOUSTIQUES
S-A780VLR
S-A3800
S-A380
Operating Instructions
Mode d'emploi
WARNING: TO PREVENT FIRE OR SHOCK HAZARD, DO NOT EXPOSE THIS APPLIANCE TO RAIN OR MOISTURE.
ATTENTION: AFIN DE PREVENIR TOUS RISQUES
DE CHOC ELECTRIQUE OU DE DEBUT D’ENCENDIE, NE PAS EXPOSER CET APPAREIL A L’HUMIDITE OU A LA PLUIE.
IMPORTANT
CAUTION
The lightning flash with arrowhead symbol, within an equilateral triangle, is intended to alert the user to the presence of uninsulated "dangerous voltage" within the product's enclosure that may be of sufficient magnitude to constitute a risk of electric shock to persons.
RISK OF ELECTRIC SHOCK
DO NOT OPEN
CAUTION:
TO PREVENT THE RISK OF ELECTRIC SHOCK, DO NOT REMOVE COVER (OR BACK). NO USERSERVICEABLE PARTS INSIDE. REFER SERVICING TO QUALIFIED SERVICE PERSONNEL.
The exclamation point within an equilateral triangle is intended to alert the user to the presence of important operating and maintenance (servicing) instructions in the literature accompanying the appliance.
[FOR U.S. MODEL] CAUTION
•Use of controls or adjustments or performance of procedures other than those specified herein may result in hazardous radiation exposure.
•The use of optical instruments with this product will increase eye hazard.
Information to User
Alteration or modifications carried out without appropriate authorization may invalidate the user’s right to operate the equipment.
Note: This equipment has been tested and found to comply with the limits for a Class B digital device, pursuant to Part 15 of the FCC Rules. These limits are designed to provide reasonable protection against harmful interference in a residential installation. This equipment generates, uses, and can radiate radio frequency energy and, if not installed and used in accordance with the instructions, may cause harmful interference to radio communications. However, there is no guarantee that interference will not occur in a particular installation. If this equipment does cause harmful interference to radio or television reception, which can be determined by turning the equipment off and on, the user is encouraged to try to correct the interference by one or more of the following measures:
–Reorient or relocate the receiving antenna.
–Increase the separation between the equipment and receiver.
–Connect the equipment into an outlet on a circuit different from that to which the receiver is connected.
–Consult the dealer or an experienced radio/TV technician for help.
[For Canadian model]
This Class B digital apparatus complies with Canadian ICES-003.
IMPORTANT NOTICE
[For U.S. model]
The serial number for this equipment is located on the rear panel. Please write this serial number on your enclosed warranty card and keep it in a secure area. This is for your security.
[For Canadian model]
CAUTION: TO PREVENT ELECTRIC SHOCK DO NOT USE THIS (POLARIZED) PLUG WITH AN EXTENSION CORD, RECEPTACLE OR OTHER OUTLET UNLESS THE BLADES CAN BE FULLY INSERTED TO PREVENT BLADE EXPOSURE.
THE STANDBY/ON BUTTON IS SECONDARY CONNECTED AND THEREFORE DOES NOT SEPARATE THE UNIT FROM MAINS POWER IN STANDBY POSITION.
[Pour le modèle Canadien]
Cet appareil numérique de la Classe B est conforme à la norme NMB-003 du Canada.
REMARQUE IMPORTANTE
Le numéro de série de cet appareil se trouve sur son panneau arrière. Pour s’y référer en cas de besoin, prière d’inscrire ce numéro sur la carte de garantie inclue et de la conserver dans un endroit sûr.
ATTENTION: POUR PREVENIR LES CHOCS ELECTRIQUES NE PAS UTILISER CETTE FICHE POLARISEE AVEC UN PROLONGATEUR, UNE PRISE DE COURANT OU UNE AUTRE SORTIE DE COURANT, SAUF SI LES LAMES PEUVENT ETRE INSERESS A FOND SANS EN LAISSER AUCUNE PARTIE A DECOUVERT.
LE BOUTON STANDBY/ON EST RACCORDE SECONDAIREMENT ET PAR CONSEQUENT NE SEPARE PAS L’APPAREIL DE L’ALIMENTATION SECTEUR SUR LA POSITION D’ATTENTE.
2
En/Fr
IMPORTANT SAFETY INSTRUCTIONS
READ INSTRUCTIONS — All the safety and operating instructions should be read before the product is operated.
RETAIN INSTRUCTIONS — The safety and operating instructions should be retained for future reference.
HEED WARNINGS — All warnings on the product and in the operating instructions should be adhered to.
FOLLOW INSTRUCTIONS — All operating and use instructions should be followed.
CLEANING — Unplug this product from the wall outlet before cleaning. The product should be cleaned only with a polishing cloth or a soft dry cloth. Never clean with furniture wax, benzine, insecticides or other volatile liquids since they may corrode the cabinet.
ATTACHMENTS — Do not use attachments not recommended by the product manufacturer as they may cause hazards.
WATER AND MOISTURE — Do not use this product near water — for example, near a bathtub, wash bowl, kitchen sink, or laundry tub; in a wet basement; or near a swimming pool; and the like.
ACCESSORIES — Do not place this product on an unstable cart, stand, tripod, bracket, or table. The product may fall, causing serious injury to a child or adult, and serious damage to the product. Use only with a cart, stand, tripod, bracket, or table recommended by the manufacturer, or sold with the product. Any mounting of the product should follow the manufacturer’s instructions, and should use a mounting accessory recommended by the manufacturer.
CART — A product and cart combination should be moved with care. Quick stops, excessive force, and uneven surfaces may cause the product and cart combination to overturn.
VENTILATION — Slots and openings in the cabinet are provided for ventilation and to ensure reliable operation of the product and to protect it from overheating, and these openings must not be blocked or covered. The openings should never be blocked by placing the product on a bed, sofa, rug, or other similar surface. This product should not be placed in a built-in installation such as a bookcase or rack unless proper ventilation is provided or the manufacturer’s instructions have been adhered to.
POWER SOURCES — This product should be operated only from the type of power source indicated on the marking label. If you are not sure of the type of power supply to your home, consult your product dealer or local power company.
LOCATION – The appliance should be installed in a stable location.
NONUSE PERIODS – The power cord of the appliance should be unplugged from the outlet when left unused for a long period of time.
GROUNDING OR POLARIZATION
÷If this product is equipped with a polarized alternating current line plug (a plug having one blade wider than the other), it will fit into the outlet only one way. This is a safety feature. If you are unable to insert the plug fully into the outlet, try reversing the plug. If the plug should still fail to fit, contact your electrician to replace your obsolete outlet. Do not defeat the safety purpose of the polarized plug.
÷If this product is equipped with a three-wire grounding type plug, a plug having a third (grounding) pin, it will only fit into a grounding type power outlet. This is a safety feature. If you are unable to insert the plug into the outlet, contact your electrician to replace your obsolete outlet.
Do not defeat the safety purpose of the grounding type plug.
POWER-CORD PROTECTION — Power-supply cords should be routed so that they are not likely to be walked on or pinched by items placed upon or against them, paying particular attention to cords at plugs, convenience receptacles, and the point where they exit from the product.
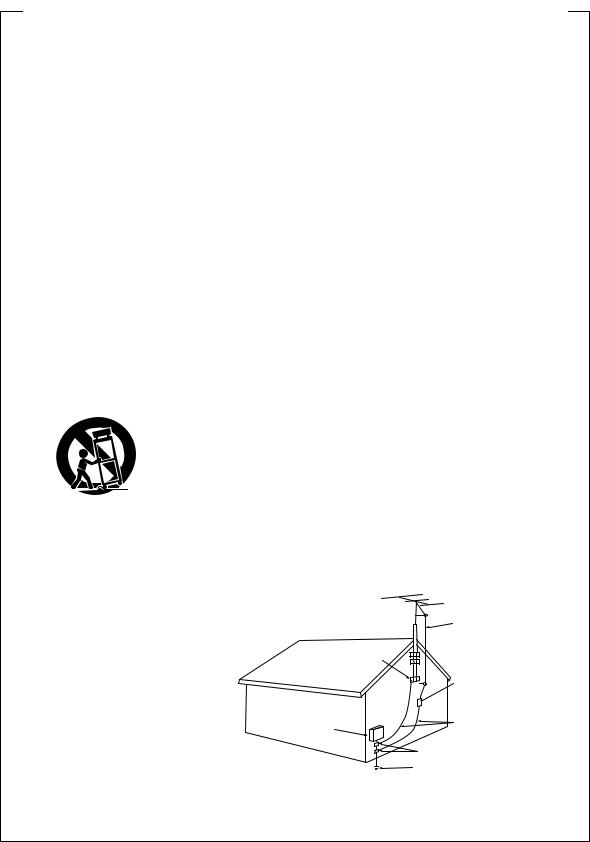
OUTDOOR ANTENNA GROUNDING — If an outside antenna or cable system is connected to the product, be sure the antenna or cable system is grounded so as to provide some protection against voltage surges and built-up static charges. Article 810 of the National Electrical Code, ANSI/NFPA 70, provides information with regard to proper grounding of the mast and supporting structure, grounding of the lead-in wire to an antenna discharge unit, size of grounding conductors, location of antenna-discharge unit, connection to grounding electrodes, and requirements for the grounding electrode. See Figure A.
LIGHTNING — For added protection for this product during a lightning storm, or when it is left unattended and unused for long periods of time, unplug it from the wall outlet and disconnect the antenna or cable system. This will prevent damage to the product due to lightning and power-line surges.
POWER LINES — An outside antenna system should not be located in the vicinity of overhead power lines or other electric light or power circuits, or where it can fall into such power lines or circuits. When installing an outside antenna system, extreme care should be taken to keep from touching such power lines or circuits as contact with them might be fatal.
OVERLOADING — Do not overload wall outlets, extension cords, or integral convenience receptacles as this can result in a risk of fire or electric shock.
OBJECT AND LIQUID ENTRY — Never push objects of any kind into this product through openings as they may touch dangerous voltage points or short-out parts that could result in a fire or electric shock. Never spill liquid of any kind on the product.
SERVICING — Do not attempt to service this product yourself as opening or removing covers may expose you to dangerous voltage or other hazards. Refer all servicing to qualified service personnel.
DAMAGE REQUIRING SERVICE — Unplug this product from the wall outlet and refer servicing to qualified service personnel under the following conditions:
÷When the power-supply cord or plug is damaged.
÷If liquid has been spilled, or objects have fallen into the product.
÷If the product has been exposed to rain or water.
÷If the product does not operate normally by following the operating instructions. Adjust only those controls that are covered by the operating instructions as an improper adjustment of other controls may result in damage and will often require extensive work by a qualified technician to restore the product to its normal operation.
÷If the product has been dropped or damaged in any way.
÷When the product exhibits a distinct change in
performance — this indicates a need for service.
REPLACEMENT PARTS — When replacement parts are required, be sure the service technician has used replacement parts specified by the manufacturer or have the same characteristics as the original part. Unauthorized substitutions may result in fire, electric shock, or other hazards.
SAFETY CHECK — Upon completion of any service or repairs to this product, ask the service technician to perform safety checks to determine that the product is in proper operating condition.
WALL OR CEILING MOUNTING — The product should not be mounted to a wall or ceiling.
HEAT — The product should be situated away from heat sources such as radiators, heat registers, stoves, or other products (including amplifiers) that produce heat.
ANTENNA
LEAD IN
WIRE
GROUND
CLAMP
ANTENNA DISCHARGE UNIT (NEC SECTION 810-20)
ELECTRIC |
GROUNDING CONDUCTORS |
|
SERVICE |
||
(NEC SECTION 810-21) |
||
EQUIPMENT |
||
|
GROUND CLAMPS
Fig. A
POWER SERVICE GROUNDING
ELECTRODE SYSTEM
(NEC ART 250, PART H)
NEC — NATIONAL ELECTRICAL CODE
3
En
[For Australian model]
CAUTION
This product contains a laser diode of higher class than 1. To ensure continued safety, do not remove any covers or attempt to gain access to the inside of the product.
Refer all servicing to qualified personnel.
The following caution label appears on your unit. Location: rear of the unit
CLASS 1
LASER PRODUCT
This product is for general household purposes. Any failure due to use for other than household purposes (such as longterm use for business purposes in a restaurant or use in a car or ship) and which requires repair will be charged for even during the warranty period.
Ce lecteur est un produit grand public destiné à un usage domestique. Si vous l’utilisez à d’autres fins (par exemple, pour la sonorisation d’un restaurant, ou bien dans un véhicule ou un bateau), les réparations éventuelles vous seront facturées, même s’il est encore sous garantie.
|
|
|
|
IC |
IN |
D |
|
|
|
|
|
|
|
|
|
|
N |
|
|
|
|
|
|
|
|
||
|
|
|
O |
|
|
S |
|
|
|
|
|
|
|
|
T |
R |
|
|
|
U |
|
|
|
|
|
|
|
|
|
|
|
|
|
|
|
|
|
|
|
||
C |
|
|
|
|
|
|
R |
|
|
|
|
|
|
|
|
|
|
|
|
|
I |
|
|
|
|
||
E |
|
|
|
|
|
|
|
E |
|
|
|
|
|
L |
|
|
|
|
|
|
|
|
|
|
|||
E |
|
|
|
|
|
|
S |
|
|
|
|
||
A |
EST |
1924 |
N |
• |
|
|
|
|
|||||
|
|
S |
|
|
|
|
|
|
|
|
|
||
• |
|
|
|
|
|
|
|
|
|
|
|
||
|
|
|
S |
|
|
IO |
|
|
|
We |
|
|
|
|
|
|
|
O CIAT |
|
|
|
Want You |
|
||||
LISTENING
For A Lifetime
Selecting fine audio equipment such as the unit you’ve just purchased is only the start of your musical enjoyment. Now it’s time to consider how you can maximize the fun and excitement your equipment offers. This manufacturer and the Electronic Industries Association’s Consumer Electronics Group want you to get the most out of your equipment by playing it at a safe level. One that lets the sound come through loud and clear without annoying blaring or distortion-and, most importantly, without affecting your sensitive hearing.
Sound can be deceiving. Over time your hearing “comfort level” adapts to higher volumes of sound. So what sounds “normal” can actually be loud and harmful to your hearing.
Guard against this by setting your equipment at a safe level BEFORE your hearing adapts.
To establish a safe level:
÷Start your volume control at a low setting.
÷Slowly increase the sound until you can hear it comfortably and clearly, and without distortion.
Once you have established a comfortable sound level:
÷ Set the dial and leave it there.
Taking a minute to do this now will help to prevent hearing damage or loss in the future. After all, we want you listening for a lifetime.
We Want You Listening ForALifetime
Used wisely, your new sound equipment will provide a lifetime of fun and enjoyment. Since hearing damage from loud noise is often undetectable until it is too late, this manufacturer and the Electronic Industries Association’s Consumer Electronics Group recommend you avoid prolonged exposure to excessive noise. This list of sound levels is included for your protection.
Decibel
Level Example
30 Quiet library, soft whispers
40 Living room, refrigerator, bedroom away from traffic
50 Light traffic, normal conversation, quiet office
60 Air conditioner at 20 feet, sewing machine
70 Vacuum cleaner, hair dryer, noisy restaurant
80 Average city traffic, garbage disposals, alarm clock at two feet.
THE FOLLOWING NOISES CAN BE DANGEROUS UNDER CONSTANT EXPOSURE
90 Subway, motorcycle, truck traffic, lawn mower
100 Garbage truck, chain saw, pneumatic drill
120 Rock band concert in front of speakers, thunderclap
140 Gunshot blast, jet plane
180 Rocket launching pad
Information courtesy of the Deafness Research Foundation.
|
|
|
|
IC |
IN |
D |
|
|
|
|
|
|
|
|
|
|
|
N |
|
|
|
|
|
|
|
||
|
|
R |
O |
|
|
U |
|
|
|
|
|
|
|
|
T |
|
|
|
|
S |
|
|
|
|
|
|
|
C |
|
|
|
|
T |
|
|
|
|
|
|||
|
|
|
|
|
|
R |
|
|
|
|
|
||
|
|
|
|
|
|
|
I |
|
|
|
|
|
|
E |
|
|
|
|
|
|
|
E |
|
|
|
|
|
L |
|
|
|
|
|
|
|
|
|
|
|
||
E |
|
|
|
|
|
|
S |
|
|
|
|
|
|
|
|
|
|
|
|
|
|
|
We |
||||
• |
|
EST |
1924 |
|
• |
Want You |
|||||||
A |
|
||||||||||||
|
|
|
|
S O CIAT |
|
|
LISTENING |
||||||
|
|
S |
|
|
ION |
|
|
|
|
|
|
||
For A Lifetime
4
En/Fr
Thank you for buying this Pioneer product.
Please read through these operating instructions so you will know how to operate your model properly. After you have finished reading the instructions, put them away in a safe place for future reference.
In some countries or regions, the shape of the power plug and power outlet may differ from that shown in the explanatory drawings. However, the method of connecting and operating the unit is the same.
Energy-saving design
This system is designed to use 1 W of electricity when power is switched to Standby.
POWER-CORD CAUTION
Handle the power cord by the plug. Do not pull out the plug by tugging the cord and never touch the power cord when your hands are wet as this could cause a short circuit or electric shock. Do not place the unit, a piece of furniture, etc., on the power cord, or pinch the cord. Never make a knot in the cord or tie it with other cords. The power cords should be routed such that they are not likely to be stepped on. A damaged power cord can cause a fire or give you an electrical shock. Check the power cord once in a while. When you find it damaged, ask your nearest PIONEER authorized service center or your dealer for a replacement.
|
Contents |
|
1 |
Before You Start |
|
|
Checking what’s in the box ................................. |
7 |
|
Using this manual .............................................. |
7 |
|
Putting the batteries in the remote ..................... |
7 |
|
Using the remote control ................................... |
8 |
|
Finding a suitable location ................................. |
9 |
|
Avoiding condensation problems ..................... |
9 |
|
Moving the system unit ...................................... |
9 |
|
Discs compatible with this system ....................... |
9 |
2 Connecting Up |
|
|
|
The rear panel ................................................. |
10 |
|
Connecting the speakers ................................... |
11 |
|
Connecting the front speakers ........................ |
11 |
|
Connecting the Super Woofer speakers .......... |
11 |
|
Connecting the rear speakers ......................... |
12 |
|
Placing the speakers ....................................... |
12 |
|
Connecting the radio antennas ........................ |
13 |
|
Connecting external antennas ......................... |
14 |
|
Connecting auxiliary components ..................... |
14 |
|
Connecting the power ....................................... |
15 |
|
Switching the demo mode on/off ...................... |
15 |
3 |
Controls & Displays |
|
|
Front panel ....................................................... |
16 |
|
Display ............................................................. |
18 |
|
Remote control ................................................. |
19 |
4 |
Getting Started |
|
|
Switching on and setting the clock ................... |
20 |
|
Playing CDs ..................................................... |
21 |
|
Summary of playback controls for CDs .......... |
22 |
|
Changing discs ................................................. |
23 |
|
Tuning in stations ............................................. |
24 |
Improving poor FM reception......................... |
24 |
Playing cassette tapes ...................................... |
25 |
Resetting the tape counter ............................. |
27 |
Relay play ...................................................... |
27 |
5 More CD Features |
|
Programming a playlist ..................................... |
28 |
Using repeat play ............................................. |
29 |
Using random play ........................................... |
29 |
6 More Tuner Features |
|
Saving stations for quick recall ......................... |
30 |
Listening to station presets ............................ |
31 |
Changing the frequency step ............................ |
31 |
7 Recording Cassette tapes |
|
Making tape recordings .................................... |
32 |
Automatically recording CDs ......................... |
34 |
Copying tapes ............................................... |
35 |
Improving AM tape recordings ....................... |
35 |
8 Singing Karaoke |
|
Singing karaoke ............................................... |
36 |
9 Using Sound Effects |
|
Using the sound morph .................................... |
37 |
Using preset effects ......................................... |
37 |
Audio preset mode ........................................ |
37 |
Surround preset mode ................................... |
37 |
Changing sound presets using the remote ...... |
38 |
Using individual sound effects .......................... |
38 |
Equalizer mode .............................................. |
38 |
Zoom Surround mode ................................... |
39 |
P.Bass mode................................................... |
39 |
Changing sound effects using the remote ....... |
39 |
Saving your own settings .................................. |
40 |
Changing the sound display ............................. |
40 |
Muting the sound ............................................. |
40 |
10 Using the Timer |
|
Setting the wake-up timer ................................ |
41 |
Setting the sleep timer ..................................... |
42 |
Setting the record timer ................................... |
42 |
Canceling the timer ......................................... |
43 |
11Additional Information |
|
Taking care of your system ............................... |
44 |
Disc lens cleaner ............................................ |
44 |
Taking care of your discs .................................. |
44 |
Storing discs .................................................. |
45 |
Discs to avoid ................................................ |
45 |
Using cassette tapes ......................................... |
46 |
Tapes you should avoid .................................. |
46 |
Protecting your recordings ............................ |
46 |
Troubleshooting............................................... |
47 |
Specifications .................................................. |
49 |
5
En
Nous vous remercions pour cet achat d’un produit Pioneer.
Nous vous demandons de lire soigneusement ce mode d’emploi; vous serez ainsi à même de faire fonctionner l’appareil correctement. Après avoir bien lu le mode d’emploi, rangez-le dans un endroit sûr pour pouvoir vous y référer ultérieurement.
Dans certains pays ou certaines régions, la forme de la fiche d’alimentation et de la prise d’alimentation peut différer de celle qui figure sur les schémas, mais les branchements et le fonctionnement de l’appareil restent les mêmes.
Conception économie d’energie
Cette chaîne est conçue pour utiliser 1 W d’electricité quand l’alimentation est en mode d’attente.
NOTE IMPORTANTE SUR LE CABLE D’ALIMENTATION
Tenir le câble d’alimentation par la fiche. Ne pas débrancher la prise en tirant sur le câble et ne pas toucher le câble avec des mains mouillées. Cela risque de provoquer un courtcircuit ou un choc électrique. Ne pas poser l’appareil ou un meuble sur le câble. Ne pas pincer le câble. Ne pas faire de nœud avec le câble ou l’attacher à d’autres câbles. Les câbles d’alimentation doivent être posés de façon à ne pas être écrasés. Un câble abîmé peut constituer un risque d’incendie ou un choc électrique. Vérifier le câble d’alimentation de temps en temps. Contacter le service après-vente PIONEER le plus proche ou le revendeur pour un remplacement.
Sommaire |
|
1 Avant de commencer |
|
Faire l’inventaire de la boîte ............................... |
7 |
Utilisation de ce manuel ..................................... |
7 |
Placer les piles dans la télécommande ................ |
7 |
Utilisation de la télécommande .......................... |
8 |
Rechercher un endroit adapté ............................ |
9 |
Comment éviter les problèmes de condensation ... |
9 |
Déplacer l’appareil ............................................ |
9 |
Disques compatibles avec cette chaîne ............... |
9 |
2 Raccordement |
|
Le panneau arrière ........................................... |
10 |
Raccorder les enceintes ..................................... |
11 |
Raccorder les enceintes avant ......................... |
11 |
Raccordement du enceinte super woofer ......... |
11 |
Raccorder les enceintes arrière ....................... |
12 |
Choisir l’emplacement des enceintes ............... |
12 |
Raccorder les antennes radio ........................... |
13 |
Raccoder des antennes extérieures .................. |
14 |
Raccoder les composants auxiliaires .................. |
14 |
Mettre sous tension .......................................... |
15 |
Activation/désactivation du mode de |
|
démonstration .................................................. |
15 |
3 Commandes et affichages |
|
Panneau frontal ................................................ |
17 |
Affichage .......................................................... |
18 |
Télécommande ................................................. |
19 |
6
4 |
Mise en service |
|
|
Mise en marche et réglage de l’horloge ............ |
20 |
|
Lecture de CD ................................................. |
21 |
|
Sommaire des commandes de lecture |
|
|
pour CD ........................................................ |
22 |
|
Changer les disques ......................................... |
23 |
|
Capter les stations ........................................... |
24 |
|
Améliorer une mauvaise réception FM ............ |
24 |
|
Lecture et enregistrement de cassettes ............. |
25 |
|
Remise à zéro du compteur de défilement |
|
|
de bande ....................................................... |
27 |
|
Lecture enchaînée ......................................... |
27 |
5 |
Informations supplémentaires sur les CD |
|
|
Programmation des répertoires ........................ |
28 |
|
Utilisation de la lecture répétée ....................... |
29 |
|
Utilisation de la lecture aléatoire ..................... |
29 |
6 |
Fonctions supplémentaires du tuner |
|
|
Mémorisation de station pour un rappel rapide ... |
30 |
|
Écoute de préréglages de station ................... |
31 |
7 |
Enregistrement sur cassettes |
|
|
Comment effectuer des enregistrements sur |
|
|
cassette ........................................................... |
32 |
|
Enregistrement automatique de CD ............... |
34 |
|
Copies de cassettes ........................................ |
35 |
|
Amélioration des enregistrements AM sur |
|
|
cassette ......................................................... |
35 |
8 Chanter avec le Karaoke |
|
|
|
Chanter avec le Karaoke ................................... |
36 |
9 Manipuler le son |
|
|
|
Utilisation de la transformation du son ............ |
37 |
|
Utilisation des effets préréglés ......................... |
37 |
|
Mode audio prédéfini .................................... |
37 |
|
Mode Surround préréglé ................................ |
37 |
|
Changement des préréglages du son en |
|
|
utilisant la télécommande .............................. |
38 |
|
Utilisation des effets sonores individuels .......... |
38 |
|
Mode Equalizer .............................................. |
38 |
|
Mode Zoom Surround ................................... |
39 |
|
Mode P.Bass .................................................. |
39 |
|
Changement des effets sonores en utilisant |
|
|
la télécommande ........................................... |
39 |
|
Sauvegarder vos mises au point ........................ |
40 |
|
Modifier l’affichage du son ............................... |
40 |
|
Mettre le son en sourdine ................................. |
40 |
10 Utilisation de la minuterie |
|
|
|
Configuration de la minuterie de réveil ............. |
41 |
|
S’endormir au son de la radio .......................... |
42 |
|
Réglage du programmateur d’enregistrement ... |
42 |
|
Annuler le programmateur ............................... |
43 |
11Informations supplémentaires |
|
|
|
Comment entretenir le système ........................ |
44 |
|
Produits nettoyants pour la lentille de disque ... |
44 |
|
Comment entretenir vos disques ...................... |
44 |
|
Rangement des disques ................................. |
45 |
|
Disques à éviter ............................................. |
45 |
|
Utilisation des cassettes ................................... |
46 |
|
Les cassettes à éviter ...................................... |
46 |
|
Protéger vos enregistrements ......................... |
46 |
|
Guide de dépannage ........................................ |
48 |
|
Spécifications .................................................. |
50 |
Fr
Before You Start |
Avant de commencer |
1 |
Checking what’s in the box
Thank you for buying this Pioneer product. Before starting to set up your new stereo system, please check that you received the following supplied accessories:
•Operating instructions
•Remote control unit
•Power cord
•FM antenna
•AM loop antenna
•AA/R6P dry cell batteries (x2)
•S-A780VLR only: Red/black speaker cords (x2), blue/black speaker cords (x2)
•Warranty card
Using this manual
This manual is for the XR-A780 and XR-A3800,
XR-A380 Stereo CD Cassette Deck Receiver. It is split into three sections: setting up (chapters 1 and 2); using the system (chapters 3 to 10), and additional information (chapter 11). This last chapter contains care information for the system, as well as discs and tapes, a troubleshooting section, and specifications.
|
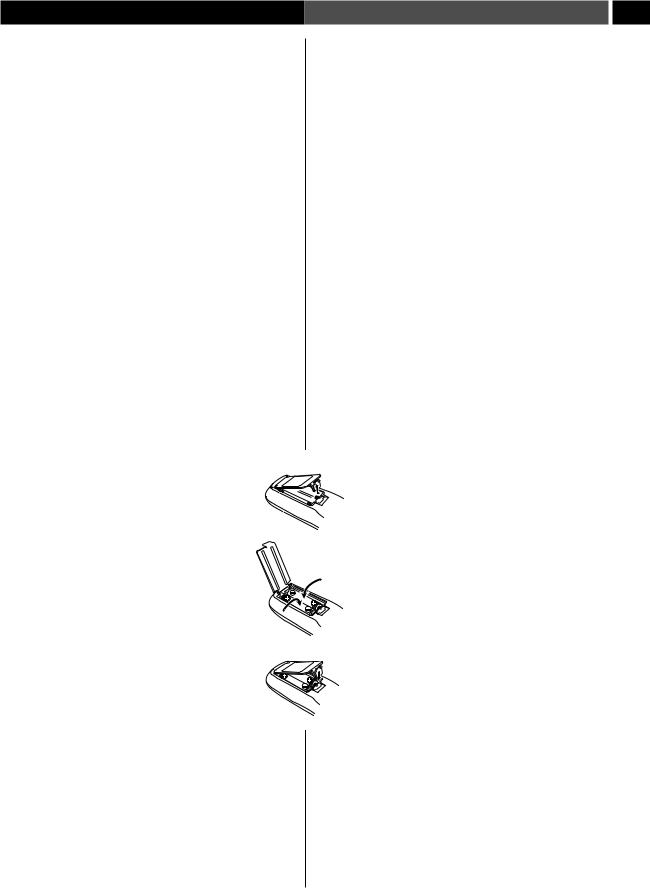
Putting the batteries in |
1 |
|
the remote |
|
1 |
Open the battery compartment cover on |
2 |
|
the back of the remote control unit. |
|
2 |
Load the supplied batteries into the |
|
|
battery compartment following the |
|
|
indications (ª, ·) inside the |
|
|
compartment. |
|
|
|
3 |
3 |
Close the cover. |
|
Caution!
•Remove the batteries if the remote is not going to be used for a month or more.
•Remove dead batteries promptly—they can leak and damage the unit.
•When disposing of used batteries, please comply with governmental public institution’s rules that apply in your country or area.
Faire l’inventaire de la boîte
Nous vous remercions d’avoir choisi un produit Pioneer. Avant d’installer votre nouveau système stéréo, veuillez faire l’inventaire des accessoires suivants:
•Mode d’emploi
•Une télécommande
•Un cordon d’alimentation
•Antenne FM
•Une antey"e cadre AM
•Deux piles sèches AA/R6P
•S-A780VLR uniquement : Cordons d’enceinte rouge/noir (x2), cordons d’enceinte bleu/noir (x2)
•Carte de garantie
Utilisation de ce manuel
Ce manuel est consacré au Lecteur CD/double platine à cassette XR-A780 et au XR-A3800, XR-A380. Il est divisé en trois sections: configuration (chapitres 1 et 2); utilisation de la chaÎne (chapitre 3 à 10), et information additionnelle (chapitre 11). Ce dernier chapitre comprend l’information pour le soin de la chaîne, ainsi que pour les disques et les cassettes, une section guide de dépannage et des spécifications.
Placer les piles dans la télécommande
1Soulevez le couvercle du compartiment à piles qui se trouve au dos de la télécommande
2Chargez les piles fournies dans le compartiment à piles en suivant les indications (ª, ·) qui se trouvent à l’intérieur du compartiment.
3 Refermez le couvercle.
Mise en garde!
•Enlevez les piles si vous n’utilisez pas la télécommande pendant un mois ou plus.
•Enlevez immédiatement les piles usées—elles peuvent présenter une fuite et endommager l’unité.
•Lorsque vous diposez de piles / batteries usées, veuillez vous conformer aux normes gouvernementales ou environnementales en vigueur dans votre pays ou région.
7
En/Fr
1 Before You Start |
Avant de commencer |
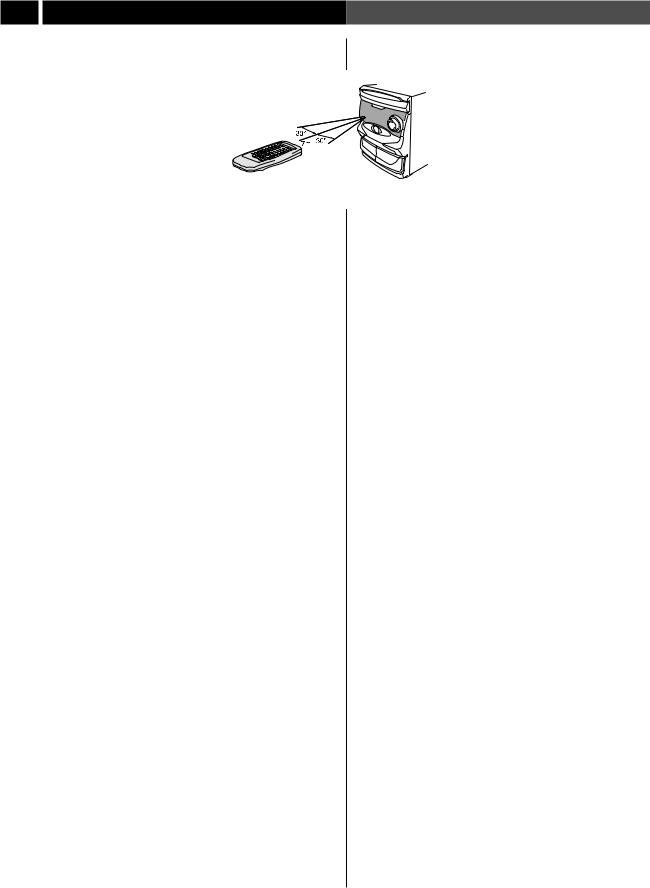
Using the remote control
Keep in mind the following when using the remote control unit:
•Make sure that there are no obstacles in between the remote and the remote sensor on the unit.
• Use within the operating range and |
|
angle, as shown in the diagram. |
(23 ft.) |
•Remote operation may become
unreliable if strong sunlight or fluorescent light is shining on the unit’s remote sensor.
•Remote controllers for different devices can interfere with each other. Avoid using remotes for other equipment located nearby this unit.
•Replace the batteries when you notice a fall off in the operating range of the remote.
Finding a suitable location
We want you to enjoy using your new stereo system for years to come, so please bear in mind the following points when choosing a suitable location for the system components and speakers:
Do...
Use in a well-ventilated room.
Place on a solid, flat, level surface, such as a table, shelf or stereo rack.
Leave at least 30 cm (12 in.) either side of the unit,
15 cm (6 in.) at the back, and 15 cm (6 in.) overhead for proper ventilation.
Don’t...
Use in a place exposed to high temperatures or humidity, including near radiators and other heat-generating appliances.
Place on a window sill or other place where any of the components or speakers will be exposed to direct sunlight.
Use in an excessively dusty or damp environment.
Place directly on top of any appliance which becomes hot in use.
Use near a television or monitor as you may experience interference—especially if the television uses an indoor antenna.
Use in a kitchen or other room where the unit may be exposed to smoke or steam.
8
Utilisation de la télécommande
N’oubliez pas les remarques suivantes lorsque vous utilisez la télécommande:
• Vérifiez qu’il n’y a aucun obstacle entre la télécommande et le télécapteur de l’unité.
•Utilisez la télécommande selon l’angle et la plage d’utilisation indiqués sur le schéma.
•La commande à distance peut être affectée par un rayonnement solaire important ou si une lumière fluorescente éclaire le télécapteur de l’unité.
•Plusieurs télécommandes peuvent faire interférence. Evitez d’utiliser les télécommandes destinées à d’autres appareils à proximité de l’unité.
•Changez les piles dès que vous remarquez une baisse de la plage d’utilisation de la télécommande.
Rechercher un endroit adapté
Ce système a été conçu pour vous offrir de nombreuses années de plaisir ; nous vous recommandons donc de ne pas oublier les points suivants au moment de choisir l’endroit où vous allez installer les composants de votre système et les enceintes:
Recommandations...
Utilisez votre système dans une pièce bien aérée.
Placez-le sur une surface résistante, à plat et à niveau, comme une table, une étagère ou un support pour chaîne stéréo.
Laissez au moins 30 cm de chaque côté de l’unité, 15 cm à l’arrière et 15 cm au-dessus pour une ventilation correcte.
Les erreurs à éviter...
N’utilisez pas votre système dans un endroit exposé à des températures élevées ou à l’humidité, y compris à proximité de radiateurs ou d’autres appareils émettant de la chaleur.
Ne le placez pas sur le rebord d’une fenêtre ou dans un endroit où les composants ou les enceintes seraient exposés directement au soleil.
N’utilisez pas le système dans un environnement très poussiéreux ou humide.
Ne le placez pas directement sur un appareil qui s’échauffe à l’utilisation.
Ne l’utilisez pas près d’une télévision ou d’un moniteur à cause des risques d’interférence—surtout si la télévision nécessite une antenne intérieure.
N’utilisez pas le système dans une cuisine ou dans une pièce où l’appareil peut être exposé à la fumée ou à la vapeur.
En/Fr
Before You Start |
Avant de commencer |
1 |
Place on an unstable surface, or one that is not large enough to support all four of the unit’s feet, or the whole footprint of each speaker.
Block the cooling fan on the rear of the unit. Don’t cover the unit with cloth, or use on thick carpet, etc.
Put objects on top of the speakers.
Avoiding condensation problems
Condensation may form inside the unit if it is brought into a warm room from outside, or if the temperature of the room rises quickly. Although the condensation won’t damage the unit, it may temporarily impair its performance. For this reason you should leave it to adjust to the warmer temperature for about an hour before switching on and using.
Moving the system unit
If you need to move the system unit, first switch it off and unplug from the wall outlet. Never lift or move the unit during play- back—discs rotate at a high speed and may be damaged.
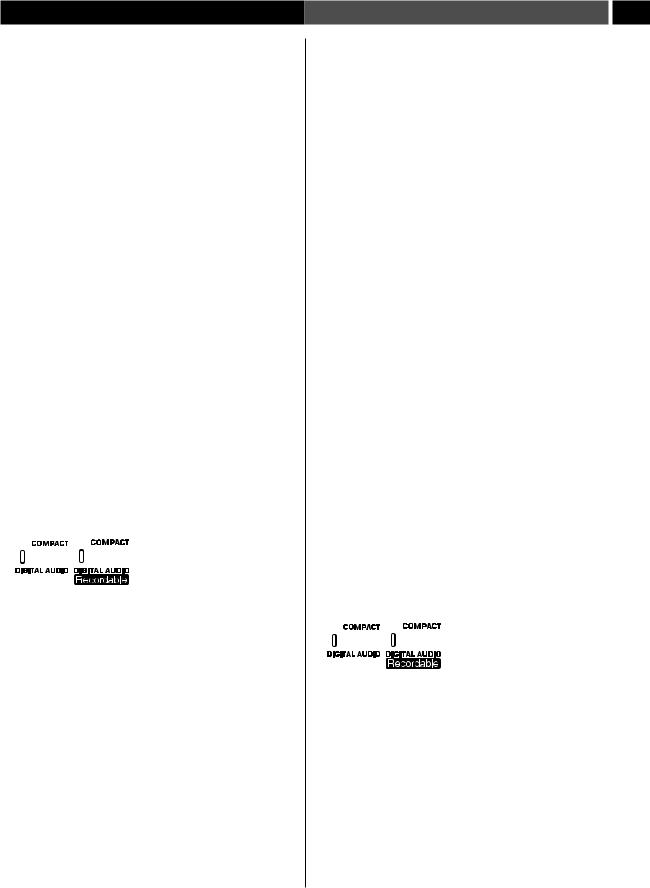
Discs compatible with this system
Any disc that displays one of the following logos should play in this system. Other formats, including DVD, Video CD, CD-RW, CD-ROM, SACD and Photo CD will not play.


 (12 cm or 8 cm discs.)
This system can play music-use CD-R discs. However, depending on the condition of the player and the disc, you may find that not all discs will play successfully. (For example, if the disc is scratched or dirty, or if the player’s pickup lens is dirty.) Note that this unit cannot record onto recordable discs.
Ne le placez pas sur une surface instable ou qui n’est pas assez grande pour pouvoir supporter les quatre pieds de l’appareil, ou chaque enceinte.
Ne bloquez pas le ventilateur à l’arrière de l’appareil. Ne le recouvrez pas d’un linge, ne l’utilisez pas sur une moquette épaisse etc.
Ne placez aucun objet sur les enceintes.
Comment éviter les problèmes de condensation
De la condensation peut se former à l’intérieur de l’appareil lorsqu’on le transporte de l’extérieur dans un endroit chaud, ou si la température de la pièce s’élève rapidement. Bien que la condensation ne puisse pas endommager l’appareil, elle peut altérer momentanément son fonctionnement normal. Dans ce cas, attendez une heure environ avant de mettre en marche l’appareil, pour qu’il puisse s’adapter à la température plus élevée.
Déplacer l’appareil
Si vous devez déplacer l’appareil, vous devez d’abord l’éteindre et le débrancher. Vous ne devez jamais déplacer ou soulever l’unité pendant la lecture—les disques tournent à haute vitesse et pourraient être endommagés.
Disques compatibles avec cette chaîne
Cette chaîne devrait pouvoir lire les disques portant les logos suivants. Il se peut qu’elle ne lise pas d’autres formats, y compris les DVD, CD Vidéo, CD-RW, CD-ROM, SACD et les CD photo.


 (Disques de 12 cm ou 8 cm.)
Cette chaîne peut lire des disques CD-R enregistrés avec audio. Mais dépendant de la condition du lecteur et du disque, il se peut que la lecture de tous les disques ne se fasse pas avec succès. (Par exemple, si le disque est rayé ou sal, ou si la lentille du capteur du lecteur est sale.) Remarquez que cette unité ne peut pas enregistrer sur des disques enregistrables.
9
En/Fr
2 Connecting Up |
Raccordement |
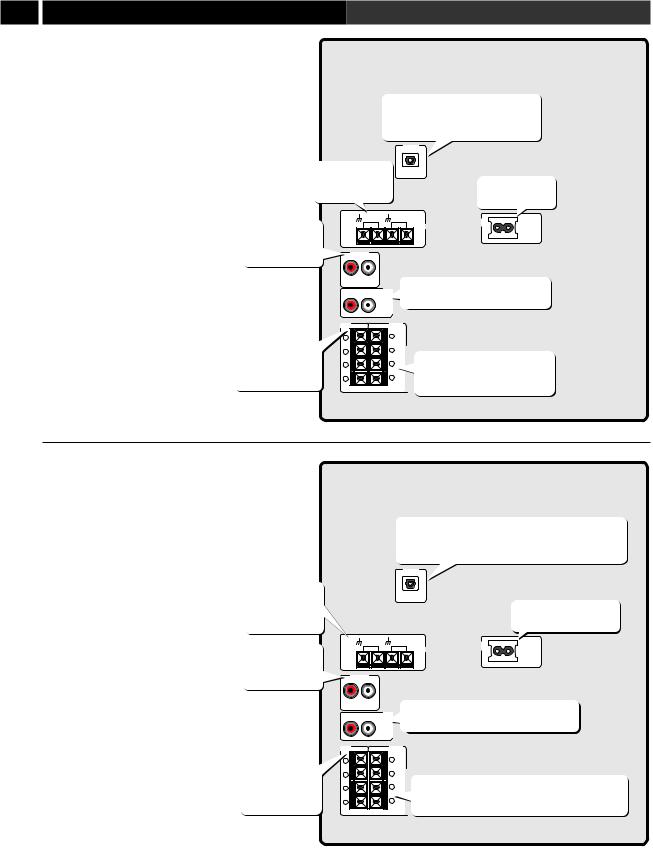
The rear panel
The illustration on this page shows the
XR-A780. Not all features are available on the XR-A3800, XR-A380.
Important: Before making or changing any rear panel connections, make sure that all the components are switched off and unplugged from the power supply.
Connect an external AV amp or digital recorder here (XR-A780 only)
OPTICAL
DIGITAL OUT
Connect the |
|
|
AM and FM |
Connect to a |
|
antennas here |
||
power outlet |
||
|
Connect an external audio source here
AM |
FM |
|
|
LOOP |
UNBAL |
|
AC |
ANTENNA |
75Ω |
|
|
|
|
ANTENNA |
INLET |
AUX IN |
|
|
|
R |
L |
Connect the rear speakers here |
|
|
|
R |
L |
(XR-A780 only) |
|
|
|
|
|
REAR |
|
|
SPEAKERS |
FRONT |
|
SUPER |
SPEAKERS |
|
WOOFER |
Connect the front speakers here
+ |
+ |
|
L |
L |
|
- |
- |
|
- |
- |
|
R |
R |
|
+ |
||
+ |
Connect the Super Woofer speakers here
(XR-A780 only)
Le panneau arrière
L’illustration sur cette page montre le XR-A780. Toutes les caractéristiques ne sont pas disponibles sur le XR-A3800, XR-A380.
Attention: Avant d’effectuer le raccordement ou de modifier les connexions sur le panneau arrière, vérifiez que les composants sont éteints et qu’ils sont débranchés.
Raccordez ici les antennes AM et FM
Raccordez ici une source audio externe
Raccordez ici les enceintes frontales
Raccordez ici un enregistreur numérique ou un ampli AV externe (XR-A780 uniquement)
OPTICAL
DIGITAL OUT
AM
LOOP
ANTENNA
AUX IN
R L
R L
Raccodez à une prise d’alimentation
FM
UNBAL
75Ω AC INLET
ANTENNA
Raccordez ici les enceintes arrière (XR-A780 uniquement)
REAR
SPEAKERS
FRONT |
SUPER |
SPEAKERS |
WOOFER |
+ |
+ |
|
|
L |
L |
|
|
- |
- |
|
|
- |
- |
Raccordez ici les enceintes Super Woofer |
|
R |
R |
||
+ |
(extrême grave) (XR-A780 uniquement) |
||
+ |
|||
|
|
10
En/Fr
Connecting Up |
Raccordement |
2 |
Connecting the speakers
XR-A780 — This system is supplied with four speakers: two main front speakers; two Super Woofer speakers. Also, This system has terminals for you to connect a pair of rear speakers.
XR-A380, XR-A3800 — This system is supplied with two speakers.
Connecting the front speakers
The S-A3800 and S-A380 speakers come with speaker cord already attached; you only need to connect them to the main unit.
If you have the S-A780 speakers, you’ll need to connect the speakers to the main unit using the supplied red and black speaker cords. To get the best sound from the system, it’s important that you connect the two strands of speaker cord for each speaker to the correct speaker terminal. The terminals and cords are color-coded to help you match them up.
Note: Make sure that the bare speaker cords cannot touch each other, or come into contact with other metal parts once the unit is switched on.
To connect a speaker cord to a terminal:
1 Pull off the protective covers on the end of each cord, then twist the exposed wire strands together.
2 Push the tab to open, then insert the twisted wire fully into the terminal.
3 Snap shut the tab to secure the speaker cord.
Connecting the Super Woofer speakers
XR-A780 only: Use the supplied blue and black speaker cords to connect the Super Woofer speakers to the main unit. Like the front speakers above, it’s important that you connect the two strands of speaker cord for each speaker to the correct speaker terminal.
Connect the Super Woofer speaker cords in the same way as the front speakers.
Note: Make sure that the bare speaker wires cannot touch each other, or come into contact with other metal parts once the unit is switched on.
Raccorder les enceintes
XR-A780 — Cette chaîne vous est fournie avec quatre enceintes : deux enceintes frontales principales ; deux enceintes Super Woofer. Cette chaîne dispose de bornes pour vous permettre de raccorder une paire d’enceintes arrière.
XR-A380, XR-A3800 — Cette chaîne vous est fournie avec deux enceintes.
Raccorder les enceintes avant
Les enceintes S-A3800, S-A380 sont fournies avec les cordons. Il ne vous faut que les raccorder à l’unité principale.
Si vous avez des enceintes S-A780, vous aurez besoin de raccorder les enceintes à l’unité principale en utilisant les cordons d’enceinte rouge et noir fournis. Pour obtenir une qualité de son optimale, vous devez branchez les deux fils du cordon de l’enceinte à la borne appropriée. Les bornes et les cordons sont codés par couleur pour vous aider à les faire correspondre.
Remarque: Les fils dénudés des enceintes ne doivent jamais se toucher ou entrer en contact avec d’autres pièces métalliques une fois l’appareil sous tension.
Comment raccorder le cordon d’une enceinte à une borne:
1 Retirez les couvercles de protection de l’extrémité de chaque cordon, puis torsadez ensemble les deux brins de fil exposés.
2 Ouvrez la languette, puis introduisez le fil torsadé dans la borne.
3 Relâchez le poussoir pour immobiliser le câble d’enceinte.
Raccordement du enceinte super woofer
XR-A780 uniquement: Utilisez les cordons bleu et noir fournis pour raccorder les enceintes super woofer à l’unité principale. Comme pour les enceintes avant ci-dessus, vous devez raccorder les deux torons du cordon pour chaque enceinte à la borne correspondantel.
Raccordez les cordons de l’enceinte Super Woofer de la même manière que les enceintes frontales.
Remarque: Les fils dénudés des enceintes ne doivent jamais se toucher ou entrer en contact avec d’autres pièces métalliques une fois l’appareil branché.
11
En/Fr

2 Connecting Up |
Raccordement |
|
Connecting the rear speakers |
|
|
Raccorder les enceintes arrière |
||||||||||
|
XR-A780 only: The rear speakers connect to the main unit by |
|
|
Modèle XR-A780 uniquement: Les enceintes arrière se |
||||||||||
|
RCA/phono-type plugs. Simply plug each speaker into the |
|
|
raccordent à l’unité principale grâce aux fiches de type RCA/phono. |
||||||||||
|
corresponding jack on the rear panel. |
|
|
|
|
|
|
|
Branchez simplement chaque enceinte dans la prise |
|||||
|
To mount the rear speakers on a wall: |
|
|
correspondante du panneau arrière. |
||||||||||
|
|
|
Pour accrocher les enceintes arrière au mur: |
|||||||||||
|
• Use the hole located on the rear panel of the speaker to mount |
|
|
|||||||||||
|
|
|
• Utilisez le trou prévu sur le panneau arrière de l’enceinte pour |
|||||||||||
|
it on a wall. Make sure that the speakers are mounted securely |
|
|
|||||||||||
|
|
|
la fixer sur le mur. Vérifiez que l’enceinte est bien accrochée |
|||||||||||
|
to prevent accidents. |
|
|
|
|
|
|
|
||||||
|
|
|
|
|
|
|
|
pour éviter tout accident. |
||||||
|
|
|
|
|
|
|
|
|
||||||
|
• Check that the wall is strong enough to hang the speakers on. |
|
|
• Vérifiez que le mur peut supporter le poids des enceintes. |
||||||||||
|
Pioneer disclaims any responsibility for damage due to falling |
|
|
Pioneer ne peut être tenu responsable de tout dommage |
||||||||||
|
speakers and other accidents caused by inappropriate strength |
|
|
entraîné par la chute des enceintes ou de tout autre accident |
||||||||||
|
of the wall or improper installation. |
|
|
provoqué par un manque de solidité du mur ou d’une |
||||||||||
|
• No screws or other fittings are supplied to mount the speakers |
|
|
mauvaise installation. |
||||||||||
|
|
|
• Aucune vis ou attache n’est fournie pour l’installation des |
|||||||||||
|
on the wall. |
|
|
|
|
|
|
|
||||||
|
|
|
|
|
|
|
|
enceintes au mur. |
|
|||||
|
Speaker Caution! |
|
|
|
|
|
|
|
|
|||||
|
|
|
|
|
|
|
|
Mise en garde! |
||||||
|
Do not connect any of the supplied speakers to any other |
|
|
Ne raccordez pas les enceintes fournies avec un autre ampli. Ceci |
||||||||||
|
amplifier. This may result in malfunction or fire. |
|
|
|||||||||||
|
|
|
pourrait entraîner des problèmes de fonctionnement ou provoquer |
|||||||||||
|
|
|
|
|
|
|
|
|
||||||
|
If you wish to connect speakers other than the ones supplied with |
|
|
un incendie. |
|
|||||||||
|
this system, use only front speakers with a nominal impedance of |
|
|
Si vous souhaitez reccoeder des enceintes autres que celles qui vous |
||||||||||
|
between 6–16 Ω with the XR-A3800, XR-A380, and between 12– |
|
|
sont fournies avec cette chaîne, utilisez uniquement les enceintes |
||||||||||
|
16 Ω with the XR-A780. Use only rear speakers with a nominal |
|
|
frontales avec une impédance nominale comprise entre 6 et 16 Ω |
||||||||||
|
impedance of between 16 ohms or more. Refer to the instructions |
|
|
avec le XR-A3800, XR-A380 et comprise entre 12 et 16 Ω avec le |
||||||||||
|
that came with your speakers if you are unsure of their impedance |
|
|
XR-A780. Utilisez uniquement des enceintes arrière ayant une |
||||||||||
|
before connecting them and switching on. |
|
|
impédance nominale entre 16 ohms ou plus. Veuillez lire les |
||||||||||
|
Placing the speakers |
|
|
|
|
|
|
|
instructions qui accompagnent vos enceintes pour vérifier leur |
|||||
|
|
|
|
|
|
|
|
impédance avant d’effectuer le raccordement et de les mettre en |
||||||
|
Where you put your speakers in the room has a big effect on the |
|
|
marche. |
|
|||||||||
|
quality of the sound. The following guidelines and the diagram |
|
|
Choisir l’emplacement des enceintes |
||||||||||
|
below should help you to get the best sound from your system. |
|
|
|||||||||||
|
|
|
Le choix de l’emplacement des enceintes est critique. Les conseils |
|||||||||||
|
• Ideally, speakers should be at about ear-level when you’re |
|
|
|||||||||||
|
|
|
suivants et le schéma donné ci-dessous vous permettront d’obtenir |
|||||||||||
|
listening to them. Putting the speakers on the floor, or |
|
|
|||||||||||
|
|
|
le meilleur son possible. |
|
||||||||||
|
mounting them very high on a |
|
|
|
|
|
|
|
|
|||||
|
|
|
|
|
|
|
|
|
|
|
|
|
• Théoriquement, les enceintes doivent |
|
|
wall is not recommended. |
|
Left front |
|
|
|
Right front |
|
||||||
|
|
|
|
|
|
être placées à hauteur de l’oreille. |
||||||||
|
|
|
|
|
|
|
||||||||
|
• For the best stereo effect, place |
|
Avant gauche |
|
|
|
Avant droit |
|
Nous ne recommandons pas de les |
|||||
|
the front speakers |
|
|
|
|
|
|
|
|
|
|
placer sur le sol ou en hauteur sur le |
||
|
2 |
-3 |
m |
|
|
|
|
|
|
|||||
|
2–3 meters (6–9 ft.) apart. |
|
|
|
|
|
|
|
|
mur. |
||||
|
|
|
(6–9 |
ft.) |
||||||||||
|
• The rear speakers should not be |
Left Super Woofer |
|
|
Right Super Woofer |
|
• Pour obtenir un effet stéréo optimal, |
|||||||
|
|
|
|
nous recommandons d’espacer les |
||||||||||
|
further away from your |
|
|
|
||||||||||
|
(XR-A780 only) |
|
|
(XR-A780 only) |
|
enceintes avant de 2–3 m. |
||||||||
|
listening position than the front |
Super woofer gauche |
|
|
Super woofer droit |
|
||||||||
|
|
|
|
• Les enceintes arrière ne doivent pas |
||||||||||
|
speakers. |
(XR-A780 uniquement) |
|
(XR-A780 uniquement) |
|
|||||||||
|
|
|
|
|
|
|
|
|
|
|
|
|
être plus éloignées de votre position |
|
|
Important: |
|
|
|
|
|
|
|
|
|
|
|
|
|
|
Left rear |
|
|
Right rear |
|
d’écoute que les enceintes avant. |
||||||||
|
S-A3800, S-A380: The |
|
|
|
Important: |
|||||||||
|
(XR-A780 only) |
|
|
(XR-A780 only) |
|
|||||||||
|
supplied speakers are not |
Arrière gauche |
|
|
Arrière droit |
|
S-A3800, S-A380: Les enceintes |
|||||||
|
magnetically shielded, so should |
(XR-A780 uniquement) |
|
(XR-A780 uniquement) |
fournies ne sont pas blindées |
|||||||||
|
not be placed near to a TV or |
|
|
|
|
|
|
|
|
|
|
|
|
magnétiquement, il ne faut donc pas les |
|
monitor. |
|
|
|
|
|
|
|
|
|
|
|
|
placer près d’un téléviseur ou d’un écran. |
|
S-A780VLR: The front, Super |
|
|
|
|
|
|
|
|
|
|
|
|
S-A780VLR : Les enceintes Super |
|
|
|
|
|
|
|
|
|
|
|
|
|
||
|
|
|
|
|
|
|
|
|
|
|
|
|
Woofer frontales fournies avec cette chaîne |
|
|
|
|
|
|
|
|
|
|
|
|
|
|
|
|
|
Woofer speakers supplied with this |
|
|
|
|
|
|
|
|
|
|
|
|
|
|
|
|
|
|
|
|
|
|
|
|
|
|
sont blindées magnétiquement. |
|
|
system are magnetically shielded. |
|
|
|
|
|
|
|
|
|
|
|
|
|
|
|
|
|
|
|
|
|
Cependant, si vous les placer extrêmement près d’un téléviseur cela |
||||||
|
However, placing them extremely close to a television may result |
|
|
|||||||||||
|
|
|
peut entraîner une déformation dans les couleurs de l’écran. Si cela |
|||||||||||
|
in color distortion on the screen. If this happens, move the |
|
|
|||||||||||
|
|
|
se produit, éloignez un peu les enceintes et éteignez le téléviseur |
|||||||||||
|
speakers a little further away and switch off the television for 15– |
|
||||||||||||
12 |
|
pendant 15 à 30 minutes. |
||||||||||||
30 minutes. |
|
|
|
|
|
|
|
|||||||
|
|
|
|
|
|
|
|
|
|
|
|
|
||
En/Fr

Connecting Up Raccordement 2
Connecting the radio |
|
Raccorder les antennes radio |
|||
antennas |
|
En raccordant les antennes fournies, vous pourrez écouter les |
|||
|
émissions de radio AM et FM. Si la réception est de mauvaise |
||||
Connecting the supplied antennas will allow you to listen to both |
|||||
qualité, utilisez une antenne extérieure pour obtenir une qualité |
|||||
AM and FM radio broadcasts. If you find that reception quality is |
|||||
de son supérieure—voir Raccorder des antennes extérieures |
|||||
poor, an outdoor antenna should give you better sound quality— |
|||||
(page 14) pour obtenir de plus amples informations. |
|||||
see the Connecting external antennas on page 14 for more on |
|||||
Avant d’effectuer ou de modifier les connexions d’antenne, vérifiez |
|||||
how to do this. |
|
||||
|
que l’alimentation est coupée et que l’unité est débranchée. |
||||
Before making or changing antenna connections, make sure that |
|||||
|
|
|
|||
the power is switched off and the unit disconnected from the wall |
|
|
|
||
power outlet. |
|
|
1 |
Enlevez les protections des deux |
|
|
|
||||
1 Pull off the protective shields of both |
|
|
|
fils d’antenne AM. |
|
|
|
2 |
Ouvrez les languettes, puis |
||
AM antenna wires. |
|
|
|||
2 Push open the tabs, then |
|
|
|
introduisez un fil dans chaque |
|
Attach to a wall with tacks |
|
borne. |
|||
insert one wire fully into |
|
||||
|
|
||||
each terminal. |
Fixez au mur avec des broquettes |
3 |
Relâchez les poussoirs pour |
||
|
|
||||
3 Snap shut the tabs to |
|
|
|
immobiliser les fils d’antenne |
|
Stabilize with pen/pencil |
|
AM. |
|||
secure the AM antenna |
|
||||
Stabiliser avec un crayon |
Placez l’antenne AM sur une surface plate et |
||||
wires. |
|||||
|
|
dirigez-la de façon à obtenir la meilleure |
|||
Place the AM antenna on a flat |
|
|
|||
|
|
réception possible. Le cas échéant, stabilisez |
|||
surface and point in the direction |
|
|
|||
|
|
avec un crayon à l’aide du trou qui se trouve |
|||
giving the best reception. If |
|
|
|||
|
|
près de la base. Ne placez pas l’antenne à |
|||
necessary, stabilize with a pen or |
|
|
|||
|
|
proximité d’ordinateurs, de téléviseurs ou |
|||
pencil through the hole near the |
|
|
|||
|
|
d’appareils électriques, et ne la mettez pas en |
|||
base. Avoid placing near comput- |
|
|
|||
|
|
contact avec des objets métalliques. |
|||
ers, television sets or other electrical appliances and do not let it |
|
||||
Il est aussi possible de fixer l’antenne AM sur le mur en |
|||||
come into contact with metal objects. |
|
||||
|
introduisant deux vis ou deux broches au travers des trous en |
||||
It’s also possible to fix the AM antenna to a wall using two small |
|||||
haut du cadre. Avant de la fixer au mur, vérifiez que la réception |
|||||
screws or pins through the two holes at the top of the loop. Before |
|||||
est satisfaisante. |
|
||||
fixing, make sure that the reception is satisfactory. |
|
||||
|
|
|
|||
4 Connect the FM wire antenna as |
|
4 Raccordez le fil d’antenne FM comme indiqué ci- |
|||
|
dessous. |
|
|
||
shown below. |
|
|
|
||
|
|
Pour obtenir de meilleurs résultats, étendez |
|||
For best results, extend the FM antenna fully |
|
|
|||
|
|
complètement l’antenne FM et fixez-la à un mur |
|||
and fix to a wall or door frame. Don’t drape |
|
|
|||
|
|
ou au chambranle d’une porte. Ne la laissez pas |
|||
loosely or leave coiled up. |
|
|
|||
|
|
pendre lâchement ou enroulée. |
|||
The supplied FM antenna is a simple means |
|
|
|||
|
|
L’antenne FM fournie est un moyen simple de |
|||
of receiving FM stations; using a dedicated, |
|
|
|||
|
|
réception de stations FM; en utilisant une antenne |
|||
outdoor FM antenna will usually give you |
|
|
|||
|
|
FM extérieure spécialisée une meilleure réception |
|||
better reception and sound quality. See |
|
|
|||
|
|
et qualité sonore vous seront fournies |
|||
Connecting external antennas for |
|
|
|||
|
habituellement. Voir Raccordement d’antennes externes pour |
||||
connection details. |
|
||||
|
les détails. |
|
|
||
Note: The signal earth (H) is designed to reduce noise that |
|
|
|||
Remarque: La marque de mise à la masse (H) est désignée |
|||||
occurs when an antenna is connected. It is not an electrical safety |
|||||
pour réduire le bruit produit quand une antenne est raccordée. Il |
|||||
earth. |
|
||||
|
ne s’agit pas d’une mise à la masse électrique de sécurité. |
||||
|
|
||||
|
|
|
|
|
|
13
En/Fr

2 Connecting Up |
Raccordement |
Connecting external antennas
External AM antenna
Use 5–6 meters (15-18 ft.) of vinyl-insulated wire and set up either indoors or outdoors. Leave the AM loop antenna connected.
Outdoor antenna
Indoor antenna
(5–6 m (15-18 ft.) vinyl-insulated wire)
AM
LOOP
ANTENNA
Ground
External FM antenna
Use 75 Ω coaxial cable to hook up an external FM antenna.
75Ω coaxial cable
AM |
FM |
LOOP |
UNBAL |
ANTENNA |
75Ω |
ANTENNA
Connecting auxiliary components
This system has a set of stereo analog inputs for connecting an external MD player, etc. XR-A780 model also has an optical digital output for use with a CD-R or MD recorder.
Use the AUX IN jacks to connect an MD player, etc. to this system.
MD player, etc.
PLAY
OUT
L
AUX IN
R
Stereo
R L
audio cable
14
Raccorder des antennes extérieures
Antenne AM extérieure
Utilisez un fil de 5 à 6 mètres recouvert d’une isolation vinyle et effectuez une installation à l’extérieur ou à l’intérieur de la maison. Laissez l’antenne cadre AM raccordée.
Antenne extérieure
Antenne intérieure
(fil recouvert de vinyle de 5 à 6 mètres)
AM
LOOP
ANTENNA
Terre
Antenne FM externe
75Utilisez le câble coaxial 75 Ω pour raccorder une antenne FM externe.
câble coaxial 75 Ω
AM |
FM |
LOOP |
UNBAL |
ANTENNA |
75Ω |
ANTENNA
Raccorder les composants auxiliaires
Cette chaîne est munie d’entrées analogiques stéréo pour raccorder un lecteur MD externe, etc. Le modèle XR-A780 est également muni d’une sortie numérique optique à utiliser avec un enregistreur CD-R ou MD.
Utilisez les prises AUX IN pour raccorder un lecteur MD, etc. à cette chaîne.
Lecteur MD, etc.
PLAY
OUT
|
|
L |
|
AUX IN |
|
|
|
R |
R |
L |
Câble audio stéréo |
En/Fr
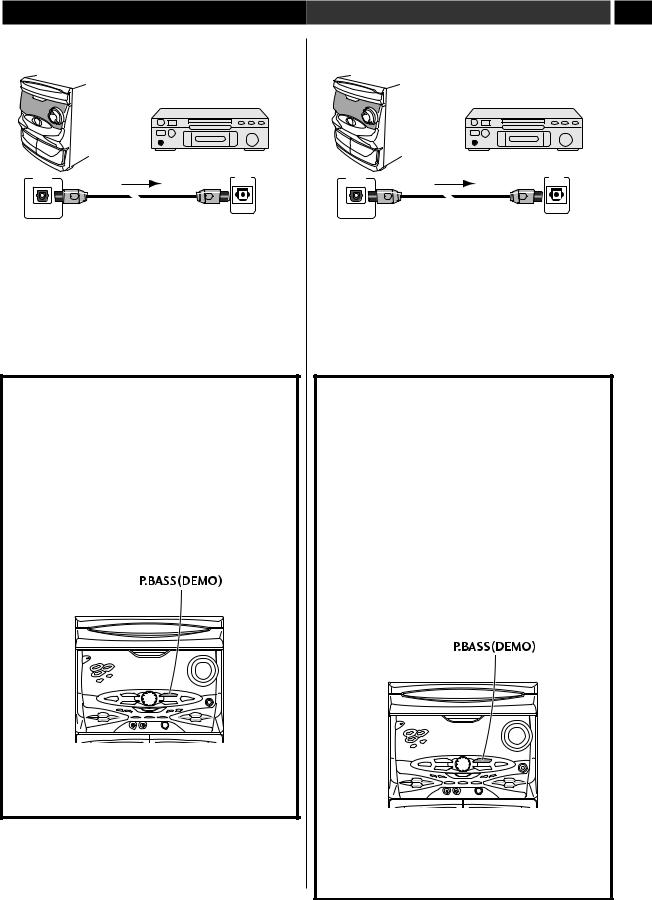
Connecting Up
Use an optical digital cord to connect a digital recorder or AV amplifier using the OPTICAL OUT.
|
MD recorder, etc. |
OPTICAL |
OPTICAL |
IN |
|
DIGITAL OUT |
|
Optical digital audio cable
Connecting the power
After making sure that everything is connected properly, plug in the power cord to the AC INLET, and the other end to a main power outlet.
Congratulations! You’re done setting up.
Switching the demo mode on/ off
When you first plug in this system the display shows a demo sequence. The demo will also start if the system is on but idle for more than 5 minutes. The demo will stop if you press any button on the main unit or the remote.
•To switch the demo mode off completely, press and hold P.BASS (DEMO) (front panel only) for 3 seconds while the demo is in progress.
•To switch the demo mode on, press and hold P.BASS (DEMO) for 3 seconds while the system is in standby.
Raccordement |
2 |
Utilisez le cordon numérique optique pour raccorder un enregistreur numérique ou un ampli AV en utilisant OPTICAL OUT.
|
Enregistreur MD etc. |
OPTICAL |
OPTICAL |
IN |
|
DIGITAL OUT |
|
Câble audio numérique optique
Mettre sous tension
Après avoir vérifié tous les raccordements, branchez le cordon d’alimentation dans AC INLET, et l’autre extrémité dans une prise.
Félicitations ! L’installation est terminée.
Activation/désactivation du mode de démonstration
Au premier branchement de cette chaîne l’afficheur montre une séquence de démonstration. La démonstration démarrera également si la chaîne est allumée mais non sollicitée pendant plus de 5 minutes. La démonstration s’arrêtera si vous appuyez sur n’importe quelle touche de l’unité principale ou de la télécommande.
•Pour désactiver complètement le mode de démonstration, appuyez et maintenez enfoncé P.BASS (DEMO) (panneau frontal uniquement) pendant 3 secondes alors que la démonstration est en cours.
•Pour activer le mode de démonstration, appuyez et maintenez enfoncé P.BASS (DEMO) pendant 3 secondes alors que la chaîne est en mode d’attente.
15
En/Fr
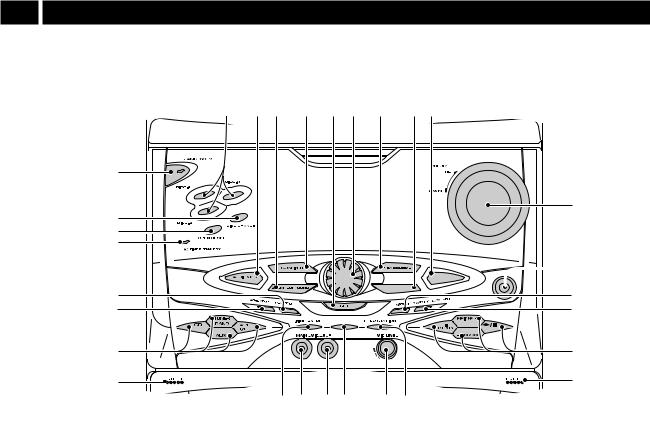
3 Controls & Displays
Front panel
The illustration on this page shows the XR-A780. Not all features |
model: XR-A780 |
|
are available on the XR-A3800, XR-A380.
1 |
2 |
3 |
4 |
5 |
6 |
7 |
8 |
9 |
29 |
|
|
|
W2-2001 |
|
|
|
|
10
28
27
26
 11
11
SURROUND MODE
DISPLAY MODE
25 |
PHONES |
12 |
24 |
|
13 |
|
REPEAT |
23 |
14 |
22 |
|
15 |
21 20 |
19 18 |
17 16 |
1 DISC-1/2/3 (page 23)
2 AUDIO MODE (page 37)
3 ZOOM SURROUND (page 39)
4 EQUALIZER (page 38)
5SET
Use to enter timer/clock settings, or user sound settings.
6JOG dial
Use to morph between sound settings, and when setting the clock or timer.
7 P.BASS (DEMO) (page 15, 39)
8 DISPLAY MODE (page 20, 40)
9 SURROUND MODE (page 37)
10 VOLUME UP/DOWN
Use to adjust the overall volume.
11PHONES jack (Headphones)
Plug in a pair of headphones to this jack.
12MONO (page 24)
13TIMER / CLOCK ADJ (page 20, 41, 43)
14Playback/tuning controls 7ST. MEMORY (page 30)
¢⁄¡·+ (page 21, 24, 30)
–·1⁄4 (page 21, 24, 30) 26 (page 21, 26)
15EJECT (tape II)
Press to open the cassette door of deck II.
16FREQ / STATION (page 31)
17MIC LEVEL (page 36)
18REPEAT (page 29)
19MIC SUB (page 36)
20MIC MAIN (page 36)
21XR-A780: 2NR* ON/OFF (page 25, 33)
XR-A3800, XR-A380: RANDOM (page 29)
22EJECT (tape I)
Press to open the cassette door of deck I.
23Function select buttons CD (page 20)
TUNER BAND (page 20, 24) AUX (page 20)
TAPE I/II (page 20)
24ASES / COPY (page 34)
25REC / STOP (page 33)
26TIMER STANDBY indicator (page 43)
27OPEN/CLOSE (page 21, 23)
28DISC CHANGE (page 23)
29STANDBY/ON and standby indicator
Press to switch the unit between standby and on. Indicator lights in standby.
*Manufactured under licence from Dolby Laboratories. “Dolby” and the double-D symbol are trademarks of Dolby Laboratories.
16
En
 Loading...