


XV-DV77
POWERED SUBWOOFER
S-DV77SW
SATELLITE SPEAKER
S-DV77ST

These labels can be found on the DVD/CD tuner rear panel (US model)/bottom panel (European model), and on the powered subwoofer rear panel.
CAUTION
RISK OF ELECTRIC SHOCK
DO NOT OPEN
Thank you for buying this PIONEER product.
Please read through these operating instructions so you will know how to operate your model properly. After you have finished reading the instructions, put them away in a safe place for future reference.
When using this product, follow the instructions written on the underside of the unit, which concern the XV-DV77.
CAUTION
This product contains a laser diode of higher class than 1. To ensure continued safety, do not remove any covers or attempt to gain access to the inside of the product.
Refer all servicing to qualified personnel.
The following caution label appear on your player.
Location: On the bottom panel of XV-DV77
CLASS 1
LASER PRODUCT
Inside the bonnet of XV-DV77
CAUTION : VISIBLE AND INVISIBLE LASER RADIATION WHEN OPEN. AVOID EXPOSURE TO BEAM.
VORSICHT : SICHTBARE UND UNSICHTBARE LASERSTRAHLUNG, WENNABDECKUNG GEÖFFNET
NICHT DEM STRAHL AUSSETZEN!
ADVARSEL : SYNLIG OG USYNLIG LASERSTRÅLING VED ÅBNING UNDGÅ UDSÆTTELSE FOR
STRÀLING.
VARNING |
: |
SYNLIG OCH OSYNLIG LASERSTRÅLNING NÄR DENNA DEL ÄR ÖPPNAD BETRAKTA |
|
|
EJ STRÅLEN. |
VARO! |
: AVATTAESSA ALTISTUT NÄKYVÄ JA NÄKYMÄTTÖMÄLLE LASERSATEIL YLLE. ÄLÄ |
|
|
|
KATSO SÄTEESEN. |
CUIDADO |
: |
RADIACIÓN LÁSER VISIBLE E INVISIBLE AL ESTAR ABIERTO. EVITAR EXPOSICIÓN AL |
|
|
RAYO. |
VRW1872
|
|
|
|
|
|
|
|
|
|
|
|
|
|
|
|
|
|
|
|
|
|
|
|
|
|
|
|
|
|
|
|
|
|
|
|
|
|
|
|
|
|
|
|
|
|
|
|
|
|
|
|
|
|
|
|
|
|
|
|
|
|
|
|
|
|
|
|
|
|
|
|
|
|
|
|
|
|
|
|
|
|
|
|
|
|
|
|
|
|
|
|
|
|
|
|
|
|
|
|
|
|
|
|
|
|
|
|
|
|
|
|
|
|
|
|
|
|
|
|
|
|
|
|
|
|
|
|
|
|
|
|
|
|
|
|
|
|
|
|
|
|
|
|
|
|
|
|
|
|
|
|
|
|
|
|
|
|
|
|
|
|
|
|
|
|
|
|
|
|
|
|
|
|
|
|
|
|
|
|
|
|
|
|
|
|
|
|
|
|
|
|
|
|
|
|
WARNING: Slot and openings in the cabinet are |
|||||||||||||
|
provided for ventilation and to ensure reliable |
|
|
|||||||||||
|
operation of the product and to protect it from |
|
|
|||||||||||
|
overheating, to prevent fire hazard, the openings |
|||||||||||||
|
should never be blocked and covered with items, such |
|||||||||||||
|
as newspapers, table-cloths, curtains, etc. Also do not |
|||||||||||||
2 |
put the apparatus on the thick carpet, bed, sofa, or |
|||||||||||||
fabric having a thick pile. |
H040 En |
|||||||||||||
|
||||||||||||||
En
Operating Environment H045 En
Operating environment temperature and humidity:
+5°C – +35°C (+41°F – +95°F); less than 85%RH (cooling vents not blocked)
Do not install in the following locations
•Location exposed to direct sunlight or strong artificial light
•Location exposed to high humidity, or poorly ventilated location
English
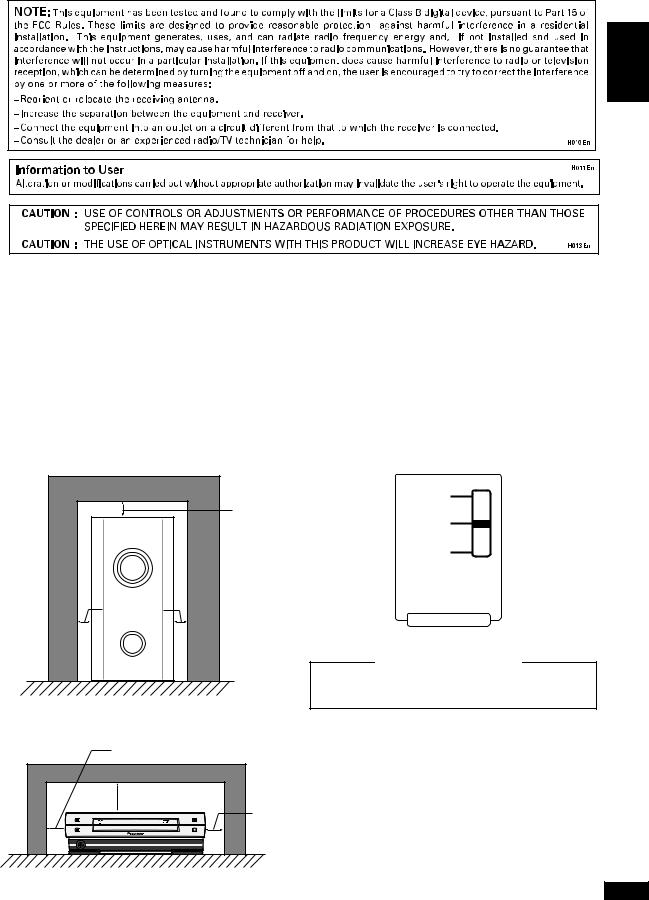
Installation Precautions
•Install components so that there are no obstructions above or either side of them, or by ventilation holes. Also install 5cm away from the wall as shown in the figures. Components feature ventilation holes on the bottom so do not install on thick pile carpets or other surfaces that may block them.
•Use a vacuum cleaner periodically to clean the port of the subwoofer to keep it free of dust.
Powered subwoofer unit (S-DV77SW)
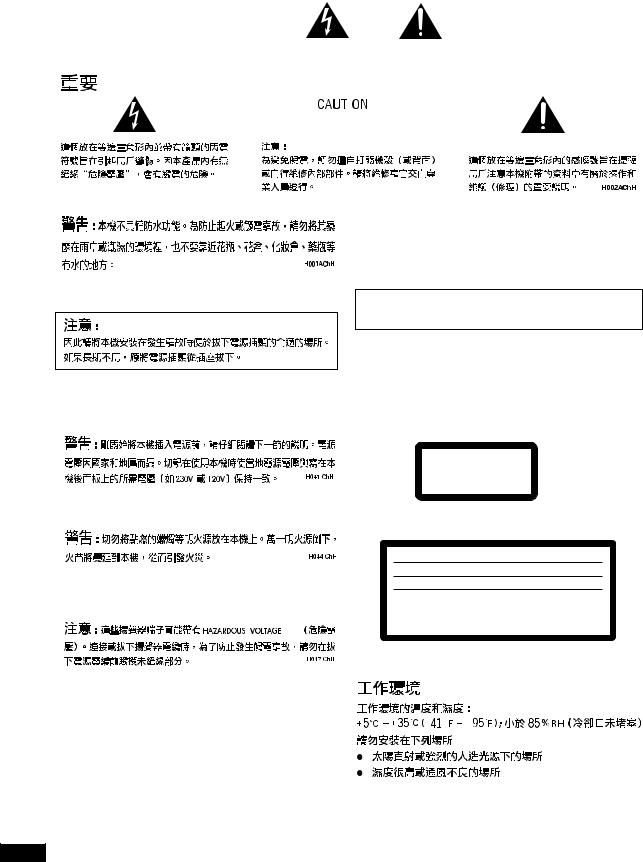
LINE VOLTAGE SELECTOR SWITCH ( Multi voltage model only)
The line voltage selector switch is located on the rear panel. Check that it is set properly before plugging the power cord into the outlet. If the voltage is not properly set or if you move to an area where the voltage requirements differ, adjust the selector switch as follows:
•Be sure to disconnect the power cord from its outlet before making this adjustment.
•Use a medium-sized (flat blade) screwdriver. Insert the tip of the screwdriver into the groove of the selector switch and turn it so that the power voltage marking of your area points to the arrow.
110 V
-120 V
5 cm or more
220 V -230 V
240 V
5 cm or more
VOLTAGE SELECTOR
CAUTION 220 – 230 V
Power source voltage is factory adjusted 220 - 230 volts. If your area is different, change voltage selectors settings.
DVD/CD Tuner (XV-DV77)
|
|
5 cm or more |
|
|
|
|
15 cm or more |
|
|
|
|
|
|
5 cm or |
6 |
PLAY/PAUSE |
1 OPEN/CLOSE |
0 |
more |
|
STANDBY/ON |
STOP |
7 |
POWER-CORD CAUTION
Handle the power cord by the plug. Do not pull out the plug by tugging the cord and never touch the power cord when your hands are wet as this could cause a short circuit or electric shock. Do not place the unit, a piece of furniture, etc., on the power cord, or pinch the cord. Never make a knot in the cord or tie it with other cords. The power cords should be routed such that they are not likely to be stepped on. A damaged power cord can cause a fire or give you an electrical shock. Check the power cord once in a while. When you find it damaged, ask your nearest PIONEER authorized service center or your dealer for a replacement.
3
En
|
|
|
|
|
|
|
|
DVD/CD |
CAUTION |
|
|||
|
|
RISK OF ELECTRIC SHOCK |
|
|||
|
|
|
|
|
DO NOT OPEN |
|
|
|
|
|
|
|
|
|
|
|
|
|
|
|
|
|
|
|
|
|
|
|
|
|
|
|
|
|
|
|
|
|
|
|
|
|
|
|
|
|
|
|
|
|
|
|
|
|
|
|
|
|
|
|
|
|
|
|
|
|
|
|
|
PIONEER
XV-DV77
H017BChH 1
XV-DV77
CLASS 1
LASER PRODUCT
XV-DV77
CAUTION : VISIBLE AND INVISIBLE LASER RADIATION WHEN OPEN. AVOID EXPOSURE TO BEAM.
VORSICHT : SICHTBARE UND UNSICHTBARE LASERSTRAHLUNG, WENNABDECKUNG GEÖFFNET
NICHT DEM STRAHL AUSSETZEN!
ADVARSEL : SYNLIG OG USYNLIG LASERSTRÅLING VED ÅBNING UNDGÅ UDSÆTTELSE FOR
STRÀLING.
VARNING |
: |
SYNLIG OCH OSYNLIG LASERSTRÅLNING NÄR DENNA DEL ÄR ÖPPNAD BETRAKTA |
|
|
EJ STRÅLEN. |
VARO! |
: AVATTAESSA ALTISTUT NÄKYVÄ JA NÄKYMÄTTÖMÄLLE LASERSATEIL YLLE. ÄLÄ |
|
|
|
KATSO SÄTEESEN. |
CUIDADO |
: |
RADIACIÓN LÁSER VISIBLE E INVISIBLE AL ESTAR ABIERTO. EVITAR EXPOSICIÓN AL |
|
|
RAYO. |
VRW1872
4
ChH

÷ 通風孔附近不得放置物品。並且如圖所示應放置於 距離牆壁5
÷ 免積塵。
S-DV77SW
5
5 |
DVD/CD XV-DV77
5
|
|
15 |
|
|
|
|
|
|
5 |
6 |
PLAY/PAUSE |
1 |
OPEN/CLOSE 0 |
|
|
STANDBY/ON |
|
STOP 7 |
|
|
|
|
English
( )
請按如下要領調整本選擇開關
¶ 開關的槽中並轉動以使貴地電源電壓標記指向箭
110 V -120 V
220 V -230 V
240 V
VOLTAGE SELECTOR
 220 230V
220 230 V
H038 ChH
PIONEER
5
ChH

Contents |
|
1 Before You Start |
|
Features ........................................................................ |
9 |
Using this manual ......................................................... |
9 |
Hints on installation .................................................. |
10 |
Avoiding problems with condensation ................... |
10 |
Moving the system ................................................... |
10 |
Discs compatible with this system ............................ |
11 |
DVD Video regions .................................................. |
11 |
2 Controls and Displays |
|
Front panel ................................................................. |
12 |
Display ........................................................................ |
12 |
Remote control .......................................................... |
14 |
3 Setting Up |
|
Introduction ............................................................... |
16 |
Switching on and setting the clock ........................... |
16 |
Changing the clock display format ......................... |
17 |
Setting up for surround sound .................................. |
18 |
Setting the speaker distances ................................. |
18 |
Balancing the surround sound ............................... |
20 |
Setting the TV System ............................................... |
21 |
Using the setup navigator ........................................ |
22 |
Setting up the remote to control your TV ............... |
24 |
Using this remote with your TV ............................. |
25 |
4 Getting Started |
|
Playing DVDs, CDs and Video CDs .......................... |
27 |
Basic playback controls .......................................... |
28 |
Navigating DVD disc menus ................................... |
29 |
Navigating Video CD PBC menus .......................... |
30 |
Listening to the radio ................................................ |
31 |
Improving FM stereo sound ................................... |
32 |
Saving station presets ............................................ |
32 |
Listening to station presets ................................... |
33 |
Naming station presets .......................................... |
34 |
Tuner system displays ................................................ |
35 |
Playing other connected components ...................... |
35 |
Reducing the auxiliary input level .......................... |
36 |
5 Using Sound modes and Effects |
|
Using the Sound menu .............................................. |
37 |
Using sound modes ................................................... |
38 |
Playing Dolby/DTS sources ................................... |
38 |
Playing other stereo sources with DSP effects ..... |
40 |
6 Playing Discs |
|
Introduction ............................................................... |
41 |
Finding what you want on a disc ............................... |
41 |
Switching camera angles ........................................... |
42 |
Switching subtitles .................................................... |
42 |
Switching audio language ......................................... |
42 |
Switching audio channels ......................................... |
43 |
Making a program list ............................................... |
43 |
Using random play .................................................... |
45 |
Using repeat play ...................................................... |
46 |
6
|
|
1 |
|
....................................... |
9 |
............................... |
9 |
.................................. |
10 |
.................... |
10 |
.............................. |
10 |
........................ |
11 |
DVD ........................... |
11 |
2 |
|
.................................... |
13 |
.................................... |
13 |
.................................... |
15 |
3 |
|
...................................... |
16 |
........................ |
16 |
........................ |
17 |
................................ |
18 |
.......................... |
18 |
............................ |
20 |
.............................. |
21 |
.............................. |
22 |
.............. |
24 |
.................... |
25 |
4 |
|
DVD CD VCD .......................... |
27 |
............................ |
28 |
DVD ......................... |
29 |
VCD PBC ......................... |
30 |
................................ |
31 |
FM .................... |
32 |
............................ |
32 |
............................ |
33 |
............................ |
34 |
............................ |
35 |
...................... |
35 |
........................ |
36 |
5 |
|
Sound ............................. |
37 |
.............................. |
38 |
/DTS ........................ |
38 |
DSP ........... |
40 |
6 |
|
...................................... |
41 |
...................... |
41 |
.............................. |
42 |
.................................. |
42 |
.............................. |
42 |
.................................. |
43 |
.............................. |
43 |
.............................. |
45 |
.............................. |
46 |
En/ChH

Looping a section of a disc .................................... |
46 |
Bookmarking a place in a disc .................................. |
47 |
Memorizing disc settings .......................................... |
47 |
Displaying disc information ...................................... |
48 |
Displays when playing ............................................ |
49 |
Displays when stopped ........................................... |
51 |
DVD and CD system displays .................................... |
51 |
Displays when playing ............................................. |
51 |
Displays when stopped ........................................... |
51 |
7 Playing MP3s |
|
Playing MP3s ............................................................. |
52 |
Searching for folders and tracks ............................... |
53 |
Using random play ..................................................... |
53 |
Using repeat play ...................................................... |
54 |
Displaying MP3 information .................................... |
54 |
Using the MP3 Navigator ......................................... |
55 |
Making a program list of MP3 tracks ....................... |
56 |
MP3 compatibility information ................................. |
57 |
8 Using the Timer |
|
Using the wake up timer ........................................... |
58 |
Activating/deactivating the wake up timer ........... |
59 |
Checking the timer settings ................................... |
60 |
Using the sleep timer ................................................ |
60 |
9 Advanced Sound Setup |
|
Dynamic Range Control ........................................... |
62 |
LFE Attenuator .......................................................... |
62 |
Dual-mono setting .................................................... |
63 |
Adjusting channel volume levels ............................... |
64 |
10 DVD Setup Menu |
|
Using the DVD Setup menu ...................................... |
65 |
Audio settings ........................................................... |
66 |
Dolby Digital Out ................................................... |
66 |
96kHz PCM Out ..................................................... |
66 |
Video settings ............................................................ |
67 |
TV Screen ................................................................ |
67 |
S-Video Out ............................................................ |
67 |
Screen Saver ........................................................... |
68 |
Background ............................................................. |
68 |
Video Adjust ........................................................... |
68 |
Slecting a preset ..................................................... |
69 |
Creating your own setting(1) ................................ |
69 |
Creating your own setting(2) ................................ |
70 |
Still Picture ............................................................. |
71 |
On Screen Display ................................................... |
71 |
Angle Indicator ....................................................... |
72 |
Language settings ..................................................... |
72 |
OSD language ......................................................... |
72 |
Audio Language ...................................................... |
72 |
Subtitle Language ................................................... |
73 |
Auto Language ......................................................... |
74 |
DVD Language ......................................................... |
75 |
Subtitle Display ....................................................... |
76 |
Subtitle Off .............................................................. |
76 |
General settings ........................................................ |
77 |
Setup Menu Mode .................................................. |
77 |
................ |
46 |
........................ |
47 |
.............................. |
47 |
.............................. |
48 |
............................ |
49 |
............................ |
51 |
DVD CD ........................... |
51 |
............................ |
51 |
............................ |
51 |
7 MP3 |
|
MP3 ................................... |
52 |
.......................... |
53 |
.............................. |
53 |
.............................. |
54 |
MP3 ............................... |
54 |
MP3 ............................... |
55 |
MP3 ..................... |
56 |
MP3 ............................... |
57 |
8 |
|
............................ |
58 |
/ ..................... |
59 |
.......................... |
60 |
............................ |
60 |
9 |
|
.............................. |
62 |
LFE ................................. |
62 |
............................ |
63 |
.......................... |
64 |
10 DVD |
|
DVD ........................... |
65 |
.................................. |
66 |
Dolby Digital Out ( ) .......... |
66 |
96kHz PCM Out (96kHz PCM ) ........... |
66 |
.................................. |
67 |
TV Screen ( ) ................... |
67 |
S-Video Out (S-Video ) ................ |
67 |
Screen Saver ( ) ............... |
68 |
Background ( )........................ |
68 |
Video Adjust ( ) ................... |
68 |
.............................. |
69 |
1 ..................... |
69 |
2 ..................... |
70 |
Still Picture ( ) .................... |
71 |
On Screen Display ( ) .............. |
71 |
Angle Indicator ( ) ............... |
72 |
.................................. |
72 |
OSD language (OSD )................... |
72 |
Audio Language ( ) ................ |
72 |
Subtitle Language ( )............... |
73 |
Auto Language ( ) ................. |
74 |
DVD Language (DVD ) .................. |
75 |
Subtitle Display ( ) ................ |
76 |
Subtitle Off ( ) .................... |
76 |
.................................. |
77 |
Setup Menu Mode ( ) .......... |
77 |
English
7
En/ChH

Parental Lock .......................................................... |
77 |
Registering a new password .................................... |
78 |
Changing your password ......................................... |
78 |
Setting/changing the Parental Lock level .............. |
79 |
Setting/changing the Country Code ..................... |
79 |
Country code list .................................................... |
80 |
Parental Lock ( ) .................... |
77 |
................................ |
78 |
.................................. |
78 |
/ Parental Lock .................. |
79 |
/ Country Code ..................... |
79 |
.............................. |
80 |
11 Connecting Up
For instructions on connecting up the speakers and the powered subwoofer, see the separate instruction sheet, Setting Up the System.
Connecting other components ................................. |
81 |
Connecting external antennas .................................. |
83 |
External AM antenna .............................................. |
83 |
External FM antenna .............................................. |
83 |
12 Additional Information |
|
Child lock .................................................................. |
84 |
Beep mode ................................................................ |
84 |
Tuner frequency step ................................................ |
84 |
Dimming the display ................................................. |
85 |
Taking care of your system ....................................... |
85 |
Disc lens cleaner ..................................................... |
85 |
Taking care of your discs ........................................ |
85 |
Storing discs ........................................................... |
86 |
Discs to avoid ......................................................... |
86 |
Glossary ..................................................................... |
87 |
Language code list .................................................... |
88 |
Screen sizes and disc formats .................................. |
89 |
Troubleshooting ........................................................ |
90 |
Amplifier fault finding ............................................ |
90 |
Optional component fault finding ......................... |
90 |
DVD fault finding .................................................... |
90 |
Troubleshooting tips ............................................... |
91 |
Resetting the system ................................................. |
92 |
Specifications ............................................................ |
95 |
Demo display .......................................................... |
100 |
11 |
|
|
|
|
|
.............................. |
81 |
.............................. |
83 |
AM .............................. |
83 |
FM .............................. |
83 |
12 |
|
.................................. |
84 |
................................ |
84 |
............................ |
84 |
............................ |
85 |
.................................. |
85 |
.......................... |
85 |
................................ |
85 |
................................ |
86 |
.......................... |
86 |
.................................... |
87 |
.............................. |
88 |
........................ |
89 |
.................................. |
90 |
........................ |
90 |
...................... |
90 |
DVD ........................... |
90 |
............................ |
91 |
.................................. |
92 |
...................................... |
95 |
..................................... |
100 |
8
En/ChH

Before You Start

 Features
÷Superlative audio performance with Dolby Digital* and DTS** software
The XV-DV77 delivers breathtaking sound quality with Dolby Digital and DTS discs, and is also compatible with 96kHz/24-bit PCM sources.
÷Super Fine Focus Digital Filter technology
This high-quality digital video filter gives you great picture quality with DVD discs. The filter is effective all the way up the video frequency range, and also reduces noise outside the video frequency range.
•This product incorporates copyright protection technology that is protected by method claims of certain U. S. patents and other intellectual property rights owned by Macrovision Corporation and other rights owners. Use of this copyright protection technology must be authorized by Macrovision Corporation, and is intended for home and other limited viewing uses only unless otherwise authorized by Macrovision Corporation. Reverse engineering or disassembly is prohibited.
*Manufactured under license from Dolby Laboratories. “Dolby”, “Pro Logic” and the double-D symbol are trademarks of Dolby Laboratories. Confidential unpublished works. © 1992-1997 Dolby Laboratories. All rights reserved.
**“DTS” and “DTS Digital Surround” are trademarks of Digital Theater Systems, Inc. Manufactured under license from Digital Theater Systems, Inc.

 Using this manual
This manual is for the XV-DV77 DVD Surround System. It is divided into several sections: information for before you start using the system (chapters 1–2); getting started using the system (chapters 3–4); more advanced features (chapters 5–9); system settings and preferences (chapter 10); connecting up the system and using this system with external components (chapter 11). Chapter 12 provides additional information, including a glossary of terms used in this manual, and a troubleshooting section.
1
|
|
English |
|||
|
|||||
÷ |
Dolby Digital * DTS** |
||||
|
|||||
|
|
|
|||
|
XV-DV77 DTS |
|
|||
|
96kHz/24 PCM |
|
|||
|
|
||||
÷ |
|
|
|
||
|
|
||||
|
DVD |
|
|
||
|
|
|
|
||
|
|
|
|
||
|
|
|
|
|
|
|
|
|
|
||
|
÷ |
|
|||
|
Macrovision |
|
|||
|
|
|
|||
|
Macrovision |
|
|||
|
Macrovision |
|
|||
|
|
|
|||
|
|
|
|||
*“Dolby” “Pro Logic” D 1992-1997
**“DTS” “DTS Digital Surround”


XV-DV77 DVD 1-23-45-9 10 1112
9
En/ChH

1
10
Before You Start

 Hints on installation
We want you to enjoy using this unit for years to come, so please bear in mind the following points when choosing a suitable location for it:
Do...
Use in a well-ventilated room.
Place on a solid, flat, level surface, such as a table, shelf or stereo rack.
Don’t...
Use in a place exposed to high temperatures or humidity, including near radiators and other heat-generating appliances.
Place on a window sill or other place where the system will be exposed to direct sunlight.
Use in an excessively dusty or damp environment.
Place directly on top of an amplifier, or other component in your stereo system that becomes hot in use.
Use near a television or monitor as you may experience interference—especially if the television uses an indoor antenna.
Use in a kitchen or other room where the system may be exposed to smoke or steam.
Use on a thick rug or carpet, or cover with cloth—this may prevent proper cooling of the unit.
Place on an unstable surface, or one that is not large enough to support all four of the unit’s feet.

 Avoiding problems with condensation
Condensation may form inside the system if it is brought into a warm room from outside, or if the temperature of the room rises quickly. Although the condensation won’t damage the system, it may temporarily impair its performance. For this reason you should leave it to adjust to the warmer temperature for about an hour before switching on and using.

 Moving the system
If you need to move the system, first switch it off and unplug from the wall outlet. Never lift or move the unit during playback—discs rotate at a high speed and may be damaged.


安裝場所之前請記住下列幾點
...
或音響架上。
...
近。
是使用室內天線的電視機附近。
本機散熱不良。


右讓其適應較高溫度後再打開使用。


會使其受損。
En/ChH
Before You Start

 Discs compatible with this system
Any disc that displays one of the following logos should play in this system. Other formats, including DVD-RAM, DVDROM, DVD-Audio, SACD Photo CD and CD-ROM (except those containing MP3 files) will not play.
DVD Video compatibility:
•Logo: 
•Single-sided or double-sided discs
•Single layer or dual layer discs
•Dolby Digital, DTS, MPEG or Linear PCM digital audio
•MPEG-2 digital video
DVD discs are generally divided into one or more titles. Titles may be further subdivided into chapters.
Audio CD and MP3 compatibility:
•Logos: 


•12cm or 8cm discs
•Linear PCM digital audio or MP3 (MPEG-1 Audio Layer 3)
•CD, CD-R* and CD-RW* formats
CDs are divided into tracks.
* This system can play CD-R and CD-RW discs recorded with audio. However, depending on the condition of the player and the disc, you may find that not all discs will play successfully. (For example, if the disc is scratched or dirty, or if the player’s pickup lens is dirty.) Note that this unit cannot record onto recordable discs.
Video CD compatibility:
•Logo: 


•12cm or 8cm discs
•MPEG-1 digital audio
•MPEG-1 digital video
Video CDs are divided into tracks.


DVD-RAM DVD-ROM DVD-Audio SACD Photo CD CD-ROM MP3
DVD
÷
÷DTS MPEG PCM
÷MPEG-2
DVD
CD MP3
÷


÷12 8
÷PCM MP3 3 MPEG-1
÷CD CD-R* CD-RW*
CD
* CD-R CD-RW
VCD
÷

÷12 8
÷MPEG-1
÷MPEG-1
VCD
1
English

 DVD Video regions
3 4 ALL
All DVD Video discs carry a region mark on the case somewhere that indicates which region(s) of the world the disc is compatible with. Your DVD system also has a region mark, which you can find on the rear panel. Discs from incompatible regions will not play in this system. Discs marked ALL will play in any player.

 DVD
DVD
3 4 ALL
DVD DVDALL
11
En/ChH
2Controls and Displays

 Front panel
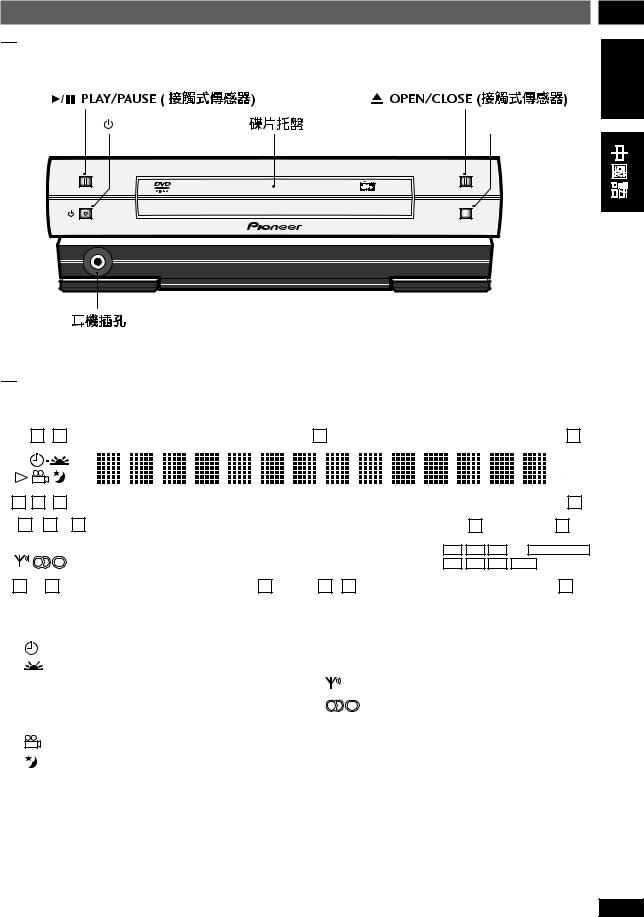
6 PLAY/PAUSE ( touch sensor) |
|
0 OPEN/CLOSE (touch sensor) |
|
STANDBY/ON |
Disc tray |
|
7 STOP |
6 PLAY/PAUSE |
|
1 OPEN/CLOSE |
0 |
STANDBY/ON |
|
STOP |
7 |
Headphone jack

 Display
|
1 |
2 |
3 |
|
|
|
4 |
|
|
|
|
|
|
|
-DSP- |
5 |
6 |
7 |
|
|
|
|
8 |
9 |
10 |
11 |
|
|
12 |
|
13 |
COND.LAST 96KHz |
|
L |
C |
R |
2PRO LOGIC |
||
|
|
RPT–1 |
PGM RDM |
Ls |
S |
Rs |
LFE 2DIGITAL |
14 |
15 |
16 |
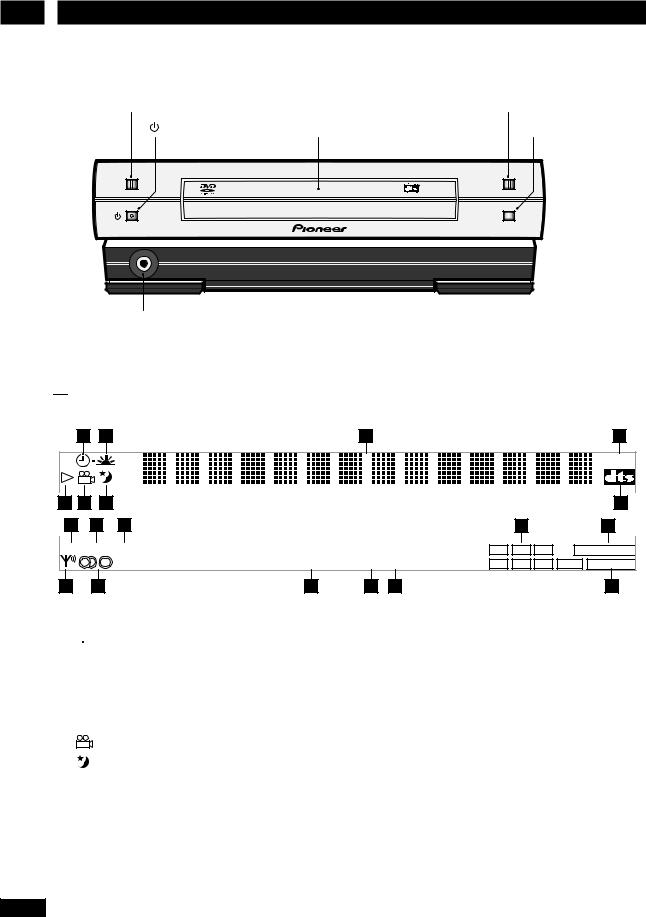
1  Timer – pages 58-61
2  Wake up timer page 58
3 Character display
4- DSP - – page 40
5#Lights when a disc is playing
6 |
Multi-angle scene – page 42 |
|
7 |
Sleep timer – page 60 |
|
8 |
|
Lights when playing a DVD with DTS sound |
|
||
9COND. Condition memory – page 47
10LAST Last memory – page 47
1196kHz Lights when playing a disc with 96kHz audio
17 |
18 |
19 |
12Active channel indicators
132PRO LOGIC Lights when playing a Dolby Pro Logic source
14
 Indicates strength of broadcast signal
15 Auto stereo/mono mode – page 32
16RPT, RPT-1 Repeat play mode – pages 46, 54
17PGM Program play – pages 43,56
18RDM Random play – pages 45, 53
192DIGITAL Lights when playing a Dolby Digital source
12
En


2
English
STANDBY/ON |
7 STOP |
6 |
PLAY/PAUSE |
1 OPEN/CLOSE |
0 |
|
STANDBY/ON |
STOP |
7 |


|
|
|
|
1 |
|
|
2 |
|
|
|
|
|
|
|
|
3 |
|
|
|
|
|
|
|
|
|
4 |
|
|||||||||||||
|
|
|
|
|
|
|
|
|
|
|
|
|
|
|
|
|
|
|
|
|
|
|
|
|
|
|
|
|
|
|
|
|
|
|
|
|
|
|
|
|
|
|
|
|
|
|
|
|
|
|
|
|
|
|
|
|
|
|
|
|
|
|
|
|
|
|
|
|
|
|
|
|
|
-DSP- |
|||||||
|
|
|
|
|
|
|
|
|
|
|
|
|
|
|
|
|
|
|
|
|
|
|
|
|
|
|
|
|
|
|
|
|||||||||
|
|
|
|
|
|
|
|
|
|
|
|
|
|
|
|
|
|
|
|
|
|
|
|
|
|
|
|
|
|
|
|
|
|
|
|
|
|
|
|
|
|
|
|
|
|
|
|
|
|
|
|
|
|
|
|
|
|
|
|
|
|
|
|
|
|
|
|
|
|
|
|
|
|
|
|
|
|
|
|
|
|
|
|
|
|
|
|
|
|
|
|
|
|
|
|
|
|
|
|
|
|
|
|
|
|
|
|
|
|
|
|
|
|
|
|
|
|
|
|
|
|
|
|
|
|
|
|
|
|
|
|
|
|
|
|
|
|
|
|
|
|
|
|
|
|
|
|
|
|
|
|
|
|
|
|
|
|
|
|
|
|
|
|
|
|
|
|
|
|
|
|
|
|
|
|
|
|
|
|
|
|
|
|
|
|
|
|
|
|
|
|
|
|
|
|
|
|
|
|
|
|
|
||
|
5 |
|
6 |
|
|
7 |
|
|
|
|
|
|
|
|
|
|
|
|
|
|
|
|
|
|
|
8 |
|
|||||||||||||
|
|
|
|
|
|
|
|
|
|
|
|
|
|
|
|
|
|
|
|
|
|
|
|
|
|
|
|
|
|
|
|
|
|
|||||||
|
|
9 |
|
|
10 |
|
|
|
11 |
|
|
|
|
|
|
|
|
|
|
|
|
|
12 |
|
13 |
|
|
|
|
|||||||||||
|
|
|
|
|
|
|
|
|
|
|
|
|
|
|
|
|
|
|
|
|
|
|
|
|
|
|
|
|
|
|
|
|
|
|
|
|
|
|
|
|
|
|
|
|
|
|
|
|
|
|
|
|
|
|
|
|
|
|
|
|
|
|
|
|
|
|
|
|
|
|
|
|
|
|
|
|
|
|
|
|
|
|
COND.LAST 96KHz |
|
|
|
|
|
|
|
|
L |
C |
R 2PRO LOGIC |
||||||||||||||||||||||||||||
|
|
|
|
|
|
|
|
|
|
|
|
|
|
|
|
|
RPT–1 |
|
PGM RDM |
|
|
|
Rs LFE |
|
|
|
|
|
|
|
|
|||||||||
|
|
|
|
|
|
|
|
|
|
|
|
|
|
Ls |
S |
2DIGITAL |
||||||||||||||||||||||||
|
|
|
|
|
|
|
|
|
|
|
|
|
|
|
|
|
|
|
|
|
|
|
|
|
|
|
|
|
|
|
|
|
|
|
|
|
|
|
||
|
14 |
|
|
|
|
15 |
|
|
16 |
|
|
|
17 |
|
18 |
|
|
|
|
|
19 |
|
|
|
||||||||||||||||
1 |
|
|
|
|
|
|
58-61 |
12 |
|
|
|
|
|
|
|
|
|
|
|
|
|
|||||||||||||||||||
|
|
|
|
|
|
|
|
|
|
|
|
|
|
|
|
|
|
|
|
|
|
|
|
|
|
|||||||||||||||
2 |
|
|
|
|
|
|
|
58 |
13 |
|
2 PRO LOGIC Pro Logic |
|||||||||||||||||||||||||||||
|
|
|
|
|
||||||||||||||||||||||||||||||||||||
|
|
|
||||||||||||||||||||||||||||||||||||||
3 |
|
|
|
14 |
|
|
|
|
|
|
|
|
|
|
|
|
|
|
|
|||||||||||||||||||||
4 |
|
|
-DSP- 40 |
15 |
|
|
|
|
|
/ 32 |
||||||||||||||||||||||||||||||
|
|
|
|
|
|
|
|
|
|
|
|
|
|
|
|
|
|
|
|
|
|
|
|
|
|
|||||||||||||||
5 |
|
|
# |
16 |
|
RPT, RPT-1 46 54 |
||||||||||||||||||||||||||||||||||
|
|
|
|
|
|
|
|
|
|
|
|
|
|
|
|
|
|
|
|
|
|
|||||||||||||||||||
6 |
|
|
|
|
|
|
42 |
17 |
|
PGM 43 56 |
||||||||||||||||||||||||||||||
7 |
|
|
|
|
|
|
60 |
18 |
|
RDM 45 53 |
||||||||||||||||||||||||||||||
8 |
|
|
|
|
|
|
|
|
|
|
|
DTS DVD |
19 |
|
2DIGITAL |
|
||||||||||||||||||||||||
|
|
|
|
|
|
|
|
|
|
|
|
|||||||||||||||||||||||||||||
|
|
|
|
|
||||||||||||||||||||||||||||||||||||
9 |
|
|
COND. 47 |
|
|
|
|
|
|
|
|
|
|
|
|
|
|
|
|
|
|
|
|
|||||||||||||||||
10LAST 47
1196kHz 96kHz
13
ChH
2Controls and Displays

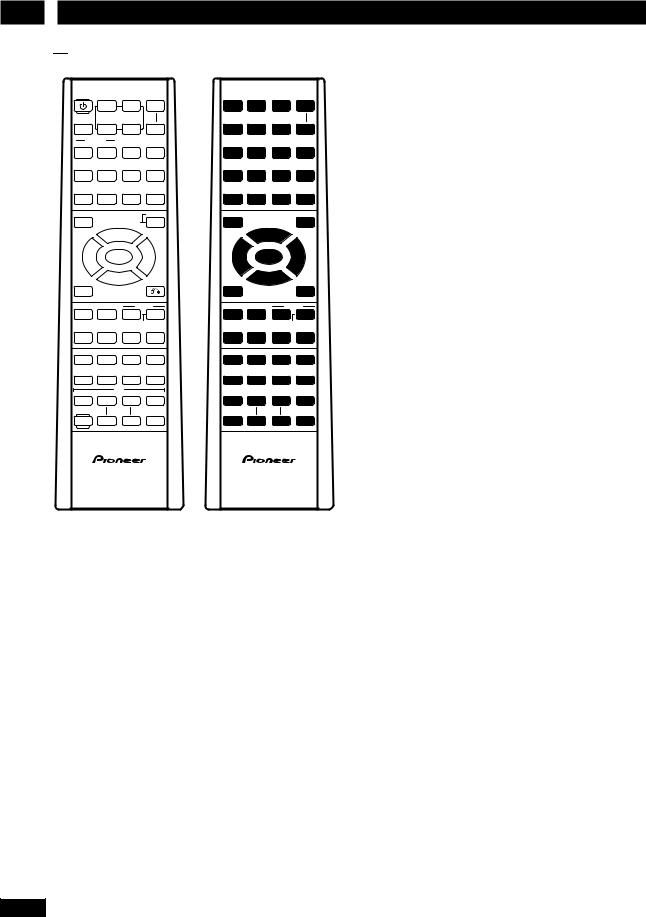
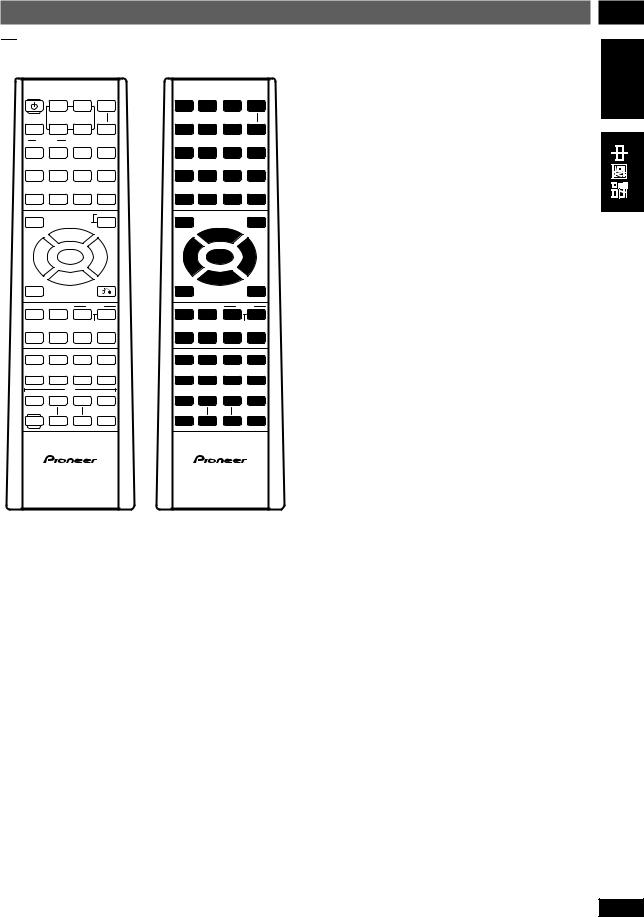
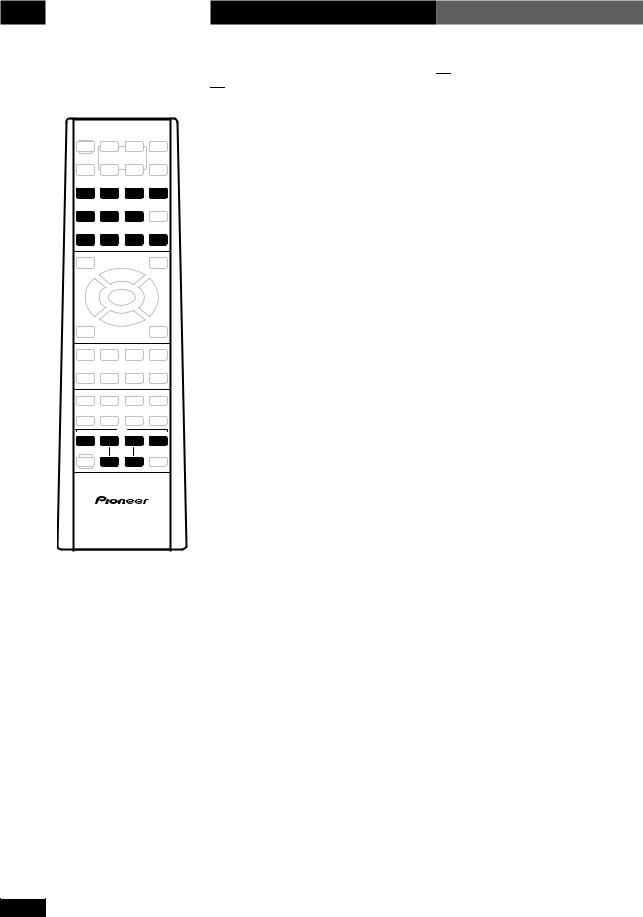
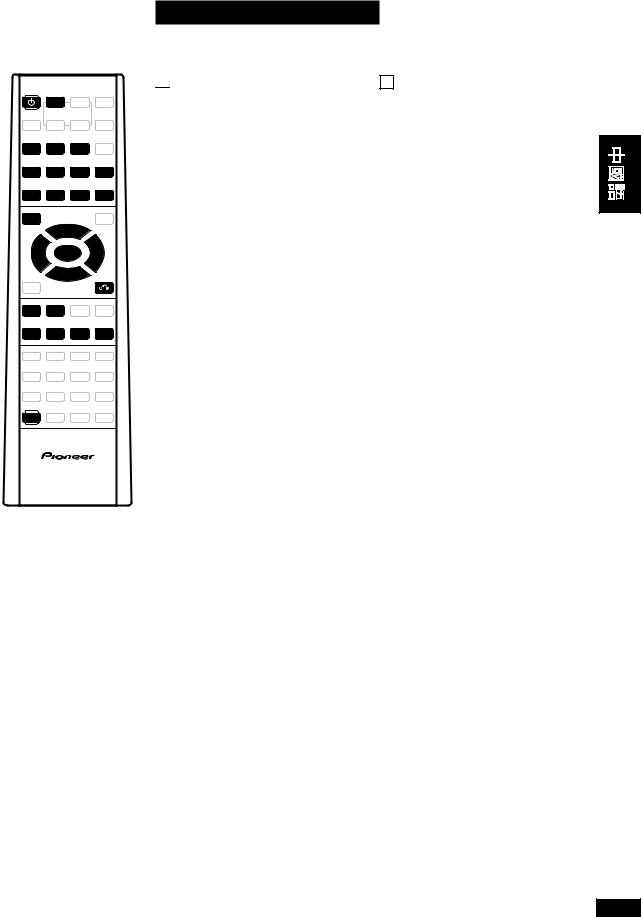
 Remote control
STANDBY |
|
|
SYSTEM |
/ON |
CD |
TUNER |
VOL |
|
DVD |
FM/AM |
+ |
V1/V2/V3 |
DIRECT PLAY 3 |
|
|
|
|
– |
|
VIDEO |
MD |
TAPE |
|
MEMORY |
|
TEST |
|
CONDITION |
LAST |
SEARCH |
TONE |
1 |
2 |
3 |
CLR |
REPEAT |
A–B |
RANDOM |
|
4 |
5 |
6 |
>10 |
DIMMER PROGRAM |
|
|
|
7 |
8 |
9 |
10/0 |
TOP MENU |
|
|
SYSTEM |
MENU |
|
SETUP |
DVD |
|
5 |
|
|
2 |
ENTER |
3 |
|
|
∞ |
RETURN |
|
|
|
|
|
SOUND |
|
|
|
|
|
SYSTEM |
|
6 |
7 |
MENU |
DISP |
|
|
CHARACTER |
|
eSTEP/SLOW E |
FOLDER/GROUP |
||
1 ¡ 4 ¢ |
|||
|
|
–PREV |
NEXT+ |
MUTE |
CH LEVEL SURROUND |
DSP |
|
AUDIO |
SUBTITLE |
ANGLE |
DVD DISP |
|
TV |
|
|
POWER |
CH |
VOL |
INPUT |
++
SHIFT |
CLOCK/ |
|
TIMER |
||
|
– –
1 |
2 |
3 |
4 |
5 |
6 |
7 |
|
8 |
9 |
10 |
11 |
12 |
13 |
14 |
15 |
16 |
17 |
18 |
19 |
20 |
|
|
21 |
|
|
22 |
|
23 |
|
24 |
25 |
|
|
26 |
|
27 |
|
|
28 |
29 |
30 |
31 |
32 |
33 |
34 |
35 |
36 |
37 |
38 |
39 |
40 |
41 |
42 |
43 |
44 |
45 |
46 |
47 |
48 |
49 |
|
|
50 |
1STANDBY/ON  page 16
2DVD/CD (DIRECT PLAY 3) page 27
3 TUNER FM/AM (DIRECT PLAY 3) page 31
4SYSTEM VOL +/–
5 VIDEO V1/V2/V3 page 35
6 MD (DIRECT PLAY 3)
7 TAPE (DIRECT PLAY 3)
8 1 | CONDITION page 48
92 | LAST page 47
103 | SEARCH page 41, 53
11CLR | TEST TONE page 20
124 | REPEAT pages 46, 54
135 | A–B page 46
146 | RANDOM pages 45, 53
15>10 Use to select numbers over 10
14
167 | DIMMER page 85
178 | PROGRAM pages 43, 56
189
1910/0 Use as 10 or 0
20MENU | TOP MENU page 29
21DVD SETUP | SYSTEM SETUP pages 18, 65
225 Cursor up
232 Cursor left
24ENTER
253 Cursor right
26∞ Cursor down
27SOUND page 37
28RETURN pages 29–30
296 pages 27–28, 52
307 pages 28, 52
31SYSTEM MENU
32SYSTEM DISP | CHARACTER pages 34, 35, 51
331| eSTEP/SLOW pages 28–29
34¡| ESTEP/SLOW pages 28–29
354| –PREV | FOLDER/GROUP pages 28–29, 53
36¢| +PREV | FOLDER/GROUP pages 28–29, 53
37MUTE Press to mute/restore the sound
38CH LEVEL page 64
39SURROUND page 38
40DSP page 40
41AUDIO page 42
42SUBTITLE page 42
43ANGLE page 42
44DVD DISP pages 48–49, 54
45POWER page 25
46CH+/– page 25
47VOL+/– page 25
48INPUT page 25
49SHIFT Press to access alternative button functions
50CLOCK/TIMER pages 16, 58–60
En


STANDBY |
|
|
SYSTEM |
/ON |
CD |
TUNER |
VOL |
|
DVD |
FM/AM |
+ |
V1/V2/V3 |
DIRECT PLAY 3 |
|
|
|
|
– |
|
VIDEO |
MD |
TAPE |
|
MEMORY |
|
TEST |
|
CONDITION |
LAST |
SEARCH |
TONE |
1 |
2 |
3 |
CLR |
REPEAT |
A–B |
RANDOM |
|
4 |
5 |
6 |
>10 |
DIMMER PROGRAM |
|
|
|
7 |
8 |
9 |
10/0 |
TOP MENU |
|
|
SYSTEM |
MENU |
|
SETUP |
DVD |
|
5 |
|
|
2 |
ENTER |
3 |
|
|
∞ |
RETURN |
|
|
|
|
|
SOUND |
|
|
|
|
|
SYSTEM |
|
6 |
7 |
MENU |
DISP |
|
|
CHARACTER |
|
eSTEP/SLOW E |
FOLDER/GROUP |
||
1 ¡ 4 ¢ |
|||
|
|
–PREV |
NEXT+ |
MUTE |
CH LEVEL SURROUND |
DSP |
|
AUDIO |
SUBTITLE |
ANGLE |
DVD DISP |
|
TV |
|
|
POWER |
CH |
VOL |
INPUT |
++
SHIFT |
CLOCK/ |
|
TIMER |
||
|
– –
1 |
2 |
3 |
4 |
5 |
6 |
7 |
|
8 |
9 |
10 |
11 |
12 |
13 |
14 |
15 |
16 |
17 |
18 |
19 |
20 |
|
|
21 |
|
|
22 |
|
23 |
|
24 |
25 |
|
|
26 |
|
27 |
|
|
28 |
29 |
30 |
31 |
32 |
33 |
34 |
35 |
36 |
37 |
38 |
39 |
40 |
41 |
42 |
43 |
44 |
45 |
46 |
47 |
48 |
49 |
|
|
50 |
1STANDBY/ON  16
16
2DVD/CD (DIRECT PLAY 3) 27
3 TUNER FM/AM (DIRECT PLAY 3) 31
4SYSTEM VOL +/–
5 VIDEO V1/V2/V3 35
6 MD (DIRECT PLAY 3)
7TAPE (DIRECT PLAY 3)
8 1 | CONDITION 48
92 | LAST 47
103 | SEARCH 41,53
11CLR | TEST TONE 20
124 | REPEAT 46,54
135 | A–B 46
146 | RANDOM 45,53
15>10 10
167 | DIMMER 85
178 | PROGRAM 43,56
189
1910/0 10 0
20MENU | TOP MENU 29
21DVD SETUP | SYSTEM SETUP 18,65
225
232
24ENTER
253
26∞
27SOUND 37
28RETURN  29-30
29-30
296 27-28,52
307 28,52
31SYSTEM MENU
32SYSTEM DISP | CHARACTER 34,35,51
331| eSTEP/SLOW 28-29
34¡| ESTEP/SLOW 28-29
354| –PREV | FOLDER/GROUP 28-29,
53
36¢| +PREV | FOLDER/GROUP 28-29, 53
37MUTE /
38CH LEVEL 64
39SURROUND 38
40DSP 40
41AUDIO 42
42SUBTITLE 42
43ANGLE 42
44DVD DISP 48-49,54
45POWER 25
46CH+/– 25
47VOL+/– 25
48INPUT 25
49SHIFT
50CLOCK/TIMER 16,58-60
2
English
15
ChH
3
STANDBY /ON
5
2 ENTER 3
∞
SYSTEM
MENU
CLOCK/
TIMER
16
Setting Up

 Introduction
Before starting, make sure that your system is installed and set up according to the Setting up the system guide, and plugged into a power outlet.
This chapter covers switching on and setting the clock, using the Setup Navigator to set some basic preferences, using all the basic controls for playing discs, using the tuner and playing external sources.

 Switching on and setting the clock
This system has a built in clock, which needs to be set to be able to use the timer features.
1Press  STANDBY/ON to switch on.
2Press CLOCK/TIMER then use the 2 or 3 buttons to select CLOCK ADJUST.
CLOCK ADJUST
3Press ENTER.
You should see a time displayed, with the hour part blinking.
9:OO am


插入電源插座。
使用調諧器及播放外接設備。


1 STANDBY/ON
2CLOCK/TIMER 2
3 CLOCK
ADJUST
CLOCK ADJUST
3ENTER
9:OO am
En/ChH

Setting Up |
|
3 |
4Use the 5 and ∞ buttons to set the hour, then press ENTER.
• The default clock display format is 12-hour.
5Use the 5 and ∞ buttons to set the minute, then press ENTER.
The display blinks for 2 seconds to indicate that the time has been set.
Press SYSTEM DISP anytime to see the clock when the system is on or in standby.

 Changing the clock display format
You can choose to display the clock and timer settings in 12-hour (default setting) or 24-hour format.
1If the system is on, press STANDBY/ON to put it into standby.
2Press SYSTEM MENU and select HOUR FORMAT.
• Use the 2 and 3 buttons to change the currently displayed option. Press ENTER to select.
3Select 12-HOUR or 24-HOUR format.
• Use the 5 and ∞ buttons to change the currently displayed option. Press ENTER to select.
The system returns to standby after pressing ENTER.
4 |
5 |
∞ ENTER |
English |
|
÷ 12 |
|
|
55 ∞
ENTER
2

SYSTEM DISP


12
24
1  STANDBY/ ON
2SYSTEM MENU HOUR FORMAT
÷ 2 3
ENTER
312-HOUR 24-HOUR
÷ 5 ∞
ENTER
ENTER
17
En/ChH

3
STANDBY |
SYSTEM |
/ON |
VOL |
|
+ |
|
– |
|
TEST |
|
TONE |
SYSTEM
SETUP DVD
5
2 ENTER 3
∞
SYSTEM
MENU
SURROUND
SHIFT
18
Setting Up

 Setting up for surround sound
You can use this system right out of the box for surround sound with just the default settings. However, for really great surround sound, we recommend that you spend a few minutes making some settings that match this system to your listening room. These include setting the distances from your listening position to your speakers, and balancing the speaker volumes. Unless you change the layout of your speakers or main listening position, you only need to make these settings once.

 Setting the speaker distances
1 Press SYSTEM SETUP.
• To access this function, hold down
SHIFT, then press SYSTEM SETUP.
2Press 2 or 3 until you see
FRONT in the display.
FRONT SP 3.Om
3Use the 5 and ∞ buttons to set the distance from your main listening position to the front left/right speakers.
Ideally, your listening position should be equidistant from the two front speakers.
The default setting is 3m. You can adjust the range from 0.3m to 9.0m in steps of 0.3m.


1SYSTEM SETUP
÷
SHIFT SYSTEM
SETUP
22 3
FRONT
FRONT SP 3.Om
35 ∞
/
個前置揚聲器之間的距離應相等。 默認設置是3 0.3
9.0 0.3
En/ChH

Setting Up
4Press 3 to move on to the CENTER speaker setting.
CENTER SP 3.Om
5Use the 5 and ∞ buttons to set the distance from your main listening position to the center speaker.
The default setting is 3m. You can adjust the range from 0.3m to 9.0m in steps of 0.3m.
6Press 3 to move on to the SURROUND speakers setting.
SURR. SP 3.Om
7Use the 5 and ∞ buttons to set the distance from your main listening position to the surround speakers.
Ideally, your listening position should be equidistant from the surround speakers.
The default setting is 3m. You can adjust the range from 0.3m to 9.0m in steps of 0.3m.
8Press ENTER to make the last setting and exit.
•The setting mode is automatically exited if no operation is performed within 20 seconds.
•There are several other settings that you can make from the System Setup menu to further enhance the surround sound. See chapter 10 for more on this.
•The speaker distance settings have no effect when the surround mode is set to VIRTUAL SURR.1 or VIRTUAL SURR.2. See chapter 5 for more on surround modes.
|
|
3 |
||
|
|
|
|
|
4 3 CENTER |
English |
|||
|
||||
|
|
|
||
|
CENTER SP 3.Om |
|
|
|
|
|
|
|
|
55 ∞
3 0.3 9.00.3
6 3 SURROUND
SURR. SP 3.Om
75 ∞
間的距離應相等。 默認設置是3 0.3 9.00.3
8ENTER
÷ 20
÷ System Setup 10
÷ VIRTUAL SURR.1
VIRTUAL SURR.2
5
19
En/ChH

3 Setting Up |
|

 Balancing the surround sound
You can further improve surround sound performance by balancing the levels from the subwoofer, center and surround speakers relative to the front left/right speakers. To help you judge the sound level of each speaker a test tone is played through each speaker in turn (make sure that there are no headphones connected). Adjust the levels until they all sound equal.
The levels you set herwwe will apply to all surround modes. However, you can set levels independently for each DSP mode (see page 64 for more on this).
It may not be possible to accurately adjust the subwoofer level using this method. You may prefer to leave it on its default setting and adjust it to your liking later when playing surround-sound sources.
1 Press SURROUND.
STANDARD
The surround mode can be set to anything except SURROUND OFF or AUTO (No test tone is output if the surround mode is set to either of these settings.)
2 Set the volume to a moderate level.
3Press TEST TONE (SHIFT and CLR) to start the test tone then adjust the master volume to a suitable level.
The test tone plays through each speaker in turn:
•Front left
•Center
•Front right
•Surround right
•Surround left
•Subwoofer


繞聲揚聲器以及前置左/
DSP
64

1 SURROUND
STANDARD
SURROUND OFF AUTO
3TEST TONE SHIFT CLR
20
En/ChH
Setting Up |
|
3 |
4Use the 5 and ∞ buttons to adjust the level of a speaker as the test tone plays.
Lch OdB
Lch + 3dB
For best results, sit in your main listening position when doing this. You can adjust each speaker in the range of +/-10dB.
5When you're done, press TEST TONE to turn off the test tone.

 Setting the TV System
The default setting of this player is AUTO, and unless you notice that the picture is distorted when playing some discs, you should leave it set to AUTO.
If you experience picture distortion with some discs, set the TV system to match your country or region.
When set to NTSC, PAL encoded DVD discs are output as is.
1 Make sure that the system is in standby.
2 Press SYSTEM MENU.
3Press 2 or 3 repeatedly until you see
VIDEO SELECT appear in the display.
4 Press ENTER.
5Use 5 or ∞ to select the video system.
Switch between AUTO, PAL and NTSC.
6 Press ENTER.
4 |
5 |
∞ |
English |
|
|||
|
|
|
|
Lch OdB
Lch + 3dB
+/-10dB
5TEST TONE


AUTO
所在國家或地區的電視制式進行設置。

NTSC PAL DVD
2SYSTEM MENU
32 3 VIDEO
SELECT
4ENTER
55 ∞
AUTO , PAL NTSC
6ENTER
21
En/ChH

3
STANDBY /ON
SETUP DVD
5
2 ENTER
∞
7
22
Setting Up

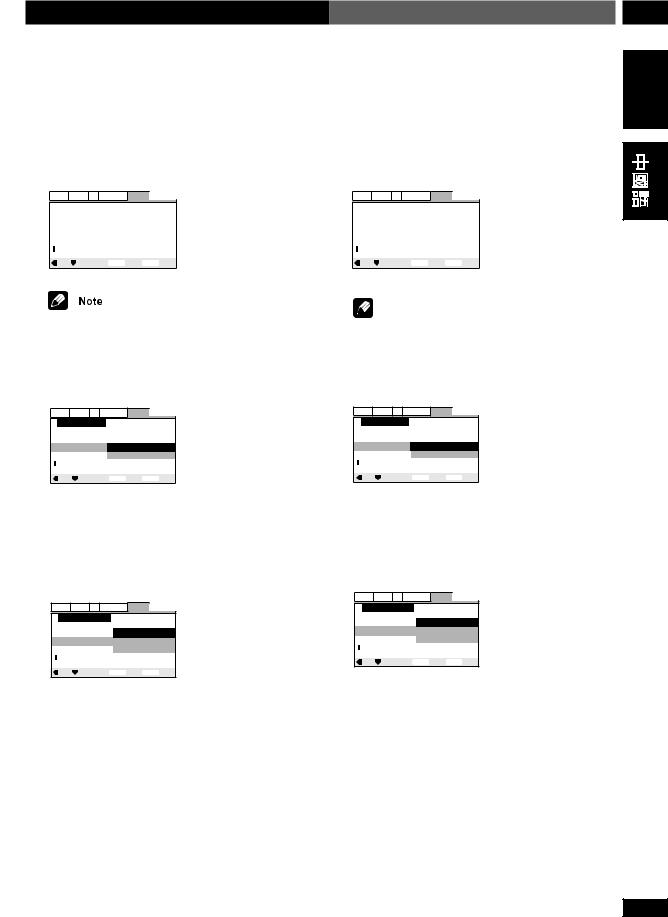
 Using the setup navigator
Before playing any discs, we strongly recommend using the Setup Navigator. This makes some basic DVD system settings for you.
1Press STANDBY/ON to switch on.
Also turn on your TV and make sure that it is set to the correct video input.
• If a disc already loaded starts playing, press 7 to stop it.
2Press DVD SETUP.
The Setup Navigator on-screen display (OSD) appears:
Audio Video1 V2 Language General 
Setup Navigator
Setup Navigator Start
Auto Start Off
 Setup using the Setup Navigator
 Move ENTER Select SETUP Exit
Navigate all of the following OSDs using these controls:
5, ∞ – cursor up/down
ENTER – select the highlighted menu option
2 – go back to the previous question
The control possibilities for the current
OSD are shown at the bottom of each screen.


DVD
1 STANDBY/ON
設置了正確的視頻輸入模式。
÷
7
2DVD SETUP
OSD
Audio Video1 V2 Language General 
Setup Navigator
Setup Navigator Start
Auto Start Off
 Setup using the Setup Navigator
 Move ENTER Select SETUP Exit
OSD
5,∞ /
ENTER
2
OSD
En/ChH
Setting Up |
|
3 |
3Select ‘Start’.
•Press ENTER to select the highlighted option.
•If you decide you don’t want to use the Setup Navigator, select Auto Start Off here instead.
4 Choose an OSD menu language.
Audio Video1 V2 Language General 
|
Setup Navigator |
|
English |
|
Language |
|
français |
|
|
Deutsch |
|
|
OSD Language |
|
Italiano |
|
|
|
Español |
 Select the On Screen Language
Move ENTER Select SETUP Exit
3“Start”
÷ENTER
÷Auto Start Off
4OSD
Audio Video1 V2 Language General 
|
Setup Navigator |
|
English |
|
Language |
|
français |
|
|
Deutsch |
|
|
OSD Language |
|
Italiano |
|
|
|
Español |
 Select the On Screen Language
Move ENTER Select SETUP Exit
English
• The language options shown in the on-screen display illustrations on the following pages may not correspond to those available in your country or region.
5 Select the type of TV you have.
Audio Video1 V2 Language General 
Setup Navigator
TV Connection
TV Type Widescreen (16:9) Standard (4:3)
 Widescreen TV 16:9 aspect ratio
Move ENTER Select SETUP Exit
• See Aspect ratio in the glossary on page 87 if you’re unsure of the difference between widescreen and standard TVs.
6 Confirm all the settings.
Audio Video1 V2 Language General 
Setup Navigator
Save Changes
Exit Setup Navigator Delete Changes
Start Again
 Changes are saved
Move ENTER Select SETUP Exit
Congratulations, you’ve set up your system!
If you want to use the Setup Navigator again at any time, it is available from the General menu. Also, each individual setting can be changed using the appropriate menu option — chapter 10 explains all menu options in detail.
÷
Audio Video1 V2 Language General 
Setup Navigator
TV Connection
TV Type Widescreen (16:9) Standard (4:3)
 Widescreen TV 16:9 aspect ratio
Move ENTER Select SETUP Exit
87 Aspect
ratio
Audio Video1 V2 Language General 
Setup Navigator
Save Changes
Exit Setup Navigator Delete Changes
Start Again
 Changes are saved
Move ENTER Select SETUP Exit
General
第10
23
En/ChH
3
1 |
2 |
3 |
CLR |
4 |
5 |
6 |
|
7 |
8 |
9 |
10/0 |
TV
POWER CH |
VOL INPUT |
+ |
+ |
– –
24
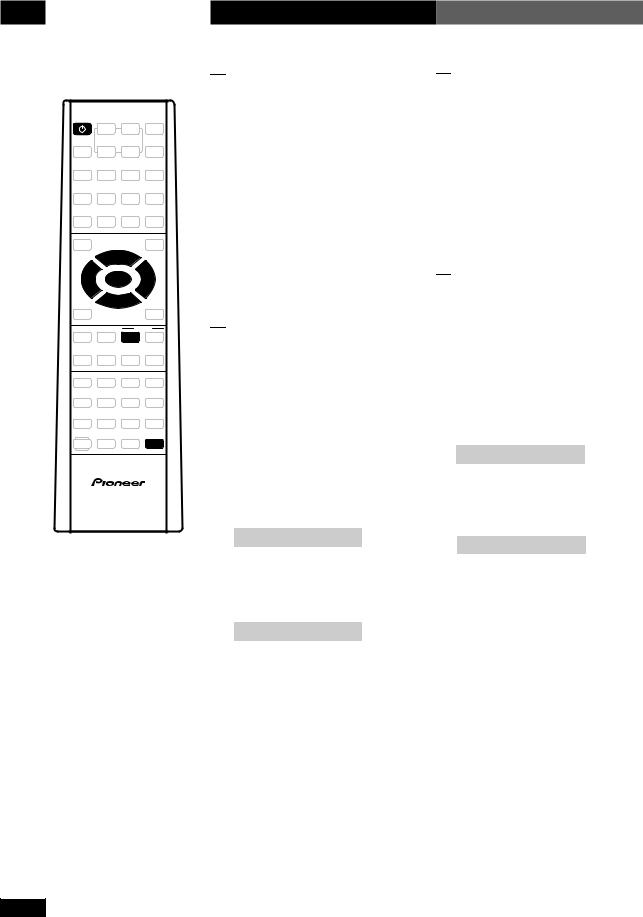
Setting Up

 Setting up the remote to control your TV
You can set up the supplied remote to control your TV.
1 Switch on your TV.
2Find the name of the manufacturer of your TV in the table on the following pages.
See the code list on the following page. Next to each manufacturer is one or more three-digit codes. These tell the remote what kind of TV you have.
• If the name of the manufacturer of your TV does not appear in the table, you won’t be able to set up this remote to control your TV.
3Point the remote at your TV, hold down the CLR button, then enter the three digit code for your TV.
The remote transmits an on/off signal to the TV. If you’ve entered the correct code, your TV should switch off.
If your TV doesn’t turn off, repeat the procedure using the next code in the list until your TV switches off.


÷
3CLR
碼。
/
電視機關閉為止。
En/ChH

Setting Up |
|
3 |

 Using this remote with your TV
The table below shows the TV controls available from this remote for Europe.
Button |
What it does |
POWER Press to switch your TV on or into standby
CH +/– Press to change the TV channel
VOL +/– Press to turn up the TV volume
INPUT Press to switch the TV’s input between the


POWER
CH +/–
VOL +/–
INPUT
English
Manufacturer |
Code(s) |
|
|
AIWA |
138 142 143 |
AKAI |
504 505 515 548 550 562 563 |
ALBA |
512 515 568 569 |
AMSTRAD |
561 567 568 569 570 571 |
BAUR |
562 563 |
BLAUPUNKT |
548 550 556 |
BRANDT |
544 545 564 565 |
BUSH |
508 512 513 514 515 559 568 569 |
CONTINENTAL EDISO |
545 564 565 |
DAEWOO |
515 558 106 135 196 |
DUAL |
559 |
EMERSON |
561 562 563 |
FERGUSON |
515 |
FINLUX |
515 535 536 537 538 539 542 543 |
FISHER |
507 504 505 111 |
FUJITSU |
139 156 157 160 |
FUNAI |
508 141 136 137 140 146 147 155 |
GOLDSTAR |
515 104 |
GOODMANS |
515 542 543 558 569 |
GRAETZ |
560 562 563 566 |
GRUNDIG |
548 550 |
HITACHI |
507 100 530 544 545 566 104 113 |
|
183 |
ICE |
141 569 |
INNO HIT |
515 |
ITT |
562 563 566 104 113 183 |
ITT-NOKIA |
504 505 512 566 |
JVC |
527 114 158 159 167 184 |
KENDO |
536 |
LOEWE |
519 520 556 |
LOEWE OPTA |
556 |
LUXOR |
507 562 563 566 |
MARANTZ |
117 |
MATSUI |
503 504 505 508 512 513 514 542 |
|
543 515 561 566 567 |
MITSUBISHI |
519 520 525 526 548 550 567 104 |
|
105 117 172 198 124 |
Manufacturer |
Code(s) |
Fabricant |
|
NATIONAL |
100 101 102 151 |
NEC |
104 105 |
NOKIA |
504 505 512 562 563 566 |
NORDMENDE |
544 545 566 |
OCEANIC |
546 547 |
ONWA |
571 |
ORION |
508 510 512 513 514 515 561 128 |
PANASONIC |
100 530 551 552 553 101 566 102 |
|
151 193 194 200 |
PHILIPS |
515 518 521 |
PHONOLA |
515 |
PIONEER |
566 107 562 572 101 118 |
PRISM |
101 |
QUASAR |
101 103 |
RADIOLA |
515 |
SABA |
544 545 564 566 |
SALORA |
504 505 562 563 566 |
SAMSUNG |
515 521 141 542 543 104 105 123 |
|
170 |
SANYO |
504 505 523 542 543 111 149 152 |
|
153 154 197 |
SCHNEIDER |
515 566 |
SEG |
536 |
SELECO |
515 539 566 |
SHARP |
523 124 120 150 187 |
SIEMENTS |
515 523 548 550 566 |
SINUDYNE |
508 512 515 535 536 539 |
SONY |
125 188 192 |
TANDBERG |
545 |
TANDY |
566 |
TECHNICS |
100 |
THOMSON |
512 544 545 564 565 |
THORN |
503 107 515 519 520 125 542 543 |
|
558 562 563 |
TOSHIBA |
500 503 107 510 124 189 |
WHITE WESTINGHOUS |
515 535 536 |
25
En/ChH

3 |
|
Setting Up |
|
|
|
|
||
|
|
|
|
|
|
|
|
|
|
|
|
Manufacturer |
Code(s) |
|
|
Manufacturer |
Code(s) |
|
|
|
|
|
|
|
|
|
|
|
|
ADMIRAL |
112 124 126 |
|
|
MITSUBISHI |
117 104 105 124 172 |
|
|
|
AIWA |
138 142 143 |
|
|
MTC |
101 103 |
|
|
|
AKAI |
104 |
|
|
NATIONAL |
100 101 102 151 |
|
|
|
AOC |
105 |
|
|
NEC |
104 105 |
|
|
|
BELL&HOWEL |
124 126 178 |
|
|
ORION |
128 |
|
|
|
BROKSONIC |
104 105 180 144 |
|
|
PANASONIC |
100 101 102 151 193 |
|
|
|
CENTURION |
105 |
|
|
PHILCO |
115 104 |
|
|
|
CIS HOTEL |
199 |
|
|
PHILIPS |
115 |
|
|
|
CORONAD |
164 |
|
|
PIONEER |
118 101 107 |
|
|
|
CRAIG |
109 110 108 |
|
|
PORTLAND |
104 |
|
|
|
CROSLEY |
115 |
|
|
PRISM |
101 |
|
|
|
CURTIS MAT |
104 107 110 |
|
|
PROSCAN |
112 104 121 119 122 185 |
|
|
|
DAEWOO |
106 104 135 196 |
|
|
QUASAR |
101 103 |
|
|
|
EMERSON |
109 108 110 104 120 133 134 180 |
|
|
RADIOSHACK |
112 105 117 110 |
|
|
|
FISHER |
111 |
|
|
RCA |
112 104 121 119 122 130 131 161 |
|
|
|
FUJITSU |
139 156 157 160 |
|
|
|
162 163 132 169 186 |
|
|
|
FUNAI |
136 137 140 141 155 146 147 |
|
|
SAMSUNG |
123 105 104 170 |
|
|
|
GE |
112 101 104 132 |
|
|
SANYO |
111 149 152 153 154 197 |
|
|
|
GOLDSTAR |
104 105 165 |
|
|
SCOTT |
110 105 |
|
|
|
HITACHI |
113 104 183 |
|
|
SEARS |
107 112 104 115 111 105 |
|
|
|
INTEQ |
126 127 |
|
|
SHARP |
124 120 150 187 |
|
|
|
JC PENNY |
104 112 |
|
|
SIGNATURE |
124 126 |
|
|
|
JVC |
114 158 159 167 184 |
|
|
SONY |
125 192 188 |
|
|
|
KTV |
104 110 166 |
|
|
SYLVANIA |
115 105 104 |
|
|
|
LXI |
112 104 115 111 107 105 |
|
|
SYMPHONIC |
110 171 |
|
|
|
MAGNASONIC |
178 |
|
|
TECHNICS |
100 |
|
|
|
MAGNAVOX |
115 105 104 116 129 168 |
|
|
TOSHIBA |
107 124 189 |
|
|
|
MARANTZ |
117 |
|
|
VIDTECH |
113 104 105 |
|
|
|
MEMOREX 178 |
|
|
|
WARDS |
104 120 105 |
|
|
|
MGA |
104 105 |
|
|
ZENITH |
126 127 190 144 |
26
En/ChH
STANDBY |
|
/ON |
CD |
|
DVD |
|
DIRECT PLAY 3 |
1 |
2 |
3 |
|
4 |
5 |
6 |
>10 |
7 |
8 |
9 |
10/0 |
TOP MENU
MENU
5
2 ENTER 3
∞
RETURN
6 7
eSTEP/SLOW E
1 ¡ 4 ¢
SHIFT
Getting Started

 Playing DVDs, CDs and Video CDs
The basic controls for playing discs are covered here. Further functions are detailed in the next chapter.
1Press STANDBY/ON (remote or front panel) to turn on the system.
2 Press DVD/CD.
3Touch the OPEN/CLOSE 0 sensor (front panel only) to open the disc tray.
4Load a disc.
Load a disc with the label side facing up, using the disc tray guide to align the disc (if you’re loading a doublesided DVD disc, load it with the side you want to play face down).
5Press 6 to start playback of the disc just loaded.
On the front panel, touch the 6 touch-sensor to start playback.
• If you’re playing a DVD or Video CD, a menu may appear. See page 29-30 for how to navigate these.
|
|
4 |
||
|
|
|
|
|
|
DVD CD VCD |
|
English |
|
|
|
|||
|
|
|
||
|
|
|
|
|
|
|
|||
|
|
|
|
|
|
|
|||
1STANDBY/ON 
2DVD/CD
3OPEN/CLOSE 0
托盤。
碟片托盤導軌調整碟片安放位置
DVD
56
6
÷ DVD VCD
請參見第29-30
27
En/ChH

4 |
|
Getting Started |
|
||
|
|
|
Basic playback controls |
|
|
|
|
|
|
||
|
|
|
|
||
Button |
What it does |
6Starts playback or pauses a disc that’s playing (press again to restart playback). DVD and Video CD only: Resumes playback of a stopped disc.
7Stops playback. DVD and Video CD only: Display shows RESUME (press 6to start playback again from the last place stopped).
11. Press & hold for fast reverse scanning. Release to resume normal playback.
2. Press once to start reverse scanning. Press again to increase the scan speed. (CD and Video CD have two scan speeds; DVD has three.) Press 6to resume normal playback.
¡1. Press & hold for fast forward scanning. Release to resume normal playback.
2. Press once to start forward scanning. Press again to increase the scan speed. (CD and Video CD have two scan speeds; DVD has three.) Press 6to resume normal playback.
4Skips to the start of the current track or chapter, then to previous tracks/chapters.
¢Skips to the next track or chapter.
Numbers If the disc is stopped, playback starts from the selected track or title number. If the disc is playing, playback jumps to the start of the selected track or chapter number.
>10 |
Selects tracks/titles/chapters 11 and over. |
|
(For example, for 24, press >10 , 2, 4.) |
|
|
6DVD VCD
7DVD VCDRESUME 6
11.
2. CD VCDDVD 6
¡1.
2. CD VCDDVD 6
4 次向前跳躍。
開始播放。
>10 11 / /24 >10 , 2, 4
28
En/ChH
Getting Started |
|
4 |
DVD and Video CD only:
E(SHIFT ¡) 1. Press to start slow-motion forward scanning. Press again to change the scanning speed (1/16 =1/8 =1/4 =1/2). 2. When playing, press once to pause; advance a single frame with each subsequent press.
DVD only:
e(SHIFT 1) 1. Press to start slow-motion reverse scanning. Press again to switch between SLOW 1 and SLOW 2 scanning speed. 2. When playing, press once to pause;
reverse a single frame with each subsequent press.
While using the DVD playback controls, you may see the

 or
or  mark displayed on-screen.

 means that the operation is not allowed by the system.
 means that the operation is not allowed by the disc.
Navigating DVD disc menus
Many DVD discs contain menus. Sometimes these are displayed automatically when you start playback; others only appear when you press MENU or TOP MENU.
|
|
|
|
Button |
What it does |
|
TOP MENU |
Displays the ‘top menu’ of a DVD disc— |
|
|
this varies with the disc. |
|
|
|
|
MENU |
Displays a DVD disc menu—this varies with |
|
|
the disc and may be the same as the ‘top |
|
|
menu’. |
|
|
|
|
RETURN |
Returns to the previously displayed menu |
|
|
screen. |
|
|
|
|
5 ∞ 2 3 |
Moves the cursor around the screen |
|
|
|
|
ENTER |
Selects the current menu option |
|
|
|
|
Numbers |
Selects a numbered menu option (some |
|
|
discs only) |
|
|
|
DVD VCD
E(SHIFT ¡) 1. 1/16 = 1/8 = 1/4
= 1/2
2.
DVD
e(SHIFT 1) 1. SLOW 1 SLOW 2
2.

DVD 


 DVD
DVD
DVD MENU TOP MENU
|
|
TOP MENU |
DVD “ ” |
|
|
|
|
MENU |
DVD |
|
“ ” |
|
|
RETURN |
|
|
|
5 ∞ 2 3 |
|
|
|
ENTER |
|
|
|
|
|
|
|
|
|
English
29
En/ChH

4 Getting Started |
|
Navigating Video CD PBC menus
Some Video CDs have menus from which you can choose what you want to watch. These are called PBC (Playback control) menus.
You can play a PBC Video CD without having to navigate the PBC menu by starting playback using a number button to select a track, rather than the 6 button.
Button |
What it does |
RETURN  Displays the PBC menu.
Numbers Selects a numbered menu option.
4Displays the previous menu page (if there is one).
¢Displays the next menu page (if there is one).
6Press to select an item from a PBC menu.
30

 VCD PBC
VCD PBC
PBC VCD 6 PBC
RETURN  PBC
PBC
6PBC
En/ChH
 Loading...