


S-71-K
/
/
Thank you for buying this Pioneer product.
Please read through these operating instructions so you will know how to operate your model properly. After you have finished reading the instructions, put them away in a safe place for future reference.
Before you start
•The nominal impedance of this speaker system is 6 Ω.
Connect the speaker system to an amplifier with a load impedance ranging from 6 Ω to 16 Ω (a model with “6 Ω to 16 Ω” displayed on the speaker output terminals).
In order to prevent damage to the speaker system resulting from input overload, please observe the following precautions:
•Do not supply power to the speaker system in excess of the maximum permissible input.
•When using a graphic equalizer to emphasize loud sounds in the high-frequency range, do not use excessive amplifier volume.
•Do not try to force a low-powered amplifier to produce loud volumes of sound (the amplifier’s harmonic distortion will be increased, and you may damage the speaker).
Caution: installation
•When placing this unit, ensure that it is firmly secured and avoid areas where it may be likely to fall and cause injury in the event of a natural disaster (such as an earthquake).
•Do not attach these speakers to the wall or ceiling. They may fall off and cause injury.
•Do not install your speakers overhead on the ceiling or wall. If improperly attached, the speaker grille can fall and cause damage or personal injury.
•Switch off and unplug your AV equipment and consult the instructions when connecting up components. Make sure you use the correct connecting cables.
Caution: in use
•Do not place the speaker on an unstable surface. It could present a hazard if it falls, as well as damaging the equipment.
•Do not use the speaker to output distorted sound for long periods of times. This can result in a fire hazard.
•Do not sit or stand on the speaker, or let children play on the speaker.
•Do not put large or heavy objects on top of the speaker.
•Do not place magnetic objects such as screwdrivers or iron parts near the coaxial unit (tweeter/midrange). Since the speakers use strong magnets, the objects may be attracted, causing injury or damaging the diaphragm.
For U.S. model
WARNING: Handling the cord on this product or cords associated with accessories sold with the product will expose you to chemicals listed on proposition 65 known to the State of California and other governmental entities to cause cancer and birth defect or other reproductive harm.
Wash hands after handling
D36-P5_A1_En
For European model
Cleaning the speaker cabinet
With normal use, wiping with a dry cloth should be sufficient to keep the cabinet clean. If necessary, clean with a cloth dipped in a neutral cleanser diluted five or six times with water, and wrung out well. Do not use furniture wax or cleansers.
Never use thinners, benzine, insecticide sprays or other chemicals on or near this unit since these will corrode the surfaces.
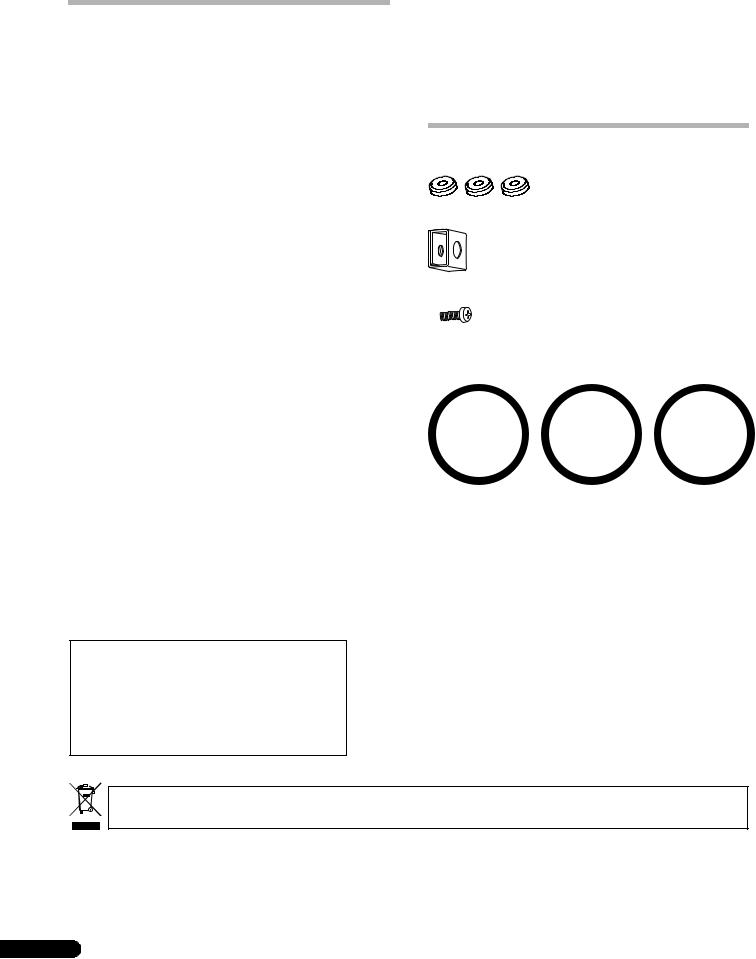
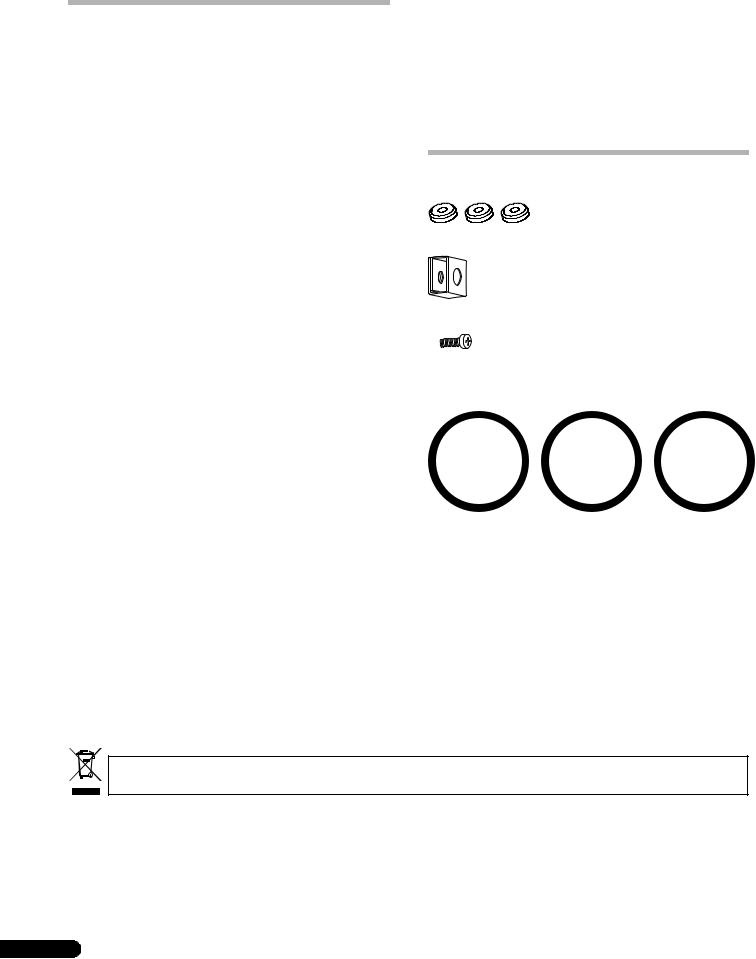
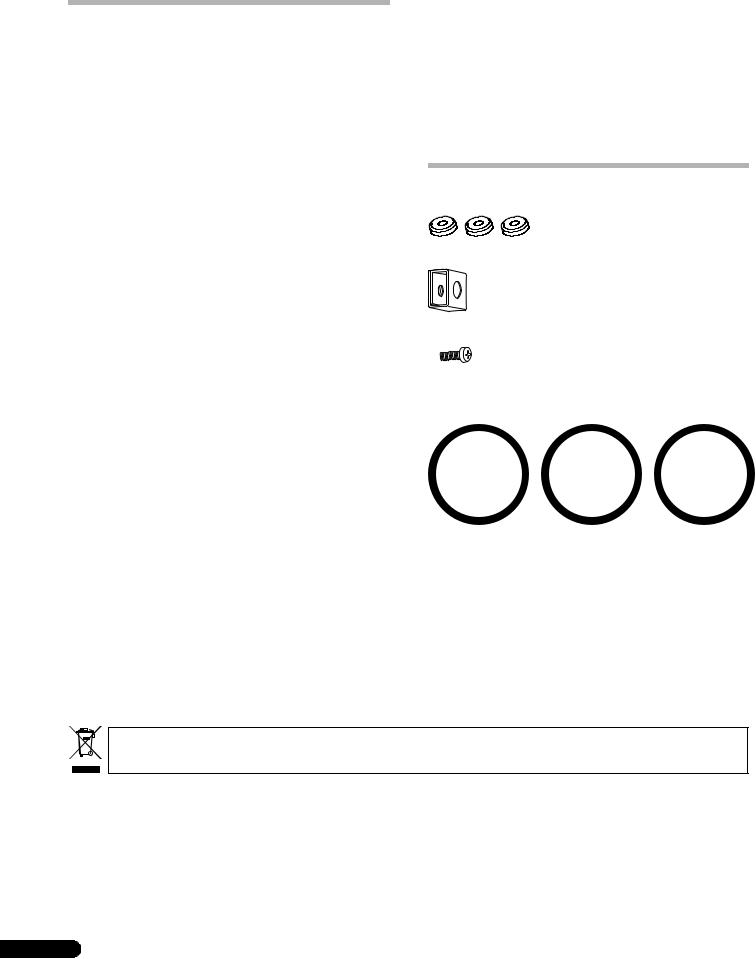
What’s in the box
Spike bases x 3
Metal catch x 1
Screw (for metal catch) x 1
Attachment grilles x 3
*These are rings designed to be attached to the speakers when not using the grille nets.
Warranty card
Operating instructions (this document)
If you want to dispose this product, do not mix it with general household waste. There is a separate collection system for used electronic products in accordance with legislation that requires proper treatment, recovery and recycling.
Private households in the member states of the EU, in Switzerland and Norway may return their used electronic products free of charge to designated collection facilities or to a retailer (if you purchase a similar new one).
For countries not mentioned above, please contact your local authorities for the correct method of disposal.
By doing so you will ensure that your disposed product undergoes the necessary treatment, recovery and recycling and thus prevent potential negative effects on the environment and human health.
K058b_A1_En
2
En
How to install
Choosing where to place the speaker systems
•Sounds played through speaker systems are easily affected in subtle ways by the conditions in the listening space.
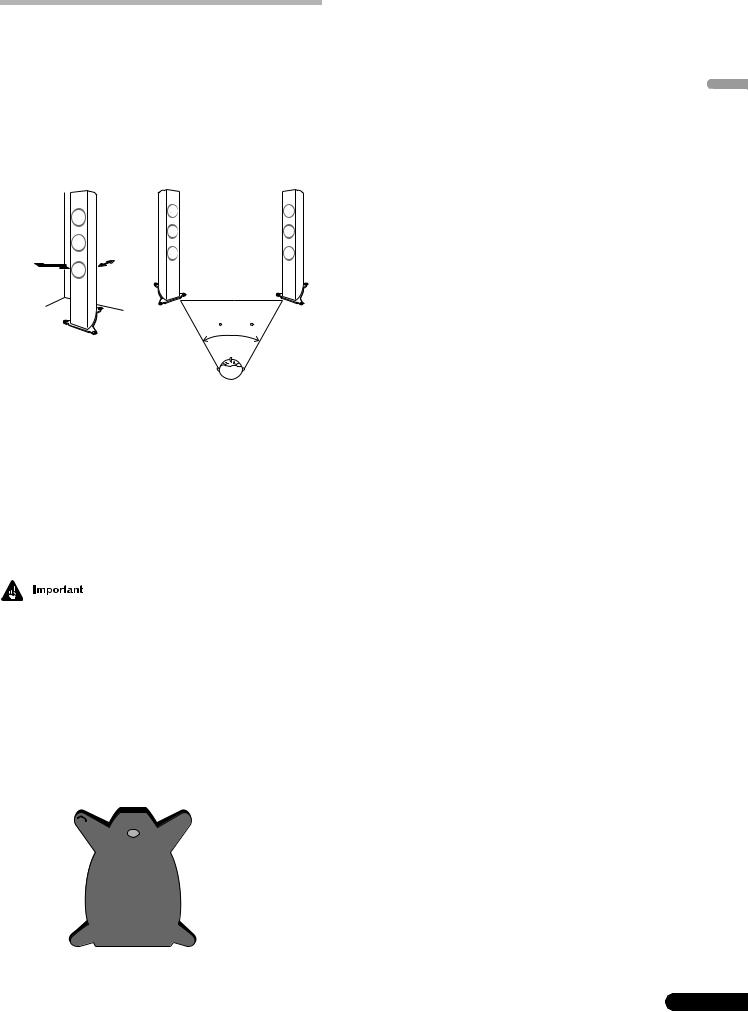
•For best sound, choose a solid floor upon which to place the speakers, and position the speakers as shown below. The level of low sounds can be adjusted by moving the speakers closer to or further from the wall. Adjust the speakers so that they are equidistant from their respective side walls to assure balanced sound.
50 cm |
20 cm |
(19 11/16 in.) |
(7 7/8 in.) |
50 to 60
•Place the left and right speakers equal distances from your listening position for good stereo sound. Use speaker cords of the same length for each speaker.
•So far as possible, place the front left and front right speakers on the same plane as the TV screen.
•To achieve optimum surround sound, you should place the TV between the left and right speakers, with the speakers pointing at a 50 to 60 degree angle toward the listening position.
•If the room has a lot of reverberation, we recommend hanging heavy fabric on the walls, and/or putting a carpet on the floor to damp the sound. For best results, cover walls completely.
•Pioneer assumes no liability whatsoever for damages resulting from assembly, improper mounting, insufficient reinforcement, misuse of the product, acts of nature, etc.
•Since these speaker systems are quite heavy, do not install them in unstable locations; a falling speaker could result in damage or dangerous personal injury.
•When installing these speaker systems, be sure to provide positive measures against tipping or falling, since accidental falls due to earthquakes or other causes could result in injury.
Using the spikes
This speaker system is supported by three points (the front two legs, and the back spike located between the back two legs).
Back
Tip-prevention legs
Cabinet base
Spikes
Front
1 |
Set the spike bases in the positions where the points of |
|
the three spikes will strike when the speaker is set down. |
|
|
2 |
Set the speaker on the spike bases and check to confirm |
|
the speaker does not rock. |
|
|
|
• Always use the spike bases as shown, with the indented |
English |
|
surface facing up to receive the spike point. |
|
|
|
|
If you do not use the spike bases when placing the speakers, the spikes may cause damage to the floor. If you plan on using the spikes we highly recommend to use the spike bases.
When the spikes are used with the speaker systems, attempting to move the speakers may cause damage to the floor surface. As a result, the spikes should be removed before changing the speaker location. Also, even when the spikes are removed, moving the speakers can result in scratches to the floor, with the result that it is recommended to lay down a sheet of thick felt or other mat material before attempting to move the speakers.
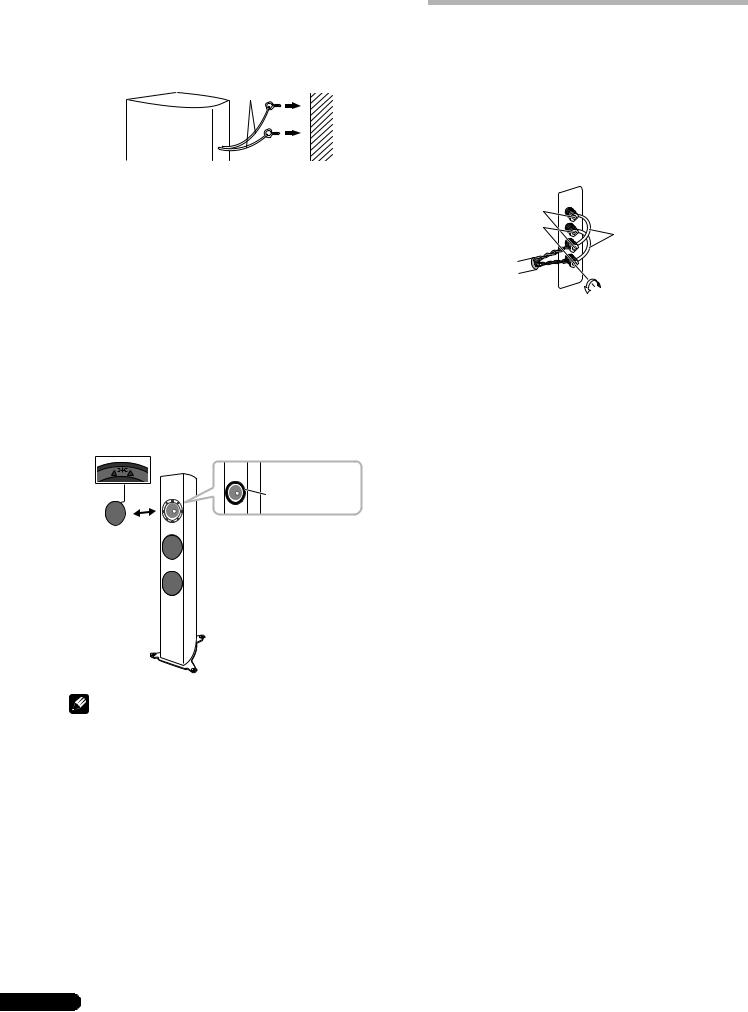
Mounting the Fall-Prevention Fastener
•Using the included screw, tightly secure the metal catch to the backside of the speaker.
•Pass a commercially-available reinforced string through the metal catch to securely support the speaker to the wall. Be sure that the wall to which you fasten the speaker is strong enough to support the weight of the speaker. After fastening the speaker, make sure that it does not fall over.
•The speaker can incur damage in the event of a fall.
•Do not attach the metal catch directly to the wall. It should only be used in conjunction with reinforced string to prevent the speaker from falling.
Reinforced strings
<Backside of speaker>
Metal catch 

•Pass two reinforced strings through the metal catch, and fasten the speaker to the wall as shown above.
3
En
Attaching and Removing the Grille
This speaker system is provided with a removable grille net.
1To remove the grille, place your fingers at the outside of the grille toward the bottom and pull gently outward. Then do the same at the top to detach.
2To reattach the grille, hold the speaker grille with the triangular symbol pointing upward, then align the four pins on the back side of the grille with the holes in the speaker and press in firmly.
Attachment grille
When using the speaker systems with the grille nets removed, install the accessory attachment grilles on the speakers. These will help prevent any unnecessary reflections and provide sound with smoother, broader qualities.
Connections
This speaker does not include speaker cables used for connecting to an amplifier.
Connecting the cables
1Switch off the power to your amplifier.
2Connect the speaker cables to the input terminals (lower) on the back of the speaker. For input terminal polarity, red is positive (+) and black is negative (–).
Red terminal (+)
Black terminal (−)
Short bar connectors
3 Connect the other ends of the cables to the amp's speaker output terminals (for more details, refer to your amp instruction manual).
•Grasp the cap knobs on the lower input terminals and rotate them to the left (counter-clockwise), insert the speaker cable wires into the holes in the terminal posts, then tighten the knobs to secure the short bar as well as the wires.
•You can also connect the speaker’s terminals with a banana plug. When using a banana plug, first use a small flat-blade screwdriver or tweezers to remove the cap at the tip of the input terminal.
4
•After connecting the plugs, pull lightly on the cables to make sure that the ends of the cables are securely connected to the terminals. Poor connections can create noise and interruptions in the sound.
•If the cables’ wires happen to be pushed out of the terminals, allowing the wires to come into contact with each other, it places an excessive additional load on the amp. This may cause the amp to stop functioning, and may even damage the amp.
•When using a set of speakers connected to an amplifier, you won’t be able to obtain the normal stereo effect if the polarity (+, –) of one of the speakers (left or right) is reversed.
CAUTION
These speaker terminals carry HAZARDOUS LIVE voltage. To prevent the risk of electric shock when connecting or disconnecting the speaker cables, disconnect the power cord before touching any uninsulated parts.
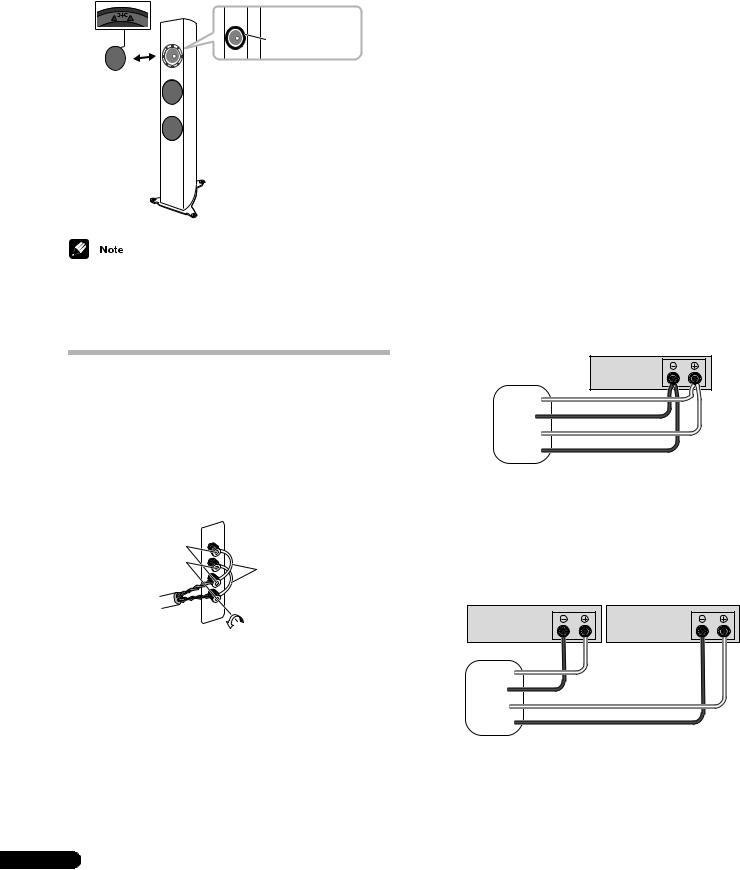
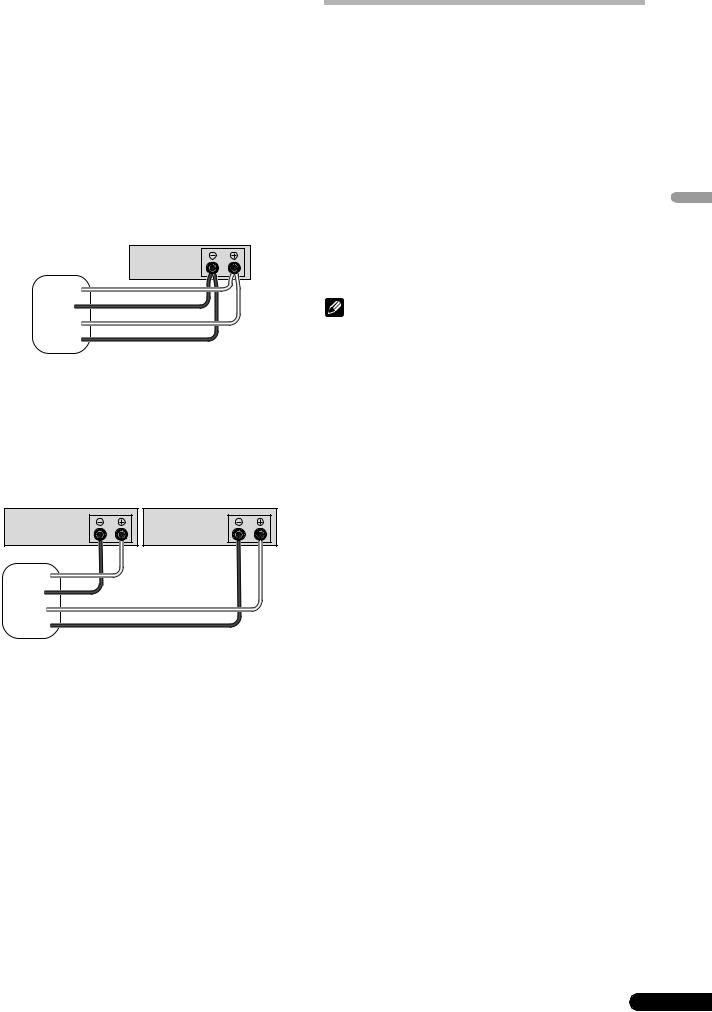
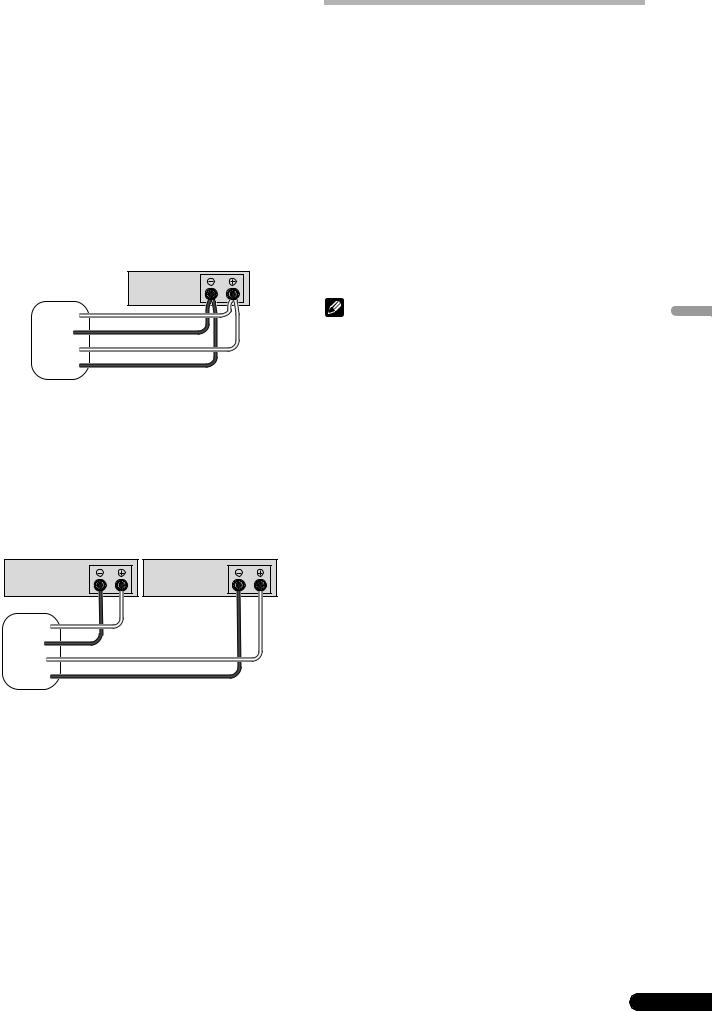
Bi-Wire connections
Bi-wiring requires two cables for each speaker, one for high frequencies and one for low frequencies. Using separate cables for the high end and low end improves the sound.
1Switch off the power to your amplifier.
2Remove the two short bars.
•In this state, the low-frequency speakers and the higherfrequency speakers are completely independent. Store the short bars in a safe place for later use.
•The lower terminals are for the bass, and the upper terminals are for midrange and treble sounds.
•Connecting the cables with reversed polarity may degrade the tone seriously. Confirm that the cables are connected properly.
(Only one channel shown)
Amplifier (rear)
Speaker
SPEAKERS OUTPUT
HF

HF

LF 

LF 

Speaker (rear): Input panel
Bi-Amplification connections
Bi-amping is an even more powerful way of connecting your speakers. Just as with bi-wiring, the input terminal short bars are removed, but here the low-frequency terminals are connected to a separate, dedicated low-frequency amp, and the high-frequency terminals are connected to a dedicated high-frequency amp.
(Only one channel shown) |
(Only one channel shown) |
Amplifier (rear) |
Amplifier (rear) |
(High frequency) |
(Low frequency) |
SPEAKERS OUTPUT |
SPEAKERS OUTPUT |
Speaker
HF

HF

LF 

LF 

Speaker (rear): Input panel
En

Specifications
Enclosure. . . . . . . . . . . . . . . . . . . . . . . . . Bass-reflex floorstanding type Configuration . . . . . . . . . . . . . . . . . . . . . . . . . . . . . . . . . . . . . . . . . .3-way Woofer . . . . . . . . . . . . . . . . . . . . . . . . . . . . . . . .13 cm (5 1/8 in.) cone x 2 Mid/Tweeter . . . . . . Coaxial unit: 13 cm (5 1/8 in.) cone/2.5 cm (1 in.) dome Impedance. . . . . . . . . . . . . . . . . . . . . . . . . . . . . . . . . . . . . . . . . . . . . . 6 Ω Frequency response . . . . . . . . . . . . . . . . . . . . . . . . . . . . 33 Hz to 50 kHz Sensitivity. . . . . . . . . . . . . . . . . . . . . . . . . . . . . . . . . . . . . . .85 dB (2.83 V) Maximum input power . . . . . . . . . . . . . . . . . . . . . . . . . . . . . . . . . . 130 W Crossover frequency . . . . . . . . . . . . . . . . . . . . . . . . . . . . . 300 Hz/2.5 kHz Exterior dimensions . . . . . . 260 (W) mm x 1114 (H) mm x 276 (D) mm
10 1/4 (W) in. x 44 (H) in. x 11 (D) in. Weight . . . . . . . . . . . . . . . . . . . . . . . . . . . . . . . . . . . 23.8 kg (52 lbs 5 oz.)
Supplied accessories
Spike bases . . . . . . . . . . . . . . . . . . . . . . . . . . . . . . . . . . . . . . . . . . . . . . . 3 Metal catch . . . . . . . . . . . . . . . . . . . . . . . . . . . . . . . . . . . . . . . . . . . . . . . 1 Screw (for metal catch) . . . . . . . . . . . . . . . . . . . . . . . . . . . . . . . . . . . . . 1 Attachment grilles . . . . . . . . . . . . . . . . . . . . . . . . . . . . . . . . . . . . . . . . . 3 Warranty card
Operating instructions (this document)
For U.S. model
Specifications and design subject to possible modification without notice, due to improvements.
 is a trademark placed on a product with Pioneer’s Phase Control technology. This technology enables high-grade sound reproduction through each component by improving overall phase matching.
Published by Pioneer Corporation.
Copyright © 2009 Pioneer Corporation.
All rights reserved.
Selecting fine audio equipment such as the unit you’ve just purchased is only the start of your musical enjoyment. Now it’s time to consider how you can maximize the fun and excitement your equipment offers. This manufacturer and the Electronic Industries Association’s Consumer Electronics Group want you to get the most out of your equipment by playing it at a safe level. One that lets the sound come through loud and clear without annoying blaring or distortion-and, most importantly, without affecting your sensitive hearing.
Sound can be deceiving. Over time your hearing “comfort level” adapts to higher volumes of sound. So what sounds “normal” can actually be loud and harmful to your hearing. Guard against this by setting your equipment at a safe level BEFORE your hearing adapts.
To establish a safe level:
•Start your volume control at a low setting.
•Slowly increase the sound until you can hear it comfortably and clearly, and without distortion.
Once you have established a comfortable sound level:
• Set the dial and leave it there.
Taking a minute to do this now will help to prevent hearing damage or loss in the future. After all, we want you listening for a lifetime.
We Want You Listening For A Lifetime
Used wisely, your new sound equipment will provide a lifetime of fun and enjoyment. Since hearing damage from loud noise is often undetectable until it is too late, this manufacturer and the Electronic Industries Association’s Consumer Electronics Group recommend you avoid prolonged exposure to excessive noise. This list of sound levels is included for your protection.
Decibel
Level Example
30 Quiet library, soft whispers
40 Living room, refrigerator, bedroom away from traffic
50 Light traffic, normal conversation, quiet office
60 Air conditioner at 20 feet, sewing machine
70 Vacuum cleaner, hair dryer, noisy restaurant
80Average city traffic, garbage disposals, alarm clock at two feet.
THE FOLLOWING NOISES CAN BE DANGEROUS UNDER CONSTANT EXPOSURE
90 Subway, motorcycle, truck traffic, lawn mower
100 Garbage truck, chain saw, pneumatic drill
120 Rock band concert in front of speakers, thunderclap
140 Gunshot blast, jet plane
180 Rocket launching pad
Information courtesy of the Deafness Research Foundation.
S001_En
5
En
English
Nous vous remercions d’avoir acheté ce produit Pioneer.
Veuillez lire attentivement ce mode d’emploi de manière à pouvoir utiliser votre modèle correctement. Après avoir lu ces explications, conservez-les en lieu sûr pour éventuellement les consulter plus tard.
Avant de commencer
•L’impédance nominale de ces enceintes acoustiques est de 6 Ω. Raccordez ces enceintes à un amplificateur dont l’impédance de charge va de 6 Ω à 16 Ω (un modèle pour lequel “6 Ω to 16 Ω” est indiqué sur les bornes de sortie des enceintes).
Pour éviter d’endommager les enceintes par une surcharge à l’entrée, observez les précautions suivantes :
•Ne fournissez pas aux enceintes acoustiques une puissance électrique dépassant l’entrée maximale autorisée.
•Si vous utilisez un égaliseur graphique pour accentuer les sons dans la plage des hautes fréquences, n’élevez pas trop le volume de l’amplificateur.
•N’essayez pas de pousser un amplificateur de faible puissance à produire un volume sonore élevé, car la distorsion harmonique de l’amplificateur en serait accentuée et vous pourriez endommager les haut-parleurs.
Précautions: d’installation
•Lors de l’installation de l’appareil, veillez à ce qu’il soit fermement immobilisé et évitez les endroits d’où il pourrait tomber et provoquer des blessures lors d’une catastrophe naturelle, telle qu’un séisme.
•Ne fixez pas les enceintes sur une paroi ou au plafond. Elles pourraient tomber et provoquer des blessures.
•N’installez pas les enceintes en hauteur, au plafond ou sur une paroi. Si elle est mal installée, la grille des haut-parleurs peut tomber et provoquer des dégâts, voire des blessures à des personnes.
•Mettez votre système audiovisuel hors tension et débranchezle, puis consultez le mode d’emploi avant de brancher des composants. Prenez soin d’utiliser correctement les cordons de raccordement.
Précautions: d’utilisation
•Ne placez pas l’enceinte sur une surface instable. En tombant, elle pourrait entraîner des blessures et être endommagée.
•N’utilisez pas les enceintes pour produire des sons distordus pendant une longue période. Cela pourrait provoquer un incendie.
•Ne montez pas et ne vous asseyez pas sur les enceintes et ne laissez pas des enfants jouer sur celles-ci.
•Ne posez pas d’objets lourds ou volumineux sur le dessus des enceintes.
•Ne placez d’objets magnétiques tels que des tournenis ou des pièces métalliques près de l’unité coaxiale (tweeter/médium). Comme ces haut-parleurs utilisent des aimants puissants, ces objets pourraient y être attirés, provoquant des dégâts aux haut-parleurs ou endommageant leur diaphragme.
Nettoyage du coffret de l’enceinte
Normalement, il suffira de frottez le coffret de ces enceintes avec un linge sec pour maintenir leur propreté. Au besoin, trempez un linge dans un détergent neutre allongé de cinq à six fois son volume d’eau et essorez bien le linge avant de l’utiliser pour frotter le coffret. N’utilisez pas de cire ou de détergent pour mobilier.
N’employez jamais de diluant, benzine, insecticide en atomiseur ou autre produit chimique sur les coffrets ou à proximité, car cela endommagerait leurs surfaces.
Contenu de l’emballage
Bases pour pointes de découplage x 3
Attache antichute x 1
Vis (pour attache antichute) x 1
Grilles de fixation x 3
*Ces anneaux sont conçus pour être fixés sur les enceintes lors que vous n’utilisez pas les treillis de grille.
Carte de garantie
Mode d’emploi (ce document)
Si vous souhaitez vous débarrasser de cet appareil, ne le mettez pas à la poubelle avec vos ordures ménagères. Il existe un système de collecte séparé pour les appareils électroniques usagés, qui doivent être récupérés, traités et recyclés conformément à la législation.
Les habitants des états membres de l’UE, de Suisse et de Norvège peuvent retourner gratuitement leurs appareils électroniques usagés aux centres de collecte agréés ou à un détaillant (si vous rachetez un appareil similaire neuf).
Dans les pays qui ne sont pas mentionnés ci-dessus, veuillez contacter les autorités locales pour savoir comment vous pouvez vous débarrasser de vos appareils.
Vous garantirez ainsi que les appareils dont vous vous débarrassez sont correctement récupérés, traités et recyclés et préviendrez de cette façon les impacts néfastes possibles sur l’environnement et la santé humaine.
K058b_A1_Fr
2
Fr

Méthode d’installation
Choix d’un emplacement pour les enceintes acoustiques
•Les sons reproduits par les enceintes acoustiques sont facilement affectés de manière subtile par les conditions du local d’écoute.
•Pour obtenir un son optimal, choisissez un plancher solide pour disposer les enceintes et positionnez-les comme indiqué ci-après. Le niveau des sons graves peut être ajusté en rapprochant ou éloignant les enceintes par rapport aux parois. Afin d’obtenir un son équilibré, ajustez les enceintes de sorte qu’elles soient équidistantes de leur mur respectif.
50 cm |
20 cm |
50 à 60
•Pour obtenir de bons sons stéréo, placez les enceintes gauche et droite à distance égale de la position d’écoute. Utilisez des cordons d’enceinte de même longueur pour chaque enceinte.
•Dans la mesure du possible, placez les enceintes avant gauche et droite dans le même plan que l’écran du téléviseur.
•Pour bénéficier d’un son d’ambiance optimal, il convient de placer le téléviseur entre les enceintes gauche et droite et d’orienter celles-ci à un angle de 50 à 60 degrés vers la position d’écoute.
•Si la pièce à tendance à réverbérer les sons, nous conseillons de suspendre des tentures aux murs et/ou de placer un tapis sur le plancher afin d’amortir les sons. Pour obtenir les meilleurs résultats possibles, couvrez complètement les murs.
•Pioneer n’assume aucune responsabilité en cas de dégâts causés par un assemblage et un montage inadéquats, un renforcement insuffisant, une erreur d’utilisation, des catastrophes naturelles, etc.
•Ces enceintes acoustiques étant très lourdes, ne l’installez pas dans un endroit instable car s’il venait à tomber il pourrait être endommager ou causer des blessures à des personnes.
•Lors de l’installation de ces enceintes acoustiques, assurezvous prendre les mesures nécessaires pour éviter que les enceintes basculent ou tombes, car en cas de séisme ou d’autres circonstances exceptionnelles elles pourraient causer des blessures.
Utilisation des pointes de découplage
Cette enceinte est soutenue par trois points (les deux pattes avant et la pointe de découplage arrière située entre les deux pattes arrière).
Arrière
Pattes |
|
|
antichute |
|
|
Base du coffret |
|
|
Pointes de |
|
|
découplage |
|
|
Avant |
|
|
1 Fixez les bases des trois pointes aux positions ou elles |
Français |
|
feront contact lorsque l’enceinte sera posée à plat. |
||
|
||
2 Posez l’enceinte sur les bases des pointes de découplage |
|
|
et assurez-vous que l’enceinte est stable. |
|
Attention
•Utilisez toujours les bases de pointe de découplage comme illustré, de sorte que le creux puisse recevoir la pointe.
Si vous n’utilisez pas de bases pour pointes de découplage à l’installation des enceintes, les pointes risquent d’âbimer le plancher. Si vous prévoyez d’employer les pointes de découplage, nous conseillons vivement d’utiliser leurs bases.
Lorsque les pointes de découplage sont utilisées pour les enceintes, vous risquez d’endommager la surface du plancher si vous essayez de déplacer les enceintes. C’est pourquoi il convient de retirer les pointes de découplage avant de changer l’emplacement des enceintes. De plus, même si les pointes de découplages sont retirées, vous risquez de griffer le plancer en déplaçant les enceintes; c’est pourquoi il est conseillé d’étaler un morceau de feutre épais ou d’un autre matériau sur le plancher avant de bouger les enceintes.
Fixation de l’attache antichute
•Au moyen de la vis fournie, fixez fermement l’attache antichute sur la face arrière de l’enceinte.
•Faites passer un cordon renforcé, disponible dans le commerce, dans l’attache antichute pour immobiliser l’enceinte à une paroi. Assurez-vous que celle-ci est suffisamment résistante pour supporter le poids de l’enceinte. Après la fixation de l’enceinte, assurez-vous qu’elle ne se renverse pas.
•Si elle devait tomber, l’enceinte subirait des dégâts.
3
Fr

•Ne fixez pas l’attache antichute directement sur une paroi. Elle doit être utilisée uniquement avec un cordon renforcé pour prévenir la chute de l’enceinte.
Cordons solides
<Face arrière de l’enceinte>
Attache 
 antichute
•Faites passer deux cordons renforcés par l’attache antichute et fixez l’enceinte sur une paroi comme illustré ci-dessus.
Fixation et dépose de la grille
Ces enceintes acoustiques sont fournies avec un treillis de grille amovible.
1Pour déposer la grille, placez vos doigts sur l’extérieur de la grille vers le bas et tirez doucement vers l’extérieur. Puis, faites de même avec la partie supérieure pour détacher la grille.
2Pour remettre la grille en place, tenez la grille avec le symbole triangulaire dirigé vers le haut, puis alignez les quatres ergots situés à l’arrière de la grille avec les trous sur les enceintes et poussez fermement.
Grille de fixation
Remarque
Si vous retirez les treillis de grille des enceintes, installez à leur place les grilles de fixation fournies comme accessoires. Elles éviteront les réflexions indésirables et fourniront un son plus doux et plus large.
4
Connexions
Les cordons d’enceintes, nécessaires pour le branchement à un ampli, ne sont pas fournis avec cette enceinte acoustique.
Câblage
1Mettez l’amplificateur hors tension.
2Branchez les cordons d’enceinte sur les bornes d’entrée (inférieures) à l’arrière de l’enceinte. En ce qui concerne les polarités des bornes, la rouge est positive (+) et la noire est négative (–).
Borne rouge (+)
Borne noire (–)
Connexion de fiche coupe-circuit
3 Raccordez l’autre bout des cordons sur les bornes de sortie d’enceinte de l’amplificateur (pour plus d’informations, consultez le mode d’emploi de votre amplificateur).
•Saisissez le bouton-capuchon sur les bornes d’entrée inférieure et tournez-le vers la gauche (sens antihoraire), insérez les fils du cordon d’enceinte dans l’orifice du montant de borne, puis tournez le bouton pour immobiliser les fiches coupe-circuit et les fils.
•Vous pouvez également utiliser une fiche banane pour cette connexion. Si vous utilisez une fiche banane, servez-vous d’un petit tournevis à lame plate ou de pincettes pour déposer le capuchon sur le bout de la borne d’entrée.
•Après avoir branché les cordons sur les bornes, tirez légèrement sur ceux-ci pour vous assurer que leur extrémité est parfaitement immobilisée sur les bornes. De mauvaises connexions sont la source de parasites, voire d’interruptions des sons.
•Si les fils des cordons ressortent des bornes et s’ils entrent en contact mutuellement, l’amplificateur subira une charge additionnelle, ce qui peut l’obliger à s’arrêter, voire l’endommager.
•Lors de l’utilisation d’un jeu d’enceintes raccordé à un amplificateur, si la polarité d’une des enceintes acoustiques (+, –) est inversée, vous n’obtiendrez pas un effet stéréophonique normal.
ATTENTION
Les bornes des haut-parleurs sont sous une tension ACTIVE DANGEREUSE. Pour éviter tout risque de décharge électrique lors du branchement et du débranchement des câbles de haut-parleur, débranchez le cordon d’alimentation avant de toucher des parties non isolées.
Fr
Bi-câblage
Le bi-câblage suppose deux câbles pour chaque haut-parleur, l’un pour les hautes fréquences et l’autre pour les basses. Le son sera amélioré si vous utilisez des câbles séparés pour les aigus et les graves.
1Mettez l’amplificateur hors tension.
2Retirez les deux straps coupe-circuit.
•Dans cet état, les haut-parleurs dse basses fréquences et ceux des hautes fréquences sont complètement indépendants. Rangez les straps coupe-circuits en lieu sûr en vue d’une éventuelle utilisation ultérieure.
•Les bornes du bas sont destinées aux graves et celles du haut au médium et aux aigus.
•La tonalité sera sérieusement dégradée si vous inversez les polarités lors de la connexion des câbles. Assurez-vous que les câbles sont correctement raccordés.
(Seule une voie est indiquée) Amplificateur
Enceinte
(arrière)
SPEAKERS OUTPUT
HF

HF

LF 

LF 

Enceinte (arrière) : Panneau d’entrée
Câblage pour bi-amplification
La bi-amplification est une méthode encore meilleure de connecter vos enceintes. Comme pour le bi-câblage, les straps coupe-circuit des bornes d’entrée sont déposés, mais ici, les bornes des basses fréquences sont connectées à un ampli basses fréquences séparé et réservé, tandis que les bornes des hautes fréquences le son à un ampli hautes fréquences réservé.
(Seule une voie est indiquée) (Seule une voie est indiquée)
Amplificateur (arrière) |
(Hautes fréquences) |
SPEAKERS OUTPUT |
Enceinte
HF

HF

LF 

LF 

Enceinte (arrière) : Panneau d’entrée
Amplificateur (arrière) |
(Basses fréquences) |
SPEAKERS OUTPUT |
Fiche technique
Coffret . . . . . . . . . . . . . . . . . . . . . . . . . . . . . Type plancher, basse reflex Configuration . . . . . . . . . . . . . . . . . . . . . . . . . . . . . . . . . . . . . . . . .3 voies Haut-parleur des graves. . . . . . . . . . . . . . . . . . . . . . . Cône de 13 cm x 2 Médium/Tweeter . . . . . . . Unité coaxiale : Cône de 13 cm/Dome de 2,5 cm Impédance. . . . . . . . . . . . . . . . . . . . . . . . . . . . . . . . . . . . . . . . . . . . . . 6 Ω Réponse en fréquence . . . . . . . . . . . . . . . . . . . . . . . . . . . 33 Hz à 50 kHz Sensibilité . . . . . . . . . . . . . . . . . . . . . . . . . . . . . . . . . . . . . . 85 dB (2,83 V) Puissance d’entrée maximum. . . . . . . . . . . . . . . . . . . . . . . . . . . . 130 W Fréquence de recouvrement . . . . . . . . . . . . . . . . . . . . . . 300 Hz/2,5 kHz Dimensions extérieures . . . . 260 (L) mm x 1114 (H) mm x 276 mm (P) Poids . . . . . . . . . . . . . . . . . . . . . . . . . . . . . . . . . . . . . . . . . . . . . . . 23,8 kg
Accessoires fournis
Bases pour pointes de découplage. . . . . . . . . . . . . . . . . . . . . . . . . . . . 3 Attache antichute . . . . . . . . . . . . . . . . . . . . . . . . . . . . . . . . . . . . . . . . . 1 Vis (pour attache antichute) . . . . . . . . . . . . . . . . . . . . . . . . . . . . . . . . . 1 Grilles de fixation . . . . . . . . . . . . . . . . . . . . . . . . . . . . . . . . . . . . . . . . . . 3 Carte de garantie
Mode d’emploi (ce document)
Remarque
Spécifications et design sous réserve de modifications sans préavis en raison d’améliorations éventuelles.
 est une marque de commerce, appliquée sur un appareil doté de la technologie “Phase Control” de Pioneer. Cette technologie autorise une reproduction sonore de haut niveau par chaque composant grâce à une amélioration de la synchronisation d’ensemble des phases.
Publication de Pioneer Corporation. © 2009 Pioneer Corporation.
Tous droits de reproduction et de traduction réservés.
5
Français
Fr

Wir danken Ihnen dafür, dass Sie sich für dieses Produkt von Pioneer entschieden haben.
Bitte lesen Sie diese Bedienungsanleitung vor der Inbetriebnahme aufmerksam durch, damit Sie die optimale Leistung von diesem Produkt erzielen können. Bitte bewahren Sie diese Anleitung anschließend für spätere Bezugnahme griffbereit auf.
Vor der Inbetriebnahme
•Die Nennimpedanz dieses Lautsprechersystems beträgt 6 Ω.
Schließen Sie dieses Lautsprechersystem ausschließlich an einen Verstärker mit einer Lastimpedanz von 6 Ω bis 16 Ω an
(die Lautsprecherklemmen des Verstärkers müssen mit der Beschriftung „6 Ω to 16 Ω“ gekennzeichnet sein).
Um eine Beschädigung des Lautsprechersystems durch ein zu starkes Eingangssignal zu vermeiden, sind die folgenden Vorsichtshinweise sorgfältig zu beachten:
•Die zulässige Belastbarkeit (Eingangspegel) dieses Lautsprechersystems darf auf keinen Fall überschritten werden.
•Wenn ein Grafik-Equalizer verwendet wird, um den hohen Frequenzbereich anzuheben, darf die Lautstärke am Verstärker nicht auf einen übermäßig hohen Pegel eingestellt werden.
•Versuchen Sie auf keinen Fall, einen sehr hohen Lautstärkepegel von einem Verstärker mit niedriger Ausgangsleistung zu erzielen (dies führt zu einer Erhöhung des Klirrfaktors des Verstärkers und kann eine Beschädigung des Lautsprechers verursachen).
Vorsichtshinweise zur Aufstellung
•Bei der Aufstellung ist sorgfältig für einen festen Stand des Lautsprechers zu sorgen; Orte, an denen der Lautsprecher bei Auftreten eines Erdbebens oder einer anderen Naturkatastrophe umkippen und Verletzungen verursachen könnte, sind unbedingt zu vermeiden.
•Montieren Sie diesen Lautsprecher nicht an einer Wand oder der Decke. Anderenfalls besteht die Gefahr, dass er herunterfällt und Verletzungen verursacht.
•Dieser Lautsprecher darf nicht oberhalb des Kopfniveaus an der Decke oder an einer Wand befestigt werden. Bei unsachgemäßer Befestigung besteht die Gefahr, dass die Frontverkleidung herunterfällt und Verletzungen oder eine Beschädigung verursacht.
•Schalten Sie die AV-Anlage aus, und ziehen Sie alle Netzstecker ab, bevor Sie die Anschlüsse unter Bezugnahme auf die Bedienungsanleitungen der einzelnen Komponenten herstellen. Achten Sie unbedingt darauf, die richtigen Anschlusskabel zu verwenden.
Vorsichtshinweise zum Betrieb
•Stellen Sie den Lautsprecher auf einer stabilen Unterlage auf. Anderenfalls besteht die Gefahr, dass der Lautsprecher umkippt und Verletzungen oder eine Beschädigung verursacht.
•Verwenden Sie den Lautsprecher auf keinen Fall zur Wiedergabe von verzerrtem Klang über längere Zeiträume hinweg. Anderenfalls besteht die Gefahr eines Brandausbruchs.
•Bitte sorgen Sie dafür, dass sich Personen nicht auf den Lautsprecher setzen oder sich darauf stellen, und dass Kinder nicht auf dem Lautsprecher spielen.
•Stellen Sie keine großen oder schweren Gegenstände auf den Lautsprecher.
•Bringen Sie keinerlei magnetische Gegenstände, z. B. aufmagnetisierte Schraubendreher oder Eisenteile, in die Nähe der Koaxialeinheit (Hochtöner/Mitteltöner). Da diese Lautsprecher starke Magneten enthalten, könnten derartige Gegenstände angezogen werden und Verletzungen verursachen oder die Lautsprechermembran beschädigen.
Reinigen des Lautsprechergehäuses
Unter normalen Bedingungen lassen sich Staub, Fingerabdrücke und leichte Verschmutzungen durch Abreiben des Lautsprechergehäuses mit einem trockenen Tuch entfernen. Falls hartnäckige Schmutzflecken an den Außenflächen vorhanden sind, tauchen Sie einen sauberen Lappen in eine Lösung aus 5 bis 6 Teilen eines neutralen Haushaltsreinigers und 1 Teil Wasser, wringen Sie ihn gründlich aus, und wischen Sie die Schmutzflecken dann ab. Benutzen Sie dazu keine Möbelpolituren oder -reinigungsmittel.
Verwenden Sie auf keinen Fall Farbverdünner, Leichtbenzin, Insektizide oder andere Chemikalien zur Reinigung des Gehäuses oder in der Nähe dieses Lautsprechers, da derartige Mittel das Oberflächenfinish anlösen.
Mitgeliefertes Zubehör
Untersetzer für Stabilisatoren x 3
Metallarretierung x 1
Schraube (für Metallarretierung) x 1
Zierring x 3
*Diese Zierrringe sind dazu vorgesehen, nach Abnehmen der Frontverkleidungen an den Lautsprechern angebracht zu werden.
Garantiekarte
Bedienungsanleitung (dieses Dokument)
Mischen Sie dieses Produkt, wenn Sie es entsorgen wollen, nicht mit gewöhnlichen Haushaltsabfällen. Es gibt ein getrenntes Sammelsystem für gebrauchte elektronische Produkte, über das die richtige Behandlung, Rückgewinnung und Wiederverwertung gemäß der bestehenden Gesetzgebung gewährleistet wird.
Privathaushalte in den Mitgliedsstaaten der EU, in der Schweiz und in Norwegen können ihre gebrauchten elektronischen Produkte an vorgesehenen Sammeleinrichtungen kostenfrei zurückgeben oder aber an einen Händler zurückgeben (wenn sie ein ähnliches neues Produkt kaufen).
Bitte wenden Sie sich in den Ländern, die oben nicht aufgeführt sind, hinsichtlich der korrekten Verfahrensweise der Entsorgung an die örtliche Kommunalverwaltung.
Auf diese Weise stellen Sie sicher, dass das zu entsorgende Produkt der notwendigen Behandlung, Rückgewinnung und Wiederverwertung unterzogen wird, und so mögliche negative Einflüsse auf die Umwelt und die menschliche Gesundheit vermieden werden.
K058b_A1_De
2
De
Installationsverfahren
Wahl des Aufstellungsortes
•Die akustischen Verhältnisse im Hörraum üben einen starken Einfluss auf die Art der Schallabstrahlung von Lautsprechern aus.
•Um die optimale Klangqualität zu erhalten, sollten die Lautsprecher möglichst auf einem soliden Fußboden aufgestellt und wie in der nachstehenden Abbildung gezeigt platziert werden. Der Basspegel kann justiert werden, indem der Abstand zwischen Lautsprecher und Wand verringert oder erhöht wird. Stellen Sie die Lautsprecher jeweils im gleichen Abstand von der seitlichen Wand auf, um einen gut ausgewogenen Klang zu erzielen.
50 cm |
20 cm |
50 bis 60
•Um einen einwandfreien Stereoeffekt zu erhalten, stellen Sie den linken und rechten Lautsprecher im gleichen Abstand von der Hörposition auf. Verwenden Sie Lautsprecherkabel der gleichen Länge für jeden Lautsprecher.
•Platzieren Sie den linken und rechten Frontlautsprecher möglichst auf der Ebene des Fernsehgerätes.
•Um den optimalen Surround Sound zu erhalten, sollte sich das Fernsehgerät zwischen dem linken und dem rechten Lautsprecher befinden, wobei diese in einem Winkel von 50 bis 60 Grad auf die Hörposition weisen.
•Wenn der Hörraum einen starken Nachhall aufweist, empfiehlt es sich, die Wände mit schwerem Stoff zu behängen und/oder einen Teppich auf den Boden zu legen, um den Schall zu dämpfen. Die besten Ergebnisse werden erzielt, wenn die Wände vollständig abgedeckt werden.
•Pioneer lehnt jegliche Haftung für Schäden ab, die durch Fehler bei Zusammenbau oder Aufstellung, eine unzureichende Verstärkung, zweckentfremdeten Gebrauch oder höhere Gewalt entstehen.
•Da diese Lautsprecher ein hohes Gewicht besitzen, dürfen sie nicht auf einer unstabilen Unterlage aufgestellt werden; anderenfalls besteht die Gefahr, dass ein Lautsprecher umkippt und schwere Verletzungen oder Schäden verursacht.
•Treffen Sie bei der Aufstellung dieser Lautsprecher unbedingt geeignete Maßnahmen, um ein Umkippen zu verhindern; anderenfalls können Verletzungen verursacht werden, wenn die Lautsprecher bei Auftreten eines Erdbebens oder aufgrund einer anderen Ursache umkippen.
Montage der Stabilisatoren
Dieses Lautsprechersystem ist auf drei Punkten gelagert (auf den beiden vorderen Füßen und dem rückwärtigen Stabilisator, der zwischen den beiden hinteren Füßen angeordnet ist).
hinten
Kippschutzfüße
Gehäusebodenplatte
Stabilisator
vorn
1Platzieren Sie die Untersetzer für die Stabilisatoren an den Positionen, an denen sich die Spitzen der drei Stabilisatoren befinden werden, wenn der Lautsprecher aufgestellt wird.
2Stellen Sie den Lautsprecher auf die Untersetzer der Stabilisatoren, und vergewissern Sie sich, dass er nicht wackelt.
Vorsichtshinweise
•Platzieren Sie die Untersetzer wie in der nachstehenden Abbildung gezeigt so, dass die Seite mit der Vertiefung nach oben weist und die Spitze des Stabilisators aufnimmt.
Wenn die Untersetzer nicht verwendet werden, können die Spitzen der Stabilisatoren den Fußboden bzw. die Unterlage am Aufstellungsort des Lautsprechers zerkratzen. Der Gebrauch der Untersetzer in Verbindung mit den Stabilisatoren wird daher empfohlen.
Wenn die Stabilisatoren an den Lautsprechern befestigt sind, können ihre Spitzen den Fußboden beschädigen, wenn der Aufstellungsort der Lautsprecher verändert werden soll. Daher sollten Sie vor einer Veränderung des Aufstellungsorts die Stabilisatoren zur Sicherheit von den Lautsprechern entfernen. Da der Fußboden auch nach Entfernen der Stabilisatoren zerkratzt werden kann, empfiehlt es sich, den Fußboden mit einer dicken Matte aus Filz oder einem anderen geeigneten Material abzudecken, bevor der Aufstellungsort der Lautsprecher verändert wird.
Anbringen der Kippschutz-Befestigung
•Befestigen Sie die Metallarretierung mit der mitgelieferten Schraube an der Rückwand des Lautsprechers.
•Führen Sie eine im Fachhandel erhältliche verstärkte Schnur durch die Metallarretierung, um den Lautsprecher an der Wand zu sichern. Vergewissern Sie sich, dass das Tragvermögen der Wand für das Gewicht des Lautsprechers ausreicht. Überzeugen Sie sich nach der Befestigung der Schnur, dass der Lautsprecher nicht umkippen kann.
3
Deutsch
De
•Durch ein Umkippen kann der Lautsprecher beschädigt werden.
•Befestigen Sie die Metallarretierung nicht direkt an der Wand. Sie ist ausschließlich zum gemeinsamen Gebrauch mit einer verstärkten Schnur vorgesehen, um ein Umkippen des Lautsprechers zu verhindern.
verstärkte Schnur
<Rückseite des Lautsprechers>
Metallarretierung 

•Führen Sie zwei verstärkte Schnüre wie im obigen Diagramm gezeigt durch die Metallarretierung, um den Lautsprecher an der Wand zu sichern.
Anbringen und Entfernen der Frontverkleidung
Dieses Lautsprechersystem ist mit abnehmbaren Frontverkleidungen ausgestattet.
1Zum Abnehmen der Frontverkleidung ergreifen Sie sie den Rand im unteren Bereich mit beiden Händen, und ziehen Sie sie sacht nach vorn, um den unteren Teil der Frontverkleidung vom Lautsprechergehäuse zu trennen. Verfahren Sie dann auf gleiche Weise im oberen Bereich, um die Frontverkleidung vollständig vom Lautsprecher zu trennen.
2Zum Anbringen der Frontverkleidung halten Sie diese so, dass die dreieckige Markierung nach oben weist, bringen Sie die vier Stifte an der Rückseite der Frontverkleidung mit den Löchern im Lautsprechergehäuse zur Deckung, und drücken Sie die Frontverkleidung dann fest gegen den Lautsprecher.
Zierring
Hinweis
Wenn die Lautsprecher mit abgenommenen Frontverkleidungen verwendet werden sollen, empfiehlt es sich, die mitgelieferten Zierringe anzubringen, um die Befestigungslöcher der Frontverkleidungen zu verdecken. Außerdem trägt diese Maßnahme dazu bei, unerwünschte Schallreflexionen zu verhindern und einen sauberen, weiträumigen Klang zu erhalten.
4
Anschlüsse
Lautsprecherkabel für den Anschluss an einen Verstärker gehören nicht zum Lieferumfang dieses Lautsprechers.
Anschließen der Kabel
1Schalten Sie den Verstärker aus.
2Schließen Sie die Lautsprecherkabel an die (unteren) Eingangsklemmen an der Rückwand jedes Lautsprechers an. Die roten Klemmen sind positiv (+), die schwarzen Klemmen negativ (–) gepolt.
rote Klemme (+) |
|
|
schwarze |
Kurzschlussbrücken |
|
Klemme (–) |
||
|
3 Schließen Sie das andere Ende jedes Lautsprecherkabels an die Lautsprecherausgangsklemmen des Verstärkers an (Einzelheiten hierzu finden Sie in der Bedienungsanleitung Ihres Verstärkers).
•Drehen Sie die Kappenknöpfe der unteren Eingangsklemmen nach links (im Gegenuhrzeigersinn), führen Sie die blanken Drähte jedes Lautsprecherkabels in die Löcher in den Polbolzen ein, und ziehen Sie die Knöpfe dann wieder an, um sowohl die Kurzschlussbrücken als auch die Drähte in den Klemmen zu sichern.
•Bananenstecker können ebenfalls für den Anschluss an den Lautsprecherklemmen verwendet werden. Zur Verwendung von Bananensteckern entfernen Sie die Kappenknöpfe mit einem kleinen Flachschraubendreher oder einer Pinzettte vorher von den Polbolzen.
•Ziehen Sie nach dem Herstellen der Anschlüsse sacht an jedem Lautsprecherkabel, um sicherzustellen, dass die Drähte fest in den Klemmen sitzen. Lose Anschlüsse können Rauschen und Tonaussetzer verursachen.
•Falls die blanken Leiter von zwei Lautsprecherkabeln so weit aus den Klemmen hervorstehen, dass sie sich gegenseitig berühren, kann dies eine Überlastung des Verstärkers verursachen. In einem solchen Fall stellt der Verstärker möglicherweise den Betrieb ein, und es kann sogar zu einer Beschädigung des Verstärkers kommen.
•Falls einer der beiden Lautsprecher eines Lautsprecherpaars versehentlich mit vertauschter Polarität (+, –) an einen Verstärker angeschlossen wird, kann der normale Stereoeffekt nicht erzielt werden.
ACHTUNG
An den Lautsprecherklemmen dieses Gerätes liegt eine potentiell GEFÄHRLICHE Spannung an. Zur Vermeidung von Stromschlaggefahr ist unbedingt darauf zu achten, den Netzstecker beim Anschließen und Abtrennen der Lautsprecherkabel von der Netzsteckdose zu trennen, bevor irgendwelche nicht isolierten Teile berührt werden.
De
Doppelverdrahtungs-Anschluss
Zur Herstellung eines Doppelverdrahtungs-Anschlusses werden zwei Lautsprecherkabel benötigt, eins für den hohen Frequenzbereich, das andere für den tiefen Frequenzbereich. Durch den Einsatz von separaten Kabeln für die Höhen und die Tiefen wird die Klangqualität verbessert.
1Schalten Sie den Verstärker aus.
2Entfernen Sie die zwei Kurzschlussbrücken.
•In diesem Zustand sind Tieftöner und Mitteltöner/Hochtöner vollständig voneinander getrennt. Bewahren Sie die Kurzschlussbrücken für zukünftige Verwendung an einem sicheren Ort auf.
•Das untere Klemmenpaar ist für die Tiefen, das obere Klemmenpaar für die Mitten und Höhen vorgesehen.
•Ein polaritätsvertauschter Anschluss der Kabel kann eine starke Beeinträchtigung der Klangqualität verursacht. Vergewissern Sie sich daher, dass die Kabel richtig angeschlossen sind.
(nur ein Kanal gezeigt) Verstärker
Lautsprecher
(Rückseite)
SPEAKERS OUTPUT
HF

HF

LF 

LF 

Lautsprecher (Rückwand): Klemmenfeld
Zweiverstärkeranschluss
Ein Zweiverstärkeranschluss der Lautsprecher liefert einen noch dynamischeren Klang. Die Kurzschlussbrücken werden genau wie beim Doppelverdrahtungs-Anschluss entfernt, doch wird das Klemmenpaar für die Tiefen mit einem ausschließlich zum Treiber der Tiefen vorgesehenen Verstärker verbunden, während das Klemmenpaar für die Höhen mit einem zweiten Verstärker verbunden wird, der ausschließlich die Mitten und Höhen treibt.
(nur ein Kanal gezeigt) |
(nur ein Kanal gezeigt) |
Verstärker (Rückwand) |
Verstärker (Rückwand) |
(hohe Frequenzen) |
(tiefe Frequenzen) |
SPEAKERS OUTPUT |
SPEAKERS OUTPUT |
Lautsprecher
HF

HF

LF 

LF 

Lautsprecher (Rückwand): Klemmenfeld
Technische Daten
Gehäuse. . . . . . . . . . . . . . . . . . . . . . . . . . . . Freistehender Bassreflextyp Aufbau . . . . . . . . . . . . . . . . . . . . . . . . . . . . . . . . . . . . . . . 3-Wege-System Tieftöner. . . . . . . . . . . . . . . . . . . . . . . . . . . . . . . . . . . . . 13-cm-Konus x 2 Mitteltöner/Hochtöner. . . . . .Koaxialeinheit: 13-cm-Konus/2,5-cm-Kalotte Impedanz . . . . . . . . . . . . . . . . . . . . . . . . . . . . . . . . . . . . . . . . . . . . . . 6 Ω Frequenzgang . . . . . . . . . . . . . . . . . . . . . . . . . . . . . . . . 33 Hz bis 50 kHz Empfindlichkeit . . . . . . . . . . . . . . . . . . . . . . . . . . . . . . . . . . 85 dB (2,83 V) Maximale Belastbarkeit . . . . . . . . . . . . . . . . . . . . . . . . . . . . . . . . . 130 W Übernahmefrequenz. . . . . . . . . . . . . . . . . . . . . . . . . . . . . 300 Hz/2,5 kHz Außenabmessungen . . . . . . 260 (B) mm x 1114 (H) mm x 276 (T) mm Masse. . . . . . . . . . . . . . . . . . . . . . . . . . . . . . . . . . . . . . . . . . . . . . . 23,8 kg
Mitgeliefertes Zubehör
Untersetzer für Stabilisatoren . . . . . . . . . . . . . . . . . . . . . . . . . . . . . . . . 3 Metallarretierung . . . . . . . . . . . . . . . . . . . . . . . . . . . . . . . . . . . . . . . . . . 1 Schraube (für Metallarretierung) . . . . . . . . . . . . . . . . . . . . . . . . . . . . . 1 Zierring . . . . . . . . . . . . . . . . . . . . . . . . . . . . . . . . . . . . . . . . . . . . . . . . . . 3 Garantiekarte
Bedienungsanleitung (dieses Dokument)
Hinweis
Änderungen der technischen Daten und äußeren Aufmachung bleiben im Sinne der ständigen Produktverbesserung jederzeit vorbehalten.
 ist eine Marke, mit der Geräte gekennzeichnet sind, die mit Pioneers Phase Control-Technologie ausgestattet sind. Diese Technologie gewährleistet eine hochwertige Klangreproduktion des betreffenden Gerätes durch eine Verbesserung der Gesamtphasenanpassung.
Veröffentlicht von Pioneer Corporation. Urheberrechtlich geschützt © 2009 Pioneer Corporation.
Alle Rechte vorbehalten.
Deutsch
5
De

Vi ringraziamo per avere acquistato questo prodotto Pioneer.
Prima di usare il prodotto, leggere questo istruzioni per l’uso in modo da saperlo utilizzare correttamente. Finito di leggerle, conservarle in un luogo sicuro per poterle riutilizzare in futuro.
Prima di cominciare
•L’impedenza nominale di questo diffusore è 6 Ω. Collegare il
diffusore ad un amplificatore con un’impedenza di carico che vada da 6 Ω a 16 Ω (un modello con da “6 Ω to 16 Ω” stampati sui terminali di uscita dei diffusori).
Per evitare danni al diffusore dovuti al sovraccarico di segnale in ingresso, osservare le seguenti norme:
•Non alimentare il diffusore con potenza oltre il massimo concesso.
•Se si usa un equalizzatore grafico per enfatizzare forti suoni di alta frequenza, non usare volumi eccessivi dell’amplificatore.
•Non tentare di forzare un amplificatore di bassa potenza a produrre alti volumi. La distorsione armonica dell’amplificatore aumenterebbe e potreste danneggiare il diffusore.
Attenzione: installazione
•Nell’installare quest’unità, controllare che sia ben ferma ed evitare le aree dove potrebbe cadere e causare ferimenti nel caso di disastri naturali, ad esempio un terremoto.
•Non installare questi diffusori su di un muro o parete. Essi possono cadere e causare ferite.
•Non installare i diffusori in alto su di un soffitto o su di una parete. Se male installati, la griglia potrebbe cadere e causare danni o ferite.
•Prima di fare collegamenti, spegnere i propri componenti AV, scollegarli e consultarne i manuali. Controllare di avere usato i cavi di collegamento corretti.
Attenzione: in uso
•Non installare il diffusore su superfici poco stabili. Esso in caso di caduta può causare incidenti e danneggiarsi.
•Non fare emettere al diffusore suono distorto per lunghi periodi. Questo può provocare incendi.
•Non sedere o appoggiarsi al diffusore, e non lasciare che i bambini ci giochino.
•Non posare oggetti grandi o pesanti sul diffusore.
•Non posare oggetti che producono campi magnetici, ad esempio cacciaviti o pezzi di metallo, vicino all’unità coassiale (tweeter/midrange). Dato che i diffusori incorporano forti magneti, questi oggetti possono venirne attratti, causando ferite o danneggiando il diaframma.
Pulizia del cabinet dei diffusori
Normalmente per mantenere pulito il diffusore dovrebbe bastare un panno morbido ed asciutto. Se necessario, passarlo con un panno inumidito con un detergente neutro diluito cinque o sei volte con acqua, quindi strizzarlo bene. Non usare cere o pulenti per mobilia.
Non usare mai diluenti, benzina, spray insetticidi o altre sostanze chimiche su o vicino a quest’unità, dato che essi ne corrodono la superficie.
Contenuto della confezione
Basi delle punte x 3
Gancio in metallo x 1
Vite (per il gancio in metallo) x 1
Anelli accessori x 3
*Questi anelli sono stati progettati per essere applicati ai diffusori qualora non si utilizzassero le griglie a rete.
Scheda di garanzia
Istruzioni per l’uso (questo documento)
Se si vuole eliminare questo prodotto, non gettarlo insieme ai rifiuti domestici. Esiste un sistema di raccolta differenziata in conformità alle leggi che richiedono appositi trattamenti, recupero e riciclo.
I privati cittadini dei paesi membri dell’UE, di Svizzera e Norvegia, possono restituire senza alcun costo i loro prodotti elettronici usati ad appositi servizi di raccolta o a un rivenditore (se si desidera acquistarne uno simile).
Per i paesi non citati qui sopra, si prega di prendere contatto con le autorità locali per il corretto metodo di smaltimento.
In questo modo, si è sicuri che il proprio prodotto eliminato subirà il trattamento, il recupero e il riciclo necessari per prevenire gli effetti potenzialmente negativi sull’ambiente e sulla vita dell’uomo.
K058b_A1_It
2
It

Norme di installazione
Scelta della posizione di installazione dei diffusori
•I suoni riprodotti dal diffusore vengono facilmente influenzati dalle condizioni dell’ambiente di ascolto.
•Per ottenere il suono migliore possibile, scegliere un pavimento solido sul quale appoggiare i diffusori e posizionarli nel modo visto di seguito. Il livello dei bassi può venire regolato avvicinando o allontanando i diffusori dalle pareti. Regolare i diffusori in modo che siano equidistanti dalle rispettive pareti in modo che il suono sia bilanciato.
50 cm |
20 cm |
Da 50 a 60
•I diffusori sinistro e destro per garantire una buona stereofonia devono essere equidistanti dalla posizione di ascolto. Usare per ciascun diffusore cavi della stessa lunghezza.
•Se possibile, porre i diffusori anteriori sinistro e destro sullo stesso piano del televisore.
•Per ottenere un suono surround ottimale, il televisore si deve trovare fra i diffusori sinistro e destro e questi devono avere un angolo di 50 a 60 gradi rispetto alla posizione di ascolto.
•Se la stanza ha molto riverbero, si raccomandano tendaggi pesanti sulle pareti e/o tappeti sul pavimento per smorzarlo. Per ottenere risultati ottimali, coprire del tutto le pareti.
Importante
•Pioneer non si assume alcuna responsabilità per danni risultanti da una scorretta messa in posa, un insufficiente rinforzo, un uso scorretto del prodotto, catastrofi naturali, ecc.
•Dato che questi diffusori sono molto pesanti, non installarli in posizioni poco stabili dove la loro caduta possa causare danni o ferimenti pericolosi.
•Quando si installano questi diffusori, controllare di prendere misure atte ad impedire che possano cadere, dato che le cadute dovute a terremoti o altre cause possono causare ferimenti.
Uso delle punte
Questo diffusore è sostenuto in tre punti (le due zampe anteriori e la punta posteriore che si trova fra le due zampe posteriori).
Retro
Zampe anti ribaltamento
Base del cabinet
Punte
Davanti
1Mettere le basi delle punte nelle posizioni dove le tre punte toccano quando il diffusore viene messo in posizione.
2Mettere il diffusore sulle basi delle punte e controllare che non oscilli.
Attenzione
•Usare le basi delle punte sempre nel modo mostrato, con la superficie indentata rivolta in alto in modo da ricevere la cima della punta.
Se non si usano le basi delle punte nell’installare i diffusori, queste possono causare danni al pavimento. Raccomandiamo caldamente l’uso delle basi delle punte a chi intende usare le punte.
Quando col sistema di diffusori vengono usate le punte di ancoraggio, lo spostamento dei diffusori può causare danni alle superficie del pavimento. Risulta perciò consigliabile rimuovere le punte di ancoraggio prima di cambiare la posizione del diffusore. Inoltre, anche dopo aver rimosso le punte di ancoraggio lo spostamento dei diffusori può produrre graffi sul pavimento e si raccomanda perciò di stendere un foglio di feltro spesso o un altro simile materiale prima di spostare i diffusori.
Installazione dell’aggancio di sicurezza |
Italiano |
|
|
• Usando la vite fornita, stringere bene l’aggancio di sicurezza |
|
sul retro del diffusore. |
|
• Far passare una cordicella robusta da acquistarsi |
|
separatamente attraverso il gancio in metallo e fermare |
|
solidamente il diffusore al muro. Controllare che il muro cui il |
|
diffusore è fissato sia sufficientemente robusto per sostenere |
|
il peso del diffusore. Dopo aver fissato il diffusore, controllare |
|
che non possa cadere. |
|
• Il caso di caduta, il diffusore può danneggiarsi. |
|
• Non collegare il pezzo di metallo direttamente al muro. Deve |
|
venire usato solo con una corda robusta in modo che il |
|
diffusore non abbia a cadere. |
|
Cordicella robusta |
|
<Retro del diffusore>
Gancio in metallo 

•Fare passare due corde robuste attraverso il pezzo in metallo e fissare il diffusore al muro nel modo indicato qui sopra.
3
It

Applicazione e rimozione della griglia
Questo sistema di diffusori è fornito di griglie a rete che possono essere rimosse.
1Per togliere la griglia, mettere le dita al suo esterno vicino al fondo e tirare piano in fuori. Fare lo stesso poi in alto e staccarla.
2Per riapplicarla, tenerla con il simbolo del triangolo rivolto in alto ed allineare i quattro spinotti sul retro della griglia con i fori del diffusore, poi spingere.
Anello accessorio
Nota
Quando si utilizza il sistema di diffusori senza le griglie a rete, installare gli anelli accessori sui diffusori stessi. Ciò aiuta nella prevenzione di riflessioni non necessarie e nel fornire al suono qualità di dolcezza ed ampiezza.
Collegamenti
Questo diffusore non include cavi per diffusori usati per il collegamento con un amplificatore.
Collegamento dei cavi
1Spegnere l’amplificatore.
2Collegare i cavi dei diffusori ai terminali di ingresso (inferiori) sul retro del diffusore. Il terminale dei diffusori positivo (+) è rosso, quello negativo (–) nero.
Terminale rosso (+)
Terminale nero (−)
Connettori con
barra di messa in corto
3 Collegare le estremità dei cavi ai terminali di uscita dei diffusori dell’amplificatore. Per maggiori dettagli, consultare il manuale del proprio amplificatore.
•Prendere le manopole dei terminali di ingresso inferiori, girarle verso sinistra (in senso antiorario) ed inserire i cavi dei diffusori nei fori dei terminali, quindi stringere le manopole per fermare sia la barra breve che i cavi.
•Potete anche collegare i terminali dei diffusori con uno spinotto a banana. Se si usa uno spinotto a banana, per prima cosa togliere con un cacciavite o delle pinzette il cappuccio in cima al terminale di ingresso.
4
•Dopo aver rimesso a posto i tappi, tirare leggermente i cavi per controllare che siano ben collegati ai rispettivi terminali. Collegamenti scadenti possono causare rumore ed interruzioni del suono.
•Se i conduttori dei cavi fuoriescono dai terminali ed entrano in contatto l’uno con l’altro, il carico posto sull’amplificatore è eccessivo. Questo può impedirne il funzionamento o addirittura danneggiarlo.
•Se si usano dei diffusori collegati ad un amplificatore, non si otterrà un normale effetto stereo se la polarità (+, –) di uno dei diffusori (destro o sinistro) viene invertita.
AVVERTENZA
I terminali degli altoparlanti sono sotto tensione, alla stessa PERICOLOSA tensione della corrente di rete. Per prevenire rischi di folgorazioni nel corso delle operazioni di collegamento o di distacco dei cavi degli altoparlanti, staccare il cavo di alimentazione principale prima di toccare qualsiasi parte non isolata.
Collegamenti a doppio filo
I collegamenti a doppio filo richiedono due cavi per diffusore, uno per le alte ed uno per le basse frequenze. L’uso di cavi separati per le alte e basse frequenze migliora l’audio.
1Spegnere l’amplificatore.
2Rimuovere le due barre brevi.
•In questo modo, gli altoparlanti per le basse frequenze e quelli per le alte sono del tutto indipendenti. Conservare le barre brevi per poterle riutilizzare.
•I terminali più in basso sono per i bassi, quelli più in alto per i medi e gli acuti.
•Il collegamento dei cavi con la polarità invertita può far degradare fortemente l’audio. Controllare che i cavi siano collegati correttamente.
(Viene mostrato un solo canale) Amplificatore
Diffusore
(retro)
SPEAKERS OUTPUT
HF

HF

LF 

LF 

Diffusore (retro): Pannello d’ingresso
Collegamenti a doppio amplificatore
I collegamenti a doppio amplificatore sono un modo ancora migliore per collegare i diffusori. Come nel caso dei collegamenti a doppio filo, le barre brevi dei terminali di ingresso vengono tolte, ma i terminali delle basse frequenze vengono collegati ad un amplificatore separato esclusivamente per le basse frequenze, mentre i terminali delle alte frequenze vengono collegati ad un amplificatore esclusivamente per le alte frequenze.
(Viene mostrato un solo canale) (Viene mostrato un solo canale)
Amplificatore (retro) |
(alte frequenze) |
SPEAKERS OUTPUT |
Diffusore
HF

HF

LF 

LF 

Diffusore (retro): Pannello d’ingresso
Amplificatore (retro) |
(basse frequenze) |
SPEAKERS OUTPUT |
It

Dati tecnici
Cassa . . . . . . . . . . . . . . . . . . . . . . . . . . . . Tipo bass-reflex da pavimento Configurazione . . . . . . . . . . . . . . . . . . . . . . . . . . . . . . . . . . . . . . . . a 3 vie Woofer . . . . . . . . . . . . . . . . . . . . . . . . . . . . . . . . . . . . . Cono da 13 cm x 2 Medi/tweeter . . . . . . . . . Unità coassiale: cono da 13 cm/cupola da 2,5 cm Impedenza . . . . . . . . . . . . . . . . . . . . . . . . . . . . . . . . . . . . . . . . . . . . . 6 Ω Risposta in frequenza. . . . . . . . . . . . . . . . . . . . . . . . . Da 33 Hz a 50 kHz Sensibilità . . . . . . . . . . . . . . . . . . . . . . . . . . . . . . . . . . . . . .85 dB (2,83 V) Potenza in ingresso massima . . . . . . . . . . . . . . . . . . . . . . . . . . . . 130 W Frequenza di incrocio . . . . . . . . . . . . . . . . . . . . . . . . . . . . 300 Hz/2,5 kHz Dimensioni esterne . . . . . . . 260 (L) mm x 1114 (A) mm x 276 (P) mm Peso . . . . . . . . . . . . . . . . . . . . . . . . . . . . . . . . . . . . . . . . . . . . . . . . 23,8 kg
Accessori in dotazione
Basi delle punte . . . . . . . . . . . . . . . . . . . . . . . . . . . . . . . . . . . . . . . . . . . 3 Gancio in metallo . . . . . . . . . . . . . . . . . . . . . . . . . . . . . . . . . . . . . . . . . . 1 Vite (per il gancio in metallo). . . . . . . . . . . . . . . . . . . . . . . . . . . . . . . . . 1 Anelli accessori. . . . . . . . . . . . . . . . . . . . . . . . . . . . . . . . . . . . . . . . . . . . 3 Scheda di garanzia
Istruzioni per l’uso (questo documento)
Nota
I dati tecnici ed il design sono soggetti a modifiche senza preavviso a causa di migliorie.
 è un marchio di fabbrica messo sul prodotto che utilizza la tecnologia Phase Control di Pioneer. Questa tecnologia permette una riproduzione audio di alta qualità attraverso i vari componenti regolandone la fase.
Pubblicato da Pioneer Corporation.
Copyright © 2009 Pioneer Corporation.
Tutti i diritti riservati.
Italiano
5
It
Hartelijk dank voor de aanschaf van dit Pioneer product.
Lees de handleiding aandachtig door zodat u volledig op de hoogte bent van de bediening en werking. Bewaar de handleiding op een veilige plaats voor eventuele naslag in de toekomst.
Voordat u begint
•De nominale impedantie van deze luidsprekers is 6 Ω. Sluit de
luidsprekers op een versterker aan met een belastingsimpedantie tussen 6 Ω en 16 Ω (een model met het opschrift “6 Ωto 16 Ω” op de luidsprekeruitgangsaansluitingen).
Om beschadiging van de luidsprekers als gevolg van overbelasting te voorkomen, dient u de volgende punten in acht te nemen:
•De stroomtoevoer naar de luidsprekers mag het maximaal toelaatbare ingangsvermogen niet overschrijden.
•Bij gebruik van een grafische equalizer voor het versterken van de hoge tonen, mag het volume van de versterker niet te hoog worden ingesteld.
•Probeer niet om een versterker met laag vermogen geluid met overmatig hoog volume te laten weergeven (de harmonische vervorming van de versterker zal toenemen, wat kan resulteren in beschadiging van de luidspreker).
Let op: opstelling
•Zet de luidspreker op een stabiele ondergrond en let erop dat de luidspreker niet kan vallen en letsel veroorzaken bij een onvoorziene situatie of natuurramp (zoals een aardbeving).
•Bevestig de luidsprekers niet aan een muur of het plafond. De luidsprekers kunnen vallen en letsel veroorzaken.
•Monteer de luidsprekers niet boven u aan het plafond of aan een muur. Als de luidspreker verkeerd is bevestigd, kan het luidsprekerfront vallen met beschadiging of letsel tot gevolg.
•Schakel de AV-apparatuur uit, haal de stekker uit het stopcontact en raadpleeg de handleidingen voordat u begint met het aansluiten van apparatuur. Zorg dat u de juiste aansluitkabels gebruikt.
Let op: gebruik
•Zet de luidspreker niet op een onstabiele ondergrond. De luidspreker kan gevaar opleveren wanneer deze omvalt of de apparatuur kan beschadigd worden.
•Laat de luidspreker niet gedurende langere tijd vervormd geluid weergeven. Dit kan resulteren in brand.
•Ga niet op de luidspreker zitten of staan en laat ook niet kinderen op de luidspreker spelen.
•Zet geen grote of zware voorwerpen op de luidspreker.
•Leg geen voorwerpen die door magneten worden aangetrokken, zoals schroevendraaiers of ijzeren voorwerpen, in de buurt van de coaxiale eenheid (tweeter/midrange). Aangezien er sterke magneten in de luidsprekers zijn, kunnen de voorwerpen worden aangetrokken met persoonlijk letsel of beschadiging van het membraan tot gevolg.
Schoonmaken van de luidsprekerbehuizing
Bij normaal gebruik is het voldoende als u de luidspreker af en toe met een droge doek afveegt. Voor het verwijderen van hardnekkig vuil kunt u de doek bevochtigen met een neutraal reinigingsmiddel dat vijfof zesmaal verdund is met water. Wring de doek goed uit voordat u begint. Gebruik geen meubelwas of sterke reinigingsmiddelen.
Gebruik nooit witte spiritus, benzine, insecticidenspray of andere chemische middelen op of in de buurt van de luidsprekers, want deze kunnen de afwerking aantasten.
Inhoud van de doos
Penvoetjes x 3
Metalen beugel x 1
Schroef (voor metalen beugel) x 1
Luidsprekerringen x 3
*Deze ringen kunt u aan de luidsprekers bevestigen wanneer de fronts niet worden gebruikt.
Garantiebewijs
Handleiding (dit document)
Deponeer dit product niet bij het gewone huishoudelijk afval wanneer u het wilt verwijderen. Er bestaat een speciaal wettelijk voorgeschreven verzamelsysteem voor de juiste behandeling, het opnieuw bruikbaar maken en de recycling van gebruikte elektronische producten.
In de lidstaten van de EU, Zwitserland en Noorwegen kunnen particulieren hun gebruikte elektronische producten gratis bij de daarvoor bestemde verzamelplaatsen of een verkooppunt (indien u aldaar een gelijkwaardig nieuw product koopt) inleveren.
Indien u zich in een ander dan bovengenoemd land bevindt kunt u contact opnemen met de plaatselijke overheid voor informatie over de juiste verwijdering van het product.
Zodoende zorgt u ervoor dat het verwijderde product op de juiste wijze wordt behandeld, opnieuw bruikbaar wordt gemaakt, t gerecycleerd en het niet schadelijk is voor de gezondheid en het milieu.
K058b_A1_Nl
2
Nl
 Loading...