

phil&teds metro User Manual [en, de, es, fr]
send 102 - 112 daniell st newtown wellington nz
visit www.philandteds.com
ph +64 4 380 0833
fax +64 4 380 0137
teds
phil&
We (Phil and Teds Most Excellent Buggy Company Ltd) own the intellectual property rights in our brands, designs and inventions
© Phil and Teds Most Excellent Buggy Company Ltd 2010.
featured in this publication. These include, without limitation, the phil`teds, adapt`survive!, `, INLINE trade marks
and INLINE DOUBLE BUGGY shape. We actively pursue people who infringe our intellectual property.
...............................................................
model CMv2 issue April 2010
metro survival guide
...............................................................
carry
metro......undressed!
.......................................
50x
a
c
g
d
h
b
e
i
f
j
o
r
v
p q
x2
x2
s
w
t
x
16
4
2
u
sold separately
y
11
12
15
13
7
14
1
1O
17
9
3
8
5
6
k
l
m
n

ATTENTION! READING ALL
THESE INSTRUCTIONS WILL
GREATLY REDUCE THE CHANCE
OF TOYS BEING THROWN!
blokes: don’t say you weren’t told
(
)
female
PG parental guidance required
english
NB baby not included
metro
metroTM instructions
KEEP INSTRUCTIONS
FOR FUTURE USE.
Be hands free & ready to ‘lighten the urban
trip fantastic’, in no time! Here’s how:
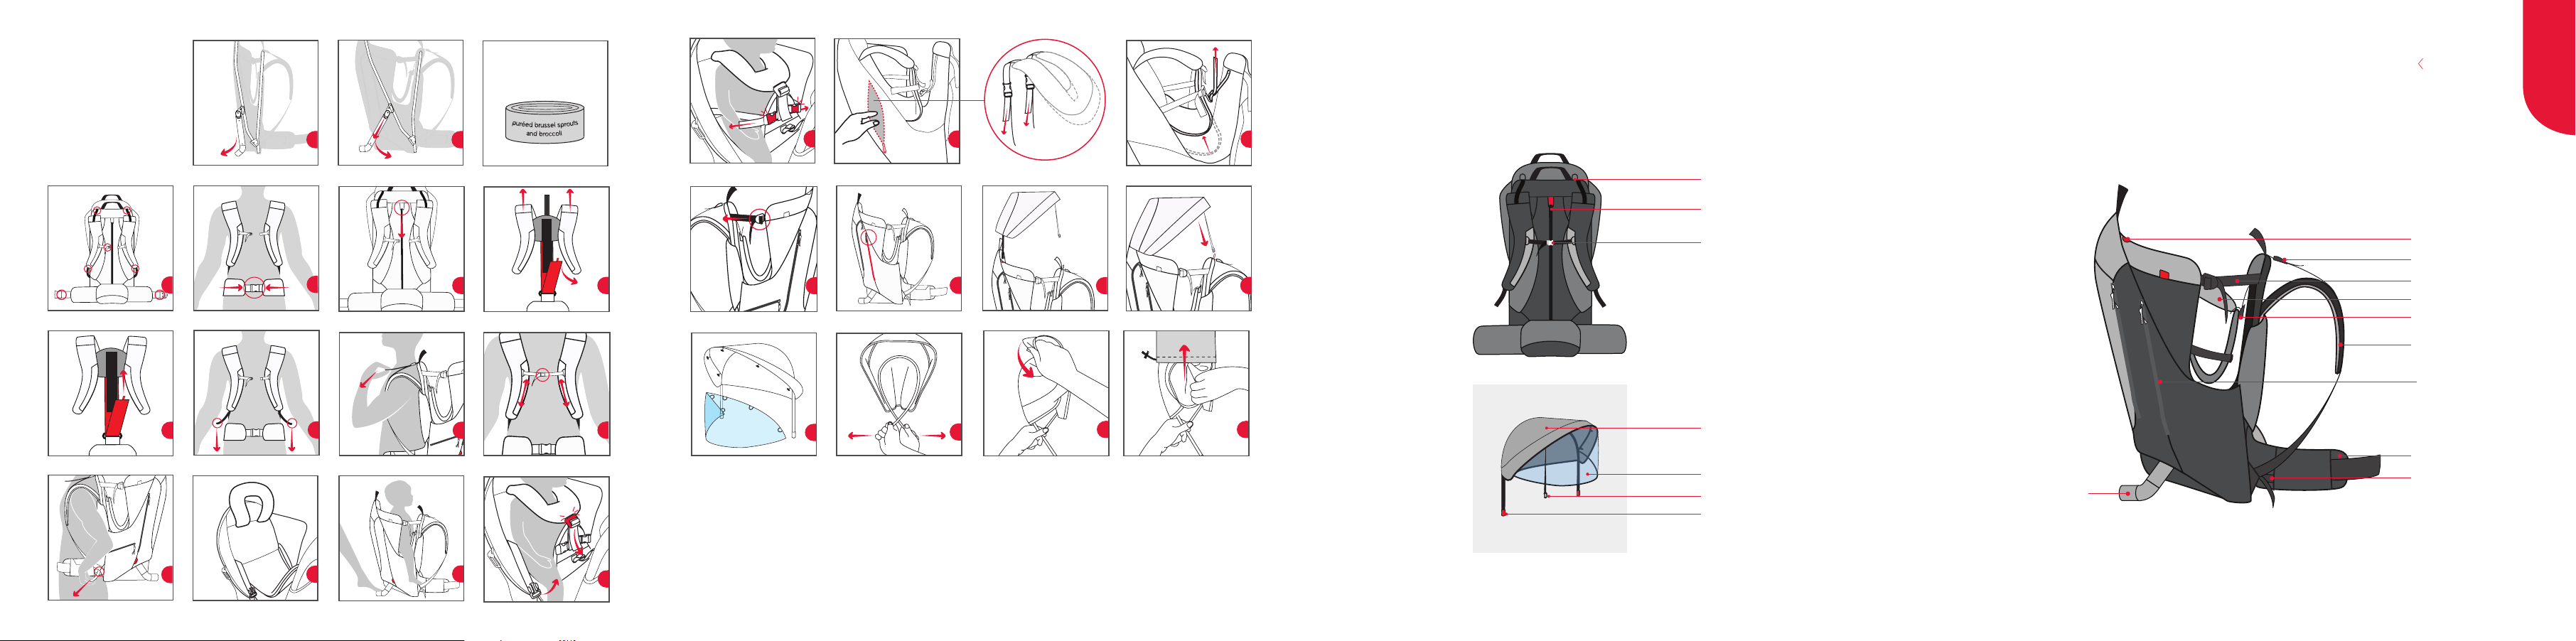
bits & bobs
The red numbers below refer to metro parts
indicated on the inside back cover of this guide.
For adult:
1. Top stabiliser straps
2. Chest strap
3. Shoulder straps
4. Center zip
5. Hipbelt
6. Lower stabiliser straps
7. Fold-out base
8. Carrier pocket
For child:
9. Seat height adjuster
10. Carrier side straps
11. Hood*
12. Visor*
13. Black rods*
14. Red fabric slots
15. Hood attachment strap
16. Elastic loop
17. Chest harness
* kit sold separately
safe & sound
We’ve attained the following safety standards:
• ASTM F2549-06
• EN 13209-1:2004
The red letters below refer to the helpful drawings on the inside front cover of this guide.
step 1: ‘stand’ proud!
The metro features a self standing fold-out
base, so you can ‘take a load off’! Make light
work of setting up the metro, & fold this
out now:
a From its folded-away position, grasp the
base arm & pull it out toward the back of
the carrier. The base will self lock.
Note Place the metro on a flat surface &
confirm it sits upright, indicating correct
extension of the fold-out base.
b To pack down after a hard day’s adventuring:
grasp the base arm & pull it down then fold
it in toward the back of the carrier.
step 2: put your back into it!
Note Your initial carrier adjustment should be
done without a child in the carrier.
Load carrier with 10–15kg/22–33lbs of
dummy weight. ie; 50 cans of baby food,
(puréed brussel sprouts and broccoli is best!)
2

c Generously loosen all the adult harness
straps, & put the carrier on.
d Fasten the hipbelt ensuring that it’s sitting
directly over your hip bones.
Note If the hipbelt is too high or low to sit on
your hip bones, then the metro back length
simply needs adjusting. To adjust:
e Take the carrier off & open the centre zip
located between the shoulder straps.
f To lengthen undo the red velcro strap & pull
it downwards, then guide the main shoulder
harness up until the desired strap height is
reached. Refasten the velcro & close the
zip.
g To shorten undo the red velcro strap & pull
it upwards to automatically shorten the shoul
der straps. Refasten the velcro & close the
zip. Put the carrier on again, & fasten the hip
belt as in ‘e’.
h Adjust the shoulder straps by pulling the
loose ends towards the floor.
i Adjust the top stabiliser straps by pulling
them toward your body. They should sit at
an approximate 45 degree angle. This will
shift the carrier weight away from your
shoulders; (whoopee!)
j Fasten the chest strap buckle (not too tight).
Slide the fastened strap up or down until it
sits comfortably across the top of your
chest. (above your breasts, ladies).
k Tighten the lower stabilising straps to pull
the carrier closer to your back.
step 3: now to make the
metro child ready!
With the carrier fold-out base extended
(see ‘stand proud!’ section), place the carrier
on flat, stable ground.
l Undo all the child straps, and undo the child
chest harness buckle
m Stand with one foot on the fold-out base to
stabilise the carrier. Lift the little one into the
child seat.
Note Have them sit with their body facing the
adult harness, & their legs hanging either side
of the carrier.
n Pull the chest harness over the child’s head
and fasten to the main seat harness buckle,
Slide the fastened strap up or down until it
sits comfortably across the child’s chest.
Tip You may need to lift them out of the seat
each time you do this, dependant upon how
much they ate for breakfast!
o Fasten side straps to the seat harness buck
les on either side and adjust by pulling loose
ends away from the body.
p Adjust the length of the child chest harness
by pulling or lengthening the straps so it sits
comfortably across the top of their chest.
english
3

metro
These are located inside the zip pocket on
the side of your carrier.
q Assess the height of their seat and adjust it
accordingly by tightening or loosening the
child seat strap, located in the centre from
of the carrier.
r Tighten each of the carrier side straps to
pull the child closer toward the adult harness,
keeping them snug.
Hey presto!
Note Never leave your child alone in the
metro. Clever it is, but a nanny it’s not!
get hooded up! … rain, hail or
shine!
Store your hood & visor inside the internal
compartment of the main carrier pocket.
1 Take the hood & visor out of the storage
bag, being mindful of young eyes as the
hood springs open. Return the storage bag
to the carrier pocket for safe keeping.
2 Locate the two red fabric slots at either side of
the top of the carrier. Take the two black rods
of the hood & insert one into each of the red
slots.
3 Clip each hanging black strap hook from
the hood into each corresponding elastic
loop above the adult harness.
*Purchase hood & visor separately
4 For extra weather protection attach the
plastic visor. To do so: lift up the front flap
of the hood to expose the wire and do up
the 5 toggles located on the underside of
the hood.
Note The visor should sit on the outside of
the black straps.
When not in use, disassemble the visor &
hood by reversing this process. Make certain
the hood & visor are dry before packing away.
5 To collapse the hood ready for flat packing
into its storage bag: stand with the black
hood rods facing your belly and the hood
interior facing towards you. Cross one
black rod over the other. Then hold it in
one hand, maintaining this position.
6 Pull the top hood wire toward you and
twist your wrist encouraging the top wire
to twist and lie down on itself.
7 The whole hood should form a flat folded
parcel. Manoeuvre the hood in this folded
position, back into the storage bag with
the folded visor.
4
cuts & bruises
The once over
Check the metro for cuts & bruises. If the
metro is damaged in any way, or you’re not
sure how to use it, contact your retailer immediately. The fabric on the metro is highly water
resistant, but zips and seams can leak. Use
plastic bags to ensure gear inside stays dry.
Caring for the metro
Unlike children, the metro likes to stay clean.
Dry the metro thoroughly before storing. Remove
dried on dirt with a soft brush. Do not wash
with soap, solvents, bleach or detergents.
(These may harm the fabric). Store in a well
ventilated space, away from direct sunlight
(which can harm/fade metro’s colourful coat).
All it can eat
Don’t load so much in the metro that it can’t
be carried with a child in it. The metro is not
for carrying the kitchen sink! No hard or sharp
objects please; they hurt!
In case of sudden explosions
In the outside pocket of the hood storage
bag you shall find a washable nappy/diaper
change mat: keep clean on the run.
rights & remedies
* consumers may have extra rights in some countries or
states.
Our products are warranted against defects in
materials and workmanship for one year from
the date of purchase. If the product has a manufacturing fault we will repair it free of charge. If
not practical to repair it, we will, at our discretion, replace the part in question. If the product
fails due to wear and tear, accident, neglect or
negligence, or is outside the warranty, we will
happily repair it for
a reasonable charge.*
Who is covered?
The original purchaser buying product from
an authorised dealer. Proof of purchase
is required.
What is covered?
Workmanship or materials that are deemed
faulty, providing the product has at all times
been used in normal conditions in accordance
with the instructions, & has been properly
maintained.
What is not covered?
Second hand product, modified product, poorly
english
5

metro
maintained product, normal wear, fading and
fabric cuts, improper use (by way of example):
abnormal use; not following instructions; a child
left unattended; excessive load; transport
damage i.e. airline or freight damage.
Customer costs within the warranty.
The customer is responsible for any inwards
freight charge to return the product to the
manufacturer or its representative for warranty
and/or service.
Customer costs outside the warranty.
Where proof of purchase is not provided or
the product is outside of the one year warranty
period: the manufacturer (or agent) reserves
the right to charge a service fee and/or charge
for parts replaced/repaired. A return freight
charge may apply.
Exclusions: any consequential loss or damage
to any person or property directly or indirectly
as a result of using the product.
Who do I contact?
Please discuss any warranty or service
queries with your store of purchase. You will
be required to show proof of purchase. They
will inform you of the next steps. Products
returned directly to the manufacturer by customers will NOT
be eligible for claims under warranty.
WARNINGS !
WARNING – FALL
OR STRANGULATION
HAZARD
WARNING Keep the instructions with
the metro for future reference. Injury
may result from improper use or not
following all the safety precautions.
WARNING Before using the metro,
please read these instructions
carefully. Safe operation depends
on careful adherence to these
instructions. The child’s safety may
be affected if you do not follow them.
WARNING Never leave a child
unattended in the metro. Ensure
the child does not climb into or out
of the metro. Injury may result from a
child falling from the metro. Stability
is only assured with external support
& parental supervision.
WARNING Always make sure the
metro is correctly adjusted. Do not
use the metro if any part is broken,
worn or missing.
6

WARNING Do not modify the metro
or use accessories not designed for
the metro. Do not use an extra seat,
or thick padding altering the seat
height. This could result in a child
falling from the carrier.
WARNING Always use the safety
harnesses. When using the metro
outdoors, be aware that children are
more vulnerable to heat/cold than
adults and can’t manage their body
temperature like adults. Make sure
you have adequate clothing for varying weather conditions such as warm
hats, sun hats and sun cream.
WARNING No child younger than
3 months, or any child unable to sit
up by themselves should be carried
in the metro. Minimum child weight
is 7.3kgs/16lbs.
WARNING Maximum load is
18kgs/40lbs (child & storage).
WARNING Do not place carrier
on counter tops, tables, or other
elevated surfaces.
WARNING Check to assure all
buckles, snaps, straps, and
adjustments are secure before
each use.
log on & relax
Please register your product purchase
through our online warranty registration by
visiting www.philandteds.com/register
english
7

adresse 102 – 112 daniell st newtown wellington nouvelle-zélande
visitez notre site www.philandteds.com
tél. +64 4 380 08 33
fax +64 4 380 01 37
Nous (Phil and Teds Most Excellent Buggy Company Ltd) sommes détenteurs de tous les droits de propriété intellectuelle associés à nos marques,
modèles et inventions mentionnés dans le présent document. Ceux-ci incluent, sans que cela soit limitatif, les marques commerciales phil~teds, adapt~survive !, ~,
et INLINE et la forme du INLINE DOUBLE BUGGY. Nous engageons des poursuites contre tous ceux qui enfreignent nos droits de notre propriété intellectuelle.
©Phil & Teds Most Excellent Buggy Company Ltd 2007.
Attention! La lecture de
cette notice contribue
à réduire le nombre de
jouets jetés par terre !
vous ne pourrez pas dire que vous n’avez pas été prévenu!
(
)
féminin
PG Avis parental requis
NB bébé non inclus
français

metro
notice metro
TM
VEUILLEZ CONSERVER
CETTE NOTICE POUR
UNE UTILISATION ULTÉRIEURE.
Voici comment votre enfant et vous allez
pouvoir affronter la ville, les mains libres !
caractéristiques
Les chiffres en rouge correspondent aux
différentes pièces décrites au dos de
cette notice.
Pour l’adulte :
1. Sangles de stabilisation supérieures
2. Sangle poitrine
3. Bretelles
4. Zip central
5. Ceinture
6. Sangles de stabilisation inférieures
7. Base pliable
8. Rangement/compartiment intérieur
Pour l’enfant :
9. Système de réglage de la hauteur du siège
10. Sangles de coté
11. Capote*
12. Rétroviseur*
13. Baguettes noires*
14. Fentes dans le tissu rouge
15. Attaches capote
16. Cordon élastique
17. Harnais poitrine
* Vendu
séparemment
sûr & solide
Le metro répond aux exigences des normes de
sécurité suivantes :
• ASTM F2549-06
• EN 13209-1:2004
Les lettres en rouge correspondent aux lignes situées sur la description en première page intérieure.
étape 1: tenir debout!
Une des caractéristiques du metro est d’être monté
sur une base pliable. Ca rend la tâche plus facile !
Vous allez voir, plier et déplier votre metro est très
facile :
a En partant de la position pliée, saisissez
le montant de la base et tirez-le vers
l’arrière. La base se verrouillera automa
tiquement.
Important: Installez le metro sur une surface plane et
vérifiez qu’il tient droit, cela indique que la base est
correctement dépliée.
b De retour de vos aventures, pour ranger
votre metro, saisissez le montant de la
base et repliez-le vers l’arrière du porte
bébé.
étape 2: mettez-le sur votre dos
Important: Le réglage de votre porte bébé sur votre
dos doit être fait sans enfant à l’intérieur.
Chargez votre porte bébé avec un poids de
10/15kg (une cinquantaine de petits pots
feront très bien l’affaire : « purée de carotte » ou « de
brocolis » sont les meilleurs pour ça !)
10
c Desserrez amplement toutes les sangles
du harnais adulte et installez le porte bébé
sur votre dos.
d Serrez la ceinture au niveau des hanches.
Assurez-vous qu’elle repose bien sur
vos hanches.
Important: Si la ceinture est trop haute ou
trop basse pour reposer convenablement sur
vos hanches, il faut alors ajuster la hauteur du
porte bébé. Pour cela :
e Ôtez le porte bébé et ouvrez le zip central
situé entre les bretelles.
f Pour allonger, défaites le velcro rouge et
tirez vers le bas. Réglez les bretelles
jusqu’à la hauteur désirée. Refermez le velcro
et le zip.
g Pour raccourcir, défaites le velcro rouge et
remontez le. Cela raccourcit automatique
ment les bretelles. Refermez le velcro et le
zip. Remettez le porte bébé et bouclez
la cein ture autour de vos hanches comme
indiqué au paragraphe « e ».
h Ajustez les bretelles en tirant les sangles
vers le bas.
i Ajustez les sangles de stabilisation su
périeures en les tirant vers vous. Elles
doivent former un angle de 45°.
Elles servent à soulager vos épaules du
poids (yessssss !).
j Fermez la boucle située au niveau du torse
(pas trop serré). Glissez la boucle vers le
haut ou vers le bas de façon à ce que ce soit
confortable pour vous. (Au dessus de la
poitrine, pour les femmes).
k Serrez les sangles de stabilisation in
férieures de façon à tenir le porte
bébé contre votre dos.
étape 3: installer l’enfant
dans le metro
La base dépliée (voir la partie « tenir debout »),
placez le porte bébé sur une surface plane.
l Défaites toutes les sangles ainsi que la
boucle du harnais poitrine.
m Avec un pied, bloquez la base de façon à
stabiliser le porte bébé. Installez l’enfant
dans le siège.
Important: Installez-le de façon à ce qu’il fasse
face au harnais adulte et que ses jambes passent de chaque coté du porte bébé.
n Passez le harnais poitrine par dessus la
ête de l’enfant, et attachez-le à la boucle
de l’assise. Faites coulisser la sangle de
haut en bas jusqu’à ce qu’elle soit confort
able ment positionnée sur la poitrine de
l’enfant.
Remarque: Il se peut que vous ayez besoin
de retirer l’enfant pour effectuer le réglage.
Tout dépend de ce qu’il aura mangé au petit
déjeuner !
o Attachez les sangles laterales aux boucles
du harnais puis ajustez en tirant sur
l’extrêmité des sangles.
français
11
 Loading...