

Page 1

CHILD CAR SEAT
GROUP 0+
Suitable for newborn – 13/15 months
Approximately 0 to 13kg (Newborn to 29lbs)
INSTRUCTIONS FOR FITTING AND USE
NOTICE
1. This is a “Universal” child restraint; it is approved to ECE
Regulation 44.04 for general use in vehicles and will fit most, but not
all, vehicle seats.
2. A correct fit is likely if the vehicle manufacturer has declared in the
vehicle handbook that the vehicle is capable of accepting a
"Universal" child restraint for this group.
3. This child restraint has been declared “Universal” under more
stringent conditions than those applied to earlier designs which do not
carry this notice.
4. If in doubt, consult either the child restraint manufacturer or the
retailer.
THESE INSTRUCTIONS ARE IMPORTANT. PLEASE READ
CAREFULLY AND RETAIN FOR FUTURE USE.
Only suitable if the vehicle is fitted with 3-point static, 3-point retractor safety belts, approved to UN/ECE Regulation No. 16 or other equivalent standards.
The correct use and maintenance of your car seat will ensure it gives long and trouble
free use. When somebody else is using your car seat, ensure they also know how to
use it, especially the correct way to adjust it. The safety of your child is your
responsibility.
EXTREME HAZARD
Do not use in passenger
seats equipped with
airbags (SRS)
SAFETY WARNINGS
1. PLEASE READ THOROUGHLY BEFORE COMMENCING INSTALLATION, AS AN
INCORRECT INSTALLATION COULD BE DANGEROUS.
2. PARENTS SHOULD NOT UNDER ANY CIRCUMSTANCES USE THIS CHILD
RESTRAINT ON A PASSENGER SEAT EQUIPPED WITH AN AIRBAG.
3. The child seat must only be installed in the rearward facing position.
4. Never use the child seat without fastening the child’s harness correctly, and never attempt
to use it without fastening it into the car as described in these fitting instructions.
5. It is most important that the seat belt is correctly routed and the child seat tightened down
on the upholstery as firmly as possible to ensure maximum protection – a recommended
method is shown in these instructions.
6. Do not add to or modify this product in any way.
7. Never use this product if it has been in an accident, or if it has become badly worn.
Periodically inspect the harness for wear, paying particular attention to attachment points,
stitching and adjusting devices.
8. Do not leave a child in the seat unattended at any time.
9. Ensure that no part of the seat or seat belt is trapped in a door or a folding seat. If your
car has a folding rear seat, ensure that it is correctly latched in its upright position.
10. Car interiors can become very hot when left standing in direct sunlight – it is therefore
recommended that the child seat, when not in use, is covered by a towel etc. This
prevents components, particularly those attached to the child seat, becoming hot and
burning the child.
11. In the event of an emergency it is important that the child can be released quickly. This
means that the buckle is not fully tamperproof and therefore your child should be
persuaded never to play with the buckle.
12. Luggage and other heavy objects should be secured in the car. Loose objects are liable
to cause injury in the event of an accident.
13. The child seat must not be used without the cover.
14. Never place your child seat on a table or work surface.
15. This seat can be used for children of 0–13kg in weight (approximately birth to 13/15
months of age) and is used in conjunction with a 3-point lap and diagonal safety belt in
the rear-facing position only.
16. When the child seat is not in use, it is recommended that it is
fastened into the car with a seat belt to avoid it being thrown about in the event of an
accident.
17. In an emergency your child can be released quickly by pressing the red button on the
harness buckle.
18. Store this child seat in a safe place when it is not being used. Avoid
placing heavy objects on top of it.
19. If you travel with passengers using both the front and rear passenger
seats, the lighter occupants should be in the rear and the heavier
occupants in the front of the vehicle.
20. Do not allow your child seat to come into contact with corrosive
substances e.g. battery acid.
Page 2
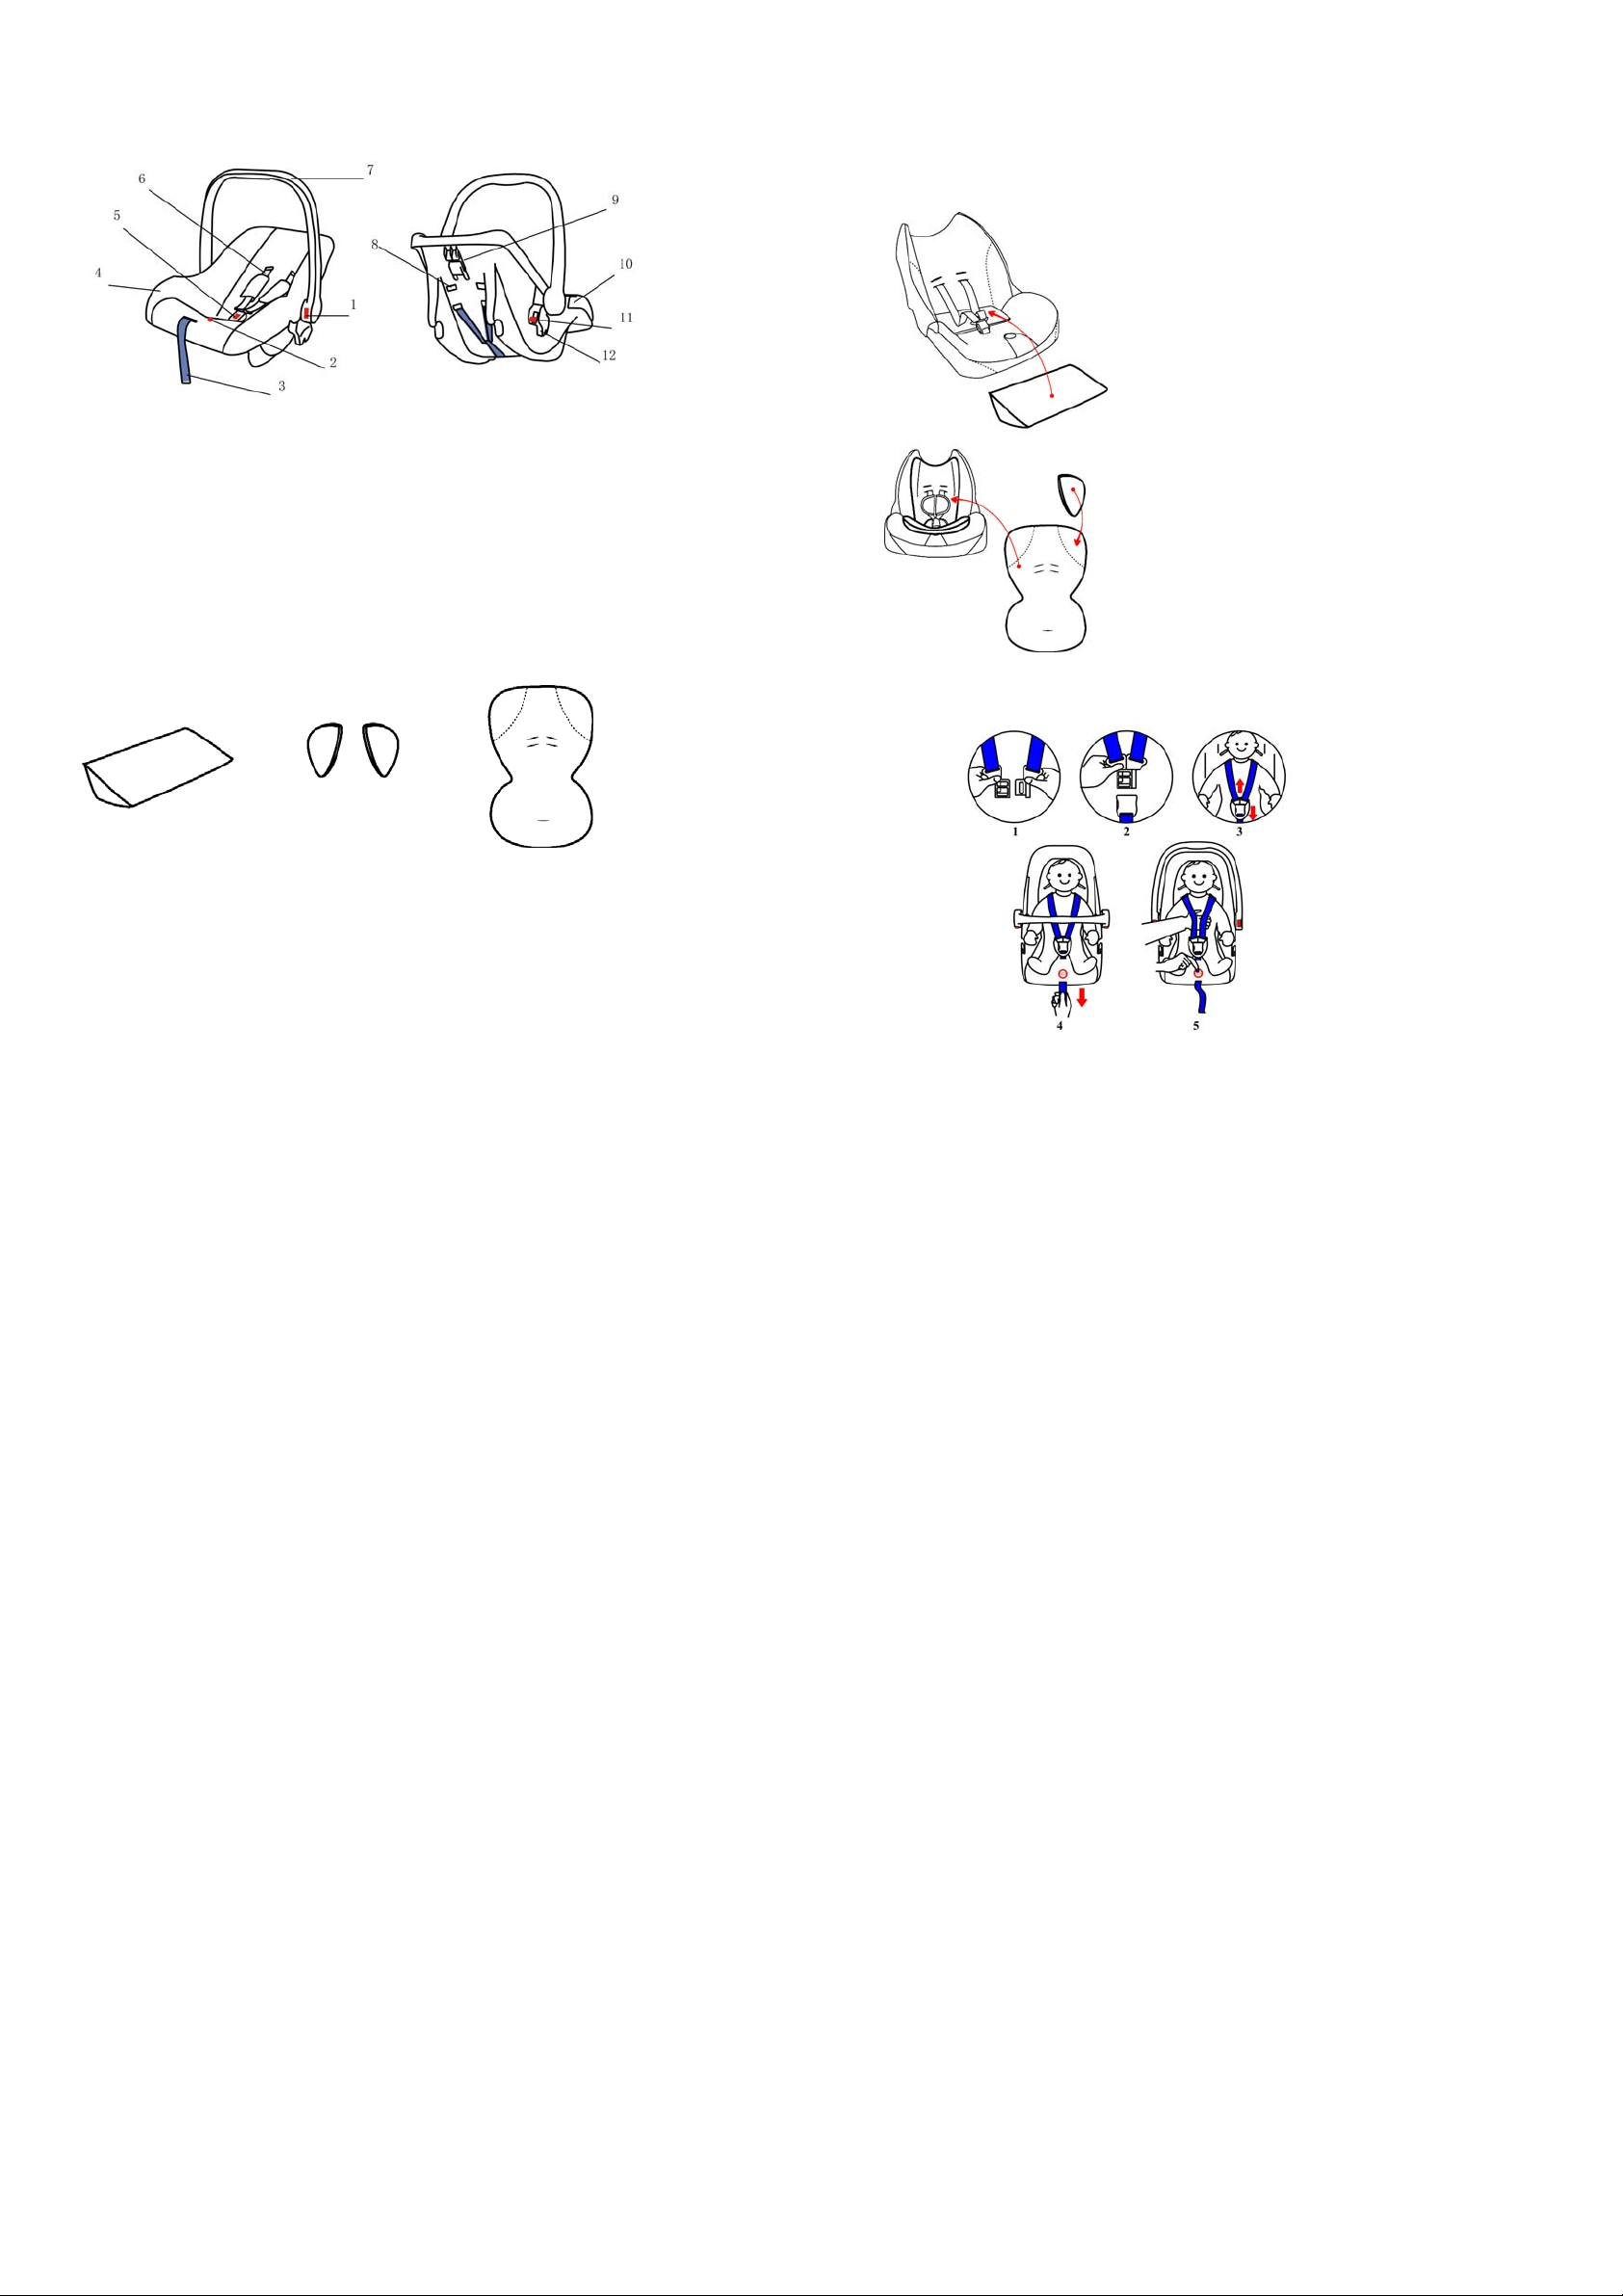
GETTING TO KNOW YOUR CHILD SEAT
1. Red button handle 6. Shoulder straps
adjuster 7. Carry handle
2. Harness adjuster under 8. Shoulder harness slots
‘Press’ 9. Dark blue diagonal belt guide
3. Harness adjuster strap 10. Light blue lap belt guide
4. Cover 11. Red switch
5. Harness buckle 12. Coupler
SEAT SUPPORT FOR NEWBORNS
SEAT SUPPORTS
1. Place the seat support into the base of the car
seat, behind the harness.
2. Insert the head pads into the corner pockets
located at the back of the seat cushion.
3. Thread the seat cushion through the harness so it fits
snug against the base.
THE HARNESS
1. Seat support 2. Head Pads 3.Seat cushion
Lumbar support Head and neck for added support for newborns.
support for newborns. and comfort.
Page 3
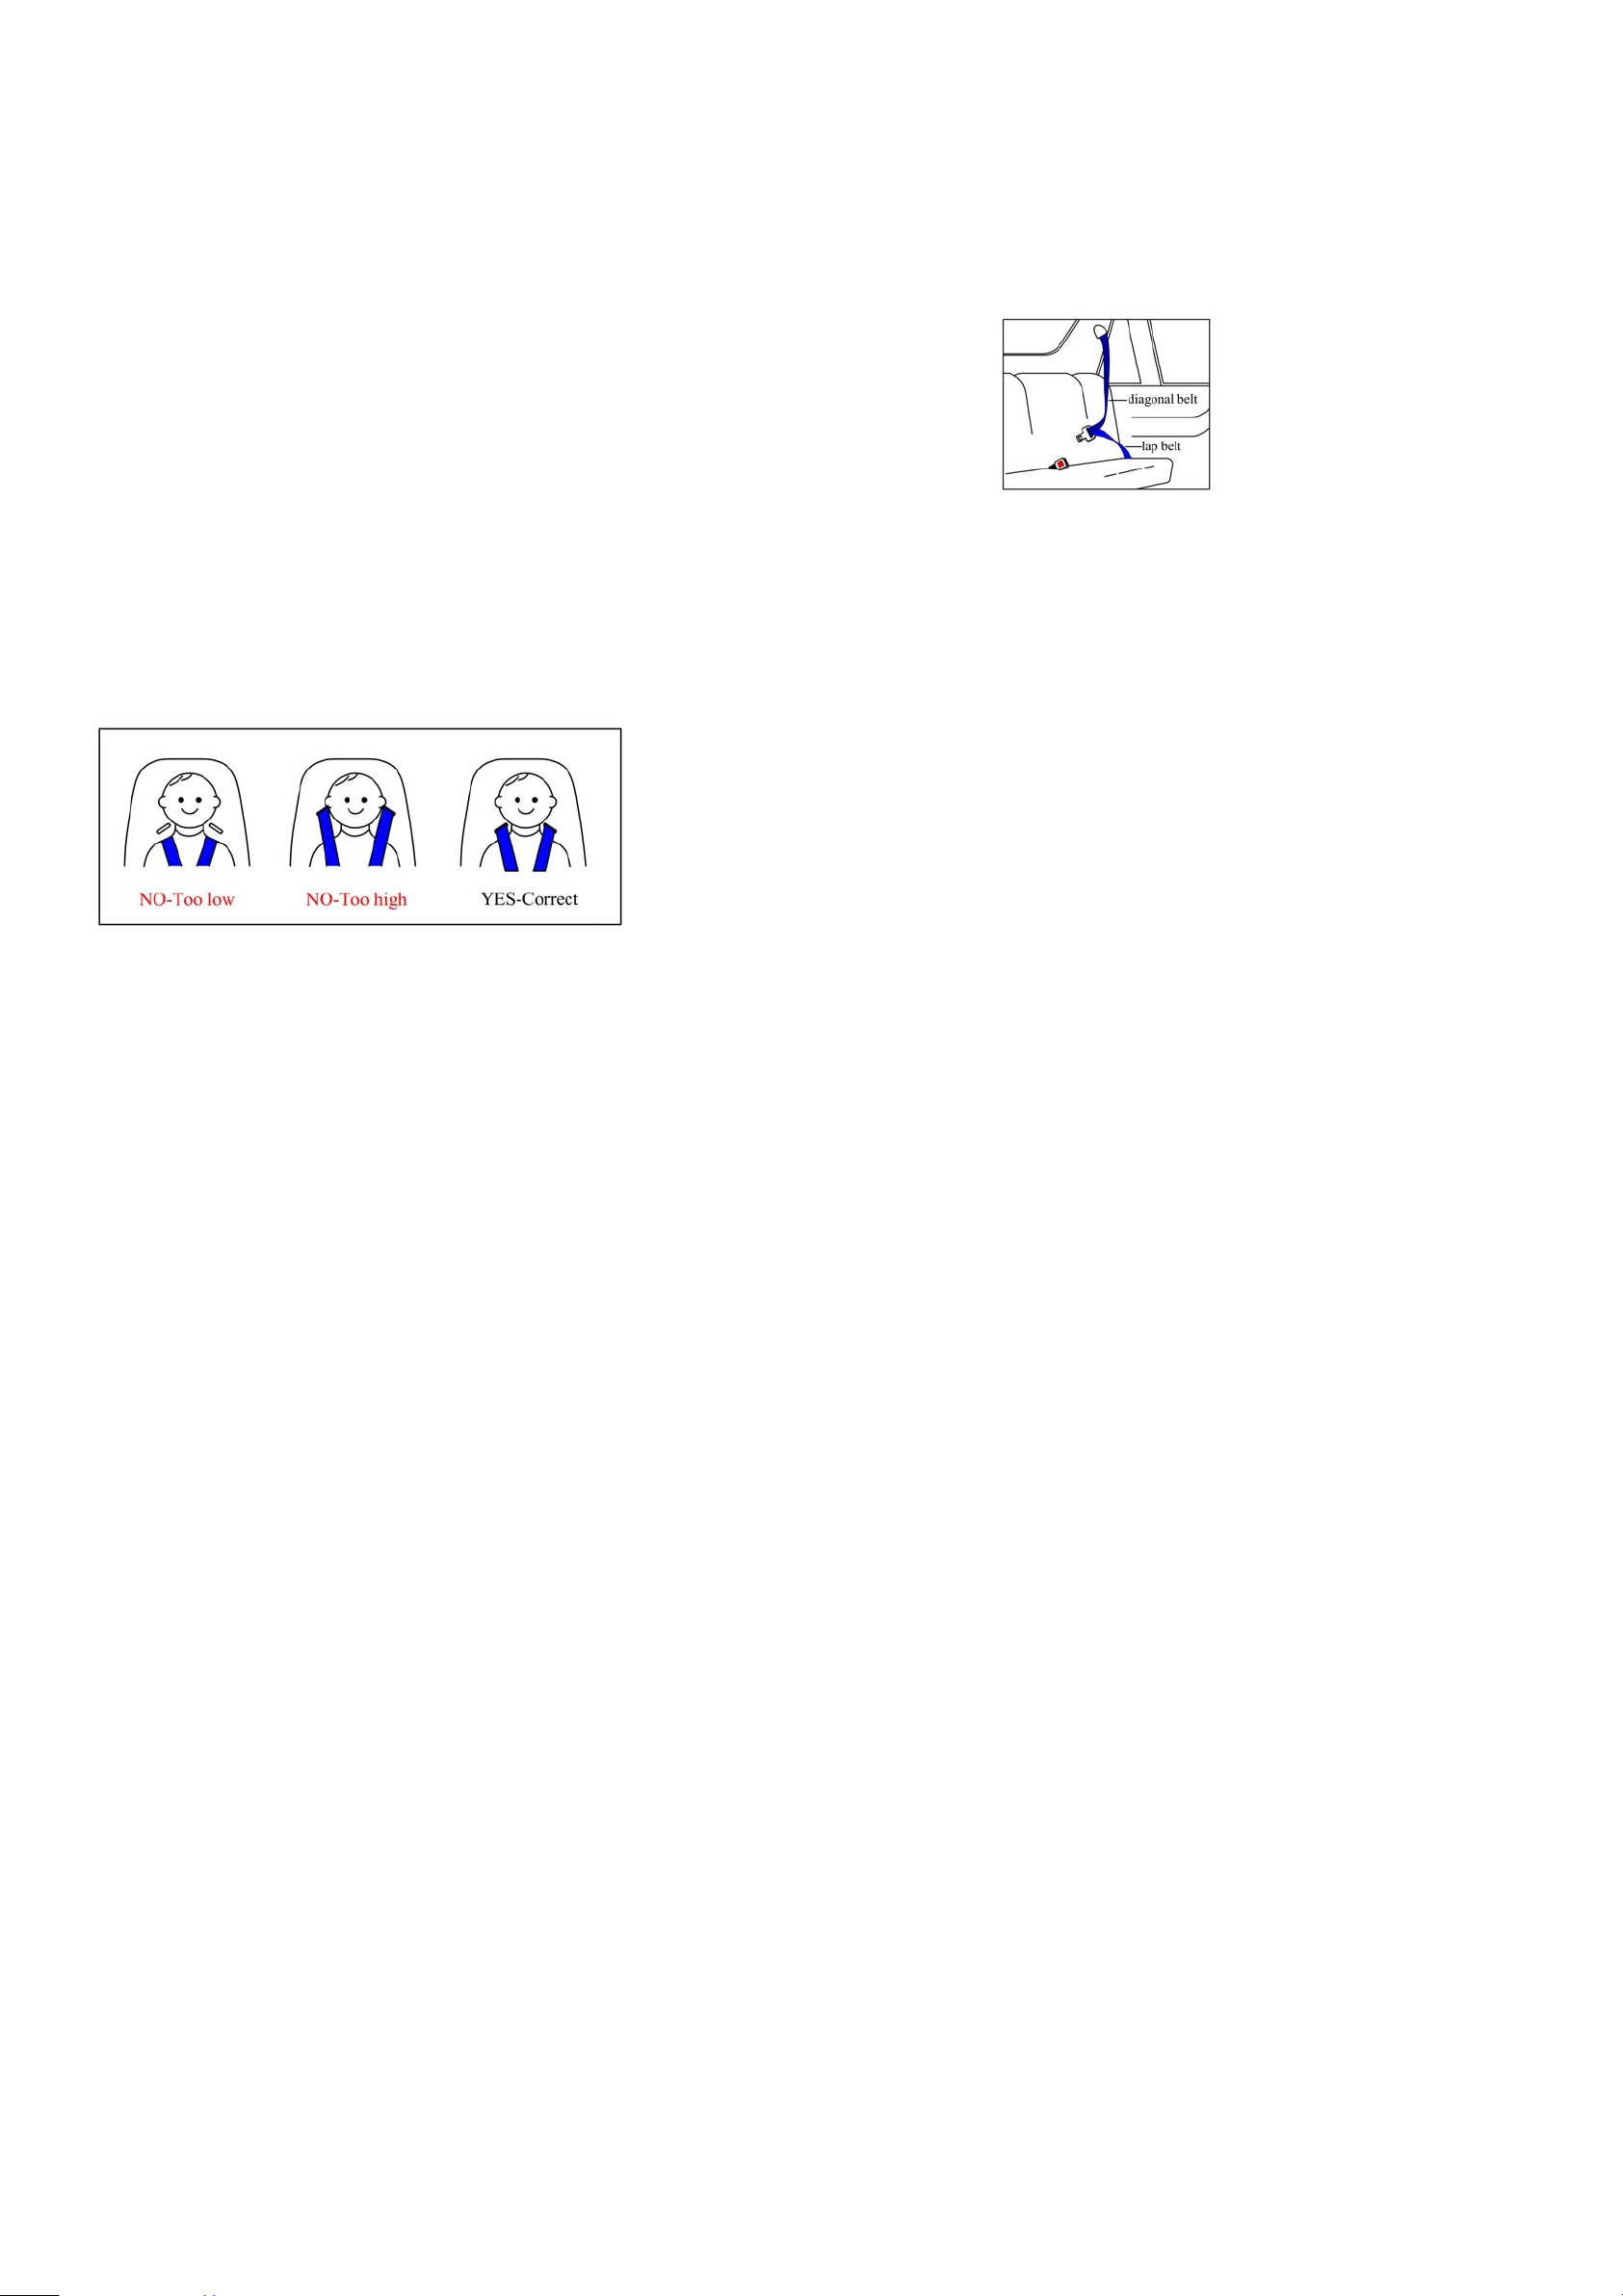
FASTENING THE HARNESS
• Slot the two plastic sections of the buckle connectors together
Fig 1
• Slot the two connectors into the hole in the top of the buckle
until they “click” into place Fig 2
• Always check that the harness is correctly locked by pulling above and below
the buckle Fig 3
• The harness should be adjusted as tightly as possible without
causing discomfort to the child. A loose harness is dangerous and should be
checked each time that you use the seat. To tighten the harness, pull down on
the adjustment strap until the harness is the correct tightness Fig. 4
• The harness is loosened by pulling on both straps at the same time press down
on the harness adjuster that is located on the shell underneath the “Press” word
stitched on the cover Fig. 5
UNFASTENING THE HARNESS
To release the harness, push the red button in the middle of the harness buckle inwards.
You can now lift your child from the seat; ensure that the buckle connectors do not catch
on clothing.
ADJUSTING THE SHOULDER HEIGHT
The harness has 2 positions. The straps should go into the slots at, or the nearest slots
above the height of the child’s shoulders. To adjust the harness, remove each strap by
passing it through the slots from the front to the back of the seat; re-route the straps
through the appropriate slots
FITTING YOUR CAR SEAT INTO THE CAR
WARNING: This car seat can only be fitted into the passenger seat of a car
with a lap and diagonal seat belt and no air bag.
THE TYPE OF APPROVED SEAT BELT YOU MUST HAVE
Your child seat can only be installed rearward facing using a lap and diagonal
seat belt in the front or rear passenger seat of the car.
INSTALLATION
• Push the child seat facing rearward firmly against the backrest of the car’s seat.
• Route the lap section of the adult safety belt through the lap belt guides and
fasten the car seat belt.
• Place the diagonal belt in the diagonal seat belt guide at the back of the seat.
• Take out all the slack in the seat belt, ensuring that there are no twists or kinks
in the seat belt.
Page 4
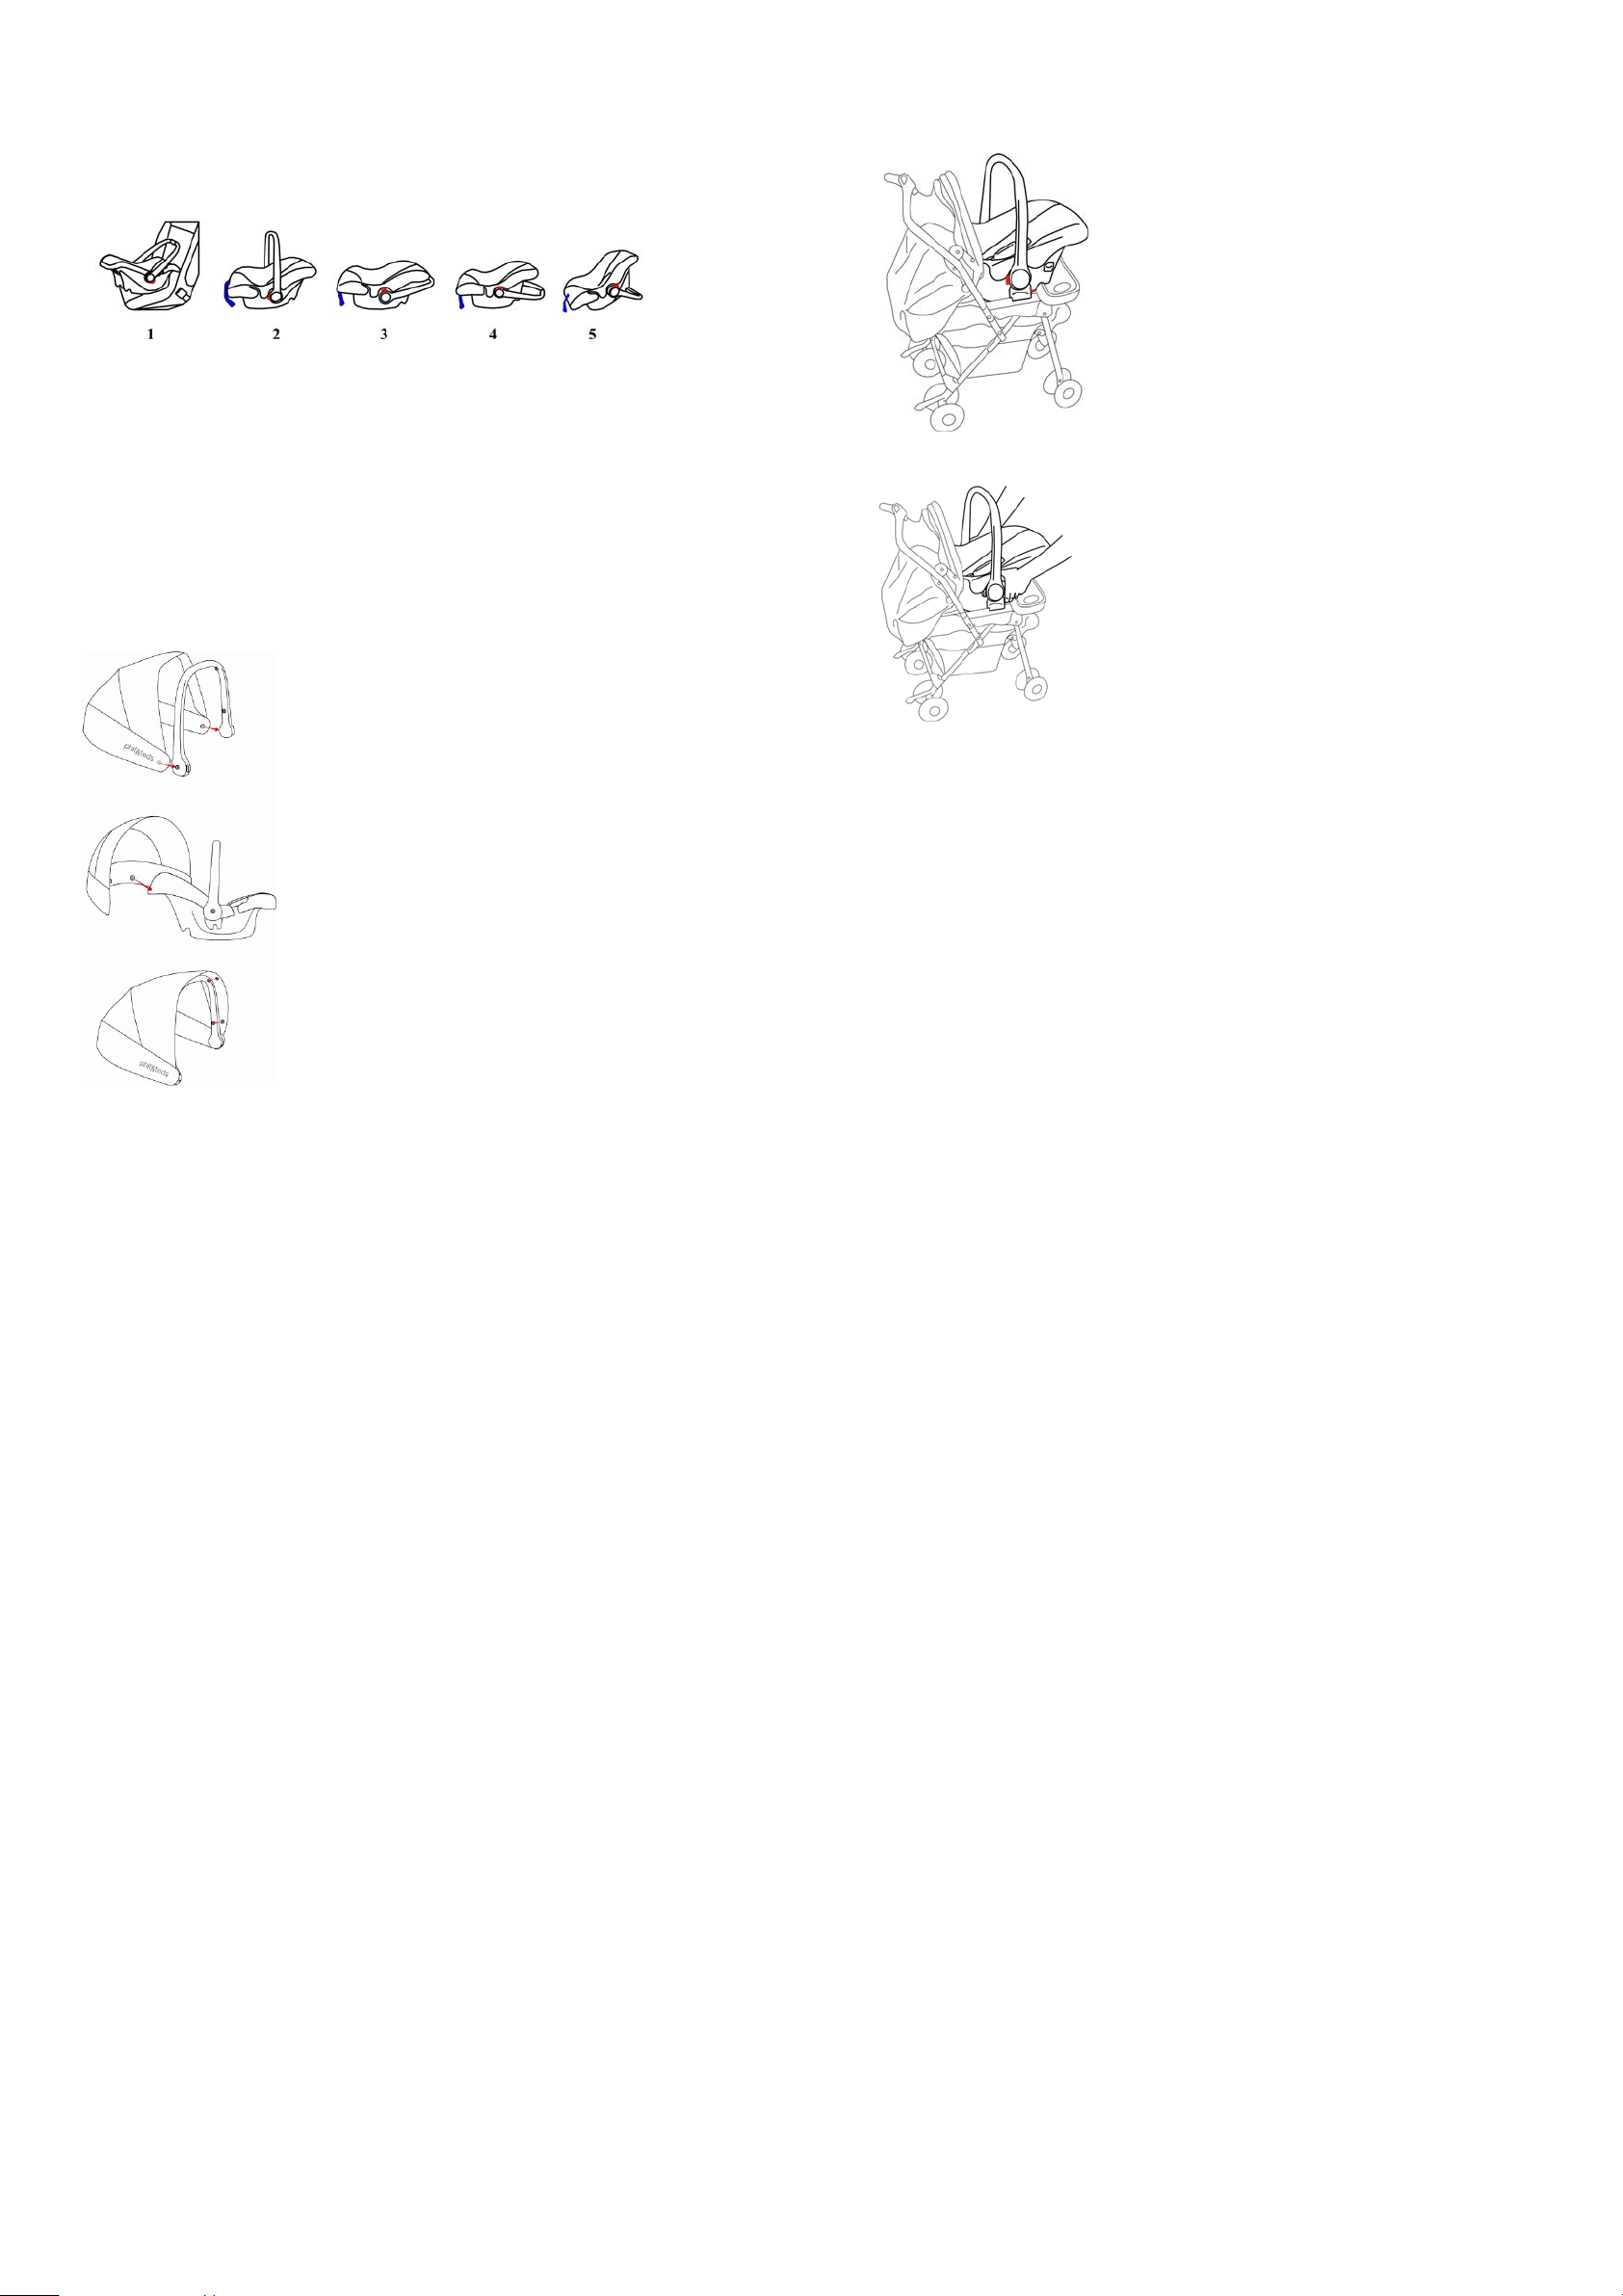
THE HANDLE POSITIONS
To adjust the handle from one position to another, pull out both sides of the handle on
the swivel point; rotate the handle forwards or backwards into the desired position:
The carry handle has four positions:
1 Forward in the car
2 Straight up for carrying
3 Against the car seat for rocking
4 All the way down to support baby for feeding and play
5 Stop rocking
Always ensure that the handle is locked in position and that the harness is correctly fitted
and the buckle fastened before lifting your car seat.
CANOPY ASSEMBLY
1. Attach domes located on the inside of the sun hood to the
outside of the handle.
2. Attach domes located at the back of the sun hood to the back of the seat.
3. Pull the sun hood forward to wrap around the handle.
Attach the domes on the inside to the handle.
This child seat can be installed into the appointed stroller as the travel system.
INSTALLATION:
stroller, then press down the coupler into the slot until you
hear a “click” signing the coupler is locked.
position the coupler on the slot of the
IMPORTANT: please make sure you hear a “click”. You
can try to pull up and forward the child seat to confirm the
coupler is locked.
TAKING DOWN:
coupler with your fingers then take the child seat out.
hold the child seat, lift the red switch of the
Page 5

CARE OF YOUR PRODUCT
REMOVING THE COVER
The fabric cover can be easily removed for washing. Remove the harness by gently
feeding the harness straps through from the front to the back of the seat, the crotch strap
including the buckle should be removed; turn the metal slide underneath the shell on its
side and feed it through the shell until the strap is free. Remove the cover and machine
wash at 30°, line dry only.
To replace the fabric cover, follow reverse of the above.
CLEANING THE SEAT
The harness and plastic parts can be sponged with very mild detergent and warm water.
Do not use chemical cleansers, bleach or corrosives on any part of the seat.
 Loading...