

Page 1
The product has been approved according to the strictest
European safety standards (ECE R 44/04) and is suit-
able for Group 0+1 (0-18KG).
cocoon genius with ISOFIX
base installation option
Group 0+I (0-18kg)
SUITABLE FOR
BS08 - T
™
Page 2
The cocoon genius™ complies with requirements applicable in
market of sale
For rights & remedies, refer www.philandteds.com/warranty
Please register your purchase through our online warranty
registration by visiting: www.philandteds.com/register
philandteds.com
Introduction
Dear parents
Thank you very much for purchasing our product.
The function and design will deliver the highest
levels of safety and comfort for your child.
Please adjust the child restraint to be suitable for
your child’s stature and weight before using our
product and then adjust and use it carefully.
Research shows that a high number of car safety
seats are incorrectly installed. Therefore, please
take the time to read through the instruction
manual carefully. Our product offers maximum
safety only when it is used in accordance with
the instructions.
Page 3

Content
Know your car seat 5-6
1. Suitability 7- 8
1.1 Suitability 7
1.2 Certication 8
2. Use in the vehicle 9-10
2.1 Rearward facing for children up to 13 kg 9
2.2 Forward facing for children up to 18 kg 10
3. Adjusting the child seat 11-1 5
3.1 Adjusting the shoulder straps and headrest 11
3.2 Reclined position of the child safety seat 13
3.3 Inserting the Newborn liner for children
up to 5.5 kg 13
3.4 Removing the Newborn liner for children
over 5.5 kg 13
4. Securing your baby 15-16
4.1 Loosening the straps 15
4.2 Securing your child 15
4.3 Tightening the straps 16
4.4 Checklist to ensure that your child is buckled
up correctly 16
5. Installation in the vehicle 19-22
5.1 Rearward facing installation in the vehicle for
children up to 13kg 19-20
5.2 Forward facing installation in the vehicle
for children 13 to 18 kg 21-22
6. Removing and Retting the cover 23
6.1 Removing the cover 23
6.2 Re-tting the cover 23
7. Care instruction 24
7.1 Cleaning 24
7.2 Checklist 24
Page 4

Important /03
Important
It is important to read this user manual before
installing your cocoon genius. Incorrect installation
could endanger your child and other passengers.
Always keep this manual in the storage pocket of
this seat.
DO NOT's
DO NOT use the cocoon genius on a passenger
seat tted with active frontal airbag.
DO NOT leave your child alone in the car.
DO NOT use the cocoon genius at home. It has not
been designed for home use and should only be
used in a car.
DO NOT attempt to dismantle, modify or add any
part to the cocoon genius or change the way your
car seat belts are made or used.
DO NOT use the cocoon genius for longer than 6
years. Due to ageing, the quality of materials may
change.
DO NOT use the cocoon genius after a serious
accident.
DO NOT use the cocoon genius without the cover.
The seat cover contributes the safety of the seat.
DO NOT use any aggressive cleaning products,
these may harm the construction material of the
cocoon genius.
DO NOT allow your child to play with or adjust the
seat.
DO'S
DO ensure that all objects and luggage likely to
cause injury in the event of an accident are properly
secured.
DO use the child safety belt provided by the cocoon
genius all times
DO check both 5-point-belt and child safety belt
are tightened rmly, in order to keep child safe and
cocoon seat movement to a maximum of 2.5 inches.
DO secure the cocoon genius even if it is not
occupied.
Page 5
IMPORTANT: The child seat must be used with a
3 point belt and diagonal seat belt that is approved
to UN/ECE Regulation No.16 or other equivalent
standards.
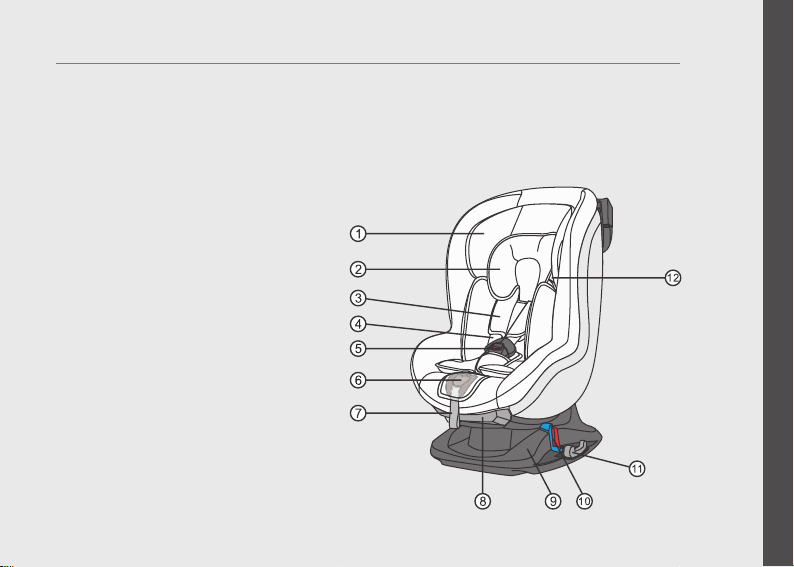
Know your car seat
1. Headrest
2. Newborn liner
3. Shoulder Pads
4. Shoulder Straps
5. Buckle
6. Central Adjuster
7. Adjuster Strap
8. Recline Adjuster Handle
9. Seat Base
10. Lap Belt Guides
11. Tensioner Handle
12. Headrest Adjuster Button
Know your car seat /04
Page 6
Know your car seat /05
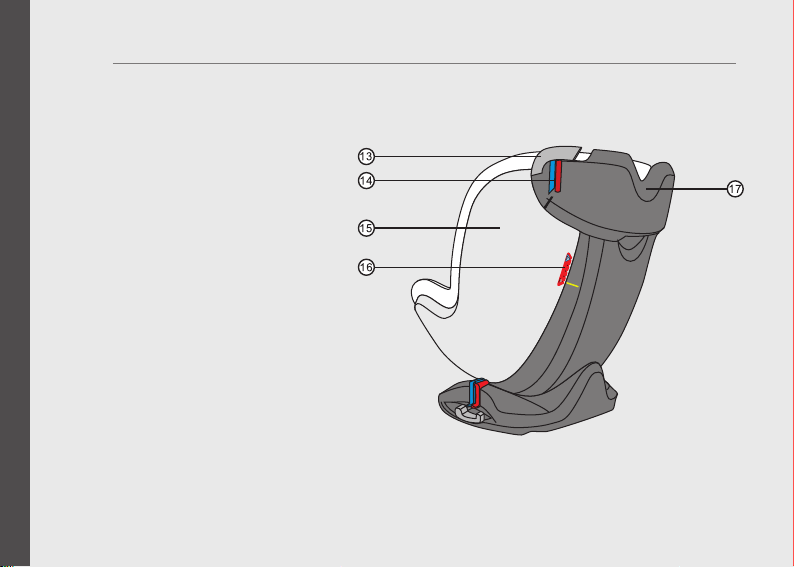
Know your cocoon genius car seat
13. Belt Clamp Handle
14. Diagonal Belt Guides
15. Seat Shell
16. Recline Position Indicator
17. Central Position for Diagonal Belt
Page 7
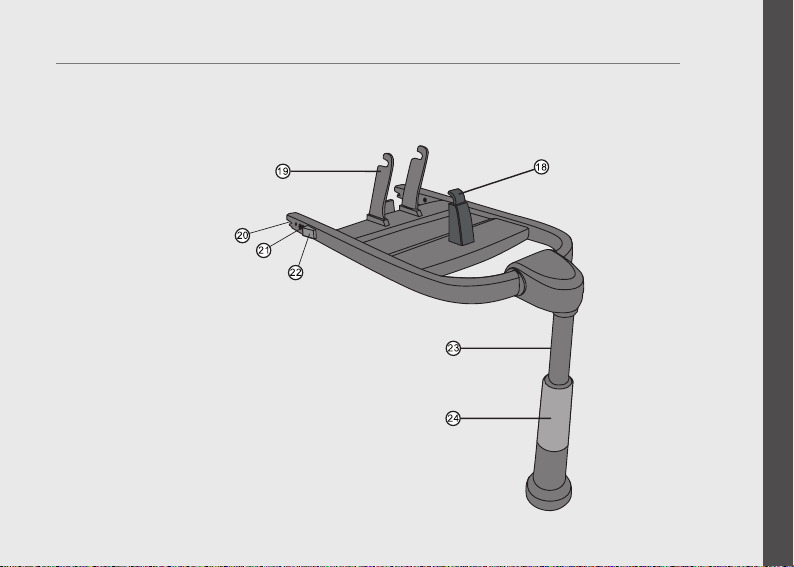
Know your ISOFIX base
18. Frontal hook
19. Rear hooks
20. Isox connector
21. Isox indicator
22. Isox release button
23. Floor support leg
24. Floor support adjustor
Know your car seat /06
Page 8
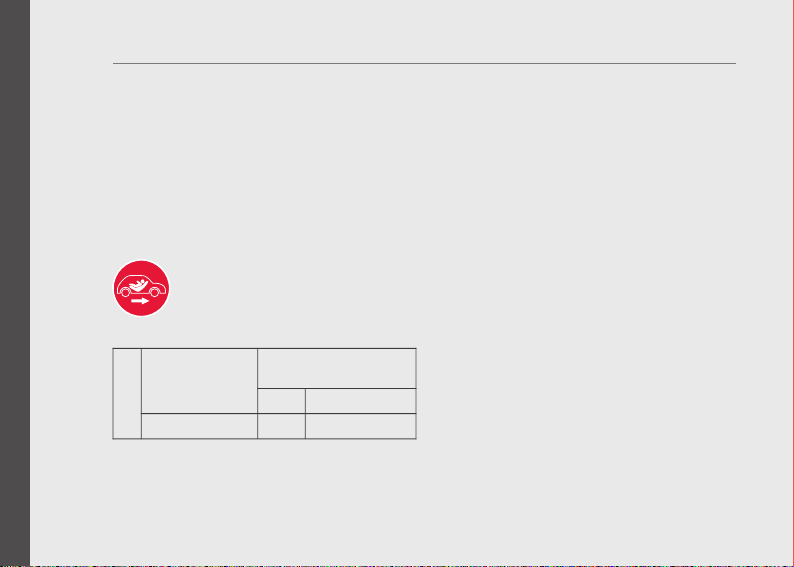
Suitablity /07
1.1 Suitability
The cocoon genius is certied to ECE R44/04 as
a child safety seat for age groups 0+ and I.
To make sure your child has optimum protection
at any age, the cocoon genius has two different
installation options:
Rearward facing for children up to 13kg
Tested and certied
child safety seat
0-13 kg
cocoon genius
*ECE = European Standard for Safety Equipment
according to ECE* R 44/04
Body WeightGroup
0+ Up to 13kg
Children with a body weight of under 9 kg must
be secured with the cocoon genius rearward
facing, but we recommend using the seat
rearward facing until your child has reached a
body weight of 13 kg.
Page 9
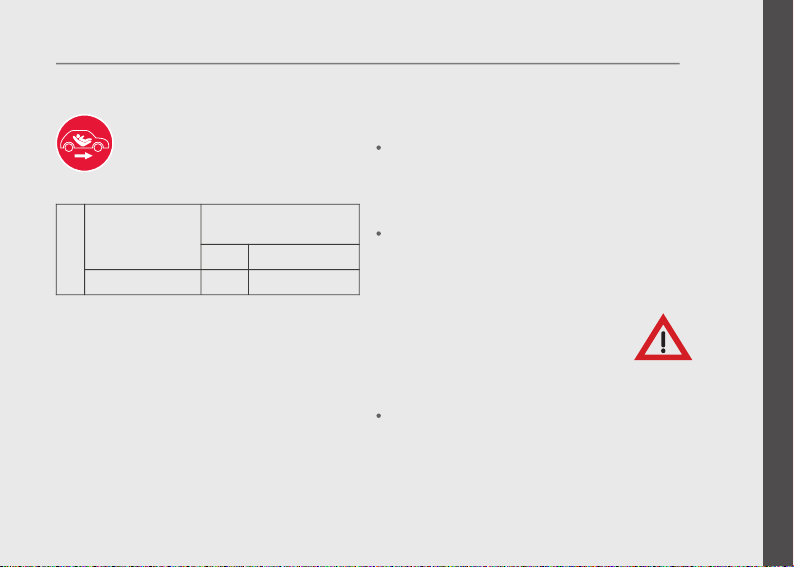
Certication /08
Forward facing for children up to
18kg (or approximately 4 years old)
Tested and certied accor-
child safety seat
0-18 kg
cocoon genius
*ECE = European Standard for Safety Equipment
ding to ECE* R 44/04
Body WeightGroup
1
9-18 kg
Children with a body weight of over 13 kg must
be secured with the cocoon genius forward
facing.
1.2 Certication
The child safety seat has been designed, tested
and certied according to the requirements of the
European Standard for Child Safety Equipment
(ECE R 44/04).
The seal of approval E (in a circle) and the
approval number are located on the approval
label (sticker on the child safety seat).
This approval will be invalidated if you make any
modications to the child safety seat. Only the
manufacturer is permitted to make modications
to the child safety seat.
Use the cocoon genius exclusively for securing
your child in your vehicle. It is not suitable as a
seat or toy in the home.
Page 10
Use in the vehicle /09
Use in the vehicle
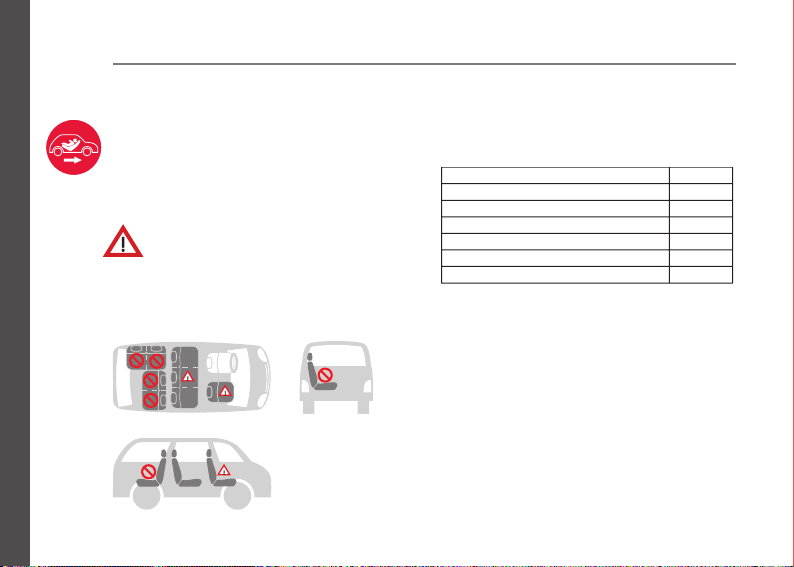
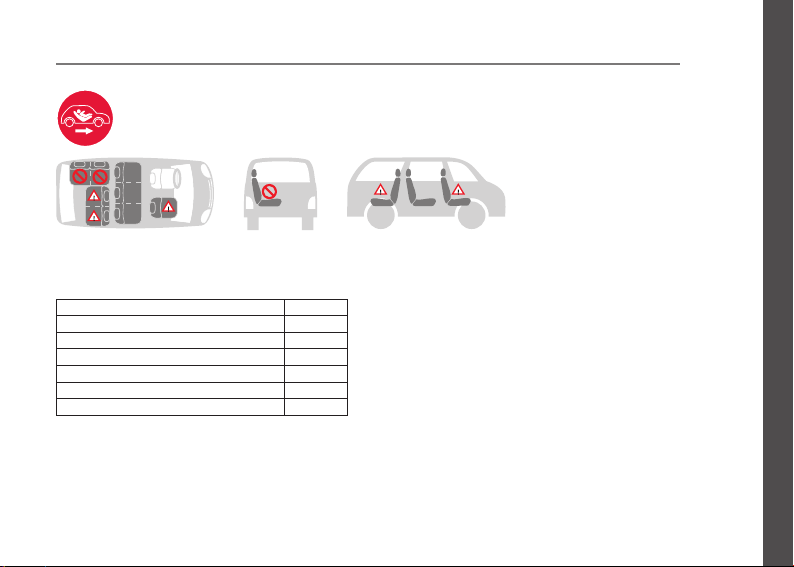
2.1 Rearward facing for children up to 13 kg
Danger! An airbag hitting a child safety seat can
cause serious injuries to your child, possibly
resulting in death.
DO NOT use on a passenger seat with a front airbag!
Please observe the instructions in your vehicle
manual for the use of child seats.
You can use your child safety seat (rearward
facing)as follows:
with 2-point belt
with 3-point belt
on front passenger seat
on outer rear seat
on centre rear seat
on seats facing sidewards
on seats facing backwards
(Please observe the regulations applicable to your particular country).
no
yes (1)
no
(2)
yes
no (3)
no
no
1) The safety belt must be approved to ECE R
16 or a comparable standard, e. g. see test label
on belt with an "E" or "e" in a circle.
2) Do not use on passenger seats with an
airbag!
3) Can be used if the vehicle seat is equipped
with a 3-point belt.
Page 11
2.2 Forward facing for children 13 to 18 kg
Use in the vehicle /10
You can use your child safety seat (foward facing)
as follows:
on seats facing backwards no (1)
on seats facing sidewards
with 3-point belt
with 2-point belt
on front passenger seat
on outer rear seat
on centre rear seat (with 3-point belt)
(Please observe the regulations applicable to your particular country).
no
yes
no
(3)
no
yes
yes (4)
(2)
1) Use is permitted on a rearward-facing
vehicle seat (e.g. in a van or minibus) only if
the vehicle seat is also approved for use by
adults. The seat may not be in the area of
effect of an airbag.
2) The safety belt must be approved to ECE
R 16 or a comparable standard, e. g. see test
label on belt with an "E" or "e" in a circle.
3) If there is a front airbag: slide passenger
seat back all the way or nearly so, and observe
any instructions in vehicle owner's manual.
4) Cannot be used if the vehicle seat is
equipped with only a 2-point belt.
Page 12
Securing your child /15
Securing your child
For the protection of your child
• Please do not leave your child unattended
in the child safety seat in the vehicle.
• The metal and plastic parts of the child
safety seat can heat up in the sun. Caution!
Your child may get burnt. Protect the child
seat against intensive solar radiation when it
is not actually in use.
• Allow your child to enter and exit the vehicle
only on the side away from traffic.
• Take your baby out of the child safety seat
as often as possible to relieve its spine. It is
recommended that your child not be in the
seat for more than 1 hour at a time without
a break, and should have regular breaks
throughout the journey.
• The Newborn liner is used to provide extra
comfort for very small babies.
Caution! Only use the Newborn liner with
inserted foam part when the shoulder strap is
in the lowest position (see 4.1).
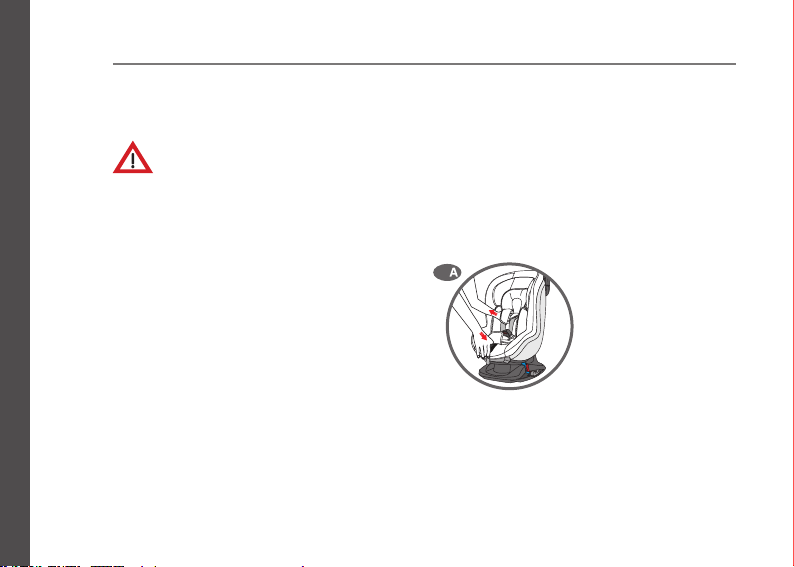
3.1 Adjusting the child seat
Press the Central Adjuster button and at the
same time pull both shoulder straps forward (4-A).
Caution! Do not pull on the shoulder pads.
4-
Page 13
Securing your child /16
3.2 Securing your child
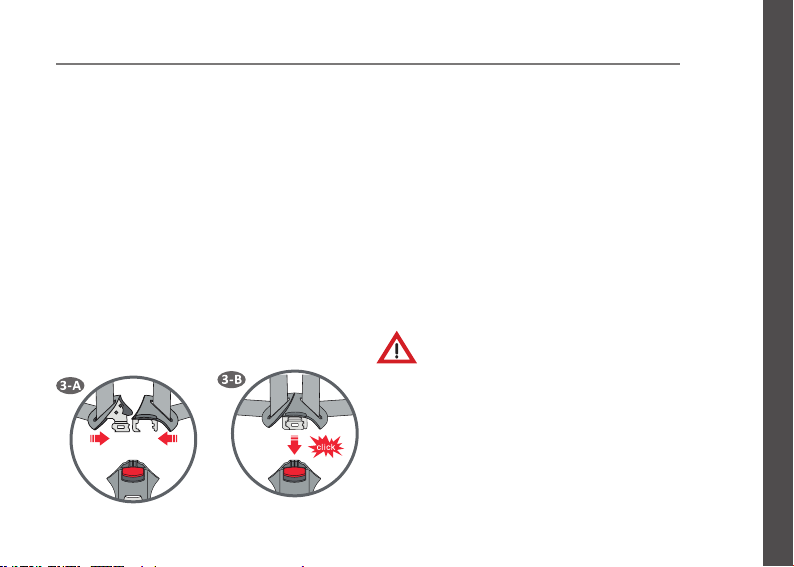
• Loosen the shoulder straps (see 3.1). Open
the harness buckle (press the red release
button), split the buckle tongues on each side
of the seat (3-B). Place your child into the
safety seat. Hook the buckle tongues
together again.
• Put the shoulder straps over the shoulders of
your child. Caution! Do not twist or interchange
the shoulder straps. Put the two buckle
tongues together (3-A) and engage in the
harness buckle with an audible CLICK! (3-B)
• Tighten the straps until they are in contact
with your child's body. (see 3.3)
Caution! The lap belt must lie as low as
possible over your child's lap.
3.3 Tightening the straps
• Push down on the central adjuster and pull the
adjuster strap until the harness fits the child
snugly. No more than two fingers should fit
between the child and the harness.
• To release, push the central adjustor and pull
the harness strap
3.4 Checklist to ensure that your child is
buckled up correctly
For the safety of your child, please check that.....
• The straps of the cocoon genius are close to
the body without constricting the child.
• The straps are not twisted.
• The buckle tongues are engaged in the harness
buckle.
• The shoulder pads are in the right position on
your child's body.
Page 14
Adjusting the child seat /11
Adjusting the child seat
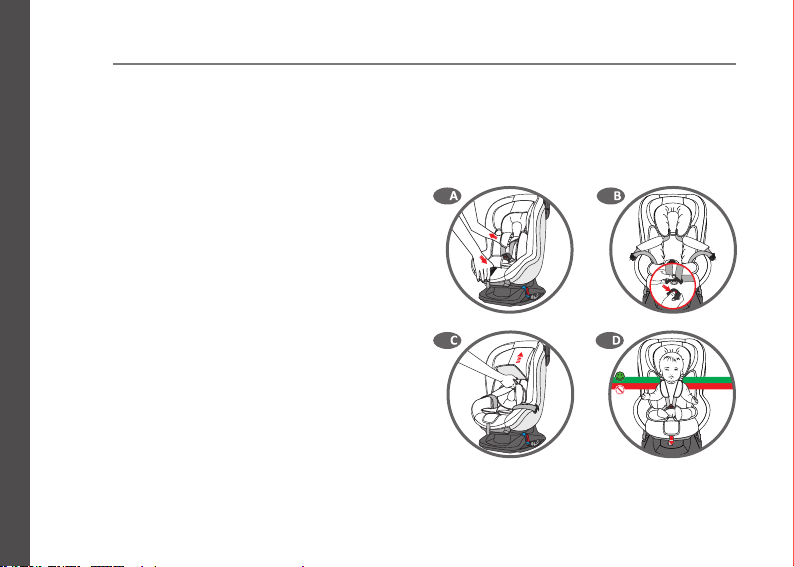
4.1 Adjusting the shoulder straps and
headrest
Correctly adjusted shoulder straps ensure optimal
protection for your child in the safety seat.
For child weight 0-13kg - Rear facing
The shoulder straps are at the same level but
not lower than your child's shoulders.
For child weight 9-18kg - Foward facing
The shoulder straps are at the same level or
higher than your child's shoulders.
To adjust the height of the shoulder straps and
headrest to t your child:
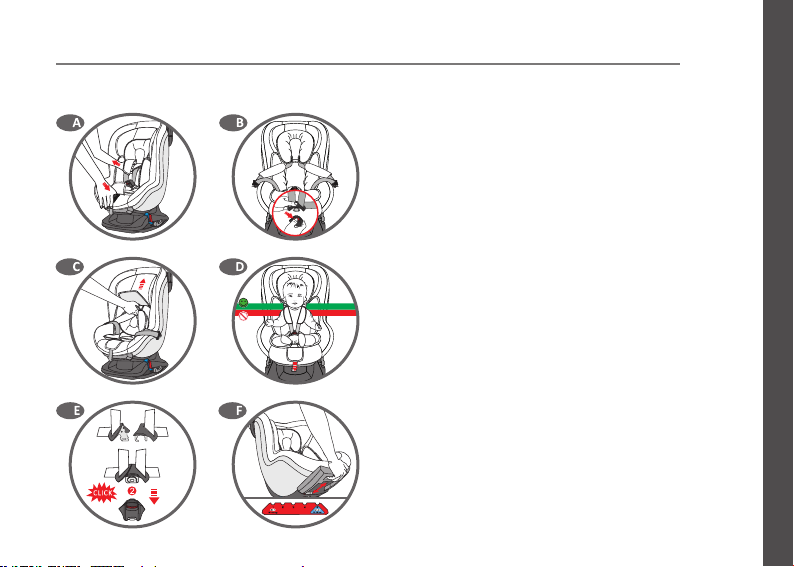
• Press and hold the Central Adjuster button,
while pulling both of the shoulder straps as
far forward as possible (4-A).
• Release the child seat buckle by pressing the
red button, then split the buckle tongues on
each side of the seat (4-B).
• Lift up the headrest button and move up/
down the headrest (4-C) to make sure the
harness belt strap slots are level with or just
above your child's shoulders (4-D).
4- 4-
4-
4-
Page 15
Adjusting the child seat /12
4-
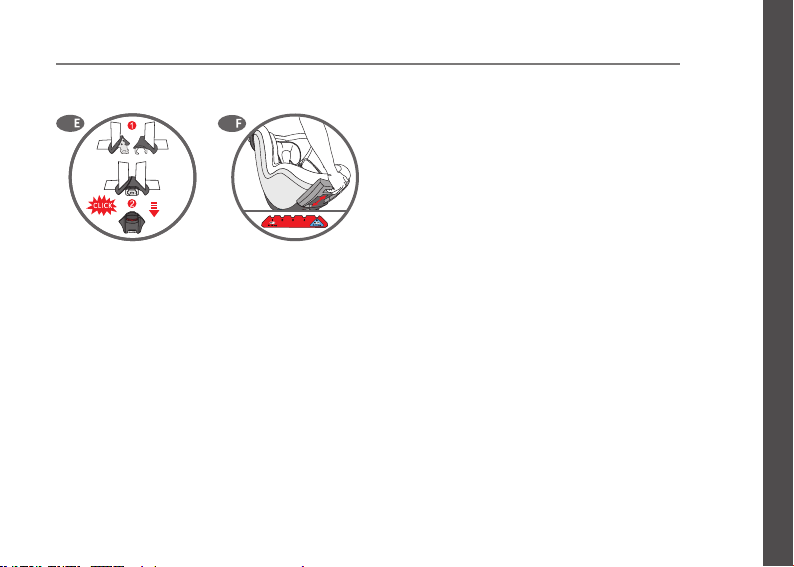
• Re-fasten the harness buckle (4-E). Tighten
the harness by pulling the adjuster strap.
4-
4.2 Reclined position of the child safety seat
To place the cocoon genius in the reclined
position:
• Lift up the handle under the front of the
seat and pull or push the shell forwards or
backwards. Release the handle in the required
position and push until you hear
a distinct click (4-F).
Page 16
Adjusting the child seat /13
Instructions
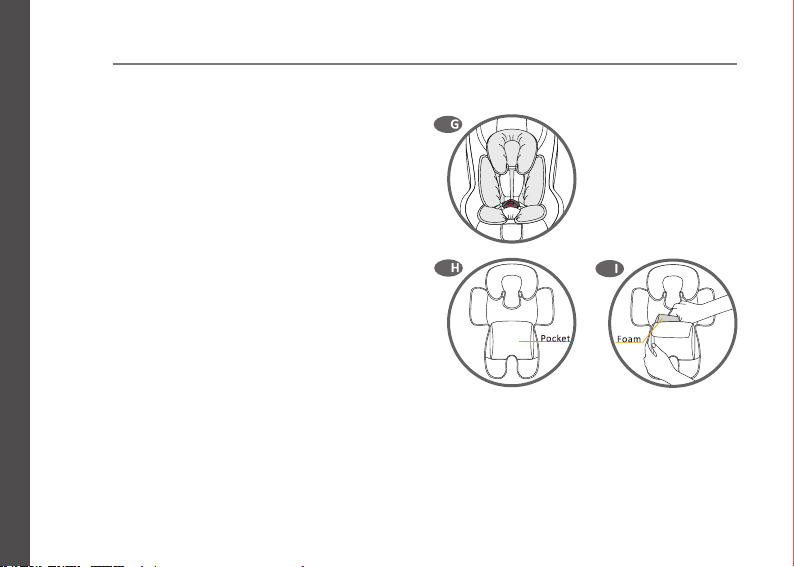
4.3 Inserting the Newborn liner
The Newborn liner gives your baby the
necessary support while he or she is under
5.5 kg (4-G).
• The Newborn liner must never be
used without its foam part for babies
weighing under 5.5 kg.
• phil&teds recommends using the
Newborn liner until your child is 9 kg.
• Only use the Newborn liner when the
shoulder strap is in the lowest position
(see 4.1).
• Tip! The Newborn liner can also be
used without foam part for children over
13 kg.
• Remove the foam part from the net
pocket on the back of the Newborn
liner (4-H/4-I).
4-
4-
4-
Page 17
4- 4-
Adjusting the child seat /14
4-
4-
4-
4-
Page 18
Installation in the vehicle /17
Seatbelt Installation in
the vehicle
5.1Rearward facing installation in the vehicle
for children up to 13 kg
Please do not leave your child unattended in the
child safety seat in the vehicle.
Children weighing less than 9 kg must use the
cocoon genius rear facing. We recommend to use
the cocoon genius rearward facing until your child
reach a body weight of 13 kg.
The cocoon genius when rear facing must be in
sleeping position (position 5) (see 4.2).
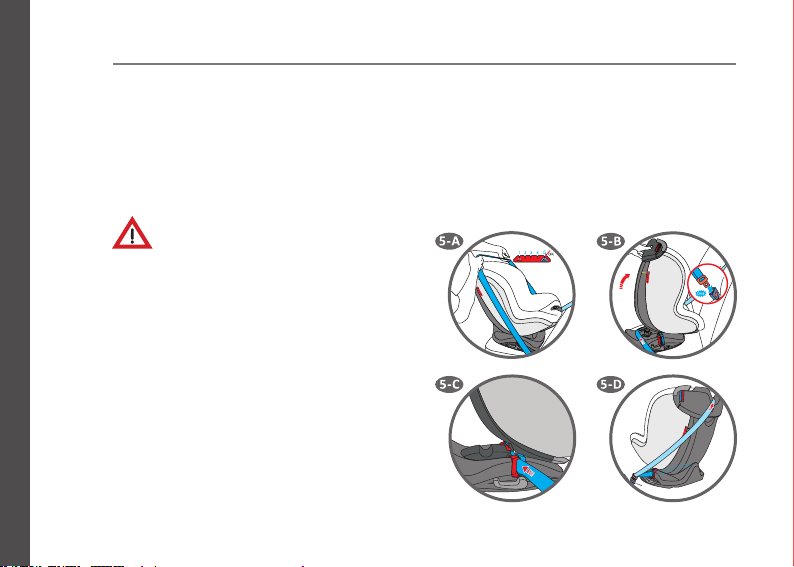
To secure the child seat rearward facing using the
3-point belt of your vehicle proceed as follows:
• Place the cocoon genius rearward facing
in your car. Pull out all the belt from the
retractor, pull the belt around the seat and
close the buckle (5-A).
• Push the Seat Shell (5-B), feed the lap
portion of 3-point-belt through the Lap Belt
Guides slot (5-C).
• Thread the diagonal portion of 3-point-belt
around the Central Position for Diagonal
Belt back of the cocoon genius (5-D).
Page 19
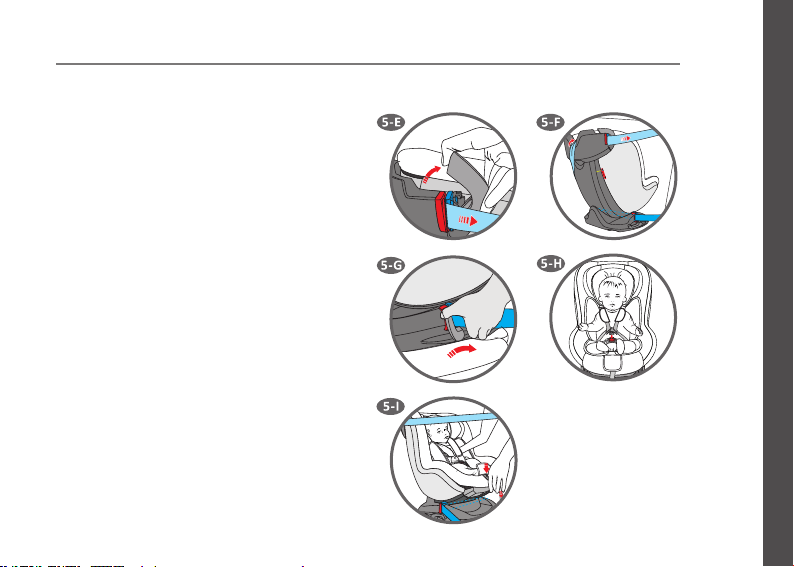
• Open the Belt Clamp Handle, insert the
diagonal belt into the clamp slot (5-E).
• Check: Use only one of the belt clamps,
it is located at the same side as the car
retractor.
• Remove all the slack in the belt, then close
the clamp (5-F). Turn the Tensioner Handle
on (5-G).
• Place your child into the seat (5-H) and t
the harness (see 4.1).
• Tighten the harness securely by pulling the
adjuster strap (5-I).
• Check: Any straps holding the restraint to
the vehicle should be tight, that any straps
restraining the child should be adjusted to
the child's body, and that straps should not
be twisted.
Installation in the vehicle /18
Page 20
Installation in the vehicle /19
Installation in the vehicle
5.2 Installation in the vehicle forward
facing for children 9 kg to 18 kg
Please do not leave your child unattended in the
child safety seat in the vehicle.
To secure the child seat forward facing using the
3-point belt of your vehicle proceed as follows:
Place the cocoon genius forward facing in your
car.
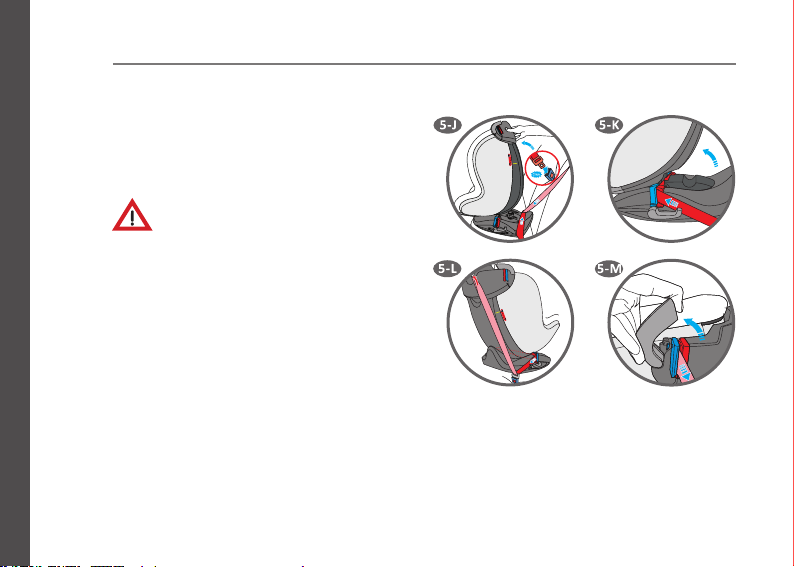
• Push the Seat Shell, pull out the belt from
the retractor, thread the belt around the
seat base and close the buckle (5-J). Feed
the lap portion of 3-point-belt through the
Lap Belt Guides slot (5-K).
• Thread the diagonal portion of 3-point-belt
around the Central Position for Diagonal
Belt back of the cocoon genius (5-L).
• Open the Belt Clamp Handle, insert the
diagonal portion of 3-point-belt into the
clamp slot (5-M).
Page 21
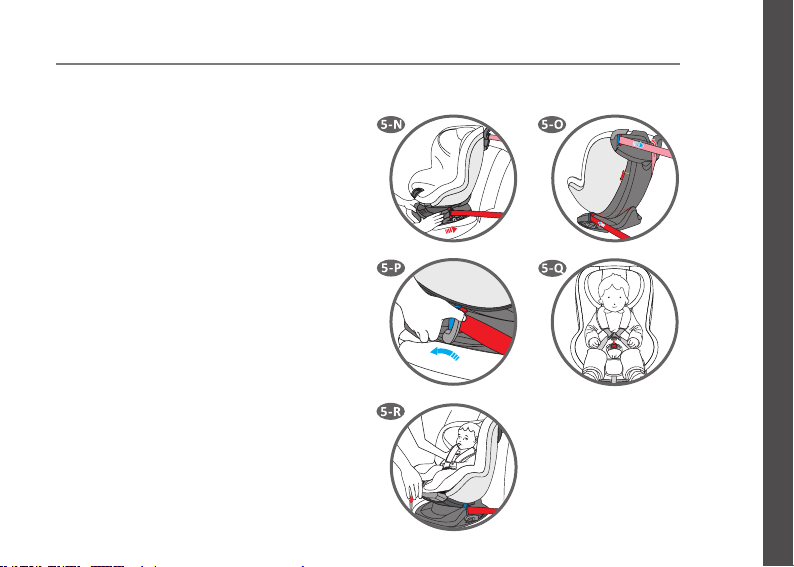
• Remove all the slack in the belt and close
the clamp (5-N/5-O).
Check: Use only one of the belt clamps,
it is located at the same side as the car
retractor.
• Turn and lock the Tensioner Handle (5-P).
• Place your child into the seat (5-Q) and t
the harness.
• Tighten the harness securely by pulling the
adjuster strap (5-R).
• Check: Any straps holding the restraint to
the vehicle should be tight, that any straps
restraining the child should be adjusted to
the child's body, and that straps should
not be twisted.
Installation in the vehicle /20
Page 22
Installation in the vehicle /21
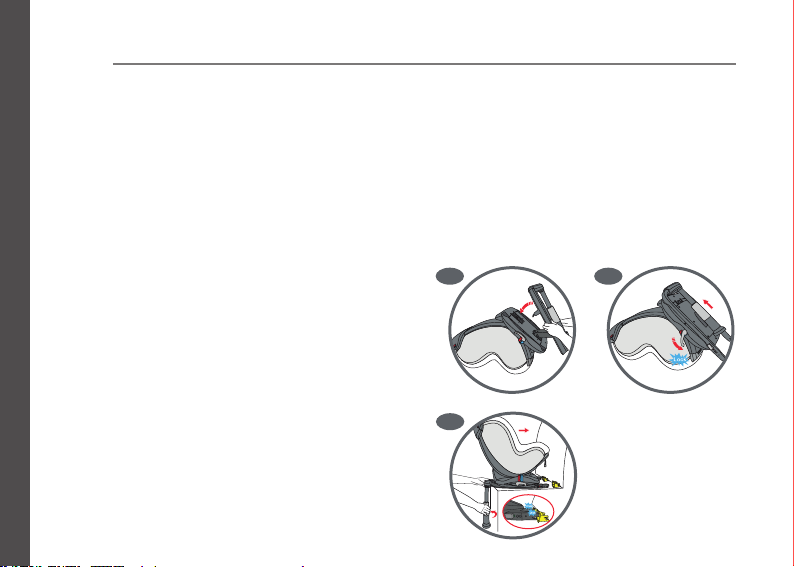
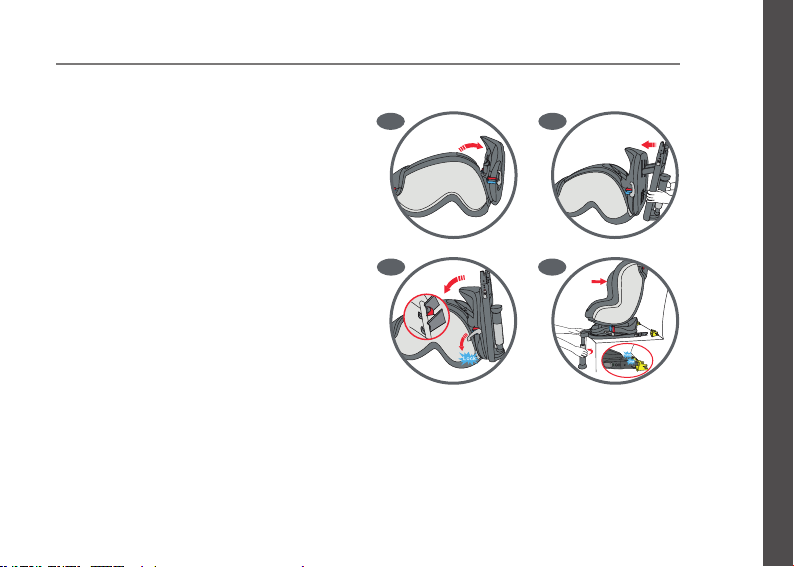
5.3 ISOFIX base installation in the vehicle
rearward facing for children 9 to 13 kg
If your car is equipped with ISOFIX anchor
points, you can install the cocoon genius using
the ISOFIX anchor points in combination with the
support leg. To check whether your car is suitable
for ISOFIX attachment and the support leg, refer
to your motor dealer.
• Place the seat on the oor face down; you
are facing the under side of the seat base.
• Install the ISOFIX base into the seat, by
inserting the three hooks into the seat base.
(5P) The ISOFIX connectors are facing
downward.
• Turn the Tensioner handle 180 degrees to
secure the connection between the ISOFIX
and seat. (5Q)
• Put the seat rearward facing in your car.
Lock the two ISOFIX connectors into the
ISOFIX anchorages in your car seat. Use
the supplied ISOFIX anchor guides. (5R)
• When the connectors are locked on the
anchorages, the ISOFIX indicator will turn
green (5R)
• Extend the oor support leg fully, adjust the
height of the oorsupport leg to make sure
the leg reaches the oor of your car.
• To remove the cocoon genius and base from
your car just pull back the ISOFIX release
buttons. (see 5.Q)
5-P
5-Q
5-R
Page 23
Installation in the vehicle /22
5.4 ISOFIX installation in the vehicle
forward facing for children 9 kg to 18 kg
Place the seat on the oor face down; you are
facing the under side of the seat base.
• Install the ISOFIX base into the seat, by
inserting the three hooks into the seat base.
(5P) The ISOFIX connectors are facing
upward.
• Turn the ISOFIX connecting handle 180
degrees to secure the connection between
the ISOFIX and seat. (5Q)
• Put the seat forward facing in your car.
• Lock the two ISOFIX connectors into the
ISOFIX anchorages in your car seat. (5O)
• When the connectors are locked on the
anchorages, the ISOFIX indicator will turn
green (5R).
• Extend the oor support leg fully out, adjust
the height of the oor support leg to make
sure the leg reaches the oor of your car.
• To remove the cocoon genius and base from
your car just push the buttons on each side
to release the ISOFIX connectors.
5-O
5-P
5-R5-Q
Page 24
Removing and Re-ttng the cover /23
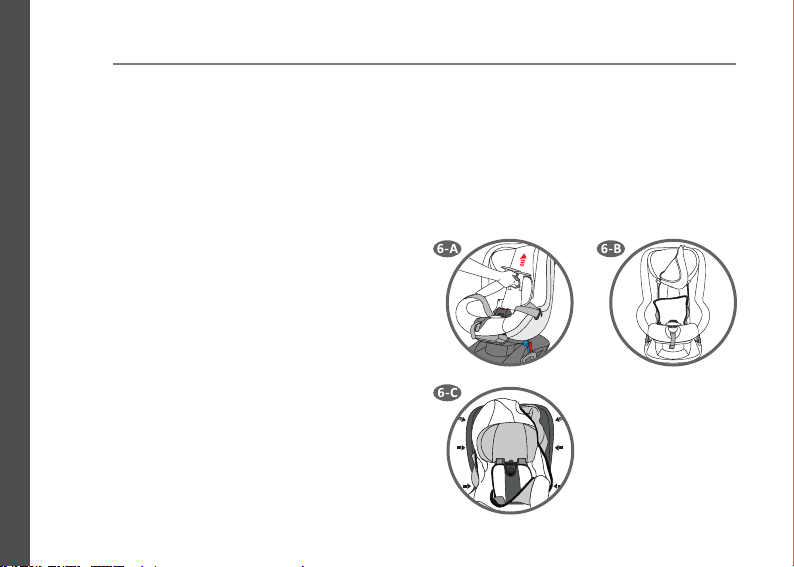
6.1 Removing the cover
The seat cover can be removed from the
cocoon genius seat and is washable only.
• Pull and hold the centre adjuster button to
loosen the belts.
• Release the child seat buckle by pressing
the red button, then split the buckle tongues
on each side of the seat.
• Remove the headrest cover from the
headrest by unhooking the elastic band
from the hook stands (6-A).
• Unbutton the cover at the seating portion
of the covers. Unhook all the elastic bands
from its hook stands, so you can remove
the seat cover from the seat (6-B).
• Don't remove the harness system on the
seat.
6.2 Re-fitting the cover
• To ret the seat cover on the seat just hook
up the elastic bands to its hook stand,
button up the cover connecting parts.
And t back the headrest cover (6-C).
Simply proceed in the reverse order of section
6.1.
Caution! Ensure that the straps are not twisted
and that they were correctly inserted in the
recesses of the cover.
Page 25
Removing and Re-ttng the cover /24
6.1 Cleaning
HAND WASH ONLY
DO NOT DRY CLEAN
DO NOT USE ABRASIVE DETERGENTS
WASH WITH WARM WATER (30°)
6.2 Safety Checklist
To retain the protective effect
• After a serious accident replace the car
seat. A serious accident qualies where
the car has visible side or frontal impact
damage. In these cases the car may
have damage that may not be visible to
the naked eye.
• Regularly check all essential parts for
damage. Ensure the correct operation of
all mechanical components.
• Should the child safety seat be damaged
(e.g after dropping it) it should be inspected
by the manufacturer.
• Never lubricate or oil parts of the child
seat.
• Store the child seat in a safe place when it
is not in use.
• Avoid placing heavy objects on top of it. Do
not store it near a direct heat source or in
direct sunlight.
Page 26
USA/CAN
phil&teds USA Inc
221 Jefferson Street
Fort Collins, CO 80524
USA.
1 800 839 4985
FRA
phil&teds France
15 rue Gertrude Bell
56000 Vannes
FRANCE.
+ 33 (0) 2 97 44 88 26
@
AU/NZ
phil&teds
102-112 Daniell Street
Newtown, Wellington 6021
New Zealand / Nouvelle-Zélande.
+ 64 4 3800 833
EUR
phil&teds Europe BV
Klavermaten 37C
7472 DD Hof van Twente (Goor)
NETHERLANDS / Pays-Bas.
+ 31 (0) 547 352 727
8060-02
© Phil and Teds Most Excellent Buggy Company Ltd 2012.
We (Phil and Teds Most Excellent Buggy Company
Ltd) own the intellectual property rights in our brands,
designs and inventions featured in this publication. These
include, without limitation, the phil~teds, adapt~survive!,
~, INLINE trade marks and INLINE DOUBLE BUGGY
shape. We actively pursue people who infringe our
intellectual property.
www.philandteds.com
Notice
1. This is a Universal child restraint. It is approved to
Regulation No.44,04 series of amendments, for general
use in vehicles and it will t most, but not all, car seats.
2. A correct t is likely if the vehicle manufacturer has
declared in the vehicle handbook that the vehicle is
capable of accepting a Universal child restraint for this
age group.
3. This child restraint has been classied as Universal
under more stringent conditions than those which
applied to earlier designs which do not carry this notice.
4. If in doubt, consult either the child restraint
manufacturer or the retailer.
5. Only suitable if the approved vehicles are tted with
a 3 point retractor safety belt approved to UN/ECE
Regulation No.16 or other equivalent standards.
6. Do not use rearward facing in seating positions where
there is an airbag installed.
7. This is an ISOFIX CHILD RESTRAINT SYSTEM. It is
approved to Regulation No.44,04 series of amendments
for general use in vehicles tted with ISOFIX anchorage
systems.
8. It will t vehicles with position approved as ISOFIX
positions (as detailed in the vehicle handbook),
depending on the category of the child seat and of the
xture.
9. The mass group and the ISOFIX size class for which
this device is intended are: Group 0+(0-12KG)and
 Loading...