

Page 1

english
inlineTM vibe survival guide
Page 2
welcome to the crazy world of parenting.
take a deep breath...
note:
P G p a r e n t a l g u i d a n c e r e q u i r e d
NB baby not included
english
Page 3
.........................................................................
.........................................................................
.........................................................................
adap t ` sur v i v e !TM
...............................................................
Page 4
vibe......undressed!
inline
TM
.......................................
buggy
1.
2.
3.
4.
5.
6.
7.
8.
9.
10.
11.
12.
13.
14.
14.
15.
15.
16.
17.
16.
18.
17.
Page 5
d o i t !
-no not that, this
....
a
b
c
1
d
h
e
i
f
j
g
k
l
m
n
o
Page 6
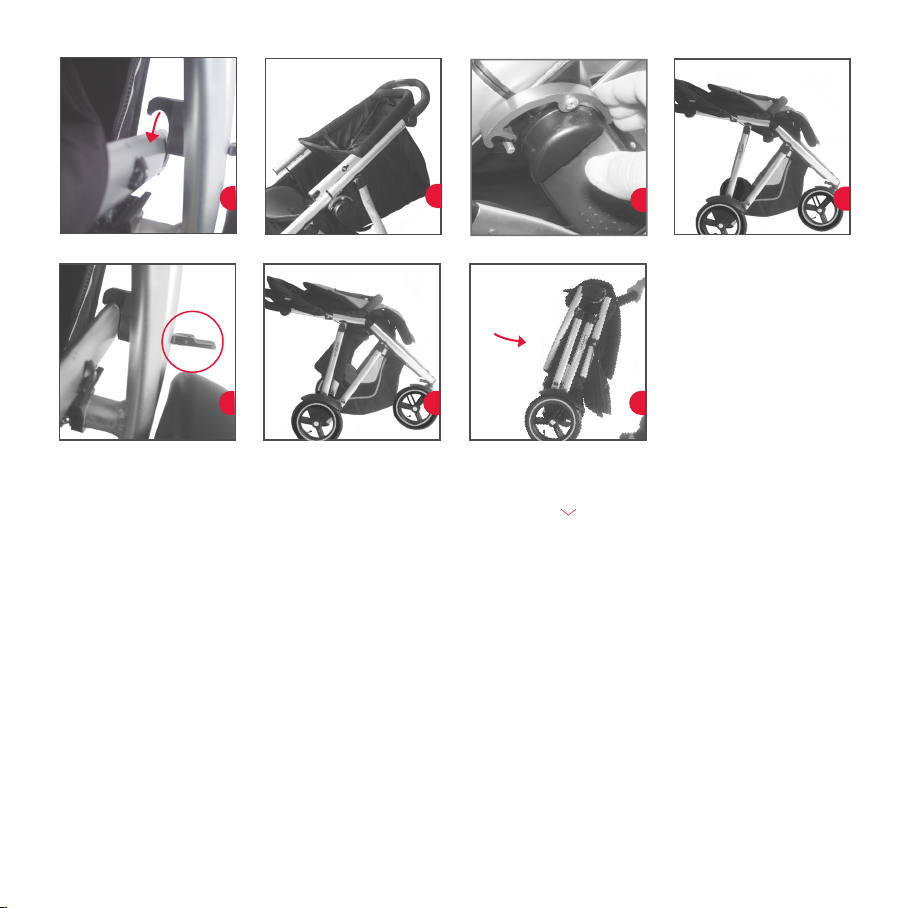
p
q
r
s
t
u
............
v
t h a t ’ s i t !
Page 7

inline
TM
buggy
vibe instructions
assembling your new phil`teds inlineTM vibe
is effortless and tool-free. just follow these
simple steps and in 4.25 minutes you’ll be off.
bits ` bobs
the red numbers below refer to buggy parts
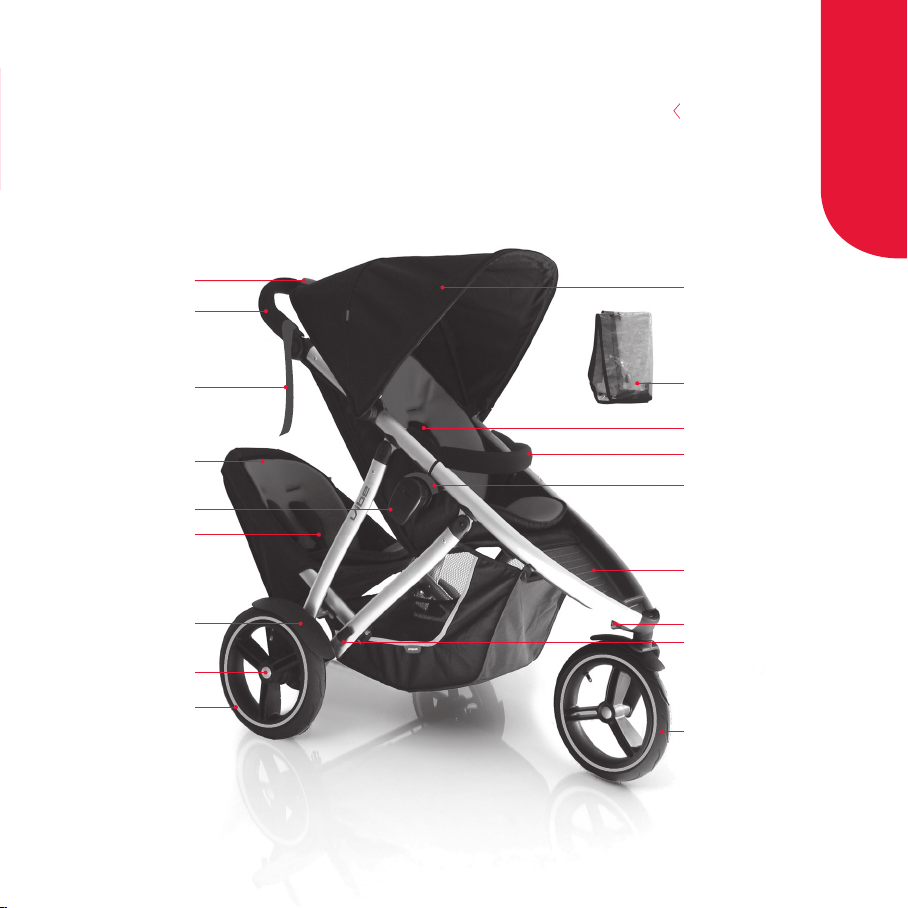
indicated inside the back flap of this guide.
1. intelligent handle brake
2. intelligent handle
3. wrist strap
4. double kit (sold separately)
5. fold lock
6. double kit harness
7. rear guards
8. rear axles
9. rear wheels
10. sunhood
11. back flap
12. slide lock harness
13. pull bar
14. red safety lock
15. footwell
16. swivel lock
17. double kit spring lock
18. front wheel
safe ` sound
we’ve attained the following safety standards.
• EN 1888:2005 • AS/NZS 2088:2000
• ASTM F833-07a
wheeling ` dealing
keep tyres inflated to 22PSI max
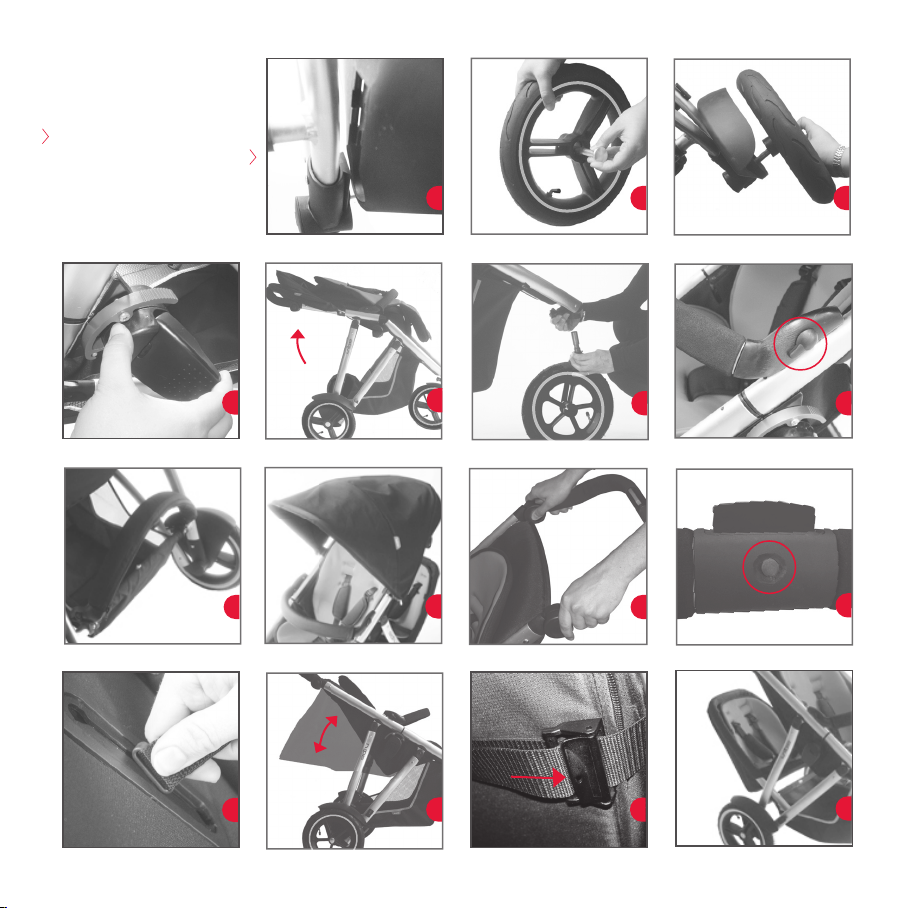
a attach rear guards by sliding them down
track at base of wheel frame. to remove rear
guards, pull bottom edge of guard outwards
and slide it up and out of track.
b insert axles into rear wheels (from side
without brake disk).
c to attach rear wheels: depress silver axle hub
and insert wheel axle into buggy axle housing.
d to unfold frame: open fold lock handles.
e open and extend buggy, close fold lock handles.
f to attach front wheel: fully extend swivel
lock knob and insert wheel rod into buggy
frame, as shown. release swivel lock knob
and check wheel is in place for use.
to place front wheel in swivel position: rotate
900 until swivel lock knob clicks into place
(visibly extended).
to lock swivel wheel: rotate 900 until swivel
lock knob clicks into place and is no longer
extended.
2
Page 8

pull bar
g slot pull bar into upper set of sockets
on centre front of buggy frame.
to remove: rotate bayonet release levers
‘1’ upwards, slide pull bar up frame, lift and
remove pull bar.
h when double kit is attached to front of buggy
(baby & toddler position), remove pull bar
and store in moulded sockets on rear
cross bar, as shown.
sunhood
i your vibe will arrive with its sunhood
attached, to remove: place thumbs on plastic
clips and rotate snap attachments outwards,
remove sunhood from frame.
to re-attach: lay sunhood on frame facing
down towards front end of buggy. use
palms of hands to snap attach plastic clips
onto frame. rotate sunhood backwards.
slide snap attachments up/down frame
to alter headroom.
intelligent handle adjustment
j to alter handle height: depress both black
buttons located on inside of handle and
rotate handle into desired position.
intelligent handle brake
k press small red button for park.
press large black button for go.
harness adjustment
l under padded seat, turn harness strap
retainer to vertical position and slide to either
top, middle, or lower setting. lock in place by
turning strap retainer to horizontal position.
note breastplate should fit snugly on baby’s
chest, allowing you to fit 2 average sized
fingers between straps and baby. harness
strap tension can be adjusted using clips
located at shoulder height.
ups ` downs
m vibe seat can be adjusted to any ergonomic
position from upright through to lie-flat.
n to adjust seat for recline: release seat
adjustment clip on seat back, recline seat into
desired position, secure seat adjustment clip.
to adjust seat for lie-flat position:
recline seat fully and undo zips on either
side of front seat pad.
double buggy
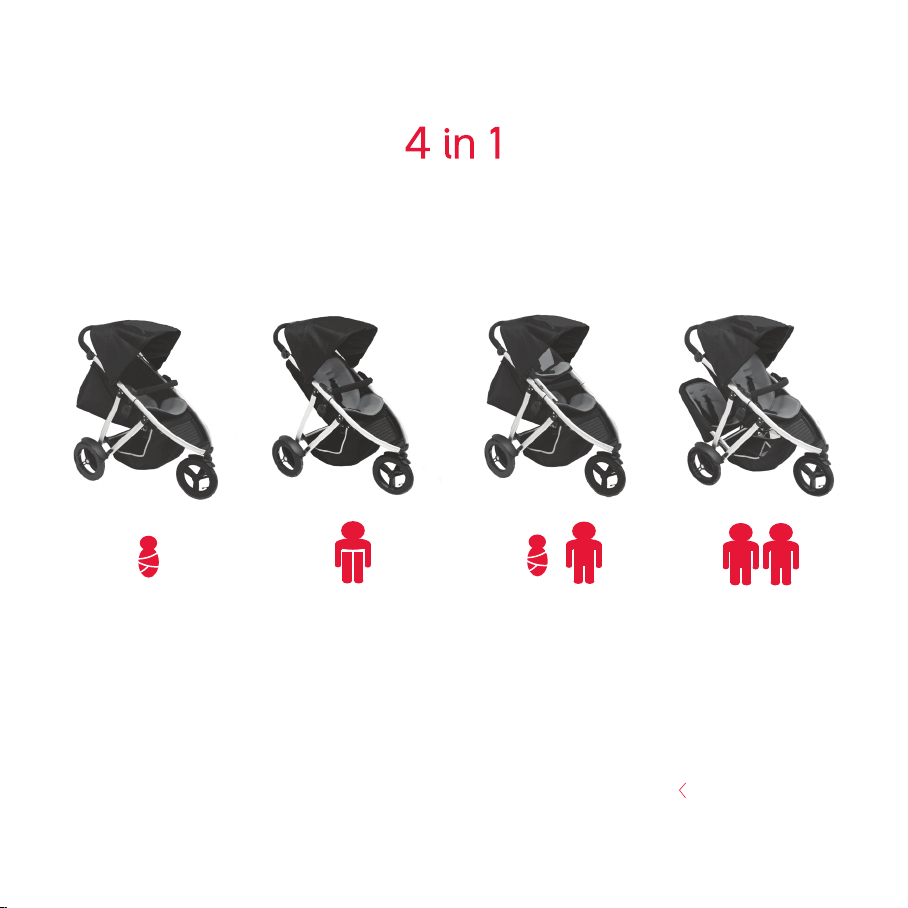
to use baby ` toddler position requires
purchase of phil`teds double kit accessory.
o double kit on back: fit double kit into
moulded plastic sockets on rear cross bar
and ensure bayonet fitting is secure. tilt
double kit back ensuring spring locks are
engaged. load heavier toddler in front seat
first. then place lighter toddler in double kit
english
3
Page 9

inline
TM
buggy
at back. always unload rear toddler first.
warning: never place a child in double kit
without a child in front seat.
p to remove: double kit from rear rotate
bayonet release levers upwards, slide double
kit backwards, lift and remove.
q attaching double kit to front: place vibe
seat in lie-flat position. remove pull bar from
front of vibe and fit double kit into front
frame sockets.
note double kit can fit in either set of sockets.
to remove from front of buggy: rotate bayonet
release levers upwards, slide double kit
up frame, lift and remove.
note: double kit has a recline feature.
to activate: undo zips that run around back
of seat.
folding
to prepare for folding: rotate handle into
upper most position and ensure front wheel
is in swivel mode. release child harness.
release fold locks.
note vibe can be folded with double kit
attached to front or rear.
r folding without double kit on: depress red
safety lock.
s fold so that buggy nose cone and handle
come together, ensure front wheel lies flat
against buggy. lock frame and secure by
closing fold locks.
note: sunhood, pull bar, and double kit
can remain attached.
t folding with double kit on: release double
kit spring locks as shown.
note do not take double kit out of
moulded sockets.
u tilt double kit towards front of buggy.
lift front seat up and slide double kit
underneath. close fold/safety locks.
v folded buggy can be manoeuvred using
pull bar as handle.
add ` adapt
other products available for vibe:
buggy covers
• single and double storm cover
• single and double mesh cover
buggy beds and liners
• buggy cocoon
• snuggle & snooze sleeping bag
buggy storage
• up & away travel bag
• base bag
• diddie bag
4
Page 10

cuts ` bruises
cleaning & caring for your vibe.
vibe fabric
brush off dirt. more intense cleaning can be
done by hand, in warm water, using a mild
natural soap. do not use detergents or
bleach. air dry.
vibe frame
brush dirt off frame and wheels regularly.
clean with a non-abrasive household cleaner
and soft cloth. wash off sand and salt after
visiting beach. always dry frame if wet.
vibe tyre and inner tube
the valve is car-size. manually inflate to 22psi
max. releasing air gives a softer ride but lower
pressure reduces tread life. new inner tubes
and tyres are generally available (30cm x 5cm
low profile tyre) from your dealer, cycle or
specialist wheel shops. standard tyre kits can
repair punctures. a flat tyre can result from grit
holding the valve open; to check: inflate tyre,
deflate rapidly, and re-inflate. tyres and tubes
are not under warranty. do not over inflate.
tyre pressure is affected by heat especially
when inside parked cars.
vibe rubber covers and grip
take care to avoid damage to foam
rubber. foam rubber is not under warranty.
vibe moving parts
excessive wear can reduce effectiveness
and safety. parts may need periodic lubrication. inspect essential components for: fraying
– especially webbing straps and safety harnesses. wear – locks, snap fasteners, tyres,
plastic parts, zips and moving parts. safety
–locks must not be loose.
rights ` remedies
*consumers may have extra rights in some countries or states.
our products are warranted against defects
in materials and workmanship for one year
from the date of purchase. if the product has
a manufacturing fault we will repair it for free.
if not practical to repair it, we will, at our discretion, replace the part in question. if the product
fails due to wear and tear, accident, neglect or
negligence, or is outside the warranty, we will
happily repair it for a reasonable charge.*
who is covered? original purchaser buying
product from an authorised dealer. proof of
purchase is required.
what is covered? workmanship or materials
that are deemed faulty, providing buggy has
at all times, been used in normal conditions,
in accordance with the instructions, and been
properly maintained.
what is not covered? second hand product,
modified product, poorly maintained product,
normal wear, fading and fabric cuts, improper
english
5
Page 11

inline
TM
buggy
use (by way of example): abnormal use: not
following instructions; child left unattended;
safety harness not used; excessive load; transport damage i.e. airline or freight damage.
customer costs within warranty. customer is
responsible for any inwards freight charge to
return product to manufacturer or its representative for warranty and or service.
customer costs outside warranty. where proof
of purchase is not provided or product is
outside of one year period. manufacturer (or
agent) reserves right to charge a service fee
and/or charge for parts replaced/ repaired.
a return freight charge may apply.
exclusions. any consequential loss or damage
to any person or property directly or indirectly
as a result of using product.
who do I contact? please discuss any
warranty or service queries with your store of
purchase. you will be required to show proof
of purchase. they will inform you of next step.
products that are returned directly to manufacturer by customer will NOT be eligible for
warranty.
log on ` relax
please register your product purchase through
our online warranty registration by visiting
www.philandteds.com
Warnings !
keep instructions with your buggy
for future reference. injury may result
from improper use or not following
all safety precautions.
warning never leave children
unattended in the buggy, it may
be dangerous. take extra care
with any child asleep in the buggy.
warning ensure that all locking
devices are engaged before use.
warning any load attached to the
handle affects the stability of the
vehicle. do not hang luggage or
carry extra children on the buggy.
do not allow a child to stand on the
seat. do not carry extra weight over
that allowed by the instructions; this
may make the buggy unstable. do
not place more than 3kg/7lbs in
the parcel tray.
warning always use the safety
harness to avoid serious injury from
falling or sliding out. always secure
all safety harness straps and ensure
6
Page 12

it’s correctly fitted and adjusted to
secure the child firmly. make sure
children are clear before folding,
erecting or adjusting the buggy.
if required, use the D-rings on the
waist strap to attach a safety harness.
warning apply brakes when park-
ing the buggy. apply brakes when
loading or unloading children. a
buggy in the single or baby & toddler
configuration is intended for children
up to 4 years or maximum weight of
40kg/88lbs and height of 1.1m or 3.3
feet. in the double configuration the
recommended max load is 25kg/
55lbs in front seat and 15kg/33lbs
in rear seat.
warning always place wrist strap
around your wrist when using buggy.
warning do not place a child in the
rear seat of a buggy without a heavier
child being in the front seat. do not
modify the buggy or use accessories
not designed for the buggy. they
may be unsafe.
warning double kit is not
recommended for children under
6 months.
warning care should be taken if
buggy is used on stairs or escalators.
warning the buggy should not be
used near an exposed flame.
warning ensure that fingers are kept
well clear of folding mechanism
when folding buggy.
warning
the buggy is not suitable for
running, skating, horse riding, water
skiing, acrobatics or similar activities.
It is not a flotation device.
enjoy!
english
7
Page 13

send 102 - 112 daniell st newtown wellington nz
visit www.philandteds.com
ph +64 4 380 0833
fax +64 4 380 0137
We (Phil and Teds Most Excellent Buggy Company Ltd) own the intellectual property rights in our brands, designs and inventions
featured in this publication. These include, without limitation, the phil`teds, adapt`survive!, `, INLINE trade marks
and INLINE DOUBLE BUGGY shape. We actively pursue people who infringe our intellectual property.
© Phil and Teds Most Excellent Buggy Company Ltd 2007.
Page 14
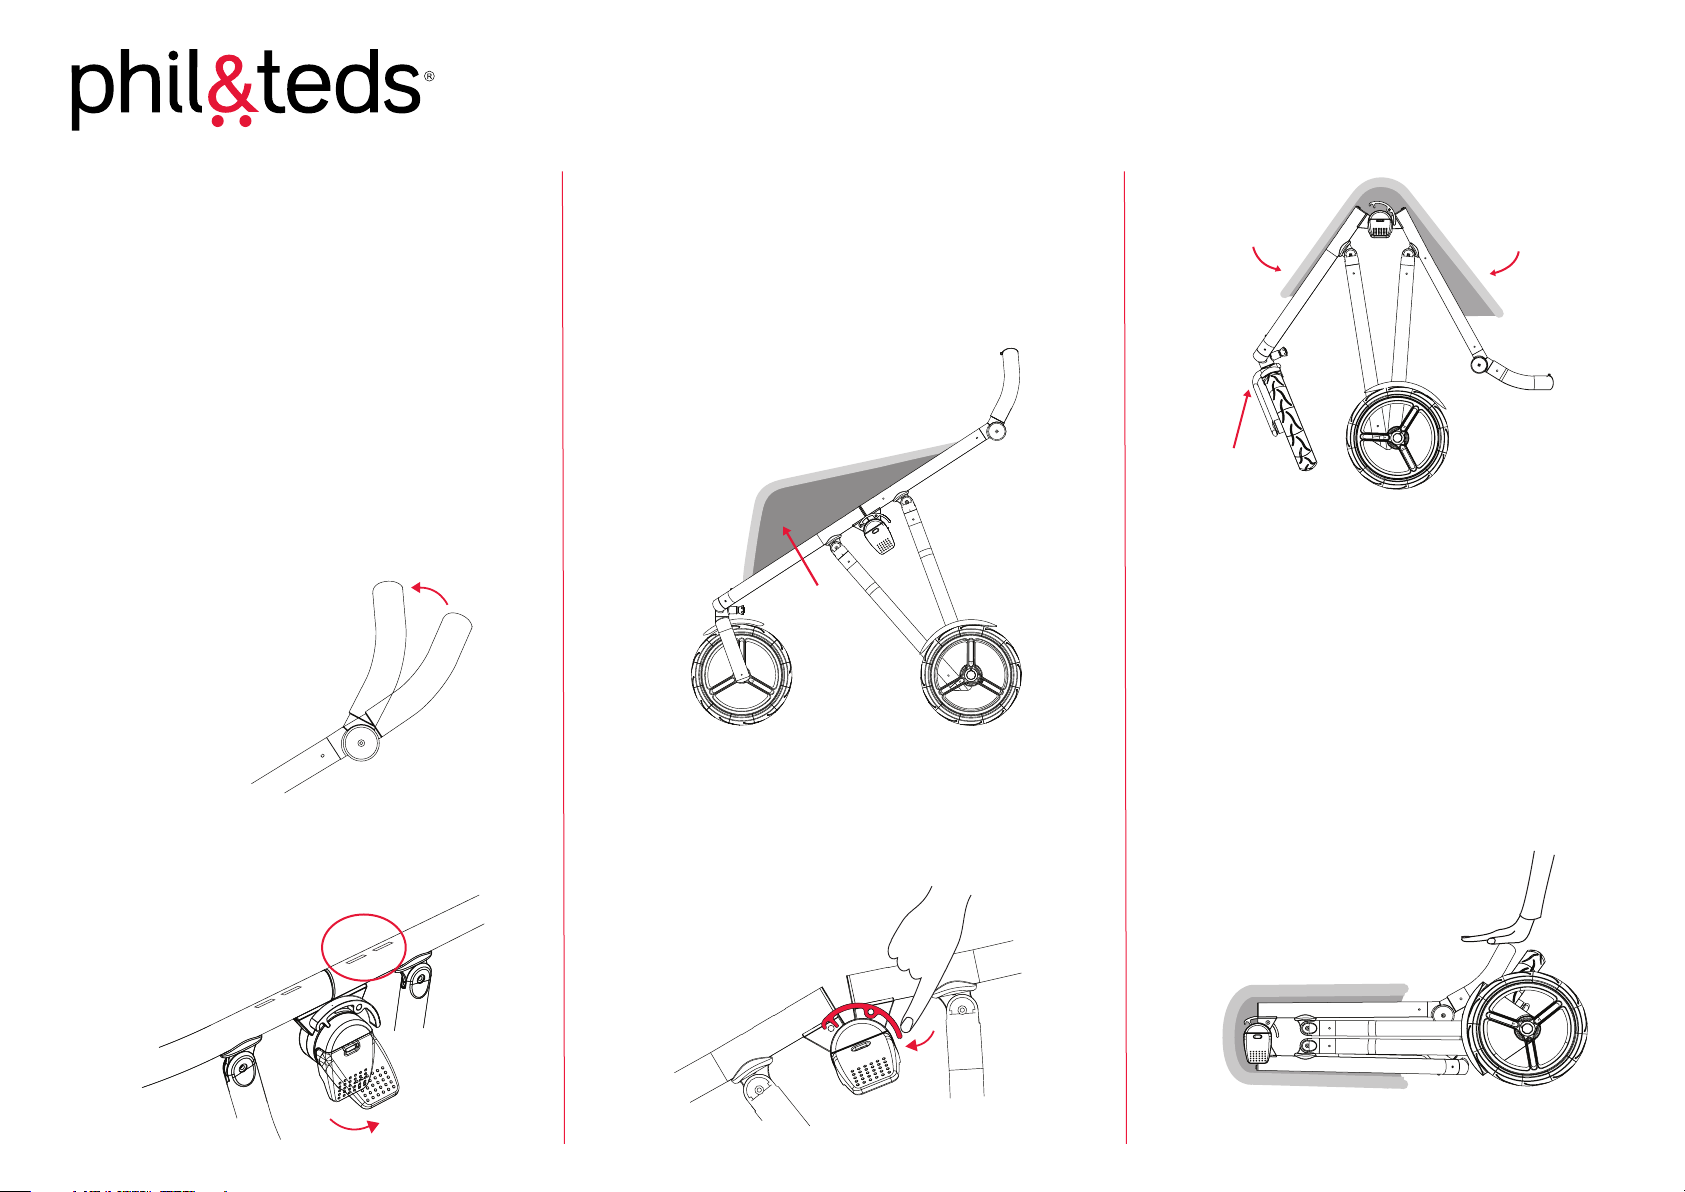
vibe folding instructions model GT issue April 2008
Please read ALL the instructions and look CAREFULLY at the pictures. Trust us; this will really help!!!
Folding without double kit attached,
or with the double kit on front of the
buggy in toddler/newborn position.
Note The double kit must be attached to
the top set of holes if you wish to leave it
on while folding the buggy, see image b.
Note If you would like to tow the buggy
like a trolley once folded, leave the brake
off and the bumper bar attached. (Super
useful in airports and the like!)
a Rotate the multi-adjust
handle into the highest
position.
b Open both of the black hinge locks.
(Those paddle things on either
side of the frame).
Top holes.
c Make sure the front wheel is in swivel
mode and the child harness is undone.
d Push the main seat base
(fabric seat) upward until it’s
fully inverted.
Push the seat
fabric up from
underneath.
e Ensuring that the parcel tray is folded
upwards at the centre, depress the red
safety latch and fold
the frame together.
Here it is.
Jbar.
Note When fully folded the front wheel
should rest on the buggy handle with the
Jbar facing outwards. (The Jbar is the black
plastic bit, shaped like an upside down ‘J’,
connected to the front wheel axle).
f Lay the buggy on the ground with the
handle facing upwards and close both
of the black hinge locks, (those same
paddle things).
done!
Page 15
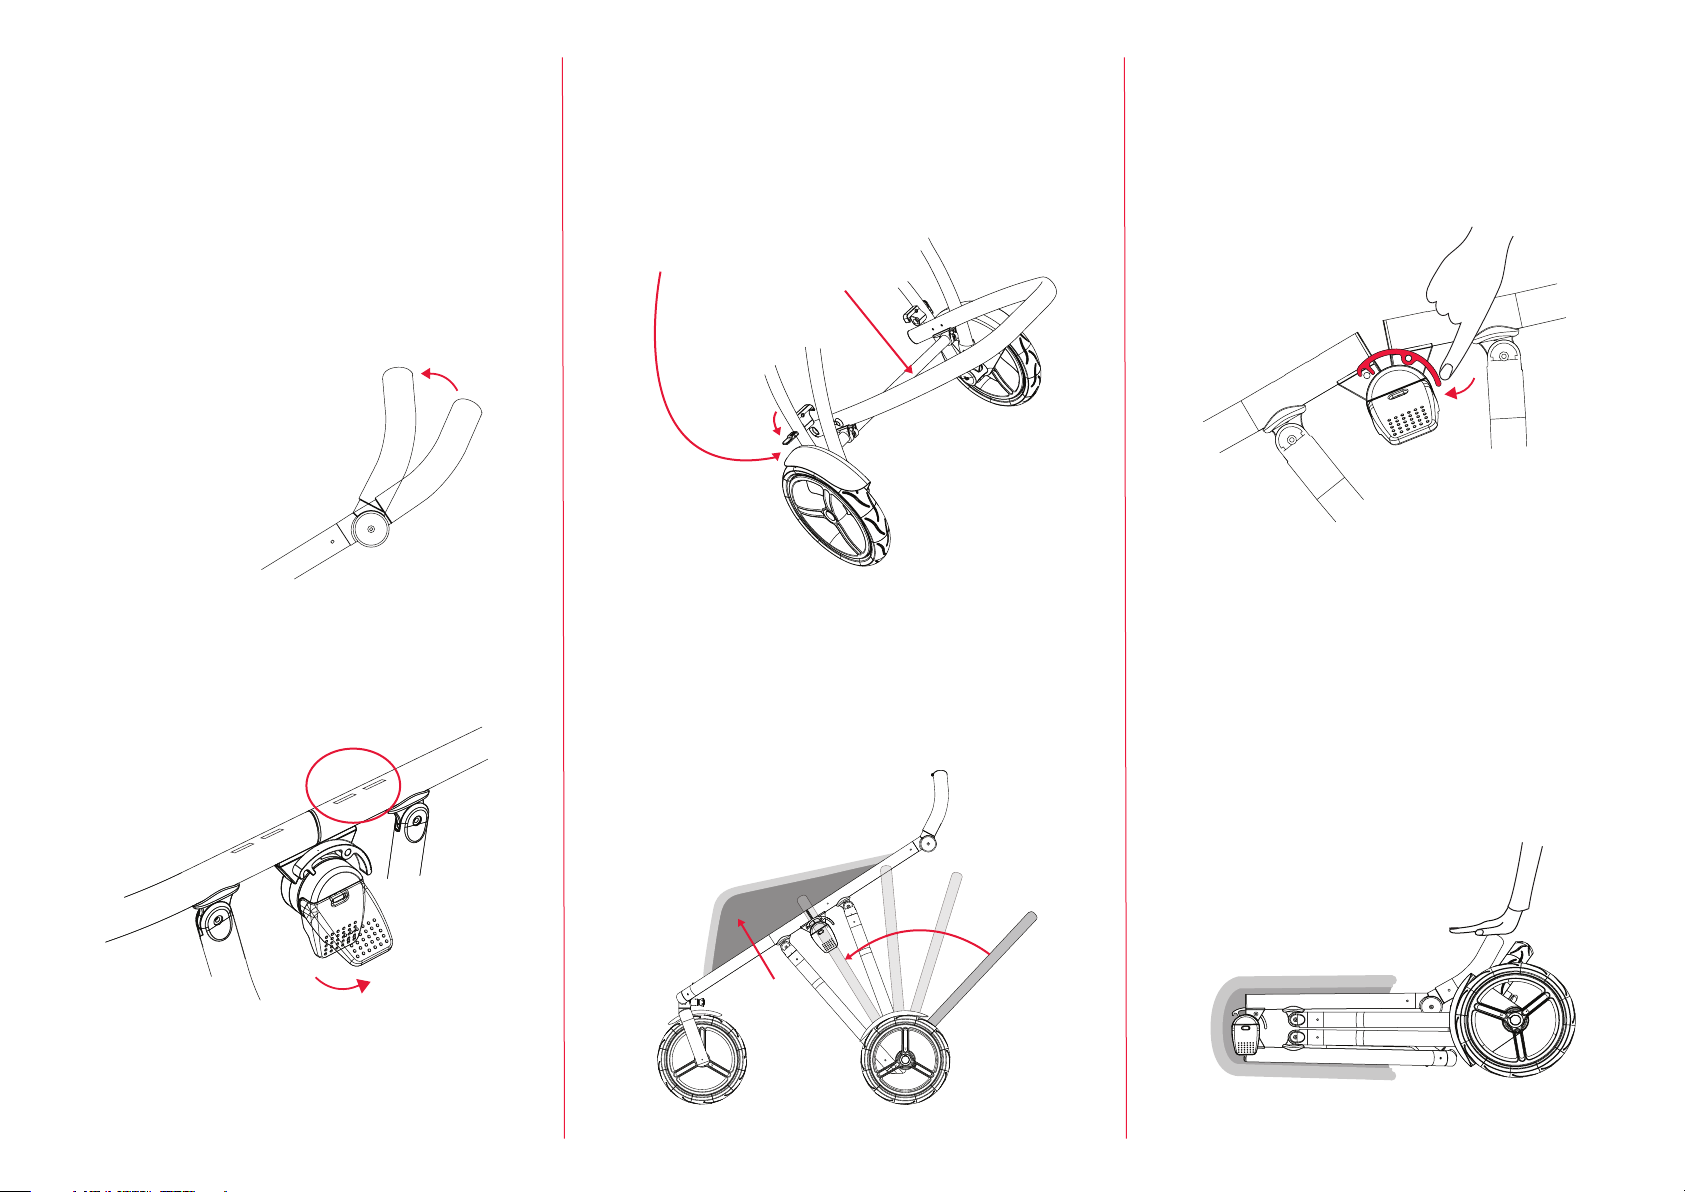
Folding with the double kit in rear
position
Note If you would like to tow the buggy
like a trolley once folded, leave the brake
off and the bumper bar attached. (Super
useful in airports and the like!)
a Rotate the multi-adjust
handle into the highest
position.
b Open both of the black hinge locks.
(Those paddle things on either
side of the frame).
Top holes.
d Open the double kit nib springs, allowing
the double kit to pivot on the cross bar.
These things are
the nib springs...
...and that’s the
cross bar.
e Push the main seat base (fabric seat)
upward until it’s fully inverted. Push the
double kit forward into the
inverted seat base.
f Ensuring that the parcel tray is folded
upwards at the centre, depress the red
safety latch and fold the frame together.
It’s still here!
Note When fully folded the front wheel
should rest on the buggy handle with the
Jbar facing outwards. (The Jbar is the black
plastic bit, shaped like an upside down ‘J’,
connected to the front wheel axle).
g Lay the buggy on the ground with the
handle facing upwards and close both
of the black hinge locks, (those same
paddle things).
c Make sure the front wheel is in swivel
mode and the child harness is undone.
Push the seat
fabric up from
underneath.
done!
Page 16
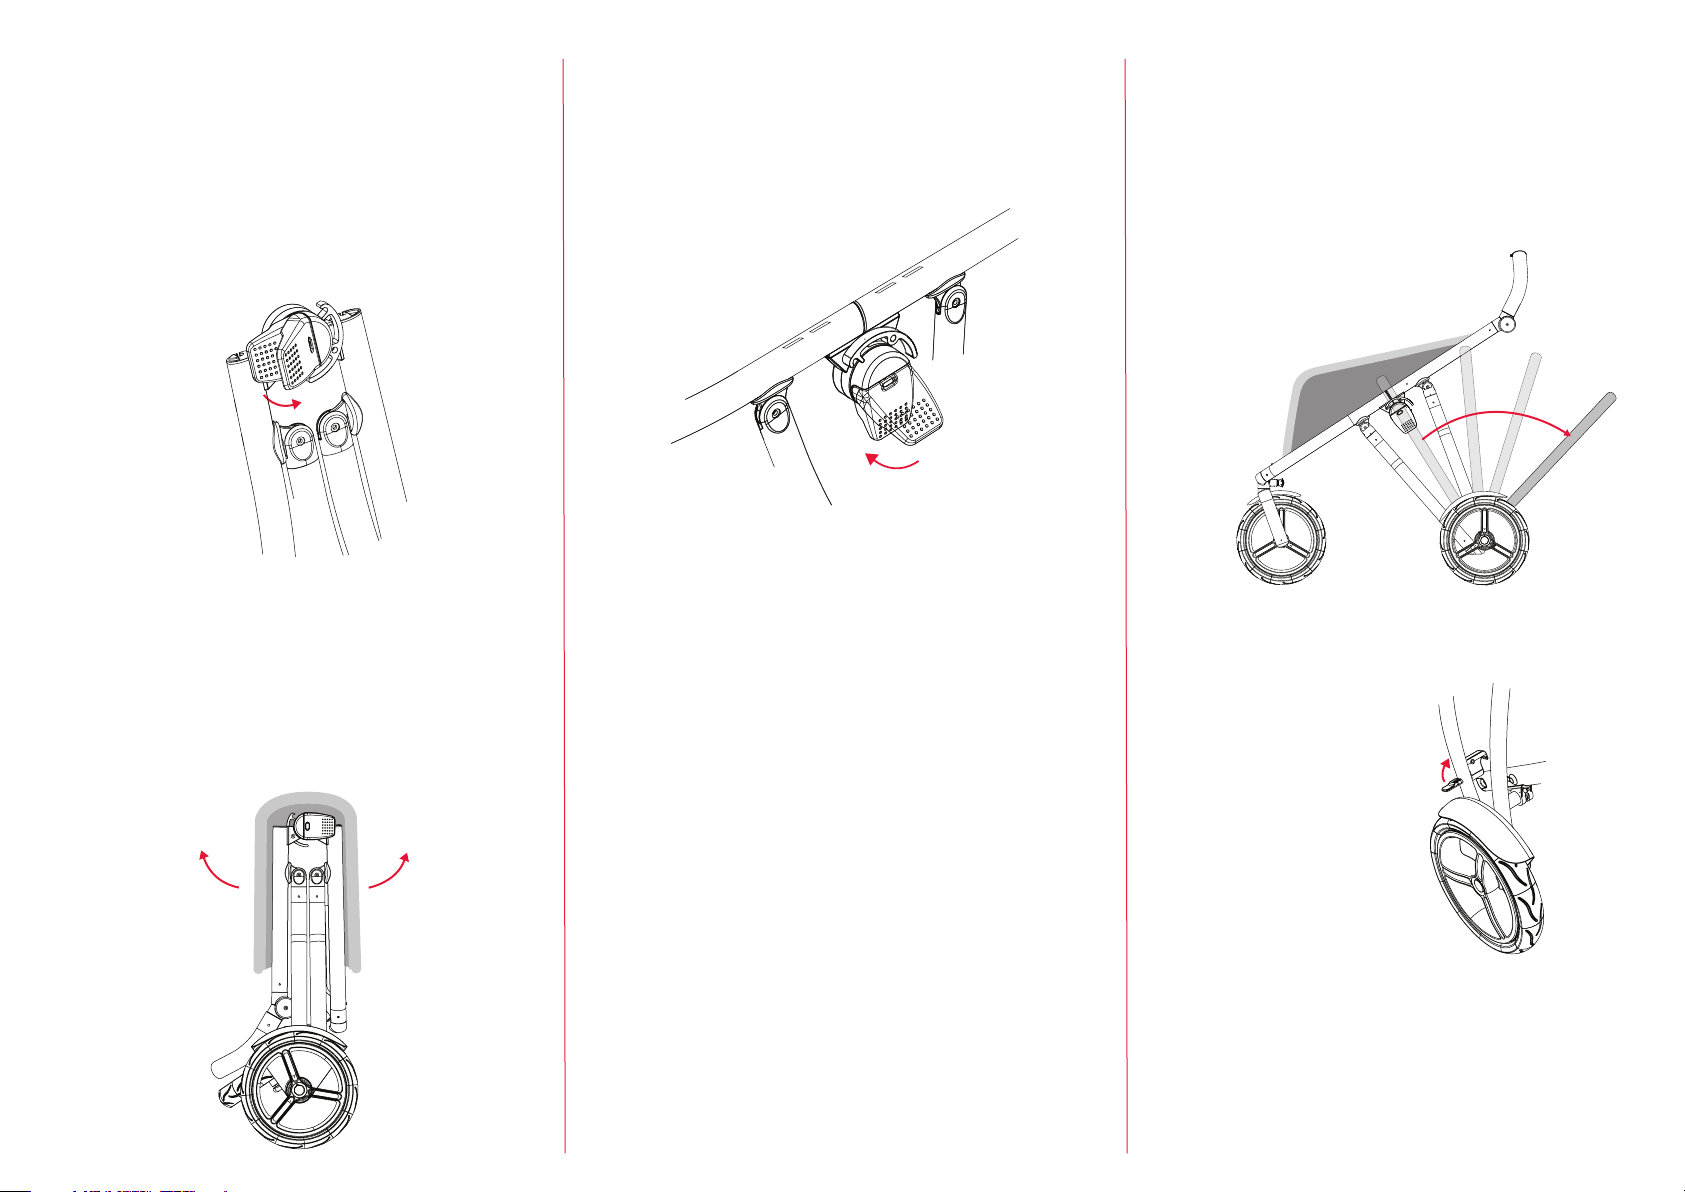
Unfolding without double kit attached,
or with the double kit on front of the buggy in
toddler/newborn position.
a Open both of the black hinge locks.
(The black paddle things on each side
of the frame).
c Close both of the black hinge locks.
(Those paddle things on either
side of the frame).
Unfolding with the double kit in
rear position.
e Repeat unfolding instructions a-c.
f Pull double kit out.
b Unfold the frame (the red safety latch
will auto engage when the buggy is
fully unfolded).
Note Sometimes the frame will lock and
needs to be pushed together to release.
d Push the main seat base
(fabric seat) down and GO GO GO..!
WARNING: THIS IS IMPORTANT
g Be sure to re-engage
the double kit
nib springs.
h Push the main seat base
(fabric seat) down and GO GO GO..!
done!
Page 17
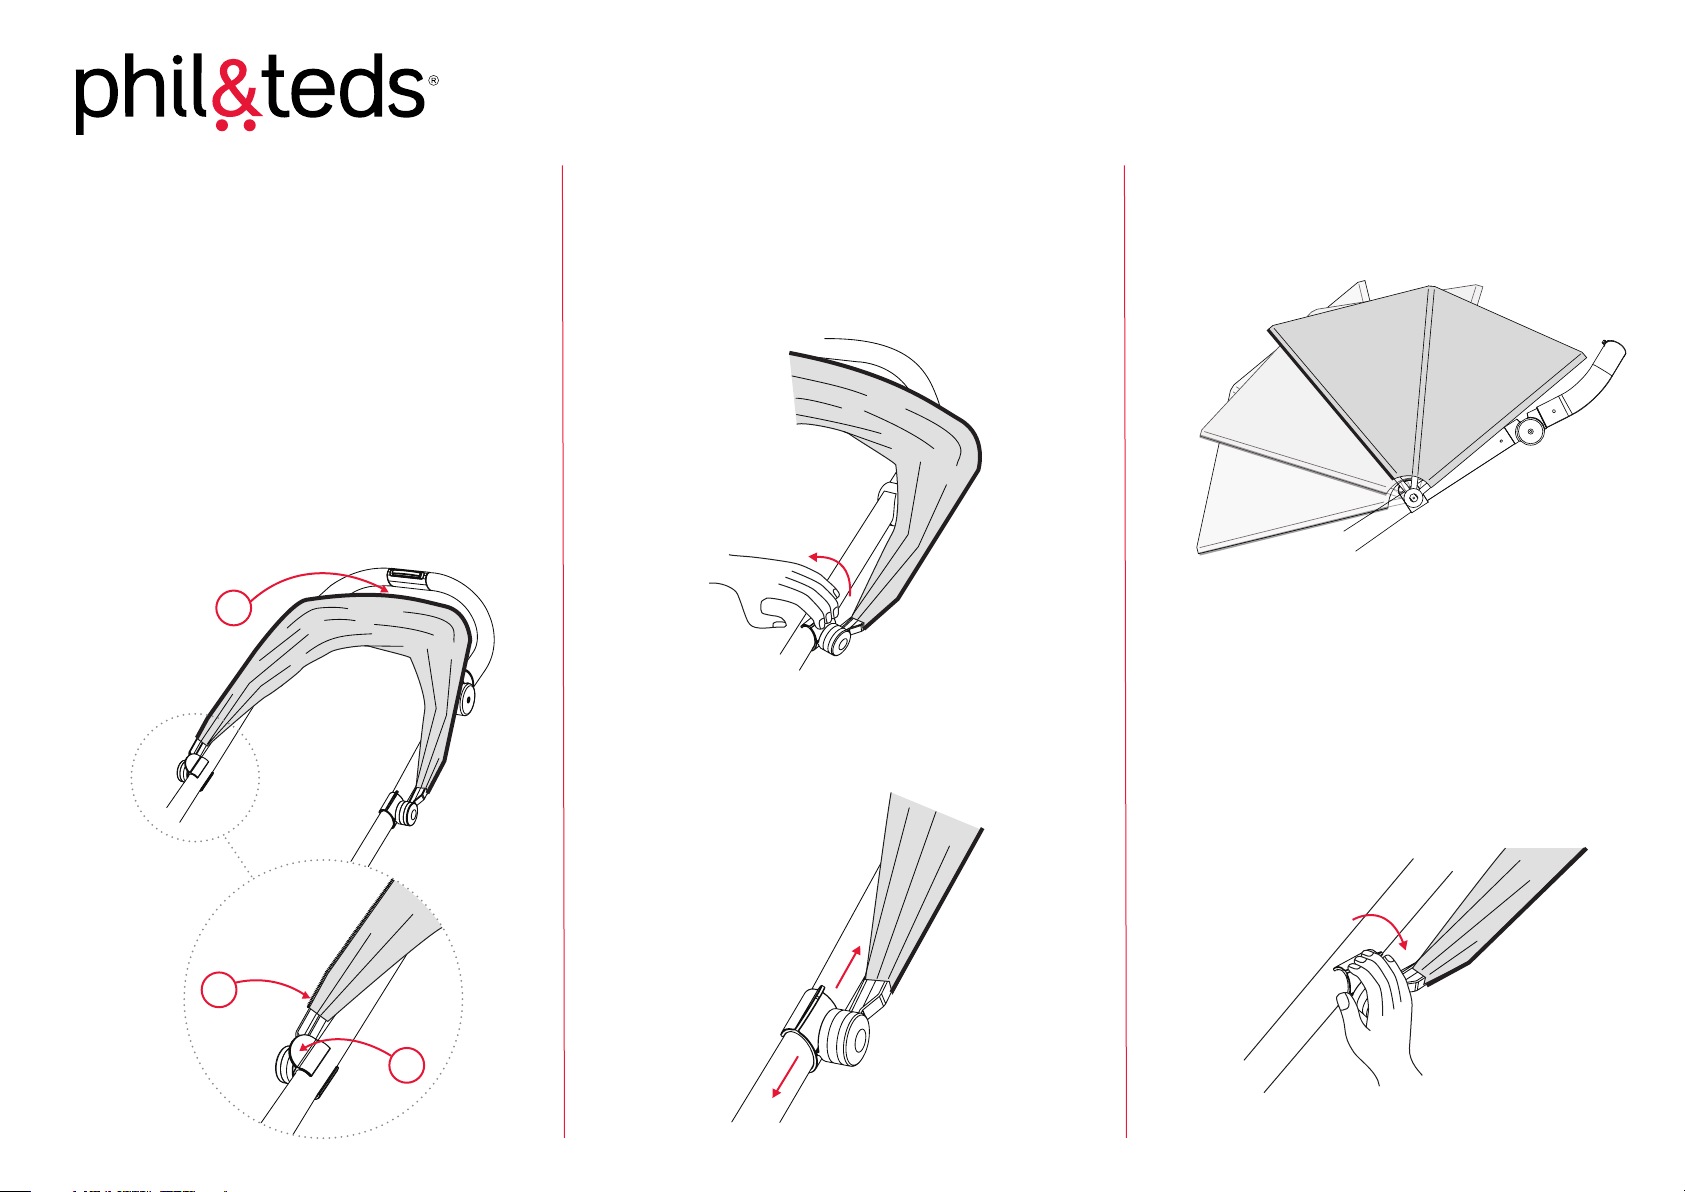
vibe sunhood instructions model GT issue April 2008
Please read ALL the instructions and look CAREFULLY at the pictures. Trust us; this will really help!!!
To attach
a Position the vibe sunhood above the
vibe buggy frame ensuring that:
1 The top of the sunhood is clear
of the handle.
2 The zip is facing upward.
3 The sunhood frame clip tab is
on the top of the buggy frame.
1
b The hood attaches to the buggy
frame using the two clips (on either
side of the hood). We’d suggest you
attach the underside of the clip first.
c Slide the hood up or down the buggy
frame, to the height that best suits you.
d Open the sunhood into desired
position.
To remove
e Pull the sunhood clip tab outward
and away from the buggy frame.
2
3
done!
Page 18
english
model GT travel bag issue march 2008
...............................................................
up`away
............
inlineTM vibe travel bag s u r v i v a l g u i d e adapt`survive!TM
Page 19
d o i t !
no not that, this
....
d
h
vibe travel bag
instructions
l
a
e
i
b
f
j
............
t h a t ’ s i t !
c
g
k
rear
wheels
with rear
guards
hood
pull bar
front
wheel
m
rear
guards
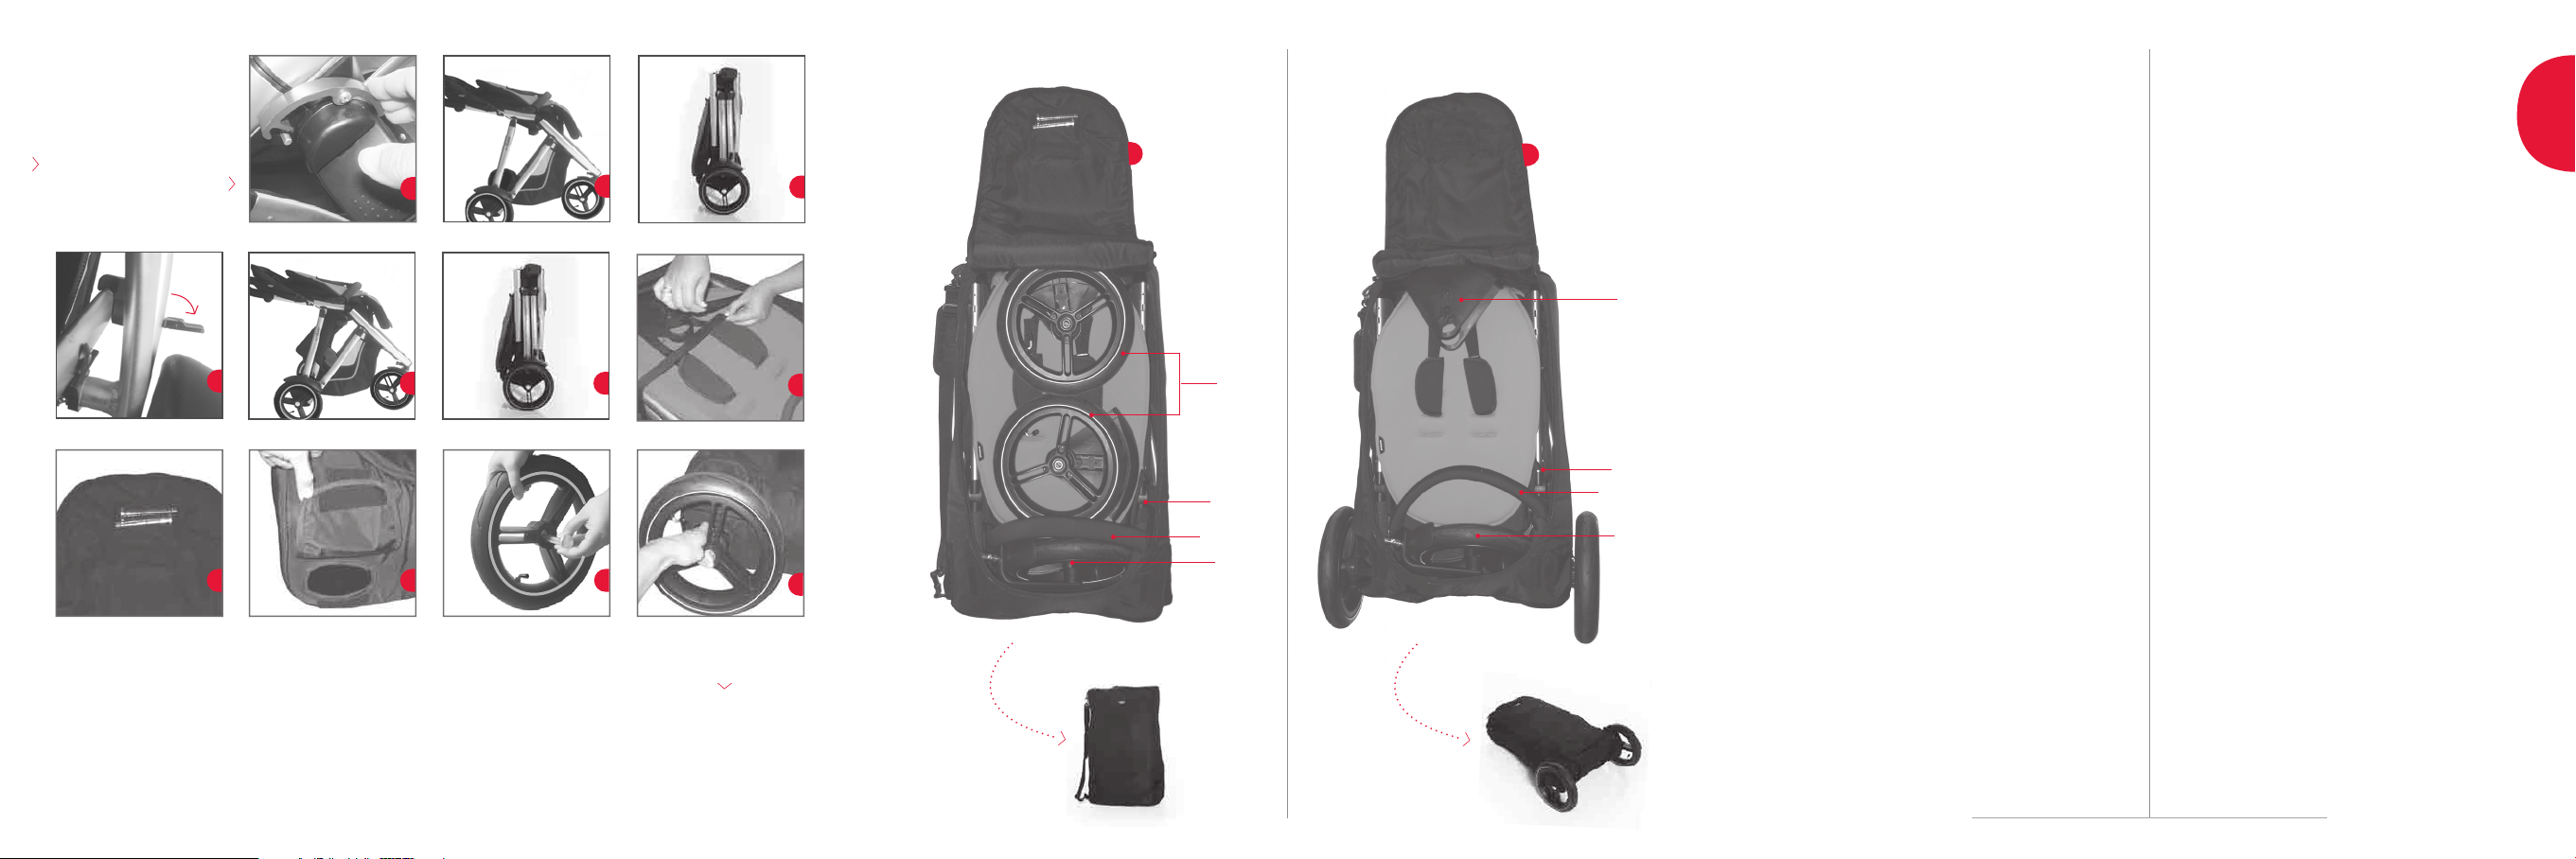
using your new phil`teds vibe travel bag
is a breeze, 2 minutes you’ll be off!
note: travel bag can hold entire vibe with
or without double kit on.
note: wheels can be packed away l or
reinserted into buggy axle housing to allow
buggy to be trundled along m.
folding vibe buggy
to prepare for folding: rotate handle into
upper most position and remove front wheel.
release child harness.
hood
pull bar
front
wheel
note: sunhood, pull bar are removed.
note vibe can be folded with double kit
attached to rear.
a folding without double kit on: release fold
locks and depress red safety lock.
b fold so that buggy nose cone and handle
come together inverting parcel tray will help,
remove front wheel. lock frame and secure
by closing fold locks.
c folded buggy should look like this.
a folding with double kit on: release fold
locks and depress red safety lock.
d release double kit spring locks as shown.
note do not take double kit out of
moulded sockets.
e tilt double kit towards front of buggy.
lift front seat up and slide double kit
underneath, inverting parcel tray will help.
close fold/safety locks.
f folded buggy should look like this.
wheels off
l place folded buggy in travel bag as shown.
g locate and close both Velcro straps to secure
buggy in bag as shown.
note: fit rear guards under rear wheels to
maximise space.
h place wheel axle pins in pocket provided
on inside of bag flap and zip travel bag closed.
wheels on
m with breaks off place folded buggy in travel
bag as shown.
g locate and close both Velcro straps to secure
buggy in bag as shown.
i locate and open both Velcro flaps at base
of travel bag.
j place wheel axle pins through rear wheels.
k insert into buggy axle housing from outside
travel bag and zip travel bag closed.
english
1
 Loading...