

Page 1
safety certified
ECE R44/04
A
R
U
B
C
R
H
E
S
G
A
-
S
E
N
O
I
C
C
U
R
T
S
N
I
-
S
E
I
T
C
U
R
T
S
N
I
-
S
N
O
I
T
C
U
R
T
S
N
I
FOR YOUR CHILD'S SAFETY
READ
THESE INSTRUCTIONS
CAREFULLY
BEFORE USE
N
W
E
I
S
U
N
G
-
I
N
S
T
R
U
K
S
J
O
N
E
R
-
I
N
S
T
R
U
K
T
I
O
N
E
R
alpha
™
KEEP FOR FUTURE REFERENCE
protect
™
Page 2
The alpha™ complies with requirements applicable in market
of sale
For rights & remedies, refer www.philandteds.com/warranty
Please register your purchase through our online warranty registration
by visiting: www.philandteds.com/register
philandteds.com
The protect™ complies with requirements applicable in market
of sale
For rights & remedies, refer www.mountainbuggy.com/warranty
Please register your product purchase through our online warranty
registration by visiting: www.mountainbuggy.com/register
mountainbuggy.com
Page 3
Congratulations on choosing
your new child seat!
Product Care
Safety Warnings
Features
Instructions
Page 4
Product care
GENERAL INSTRUCTIONS
Group 0+
Suitable for birth to 13kg child.
THIS DOCUMENT CONTAINS
IMPORTANT INFORMATION AND MUST
BE KEPT WITH THE SEAT FOR FUTURE
REFERENCE.
This product should be used rearward
facing until the child is too large for the seat
or exceeds 13kgs.
This product should never be used forward
facing.
CLEANING & CARING
Check your car seat for cuts & bruises. If your product
is damaged in any way, or you’re not sure how to use
it, please consult our web support from where you can
access a local customer care team.
Caring for your car seat
Unlike children, your car seat likes to stay clean.
Cleaning the fabric cover:
• Read the label on the removable cover for washing
instructions.
• Hand wash in warm water only.
• DO NOT tumble dry.
• The fabric cover can be easily removed for washing.
1. Remove the harness by gently feeding it through from
the front to the back of the seat.
2. Next remove the crotch strap, including buckle, by
rotating it a quarter turn and feeding it out through the
seat shell. The cover should now be free of obstruction.
3. Remove the cover and hand wash it at 30ºC; dry at -
away from direct heat.
4. To replace the cover follow the instructions above in
reverse.
Page 5

Product care
Cleaning the harness, chest pads and seat:
• Sponge clean only. Use hand soap and warm water.
• DO NOT use solvents, harsh detergents or washing
up liquids as these may weaken the harness and
seat.
• Use only mild detegents.
• DO NOT lubricate or oil any part of the seat.
• DO NOT wring.
• Dry thoroughly before storage.
• Store in a well ventilated space, away from direct
sunlight which could damage or fade your product.
• Store in a safe place when it is not being used. Avoid
placing heavy objects on top of it.
• DO NOT allow to come into contact with corrosive
substances e.g. battery acid.
Cleaning the buckle
Food, drink, or other debris may collect inside the
harness buckle which can affect proper function. Wash in
warm water until clean. Be sure you can hear an audible
click to make sure the buckle is working properly.
The correct use and maintenance of your carseat will ensure it gives long and trouble free use. When somebody else
is using your car seat, ensure that they also know how to use it and especially the correct way to adjust it. The safety
of your child is your responsibility.
Please read thoroughly before commencing
installation as an incorrect installation could be
dangerous.
• This is a “Universal” child restraint; it is approved
to ECE Regulation 44.04 for general use in
vehicles and will t most, but not all, vehicle seats.
• A correct t is likely if the vehicle manufacturer has
declared in the vehicle handbook that the vehicle
is capable of accepting a “Universal” child restraint
for this group.
• This child restraint has been declared “Universal”
under more stringent conditions than those
applied to earlier designs which do not carry this
notice.
• If in doubt, consult either phil&teds/Mountain
Buggy or the retailer.
Extreme Hazard
• Do not use in passenger seats equipped with
airbags.
IMPORTANT
Page 6

Safety Warnings
WARNINGS
• PLEASE READ THOROUGHLY BEFORE
COMMENCING INSTALLATION AS AN
INCORRECT INSTALLATION COULD BE
DANGEROUS.
• THIS CHILD SEAT SHOULD NEVER BE
USED ON A PASSENGER SEAT EQUIPPED
WITH AN AIRBAG.
• The child seat must only be installed in a rear
facing position.
• Important: Because of potential medical
issues inherent in low birth weight and
premature infants, always have a trained
professional doctor, or hospital staff member
assess the suitabillity of the child restraint
prior to leaving the hospital or using the child
restraint.
• Do not remove any labels on the child safety
seat. Important information is contained on
the labels.
• Do not modify the child safety seat in any way.
• Do not take apart or attempt to take apart
or attempt to take apart the child safety seat
except as instructed in this manual.
• Do not use the child safety seat with damaged
or missing parts.
• Do not use damaged or frayed harness straps
or vehicle belt.
• Never use this child safety seat without the car
seat cover.
• Do not replace the child seat cover or harness
with any other than the ones we recommend
as these parts are integral to the child safety
seat's performance.
• Never use this child restraint with any other
base except ones that the manufacturer
permits.
• Do not use a child safety seat that has been in
a crash. A crash can cause damage to the child
safety seat that you cannot see.
Page 7
Safety Warnings
• Do not use a second-hand child seat or child
seat whose history you don't know.
• Always check the tightness of the restraint
and the harness before each use.
• Always make sure all vehicle belts and
harness straps are not twisted before each
use.
• Never leave the child in the child seat when
the harness straps are loose or undone.
• Never leave your child unattended even for a
short time.
• Do not leave your child in this restraint for an
extended period of time.
• Do not use this child seat on a vehicle
passenger seat tted with an active airbag.
Death or serious injury can occur.
• Always install the child safety seat in a rearfacing position.
• Never install the child safety seat fowardfacing.
• Do not use on the vehicle seats that face
the sides or rear of the vehicle. Use the child
safety seat only on the vehicle seats that
face foward. According to accident statistics,
children are safer when properly restrained
in the rear seating positions than in the front
seating positions.
• Never use this child safety seat with 2 point
vehicle belts.
• Do not use in any conguration not shown in
the instructions.
• Do not use alternative routings not shown in
these instructions.
• Make sure that the child safety seat does
not become trapped by folding or moveable
passenger seat or in the door of your car.
• Make sure all folding passenger seats are
properly latched.
• Do make sure to properly secure any loose
objects, such as luggage or books, in your car
Page 8

Safety Warnings
as they may cause injuries in the event of an
accident.
• This child restraint should be securely belted
in the vehicle even when not in use. In a crash
or sudden stop, an unsecured child safety seat
may injure other occupants.
• All occupants of the vehicle should be correctly
restrained. Unrestrained passengers may
be thrown into other passengers and cause
serious injury or death in a crash.
• Do not allow children to play with or adjust the
child safety seat.
• Always make sure the handle is properly
locked in the upright carrying position before
carrying a child in the child seat.
• Never take a child out of the child safety seat
when the vehicle is moving.
• Cover the child safety seat when left in the
direct sunlight. Parts of a child safety seat may
become too hot for the child's skin. Always
check surfaces before placing a child in the
child's seat. Seat cover may fade in direct
sunlight.
• Never place the car seat or infant carrier near
the edge of an elevated surface or on a soft
surface such as a seat cushion or mattress.
The car seat of an infant carrier could fall off
these surfaces and cause serious injury or
death.
• Never use the child safety seat with a
shopping cart.
• Make sure the lap strap of the harness is
worn low down so that the infant pelvis is
rmly engaged.
Page 9
CHECKLIST BEFORE USE
Inspect
• Only use this car seat rear facing
• Child restraint free of damage
Verify Child within Weight and Size Range
• Weight between birth and 13kg
• Height 74cm or less (top of head 2cm or more
below top of shell)
Secure Child Properly in Child Restraint
• Correct shoulder strap height (at or slightly
below shoulders)
• Harness not twisted and low across hips
• Harness secure and tight
Safety Warnings
Install Child Restraint Rearward-facing in Safe
Location in Vehicle
• Vehicle seats that face front of vehicle only
• Handle locked in specied position (6a)
• Child facing rear of vehicle
• Position with NO active airbag
• 3 point (shoulder/lap) belt used
• Seat belt not twisted
• Belt path followed
• Tight against vehicle seat
Page 10
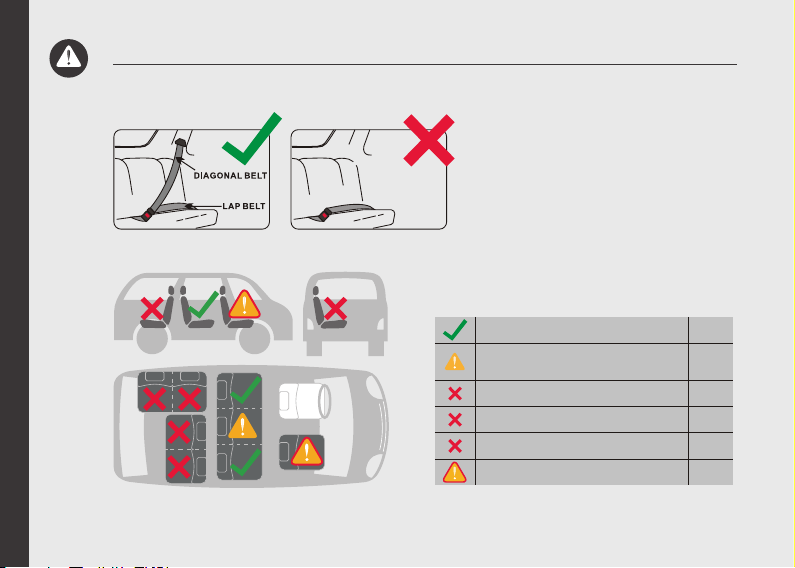
Safety Warnings
On outer rear seat
On centre rear seat with
3-point belt
On a rearward-facing seat
On seats facing sidewards
On rear seat with lapbelt only
Front seat with airbag off
YES
YES
NO
NO
NO
YES
Page 11
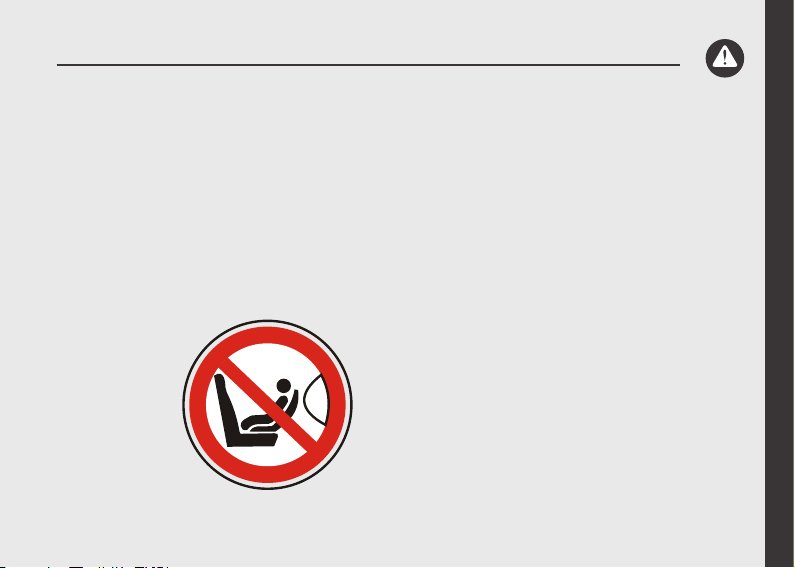
APPROVED SEAT BELT TYPES:
This car seat can only be tted into the
passenger seat of a car with a lap and diagonal
seat belt and no air bag.
The car seat is only suitable if the vehicle is tted
with 3-point static or 3-point retractor safety belt,
approved to UN/ECE Regulation No. 16 or
other equivalent standards.
Do not use on a
passenger seat
with an airbag.
Safety Warnings
Page 12
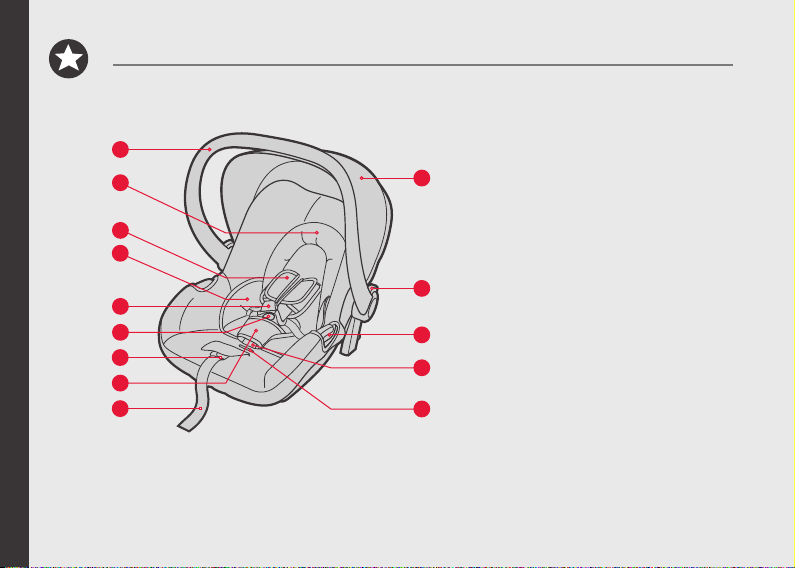
Features
Features
1
2
3
4
5
6
7
8
9
01 Handle
02 Head Support
10
03 Shoulder Pads
04 Infant Pads
05 Harness
06 Buckle
11
12
13
14
07 Adjuster Button
08 Crotch Pad
09 Adjuster Strap
10 Canopy
11 Handle Release Button
12 Lap Belt Guide
13 Crotch Belt
14 Crotch Strap Slot
Page 13
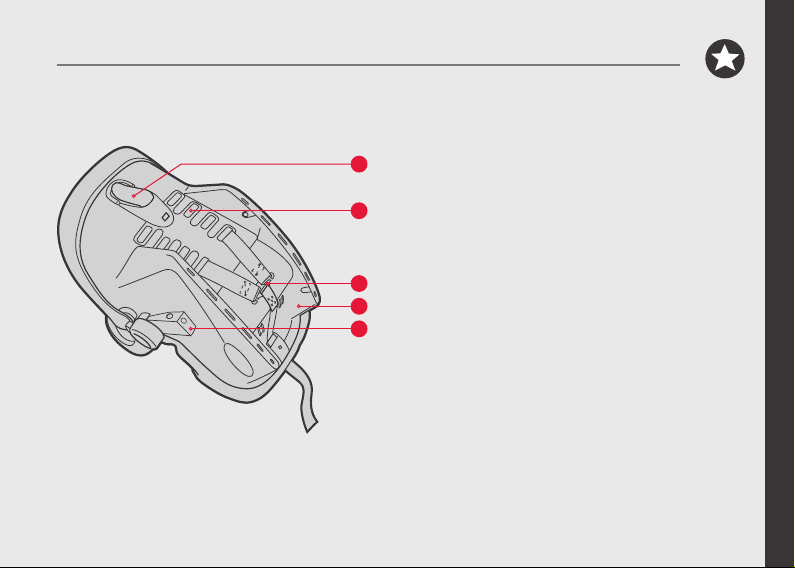
Features
Features
15 Shoulder Belt Guide
15
16
17
18
19
16 Harness Slot
17 Splitter Plate
18 Shell
19 Adapter* (only for some models)
Page 14
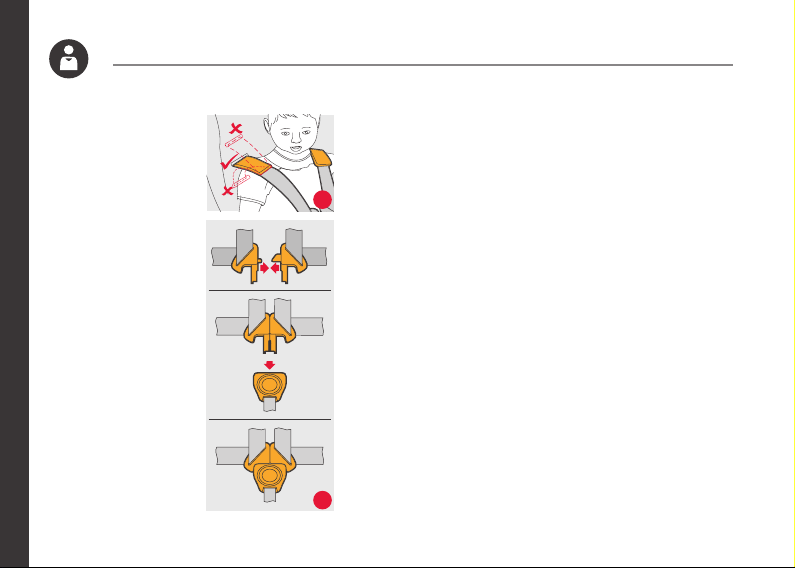
Instructions
HARNESS POSITIONING
1a Position the height of harness according to the child’s
height. The harness straps should be level with the
1a
1b
child’s shoulders. Do not use the child restraint
with the harness if the child’s shoulders are above
the highest slots in the backrest or if the child’s
weight exceeds 13kg.
1b Put the two buckle clips together, then lock into
the female buckle. (1b)
Tighten the straps until they are in contact with your
child's body.
CAUTION!
The hip belt must lie as low as possible over your
child's hips.
Page 15
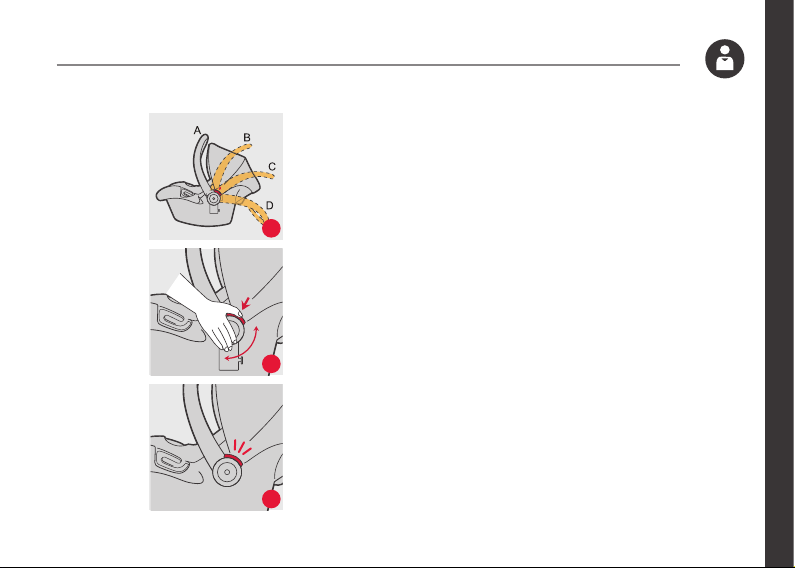
Instructions
ADJUSTING THE HANDLE
2a There are 4 positions: In vehicle position (A),
Carry position (A), Middle position (B,C), and
Stationary position(D)
2a
2b
2c
2b To adjust, squeeze handle release buttons on both
sides, then rotate the handle, The handle will lock
into position.
2c You should hear a click when the handle button
is engaged and handle is locked into the upright
carrying position.
WARNING:
Always make sure the handle is securely locked in
the upright carrying position before carrying.
Page 16
Instructions
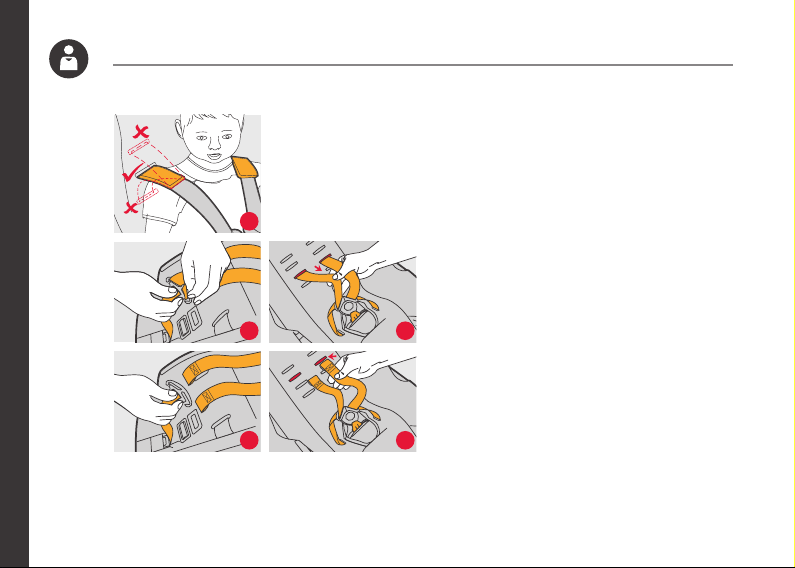
ADJUSTING THE HARNESS
3a Adjust the shoulder straps height so they are
level with, or just below child shoulders.
3a
3b
3c
3b To adjust the height of shoulder straps, you need to
take out the straps from the splitter plate located in
the rear of the seat.
3d Pull both straps through the shell and seat cover.
3e Thread the harness straps through the proper
harness slot. Make sure that both straps are even
3d
and not twisted. From the rear of the seat, secure
the har ness strap onto the splitter plate (3b). Pull to
make sure the harness straps are rmly secured
onto the splitter plate. Remember, shoulder
straps should be level with, or just below the child’s
shoulders (3a).
3e
Page 17
Instructions
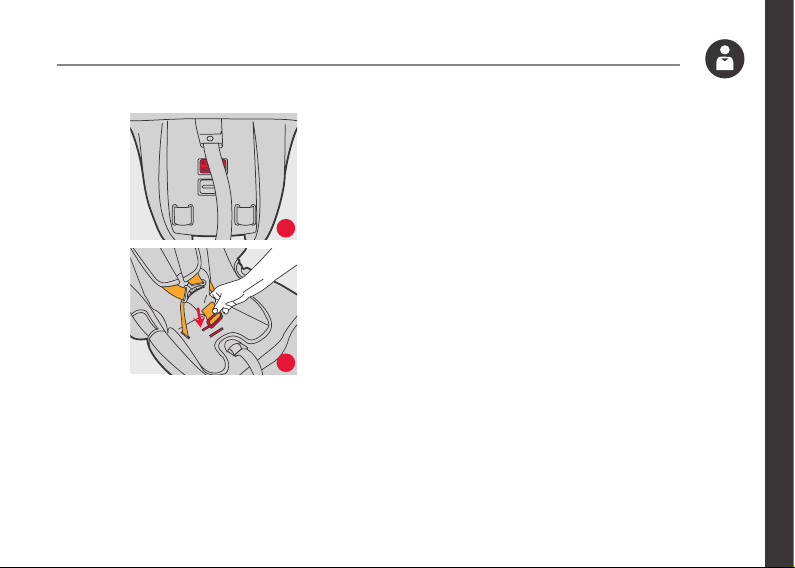
ADJUSTING THE CROTCH STRAP POSITION
The crotch strap adjusts to 2 positions to t the child’s
size. Only move crotch strap position to outer position
when the child weighs more than 7kg. Typically this is
4a
4b
when the harness is in middle slots.
4a To move the crotch strap, locate the metal plate attached
to the crotch strap under the child restraint (4a). Rotate
the metal plate and push it through the shell and seat
cover. Loosen harness adjuster strap if it is in the way.
4b Locate the appropriate crotch strap slot and insert the
metal plate and crotch strap through the seat cover and
shell (4b). Pull on harness buckle to make sure crotch
strap is securely installed.
Page 18
Instructions
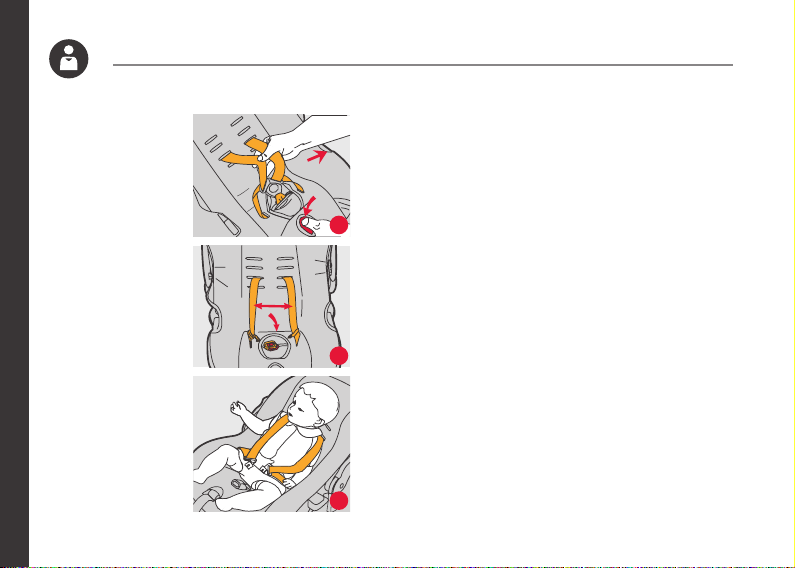
SECURING THE CHILD IN CHILD
RESTRAINT
5a Press the adjuster button on the front center of the seat
and pull on both shoulder straps to loosen the harness.
5a
5b
5c
5b Press the red button on the buckle to release the
shoulder straps and move them to the side.
5c Place child’s bottom on the seat and the child’s back
at against the back of the child restraint. This will
increase the child’s comfort and allow the harness to
properly secure the child. Slide shoulder straps over the
child’s shoulders (5c). Make sure the harness is at or
below the top of the child’s shoulders.
Page 19
Instructions
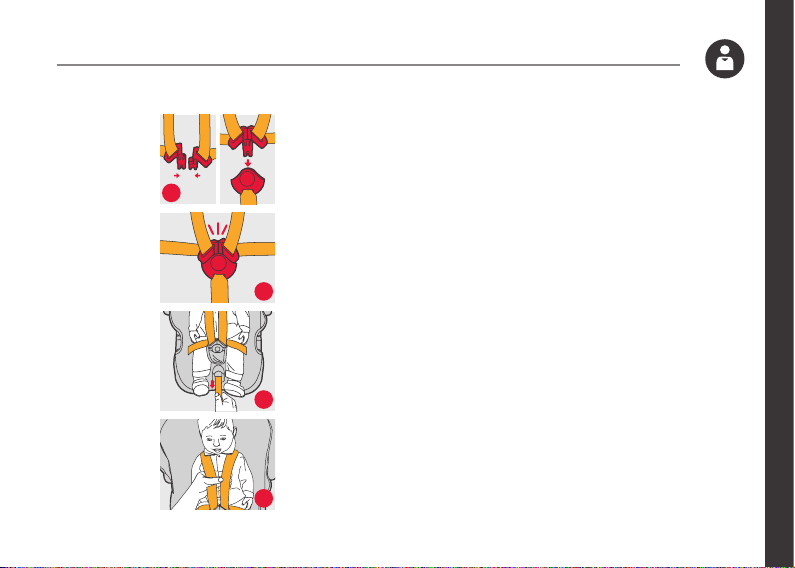
5d Align the top and bottom buckle clips to form
one clip.
5e Insert into the buckle until you hear a “click”. Make sure the
5d
shoulder straps are not twisted. Adjust the shoulder pads
over the centre of the child’s shoulders.
5f Pull the harness adjustment strap until shoulder straps are
tight against the child.
5e
5g For proper tightness, one nger should t between the
harness straps and the child’s shoulders.
To remove the child, loosen shoulder straps and release
buckle.
Discontinue use when child’s weight is greater than 13kg,
5f
5g
height is greater than 74cm or head is less than 2cm
above the top of the shell.
Page 20
Instructions
APPROVED USES OUTSIDE OF
THE VEHICLE
• ALWAYS secure the child with the harness when placing
the child in the child restraint.
• ALWAYS make sure the handle is securely locked before
using. For use as an infant carrier, place handle in carrying
station (A in 2a). For rocking, place the child restraint on
level ground, make sure handle is in carrier positions (A in
2a) and lock gently.
• For feeding and resting, place seat on secure and
level surface away from the edge of elevated surfaces,
and put handle in the stationary position (D in 2a).
Page 21
INSTALLATION IN THE VEHICLE
WITHOUT BASE
Instructions
6a
6b
6c
6d
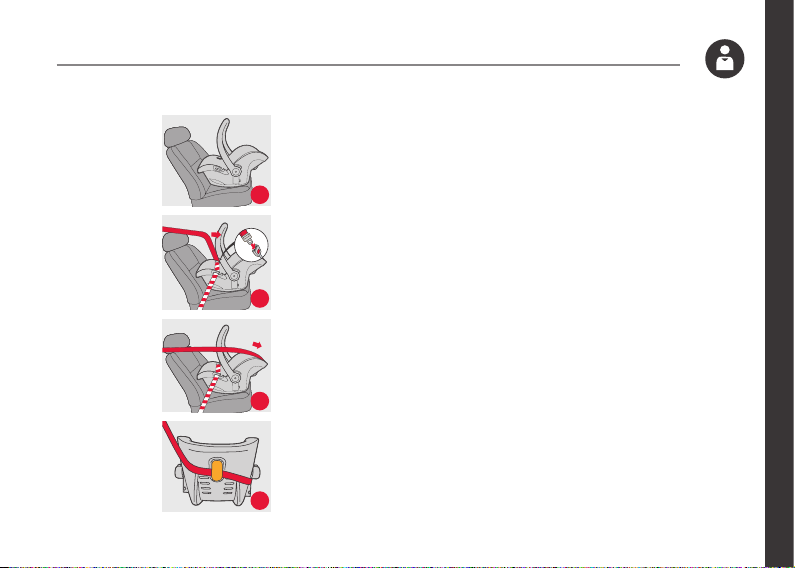
6a Place the child restraint rear-facing on the vehicle seat and
make sure the handle is in specied position. The child will
face the rear of the vehicle.
6b Route the vehicle lap belt through both lap belt guides and
buckle the seat belt.
6c Route the vehicle shoulder belt around the back of the
child restraint and through the shoulder belt guide.
6d If vehicle shoulder belt is too short, please move vehicle
seat as far back as possible and lower the vehicle seat belt
height adjustment to the lowest possible height. If the vehicle
belt is still too short, try another authorised seating position.
Page 22
Instructions
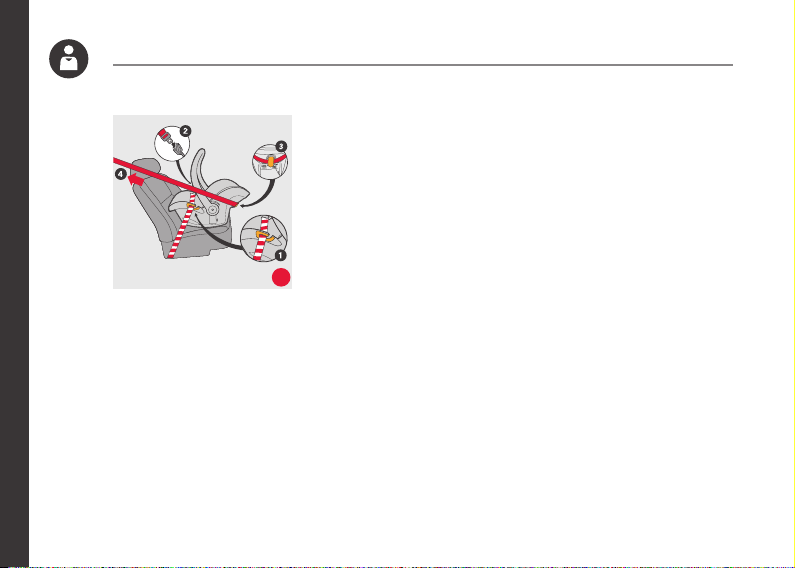
6e Adjust the child restraint to the proper recline to ensure
maximum protection for the child. A tightly rolled towel
under the front edge of the child restraint can be used to
achieve the correct recline.
WARNING:
Do not route the vehicle belt using any other path when
using the child seat. For assistance contact our Customer
Service team.
6e
Do not use 2 point vehicle belt to install this child seat.
Only install the child restraint rear-facing on forward-
facing vehicle seats.
Make sure the child is properly secured in the child
restraint, and the child restraint is tightly installed in the
vehicle.
Page 23
Instructions
REMOVING THE CANOPY AND COVER
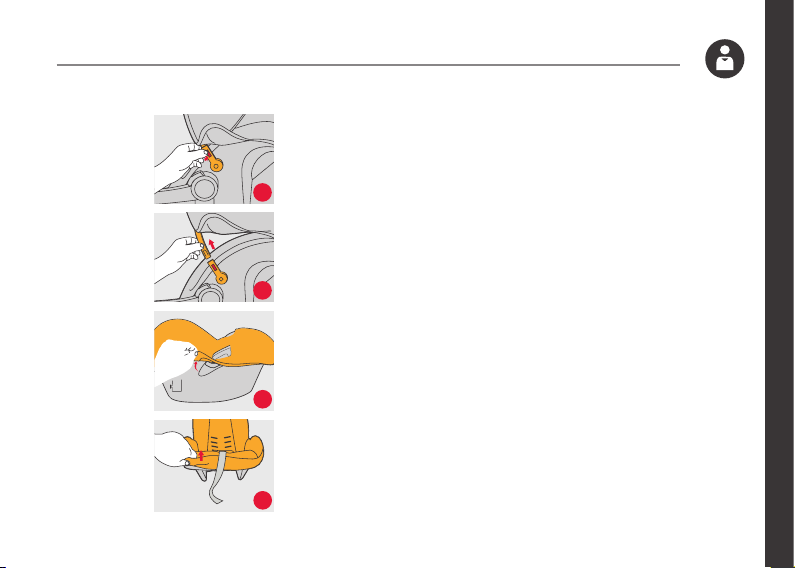
7a / 7b On the side of canopy, pull the tab and detach the
7a
7b
7c
7d
canopy frame.
7c / 7d Pull out the cover from shell front.
Page 24
Instructions
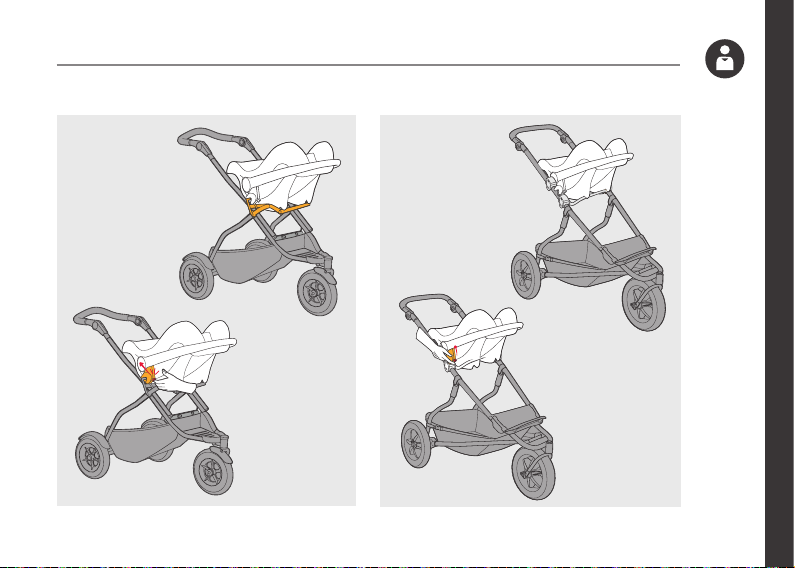
TRAVEL SYSTEMS
This child seat can be used as a travel system in
conjunction with selected strollers
Installing:
Having correctly attached an appropriate car seat adapter
(sold separately) to your stroller, test that the child seat is
fully attached by pulling the child seat up and forward; it
should not come free from the car seat adaptor.
Removing the child seat:
Red release levers are located on both sides of the child
seat, immediately above the connector points (as shown).
Lift up on both levers then lift the child seat off the stroller
using the carry handle.
Page 25
Instructions
alpha
use only original mountain buggy or phil&teds car seat adapters to secure capsule to a buggy.
protect
Page 26

Page 27

© Phil and Teds Most Excellent Buggy Company Ltd 2012.
We (Phil and Teds Most Excellent Buggy Company Ltd) own the intellectual property rights in our brands, designs and inventions featured in this
publication. These include, without limitation, the phil~teds, adapt~survive!, ~, INLINE trade marks and INLINE DOUBLE BUGGY shape. We actively
pursue people who infringe our intellectual property.
©Phil & Teds Most Excellent Buggy Company Ltd 2012.
Nous (Phil and Teds Most Excellent Buggy Company Ltd) sommes détenteurs de tous les droits de propriété intellectuelle associés à nos marques, modèles
et inventions mentionnés dans le présent document. Ceux-ci incluent, sans que cela soit limitatif, les marques commerciales phil~teds, adapt~survive !, ~, et
INLINE et la forme du INLINE DOUBLE BUGGY. Nous engageons des poursuites contre tous ceux qui enfreignent nos droits de notre propriété intellectuelle.
© Phil and Teds Most Excellent Buggy Company Ltd 2012.
Wir (Phil and Teds Most Excellent Buggy Company Ltd) sind Eigentümer aller geistigen Eigentumsrechte bezüglich unserer in dieser Veröffentli-
chung aufgeführten Marken, Designs und Erfindungen. Diese schließen die Marken phil~teds, adapt~survive!, ~, und INLINE sowie die Form INLINE
DOUBLE BUGGY ohne Einschränkungen ein. Personen, die unsere Eigentumsrechte verletzen, werden von uns aktiv verfolgt.
© Phil and Teds Most Excellent Buggy Company Ltd 2012.
Nos pertenecen a nosotros (Phil and Teds Most Excellent Buggy Company Ltd) los derechos de propiedad intelectual de nuestras marcas, diseños
e inventos mostrados en la presente publicación. Se incluyen, sin limitarse a, las marcas phil~teds, adapt~survive!, ~, e INLINE la forma de INLINE
DOUBLE BUGGY. Iniciaremos acciones legales contra aquéllos que violen nuestra propiedad intelectual.
© Phil and Teds Most Excellent Buggy Company Ltd 2012.
Wij (Phil and Teds Most Excellent Buggy Company Ltd) bezitten de intellectuele eigendomsrechten op onze merken, ontwerpen en uitvindingen
die in deze publicatie worden vermeld. Dit zijn, zonder beperking, de handelsmerken phil~teds, adapt~survive!, ~, INLINE en de INLINE DOUBLE
BUGGY-vorm. We dienen daadwerkelijk een aanklacht in tegen degenen die inbreuk maken op ons intellectueel eigendomsrecht.
Page 28
AU/NZ
Mountain Buggy Australasia
102-112 Daniell Street
Newtown, Wellington 6021
New Zealand / Nouvelle-Zélande.
+ 64 4 3800 833
EUR
Mountain Buggy Europe
Klavermaten 37C
7472 DD Hof van Twente (Goor)
NETHERLANDS / Pays-Bas.
+ 31 (0) 547 352 727
USA/CAN
Mountain Buggy USA
221 Jefferson Street
Fort Collins, CO 80524
USA.
1 800 916 8442
FRA
Mountain Buggy France
15 rue Gertrude Bell
56000 Vannes
FRANCE.
+ 33 (0) 2 97 44 88 26
@
8053-05
AU/NZ
phil&teds
102-112 Daniell Street
Newtown, Wellington 6021
New Zealand / Nouvelle-Zélande.
+ 64 4 3800 833
EUR
phil&teds Europe BV
Klavermaten 37C
7472 DD Hof van Twente (Goor)
NETHERLANDS / Pays-Bas.
+ 31 (0) 547 352 727
USA/CAN
phil&teds USA Inc
221 Jefferson Street
Fort Collins, CO 80524
USA.
1 800 839 4985
FRA
phil&teds France
15 rue Gertrude Bell
56000 Vannes
FRANCE.
+ 33 (0) 2 97 44 88 26
@
 Loading...