

Page 1

™
your e3 twin
survival guide
Page 2
Page 3
nitty ` gritty
bits
`
bobs 2
one: wheeling
`
dealing 3
two: swivel ` swerve 4
three: up ` running 5
four: handling 6
five: hooding up 7
six: insert babies 7
ups ` downs
newborns 8
toddlers 9
tricks ` treats
buggy covers 10
buggy cocoon 10
buggy storage 11
buggy liners 11
cuts ` bruises 13
rights ` remedies 14
return ` relax 15
nitty ` gritty
twin
welcome to the
adaptable ` delightful
world of
our boxes make a great
distraction for your children while
you get into the nitty ` gritty. the
plastic bag, however, does not!
Please read the WARNINGS on inside
back cover carefully and help us continue
improving our adaptability range by
returning your warranty from.
Page 4
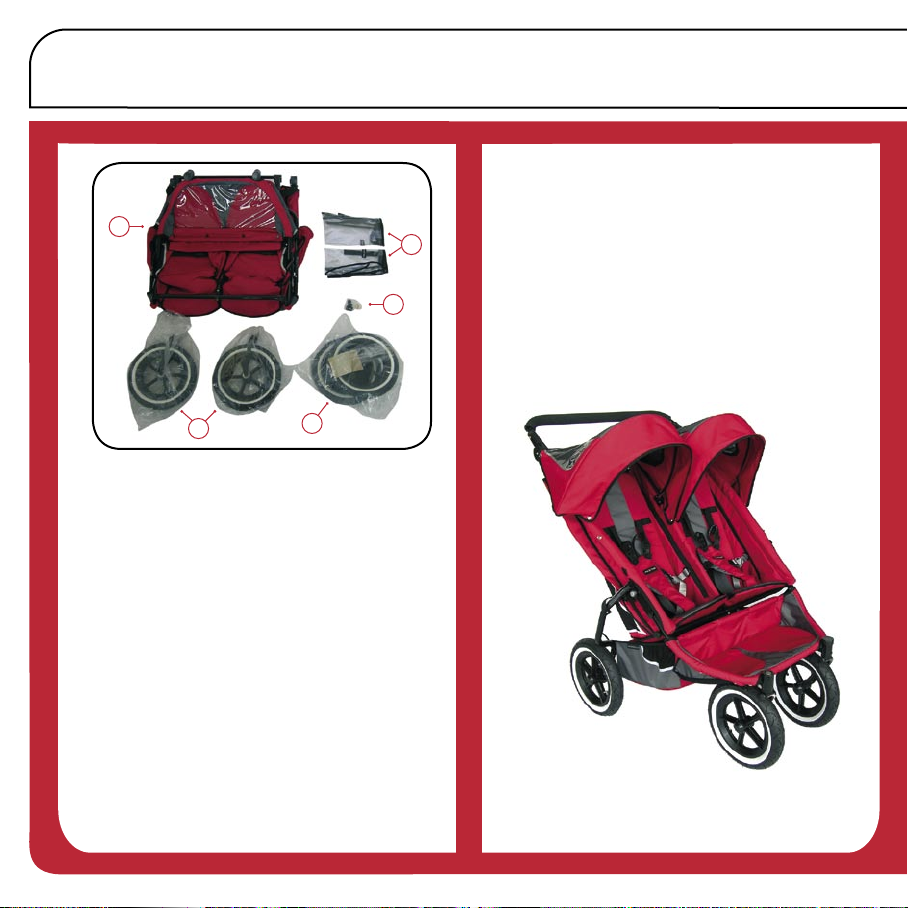
Open your e3 twin carton and check that
the following bits and bobs are there
a. 2 x rear wheels
b. 1 x main buggy
c. 2 x front wheel
d. 4 x bungs (attached to front of buggy)
– use when bumper bar is not attached
(push in silver buttons and remove).
e. 2 x clear backflap (for use in newborn
baby position)
check your bits ` bobs
You will need
1 x scissors
1 x adult (or someone who follows
instructions!)
Now just follow steps one to six...
b
a
d
Please note that this buggy has not been designed for
running or jogging purposes.
e
c
Page 5
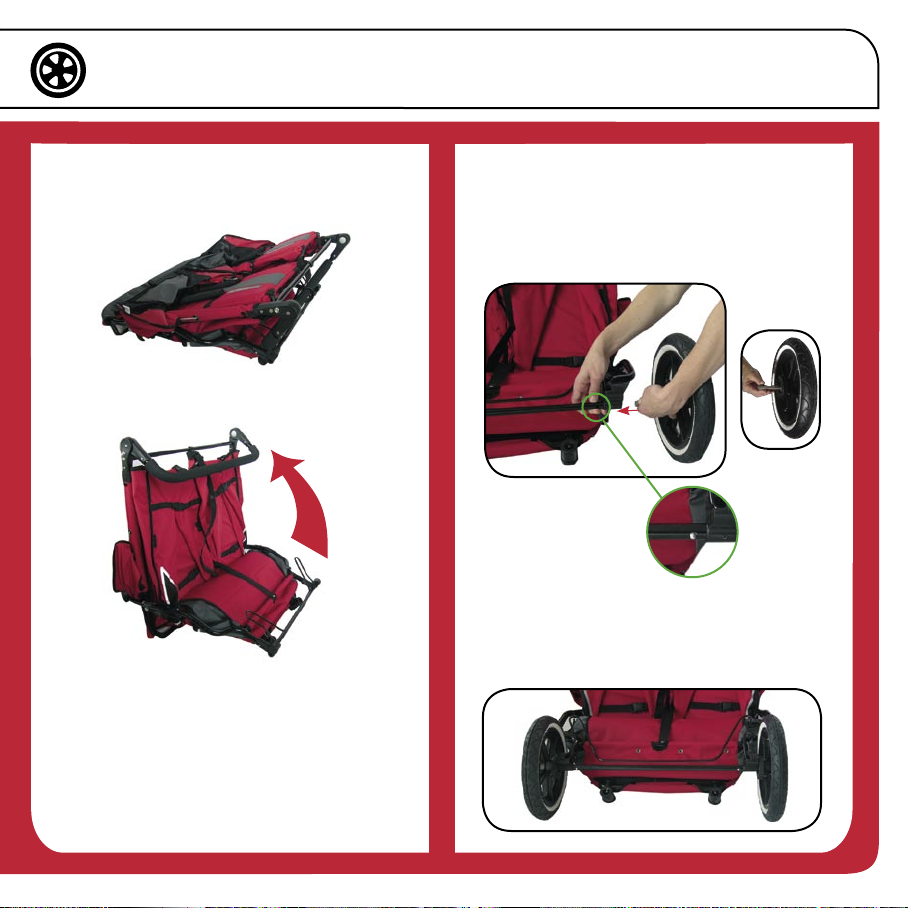
1. Take main buggy and lay flat
(sunhoods up) as shown.
one: wheeling ` dealing
2. Lift handle so rear axle is clear to
attach rear wheels.
3. Remove rear wheels from plastic bag
and use scissors to unwrap packaging
(discard bag immediately – it is a
suffocation hazard for children).
4. Take one rear wheel and push in silver
button on silver wheel axle.
5. Hold silver button in while inserting
wheel axle into buggy frame. Line up
silver button so it pops out of hole
on frame.
32
6. Repeat for second rear wheel on
opposite side (wheels work on
either side).
`
Page 6
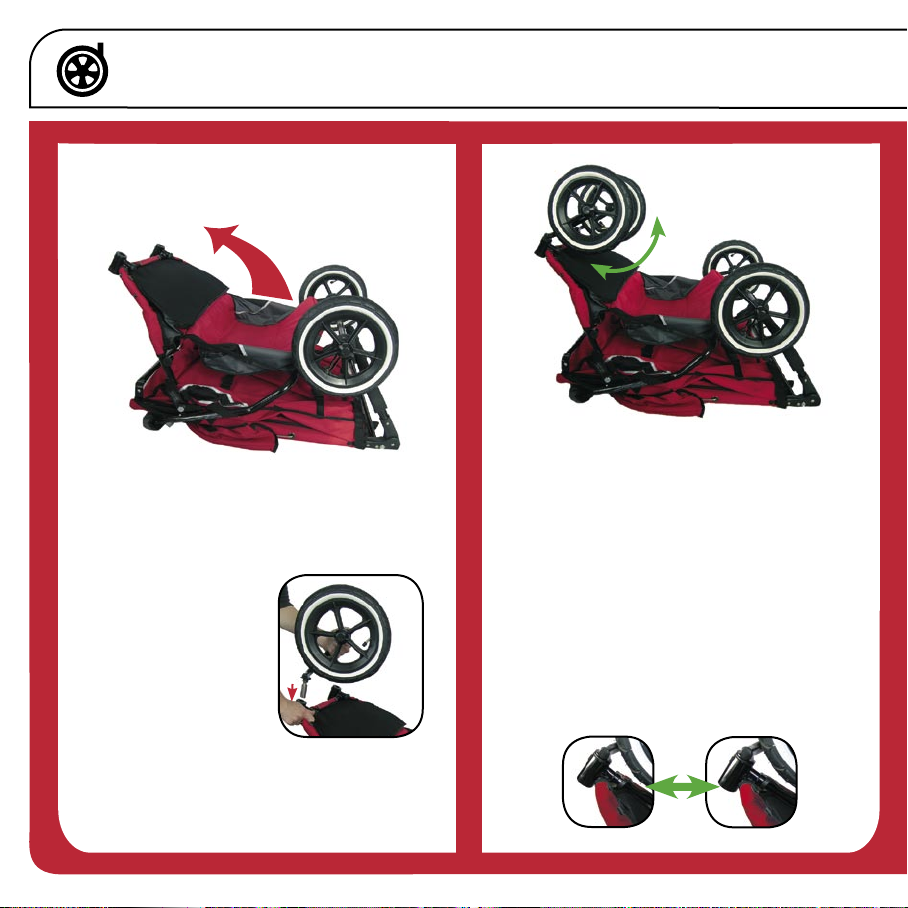
two: swivel ` swerve
1. Turn twin buggy over and lift front as
far as hinge will allow.
2. Remove first front wheel from bag (the
rod is greased so watch out for greasy
fingers!).
4. Release cap. Your wheel will be in
place for use.
5. Repeat for other front wheel.
to lock the front wheels
1. Align silver button with small hole on
inside of front wheel black cap.
2. Turn wheel towards rear wheels
of buggy so front wheel is directly
underneath footwell and parallel with
rear wheels.
3. Cap will then fully close and fix front
wheel. Reverse for swivel.
3. Extend black
cap out fully
on underside
of footwell and
insert rod on
front wheel.
cap open cap closed
4
`
swivel
fixed
Page 7
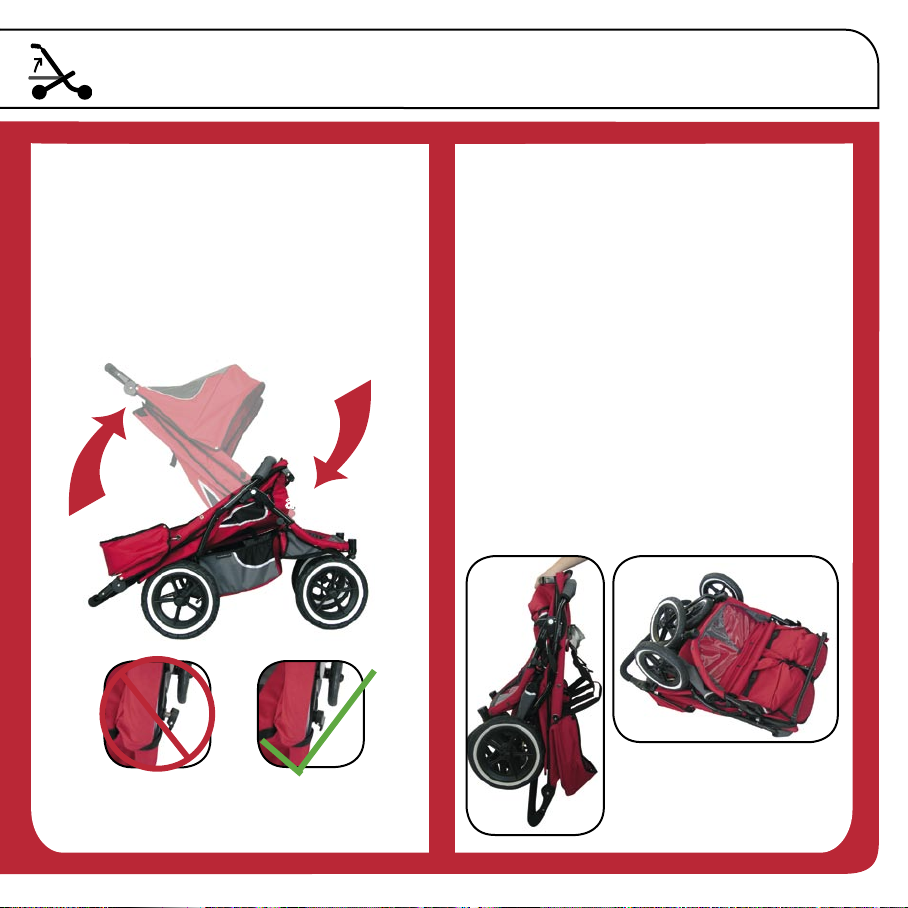
`
`
a
b
three: up
`
running
to fold
1.
Press lever ‘
b’
and pull lever
‘
a’
(autolocks) on either side at bottom of
frame seat
with fingers whi
lst holding
fr
ame with palms of hands
.
2
.
Let handle drop down,
lift buggy by
cross bar (parallel to bumper bar)
‘c’;
front wheels (swivel) fold under frame.
3.
Attach wrist st
rap around main buggy
frame to help hold it folded.
Make sure children are clear of buggy before folding,
unfolding or adjusting the buggy. Watch fingers - injury
may result.
5
4.
Ensure levers
‘a’
and
‘
b’
(autolocks) are
properly engaged
(as above).
Ensure that you hold the main
frame of the buggy when lifting in
and out of car.
1.
Turn buggy over onto 4 wheels.
2.
Pull up rear frame
.
3
.
Pull up until you hear a resounding ‘click’.
Ensure that locks are engaged. Seats
should now be firmly in place.
Page 8
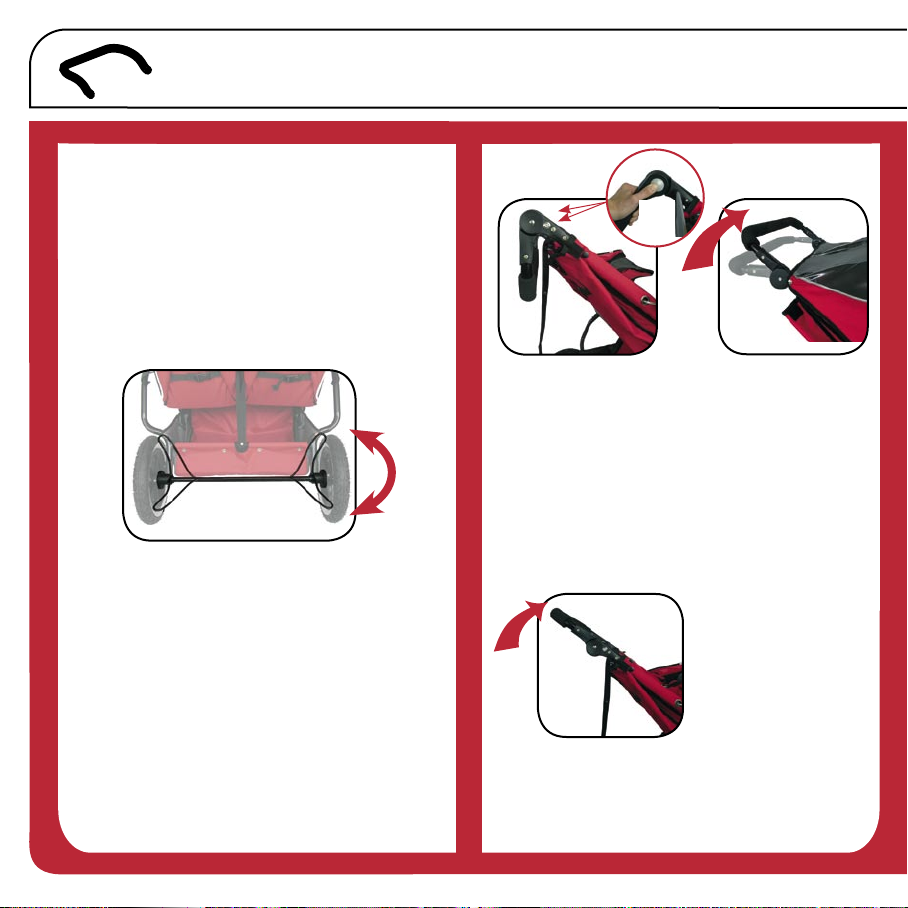
four: handling her
handle
1.
Push hood forward to access top
of frame.
2. Press in buttons ‘a’ on inside of handle
(both L and R sides).
3.
Hold both buttons in and pull handle
up until you hear a clear ‘click’. Ensure
buttons
‘a’
pop out again.
If you’re not happy with lower handle
setting adjust to higher setting:
4. Push in buttons ‘a’ on either side on
the inside of the handle again.
5. Pull handle up to higher postion until
you hear a clear ‘click’.
Ensure buttons
‘a’
pop out again.
a
‘a’
push
in
`
6
When pulling buggy
ALWAYS adjust handle to
ensure it aligns with frame
as per photo.
brakes
Now you’re up and running don’t let buggy
get away on you - use brakes.
1. Stand behind buggy and push brake
lever down with foot. This will put
brakes on. Push up to take brakes off.
off
on
Safety Wrist Strap - Your buggy can be free wheeling
without the brakes so the safety wrist strap should be
worn at all times when pushing the buggy. Just loop it
round your wrist.
Page 9
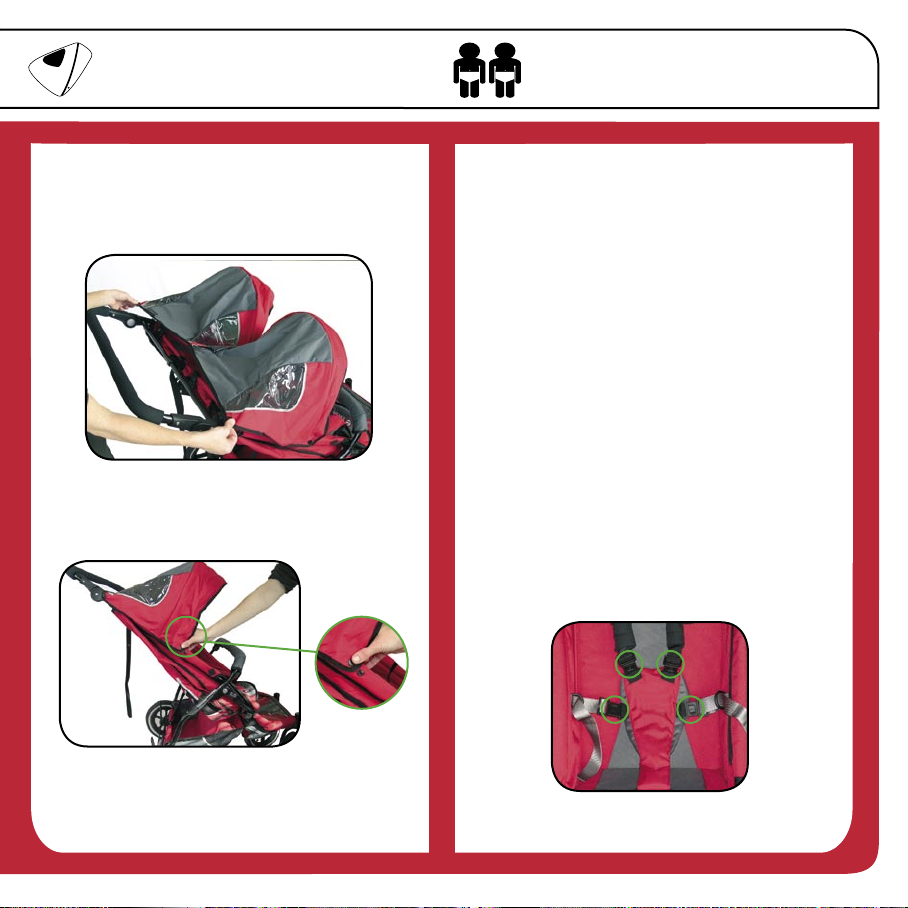
six: insert babies
Apply brakes and insert babies and fasten
safety harnesses.
1. Unclip 4 buckles on breastplate
(circled in green) and place baby
in buggy.
2. Adjust upper straps to fit snugly on
babies’ shoulders.
3. The breastplate should sit snugly on
each baby’s chest. Adjust side straps
until it sits in correct position. (You
should be able to fit 2 average size
fingers between straps and baby.)
4.
Adjust crotch strap length (under or
over webbing loop) for a comfortable
fit.
1. Attach snaps on back of sunhoods to
higher snaps on handle, both left and
right sides.
five: hooding up
2. Move to front of buggy and secure
snaps on front of sunhoods to seats.
WARNING: Ensure harnesses are used and properly
adjusted at all times.
Note that the windows in the hood are lined with a
sun mesh of a lower shade factor than buggy fabric.
Always use sun cream and clothing for protection of
children in direct sunlight.
7
Page 10
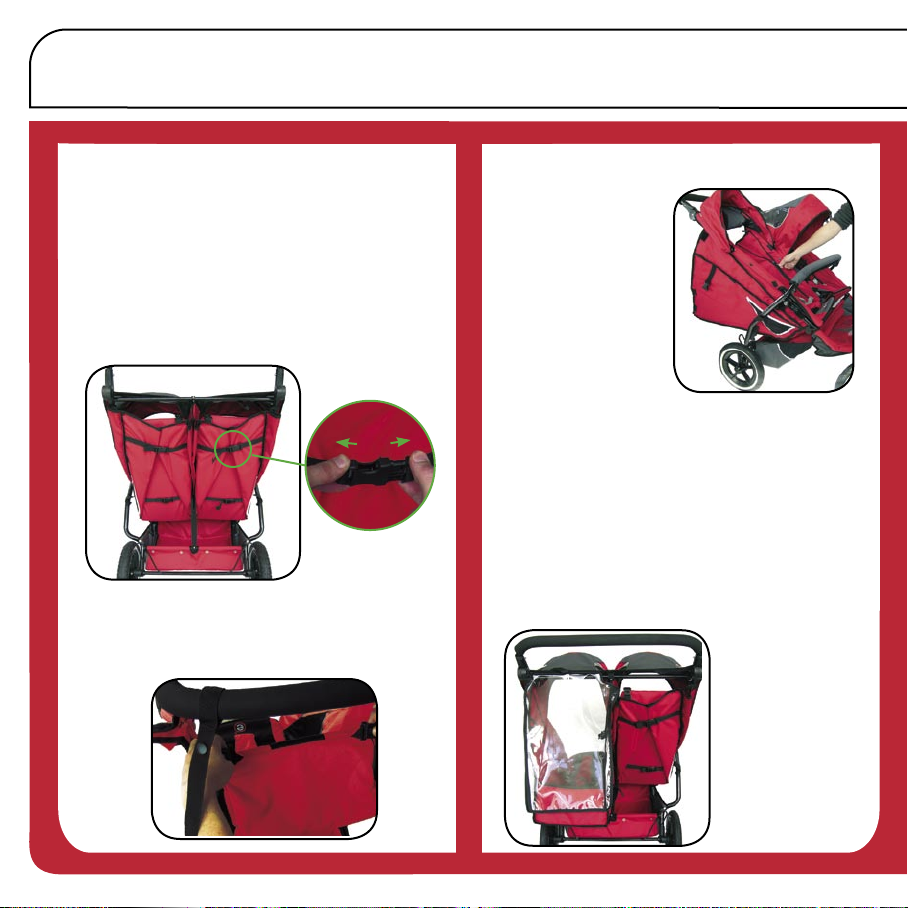
newborn buggy
(carry newborn babies)
1. With buggy set up ready to go,
apply brakes.
2. Undo 2 clips at back of seat, ‘a’ and ‘b’.
ups ` downs
a
b
3. Undo clips ‘c’ and ‘d’ at top of seat
base and push base corners down
until it is almost flat.
4.
Undo zips fully
on either side of
seat base for a
completely flat
newborn bed.
5. Lie baby flat
in newborn
position, facing
c
d
The back flap can be
rolled up and held
at top using strip
of hook/loop tape
at top.
WARNING: Never
allow the plastic to
fall over the child.
1
2 2
3 3
forward, and secure baby firmly with
adjusted safety harness.
6. Repeat for other seat.
using the clear plastic back flap
1. Attach clear plastic back flap using
hook/loop tape at top, ‘1’, and sides, ‘2’
and ‘3’.
Page 11
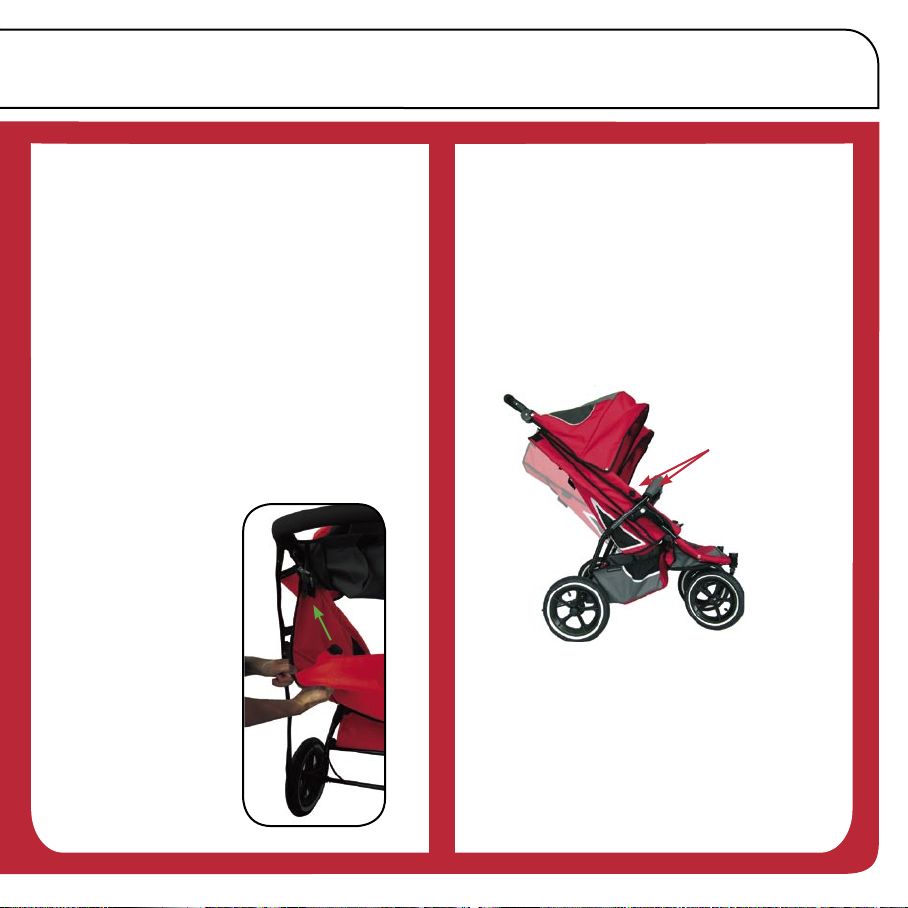
ups ` downs
toddler buggy
(carry 2 children)
This position is generally comfortable for a
child from 3-6 months, once child is strong
enough to support its head.
Setting up from newborn baby position:
1.
Remove and store clear plastic
back flaps.
2.
Do up zips on either side of seat bases.
5.
Attach clips at top of seat base to back
of seat fabric.
6.
Repeat for other seat.
recline seat
1.
Unzip zips inside seats to recline.
‘clip’
3.
Move behind
buggy and
invert seat base
so that clips
at top of base
show.
4.
Push up and
do up 2 clips at
back of seat.
unzip
This position is not recommended for
newborns. Newborns need to lie flat – refer
to newborn buggy instructions.
Note that it is easier to zip up seats without
a children in the buggy!
98
Page 12
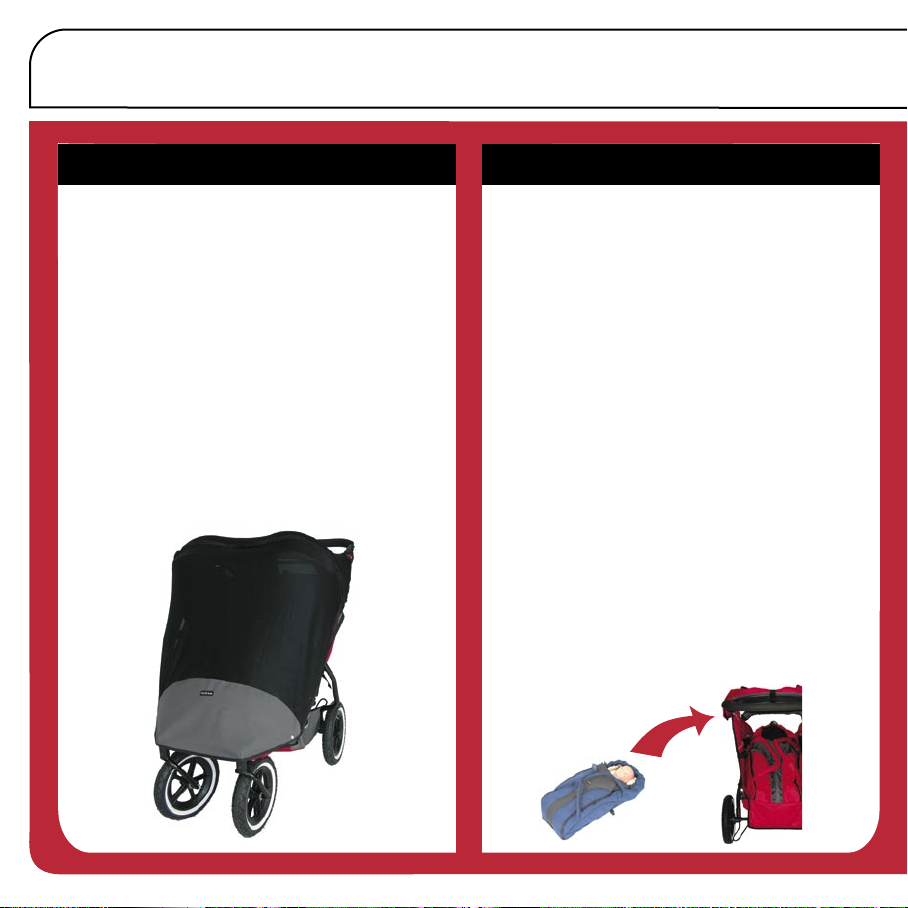
tricks ` treats
e3 cocoon
The cocoon is a light, portable carry-cot
which fits quickly and easily in buggy, so
you can move a sleeping child to and from
buggy with no bother or fuss.
1. With buggy set up ready to go,
apply brakes.
2. Unzip cocoon top and make baby
comfortable inside.
3. Set-up buggy in baby buggy position
and lie cocoon inside.
4.
Face baby either towards or away
from you.
5. Clip cocoon to buggy using buckles on
each side of buggy.
stormy weather & uv sunny days
1. Unfold cover carefully.
2.
Place over sunhoods. Attach around
handle using snaps on each side of cover.
3. Attach cover to lower frame using
snaps on each side of buggy.
Note that uv sunny days also has two mesh
backflaps - apply in the same way as the
clear plastic backflaps for newborn buggy.
buggy covers buggy cocoon
`
10
x2
Page 13
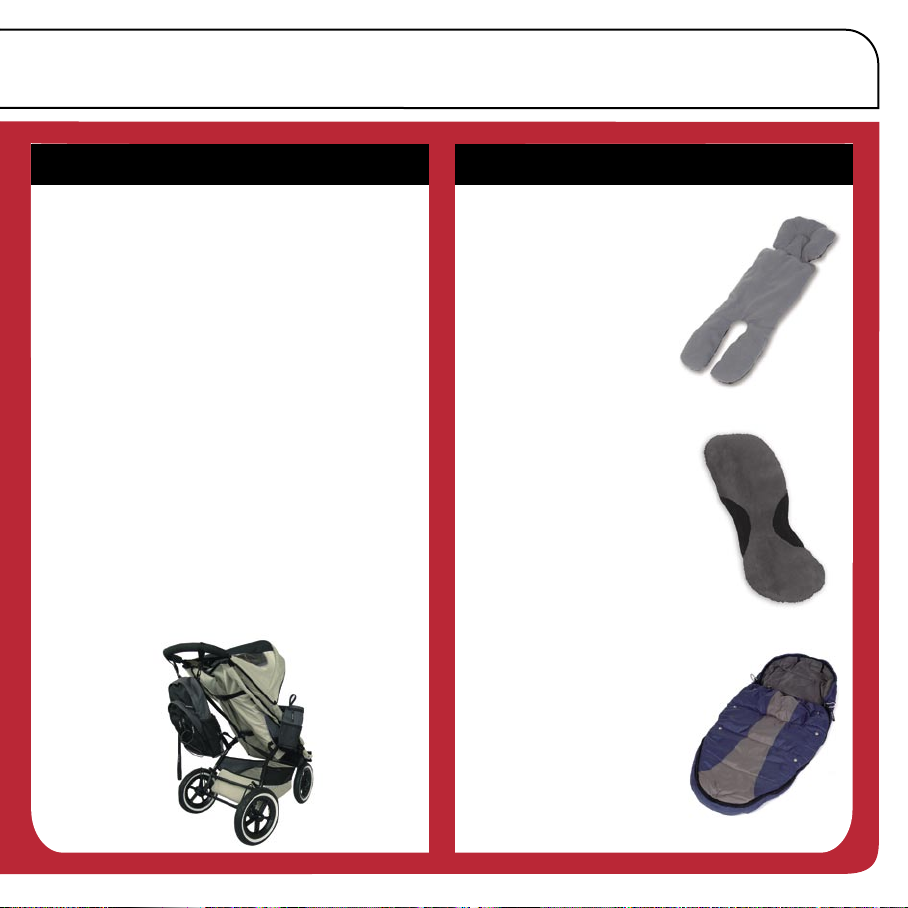
tricks ` treats
1110
buggy storage
bacpac X
Put it on your back or attach it to your buggy.
1. Remove 2 straps looped through D rings,
‘a’ and ‘b’, at top of bacpac.
2. Attach clips on straps to bacpac D rings,
‘a’ and ‘b’, and attach straps around
buggy handle using snaps.
3. Use hook/loop tape on bottom of 2
shoulder straps to attach bacpac to either
side of buggy frame.
4. Bottle/snack holder clips into holder
on buggy side (right hand side when
standing at back of buggy).
buggy liners
buggy bunny
1. Place in buggy and
feed harness straps
through gaps.
woolly & warm
1. Feed harness straps
through slots on rear
of liner (cut new slots
as required).
snuggle & snooze
1. Feed harness straps
through slots on rear
of sleeping bag.
a
b
Page 14
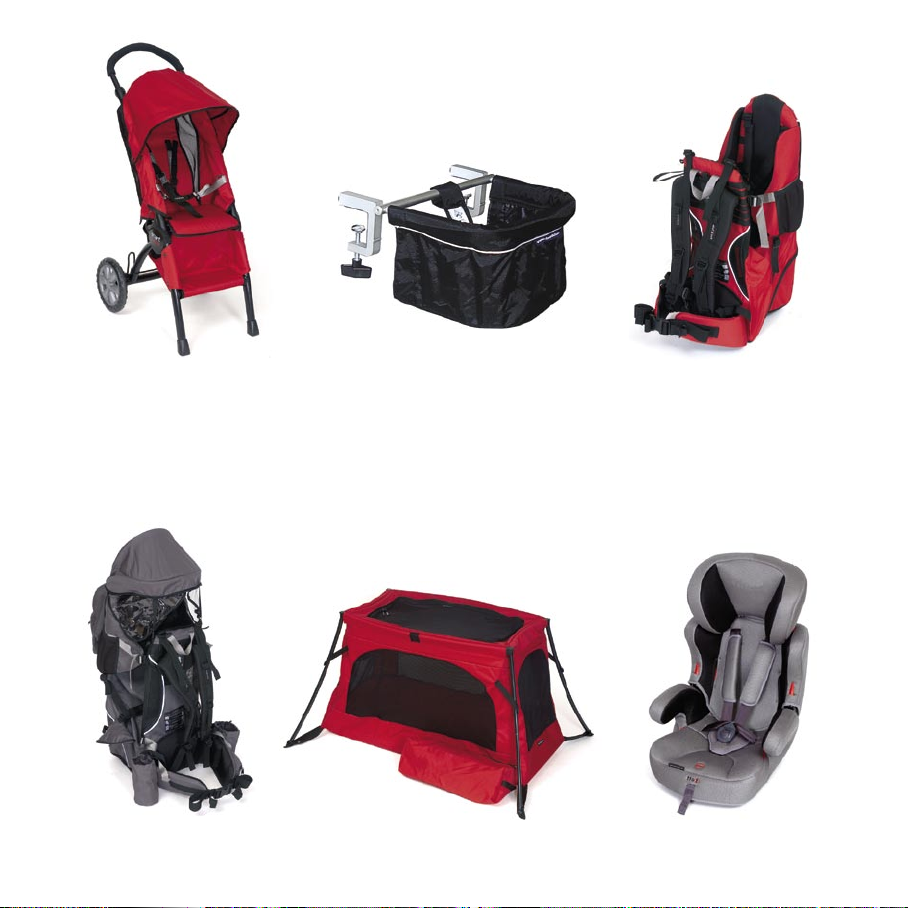
smartbuggy metoo metro
escape T2 tott
™
™
™
adapt ` survive!
™ ™
™
Page 15

cleaning & caring for your e3 twin
unlike children, your e3 twin likes to stay clean.
e3 twin’s coat
The fabric is backed with a water-resistant
coating. Brush off dirt. More intense cleaning
can be done by hand, in warm water, using
a mild natural soap. Rinse out soap. Do
not use detergents or bleach. Air dry. Don’t
leave the e3 twin out in the sun - the fabric
is fade resistant but not fade proof (just like
your kids!).
e3 twin’s body
We recommend that dirt is brushed off the
frame and wheels regularly. Clean with a non-
abrasive household cleaner and soft cloth.
Wash off sand and salt after beach activity.
(How would you like it if someone left sand in
your knickers!!) Always dry frame if wet (no
one likes soggy knickers!).
tyres & inner tube
The valve is car-size. We recommend 20
- 22 psi. Releasing air gives a softer ride,
but lower pressure reduces tread life. New
inner tubes and tyres are generally available
(21/4” x 121/2” tyre) from your dealer, cycle or
specialist wheel shops. Standard tyre kits can
repair punctures. A flat tyre can result from grit
holding the valve open; to check: inflate tyre,
deflate rapidly, and re-inflate. Tyres and tubes
are not under warranty. Do not over inflate.
rubber covers & grip
Take care to avoid damage to the foam rubber
on both the handle and the bumper bar. The
foam rubber is not under warranty.
inspect & maintain
Moving parts may need periodic lubrication.
Inspect essential components for fraying
(esp. webbing straps and safety harness),
wear (esp. auto-locks, snap fasteners, button
springs, tyres, plastic parts, zips and moving
parts), security (esp. autolocks and caps
which must not be loose) and freedom of
movement (esp. wheels, nuts). Excessive
wear can reduce effectiveness and safety.
cuts ` bruises
13
Page 16

our warranty and service policy
We want to give owners confidence in the
quality of our products. They are warranted
against defects in materials and workmanship
for one year from the date of purchase.
If the product has a manufacturing fault we will
repair it free of charge. If not practical to repair
it we will, at our discretion, replace the part
in question*. If the product fails due to wear
and tear, accident, neglect or negligence, or is
outside the one year warranty, we will happily
repair it for a reasonable charge.
details of warranty
Who is covered? Original purchaser buying
new product from an authorised dealer. Proof
of purchase is required.
What is covered? Workmanship or materials
that are deemed faulty, providing the e3
twin has, at all times, been used in normal
conditions, in accordance with the instructions
and properly maintained.
What is not covered? Second hand product.
Modified product. Poorly maintained product.
Normal wear, fading and fabric cuts. Improper
use (by way of example): abnormal use; not
following instructions; child left unattended;
safety harness not used; excessive
load; transport damage i.e. airline or any
freight damage.
Customer costs within warranty. The customer
is responsible for any inwards freight charge
to return the product to the manufacturer or its
representative for warranty and or service.
Customer costs outside of warranty. Where
proof of purchase is not provided or the
product is outside of the one year period. The
manufacturer (or agent) reserves the right to
charge a service fee and/or charge for parts
replaced/repaired. A return freight charge may
apply.
Exclusions. Any consequential loss or damage
to any person or property directly or indirectly
as a result of using the product.
Who do I contact? Please discuss any warranty
or service queries with your store of purchase.
You will be required to show proof of purchase.
They will inform you of the next step.
* The consumer may have additional rights in some countries
or states.
rights ` remedies
14
Page 17
Name
Address
Phone
Email
Just a few extra details to help us
adapt & survive!
Your age?
under 25 25-34 35-40 40+
Number of children
1 2 3 3+ soon!
Their ages?
How did you hear about us?
Which most excellent product did you buy?
Date of purchase? / /
Rate from 1-10 how likely you would be to
recommend this product to someone else?
1 2 3 4 5 6 7 8 9 10
Why?
Any general suggestions?
Can we inform you of any new products
and specials? yes no
www.philandteds.com
e3 twin
smartbuggy
accessories
e3 double kit
escape
metro
metoo
pepe
e3
T2
bebe
tott
return ` relax warranty form
✄
™
Page 18

102-112 daniell street
newtown
wellington 6002
new zealand
affix
stamp
here
™
Page 19

warnings
Keep with your buggy for future reference.
Ensure you read carefully all the safety
information and warning notices.
Injury may result if you do not follow all
safety precautions. Injury may result from
improper use.
WARNING: Never leave children
unattended, it may be dangerous. Take
extra care with any child asleep in
the buggy.
WARNING: Ensure that all locking
devices are engaged before use.
WARNING: Any load attached to the
handle affects the stability of the vehicle.
Do not hang luggage or carry extra
children on the buggy. Do not allow a
child to stand on the seat. Do not carry
extra weight over that allowed by the
instructions, this may make the buggy
unstable. Do not place more than 3kg/
7lbs in the parcel tray.
WARNING: Always use the safety
harness to avoid serious injury from
falling or sliding out. Always secure all
safety harness straps. Ensure the safety
harness is correctly fitted, adjusted and
securing child firmly. Make sure children
are clear before folding, erecting or
adjusting the buggy.
WARNING: Apply brakes when you
park the buggy. Apply brakes when
loading or unloading children.
WARNING: e3 twin can carry a
maximum load of 40kg/88lbs at any time
in any configuration.
WARNING: Do not modify the buggy or
use accessories not designed for it. They
may be unsafe.
WARNING: Care should be taken if
buggy is used on stairs or escalators.
WARNING:
The buggy should
not be used near an exposed flame.
WARNING:
The buggy is not suitable
for running or skating.
If required, use the D-rings on the
waist strap to attach a safety harness
conforming to BS 6684.
Page 20

adapt ` survive!
™
head office +64 (4) 380 0833
fax +64 (4) 380 0137
address 102-112 daniell street
wellington new zealand
visit www.philandteds.com
Phil & Teds Most Excellent Buggy Co Ltd (phil & teds), phil and teds, the phil
& teds logo, the shapes and designs of the products and the adapt & survive
logo are global trademarks of Phil & Teds New Zealand Limited. Phil & Teds
New Zealand Limited is the owner of all past, present and future intellectual
property used and developed in relation to the business and reserves all
rights in relation to its intellectual property and the presentation of it.
© phil & teds most excellent buggy company ltd
Issue 1 (e3 twin) April 2006
safe ` sound
we’ve attained the following safety
standard as product safety is
paramount to us:
BS 7409:1996
 Loading...