

phil&teds kiwi traveller cot User Manual
TM
.
Warranty registration
Return your warranty response
form to qualify for your 12 month
warranty.
We keep your warranty record on
file. Registration on the form
provided allows us to contact you if
needed. So please return your
warranty card!
If your Kiwi Traveller has a
problem or you are concerned
about any aspect of its operation
please contact your most excel-
lent dealer or Phil & Teds Most
Excellent Buggy Co. Ltd.
Instructions
Kiwi Traveller™
Dear Kiwi Traveller Owner
Congratulations and thank you for purchasing the fabulous Kiwi Traveller
We really value customer feedback so, if you have any comments, please
contact us.
Don’t forget to complete your warranty form and mail it to us. We respect your
privacy so will not give this information to others - it is confidential.
We trust you’ll get a great deal of enjoyment and use from your Kiwi
.
TM
Traveller
The Most Excellent Team
These instructions are
is correctly assembled.
TM
read and understand the
TM
important…
Read these instructions carefully
before use and keep them for
future reference. Your child’s safety
may be affected if you do not follow
these instructions. Our product is
safe if used safely. Safe operation
depends on careful adherence to
the instructions outlined in this
manual. Please study them and
contact us if you are unsure.
. Injury
TM
before assembly or
TM
.
TM
Read carefully the WARNINGS
detailed inside this instruction card.
They are for your safety and
information, and your child’s safety
. This could
TM
to the ground when using
. Any infringement of
TM
TM
if any part is broken, torn, or missing.
TM
Incorrect assembly may compromise your child’s safety.
Please follow these instructions.
Kiwi Traveller™ Warranty
The warranty protects the original purchaser against faulty workmanship and faulty
items. If it breaks when it shouldn’t have, we’ll put it right. This does not cover normal
wear and tear. This warranty is for 1 year from date of purchase. Kiwi Traveller must
be used at all times in normal conditions, satisfactorily maintained and with these
instructions being followed, otherwise this warranty is invalid. The customer is
responsible for any inwards freight charge to the manufacturer for warranty claims.
This warranty is only for the benefit of the original purchaser of a new Kiwi Traveller
from an authorised dealer. Proof of purchase may be required. Any consequential loss
or damage directly or indirectly as a result of using your Kiwi Traveller is expressly
excluded from this warranty.
For any warranty issue contact your retailer or the maker - Phil & Teds Most
Excellent Buggy Co Ltd, 102-112 Daniell Street, Newtown, Wellington, New Zealand
Tel +64 4 380 0833 Fax +64 4 380 0137 www.babybuggy.co.nz
Injury may result if you do not follow these safety precautions.
Warnings and Safety Notices
instructions.
Injury may result from improper use.
! WARNING: Before assembling your Kiwi Traveller
! WARNING: Before each use, make sure your Kiwi Traveller
! WARNING: Ensure that your child does not climb out of the Kiwi Traveller
! WARNING: Do not use your Kiwi Traveller
may result from your child falling from the Kiwi Traveller
! WARNING: Make sure your child is clear of the Kiwi Traveller
near a heater, cooking device, open fire,
or use accessories not designed for Kiwi
TM
TM
is supplied with an inflatable mattress. Use only the
TM
. They may be unsafe. Please contact your dealer if you are unsure.
TM
Traveller
dis-assembly.
or exposed flame.
! WARNING: Do not use your Kiwi Traveller
! WARNING: Do not modify Kiwi Traveller
mattress supplied, and ensure it is properly inflated before use.
! WARNING: Your Kiwi Traveller
an additional mattress, or a mattress of the wrong size or thickness, may create
hazardous gaps and will affect the internal height of your Kiwi Traveller
! WARNING: Do not use an extra mattress, or one different from that supplied. Using
outdoors.
result in suffocation and falls from the cot.
! WARNING: Always use pegs to secure your Kiwi Traveller
infringing party.
our rights will not be tolerated and result in immediate action against the
! An international patent is registered on Kiwi Traveller
the webbing loop at the centre of
each side.
through the webbing loop on the other
end.
on the webbing strap, closest to the
cot .
self-inflated, manually add air before
closing the valve.
8 Continue down, passing the pole
9 Guide each pole through the eyelets
10 Place the mattress inside. If not fully
is now assembled.
TM
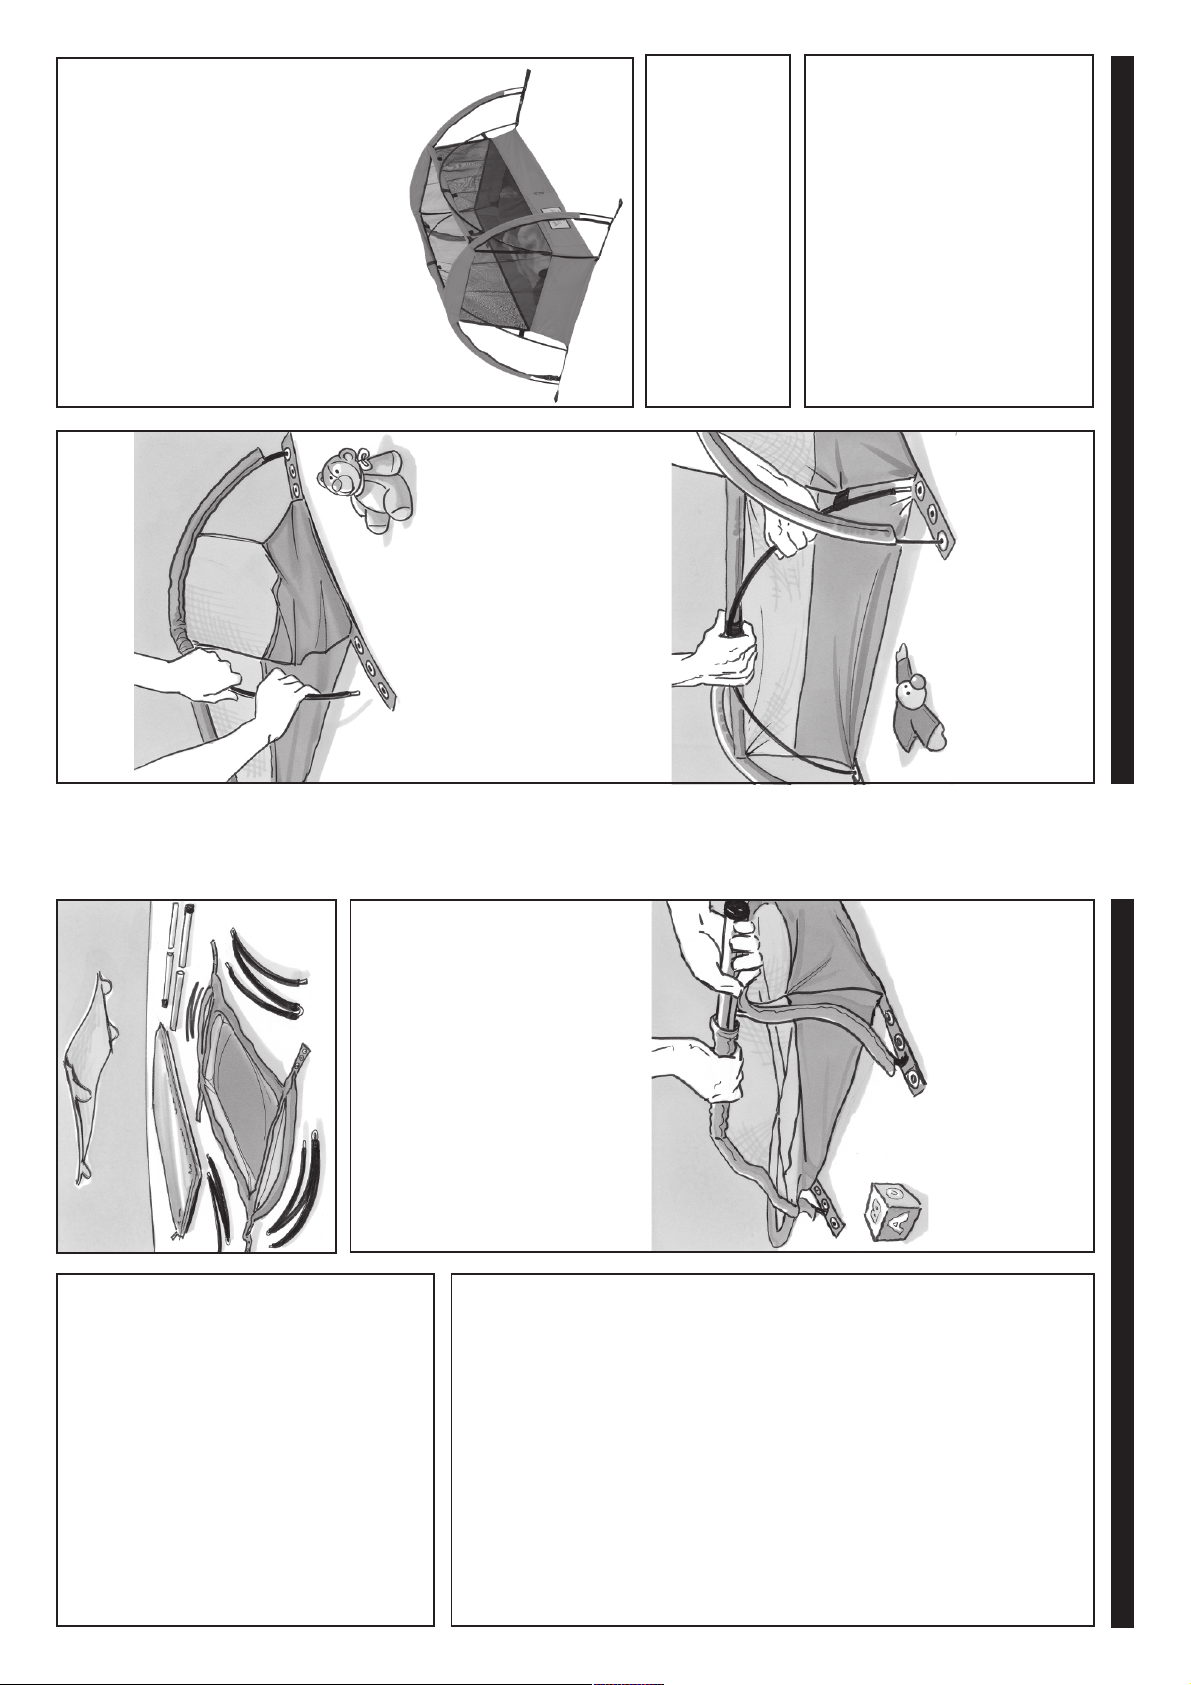
Check that it matches the diagram.
Your Kiwi Traveller
is not
TM
stored damp.
Disassembly
1 Reverse the procedure above.
2 Store in carry bag
3 Ensure your Kiwi Traveller
TM
outdoors.
TM
Traveller
on each webbing strap.
help protect your child from the
elements. Fasten the velcro on the
ends of the mesh around the top
Outside Use
• Always use pegs to secure Kiwi
• Pass pegs through the middle eyelet
• Attach the optional sun/insect mesh to
.
TM
corners of Kiwi Traveller
• Use the carry bag.
Flexi-poles:
1 Insert a flexi-pole into each sleeve.
side. Insert each pole end into the
outside eyelet on the webbing straps.
resistance at a seam, stop and feed
the end of the pole gently past the
seam. Do not force the pole!
2 Guide all the way through to the other
Assembly
Side poles:
1 Insert the two side poles into the fabric
3 If you find the pole meets with
TM
sleeves running along the top sides of
the Kiwi Traveller
first, and, when poles are fully in-
4 Clip buckles together.
serted, fasten velcro end pieces.
These keep the poles in place, which
support the top sides of your Kiwi
2 Insert the thin end of each side pole
sides of your Kiwi Traveller
5 Attach two other flexi-poles to the
TM
Traveller
loop located where the mesh sides
meet the fabric corner.
6 Pass the pole up through the webbing
strap attached to the fabric sleeves
7 Continue, passing the pole through
TM
at each end of your Kiwi Traveller
3 Unbuckle the clip on each webbing
and check that you have all
TM
2 sections
four sections joined with shock-cord
Component Check
Open the carry bag of your Kiwi
Traveller
components:
• one Kiwi TravellerTM• two thick aluminium pole sets, each of
• four black pre-bent flexi-poles, with
• one inflatable mattress
• four pegs
• optional sun/insect mesh
Check that no component appears
damaged.
the mattress. Open the inflation valve,
and leave to self inflate. New mat-
tresses often require manual inflation
too.
Pre-assembly
Mattress:
• Remove the elastic strap and unfold
2 side poles:
• Assemble each of the two thick
aluminium poles. Each is made up of
two sections - the thin section is
stored within the thick section when
not in use.
the end; remove the thin section
inside. Replace bung.
into the indented end in the thick
section.
• Remove the black plastic bung from
• Insert the open end of the thin section
4 flexi-poles:
• Assemble the four black, pre-bent
poles. Each pole is joined with shock-
cord. Align each section with the next;
click and form a smooth curve.
 Loading...